training manual for purchase order to invoice ezbuy ... · training manual for purchase order to...
TRANSCRIPT

Training Manual for Purchase Order to Invoice EZBuy–Supplier Self-Services (SUS) Portal
Submitted by: Bristlecone

Version 1.0 Page 2
Contents
1. How to Login to Supplier Self Services (SUS) Portal: ....................................................................... 3
2. How to Search for a Purchase Order ............................................................................................... 6
3. How to Acknowledge a Purchase Order: ......................................................................................... 8
4. How to create Confirmation: ......................................................................................................... 11
5. How to create Invoice: ................................................................................................................... 18
6. How to create a Credit Memo: ...................................................................................................... 24

Version 1.0 Page 3
1. How to Login to Supplier Self Services (SUS) Portal: Step 1: For logging into SUS portal, ctrl+click on below link or simply copy and paste to your web
browser:
NOTE: SAP recommends to use Internet Explorer IE 8 and above
Portal Link-
https://www.ezbuy.axiata.com:4443/sap/bc/bsp/sap/srmsus?sap-client=310
Step 2: Enter User ID & Password
User Id –XXXXXX (Shared over email)
Password-XXXXXX (created by you after registration)
Password must be combination of Lowercase, Uppercase, Special character and Numbers. Also it must
be different from last five previous password.

Version 1.0 Page 4
After you login into the SUS Portal, you will see this screen:
What do the fields on EZBuy SUS Portal mean?
Field/Link Name Description
All - Shows all your Purchase Orders regardless of status
New – Shows new Purchase Orders which require your acknowledgement
Changed – Shows Purchase Orders which have been amended by Axiata which require your acknowledgement
In Process – Shows Purchase Orders which have been saved by you for further action
Confirmed –Shows Purchase Orders where all line items are
confirmed by you (with or without any amendment)
Partially Confirmed – Shows Purchase Orders where some line items are rejected by you
Rejected – Shows Purchase Orders where all line items are rejected by you
Canceled – Shows Purchase Orders which have been cancelled by Axiata

Version 1.0 Page 5
Field/Link Name Description
All – Shows all Confirmations created by you
In Process – Shows all Confirmations which have been saved by you for further action
Completion Reported – Shows all Confirmations which have been fully confirmed by you
Partially Accepted –Shows all Confirmations where line items have been partially accepted by you
Approved- Shows all Confirmations which have been accepted by Axiata
Rejected – Shows all Confirmations which have been rejected by Axiata
Canceled – Confirmations which have been cancelled by you.
Field/Link Name Description
All – Shows all the Invoices and Credit Memos created by you
In Process – Shows all Invoices which have been saved by you
Document Sent – Shows all Invoices which have been sent by you
Approved – Shows all Invoices which have been approved by Axiata
Rejected – Shows all Invoices which have been rejected by Axiata
Create Invoice – Opens a new window where you can directly create an Invoice by selecting the PO/Confirmation accepted by Axiata.

Version 1.0 Page 6
2. How to Search for a Purchase Order: There are 2 methods through which you can search for a Purchase Order:
A. If you know the Purchase Order Number (refer to PO number in the email notification),
click on “Find”:
Enter the Purchase Order number and click on the “Find” button:
The Purchase Order details will be visible to you as follows:
Click on the Purchase Order number for a more detailed view.

Version 1.0 Page 7
B. If you do not know the Purchase Order Number, click on “All Purchase Orders”:
List of All Purchase Orders will be displayed, click on a Purchase Order for a more detailed view:

Version 1.0 Page 8
3. How to Acknowledge a Purchase Order: Step 1: After going to the detailed view of the Purchase Order (Refer to Section 2), click on “Process”.
This will allow you to edit your acknowledgement before sending it to Axiata.
Step 2: If you want to make any changes, you are only allowed to change the DELIVERY DATE and/or
reduce QUANTITY. This can be done by editing the respective fields highlighted below, before
acknowledging the Purchase Order.
Step 3: To selectively Confirm or Reject the PO items click on either of the buttons:
A. To Confirm (With or without any amendment) click on :
B. To Reject, click on : . This means you do not intend to supply this line item.
C. Confirm/ Reject All Items :
D. Reset All Items: If you want to reset the current decision on all the line items :

Version 1.0 Page 9
Based on your decision the status of the item changes from “In Process” to “Confirmed” or “Rejected”
accordingly.
NOTE: Please be careful during acknowledgement of Purchase Order line items. Any errors will
require the entire Purchase Order issuance cycle to be repeated.
Step 4: Click on “Send”. The document status “In Process” changes to “Confirmed” or “Partially
Confirmed”
Your acknowledgement will create a Purchase Order Response (POR), which will be sent to Axiata for
“Acceptance” or “Rejection”.

Version 1.0 Page 10
What is the next step if the Purchase Order Response (POR) sent by me to Axiata is “Rejected”?
You will be receive an email notifying you of the rejection. Kindly contact Axiata for further details.
What is the next step if the Purchase Order Response (POR) sent by me to Axiata is “Accepted”? Once the Purchase Order Response has been “Accepted”, the same information will get updated in
Purchase Order.
A. Scenario 1- No changes made by you during acknowledgement of the Purchase Order, and the
same has been “Accepted” by Axiata.
The next step is “Confirmation” creation by supplier, as shown in Section 4.
B. Scenario 2- Some changes made by you during acknowledgement of the Purchase Order, and
the same has been “Accepted” by Axiata.
The Purchase Order status will change to “In Process”. You will have to “Process” (Refer Steps 1
to 4 in Section 3) the Purchase Order again. Your Purchase Order Response will move to Axiata
for “Acceptance”. The next step is “Confirmation” creation by supplier, as shown in Section 4.
C. Scenario 3- Some changes made by you during acknowledgement of the Purchase Order, and
the same has been “Rejected” by Axiata.
The required terms and conditions of the Purchase Order will remain unchanged. Contact Axiata
for any further clarification required.

Version 1.0 Page 11
4. How to create Confirmation: Step 1: Login to Supplier Portal. (Refer to Section 1)
Step 2: The Start page opens. Click on ‘All Purchase Order” tab.
Step 3: Purchase Orders list is displayed, click on the relevant Purchase Order number, visible in blue
colour, under “Purchase Order No.”

Version 1.0 Page 12
Step 4: A new page opens, showing the details of the Purchase Order. Click on “Create Confirmation”.
A. The screen is editable now, you may change the QUANTITY for partial confirmation, if required.
B. Enter the Confirmation Name (this is a free text field, which you may use for future reference)
C. You may send a Message to Purchaser and Add an attachment (if applicable).
Version 1.0 Page 13
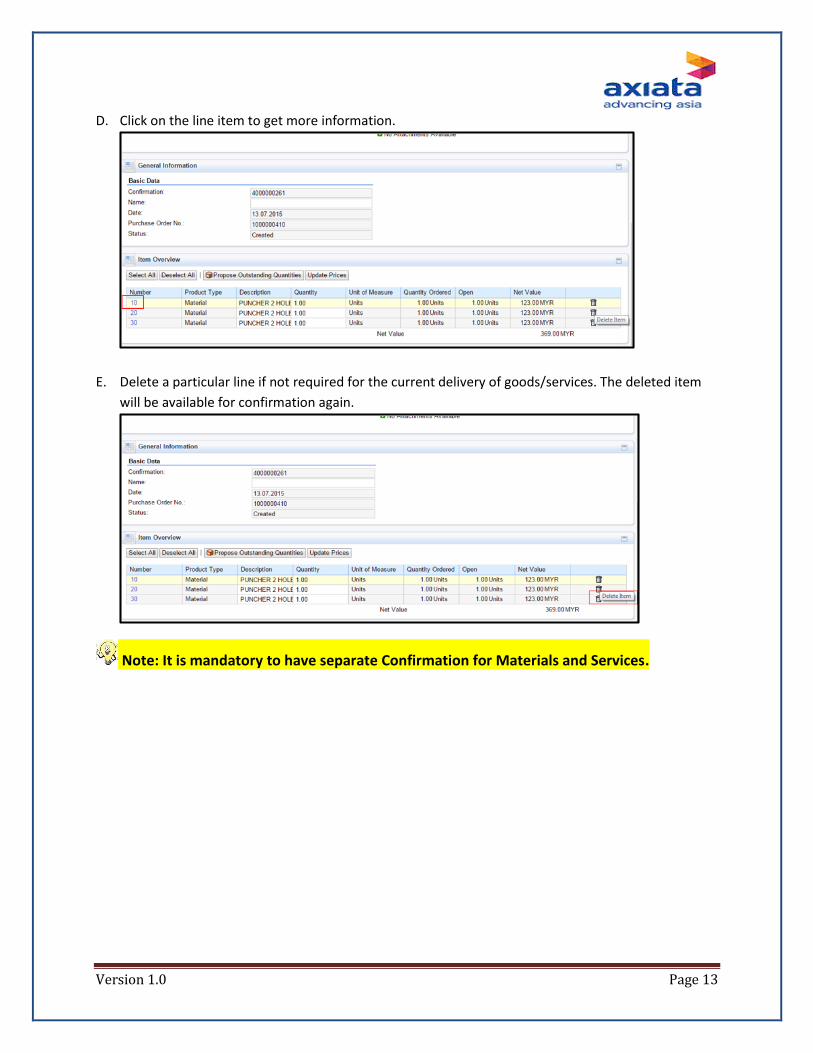
D. Click on the line item to get more information.
E. Delete a particular line if not required for the current delivery of goods/services. The deleted item
will be available for confirmation again.
Note: It is mandatory to have separate Confirmation for Materials and Services.

Version 1.0 Page 14
What do I do if the Purchase Order contains both types of products (Material & Service)?
I. Create Confirmation for Materials:
Open the desired Purchase Order and after clicking on “Create Confirmation” button (Refer to
Section 4, Step 4),
To confirm only for Materials, “Delete” the line items which are Services and then click on
“Update Price” button.
After deletion of Services, only Materials will be visible on the “Item Overview” tab.
Click on “Confirm”. Confirmation is displayed with status ‘Created’.

Version 1.0 Page 15
Now the status changes to “Completion Reported”.
The confirmation is sent to the Axiata for approval.
II. Create Confirmation for Services:
Now click on “Display Document Flow” and open the Purchase Order.
Click on “Create Confirmation” button.
Only Services will be visible in the “Item Overview” tab:
Version 1.0 Page 16
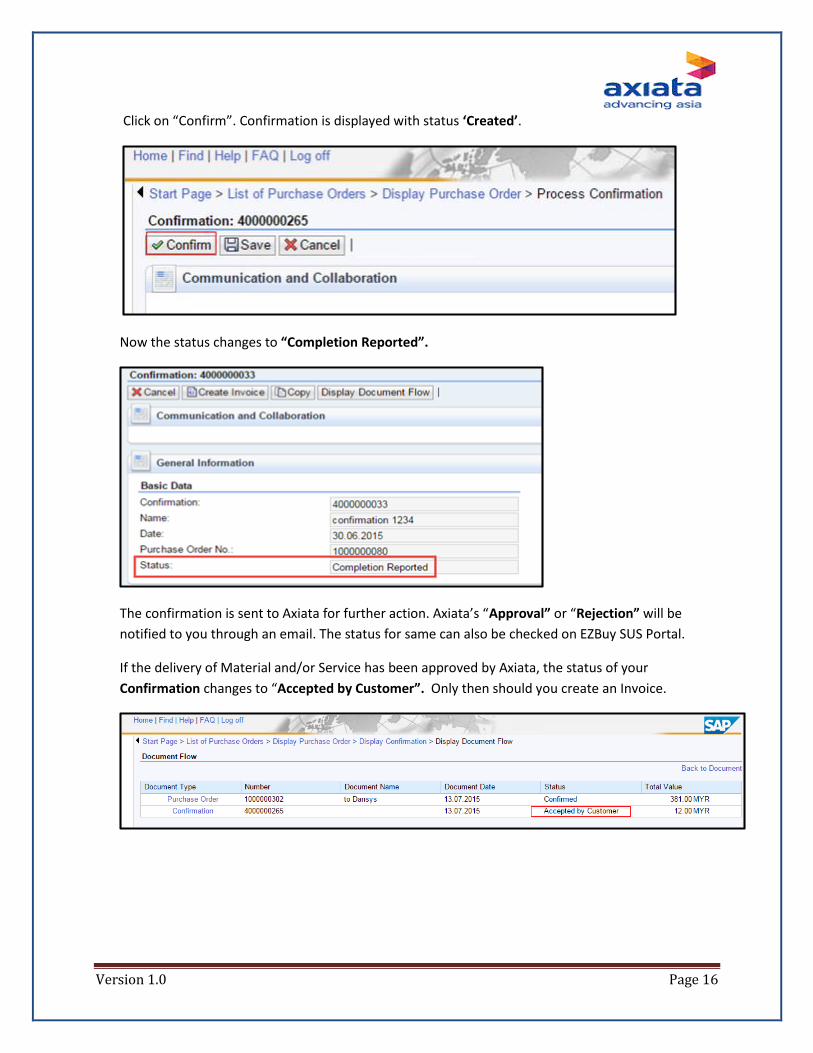
Click on “Confirm”. Confirmation is displayed with status ‘Created’.
Now the status changes to “Completion Reported”.
The confirmation is sent to Axiata for further action. Axiata’s “Approval” or “Rejection” will be
notified to you through an email. The status for same can also be checked on EZBuy SUS Portal.
If the delivery of Material and/or Service has been approved by Axiata, the status of your
Confirmation changes to “Accepted by Customer”. Only then should you create an Invoice.

Version 1.0 Page 17
NOTE: In case of any errors in your Confirmation, you may “Cancel” your Confirmation if it has not
been “Approved” or “Rejected” by Axiata.
The status will change to “Canceled”

Version 1.0 Page 18
5. How to create Invoice: Step 1: Login to Supplier Portal (Refer to Section 1).
Step 2: The Start page opens. Confirmation against which an invoice has to be generated can be
searched by clicking on “Accepted” or “Partially Accepted” under “All Confirmations” tab.
Step 3: Purchase Orders list is displayed, click on the Purchase Order No., against which you intend to
raise an Invoice.

Version 1.0 Page 19
Step 4: The Purchase Order is displayed, click on the “Display Document Flow” tab;
Step 5: Document Flow page opens, you must select the Confirmation document with status “Accepted
by Customer”.
To proceed click on “Confirmation”.
Step 6: Confirmation page opens, Click on “Create Invoice” tab;

Version 1.0 Page 20
Step 7: Process Invoice page is displayed and you need to enter the following information
A. Invoice name : Enter the Invoice Name (this is a free text field, which you may use for future
reference)
B. Enter the External Invoice Number: this is a MANDATORY FIELD
External Invoice Number is your internal invoice number and can be alpha numeric, maximum 20
characters.

Version 1.0 Page 21
C. Add an Attachment: Attachment is MANDATORY including a softcopy of your internal invoice as
well as any other supporting documents. Malaysian GST registered companies MUST attach a valid
Tax Invoice. The maximum total attachment file size is 8 MB
Click on “Browse” Select file from your computer Click on “Upload”
After successful upload, your “Attachment” can be seen as below:
D. Applicable “Tax”, click on the dropdown menu and select appropriate Tax Options

Version 1.0 Page 22
E. After all the data as highlighted below have been provided, click on “Send”

Version 1.0 Page 23
Step 8: Invoice gets created with the message displayed. The status will change to “Document Sent”
The invoice will be sent to the Axiata for further processing. Once the invoice has been approved, you
will receive an email notification and the invoice status will change to “Accepted by Customer”.
In case your invoice is rejected, you will receive an email notification and the invoice status will change
to “Rejected by Customer”.
Version 1.0 Page 24
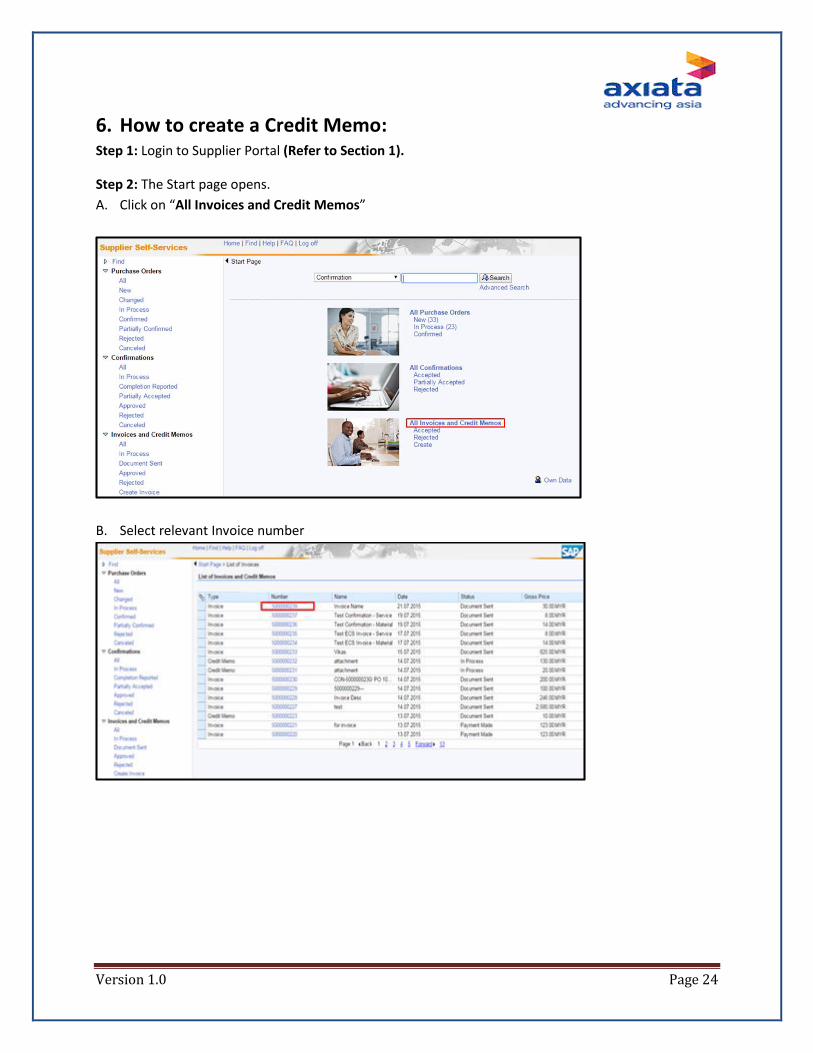
6. How to create a Credit Memo: Step 1: Login to Supplier Portal (Refer to Section 1).
Step 2: The Start page opens.
A. Click on “All Invoices and Credit Memos”
B. Select relevant Invoice number

Version 1.0 Page 25
C. A new window opens, click on “Create Credit Memo”
D. Add an Attachment: Attachment is MANDATORY including your internal Credit Memo and any other
supporting documents. The maximum total attachment file size is 8 MB
Click on “Browse” Select file from your computer Click on “Upload”
After successful upload, your “Attachment” can be seen as below:
Version 1.0 Page 26
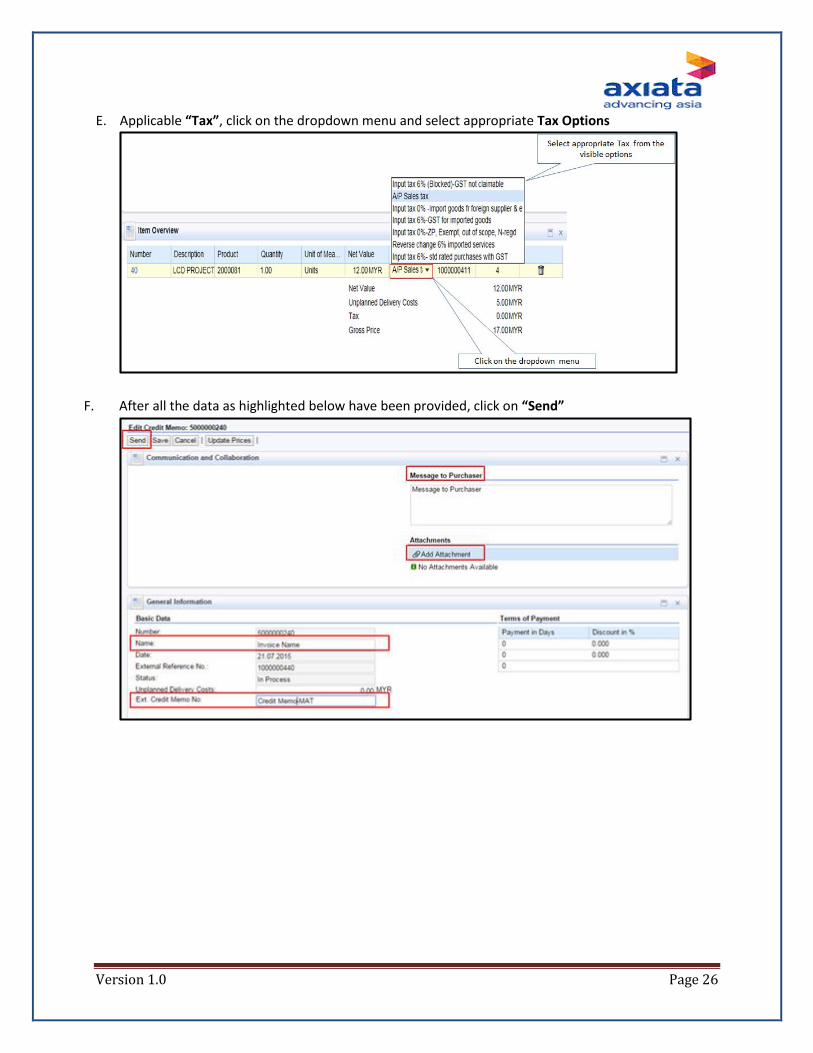
E. Applicable “Tax”, click on the dropdown menu and select appropriate Tax Options
F. After all the data as highlighted below have been provided, click on “Send”

Version 1.0 Page 27
Step 8: Credit Memo gets created with the message displayed. The status will change to “Document
Sent”
The Credit Memo will be sent to the Axiata for further processing. Once the Credit Memo has been
approved, you will receive an email notification and the Credit Memo status will change to “Accepted by
Customer”.
Version 1.0 Page 28
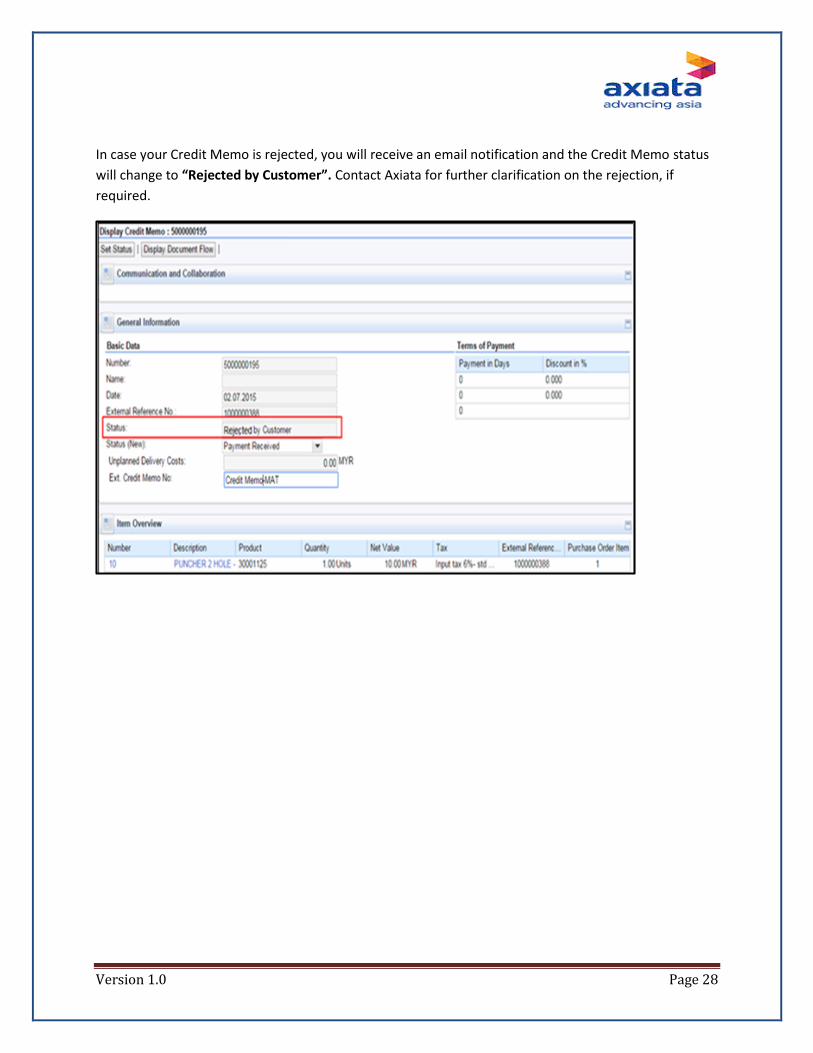
In case your Credit Memo is rejected, you will receive an email notification and the Credit Memo status
will change to “Rejected by Customer”. Contact Axiata for further clarification on the rejection, if
required.

Version 1.0 Page 29
Additional Features:
There is an additional feature which you may utilize for your own convenience and internal tracking of
invoice payment status.
Once you receive payment from Axiata for any invoice, you may MANUALLY change the status of the
invoice to “Payment Made”.
Click on Invoice and Credit Memo Open relevant Invoice Click on “Set Status” with “Payment
Received”