tt pgreen 09€¦ · in nature, bacteria can transfer plasmids back and forth, allowing them to...
TRANSCRIPT
Transformation Kit BACTERIAL TRANSFORMATION: GREEN FLUORESCENT PROTEIN
Partnership for Biotechnology and Genomics Education Barbara Soots Linda Curro
Education Coordinator
University of California Davis
Assistant Education Coordinator
University of California Davis
530 752‐6552 530 752‐6613
530 754‐4410 (fax) 530 754‐4410 (fax)
[email protected] [email protected]
This program is made possible through the generous support of:

Biotechnology in the Classroom 2009 2 updated 9/23/2009
Introduction
Transformation has been of critical importance in the development of molecular biology. Today it is one of the most widely used and versatile tools in genetic engineering.
In this lab activity, students will attempt to cause a wild type strain of E. coli to incorporate and express a plasmid containing a gene that codes for a green fluorescent protein (GFP). The source of the GFP gene is the bioluminescent jellyfish Aequorea victoria. The plasmid also contains an ampicillin‐resistance gene.
Attached readings and diagrams will help illustrate this transformation procedure. Also included are several bioethics activities that supplement the experiment.
Objectives
1. Understand the transformation procedure using the heat shock method.
2. Describe the importance of marker or reporter genes in molecular biology experiments.
3. Become familiar with the sterile techniques that are used to handle bacteria, including decontamination when experiment is complete.
4. Learn how to calculate transformation efficiency.
Materials
For Each Lab Group gloves safety goggles waterproof marker two microtubes microtube rack 6 disposable pipets 6 disposable inoculating loops bacterial waste container (ie. plastic cup) half full of 10% bleach solution *
foam cup with crushed ice * 2 LB plates 2 LB + AMP plates
Two Groups Will Share
squirt bottle containing 10% bleach microtube filled with 50mM CaCl2 microtube filled with Luria broth
BACTERIAL TRANSFORMATION Green Fluorescent Protein
TeacherInformation

Biotechnology in the Classroom 2009 3 updated 9/23/2009
Common Materials 10 μl micropipet and tips for instructor use only
water bath (with floating racks) streak plates of E. coli pGREEN plasmid (.005 μg/μl) crushed ice * distilled water * 37°C incubator Parafilm UV light large container with bleach for sterilization of petri dishes *
* materials provided by instructor
Advance Preparation
DAY 1: 1. Remove E. coli streak plates from the
refrigerator 24 hours prior to lab.
2. Aliquot one microtube with just over 1 ml of 50 mM CaCl2 for each two lab groups.
3. Aliquot one microtube with just over 1 ml of Luria broth for each two lab groups.
4. Make a 10% bleach solution to fill 6 squirt bottles and a bucket of the bleach solution.
5. Obtain enough crushed ice for 12 foam cups or beakers.
6. Fill water bath with distilled water and warm to 42°C.
7. Remove plasmid DNA from freezer right before class begins.
DAY 2 1. Remove LB and LB/AMP plates
from refrigerator and let warm to room temperature.
2. Pre‐heat incubator to 37°C.
DAY 3: 1. Prepare a bucket of 10% bleach solution
for students to sterilize their agar plates in when transformation results have been analyzed.
Post Lab Cleanup
When all of your classes have finished using the streak plates, open the dishes and immerse in bleach solution for at least 20 minutes. Following sterilization, pour off liquid, put dishes in plastic bag, and throw away in regular garbage.
Dispose of transformation petri dishes from day 3 in the same manner.
Teacher Notes
LB AND LB/AMP PLATES: These agarose plates have the nutrient media Luria broth added to encourage bacterial growth. LB/AMP plates have the antibiotic ampicillin added. Store these plates in refrigerator until ready for use.
USE AND DISPOSAL OF E. COLI: You will receive E. coli on LB/agar plates. Keep them in the refrigerator until the day before you will use them for the lab. The bacteria will rebound by being at room temperature for 24 hours.
E. coli is a normal part of the bacterial flora of the human gut. It is not considered pathogenic and is rarely associated with any illness in healthy individuals. Furthermore, strain MM294 is ineffective in colonizing the human gut. Adherence to simple guidelines for handling and disposal makes work with E. coli a nonthreatening experience.

Biotechnology in the Classroom 2009 4 updated 9/23/2009
Keep nose and mouth away from tip end when pipetting suspension culture to avoid inhaling any aerosol that might be created.
Do not overincubate plates. Long incubation times allow contaminating bacteria and fungi to arise.
When lab is complete, collect all petri dishes, disposable pipets, and tubes, and immerse in a 10% bleach solution to kill all bacteria. Allow materials to stand in bleach solution for 20 minutes or more. Drain excess solution, seal materials in a plastic bag and dispose in the regular garbage.
Wipe down lab bench with bleach solution at the end of lab.
Wash hands before leaving lab.
USE OF PGREEN: The pGREEN plasmid contains a mutant version of GFP linked to another gene called beta‐galactosidase. This combination of genes was chosen because the protein produced from this combination turns bacteria yellow‐green, even in normal light. If you expose the colonies to a UV light, they also fluoresce. The plasmid also contains an antibiotic resistance gene.
The plasmid DNA should be kept in the refrigerator until it is aliquotted for students. When ready, have the students come up to you one at a time and dispense the plasmid DNA directly into their + tube.
Answers to Student Activity
1. Plasmid does not fluoresce green.
A: Since the plate had no antibiotic present, the wild type strain grew normally, creating a “lawn”.
B: The transformed and untransformed bacteria grew normally since there was no antibiotic present to act as a selective agent.
C: Wild type bacteria should not grow on plates containing ampicillin. The antibiotic inhibits cell wall formation resulting in cell death.
D: Some of the bacteria exposed to pGREEN were transformed. They now contain an ampicillin‐resistant gene and can grow in the presence of the antibiotic, moreover, they fluoresce green.
3. Plate A and C are the controls used to determine
the growth of the wild type E. coli.
4. The transformants should appear on plate D. If the plasmid was integrated into the bacterial DNA, the colonies should glow green and survive on the amp plates.
5. answers will vary
6. answers will vary
7. The fluorescence does not come from the DNA itself. Instead, the GFP gene codes for a protein that exhibits fluorescence
8. No, not all bacteria are transformed. Only a small percentage of the bacteria will take up the plasmid.
9. a) 0.05 ug b) 510 ul c) 0.196 d) 0.0098
e) answers will vary (should be around 103 ‐104).
10. Factors influencing transformation efficiency include technique errors, the temperature and length of the incubation period, the growth stage of the cells, and using the correct mass of plasmid DNA.
LB plate LB/AMP plate
E. coli not exposed to pGREEN
E. coliexposed to pGREEN
A
B D
C
2.

Biotechnology in the Classroom 2009 5 updated 9/23/2009
Background
Transformation means change. In molecular biology, transformation refers to a form of genetic change in which the genetic material carried by an individual cell is altered by incorporation of foreign DNA into its genome.
Genetic transformation is used in many areas of biotechnology. Genes coding for traits such as frost, pest, or drought resistance can be genetically transformed into plants. Bacteria can be genetically transformed with genes enabling them to digest oil spills. Diseases caused by defective genes are beginning to be treated by transforming a sick person's cells with healthy copies of the defective gene that causes their disease.
You will be transforming a bacterium, E. coli, which lives in the human gut. Genetically, E. coli is relatively simple and well understood. Its genetic material consists mostly of one large circle of DNA between 3‐5 million base pairs in length. Also present are small loops of DNA called plasmids, usually ranging from 5,000‐10,000 base pairs in length. In nature, bacteria can transfer plasmids back and forth, allowing them to share genes. This natural mechanism allows bacteria to adapt to new environments. Plasmids are important to genetic engineers because they can be used as “gene taxis” in transformation events.
In this lab, you will use a plasmid that encodes the gene for the Green Fluorescent Protein (GFP) and a gene for resistance to the antibiotic ampicillin.
GFP comes from the bioluminescent jellyfish Aequorea victoria. This protein causes the jellyfish to fluoresce and glow in the dark. Following the transformation procedure, bacteria will express their newly acquired jellyfish gene and produce the fluorescent protein, which causes them to glow green under ultraviolet light. This particular plasmid has a mutant form of GFP that allows it to be a yellow‐green color even in white light.
Because of this glowing feature, GFP has become widely used in research as a reporter molecule. A reporter molecule is a marker protein linked to the protein you are actually interested in studying. You follow your protein of interest by following the colored reporter protein.
In addition to GFP, this plasmid also contains an ampicillin resistance gene. Ampicillin is an antibiotic that prevents E. coli from constructing cell walls, thereby killing the bacteria. If a strain of E. coli has an ampicillin ‐resistance gene, the strain survives on a plate containing ampicillin because the gene directs the production of an enzyme to block the action of the chemical. By including this marker gene in the plasmid, you can quickly tell if the transformation has been successful by growing the bacteria on plates containing ampicillin. Only the transformants will survive.
LaboratoryBACTERIAL TRANSFORMATION Green Fluorescent Protein

Biotechnology in the Classroom 2009 6 updated 9/23/2009
Objectives
1. Understand the transformation procedure using the heat shock method.
2. Describe the importance of marker or reporter genes in molecular biology experiments.
3. Become familiar with the sterile techniques that are used to handle bacteria, including decontamination when experiment is complete.
4. Learn how to calculate transformation efficiency.
Materials
For Each Lab Group gloves safety goggles waterproof marker two microtubes microtube rack 6 disposable pipets 6 disposable inoculating loops bacterial waste container (i.e. plastic cup) half full of 10% bleach solution *
foam cup with crushed ice * 1 LB plate (day 2) 2 LB + AMP plates (day 2)
Two Groups Will Share
squirt bottle containing 10% bleach microtube filled with 50mM CaCl2 microtube filled with Luria broth
Common Materials 10 �l micropipet for instructor use water bath (with floating tube rack) streak plates of E. coli pGREEN plasmid (.005 �g/�l) crushed ice * distilled water * 37�C incubator (day 2) Parafilm (day 2) large container with bleach *
* materials provided by instructor
Precautions
Keep nose and mouth away from tip end when pipetting suspension culture to avoid inhaling any aerosol that might be created.
When lab is complete, collect all petri dishes, disposable pipets, and tubes, and immerse in a 10% bleach solution to kill bacteria. Allow materials to stand in bleach solution for 15 minutes or more. Drain excess solution, seal materials in a plastic bag and dispose in the regular garbage.
Wipe down lab bench with bleach solution at the end of lab
Wash hands before leaving lab.
Procedure
Plasmid map of pGREEN and photo of transformed colonies.
Images courtesy of Carolina Biological Supply
Company’s Transformations: A Teacher’s Manual

Biotechnology in the Classroom 2009 7 updated 9/23/2009
DAY 1: 1. Gather all necessary materials before starting. Make sure you have your bacterial waste
container filled with 10% bleach solution and a cup of crushed ice. 2. Put on gloves and safety goggles. 3. Mark one sterile microtube “+”. Mark another “‐”. Place your lab group’s initials on each tube.
Note: Plasmid DNA (pGREEN) will be added to the “+” tube; none will be added to the “‐” tube.
4. Using a disposable pipet, add 250 �l of CaCl2 solution (50 mM) to each tube (“+” and “‐”).
5. Discard the disposable pipet and place both tubes on ice. 6. Use a sterile plastic loop to transfer one or two 3 mm bacterial colonies from the streak plate to
the “+” tube.
a) If the plates do not contain enough 3 m colonies, scrape up several smaller colonies. Be careful not to transfer any agar (impurities in the agar can inhibit transformation).
b) Immerse the loop tip into the calcium chloride solution in the “+” tube and vigorously spin the loop to dislodge the cell mass.
c) Continue spinning the loop between your index finger and thumb until the entire colony is dispersed in the calcium chloride solution (no floating chunks). Note: No visible clumps of cells should remain. This step is critical to obtaining good results.
d) Place the loop into the bacterial waste cup for disposal. 7. Close the tube lid and put the tube on ice. 8. Use a new sterile loop to transfer a mass of cells to the “‐“ tube as described in
steps 6 ‐ 7 above. Both tubes should now be on ice.
CaCl2 solution
+ _
+

Biotechnology in the Classroom 2009 8 updated 9/23/2009
9. Your instructor will pass a UV lamp over the pGREEN DNA solution. Note your observations on the student activity sheet.
10. Your instructor will dispense 10ul of pGREEN directly into your “+” tube. Following the addition
of the plasmid, close the tube lid. Tap the tube lid with your finger to mix. Avoid making bubbles in the suspension or splashing the suspension up the sides of the tube.
11. Return the “+” tube to the ice. Incubate both tubes on ice for 15 minutes. While the cells are
incubating, complete the student activity sheet. 12. Following incubation, heat shock the cells. It is essential that the cells receive a sharp and
distinct shock. a) Carry the ice container with the tubes to the 42�C water bath. b) Remove both tubes from ice; hold them in the water for 90 seconds. Three‐fourths of the
tube should be under water. c) After heat shock, immediately return the tubes to ice. Let them stay on ice for at least one
minute. 13. Use a disposable pipet to add 250 �l of Luria broth to the “‐” tube. Discard this pipet into the
bacterial waste cup. Close lid and tap gently to mix. 14. Using a new disposable pipet, add 250 �l of Luria broth to the “+” tube. Discard this pipet into
the bacterial waste cup. Close lid and tap gently to mix. 15. Let tubes rest at room temperature for at least 10 minutes or, if you will not finish the lab today,
give the tubes to your teacher for overnight storage. 16. Spray workspace with bleach solution and wipe down. Wash hands before leaving lab.
STOP POINT: Instructor: After a 10 minute rest at room temperature, the tubes can be refrigerated overnight and removed just prior to the beginning of lab the next day. Pour liquid in bacterial waste containers down drain after it has sat for at least 15 minutes. Collect tips in a plastic bag and discard in the normal garbage.

Biotechnology in the Classroom 2009 9 updated 9/23/2009
DAY 2:
1. Gather all necessary materials. Set the tubes from day 1 in a microtube rack at room temperature. Refill bacterial waste containers with bleach solution.
2. Label two LB and two LB/AMP plates with lab group names and the date. Make sure the plates
are at room temperature and write the information on the BOTTOM of the Petri dish.
a) Label 1 LB plate “+ PLASMID” and 1 LB/AMP plate “+ PLASMID” b) Label 1 LB plate “– PLASMID” and 1 LB/AMP plate “‐ PLASMID”
3. Use a disposable pipet to add 100 �l of cell suspension from the “‐” tube to the “LB ‐ PLASMID”
plate, and another 100�l to the “LB/AMP ‐ PLASMID” plate. Discard the pipet and “‐” tube into the bacterial waste container.
4. Use a new sterile tip to add 100 �l of cell suspension from the “+” tube to the “LB + PLASMID” plate, and another 100 �l to the “LA/AMP + PLASMID” plate. Discard tip and “+” tube into bacterial waste container. Note: Do not let the suspension sit on the plate too long before spreading. If too much liquid is absorbed by the agar, the cells cannot be evenly distributed.
+ PLASMID LB
+ PLASMID
LB/AMP
‐ PLASMID LB
‐ PLASMID
LB/AMP
+ -
+ PLASMID + PLASMID ‐ PLASMID ‐ PLASMID LB LB/AMP LB LB/AMP
Note: Aliquot from the “‐“ tube first to avoid possibility of contamination!

Biotechnology in the Classroom 2009 10 updated 9/23/2009
5. Using a new sterile loop for each plate, spread the suspensions evenly around the surface of the agar by quickly skating the flat surface of a new sterile loop back and forth across the plate surface. Turn the plate a quarter turn and go back and forth several more times.
6. Wrap Parafilm around your four plates to seal the lids. 7. After tips and tubes have sat in bleach solution for at least 15 minutes, pour liquid in bacterial
waste container down drain. Collect tips and tubes in a plastic bag and discard in the normal garbage. Spray down workspace with bleach solution. Wash hands before leaving lab.
STOP POINT: Rest the plates on the lab bench for 10 minutes. Then place the four plates upside down in a 37�C incubator. Incubate for 24 hours.
DAY 3:
1. Remove plates from incubator and check for growth. Fill in the actual results on the activity sheet you began on day 1 of the lab.
2. Observe plates with handheld UV light. Fill in results on the activity sheet. 3. Open the petri plates and immerse in large bucket of bleach solution your instructor has set
up. Spray down workspace with bleach solution. Wash hands before leaving lab.

Biotechnology in the Classroom 2009 11 updated 9/23/2009
1. What happened when your instructor illuminated the plasmid DNA with UV light? 2. Shade the circles to indicate the plates you predict will show bacterial growth after incubation at
37�C for 24 hours.
3. Which of these plates are control plates? What purpose does a control plate serve? 4. On which of these plates would you expect to find transformants? Why? 5. Did actual growth match prediction? If no, why not?
StudentActivity
BACTERIAL TRANSFORMATION Green Fluorescent Protein
LB plate LB/AMP plate
“‐ PLASMID”
A
B
C
D
“+ PLASMID”
Biotechnology in the Classroom 2009 12 updated 9/23/2009
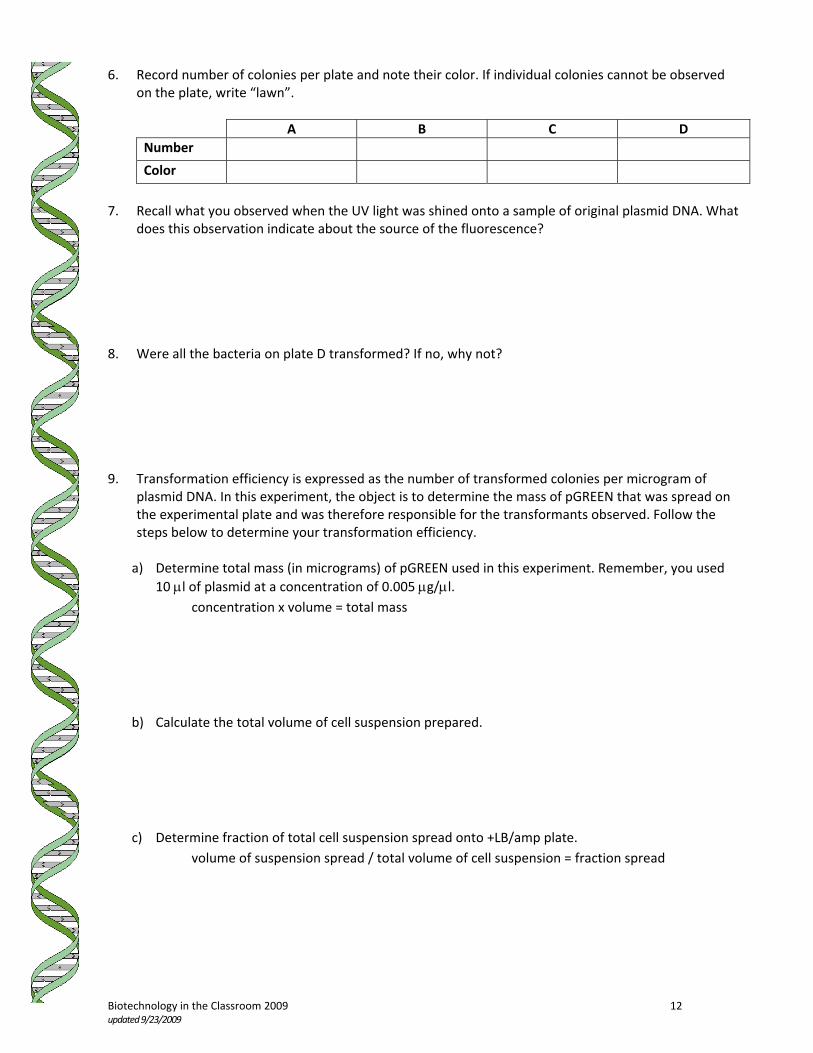
6. Record number of colonies per plate and note their color. If individual colonies cannot be observed
on the plate, write “lawn”.
A B C D Number
Color
7. Recall what you observed when the UV light was shined onto a sample of original plasmid DNA. What
does this observation indicate about the source of the fluorescence? 8. Were all the bacteria on plate D transformed? If no, why not? 9. Transformation efficiency is expressed as the number of transformed colonies per microgram of
plasmid DNA. In this experiment, the object is to determine the mass of pGREEN that was spread on the experimental plate and was therefore responsible for the transformants observed. Follow the steps below to determine your transformation efficiency.
a) Determine total mass (in micrograms) of pGREEN used in this experiment. Remember, you used
10 μl of plasmid at a concentration of 0.005 μg/μl. concentration x volume = total mass
b) Calculate the total volume of cell suspension prepared.
c) Determine fraction of total cell suspension spread onto +LB/amp plate. volume of suspension spread / total volume of cell suspension = fraction spread

Biotechnology in the Classroom 2009 13 updated 9/23/2009
d) Determine mass of pGREEN in cell suspension spread onto “LB/AMP + PLASMID” plate.
total mass pGREEN (a) x fraction spread (c) = mass pGREEN spread
e) Determine number of colonies per microgram of pGREEN. Express answer in scientific notation.
colonies observed / mass plasmid spread (d) = transformation efficiency
10. What factors might influence transformation efficiency? Explain the effect of each factor you mention.