tthe lost mines he lost mines by greg a. vaughan with ...mojoichiban.com/dnd/resources/scales of...
TRANSCRIPT

56O c t o b e r 2 0 0 8 | DU NGEON 159
by Greg A. Vaughanwith James Larrison
illustrations by Wayne Reynolds, Rob Alexander, and Ryan Barger
cartography by Mike Schley
56b e r 2 0 0 8 | DU NGEON 159
56
The Lost Mines The Lost Mines of Karakof Karak
“This is a mission for
heroes who have shown
their mettle in the
defense of others.
If the evidence you have
uncovered is true, the
Siege of Bordrin’s Watch
was but the fi rst sortie
in a larger campaign,
against which Overlook
and Elsir Vale cannot
stand for long. I will tell
you of the Karak Lode,
and of lost wealth with
which we might defend
our land against the war
that is coming.”
TM & © 2008 Wizards of the Coast, Inc. All rights reserved.
The Lost Mines of Karak
57O c t o b e r 2 0 0 8 | DU NGEON 159
“The Lost Mines of Karak” is an adventure for five 6th-level characters. Characters should be midway through 7th level by the adventure’s end. This adventure is the sequel to “The Shadow Rift of the Umbraforge” and the fourth part of the Scales of War adventure path. However, with a little modification, it can be played as a standalone adventure or integrated into any existing wilderness campaign in an area where a dwarven kingdom might once have stood.
ADVENTURE ADVENTURE BACKGROUNDBACKGROUND
The city of Overlook stands at the base of the Stone-home Mountains at the farthest western reaches of the Elsir Vale. This age-old redoubt was the center of the ancient dwarf-kingdom that once dominated the vale, but which faded into obscurity generations ago. Though little is remembered of this lost kingdom, its folk ventured far and wide in their day. One dwarf clan—the Ironfell—made forays in search of mineral wealth in the deserts beyond the Thornwaste to the southwest of Elsir Vale. There, they established a mine they called the Karak Lode, after the first dwarf of Clan Ironfell to fall in its defense. Over long years, Karak became a legendary source of wealth as its folk pulled rich deposits of gold, silver, and other precious metals from beneath the desert sands. A supply depot was established at the desert’s edge to service the caravans traveling between the mine and Elsir Vale, but the location of the Karak Lode was kept a closely guarded secret. Only oath-sworn members of Clan Ironfell ever made the final leg of the journey across the sands.
Dwarves hold their secrets close, and their grip is doubly tight where wealth is concerned. So it was that Karak’s secrecy eventually became its downfall. Under the pressure of monstrous marauders, famine, and migrant human tribes, the dwarf kingdom of Elsir Vale declined. As its resources were taxed past the breaking point, the kingdom’s borders began to contract until little more than the territory imme-diately surrounding Overlook was left. In time, sandstorms struck the southern wastes and the Karak supply depot was abandoned. Soon, all contact with the mine was lost, and the Karak Lode was consigned to history.
ADVENTURE SYNOPSISADVENTURE SYNOPSIS
After their successes in “Siege of Bordrin’s Watch” and “Shadow Rift of the Umbraforge,” the PCs have established something of a reputation for themselves within Overlook. The party is introduced to a wealthy dwarf named Bram Ironfell, a member of the Elsir Consortium and scion of Clan Ironfell. Bram takes the PCs into his confidence as he tells them of the recent discovery of a parchment con-nected to the shadar-kai arms dealer Sarshan. Bram believes that the parchment details the location of the Karak Lode—a mine belonging to his clan that has been lost for generations. Bram hopes that if the mine is found, its wealth can be used to defend Overlook and the Elsir Vale against the brewing conflict that the PCs saw hints of in the Shadowfell. Following the directions on the ancient scroll, the party heads south past the Westdeep and into the dry lands known as the Thornwaste. There, they are beset by dwarf warriors from a rival clan who have caught
wind of Bram’s discovery. They also encounter a wan-derer named Mag Blackthorn, from whom they can seek guidance through the treacherous wastes. Beyond the Thornwaste, the PCs come to Dunesend—a small village at the edge of the desert, controlled by a cruel gnoll called the Warden. After defeating the Warden and his allies, the PCs learn that the village is held in thrall by a mysterious desert despot calling herself Shephatiah, Queen of the Drylands. The Warden’s path through the desert follows a forgotten track to Shephatiah’s lair in a lost mine—the
QUESTS
“Lost Mines of Karak” offers the opportunity for
PCs to earn quest XP in a couple of places. Pro-
vided here is the list of quests, and their rewards,
in the adventure.
Major Quest—Lost Karak: The PCs undertake
an arduous journey across wasteland and desert
in an attempt to locate the lost mines of the
Karak Lode. They complete this quest upon their
successful return to Overlook, having secured
the mines against the depredations of Queen
Shephatiah and her followers.
Reward: 1,250 XP.
Minor Quest—Saving Dunesend: The folk
of the tiny village of Dunesend have become
unwitting vassals of the Queen of the Drylands.
By overcoming the immediate threat of Shepha-
tiah’s lieutenant (the Warden) and routing her
in Karak, the PCs free the village from further
threats and earn the gratitude of its people.
Reward: 250 XP.

The Lost Mines of Karak
58O c t o b e r 2 0 0 8 | DU NGEON 159
Karak Lode. However, the PCs find the ancient dwar-ven ruins occupied and defended by desert raiders and foul subterranean creatures led by an evil dryad. However, though the PCs make short work of the queen and her followers, they can find no trace of the mines. As they wait out a sandstorm, the PCs find them-selves beset by a band of cavern choker assassins led by a troglodyte curse chanter. Only by retracing the steps of these marauders do the characters locate the previously hidden entrance to the mines. There, the true Queen Shephatiah holds court. Exploring the ancient dwarven caverns, the PCs battle Shephatiah’s followers before confronting the real Queen of the Drylands—a powerful naga. Having discovered a rift linking the mines with the Elemental Chaos, Shephatiah has made the Karak Lode her lair. However, after defeating the naga and her servants, the PCs uncover evidence that Karak’s wealth is now controlled by an unknown group from another plane. The PCs return to Overlook and recount their findings to Bram Ironfell, who tells them he will leave the mine sealed. However, the forces responsible for shipping the mine’s wealth through the Elemental Chaos have a long reach and dark plans.
PREPARING FORPREPARING FORADVENTUREADVENTURE
“Lost Mines of Karak” takes the PCs across the arid badlands known as the Thornwaste, then into the desert beyond in search of the Karak Lode. On their journey of exploration, the PCs find themselves under assault by Queen Shephatiah’s forces aboveground and below, culminating in a deadly showdown along-
side a rift leading to the Elemental Chaos. If you are pressed for time before beginning the adventure, read the adventure background and synopsis, “Part 1: The Road to Karak,” “Through the Thornwaste,” and the first two encounters. This gets the PCs caught up in the adventure and into the village of Dunesend—an action-packed first session of play.
What You Need to PlayThis adventure contains everything you need to play, including background information, setup, and encounters (including tactical maps). Reading through the DUNGEONS & DRAGONS 4th Edition rules is your first best step to understanding and prepar-ing to run the adventure. As mentioned above, read through at least the opening sections and initial encounters before starting. This review enables you to become familiar with the material and the style of presentation. The sections below describe the adven-ture format.
Using Tactical EncountersEach encounter includes several common elements.
Encounter LevelEach tactical encounter assumes a group of five player characters. An encounter of average difficulty is one where the encounter level is equal to the level of the party. Encounters that are 1 or 2 levels lower than the party are easy encounters, while encounters that are a higher level than the party are difficult encounters. For overcoming an encounter, a group earns the XP value noted beside the encounter level. This amount should be divided by the number of group members, and an equal amount should be awarded to each character.
SetupThis section of a tactical encounter provides you with the basic parameters of the encounter. First, it pro-vides a key to the monsters in the encounter so you can locate them on the tactical map. Next, it provides context or background information for the encounter. The map of each encounter area indicates where the monsters are located when the encounter begins. The setup section also describes what the monsters are doing and how they react when the PCs arrive.
Read Aloud TextRead aloud text provides information detailing what the characters can see and are aware of. You do not have to read it word for word; feel free to para-phrase and use your own words when describing this information. Use read aloud text wisely. It is written for the most common approach to a particular situation, but what your player characters do might require you to alter the information in any number of ways.
Monster StatisticsEncounters include stat blocks for each monster type present in the encounter. If more than one monster of a particular kind is present, the stat block indicates how many creatures can be found.
TacticsThis entry describes special actions the monsters take to defeat the adventurers. Sometimes this means the monsters take advantage of special features of the area or make use of special powers or equipment.

The Lost Mines of Karak
59O c t o b e r 2 0 0 8 | DU NGEON 159
MapEach encounter includes a map keyed with the initial locations of each monster. The map also indicates the location of any special features of the area.
Features of the AreaThis section describes special features noted on the map. If the location has items or areas of interest with which the characters can interact, those features are described here. Look here to see if a door is out of the ordinary, if an altar has a secret compartment, or if the area includes treasure.
Treasure PreparationAs with the previous installments of the Scales of War adventure path, this adventure makes use of the parcel system of treasure rewards described in the Dungeon Master’s Guide. The characters should accumulate 14 parcels by the end of the adventure. You can supply these treasures in whatever way you wish, but the following sidebar presents the most likely areas to feature treasure. During your prepara-tion, assign parcels from those that follow to the areas in the spaces provided. Use the players’ wish lists to come up with magic items for the first six parcels.
PART 1: PART 1: THE ROAD TO KARAKTHE ROAD TO KARAK
The adventure begins in the city of Overlook, where the PCs were left at the end of “Shadow Rift of the Umbraforge.” However, if the PCs have traveled elsewhere since the end of that adventure, the initial setup below can take place in Brindol or any other settlement between Elsir Vale and the mountains.
Sarshan’s PlotsAs a result of saving the city not once but twice, the PCs have become well known in Overlook. This notoriety sees them approached by Kalad, the dwarf paladin they rescued in “Siege of Bordrin’s Watch.” In the aftermath of the thwarted raid, Kalad has taken up a position as a sergeant in the Overlook watch. It is official business that brings him to the PCs, where he asks them to meet with a member of the Elsir Con-sortium (see “Siege of Bordrin’s Watch,” page 19). If Kalad did not survive the previous adventure, some other emissary of the guard seeks the party out. At a time of the PCs’ choosing, Kalad escorts them to a private room in an upscale Elftown tavern. There, he introduces them to a well-dressed dwarf wearing the rich robes of a successful merchant, his golden beard braided with silver bands.
“Greetings, Heroes of Overlook. I am Bram Ironfell of the Clan Ironfell and representative of the Elsir Consortium. Your reputations precede you, and for your actions, you have my personal thanks in addition to that of the city. I have a tale I wish to share with you, over dinner and drinks of course.”
Parcel A: _________________________________ , Clan Rivals.
Parcel B: ________________________________, The Warden.
Parcel C: ________________________________, The Warden.
Parcel D: _______________________________ , Desert Patrol.
Parcel E: __________________________________ , Courtyard.
Parcel F: ____________________________________ , Area 10.
Parcel G: _________________________________ , Guard Hall.
Parcel H: __________________________________, Great Hall.
Parcel I: ___________________________________, Great Hall.
Parcel J: ______________________________________, Crypts.
Parcel K: ______________________________ , Mine Entrance.
Parcel L: ________________________________ , Chaos Mines.
Parcel M: ____________________________ , Queen’s Retinue.
Parcel N: ____________________________ , Queen’s Retinue.
Based on the guidelines in the Dungeon Master’s Guide, the following parcels can go in the spaces above. Rely on the wish lists your
players gave you for the first four parcels.
Parcel 1: Magic item, level 10
Parcel 2: Magic item, level 9
Parcel 3: Magic item, level 9
Parcel 4: Magic item, level 8
Parcel 5: Magic item, level 7
Parcel 6: Magic item, level 7
Parcel 7: Two 250 gp art objects + 500 gp
Parcel 8: 900 gp
Parcel 9: Four 100 gp gems + 400 gp
Parcel 10: One 250 gp art object + two potions of healing + 250 gp
Parcel 11: 600 gp
Parcel 12: Three 100 gp gems
Parcel 13: One potion of healing + two 100 gp gems + 50 gp
Parcel 14: Two potions of healing + 100 gp
TREASURE PARCELS

The Lost Mines of Karak
60O c t o b e r 2 0 0 8 | DU NGEON 159
Bram relates the information found in the “Adventure Background” section, which you can read or para-phrase as you see fit. Then read the following.
“The location of the Karak Lode was known to few even within the clan, and it was thought that all who had such knowledge were lost when the mines were reclaimed by the desert. Even within the clan, Karak is all but forgotten. However, recent events might change that. “The destruction of Sarshan’s operations in Overlook saw the shadar-kai’s many warehouses and transit points raided. In one of those raids, the watch uncovered documents connected to Sarshan’s operations, including an ancient fragment of parchment. On it was written a list of landmarks and bearings for a journey, along with
the name of Clan Ironfell. I had never seen this parchment before. However, at the watch’s request, I undertook a bit of research into my family’s archives. If what I discovered there holds true, this parchment holds the directions to the Karak Lode.”
Although Bram Ironfell obviously has a personal stake in the search for the lost mines, he downplays his own self-interest. If the information the PCs dis-covered in “Shadow Rift of the Umbraforge” has not yet become common knowledge in Overlook, Bram has already guessed correctly that the siege of Bor-drin’s Watch represents a larger threat to Elsir Vale.
“Discovering what became of my kin would end a sad chapter in Ironfell history, but that is not my primary motive in seeking your aid. If the Karak Lode can be found, its wealth offers the means to shore up the defenses of Overlook and the Elsir Vale. However, it is anyone’s guess what manner of creatures might lair there, or what defenses the last of the clan left to guard the mines. This is not a job for the city watch, I fear.”
Bram offers the PCs 1,000 gp (half in gold, half in gems) as an upfront payment for undertaking the search for the Karak Lode. In addition, the PCs can claim any other treasure they recover along the way. Following the directions to the Karak Lode, the PCs first head south across the Thornwaste that stretches between Elsir Vale and the Stonehome Mountains. (On the area map in “Rescue at Riven-roar,” the Thornwaste is the area directly west of the Wyvernwatch Mountains.) A four-day journey takes the PCs to a location Bram believes was once the ancient supply depot for the mines. From there, the PCs must head south into the heart of the desert.
Bram Ironfell’s SecretThe parchment is genuine, but there is more to Bram Ironfell’s story than he lets on. For more than a year, the dwarf has been one of Sarshan’s agents in the city, using his position on the Elsir Consortium to aid the shadar-kai’s operations. Bram’s story of how the directions to Karak were found in one of Sarshan’s warehouses is the truth. However, it was the dwarf who originally sent them to Sarshan after discovering them in a cache of family records months before. Bram was in the process of seeking the shadar-kai’s aid in locating and clearing out the mine. With Sarshan’s operations shut down, the dwarf now needs a new set of agents to find the Karak Lode and overcome whatever defenses might be found there. The PCs can make Sense Motive checks against Bram, but the dwarf ’s stated intention in using the wealth of the mines to defend Overlook and Elsir Vale is entirely truthful. If the PCs have previously heard of the consortium’s secret plots to replace the ruling council with a hand-picked body loyal to the merchants’ own interests, Kalad confirms that Bram is known to be opposed to that group. (In truth, the canny dwarf opposes them because he plans to one day rule the council single-handedly.) Kalad is familiar with the Ironfell clan and vouches for Bram’s good character. However, his duties with the watch prevent him from accompany-ing the party on their mission.

The Lost Mines of Karak
61O c t o b e r 2 0 0 8 | DU NGEON 159
Through the Thornwaste Level 6Skill Challenge XP 750
South of the Westdeep, the broken ground of the Thornwaste stretches before you. Ridges of knife-edged stone spread as far as the eye can see, interspersed with heavy growths of twisted brambles. Your first investigation of these reveal that their thorns are iron-sharp, capable of drawing blood even through the thickest clothing. No trail or tracks lead into the wasteland ahead.
This skill challenge sees the PCs make their way across the
desolate landscape of the Thornwaste, seeking the supply
depot that marks the beginning of their journey into the
desert.
The Thornwaste is a parched landscape of washed-out gullies
and tangled briars. The directions from the parchment
indicate that a road once passed this way, but it has long
since disappeared. Though the area appears inhospitable,
dozens of species of desert animal dwell here, hunted by
predators including lions and wild boar.
The PCs meet Mag Blackthorn (see below) after their second
success or first failure (whichever comes first) in the skill
challenge. The first combat encounter (“Clan Rivals,” page 72)
takes place after the party’s fourth success or second failure.
Complexity 3 (requires 8 successes before 3 failures).
Primary Skills Endurance, Nature, Perception.
Other Skills Nature, Perception.
Victory If the PCs achieve 8 successes before 3 failures, they
emerge from the Thornwaste near Dunesend.
Defeat If the PCs get 3 failures before attaining 8 successes,
they stumble out of the Thornwaste one day away from
Dunesend. This extra day of travel costs each PC 1 extra
healing surge. Additionally, the party attracts the attention
of a satyr rake that shadows them, then joins the combat in
“The Warden” encounter.
Special If the PCs ally themselves with Mag Blackthorn, they
gain a +2 bonus to further checks in this skill challenge.
Endurance (DC 12). The PCs must endure the harsh
environment and deadly briars of the barren Thornwaste as
they make their way south.
This is a group check. One character acts as lead, while the
others make checks to aid that character. Each ally that gets
a result of 10 or higher provides a +2 bonus to the lead
character’s check (which counts as the check to determine
a success or a failure). A failed check indicates that all
members of the party lose one healing surge, in addition to
counting as a failure for the challenge.
Nature (DC 12). The PC makes a Nature check to help find a
safe path through the briars, or to find sufficient water to
sustain the group.
Perception (DC 17). The PC seeks and finds a good vantage
point atop a stony ridge, from which the best path can be
seen through the scrubland ahead.
Nature or Perception (DC 12). The PC notes signs of
predatory beasts or finds a remnant of the ancient dwarf
track through the wastes. On a successful check, the next
primary skill check made in the challenge gains a +2 bonus.
This use of these skills does not count as a success or failure
toward the completion of this challenge.
Mag BlackthornAfter their second success or first failure in the skill challenge, the PCs happen upon another wanderer in the Thornwaste.
In the distance, you spot something. Slipping through the brush and brambles is a human male in a tattered black coat and leggings. A battered, wide-brimmed hat shrouds his face, his boots held together with coarse twine. He carries a spear in one hand, a leather-bound book in the other.
Mag Blackthorn is a ranger and a disciple of the Ghostlord—a legendary druid lich said to linger within the Thornwaste. (The Ghostlord appears in the 3rd edition adventure Red Hand of Doom, but does not play a part in this adventure path.) Mag hails the PCs, declaring himself protector of the Thornwaste and demanding to know their business. If the characters react in an even-handed manner and indicate that they are simply passing through, Mag relaxes and becomes friendly. If the PCs react with hostility, Mag challenges one of them to a duel for the right of passage. Once the challenge is issued, a DC 18 Diplomacy check is necessary to get Mag back on friendly footing. If the PCs take up his challenge, this DC increases to
23. If Mag is fought and defeated in single combat, he becomes automatically friendly (and apologetic) if he is allowed to live. Mag knows nothing of Karak if he is asked about the mines, though he identifies Dunesend as the only settlement in the vicinity of the PCs route.
Mag Blackthorn, Ranger Level 6 SkirmisherMedium natural humanoid (human) XP 250
Initiative +6 Senses Perception +8
HP 70; Bloodied 35
AC 20; Fortitude 16, Reflex 19, Will 19
Speed 6
m Spear (standard; at-will) ✦ Weapon +11 vs. AC; 1d8 + 6 damage.
r Crossbow (standard; at-will) ✦ Weapon Ranged 15/30; +11 vs. AC; 1d8 + 6 damage
Defensive Mobility Mag gains a +2 bonus to AC against opportunity attacks.
Hunter’s Quarry (minor; at-will)
Mag can designate the enemy nearest to him as his quarry.
Once per round, he deals +1d6 damage to his quarry. This
effect remains active until the end of the encounter, until
the quarry is defeated, or until he designates a different
target as his quarry.
Nimble Strike (standard; at-will) ✦ Weapon Ranged 15/30; +11 vs. AC; 1d8 + 6 damage; Mag shifts 1
before or after the attack.
Disruptive Strike (immediate interrupt, when Mag or an ally is
attacked by a creature; encounter) ✦ Weapon Ranged 15/30; +11 vs. AC; 1d8 + 6 damage. Hit: The target
takes a –6 penalty to its attack roll.
Splintering Shot (standard; daily) ✦ Weapon Ranged 15/30; +11 vs. AC. Hit: 3d8 + 6 damage, and the
target takes a –2 penalty to attack rolls until the end of the
encounter. Miss: Half damage, and the target takes a –1
penalty to attack roles until the end of the encounter.
Weave Through the Fray (immediate interrupt, when an
enemy moves adjacent to Mag; encounter)
Mag can shift 3 squares.
Alignment Unaligned Languages Common, Elven
Skills Nature +11, Endurance +10
Str 13 (+4) Dex 16 (+6) Wis 16 (+6)
Con 14 (+5) Int 11 (+3) Cha 10 (+3)
Equipment warhammer, crossbow, quiver of 15 bolts

The Lost Mines of Karak
62O c t o b e r 2 0 0 8 | DU NGEON 159
He is willing to escort the PCs through the Thorn-waste, granting a +2 bonus to subsequent checks in the skill challenge. Once within sight of Dunesend, Mag wishes the party well and departs back into the scrubland.
Showdown in DunesendThe village of Dunesend marks the frontier of two equally desolate lands. To the north lies the forbidding Thornwaste, across which only the most experienced—or most desperate—explorers tread. To the south, endless desert dunes march to the far horizon. As the PCs approach the edge of the village from the north, they find one of Queen Shephatiah’s lieutenants—a gnoll demonic scourge called “the Warden”—in the process of collecting the village’s tribute. Tactical Encounter: The Warden (page 74).
DunesendVillage, Population 183Dunesend was built on the ruins of the dwarven supply depot that once served Clan Ironfell’s hidden mining operations in the desert. All that remains of the original dwarven enclave are scattered founda-tions and a single watchtower. However, the dwarves’ carefully constructed system of spring-fed wells and cisterns still functions, allowing those who dwell here to farm the scrubland and eke out an existence in the harsh landscape. In years past, trade caravans made Dunesend a waypoint along an east-west road. Today, the road is sand and the caravans have all but vanished. The handful of families remaining in Dunesend do so because they have nowhere else to go.
Leadership: Lotho Elberesk, owner of the Dunesend caravansary is a village elder and the settlement’s de facto leader. Demographics: The isolated population of Dunesend are all human with the exception of Bede, the half ling baker. Though they have little exposure to nonhumans, the folk of the village have no malice or prejudice against them.
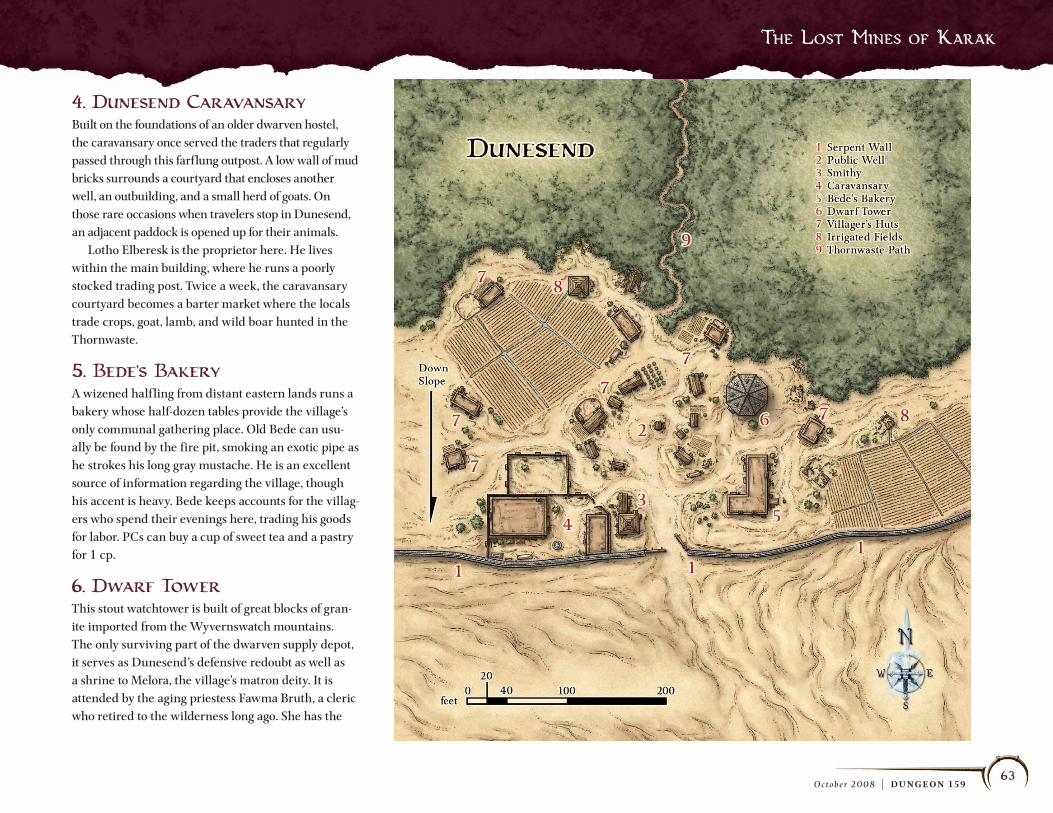
1. Serpent WallThis weathered stone wall is formed of ancient basalt blocks and carved in the form of a serpentine crea-ture with a crest running down its back. It stretches for miles in either direction, marking the end of the rolling desert sands and the beginning of the Thorn-waste. A wooden stockade gate of recent construction features great serpent-headed gate posts. With a DC 17 History check, a PC recalls that the serpent wall was here long before the dwarven supply depot was established. It dates back thousands of years to an ancient serpent kingdom that once ruled this region.
2. Public WellThis bucket-drawn stone well features a wooden roof set on stanchions. This can be lowered during high winds to keep blown sand out of the village’s water supply. The well is part of the ancient dwarven water-works, and holds an inexhaustible supply of fresh water even during the driest months.
3. SmithyAn aged human named Darkus Comahni works the forge here, repairing tools and household implements for the villagers. Though he has little call for it, he can repair weapons and armor as well.
The Lost Mines of Karak
63O c t o b e r 2 0 0 8 | DU NGEON 159
4. Dunesend CaravansaryBuilt on the foundations of an older dwarven hostel, the caravansary once served the traders that regularly passed through this farflung outpost. A low wall of mud bricks surrounds a courtyard that encloses another well, an outbuilding, and a small herd of goats. On those rare occasions when travelers stop in Dunesend, an adjacent paddock is opened up for their animals. Lotho Elberesk is the proprietor here. He lives within the main building, where he runs a poorly stocked trading post. Twice a week, the caravansary courtyard becomes a barter market where the locals trade crops, goat, lamb, and wild boar hunted in the Thornwaste.
5. Bede’s BakeryA wizened half ling from distant eastern lands runs a bakery whose half-dozen tables provide the village’s only communal gathering place. Old Bede can usu-ally be found by the fire pit, smoking an exotic pipe as he strokes his long gray mustache. He is an excellent source of information regarding the village, though his accent is heavy. Bede keeps accounts for the villag-ers who spend their evenings here, trading his goods for labor. PCs can buy a cup of sweet tea and a pastry for 1 cp.
6. Dwarf TowerThis stout watchtower is built of great blocks of gran-ite imported from the Wyvernswatch mountains. The only surviving part of the dwarven supply depot, it serves as Dunesend’s defensive redoubt as well as a shrine to Melora, the village’s matron deity. It is attended by the aging priestess Fawma Bruth, a cleric who retired to the wilderness long ago. She has the

The Lost Mines of Karak
64O c t o b e r 2 0 0 8 | DU NGEON 159
healing word power (3rd level), which she uses for any PCs who make a stand against the Warden.
7. Villagers’ HutsEach of these simple structures of mud bricks and scavenged wood holds a single family of eight villag-ers and their animals.
8. Irrigated FieldsThese are just two of a dozen fields of crops border-ing the Thornwaste along the wall to the east and west of the village. Each has a crude wooden pump house containing still-functioning dwarven pumps that bring water from underground cisterns to the surface.
The Situation in DunesendIn the aftermath of the encounter with the Warden, the PCs find themselves in a complex dilemma. The folk of Dunesend have been saved from the preda-tions of the Warden and his allies, but they fear that reprisals from Queen Shephatiah will soon follow. As a result, most of the villagers are noticeably cool toward the PCs, though none are hostile. If Darkus Comahni is approached as he gathers up the remains of his apprentice for burial, a DC 12 Diplomacy check inspires him to speak to the PCs. Likewise, a DC 17 Diplomacy check inspires Lotho Elberesk or the half ling Bede to open up. Attempts to communicate with other villagers result only in sullen anger.
“The queen’s wrath will surely come down on us. Where will you outsiders be then, I wonder?”
In response to specific questions, Elberesk, Darkus, or Bede respond with the following:
What was going on here? Who was that gnoll and those other creatures?
“That creature was the Warden, a foul tyrant that serves the Queen of the Drylands. The blue worm was his steed and enforcer, and it has slain several among us in recent months. The others were creatures of the Thornwaste in league with the Warden. They are the ones that prevent us from f leeing this place or seeking aid for our plight. “The Warden was here to make his monthly collection of tribute. Poor weather has delayed our crops, but he accused us of holding out. He used poor Vaudnim to set an example for us all.”
Where did the Warden come from? Why was he collecting tribute? Who is the Queen of the Drylands?
“The Warden first appeared from the desert a year ago, stating that Queen Shephatiah had come to reclaim her ancient throne. The name meant nothing to us, but the Warden slew several of our strongest when we stood against him. Now he orders us to pay tribute in goods and food or his blue worm will devour us.”
Where can this Queen Shephatiah be found? Are there more of her followers?
“The satyrs live within the Thornwaste along the desert frontier. Like the shifter brigands of the desert, they have eagerly pledged themselves to the Warden’s service. The Warden comes always from the desert to the south. Where his queen is, we do not know, but he and his followers
carry no more than a few days’ water to get here. A few of our folk tried to follow the Warden’s trail when he first appeared, but they never returned. All I can tell you is that the Warden came once with a shifter who spoke out loud of returning to somewhere called Karak. This creature was soundly beaten by the Warden for his slip.”
If the PCs indicate their intent to end the threat from Queen Shephatiah, Lotho puts them up and feeds them free of charge at the caravansary while they pre-pare for their journey.
Desert TrekSetting out from Dunesend, the PCs make their way into the desert. Though the arid sands are inhospi-table, their hard-packed dunes make for easier going than the Thornwaste.
As you travel, the intermittent desert landmarks you pass are a perfect match for the course set out by Bram’s directions. These are a scattered series of basalt pillars, the remnants of long-ago volcanic eruptions rising now like sentinels from the sand.
On the second day of travel, the PCs are spotted and attacked by a patrol sent out by Queen Shephatiah. Tactical Encounter: Desert Patrol (page 76).

The Lost Mines of Karak
65O c t o b e r 2 0 0 8 | DU NGEON 159
PART 2: PART 2: FORTRESS IRONFELLFORTRESS IRONFELL
Deep in the desert three days south of Dunesend, an isolated outcropping of basalt marks the loca-tion of the famous Karak Lode. When the members of Clan Ironfell began their excavations here, they constructed a defensible fortress to protect the mines below. Within the rock of the basalt bluff, they carved a multilevel complex whose gatehouse was the only sign of what lay below. From this bastion, the Ironfells controlled the desert for 50 miles in all directions. As part of the complex’s unparalleled security, access from the fortress to the mines was carefully hidden. Only by using special signet rings could the dwarves of the clan access the mines once their secret gate was sealed. In case the fortress ever fell to
invaders, the clan created false trails leading off into the desert, creating the appearance that the fortress was simply a stop-over point for shipping ore back to the supply depot.
Approaching the FortressThe PCs reach Karak the day after the “Desert Patrol” encounter.
Earlier that morning, the course you have been following became a rocky track leading toward another basalt bluff in the distance. However, as the track curves around to its south side, you see two guard towers of hewn stone set into the face of the bluff. Narrow gouges that might be arrow slits f lank a narrow track leading directly into the rock. Though worn by long years of sand and wind, the towers are clearly of dwarven construction, standing as strong as the day they were built.
Secret HistoryDespite what the PCs have been told, the history of the mines of Karak is more complicated than Bram Ironfell would have them believe. Though the mines were rich with deposits of precious metals, the caverns of Karak were tainted by veins of raw elemental energy. These were the physical remnants of powerful magical experiments performed here by the sorcerers of the serpent kingdom that ruled this area millennia ago. The arcanists of Clan Ironfell determined that the elemental energy of the mines presented no danger. However, though the mines made the clan rich, so too were they the dwarves’ undoing. A rift leading directly to the Elemental Chaos was uncovered in the deepest part of Karak, its energy f looding the mines with madness. The dwarves of Ironfell turned on each other, the folk of the supply depot waiting in vain

The Lost Mines of Karak
66O c t o b e r 2 0 0 8 | DU NGEON 159
when an expected shipment of riches from the mines failed to appear. Though expeditions were made in search of Karak, none but the dwarves within knew its location. Eventually, the supply depot was aban-doned, and the Karak Lode passed from memory.
Outside the MinesThe fortress guarding the Karak Lode consists of two levels within the basalt bluff, plus a lower level that hides the secret entrance to the mines. The basalt bluff is 50 feet high and requires a DC 15 Athletics check to climb. From its top, the PCs have a view of the desert for several miles in every direction. Fireplaces and braziers within the complex are vented to chimneys that route through narrow cracks and crevices, making entry from above impos-sible. However, in the long years since the mine was lost, a collapse on the bluff above has created an entrance into area 9. A f light of harpies lairs here (see the “Courtyard” tactical encounter, page 80), but these creatures raise no alarm at the approach of intruders. They can be spotted atop the bluff with a DC 17 Perception check. If their nest is explored, it contains only the foul remains of the desert creatures on which the harpies feed.
The FortressThe ancient halls of the Karak lode remain essentially unchanged since the days of the dwarves. Illumination: Unless otherwise noted, there is no illumination within the fortress. Walls, Floors, and Ceilings: The interior spaces of the fortress are constructed of close-fitted stone (DC 20 to climb). Ceilings are 20 feet high except as noted.
Portals: Rusted iron portcullises bar the way into the fortress. See individual encounter areas for specific information on raising and lowering the portcullises. All doors within the complex are of sturdy wood (Strength DC 16 to break open if locked). Except for the main gates (which are barred), all the doors within the complex, as well as the port-cullises, can be opened or activated by the touch of an Ironfell signet ring (a minor action). The curse chanter in the “Foiled Ambush” encounter (page 86) carries an Ironfell signet ring, as does the real Queen Shephatiah (the “Queen’s Retinue” encounter, page 92). Rot and Debris: With the exception of area 19, much of the fortress has been given over to filth and decay. Rubble and the dry-rotted remains of furniture are spread across the f loors, and the walls are stained with condensation and mildew. In the year since Karak was reoccupied, Shephatiah’s followers have discarded rotten food and other filth in the areas they do not inhabit.
1. Entry TunnelA rusted portcullis blocks this long tunnel, with another raised and hidden beyond it. The down port-cullis can be raised only from this area, but it cannot be locked in the up position. Arrow slits and murder holes along the length of the tunnel provide defenders with multiple angles of attack. Anyone looking in through the arrow slits sees shadowy figures beyond (see below or the tactical encounter). Tactical Encounter: Gatehouse (page 78).
2. West GatehouseSand blown in through the southern arrow slits spreads across the f loor. Straw dummies have been erected behind the arrow slits to give the illusion of numerous guardians. Tactical Encounter: Gatehouse.
3. East GatehouseOld weapons racks line the wall of this chamber. The rotting and rusted polearms they once held have been used to arm more straw dummies. Tactical Encounter: Gatehouse.
4. West Upper GatehouseBones scattered across the f loor show where a desert predator once laired in this chamber. Tactical Encounter: Gatehouse.
5. East Upper GatehouseA winch in this chamber once controlled the first portcullis in area 1. However, it is rusted and broken, so that the portcullis cannot be raised from here or locked in the down position.
6. Southern OverlookThis chamber allowed defenders to fire down through murder holes into the entry tunnel, or through arrow slits into the courtyard below. A working winch con-trols the second portcullis in area 1. Tactical Encounter: Gatehouse.
7. West GuardhouseStone benches and a rusted brazier mark this as a resting place for off-duty gate guards. Access to the northern overlook (area 19) is barred by a portcullis along the passage to the north.

The Lost Mines of Karak
67O c t o b e r 2 0 0 8 | DU NGEON 159
8. East GuardhouseThis chamber is identical to area 7. A portcullis along the passage to the north blocks access to area 19.
9. CourtyardThis vast chamber features an arched ceiling supported by massive carved columns. A portion of the ceiling has collapsed, covering the floor here in wind-blown sand and creating an opening to the top of the basalt bluff. Tactical Encounter: Courtyard (page 80).
10. Stables and Cart StorageDusty bones, rotting wood, and bands of rusted iron are scattered across the f loor here. These are the remains of the wide-wheeled wagons once used to haul ore shipments across the desert and the mules that pulled them. A scattering of blue scales show where the behir has made this area its lair.
11. Stable Master’s QuartersThis chamber was taken over by the Warden. A rough bed built of scavenged wood sits against one wall, while the gnoll’s filthy and foul-smelling gear is strewn across the room.
12. Ore StorageOre from the mines was stored here and made ready for transport. Though the area is empty, the dust of the f loor shows where crates have been moved through here recently (Perception DC 12).
13. Entry HallThis corridor once guarded entry into the fortress’s great hall. Footprints show where numerous creatures have recently passed this way. Tactical Encounter: Great Hall (page 83).
14. West Guard PostThis former guard chamber is the habitat of a sussur tree growing up from the cracked stone f loor. See the tactical encounter for a description. Tactical Encounter: Great Hall.
15. East Guard PostLike area 14, this chamber is empty except for a pair of sussur trees growing through the stone of the f loor. Tactical Encounter: Great Hall.

68O c t o b e r 2 0 0 8 | DU NGEON 159
16. Great HallThe dwarves of Karak once feasted here before the high seat of their mine-thane. This chamber is now the lair of an evil dryad who has raised a grove of sussur trees within it. Tactical Encounter: Great Hall.
17. KitchenThis chamber now serves as the den of a pair of cack-lefiend hyenas. An open well accesses a cistern filled with drinkable water. Tactical Encounter: Great Hall.
18. LarderA layer of rot and mold surrounds the roots of a lone sussur tree. Tactical Encounter: Great Hall.
19. Northern OverlookThis defensive position commanded a view of the courtyard below. Along its northern wall were the quarters of the mine-thane, the clan accountant, and the head of the guard, as well as a private latrine. The personal chambers have long since been stripped of any valuables. As well as being easily defensible, this area is free of the stench and squalor that fills much of the rest of the fortress. It makes a good place for the PCs to take an extended rest. Tactical Encounter: Foiled Ambush (page 86).
20. AlehouseThis storage area contains only a few dry and splintered kegs.
21. SmithyCold forges and dusty anvils show where dwarf smiths repaired and crafted the mine’s weapons and tools.
22. Coal StorageDusty lumps of anthracite are scattered across the f loor here, a pair of rusted shovels set against the wall.
23. Guard HallThis wide hall blocks access to the fortress’s lower level with a portcullis controlled from the barracks. The desert brigands who occupy the fortress have filled this area with supplies taken from caravans they have attacked. A rusted iron statue of a dwarf miner stands on the stairwell landing below. Tactical Encounter: Guard Hall (page 81).

The Lost Mines of Karak
69O c t o b e r 2 0 0 8 | DU NGEON 159
24. LatrineThis privy contains nothing of interest or use.
Tactical Encounter: Guard Hall.
25. BarracksThe miners, crafters, and guards of the Karak Lode lived in this area, while the smaller side chamber housed shift-captains. Six stone bunks stand here, along with roughly made wooden tables, benches, and chairs. Tactical Encounter: Guard Hall.
26. Lower Guard HallThis locked door controlled access to the fortress’s lower level. Tactical Encounter: Guard Hall.
27. Lower Guard PostWhen the fortress was occupied, guards here main-tained a watch through the arrow slit looking out onto the hall. Tactical Encounter: Guard Hall.
28. GuardroomA squad of guards watched over the empty cells in area 29—actually the secret entrance to the mines below.
29. DungeonFour cells with barred portcullis doors are empty except for stone cots and manacles set into the walls. Set within the f loor of one of the cells is the only entrance to the Karak Lode, but it cannot be detected from this side as long as it is closed. See the “Foiled Ambush” tactical encounter (page 86) for more information.
30. StoreroomsThese chambers once held supplies for the main-tenance and upkeep of the fortress. A fine layer of moldy debris is all that remains
31. CryptsThe dwarves of Ironfell interred their dead here. The vaults were half filled (mostly with victims of mining accidents or folk who died in the desert) by the time the mine was abandoned. Tactical Encounter: Crypts (page 85).

The Lost Mines of Karak
70O c t o b e r 2 0 0 8 | DU NGEON 159
THE BIRDMAN
When the PCs first explore area 29, they find one
of the cells with a prisoner recently captured by a
patrol.
This ancient dungeon shows signs of recent use, with scuff marks along the floor indicating traffic in both directions. Four large cells stand in the center of the chamber, the entrance of each blocked by a lowered portcullis con-trolled by a nearby winch and pulley. From the darkness ahead comes a bright chirping sound.
The southwest cell is occupied by an aged human
male, his lined face sporting a snow-white beard to
match his fringe of hair. He wears the garb of a simple
desert peasant, and appears to have not been here
long. Seven yellow canaries perch on his shoulders
and hop around his cell. The Birdman whistles and
chirps at his tiny charges. If spoken to, he simply nods
and smiles.
The prisoner offers no resistance and allows him-
self to be led about by the PCs. If any survivors from
the fortress are questioned, they state that the Bird-
man is a simple-minded peasant found wandering the
desert not far from Dunesend a few days before. He
was captured and brought here to feed the behir.
The Birdman wanders those areas of the fortress
already cleared out by the PCs, hiding from any sub-
sequent combat. He accepts food and water if it is
offered, smiling if spoken to but otherwise ignoring
the party.
The Birdman plays a role in the aftermath of the
“Foiled Ambush” encounter (page 86).

The Lost Mines of Karak
71O c t o b e r 2 0 0 8 | DU NGEON 159
PART 3: THE LOST PART 3: THE LOST MINES OF KARAKMINES OF KARAK
Beyond the secret portal in the dungeon lies the Karak Lode—now the lair and sanctum of the real Queen Shephatiah and her followers. The Karak mines are a meandering series of tunnels extending deep underground. Karak’s abandoned passages are not mapped. They contain nothing of interest and play no part in the adventure. In the areas the PCs explore, they notice seams of red stone glowing with a dull light. A DC 17 Dun-geoneering or Nature check reveals that this is not a known Underdark phenomena. A DC 17 Arcana check identifies the stuff as veins of raw elemental energy that has somehow leached into the natural world.
1. Mine EntranceThe secret portal in the dungeon (area 29, above) leads to a lift system descending down an 80-foot passage. There, a final portcullis and guardroom are defended by a force of troglodytes. Beyond lies access to the dark caverns of the Karak Lode. Tactical Encounter: Mine Entrance (page 88).
2. Chaos MinesIn the heart of Karak, this open gallery chamber leads off into a half-dozen shafts under excavation when the mines were lost. A vein of elemental energy passes through the cavern, bolstering the barlgura (Shepha-tiah’s devoted servant) that guards this area with the help of a host of undead and monstrous creatures. Tactical Encounter: Chaos Mines (page 90).
3. Queen’s RetinueThis deep cavern is the lair of Shephatiah, and the place where the Queen of the Drylands and her fol-lowers make a final stand. A rift to the Elemental Chaos lies at the bottom of a deep chasm here—the source of the deadly energy that f looded the mines and destroyed Clan Ironfell. Tactical Encounter: Queen’s Retinue (page 92).
CONCLUSIONCONCLUSION
In the “Queen’s Retinue” encounter, the PCs discover how Shephatiah reopened the Karak Lode, and that the naga works for unseen masters to whom the mine’s output is being shipped by way of the elemen-tal rift. If the PCs return to Dunesend, they are welcomed as heroes. The folk of the village provide food and supplies for the party’s return trip to Overlook. Once back in the mountain city, the PCs can relay their findings to Bram Ironfell. The dwarf is disheart-ened by the news, and he tells the PCs that he will leave the mines closed in order to prevent others from suffering the fate of his clanfolk who perished there. However, though Bram promises to seal off the mines, the forces controlling Shephatiah have a long reach and dark plans. Though neither the dwarf nor the PCs know it yet, they are all caught up in a dark plot whose full extents have yet to be revealed.

The Lost Mines of Karak
72O c t o b e r 2 0 0 8 | DU NGEON 159
CLAN RIVALSCLAN RIVALS
Encounter Level 6 (1,250 XP)
Setup 3 dwarf hammerers (D) 2 dwarf bolters (B) 1 hell hound (D)
As the PCs make their way across the Thornwaste, they discover that dwarves of the rival Hammerfist Clan have caught wind of their expedition and seek to steal the secret directions to the lost mines. This ambush occurs after the party’s fourth success or second failure in the “Through the Thorn-waste” skill challenge (page 61). The area the PCs pass through is thick with thorn brambles and stud-ded with outcroppings of rock. The dwarves attack at dawn or sunset, depending on whether the PCs are traveling by day or night. The PCs begin the encounter with their minia-tures along the northern edge of the tactical map. The two dwarf hammerers are hiding in the brambles with total concealment, while the other creatures in the encounter are behind boulders and out of line of sight.
If the PCs spot the dwarf hammerers, read:
Hidden within the brambles, two dwarves lie in wait, warhammers in hand.
If the bolters are spotted, or when the PCs approach the ravine, read:
Over the crest of a large outcropping just beyond a ravine ahead, a crossbow appears, trained on your group. A scuff ling to the east reveals another dwarf bolter rising from behind a hedge of screening brambles.
Show the dwarf bolters when they appear, but do not place the miniatures for the hammerers and the hell hound unless they are spotted or until they attack.
3 Dwarf Hammerers Level 5 SoldierMedium natural humanoid XP 200
Initiative +4 Senses Perception +4; low-light vision
HP 64; Bloodied 32
AC 23; Fortitude 18, Reflex 15, Will 17
Saving Throws +5 against poison effects
Speed 5m Warhammer (standard; at-will) ✦ Weapon +11 vs. AC; 1d10 + 3 damage.
M Shield Bash (minor; recharge 5 6 )
+9 vs. Fortitude; 2d6 + 3 damage, and the target is knocked
prone or pushed 1 square (dwarf hammerer’s choice).
R Throwing Hammer (standard; at-will) ✦ Weapon Ranged 5/10; +10 vs. AC; 1d6 + 3 damage.
Stubborn (immediate interrupt, when an enemy tries to push
the dwarf or knock it prone; at-will)
The hammerer makes a melee basic attack against
the enemy.
Stand Your Ground When an effect forces a dwarf to move—through a pull,
a push, or a slide—the dwarf moves 1 square less than
the effect specifies. When an attack would knock the
dwarf prone, the dwarf can roll a saving throw to avoid
falling prone.
Alignment Unaligned Languages Common, Dwarven
Skills Dungeoneering +11, Endurance +5
Str 17 (+5) Dex 10 (+2) Wis 14 (+4)
Con 16 (+5) Int 11 (+2) Cha 12 (+3)
Equipment plate armor, heavy shield, warhammer,
3 throwing hammers

The Lost Mines of Karak
73O c t o b e r 2 0 0 8 | DU NGEON 159
2 Dwarf Bolters Level 4 ArtilleryMedium natural humanoid XP 175
Initiative +5 Senses Perception +8; low-light vision
HP 46; Bloodied 23
AC 17; Fortitude 16, Reflex 16, Will 14
Saving Throws +5 against poison effects
Speed 5m Warhammer (standard; at-will) ✦ Weapon +8 vs. AC; 1d10 + 2 damage.
R Crossbow (standard; at-will) ✦ Weapon Ranged 15/30; +10 vs. AC; 1d8 + 3 damage.
Aimed Shot The dwarf bolter gains a +2 bonus to attack rolls and
deals an extra 1d6 damage with ranged attacks against
creatures that don’t have cover.
Stand Your Ground When an effect forces a dwarf to move—through a pull,
a push, or a slide—the dwarf moves 1 square less than
the effect specifies. When an attack would knock the
dwarf prone, the dwarf can roll a saving throw to avoid
falling prone.
Alignment Unaligned Languages Common, Dwarven
Skills Dungeoneering +10, Endurance +7
Str 14 (+4) Dex 16 (+5) Wis 12 (+3)Con 16 (+5) Int 11 (+2) Cha 10 (+2)
Equipment chainmail, warhammer, crossbow with 20 bolts
Hell Hound Level 7 BruteMedium elemental beast (fire) XP 300
Initiative +5 Senses Perception +11
Fire Shield (Fire) aura 1; any creature that enters or begins its
turn in the aura takes 1d6 fire damage.
HP 96; Bloodied 48
AC 20; Fortitude 18, Reflex 17, Will 18
Resist 20 fire
Speed 7
m Bite (standard; at-will) ✦ Fire +10 vs. AC; 1d8 + 2 plus 1d8 fire damage.
C Fiery Breath (standard; recharge 4 5 6 ) ✦ Fire Close blast 3; +9 vs. Reflex; 2d6 + 3 fire damage.
Alignment Unaligned Languages —
Str 14 (+5) Dex 14 (+5) Wis 17 (+6)
Con 16 (+6) Int 2 (–1) Cha 10 (+3)
TacticsThe bolters open fire while the hammerers charge forward in an attempt to force the PCs into the ravine. If the PCs attempt to cross the ravine, the third ham-merer releases the hell hound to charge them, then follows quickly behind. The hell hound tries to catch any PCs in the ravine in its fiery breath while the hammerer attacks anyone trying to climb out. The dwarves are sure of their combat superiority. They and their hell hound fight to the death.
Features of the Area Illumination: Dim light. Thorn Brambles: These thick, thorny brambles grow to a height of 8 feet and are difficult terrain. Within the brambles, adjacent creatures have con-cealment, while creatures not adjacent have total concealment. Boulders: These 5-foot-high rocks provide cover. A boulder can be climbed with a DC 10 Athletics check. A creature on top of a boulder reduces conceal-ment for creatures in the brambles within 4 squares of it, from full concealment to concealment, or from concealment to none. Rock Outcropping: These outcroppings of basalt stand 20 feet high and can be climbed with a DC 15 Athletics check. Creatures on top of an outcropping have superior cover against creatures below. Ravine: This ravine is 10 feet deep with steep, crumbling sides. A creature in the ravine has cover against all creatures not adjacent to the edge. Scaling the sides of the ravine requires a DC 15 Athletics check.
Treasure: In addition to any treasure you place here (see “Treasure Parcels,” page 59), one of the dwarves bears a fist-and-hammer crest on the side of his warhammer. A DC 15 History check (DC 10 for a resident of Elsir Vale) recognizes the crest as that of Hammerfist, a clan of local dwarves that have long been bitter rivals of the Ironfells. One of the dwarves also carries a journal hinting at his clan’s hunger to claim the lost Karak Lode in defiance of Clan Ironfell. This journal makes note of “the secret route to the mine” being discovered months before, but makes no mention of who did so.

The Lost Mines of Karak
74O c t o b e r 2 0 0 8 | DU NGEON 159
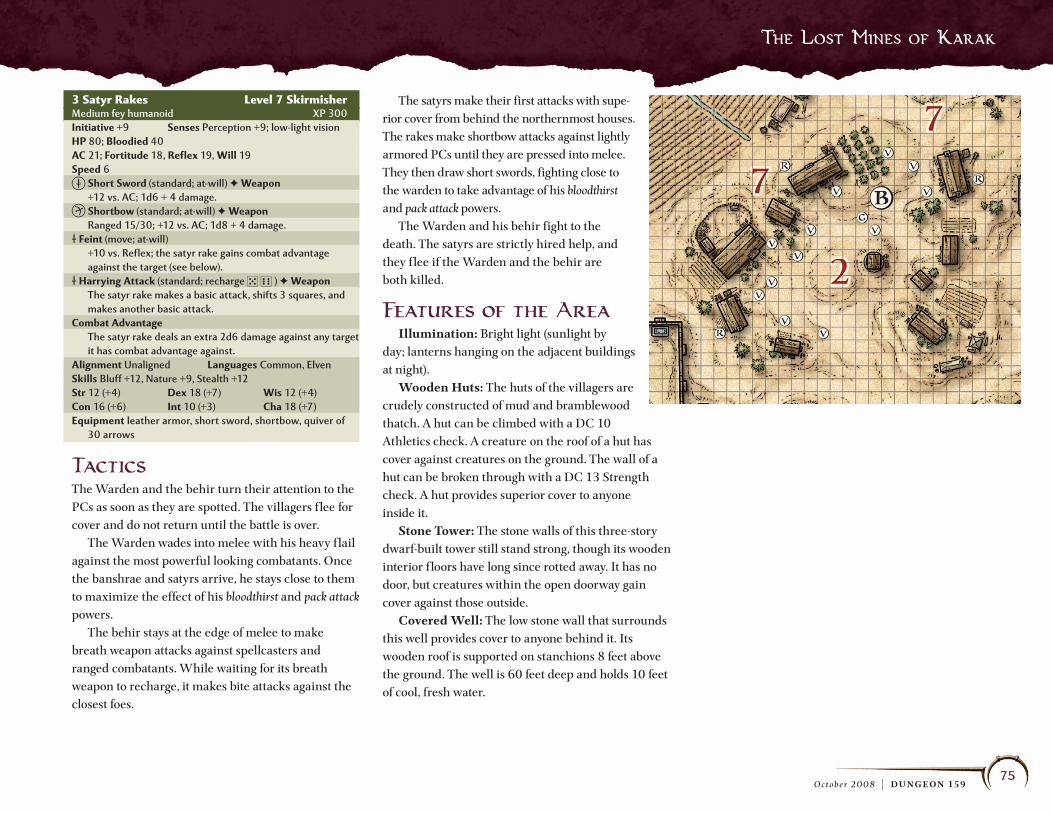
THE WARDENTHE WARDEN
Encounter Level 8 (1,750 XP)
Setup The Warden, gnoll demonic scourge (G) 1 behir (B) 3 satyr rakes (R) 12 villagers (V)
The PCs’ arrival in Dunesend comes at a critical moment. Believing that the villagers are holding out on tribute of crops and livestock to Queen Shepha-tiah, the Warden has decided to teach them a deadly lesson. In addition to his behir, the Warden has a trio of satyr rakes patrolling the perimeter of the village. The satyrs are hidden as the PCs approach.
Perception CheckDC 12: A rustling in the thorny bracken reveals the presence of a creature ahead.DC 17: You catch a glimpse of a bearded face, its forehead marked with goat’s horns. It snarls as it turns and races away to the south, quickly disappearing within the briars.
As the PCs enter Dunesend, read:
You crest a low rise to see the expanse of thorns suddenly end, a great sea of sand beyond it. At the transition from the Thornwaste to the desert, a decrepit village sprawls, its huts and fields spreading to either side of an ancient stone tower. A sudden cry of pain drifts toward you on the wind.
As the PCs approach, read:
In the center of the settlement, sun-darkened human villagers observe in angry silence as a massive gnoll raises a blood-flecked flail over its head. At its feet, a human male lies dead. Behind the gnoll coils a serpentine creature with glittering blue scales and dozens of legs. It watches the villagers hungrily.
The satyrs remain hidden in the briars off the map until the PCs make a move. (They are loyal to Shephatiah but not anxious to get in the Warden’s way.) Do not place their miniatures unless they are spotted or attack.
The Warden, Level 8 Brute (Leader) Gnoll Demonic ScourgeMedium natural humanoid XP 350
Initiative +6 Senses Perception +7; low-light vision
Leader of the Pack aura 5; allies in the aura gain a +1 bonus
to attack rolls. While this creature is bloodied, the bonus
increases to +2.
HP 106; Bloodied 53
AC 20; Fortitude 21, Reflex 18, Will 18
Speed 5
m Heavy Flail (standard; at-will) ✦ Weapon +13 vs. AC; 2d6 + 5 damage, or 2d6 + 7 while bloodied;
against a bloodied enemy, this attack also knocks the
target prone; see also pack attack.
Bloodthirst If the gnoll demonic scourge bloodies an enemy with a
melee attack, an ally adjacent to the enemy can make a
melee attack against that enemy as an immediate reaction.
Overwhelming Attack (free; encounter)
The gnoll demonic scourge applies its bloodthirst power to
two allies instead of one.
Pack Attack The gnoll demonic scourge deals an extra 5 damage on
melee attacks against an enemy that has two or more of
the demonic scourge’s allies adjacent to it.
Alignment Chaotic evil Languages Abyssal, Common
Skills Insight +10, Intimidate +13, Religion +10
Str 20 (+9) Dex 14 (+6) Wis 12 (+5)
Con 16 (+7) Int 13 (+5) Cha 15 (+6)
Equipment hide armor, heavy flail
Juvenile Behir Thunderlance Level 10 ArtilleryLarge natural magical beast (reptile) XP 500
Initiative +6 Senses Perception +7, darkvision
HP 87; Bloodied 43
AC 22; Fortitude 24, Reflex 22, Will 22
Resist 15 lightning
Speed 8, climb 4
m Bite (standard; at-will)
+17 vs. AC; 1d8 + 5 damage.
R Lightning Breath (standard; recharge 3 4 5 6 ) ✦ Lightning
Area blast 1 within 10; +15 vs. Reflex; 3d6 + 5 lightning
damage, and all creatures adjacent to the target take 5
lightning damage. Miss: Half damage.
R Thunder Lance (standard; encounter) ✦ Lightning The behir thunderlance sends a spear of crackling electricity
from its mouth. The behir thunderlance targets up to two
creatures with its thunder lance; the first target must be
within 10 squares of the behir, and the second target must
be within 10 squares of the first; +15 vs. Reflex; 3d8 + 5
lightning damage, and the target is pushed 2 and
knocked prone.
M Devour (standard; sustain minor; recharge when no creature
is affected by this power)
+19 vs. Reflex; 2d8 + 4 damage and the target is grabbed
(until escape). While grabbed, the grabbed creature is pulled
into the behir’s space, is restrained, and can only target the
behir. The behir thunderlance can sustain the power as a
minor action, dealing 10 damage and maintaining the grab.
After escaping, the target is placed in any square adjacent to
the behir.
Alignment Unaligned Languages Common
Skills Athletics +14
Str 19 (+9) Dex 13 (+6) Wis 14 (+7)
Con 21 (+10) Int 7 (+3) Cha 12 (+6)
The Lost Mines of Karak
75O c t o b e r 2 0 0 8 | DU NGEON 159
3 Satyr Rakes Level 7 SkirmisherMedium fey humanoid XP 300
Initiative +9 Senses Perception +9; low-light vision
HP 80; Bloodied 40
AC 21; Fortitude 18, Reflex 19, Will 19
Speed 6m Short Sword (standard; at-will) ✦ Weapon +12 vs. AC; 1d6 + 4 damage.
r Shortbow (standard; at-will) ✦ Weapon Ranged 15/30; +12 vs. AC; 1d8 + 4 damage.
M Feint (move; at-will)
+10 vs. Reflex; the satyr rake gains combat advantage
against the target (see below).
M Harrying Attack (standard; recharge 5 6 ) ✦ Weapon The satyr rake makes a basic attack, shifts 3 squares, and
makes another basic attack.
Combat Advantage The satyr rake deals an extra 2d6 damage against any target
it has combat advantage against.
Alignment Unaligned Languages Common, Elven
Skills Bluff +12, Nature +9, Stealth +12
Str 12 (+4) Dex 18 (+7) Wis 12 (+4)
Con 16 (+6) Int 10 (+3) Cha 18 (+7)
Equipment leather armor, short sword, shortbow, quiver of
30 arrows
TacticsThe Warden and the behir turn their attention to the PCs as soon as they are spotted. The villagers f lee for cover and do not return until the battle is over. The Warden wades into melee with his heavy f lail against the most powerful looking combatants. Once the banshrae and satyrs arrive, he stays close to them to maximize the effect of his bloodthirst and pack attack powers. The behir stays at the edge of melee to make breath weapon attacks against spellcasters and ranged combatants. While waiting for its breath weapon to recharge, it makes bite attacks against the closest foes.
The satyrs make their first attacks with supe-rior cover from behind the northernmost houses. The rakes make shortbow attacks against lightly armored PCs until they are pressed into melee. They then draw short swords, fighting close to the warden to take advantage of his bloodthirst and pack attack powers. The Warden and his behir fight to the death. The satyrs are strictly hired help, and they f lee if the Warden and the behir are both killed.
Features of the Area Illumination: Bright light (sunlight by day; lanterns hanging on the adjacent buildings at night). Wooden Huts: The huts of the villagers are crudely constructed of mud and bramblewood thatch. A hut can be climbed with a DC 10 Athletics check. A creature on the roof of a hut has cover against creatures on the ground. The wall of a hut can be broken through with a DC 13 Strength check. A hut provides superior cover to anyone inside it. Stone Tower: The stone walls of this three-story dwarf-built tower still stand strong, though its wooden interior f loors have long since rotted away. It has no door, but creatures within the open doorway gain cover against those outside. Covered Well: The low stone wall that surrounds this well provides cover to anyone behind it. Its wooden roof is supported on stanchions 8 feet above the ground. The well is 60 feet deep and holds 10 feet of cool, fresh water.
The Lost Mines of Karak
76O c t o b e r 2 0 0 8 | DU NGEON 159
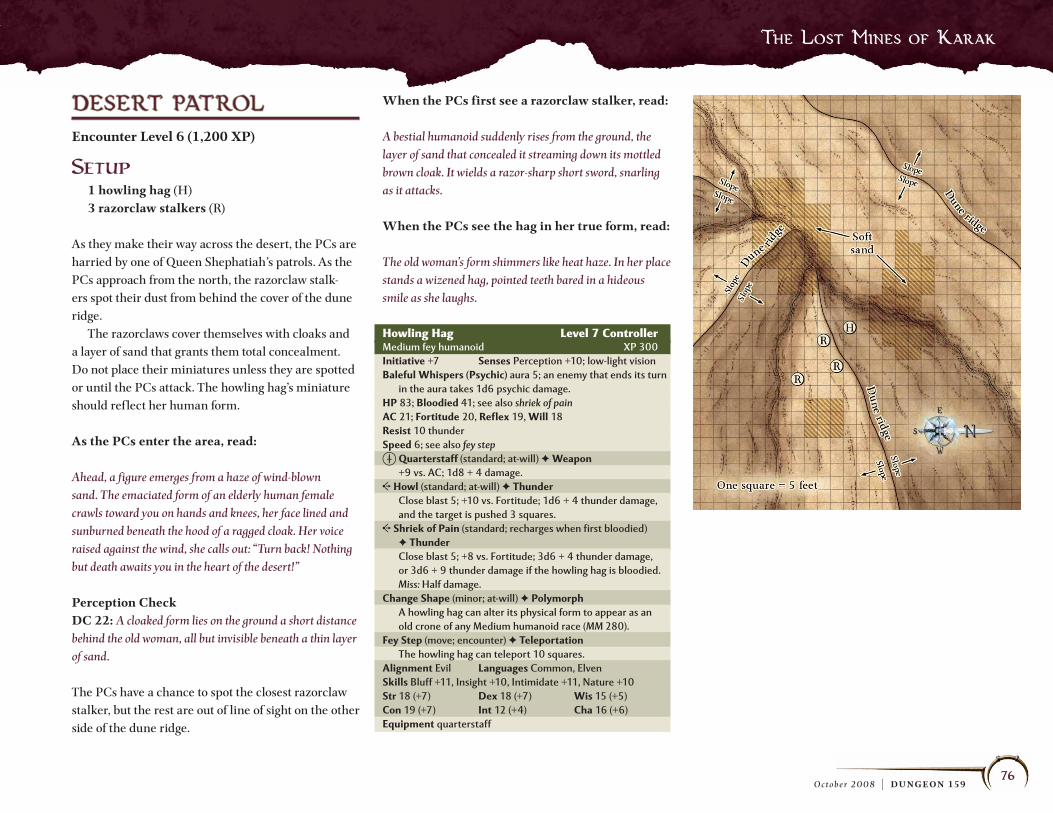
DESERT PATROLDESERT PATROL
Encounter Level 6 (1,200 XP)
Setup 1 howling hag (H) 3 razorclaw stalkers (R)
As they make their way across the desert, the PCs are harried by one of Queen Shephatiah’s patrols. As the PCs approach from the north, the razorclaw stalk-ers spot their dust from behind the cover of the dune ridge. The razorclaws cover themselves with cloaks and a layer of sand that grants them total concealment. Do not place their miniatures unless they are spotted or until the PCs attack. The howling hag’s miniature should reflect her human form.
As the PCs enter the area, read:
Ahead, a figure emerges from a haze of wind-blown sand. The emaciated form of an elderly human female crawls toward you on hands and knees, her face lined and sunburned beneath the hood of a ragged cloak. Her voice raised against the wind, she calls out: “Turn back! Nothing but death awaits you in the heart of the desert!”
Perception CheckDC 22: A cloaked form lies on the ground a short distance behind the old woman, all but invisible beneath a thin layer of sand.
The PCs have a chance to spot the closest razorclaw stalker, but the rest are out of line of sight on the other side of the dune ridge.
When the PCs first see a razorclaw stalker, read:
A bestial humanoid suddenly rises from the ground, the layer of sand that concealed it streaming down its mottled brown cloak. It wields a razor-sharp short sword, snarling as it attacks.
When the PCs see the hag in her true form, read:
The old woman’s form shimmers like heat haze. In her place stands a wizened hag, pointed teeth bared in a hideous smile as she laughs.
Howling Hag Level 7 ControllerMedium fey humanoid XP 300
Initiative +7 Senses Perception +10; low-light vision
Baleful Whispers (Psychic) aura 5; an enemy that ends its turn
in the aura takes 1d6 psychic damage.
HP 83; Bloodied 41; see also shriek of painAC 21; Fortitude 20, Reflex 19, Will 18
Resist 10 thunder
Speed 6; see also fey stepm Quarterstaff (standard; at-will) ✦ Weapon +9 vs. AC; 1d8 + 4 damage.
C Howl (standard; at-will) ✦ Thunder Close blast 5; +10 vs. Fortitude; 1d6 + 4 thunder damage,
and the target is pushed 3 squares.
C Shriek of Pain (standard; recharges when first bloodied)
✦ Thunder Close blast 5; +8 vs. Fortitude; 3d6 + 4 thunder damage,
or 3d6 + 9 thunder damage if the howling hag is bloodied.
Miss: Half damage.
Change Shape (minor; at-will) ✦ Polymorph A howling hag can alter its physical form to appear as an
old crone of any Medium humanoid race (MM 280).
Fey Step (move; encounter) ✦ Teleportation The howling hag can teleport 10 squares.
Alignment Evil Languages Common, Elven
Skills Bluff +11, Insight +10, Intimidate +11, Nature +10
Str 18 (+7) Dex 18 (+7) Wis 15 (+5)
Con 19 (+7) Int 12 (+4) Cha 16 (+6)
Equipment quarterstaff

The Lost Mines of Karak
77O c t o b e r 2 0 0 8 | DU NGEON 159
3 Razorclaw Stalkers Level 7 SkirmisherMedium natural humanoid, shifter XP 300
Initiative +7 Senses Perception +9; low-light vision
HP 79; Bloodied 39
AC 21; Fortitude 20, Reflex 20, Will 18; see also razorclaw shifting
Speed 6; see also razorclaw shiftingm Short Sword (standard; at-will) ✦ Weapon +13 vs. AC; 1d6 + 4 damage; see also skirmish.
M Short Sword Riposte (free, when an enemy makes an
opportunity attack against the razorclaw stalker; at-will)
✦ Weapon The razorclaw stalker makes a short sword attack against
the enemy.
Skirmish +1d6 If, on its turn, the razorclaw stalker ends its move at least 4
squares away from its starting point, it deals an extra 1d6
damage on its attacks until the start of its next turn.
Razorclaw Shifting (minor, usable only while bloodied;
encounter)
Until the end of the encounter or until rendered uncon-
scious, the razorclaw stalker gains +2 speed and a +1
bonus to AC and Reflex defense.
Alignment Unaligned Languages Common
Skills Acrobatics +12, Stealth +12, Streetwise +8
Str 18 (+7) Dex 14 (+5) Wis 13 (+4)
Con 15 (+5) Int 12 (+4) Cha 11 (+3)
Equipment leather armor, short sword
TacticsThe howling hag in crone form attempts to lure the PCs toward her through the soft sand. With a success-ful Insight check made against her Bluff check (+11), a PC senses that all is not as it appears. As soon as two or more PCs come within 5 squares of her (or if she is attacked at once), the hag unleashes her shriek of pain and uses fey step to teleport to the south side of the dune ridge. She then changes into her natural form, using howl to push PCs into areas of soft sand and staying out of melee with fey step. The razorclaw stalkers hold their positions until the PCs cross over the dune ridge in pursuit of the howling hag. They then rise from hiding and attack. They stay in constant motion to make use of their skir-mish power, while trusting their short sword riposte to turn opportunity attacks against their foes.
Features of the Area Illumination: Bright light by day; dim light at night. Sand Dunes: The hard-packed sand in this area rises and falls in sweeping dunes. The direction of each dune’s slope is indicated on the map. The upward slope of a dune is difficult terrain, but moving along the downward slope incurs no penalty. Crea-tures on opposite sides of a dune slope have cover against each other. Soft Sand: These patches of deep shifting sand are difficult terrain. Additionally, movement through soft sand requires a DC 17 Acrobatics or Athletics check. On a failed check, a creature is restrained as its move-ment stops and it sinks up to its knees. With a DC 20 Nature check, a creature recognizes all the squares of soft sand adjacent to it. (Seeing a creature sink in soft sand automatically warns other creatures of the effect in that square.) The razorclaw stalkers and the howling hag know the location of all patches of soft sand in the area.
The Lost Mines of Karak
78O c t o b e r 2 0 0 8 | DU NGEON 159
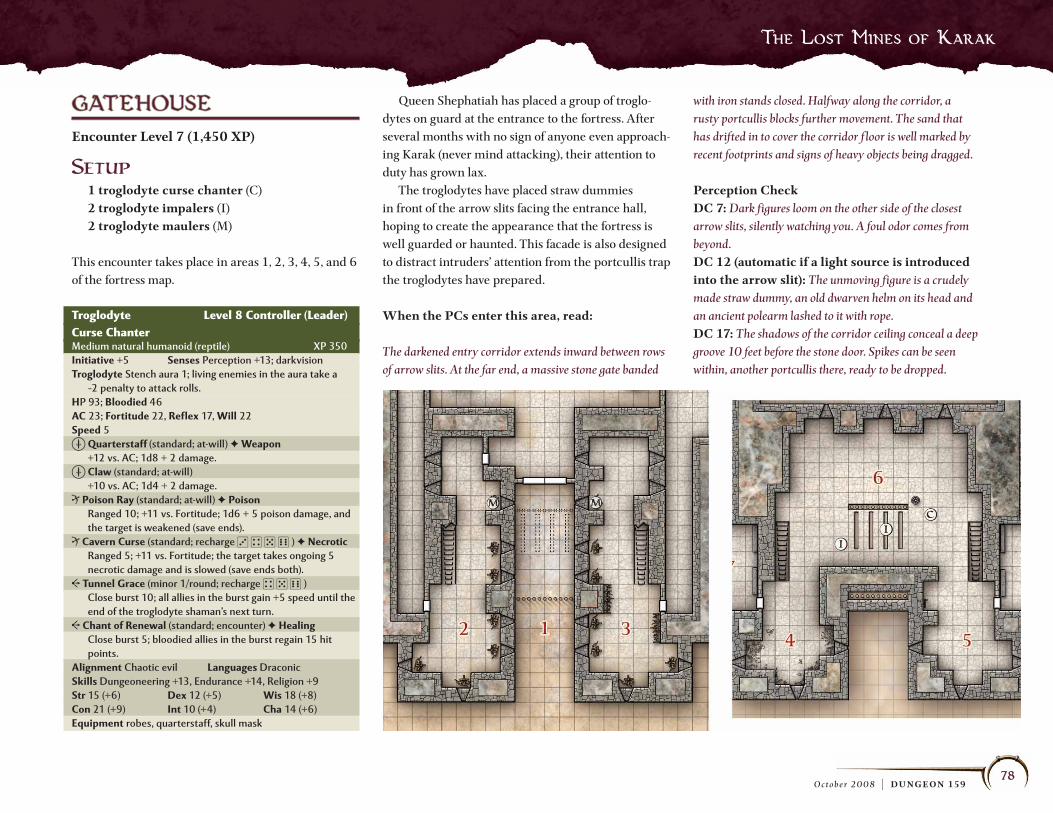
GATEHOUSEGATEHOUSE
Encounter Level 7 (1,450 XP)
Setup 1 troglodyte curse chanter (C) 2 troglodyte impalers (I) 2 troglodyte maulers (M)
This encounter takes place in areas 1, 2, 3, 4, 5, and 6 of the fortress map.
Queen Shephatiah has placed a group of troglo-dytes on guard at the entrance to the fortress. After several months with no sign of anyone even approach-ing Karak (never mind attacking), their attention to duty has grown lax. The troglodytes have placed straw dummies in front of the arrow slits facing the entrance hall, hoping to create the appearance that the fortress is well guarded or haunted. This facade is also designed to distract intruders’ attention from the portcullis trap the troglodytes have prepared.
When the PCs enter this area, read:
The darkened entry corridor extends inward between rows of arrow slits. At the far end, a massive stone gate banded
with iron stands closed. Halfway along the corridor, a rusty portcullis blocks further movement. The sand that has drifted in to cover the corridor f loor is well marked by recent footprints and signs of heavy objects being dragged.
Perception CheckDC 7: Dark figures loom on the other side of the closest arrow slits, silently watching you. A foul odor comes from beyond.DC 12 (automatic if a light source is introduced into the arrow slit): The unmoving figure is a crudely made straw dummy, an old dwarven helm on its head and an ancient polearm lashed to it with rope.DC 17: The shadows of the corridor ceiling conceal a deep groove 10 feet before the stone door. Spikes can be seen within, another portcullis there, ready to be dropped.
Troglodyte Level 8 Controller (Leader)Curse ChanterMedium natural humanoid (reptile) XP 350
Initiative +5 Senses Perception +13; darkvision
Troglodyte Stench aura 1; living enemies in the aura take a
–2 penalty to attack rolls.
HP 93; Bloodied 46
AC 23; Fortitude 22, Reflex 17, Will 22
Speed 5m Quarterstaff (standard; at-will) ✦ Weapon +12 vs. AC; 1d8 + 2 damage.
m Claw (standard; at-will)
+10 vs. AC; 1d4 + 2 damage.
R Poison Ray (standard; at-will) ✦ Poison Ranged 10; +11 vs. Fortitude; 1d6 + 5 poison damage, and
the target is weakened (save ends).
R Cavern Curse (standard; recharge 3 4 5 6 ) ✦ Necrotic Ranged 5; +11 vs. Fortitude; the target takes ongoing 5
necrotic damage and is slowed (save ends both).
C Tunnel Grace (minor 1/round; recharge 4 5 6 )
Close burst 10; all allies in the burst gain +5 speed until the
end of the troglodyte shaman’s next turn.
C Chant of Renewal (standard; encounter) ✦ Healing Close burst 5; bloodied allies in the burst regain 15 hit
points.
Alignment Chaotic evil Languages Draconic
Skills Dungeoneering +13, Endurance +14, Religion +9
Str 15 (+6) Dex 12 (+5) Wis 18 (+8)
Con 21 (+9) Int 10 (+4) Cha 14 (+6)
Equipment robes, quarterstaff, skull mask

The Lost Mines of Karak
79O c t o b e r 2 0 0 8 | DU NGEON 159
TacticsAs long as the troglodytes remain behind arrow slits and murder holes, the PCs are unaffected by their stench. If possible, the troglodytes wait until two or more PCs have reached the gates before springing their trap. At that point, the curse chanter releases the northern portcullis with a minor action, locking it in place. It then attacks PCs south of the portcullis with poison ray and cavern curse, targeting them through one of the murder holes in the f loor. The troglodyte impalers f ling javelins through the murder holes against targets south of the portcullis, using their impaling shot as often as possible.
The troglodyte maulers target PCs trapped north of the portcullis, hurling javelins through the arrow slits. All the creatures here are content to snipe at the PCs from behind cover. If the PCs break through the gates, all the troglodytes rush to the first level. They attempt to keep the PCs in the corridor as they fight to the death.
Features of the Area Illumination: During the day, the entrance cor-ridor is filled with bright light for 10 squares, while sunlight through the southern arrow slits fills both gate houses with dim light. The rest of this area is dark. Ceiling: 20 feet high.
Stone Gates: The stone gates are closed and barred from within with rough timbers (Strength DC 18 to break through). Rusted Portcullises: The southern portcullis is down but its winch (on the second level of this area) is damaged. It cannot be locked in place (up or down), and can be lifted with a DC 15 Strength check. If the northern portcullis is dropped from above by the troglodyte impalers, it can be locked in place, requiring a DC 23 Strength check to raise or break through. A character at the winch on the second level can lower the northern portcullis as a minor action, or can raise it with two move actions and a DC 10 Strength check. The portcullis can also be raised or lowered in 1 round by anyone bearing an Ironfell signet ring that is touched to the bars or the winch (a minor action). Arrow Slits and Murder Holes: These apertures provide superior cover to creatures on either side of them. However, they allow attacks to be made only in the two squares adjacent to them. A creature standing in a square adjacent to the wall 5 feet or more from an arrow slit cannot be seen by anyone on the other side. Creatures on the second level more than 5 feet from a murder hole cannot be seen by creatures below.
2 Troglodyte Impalers Level 7 ArtilleryMedium natural humanoid (reptile) XP 300
Initiative +5 Senses Perception +9; darkvision
Troglodyte Stench aura 1; living enemies in the aura take a –2
penalty to attack rolls.
HP 69; Bloodied 34
AC 22; Fortitude 22, Reflex 19, Will 18
Speed 5
m Spear (standard; at-will) ✦ Weapon +11 vs. AC; 1d8 + 4 damage.
m Claw (standard; at-will)
+9 vs. AC; 1d4 + 4 damage.
r Javelin (standard; at-will) ✦ Weapon Ranged 10/20; +12 vs. AC; 1d6 + 4 damage.
R Impaling Shot (standard; recharge 3 4 5 6 ) ✦ Weapon Requires javelin; ranged 10; +12 vs. AC; 2d6 + 4 damage,
and the troglodyte impaler makes a secondary attack
against the same target. Secondary Attack: +10 vs.
Fortitude; the target is restrained (save ends).
Alignment Chaotic evil Languages Draconic
Skills Athletics +12, Endurance +13
Str 19 (+7) Dex 14 (+5) Wis 13 (+4)
Con 21 (+8) Int 7 (+1) Cha 9 (+2)
Equipment spear, quiver of 6 javelins
2 Troglodyte Maulers Level 6 SoldierMedium natural humanoid (reptile) XP 250
Initiative +6 Senses Perception +5; darkvision
Troglodyte Stench aura 1; living enemies in the aura take a
–2 penalty to attack rolls.
HP 74; Bloodied 37
AC 22; Fortitude 21, Reflex 18, Will 19
Speed 5
m Greatclub (standard; at-will) ✦ Weapon +12 vs. AC; 2d4 + 4 damage, and the target is marked until
the end of the troglodyte mauler’s next turn.
m Claw (standard; at-will)
+10 vs. AC; 1d4 + 4 damage.
M Bite (minor 1/round; at-will)
Requires combat advantage; +10 vs. Fortitude; 1d6 + 4
damage, and until the end of the troglodyte mauler’s next
turn, healing on the target restores only half the total
amount.
R Javelin (standard; at-will) ✦ Weapon Ranged 10/20; +12 vs. AC; 1d6 + 4 damage.
Alignment Chaotic evil Languages Draconic
Skills Athletics +12, Endurance +12
Str 18 (+7) Dex 12 (+4) Wis 15 (+5)
Con 18 (+7) Int 6 (+1) Cha 8 (+2)
Equipment greatclub, 2 javelins

The Lost Mines of Karak
80O c t o b e r 2 0 0 8 | DU NGEON 159
COURTYARDCOURTYARD
Encounter Level 6 (1,300 XP)
Setup 1 carrion crawler (C) 4 harpies
The carrion crawler lairs out of sight beneath the great sand pile that has collected beneath the hole in the ceiling. The harpies begin the encounter in their lair on the bluff above the hole, out of line of sight from below. Do not place the monsters’ miniatures unless they are spotted or until they attack.
When the PCs can see into this area, read:
The ceiling of this huge pillared chamber has collapsed, a great pile of sand collecting near the east wall. Three sets of doors exit this area, arrow slits lining the walls high above.
Perception CheckDC 25: Within the sand pile, something is stirring.
The carrion crawler bursts from the sand pile when the first PC passes the midpoint of the room.
TacticsThe carrion crawler makes tentacle attacks against any PCs within reach, focusing on targets previously immobilized or stunned. The harpies f ly down in the second round, using their alluring song to pull PCs into melee with the carrion crawler. The crawler has gained immunity to their alluring song but takes damage from their deadly screech. If two harpies are killed, the survivors f lee through the hole in the ceiling once both are bloodied. The carrion crawler fights to the death.
Features of the Area Illumination: Dim light by day; dark at night. Ceiling: 40 feet high. The hole rises through 10 feet of rough rock to the top of the bluff beyond. Pillars: These provide cover and can be climbed with a DC 15 Athletics check. Sand Pile: This pile of wind-blown sand stands 10 feet high and is difficult terrain. It takes a DC 12 Acrobatics or Athletics check to move through the area of the sand pile.
Carrion Crawler Level 7 ControllerLarge aberrant beast XP 300
Initiative +6 Senses Perception +5; darkvision
HP 81; Bloodied 40
AC 20; Fortitude 19, Reflex 18, Will 17
Speed 6, climb 6 (spider climb)
m Tentacles (standard; at-will) ✦ Poison Reach 2; +10 vs. Fortitude; 1d4 + 5 damage, and the target
takes ongoing 5 poison and is slowed (save ends both). First Failed Save: The target is immobilized instead of slowed
(save ends). Second Failed Save: The target is stunned instead
of immobilized (save ends). Saving throws made against the
carrion crawler’s paralytic tentacles take a –2 penalty.
M Bite (standard; at-will)
+12 vs. AC; 1d10 + 5 damage.
Alignment Unaligned Languages —
Str 20 (+8) Dex 16 (+6) Wis 14 (+5)
Con 17 (+6) Int 2 (–1) Cha 16 (+6)
4 Harpies Level 6 ControllerMedium fey humanoid XP 250
Initiative +5 Senses Perception +5
HP 71; Bloodied 35
AC 20; Fortitude 17, Reflex 17, Will 19
Resist 10 thunder
Speed 6, fly 8 (clumsy)
m Claw (standard; at-will)
+11 vs. AC; 1d8 + 2 damage.
C Alluring Song (standard; sustain minor; at-will) ✦ Charm Close burst 10; deafened creatures are immune; +12 vs.
Will; the target is pulled 3 squares and immobilized (save
ends). When the harpy sustains the power, any target that
has not yet saved against the effect is pulled 3 squares and
immobilized (save ends).
C Deadly Screech (standard; recharge 5 6 ) ✦ Thunder Close burst 4; +12 vs. Fortitude; 1d6 + 4 thunder damage,
and the target is dazed (save ends).
Alignment Evil Languages Common
Skills Stealth +10
Str 15 (+5) Dex 15 (+5) Wis 14 (+5)
Con 15 (+5) Int 10 (+3) Cha 19 (+7)
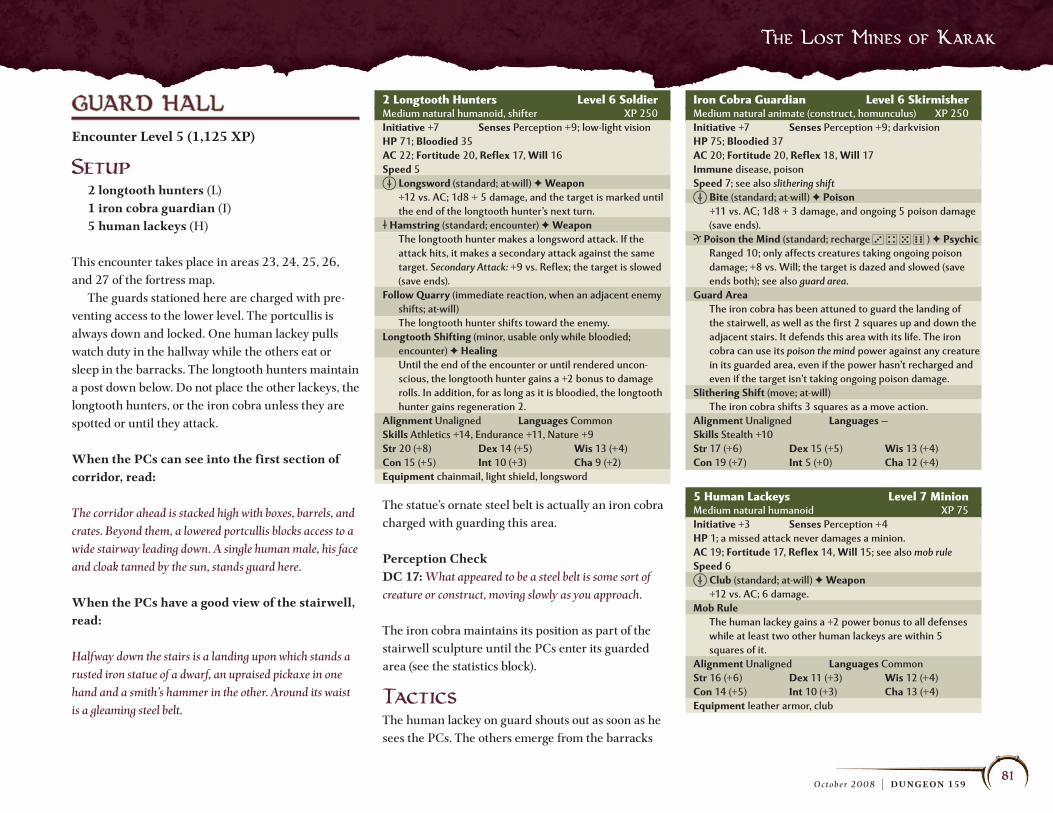
The Lost Mines of Karak
81O c t o b e r 2 0 0 8 | DU NGEON 159
GUARD HALLGUARD HALL
Encounter Level 5 (1,125 XP)
Setup 2 longtooth hunters (L) 1 iron cobra guardian (I) 5 human lackeys (H)
This encounter takes place in areas 23, 24, 25, 26, and 27 of the fortress map. The guards stationed here are charged with pre-venting access to the lower level. The portcullis is always down and locked. One human lackey pulls watch duty in the hallway while the others eat or sleep in the barracks. The longtooth hunters maintain a post down below. Do not place the other lackeys, the longtooth hunters, or the iron cobra unless they are spotted or until they attack.
When the PCs can see into the first section of corridor, read:
The corridor ahead is stacked high with boxes, barrels, and crates. Beyond them, a lowered portcullis blocks access to a wide stairway leading down. A single human male, his face and cloak tanned by the sun, stands guard here.
When the PCs have a good view of the stairwell, read:
Halfway down the stairs is a landing upon which stands a rusted iron statue of a dwarf, an upraised pickaxe in one hand and a smith’s hammer in the other. Around its waist is a gleaming steel belt.
The statue’s ornate steel belt is actually an iron cobra charged with guarding this area.
Perception CheckDC 17: What appeared to be a steel belt is some sort of creature or construct, moving slowly as you approach.
The iron cobra maintains its position as part of the stairwell sculpture until the PCs enter its guarded area (see the statistics block).
TacticsThe human lackey on guard shouts out as soon as he sees the PCs. The others emerge from the barracks
2 Longtooth Hunters Level 6 SoldierMedium natural humanoid, shifter XP 250
Initiative +7 Senses Perception +9; low-light vision
HP 71; Bloodied 35
AC 22; Fortitude 20, Reflex 17, Will 16
Speed 5
m Longsword (standard; at-will) ✦ Weapon +12 vs. AC; 1d8 + 5 damage, and the target is marked until
the end of the longtooth hunter’s next turn.
M Hamstring (standard; encounter) ✦ Weapon The longtooth hunter makes a longsword attack. If the
attack hits, it makes a secondary attack against the same
target. Secondary Attack: +9 vs. Reflex; the target is slowed
(save ends).
Follow Quarry (immediate reaction, when an adjacent enemy
shifts; at-will)
The longtooth hunter shifts toward the enemy.
Longtooth Shifting (minor, usable only while bloodied;
encounter) ✦ Healing Until the end of the encounter or until rendered uncon-
scious, the longtooth hunter gains a +2 bonus to damage
rolls. In addition, for as long as it is bloodied, the longtooth
hunter gains regeneration 2.
Alignment Unaligned Languages Common
Skills Athletics +14, Endurance +11, Nature +9
Str 20 (+8) Dex 14 (+5) Wis 13 (+4)
Con 15 (+5) Int 10 (+3) Cha 9 (+2)
Equipment chainmail, light shield, longsword
Iron Cobra Guardian Level 6 SkirmisherMedium natural animate (construct, homunculus) XP 250
Initiative +7 Senses Perception +9; darkvision
HP 75; Bloodied 37
AC 20; Fortitude 20, Reflex 18, Will 17
Immune disease, poison
Speed 7; see also slithering shiftm Bite (standard; at-will) ✦ Poison +11 vs. AC; 1d8 + 3 damage, and ongoing 5 poison damage
(save ends).
R Poison the Mind (standard; recharge 3 4 5 6 ) ✦ Psychic Ranged 10; only affects creatures taking ongoing poison
damage; +8 vs. Will; the target is dazed and slowed (save
ends both); see also guard area.
Guard Area The iron cobra has been attuned to guard the landing of
the stairwell, as well as the first 2 squares up and down the
adjacent stairs. It defends this area with its life. The iron
cobra can use its poison the mind power against any creature
in its guarded area, even if the power hasn’t recharged and
even if the target isn’t taking ongoing poison damage.
Slithering Shift (move; at-will)
The iron cobra shifts 3 squares as a move action.
Alignment Unaligned Languages —
Skills Stealth +10
Str 17 (+6) Dex 15 (+5) Wis 13 (+4)
Con 19 (+7) Int 5 (+0) Cha 12 (+4)
5 Human Lackeys Level 7 MinionMedium natural humanoid XP 75
Initiative +3 Senses Perception +4
HP 1; a missed attack never damages a minion.
AC 19; Fortitude 17, Reflex 14, Will 15; see also mob ruleSpeed 6m Club (standard; at-will) ✦ Weapon +12 vs. AC; 6 damage.
Mob Rule The human lackey gains a +2 power bonus to all defenses
while at least two other human lackeys are within 5
squares of it.
Alignment Unaligned Languages Common
Str 16 (+6) Dex 11 (+3) Wis 12 (+4)
Con 14 (+5) Int 10 (+3) Cha 13 (+4)
Equipment leather armor, club

The Lost Mines of Karak
82O c t o b e r 2 0 0 8 | DU NGEON 159
1 round later (or 1 round after they hear any sound of combat in the corridor). The lackeys fight in close proximity to take advantage of their mob rule power, f lanking for combat advantage if possible. At any sound of combat from above, the longtooth hunters move onto the stairs and wait for the PCs to come through the portcullis. They open with ham-string attacks, then f lank with their longswords. Once bloodied, they use longtooth shifting to stay in the fight. The iron cobra attacks any PCs that enter its guarded area, using poison the mind as often as possible.
DevelopmentIf any of these guards are captured and interro-gated, they reveal what they know of the complex in exchange for their freedom. However, their knowledge is incomplete. They believe that Queen Shephatiah is an eladrin who lairs in the great hall, and they know nothing of the mines below the for-tress. See area 16 (page 68) and the “Great Hall” encounter (page 83) for more information.
Features of the Area Illumination: Lanterns shed bright light in the barracks, the upper corridor, and the lower guard post. Dim light on the stairs and the landing. Ceiling: 20 feet high. Crates and Boxes: These low stacks of crates and boxes provide cover and are difficult terrain. They hold rations stolen from Dunesend and a handful of caravans attacked by Queen Shephatiah’s raiders. Rusted Portcullis: The portcullis is locked in place, requiring a DC 23 Strength check to raise or break through. A character at the winch in the bar-racks can raise the portcullis with two move actions and a DC 10 Strength check, or can lower it as a
minor action. The portcullis can also be raised or lowered in 1 round by anyone bearing an Ironfell signet ring that is touched to the bars or the winch (a minor action). Barracks: This area housed the miners, crafters, and guards of the Karak Lode, while the smaller side chamber housed shift-captains. The stairs lead up to another barracks that is not part of this encounter area. Bunks: These triple-deck stone bunks are anchored to f loor and ceiling. A few are in use by the guards, and are covered by rough mattresses and threadbare blankets. The side chamber holds double bunks of similar construction, though these remain unused.
Tables and Benches: A long trestle table with benches has been haphazardly constructed from old crates. An old table and a set of chairs sized for dwarves occupies the side room, but these are so full of dry rot that they crumble into dust and splinters if used. Lower Guardroom: A single bunk and table with two chairs occupies this small chamber. An arrow slit looks out into the corridor beyond. The door is locked (the longtooth hunters each have a key). Iron Statue: The statue on the landing stands 10 feet tall and depicts a dwarf miner of the Ironfell Clan.
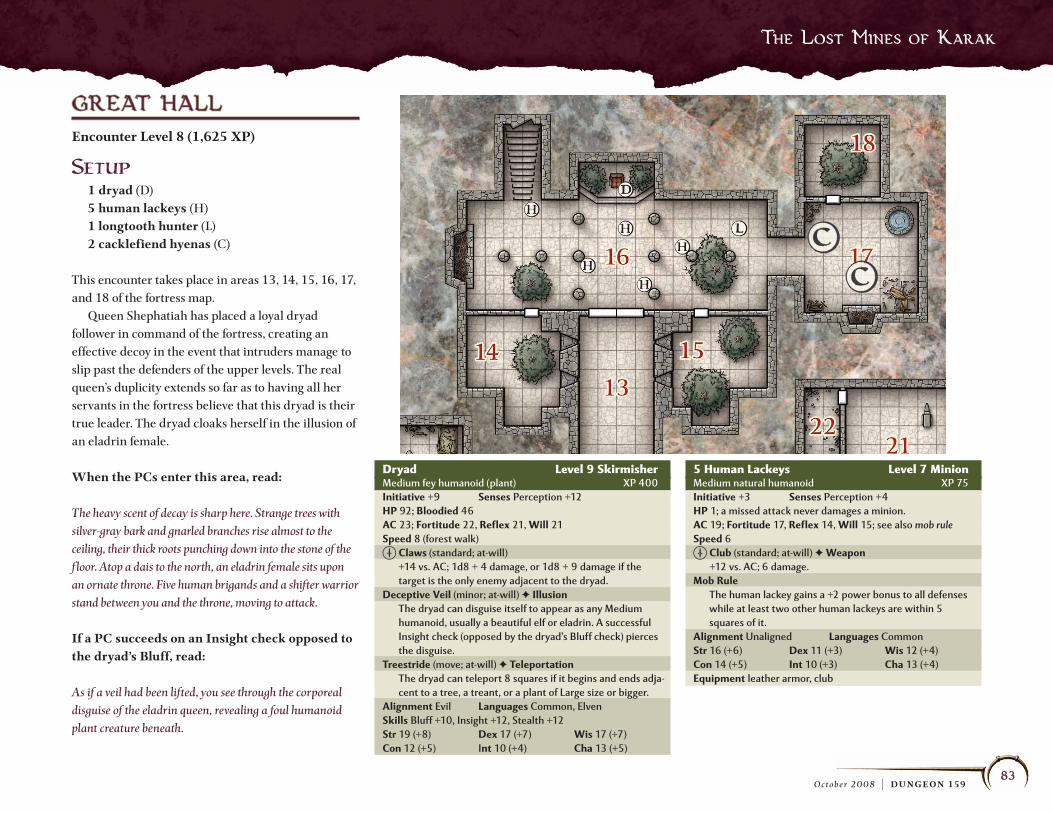
The Lost Mines of Karak
83O c t o b e r 2 0 0 8 | DU NGEON 159
GREAT HALLGREAT HALL
Encounter Level 8 (1,625 XP)
Setup 1 dryad (D) 5 human lackeys (H) 1 longtooth hunter (L) 2 cacklefiend hyenas (C)
This encounter takes place in areas 13, 14, 15, 16, 17, and 18 of the fortress map. Queen Shephatiah has placed a loyal dryad follower in command of the fortress, creating an effective decoy in the event that intruders manage to slip past the defenders of the upper levels. The real queen’s duplicity extends so far as to having all her servants in the fortress believe that this dryad is their true leader. The dryad cloaks herself in the illusion of an eladrin female.
When the PCs enter this area, read:
The heavy scent of decay is sharp here. Strange trees with silver-gray bark and gnarled branches rise almost to the ceiling, their thick roots punching down into the stone of the f loor. Atop a dais to the north, an eladrin female sits upon an ornate throne. Five human brigands and a shifter warrior stand between you and the throne, moving to attack.
If a PC succeeds on an Insight check opposed to the dryad’s Bluff, read:
As if a veil had been lifted, you see through the corporeal disguise of the eladrin queen, revealing a foul humanoid plant creature beneath.
Dryad Level 9 SkirmisherMedium fey humanoid (plant) XP 400
Initiative +9 Senses Perception +12
HP 92; Bloodied 46
AC 23; Fortitude 22, Reflex 21, Will 21
Speed 8 (forest walk)
m Claws (standard; at-will)
+14 vs. AC; 1d8 + 4 damage, or 1d8 + 9 damage if the
target is the only enemy adjacent to the dryad.
Deceptive Veil (minor; at-will) ✦ Illusion The dryad can disguise itself to appear as any Medium
humanoid, usually a beautiful elf or eladrin. A successful
Insight check (opposed by the dryad’s Bluff check) pierces
the disguise.
Treestride (move; at-will) ✦ Teleportation The dryad can teleport 8 squares if it begins and ends adja-
cent to a tree, a treant, or a plant of Large size or bigger.
Alignment Evil Languages Common, Elven
Skills Bluff +10, Insight +12, Stealth +12
Str 19 (+8) Dex 17 (+7) Wis 17 (+7)
Con 12 (+5) Int 10 (+4) Cha 13 (+5)
5 Human Lackeys Level 7 MinionMedium natural humanoid XP 75
Initiative +3 Senses Perception +4
HP 1; a missed attack never damages a minion.
AC 19; Fortitude 17, Reflex 14, Will 15; see also mob ruleSpeed 6m Club (standard; at-will) ✦ Weapon +12 vs. AC; 6 damage.
Mob Rule The human lackey gains a +2 power bonus to all defenses
while at least two other human lackeys are within 5
squares of it.
Alignment Unaligned Languages Common
Str 16 (+6) Dex 11 (+3) Wis 12 (+4)
Con 14 (+5) Int 10 (+3) Cha 13 (+4)
Equipment leather armor, club

The Lost Mines of Karak
84O c t o b e r 2 0 0 8 | DU NGEON 159
Longtooth Hunter Level 6 SoldierMedium natural humanoid, shifter XP 250
Initiative +7 Senses Perception +9; low-light vision
HP 71; Bloodied 35
AC 22; Fortitude 20, Reflex 17, Will 16
Speed 5m Longsword (standard; at-will) ✦ Weapon +12 vs. AC; 1d8 + 5 damage, and the target is marked until
the end of the longtooth hunter’s next turn.
M Hamstring (standard; encounter) ✦ Weapon The longtooth hunter makes a longsword attack. If the
attack hits, it makes a secondary attack against the same
target. Secondary Attack: +9 vs. Reflex; the target is slowed
(save ends).
Follow Quarry (immediate reaction, when an adjacent enemy
shifts; at-will)
The longtooth hunter shifts toward the enemy.
Longtooth Shifting (minor, usable only while bloodied;
encounter) ✦ Healing Until the end of the encounter or until rendered uncon-
scious, the longtooth hunter gains a +2 bonus to damage
rolls. In addition, for as long as it is bloodied, the longtooth
hunter gains regeneration 2.
Alignment Unaligned Languages Common
Skills Athletics +14, Endurance +11, Nature +9
Str 20 (+8) Dex 14 (+5) Wis 13 (+4)
Con 15 (+5) Int 10 (+3) Cha 9 (+2)
Equipment chainmail, light shield, longsword
TacticsThe human lackeys stay close to take advantage of mob rule as they prevent anyone from reaching their queen. The longtooth hunter chooses a lightly armored target for his first hamstring attack. He stays in the thick of melee, f lanking with the human lackeys or the cacklefiend hyenas if possible. The cacklefiend hyenas enter the fray in the second round, using fiendish cackle to harry foes, then following up with bite attacks. The dryad stays out of combat for as long as possi-ble, holding her action and using treestride to teleport
behind one of her sussur trees if a PC steps onto the dais or hits her with a ranged attack. She stays at the edge of combat, hoping to pick off a lone PC to deal extra damage with her claw attacks.
Features of the Area Illumination: Dim light from shrouded oil lamps set high on the pillars. Ceiling: 40 feet high. Pillars: These provide cover and can be climbed with a DC 15 Athletics check. Dais and Throne: This stone platform stands 2 feet above the f loor. Atop it is a marble throne carved
with bas-reliefs of dwarf miners at work. The throne provides superior cover to anyone who squeezes behind it. Sussur Trees: The power of the dryad has caused a grove of sussur trees to erupt through the f lagstones of the f loor, their topmost limbs brushing the ceiling. Also known as deeproot trees, sussurs grow only in the caverns of the Underdark. Their gnarled branches have few leaves but feature sprawling clusters of aerial roots. With a DC 17 Nature check, a PC determines that these trees must somehow be feeding on energy within the ground (the subtle emanations of chaos energy from the mines below). The trunks of these trees can be climbed with a DC 17 Athletics check. The sparse branches of a tree (beginning 10 feet up) provide concealment to anyone within them. Kitchen: The fortress’s main kitchen lies just off the great hall. It includes a side larder, now empty except for a lone sussur tree. Tables: These stone tables are tall enough that a Small creature can move under them and gain cover. It costs 2 squares of movement to hop up onto a table. A character can make a DC 17 Strength check to tip over a stone table, which then grants superior cover. Cistern: A well shaft descends 20 feet to a cistern of cold, crystal-clear water. A steel bucket and chain are bolted to the wall nearby. Dead Villager: The decomposing corpse of a vil-lager from Dunesend lies next to the throne. If the PCs see through the dryad’s deceptive veil before she enters combat, they see her feet turn to roots digging deep into the body.
2 Cacklefiend Hyenas Level 7 BruteLarge elemental beast XP 300
Initiative +5 Senses Perception +11; low-light vision
HP 96; Bloodied 48; see also acid bloodspurtAC 19; Fortitude 20, Reflex 17, Will 18
Resist 20 acid
Speed 8m Bite (standard; at-will) ✦ Acid +10 vs. AC; 1d6 + 5 damage, and ongoing 5 acid damage
(save ends); see also pack attack.
C Fiendish Cackle (minor; recharge 5 6 ) ✦ Fear Close burst 3; deafened creatures are immune; targets
enemies; +8 vs. Will; the target takes a –2 penalty to attack
rolls until the end of the cacklefiend hyena’s next turn.
C Acid Bloodspurt (when first bloodied; encounter) ✦ Acid Close burst 1; automatic hit; 2d8 acid damage, and ongoing
5 acid damage (save ends).
Pack Attack A cacklefiend hyena deals an extra 1d6 damage against
an enemy adjacent to two or more of the cacklefiend
hyena’s allies.
Harrier If a cacklefiend hyena is adjacent to an enemy, all other
creatures have combat advantage against that enemy
when making melee attacks.
Alignment Chaotic evil Languages Abyssal, Common
Str 20 (+8) Dex 14 (+5) Wis 14 (+5)
Con 16 (+6) Int 6 (+1) Cha 10 (+3)
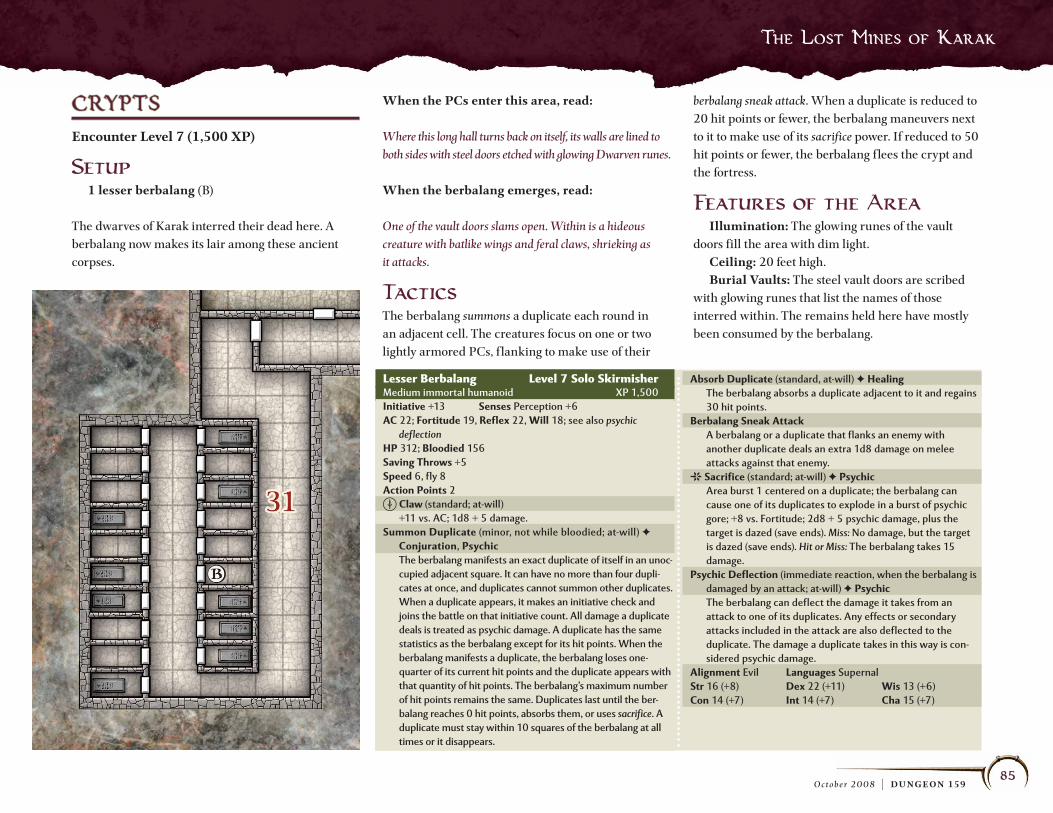
The Lost Mines of Karak
85O c t o b e r 2 0 0 8 | DU NGEON 159
CRYPTSCRYPTS
Encounter Level 7 (1,500 XP)
Setup 1 lesser berbalang (B)
The dwarves of Karak interred their dead here. A berbalang now makes its lair among these ancient corpses.
When the PCs enter this area, read:
Where this long hall turns back on itself, its walls are lined to both sides with steel doors etched with glowing Dwarven runes.
When the berbalang emerges, read:
One of the vault doors slams open. Within is a hideous creature with batlike wings and feral claws, shrieking as it attacks.
TacticsThe berbalang summons a duplicate each round in an adjacent cell. The creatures focus on one or two lightly armored PCs, f lanking to make use of their
berbalang sneak attack. When a duplicate is reduced to 20 hit points or fewer, the berbalang maneuvers next to it to make use of its sacrifice power. If reduced to 50 hit points or fewer, the berbalang f lees the crypt and the fortress.
Features of the Area Illumination: The glowing runes of the vault doors fill the area with dim light. Ceiling: 20 feet high. Burial Vaults: The steel vault doors are scribed with glowing runes that list the names of those interred within. The remains held here have mostly been consumed by the berbalang.
Lesser Berbalang Level 7 Solo SkirmisherMedium immortal humanoid XP 1,500
Initiative +13 Senses Perception +6
AC 22; Fortitude 19, Reflex 22, Will 18; see also psychic deflection
HP 312; Bloodied 156
Saving Throws +5
Speed 6, fly 8
Action Points 2m Claw (standard; at-will)
+11 vs. AC; 1d8 + 5 damage.
Summon Duplicate (minor, not while bloodied; at-will) ✦
Conjuration, Psychic The berbalang manifests an exact duplicate of itself in an unoc-
cupied adjacent square. It can have no more than four dupli-
cates at once, and duplicates cannot summon other duplicates.
When a duplicate appears, it makes an initiative check and
joins the battle on that initiative count. All damage a duplicate
deals is treated as psychic damage. A duplicate has the same
statistics as the berbalang except for its hit points. When the
berbalang manifests a duplicate, the berbalang loses one-
quarter of its current hit points and the duplicate appears with
that quantity of hit points. The berbalang’s maximum number
of hit points remains the same. Duplicates last until the ber-
balang reaches 0 hit points, absorbs them, or uses sacrifice. A
duplicate must stay within 10 squares of the berbalang at all
times or it disappears.
Absorb Duplicate (standard, at-will) ✦ Healing The berbalang absorbs a duplicate adjacent to it and regains
30 hit points.
Berbalang Sneak Attack A berbalang or a duplicate that flanks an enemy with
another duplicate deals an extra 1d8 damage on melee
attacks against that enemy.
A Sacrifice (standard; at-will) ✦ Psychic Area burst 1 centered on a duplicate; the berbalang can
cause one of its duplicates to explode in a burst of psychic
gore; +8 vs. Fortitude; 2d8 + 5 psychic damage, plus the
target is dazed (save ends). Miss: No damage, but the target
is dazed (save ends). Hit or Miss: The berbalang takes 15
damage.
Psychic Deflection (immediate reaction, when the berbalang is
damaged by an attack; at-will) ✦ Psychic The berbalang can deflect the damage it takes from an
attack to one of its duplicates. Any effects or secondary
attacks included in the attack are also deflected to the
duplicate. The damage a duplicate takes in this way is con-
sidered psychic damage.
Alignment Evil Languages Supernal
Str 16 (+8) Dex 22 (+11) Wis 13 (+6)
Con 14 (+7) Int 14 (+7) Cha 15 (+7)
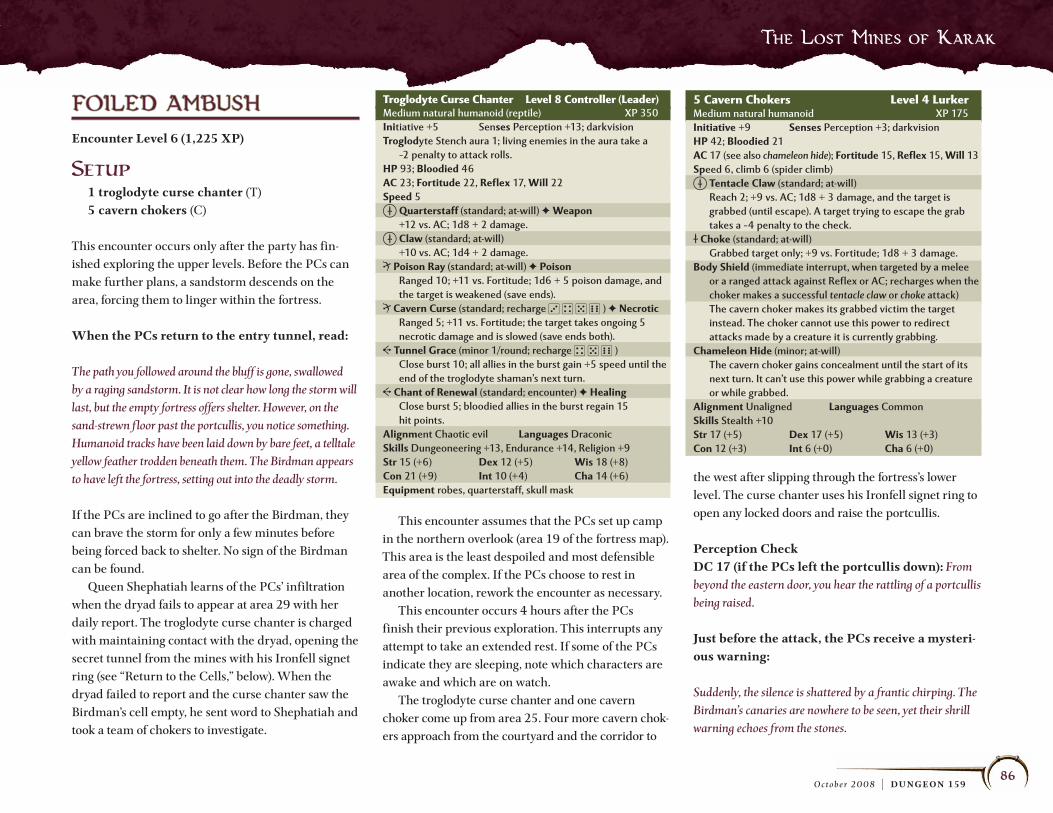
The Lost Mines of Karak
86O c t o b e r 2 0 0 8 | DU NGEON 159
FOILED AMBUSHFOILED AMBUSH
Encounter Level 6 (1,225 XP)
Setup 1 troglodyte curse chanter (T) 5 cavern chokers (C)
This encounter occurs only after the party has fin-ished exploring the upper levels. Before the PCs can make further plans, a sandstorm descends on the area, forcing them to linger within the fortress.
When the PCs return to the entry tunnel, read:
The path you followed around the bluff is gone, swallowed by a raging sandstorm. It is not clear how long the storm will last, but the empty fortress offers shelter. However, on the sand-strewn f loor past the portcullis, you notice something. Humanoid tracks have been laid down by bare feet, a telltale yellow feather trodden beneath them. The Birdman appears to have left the fortress, setting out into the deadly storm.
If the PCs are inclined to go after the Birdman, they can brave the storm for only a few minutes before being forced back to shelter. No sign of the Birdman can be found. Queen Shephatiah learns of the PCs’ infiltration when the dryad fails to appear at area 29 with her daily report. The troglodyte curse chanter is charged with maintaining contact with the dryad, opening the secret tunnel from the mines with his Ironfell signet ring (see “Return to the Cells,” below). When the dryad failed to report and the curse chanter saw the Birdman’s cell empty, he sent word to Shephatiah and took a team of chokers to investigate.
This encounter assumes that the PCs set up camp in the northern overlook (area 19 of the fortress map). This area is the least despoiled and most defensible area of the complex. If the PCs choose to rest in another location, rework the encounter as necessary. This encounter occurs 4 hours after the PCs finish their previous exploration. This interrupts any attempt to take an extended rest. If some of the PCs indicate they are sleeping, note which characters are awake and which are on watch. The troglodyte curse chanter and one cavern choker come up from area 25. Four more cavern chok-ers approach from the courtyard and the corridor to
the west after slipping through the fortress’s lower level. The curse chanter uses his Ironfell signet ring to open any locked doors and raise the portcullis.
Perception CheckDC 17 (if the PCs left the portcullis down): From beyond the eastern door, you hear the rattling of a portcullis being raised.
Just before the attack, the PCs receive a mysteri-ous warning:
Suddenly, the silence is shattered by a frantic chirping. The Birdman’s canaries are nowhere to be seen, yet their shrill warning echoes from the stones.
Troglodyte Curse Chanter Level 8 Controller (Leader)Medium natural humanoid (reptile) XP 350
Initiative +5 Senses Perception +13; darkvision
Troglodyte Stench aura 1; living enemies in the aura take a
–2 penalty to attack rolls.
HP 93; Bloodied 46
AC 23; Fortitude 22, Reflex 17, Will 22
Speed 5m Quarterstaff (standard; at-will) ✦ Weapon +12 vs. AC; 1d8 + 2 damage.
m Claw (standard; at-will)
+10 vs. AC; 1d4 + 2 damage.
R Poison Ray (standard; at-will) ✦ Poison Ranged 10; +11 vs. Fortitude; 1d6 + 5 poison damage, and
the target is weakened (save ends).
R Cavern Curse (standard; recharge 3 4 5 6 ) ✦ Necrotic Ranged 5; +11 vs. Fortitude; the target takes ongoing 5
necrotic damage and is slowed (save ends both).
C Tunnel Grace (minor 1/round; recharge 4 5 6 )
Close burst 10; all allies in the burst gain +5 speed until the
end of the troglodyte shaman’s next turn.
C Chant of Renewal (standard; encounter) ✦ Healing Close burst 5; bloodied allies in the burst regain 15
hit points.
Alignment Chaotic evil Languages Draconic
Skills Dungeoneering +13, Endurance +14, Religion +9
Str 15 (+6) Dex 12 (+5) Wis 18 (+8)
Con 21 (+9) Int 10 (+4) Cha 14 (+6)
Equipment robes, quarterstaff, skull mask
5 Cavern Chokers Level 4 LurkerMedium natural humanoid XP 175
Initiative +9 Senses Perception +3; darkvision
HP 42; Bloodied 21
AC 17 (see also chameleon hide); Fortitude 15, Reflex 15, Will 13
Speed 6, climb 6 (spider climb)
m Tentacle Claw (standard; at-will)
Reach 2; +9 vs. AC; 1d8 + 3 damage, and the target is
grabbed (until escape). A target trying to escape the grab
takes a –4 penalty to the check.
M Choke (standard; at-will)
Grabbed target only; +9 vs. Fortitude; 1d8 + 3 damage.
Body Shield (immediate interrupt, when targeted by a melee
or a ranged attack against Reflex or AC; recharges when the
choker makes a successful tentacle claw or choke attack)
The cavern choker makes its grabbed victim the target
instead. The choker cannot use this power to redirect
attacks made by a creature it is currently grabbing.
Chameleon Hide (minor; at-will)
The cavern choker gains concealment until the start of its
next turn. It can’t use this power while grabbing a creature
or while grabbed.
Alignment Unaligned Languages Common
Skills Stealth +10
Str 17 (+5) Dex 17 (+5) Wis 13 (+3)
Con 12 (+3) Int 6 (+0) Cha 6 (+0)

The Lost Mines of Karak
87O c t o b e r 2 0 0 8 | DU NGEON 159
When the chokers attack, read:
You see sudden movement at the arrow slits along the south wall. Three gray-skinned creatures with long, spindly arms are squeezing through the narrow gaps.
If the PCs have barred or spiked the eastern door, it takes the troglodyte 1d4 rounds to break through.
When the troglodyte enters, read:
A hulking troglodyte with a skull mask and staff bursts through the east door, another gray-skinned choker behind him.
TacticsThe chokers make tentacle claw attacks against lightly armored PCs, grabbing in order to choke. They stay in the thick of melee with grabbed foes, trusting their body shield to deflect attacks. The troglodyte curse chanter hits the chokers with tunnel grace each round, using cavern curse against the strongest-looking melee combatants. It uses poison ray against PCs on the edge of the fray. All these creatures fight to the death for the Queen of the Drylands.
DevelopmentAny search of the curse chanter reveals the Ironfell signet ring he carries.
Features of the Area Illumination: Whatever the PCs use. Ceiling: 20 feet high. Rusted Portcullises: The portcullises are locked in place, requiring a DC 23 Strength check to raise or break through. A character at a winch near one of the arrow slits can raise a portcullis with two move actions
and a DC 10 Strength check, or can lower it as a minor action. A portcullis can also be raised or lowered in 1 round by anyone bearing an Ironfell signet ring that is touched to the bars or the winch (a minor action). Arrow Slits: These apertures provide superior cover to creatures on either side of them. However, they allow attacks to be made only in the two squares adjacent to them. A creature standing in a square adjacent to the wall 5 feet or more from an arrow slit cannot be seen by anyone on the other side. The cavern chokers’ rubbery bones allow them to squeeze through these narrow openings at half speed.
RETURN TO THE CELLSRETURN TO THE CELLS
In the aftermath of combat, any Perception check notices a scattering of yellow feathers near the passage to area 16. Subsequent checks reveal more feathers in the hall at area 23 and outside area 29. If the PCs enter the area of the cells, they see the following.
The solid f loor of the southeast cell now contains a perfectly round hole at the head of a smooth-walled shaft leading straight down. Below the f loor, an aging pulley system descends into darkness. The pulley raises and lowers an 8-foot-wide wooden lift platform that sits now a few feet below the hole. The battered platform is emblazoned with the faded crest of Clan Ironfell.
Touching an Ironfell signet ring to the f loor of the cell causes the magic portal to close or open. Of the mys-terious Birdman, there is no further sign.
The Way DownThe ancient hoist shows signs of repair and much use. Unless the PCs elect to descend the shaft in some other way (it takes a DC 25 Athletics check to scale its smooth walls), up to six characters can descend on the platform. It takes a DC 10 Strength check to lower the lift and a DC 15 Strength check to raise it. Up to two other char-acters can aid the character making the check.

The Lost Mines of Karak
88O c t o b e r 2 0 0 8 | DU NGEON 159
MINE ENTRANCEMINE ENTRANCE
Encounter Level 8 (1,625 XP)
Setup 3 troglodyte spear warriors (W) 1 troglodyte mauler (M) 2 troglodyte impalers (I)
The entrance to Queen Shephatiah’s mines are guarded by a force of troglodytes and the ancient dwar-ven trap they have restored. The troglodytes are on alert and waiting for the return of the curse chanter’s strike team. The tactical map shows their position if the PCs approach unseen and unheard (for example, by sending a scout down to reconnoiter). If these crea-tures are aware of the PCs’ approach, see below.
When the PCs can see beyond the portcullis, read:The passage ahead is blocked by a portcullis, a pair of troglodytes on guard beyond it. From behind them comes the sound of voices speaking in hushed tones.
The troglodytes sound an alarm as soon as they see the PCs, or if the curse chanter and its party do not reappear immediately after the descent of the lift. If the PCs take more than 1 round to decide how to attack, the troglodytes all move into defensive posi-tions in the corridor.
TacticsThe troglodytes initially stay back from the portcullis, trying to lure the PCs into approaching and triggering the poisoned dart wall trap. Once that trap is acti-vated or bypassed, they approach. (The trap fires only south of the portcullis.)
Until the PCs raise the portcullis, the troglodyte warriors harry them with spear attacks from 2 squares away. Once the portcullis is up, the warriors
form a defensive line, holding the PCs in place while the impalers and the mauler make ranged attacks from behind. The troglodyte impalers launch javelin attacks against lightly armored PCs and anyone making ranged attacks, using impaling shot as often as possible. Once the PCs move past the warriors, they continue to make ranged attacks for as long as possible, falling back into the northern chamber. An impaler makes spear attacks if surrounded, but it takes any opportu-nity to move back into javelin range. The troglodyte mauler moves up with his warrior allies to fight in the first rank when the PCs raise the portcullis. He targets the strongest-looking melee combatant in the first rank of PCs, marking the foe with greatclub attacks. All these creatures fight to the death.
3 Troglodyte Spear Warriors Level 12 MinionMedium natural humanoid (reptile) XP 175
Initiative +6 Senses Perception +5; darkvision
Troglodyte Stench aura 1; living enemies in the aura take a –2
penalty to attack rolls.
HP 1; a missed attack never damages a minion.
AC 25; Fortitude 25, Reflex 22, Will 21
Speed 5M Longspear (standard; at-will) ✦ Weapon Reach 2; +15 vs. AC; 7 damage.
Alignment Chaotic evil Languages Draconic
Skills Athletics +14, Endurance +13
Str 18 (+9) Dex 12 (+6) Wis 11 (+5)
Con 16 (+8) Int 6 (+3) Cha 8 (+4)
Equipment light shield, longspear
Troglodyte Mauler Level 6 SoldierMedium natural humanoid (reptile) XP 250
Initiative +6 Senses Perception +5; darkvision
Troglodyte Stench aura 1; living enemies in the aura take a –2
penalty to attack rolls.
HP 74; Bloodied 37
AC 22; Fortitude 21, Reflex 18, Will 19
Speed 5m Greatclub (standard; at-will) ✦ Weapon +12 vs. AC; 2d4 + 4 damage, and the target is marked until
the end of the troglodyte mauler’s next turn.
m Claw (standard; at-will)
+10 vs. AC; 1d4 + 4 damage.
M Bite (minor 1/round; at-will)
Requires combat advantage; +10 vs. Fortitude; 1d6 + 4
damage, and until the end of the troglodyte mauler’s next
turn, healing on the target restores only half the total
amount.
R Javelin (standard; at-will) ✦ Weapon Ranged 10/20; +12 vs. AC; 1d6 + 4 damage.
Alignment Chaotic evil Languages Draconic
Skills Athletics +12, Endurance +12
Str 18 (+7) Dex 12 (+4) Wis 15 (+5)
Con 18 (+7) Int 6 (+1) Cha 8 (+2)
Equipment greatclub, 2 javelins
2 Troglodyte Impalers Level 7 ArtilleryMedium natural humanoid (reptile) XP 300
Initiative +5 Senses Perception +9; darkvision
Troglodyte Stench aura 1; living enemies in the aura take a
–2 penalty to attack rolls.
HP 69; Bloodied 34
AC 22; Fortitude 22, Reflex 19, Will 18
Speed 5m Spear (standard; at-will) ✦ Weapon +11 vs. AC; 1d8 + 4 damage.
m Claw (standard; at-will)
+9 vs. AC; 1d4 + 4 damage.
r Javelin (standard; at-will) ✦ Weapon Ranged 10/20; +12 vs. AC; 1d6 + 4 damage.
R Impaling Shot (standard; recharge 3 4 5 6 ) ✦ Weapon Requires javelin; ranged 10; +12 vs. AC; 2d6 + 4 damage,
and the troglodyte impaler makes a secondary attack
against the same target. Secondary Attack: +10 vs. Forti-
tude; the target is restrained (save ends).
Alignment Chaotic evil Languages Draconic
Skills Athletics +12, Endurance +13
Str 19 (+7) Dex 14 (+5) Wis 13 (+4)
Con 21 (+8) Int 7 (+1) Cha 9 (+2)
Equipment spear, quiver of 6 javelins

The Lost Mines of Karak
89O c t o b e r 2 0 0 8 | DU NGEON 159
Seams of ChaosWithin the rough mine shafts to the north, the PCs catch their first sight of the mysterious veins of red stone lining the walls of the mine.
Within the damp gray stone of the cavern walls, a faint light pulses. On close examination, you see veins of dark red twisting through the stone of the walls and ceiling, glowing with a dull light.
A DC 17 Dungeoneering or Nature check reveals that this is not a known Underdark phenomena. A DC 17 Arcana check identifies the stuff as veins of raw elemental energy that has somehow leached into the natural world.
Features of the Area Illumination: None. Ceiling: 10 feet high Entry Shaft: The shaft descends 80 feet from the cell above to the mine below. Its sheer walls can be climbed with a DC 25 Athletics check. Lift Platform: The 8-foot-wide lift platform can carry up to six Medium or smaller creatures. It takes a DC 10 Strength check to lower the lift and a DC 15 Strength check to raise it. Up to two other characters can aid the character making the check. Mine Entrance: Just below the entry shaft, this finished stone chamber is piled high with ore carts, storage bins, shoring timbers, and spare parts for the hoist system. Guardroom: The guardroom contains a rough table and chairs, as well as the winch that controls the portcullis. Chairs: These are difficult terrain.
Tables: A table is tall enough that a Small creature can move under it and gain cover. It costs 2 squares of movement to hop up onto a table. A character can make a DC 10 Strength check to tip over a table, which then grants superior cover. Rusted Portcullis: The portcullis is locked in place, requiring a DC 23 Strength check to raise or break through. A character at the winch in the guard-room can raise the portcullis with two move actions and a DC 10 Strength check, or can lower it as a minor action. The portcullis can also be raised or low-ered in 1 round by anyone bearing an Ironfell signet ring that is touched to the bars or the winch (a minor action).
Tunnels: Beyond the guardroom, the tunnels and chambers of the mine become hewn stone shored up by ancient timbers. Rubble: These sections of crumbling stone are dif-ficult terrain.
Poisoned Dart Wall Level 6 BlasterTrap XP 250
Darts fire from the wall, preventing characters from advancing along the corridor.
Trap: Each round on its initiative, the trap fires a barrage of
poison darts that randomly attack 2d4 targets in the entire
area south of the portcullis.
Perception✦ DC 17: The character notices the small holes in the walls.
✦ DC 21: The character notices the tripwire trigger.
Initiative +7
Trigger When a character moves across the tripwire south of the
portcullis, the trap rolls initiative.
AttackStandard Action Ranged 20
Targets: 2d4 targets in range
Attack: +11 vs. AC
Hit: 1d8+2 damage and ongoing 5 poison damage (save ends).
Countermeasures✦ An adjacent character can disable the tripwire with a DC
17 Thievery check.
✦ A character who moves no more than 1 square on a turn
gains a +5 bonus to AC against the dart attacks.

The Lost Mines of Karak
90O c t o b e r 2 0 0 8 | DU NGEON 159
CHAOS MINESCHAOS MINES
Encounter Level 7 (1,500 XP)
Setup 1 bloodweb spider swarm (S) 1 barlgura (B) 1 chillborn zombie (Z) 2 carrion crawlers (C)
As the PCs make their way through the mine, they see signs of ancient battles and renewed mining activity.
Recent tracks along the main passageway lead you on. The central caverns you pass through show signs of recent mining activity, though on a much smaller scale than the dwarves’ operations of old. Here and there, dwarf skeletons are strewn across the rocky ground, rusted weapons lying nearby. The dwarves of Karak appear to have slain each other in the end. Oddly, however, many of the skeletons appear to be missing their skulls.
The track the PCs follow leads them to a former main cavern that now guards access to Queen Shephatiah’s lair. One of her demonic lieutenants has taken charge of marshalling the natural predators that lair here. As the PCs approach from the southeast, the barlgura watches from the cover of his ledge.
When the PCs enter this area, read:
A vast gallery opens up here where the dwarves of Ironfell once worked, their long-rotted bodies now scattered before you. The rickety remains of ancient ladders and carts are spread across the cavern. One prominent vein of the strange, red-glowing stone crosses this chamber’s f loor and climbs its walls, its cold light pulsing brightly.
Perception CheckDC 7: As in the chambers above, more than half the dwarven bodies here are missing their skulls.DC 12: From around the corner of an outcropping, the shaggy head of a huge beast watches you.DC 17: The sounds of skittering stone echo faintly from further into the chamber, an unseen creature moving there.
The chillborn zombie rises as soon as a PC passes through any square of elemental energy adjacent to it.
When the chillborn zombie rises, read:
A rustling in the rubble reveals a gray-skinned hand grasping the air. A bearded face follows, the animated corpse of a long-dead dwarf lurching to its feet. A cold mist f lows from between its black teeth.
Bloodweb Spider Swarm Level 7 SoldierMedium natural beast (spider, swarm) XP 300
Initiative +12 Senses Perception +6; tremorsense 5
Swarm Attack aura 1; the bloodweb spider swarm makes
a basic attack as a free action against each enemy that
begins its turn in the aura. In addition, an enemy that
enters or starts its turn in the aura is slowed (save ends)
by strands of crimson webbing.
HP 80; Bloodied 40
AC 21; Fortitude 16, Reflex 20, Will 16
Resist half damage from melee and ranged attacks; Vulnerable 10 against close and area attacks
Speed 4, climb 4 (spider climb)
m Swarm of Fangs (standard; at-will) ✦ Poison+10 vs. Reflex; 2d6 + 2 damage, and ongoing 5 poison damage
(save ends).
Alignment Unaligned Languages —Skills Stealth +15
Str 14 (+5) Dex 24 (+10) Wis 16 (+6)
Con 16 (+6) Int 1 (–2) Cha 8 (+2)
Barlgura Level 8 BruteLarge elemental beast (demon) XP 350
Initiative +7 Senses Perception +12; low-light vision
HP 108; Bloodied 54; see also savage howlAC 19; Fortitude 20, Reflex 17, Will 17
Resist 10 variable (1/encounter; see glossary)
Speed 8, climb 8
m Slam (standard; at-will)
Reach 2, +10 vs. AC; 1d8 + 6 damage, or 2d8 + 6 damage
if the barlgura is bloodied.
M Double Attack (standard; at-will)
The barlgura makes two slam attacks.
Savage Howl (free, when first bloodied; encounter)
The barlgura and all allies within 5 squares of the barlgura
gain a +2 bonus to attack rolls until the end of the barlgura’s
next turn.
Alignment Chaotic evil Languages Abyssal
Skills Athletics +15
Str 22 (+10) Dex 16 (+7) Wis 16 (+7)
Con 18 (+8) Int 6 (+2) Cha 12 (+5)
Chillborn Zombie Level 6 SoldierMedium natural animate (cold, undead) XP 250
Initiative +5 Senses Perception +3; darkvision
Chillborn Aura (Cold) aura 2; any creature that enters or
begins its turn in the aura takes 5 cold damage. Multiple
chillborn auras deal cumulative damage.
HP 71; Bloodied 35; see also death burstAC 22; Fortitude 20, Reflex 16, Will 16
Immune disease, poison; Resist 10 cold, 10 necrotic;
Vulnerable 5 fire, 5 radiant
Speed 4m Slam (standard; at-will) ✦ Cold +11 vs. AC; 1d6 + 4 damage, and the target is immobilized
until the end of the chillborn zombie’s next turn and takes
ongoing 5 cold damage (save ends); see also ice reaper.C Death Burst (when reduced to 0 hit points) ✦ Cold The chillborn zombie explodes. Close burst 1; +9 vs.
Fortitude; 2d6 + 2 cold damage, and the target is slowed
(save ends).
Ice Reaper ✦ Cold The chillborn zombie deals an extra 5 cold damage to an
immobilized creature.
Alignment Unaligned Languages —Str 19 (+7) Dex 10 (+3) Wis 10 (+3)
Con 15 (+5) Int 2 (–1) Cha 6 (+1)

The Lost Mines of Karak
91O c t o b e r 2 0 0 8 | DU NGEON 159
2 Carrion Crawlers Level 7 ControllerLarge aberrant beast XP 300
Initiative +6 Senses Perception +5; darkvision
HP 81; Bloodied 40
AC 20; Fortitude 19, Reflex 18, Will 17
Speed 6, climb 6 (spider climb)
m Tentacles (standard; at-will) ✦ Poison Reach 2; +10 vs. Fortitude; 1d4 + 5 damage, and the target
takes ongoing 5 poison and is slowed (save ends both). First Failed Save: The target is immobilized instead of slowed
(save ends). Second Failed Save: The target is stunned instead
of immobilized (save ends). Saving throws made against the
carrion crawler’s paralytic tentacles take a –2 penalty.
M Bite (standard; at-will)
+12 vs. AC; 1d10 + 5 damage.
Alignment Unaligned Languages —Str 20 (+8) Dex 16 (+6) Wis 14 (+5)
Con 17 (+6) Int 2 (–1) Cha 16 (+6)
TacticsThe chillborn zombie wades into the largest group of PCs with slam attacks, targeting immobilized crea-tures for extra damage from its ice reaper power. The carrion crawlers surge into battle as soon as the zombie rises, targeting individual PCs with repeated attacks in the hope of a quick kill. The bloodweb spider swarm stays in the thick of combat to maximize the effect of its swarm attack aura, slowing the PCs in the hope of making them easier targets for the carrion crawlers. If it is not spotted, the barlgura waits until the PCs are engaged by the chillborn zombie or the blood-web spider swarm before attacking. Once in melee, it makes double attacks, staying close to its servants to maximize the effect of its savage howl. It stays within the vein of elemental energy whenever possible, hoping that the area’s effect hinders any PC making melee attacks against it.
DevelopmentThe chillborn zombie was once the mine-thane of Karak, killed with the rest of his people and raised to undeath by the lingering power of the elemental energy in this area. Any Perception check made to search the body shows that the ring finger on its right hand has been recently hacked off (when Shephatiah found and took the Ironfell signet ring).
Features of the Area Illumination: The vein of elemental energy fills the chamber with dim light. Ceiling: 60 feet high. Ledge: The barlgura’s ledge is 20 feet high. It can be climbed with a DC 20 Athletics check. Rubble: These sections of crumbling stone and debris are difficult terrain. Elemental Chaos: A vein of glowing red stone tainted with elemental energy crosses the cavern f loor and climbs the walls. Creatures of chaotic evil alignment standing in a square of elemental chaos gain a +2 bonus to attack rolls and damage rolls. Crea-tures of any other alignment standing in a square of elemental chaos take a –2 penalty to attack rolls and damage rolls. Eggs: This clutch of a dozen 1-foot-diameter green ovoid spheres are carrion crawler eggs. If any PC approaches within 10 squares of the eggs during combat, the carrion crawlers gain a +2 bonus to attack rolls against that character.

The Lost Mines of Karak
92O c t o b e r 2 0 0 8 | DU NGEON 159
QUEEN’S RETINUEQUEEN’S RETINUE
Encounter Level 10 (2,600 XP)
Setup Shephatiah, guardian naga (N) 2 lesser mezzodemons (M) 1 firelasher (F)
This deep cavern was Clan Ironfell’s downfall. When the dwarves broke into this area, they uncovered a
rift leading directly to the Elemental Chaos. Disaster struck as the rift f lared, its terrible energy spread-ing along the veins of chaos stone throughout all the caverns of Karak. The dwarves of Clan Ironfell turned on each other in madness and were slain to the last. When those in the fortress above came down in search of their kin, they too were lost. The guardian naga Queen Shephatiah found her way to this cavern from the Elemental Chaos, discovering and learning how to control the rift. (She-phatiah is treated as an elemental creature by virtue of the primordial ring she wears. See the treasure entry in “Features of the Area.”)
When the PCs can see into this area, read:
A circular cavern before you shows signs of excavation on its far side. However, the way ahead is blocked by a wide
crevice that pulses with a lurid red glow. In the shadow of that light stand two red-skinned demons, slashing the air with three-clawed hands. Behind them are piled hundreds of dwarven skulls, a gruesome bier on which coils a serpentine creature with a humanlike face.
TacticsQueen Shephatiah and her defenders remain on their side of the rift, intent on forcing the PCs to come to them. The mezzodemons move to the edge of the rift and use poison breath against targets in range. They make
Queen Shephatiah, Level 12 Elite ArtilleryGuardian NagaLarge immortal elemental* magical beast (reptile) XP 1,400
Initiative +10 Senses Perception +13; darkvision
HP 186; Bloodied 93
AC 25; Fortitude 23, Reflex 24, Will 22
Saving Throws +2
Speed 6Action Points 1m Tail Slap (standard; at-will)
Reach 2; +16 vs. AC; 1d8 + 3 damage, and the target is
pushed 2 squares.
R Word of Pain (standard; at-will) ✦ Psychic Ranged 20; +17 vs. Will; 2d8 + 4 psychic damage, and the
target is immobilized (save ends).
C Spit Poison (standard; recharge 5 6 ) ✦ Poison Close blast 3; +15 vs. Fortitude; 1d8 + 2 poison damage,
and the target takes ongoing 5 poison damage, a –2 pen-
alty to Fortitude defense, and a –2 penalty to saving throws
(save ends all).
A Thunderstrike (standard; recharge 5 6 ) ✦ Thunder Area burst 1 within 20; +16 vs. Fortitude; 2d10 + 4
thunder damage, and the target is dazed (save ends).
Miss: Half damage, and the target is not dazed.
Alignment Evil Languages Common, Deep Speeh,
Draconic, Abyssal, Primordial
Skills Arcana +15, History +15, Insight +13
Str 16 (+9) Dex 18 (+10) Wis 14 (+8)
Con 15 (+8) Int 18 (+10) Cha 12 (+7)
* Shephatiah is considered to be an elemental creature while
she wears her primordial ring.
2 Lesser Mezzodemons Level 7 SoldierLarge elemental humanoid (demon) XP 300
Initiative +9 Senses Perception +13; darkvision
HP 113; Bloodied 56
AC 23; Fortitude 21, Reflex 18, Will 19
Resist 20 poison, 10 variable (2/encounter; MM 282)
Speed 6
m Trident (standard; at-will) ✦ Weapon Requires trident; reach 2; +14 vs. AC; 1d8 + 4 damage.
M Skewering Tines (standard; at-will) ✦ Weapon Reach 2; +14 vs. AC; 1d8 + 4 damage, ongoing 5 damage
target enemies only and the target is restrained (save ends
both). While the target is restrained, the mezzodemon
can’t make trident attacks.
C Poison Breath (standard; recharge 5 6 ) ✦ Poison Close blast 3; targets enemies; +12 vs. Fortitude; 2d6 + 2
poison damage, and ongoing 5 poison damage (save ends).
Alignment Chaotic evil Languages Abyssal
Skills Intimidate +11
Str 20 (+10) Dex 15 (+7) Wis 16 (+8)
Con 17 (+8) Int 10 (+5) Cha 13 (+6)
Equipment trident

The Lost Mines of Karak
93O c t o b e r 2 0 0 8 | DU NGEON 159
trident attacks against PCs within reach on the rift’s far side, or against those who attempt to cross it. Once engaged in melee, they make skewering tines attacks. Shephatiah uses word of pain and thunderstrike against targets on the far side of the rift, targeting ranged combatants or PCs not engaging the mezzode-mons. If the PCs cross the rift, she moves behind the skull pile and continues to attack at range, making word of pain attacks. The firelasher lurks in the rift, emerging in the second round. It moves through the PCs with its whirlwind dash, making wildfire cyclone attacks in an attempt to push targets into the rift. If Shephatiah is killed or knocked unconscious, the firelasher and the mezzodemons f lee through the
rift and disappear into the Elemental Chaos. The self-styled Queen of the Drylands fights to the finish.
ConclusionSet apart from the refuse and debris of Shephatiah’s lair, the PCs find clues that explain how the naga reopened the mines—and hints of future conflicts. A DC 17 Search check within the chamber turns up a set of scrolls holding parchment correspondence written and transported by the naga’s mezzodemon lieutenants. The missives are in Deep Speech, and require a DC 17 Intelligence check to translate. The parchments detail how Shephatiah discovered the portal leading to the Karak Lode on a sojourn within the Elemental Chaos. They also make refer-ence to the reopening of the mines being financed by a group that the scrolls do not name. These unknown masters have claimed the wealth of the Karak Lode for themselves, and are having that wealth shipped to them by way of the elemental rift. While the parchments indicate that this group intends to ramp up production in the mines in response to an increasing need for ore, the cryptic notes indicate that Shephatiah herself does not know the identity of those she works for. (If Queen Shephatiah is kept alive for questioning, do not let the PCs find the scrolls. Instead, have the naga bitterly bargain for her freedom, offering the PCs the above information if they allow her to f lee.)
Features of the Area Illumination: The rift fills the area with dim light. Ceiling: 20 feet high. Bed of Skulls: Queen Shephatiah’s nest is composed of hundreds of dwarven skulls taken from the bodies that litter the mines. The pile provides cover and is dif-ficult terrain for any creature smaller than Large.
Elemental Chaos Rift: A 20-foot-deep chasm cuts through the stone floor of the cavern, filled at the bottom with what appears to be bubbling magma shot through with vibrant hues of purple and blue. This bar-rier of elemental energy is a gate to the Elemental Chaos. The walls of the rift can be climbed with a DC 20 Athletics check. Elemental creatures can jump into the rift to pass through to the Elemental Chaos (a move action that deals no damage). All other creatures jump-ing or falling into the rift take 2d10 falling damage. Nonelemental creatures that hit the bottom of the rift find themselves waist-deep in a field of raw elemental energy. This is difficult terrain and deals 3d6 damage per round to nonelemental creatures within it. Treasure: In addition to any other treasure you place here, Queen Shephatiah wears a primordial ring on the tip of her tail and has an Ironfell signet ring hidden behind her bed of skulls (Perception DC 17).
Primordial Ring Primordial Ring Level 14Level 14
This ring consists of twisted metal bands whose colors shift before your eyes.
Item Slot: Ring 21,000 gp
Property: You are treated as an elemental creature (MM
281) as long as the ring is worn.
Power (Daily): Minor Action: Gain resistance 10 variable
(MM 282) until the end of the encounter or for 5 minutes.
You cannot use this power to resist a damage type to
which you have a vulnerability.
If you’ve reached at least one milestone today, your
resistance 10 variable becomes (2/encounter). G
About the AuthorGreg is a lifelong gamer who has been writing adventures for the past half-dozen years. He received his first ENnie award this year leaving only the Heisman Trophy and Nobel Prize left on his list of lifetime goals. He considers himself to be well ahead of schedule.
Firelasher Level 11 SkirmisherLarge elemental magical beast (air, fire) XP 600
Initiative +12 Senses Perception +5
HP 108; Bloodied 54
AC 25; Fortitude 21, Reflex 25, Will 20
Immune disease, poison; Resist 25 fire
Speed fly 8 (hover)
m Fire Lash (standard; at-will) ✦ Fire Reach 2; +14 vs. Reflex; 2d8 + 5 fire damage.
C Wildfire Cyclone (standard; recharge 5 6 ) ✦ Fire Close burst 2; +14 vs. Reflex; 2d6 + 5 fire damage, and the
target is pushed 1 square and knocked prone. Miss: Half
damage, and the target is neither pushed nor knocked
prone.
Whirlwind Dash (standard; recharge 6 ) ✦ Fire The firelasher can move up to twice its speed. It can move
through spaces occupied by other creatures without
provoking opportunity attacks. It must end its move in an
unoccupied space. Any creature whose space the firelasher
enters takes 10 fire damage.
Mutable Shape The firelasher can squeeze through spaces as though it
were a Medium creature.
Alignment Unaligned Languages Primordial
Str 11 (+5) Dex 21 (+10) Wis 11 (+5)
Con 12 (+6) Int 7 (+3) Cha 8 (+4)