twedge - tec-it · 7.2 predefined variables 24 ... tcp/ip, usb or bluetooth) and ... twedge is...
TRANSCRIPT

TWedge Universal Data Acquisition Software
Version 2.4
User Documentation
24 Februar 2014
TEC-IT Datenv erarbei tung GmbH
Hans-W agner-Strasse 6 A-4400 Steyr, Austr ia
t ++43 (0)7252 72720
f ++43 (0)7252 72720 77 of f ice@tec-it .com
www.tec- i t .com
Page 2 of 42
TWedge User Documentation
1 Content
1 Content 2 1.1 Table of Figures 3 1.2 List of Tables 4
2 Disclaimer 5
3 Introduction 6 3.1 About 6 3.2 Customized Behavior 6 3.3 Communication 6 3.4 Keyboard Simulation 7 3.5 Direct Database and File Access 7 3.6 Flexible Scripting 7 3.7 Hotkey Support 7 3.8 Timer Support 7 3.9 Distributable Configurations 7 3.10 Automatic Initialization 7 3.11 Bi-Directional Communication 7 3.12 Supported Operating Systems 8
4 Common Operations 9 4.1 Configuring TWedge 9 4.2 Saving your Settings 9 4.3 Receiving Data 9 4.4 Stop Communication 9 4.5 Load a Saved Configuration 9
5 User Interface 10 5.1 Main Window 10 5.2 Menu 10
5.2.1 File 10 5.2.2 Configuration 11 5.2.3 Communication 11 5.2.4 View 11 5.2.5 Help 11
5.3 Toolbar 11 5.4 TWedge Summary 12 5.5 Protocol Window 12 5.6 Operating Controls 12
6 Configuration 14 6.1 General 14 6.2 Interface 14
6.2.1 Interface Selection 15 6.2.2 Interface Settings 15
6.2.2.1 Settings for the Serial (RS-232) Interface 15 6.2.2.2 TCP/IP Settings 15 6.2.2.3 Bluetooth Settings 16
6.2.3 Retries 16 6.3 Data Packets 16
6.3.1 Packaging Rules 17 6.3.2 Packet Size and Timeout 17 6.3.3 Packet Delimiter 17
6.4 Script Editor 19 6.4.1 Global Definitions 20 6.4.2 OnStart 20 6.4.3 OnData 20 6.4.4 OnStop 20 6.4.5 OnHotkey 20 6.4.6 OnTimer 20
6.5 Hotkey 21 6.6 Logfile 22 6.7 Preferences 23
7 JavaScript 24 7.1 General 24 7.2 Predefined Variables 24
7.2.1 “DATA” 24 7.2.2 “DATARAW” 24
7.3 Modifying the Input Data 24 7.4 Keyboard Simulation 25

Page 3 of 42
TWedge User Documentation
7.4.1 Non-printable Keys 25 7.4.2 Key Combinations 26 7.4.3 Delay Character 26
7.5 User Input 26 7.6 Using the Clipboard 27 7.7 Window Activation 28 7.8 Starting an Application 28 7.9 User Feedback 28
7.9.1 Message Box 29 7.9.2 Protocol Entry 29 7.9.3 Acoustic Feedback 29
7.10 Accessing Text Files 29 7.11 Accessing Databases 30
7.11.1 Opening a Database Connection 30 7.11.2 Executing SQL Statements 30 7.11.3 Using Record Sets 31
7.11.3.1 Open a Record Set 31 7.11.3.2 Cursor Positioning 31 7.11.3.3 Accessing Data 31
8 Example 33 8.1 Capturing a Data Series in Microsoft Excel
® 33
8.1.1 Interface Configuration 33 8.1.2 Data Packaging 33 8.1.3 Start or activate Microsoft Excel automatically 34 8.1.4 Capture the Data in Excel 34
8.1.4.1 Modify the received Input Data 35 8.1.4.2 Paste the received Input Data 35 8.1.4.3 Set the Focus to the next Input Cell 35
9 Licensing 36 9.1 License Types 36 9.2 Entering your License Data 36
9.2.1 Online Activation using an Activation Key 36 9.2.2 Manual Licensing 36 9.2.3 Licensed Configuration Files 37
10 FAQ 38 10.1 How can I stop the CR/LF after each data input? 38 10.2 How can I select a certain input field automatically? 38 10.3 How can I bring a certain window to the foreground? 38 10.4 Can I use two instances of TWedge simultaneously? 39 10.5 I get the error “80070002, The System cannot find the file specified.” 39 10.6 I get the error “80070005, Access is denied.” 39 10.7 I cannot activate the Virtual Serial Port (SPP) for the Bluetooth Stack 39 10.8 How to Install TWedge as Windows Service? 39
11 Contact and Support Information 40
Appendix A : Start TWedge with Customized Settings 41 A.1 General 41 A.2 Command Line Parameter 41 A.3 Shortcuts 41
Appendix B : Password Protected Configuration Files 42 B.1 General 42 B.2 Lock Interface Settings 42 B.3 Lock Preferences Dialog 42 B.4 Licensed Configurations Files 42
1.1 Table of Figures
Figure 1: Data Acquisition with TWedge 6 Figure 2: Main Window 10 Figure 3: Toolbar 12 Figure 4: Interface 14 Figure 5: Interface Settings - TCP/IP 15 Figure 6: Interface Settings – Bluetooth 16 Figure 7: Transmission Settings 17 Figure 8: Script Editor 19
Page 4 of 42
TWedge User Documentation
Figure 9: Hotkey Settings 21 Figure 10: Logfile settings 22 Figure 11: Start-Up Options 23 Figure 12: InputBox - String 27 Figure 13: InputBox - Number 27 Figure 14: Capturing a Data Series in Microsoft Excel 33 Figure 15: License Dialog - Online Activation 36 Figure 16: License Dialog – Manual Licensing 37 Figure 17: Licensed Configuration Files 42
1.2 List of Tables
Table 1: Key identifiers for non-printable keys 25

Page 5 of 42
TWedge User Documentation
2 Disclaimer
The actual version of this product (document) is available as is. TEC-IT declines all warranties which go beyond applicable rights. The licensee (or reader) bears all risks that might take place during the use of the system (the documentation). TEC-IT and its contractual partners cannot be penalized for direct and indirect damages or losses (this includes non-restrictive, damages through loss of revenues, constriction in the exercise of business, loss of business information or any kind of commercial loss), which is caused by use or inability to use the product (documentation), although the possibility of such damage was pointed out by TEC-IT.
We reserve all rights to this document and the information contained therein. Reproduction, use or disclosure to third parties without express authority is strictly forbidden.
Für dieses Dokument und den darin dargestellten Gegenstand behalten wir uns alle Rechte vor. Vervielfältigung, Bekanntgabe an Dritte oder Verwendung außerhalb des vereinbarten Zweckes sind nicht gestattet.
© 1998-2014 TEC-IT Datenverarbeitung GmbH Hans-Wagner-Str. 6
A-4400 Austria t.: +43 (0)7252 72720 f.: +43 (0)7252 72720 77 http://www.tec-it.com

Page 6 of 42
TWedge User Documentation
3 Introduction
3.1 About
TWedge is a versatile tool for capturing and transmitting data over serial interfaces, Bluetooth®,
USB or over TCP/IP: You can capture data from any device and forward it to any target application including data-bases and text-files.
Figure 1: Data Acquisition with TWedge
3.2 Customized Behavior
Acquiring data is not all that TWedge can do. Using JavaScript™ code you can customize the com-plete TWedge behavior: basic user-interaction, writing and reading files, accessing databases (via ODBC) and sending data to the connected device are just some of the possibilities.
3.3 Communication
The following interfaces are supported:
Serial Interface (all communication parameters are adjustable)
Bluetooth® (native, no virtual COM port is required)
USB (via a virtual serial driver)
TCP/IP (in client mode)
Page 7 of 42
TWedge User Documentation
3.4 Keyboard Simulation
Using TWedge it is possible to input data from external devices into any target application. TWedge captures data from external devices (connected via serial port, TCP/IP, USB or Bluetooth) and translates this data into virtual keystroke sequences. These keystrokes are then forwarded to the target application. This also works in Citrix
® or Terminal Server environments.
3.5 Direct Database and File Access
Captured device data can be stored in databases or files with a few mouse clicks. TWedge can read and write arbitrary databases directly via ODBC. Additional database applications like Micro-soft
® Access
® or similar are not required.
3.6 Flexible Scripting
The behavior of TWedge can be modified easily to meet all data acquisition requirements. The integrated scripting engine (based on JavaScript™) was extended with database and file access functions. Thus, TWedge enables the user to modify the captured data before further processing. The user can control the data collection behavior individually.
3.7 Hotkey Support
TWedge may be configured to monitor an adjustable hotkey. Whenever the hotkey is pressed a custom function (like sending a character sequence to the connected device) may be executed. This feature is especially useful for initiating data acquisition on demand.
3.8 Timer Support
If required, TWedge is able to use a so-called timer function. This timer function is fully scriptable and may be used to poll a connected device periodically.
3.9 Distributable Configurations
With TWedge you can save different configurations and distribute them to clients. If required, the configuration files may be encrypted and password protected. Thus no one can take insight into your JavaScript code or modify the settings, unless he knows the password. This allows you to protect the password an for an ODBC connection and other sensitive data.
3.10 Automatic Initialization
For your convenience, TWedge can be configured to automatically load a configuration and start data acquisition on start-up.
3.11 Bi-Directional Communication
TWedge is capable of bi-directional communication with the connected device. From within Java-Script use the function WriteToDevice to send arbitrary commands to a connected device.

Page 8 of 42
TWedge User Documentation
3.12 Supported Operating Systems
TWedge requires one of the operating systems listed below. It works with 32-bit and 64-bit operating systems.
Microsoft® Windows 2000
Microsoft® Windows XP
Microsoft® Windows Vista
Microsoft®
Windows 7
Microsoft®
Windows 8
Microsoft® Windows Server 2003 (including Terminal Server)
Microsoft® Windows Server 2008 (including Terminal Server)
Windows® Embedded (based on Windows XP)
Windows® Embedded POSReady

Page 9 of 42
TWedge User Documentation
4 Common Operations
4.1 Configuring TWedge
For setting up TWedge you use the Configuration menu.
► The most important step is to configure the communication interface. If the interface settings do not match the settings of the connected device the data may not be received (or it may not be received correctly).
For detailed information on possible adjustments, please refer to chapter 6.
4.2 Saving your Settings
To save your current configuration select File ► Save (or Save As) from the menu, or click on the symbol in the tool bar. All settings from the Configuration menu will be stored in the specified file. TWedge configuration files are identified by the .TWI file extension.
► TWedge allows you to save password protected, encrypted configuration files. When using these files the configuration may not be viewed or modified unless you know the key for unlocking. For further information, please refer to Appendix B.
4.3 Receiving Data
To start receiving data click on the Start button at the bottom of the window (which will change its caption to “Stop” as soon as the connection is started) or click on the button in the tool bar.
When the connection is started TWedge executes the OnStart script from the Script Editor. This script may be used for initialization routines like opening a file or a database. Thereafter, every time new data is received, the OnData script will be executed. In this script you can process the received data. Per default the acquired data is simulated as keystroke sequence. Thus it can be pasted into an arbitrary application. Alternatively you can also write the data into a file or into a database.
► For your convenience TWedge can be configured to start communication automatically as
soon as a configuration file is opened. For details please refer to section 6.7.
4.4 Stop Communication
To end data transmission click on the Stop button (which will now change its caption back to “Start”
again) or click on the button in the toolbar.
Before the connection is stopped TWedge will execute the OnStop script from the Script Editor. This script may be used for closing any open files or database connections.
4.5 Load a Saved Configuration
To load a saved configuration, select File ► Open from the menu or click on the symbol in the tool bar. As an alternative TWedge can also be launched with the desired configuration right from the start (see Appendix A).

Page 10 of 42
TWedge User Documentation
5 User Interface
5.1 Main Window
Figure 2: Main Window
The main window is divided into the following areas:
Menu (see section 5.2)
Toolbar (see section 5.3)
General Information (see section 5.4)
Protocol Window (see section 5.5)
Operating Controls (see section 5.6)
5.2 Menu
5.2.1 File
The file menu is used for loading and storing different configurations.
New Creates a new configuration. All parameters will be reset to default values.
Open… Loads an existing configuration from file.
Save and Save As… Saves the current configuration to file.
Save Password Protected…
Saves the current configuration to file. The file will be encrypted and password protected (see Appendix B). When loading a password protected file the user can start communication,
but he cannot view or modify the configuration. For accessing the configuration the file needs to be unlocked.
Unlock Current File… Unlocks a password protected file. The password is required.
Exit Exits TWedge.

Page 11 of 42
TWedge User Documentation
5.2.2 Configuration
In the configuration menu all program settings are adjusted. You may configure the interface which is used for receiving (or sending) data, and you can configure the processing steps which are executed when data is received. Furthermore you can configure a hotkey and change general appli-cation preferences.
For details, please refer to chapter 6.
Interface… Configures the interface which is used for communication with the connected device (see
section 6.2).
Data Packets… Configures the parameters for data packaging (see section 6.3).
In the first step all received data is accumulated into packages before further processing. These settings specify the rules for data packaging.
Script Editor… Opens the TWedge Script Editor (see section 6.4).
The complete behavior of TWedge is specified through scripts. Using the Script Editor you can simulate keystrokes, access text files, connect to databases (via ODBC), send data to the connected device, and more.
Hotkey… Configures the Hotkey (see section 6.5).
The hotkey gives you the possibility to execute commands by pressing a predefined key or keyboard shortcut.
Logfile… Configures data logging (see section 6.6).
Data logging is an easy possibility to store the received data in text files.
Preferences… Configures additional TWedge preferences (see section 6.7).
You can specify start-up options (auto-start, minimize) and you can enable trace files (for debugging purposes).
5.2.3 Communication
Start Starts data acquisition.
Stop Stops data acquisition.
Restart Closes the connection and restarts data acquisition.
5.2.4 View
Toolbar Displays or hides the Toolbar.
Status Bar Displays or hides the Status bar.
Clear Protocol Clears the protocol window.
5.2.5 Help
Help Opens the documentation (this file).
License… To license your version (= deactivate the demo mode) you have two possibilities:
a) The activation code as received with your order must be registered with the TEC-IT activation server via Internet. This activation process enters the license key automatically.
b) Enter your license in this dialog. Your computer's System ID will be displayed in this
dialog (needed for ordering a “Single” license).
The license key will be stored permanently in the registry. Installing or moving the software to another computer requires re-entering the license key.
Check for Update… This option checks if a newer product version is available for download. Internet connectivity is required.
Go to www.tec-it.com If you want to learn more about our products, please visit us at http://www.tec-it.com. On this
page you will find the latest product versions and user documentations.
About TWedge Shows detailed version and copyright information.
5.3 Toolbar
The toolbar gives you quick access to the most important functions and settings:

Page 12 of 42
TWedge User Documentation
Figure 3: Toolbar
Creates a new configuration.
Opens an existing configuration from file.
Saves the current configuration to file.
Starts data acquisition.
Stops data acquisition.
Clears the protocol window.
Configures the interface.
Configures a hotkey.
Opens the TWedge Script Editor.
Configures general TWedge preferences.
Opens the about dialog.
5.4 TWedge Summary
The summary shows some program statistics:
Started at The starting date and time of the current TWedge session.
Received data packets The total amount of received data packets since the program was started.
Next Logfile The name of the logfile where the received data is stored.
The “–“ indicates that data logging is disabled.
5.5 Protocol Window
The protocol window displays important runtime messages:
Type The following icons are used for different message types:
… Data received
… Information
… Error
… JavaScript Error
… JavaScript Warning
… JavaScript Information
Date These fields show the date and time when the log entry was generated.
Time
Data / Message If data has been received, the current data packet will be displayed.
Otherwise any message text is shown.
In the protocol window a maximum of 1000 entries will be kept. When exceeding this limit the oldest messages will be discarded automatically.
5.6 Operating Controls
With these controls you can start, stop and exit TWedge:
Start / Stop Activates or deactivates data acquisition from the selected interface.
File Communi-
cation Configuration Help
Page 13 of 42
TWedge User Documentation
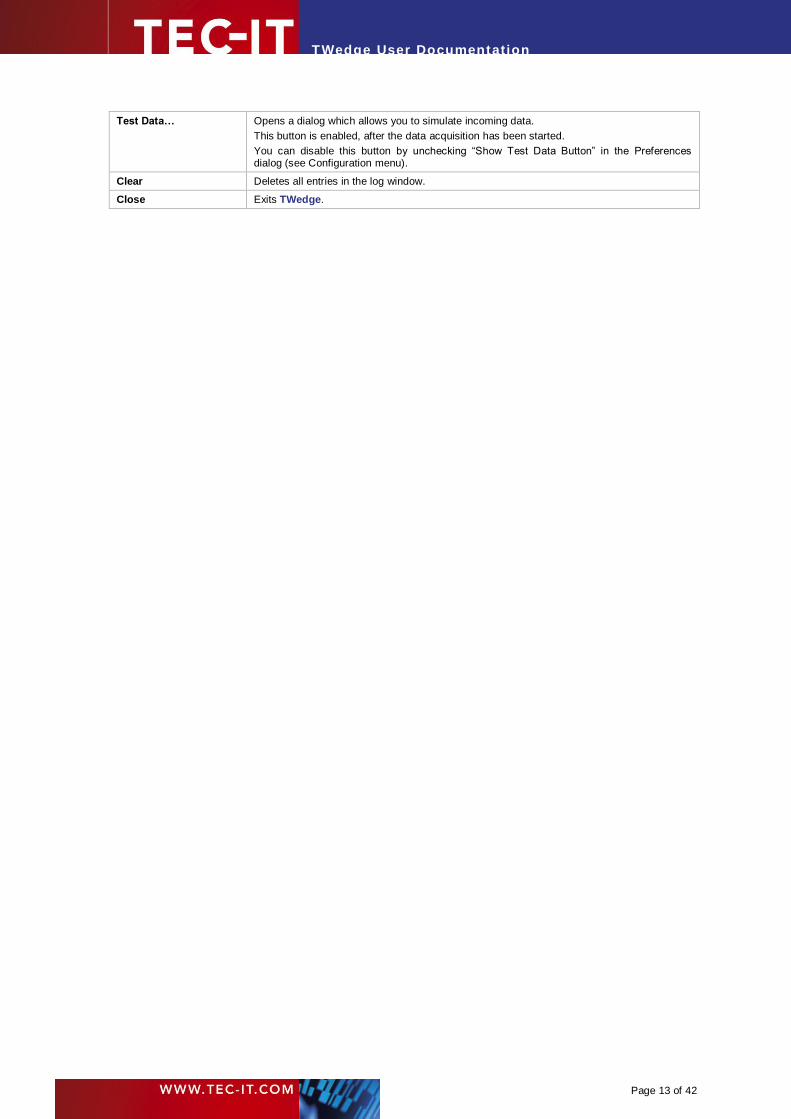
Test Data… Opens a dialog which allows you to simulate incoming data.
This button is enabled, after the data acquisition has been started.
You can disable this button by unchecking “Show Test Data Button” in the Preferences dialog (see Configuration menu).
Clear Deletes all entries in the log window.
Close Exits TWedge.
Page 14 of 42
TWedge User Documentation
6 Configuration
6.1 General
The configuration menu allows you to configure the following settings:
Interface (see section 6.2)
Data Packets (see section 6.3)
Script Editor (see section 6.4)
Hotkey (see section 6.5)
Logfile (see section 6.6)
Preferences (see section 6.7)
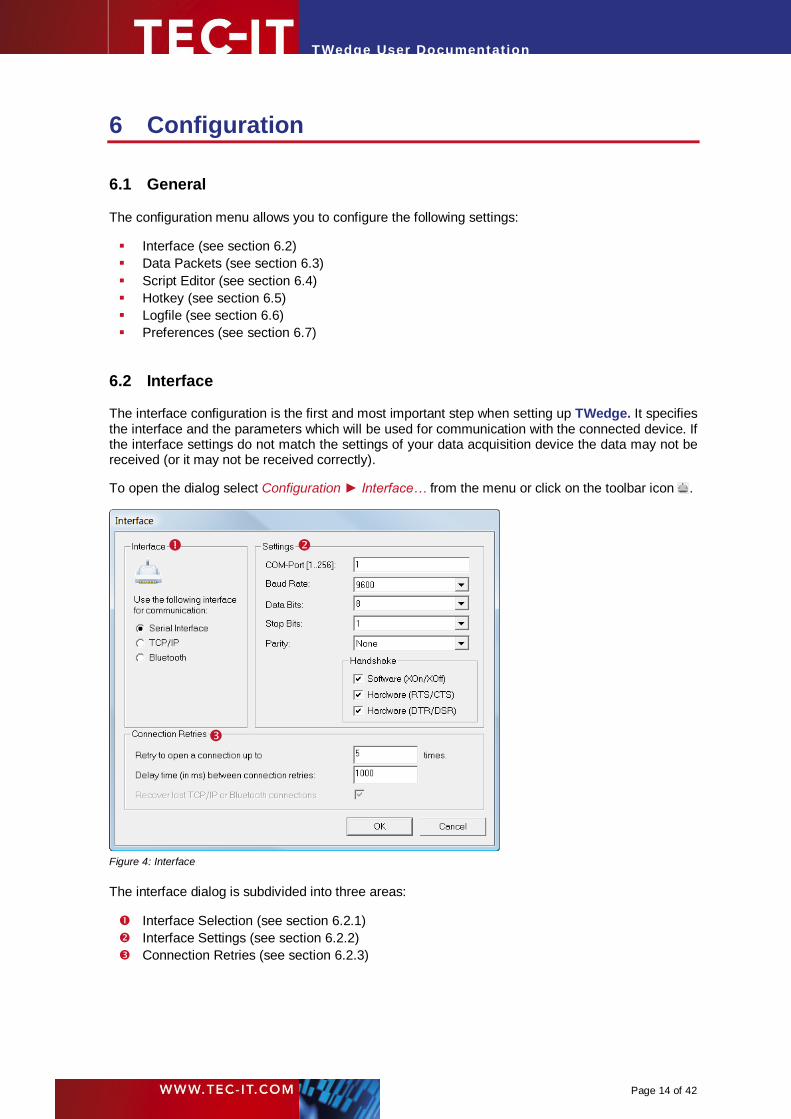
6.2 Interface
The interface configuration is the first and most important step when setting up TWedge. It specifies the interface and the parameters which will be used for communication with the connected device. If the interface settings do not match the settings of your data acquisition device the data may not be received (or it may not be received correctly).
To open the dialog select Configuration ► Interface… from the menu or click on the toolbar icon .
Figure 4: Interface
The interface dialog is subdivided into three areas:
Interface Selection (see section 6.2.1)
Interface Settings (see section 6.2.2)
Connection Retries (see section 6.2.3)

Page 15 of 42
TWedge User Documentation
6.2.1 Interface Selection
The following interfaces are available:
Serial Interface
TCP/IP (connects in client mode)
Bluetooth
Each of these interfaces has different settings:
6.2.2 Interface Settings
When the “Serial Interface” is selected you can connect to any serial device (or to any Bluetooth®
device which provides a Serial Port service).
6.2.2.1 Settings for the Serial (RS-232) Interface
COM-Port This is the port of your PC to which the device is connected. (COM1 to COM256).
Baud Rate The baud rate specifies the transmission speed in bits per second (9600, …, 115200, …, 256000).
Data Bits This setting specifies the number of data bits per transmission unit.
Stop Bits This setting specifies the number of stop bits per transmission unit.
Parity This setting specifies the use of parity bits per transmission unit.
The following handshake modes can be configured:
Software (XOn/XOff) Enables XOn/XOff Software Handshake.
Hardware (RTS/CTS) Enables RTS/CTS Hardware Handshake.
Hardware (DTR/DSR) Enables DTR/DSR Hardware Handshake.
If no handshake is required leave all checkboxes unmarked (not recommended).
6.2.2.2 TCP/IP Settings
When the Interface is set to “TCP/IP” you can connect to a host computer (or device) via TCP/IP. TWedge always connects in client mode.
Figure 5: Interface Settings - TCP/IP
The following settings are available:
Host The host name (e.g. www.tec-it.com) or the IP address (e.g. 127.0.0.1) of the TCP/IP server.
Service/Port The service name (e.g. http) or the port number (e.g. 80).
Use Keep-Alive Enables the TCP keep-alive with the specified time interval.
This setting must be enabled in order to detect a lost connection in a reasonable time (the default time is 2 hours). A connection may be lost if the host application crashes, if a network cable is unplugged, if you are moving out of range with a wireless device…
If enabled TWedge detects the failed connection and automatically tries to re-establish it
Page 16 of 42
TWedge User Documentation
(see also connection retries: Figure 4, ).
Keep-Alive Interval If there is no activity for the given time interval a keep-alive packet will be sent to detect,
whether the host is still reachable.
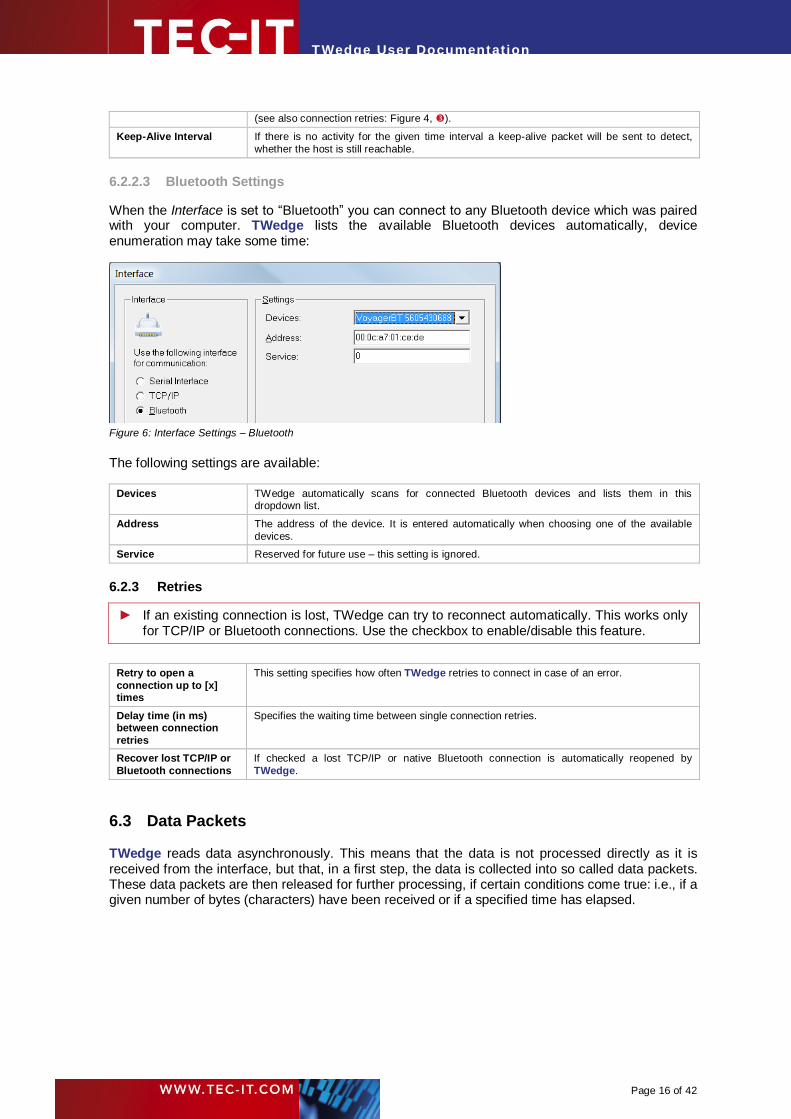
6.2.2.3 Bluetooth Settings
When the Interface is set to “Bluetooth” you can connect to any Bluetooth device which was paired with your computer. TWedge lists the available Bluetooth devices automatically, device enumeration may take some time:
Figure 6: Interface Settings – Bluetooth
The following settings are available:
Devices TWedge automatically scans for connected Bluetooth devices and lists them in this dropdown list.
Address The address of the device. It is entered automatically when choosing one of the available
devices.
Service Reserved for future use – this setting is ignored.
6.2.3 Retries
► If an existing connection is lost, TWedge can try to reconnect automatically. This works only for TCP/IP or Bluetooth connections. Use the checkbox to enable/disable this feature.
Retry to open a
connection up to [x] times
This setting specifies how often TWedge retries to connect in case of an error.
Delay time (in ms) between connection
retries
Specifies the waiting time between single connection retries.
Recover lost TCP/IP or
Bluetooth connections
If checked a lost TCP/IP or native Bluetooth connection is automatically reopened by
TWedge.
6.3 Data Packets
TWedge reads data asynchronously. This means that the data is not processed directly as it is received from the interface, but that, in a first step, the data is collected into so called data packets. These data packets are then released for further processing, if certain conditions come true: i.e., if a given number of bytes (characters) have been received or if a specified time has elapsed.
Page 17 of 42
TWedge User Documentation
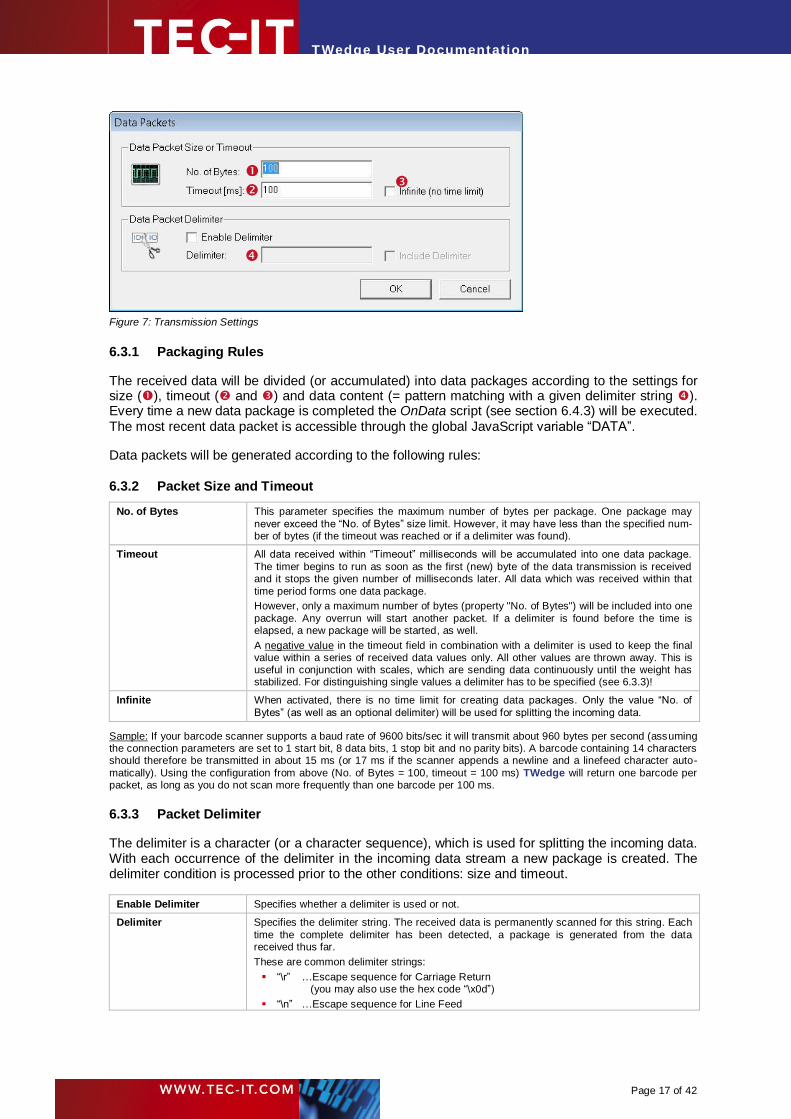
Figure 7: Transmission Settings
6.3.1 Packaging Rules
The received data will be divided (or accumulated) into data packages according to the settings for size (), timeout ( and ) and data content (= pattern matching with a given delimiter string ). Every time a new data package is completed the OnData script (see section 6.4.3) will be executed. The most recent data packet is accessible through the global JavaScript variable “DATA”.
Data packets will be generated according to the following rules:
6.3.2 Packet Size and Timeout
No. of Bytes This parameter specifies the maximum number of bytes per package. One package may
never exceed the “No. of Bytes” size limit. However, it may have less than the specified num-ber of bytes (if the timeout was reached or if a delimiter was found).
Timeout All data received within “Timeout” milliseconds will be accumulated into one data package.
The timer begins to run as soon as the first (new) byte of the data transmission is received and it stops the given number of milliseconds later. All data which was received within that
time period forms one data package.
However, only a maximum number of bytes (property "No. of Bytes") will be included into one
package. Any overrun will start another packet. If a delimiter is found before the time is elapsed, a new package will be started, as well.
A negative value in the timeout field in combination with a delimiter is used to keep the final value within a series of received data values only. All other values are thrown away. This is useful in conjunction with scales, which are sending data continuously until the weight has stabilized. For distinguishing single values a delimiter has to be specified (see 6.3.3)!
Infinite When activated, there is no time limit for creating data packages. Only the value “No. of
Bytes” (as well as an optional delimiter) will be used for splitting the incoming data.
Sample: If your barcode scanner supports a baud rate of 9600 bits/sec it will transmit about 960 bytes per second (assuming the connection parameters are set to 1 start bit, 8 data bits, 1 stop bit and no parity bits). A barcode containing 14 characters should therefore be transmitted in about 15 ms (or 17 ms if the scanner appends a newline and a linefeed character auto-
matically). Using the configuration from above (No. of Bytes = 100, timeout = 100 ms) TWedge will return one barcode per packet, as long as you do not scan more frequently than one barcode per 100 ms.
6.3.3 Packet Delimiter
The delimiter is a character (or a character sequence), which is used for splitting the incoming data. With each occurrence of the delimiter in the incoming data stream a new package is created. The delimiter condition is processed prior to the other conditions: size and timeout.
Enable Delimiter Specifies whether a delimiter is used or not.
Delimiter Specifies the delimiter string. The received data is permanently scanned for this string. Each
time the complete delimiter has been detected, a package is generated from the data received thus far.
These are common delimiter strings:
“\r” …Escape sequence for Carriage Return (you may also use the hex code “\x0d”)
“\n” …Escape sequence for Line Feed

Page 18 of 42
TWedge User Documentation
(you may also use the hex code “\x0a”)
“\r\n” …Carriage Return + Line Feed (you may also use the hex code “\x0d\x0a”)
Include Delimiter This flag specifies, if the delimiter should remain part of the data package or if it should be
omitted (stripped off).
Sample: If your barcode reader automatically appends a carriage return + line feed at the end of the scanned barcodes you could use the delimiter string “\r\n” for identifying data packets. Even when setting the “Timeout” to one minute you would still receive reasonable packages containing one barcode each.
► For the negative timeout feature (see 6.3.2) a delimiter needs to be specified! That is the only possibility for TWedge to identify where one received value ends and where the next
begins.

Page 19 of 42
TWedge User Documentation
6.4 Script Editor
In the Script Editor you specify the behavior of TWedge by using JavaScript™ code. The default behavior is to send the received data as keystrokes. But you also have the possibility to access text files, connect to databases (via ODBC), send data to the connected device, and more.
Figure 8: Script Editor
Checkbox enables or disables JavaScript execution.
Using the combined tree and list view in you can browse through available variables, constants, functions and common JavaScript statements. For each selection in a quick help is available in . By double-clicking the entry or by pressing the Insert button the selected entry will be inserted at the current cursor position in the code window .
The tree view also contains some sample applications. When inserted they will replace all of the code sections (Global Definitions, OnStart, etc.). These sample applications can be tried out for demonstration purposes. They are useful in order to learn how certain functions have to be used.
In you select different code sections for editing. Each code section will be executed upon diffe-rent events (see below).
► Please note: Most of the functions listed in the tree view are TWedge specific language ex-tensions! Standard JavaScript functions are not listed here (with exceptions), although they are (of course) supported.
► For additional help on JavaScript, please refer to chapters 7 and 8. These chapters will provide some TWedge specific JavaScript samples and explain them. For any general
issues, please refer to any JavaScript language reference!

Page 20 of 42
TWedge User Documentation
6.4.1 Global Definitions
The “Global Definitions” section is used for declaring variables and function. These variables and functions can then be used in all other code sections (OnStart, OnData, OnStop, OnHotkey and OnTimer).
6.4.2 OnStart
The “OnStart” section is executed when the communication is started (when the start button is pres-sed). Usually this section is used for initialization routines like opening files and/or database con-nections, starting or activating applications, and so on.
6.4.3 OnData
The “OnData” section is executed every time a data packet is received (see section 6.3). The data packet is provided in the variable “DATA” (for binary data use “DATARAW” see 7.2.2).
Usually the received data is simulated as keystroke sequence, so you can paste it into any running application. However, you may also write the data to a text file or to a database at will. The packet itself can be used as is, or it can be modified (cropped, extended, etc.).
6.4.4 OnStop
The “OnStop” section is executed when communication is stopped (when the stop button is pres-sed). Usually this section is used for cleaning up (closing files and/or database connections, etc.).
6.4.5 OnHotkey
The “OnHotkey” section is executed every time the hotkey is pressed. Therefore the hotkey must be enabled (see section 6.5).
A typical application for this feature is data acquisition on demand (this is, when the device needs to receive a certain control string before it starts sending data). In order make the device start sending you can use the function WriteToDevice. This function transmits a custom string to the connected device.
6.4.6 OnTimer
The “OnTimer” section is executed regularly in given time intervals. Therefore the timer must be started.
In order to start the timer use the function SetTimer. Usually this is done in the “OnStart” section. To stop the timer call the function KillTimer. This function should be placed at the beginning of the “OnStop” section.

Page 21 of 42
TWedge User Documentation
6.5 Hotkey
The hotkey is used to trigger JavaScript execution upon user interaction.
If the hotkey is enabled, TWedge executes the OnHotkey script (see section 6.4.5) each time the predefined key or key combination is pressed. The script may be used for starting data acquisition on demand (this is, if the device needs to receive a certain control string before it starts sending data).
► Please note: The hotkey will be activated as soon as the communication is started, and it will be deactivated if the communication is stopped.
Figure 9: Hotkey Settings
Enable Hotkey Enables/disables the hotkey.
Modifiers Key modifiers for the selected key. (Multiple selections are possible).
Key Key selection.
Example: If you want to use the key combination Ctrl+F9 as hotkey, you have to select "F9" as key. Additionally press the "Ctrl" button in the Modifiers.
Script Editor… This button opens the script editor so you can directly modify the code in the OnHotkey secti-
on.
► Certain key combinations may not work as hotkey (e.g. Win+TAB). Please try different key combinations instead!
Page 22 of 42
TWedge User Documentation
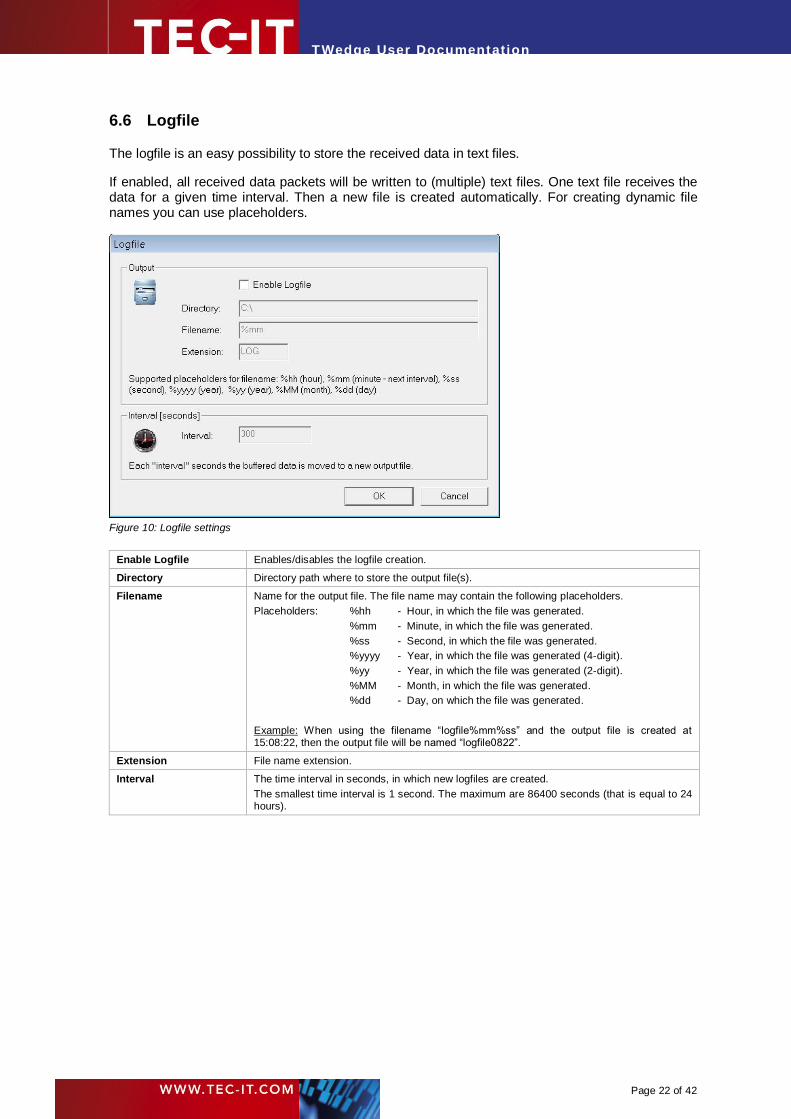
6.6 Logfile
The logfile is an easy possibility to store the received data in text files.
If enabled, all received data packets will be written to (multiple) text files. One text file receives the data for a given time interval. Then a new file is created automatically. For creating dynamic file names you can use placeholders.
Figure 10: Logfile settings
Enable Logfile Enables/disables the logfile creation.
Directory Directory path where to store the output file(s).
Filename Name for the output file. The file name may contain the following placeholders.
Placeholders: %hh - Hour, in which the file was generated.
%mm - Minute, in which the file was generated.
%ss - Second, in which the file was generated.
%yyyy - Year, in which the file was generated (4-digit).
%yy - Year, in which the file was generated (2-digit).
%MM - Month, in which the file was generated.
%dd - Day, on which the file was generated.
Example: When using the filename “logfile%mm%ss” and the output file is created at 15:08:22, then the output file will be named “logfile0822”.
Extension File name extension.
Interval The time interval in seconds, in which new logfiles are created.
The smallest time interval is 1 second. The maximum are 86400 seconds (that is equal to 24 hours).

Page 23 of 42
TWedge User Documentation
6.7 Preferences
In the preferences you specify the on-load behavior for configuration files. Additionally you have the possibility to create trace files, which may be valuable for our support team in case of an error.
The on-load behavior is adjusted in the Start-Up and Tray Settings: The options “Automatically start data acquisition” and “Automatically minimize TWedge” are both taken into account on loading a configuration file. “Minimize to system tray” on the other hand, is a more general option. It tells TWedge to move either to the system tray or to the taskbar when being minimized.
Example:
If you want to start TWedge automatically, you have to check option , confirm with OK, and then save the configuration file. Every time this specific configuration is loaded, data acquisition will now start automatically. (Please note: If you save a file and then load the same file, this configuration will NOT be actually be loaded, since the file is already open!)
Figure 11: Start-Up Options
Automatically start data
acquisition
If checked, data acquisition will start automatically every time this configuration is loaded.
Automatically minimize
TWedge
If checked, TWedge will be minimized automatically every time this configuration is loaded.
Minimize to system tray If checked, TWedge will always minimize to the system tray instead of the taskbar.
When minimized to the tray use the right mouse button to start, stop or exit TWedge. In order to restore TWedge to its normal window state, double-click on the tray icon.
Enable tracing for data interface
If checked, a trace file for the internal TConnector component will be created. You can enable the trace file option even during data acquisition. The files are stored in the temp
directory of the current user.
Enable tracing for
JavaScript
If checked, a trace file for JavaScript execution will be created. You can enable the trace file
option even during data acquisition. The files are stored in the temp directory of the current user.
Show Test Data button If checked, a button will appear next to the Start button to simulate incoming data
Display received data in
Protocol window
If checked, received device data is automatically displayed in Protocol window.
Display Data as Hex values
If checked, received data is displayed in hexadecimal-notation.

Page 24 of 42
TWedge User Documentation
7 JavaScript
7.1 General
This chapter explains the most commonly required steps for processing the received data. The Script Editor of TWedge provides a complete overview for supported JavaScript functions and methods.
7.2 Predefined Variables
The received device data is provided in the predefined JavaScript variables “DATA” and “DATARAW”.
7.2.1 “DATA”
The input data is treated as Windows-1252 character set and converted to Unicode (UTF-16). The result of this conversion is stored in the JavaScript variable “DATA”. Use this variable if you want to process text input or perform JavaScript string operations.
7.2.2 “DATARAW”
The device data is copied to the JavaScript variable “DATARAW” without any further conversion. Use this variable if you want to deal with binary data (e.g. when using string.charCodeAt(..) to get the Byte value at a specific string position).
7.3 Modifying the Input Data
For some applications you will need to extract only parts of the received data, or you will need to append constant strings. Below you find some examples how to do this.
The most important string manipulation functions are described in the combined tree and list view in the Script Editor window (see Code Snippets ► Functions ► Strings). So you have a quick help at hand when editing the code. For a complete reference on string functions, please refer to any Java-Script help.
All of the following samples return new strings. These strings can then be assigned to variables, or they can be directly passed as function parameters (e.g., for simulating keystrokes).
Examples:
Use the first five characters of the input only:
Left(DATA, 5)
Cut the first two characters of the input string:
Right(DATA, DATA.length - 2)
Extract characters 2 to 5 of the received data. This means the first two characters are cut off. Only the next three characters are used. Please note: For the substring function the start and end indices are zero-based. The end character is not included.
DATA.substring(2, 5)
Prepend the prefix “pfx“ and append the suffix “sfx” to the input data:
Page 25 of 42
TWedge User Documentation
"pfx" + DATA + "sfx"
7.4 Keyboard Simulation
For simulating keyboard input use the function SendKeyStrokes. This function simulates the given input string as keystroke sequence. Thus you can “paste” the received data directly into the re-quired application.
► Please note: If the TWedge window has the focus, keyboard simulation will be suppressed.
Keyboard simulation can only be used for other application windows.
Example:
// simulate the received data as keystrokes:
SendKeyStrokes(DATA);
TWedge pauses after every keystroke for a short time (default: 10 ms) to give the receiving application some time to process the keystroke. The delay can be changed by calling the function with an additional parameter.
Example:
// simulate the received data as keystrokes and wait 100 ms after every character
SendKeyStrokes(DATA, 100);
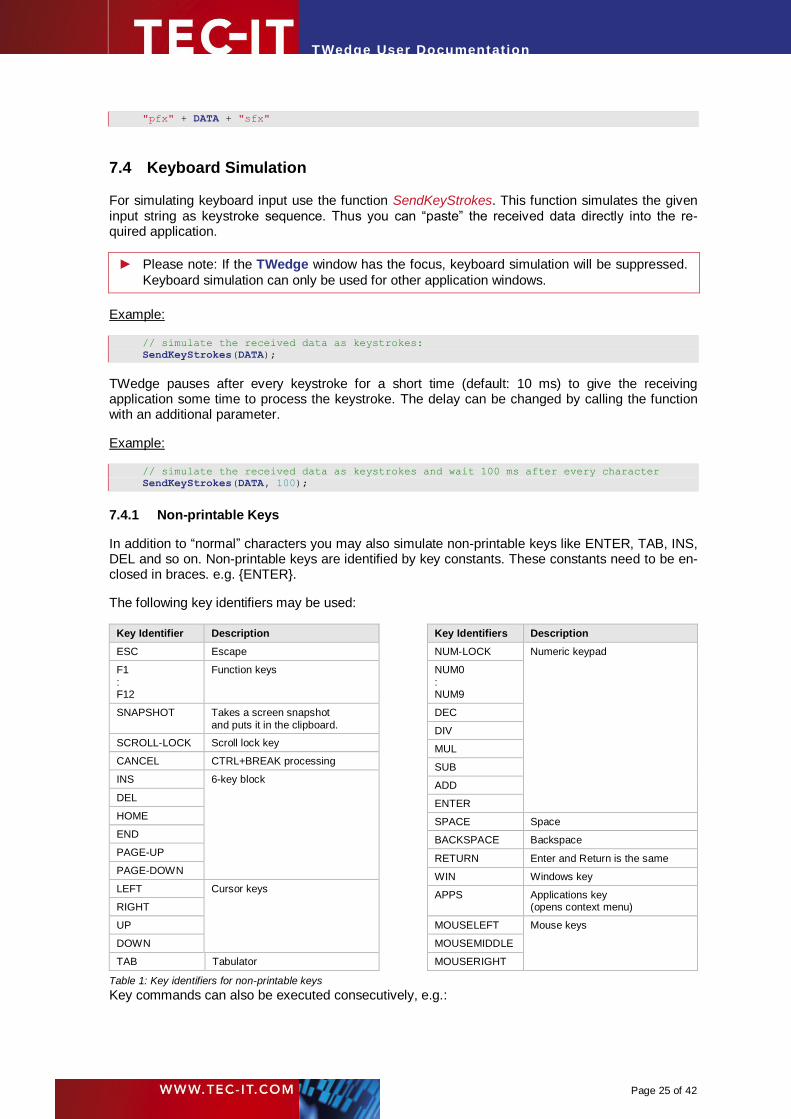
7.4.1 Non-printable Keys
In addition to “normal” characters you may also simulate non-printable keys like ENTER, TAB, INS, DEL and so on. Non-printable keys are identified by key constants. These constants need to be en-closed in braces. e.g. {ENTER}.
The following key identifiers may be used:
Key Identifier Description
ESC Escape
F1
: F12
Function keys
SNAPSHOT Takes a screen snapshot
and puts it in the clipboard.
SCROLL-LOCK Scroll lock key
CANCEL CTRL+BREAK processing
INS 6-key block
DEL
HOME
END
PAGE-UP
PAGE-DOWN
LEFT Cursor keys
RIGHT
UP
DOWN
TAB Tabulator
Table 1: Key identifiers for non-printable keys
Key Identifiers Description
NUM-LOCK Numeric keypad
NUM0
: NUM9
DEC
DIV
MUL
SUB
ADD
ENTER
SPACE Space
BACKSPACE Backspace
RETURN Enter and Return is the same
WIN Windows key
APPS Applications key (opens context menu)
MOUSELEFT Mouse keys
MOUSEMIDDLE
MOUSERIGHT
Key commands can also be executed consecutively, e.g.:

Page 26 of 42
TWedge User Documentation
// type the string 'ab05', then press the enter and the tab key:
SendKeyStrokes("ab05{ENTER}{TAB}");
7.4.2 Key Combinations
It is also possible to press keys simultaneously with modifier keys (SHIFT, CTRL or ALT). To do this, all keys must be enclosed in a single pair of braces {} separated by a plus sign '+'.
Example:
// press Ctrl+S (save the current document):
SendKeyStrokes("{CTRL+s}");
// press Ctrl+Alt+e (write a '€' sign on a German keyboard layout)
SendKeyStrokes("{CTRL+ALT+e}");
It is also possible to call SendKeyStrokes with an additional parameter. This parameter is used for specifying modifier keys.
Example:
// press Ctrl+S (save the current document):
SendKeyStrokes(CTRL, "s");
// press Ctrl+Alt+e (write a '€' sign on a German keyboard layout)
SendKeyStrokes(CTRL+ALT, "e");
7.4.3 Delay Character
The delay character is used to force a delay between two simulated keystrokes in the SendKey-Strokes function: Each time the specified character occurs in the passed string a delay will be inserted instead of simulating a keystroke. In order to use this feature you have to specify a delay character and the required delay time. Then enable delay character processing using the function EnableDelayCharacter().
The delay character functions are described in the section Code Snippets ► Functions ► Input/Output ► Keyboard in the Code Editor.
Example:
Set the delay character to comma (,) and the delay time to 100 milliseconds:
SetDelayCharacter(",");
SetDelayTime(100);
EnableDelayCharacter(true);
Now the comma is interpreted as delay character. The following keystroke simulation will pause be-tween each character in the string “Hello world!”.
SendKeyStrokes("H,e,l,l,o, ,w,o,r,l,d,!");
7.5 User Input
The function InputBox is used to prompt the user for input during runtime. Calling this function pauses script execution until the user dismisses the upcoming dialog.
InputBox("String", "Please enter an arbitrary string");

Page 27 of 42
TWedge User Documentation
Figure 12: InputBox - String
To enable input validation the function has to be called with three additional parameters:
InputBox("Number", "Please enter an integer value between 1 and 10", LONG, 0, 10);
The third parameter specifies the expected data type of the input while the fourth and fifth parameter specify the allowed minimum and maximum value.
Figure 13: InputBox - Number
7.6 Using the Clipboard
The clipboard can be accessed with the functions CopyToClipboard and GetFromClipboard. This is useful for larger amounts of data, where a simulation of keystrokes is not feasible or too slow.
These functions are described in the section Code Snippets ► Functions ► Input/Output ► Clipboard in the Code Editor.
Example:
// Copy received data to the Clipboard and paste it into notepad.
CopyToClipboard(DATA);
ActivateWindow ("Notepad");
SendKeyStrokes("{CTRL+v}");
If the content of the clipboard could not be successfully written or read, the operation is retried a number of times (default: 5) after a short delay (default: 100 ms). These settings can be changed, by calling the function with 2 additional parameters.
Example:
// Copy received data to the Clipboard and retry the operation 2 times after 200ms in
case of an error.
CopyToClipboard(DATA, 2, 200);
Page 28 of 42
TWedge User Documentation
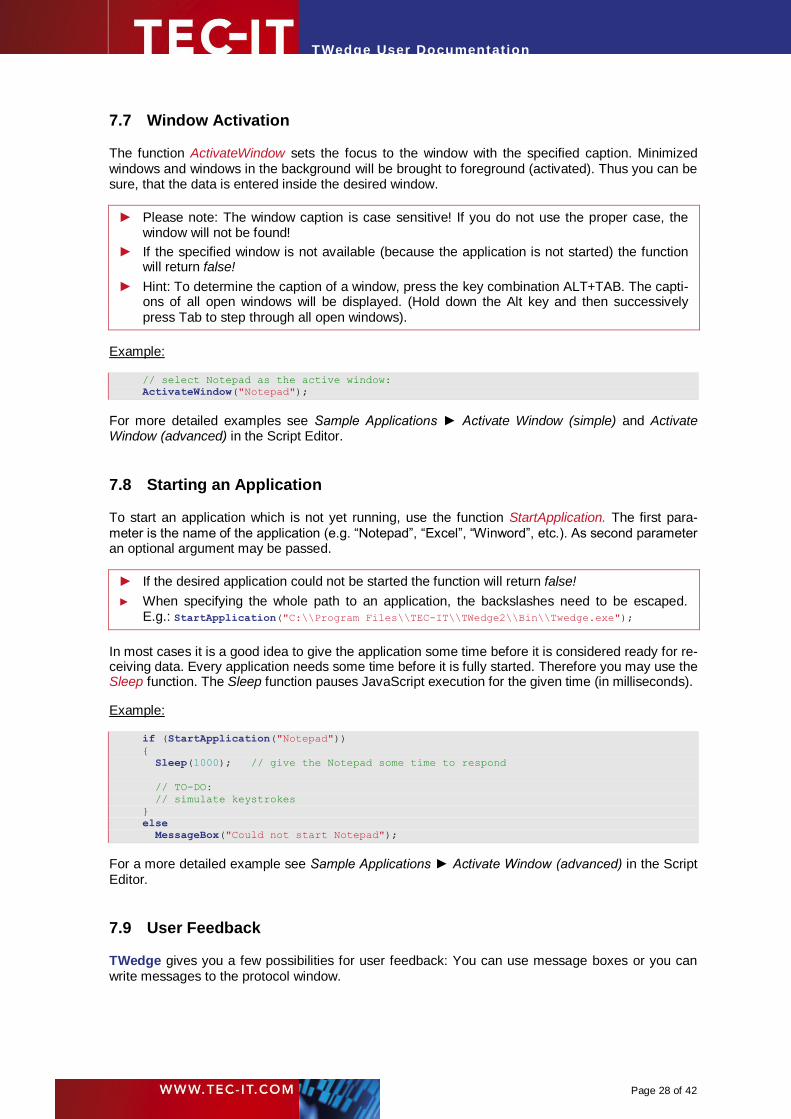
7.7 Window Activation
The function ActivateWindow sets the focus to the window with the specified caption. Minimized windows and windows in the background will be brought to foreground (activated). Thus you can be sure, that the data is entered inside the desired window.
► Please note: The window caption is case sensitive! If you do not use the proper case, the window will not be found!
► If the specified window is not available (because the application is not started) the function will return false!
► Hint: To determine the caption of a window, press the key combination ALT+TAB. The capti-ons of all open windows will be displayed. (Hold down the Alt key and then successively press Tab to step through all open windows).
Example:
// select Notepad as the active window:
ActivateWindow("Notepad");
For more detailed examples see Sample Applications ► Activate Window (simple) and Activate Window (advanced) in the Script Editor.
7.8 Starting an Application
To start an application which is not yet running, use the function StartApplication. The first para-meter is the name of the application (e.g. “Notepad”, “Excel”, “Winword”, etc.). As second parameter an optional argument may be passed.
► If the desired application could not be started the function will return false!
► When specifying the whole path to an application, the backslashes need to be escaped. E.g.: StartApplication("C:\\Program Files\\TEC-IT\\TWedge2\\Bin\\Twedge.exe");
In most cases it is a good idea to give the application some time before it is considered ready for re-ceiving data. Every application needs some time before it is fully started. Therefore you may use the Sleep function. The Sleep function pauses JavaScript execution for the given time (in milliseconds).
Example:
if (StartApplication("Notepad"))
{
Sleep(1000); // give the Notepad some time to respond
// TO-DO:
// simulate keystrokes
}
else
MessageBox("Could not start Notepad");
For a more detailed example see Sample Applications ► Activate Window (advanced) in the Script Editor.
7.9 User Feedback
TWedge gives you a few possibilities for user feedback: You can use message boxes or you can write messages to the protocol window.

Page 29 of 42
TWedge User Documentation
7.9.1 Message Box
A Message-Box can be displayed using the MessageBox function. Code execution will be paused until the message has been acknowledged by pressing the OK Button.
Example:
MessageBox("Hello world!");
7.9.2 Protocol Entry
Writing messages to the protocol window can be done using the Notify functions. These functions cause no program interruption. You can display three different kinds of messages: infos, warnings and error messages. These messages differ only in the icon which is displayed in the left column.
Example:
NotifyInfo("This is an info text.");
NotifyWarning("This is a warning.");
NotifyError("This is an error.");
7.9.3 Acoustic Feedback
For acoustic feedback use the function Beep. This function uses two parameters: frequency and duration.
Example:
// play a short beep (1000 Hertz, 100 milliseconds):
Beep(1000,100);
7.10 Accessing Text Files
Usually the following pattern is used for writing to files:
// create a new TFile object:
var myFile = new TFile();
// open the file for writing:
// this will create a new file on the hard disk (or overwrite an existing file)
// then make sure, that the file was opened successfully
if (myFile.Open("C:/MyFile.txt", "w"))
{
// write something into the file
// and check for successful operation:
if (myFile.Write("I am the content of this text file.") == -1)
MessageBox("Error writing to file!\n" + myFile.LastError);
// close the file
myFile.Close();
}
else
MessageBox("Could not open file!\n" + myFile.LastError);
When opening a file for reading you can read line after line until the end of the file (EOF) is reached:
// create a new TFile object:
var myFile = new TFile();
// open the file for reading:
// continue only, if the file was opened successfully
if (myFile.Open("C:/MyFile.txt", "r"))
{
// as long as the end of the file is not reached:
Page 30 of 42
TWedge User Documentation
// read line after line and display it in the protocol window
while (!myFile.EOF)
{
NotifyInfo (myFile.ReadLine());
}
// close the file
myFile.Close();
}
else
MessageBox("Could not open file!\n" + myFile.LastError);
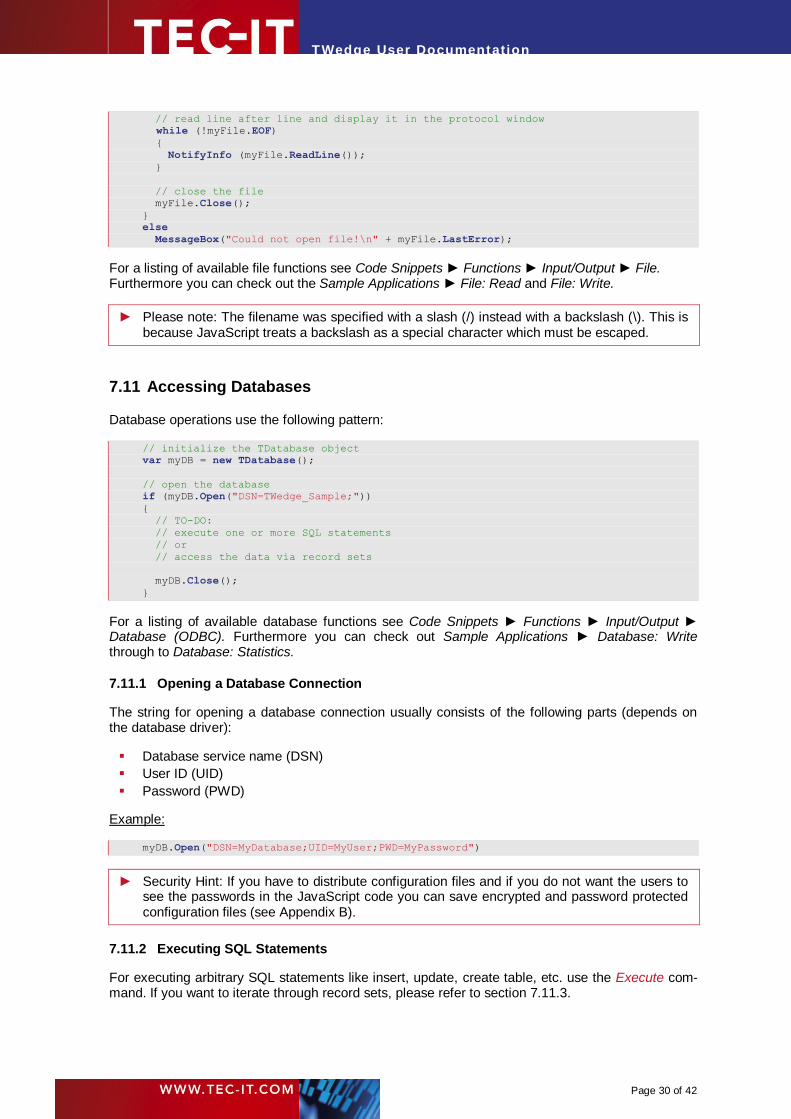
For a listing of available file functions see Code Snippets ► Functions ► Input/Output ► File. Furthermore you can check out the Sample Applications ► File: Read and File: Write.
► Please note: The filename was specified with a slash (/) instead with a backslash (\). This is because JavaScript treats a backslash as a special character which must be escaped.
7.11 Accessing Databases
Database operations use the following pattern:
// initialize the TDatabase object
var myDB = new TDatabase();
// open the database
if (myDB.Open("DSN=TWedge_Sample;"))
{
// TO-DO:
// execute one or more SQL statements
// or
// access the data via record sets
myDB.Close();
}
For a listing of available database functions see Code Snippets ► Functions ► Input/Output ► Database (ODBC). Furthermore you can check out Sample Applications ► Database: Write through to Database: Statistics.
7.11.1 Opening a Database Connection
The string for opening a database connection usually consists of the following parts (depends on the database driver):
Database service name (DSN)
User ID (UID)
Password (PWD)
Example:
myDB.Open("DSN=MyDatabase;UID=MyUser;PWD=MyPassword")
► Security Hint: If you have to distribute configuration files and if you do not want the users to see the passwords in the JavaScript code you can save encrypted and password protected configuration files (see Appendix B).
7.11.2 Executing SQL Statements
For executing arbitrary SQL statements like insert, update, create table, etc. use the Execute com-mand. If you want to iterate through record sets, please refer to section 7.11.3.

Page 31 of 42
TWedge User Documentation
Example:
// execute a SQL statement:
var nRet = myDB.Execute("INSERT INTO MyTable (ScanData) VALUES('" + DATA + "');");
if (nRet < -1)
MessageBox ("Error during SQL statement:" + myDB.LastError);
7.11.3 Using Record Sets
Record sets are used for reading and/or updating records in a table. For more details see below:
7.11.3.1 Open a Record Set
First the record set must be opened. Therefore use the Select method. As parameter use either the table name or a select statement:
Example:
var myRecordset = myDB.Select("SELECT * FROM MyTable");
if (myRecordset.IsOpen)
{
// TO-DO:
// move through the record set by moving the cursor
// and access single records
}
► Please note: If you want to update records the correct cursor type and the correct concurren-cy must be specified (depends on the database driver). Example: var myRecordset = myDB.Select("MyTable", myDB.Dynaset, myDB.Values);
7.11.3.2 Cursor Positioning
Once the record set is open, you can position the cursor using the methods MoveFirst, MoveNext and MoveLast. The EOF property will signal if you have reached the end of the records.
Example:
// iterate through all records in the record set
while(!myRecordset.EOF)
{
// TO-DO:
// access the data in the current record
// move to the next record
myRecordset.MoveNext();
}
7.11.3.3 Accessing Data
Two functions are available to retrieve or to set the value of a database field. The value of a database-field is retrieved through the GetValue function:
myRecordset.GetValue("MyField")
And the value is set with the SetValue function:
myRecordset.SetValue("MyField", Value)
► Please note: Field names are case sensitive! If you do not use the proper case, the fields will not be recognized!
Page 32 of 42
TWedge User Documentation
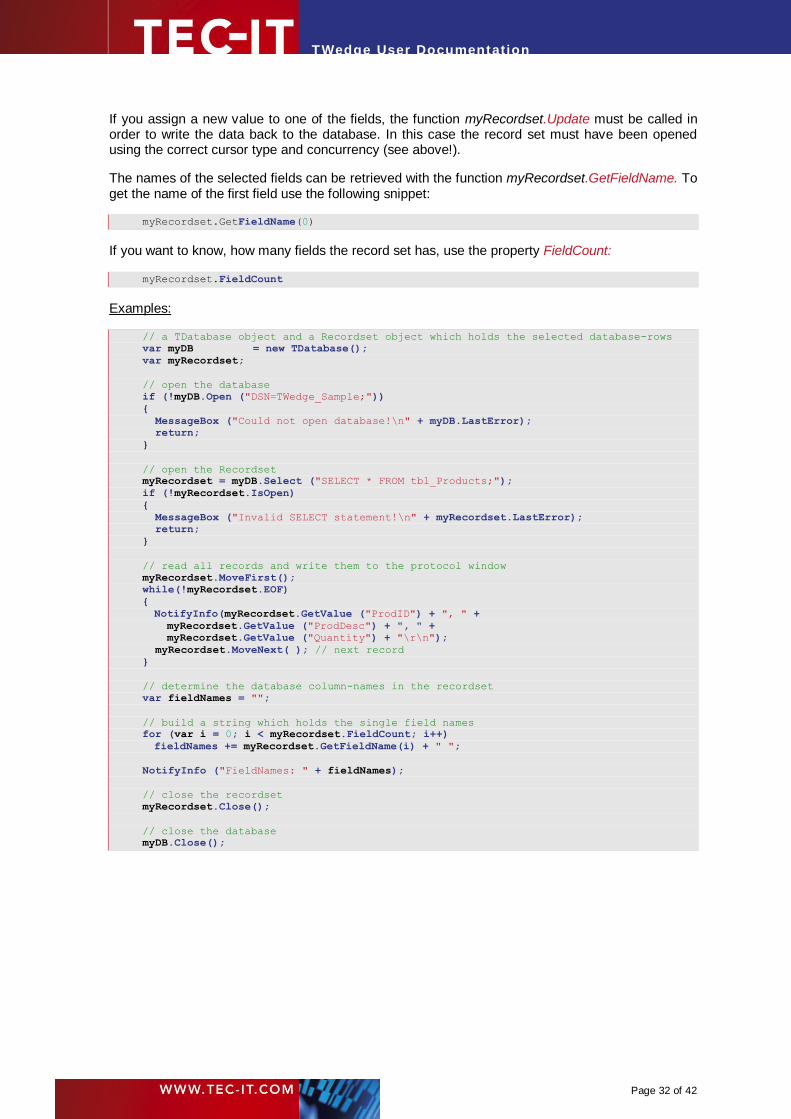
If you assign a new value to one of the fields, the function myRecordset.Update must be called in order to write the data back to the database. In this case the record set must have been opened using the correct cursor type and concurrency (see above!).
The names of the selected fields can be retrieved with the function myRecordset.GetFieldName. To get the name of the first field use the following snippet:
myRecordset.GetFieldName(0)
If you want to know, how many fields the record set has, use the property FieldCount:
myRecordset.FieldCount
Examples:
// a TDatabase object and a Recordset object which holds the selected database-rows
var myDB = new TDatabase();
var myRecordset;
// open the database
if (!myDB.Open ("DSN=TWedge_Sample;"))
{
MessageBox ("Could not open database!\n" + myDB.LastError);
return;
}
// open the Recordset
myRecordset = myDB.Select ("SELECT * FROM tbl_Products;");
if (!myRecordset.IsOpen)
{
MessageBox ("Invalid SELECT statement!\n" + myRecordset.LastError);
return;
}
// read all records and write them to the protocol window
myRecordset.MoveFirst();
while(!myRecordset.EOF)
{
NotifyInfo(myRecordset.GetValue ("ProdID") + ", " +
myRecordset.GetValue ("ProdDesc") + ", " +
myRecordset.GetValue ("Quantity") + "\r\n");
myRecordset.MoveNext( ); // next record
}
// determine the database column-names in the recordset
var fieldNames = "";
// build a string which holds the single field names
for (var i = 0; i < myRecordset.FieldCount; i++)
fieldNames += myRecordset.GetFieldName(i) + " ";
NotifyInfo ("FieldNames: " + fieldNames);
// close the recordset
myRecordset.Close();
// close the database
myDB.Close();
Page 33 of 42
TWedge User Documentation
8 Example
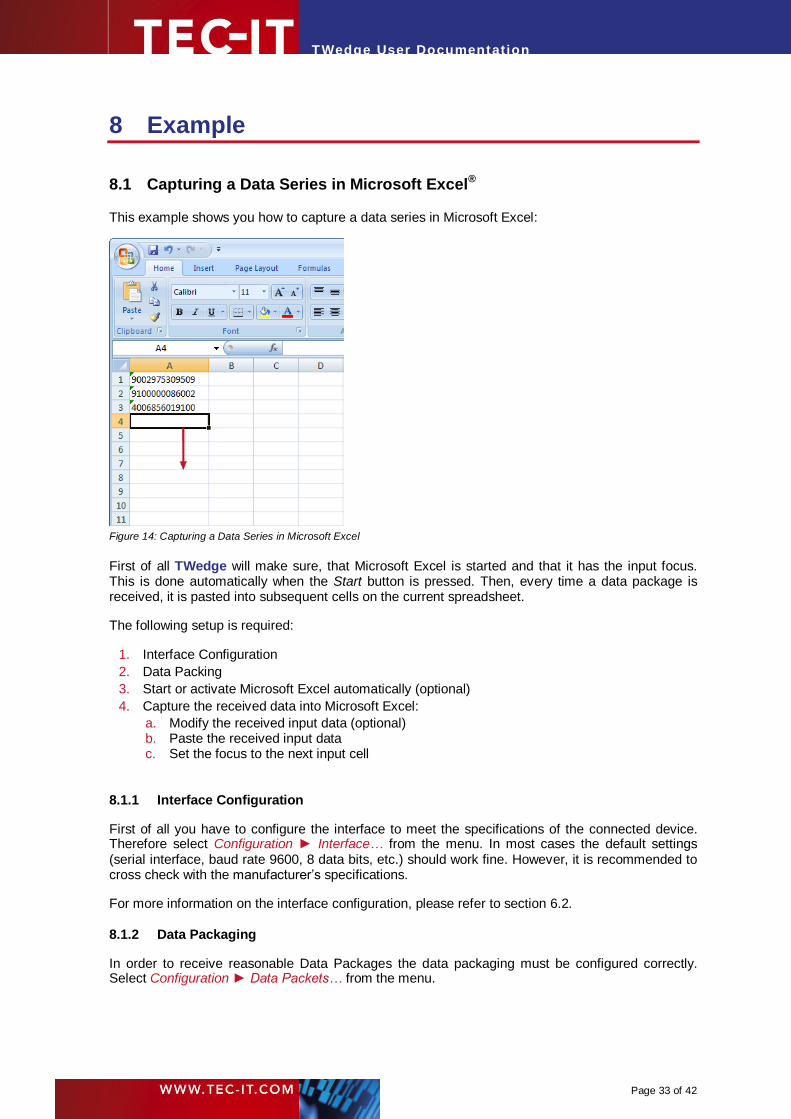
8.1 Capturing a Data Series in Microsoft Excel®
This example shows you how to capture a data series in Microsoft Excel:
Figure 14: Capturing a Data Series in Microsoft Excel
First of all TWedge will make sure, that Microsoft Excel is started and that it has the input focus. This is done automatically when the Start button is pressed. Then, every time a data package is received, it is pasted into subsequent cells on the current spreadsheet.
The following setup is required:
1. Interface Configuration
2. Data Packing
3. Start or activate Microsoft Excel automatically (optional)
4. Capture the received data into Microsoft Excel:
a. Modify the received input data (optional) b. Paste the received input data c. Set the focus to the next input cell
8.1.1 Interface Configuration
First of all you have to configure the interface to meet the specifications of the connected device. Therefore select Configuration ► Interface… from the menu. In most cases the default settings (serial interface, baud rate 9600, 8 data bits, etc.) should work fine. However, it is recommended to cross check with the manufacturer’s specifications.
For more information on the interface configuration, please refer to section 6.2.
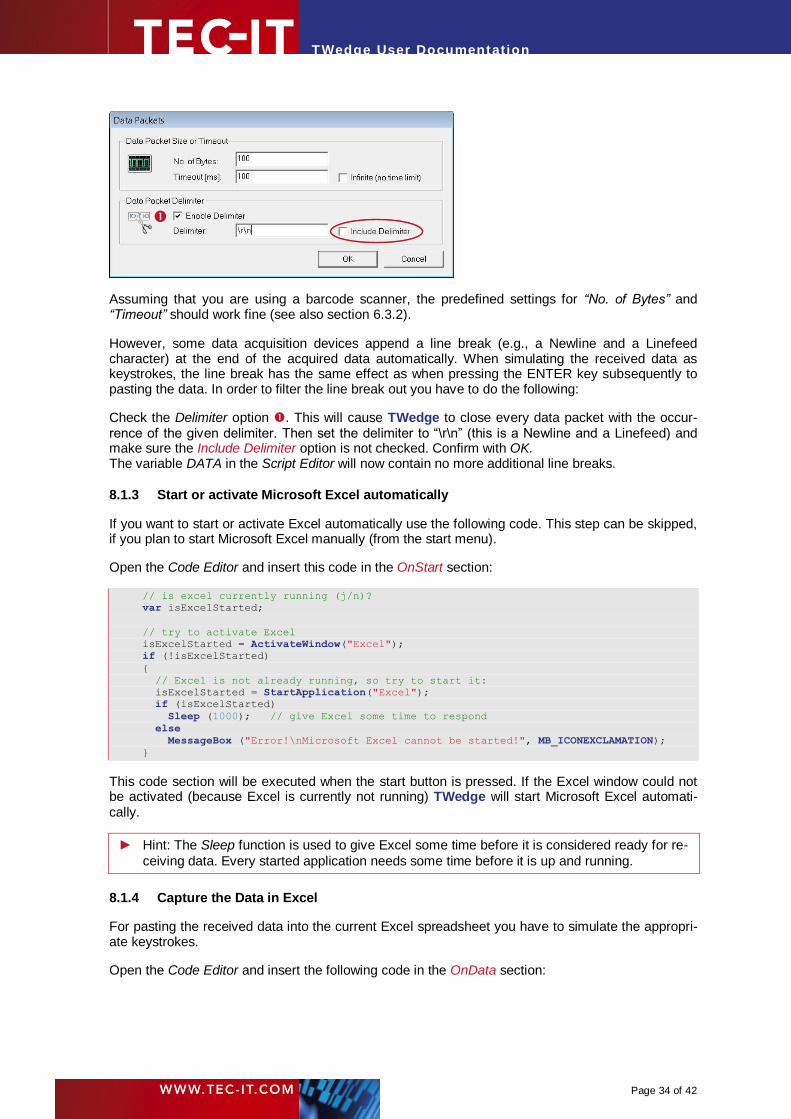
8.1.2 Data Packaging
In order to receive reasonable Data Packages the data packaging must be configured correctly. Select Configuration ► Data Packets… from the menu.
Page 34 of 42
TWedge User Documentation
Assuming that you are using a barcode scanner, the predefined settings for “No. of Bytes” and “Timeout” should work fine (see also section 6.3.2).
However, some data acquisition devices append a line break (e.g., a Newline and a Linefeed character) at the end of the acquired data automatically. When simulating the received data as keystrokes, the line break has the same effect as when pressing the ENTER key subsequently to pasting the data. In order to filter the line break out you have to do the following:
Check the Delimiter option . This will cause TWedge to close every data packet with the occur-rence of the given delimiter. Then set the delimiter to “\r\n” (this is a Newline and a Linefeed) and make sure the Include Delimiter option is not checked. Confirm with OK. The variable DATA in the Script Editor will now contain no more additional line breaks.
8.1.3 Start or activate Microsoft Excel automatically
If you want to start or activate Excel automatically use the following code. This step can be skipped, if you plan to start Microsoft Excel manually (from the start menu).
Open the Code Editor and insert this code in the OnStart section:
// is excel currently running (j/n)?
var isExcelStarted;
// try to activate Excel
isExcelStarted = ActivateWindow("Excel");
if (!isExcelStarted)
{
// Excel is not already running, so try to start it:
isExcelStarted = StartApplication("Excel");
if (isExcelStarted)
Sleep (1000); // give Excel some time to respond
else
MessageBox ("Error!\nMicrosoft Excel cannot be started!", MB_ICONEXCLAMATION);
}
This code section will be executed when the start button is pressed. If the Excel window could not be activated (because Excel is currently not running) TWedge will start Microsoft Excel automati-cally.
► Hint: The Sleep function is used to give Excel some time before it is considered ready for re-
ceiving data. Every started application needs some time before it is up and running.
8.1.4 Capture the Data in Excel
For pasting the received data into the current Excel spreadsheet you have to simulate the appropri-ate keystrokes.
Open the Code Editor and insert the following code in the OnData section:
Page 35 of 42
TWedge User Documentation
// send the keystrokes only if Excel can be invoked
if (ActivateWindow("Excel"))
{
SendKeyStrokes("'" + DATA);
SendKeyStrokes("{DOWN}");
}
else
MessageBox ("Excel is currently not running!", MB_ICONEXCLAMATION);
To make sure, that the data is inserted in Excel and in no other window, activate Excel prior to sending any keystrokes. (Someone could have clicked on any other window in the meantime.) Then simulate the received data as keystroke sequence. By simulating the down arrow the input focus is set to the next input cell.
The single steps of this code section are discussed below:
8.1.4.1 Modify the received Input Data
In this example the whole input data is pasted into Excel as is. In order to make Excel treat the data as string (and not as number) a quotation mark (‘) is prepended. If you need only parts of the received data package, use the functions Left, Right, or substring (see section 0).
8.1.4.2 Paste the received Input Data
For entering the received data via keystroke simulation the variable DATA is passed as parameter for the function SendKeyStrokes.
8.1.4.3 Set the Focus to the next Input Cell
Setting the focus to the next input cell is done by simulating the down arrow (directly after pasting the data). If you do not want to capture the data in one column, but in one row, you could also use the right arrow instead:
SendKeyStrokes("{RIGHT}");
However, you should always consider:
► Before implementing a keystroke sequence for an application, try to figure out how to move the cursor to the desired input field manually by pressing the keys on the keyboard (without using TWedge). Some fields may be accessed directly with an Alt+character shortcut. Others can be selected by navigating through the input mask using the tab or the cursor keys. If you have found a way to put the cursor to the correct field, you can simulate the appro-priate keystroke sequence per code.
Page 36 of 42
TWedge User Documentation
9 Licensing
9.1 License Types
Please check out http://www.tec-it.com/de/order/prices/PriceList.aspx#TWDG for available license types and pricing.
In the licensed version of TWedge the demo hints and the random insertion of demo data will be deactivated.
9.2 Entering your License Data
The license information is entered in the following dialog. To enter the license data select Help ► License… from the menu. Usually the software is activated online (see 9.2.1):
► Online activation is not possible or do you prefer manual activation? Please get in touch us with us if your system has no internet access or if you prefer to use the manual activation for any reason. We will be glad to send you the license data which is suitable for manual licensing (see 9.2.2) without internet access.
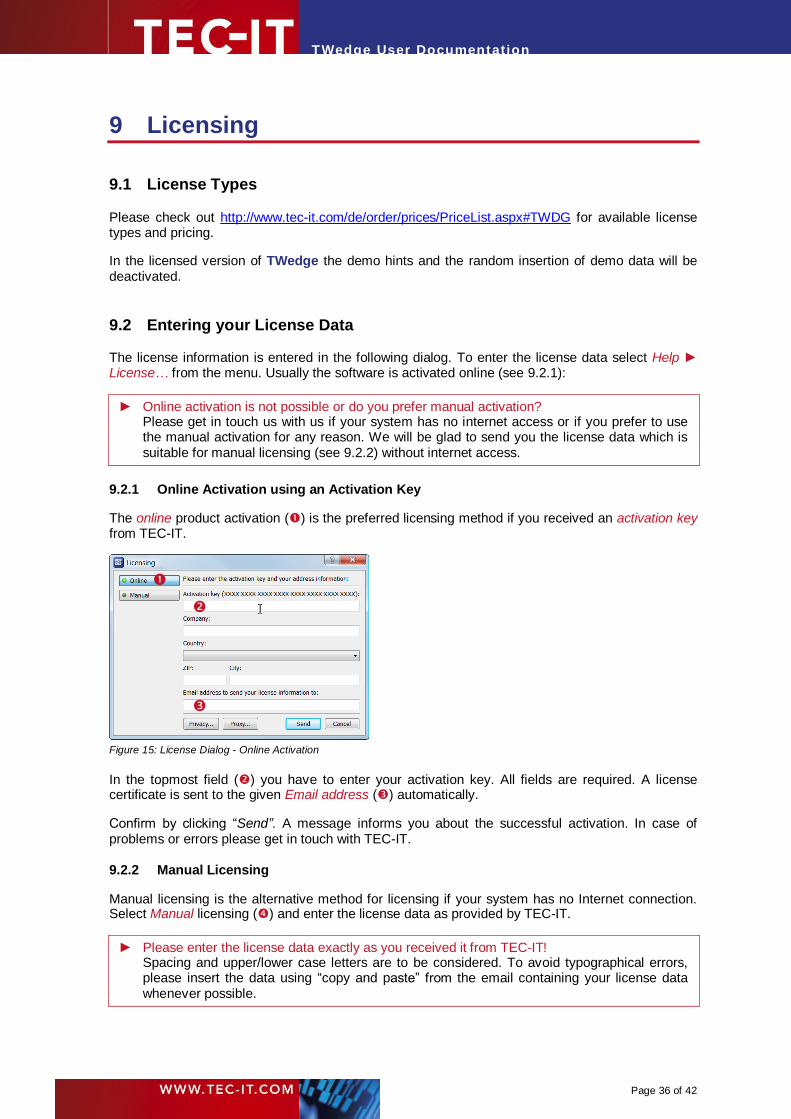
9.2.1 Online Activation using an Activation Key
The online product activation () is the preferred licensing method if you received an activation key from TEC-IT.
Figure 15: License Dialog - Online Activation
In the topmost field () you have to enter your activation key. All fields are required. A license certificate is sent to the given Email address () automatically.
Confirm by clicking “Send”. A message informs you about the successful activation. In case of problems or errors please get in touch with TEC-IT.
9.2.2 Manual Licensing
Manual licensing is the alternative method for licensing if your system has no Internet connection. Select Manual licensing () and enter the license data as provided by TEC-IT.
► Please enter the license data exactly as you received it from TEC-IT! Spacing and upper/lower case letters are to be considered. To avoid typographical errors, please insert the data using “copy and paste” from the email containing your license data whenever possible.
Page 37 of 42
TWedge User Documentation
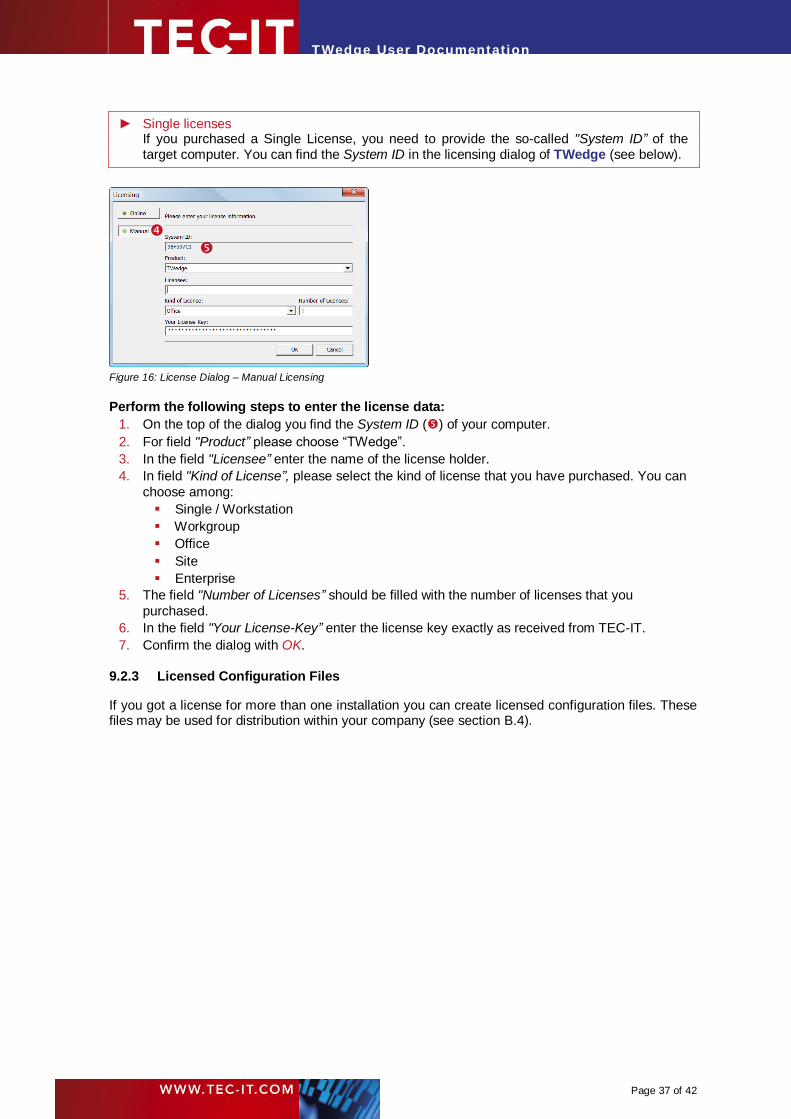
► Single licenses If you purchased a Single License, you need to provide the so-called "System ID” of the target computer. You can find the System ID in the licensing dialog of TWedge (see below).
Figure 16: License Dialog – Manual Licensing
Perform the following steps to enter the license data:
1. On the top of the dialog you find the System ID () of your computer.
2. For field "Product” please choose “TWedge”.
3. In the field "Licensee” enter the name of the license holder.
4. In field "Kind of License”, please select the kind of license that you have purchased. You can
choose among:
Single / Workstation
Workgroup
Office
Site
Enterprise
5. The field "Number of Licenses” should be filled with the number of licenses that you
purchased.
6. In the field "Your License-Key” enter the license key exactly as received from TEC-IT.
7. Confirm the dialog with OK.
9.2.3 Licensed Configuration Files
If you got a license for more than one installation you can create licensed configuration files. These files may be used for distribution within your company (see section B.4).

Page 38 of 42
TWedge User Documentation
10 FAQ
10.1 How can I stop the CR/LF after each data input?
Q: I am attempting to route scanned data into an existing application, so I just need the raw data, no “Carriage Return” or “Line Feed”. How can I turn the CR/LF off?
A: Follow these steps to clip CR/LF at the end of your data:
Select Configuration ► Data Packets… from the menu.
Enter as for the Delimiter “\r\n” (these are the escape sequences CR+LF) (or just “\r” if you only need the CR stripped off).
Leave the Include Delimiter option unchecked.
Now if a CR+LF are found in the input data it will be filtered out (because Include Delimiter is unchecked).
10.2 How can I select a certain input field automatically?
Q: I would like to make sure that my data is always inserted into the same input field - in other words the cursor should always be placed in the correct field before the data is inserted.
A: In order to achieve this, you must find a way to select the designated field with a series of key-strokes. Some fields may be directly accessible with an Alt+character shortcut. Others can be selected by navigating through the input mask using the tab or the cursor keys. If you have found a way to put the cursor into the correct field, all you have to do is simulate the appropriate keystroke sequence per code:
Select Configuration ► Script Editor… from the menu.
Go to the OnData code section.
Use the function SendKeyStrokes to simulate the keys that will select the input field.
(See also section 7.4.)
Thereafter the command SendKeyStrokes(DATA) can be used to insert the received data.
► To make sure that the correct window receives the data you may also use the function ActivateWindow before sending the keystrokes.
10.3 How can I bring a certain window to the foreground?
Q: I want to make sure that the data is entered into the correct window (= the correct application), even if the window is deactivated or minimized.
A: You can activate an application using the function ActivateWindow in the Script Editor:
First you have to learn the caption of the target window. If you cannot see the window caption in the title bar press Alt+Tab to switch to the desired window. In the task switcher the window caption will be displayed below the selected window icon.
Then go to the Script Editor and use the command ActivateWindow. As parameter pass the window caption (or just parts of it). It should look like this: ActivateWindow("Word"); or ActivateWindow("SAP R/3");
Afterwards it is recommended to give the activated application a little time to respond. Therefore use the Sleep function.

Page 39 of 42
TWedge User Documentation
10.4 Can I use two instances of TWedge simultaneously?
Q: I want to monitor two ports on my PC at the same time. Can I therefore run two instances of TWedge simultaneously?
A: Basically you can run two (or more) instances of TWedge on one PC at the same time. Anyway there are two things you should consider:
1) Each instance must be configured to use a different interface. Otherwise the programs will block one another. (One interface cannot be used by more than one program at the same time!)
2) The two instances cannot use the same hotkey.
10.5 I get the error “80070002, The System cannot find the file specified.”
Q: I get the error “80070002, The System cannot find the file specified.” when trying to start TWedge. What could be the reason?
A: This error indicates that the specified COM port does not exist on your system. If you want to know, which COM ports are available, open the device manager (Control Panel ► System ► Hardware) and check the “Ports (COM & LPT)” section.
10.6 I get the error “80070005, Access is denied.”
Q: I get the error “80070005, Access is denied.” when trying to start TWedge. What could be the reason?
A: This error indicates that the specified COM port is already in use and therefore locked. Two pro-grams cannot access the same COM port at the same time. Try to figure out, which program already uses the COM port and then stop this application. Now TWedge should be able to connect.
10.7 I cannot activate the Virtual Serial Port (SPP) for the Bluetooth Stack
Q: When trying to enable the Serial Port service for my Bluetooth scanner I get the message “Acces is denied”. What’s wrong?
A: By default the “Bluetooth Support Service” is configured to log on with the Local System Acc-ount (NT AUTHORITY/LocalService). However, to enable the service you actually need local administrator rights. So change the account in the “Log On” tab to any account with local ad-ministrator rights and restart the service. For general information on configuring Bluetooth
® devices, please refer to the Microsoft KB
article 883259. The “Access is denied” issue is discussed in the KB article 892891.
10.8 How to Install TWedge as Windows Service?
Q: I want to install TWedge as Windows service. How is the workflow for that? How does this work?
A: You can find information on how to install TWedge as Windows service on our website under Software/Data Acquisition/TWedge/Tips & Tricks.

Page 40 of 42
TWedge User Documentation
11 Contact and Support Information
TEC-IT Datenverarbeitung GmbH
Address: Hans-Wagner-Str. 6
AT-4400 Steyr
Austria/Europe
Phone: +43 / (0)7252 / 72 72 0
Fax: +43 / (0)7252 / 72 72 0 - 77
Email: mailto:[email protected]
Web: http://www.tec-it.com
AIX is a registered trademark of IBM Corporation. The Bluetooth word mark and logo are registered trademarks and are owned by the Bluetooth SIG, Inc. HTML, DHTML, XML, XHTML are trademarks or registered trademarks of W3C, World Wide Web Consortium, Laboratory for Computer Science NE43-358, Massachusetts Institute of Technology, 545 Technology Square, Cambridge, MA 02139. JAVA is a registered trademark of Sun Microsystems, Inc., 901 San Antonio Road, Palo Alto, CA 94303 USA.
JavaScript is a trademark of Sun Microsystems, Inc. used under license for technology invented and implemented by Netscape Communications Corporation. Microsoft®, Windows®, Microsoft Word®, Microsoft Excel® are registered trademarks of Microsoft Corporation. Navision is a registered trademark of Microsoft Business Solutions ApS in the United States and/or other countries. Oracle® is a registered trademark of Oracle Corporation. PCL® is a registered trademark of the Hewlett-Packard Company. PostScript is a registered trademark of Adobe Systems Inc. SAP, SAP Logo, R/2, R/3, ABAP, SAPscript are trademarks or registered trademarks of SAP AG in Germany (and in several other countries).
All other products mentioned are trademarks or registered trademarks of their respective companies. If any trademark on our web site or in this document is not marked as trademark (or registered trademark), we ask you to send us a short message (mailto:[email protected]).

Page 41 of 42
TWedge User Documentation
Appendix A: Start TWedge with Customized Settings
A.1 General
When starting TWedge over the Windows Start Menu all program settings will be preset to default values: TWedge will be configured to use the Serial Interface (COM1) for communication, and the received data will be simulated as keystrokes.
If you want to start TWedge with a previously stored configuration, you can either
double-click on the desired configuration file or
pass the configuration file as a command line parameter (see below).
In both cases TWedge will restore the settings from the .TWI file. Depending on the restored configuration some additional automation may be executed subsequent-ly (like minimizing TWedge and/or starting data acquisition automatically) - see section 6.7.
A.2 Command Line Parameter
The following sample shows you how to start TWedge with a command line parameter. In this sample TWedge will be started using the configuration file MyConfig.TWI.
"C:\Program Files\TEC-IT\TWedge2\Bin\TWedge.exe" C:\MyConfig.TWI
A.3 Shortcuts
For your convenience you can create shortcuts for different configurations (e.g., on your desktop):
The target for the shortcut is either the configuration file (the TWI file itself) or the TWedge executable followed by the configuration file as a command line parameter (as in A.2).
Page 42 of 42
TWedge User Documentation
Appendix B: Password Protected Configuration Files
B.1 General
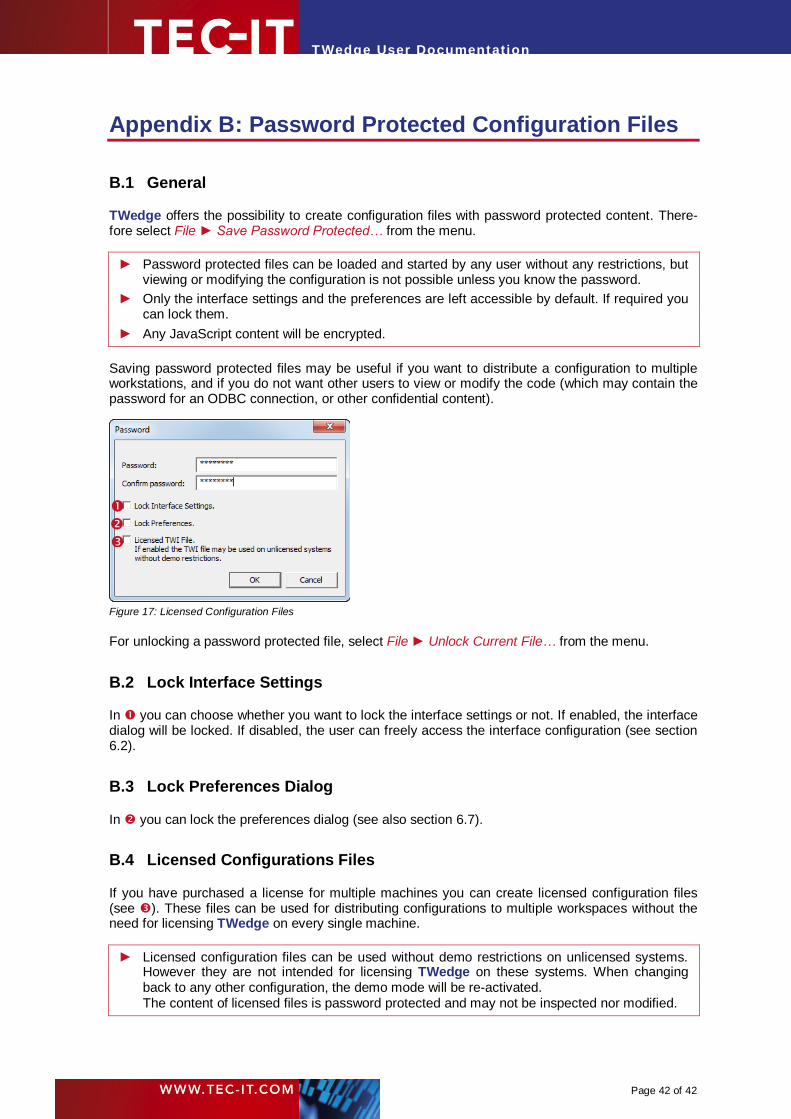
TWedge offers the possibility to create configuration files with password protected content. There-fore select File ► Save Password Protected… from the menu.
► Password protected files can be loaded and started by any user without any restrictions, but viewing or modifying the configuration is not possible unless you know the password.
► Only the interface settings and the preferences are left accessible by default. If required you can lock them.
► Any JavaScript content will be encrypted.
Saving password protected files may be useful if you want to distribute a configuration to multiple workstations, and if you do not want other users to view or modify the code (which may contain the password for an ODBC connection, or other confidential content).
Figure 17: Licensed Configuration Files
For unlocking a password protected file, select File ► Unlock Current File… from the menu.
B.2 Lock Interface Settings
In you can choose whether you want to lock the interface settings or not. If enabled, the interface dialog will be locked. If disabled, the user can freely access the interface configuration (see section 6.2).
B.3 Lock Preferences Dialog
In you can lock the preferences dialog (see also section 6.7).
B.4 Licensed Configurations Files
If you have purchased a license for multiple machines you can create licensed configuration files (see ). These files can be used for distributing configurations to multiple workspaces without the need for licensing TWedge on every single machine.
► Licensed configuration files can be used without demo restrictions on unlicensed systems. However they are not intended for licensing TWedge on these systems. When changing back to any other configuration, the demo mode will be re-activated. The content of licensed files is password protected and may not be inspected nor modified.