tzworks ntfs metadata extractor (ntfswalk) users guide · tzworks® ntfs extractor (ntfswalk) users...
TRANSCRIPT
Abstract ntfswalk is a standalone, command-line tool that traverses
a specified NTFS volume reading all MFT entries while
extracting useful metadata about each file and folder.
ntfswalk can operate on a live volume, an image of a
volume or a VMWare volume. All artifacts can be
outputted in one of three parsable formats for easy
inclusion with other forensics artifacts. ntfswalk runs on
Windows, Linux and Mac OS-X.
Copyright © TZWorks LLC
www.tzworks.net
Contact Info: [email protected]
Document applies to v0.74 of ntfswalk
Updated: Jul 29, 2018
TZWorks® NTFS Metadata Extractor (ntfswalk) Users Guide
Copyright © TZWorks LLC Jul 29, 2018 Page 1
Table of Contents
1 Introduction .......................................................................................................................................... 3
2 How to Use ntfswalk ............................................................................................................................. 3
2.1 The Command line options for the above .................................................................................... 4
2.2 Understanding the Output ............................................................................................................ 5
2.3 Parsing Live Volume ...................................................................................................................... 8
2.3.1 Targeting a Partition ............................................................................................................. 8
2.3.2 Targeting a Drive Number ..................................................................................................... 8
2.3.3 Targeting a Volume Shadow Copy ........................................................................................ 9
3 Considerations when using ntfswalk .................................................................................................. 10
4 Available Options ................................................................................................................................ 11
4.1 Source options ............................................................................................................................ 12
4.2 Filtering Options .......................................................................................................................... 12
4.2.1 Selecting Deleted Files ........................................................................................................ 14
4.2.2 Selecting Files with Specified Extensions ............................................................................ 15
4.2.3 Selecting Files that include a partial name ......................................................................... 15
4.2.4 Selecting Files with in a MFT entry (inode) range ............................................................... 15
4.2.5 Selecting Files are that have a certain parent directory ..................................................... 15
4.2.6 Selecting Files based on their Binary Signature (Executable files, Registry Files, Event Logs,
or SQLite Files) .................................................................................................................................... 16
4.2.7 Selecting Files in a Time Range ........................................................................................... 16
4.2.8 Selecting Files that are present in unallocated clusters ..................................................... 17
4.3 Extraction Options ...................................................................................................................... 17
4.3.1 Extracting the Data from a file ............................................................................................ 17
4.3.2 Extracting the First 32 bytes of the file ............................................................................... 18
4.3.3 Extracting the Cluster Information Associated with a file .................................................. 18
4.4 Output Options ........................................................................................................................... 18
4.4.1 Computing the hash of the file ........................................................................................... 20
4.5 General Purpose Options ............................................................................................................ 20
Copyright © TZWorks LLC Jul 29, 2018 Page 2
4.5.1 Using a Script File ................................................................................................................ 22
4.5.2 Spawning multiple instances of ntfswalk ............................................................................ 23
5 Authentication and the License File .................................................................................................... 25
5.1 Limited versus Demo versus Full in the tool’s Output Banner .................................................... 26
6 References .......................................................................................................................................... 26
Copyright © TZWorks LLC Jul 29, 2018 Page 3
TZWorks® NTFS Extractor (ntfswalk) Users Guide
Copyright © TZWorks LLC
Webpage: http://www.tzworks.net/prototype_page.php?proto_id=12
Contact Information: [email protected]
1 Introduction ntfswalk is a command line tool that traverses a specified NTFS volume reading all the MFT entries and
pulling predefined statistics as it runs.
Originally, the NTFS engine was designed as a widget for other applications to help pull data out from
targeted categories of files on NTFS partitions. After successfully using the functionality in other tools, it
was determined that the utility in making a standalone tool would be helpful in debugging and
understanding the internals of any NTFS volume. This new tool, coined ntfswalk, is named after its
ability to walk an entire NTFS volume and output each MFT entry it encounters.
Designed to work with live NTFS partitions, there is also functionality for traversing NTFS images created
with the dd utility (as well as some versions of VMWare VMDK files). There are options to filter on file
extension, timestamp range, binary signature, partial filenames, and directory contents. For the entries
found, one can list the summary metadata, extract the header bytes, or extract the entire file contents
into a designated directory. Since the engine is Windows API agnostic, there are compiled versions for
Windows, Linux and Mac OS X.
If targeting a volume mounted on a live Windows system, one needs to be run ntfswalk with
administrator privileges.
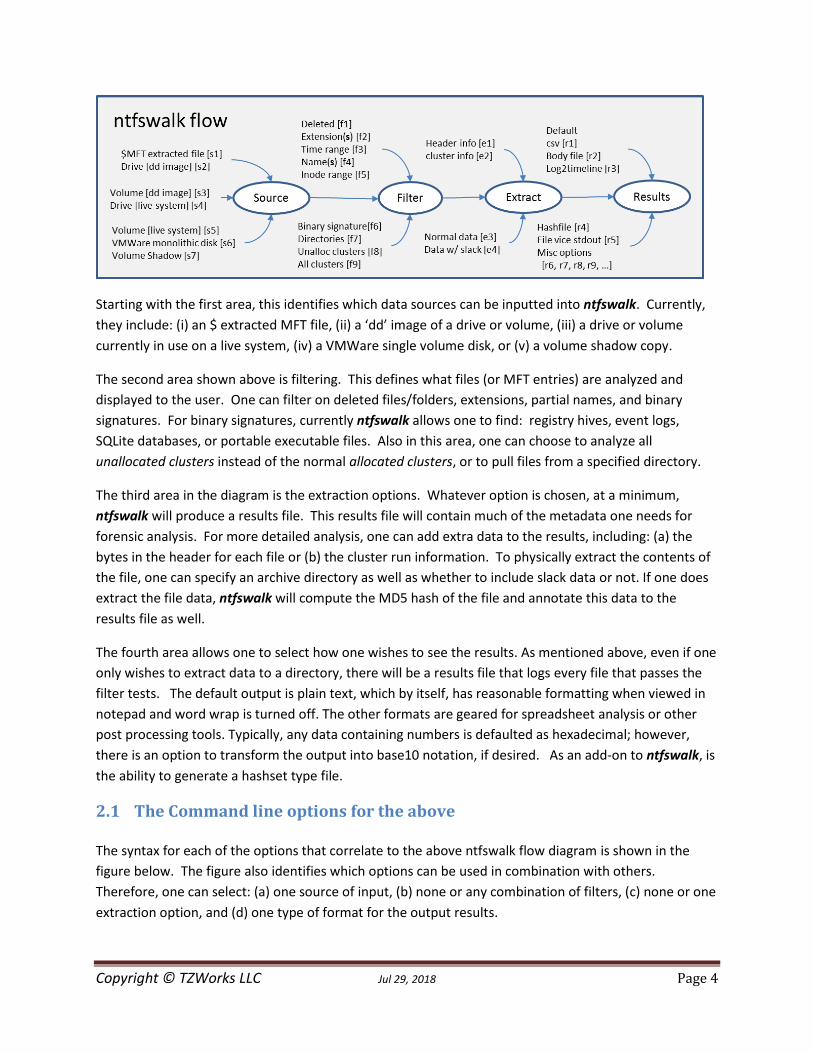
2 How to Use ntfswalk ntfswalk has a number of command line switches, and for the occasional user, it can be confusing which
options can be used together and which cannot. The figure below divides ntfswalk's processing flow
into 4 main areas.
Copyright © TZWorks LLC Jul 29, 2018 Page 4
Starting with the first area, this identifies which data sources can be inputted into ntfswalk. Currently,
they include: (i) an $ extracted MFT file, (ii) a ‘dd’ image of a drive or volume, (iii) a drive or volume
currently in use on a live system, (iv) a VMWare single volume disk, or (v) a volume shadow copy.
The second area shown above is filtering. This defines what files (or MFT entries) are analyzed and
displayed to the user. One can filter on deleted files/folders, extensions, partial names, and binary
signatures. For binary signatures, currently ntfswalk allows one to find: registry hives, event logs,
SQLite databases, or portable executable files. Also in this area, one can choose to analyze all
unallocated clusters instead of the normal allocated clusters, or to pull files from a specified directory.
The third area in the diagram is the extraction options. Whatever option is chosen, at a minimum,
ntfswalk will produce a results file. This results file will contain much of the metadata one needs for
forensic analysis. For more detailed analysis, one can add extra data to the results, including: (a) the
bytes in the header for each file or (b) the cluster run information. To physically extract the contents of
the file, one can specify an archive directory as well as whether to include slack data or not. If one does
extract the file data, ntfswalk will compute the MD5 hash of the file and annotate this data to the
results file as well.
The fourth area allows one to select how one wishes to see the results. As mentioned above, even if one
only wishes to extract data to a directory, there will be a results file that logs every file that passes the
filter tests. The default output is plain text, which by itself, has reasonable formatting when viewed in
notepad and word wrap is turned off. The other formats are geared for spreadsheet analysis or other
post processing tools. Typically, any data containing numbers is defaulted as hexadecimal; however,
there is an option to transform the output into base10 notation, if desired. As an add-on to ntfswalk, is
the ability to generate a hashset type file.
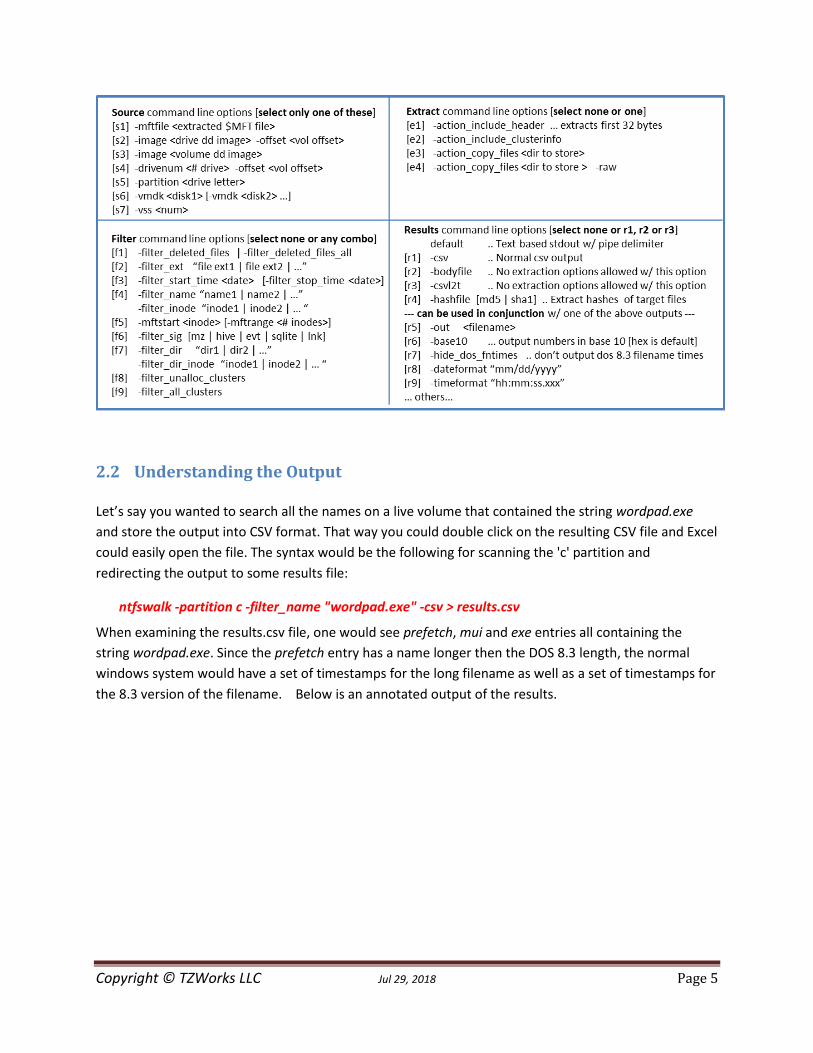
2.1 The Command line options for the above The syntax for each of the options that correlate to the above ntfswalk flow diagram is shown in the
figure below. The figure also identifies which options can be used in combination with others.
Therefore, one can select: (a) one source of input, (b) none or any combination of filters, (c) none or one
extraction option, and (d) one type of format for the output results.
Copyright © TZWorks LLC Jul 29, 2018 Page 5
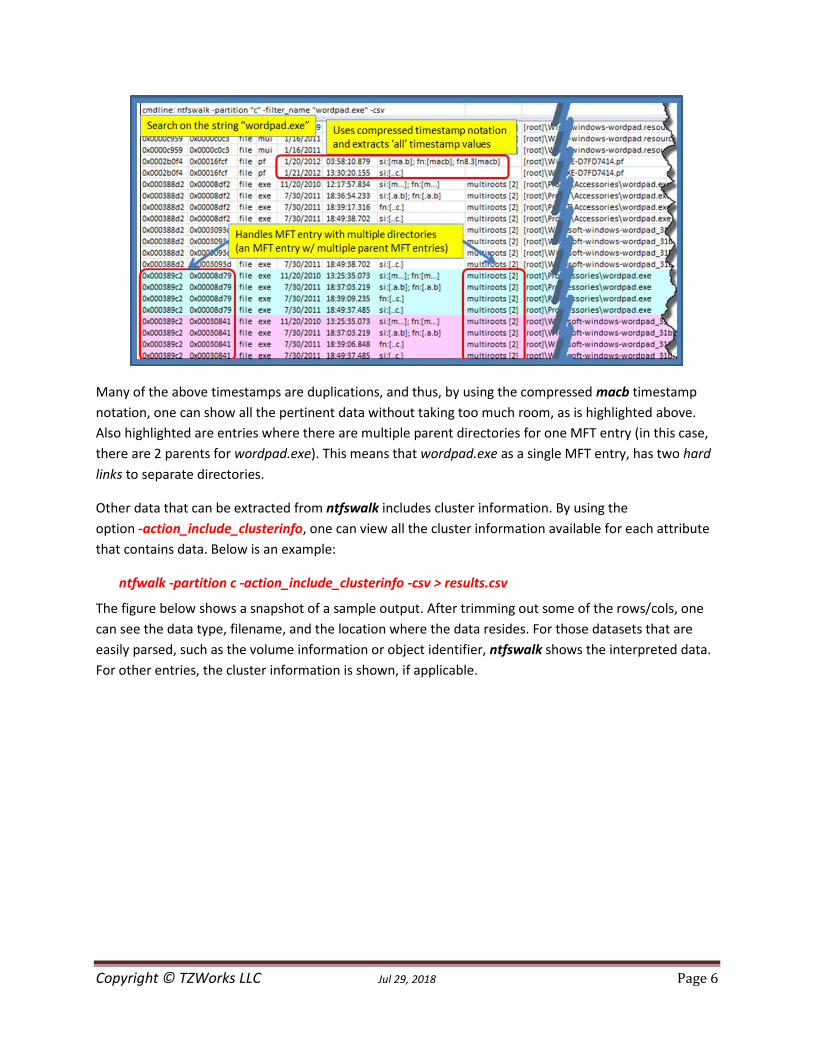
2.2 Understanding the Output Let’s say you wanted to search all the names on a live volume that contained the string wordpad.exe
and store the output into CSV format. That way you could double click on the resulting CSV file and Excel
could easily open the file. The syntax would be the following for scanning the 'c' partition and
redirecting the output to some results file:
ntfswalk -partition c -filter_name "wordpad.exe" -csv > results.csv
When examining the results.csv file, one would see prefetch, mui and exe entries all containing the
string wordpad.exe. Since the prefetch entry has a name longer then the DOS 8.3 length, the normal
windows system would have a set of timestamps for the long filename as well as a set of timestamps for
the 8.3 version of the filename. Below is an annotated output of the results.
Copyright © TZWorks LLC Jul 29, 2018 Page 6
Many of the above timestamps are duplications, and thus, by using the compressed macb timestamp
notation, one can show all the pertinent data without taking too much room, as is highlighted above.
Also highlighted are entries where there are multiple parent directories for one MFT entry (in this case,
there are 2 parents for wordpad.exe). This means that wordpad.exe as a single MFT entry, has two hard
links to separate directories.
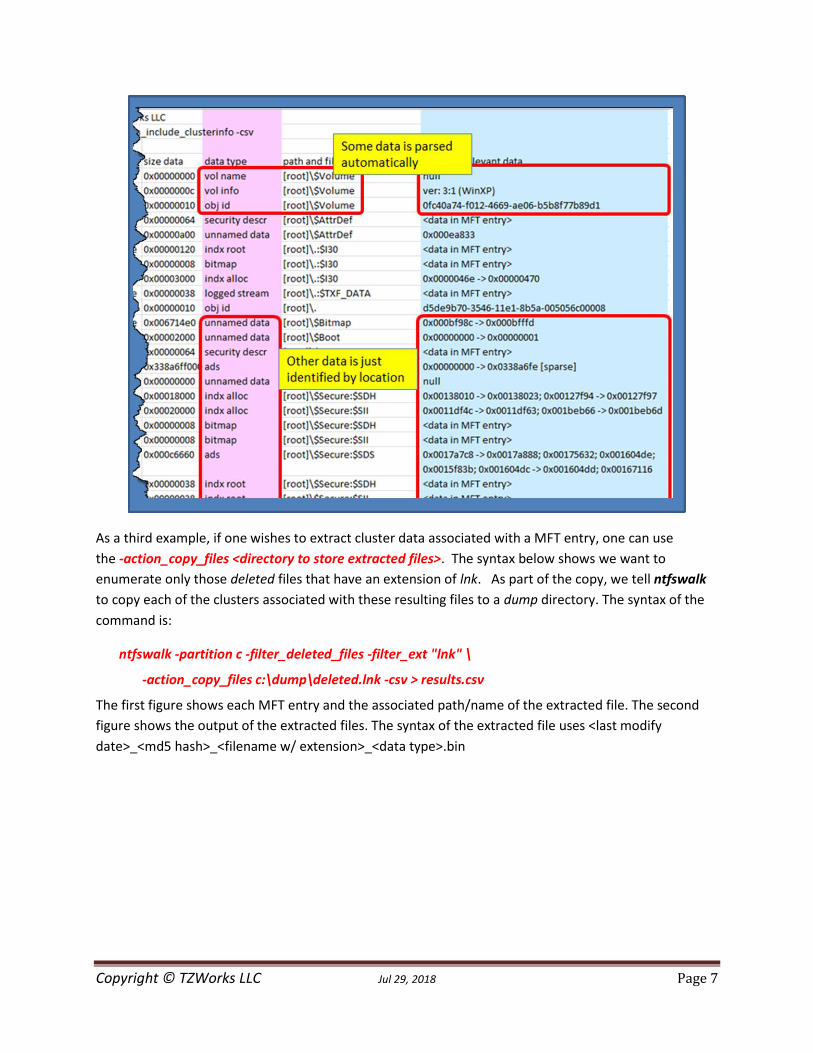
Other data that can be extracted from ntfswalk includes cluster information. By using the
option -action_include_clusterinfo, one can view all the cluster information available for each attribute
that contains data. Below is an example:
ntfwalk -partition c -action_include_clusterinfo -csv > results.csv
The figure below shows a snapshot of a sample output. After trimming out some of the rows/cols, one
can see the data type, filename, and the location where the data resides. For those datasets that are
easily parsed, such as the volume information or object identifier, ntfswalk shows the interpreted data.
For other entries, the cluster information is shown, if applicable.
Copyright © TZWorks LLC Jul 29, 2018 Page 7
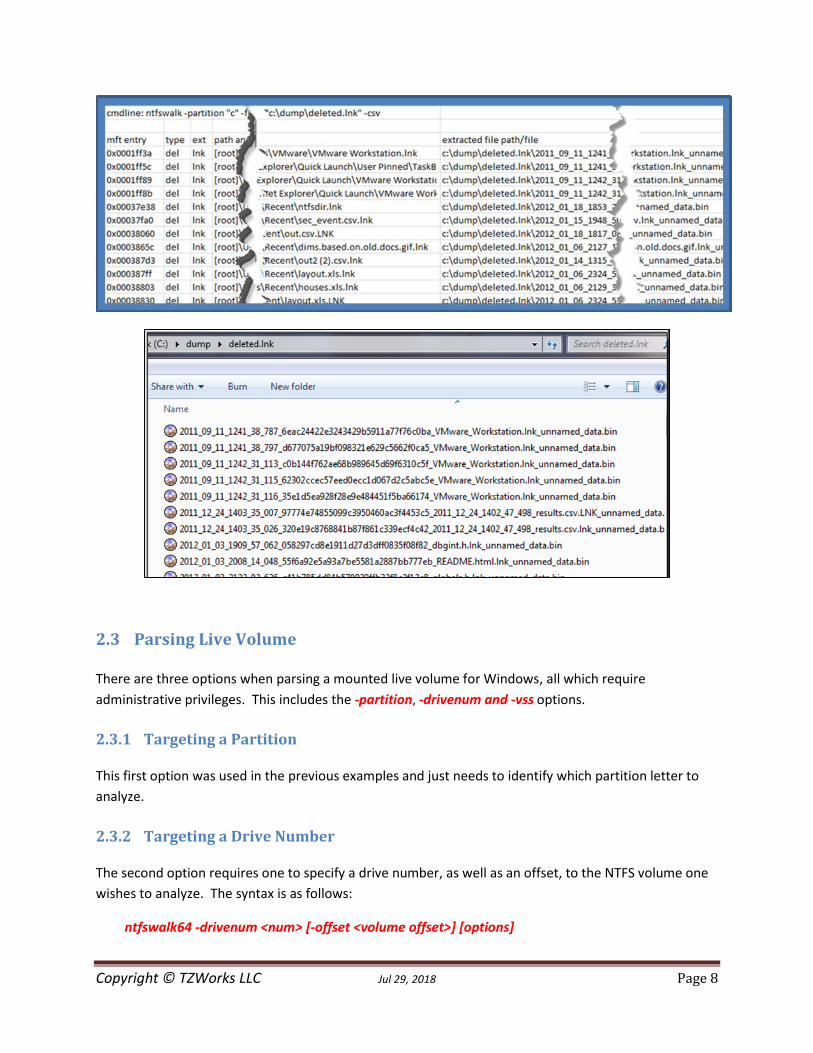
As a third example, if one wishes to extract cluster data associated with a MFT entry, one can use
the -action_copy_files <directory to store extracted files>. The syntax below shows we want to
enumerate only those deleted files that have an extension of lnk. As part of the copy, we tell ntfswalk
to copy each of the clusters associated with these resulting files to a dump directory. The syntax of the
command is:
ntfswalk -partition c -filter_deleted_files -filter_ext "lnk" \
-action_copy_files c:\dump\deleted.lnk -csv > results.csv
The first figure shows each MFT entry and the associated path/name of the extracted file. The second
figure shows the output of the extracted files. The syntax of the extracted file uses <last modify
date>_<md5 hash>_<filename w/ extension>_<data type>.bin
Copyright © TZWorks LLC Jul 29, 2018 Page 8
2.3 Parsing Live Volume There are three options when parsing a mounted live volume for Windows, all which require
administrative privileges. This includes the -partition, -drivenum and -vss options.
2.3.1 Targeting a Partition
This first option was used in the previous examples and just needs to identify which partition letter to
analyze.
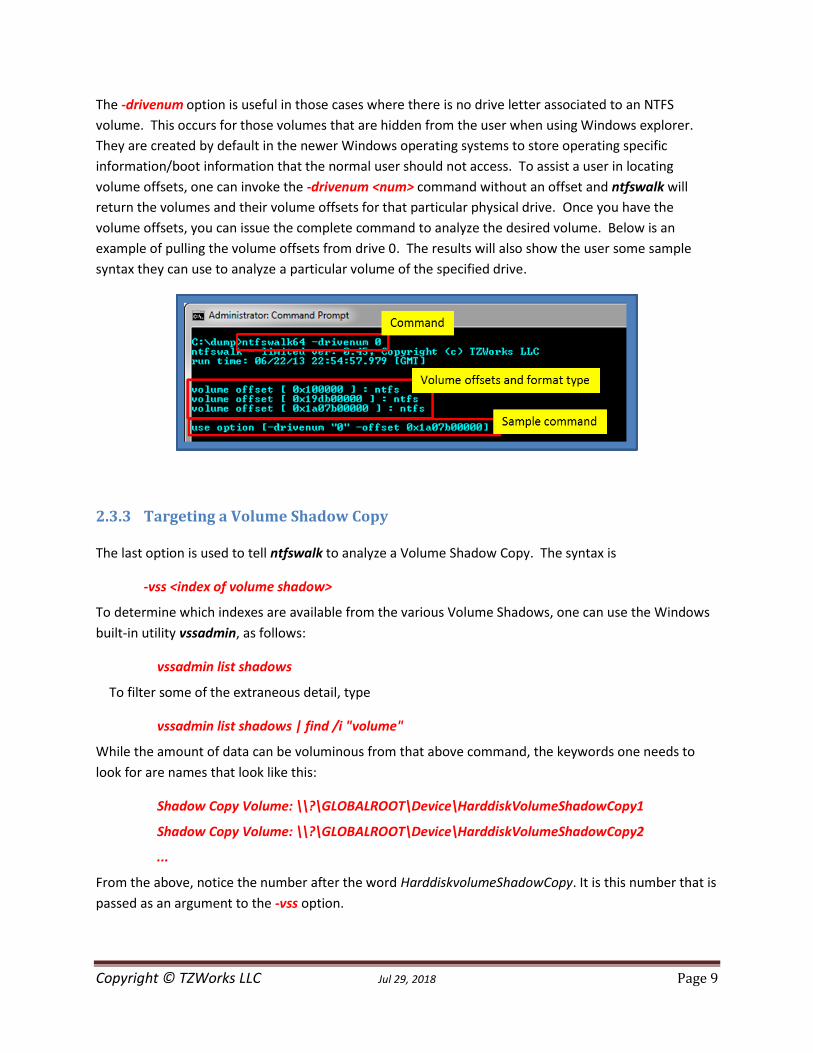
2.3.2 Targeting a Drive Number
The second option requires one to specify a drive number, as well as an offset, to the NTFS volume one
wishes to analyze. The syntax is as follows:
ntfswalk64 -drivenum <num> [-offset <volume offset>] [options]
Copyright © TZWorks LLC Jul 29, 2018 Page 9
The -drivenum option is useful in those cases where there is no drive letter associated to an NTFS
volume. This occurs for those volumes that are hidden from the user when using Windows explorer.
They are created by default in the newer Windows operating systems to store operating specific
information/boot information that the normal user should not access. To assist a user in locating
volume offsets, one can invoke the -drivenum <num> command without an offset and ntfswalk will
return the volumes and their volume offsets for that particular physical drive. Once you have the
volume offsets, you can issue the complete command to analyze the desired volume. Below is an
example of pulling the volume offsets from drive 0. The results will also show the user some sample
syntax they can use to analyze a particular volume of the specified drive.
2.3.3 Targeting a Volume Shadow Copy
The last option is used to tell ntfswalk to analyze a Volume Shadow Copy. The syntax is
-vss <index of volume shadow>
To determine which indexes are available from the various Volume Shadows, one can use the Windows
built-in utility vssadmin, as follows:
vssadmin list shadows
To filter some of the extraneous detail, type
vssadmin list shadows | find /i "volume"
While the amount of data can be voluminous from that above command, the keywords one needs to
look for are names that look like this:
Shadow Copy Volume: \\?\GLOBALROOT\Device\HarddiskVolumeShadowCopy1
Shadow Copy Volume: \\?\GLOBALROOT\Device\HarddiskVolumeShadowCopy2
...
From the above, notice the number after the word HarddiskvolumeShadowCopy. It is this number that is
passed as an argument to the -vss option.
Copyright © TZWorks LLC Jul 29, 2018 Page 10
3 Considerations when using ntfswalk Since the NTFS volume can have hard links, it is possible for a specific MFT entry to have multiple
parents (or directories) that it belongs to. Furthermore, in addition to, multiple parents, an MFT entry
can have different long filenames. The bottom line is there may be more filename attributes per MFT
entry than one might expect. Thus, when reporting timestamps, all these additional filename attribute
entries need to be considered. Fortunately, the NTFS parsing engine in ntfswalk can traverse all the
parent directories given a specific MFT entry. When representing additional parents for a MFT entry,
the output can be messy and confusing.
To accommodate the additional data, the output is expressed in the macb [Modify, Access Changed
MFT, Birth] format to allow easy display of the timestamps associated with all the possible parents
(directories) and/or differing filenames. Thus, if an MFT entry has more than one parent directory or
multiple names, there will be separate macb entries to accommodate those attributes.
There is also the capability for ntfswalk to parse an extracted $MFT file vice simply using an image of a
drive or a live system. Just one caution when using this option, however; for MFT entries that rely on
non-resident attribute lists, the data is obviously contained in a cluster outside the normal $MFT set of
clusters. This means that the attribute data associated with the non-attribute list will not be reflected in
the output.
In addition to the default text output, where each field is delimited by the pipe ‘|’ character, there also
exists options for: (a) normal CSV format, (b) The SleuthKit's v3 bodyfile format, and (c) a log2timeline
CSV format, to allow for easier data import into a timelining tool. Of the output formats available, the
default and normal CSV formats will yield the most data to the user.
For CSV (comma separated values) output, there are restrictions in the characters that are outputted.
Since commas are used as a separator in CSV, any data that has commas in its name are changed to
spaces. For the default (non-csv) output no changes are made to the data, since the pipe character is
used as the delimiter, which does not have any character collision problems with filenames.
Finally, the newer versions of ntfswalk incorporate the ability to make use of multiple cores to process
the data. Whether this option is appropriate to use for your system will depend on your machine’s
configuration and whether the system is resource bound or not. Refer to the section on “Spawning
multiple instances of ntfswalk” for more information.
Copyright © TZWorks LLC Jul 29, 2018 Page 11
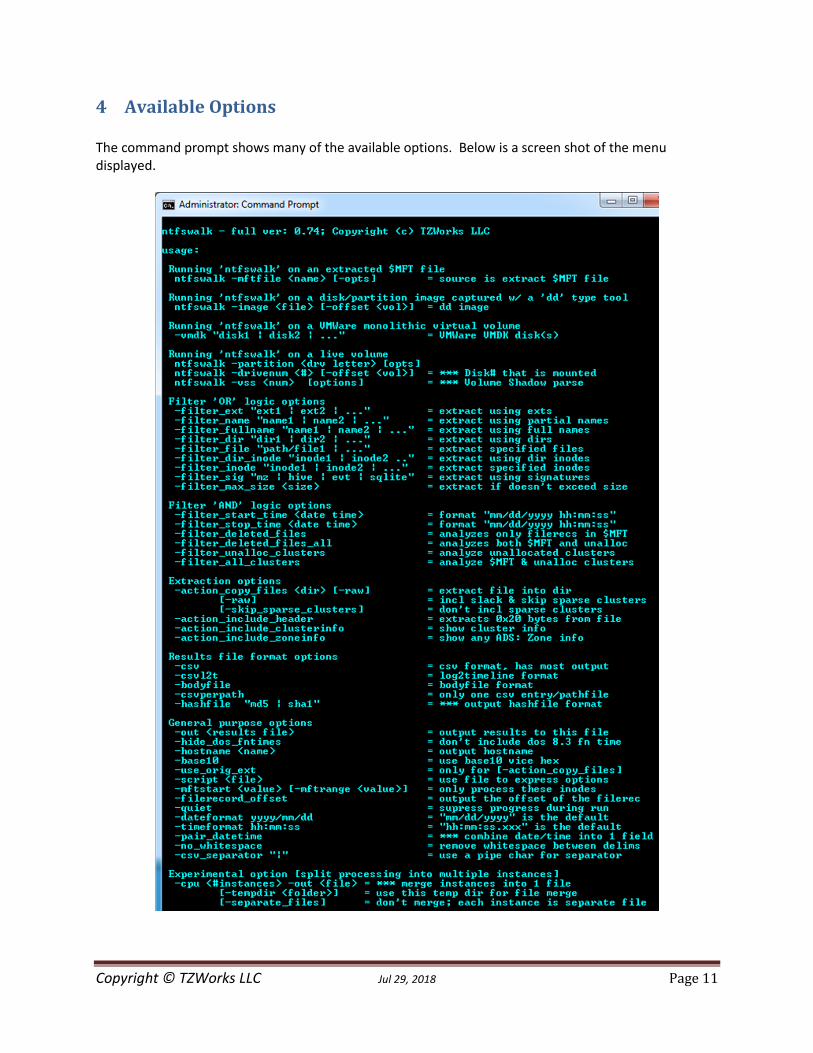
4 Available Options The command prompt shows many of the available options. Below is a screen shot of the menu displayed.
Copyright © TZWorks LLC Jul 29, 2018 Page 12
These options can be broken up into the ntfswalk flow diagram shown earlier. The main categories are: (a) Source options, (b) Filter options, (c) Extraction options, (d) Output options, and a catch all of (e) General purpose options.
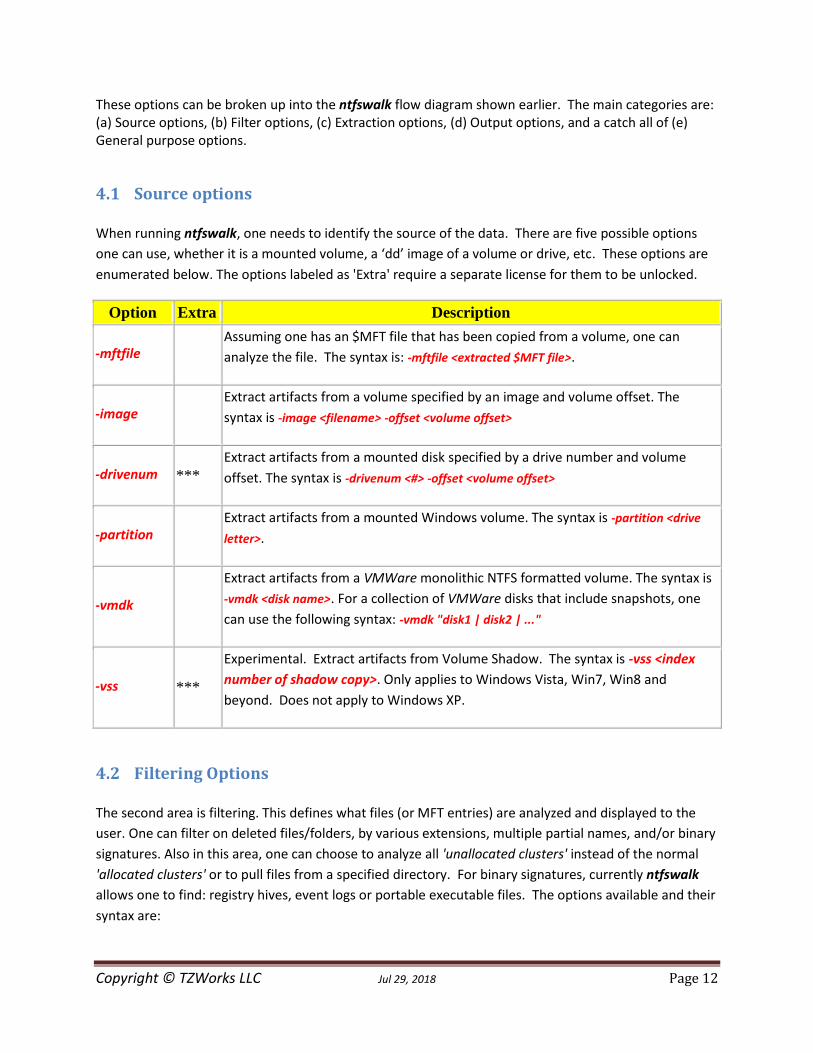
4.1 Source options When running ntfswalk, one needs to identify the source of the data. There are five possible options
one can use, whether it is a mounted volume, a ‘dd’ image of a volume or drive, etc. These options are
enumerated below. The options labeled as 'Extra' require a separate license for them to be unlocked.
Option Extra Description
-mftfile
Assuming one has an $MFT file that has been copied from a volume, one can
analyze the file. The syntax is: -mftfile <extracted $MFT file>.
-image
Extract artifacts from a volume specified by an image and volume offset. The
syntax is -image <filename> -offset <volume offset>
-drivenum ***
Extract artifacts from a mounted disk specified by a drive number and volume
offset. The syntax is -drivenum <#> -offset <volume offset>
-partition
Extract artifacts from a mounted Windows volume. The syntax is -partition <drive
letter>.
-vmdk
Extract artifacts from a VMWare monolithic NTFS formatted volume. The syntax is
-vmdk <disk name>. For a collection of VMWare disks that include snapshots, one
can use the following syntax: -vmdk "disk1 | disk2 | ..."
-vss ***
Experimental. Extract artifacts from Volume Shadow. The syntax is -vss <index
number of shadow copy>. Only applies to Windows Vista, Win7, Win8 and
beyond. Does not apply to Windows XP.
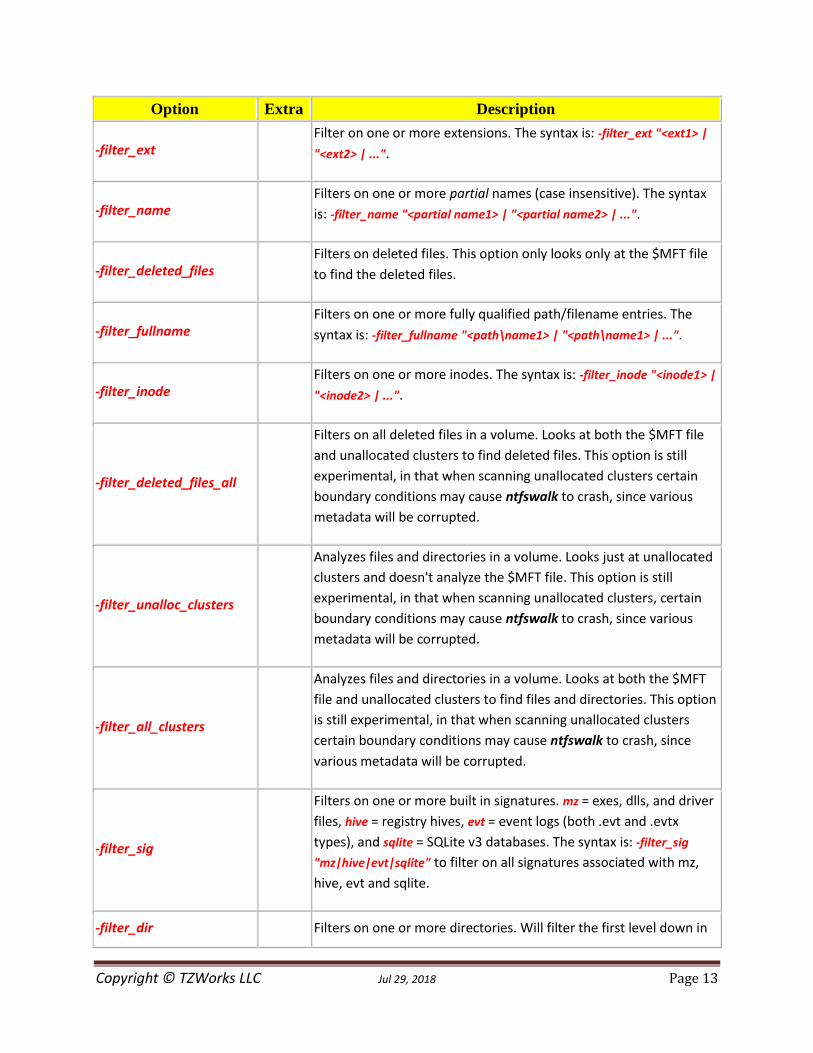
4.2 Filtering Options The second area is filtering. This defines what files (or MFT entries) are analyzed and displayed to the
user. One can filter on deleted files/folders, by various extensions, multiple partial names, and/or binary
signatures. Also in this area, one can choose to analyze all 'unallocated clusters' instead of the normal
'allocated clusters' or to pull files from a specified directory. For binary signatures, currently ntfswalk
allows one to find: registry hives, event logs or portable executable files. The options available and their
syntax are:
Copyright © TZWorks LLC Jul 29, 2018 Page 13
Option Extra Description
-filter_ext
Filter on one or more extensions. The syntax is: -filter_ext "<ext1> |
"<ext2> | ...".
-filter_name
Filters on one or more partial names (case insensitive). The syntax
is: -filter_name "<partial name1> | "<partial name2> | ...".
-filter_deleted_files
Filters on deleted files. This option only looks only at the $MFT file
to find the deleted files.
-filter_fullname
Filters on one or more fully qualified path/filename entries. The
syntax is: -filter_fullname "<path\name1> | "<path\name1> | ...".
-filter_inode
Filters on one or more inodes. The syntax is: -filter_inode "<inode1> |
"<inode2> | ...".
-filter_deleted_files_all
Filters on all deleted files in a volume. Looks at both the $MFT file
and unallocated clusters to find deleted files. This option is still
experimental, in that when scanning unallocated clusters certain
boundary conditions may cause ntfswalk to crash, since various
metadata will be corrupted.
-filter_unalloc_clusters
Analyzes files and directories in a volume. Looks just at unallocated
clusters and doesn't analyze the $MFT file. This option is still
experimental, in that when scanning unallocated clusters, certain
boundary conditions may cause ntfswalk to crash, since various
metadata will be corrupted.
-filter_all_clusters
Analyzes files and directories in a volume. Looks at both the $MFT
file and unallocated clusters to find files and directories. This option
is still experimental, in that when scanning unallocated clusters
certain boundary conditions may cause ntfswalk to crash, since
various metadata will be corrupted.
-filter_sig
Filters on one or more built in signatures. mz = exes, dlls, and driver
files, hive = registry hives, evt = event logs (both .evt and .evtx
types), and sqlite = SQLite v3 databases. The syntax is: -filter_sig
"mz|hive|evt|sqlite" to filter on all signatures associated with mz,
hive, evt and sqlite.
-filter_dir
Filters on one or more directories. Will filter the first level down in
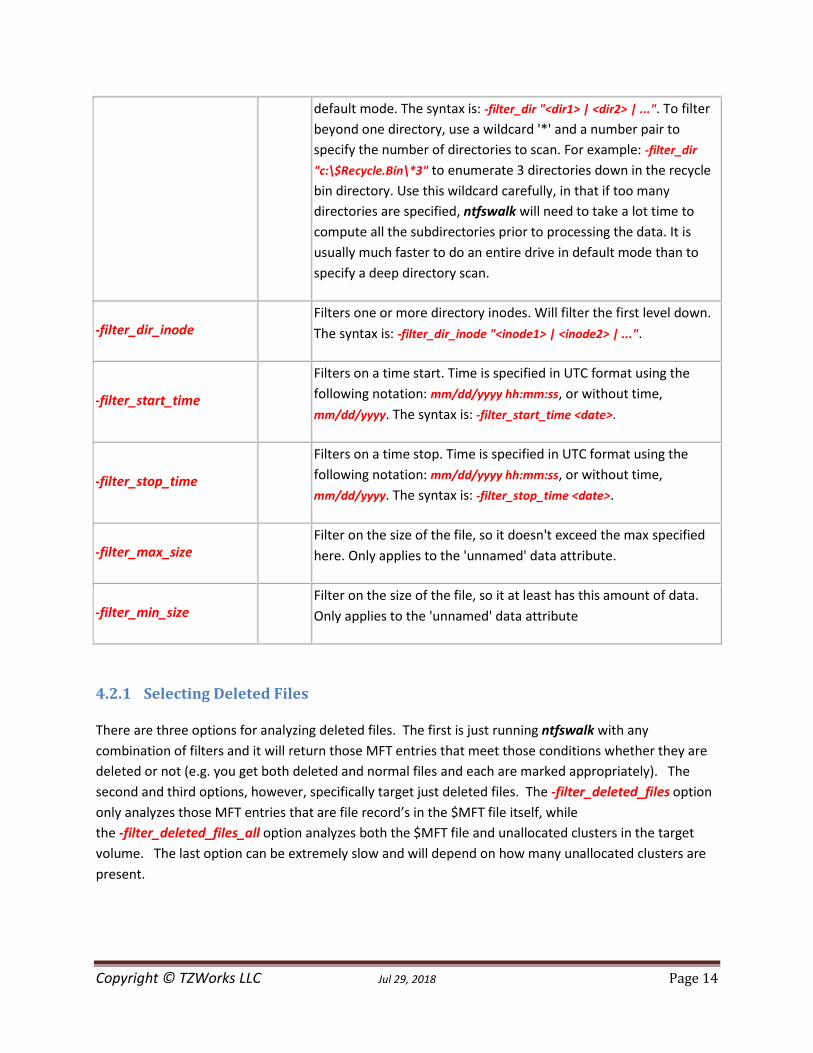
Copyright © TZWorks LLC Jul 29, 2018 Page 14
default mode. The syntax is: -filter_dir "<dir1> | <dir2> | ...". To filter
beyond one directory, use a wildcard '*' and a number pair to
specify the number of directories to scan. For example: -filter_dir
"c:\$Recycle.Bin\*3" to enumerate 3 directories down in the recycle
bin directory. Use this wildcard carefully, in that if too many
directories are specified, ntfswalk will need to take a lot time to
compute all the subdirectories prior to processing the data. It is
usually much faster to do an entire drive in default mode than to
specify a deep directory scan.
-filter_dir_inode
Filters one or more directory inodes. Will filter the first level down.
The syntax is: -filter_dir_inode "<inode1> | <inode2> | ...".
-filter_start_time
Filters on a time start. Time is specified in UTC format using the
following notation: mm/dd/yyyy hh:mm:ss, or without time,
mm/dd/yyyy. The syntax is: -filter_start_time <date>.
-filter_stop_time
Filters on a time stop. Time is specified in UTC format using the
following notation: mm/dd/yyyy hh:mm:ss, or without time,
mm/dd/yyyy. The syntax is: -filter_stop_time <date>.
-filter_max_size
Filter on the size of the file, so it doesn't exceed the max specified
here. Only applies to the 'unnamed' data attribute.
-filter_min_size
Filter on the size of the file, so it at least has this amount of data.
Only applies to the 'unnamed' data attribute
4.2.1 Selecting Deleted Files
There are three options for analyzing deleted files. The first is just running ntfswalk with any
combination of filters and it will return those MFT entries that meet those conditions whether they are
deleted or not (e.g. you get both deleted and normal files and each are marked appropriately). The
second and third options, however, specifically target just deleted files. The -filter_deleted_files option
only analyzes those MFT entries that are file record’s in the $MFT file itself, while
the -filter_deleted_files_all option analyzes both the $MFT file and unallocated clusters in the target
volume. The last option can be extremely slow and will depend on how many unallocated clusters are
present.
Copyright © TZWorks LLC Jul 29, 2018 Page 15
4.2.2 Selecting Files with Specified Extensions
An easy and quick way to analyze specific file types is to filter on certain extensions. Many good files to
perform forensic analysis on can be easily located with this option. A few examples includes: prefetch
files (*.pf), LNK files (*.lnk), Microsoft Office files (*.doc, *.docx, …), email files (*.eml, *.pst), graphics
files (*.bmp, *.gif, ..), and many others. By using the -filter_ext “ext1 | ext2 |…”, option, one can place
as many extensions in the expression, where each extension is delimited by a pipe character and the
entire expression of extensions is double quoted. To make this work properly, ntfswalk treats the
extension filter as an ‘OR’ filter, meaning if any one of the conditions in this filter (or any other filter) are
met, it will cause the file to pass. Below is an example of filtering for Microsoft Office files:
-filter_ext “.doc | .docx | .ppt | .pptx | .xls | .xlsx”
4.2.3 Selecting Files that include a partial name
One can filter on a partial name of the file or directory by using the -filter_name “name1 | name2 | …”
option. Similar to the extension filter example shown above, this filter allows one to put a number of
partial names to filter on, where each name is delimited by a pipe character. This filter is also treated as
an ‘OR’ filter, meaning if any one of the conditions in this filter (or any other filter) are met, it will cause
the file or directory to pass. A couple of use-cases for using this type of filter are to locate and process
Jump List artifacts, thumbcache files, or system logs (which can have various extensions in their names).
Below is an example:
-filter_name “destinations-ms | thumbcache | setupapi”
4.2.4 Selecting Files with in a MFT entry (inode) range
If you know the inodes (or MFT entry number) of the file, one can specify one or more inodes in a filter.
This filter is also treated as an ‘OR’ filter, meaning if any one of the conditions in this filter (or any other
filter) are met, it will cause the file or directory to pass. One can, for example, pull system files that are
of interest that have immutable inode numbers. Files such as $MFT (inode 0), $LogFile (inode 2),
$Bitmap (inode 6), $Boot (inode 7), $Secure (inode 9), etc. If desiring to analyze or collect any of these
system files, one could use the following syntax:
-filter_inode “0 | 2 | 6 | 7 | 9”
4.2.5 Selecting Files are that have a certain parent directory
If one is interested in a certain directory of files, one can use the -filter_dir “dir1 | dir2 | …” or the inode
variant -filter_dir_inode “inode1 | inode2 | …” options to specify that you want to analyze any file
under one or more directories. These filters are also treated as ‘OR’ filter, meaning if any one of the
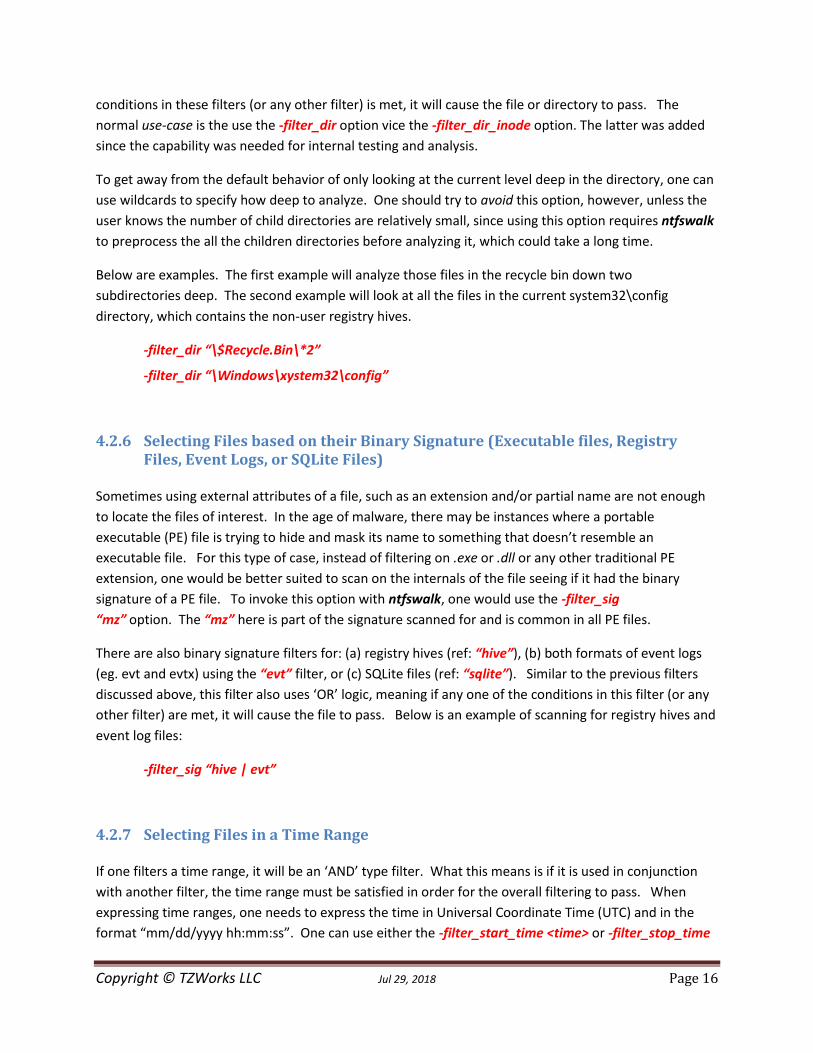
Copyright © TZWorks LLC Jul 29, 2018 Page 16
conditions in these filters (or any other filter) is met, it will cause the file or directory to pass. The
normal use-case is the use the -filter_dir option vice the -filter_dir_inode option. The latter was added
since the capability was needed for internal testing and analysis.
To get away from the default behavior of only looking at the current level deep in the directory, one can
use wildcards to specify how deep to analyze. One should try to avoid this option, however, unless the
user knows the number of child directories are relatively small, since using this option requires ntfswalk
to preprocess the all the children directories before analyzing it, which could take a long time.
Below are examples. The first example will analyze those files in the recycle bin down two
subdirectories deep. The second example will look at all the files in the current system32\config
directory, which contains the non-user registry hives.
-filter_dir “\$Recycle.Bin\*2”
-filter_dir “\Windows\xystem32\config”
4.2.6 Selecting Files based on their Binary Signature (Executable files, Registry Files, Event Logs, or SQLite Files)
Sometimes using external attributes of a file, such as an extension and/or partial name are not enough
to locate the files of interest. In the age of malware, there may be instances where a portable
executable (PE) file is trying to hide and mask its name to something that doesn’t resemble an
executable file. For this type of case, instead of filtering on .exe or .dll or any other traditional PE
extension, one would be better suited to scan on the internals of the file seeing if it had the binary
signature of a PE file. To invoke this option with ntfswalk, one would use the -filter_sig
“mz” option. The “mz” here is part of the signature scanned for and is common in all PE files.
There are also binary signature filters for: (a) registry hives (ref: “hive”), (b) both formats of event logs
(eg. evt and evtx) using the “evt” filter, or (c) SQLite files (ref: “sqlite”). Similar to the previous filters
discussed above, this filter also uses ‘OR’ logic, meaning if any one of the conditions in this filter (or any
other filter) are met, it will cause the file to pass. Below is an example of scanning for registry hives and
event log files:
-filter_sig “hive | evt”
4.2.7 Selecting Files in a Time Range
If one filters a time range, it will be an ‘AND’ type filter. What this means is if it is used in conjunction
with another filter, the time range must be satisfied in order for the overall filtering to pass. When
expressing time ranges, one needs to express the time in Universal Coordinate Time (UTC) and in the
format “mm/dd/yyyy hh:mm:ss”. One can use either the -filter_start_time <time> or -filter_stop_time
Copyright © TZWorks LLC Jul 29, 2018 Page 17
<time> or both to specify a range. The first specifies the start date and the second specifies a do not
exceed date. Below are examples.
-filter_start_time "02/03/1950 19:20:30"
-filter_stop_time "01/01/2013 00:00:00"
4.2.8 Selecting Files that are present in unallocated clusters
More typically, one is interested in the data on the unallocated clusters, primarily to determine what
artifacts were once present that the user of the machine tried to erased.
The option -filter_unalloc_clusters will cause ntfswalk to scan only the unallocated clusters. It does this
by reading the $Bitmap (inode 6) file to determine the cluster mapping of which clusters are allocated
and which are not.
4.3 Extraction Options Any file passing the filtering test will be a candidate for extraction. There are a few extraction options:
(a) extract the entire file, (b) extract only the header of the file (32 bytes worth), or (c) extract the
cluster run associated with the data of the file. The syntax and explanation of these options are listed in
the table below:
Option Extra Description
-action_copy_files
Extracts the file data into the specified directory. The syntax is:
-action_copy_files <directory to store files> [-raw]
[-skip_sparse_clusters]. The -raw sub-option says to copy all
clusters associated with a file in a bit-for-bit copy operation.
This include slack space as well as not uncompressing any data
that may use native NTFS compression. The
-skip_sparse_clusters sub-option says to ignore any clusters that
are sparse during the copy operation.
-action_include_header
Extracts the first 32 bytes of data and appends it to the CSV
output
-action_include_clusterinfo
Show additional information regarding data types and cluster
runs and appends it to the CSV output
4.3.1 Extracting the Data from a file
Copyright © TZWorks LLC Jul 29, 2018 Page 18
Extracting files is a common need, especially when gathering critical data from an incident response
request. By using the -action_copy_files <root directory> [-raw] [-skip_sparse_clusters] one can direct
the files copied to a root directory, but also indicate whether you want to include the file slack (-raw
option) or to skip sparse clusters (-skip_sparse_clusters option).
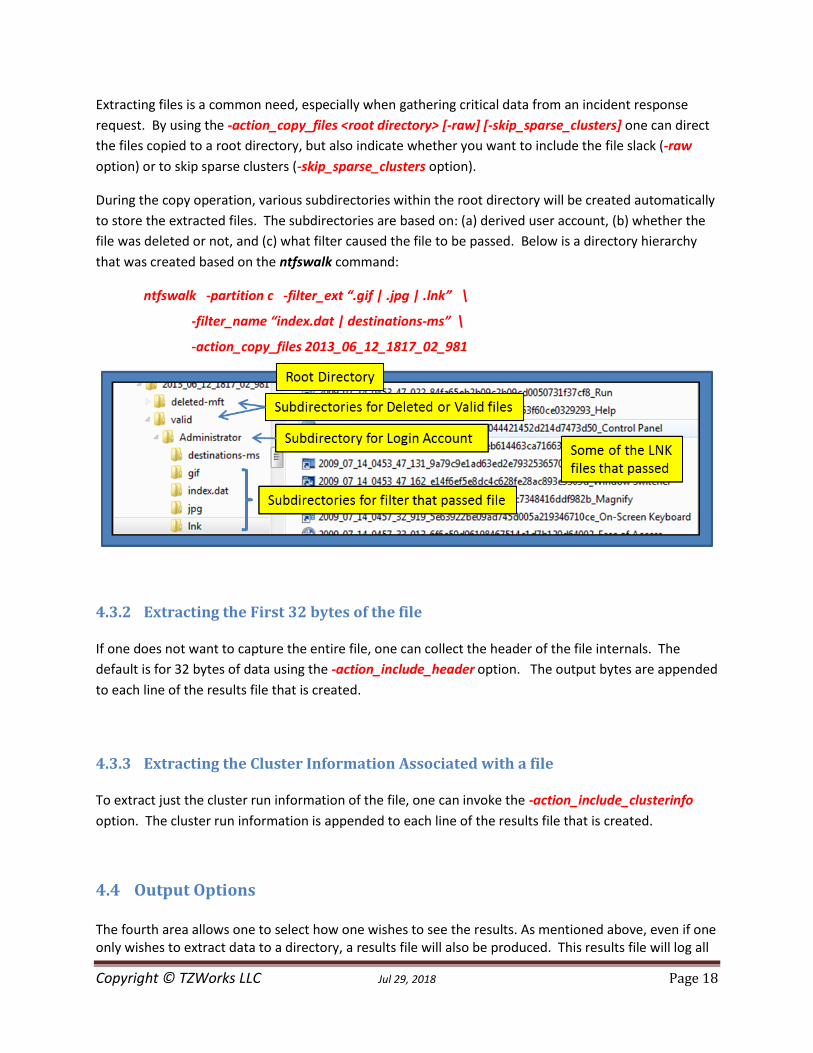
During the copy operation, various subdirectories within the root directory will be created automatically
to store the extracted files. The subdirectories are based on: (a) derived user account, (b) whether the
file was deleted or not, and (c) what filter caused the file to be passed. Below is a directory hierarchy
that was created based on the ntfswalk command:
ntfswalk -partition c -filter_ext “.gif | .jpg | .lnk” \
-filter_name “index.dat | destinations-ms” \
-action_copy_files 2013_06_12_1817_02_981
4.3.2 Extracting the First 32 bytes of the file
If one does not want to capture the entire file, one can collect the header of the file internals. The
default is for 32 bytes of data using the -action_include_header option. The output bytes are appended
to each line of the results file that is created.
4.3.3 Extracting the Cluster Information Associated with a file
To extract just the cluster run information of the file, one can invoke the -action_include_clusterinfo
option. The cluster run information is appended to each line of the results file that is created.
4.4 Output Options The fourth area allows one to select how one wishes to see the results. As mentioned above, even if one only wishes to extract data to a directory, a results file will also be produced. This results file will log all
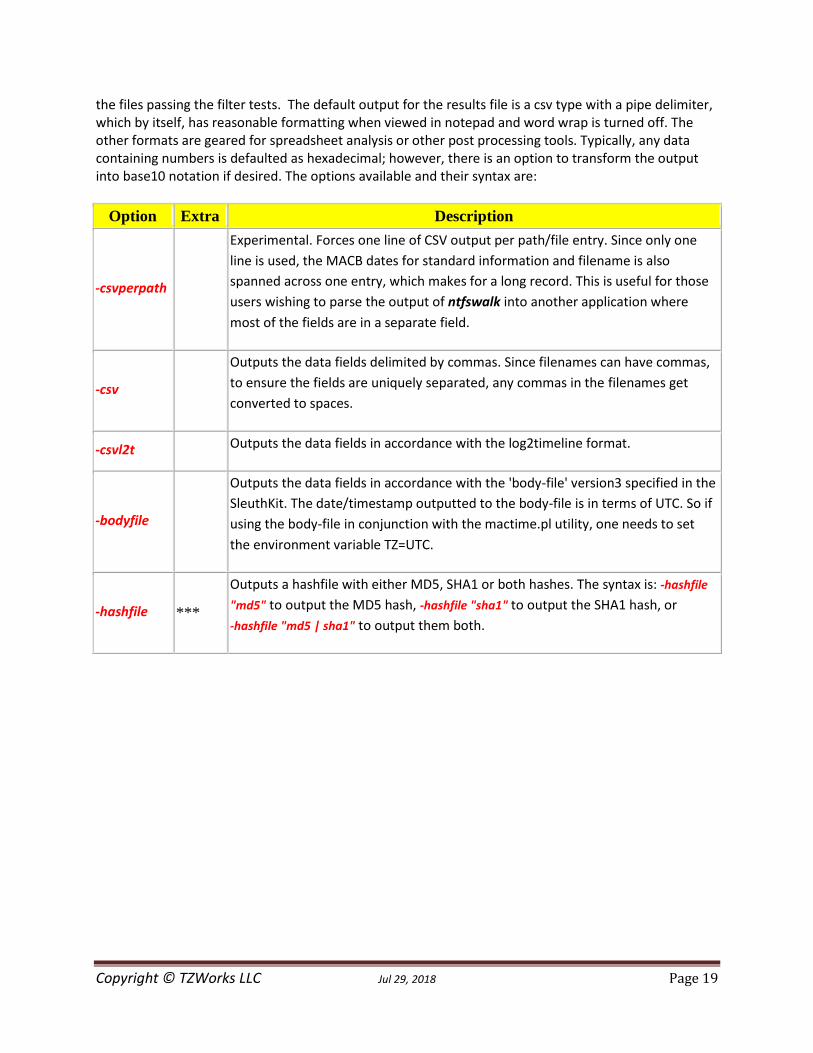
Copyright © TZWorks LLC Jul 29, 2018 Page 19
the files passing the filter tests. The default output for the results file is a csv type with a pipe delimiter, which by itself, has reasonable formatting when viewed in notepad and word wrap is turned off. The other formats are geared for spreadsheet analysis or other post processing tools. Typically, any data containing numbers is defaulted as hexadecimal; however, there is an option to transform the output into base10 notation if desired. The options available and their syntax are:
Option Extra Description
-csvperpath
Experimental. Forces one line of CSV output per path/file entry. Since only one
line is used, the MACB dates for standard information and filename is also
spanned across one entry, which makes for a long record. This is useful for those
users wishing to parse the output of ntfswalk into another application where
most of the fields are in a separate field.
-csv
Outputs the data fields delimited by commas. Since filenames can have commas,
to ensure the fields are uniquely separated, any commas in the filenames get
converted to spaces.
-csvl2t
Outputs the data fields in accordance with the log2timeline format.
-bodyfile
Outputs the data fields in accordance with the 'body-file' version3 specified in the
SleuthKit. The date/timestamp outputted to the body-file is in terms of UTC. So if
using the body-file in conjunction with the mactime.pl utility, one needs to set
the environment variable TZ=UTC.
-hashfile ***
Outputs a hashfile with either MD5, SHA1 or both hashes. The syntax is: -hashfile
"md5" to output the MD5 hash, -hashfile "sha1" to output the SHA1 hash, or
-hashfile "md5 | sha1" to output them both.
Copyright © TZWorks LLC Jul 29, 2018 Page 20
4.4.1 Computing the hash of the file
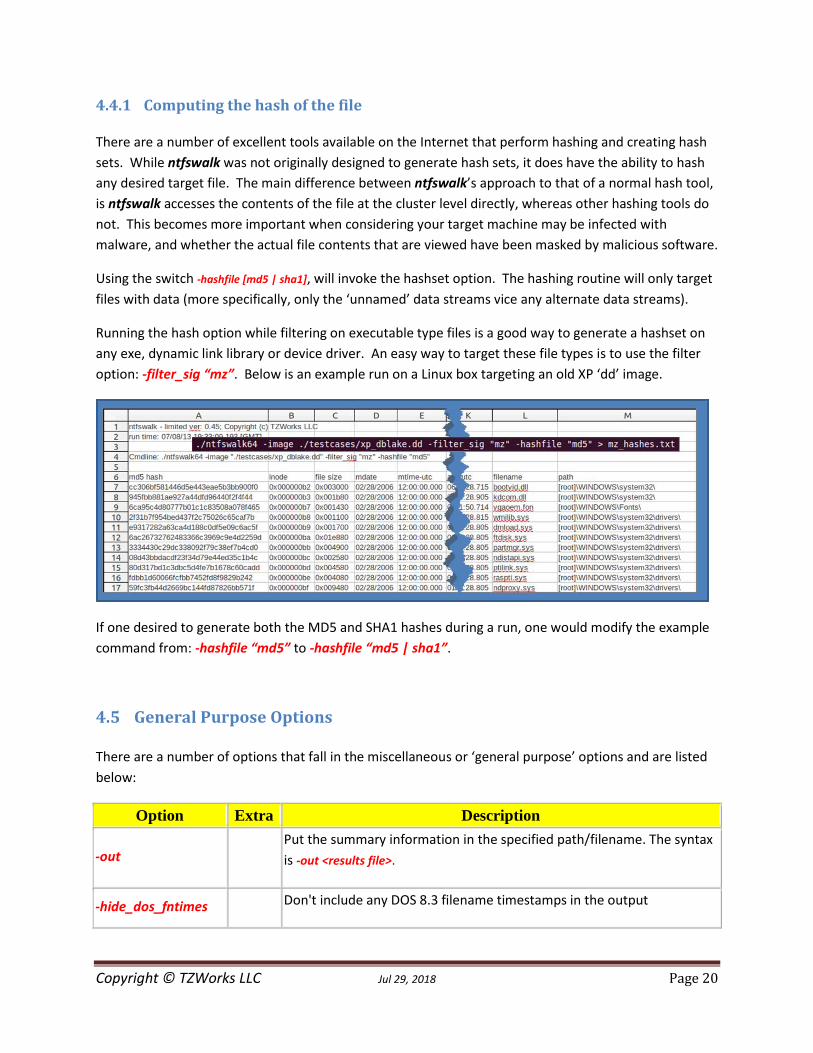
There are a number of excellent tools available on the Internet that perform hashing and creating hash
sets. While ntfswalk was not originally designed to generate hash sets, it does have the ability to hash
any desired target file. The main difference between ntfswalk’s approach to that of a normal hash tool,
is ntfswalk accesses the contents of the file at the cluster level directly, whereas other hashing tools do
not. This becomes more important when considering your target machine may be infected with
malware, and whether the actual file contents that are viewed have been masked by malicious software.
Using the switch -hashfile [md5 | sha1], will invoke the hashset option. The hashing routine will only target
files with data (more specifically, only the ‘unnamed’ data streams vice any alternate data streams).
Running the hash option while filtering on executable type files is a good way to generate a hashset on
any exe, dynamic link library or device driver. An easy way to target these file types is to use the filter
option: -filter_sig “mz”. Below is an example run on a Linux box targeting an old XP ‘dd’ image.
If one desired to generate both the MD5 and SHA1 hashes during a run, one would modify the example
command from: -hashfile “md5” to -hashfile “md5 | sha1”.
4.5 General Purpose Options There are a number of options that fall in the miscellaneous or ‘general purpose’ options and are listed
below:
Option Extra Description
-out
Put the summary information in the specified path/filename. The syntax
is -out <results file>.
-hide_dos_fntimes
Don't include any DOS 8.3 filename timestamps in the output
Copyright © TZWorks LLC Jul 29, 2018 Page 21
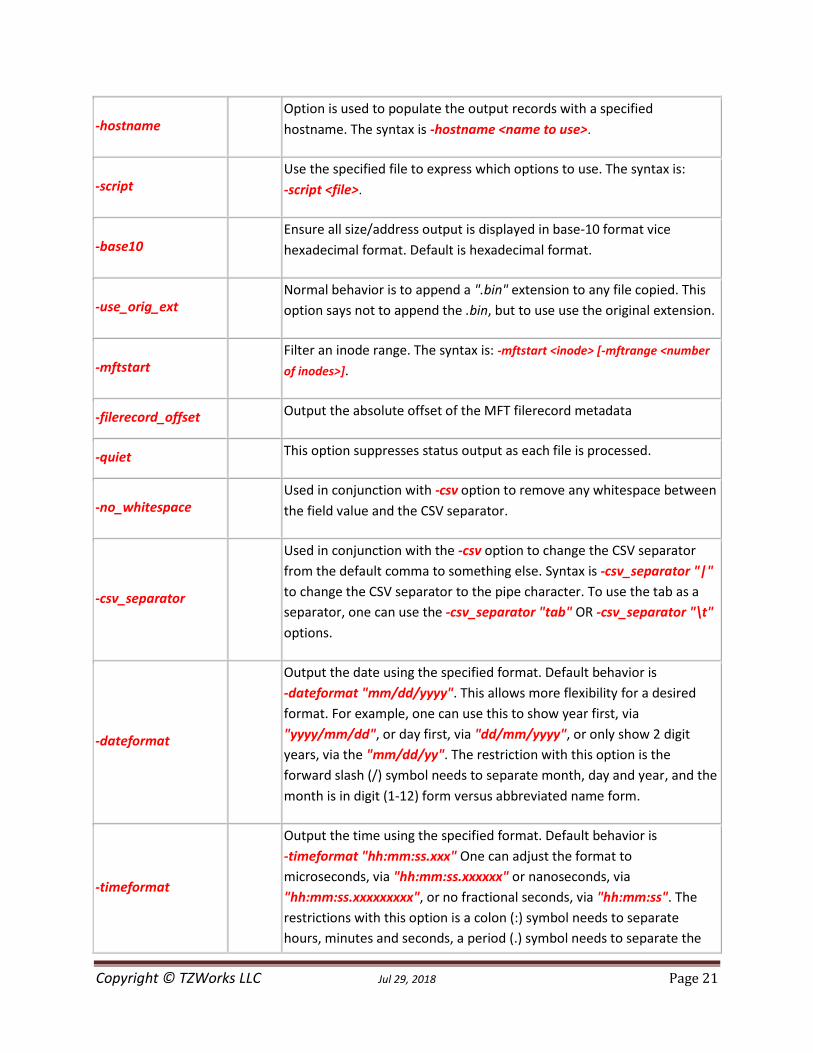
-hostname
Option is used to populate the output records with a specified
hostname. The syntax is -hostname <name to use>.
-script
Use the specified file to express which options to use. The syntax is:
-script <file>.
-base10
Ensure all size/address output is displayed in base-10 format vice
hexadecimal format. Default is hexadecimal format.
-use_orig_ext
Normal behavior is to append a ".bin" extension to any file copied. This
option says not to append the .bin, but to use use the original extension.
-mftstart
Filter an inode range. The syntax is: -mftstart <inode> [-mftrange <number
of inodes>].
-filerecord_offset
Output the absolute offset of the MFT filerecord metadata
-quiet
This option suppresses status output as each file is processed.
-no_whitespace
Used in conjunction with -csv option to remove any whitespace between
the field value and the CSV separator.
-csv_separator
Used in conjunction with the -csv option to change the CSV separator
from the default comma to something else. Syntax is -csv_separator "|"
to change the CSV separator to the pipe character. To use the tab as a
separator, one can use the -csv_separator "tab" OR -csv_separator "\t"
options.
-dateformat
Output the date using the specified format. Default behavior is
-dateformat "mm/dd/yyyy". This allows more flexibility for a desired
format. For example, one can use this to show year first, via
"yyyy/mm/dd", or day first, via "dd/mm/yyyy", or only show 2 digit
years, via the "mm/dd/yy". The restriction with this option is the
forward slash (/) symbol needs to separate month, day and year, and the
month is in digit (1-12) form versus abbreviated name form.
-timeformat
Output the time using the specified format. Default behavior is
-timeformat "hh:mm:ss.xxx" One can adjust the format to
microseconds, via "hh:mm:ss.xxxxxx" or nanoseconds, via
"hh:mm:ss.xxxxxxxxx", or no fractional seconds, via "hh:mm:ss". The
restrictions with this option is a colon (:) symbol needs to separate
hours, minutes and seconds, a period (.) symbol needs to separate the
Copyright © TZWorks LLC Jul 29, 2018 Page 22
seconds and fractional seconds, and the repeating symbol 'x' is used to
represent number of fractional seconds. (Note: the fractional seconds
applies only to those time formats that have the appropriate precision
available. The Windows internal filetime has, for example, 100 nsec unit
precision available. The DOS time format and the UNIX 'time_t' format,
however, have no fractional seconds). Some of the times represented by
this tool may use a time format without fractional seconds, and
therefore, will not show a greater precision beyond seconds when using
this option.
-pair_datetime *** Output the date/time as 1 field vice 2 for csv option
-cpu ***
This option is experimental and can only be used for processing MFT
entries (as opposed to scanning unallocated clusters or other clusters
outside the MFT). Its purpose is to take advantage of multiple CPUs to
process a desired target. This option also requires one to specify an
output file, via -out <result file>. Since this option creates multiple
temporary files before merging the results into a final results file, one
can also specify a folder where the temporary files can be stored. The
option to specify a temporary folder is -tempdir <folder name>. The
option to instruct the tool to not merge each instance spawned
is -separate_files. The syntax is: -cpu <# children instances> -out
<results file> [-tempdir <folder>] [-separate_files]
4.5.1 Using a Script File
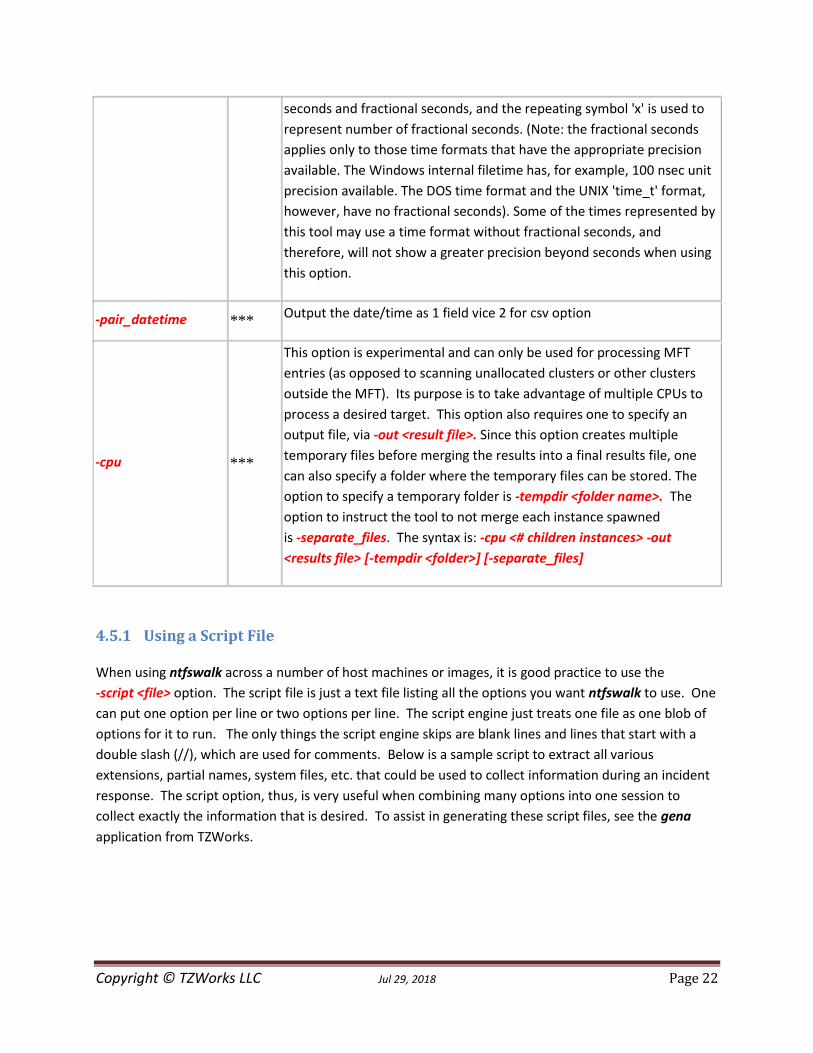
When using ntfswalk across a number of host machines or images, it is good practice to use the
-script <file> option. The script file is just a text file listing all the options you want ntfswalk to use. One
can put one option per line or two options per line. The script engine just treats one file as one blob of
options for it to run. The only things the script engine skips are blank lines and lines that start with a
double slash (//), which are used for comments. Below is a sample script to extract all various
extensions, partial names, system files, etc. that could be used to collect information during an incident
response. The script option, thus, is very useful when combining many options into one session to
collect exactly the information that is desired. To assist in generating these script files, see the gena
application from TZWorks.
Copyright © TZWorks LLC Jul 29, 2018 Page 23
4.5.2 Spawning multiple instances of ntfswalk
ntfswalk can spawn multiple instances of itself to make use of more than one CPU to process a target
MFT file or image. This capability was able to be implemented as an add-on option by splitting the MFT
file into separate chunks and telling each instance of ntfswalk to target a specific MFT range. Each
instance then creates its own results file and the parent instance merges the intermediate results files
into a final one when each of the children instances terminate. To invoke this option, use the -cpu <#
instances> syntax.
Below is a functional diagram of what happens when using an example of three worker instances,
invoked with the option -cpu 3. The number 3 was picked since it represents the case of operating with
a quad core processor. The main instance (eg. parent) spawns 3 child instances of ntfswalk and
instructs each one to work on a specific section of the MFT to process. When a child instance finishes
the task, they die off and leave behind the results in the form of a temporary file. The parent is
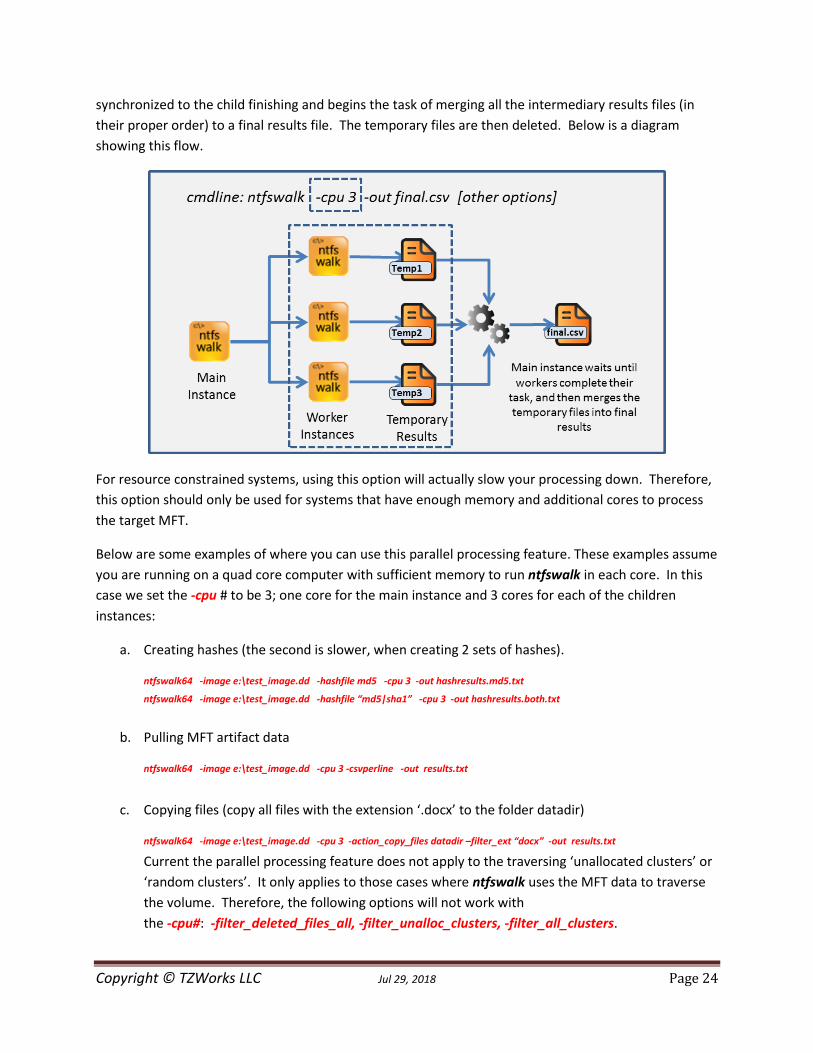
Copyright © TZWorks LLC Jul 29, 2018 Page 24
synchronized to the child finishing and begins the task of merging all the intermediary results files (in
their proper order) to a final results file. The temporary files are then deleted. Below is a diagram
showing this flow.
For resource constrained systems, using this option will actually slow your processing down. Therefore,
this option should only be used for systems that have enough memory and additional cores to process
the target MFT.
Below are some examples of where you can use this parallel processing feature. These examples assume
you are running on a quad core computer with sufficient memory to run ntfswalk in each core. In this
case we set the -cpu # to be 3; one core for the main instance and 3 cores for each of the children
instances:
a. Creating hashes (the second is slower, when creating 2 sets of hashes).
ntfswalk64 -image e:\test_image.dd -hashfile md5 -cpu 3 -out hashresults.md5.txt
ntfswalk64 -image e:\test_image.dd -hashfile “md5|sha1” -cpu 3 -out hashresults.both.txt
b. Pulling MFT artifact data
ntfswalk64 -image e:\test_image.dd -cpu 3 -csvperline -out results.txt
c. Copying files (copy all files with the extension ‘.docx’ to the folder datadir)
ntfswalk64 -image e:\test_image.dd -cpu 3 -action_copy_files datadir –filter_ext “docx” -out results.txt
Current the parallel processing feature does not apply to the traversing ‘unallocated clusters’ or
‘random clusters’. It only applies to those cases where ntfswalk uses the MFT data to traverse
the volume. Therefore, the following options will not work with
the -cpu#: -filter_deleted_files_all, -filter_unalloc_clusters, -filter_all_clusters.
Copyright © TZWorks LLC Jul 29, 2018 Page 25
For more complicated cases, one can just wrap all the desired option in a script and invoke the -script
<script file> option along with the -cpu # option.
4.5.2.1 Discussion on when and when not to use parallel processing
When parsing NTFS artifacts, either in an online fashion or offline mode, there is usually significant disk
I/O just to read the desired data so it can be parsed. Then on the back end there is more disk I/O to
store the results. ntfswalk, for example, will reads the MFT data from a volume or an extracted MFT
file. If the volume is mounted (or unmounted, but backed by a typical disk drive that spins its platters,
as opposed to a RAM disk), then the likely limiting factor is the disk I/O and not the CPU. What this
means is adding more CPU cores, in this case, to parse the data may not buy you too much in speed
enhancement, and in some cases, may actually be slower. For the case, where slower times occur, it is
because parallel processing requires some additional overhead to coordinate the other instances on
which data chunk to target and again during the reconstruction, whereas the single core option doesn’t
have this additional overhead. This coordination requires the use of synchronization objects which may
or may not be cheap in terms of resources and will depend on your system configuration.
Where the parallel processing really has noticeable gains, is when one maximizes the I/O speed (there
are a number of ways to do this, but a RAM disk comes to mind). If you are able to sufficiently minimize
the I/O latency and make the limiting factor the CPU, then using multiple cores to process the data
makes sense.
For those that use SSD hard drives, then you most likely will gain some overall speed by using the -cpu #
option. To test your system, we suggest you use one of our options we use for our internal testing of
our tools (we exported with the newer version of the tool so users can make use of it). This option is
just to profile the tool to see how fast it runs. By issuing the -profile option, with the rest of your normal
arguments, will cause the tool to measure the start and stop time, displaying the results at the
command line when the processing is finished. The results are displayed in seconds and fractions
thereof.
5 Authentication and the License File This tool has authentication built into the binary. There are two authentication mechanisms: (a) the
digital certificate embedded into the binary and (b) the runtime authentication. For the first method,
only the Windows and Mac OS-X (if available) versions have been signed by an X-509 digital code signing
certificate, which is validated by Windows (or OS-X) during operation. If the binary has been tampered
with, the digital certificate will be invalidated.
For the second (runtime authentication) method, the authentication does two things: (a) validates that
the tool has a valid license and (b) validates the tool's binary has not been corrupted. The license needs
to be in the same directory of the tool for it to authenticate. Furthermore, any modification to the
license, either to its name or contents, will invalidate the license. The runtime binary validation hashes
the executable that is running and fails the authentication if it detects any modifications.
Copyright © TZWorks LLC Jul 29, 2018 Page 26
5.1 Limited versus Demo versus Full in the tool’s Output Banner The tools from TZWorks will output header information about the tool's version and whether it is
running in limited, demo or full mode. This is directly related to what version of a license the tool
authenticates with. The limited and demo keywords indicates some functionality of the tool is not
available, and the full keyword indicates all the functionality is available. The lacking functionality in the
limited or demo versions may mean one or all of the following: (a) certain options may not be available,
(b) certain data may not be outputted in the parsed results, and (c) the license has a finite lifetime
before expiring.
6 References
1. http://en.wikipedia.org/wiki/NTFS website 2. Brian Carrier's book, File System Forensic Analysis, sections on NTFS
3. Various Microsoft Technet articles
4. SleuthKit's Body file format
5. log2timeline CSV format - currently under evaluation