u 2 s - bunn - home & commercial beverage products ... 1: enter the program mode and scroll to...
TRANSCRIPT
Unit Objectives
Unit 2 setup
Given a realistic scenario depicting a new site install, the learner will be able to install and setup the brewer for customer turnover without error.
Given an installed machine, all the necessary tools and safety equipment, the learner will be able to set the machine up for initial operation.
The learner will be able to operate the switch controls. The learner will be able to enter programming. Thelearnerwillbeabletoperformtheflowcalibrationofthebrewtankandhotwatertank. The learner will be able to perform a brew process.
Bunn-O-Matic Corporation7
Setup and Programming
User Interface
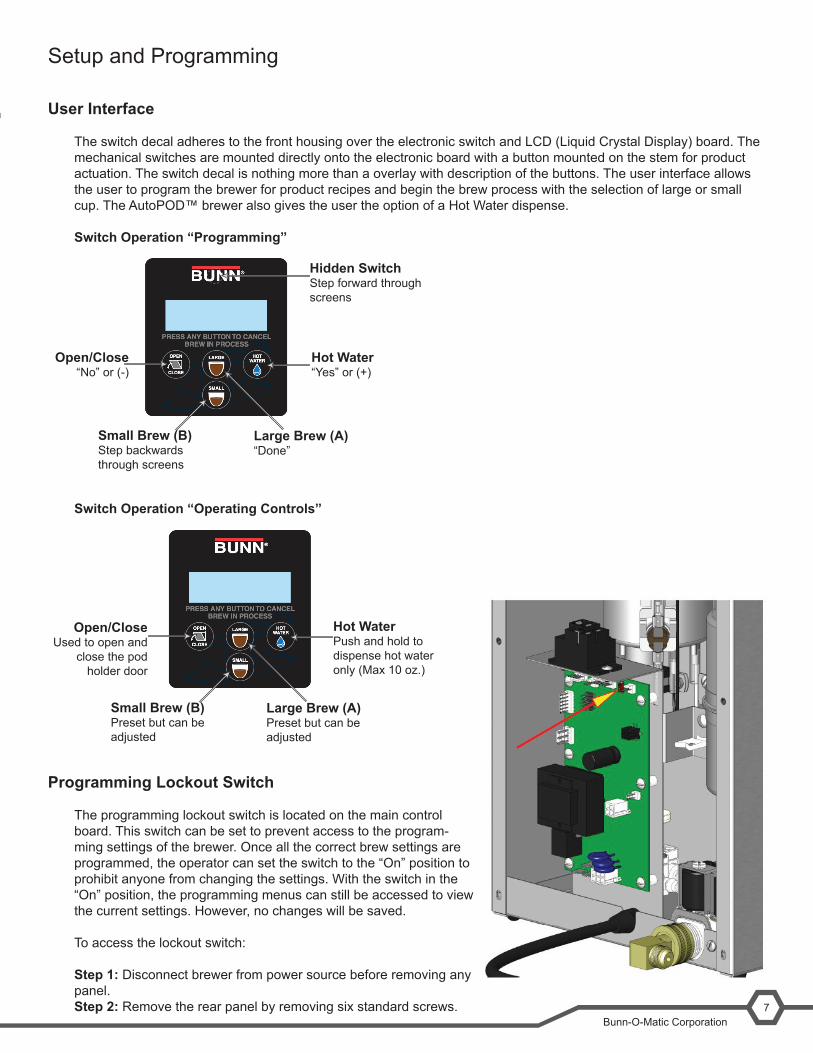
The switch decal adheres to the front housing over the electronic switch and LCD (Liquid Crystal Display) board. The mechanical switches are mounted directly onto the electronic board with a button mounted on the stem for product actuation. The switch decal is nothing more than a overlay with description of the buttons. The user interface allows the user to program the brewer for product recipes and begin the brew process with the selection of large or small cup. The AutoPOD™ brewer also gives the user the option of a Hot Water dispense.
Switch Operation “Programming”
Switch Operation “Operating Controls”
Programming Lockout Switch
The programming lockout switch is located on the main control board. This switch can be set to prevent access to the program-ming settings of the brewer. Once all the correct brew settings are programmed, the operator can set the switch to the “On” position to prohibit anyone from changing the settings. With the switch in the “On” position, the programming menus can still be accessed to view the current settings. However, no changes will be saved.
To access the lockout switch:
Step 1: Disconnect brewer from power source before removing any panel.Step 2: Remove the rear panel by removing six standard screws.
Hot Water“Yes” or (+)
Hidden SwitchStep forward through screens
Small Brew (B)Step backwards through screens
Large Brew (A)“Done”
Open/Close“No” or (-)
Hot WaterPush and hold to dispense hot water only (Max 10 oz.)
Small Brew (B)Preset but can be adjusted
Large Brew (A)Preset but can be adjusted
Open/CloseUsed to open and
close the pod holder door
AutoPOD™ Training Manual8
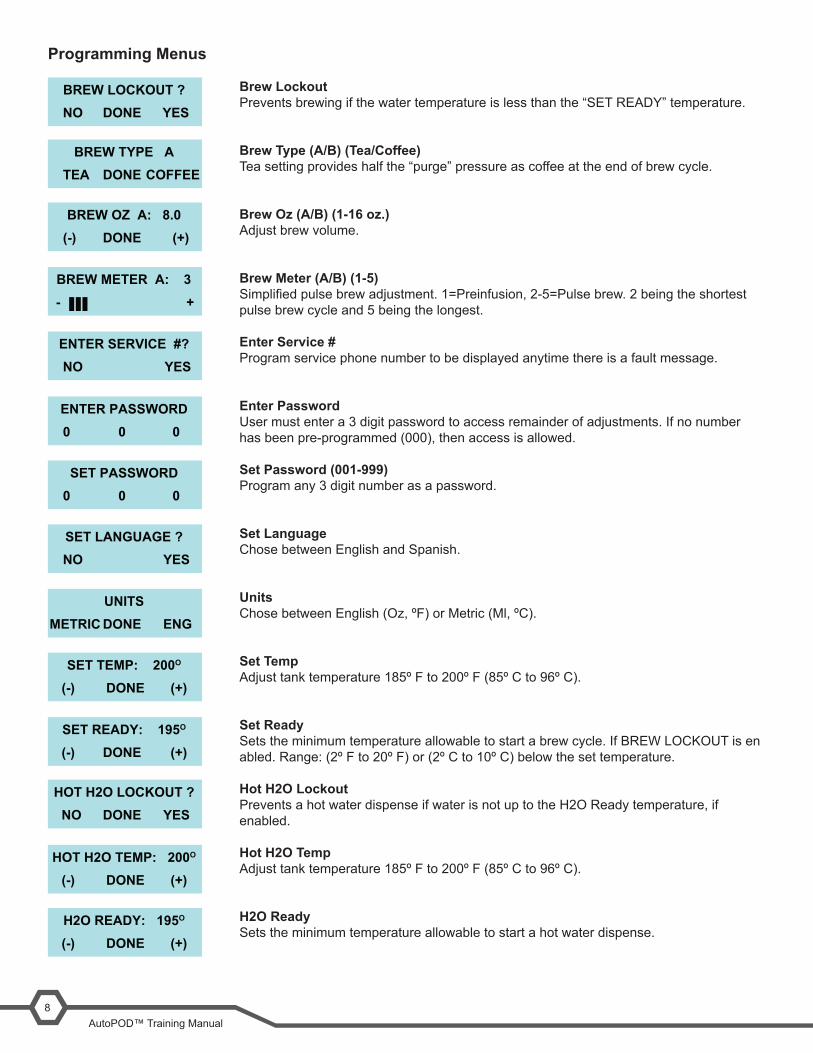
Programming Menus
Brew Lockout Prevents brewing if the water temperature is less than the “SET READY” temperature.
Brew Type (A/B) (Tea/Coffee) Tea setting provides half the “purge” pressure as coffee at the end of brew cycle.
Brew Oz (A/B) (1-16 oz.) Adjust brew volume.
Brew Meter (A/B) (1-5) Simplifiedpulsebrewadjustment.1=Preinfusion,2-5=Pulsebrew.2beingtheshortest pulse brew cycle and 5 being the longest.
Enter Service # Program service phone number to be displayed anytime there is a fault message.
Enter Password User must enter a 3 digit password to access remainder of adjustments. If no number has been pre-programmed (000), then access is allowed.
Set Password (001-999) Program any 3 digit number as a password.
Set Language Chose between English and Spanish.
Units Chose between English (Oz, ºF) or Metric (Ml, ºC).
Set Temp Adjust tank temperature 185º F to 200º F (85º C to 96º C).
Set Ready Sets the minimum temperature allowable to start a brew cycle. If BREW LOCKOUT is en abled. Range: (2º F to 20º F) or (2º C to 10º C) below the set temperature.
Hot H2O Lockout Prevents a hot water dispense if water is not up to the H2O Ready temperature, if enabled.
Hot H2O Temp Adjust tank temperature 185º F to 200º F (85º C to 96º C).
H2O Ready Sets the minimum temperature allowable to start a hot water dispense.
BREW TYPE ATEA COFFEEDONE
BREW OZ A: 8.0(-) (+)DONE
BREW METER A: 3- +
ENTER SERVICE #?NO YES
ENTER PASSWORD0 00
SET PASSWORD0 00
SET LANGUAGE ?NO YES
UNITSMETRIC ENGDONE
SET TEMP: 200O
(-) (+)DONE
SET READY: 195O
(-) (+)DONE
HOT H2O LOCKOUT ?NO YESDONE
HOT H2O TEMP: 200O
(-) (+)DONE
H2O READY: 195O
(-) (+)DONE
BREW LOCKOUT ?NO YESDONE
Bunn-O-Matic Corporation9
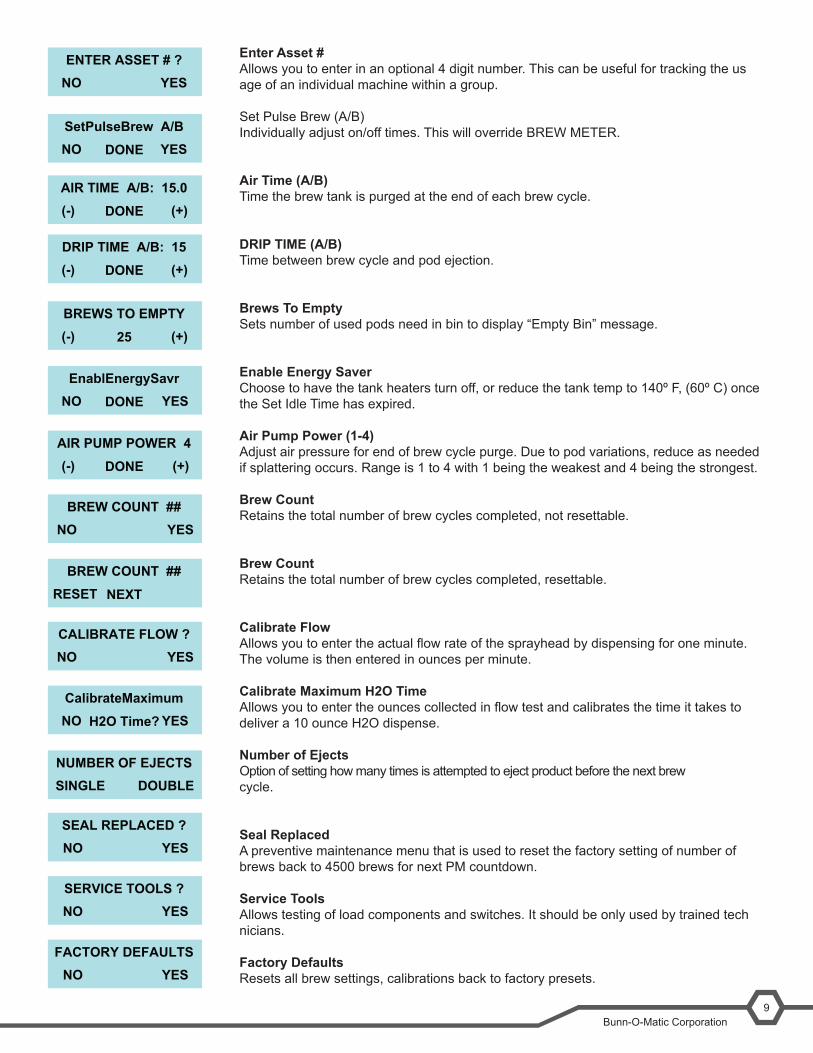
ENTER ASSET # ?NO YES
Enter Asset # Allows you to enter in an optional 4 digit number. This can be useful for tracking the us age of an individual machine within a group.
Set Pulse Brew (A/B) Individually adjust on/off times. This will override BREW METER.
Air Time (A/B) Time the brew tank is purged at the end of each brew cycle.
DRIP TIME (A/B) Time between brew cycle and pod ejection.
Brews To Empty Sets number of used pods need in bin to display “Empty Bin” message.
Enable Energy Saver Choose to have the tank heaters turn off, or reduce the tank temp to 140º F, (60º C) once the Set Idle Time has expired.
Air Pump Power (1-4) Adjust air pressure for end of brew cycle purge. Due to pod variations, reduce as needed if splattering occurs. Range is 1 to 4 with 1 being the weakest and 4 being the strongest.
Brew Count Retains the total number of brew cycles completed, not resettable.
Brew Count Retains the total number of brew cycles completed, resettable.
Calibrate Flow Allowsyoutoentertheactualflowrateofthesprayheadbydispensingforoneminute. The volume is then entered in ounces per minute.
Calibrate Maximum H2O Time Allowsyoutoentertheouncescollectedinflowtestandcalibratesthetimeittakesto deliver a 10 ounce H2O dispense.
Number of Ejects Option of setting how many times is attempted to eject product before the next brew cycle.
Seal Replaced A preventive maintenance menu that is used to reset the factory setting of number of brews back to 4500 brews for next PM countdown.
Service Tools Allows testing of load components and switches. It should be only used by trained tech nicians.
Factory Defaults Resets all brew settings, calibrations back to factory presets.
SetPulseBrew A/BNO YESDONE
AIR TIME A/B: 15.0(-) (+)DONE
BREWS TO EMPTY(-) (+)25
EnablEnergySavrNO YESDONE
AIR PUMP POWER 4(-) (+)DONE
BREW COUNT ##NO YES
BREW COUNT ##RESET NEXT
CALIBRATE FLOW ?NO YES
CalibrateMaximumNO YESH2O Time?
NUMBER OF EJECTSSINGLE DOUBLE
SEAL REPLACED ?NO YES
SERVICE TOOLS ?NO YES
FACTORY DEFAULTSNO YES
DRIP TIME A/B: 15(-) (+)DONE
AutoPOD™ Training Manual10
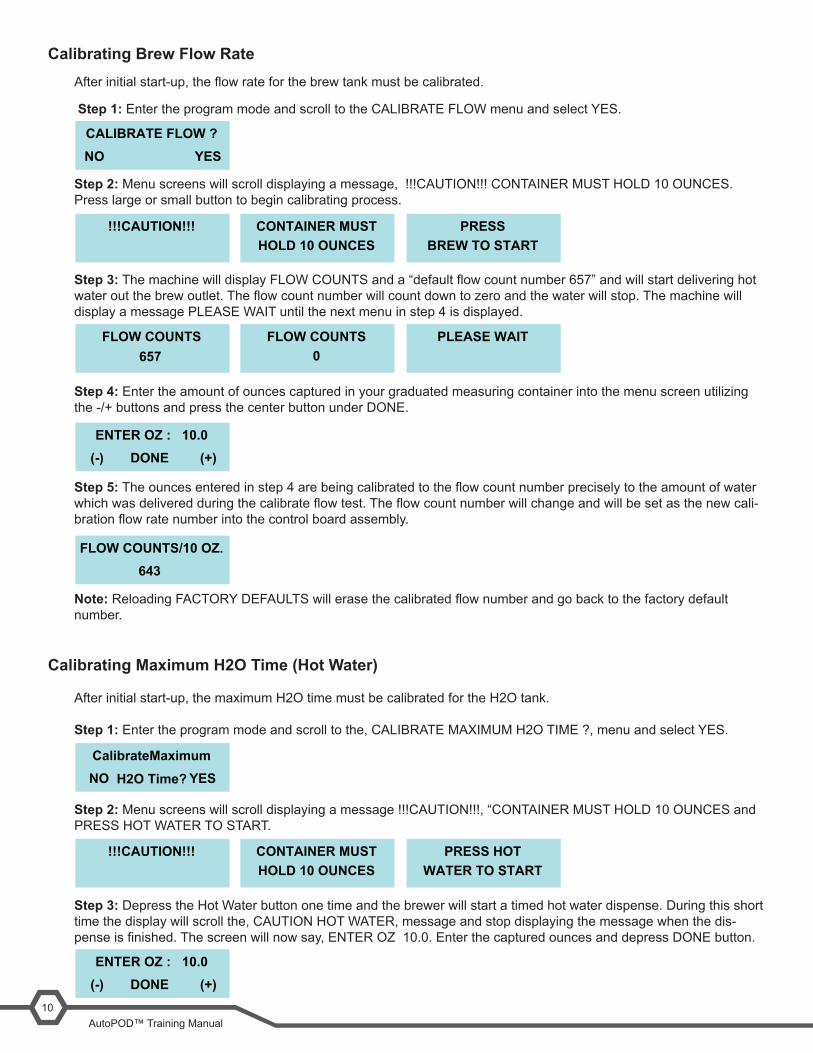
Calibrating Brew Flow RateAfterinitialstart-up,theflowrateforthebrewtankmustbecalibrated.
Step 1: Enter the program mode and scroll to the CALIBRATE FLOW menu and select YES.
Step 2: Menu screens will scroll displaying a message, !!!CAUTION!!! CONTAINER MUST HOLD 10 OUNCES. Press large or small button to begin calibrating process.
Step 3:ThemachinewilldisplayFLOWCOUNTSanda“defaultflowcountnumber657”andwillstartdeliveringhotwateroutthebrewoutlet.Theflowcountnumberwillcountdowntozeroandthewaterwillstop.Themachinewilldisplay a message PLEASE WAIT until the next menu in step 4 is displayed.
Step 4: Enter the amount of ounces captured in your graduated measuring container into the menu screen utilizing the -/+ buttons and press the center button under DONE.
Step 5:Theouncesenteredinstep4arebeingcalibratedtotheflowcountnumberpreciselytotheamountofwaterwhichwasdeliveredduringthecalibrateflowtest.Theflowcountnumberwillchangeandwillbesetasthenewcali-brationflowratenumberintothecontrolboardassembly.
Note:ReloadingFACTORYDEFAULTSwillerasethecalibratedflownumberandgobacktothefactorydefaultnumber.
Calibrating Maximum H2O Time (Hot Water)
After initial start-up, the maximum H2O time must be calibrated for the H2O tank.
Step 1: Enter the program mode and scroll to the, CALIBRATE MAXIMUM H2O TIME ?, menu and select YES.
Step 2: Menu screens will scroll displaying a message !!!CAUTION!!!, “CONTAINER MUST HOLD 10 OUNCES and PRESS HOT WATER TO START.
Step 3: Depress the Hot Water button one time and the brewer will start a timed hot water dispense. During this short time the display will scroll the, CAUTION HOT WATER, message and stop displaying the message when the dis-penseisfinished.Thescreenwillnowsay,ENTEROZ10.0.EnterthecapturedouncesanddepressDONEbutton.
!!!CAUTION!!! CONTAINER MUSTHOLD 10 OUNCES
PRESSBREW TO START
FLOW COUNTS FLOW COUNTS0657
PLEASE WAIT
ENTER OZ : 10.0(-) (+)DONE
FLOW COUNTS/10 OZ.643
CalibrateMaximumNO YESH2O Time?
!!!CAUTION!!! CONTAINER MUSTHOLD 10 OUNCES
PRESS HOTWATER TO START
ENTER OZ : 10.0(-) (+)DONE
CALIBRATE FLOW ?NO YES

Bunn-O-Matic Corporation11
Step 4: After entering the ounces collected, the machine changed the default time to the actual calibrated dispense time to deliver 10 ounces of water. The display will revert back to the original menu, CALIBRATE MAXIMUM H2O TIME?, to repeat test if needed.
Coffee Brewing Process
Step 1: Home screen will display a total of three messages.
Step 2: Place cup under brew chamber onto booster tray or drip tray. The booster tray will allow up to 5 inch cup clearance or bottom drip tray up to 8 inch cup clearance.Step 3:PresstheOpen/Closeswitchtoopenthepoddoorandpressacoffeepodfirmlydownintothepodholder.Menu screens will prompt you through the process. The pod holder will accommodate a variety of pods and different sizes from 50 to 61mm diameter.
Step 4: Press the Open/Door switch to close the pod door. Menu screens will prompt you through closing the door and selecting brew size.
Step 5: After selecting brew, the menu screens will scroll brewing messages during the brew process and inform you when brewing is complete. The system will automatically dispense the pod into the pod bin, reset back to standby position and be ready for next brew command.
AutoPod Brewer Place CupTo Begin
Press OpenTo Load PodReady To Brew
PLEASE WAITDOOR OPENING
PRESS PODIN DRAWER
PLEASE WAITDOOR CLOSING
SELECT BREW
PLEASE WAITPRE-INFUSION
BREWING BREWINGCOMPLETEPLEASE WAIT
ENJOYYOUR BEVERAGE