u-5000at ultrasonic nebulizer operator’s manual · enhanced by up to an order of magnitude when...
TRANSCRIPT
U-5000AT Ultrasonic Nebulizer Operator’s Manual

U-5000AT Operator Manual
COPYRIGHT
Copyright SD Acquisition, Inc., DBA CETAC Technologies 480001
REPRODUCTION
All rights reserved. Reproduction or transmission of this document in whole or in part, and by any means without the express written consent of the copyright owner or authorized agent is prohibited. Requests for additional copies of this, or any other CETAC publication, can be filled by contacting an authorized distributor or
CETAC Technologies Customer Service & Support 14306 Industrial Road Omaha, Nebraska 68144, USA Phone (800) 369-2822 (USA only) Phone (402) 733-2829 Fax (402) 733-1932 E-mail [email protected]
DISCLOSURE
This document contains CETAC proprietary data and is provided solely to its customers for their express benefit of safe, efficient operation and maintenance of the product described herein. Use or disclosure of CETAC proprietary data for the purpose of manufacture or reproduction of the item described herein, or any similar item, is prohibited, and delivery of this document shall not constitute any license or implied authorization to do so.
REVISIONS
CETAC Technologies strives to provide the scientific community with an unparalleled combination of effective technology and continuing value. Modular upgrades for existing instruments will continue to be a prime consideration as designs progress.
CETAC Technologies reserves the right to revise this document and/or improve products described herein at any time without notice or obligation. Warranty registration entitles the named owner exclusively to manual change pages/new editions as they are published.
FCC NOTICE
This equipment has been tested and found to comply with the limits for a Class A digital device, pursuant to Part 15 of the FCC Rules. These limits are designed to provide reasonable protection against harmful interference when the equipment is operated in a commercial environment. This equipment generates, uses, and can radiate radio frequency energy and, if not installed and used in accordance with the instruction manual, may cause harmful interference to radio communications. Operation of this equipment in a residential area is likely to cause harmful interference in which case the user will be
required to correct the interference at his own expense.
SAFETY
Instruments, accessories, components or other associated materials may not be returned to CETAC Technologies if contaminated with biohazard or radioactive materials, infectious agents, or any other materials and/or conditions that could constitute a health or injury hazard to CETAC employees. Call Customer Service and Support if there is any question or doubt relative to decontamination requirements. CAUTION and WARNING statements, as applied in this document, shall be interpreted consistent with the following context: CAUTION applies only to potential property damage conditions; WARNING applies to potential personal injury conditions, in combination with or exclusive of potential property damage.
All user-serviceable components are specifically identified in this document as such; the balance shall be assumed to require the expertise of a factory service technician/engineer for adjustment, repair, replacement, modification, etc. Others not so qualified and performing these actions shall do so at their own risk. Furthermore, never operate the instrument without first reading and understanding the U-5000AT Ultrasonic Nebulizer Operator’s Manual and ensuring the nebulizer is operated safely and properly. Under all conditions the user must use safe laboratory procedures during the use of this product.
ORIGINAL PACKAGING
Retain original factory packaging for moves and factory return shipments. Shipping in anything other than the original fitted foam and container can result in incidental damage from which the purchaser will not be protected under warranty.
CANADIAN DEPARTMENT OF COMMUNICATIONS COMPLIANCE STATEMENT
This equipment does not exceed Class A limits per radio noise emissions for digital apparatus set out in the Radio Interference Regulation of the Canadian Department of Communications. Operation in a residential area may cause unacceptable interference to radio and TV reception requiring the owner or operator to take whatever steps are necessary to correct the interference.

U-5000AT Operator Manual
AVIS DE CONFORMITE AUX NORMES DU MINISTERE DES COMMUNICATIONS DU CANADA
Cet equipment ne depasse pas les limites de Classe A d'emission de bruits radioelectriques pour les appareils numeriques telles que perscrites par le Reglement sur le brouillage radioelectrique establi par le ministere des Communications du Canada. L'exploitation faite en milieu residentiel peut entrainer le brouillage des receptions radio et television, ce qui obligerait le proprietaire ou l'operateur a prende les dispositions necessaires pour en eliminer les causes.
VDE NOTICE
We hereby certify that the U-5000AT Ultrasonic Nebulizer is in compliance with Postal Regulation 1046/1984 and is RFI suppressed.
The marketing and sale of the equipment was reported to the German Postal Service. The right to retest this equipment to verify compliance with the regulation was given to the German Postal Service.
SAFETY NOTICE
The U-5000AT Ultrasonic Nebulizer or its components may not be returned if they are contaminated by radioactive materials, infectious agents, or other materials constituting health hazards to CETAC employees.

U-5000AT Operator Manual
Table of Contents 1.0 General Description 3
2.0 Guideline to Installation 3
3.0 Installation 4
3.1 Utility Cart Assembly 4
3.2 Constant Temperature Cooling System (CTCS) Installation 4
3.3 Drainage System Assembly 5
3.4 Liquid Sample Delivery and Rinse System 5
3.5 Perform ICP Torch Interface 6
4.0 Initial Operation Procedure 8
5.0 ICP Operation 10
6.0 System Optimization 10
7.0 Routine Operation 11
7.1 Start-up Procedure 11
7.2 Shutdown Procedure 11
8.0 Maintenance 12
8.1 Transducer Assembly Removal 12
8.2 Transducer Assembly Installation 12
8.3 RF Circuit Breaker 13
8.4 Main Fuse Replacement 13
8.5 Pump Tubing Replacement 14
8.6 Drain Tubing Replacement 14

U-5000AT Operator Manual
2
Figure 1: Top View of U-5000AT 16
Figure 2: Front View of U-5000AT 18
Figure 3: Rear View of U-5000AT 20
Appendix 1 - ICP/U-5000AT Optimization Procedure 22
Appendix 2 - Trouble Shooting 25
Appendix 3 - Packaging Check List 26
Appendix 4 - U-5000AT AC Wiring Diagram 28

U-5000AT Operator Manual
3
1.0 General Description The CETAC U-5000AT is an enhanced sample introduction system for ICP spectrometry. The system consists of an air-cooled piezoelectric transducer, an aerosol chamber, a temperature controlled heated U-tube and a temperature-controlled condenser. In addition, a built-in drain pump and an auto-tuned stabilized power supply provide excellent reproducibility and reliability.
To operate the U-5000AT, a liquid sample is pumped onto the piezoelectric transducer where the ultrasonic action efficiently converts it to a fine, dense aerosol. The nebulizer carrier gas flow then transports the wet aerosol through a heated U-tube where the solvent is vaporized. Subsequently, most of the solvent vapor is removed from the aerosol stream by passing the stream through a chilled condenser. The result is a dry, analyte-laden aerosol which is introduced to the plasma.
The U-5000AT improves limits of detection by both increasing the analyte transport efficiency and by stripping the solvent from the aerosol thereby reducing the solvent load on the plasma. Compared to typical pneumatic nebulizers, detection of sample analytes is generally enhanced by up to an order of magnitude when using the U-5000AT Ultrasonic Nebulizer. The enhancement in sensitivity is found with both ICP-AES and ICP-MS instruments.
2.0 Guideline to Installation As with other laboratory equipment, the U-5000AT is a sensitive instrument which should be handled with care. The operator should read this manual and study the associated diagrams before installing or operating the U-5000AT system.
To achieve optimum performance from the U-5000AT, the ICP system must be in good operating condition. Check the ICP performance using a conventional pneumatic nebulizer before the U-5000AT installation. If the detection limits do not meet instrument specifications, consult the ICP manufacturer for assistance. If the detection limits are within the manufacturer's specifications, begin installation of the U-5000AT system.

U-5000AT Operator Manual
4
3.0 Installation Upon receipt of the U-5000AT system, inspect all items for damage according to the packaging checklist in the back of this manual. Installation of each component is discussed below.
Check the transducer cable to determine if it has been disconnected for shipment. Upon unpacking the unit, reconnect the cable to the connector located on the end of the transducer assembly (Figure 1: B,D). Failure to do so will trip (open) the RF circuit breaker.
3.1 Utility Cart Assembly
The utility cart provides a mobile station for the U-5000AT system. Set up the cart, according to the directions in the cart container. Place the U-5000AT on the top shelf with the Constant Temperature Cooling System (CTCS) and the waste bottle on the bottom shelf.
3.2 Constant Temperature Cooling System (CTCS) Installation
1) Connect the two insulated cooling hoses to the inlet and outlet of the CTCS.
2) Connect the COOLANT OUT of the CTCS to the COOLANT IN of the U-5000AT.
3) Connect the COOLANT IN of the CTCS to the COOLANT OUT of the U-5000AT.
4) Remove the CTCS reservoir cover and thermometer. Pour 5 liters of 1:1 ethylene glycol:water mixture into the CTCS reservoir. Replace the reservoir cover and ensure that the thermometer is inserted all the way into the hole in the center of the cover.
Note:
After initial use of the CTCS, add additional coolant to the reservoir to account for the coolant volume required to fill the U-5000AT condenser and hoses. Fill to within 1 inch of the top of the CTCS reservoir.
Caution

U-5000AT Operator Manual
5
3.3 Drainage System Assembly
The U-5000AT drainage system removes both sample waste from the spray chamber and condensed solvent from the condenser. It consists of a built-in four roller peristaltic pump and the associated pump tubing and connectors (Figure 3: H,I,J,K,L). Connect the length of 1/8" I.D. Tygon tubing to the outlet of the "T" fitting (Figure 3: J) from the pump. Place the other end of the tubing into the waste bottle. The drain and pump tubing on the U-5000AT are user replaceable. To replace, refer to Sections 8.5 and 8.6.
3.4 Liquid Sample Delivery and Rinse System The sample/rinse adapter (Figure 2: G) holds the sample tubing in place. It is mounted and aligned during assembly and should require no adjustment prior to use. Sample liquid is delivered to the U-5000AT transducer through 0.5 mm I.D. PEEK sample tubing which is inserted through the glass sample inlet tube (Figure 2: K), located at the base of the aerosol chamber (Figure 2: F). For proper sample delivery, the end of the sample inlet tubing is cut at an angle of approximately 60 degrees. As previously mentioned, the sample/rinse adapter is mounted and aligned during assembly, however, it may become necessary to adjust this adapter or remove it and re-cut the end of the tubing periodically for optimum sample delivery. This procedure is outlined below: 1) Remove the three acorn nuts from the aluminum heat shield
using the wrench stored in the U-5000AT chassis (Figure 1: F). Remove the heat shield by lifting the heat shield off the studs and then sliding it to the right past the ball joint clamp and lift off. This cover is designed for a snug fit for proper safety.
2) Remove the sample/rinse adapter from the glass sample inlet
tube by carefully sliding the adapter along the glass sample inlet tube.
3) Re-cut the sample tubing at a 60 degree angle using a sharp
razor blade. An improper cut or a blunt tip may cause inefficient nebulization.
4) Loosen the compression fitting nut which holds the PEEK
sample inlet tubing. Adjust the tubing position to account for the removed section. Tighten the sample inlet compression fitting nut to hold the tubing in place.
5) To replace the adapter, first insert the sample inlet tubing, then
slide the adapter back onto the glass tube.

U-5000AT Operator Manual
6
6) Slide the adapter until the sample tubing touches the face of the
transducer, then, slightly pull the adapter back to form a very narrow gap (approximately 0.2 to 0.4 mm) between the transducer and the tubing. This position allows proper adhesion of sample solution onto the transducer without any contact between the tubing and the transducer. At this point, the end of the sample tubing should be parallel to the transducer face.
7) If the length of the sample inlet tubing is not correct, remove
the sample inlet adapter and repeat steps 4 through 6 until proper adjustment is achieved.
8) Replace the aluminum heat shield and tighten the three acorn
nuts. For high concentrations of sulfuric and nitric acid it is recommended that the Peek sample inlet tubing be replaced with the clear Tefzel sample inlet tubing supplied as an accessory with the U-5000AT. The Tefzel tubing performs much better when using these types of acid. To install the Tefzel tubing, follow the above outlined procedure for the Peek sample inlet tubing. The auxiliary rinse port on the sample/rinse inlet adapter (Figure 2: J) provides the capability for rapidly cleaning the transducer faceplate between samples. This reduces memory effects. A rinse bottle is provided for this purpose. The auxiliary rinse port should always have the male luer plug inserted if the rinse port is not utilized. (The CETAC Auto Rinse System 2000 is available for automatic rinsing when an autosampler is used). To rinse between samples: 1) Remove the male luer plug from the auxiliary rinse port of the
sample/rinse adapter (Figure 2: J) with a counter-clockwise twist.
2) Attach the male luer, on the end of the gum rubber tubing of
the rinse bottle, into the rinse port using a clockwise motion. 3) Fill the auxiliary rinse bottle with deionized water. 4) Gently squeeze the handle of the bottle a few times to deliver
deionized water to the transducer face. Rinse water should splash around the transducer area of the aerosol chamber each time the handle is squeezed.
3.5 Perform ICP Torch Interface
Depending on the ICP manufacturer and the model of the ICP, a torch adapter or spray chamber adapter is supplied for the interfacing of the U-5000AT to the ICP. The torch adapter requires removal of the

U-5000AT Operator Manual
7
pneumatic nebulizer and the spray chamber. The adapter then connects to the bottom of the torch. The spray chamber adapter requires removal of the pneumatic nebulizer and the spray chamber baffle. The spray chamber adapter is then inserted inside the spray chamber.
1) If using a torch adapter, the pneumatic nebulizer and the spray chamber must be removed. If using a spray chamber adapter, the pneumatic nebulizer and the spray chamber baffle must be removed leaving the spray chamber in place.
2) Mount the spray chamber/torch adapter.
3) Make sure that the power is disconnected from the U-5000AT and the heated U-tube is cool before continuing.
4) Remove the bronze-colored plastic cover from the U-5000AT.
5) Remove the three acorn nuts from the aluminum heat shield. Remove the heat shield by lifting the heat shield off the studs and then sliding it to the right past the ball joint clamp and lift off. This cover is designed for a snug fit to ensure maximum safety.
6) Locate the glass sample outlet on the back of the white plastic condenser housing (Figure 1: U).
7) Connect the glass sample outlet tube of the U-5000AT to the ICP torch/spray chamber adapter using the 3/16" I.D. Tygon tubing.
8) Replace the heat shield and the bronze-colored plastic cover. Ensure the ICP torch has remained properly aligned and located in the induction coil according to the ICP manufacturers instructions.
Connect the nebulizer carrier gas from the ICP instrument to the U-5000AT using the ARGON IN connector (Figure 3: M) and 3/16" I.D. Tygon tubing.
Note:
Some ICPs utilize a pressure switch on the argon nebulizer gas that will not allow the user to reduce the pressure enough to get the 0.7 L/min flow of argon for the U-5000AT. With these ICPs, it is necessary to use an auxiliary flow restrictor between the nebulizer gas supply and the U-5000AT ARGON IN connector for control of the nebulizer argon flow. This flow restrictor will be provided by CETAC when necessary.

U-5000AT Operator Manual
8
4.0 Initial Operation Procedure 1) Verify that the voltage select plug on the U-5000AT is stamped
with the proper operating line voltage (100 VAC or 115 VAC or 230 VAC) (Figure 1: T and Figure 2: P). If the nebulizer is to operate on a voltage other than that stamped on the plug, contact CETAC or an authorized service representative for the proper plug.
2) Plug in the power cords for the Constant Temperature Cooling System and the U-5000AT.
Set the CTCS temperature dial to 5 °C and turn on the power switch. It will take approximately 90 minutes to reach this temperature and stabilize. The cooling unit has stabilized when the heater light on the front panel intermittently lights and the thermometer reads 5°C. If the thermometer is not at 5 °C, adjust the temperature dial slightly.
Note:
After initial use of the CTCS, add additional coolant to the reservoir to account for the coolant volume required to fill the U-5000AT condenser and the hoses. Fill to within 1 inch of the top of the CTCS reservoir.
4) Adjust the pump speed knob on the rear of the U-5000AT to 3 (Figure 3: G). Ensure the drain pump pressure shoe is engaged.
5) Press the red POWER switch of the U-5000AT (Figure 2: S). The red light will illuminate. The temperature controller for the heated U-tube is preset at 140 °C and should stabilize in about 10 minutes (Figure 2: U). The temperature controller has stabilized when the "on" light on the front left of the temperature controller is intermittently lit and the two temperatures on the display both read 140 °C +/- 2 °C. The U-5000AT is equipped with a thermal safety switch (Figure 1: O). The thermal safety switch protects the unit from thermal overload.
6) Once the cooling and heating temperatures stabilize at 5 °C and 140 °C, respectively, turn on the nebulizer gas from the ICP and adjust to 0.7 L/min.
7) Connect the sample peristaltic pump to the 0.5 mm I.D. Peek sample tubing. If the Peek sample tubing is not long enough to connect to the sample peristaltic pump, a three foot piece of 0.5 mm I.D. Tefzel extension tubing and necessary fittings has been included with the unit. Refer to the illustration below for proper assembly of the fittings.

U-5000AT Operator Manual
9
8) Turn on the pump and deliver deionized water at 2.5 mL/min.
Ensure the transducer cable has not become disconnected. If it has, connect the cable between the connector on the end of the transducer and the connector in the U-5000AT chassis (Figure 1: B,D,E and Figure 2: A).
9) Press the yellow OPERATE switch (Figure 2: R). The yellow light will illuminate and a mist should be observed inside the aerosol chamber. The yellow light is an indication of RF power to the transducer. (If this light does not illuminate after the OPERATE switch is pressed, the RF oscillator is not operating. Refer to Appendix 2 of this manual).
10) Prepare 250 mL of a 0.5% (v/v) solution of hydrofluoric acid and nebulize it for 20 to 30 seconds. The mist in the aerosol chamber should be dense at this point. If not, refer to Appendix 2 of this manual.
Note:
Although this dilute hydrofluoric acid will not harm the glassware system of the U-5000AT or the ICP when nebulized for short periods, it should only be used when the transducer face becomes dirty, which is evidenced by a weak or intermittent mist. Reserve the remaining solution for future use.
11) Begin to nebulize deionized water.
12) Adjust the PUMP SPEED knob (Figure 3: G) on the back of the U-5000AT such that the drain pump draws out excess sample solution faster than the sample pump is delivering the sample.
Caution

U-5000AT Operator Manual
10
If the pump speed is too slow, the aerosol chamber (Figure 2: V) will begin to fill with liquid. Should this occur, press the FAST PUMP switch; the green light will illuminate (Figure 2: T). After the excess liquid has been removed from the aerosol chamber drain tube, press the green switch again; the green light will go out and the pump will return to its previous speed. At this point, increase the PUMP SPEED to prevent excess solution from collecting in the spray chamber.
13) Turn off the yellow OPERATE switch, the sample peristaltic pump, and the nebulizer gas supply to the ICP.
5.0 ICP Operation 1) Ignite the ICP plasma as instructed in the ICP operating
manual. The nebulizer gas flow rate should be set at 0.7 L/min.
2) Press the yellow OPERATE switch to energize the transducer of the U-5000AT.
3) Begin aspirating a 100 µg/mL solution of yttrium into the plasma. The emission color and intensity in the plasma should be similar to that found when 1000 µg/mL of yttrium aspirated with a pneumatic nebulizer. If the yttrium emission is weak, check for gas leaks in the U-5000AT/ICP system.
6.0 System Optimization It may be necessary to optimize the ICP system after installation of the ultrasonic nebulizer. Optimization procedures may include adjustment of the nebulizer gas and the auxiliary gas flow rates, the sample uptake rate, the plasma gas flow rate and the viewing height. Usually the signal-to-noise ratio or signal-to- background ratio is the primary criterion for optimization. During optimization, ensure the plasma is properly sustained. Extreme conditions which may cause unstable plasma formation, torch erosion, or high reflected power should be avoided. For detailed instructions on system optimization, refer to Appendix 1 in the back of this manual. After the system has been optimized, the ultrasonic nebulizer is ready for routine operation.

U-5000AT Operator Manual
11
7.0 Routine Operation
7.1 Start-up Procedure
1) If the constant temperature cooling system is off, turn it on and let the temperature stabilize (approximately 90 minutes).
2) Press the POWER switch of the U-5000AT. The heated U-tube temperature should stabilize in about 10 minutes.
3) Initiate the plasma according to the ICP operating manual. Adjust the ICP operating conditions to previously optimized values.
4) Press the OPERATE switch.
5) Turn on the sample peristaltic pump and deliver deionized water to the transducer. The ultrasonic nebulizer should stabilize in about 15 minutes. If necessary, aspirate the dilute hydrofluoric solution to achieve a dense aerosol. The ultrasonic nebulizer is now ready for routine analysis.
7.2 Shutdown Procedure
1) Aspirate deionized water for at least 3 minutes. Momentarily rinse the entire transducer faceplate and its surrounding area by introducing water through the auxiliary rinse port of the aerosol chamber (Figure 2: J). This procedure prevents accumulation of corrosive liquid samples on the transducer faceplate and the glassware.
2) Turn off the sample peristaltic pump and let the nebulizer run dry for about 15 seconds.
3) Turn off the OPERATE switch.
4) Press the FAST PUMP switch and allow the pump to drain all liquid from the system. All the liquid will be drained when no liquid can be seen flowing out of the drain tubing.
5) Turn off the green FAST PUMP switch followed by the red POWER switch. If desired, the CTCS may be left on overnight to eliminate the 90 minute cool-down time.
6) Turn off the plasma and the gas supplies according to the ICP system operating manual.

U-5000AT Operator Manual
12
8.0 Maintenance
The U-5000AT should be turned off and the power cord unplugged before performing any maintenance on the instrument!
8.1 Transducer Assembly Removal
1) Turn off the ultrasonic nebulizer and the ICP as described in the shutdown procedure.
2) Disconnect the transducer cable connector from the end of the transducer assembly (Figure 1: D).
Note:
The orientation of the assembly and the transducer mounting screws before removal so that the new transducer can be oriented the same way!
3) Pull out the hex-head transducer wrench stored in the U-5000AT chassis (Figure 1: F). Hold the transducer assembly firmly with one hand and remove the three spring-loaded socket head screws using the wrench.
4) Carefully slide the transducer assembly and the O-ring from the aerosol chamber. Wipe off any droplets in the opening of the aerosol chamber without touching the fragile glass sample tube.
8.2 Transducer Assembly Installation
1) The spare transducer assembly and screw/spring set are packaged in a protective handling box which should not be discarded. Remove the spare transducer from the box and ensure the transducer face is clean. This can be accomplished by gently wiping the crystal face with a water moistened lint-free tissue.
2) Place the O-ring back into the aerosol chamber and ensure the O-ring is smoothly seated against the glass bezel inside.
3) Align the spare transducer assembly with the screw holes in the aerosol chamber stand and slide it into the aerosol chamber.
Hold the transducer assembly with one hand and replace the spring-loaded socket head screws. The heads of the screws should be flush
Caution

U-5000AT Operator Manual
13
with the second fin (from the cable connector end) of the transducer heat sink.
Do not over tighten the screws! Proper seating of the O-ring can be observed through the aerosol chamber.
5) Reconnect the transducer cable connector to the end of the transducer assembly and replace the transducer wrench.
8.3 RF Circuit Breaker
The RF circuit breaker will trip if an open circuit occurs anywhere in the RF cable and the OPERATE switch is on. If an open does occur the RF circuit breaker will trip in approximately seven seconds. The RF circuit breaker is located on the right rear of the unit under the square black heat sink (Figure 3: C). To reset the RF circuit breaker:
1) Turn the unit off.
2) Check to ensure the RF cable between the transducer heat sink and the U-5000AT chassis is installed and securely connected (Figure 1: B,D,E and Figure 2: A).
3) Reset the RF circuit breaker by simply pressing the plastic mechanism in until it latches.
4) Attempt to operate the unit. If the RF circuit breaker subsequently trips, contact your authorized service representative or CETAC.
8.4 Main Fuse Replacement
The main fuses are located in the rear of the unit and are part of the power cord connector (Figure 3: E).
1) Turn off the unit and unplug the power cord.
2) Use a small flat blade screwdriver to pop open the fuse holder.
3) Replace the defective fuse with a GMC 5A, 125V slo-blow if operating on 100/115 VAC or a GMC 2.5A, 250V slo-blow if operating on 230 VAC.
Use of a different fuse other than the one specified can damage the electrical components of the U-5000AT!.
Caution
Caution

U-5000AT Operator Manual
14
4) Replace the power cord and attempt to operate the unit. If the new fuse subsequently blows, contact your authorized service representative or CETAC.
8.5 Pump Tubing Replacement
Phar-Med tubing (3/32" I.D., 1/32" wall) is used for the peristaltic drain pump. This tubing may be purchased pre-cut from CETAC.
1) Unlatch the pressure shoe.
2) Remove the old pump tubing by snapping the tubing connectors out of the tubing keeper (Figure 3: I).
3) If the tubing is not ordered from CETAC, cut 2 3-3/4" long pieces using a razor blade. Attach the plastic connectors.
4) Place the new tubing with connectors in the tubing keeper. Firmly press the connector into the tubing keeper slot until it locks into place.
8.6 Drain Tubing Replacement
1) To replace the drain tubing, turn off the operate switch and the sample peristaltic pump.
2) Turn on the FAST PUMP switch and pump all liquid from the system.
3) Turn off the U-5000AT and unplug the power cord and all external tubing and hoses.
4) Remove the brown-colored plastic cover. Carefully turn the unit upside down. Support the unit under the white plastic condenser using a book, for example, to make the bottom of the unit level.
Use a flat blade screwdriver to turn each of the four fasteners 1/4 turn counterclockwise and remove the small cover.
Remove only the small cover! A tubing diagram is located inside this cover. Note that only the tubing connected to the aerosol chamber drain and the condenser drains is replaceable.
6) Remove the old drain tubing from the glass drains by carefully using a razor blade to slit the tubing for easier removal.
Caution

U-5000AT Operator Manual
15
7) Using 1/8" I.D. Tygon tubing, cut new tubing to the same length as the old. To install the new tubing, moisten one end with water and stretch that end with a tubing stretcher or needle nose pliers. Do not stretch the tubing on the end that attaches to the plastic tubing connectors!
Carefully push the tubing onto each glass drain until it stops. Each piece of tubing should be pushed on at least 1/4".
Do not force the tubing, it may break the glass connectors!
9 Connect the other end of the tubing to the appropriate "T" or tubing connector.
10) After changing the tubing, replace the cover. Ensure that each of the fasteners is locked in.
11) Turn the unit right side up, replace the covers, and reconnect all tubing and hoses.
12) Plug in the power cord.
Caution

U-5000AT Operator Manual
16
Figure 1.

U-5000AT Operator Manual
17
Top View of the U-5000AT Ultrasonic Nebulizer (Figure 1)
A) Lexan cover guides.
B) Transducer RF cable.
C) Transducer heat sink.
D) Transducer cable connector.
E) Chassis cable connector.
F) Heat shield/transducer wrench.
G) Aerosol chamber stand.
H) Aerosol chamber.
I) Argon carrier gas tubing.
J) Teflon 28/15 ball/socket clamp.
K) Aluminum heat shield support post.
L) Glass U-tube.
M) U-tube heat cords.
N) Teflon U-tube support.
O) Thermal safety switch.
P) Teflon 18/9 ball/socket clamp.
Q) Thermocouple wire.
R) Thermocouple socket.
S) Heat cord plugs.
T) Voltage select plug.
U) Glass sample outlet tube.
V) Condenser box.
W) Thermal safety switch plug.

U-5000AT Operator Manual
18
Figure 2.
U-5000AT Operator Manual
19
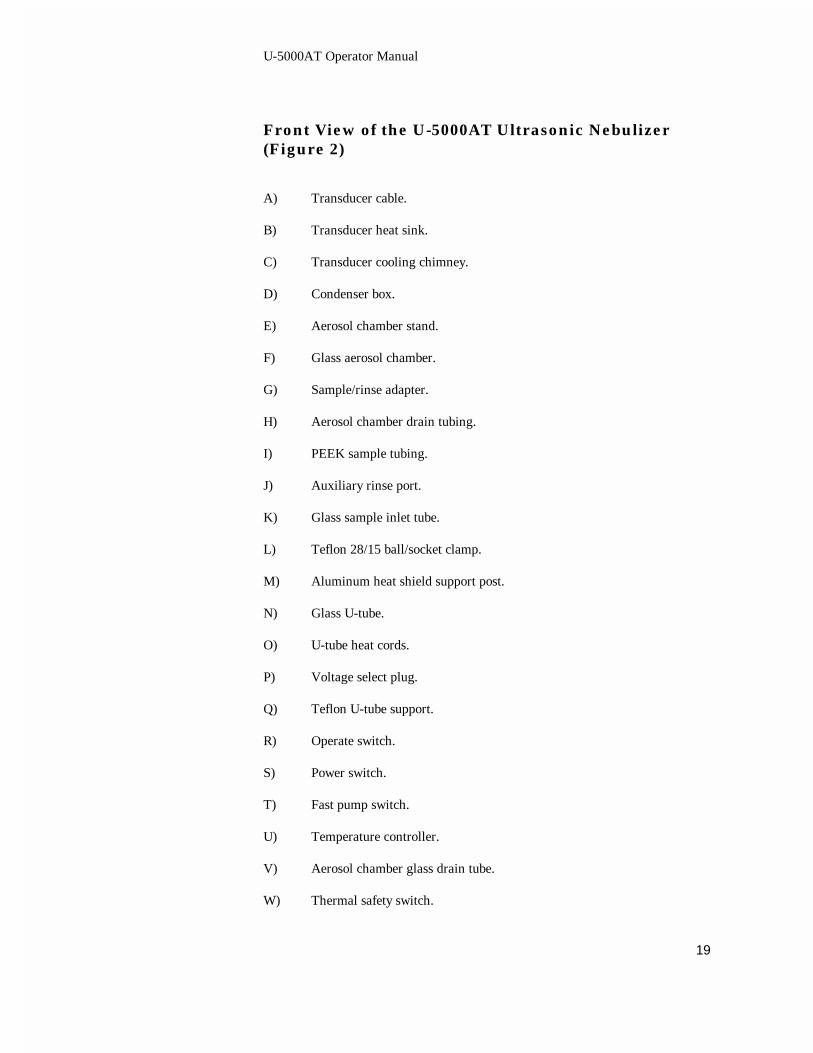
Front View of the U-5000AT Ultrasonic Nebulizer (Figure 2) A) Transducer cable. B) Transducer heat sink. C) Transducer cooling chimney. D) Condenser box. E) Aerosol chamber stand. F) Glass aerosol chamber. G) Sample/rinse adapter. H) Aerosol chamber drain tubing. I) PEEK sample tubing. J) Auxiliary rinse port. K) Glass sample inlet tube. L) Teflon 28/15 ball/socket clamp. M) Aluminum heat shield support post. N) Glass U-tube. O) U-tube heat cords. P) Voltage select plug. Q) Teflon U-tube support. R) Operate switch. S) Power switch. T) Fast pump switch. U) Temperature controller. V) Aerosol chamber glass drain tube. W) Thermal safety switch.

U-5000AT Operator Manual
20
Figure 3.

U-5000AT Operator Manual
21
Rear View of the U-5000AT Ultrasonic Nebulizer (Figure 3)
A) Transistor heat sink.
B) Transistor.
C) RF circuit breaker.
D) External connector.
E) Main fuse holder.
F) AC power cord connector.
G) Pump speed knob.
H) Drain pump assembly.
I) Drain pump tubing.
J) "T" fitting.
K) Tygon drain tubing from U-5000AT.
L) Tygon drain tubing to waste bottle.
M) Argon in connector.
N) Coolant in connector.
O) Coolant out connector.

U-5000AT Operator Manual
22
Appendices
Appendix 1. ICP/U-5000AT Optimization Procedure 1) Recommended operating conditions and operating ranges for
aqueous sample analysis: Normal Condition Range ICP forward power 1200 W 800-1500 W Outer gas flow rate (plasma) 15 L/min 12-20 L/min Intermediate gas flow rate 0.5 L/min 0.0-2.0 L/min (auxiliary) Injector gas flow rate 0.7 L/min 0.3-1.5 L/min (nebulizer) Observation height 15 mm 10-20 mm U-5000AT sample uptake rate 2.5 mL/min 1.0-3.0 mL/m U-5000AT heating temp. 140° C 60-180° C U-5000AT cooling temp. 5° C 0-15° C
2) Optimization of the ICP and the USN systems may be necessary to achieve the optimum sensitivity for specific elements in various aqueous samples. S/B ratios or S/N ratios may be used as the objective function for optimization procedures.
3) For the initial start-up procedure, the recommended operating conditions listed above may be used. These parameters represent compromise operating conditions for most elements and most aqueous samples and may be used satisfactorily for many applications. Optimum conditions may vary, depending upon the ICP system used.
The recommended operating ranges for the ICP and the USN are also listed above. The most sensitive operating parameters are injector gas flow, forward power, and observation height; these particular parameters should be the first optimized. Optimization of other parameters is usually not required; they are usually preset to the nominal values listed above.

U-5000AT Operator Manual
23
5) Simplex optimization may be used to optimize all the above parameters simultaneously. The above ranges of operating conditions may be used as the boundary limits of the simplex method.
Note:
An optimization data sheet has been included on the following page.
The parameters specified are for a standard ICP torch.
Conditions will vary for instruments utilizing low gas flow torches or for ICP/MS instruments.

U-5000AT Operator Manual
24
U-5000AT Optimization Data Sheet Make/model USN_________________________________ Setting Injector gas flow rate (nebulizer) _______ Forward RF power _______ Observation height _______ Outer gas flow rate (plasma) _______ Intermediate gas flow rate (auxiliary) _______ Reflected RF power _______ Integration time _______ U-5000AT Heating temperature _______ U-5000AT Cooling temperature _______ Sample uptake rate _______ Number of replicated measurements __________________________________________________ _______ __________________________________________________ _______ __________________________________________________ _______ Element Wavelength LOD U-5000AT ______ _________ ____________ ______ _________ ____________ ______ _________ ____________ ______ _________ ____________ ______ _________ ____________ ______ _________ ____________ ______ _________ ____________ ______ _________ ____________ ______ _________ ____________ ______ _________ ____________ ______ _________ ____________ ______ _________ ____________ ______ _________ ____________ ______ _________ ____________ ______ _________ ____________ ______ _________ ____________ Remarks ________________________________________________________________________________________________________________________________________________________________________________________________________________________________________________________________________________________________________________________________________________________________________________________________________________________________________________________________________________________________________________________________________________________________

U-5000AT Operator Manual
25
Appendix 2. Troubleshooting Problem Possible Cause Solution
Poor and / or unstable mist generation.
Sample inlet tubing improperly cut or adjusted.
Readjust or cut sample inlet tubing as described in section 3.4.
Sample uptake rate too low. Readjust. Nebulizer gas too high Readjust. Transducer face dirty. Clean transducer face as described in
the INITIAL OPERATION section. Transducer failure Replace transducer as described in the
MAINTENANCE section. Power lamp does not illuminate. Heat controller does not illuminate.
Power cord not plugged into AC wall outlet.
Plug power cord into AC wall outlet.
Main fuse blown. Install a new main fuse as described in the MAINTENANCE section.
Power lamp does not illuminate/ Heat controller DOES illuminate.
Voltage select plug not installed. Install correct voltage select plug for either 115VAC or 230VAC.
NOTE: Install a 2.5A, 250V slo-blo fuse if using 230VAC or a 5A, 125V slo-blo if using 115VAC, into main fuse holder.
Top display of heat controller reads EEE/heat cords do not warm up.
Thermocouple connector not plugged into U-5000AT chassis. Break in thermocouple wire.
Contact service representative.
Operate lamp does not illuminate, no aerosol present.
RF circuit breaker tripped (opens). Reset circuit breaker as described in the MAINTENANCE section.
Water backing up into aerosol chamber. Drain system not functioning
properly. Refer to the INITIAL OPERATION section.
Plasma flickers excessively/ is unstable. Condenser drain system not
functioning properly. Water in sample out transfer tubing to ICP.
Refer to INITIAL OPERATION section. Ensure CTCS is on and set at 5°C.
During operation heat controller display stops illuminating.
Thermal safety switch tripped due to excessive temperature.
Contact service representative.
CAUTION: If a fuse is replaced and subsequently blows again, contact CETAC or your authorized service representative. Any other problems? Contact CETAC Technologies Inc. (U.S.A.) directly. Phone: (800) 369-2822 Fax: (402) 733-5292

U-5000AT Operator Manual
26
Appendix 3. Packaging Check List Container 1: __Instruction manual and warranty card __U-5000AT Ultrasonic Nebulizer (1) __Plastic U-5000AT protective cover (1) __Insulated coolant hoses (2) Container 2: __Waste bottle (1) __U-5000AT power cord (1) __Torch and/or spray chamber adapter __Spare Transducer (1) __Sample out tubing (3/16"/4.8mm I.D.) Tygon (5'/152.4mm) __Argon in tubing (3/16"/4.8mm I.D.) Tygon (5'/152.4mm) __Drain tubing (1/8"/3.2mm I.D.) Tygon (5'/152.4mm) __Argon in tubing connector (1) __Auxiliary rinse bottle with tubing. __Peristaltic pump tubing (1.30mm I.D.) (3) __Tefzel sample inlet tubing (0.5mm I.D.) (1) __Extension tubing kit (union, flangeless nut (2), ferrule (2), Tefzel
tubing (3'/91.4mm)) __Replacement drain pump tubing (2) __Spare drain pump tubing connector (4) __Spare male luer plug (auxiliary rinse port) (1) __Spare sample inlet tubing ferrule (1) __Spare fuse, main power, GMC 5A, 250V, slo-blo used only for
100/115VAC operation __Spare fuse, main power, GMC 2.5A, 250V, slo-blo used only for
230VAC operation Container 3: __Constant Temperature Cooling System (CTCS) (1) __Instruction manual and warranty card Container 4: __Utility cart (1) __Instruction sheet Optional Accessories __Acid-proof O-ring kit (resistant to concentrated acid) __Organics tubing kit __Auto Rinse 2000 (automatic auxiliary rinsing system)
U-5000AT Operator Manual
27
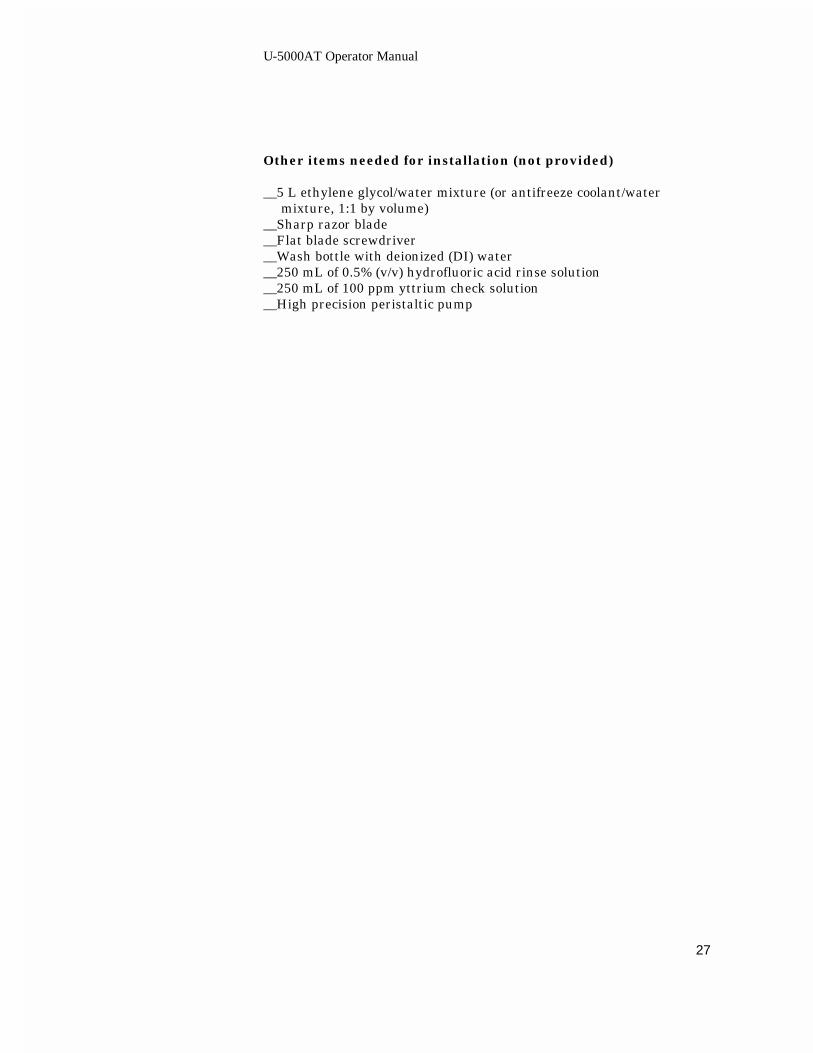
Other items needed for installation (not provided) __5 L ethylene glycol/water mixture (or antifreeze coolant/water
mixture, 1:1 by volume) __Sharp razor blade __Flat blade screwdriver __Wash bottle with deionized (DI) water __250 mL of 0.5% (v/v) hydrofluoric acid rinse solution __250 mL of 100 ppm yttrium check solution __High precision peristaltic pump

U-5000AT Operator Manual
28
Appendix 4. U-5000AT AC Wiring Diagram