uc6 installation and operation manual - temperzone
TRANSCRIPT


Temperzone Unit Controller 6 - Operation and installation Issue 1
Page 3 of 18
1. Introduction
The temperzone Unit Controller 6 (UC6) is the successor to the OUC4 controller. The UC6 provides increased capability and flexibility in indoor-, outdoor- and
packaged units. The complete controller combines the µPC controller board from Carel plus an interface board to connect temperzone standard sensors and plugs.
The UC6 receives requests such as “Unit On/Off”, “Start 1 or 2 compressors”, “Activate HEAT (Reverse Cycle)” and transfers these requests to the outputs after
enforcing safety timers. The UC6 ensures unit safety by continuously monitoring input signals such as pressures and temperatures. Beside the normal controls and
unit safety the UC6 has many other functions, for example head pressure control, capacity control, superheat control, serial communications and more.
2. Features
The UC6 has the following features:
Normal controls: - One controller can manage two complete refrigeration circuits
- Two drivers for uni-polar electronic expansion valves (EEV) - Outdoor fan control
- Outdoor coil De-ice management - Reversing valve change over management
- Digital scroll compressor management - Variable speed compressor management
- Crankcase heater control
- BMS interface with optional board - DRED input and control
Safety functions: - Compressor minimum cycle time, minimum run time, minimum off time.
- High pressure protection via HP switch or high pressure transducer - Low pressure protection via LP switch or low pressure transducer
- Loss of refrigerant protection - Indoor coil frost protection
- Repeat fault lock out - Error code display
- Alarm logging
Commissioning functions:
- Commissioning mode - Automatic test sequence

Temperzone Unit Controller 6 - Operation and installation Issue 1
Page 4 of 18
3. Lower board connections
The paragraphs on the following pages give details how the UC6 should be connected both for packaged units and for the outdoor unit of a split system.
Care must be taken that the correct connections are made as the UC6 can be configured in various modes.
Important:
The UC6 controller must be mounted inside an electrical panel.
To minimise electrical interference low power signal wires from temperature sensors, pressure transducers and low voltage control signals must be kept
physically separate from wiring and cables that carry mains power.
Never run power cables and signal cables in the same conduits.
Contact temperzone if the controller has malfunctioned. Do not attempt to repair the controller.

Temperzone Unit Controller 6 - Operation and installation Issue 1
Page 5 of 18
3.1. Power supply terminals
The UC6 is powered by 24V ±10% AC. A class 2 safety transformer with a minimum rating of 24VA must be used in the installation. The power supply to the
UC6 controller must not be used to power other electrical devices. If the 24V
secondary winding of the transformer is earthed then make sure that the earthed wire connects to terminal “µPC supply 0V”.
A yellow LED indicates when the UC6 is powered.
Terminal Signal Notes
HOT
(uPC supply)
24V AC HOT Do not inadvertently connect
230V AC to these pins!
0V
(uPC supply)
24V AC COMMON
Output supply Relay common power supply for
switched output signals:
CMC1 CMC2 RV1 RV2
CCH CCS
This terminal normally
connects to 230V AC phase.
Fan supply Power supply for fan control
terminals.
Depending on the
connections to the fan or fan controller this terminal
normally connects to 24V AC HOT
or 230V AC phase or 10 or 12V DC
3.2. Output terminals
When the UC6 is configured to control indoor fan speed:
Terminal Signal Notes
Low1 Indoor fan(s) Low speed terminal
When active these outputs electrically connect to the
Fan supply terminal.
Low2
Med1 Indoor fan(s) Medium speed terminal
Med2
Hi1 Indoor fan(s) High speed terminal
Hi2

Temperzone Unit Controller 6 - Operation and installation Issue 1
Page 6 of 18
When the UC6 is configured NOT to control indoor fan speed:
Terminal Signal Notes
Low1 System 1 indoor fan off during an outdoor coil de-ice cycle.
When active these outputs
electrically connect to the Fan supply terminal.
Low2
Med1 System 1 indoor fan off during an
outdoor coil de-ice cycle. Med2
Hi1 No function.
Terminal Signal Notes
CMC1 Compressor 1 CMC1
When active these outputs
electrically connect to the Output supply terminal.
CMC2 Compressor 2 CMC2
RV1 Reversing valve1
RV2 Reversing valve2
CCH Crankcase Heater
CCS Compressor capacity solenoid (compressor modulating valve)
3.3. Input terminals
Terminal Signal Notes
CS This input can have one of two functions:
(1) 0 to 1V Analogue input (2) Return or supply air
temperature
For variable capacity systems For fixed capacity systems
ST1 Compressor 1 suction line temperature
NTC blue wires
ST2 Compressor 2 suction line temperature
DT1 Compressor 1 discharge line
temperature
NTC red wires
DT2 Compressor 2 discharge line temperature
Temperzone Unit Controller 6 - Operation and installation Issue 1
Page 7 of 18
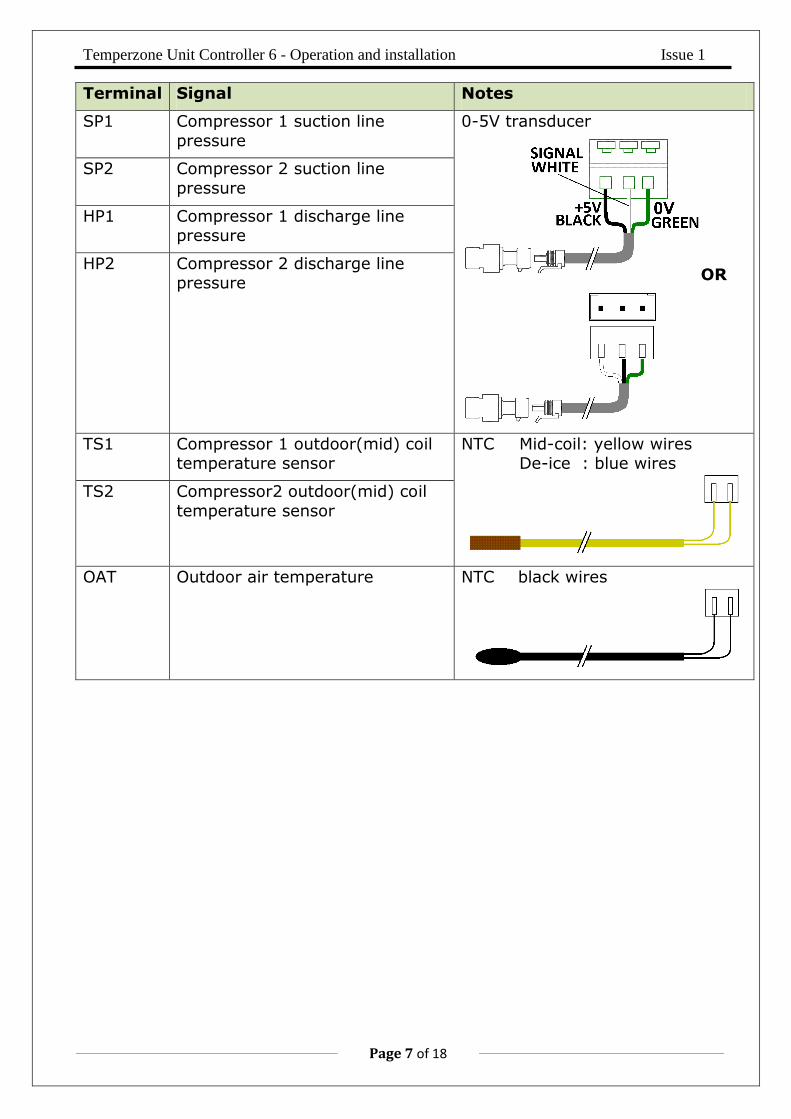
Terminal Signal Notes
SP1 Compressor 1 suction line
pressure
0-5V transducer
OR
SP2 Compressor 2 suction line
pressure
HP1 Compressor 1 discharge line pressure
HP2 Compressor 2 discharge line pressure
TS1 Compressor 1 outdoor(mid) coil temperature sensor
NTC Mid-coil: yellow wires De-ice : blue wires
TS2 Compressor2 outdoor(mid) coil
temperature sensor
OAT Outdoor air temperature NTC black wires

Temperzone Unit Controller 6 - Operation and installation Issue 1
Page 8 of 18
4. Upper board connections
The digital input port common pins DIC1 and DIC2 are internally directly
connected to the local board 0V.
4.1. Digital input signals
When the UC6 is configured to control indoor fan speed:
DI Signal
1 Indoor fan LOW speed input
2 Indoor fan MEDIUM speed input
3 Indoor fan HIGH speed input
When the UC6 is NOT configured to control indoor fan speed:
DI Signal
1 No function 2 No function 3 No function
DI Signal Notes
4 Reverse cycle request Heat
5 Compressor 1 request Or overload input 1
Without TZT-100: Comp1 With TZT-100: Overload input 1
6 Compressor 2 request
or overload input 2
Without TZT-100: Comp2
With TZT-100: Overload input 2
7 Remote on/off This input must be closed circuit to allow
the UC6 to switch compressors and fans on.

Temperzone Unit Controller 6 - Operation and installation Issue 1
Page 9 of 18
When the UC6 is configured for DRED function:
DI Signal Notes
8 DRED1 When activated the compressors will be OFF. The indoor fan is allowed to continue.
9
DRED2 or DRED3
(configurable via UC6
service interface)
DRED2 active: Total unit energy
consumption will be reduced to less than 75% of rating.
DRED3 active: Total unit energy consumption will be reduced to less than
50% of rating. When the UC6 is configured for Quiet mode:
DI Signal Notes
8 DRED1
When activated the compressors will be
switched off. The indoor fan is allowed to continue.
9 Quiet mode Quiet mode is enabled when this input is made active.
DI Signal Notes
10 Push button
Press and hold the push button on the lower board 1 to 5 seconds to start test mode.
Test mode can only be activated when both compressors are OFF.
Press and hold the push button on the lower
board 10 to 15 seconds to start commissioning mode.
4.2. Digital output signals
DO Signal Notes
NO7 Normally open
Alarm output relay C3 Common
NC7 Normally closed
4.3. Analogue output signals
AOUT Signal Notes
Y1 Indoor fan speed 0-10V (if used)
Y2 System 1 outdoor
fan speed
System 1 0-10V outdoor fan speed control
(if used)
Y3 System 2 outdoor
fan speed
System 2 0-10V outdoor fan speed control
(if used)
Y4 LED display control Controls the 1-digit LED display used to
show alarm codes.

Temperzone Unit Controller 6 - Operation and installation Issue 1
Page 10 of 18
4.4. Communication ports
Several types of communication ports are available on the UC6.
COMM PORT
Signal Notes
RS4851 MODBUS / CAREL RS485 Thermostat, Inverter
pLAN UC6 service tool Programmable graphic display
PLD1 Fieldbus (RS485 or TLan) Supervisory System
BMS2 RS485 MODBUS (BACnet or Ethernet
optional)
Available only with additional plug-in module connected to the “BMS” connector
(adjacent to the Digital Input connector).
Note 1: Connectors to the UC6 show R+/T+ for signal A, R-/T- for signal B.
Note 2: Current software supports only BMS via RS485 MODBUS. BACnet or Ethernet options can
be made available on request.
4.4.1. Temperzone TZT-100 thermostat connection
The UC6 can connect directly to the temperzone TZT-100 thermostat using a
shielded cable with two twisted pair wires suitable for RS85 serial communications. The drawing below shows connection details.

Temperzone Unit Controller 6 - Operation and installation Issue 1
Page 11 of 18
4.5. Electronic expansion valves
The UC6 has two drivers to control electronic expansion valves (EEV). The EEV outputs are EEV1 and EEV2.
Note: Only one valve must be connected to each connector.
EEV type 6-wire uni-polar stepper motor
Motor supply voltage 12V DC±10%
Motor winding current 0.3A maximum (each winding)
Motor winding resistance 40Ω minimum
Maximum power each EEV 7W
EEV step frequency Set by temperzone software
5. Operation
5.1. Remote on/off
The remote on/off function can be enabled or disabled by using a UC6 service
tool.
When the function is enabled the remote on/off signal must connect to input
DI7, signal return is DIC1. The remote on/off signal must be an external voltage free switched relay contact.
The unit is active when DI7 is connected to DIC1.
5.2. Variable duty units
The UC6 can control a unit where one of the two compressors is a variable speed
compressor or a digital scroll compressor. Temperzone pre-configures the unit to the correct compressor type; a UC6 service tool is required if the compressor type
configuration must be changed.
The capacity input signal must connect to input CS (0-1V, duty 10% per 0.1V).
For digital scroll compressors the capacity output signal (compressor modulating valve control signal) is on output CCS.
The minimum compressor duty is: 20 to 30% for a variable speed compressor (depends on compressor model)
16% for a digital scroll compressor
When a capacity signal is present on input CS that is lower than the minimum
duty (for example 0.0V) then the compressor will continue to operate on minimum duty. Safety functions may place further restrictions on the minimum
duty and may act at any operating condition.

Temperzone Unit Controller 6 - Operation and installation Issue 1
Page 12 of 18
5.3. Outdoor fan control
When a unit is in cooling mode the UC6 can control condensing temperature by regulating the speed of multiple outdoor fans via two 0-10V signals.
When a unit is in heating mode the UC6 normally commands the outdoor fans to
run at high speed.
When a unit is de-icing the outdoor coil the outdoor fans stop.
The outdoor fan speed control signals are: Y2 for system 1 outdoor fan(s)
Y3 for system 2 outdoor fan(s)
The UC6 determines the condensing temperatures either by converting the high
pressure readings (as reported by the high pressure transducers connected to inputs HP1 and HP2) to a condensing temperature, or by measuring the outdoor
mid-coil temperatures (temperature sensors connected to TS1 and TS2).
5.4. Indoor fan control
The UC6 can be used to control the indoor fan speed. The configuration of the
UC6 can be set using a UC6 service tool. If the UC6 is configured to control the indoor fan then the following applies.
Indoor fan control input signals are: If the UC6 is configured to use digital input signals then the indoor fan
control signals are: o DI1: Low
o DI2: Medium o DI3: High
If the system uses a temperzone TZT-100 thermostat then the indoor fan
input signals are received from the TZT-100 through the RS485 communications cable.
Two types of outputs are available for indoor fan speed control: Relays to control a three speed indoor fan motor
o Low1 and Low2 o Med1 and Med2
o Hi1 and Hi2 A 0-10V signal on analogue output Y1 for electronically controlled fans.
5.5. Heating mode
When input DI4 is made active the unit is placed in heating mode. The reversing valves are connected to outputs RV1 and RV2. If the unit was cooling when the
input signal changed the compressors will be stopped first and the change-over of the reversing valves will be delayed to prevent “gas rush”. The length of the delay
is adjustable by using a UC6 service tool.
If heating mode is requested but the compressors are not started within 5
minutes then the reversing valves are switched off again to save power. They will re-activate as soon as a compressor run request is received. The duration of the 5
minute timeout is adjustable by using a UC6 service tool.
Temperzone Unit Controller 6 - Operation and installation Issue 1
Page 13 of 18
5.6. Outdoor coil de-ice control
When a unit is in heating mode and the outdoor coil temperature falls below freezing point then ice may start forming on the outdoor coil. If the amount of ice
continues to build up then the UC6 may start an outdoor coil de-ice cycle.
The de-ice cycle ends as soon as the outdoor coil reaches a temperature sufficiently high to ensure that all ice has melted. If operating conditions are
particularly severe then it is possible that the required temperature cannot be reached. In the latter case the duration of a de-ice cycle is limited to a maximum
of 10 minutes.
The UC6 will not start a new de-ice cycle until a “hold-off period” has expired
since the end of the last de-ice cycle. The nominal duration of the hold-off period is half an hour. The duration of the “de-ice hold-off period” may vary
automatically, for example when the UC6 detects that little ice is being formed on the outdoor coil.
At the start of a de-ice cycle the compressor is first stopped (or slowed down for a variable speed compressor). After one minute the reversing valve is changed to
cooling mode and the compressor is restarted (or speed is increased). During the de-ice cycle the outdoor fan is stopped. At the end of a de-ice cycle the
compressor is stopped again (or slowed down). The outdoor fan is started 90
seconds before the compressor to remove water from the outdoor coil. Normal heating mode resumes after that.
If a unit is configured to operate in “commercial” mode the compressor is not stopped at the start of a de-ice cycle.
On most two compressor units the de-ice cycle as described above applies to each individual system. The UC6 will not allow both systems to de-ice at the same
time. Exceptions to this rule exist, for example for units with a common outdoor fan chamber must de-ice the two outdoor coils at the same time. Temperzone
configures each unit to the correct de-ice strategy.
Display indication during a de-ice cycle number 8
5.7. Crankcase heater
Crankcase heaters are controlled by output CCH.
The crankcase heaters are activated when the following conditions are met:
Mains power has just been turned on
OR: One or both compressor(s) is (are) OFF
The compressor(s) has (have) not run for at least one hour The outdoor ambient temperature is below +7°C.

Temperzone Unit Controller 6 - Operation and installation Issue 1
Page 14 of 18
5.8. Electronic expansion valve control
On units equipped with electronic expansion valves (EEV) the EEV are used to regulate suction side superheat. The EEV connect to outputs EEV1 and EEV2.
Suction side superheat is defined by the difference between the evaporating
temperature and the compressor suction line temperature. The evaporating temperature normally is calculated from the suction line pressure.
Temperzone has selected optimum EEV control parameters to guarantee best unit performance when cooling and when heating.
5.9. Demand response management
The UC6 provides 2 or 3 inputs (depends on unit configuration) for the D.R.E.D. function. D.R.E.D. stands for “Demand Response Enabling Device”. The aim of the
function is to have a measure of control over the total energy that is consumed by the unit as measured over a half hour period. Refer to Australian draft
standard AS4755.3.1 for detailed information.
The UC6 achieves compliance to the standard by “duty cycling” or stopping one or
two compressors.
Inputs for the DRED function are:
DI8 DRM1 DI9 DRM2 or DRM3 (configurable)
If the unit is configured with Quiet mode enabled then input DI9 is not available for the DRED function.
Display indication with DRM1 active letter b
Display indication with DRM2 or DRM3 active letter C
6. Protection functions
6.1. Minimum compressor run time
Minimum time that a compressor must run when started. This ensures that an adequate amount of compressor lubricating oil is returned to the compressor after
start up.
Display indication when timer is active number 2
6.2. Minimum compressor off time
Minimum time that a compressor must remain off after it has stopped. This time ensures that a compressor is not re-started while there still is a high pressure
differential across the compressor.
Display indication when timer is active number 1
6.3. Minimum compressor cycle time
A compressor is allowed a maximum of 10 starts per hour (one start per 6 minutes). This limits the amount of stress on the compressor motor.
Display indication when timer is active number 1
Temperzone Unit Controller 6 - Operation and installation Issue 1
Page 15 of 18
6.4. Delay time between compressor 1 and compressor 2 start
The UC6 does not allow both compressors in the unit to start at the same time even when the compressor run request is received at the same time; a brief time
delay (normally 40 seconds) is inserted. This delay reduces the unit peak inrush
current.
Display indication when timer is active number 1
6.5. High pressure protection (HP) If high pressure transducers are connected to inputs HP1 and HP2 then a
compressor is switched off when the discharge line pressure reading exceeds
42.0bar.
Instead of high pressure transducers some systems may be fitted with high
pressure switches. These also connect to inputs HP1 and HP2. When a high pressure switch activates (electrical circuit opens) the compressor is stopped.
Similarly, if the condensing temperature reported by an outdoor coil temperature sensor (connected to TS1 and TS2) reports a coil temperature above +66°C
(cooling mode) the compressor is switched off.
The UC6 will automatically reduce capacity of a digital scroll compressor before
the maximum value of 42bar / 66°C is reached.
When a compressor is stopped due to high pressure it is held off for a period of 3
minutes, after which it is allowed to restart (provided pressure has fallen well below the maximum).
If three consecutive trips occur then the unit will be “locked out”. The trip counter is reset to 0 when there has been no compressor run request for longer than 60
minutes.
Display indication when protection is active number 4 (flashing)
6.6. Loss of refrigerant protection (LOR)
When a compressor is running the UC6 continuously monitors the various
temperatures. The controller software applies logic that enables it to determine whether the system has an adequate amount of refrigerant. Signals used for this
check are mid-coil temperatures (TS1, TS2), suction temperatures (ST1, ST2 and discharge line pressures (HP1 and HP2, if present).
The check is not made during the first 5 minutes after a compressor is started to allow pressures and temperatures to settle.
If the compressor is a variable speed type or a digital scroll type then the check is
made only when the capacity is at 100%.
When a compressor is stopped due to loss of refrigerant it is held off for a period
of 3 minutes, after which it is allowed to restart.
If three consecutive trips occur then the unit will be “locked out”. The trip counter
is reset to 0 when there has been no compressor run request for longer than 60 minutes.
Display indication when protection is active number 3 (flashing)

Temperzone Unit Controller 6 - Operation and installation Issue 1
Page 16 of 18
6.7. Indoor coil frost protection (FROST)
When the unit is cooling the evaporating temperature in the indoor coil must remain above -10°C (adjustable from -10°C to -2°C by using a UC6 service tool).
If this temperature falls below the threshold then some amount of ice (frost) is
likely to have formed on the indoor coil.
When indoor coil frost protection is activated the compressor is stopped for 15
minutes, after which it is allowed to restart.
If three consecutive trips occur then the unit will be “locked out”. The trip counter
is reset to 0 when there has been no compressor run request for longer than 60 minutes.
Display indication when protection is active number 7 (flashing)
6.8. High discharge line temperature protection (HDT)
The controller monitors the discharge line temperature (inputs DT1, DT2) and
should it rise above 110°C the compressor will be stopped.
When high temperature protection is activated the compressor is stopped for at least 3 minutes. The compressor is allowed to restart after 3 minutes provided
that the discharge line temperature has fallen to below 100°C.
If three consecutive trips occur then the unit will be “locked out”. The trip counter
is reset to 0 when there has been no compressor run request for longer than 60 minutes.
Units with a variable compressor or digital scroll compressor will automatically reduce capacity before the discharge temperature rises close to the threshold.
Display indication when protection is active number 9 (flashing)
6.9. Compressor lock-out
Certain faults (as outlined in the preceding paragraphs) can cause the unit to be “locked out” if they occur three consecutive times while the compressor-run
request has remained active. When a unit is locked out the compressor is not allowed to start until the lock-out is manually reset. Lock-out protects the unit
from repeatedly starting the compressor when a serious fault exists that requires the attention of a service technician.
When a unit is locked out the alarm relay output (NO7, NC7) will be active.
A unit that is locked out can be reset by either of the following two methods:
1. Remove mains power from the unit for at least 3 seconds, then restore
power. 2. Use a UC6 service tool service tool to manually reset the lock-out condition.
Display indication when protection is active letter F (flashing)

Temperzone Unit Controller 6 - Operation and installation Issue 1
Page 17 of 18
6.10. Sensor alarm
If the signal of a temperature sensor or pressure transducer is out of normal operating range the UC6 will generate an alarm. The sensor may be faulty,
disconnected or short circuit.
Display indication temperature sensor alarm number 5 (flashing)
Display indication pressure transducer alarm number 6 (flashing)
6.11. Loss of RS485 communications alarm
If the UC6 does not receive correct responses from a device that connects via the RS485 Modbus serial communications port then an alarm is generated. Examples
of such devices are: a TZT-100 thermostat, a Carel Power+ inverter.
Display indication for communications fault letter C (flashing)
7. Test mode
Test mode can only be activated when both compressors are OFF.
To start test mode press and hold down the push button on the lower board between 1 and 5 seconds.
In test mode each output is activated for 5 to 10 seconds, one output at a time. When test mode completes the unit automatically returns to normal operation.
Display indication during test mode letter A
8. Commissioning mode
To start commissioning mode press and hold down the push button on the lower board between 10 and 15 seconds.
In commissioning mode all time delays are reduced to 1/10th their standard value to enable rapid diagnostic testing.
Commissioning mode automatically completes after 30 minutes and the unit will return to normal operation. Cycling mains power off and on again also ends
commissioning mode.
Display indication during commissioning mode letter C

Temperzone Unit Controller 6 - Operation and installation Issue 1
Page 18 of 18
9. Display summary
Description Notes Section
0 Normal operation
1 Compressor timer active Compressor is held OFF until timer
expires 6.2 6.3 6.4
2 Compressor timer active Compressor is held ON until timer
expires
6.1
3 Loss of refrigerant alarm 6.6
4 High pressure alarm 6.5
5 Temperature sensor signal out of range
Sensor may be faulty, disconnected or short circuit.
6.10
6 Pressure transducer
signal out of range
Transducer may be faulty,
disconnected, short circuit, inadvertently swapped with another
transducer or the wrong type is fitted.
6.10
7 Indoor coil frost alarm 6.7
8 Outdoor coil de-ice cycle is active
5.6
9 High discharge line temperature alarm
6.8
A Test mode 7
b D.R.E.D. active (reduced capacity operation)
5.9
C RS485 Modbus communications alarm
Check connections with TZT-100 thermostat and/or compressor
inverter
6.11
d Unit is OFF by remote on/off signal OR
Overload alarm
When a TZT-100 thermostat is used then inputs DI5 and DI6 are used as
overload input signals
5.1
E Commissioning mode 8
F Lock out(Repetitive fault
has caused shut down)
Any below events will trigger the
Alarm lockout LED digit 1.Frost_lockout_comp1/2
2.HP_lockout_comp1/2 3.HT_lockout_comp1/2
4.REF_lockout_comp1/2
6
www.temperzone.co.nz