un uf in if sn sf - john morris scientific uf in if sn sf 100% atmosafe. made in germany. operating...
TRANSCRIPT

www.memmert.com | www.atmosafe.net
UN UFIN IF SN SF
100% ATMOSAFE. MADE IN GERMANY.
OPERATING INSTRUCTIONS
UNIVERSAL OVEN UNIVERSAL OVEN U
INCUBATORINCUBATOR I
S STERILISERSTERILISERSTERILISER

Manufacturer and customer serviceMemmert GmbH + Co. KGWilli-Memmert-Straße 90–96D-91186 BüchenbachDeutschlandPhone: +49 (0)9122 925-0Fax: +49 (0)9122 14585E-mail: [email protected]: www.memmert.com
Customer service:Service hotline: +49 (0)9171 9792 911Service fax: +49 (0)9171 9792 979 E-mail: [email protected] contacting customer service, always quote the product serial number on the nameplate (see page 12 ).
Shipping address for repairs:Shipping address for repairs:Memmert GmbH + Co. KGKundenserviceWilli-Memmert-Str. 90-96DE-91186 BüchenbachGermanyPlease contact our customer service before sending appliances for repair or before returning equipment, otherwise, we have to refuse acceptance of the shipment.
© 2013 MEMMERT GmbH + Co. KGDate 06/2013We reserve the right to make changes

3
About this manual
About this manual
Purpose and target groupThis manual describes the setup, function, transport, operation and maintenance of universal ovens UN/UF, sterilisers SN/SF and incubators IN/IF. It is intended for use by trained personnel of the owner who have the task of operating and/or maintaining the respective appliance. If you are asked to work on the appliance, read this manual carefully before starting. Familiar-ise yourself with the safety regulations. Only perform work that is described in this manual. If there is something you do not understand, or certain information is missing, ask your superior or contact the manufacturer. Do not do anything without authorisation.
VersionsThe appliances are available in different configurations and sizes. If specific equipment fea-tures or functions are available only for certain configurations, this is indicated at the relevant points in this manual.Due to individual configurations and sizes, illustrations in this manual may be slightly different from the actual appearance. Function and operation are identical.
Other documents that have to be observed:► For operation of the appliance with MEMMERT AtmoCONTROL, observe the separate
software manual► For service and repair (see page 43), please refer to the separate service manual
Storage and forwardingThis instruction manual belongs with the appliance and should always be stored where persons working on the appliance have access to it. It is the responsibility of the owner to ensure that persons who are working or will work on the appliance are informed as to the whereabouts of this instruction manual. We recommend that it is always stored in a protected location close to the appliance. Make sure that the instruction manual is not damaged by heat or humidity. If the appliance is sold on or transported and then set up again at a different location, the operating instructions must go with it.You will find the current version of our operating manual as pdf file if you go to www.memmert.com/de/service/downloads/bedienungsanleitung/.

4
Contents
1. Safety regulations 61.1 Terms and signs used........................................................................................................... 6
1.1.1 Terms used .................................................................................................................... 61.1.2 Signs used ...................................................................................................................... 6
1.2 Product safety and dangers ................................................................................................ 71.3 Requirements of the operating personnel .......................................................................... 71.4 Responsibility of the owner .................................................................................................1.4 Responsibility of the owner .................................................................................................1.4 Responsibility of the owner 81.5 Intended use ........................................................................................................................1.5 Intended use ........................................................................................................................1.5 Intended use 81.6 Changes and alterations ...................................................................................................... 91.7 Behaviour in case of malfunctions and irregularities .......................................................... 91.8 Switching off the appliance in an emergency ....................................................................1.8 Switching off the appliance in an emergency ....................................................................1.8 Switching off the appliance in an emergency 92. Construction and description 102.1 Construction ......................................................................................................................102.2 Function .............................................................................................................................112.3 Material..............................................................................................................................112.4 Electrical equipment ..........................................................................................................112.5 Connections and interfaces ...............................................................................................12
2.5.1 Electrical connection ....................................................................................................122.5.2 Communication interface ............................................................................................2.5.2 Communication interface ............................................................................................2.5.2 Communication interface 12
2.6 Designation (nameplate) ...................................................................................................122.7 Technical data ....................................................................................................................132.8 Applied directives and standards ......................................................................................142.9 Ambient conditions ...........................................................................................................152.10 Scope of delivery ...............................................................................................................2.10 Scope of delivery ...............................................................................................................2.10 Scope of delivery 152.11 Optional accessories ..........................................................................................................153. Delivery, transport and setting up 163.1 Safety regulations ..............................................................................................................163.2 Delivery ..............................................................................................................................3.2 Delivery ..............................................................................................................................3.2 Delivery 163.3 Transport ............................................................................................................................163.4 Unpacking .........................................................................................................................16
3.4.1 Checking for completeness and transport damage....................................................163.4.2 Disposing of packaging material.................................................................................16
3.5 Storage after delivery ........................................................................................................3.5 Storage after delivery ........................................................................................................3.5 Storage after delivery 173.6 Setting up ..........................................................................................................................17
3.6.1 Prerequisites ................................................................................................................173.6.2 Installation options ......................................................................................................183.6.3 Tilt protection ..............................................................................................................19
4. Putting into operation 204.1 Connecting the appliance .................................................................................................4.1 Connecting the appliance .................................................................................................4.1 Connecting the appliance 204.2 Switching on ......................................................................................................................20
Contents

5
Contents
5. Operation and control 215.1 Operating personnel..........................................................................................................215.2 Opening the door ..............................................................................................................5.2 Opening the door ..............................................................................................................5.2 Opening the door 215.3 Loading the appliance .......................................................................................................5.3 Loading the appliance .......................................................................................................5.3 Loading the appliance 225.4 Operating the appliance ....................................................................................................5.4 Operating the appliance ....................................................................................................5.4 Operating the appliance 22
5.4.1 ControlCOCKPIT ...........................................................................................................5.4.1 ControlCOCKPIT ...........................................................................................................5.4.1 ControlCOCKPIT 225.4.2 Basic operation ............................................................................................................245.4.3 Operating modes.........................................................................................................245.4.4 Manual mode ..............................................................................................................5.4.4 Manual mode ..............................................................................................................5.4.4 Manual mode 255.4.5 Timer operation ...........................................................................................................25
5.5 Temperature monitoring ..................................................................................................265.5.1 Electronic temperature monitoring ............................................................................265.5.2 Mechanical temperature monitoring: Temperature limiter (TB) .................................285.5.3 Function .......................................................................................................................28
5.6 Ending operation ...............................................................................................................286. Malfunctions, warning and error messages 296.1 Warning messages of the temperature monitoring function ..........................................296.2 Malfunctions, operating problems and appliance errors ................................................306.3 Power failure ......................................................................................................................6.3 Power failure ......................................................................................................................6.3 Power failure 307. Menu mode 317.1 Overview ............................................................................................................................7.1 Overview ............................................................................................................................7.1 Overview 317.2 Basic operation in menu mode using the example of language selection .......................327.3 Setup..................................................................................................................................33
7.3.1 IP address and subnet mask ........................................................................................7.3.1 IP address and subnet mask ........................................................................................7.3.1 IP address and subnet mask 337.3.2 Unit ..............................................................................................................................347.3.3 Temperature monitoring (Alarm Temp and Max Alarm).............................................357.3.4 Timer Mode .................................................................................................................7.3.4 Timer Mode .................................................................................................................7.3.4 Timer Mode 367.3.5 Type of the slide-in unit (Grid or Shelf) .......................................................................37
7.4 Date and time ....................................................................................................................7.4 Date and time ....................................................................................................................7.4 Date and time 387.5 Calibration .........................................................................................................................398. Sterilisers SF/SN 428.1 Intended use ......................................................................................................................8.1 Intended use ......................................................................................................................8.1 Intended use 428.2 Note in accordance with Medical Devices Directive .........................................................8.2 Note in accordance with Medical Devices Directive .........................................................8.2 Note in accordance with Medical Devices Directive 428.3 Guidelines for sterilisation .................................................................................................429. Maintenance and service 439.1 Cleaning .............................................................................................................................43
9.1.1 Working chamber and metal surfaces ........................................................................439.1.2 Plastic parts ..................................................................................................................439.1.3 Glass surfaces ..............................................................................................................43
9.2 Regular maintenance.........................................................................................................439.3 Repairs and service ............................................................................................................9.3 Repairs and service ............................................................................................................9.3 Repairs and service 4310. Storage and disposal 4410.1 Storage ..............................................................................................................................10.1 Storage ..............................................................................................................................10.1 Storage 4410.2 Disposal .............................................................................................................................44Index 45

6
Safety regulations
1. Safety regulations
1.1 Terms and signs usedIn this manual and on the appliance itself, certain common terms and signs are used to warn you of possible dangers or to give you hints that are important in avoiding injury or damage. Observe and follow these hints and regulations to avoid accidents and damage. These terms and signs are explained below.
1.1.1 Terms used
"Warning" is used whenever you or somebody else could be injured if you do not observe the accompanying safety regulation.
"Caution" is used for information that is important for avoiding damage.
1.1.2 Signs used
Warning signs (warning of a danger)
Danger of electrocution
Danger of
explosion
Dangerous gases / vapours
Danger of burns
Danger of toppling
over
Hazard area!Observe the opera-
ting instructions
Prohibition signs (forbidding an action)
Do not lift Do not tilt
Do not enter
Regulation signs (stipulating an action)
Disconnect the mains
plug
Wear gloves
Wear safety boots
Observe information in separate
manual
Other icons
Important or useful additional information

7
Safety regulations
1.2 Product safety and dangersThe appliances described in this manual are technically sophisticated, manufactured using high-quality materials and subject to many hours of testing in the factory. They contain the latest technology and comply with recognised technical safety regulations. However, there are still risks involved, even when the appliances are used as intended. These are described below.
Warning!After removing covers, live parts may be exposed. You may receive an electric shock if you touch these parts. Disconnect the mains plug before removing any covers. Only electrical technicians may work on the electrical equipment of the appliances.
Warning!When loading the appliance with an unsuitable load, poisonous or explosive vapours or gases may be produced. This could cause the appliance to explode, and persons could be severely injured or poisoned. The appliance may only be loaded with materials/test objects which do not form any toxic or explosive vapours when heated up (see also "Intended use" on page 8).
Warning!Depending on operation, the surfaces in the working chamber and the chamber load may still be very hot after the appliance is switched off. Touching these surfaces can cause burns. Wear heat-resistant protective gloves or wait until the appliance cools down. To do so, pull the handle bar until the door springs open into its ventilating position (see page 21).
Warning!In case of appliances of a certain size, you can get accidentally locked in, which is life-threatening. Do not climb into the appliance!
1.3 Requirements of the operating personnelThe appliance may only be operated and maintained by persons who are of legal age and have been instructed accordingly. Personnel who are to be trained, instructed or who are undergoing general training may only work with the appliance under the continuous supervision of an experienced person.Repairs may only be performed by qualified electricians. The regulations in the separate service manual must be observed.

8
Safety regulations
1.4 Responsibility of the ownerThe owner of the appliance► is responsible for the flawless condition of the appliance and for its proper operation in
accordance with its intended use (see page 8);► is responsible for ensuring that persons who are to operate or service the appliance are
qualified to do this, have been instructed accordingly and are familiar with the operating instructions at hand;
► must know about the applicable guidelines, requirements and operational safety regulations, and train staff accordingly;
► is responsible for ensuring that unauthorised persons have no access to the appliance;► is responsible for ensuring that the maintenance plan is adhered to and that maintenance
work is carried out properly (see page 43);► has to ensure that the appliance and its surroundings are kept clean and tidy, for example
through corresponding instructions and inspections;► is responsible for ensuring that personal protective clothing is worn by operating
personnel, e.g. work clothes, safety shoes and protective gloves.
1.5 Intended useThis appliance is exclusively intended for heating up non-explosive substances and objects. Any other use is improper, and may result in hazards and damage.The appliance is not explosion-proof (does not comply with the German workplace health & safety regulation VBG 24). The appliance may only be loaded with materials and substances which cannot form any toxic or explosive vapours at the set temperature and which cannot explode, burst or ignite. The appliance may not be used for drying, vaporising and branding paints or similar materials the solvents of which could form an explosive mixture when combined with air. If there is any doubt as to the composition of materials, they must not be loaded into the appliance. Potentially explosive gas-air mixtures must not form, neither in the working chamber nor in the direct vicinity of the appliance.
Steriliser SFThe appliance’s intended use is the sterilisation of medical material through dry heated air at atmospheric pressure (also see page 42).
Appliances IF/UF for use as medical deviceAppliances IF/UF for use as medical deviceFor appliances IF and UF with extended overtemperature protection (option A6, recognisable due to standard DIN 12880-2007-Kl.:3.1 on the nameplate) subject to the 93/42/EEC directive (Directive of the council on harmonisation of the laws of the member states relating to medical devices), the intended use is defined as follows: The appliance’s intended use is the warming of non-sterile cloths and covers.

9
Safety regulations
1.6 Changes and alterationsNo unauthorised changes or alterations may be made to the appliance. No parts may be added or inserted which have not been approved by the manufacturer. Unauthorised modifications or changes result in the CE declaration of conformity losing its validity and the appliance must no longer be operated. The manufacturer is not liable for any damage, danger or injuries that result from unauthorised changes or alterations, or from non-observance of the regulations in this manual.
1.7 Behaviour in case of malfunctions and irregularitiesThe appliance may only be used in a flawless condition. If you as the operator notice irregularities, malfunctions or damage, immediately take the appliance out of service and inform your superior.
You can find information on correcting malfunctions from page 29.
1.8 Switching off the appliance in an emergencyPush the On/Off switch on the control panel ( Fig. 1 ) and disconnect power plug. This disconnects the appliance from the power supply at all poles.
Warning!Depending on the operation performed , the surfaces in the working chamber and the chamber load may still be very hot after the appliance is switched off. Touching these surfaces can cause burns. Wear heat-resistant protective gloves or wait until the appliance cools down. To do so, pull the handle bar until the door springs open into its ventilating position (see page 21).
Hauptschalter
>Zu der Typenbezeichnung gibt es momentan drei Entwurfsrichtungen, ich kann Ihnen noch nicht sagen, ob Memmert hierzu schon eine Entscheidung getro�en hat. Die hier gezeigt Variante, ist die von uns empfohlene Richtung.
UF 110PLUS
ON
344.4444 4.
TEMP
Set
°C°C
FLAP
40 %
TIMER
hd 1002End Sept.29 22 24
FAN
%0
%100ALARM
max444.4°C
auto+/- 0.0 K
min444.4°C
OOONNNNOONO
Manu
44.Sept
Fig. 1 Switch off the appliance by pressing the On/Off switch

10
Setup and description
2. Construction and description
2.1 Construction
1
2
3
4
7
8
5 6
Fig. 2 Construction1 ControlCOCKPIT with capacitive function
keys (see page 23)ControlCOCKPIT with capacitive function keys (see page 23)ControlCOCKPIT with capacitive function
2 On/Off switch (see page 20)keys (see page 23)On/Off switch (see page 20)keys (see page 23)
3 Working chamber fan (forOn/Off switch (see page 20)Working chamber fan (forOn/Off switch (see page 20)
UF/IF/SF appliances only)Working chamber fan (forUF/IF/SF appliances only)Working chamber fan (for
4 Steel grid5 Working chamber
Steel gridWorking chamberSteel grid
6 Nameplate (covered, see page 12)Working chamberNameplate (covered, see page 12)Working chamber
7 Door handle (see page 21)Nameplate (covered, see page 12)Door handle (see page 21)Nameplate (covered, see page 12)
8 Turn control with confirmation keyDoor handle (see page 21)Turn control with confirmation keyDoor handle (see page 21)

11
Setup and description
2.2 FunctionAppliances of the UN, SN and IN type series feature natural circulation (convection). For the UF, SF and IF type series, air is circulated by a fan at the working chamber rear panel Fig. 3 , No. 1). It increases the air flow and provides stronger horizontal forced air circulation than natural convection.In both the convection and fan ventilated appliances, supply air (2) is preheated in a pre-heating chamber (3). Through the ventilation slits in the side panel of the working chamber, the preheated air is introduced into the interior of the chamber. The supply and exhaust air (5) volume (air change) is controlled by the air flap (4) on the rear panel of the appliance.
2.3 MaterialFor the outer housing, MEMMERT deploys stainless steel (Mat.No. 1.4016 – ASTM 430) and for the interior, stainless steel (Mat.No. 1.4301 – ASTM 304) is used, which stands out through its high stability, optimal hygienic properties and corrosion-resistance towards many (but not all!) chemical compounds (caution for example with chlorine compounds).The chamber load for the appliance must be carefully checked for chemical compatibility with the materials mentioned. A material resistance table can be requested from the manufacturer.
2.4 Electrical equipment► Operating voltage and current consumption: See nameplate► Protection class I, i.e. operating insulation with PE conductor in accordance with EN 61010► Protection type IP 20 acc. to EN 60 529► Interference suppression acc. to EN 55011 class B► Appliance fuse: Fusible link 250 V/15 A quick-blow► The temperature controller is protected with a miniature fuse 100 mA (200 mA at 115 V)
4444
11
2
5
333
Fig. 3 Function1 Fan2 Fresh air3 Pre-heating chamber4 Air flap
Pre-heating chamberAir flapPre-heating chamber
5 Exhaust airAir flapExhaust airAir flap

12
Setup and description
2.5 Connections and interfaces
2.5.1 Electrical connectionThis appliance is intended for operation on an electrical power system with a system impedance Zmax of a maximum of 0.292 ohm at the point of transfer (service line). The max of a maximum of 0.292 ohm at the point of transfer (service line). The maxoperator must ensure that the appliance is operated only on an electrical power system that meets these requirements. If necessary, you can ask your local energy supply company what the system impedance is.Observe the country-specific regulations when connecting (e.g. in GermanyDIN VDE 0100 with residual current circuit breaker).
2.5.2 Communication interfaceThe Ethernet interface is intended for appliances which meet the requirements of IEC 60950-1.Via Ethernet interface, the appliance can be connected to a network to read out protocol logs with AtmoCONTROL, the optional appliance software. The Ethernet interface is located on the rear of the appliance (Fig. 4 ).For identification purposes, each appliance connected must have its own unique IP address. Setting the IP address is described on page 33.With an optional USB to Ethernet converter, the appliance can be directly connected to a computer / laptop (see "Optional accessories" on page 15).
2.6 Designation ( nameplate)The nameplate (Fig. 5) provides information about the appliance model, manufacturer and technical data. It is attached to the front of the appliance, on the right side under the door (see page 10).
Typ: UN 260 F.-Nr.: 0109.0088230 V~ 14.8 A 50/60 Hz 3400 WDIN12880-Kl.3.1 Nenntemp.: 300 °C
12
3
4
5
6
10
8
9
7
Fig. 5 Nameplate (example)1 Type designation2 Operating voltage
Type designationOperating voltageType designation
3 Applied standardOperating voltageApplied standardOperating voltage
4 Protection type5 CE conformity
Protection typeCE conformityProtection type
6 Address of manufacturer7 Disposal note8 Temperature range9 Connection / power ratings
Temperature rangeConnection / power ratingsTemperature range
10 Appliance numberConnection / power ratingsAppliance numberConnection / power ratings
Fig. 4 Ethernet interface
13
Setup and description
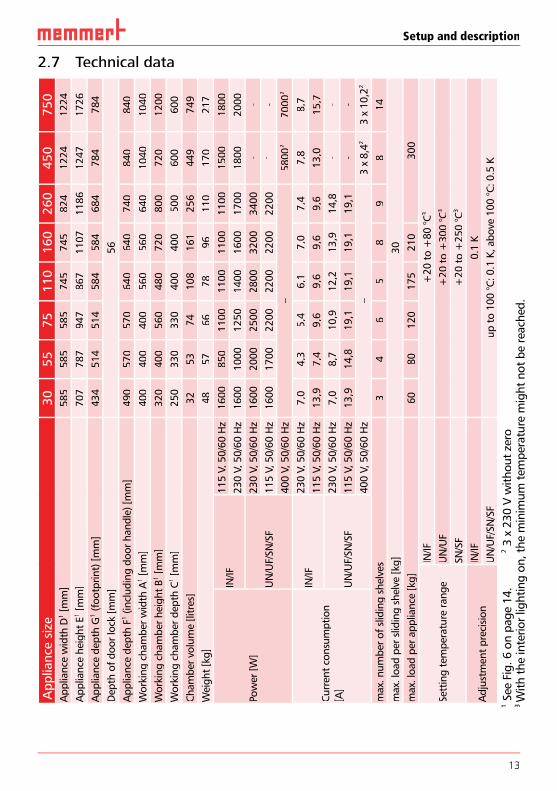
2.7 Technical dataA
pp
liance
siz
e30
55
75
110
160
260
450
750
App
lianc
e w
idth
D1 [
mm
]58
558
558
574
574
582
412
2412
24A
pplia
nce
heig
ht E
1 [m
m]
707
787
947
867
1107
1186
1247
1726
App
lianc
e de
pth
G1 (
foot
prin
t) [m
m]
434
514
514
584
584
684
784
784
Dep
th o
f doo
r loc
k [m
m]
56A
pplia
nce
dept
h F1 (
incl
udin
g do
or h
andl
e) [m
m]
490
570
570
640
640
740
840
840
Wor
king
cha
mbe
r wid
th A
1 [m
m]
400
400
400
560
560
640
1040
1040
Wor
king
cha
mbe
r hei
ght B
1 [m
m]
320
400
560
480
720
800
720
1200
Wor
king
cha
mbe
r dep
th C
1 [m
m]
250
330
330
400
400
500
600
600
Cham
ber v
olum
e [li
tres
]32
5374
108
161
256
449
749
Wei
ght [
kg]
4857
6678
9611
017
021
7
Pow
er [W
]
IN/IF
115
V, 5
0/60
Hz
1600
850
1100
1100
1100
1100
1500
1800
230
V, 5
0/60
Hz
1600
1000
1250
1400
1600
1700
1800
2000
UN
/UF/
SN/S
F23
0 V,
50/
60 H
z16
0020
0025
0028
0032
0034
00-
-11
5 V,
50/
60 H
z16
0017
0022
0022
0022
0022
00-
-40
0 V,
50/
60 H
z–
5800
270
002
Curr
ent c
onsu
mpt
ion
[A]
IN/IF
230
V, 5
0/60
Hz
7,0
4,3
5,4
6,1
7,0
7,4
7,8
8,7
115
V, 5
0/60
Hz
13,9
7,4
9,6
9,6
9,6
9,6
13,0
15,7
UN
/UF/
SN/S
F23
0 V,
50/
60 H
z7,
08,
710
,912
,213
,914
,8-
-11
5 V,
50/
60 H
z13
,914
,819
,119
,119
,119
,1-
-40
0 V,
50/
60 H
z–
3 x
8,42
3 x
10,2
2
max
. num
ber o
f slid
ing
shel
ves
34
65
89
814
max
. loa
d pe
r slid
ing
shel
ve [k
g]30
max
. loa
d pe
r app
lianc
e [k
g]60
8012
017
521
030
0
Sett
ing
tem
pera
ture
rang
eIN
/IF+
20 to
+80
°C3
UN
/UF
+20
to +
300
°C3
SN/S
F+
20 to
+25
0 °C
3
Adj
ustm
ent p
reci
sion
IN/IF
0.1
KU
N/U
F/SN
/SF
up to
100
°C: 0
.1 K
, abo
ve 1
00 °C
: 0.5
K1 S
ee F
ig. 6
on
page
14.
2 3
x 2
30 V
with
out z
ero
3 W
ith th
e in
terio
r lig
htin
g on
, the
min
imum
tem
pera
ture
mig
ht n
ot b
e re
ache
d.

14
Setup and description
D
AGF
C
56
E
B
Fig. 6 Dimensions (see table on page 13)
2.8 Applied directives and standards► Directive 2004/108/EC amended (Directive of the council on harmonisation of the laws of
the member states on electromagnetic compatibility). Fulfilled standards:DIN EN 61326:2004-05, EN 61326:1997, EN 61326/A1:1998, EN 61326/A2:2001EN 61326/A2:2003
► Directive 2006/95/EC amended (Directive of the council on harmonisation of the laws of member states relating to electrical equipment designed for use within certain voltage limits). Standards complied with:DIN EN 61 010-1 (VDE 0411 Part 1):2002-08DIN EN 61 010-2-010 (VDE 0411 Part 2-010):2004-06EN 61 010-1:2001, EN 61 010-2-010:2003
When used as a medical device► Directive 93/42/EEC (Directive of the Commission on the harmonisation of the legal
regulations of the member states on medical devices) ► Directive 2004/108/EC amended (Directive of the council on harmonisation of the laws of
the member states on electromagnetic compatibility). Standards complied with:DIN EN 61326:2004-05, EN 61326:1997, EN 61326/A1:1998, EN 61326/A2:2001EN 61326/A2:2003

15
Setup and description
2.9 Ambient conditions► The appliance may only be used in enclosed rooms and under the following ambient
conditions:
Ambient temperature +5 ºC to +40 ºC
Humidity rh max. 80 %, non-condensing
Overvoltage category II
Pollution degree 2
Altitude of installation max. 2,000 m above sea level
► The appliance may not be used in areas where there is a risk of explosion. The ambient air must not contain any explosive dusts, gases, vapours or gas-air mixtures. The appliance is not explosion-proof.
► Heavy dust production or aggressive vapours in the vicinity of the appliance could lead to sedimentation in the interior and, as a consequence, could result in short circuits or damage to electrical parts. For this reason, sufficient measures to prevent large clouds of dust or aggressive vapours from developing should be taken.
2.10 Scope of delivery► Power cable ► Tilt protection► One or two sliding steel grids (load capacity 30 kg each)► The operating instructions at hand► Calibration certificate
2.11 Optional accessories► AtmoCONTROL software for reading out
and processing of protocol log files► USB to Ethernet converter (Fig. 7 ). Makes
it possible to connect the appliance's network interface (see page 12) to the USB port of a computer / laptop.
► Reinforced, sliding steel grids with a load capacity of 60 kg each (for appliance size 110 and larger)
Fig. 7 Converter USB to Ethernet

16
Delivery, transport and setting up
3. Delivery, transport and setting up
3.1 Safety regulationsWarning!You may get your hands or feet squashed when transporting and installing the appliance. Wear protective gloves and safety boots.
Warning!Because of the heavy weight of the appliance, you could injure yourself if you try to lift it. To carry appliances of the sizes 30 and 55, at least two persons, for appliances of the sizes 75 and 110, four people are needed. Appliances larger than that may not be carried but must be transported with a manual pallet jack or forklift truck.
30 55 75 110 160 260 450 750
Warning!The appliance could fall over and seriously injure you. Never tilt the appliance and transport it in upright position and without load only (except for standard accessories such as steel grids or shelves).
3.2 DeliveryThe appliance is packed in cardboard and is delivered on a wooden palette.
3.3 TransportThe appliance can be transported in three ways:► With a forklift truck; move the forks of the truck entirely under the pallet► On a manual pallet jack► On its own castors, in case of the corresponding configuration, for which the catch on the
(front) castors must be released
3.4 Unpacking
To avoid damage, do not unpack the appliance until you reach the installation site.
Remove the cardboard packaging by pulling it upwards or carefully cutting along an edge.
3.4.1 Checking for completeness and transport damage► Check the delivery note to ensure that the delivery is complete.► Check the appliance for damage. If you notice deviations from the delivery note, damage or irregularities, do not put the appliance into operation but inform the haulage company and the manufacturer.
3.4.2 Disposing of packaging materialDispose of the packaging material (cardboard, wood, foil) in accordance with the applicable disposal regulations for the respective material in your country.

17
Delivery, transport and setting up
3.5 Storage after deliveryIf the appliance is first to be stored after delivery: Read the storage conditions from page 44.
3.6 Setting up
Warning!Due to its centre of gravity, the appliance can fall over to the front and injure you or other people. Always attach the appliance to a wall with the tilt protection (see page 19). If this cannot be done due to space problems, do not operate the appliance and do not open the door. Contact the Memmert service team (see page 2).
3.6.1 PrerequisitesThe installation site must be flat and horizontal and must be able to reliably bear the weight of the appliance (see "Technical data" on page 13). Do not place the appliance on a flammable surface.Depending on the model (see nameplate), a 230 V, 115 V or 400 V power connection must be available at the installation site.The distance between the wall and the rear of the appliance must be at least 15 cm. The clearance from the ceiling must not be less than 20 cm and the side clearance from walls or nearby appliances must not be less than 5 cm (Fig. 8). Sufficient air circulation in the vicinity of the appliance must be guaranteed at all times.For appliances with castors, these need to be positioned in forward direction at all times.
≥ 5 cm ≥ 5 cm ≥ 15 cm
≥ 20
cm
Fig. 8 Minimum clearance from walls and ceiling

18
Delivery, transport and setting up
3.6.2 Installation options
Setting up CommentsSuitable for appliance size ...
30 55 75 110 160 260 450 750Floor
Table
Check the load capacity first
Stackedtwo appliances maximum; mounting material (feet) provided
Wallmounting
Separately packaged fastening material is included in the scope of delivery. Observe the assembly instructions provided.
Base
with/without castors
Castorframe
Height adjustable
feet

19
Delivery, transport and setting up
3.6.3 Tilt protection
Attach the appliance to a wall with the tilt protection. The tilt protection is included in the delivery.1. As illustrated, fasten the
tilt protection to the rear side of the appliance.
2. Bend the tilt protec-tion upwards by 90 ° in the desired distance to the wall (consider the minimum distance to the wall, see Fig. 8).
3. Drill a hole, insert a plug and screw the tilt protec-tion to a suitable wall.
≥ 5 cm ≥ 5 cm
≥ 20
cm

20
Putting into operation
4. Putting into operationCaution:The first time the appliance is operated, it must not be left unattended until it has reached the steady state.
4.1 Connecting the applianceCaution:Observe the country-specific regulations when making connections (e.g. in Germany DIN VDE 0100 with residual current circuit breaker). Observe the connection and power ratings (see nameplate and “Technical data” on page 13). Make sure to establish a safe PE con-ductor connection. Place the power cable where it is easily accessible at all times and can be pulled off quickly, for example in case of an interference or emergency.
230/115-V appliances:230/115-V appliances:Plug the provided power cable into the rear of the appli-ance and connect it to a CEE 7/4 socket (Fig. 9).
400V appliances:400V appliances:The power cable is permanently installed. Connect the plug to a 400 V CEE coupling (Fig. 10).
4.2 Switching onSwitch on the appliance by pressing the On/Off switchon the front of the appliance ( Fig. 11 ).
If the appliance has never been operated before, you will be prompted to set the operating language, date and time when you first switch it on. A description of how to do this is given from page 32. However, to get a basic overview of operating the appliance, you should read the following chapter first.
Fig. 9 Power connection 230/115 VFig. 9 230/115 VFig. 9
Fig. 10 400 V CEE connection
Hauptschalter
>Zu der Typenbezeichnung gibt es momentan drei Entwurfsrichtungen, ich kann Ihnen noch nicht sagen, ob Memmert hierzu schon eine Entscheidung getro�en hat. Die hier gezeigt Variante, ist die von uns empfohlene Richtung.
UF 110PLUS
ON
344.4444 4.
TEMP
Set
°C°C
FLAP
40 %
TIMER
hd 1002End Sept.29 22 24
FAN
%0
%100ALARM
max444.4°C
auto+/- 0.0 K
min444.4°C
OOONNNNOONO
Manu
44.Sept
Fig. 11 Switch on appliance

21
Operation and control
5. Operation and controlCaution:When loading and operating sterilisers of the SN/SF type, make sure to observe the special notes provided in chapter “Sterilisers SF/SN” from page 42.
5.1 Operating personnelThe appliance may only be operated by persons who are of legal age and have been instruct-ed accordingly. Personnel who are to be trained, instructed or who are undergoing general training may only work with the appliance under the continuous supervision of an experi-enced person.
5.2 Opening the door► To open the door, pull the handle bar to the side (to the left or to the right, depending on
the door variation, see Fig. 12, A). The door opens slightly, so that the heat can be vented with the door ajar in case of high temperature inside the chamber. The door can then be opened completely (B).
► To close the door, push the handle bar back (C).
A CB
Fig. 12 Opening and closing the door
Warning!In case of appliances of a certain size, you can get accidentally locked in, which is life-threatening. Do not climb into the appliance!

22
Operation and control
5.3 Loading the appliance
Warning!When loading the appliance with an unsuitable load, poisonous or explosive vapours or gases may be produced. This could cause the appliance to explode, and persons could be severely injured or poisoned. The appliance may only be loaded with materials which do not form any toxic or explosive vapours when heated up and cannot ignite (see also “Intended use” on page 8). If there is any doubt as to the composition of materials, they must not be loaded into the appli-ance.
Caution:Check the chamber load for chemical compatibility with the materials of the appliance (see page 11).
Insert the sliding steel grids or sliding shelves. The maximum number or grids / shelves and the load capacity are specified in the technical data overview on page 13.The chamber must not be loaded too tightly, so that proper air circulation in the working chamber is guaran-teed. Do not place any chamber load on the floor, touching the side walls or right below the ceiling of the working chamber (Fig. 13 , see also the "correct loading" sticker on the appliance).In case of improper loading (chamber loaded too tightly), reaching the set temperature may take longer than normal.
To achieve the correct heating capacity, the type of slide-in unit used – Grid or Shelf – must be set in the menu under SETUP (see page 37).
5.4 Operating the appliance
5.4.1 ControlCOCKPITIn manual operation, the desired parameters are entered at the ControlCOCKPIT on the front of the appliance (Fig. 14 and Fig. 15 ). You can also make basic settings here (menu). Addition-ally, warning messages are displayed, e.g. if the temperature is exceeded.
Fig. 13 Correct placement of the chamber load

23
Operation and control
TIMER
End 14:45
44h:44m
180.4°C
TEMP
Set 180.4°C
20%
FLAP
FAN
%0FLAP
40 %
53 41 2
11 126 7 8 9 10
TIMER
30m04h
End 13:30 23.11.
Fig. 14 ControlCOCKPIT for UF/IF/SF appliances in operating mode
180.0 °CSet 180.9 °C
TEMP
TIMER
End 14:45
44h:44m
FLAPFLAP
40 %
1 2 5
10 11 12
TIMER
30m04h
End 13:30 23.11.
6 7 8 9
Fig. 15 ControlCOCKPIT for UN/IN/SN appliances in operating mode
1 Activation key for temperature setpoint adjustmentActivation key for temperature setpoint adjustmentActivation key for temperature setpoint
2 Setpoint and actual temperature displayadjustmentSetpoint and actual temperature displayadjustment
3 Fan speed displaySetpoint and actual temperature displayFan speed displaySetpoint and actual temperature display
4 Activation key for fan speed settingFan speed displayActivation key for fan speed settingFan speed display
5 Switch to menu mode (see page 31)Activation key for fan speed settingSwitch to menu mode (see page 31)Activation key for fan speed setting
6 Activation key for timer settingSwitch to menu mode (see page 31)Activation key for timer settingSwitch to menu mode (see page 31)
7 On/Off switchActivation key for timer settingOn/Off switchActivation key for timer setting
8 Timer display9 Air flap position display
Timer displayAir flap position displayTimer display
10 Activation key for air flap position adjust-Air flap position displayActivation key for air flap position adjust-Air flap position display
ment11 Turn control for setpoint adjustment12 Confirmation key (accepts setting made
Turn control for setpoint adjustmentConfirmation key (accepts setting made Turn control for setpoint adjustment
with the turn control)Confirmation key (accepts setting made with the turn control)Confirmation key (accepts setting made

24
Operation and control
5.4.2 Basic operationIn general, all settings are made according to the following pattern:
1. Activate the desired parameter (e.g. tem-perature). To do so, press the correspond-ing activation key on the left or right of the respective display. The activated dis-play is lined in colour, the other displays are dimmed. The set value is highlighted in colour.
30.0%rh
50.0%CO2Programm 12
Fr 20.10.2010 20:31
min000°C
max000°C
.5°C100
ICH 500
MENU
30.0%rh
50.0%CO2Programm 12
Fr 20.10.2010 20:31
min000°C
max000°C
MENU
TIMER
---- mh
22.4°C
TEMP
37.0°CSet
2. By turning the turn control to the left or right, adjust the set value (e.g. to 180.0 ºC).
Hauptschalter
>Zu der Typenbezeichnung gibt es momentan drei Entwurfsrichtungen, ich kann Ihnen noch nicht sagen, ob Memmert hierzu schon eine Entscheidung getro�en hat. Die hier gezeigt Variante, ist die von uns empfohlene Richtung.
UF 110PLUS
ON
344.4444 4.
TEMP
Set
°C°C
FLAP
40 %
TIMER
hd 1002End Sept.29 22 24
FAN
%0
%100ALARM
max444.4°C
auto+/- 0.0 K
min444.4°C
OOONNNNOONO
Manu
44.Sept
3. Save the set value by pressing the confir-
mation key. The display returns to normal and the appliance begins adjusting to the defined set value.
Hauptschalter
>Zu der Typenbezeichnung gibt es momentan drei Entwurfsrichtungen, ich kann Ihnen noch nicht sagen, ob Memmert hierzu schon eine Entscheidung getro�en hat. Die hier gezeigt Variante, ist die von uns empfohlene Richtung.
UF 110PLUS
ON
344.4444 4.
TEMP
Set
°C°C
FLAP
40 %
TIMER
hd 1002End Sept.29 22 24
FAN
%0
%100ALARM
max444.4°C
auto+/- 0.0 K
min444.4°C
OOONNNNOONO
Manu
44.Sept
23.2°C
TEMP
Set 180.0°C
Additional parameters (air flap position etc.) can be set accordingly. If no new values are entered or confirmed for approx. 30 seconds, the appliance automati-cally returns to the main menu and restores the former values.If you want to cancel the setting procedure, press the activation key on the left or right of the display that you want to exit. The appliance restores the former values. Only the settings that you have confirmed by pressing the confirmation key before cancelling the setting procedure are accepted.
5.4.3 Operating modesThe appliance can be operated in two modes:► Manual mode: The appliance runs in permanent operation at the values set on the
ControlCOCKPIT. Operation in this mode is described in chapter 5.4.4.► Timer operation: The appliance runs at the values set until the timer has elapsed. Opera-
tion in this mode is described in chapter 5.4.5 .
22.4°C
TEMP
180.0°CSet
30.0%rh
50.0%CO2Programm 12
Fr 20.10.2010 20:31
min000°C
max000°C
.5°C100
ICH 500
MENU
30.0%rh
50.0%CO2Programm 12
Fr 20.10.2010 20:31
min000°C
max000°C
MENU
TIMER
-
22.4°C
TEMP
37.0°CSet

25
Operation and control
5.4.4 Manual modeIn this operating mode, the appliance runs in permanent operation at the values set on the ControlCOCKPIT.
Adjustment optionsAdjustment optionsAs described in chapter 5.4.2, you can set the following parameters after pressing the cor-responding activation key (in any sequence):
TemperatureTemperatureAdjustment range: model dependent (see nameplate and technical date on page 13)
Heating operation is indicated by the symbol. symbol.You can select °C or °F as the temperature unit displayed (see page 34).
24.4°C
TEMP
180.4 °CSet
Air flap positionAir flap positionAdjustment range: 0 % (closed, recirculating operation) to 100 % (completely opened, fresh air operation) in steps of 10%
FLAP
%40Fan speedFan speed(only for UF/IF/SF appliances)Adjustment range: 0 to 100 % in steps of 10%
FAN
%50FAN
505.4.5 Timer operationIn timer operation, you can adjust the time the appliance runs at the set value:
1. Press the activation key to the left of the timer display. The timer display is activated.
30.0%rh
50.0%CO2Programm 12
Fr 20.10.2010 20:31
min000°C
max000°C
.5°C100
ICH 500
MENU
30.0%rh
50.0%CO2Programm 12
Fr 20.10.2010 20:31
min000°C
max000°C
MENU
FANTIMER
-Ende 9:00 23.11.
- -h- m
2. Turn the turn control until the desired duration is displayed – in this example 4 hours 30 minutes. The approximate end time is shown beneath, in a smaller font.
Hauptschalter
>Zu der Typenbezeichnung gibt es momentan drei Entwurfsrichtungen, ich kann Ihnen noch nicht sagen, ob Memmert hierzu schon eine Entscheidung getro�en hat. Die hier gezeigt Variante, ist die von uns empfohlene Richtung.
UF 110PLUS
ON
344.4444 4.
TEMP
Set
°C°C
FLAP
40 %
TIMER
hd 1002End Sept.29 22 24
FAN
%0
%100ALARM
max444.4°C
auto+/- 0.0 K
min444.4°C
OOONNNNOONO
Manu
44.Sept
TIMER
End
013:30 23.11.
04 mh 3
Up to a duration of 23 hours 59 minutes, the time is displayed in hh:mm (hours:minutes) format. For 24 hours and more, the format dd:hh (days:hours) is used. The maximum duration adjustable is 99 days 00 hours.

26
Operation and control
3. Press the confirmation key.
Hauptschalter
>Zu der Typenbezeichnung gibt es momentan drei Entwurfsrichtungen, ich kann Ihnen noch nicht sagen, ob Memmert hierzu schon eine Entscheidung getro�en hat. Die hier gezeigt Variante, ist die von uns empfohlene Richtung.
UF 110PLUS
ON
344.4444 4.
TEMP
Set
°C°C
FLAP
40 %
TIMER
hd 1002End Sept.29 22 24
FAN
%0
%100ALARM
max444.4°C
auto+/- 0.0 K
min444.4°C
OOONNNNOONO
Manu
44.Sept
The display now shows the remaining time in a large font and the approximate end time in a smaller font beneath. The status display shows „Timer active“.
TIMER
30m04h
Ende 13:30 23.11.
Timer active
12.Sept.2012 13:44
4. Now, as described under 5.4.2, set the individual values for temperature, air flap position etc. which you want the appliance to operate at. For universal ovens UN/UF and incubators IN/IF, the set values can be changed while the timer elapses. The changes are effective im-mediately. For sterilisers SN/SF, parameters cannot be changed while the timer elapses.For universal ovens UN/UF and incubators IN/IF, you can choose if the timer should run setpoint-dependent or not in the Setup – this determines if the timer should not start until a tolerance band around the set temperature is reached or if it should start right after activation (see page 36). If the timer runs setpoint-dependent, this is indicated by the symbol in the timer display.
When the timer has elapsed, the display shows 00h:00m. All func-tions (heating etc.) are switched off. If a fan had been active, it will keep on running for a short safety period. In addition, an acoustic alarm sounds, which can be turned off by pressing the confirma-tion key.
To deactivate the timer, open the timer display by pressing the activation key again and then turning the turn control to reduce the timer setting until --:-- is displayed. Confirm with the confirma-tion key.
5.5 Temperature monitoring The appliance is equipped with a double overtemperature protection (mechanical/electronic) in accordance with DIN 12 880. This serves to avoid damage to the chamber load and/or ap-pliance in case of a malfunction:► Electronic temperature monitoring (TWW/TWB)TWW/TWB)TWW/► mechanical temperature limiter (TB)
5.5.1 Electronic temperature monitoring The monitoring temperature of the electronic temperature monitoring is measured via the Pt100 temperature sensor in the interior of the chamber. The type of temperature monitoring (TWW/TWB) and the monitoring temperature are set in menu mode in the Setup display (see page 35). The setting made applies to all operating modes.
TIMER
00m00h
End 13:30 23.11.
TIMER
--m--h
End 9:00 23.11.

27
Operation and control
If the manually set monitoring temperature is exceeded, temperature monitoring takes over temperature control and begins to regulate the monitoring temperature (TWW, Fig. 16) or switches off the heating (TWB, Fig. 17).
t
°CSetting Max Alarm
Set temperature
Controller error
Emergency operation
Fig. 16 Schematic diagram of how the TWW temperature monitoring system works
t
°Cheating switched off by TWB
Setting Max AlarmSet temperature
Controller error
Fig. 17 Schematic diagram of how the TWB temperature monitoring works

28
Operation and control
5.5.2 Mechanical temperature monitoring: Temperature limiter (TB)The appliance is equipped with a mechanical temperature limiter (TB) of protection class 1 in accordance with DIN 12 880. If the electronic monitoring unit should fail during operation and the factory-set maximum temperature is exceeded by approx. 20 °C, the temperature limiter, as the final protective measure, switches off the heating permanently.
5.5.3 FunctionIf temperature monitoring has been triggered, this is indicated by the temperature display: the actual tempera-ture is highlighted in red and a warning symbol is shown (Fig. 18 ). The type is shown (Fig. 18 ). The type of temperature monitoring triggered is shown beneath the temperature: TB for mechanical and TWW or TWB for electronic temperature monitoring. The alarm is additionally signalled by an intermittent acoustic signal, which can be turned off by pressing the confirma-tion key. Information on what to do in this case are provided in the chapter Malfunctions, warning and error messages from page 29.
5.6 Ending operation
Warning!Depending on the operation performed , the surfaces in the working chamber and the chamber load may still be very hot after the appli-ance is switched off. Touching these surfaces can cause burns. Wear heat-resistant protective gloves or wait until the appliance cools down. To do so, pull the handle bar until the door springs open into its ventilating position (see page 21).
1. Switch off active appliance functions (turn down the heating, deactivate the fan etc.).
2. Remove the chamber load.3. Switch off the appliance Fig. 19 ).
TIMER
End 14:45
44h:44m
Holz trocknenaufheizen09:12h
Fr 20.10.2010 20:31
min000°C
ALARM of °C max000°Cauto off
99K-+ 0 12
%rh°C
GRAPH
off
180.4°C
TEMP
Set 185.0°C
ONON
20%
FLAP
>Zu der Typenbezeichnung gibt es momentan drei Entwurfsrichtungen,
UF 110PLUS
ON
344.4444 4.
TEMP
Set
°C°C
FLAP
40 %
TIMER
hd 1002End Sept.29 22 24
FAN
%0
%100ALARM
max444.4°C
auto+/- 0.0 K
min444.4°C
OOONNNNOONO
Manu
44.SeptLÜFTER
%0KLAPPE
40 %
LICHT
%100ALARM
max190.0°C
5.0 K
min160.0°C
auto+-
Manueller Betrieb
12.Sept.2012 13:44
TIMER
30m04h
Ende 13:30 23.11.
23.2°C
TEMP
Set 180.0°C
TEMP
TB Set 190.0 °C
195.4°C
TIMER
End 14:45
44h:44m
Holz trocknenaufheizen09:12h
Fr 20.10.2010 20:31
min000°C
ALARM of °C max000°Cauto off
99K-+ 0 12
%rh°C
GRAPH
off
180.4°C
TEMP
Set 185.0°C
ONON
20%
FLAP
>Zu der Typenbezeichnung gibt es momentan drei Entwurfsrichtungen,
UF 110PLUS
ON
344.4444 4.
TEMP
Set
°C°C
FLAP
40 %
TIMER
hd 1002End Sept.29 22 24
FAN
%0
%100ALARM
max444.4°C
auto+/- 0.0 K
min444.4°C
OOONNNNOONO
Manu
44.SeptLÜFTER
%0KLAPPE
40 %
LICHT
%100ALARM
max190.0°C
5.0 K
min160.0°C
auto+-
Manueller Betrieb
12.Sept.2012 13:44
TIMER
30m04h
Ende 13:30 23.11.
23.2°C
TEMP
Set 180.0°C
TEMP
TB Set 190.0 °C
195.4°C
Fig. 18 Temperature monitoring triggered
Hauptschalter
>Zu der Typenbezeichnung gibt es momentan drei Entwurfsrichtungen, ich kann Ihnen noch nicht sagen, ob Memmert hierzu schon eine Entscheidung getro�en hat. Die hier gezeigt Variante, ist die von uns empfohlene Richtung.
UF 110PLUS
ON
344.4444 4.
TEMP
Set
°C°C
FLAP
40 %
TIMER
hd 1002End Sept.29 22 24
FAN
%0
%100ALARM
max444.4°C
auto+/- 0.0 K
min444.4°C
OOONNNNOONO
Manu
44.Sept
Fig. 19 Switch off appliance

29
Malfunctions, warning and error messages
6. Malfunctions, warning and error messagesWarning!After removing covers, live parts may be exposed. You may receive an electric shock if you touch these parts. Malfunctions requiring work inside the appliance may only be rectifi ed by electricians. Observe the separate service manual for this.
Do not try to rectify appliance errors yourself but contact the MEMMERT customer service department (see page 2) or an authorised service point.In case of enquiries, please always specify the model and appliance number from the nameplate (see page 12).
6.1 Warning messages of the temperature monitoring function
Description Cause Action See
Temperature alarm and "TWW" are displayed
TEMP
TWW Set 190.0 °C
195.4°C
The adjustable undertemperature / overtemperature controller (TWW) has assumed heating control.
Increase the difference between the monitoring and setpoint temperature – by either increasing the max value of the temperature monitoring (MAX temp) or decreasing the setpoint temperature.If the alarm continues: Contact customer service
page 35
page 2
Temperature alarm and "TWB" are displayed
TEMP
TWB Set 190.0 °C
195.4°C
The electronic temperature limiter (TWB) permanently switched off heating.
Deactivate the alarm by pressing the confirmation key.Increase the difference between the monitoring and setpoint temperature – by either increasing the max value of the temperature monitoring (MAX temp) or decreasing the setpoint temperature.If the alarm continues: Contact customer service
page 35
page 2
Temperature alarm and TB are displayed
TEMP
TB
230.4 °C
The mechanical temperature limiter (TB) permanently switched off heating.
Switch off the appliance and leave to cool down. Contact customer service and have the error rectified (e.g. by replacing the temperature sensor).
page 2

30
Malfunctions, warning and error messages
6.2 Malfunctions, operating problems and appliance errors
Error description Cause of errors Rectifying errors See
Displays are dark External power supply was interrupted
Check the power supply
page 20
Miniature fuse, appliance fuse or power module faulty
Contact customer service
page 2
Individual or all displays cannot be activated
Appliance is in timer mode Wait for end of timer or deactivate it
Displays suddenly look different
Appliance is in "wrong" mode
Change to operating or menu mode by pressing the MENU key
Error message in timer display
Error 23Pt100 ErrorContactService
Appliance error Contact customer service
page 2
6.3 Power failureWarning!Depending on the operation performed, the surfaces in the interior and the chamber load may still be very hot after power loss. Additionally, depending on the duration of the power loss, the appliance might heat up again after power supply has been restored (see below). Touching these surfaces can cause burns. Wear heat-resistant protective gloves or wait until the appliance cools down fi rst.
In case of a power failure, the appliance operates as follows:
In manual modeAfter power supply has been restored, operation is continued with the parameters set. The time and the duration of the power failure is documented in the protocol log memory.
In timer modeIn case of an interruption of the power supply of less than 60 minutes, the current timer is continued from the point at which it was interrupted. For interruptions of the power supply longer than this, all appliance functions (heating, fan etc.) are switched off and the air flap is opened.
In timer mode of sterilisersAfter power supply has been restored, the timer always starts again.

31
Menu functions
7. Menu modeIn menu mode, you can make basic settings as well as adjust appliance parameters.
Caution:Before changing menu settings, read the description of the respective functions on the fol-lowing pages to avoid possible damage to the appliance and/or chamber load.
To enter menu mode, press the MENU key.To exit the menu mode at any time, press the MENU key again. The appliance then returns to manual mode. Only changes accepted by pressing the confirmation key are saved.
7.1 OverviewPress the MENU key to change between the displays in menu mode:
SETUP
SIGNALTÖNE
CALIB
LANGUAGE TIME USER ID
>Zu der Typenbezeichnung gibt es momentan drei Entwurfsrichtungen, ich kann Ihnen noch nicht sagen, ob Memmert hierzu schon eine Entscheidung
UF 110PLUS
ON
344.4444 4.
TEMP
Set
°C°C
FLAP
40 %
TIMER
hd 1002End Sept.29 22 24
FAN
%0
OOONNNNOONO
1 2 3 4 5
6 7 8 9 10 11
Fig. 20 ControlCOCKPIT in menu mode
1 Language selection activation key2 Language selection display
Language selection activation keyLanguage selection displayLanguage selection activation key
3 Date and time displayLanguage selection displayDate and time displayLanguage selection display
4 Date and time setting activation keyDate and time displayDate and time setting activation keyDate and time display
5 Return to manual modeDate and time setting activation keyReturn to manual modeDate and time setting activation key
6 Setup activation key (basic appliance set-tings)
7 Setup display (basic appliance settings)8 Adjustment display
Setup display (basic appliance settings)Adjustment displaySetup display (basic appliance settings)
9 Adjustment activation keyAdjustment displayAdjustment activation keyAdjustment display
10 Turn control for adjustmentAdjustment activation keyTurn control for adjustmentAdjustment activation key
11 Confirmation key (accepts setting made Turn control for adjustmentConfirmation key (accepts setting made Turn control for adjustment
with the turn control)Confirmation key (accepts setting made with the turn control)Confirmation key (accepts setting made
Hauptschalter
>Zu der Typenbezeichnung gibt es momentan drei Entwurfsrichtungen, ich kann Ihnen noch nicht sagen, ob Memmert hierzu schon eine Entscheidung getro�en hat. Die hier gezeigt Variante, ist die von uns empfohlene Richtung.
UF 110PLUS
ON
344.4444 4.
TEMP
Set
°C°C
FLAP
40 %
TIMER
hd 1002End Sept.29 22 24
FAN
%0
%100ALARM
max444.4°C
auto+/- 0.0 K
min444.4°C
OOONNNNOONO
Manu
44.Sept

32
Menu functions
7.2 Basic operation in menu mode using the example of language selection
In general, all settings in menu mode are done just like in manual mode: Activate the re-spective display, use the turn control for setting and press the confirmation key to accept the change. A more detailed description is provided in the following, using the example of language selection.
1. Activate the desired parameter (in this example the language). To do so, press the corresponding activation key on the left or right of the respective display. The activated display is enlarged.
UFP 100
LANGUAGE
ENGLISH
PROGRAM
TIME USER ID
PROTOCOLPROGRAM
TIME USER ID
PROTOCOL
DEUTSCH
ESPANOLFRANCAIS
If you want to exit or cancel your settings, again press the activation key which you have used to activate the display. The appliance returns to the menu overview. Only the settings that you have confirmed by pressing the confirmation key before cancelling the setting procedure are accepted.
SETUP
SIGNALTÖNE PROG
ZEIT UND DATUMCALIB USER ID
PROTOCOLLANGUAGE
UFP 100
PROGRAM
TIME USER ID
PROTOCOL
SETUP
SOUND
CALIBRATION
LANGUAGE
>Zu der Typenbezeichnung gibt es momentan drei Entwurfsrichtungen, ich kann Ihnen noch nicht sagen, ob Memmert hierzu schon eine Entscheidung getro�en hat.
UF 110PLUS
ON
344.4444 4.
TEMP
Set
°C°C
FLAP
40 %
TIMER
hd 1002End Sept.29 22 24
FAN
%0
%100ALARM
max444.4°C
auto+/- 0.0 K
min444.4°C
OOONNNNOONO
Manu
44.Sept
2. With the turn control, select the desired new setting, e.g. Español (Spanish).
Hauptschalter
>Zu der Typenbezeichnung gibt es momentan drei Entwurfsrichtungen, ich kann Ihnen noch nicht sagen, ob Memmert hierzu schon eine Entscheidung getro�en hat. Die hier gezeigt Variante, ist die von uns empfohlene Richtung.
UF 110PLUS
ON
344.4444 4.
TEMP
Set
°C°C
FLAP
40 %
TIMER
hd 1002End Sept.29 22 24
FAN
%0
%100ALARM
max444.4°C
auto+/- 0.0 K
min444.4°C
OOONNNNOONO
Manu
44.Sept
3. Save the setting by pressing the
confirmation key.
Hauptschalter
>Zu der Typenbezeichnung gibt es momentan drei Entwurfsrichtungen, ich kann Ihnen noch nicht sagen, ob Memmert hierzu schon eine Entscheidung getro�en hat. Die hier gezeigt Variante, ist die von uns empfohlene Richtung.
UF 110PLUS
ON
344.4444 4.
TEMP
Set
°C°C
FLAP
40 %
TIMER
hd 1002End Sept.29 22 24
FAN
%0
%100ALARM
max444.4°C
auto+/- 0.0 K
min444.4°C
OOONNNNOONO
Manu
44.Sept
SPRACHE
ENGLISHDEUTSCH
ESPANOL FRANCAIS
4. To return to the menu overview, press the activation key again.
SETUP
SIGNALTÖNE PROG
ZEIT UND DATUMCALIB USER ID
PROTOCOLLANGUAGE
UFP 100
PROGRAM
TIME USER ID
PROTOCOL
SETUP
SOUND
CALIBRATION
LANGUAGE
>Zu der Typenbezeichnung gibt es momentan drei Entwurfsrichtungen, ich kann Ihnen noch nicht sagen, ob Memmert hierzu schon eine Entscheidung getro�en hat.
UF 110PLUS
ON
344.4444 4.
TEMP
Set
°C°C
FLAP
40 %
TIMER
hd 1002End Sept.29 22 24
FAN
%0
%100ALARM
max444.4°C
auto+/- 0.0 K
min444.4°C
OOONNNNOONO
Manu
44.Sept
You can now► activate another menu function by
pressing the corresponding activation key or
► return to manual mode by pressing the MENU key.
SETUP
Balance
PROGRAM
TIME USER ID
PROTOCOLPROGRAM
TIME USER ID
PROTOCOL
EinheitIP Adresse
+30%
192.168.100.100
Alarm Temp°C FTWW TWB
Timer Mode
Setup
Unit
IP address 192.168.100.100
Subnet mask 255.255.0.0
Alarm temp°C FTWW TWB
Timer modeSlide-in unit Grid Shelf
Hauptschalter
>Zu der Typenbezeichnung gibt es momentan drei Entwurfsrichtungen, ich kann Ihnen noch nicht sagen, ob Memmert hierzu schon eine Entscheidung getro�en hat. Die hier gezeigt Variante, ist die von uns empfohlene Richtung.
UF 110PLUS
ON
344.4444 4.
TEMP
Set
°C°C
FLAP
40 %
TIMER
hd 1002End Sept.29 22 24
FAN
%0
%100ALARM
max444.4°C
auto+/- 0.0 K
min444.4°C
OOONNNNOONO
Manu
44.Sept
SPRACHE
ENGLISHDEUTSCH
ESPANOL FRANCAIS

33
Menu functions
All other settings can be made accordingly. The settings possible are described in the follow-ing sections.
If no new values are entered or confirmed for approx. 30 seconds, the appliance automati-cally returns to the main menu and restores the former values.
7.3 SetupIn the SETUP display, you can set the following parameters:► the IP address and Subnet mask of the appliance's Ethernet interface (for connection to Subnet mask of the appliance's Ethernet interface (for connection to Subnet mask
a network)► the Unit of the temperature display (°C or °F, see page 34)► the type of temperature monitoring (TWW or TWB, Alarm Temp) and the trigger tem-
perature of the monitoring function (Max alarm, see page 35). ► the Timer mode (see page 36)► the type of the slide-in unit (Grid or Shelf, see page 37)
If the SETUP menu contains more entries than can be displayed, this is indicated by the display “1/2”. This means that there is a second „page“ of entries.To display the hidden entries, use the turn control to scroll beyond the lowest entry. The page display changes to “2/2”.
7.3.1 IP address and subnet maskIf you want to operate one ore more appliances in a network, each appliance must have its own unique IP address for identification. By default, each appliance is delivered with the IP address 192.168.100.100.
LAN
1: 1
92.1
68.1
.233
192.168.1.216
LAN
2: 1
92.1
68.1
.215
LAN
3: 1
92.1
68.1
.241
192.168.1.216
EditorProgrammname Simulation Protokoll
- +- +
INP 250 Test 01
180.0°C
i
HPP 250 Labor
i
37.0°C
44.4%rh
1515STAND BY
Programm negnulletsniEllokotorPtäreG efliHnekcurDAtmoCONTROL
Fig. 21 Operation of several appliances in a network (schematic example)
Setup
Unit
IP adress 255.145.136.225
Subnet mask 255.255.0.0
Alarm Temp°C F
Timer modeTWW TWB
1/2

34
Menu functions
1. Activate the SETUP display. The entry IP address is automatically highlighted.
SETUP
Balance
PROGRAM
TIME USER ID
PROTOCOLPROGRAM
TIME USER ID
PROTOCOL
EinheitIP Adresse
+30%
192.168.100.100
Alarm Temp°C FTWW TWB
Timer Mode
Setup
Unit
IP address 192.168.100.100
Subnet mask 255.255.0.0
Alarm temp°C FTWW TWB
Timer modeSlide-in unit Grid Shelf
2. Accept the selection by pressing the confirmation key. The first three digits of the IP address are automatically selected.
Hauptschalter
>Zu der Typenbezeichnung gibt es momentan drei Entwurfsrichtungen, ich kann Ihnen noch nicht sagen, ob Memmert hierzu schon eine Entscheidung getro�en hat. Die hier gezeigt Variante, ist die von uns empfohlene Richtung.
UF 110PLUS
ON
344.4444 4.
TEMP
Set
°C°C
FLAP
40 %
TIMER
hd 1002End Sept.29 22 24
FAN
%0
%100ALARM
max444.4°C
auto+/- 0.0 K
min444.4°C
OOONNNNOONO
Manu
44.Sept
SETUP
Unit
IP address 192.168.100.100
Subnet mask 255.255.0.0
Alarm temp°C FTWW TWB
Timer modeSlide-in unit Grid Shelf
3. With the turn control, set the new number, e.g. 255.
Hauptschalter
>Zu der Typenbezeichnung gibt es momentan drei Entwurfsrichtungen, ich kann Ihnen noch nicht sagen, ob Memmert hierzu schon eine Entscheidung getro�en hat. Die hier gezeigt Variante, ist die von uns empfohlene Richtung.
UF 110PLUS
ON
344.4444 4.
TEMP
Set
°C°C
FLAP
40 %
TIMER
hd 1002End Sept.29 22 24
FAN
%0
%100ALARM
max444.4°C
auto+/- 0.0 K
min444.4°C
OOONNNNOONO
Manu
44.Sept
SETUP
Unit
IP address 255.168.100.100
Subnet mask 255.255.0.0
Alarm temp°C FTWW TWB
Timer modeSlide-in unit Grid Shelf
4. Accept the selection by pressing the confirmation key. The next three digits of the IP address are automatically selected. Setting these is done with the turn control according to the description above.
Hauptschalter
>Zu der Typenbezeichnung gibt es momentan drei Entwurfsrichtungen, ich kann Ihnen noch nicht sagen, ob Memmert hierzu schon eine Entscheidung getro�en hat. Die hier gezeigt Variante, ist die von uns empfohlene Richtung.
UF 110PLUS
ON
344.4444 4.
TEMP
Set
°C°C
FLAP
40 %
TIMER
hd 1002End Sept.29 22 24
FAN
%0
%100ALARM
max444.4°C
auto+/- 0.0 K
min444.4°C
OOONNNNOONO
Manu
44.Sept
SETUP
Unit
IP address 255.168.100.100
Subnet mask 255.255.0.0
Alarm temp°C FTWW TWB
Timer modeSlide-in unit Grid Shelf
5. After setting the last three digits, accept the new IP address by pressing the confirmation key. The selection returns to the overview.
The subnet mask is set accordingly.
Hauptschalter
>Zu der Typenbezeichnung gibt es momentan drei Entwurfsrichtungen, ich kann Ihnen noch nicht sagen, ob Memmert hierzu schon eine Entscheidung getro�en hat. Die hier gezeigt Variante, ist die von uns empfohlene Richtung.
UF 110PLUS
ON
344.4444 4.
TEMP
Set
°C°C
FLAP
40 %
TIMER
hd 1002End Sept.29 22 24
FAN
%0
%100ALARM
max444.4°C
auto+/- 0.0 K
min444.4°C
OOONNNNOONO
Manu
44.Sept
SETUP
Unit
IP address 255.145.136.225
Subnet mask 255.255.0.0
Alarm temp°C FTWW TWB
Timer modeSlide-in unit Grid Shelf
7.3.2 UnitHere, you can choose whether the temperature is displayed in °C or °F.
1. Activate the SETUP display and select Unit with the turn control.
Hauptschalter
>Zu der Typenbezeichnung gibt es momentan drei Entwurfsrichtungen, ich kann Ihnen noch nicht sagen, ob Memmert hierzu schon eine Entscheidung getro�en hat. Die hier gezeigt Variante, ist die von uns empfohlene Richtung.
UF 110PLUS
ON
344.4444 4.
TEMP
Set
°C°C
FLAP
40 %
TIMER
hd 1002End Sept.29 22 24
FAN
%0
%100ALARM
max444.4°C
auto+/- 0.0 K
min444.4°C
OOONNNNOONO
Manu
44.Sept
SETUP
Unit
IP address 255.145.136.225
Subnet mask 255.255.0.0
Alarm temp°C °F
TWW TWBTimer modeSlide-in unit Grid Shelf
2. Accept the selection by pressing the confirmation key. The adjustment options are automatically highlighted.
Hauptschalter
>Zu der Typenbezeichnung gibt es momentan drei Entwurfsrichtungen, ich kann Ihnen noch nicht sagen, ob Memmert hierzu schon eine Entscheidung getro�en hat. Die hier gezeigt Variante, ist die von uns empfohlene Richtung.
UF 110PLUS
ON
344.4444 4.
TEMP
Set
°C°C
FLAP
40 %
TIMER
hd 1002End Sept.29 22 24
FAN
%0
%100ALARM
max444.4°C
auto+/- 0.0 K
min444.4°C
OOONNNNOONO
Manu
44.Sept
SETUP
Unit
IP address 255.145.136.225
Subnet mask 255.255.0.0
Alarm tempTimer mode
TWW TWB°C °F

35
Menu functions
3. With the turn control, select the desired unit – in this example °C.
Hauptschalter
>Zu der Typenbezeichnung gibt es momentan drei Entwurfsrichtungen, ich kann Ihnen noch nicht sagen, ob Memmert hierzu schon eine Entscheidung getro�en hat. Die hier gezeigt Variante, ist die von uns empfohlene Richtung.
UF 110PLUS
ON
344.4444 4.
TEMP
Set
°C°C
FLAP
40 %
TIMER
hd 1002End Sept.29 22 24
FAN
%0
%100ALARM
max444.4°C
auto+/- 0.0 K
min444.4°C
OOONNNNOONO
Manu
44.Sept
SETUP
Unit
IP address 255.145.136.225
Subnet mask 255.255.0.0
Alarm tempTimer mode
TWW TWB°C °F
4. Save the setting by pressing the confirmation key.
Hauptschalter
>Zu der Typenbezeichnung gibt es momentan drei Entwurfsrichtungen, ich kann Ihnen noch nicht sagen, ob Memmert hierzu schon eine Entscheidung getro�en hat. Die hier gezeigt Variante, ist die von uns empfohlene Richtung.
UF 110PLUS
ON
344.4444 4.
TEMP
Set
°C°C
FLAP
40 %
TIMER
hd 1002End Sept.29 22 24
FAN
%0
%100ALARM
max444.4°C
auto+/- 0.0 K
min444.4°C
OOONNNNOONO
Manu
44.Sept
SETUP
Unit
IP address 255.145.136.225
Subnet mask 255.255.0.0
Alarm temp°C °F
Timer modeTWW TWB
7.3.3 Temperature monitoring (Alarm Temp and Max Alarm)Here, the type of monitoring function that should be activated (TWW or TWB, description from page 26) can be set (Alarm Temp), as well as the temperature at which the auto-matic temperature monitoring should be triggered (Max alarm).
The monitoring temperature must be set sufficiently high above the maximum set tem-perature. We recommend 5 to 10 K difference for UN/UF/SN/SF and 1 to 3 K difference for IN/IF.
1. Activate the SETUP display and select Alarm temp with the turn control.
Hauptschalter
>Zu der Typenbezeichnung gibt es momentan drei Entwurfsrichtungen, ich kann Ihnen noch nicht sagen, ob Memmert hierzu schon eine Entscheidung getro�en hat. Die hier gezeigt Variante, ist die von uns empfohlene Richtung.
UF 110PLUS
ON
344.4444 4.
TEMP
Set
°C°C
FLAP
40 %
TIMER
hd 1002End Sept.29 22 24
FAN
%0
%100ALARM
max444.4°C
auto+/- 0.0 K
min444.4°C
OOONNNNOONO
Manu
44.Sept
SETUP
Unit
IP address 255.145.136.225
Subnet mask 255.255.0.0
Alarm temp°C F
TWW TWBTimer modeSlide-in unit Grid Shelf
2. Accept the selection by pressing the confirmation key. The adjustment options are automatically highlighted.
Hauptschalter
>Zu der Typenbezeichnung gibt es momentan drei Entwurfsrichtungen, ich kann Ihnen noch nicht sagen, ob Memmert hierzu schon eine Entscheidung getro�en hat. Die hier gezeigt Variante, ist die von uns empfohlene Richtung.
UF 110PLUS
ON
344.4444 4.
TEMP
Set
°C°C
FLAP
40 %
TIMER
hd 1002End Sept.29 22 24
FAN
%0
%100ALARM
max444.4°C
auto+/- 0.0 K
min444.4°C
OOONNNNOONO
Manu
44.Sept
SETUP
Unit
IP address 255.145.136.225
Subnet mask 255.255.0.0
Alarm temp°C F
TWW TWBTimer modeSlide-in unit Grid Shelf
3. With the turn control, select the desired setting – in this example TWB.
Hauptschalter
>Zu der Typenbezeichnung gibt es momentan drei Entwurfsrichtungen, ich kann Ihnen noch nicht sagen, ob Memmert hierzu schon eine Entscheidung getro�en hat. Die hier gezeigt Variante, ist die von uns empfohlene Richtung.
UF 110PLUS
ON
344.4444 4.
TEMP
Set
°C°C
FLAP
40 %
TIMER
hd 1002End Sept.29 22 24
FAN
%0
%100ALARM
max444.4°C
auto+/- 0.0 K
min444.4°C
OOONNNNOONO
Manu
44.Sept
SETUP
Unit
IP address 255.145.136.225
Subnet mask 255.255.0.0
Alarm temp°C F
TWW TWBTimer modeSlide-in unit Grid Shelf
4. Save the setting by pressing the confirmation key.
Hauptschalter
>Zu der Typenbezeichnung gibt es momentan drei Entwurfsrichtungen, ich kann Ihnen noch nicht sagen, ob Memmert hierzu schon eine Entscheidung getro�en hat. Die hier gezeigt Variante, ist die von uns empfohlene Richtung.
UF 110PLUS
ON
344.4444 4.
TEMP
Set
°C°C
FLAP
40 %
TIMER
hd 1002End Sept.29 22 24
FAN
%0
%100ALARM
max444.4°C
auto+/- 0.0 K
min444.4°C
OOONNNNOONO
Manu
44.Sept
SETUP
Unit
IP address 255.145.136.225
Subnet mask 255.255.0.0
Alarm temp°C F
TWW TWBTimer modeSlide-in unit Grid Shelf
5. Select Max Alarm with the turn control.
Hauptschalter
>Zu der Typenbezeichnung gibt es momentan drei Entwurfsrichtungen, ich kann Ihnen noch nicht sagen, ob Memmert hierzu schon eine Entscheidung getro�en hat. Die hier gezeigt Variante, ist die von uns empfohlene Richtung.
UF 110PLUS
ON
344.4444 4.
TEMP
Set
°C°C
FLAP
40 %
TIMER
hd 1002End Sept.29 22 24
FAN
%0
%100ALARM
max444.4°C
auto+/- 0.0 K
min444.4°C
OOONNNNOONO
Manu
44.Sept
SETUP
Max Alarm 190 °C2/2

36
Menu functions
6. Accept the selection by pressing the confirmation key. The current settings are automatically highlighted.
Hauptschalter
>Zu der Typenbezeichnung gibt es momentan drei Entwurfsrichtungen, ich kann Ihnen noch nicht sagen, ob Memmert hierzu schon eine Entscheidung getro�en hat. Die hier gezeigt Variante, ist die von uns empfohlene Richtung.
UF 110PLUS
ON
344.4444 4.
TEMP
Set
°C°C
FLAP
40 %
TIMER
hd 1002End Sept.29 22 24
FAN
%0
%100ALARM
max444.4°C
auto+/- 0.0 K
min444.4°C
OOONNNNOONO
Manu
44.Sept
SETUP
Max Alarm 190 °C2/2
7. With the turn control, select the desired new trigger temperature - in this example 160 °C.
Hauptschalter
>Zu der Typenbezeichnung gibt es momentan drei Entwurfsrichtungen, ich kann Ihnen noch nicht sagen, ob Memmert hierzu schon eine Entscheidung getro�en hat. Die hier gezeigt Variante, ist die von uns empfohlene Richtung.
UF 110PLUS
ON
344.4444 4.
TEMP
Set
°C°C
FLAP
40 %
TIMER
hd 1002End Sept.29 22 24
FAN
%0
%100ALARM
max444.4°C
auto+/- 0.0 K
min444.4°C
OOONNNNOONO
Manu
44.Sept
SETUP
Max Alarm 160 °C2/2
8. Save the setting by pressing the confirmation key. The electronic temperature monitoring system will now be triggered when the actual temperature reaches 160 °C.
Hauptschalter
>Zu der Typenbezeichnung gibt es momentan drei Entwurfsrichtungen, ich kann Ihnen noch nicht sagen, ob Memmert hierzu schon eine Entscheidung getro�en hat. Die hier gezeigt Variante, ist die von uns empfohlene Richtung.
UF 110PLUS
ON
344.4444 4.
TEMP
Set
°C°C
FLAP
40 %
TIMER
hd 1002End Sept.29 22 24
FAN
%0
%100ALARM
max444.4°C
auto+/- 0.0 K
min444.4°C
OOONNNNOONO
Manu
44.Sept
SETUP
Max Alarm 160 °C2/2
7.3.4 Timer ModeFor universal ovens UN/UF and incubators IN/IF, you can choose if the timer (see page 25) should run setpoint-dependent or not – this determines if the timer should not start until a tolerance band of ±3 K around the set temperature is reached ( Fig. 22, B) or if it should start right after activation (A).
tTimer
tTimerAB°C
/°F
t
6 K
Fig. 22 Timer ModeA Timer independent of setpoint: Timer starts right after activationFig. 22 A Timer independent of setpoint: Timer starts right after activationFig. 22
B Timer setpoint-dependent: Timer does not start until tolerance band is reachedA Timer independent of setpoint: Timer starts right after activationB Timer setpoint-dependent: Timer does not start until tolerance band is reachedA Timer independent of setpoint: Timer starts right after activation
For sterilisers SN/SF, the timer is by default setpoint-dependent. To ensure that the required temperature is maintained for a sufficient period of time, this setting cannot be changed. If the temperature is no longer within the tolerance band, the sterilisation time is, for reasons of safety, restarted as soon as the required temperature is reached again. For uni-versal ovens UN/UF and incubators IN/IF, the timer is in this case interrupted and resumed as soon as the required temperature is reached again.

37
Menu functions
SettingSetting
1. Activate the SETUP display and select Timer mode with the turn control.
Hauptschalter
>Zu der Typenbezeichnung gibt es momentan drei Entwurfsrichtungen, ich kann Ihnen noch nicht sagen, ob Memmert hierzu schon eine Entscheidung getro�en hat. Die hier gezeigt Variante, ist die von uns empfohlene Richtung.
UF 110PLUS
ON
344.4444 4.
TEMP
Set
°C°C
FLAP
40 %
TIMER
hd 1002End Sept.29 22 24
FAN
%0
%100ALARM
max444.4°C
auto+/- 0.0 K
min444.4°C
OOONNNNOONO
Manu
44.Sept
SETUP
Unit
IP address 255.145.136.225
Subnet mask 255.255.0.0
Alarm temp°C F
TWW TWBTimer modeSlide-in unit Grid Shelf
2. Accept the selection by pressing the confirmation key. The adjustment options are automatically highlighted.
Hauptschalter
>Zu der Typenbezeichnung gibt es momentan drei Entwurfsrichtungen, ich kann Ihnen noch nicht sagen, ob Memmert hierzu schon eine Entscheidung getro�en hat. Die hier gezeigt Variante, ist die von uns empfohlene Richtung.
UF 110PLUS
ON
344.4444 4.
TEMP
Set
°C°C
FLAP
40 %
TIMER
hd 1002End Sept.29 22 24
FAN
%0
%100ALARM
max444.4°C
auto+/- 0.0 K
min444.4°C
OOONNNNOONO
Manu
44.Sept
SETUP
Unit
IP address 255.145.136.225
Subnet mask 255.255.0.0
Alarm temp°C F
TWW TWBTimer modeSlide-in unit Grid Shelf
3. With the turn control, select the desired setting – in this example Timer independent of setpoint ( ). ).
Hauptschalter
>Zu der Typenbezeichnung gibt es momentan drei Entwurfsrichtungen, ich kann Ihnen noch nicht sagen, ob Memmert hierzu schon eine Entscheidung getro�en hat. Die hier gezeigt Variante, ist die von uns empfohlene Richtung.
UF 110PLUS
ON
344.4444 4.
TEMP
Set
°C°C
FLAP
40 %
TIMER
hd 1002End Sept.29 22 24
FAN
%0
%100ALARM
max444.4°C
auto+/- 0.0 K
min444.4°C
OOONNNNOONO
Manu
44.Sept
SETUP
Unit
IP address 255.145.136.225
Subnet mask 255.255.0.0
Alarm temp°C F
TWW TWBTimer modeSlide-in unit Grid Shelf
4. Save the setting by pressing the confirmation key.
Hauptschalter
>Zu der Typenbezeichnung gibt es momentan drei Entwurfsrichtungen, ich kann Ihnen noch nicht sagen, ob Memmert hierzu schon eine Entscheidung getro�en hat. Die hier gezeigt Variante, ist die von uns empfohlene Richtung.
UF 110PLUS
ON
344.4444 4.
TEMP
Set
°C°C
FLAP
40 %
TIMER
hd 1002End Sept.29 22 24
FAN
%0
%100ALARM
max444.4°C
auto+/- 0.0 K
min444.4°C
OOONNNNOONO
Manu
44.Sept
SETUP
Unit
IP address 255.145.136.225
Subnet mask 255.255.0.0
Alarm temp°C F
TWW TWBTimer modeSlide-in unit Grid Shelf
7.3.5 Type of the slide-in unit (Grid or Shelf)Here, you have to set the type of the slide-in unit (grid or shelf) used. The selection Shelf ena-bles you to adjust the control function to the different air flow characteristics in the interior when using optional sliding shelves instead of the grids that are part of the standard delivery.
1. Activate the SETUP display and select Slide-in unit with the turn control.
Hauptschalter
>Zu der Typenbezeichnung gibt es momentan drei Entwurfsrichtungen, ich kann Ihnen noch nicht sagen, ob Memmert hierzu schon eine Entscheidung getro�en hat. Die hier gezeigt Variante, ist die von uns empfohlene Richtung.
UF 110PLUS
ON
344.4444 4.
TEMP
Set
°C°C
FLAP
40 %
TIMER
hd 1002End Sept.29 22 24
FAN
%0
%100ALARM
max444.4°C
auto+/- 0.0 K
min444.4°C
OOONNNNOONO
Manu
44.Sept
SETUP
Unit
IP adress 255.145.136.225
Subnet mask 255.255.0.0
°C °F
Timer mode
Alarm temp TWW TWB
Slide-in unit Grid Shelf
2. Accept the selection by pressing the con-firmation key. The adjustment options are automatically selected.
Hauptschalter
>Zu der Typenbezeichnung gibt es momentan drei Entwurfsrichtungen, ich kann Ihnen noch nicht sagen, ob Memmert hierzu schon eine Entscheidung getro�en hat. Die hier gezeigt Variante, ist die von uns empfohlene Richtung.
UF 110PLUS
ON
344.4444 4.
TEMP
Set
°C°C
FLAP
40 %
TIMER
hd 1002End Sept.29 22 24
FAN
%0
%100ALARM
max444.4°C
auto+/- 0.0 K
min444.4°C
OOONNNNOONO
Manu
44.Sept
SETUP
Unit
IP adress 255.145.136.225
Subnet mask 255.255.0.0
°C °F
Timer mode
Alarm temp TWW TWB
Slide-in unit Grid Shelf
3. With the turn control, select the desired setting – in this example Shelf.
Hauptschalter
>Zu der Typenbezeichnung gibt es momentan drei Entwurfsrichtungen, ich kann Ihnen noch nicht sagen, ob Memmert hierzu schon eine Entscheidung getro�en hat. Die hier gezeigt Variante, ist die von uns empfohlene Richtung.
UF 110PLUS
ON
344.4444 4.
TEMP
Set
°C°C
FLAP
40 %
TIMER
hd 1002End Sept.29 22 24
FAN
%0
%100ALARM
max444.4°C
auto+/- 0.0 K
min444.4°C
OOONNNNOONO
Manu
44.Sept
SETUP
Unit
IP adress 255.145.136.225
Subnet mask 255.255.0.0
°C °F
Timer mode
Alarm temp TWW TWB
Slide-in unit Grid Shelf

38
Menu functions
4. Save the setting by pressing the confir-mation key.
Hauptschalter
>Zu der Typenbezeichnung gibt es momentan drei Entwurfsrichtungen, ich kann Ihnen noch nicht sagen, ob Memmert hierzu schon eine Entscheidung getro�en hat. Die hier gezeigt Variante, ist die von uns empfohlene Richtung.
UF 110PLUS
ON
344.4444 4.
TEMP
Set
°C°C
FLAP
40 %
TIMER
hd 1002End Sept.29 22 24
FAN
%0
%100ALARM
max444.4°C
auto+/- 0.0 K
min444.4°C
OOONNNNOONO
Manu
44.Sept
SETUP
Unit
IP adress 255.145.136.225
Subnet mask 255.255.0.0
°C °F
Timer mode
Alarm temp TWW TWB
Slide-in unit Grid Shelf
7.4 Date and timeIn the TIME display, you can set the date and time, time zone and daylight savings.
1. Activate the time setting To do so, press the activation key on the right side of the TIME display. The display is enlarged and the first adjustment option (Date) automatically highlighted. On the right, the current settings are shown.
UFP 100
Date and time
TimeTime zoneDaylight savings
12.05.201212:00GMT +1
SETUP
SOUND
CALIBRATION
LANGUAGE
SETUP
SOUND
CALIBRATION
LANGUAGE
Date
If you want to change another setting – e.g. the time zone: Turn the turn control until the corresponding entry is highlighted.
Hauptschalter
>Zu der Typenbezeichnung gibt es momentan drei Entwurfsrichtungen, ich kann Ihnen noch nicht sagen, ob Memmert hierzu schon eine Entscheidung getro�en hat. Die hier gezeigt Variante, ist die von uns empfohlene Richtung.
UF 110PLUS
ON
344.4444 4.
TEMP
Set
°C°C
FLAP
40 %
TIMER
hd 1002End Sept.29 22 24
FAN
%0
%100ALARM
max444.4°C
auto+/- 0.0 K
min444.4°C
OOONNNNOONO
Manu
44.Sept
TIME
Time
Daylight savings
12.05.201212:00GMT +1
Date
Time zone
2. Accept the selection by pressing the confirmation key. The first value – in this case the day – is automatically highlighted in orange.
Hauptschalter
>Zu der Typenbezeichnung gibt es momentan drei Entwurfsrichtungen, ich kann Ihnen noch nicht sagen, ob Memmert hierzu schon eine Entscheidung getro�en hat. Die hier gezeigt Variante, ist die von uns empfohlene Richtung.
UF 110PLUS
ON
344.4444 4.
TEMP
Set
°C°C
FLAP
40 %
TIMER
hd 1002End Sept.29 22 24
FAN
%0
%100ALARM
max444.4°C
auto+/- 0.0 K
min444.4°C
OOONNNNOONO
Manu
44.Sept
TIME
TimeTime zoneDaylight savings
.05.201212:00GMT +1
Date 12
3. With the turn control, set the current day, e.g. 27.
Hauptschalter
>Zu der Typenbezeichnung gibt es momentan drei Entwurfsrichtungen, ich kann Ihnen noch nicht sagen, ob Memmert hierzu schon eine Entscheidung getro�en hat. Die hier gezeigt Variante, ist die von uns empfohlene Richtung.
UF 110PLUS
ON
344.4444 4.
TEMP
Set
°C°C
FLAP
40 %
TIMER
hd 1002End Sept.29 22 24
FAN
%0
%100ALARM
max444.4°C
auto+/- 0.0 K
min444.4°C
OOONNNNOONO
Manu
44.Sept
TIME
TimeTime zoneDaylight savings
.05.201212:00GMT +1
Date 27
4. Save the setting by pressing the confirmation key. The month is automatically highlighted. You can change it with the turn control.
Hauptschalter
>Zu der Typenbezeichnung gibt es momentan drei Entwurfsrichtungen, ich kann Ihnen noch nicht sagen, ob Memmert hierzu schon eine Entscheidung getro�en hat. Die hier gezeigt Variante, ist die von uns empfohlene Richtung.
UF 110PLUS
ON
344.4444 4.
TEMP
Set
°C°C
FLAP
40 %
TIMER
hd 1002End Sept.29 22 24
FAN
%0
%100ALARM
max444.4°C
auto+/- 0.0 K
min444.4°C
OOONNNNOONO
Manu
44.Sept
TIME
TimeTime zoneDaylight savings
. .201212:00GMT +1
Date 27 05
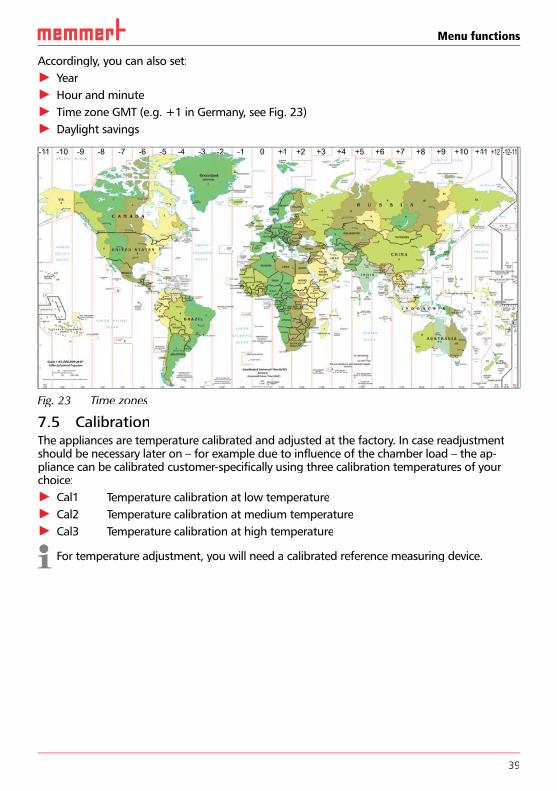
39
Menu functions
Accordingly, you can also set:► Year► Hour and minute► Time zone GMT (e.g. +1 in Germany, see Fig. 23 )► Daylight savings
-11 -10 -9 -8 -7 -6 -5 -4 -3 -2 -1 0 +1 +2 +3 +4 +5 +6 +7 +8 +9 +10 +11 +12 -12-11-11 -10 -9 -8 -7 -6 -5 -4 -3 -2 -1 0 +1 +2 +3 +4 +5 +6 +7 +8 +9 +10 +11 +12 -12-11
Fig. 23 Time zones
7.5 CalibrationThe appliances are temperature calibrated and adjusted at the factory. In case readjustment should be necessary later on – for example due to influence of the chamber load – the ap-pliance can be calibrated customer-specifically using three calibration temperatures of your choice:► Cal1 Temperature calibration at low temperature► Cal2 Temperature calibration at medium temperature► Cal3 Temperature calibration at high temperature
For temperature adjustment, you will need a calibrated reference measuring device.

40
Menu functions
CAL 1+0,5 K
CAL 3-0,8 K
CAL 2+2,6 K
180°C40°C 120°C0°C
factory calibration
Fig. 24 Schematic example of temperature adjustment
Example: Temperature deviation at 120 °C should be corrected.
1. Activate the adjustment setting. To do so, press the activation key on the right side of the CALIB display. The display is enlarged and the first calibration temperature – in this case 40 °C – automatically highlighted.
UFP 100
Cal1 °C -0,2 K
Cal2 100.0 °C +0,1 K
Cal3 180.0 °C -0,2 K
JUSTIEREN
Temperatur
PROGRAM
TIME USER ID
PROTOCOLPROGRAM
TIME USER ID
PROTOCOL
letzte Justierung 12.10.2012 12:00
40.0C K0,2-C K0,1+C K0,2-
Calibration
Temperature
Last updated 12.10.2012 12:00:00
Cal1
Cal2
Cal3
100.0
180.0
40.0
2. Press the confirmation key repeatedly, until the calibration temperature Cal2 is selected.
Hauptschalter
>Zu der Typenbezeichnung gibt es momentan drei Entwurfsrichtungen, ich kann Ihnen noch nicht sagen, ob Memmert hierzu schon eine Entscheidung getro�en hat. Die hier gezeigt Variante, ist die von uns empfohlene Richtung.
UF 110PLUS
ON
344.4444 4.
TEMP
Set
°C°C
FLAP
40 %
TIMER
hd 1002End Sept.29 22 24
FAN
%0
%100ALARM
max444.4°C
auto+/- 0.0 K
min444.4°C
OOONNNNOONO
Manu
44.Sept
C K0,2-C K0,1+C K0,2-
JUSTIEREN
Temperature
Last adjustment 12.10.2012 12:00
Cal1
Cal2
Cal3
180.0
40.0
100.0
3. With the turn control, set the calibration temperature Cal2 to 120 °C.
Hauptschalter
>Zu der Typenbezeichnung gibt es momentan drei Entwurfsrichtungen, ich kann Ihnen noch nicht sagen, ob Memmert hierzu schon eine Entscheidung getro�en hat. Die hier gezeigt Variante, ist die von uns empfohlene Richtung.
UF 110PLUS
ON
344.4444 4.
TEMP
Set
°C°C
FLAP
40 %
TIMER
hd 1002End Sept.29 22 24
FAN
%0
%100ALARM
max444.4°C
auto+/- 0.0 K
min444.4°C
OOONNNNOONO
Manu
44.Sept
C K0,2-C K0,1+C K0,2-
JUSTIEREN
Temperature
letzte Kalibrierung 12.10.2012 12:00
Cal1
Cal2
Cal3
180.0
40.0
120.0
4. Save the setting by pressing the confirmation key. The corresponding calibration value is automatically highlighted.
Hauptschalter
>Zu der Typenbezeichnung gibt es momentan drei Entwurfsrichtungen, ich kann Ihnen noch nicht sagen, ob Memmert hierzu schon eine Entscheidung getro�en hat. Die hier gezeigt Variante, ist die von uns empfohlene Richtung.
UF 110PLUS
ON
344.4444 4.
TEMP
Set
°C°C
FLAP
40 %
TIMER
hd 1002End Sept.29 22 24
FAN
%0
%100ALARM
max444.4°C
auto+/- 0.0 K
min444.4°C
OOONNNNOONO
Manu
44.Sept
C K0,2-C K
C K0,2-
JUSTIEREN
Temperature
letzte Kalibrierung 12.10.2012 12:00
Cal1
Cal2
Cal3
180.0
40.0
120.0 0,1+

41
Menu functions
5. Set the calibration value to 0.0 K and accept the setting by pressing the confirmation key.
Hauptschalter
>Zu der Typenbezeichnung gibt es momentan drei Entwurfsrichtungen, ich kann Ihnen noch nicht sagen, ob Memmert hierzu schon eine Entscheidung getro�en hat. Die hier gezeigt Variante, ist die von uns empfohlene Richtung.
UF 110PLUS
ON
344.4444 4.
TEMP
Set
°C°C
FLAP
40 %
TIMER
hd 1002End Sept.29 22 24
FAN
%0
%100ALARM
max444.4°C
auto+/- 0.0 K
min444.4°C
OOONNNNOONO
Manu
44.Sept
C K0,2-C K
C K0,2-
Calibration
Temperature
letzte Kalibrierung 12.10.2012 12:00
Cal1
Cal2
Cal3
180.0
40.0
120.0 0,0
6. Position the sensor of a calibrated reference instrument centrally in the appliance's working chamber.
7. Close the door and, in manual mode, adjust the set temperature to 120 °C.
21.4°C
TEMP
120.0 °CSet
8. Wait until the appliance reaches the set temperature and displays 120 °C. The reference instrument for example displays 122.6 °C. 120.0°C
TEMP
Set 120.0°C
122.6 °C
9. In the SETUP, adjust the calibration value Cal2 to +2.6 K (actual value measured minus setpoint temperature) and save the setting by pressing the confirmation key.
Hauptschalter
>Zu der Typenbezeichnung gibt es momentan drei Entwurfsrichtungen, ich kann Ihnen noch nicht sagen, ob Memmert hierzu schon eine Entscheidung getro�en hat. Die hier gezeigt Variante, ist die von uns empfohlene Richtung.
UF 110PLUS
ON
344.4444 4.
TEMP
Set
°C°C
FLAP
40 %
TIMER
hd 1002End Sept.29 22 24
FAN
%0
%100ALARM
max444.4°C
auto+/- 0.0 K
min444.4°C
OOONNNNOONO
Manu
44.Sept
C K0,2-C K
C K0,2-
JUSTIEREN
Temperature
letzte Kalibrierung 12.10.2012 12:00
Cal1
Cal2
Cal3
180.0
40.0
120.0 2,6+
10. After the calibration procedure, the temperature measured by the reference instrument should now also be 120 °C. 120.0°C
TEMP
Set 120.0°C
120.0 °C
With Cal1, a calibration temperature below Cal2 can be programmed accordingly, and with Cal3, a temperature above. The minimum difference between the Cal values is 20 K for univer-sal ovens UN plus/UF plus as well as sterilisers SN/SF and 10 K for incubators IN/IF.
If all calibration values are set to 0.0 K, the factory calibration settings are restored.

42
Sterilisers SF/SN
8. Sterilisers SF/SN
8.1 Intended useThe SF/SN appliance serves for sterilising medical material through dry heated air at atmospheric pressure.
8.2 Note in accordance with Medical Devices DirectiveThe product lifetime as intended by the manufacturer is eight years.
8.3 Guidelines for sterilisationFor hot air sterilisation, there are different guidelines on the temperature and sterilisation time to choose, as well as on packaging the sterilisation load. The values to be chosen depend on the type and characteristics of the load to be sterilised and on the type of germs to be neutralised. Before beginning sterilisation, make yourself familiar with the sterilisation method laid down for your application.Process parameters for hot air sterilisers are temperature and minimum hold time. The following process parameters have been defined in recognised standards:► According to WHO: 180 °C with a minimum hold time of 30 min► According to the European Pharmacopoeia: 160 °C with a minimum hold time of 120 minFor the inactivation of endotoxin (pyrogenes), dry heat of at least 180 °C can be applied. For the depletion of pyrogenic substances, you have to keep a combination of temperature and time going beyond the requirements of sterilisation.Inactivation of endotoxin is possible using the following process parameters (data in accordance with ISO 20857:2010):► 180 °C with a minimum effective time of 180 min► 250 °C with a minimum effective time of 30 min
Caution: The temperature and time requirements normal for hot air sterilisation do not destroy endotoxins.
Especially when the appliance is heavily loaded, using these parameters without checking them will not be sufficient. For safe sterilisation, validation of the individual sterilisation process is required. The requirements for the validation of sterilisation by dry heat are e.g. defined in standard ISO 20857:2010. Also valuable is the "guideline on validation and routine monitoring of sterilisation processes using dry heat for medical products" issued by the German Society for Hospital Hygiene (DGKH).

43
Maintenance and service
9. Maintenance and service
9.1 CleaningWarning!Danger of injury by electric shock. Before any cleaning work, pull out the mains plug.
Warning!In case of appliances of a certain size, you can get accidentally locked in, which is life-threatening. Do not climb into the appliance!
9.1.1 Working chamber and metal surfacesRegular cleaning of the easy-to-clean working chamber prevents build up of material remains that could impair the appearance and functionality of the stainless steel working chamber over time.The metal surfaces of the appliance can be cleaned with normal stainless steel cleaning agents. Make sure that no rusty objects come into contact with the working chamber or with the stainless steel housing. Rust deposits can lead to an infection of the stainless steel. If rust spots should appear on the surface of the working chamber due to impurities, the affected area must be immediately cleaned and polished.
9.1.2 Plastic partsDo not clean the ControlCOCKPIT and other plastic parts of the appliance with caustic or solvent-based cleaning agents.
9.1.3 Glass surfacesGlass surfaces can be cleaned with a commercially available glass cleaner.
9.2 Regular maintenanceOnce a year, grease the moving parts of the doors (hinges and lock) with thin silicone grease and check that the hinge screws are not loose.
9.3 Repairs and service
Warning!After removing covers, live parts may be exposed. You may receive an electric shock if you touch these parts. Disconnect the mains plug before removing any covers. Any work inside the appliance may only be performed by qualifi ed electricians.
Repairs and service work are described in a separate service manual.
44
Storage and disposal
10. Storage and disposal
10.1 StorageThe appliance may only be stored under the following conditions:► in a dry and enclosed, dust-free room► frost-free► disconnected from the power supply
10.2 DisposalThis product is subject to the Directive 2002/96/EC on Waste Electrical and Electronic Equipment (WEEE) of the European Parliament and of the Council. This appliance has been brought to market after August 13th, 2005 in countries which have already integrated this directive into their national laws. It may not be disposed of in normal household waste. For disposal, please contact your dealer or the manufacturer. Any appliances that are infected, infectious or contaminated with materials hazardous to health are excluded from return. Please also observe all other regulations applicable in this context.Note for Germany:Note for Germany:The appliance may not be left at public or communal recycling or collection points.

45
Index
Index
AAccessories 15Activation key 24Adjustment 39Air flap position 25Air supply 11Alarm 35Alarm temperature 35Ambient conditions 14Ambient temperature 15Appliance error 30AtmoCONTROL 3, 12, 15
BBasic device settings 31Basic settings 31
CCalibration 39Carrying 16Cause of errors 30Chamber load 22Changes 9Cleaning 43Communication interfaces
12Compensation correction
value 41Connections 12ControlCOCKPIT 23Convection 11Customer service 2
DDate and time 38Daylight savings 39Decommissioning 44Delivery 16, 20, 42Dimensions 14Disposal 44Door 21
EElectrical connection 12Electrical connections 20Electronic temperature moni-
toring 26Emergency 9Ending operation 28Error description 30Error message 30Error messages 29Explosion protection 8
Ffactory calibration 41Fan speed 25Forklift truck 16Function 11
GGMT 39Graph 28Grid 37
HHazards 7
IInstallation site 17Intended use 8Interfaces 12IP address 33
LLanguage selection 32Loading the appliance 22Log memory 30
MMaintenance 43Malfunctions 9, 29Manufacturer 2Material 11
Mechanical temperature monitoring 28
Medical Devices Directive 42Menu 31Minimum clearances 17
NNameplate 12Network 12, 33Normal mode 24, 25
OOperating 21Operating modes 24Operating personnel 7, 21Operating problems 30Operation 21
PPackaging material 16Power failure 30Product safety 7Putting into operation 20,
42
RRectifying errors 30Regular maintenance 43
SSafety regulations 6Service 43Servicing 43Setting parameters 24, 32Setting up 16, 17Setup 33Shelf 37Slide-in unit 37Sterilisers 3, 21, 26, 36, 42Storage after delivery 17Switching off 28Switching on 20

46
Index
TTB 28Technical data 13Temperature 25Temperature comparison 39Temperature deviation 40Temperature limiter 28Temperature monitoring 26,
35Time 37, 38Timer mode 36Timer operation 25Time zone 39Transport 16Transport damage 16Turn control 24TWB 26TWW 26
UUnit 34Unpacking 16
WWarning messages 12, 29Weight 13


15.06.2012HPP/IPPplus deutsch
D24029
Memmert GmbH + Co. KGWilli-Memmert-Straße 90-96 | D-91186 BüchenbachTel. +49 9122 925-0 | Fax +49 9122 14585E-Mail: [email protected]/memmert.familyDie Experten-Plattform: www.atmosafe.net
Universal ovens
Incubators
Sterilisers
24.05.2013
D24022 // englisch