understanding the eos m6 mark ii · 2020-04-24 · reproduction, hiring, lending prohibited....
TRANSCRIPT

A fast track guide to understanding how to use the EOS M6 Mark II’s key controls and functions
Contents include:
• Exposure modes
• Camera layout
• Menu options
• Key camera overrides
• Feature use
• Customisations
Understanding the EOS M6 Mark II
Written by Nina BaileyEspecially written for Canon EOS users

22
Written, designed and images by
Nina Bailey
www.ninabailey.co.uk
Produced by Nina Bailey © 2020. All rights reserved. Unauthorised copying, reproduction, hiring, lending prohibited. E&OE.
The EOS M6 Mark II is a well specified mirrorless body that is light and compact, and has an optional electronic viewfinder available for ease of use. This model has a wide range of features, many of which will be very familiar to photographers that have used the DSLR EOS models. Yet as similar as it is, it is quite different in operation, with a very different viewing and focusing system.
Designed to be ultra small and light and with its own range of EF-M lenses, also designed for compactness and light weight, the camera also has an adaptor that allows it to take the extensive range of EF and EF-S lenses, making it an attractive compact option for those that already have these lenses.
This book will look at all of the key features that are found on this model and explain what they do and how they can be used. It is designed to present the information in a much more accessible way than is found in the manual and is liberally illustrated throughout with screen images and also images to show what the features actually do to the images that you take. The camera is very versatile and can tackle most types of photography easily as it has an extensive range of overrides that will enable you to cope in almost any shooting conditions.
There is also a companion Pocketbook available to provide a small A6 size 40 page guide that is easy to take with you when shooting to help you remember how to set the key features on the camera. This is available from the EOS magazine shop.
Click here to find out more about the range of Pocketbooks or go to www.eos-magazine-shop.com and click on the links for books.
About this book PREVIEW
EDITION

33
About the author
Nina started her career in the retail sector of the photographic industry and then moved to Canon UK where she had a successful nine years looking after training, exhibitions and marketing both in the UK and also within Europe. This gave Nina an unrivalled
knowledge of not only the Canon EOS system but also how to develop and enhance the skills of photographers of all ability levels.
Nina started her own business in 1999, concentrating on training for amateur photographers. As well as developing the online training academy and direct training of photographers, Nina is a prolific professional photographer producing images not only for the EOS Training Academy but for a variety of outside organisations. In 2014 Nina started producing her own range of ebooks to bring photography training to an ever wider audience. In 2017 Nina also launched a range of printed compact pocket books for the EOS range.
Nina started taking images when she was very young and is still a very keen photographer both professionally and personally. Nina loves travel, landscape and wildlife photography and still shoots commercially within the travel photography market.
Some of the test images shot on the EOS M6 Mark II whilst producing the books on the EOS M6 Mark II showing the great images that can be achieved. These images are straight out of the camera, shot as a JPEG files and have had no postproduction done to them.
PREVIEW
EDITION

44
Contents
Displays options 7 Feature and mode guides on the EOS M6 Mark II 8 Key setting options 9 What each option does 10 Basic Camera Layout 11 Rear camera controls 12 Top camera controls 13 Rear camera controls 14 Touch controls 15 Touch shutter 16 Viewing options 17 M6 Mark II power saving options 18 Other display options 19 Shooting information display 20 Screen information 22 Understanding Key Settings 23 Understanding the shooting modes 24 What ISO means and controls 25 What shutter speeds mean and control 26 What the aperture does and controls 27 What the lenses you use control 28 Lens jargon and terminology 29 Explanation of sensor size 32Understanding Exposure Modes 33 Focus lock - an essential control 34 Auto plus or scene intelligent auto 35 Hybrid Auto mode 39 Scene or SCN modes 39 SCN mode usage - Self Portrait 40 SCN mode usage - Key override controls 41 SCN mode usage - Portrait 42 SCN mode usage - Smooth skin 43 SCN mode usage - Landscape 44 SCN mode usage - Sports 45 SCN mode usage - Panning 46 SCN mode usage - Close up 47 SCN mode usage - Food 48 SCN mode usage - Night portrait 49 SCN mode usage - Handheld night scene 50 SCN mode usage - HDR Backlight control 51 Creative filters 52 Creative filter effects - Grainy black and white 53 Creative filter effects - Soft focus 54
Creative filter effects - Fish eye effect 55 Creative filter effects - Art bold effect 56 Creative filter effects - Water painting effect 57 Creative filter effects - Toy camera effect 58 Creative filter effects - Miniature effect 59 Creative filter mode - About the HDR options 60 Creative modes 61 P - Program mode 62 Understanding when to use TV mode 63 How to use TV mode 64 Understanding when to use AV mode 65 How to use AV mode 66 ISO speed settings 67 ISO speed settings - Manual options 68 ISO speed settings - Auto options 69 ISO speed settings - Min shutter speed - Auto 70 ISO speed settings - Min shutter speed - Manual 71 M - Manual mode 72 B - BULB mode 74 Bulb timer 74 FV mode 75 Setting options in FV mode 76 Using FV mode - Like P mode 78 Using FV mode - Like TV mode 79 Using FV mode - Like AV mode 80 Using FV mode - Like M mode With Auto ISO 81 Using FV mode - Exposure compensation settings 82 Using FV mode - Like M mode 83 FV mode summary 84 Custom shooting mode 85 Movie mode 86Understanding the settings we use 87 About the settings we use in photography 88 ISO - What it sets and how to use it 89 I SO comparison 90 ISO Auto options 91 About the high ISO settings 92 Exposure settings - Shutter speeds and their usage 93 All about slow shutter speeds 94 General shutter speeds 96 Using the high shutter speeds 97 Shutter speed on high resolution models 98 Apertures - what they are and how to use them 99
What do the aperture numbers mean 101 Depth of field 102 Depth of field - Focal length effect 103 Depth of field - Portraits and framing 105 Depth of field - Apertures and their effect 106 Depth of field - Background distances 108 Exposure settings - putting the settings together 111Autofocus controls 113 About focusing on the EOS M6 Mark II 114 Focusing methods 115 Face detection + tracking 116 Face detection + tracking with eye detection 117 Improvements in eye detection 118 Spot AF 119 1 point AF 120 Touch and drag AF - Only if viewfinder is attached 121 Zone AF 122 Focusing mode - One Shot AF 123 Focusing mode - Servo AF 124 Focusing custom functions 125 C.FN II - 1 Limit AF methods 125 C.FN II - 2 Orientation linked AF point 125 C.FN II - 3 Initial servo AF point for face detection + tracking 126 Focusing mode - Manual focusing 127 Focusing mode - MF Peaking settings 128 Key camera overrides 129 Understanding the Q screen display 130 Understanding the shooting display 133 Why these controls are so important 134 Camera overrides and RAW processing 135 Image quality and file formats 136 New - CRAW format 138 RAW vs JPEG shooting 139 File formats - RAW 140 File formats - JPEG 141 RAW vs JPEG - Which is best 143 Exposure compensation - correcting brightness 144 Quick setting of exposure compensation 145 AEB - Auto Exposure Bracketing 146 Custom functions affecting bracketing and exposure 148 C.FN I - 5 Number of bracketed shots 148 C.FN I - 4 Exposure bracketing sequence 149 C.FN I - 3 Exposure bracketing auto cancel 149
PREVIEW
EDITION

55
Contents C.FN I - 1 Exposure level increments 149 C.FN I - 2 ISO speed increments 149 AE Lock 150 Custom function affecting AE Lock 151 About Picture Styles 152 Auto picture style 154 Standard picture style 155 Portrait picture style 156 Landscape picture style 157 Fine detail picture style 158 Neutral picture style 159 Faithful picture style 160 Monochrome picture style 161 White balance system and overrides 162 White balance - AWB options 163 About the K values 165 White balance - WB preset options 166 Custom white balance 169 The K setting 171 White balance shift 172 White balance bracketing 173 Auto lighting optimizer 174 Metering - measuring the light 176 Understanding metering 177 What we see versus what we get 179 AE Lock - how to use it 181 Evaluative metering 182 Understanding partial metering 183 Understanding spot metering 183 Understanding centerweighted metering 184 Drive settings 185 Anti flicker shoot 186 Aspect ratio settings 187 Key settings summary 188Image processing options 189 DLO - Digital lens optimization 190 DLO - Problems with third party software 191 Peripheral illumination correction 193 Distortion correction 194 Chromatic aberration correction 195 Diffraction correction 196 RAW Burst mode 197 Saving RAW burst images on the camera 198
Saving RAW burst images in DPP 199 Shutter modes 202 Highlight tone priority 203 High ISO noise reduction 205 High ISO noise reduction examples 206 Multi shot noise reduction 207 Multi shot noise reduction examples 208 Long exposure noise reduction 209 HDR Mode 211 HDR Mode - When it works best 214 F ocus Bracketing 215 Focus bracketing lens compatibility 217 Focus bracketing settings 218 Focus bracketing shooting techniques 220 Merging Focus bracketing images in DPP 221 The Depth compositing editing tool 225 Depth compositing summary 226 The Menu System 227 Menu navigation 228The Shoot Menu 229 Shoot 1 menu 230 Image quality Still image aspect ratio Image review Lens aberration correction Flash control Drive mode RAW Burst mode Shoot 2 menu 231 Expo.Comp/AEB ISO speed settings Camera ISO speed settings Movie Auto lighting optimizer Highlight tone priority Shoot 3 menu 231 Metering mode Metering timer Expo. simulation Shoot 4 menu 232 White balance Custom white balance WB Shift/Bracket Colour space
Picture style About colour spaceShoot 5 menu 233 Long exposure noise reduction High ISO speed noise reduction Dust delete data HDR Mode Focus bracketingShoot 6 menu 234 Touch shutter Shutter mode Interval timer Bulb timer Anti flicker shootShoot 7 menu 236 AF operation AF method Eye detection AF Continuous AF Lens electronic AF AF Assist beam firing Shoot 8 Menu 237 MF Peaking settings IS settings Movie Auto levelShoot 9 menu 237 Movie record size Sound recording Movie servo AF Auto slow shutterPlayback Options / Menus 238 Playback options and controls 239 The playback Q button options 240Playback 1 menu 242 Protect images Rotate ErasePlayback 1 continued 243 Print order Photobook set up Creative filtersPlayback 2 menu 244 RAW image processing
PREVIEW
EDITION
66
Creative assist Quick control RAW image processing Playback 2 continued 245 Red eye correction Create album Cropping ResizePlayback 3 menu 246 Rating Slide show Set image search conditions Image jump with main dialPlayback 4 menu 247 Playback information display Highlight alert AF point displayPlayback 4 menu continued 248 Playback grid View from last seen Magnification (apx) How to see the image settings on a computer 249 Canon software that you need 250Network menu 251 Introduction to Wi-Fi functions 252 Connecting to a smart phone - Bluetooth connection 252 About the Canon Camera Connect app 254 Connection to a computer 256 About Wi-Fi options 258 The Set Up Menus 259Set up 1 menu 260 Select folder File numbering Auto rotate Format card Mode guide Feature guide Set up 2 menu 261 ECO mode Power saving Disp. brightness Date/Time/Zone Language Video system
Sensor cleaningSet up 3 menu 262 Touch operation Beep HDMI resolution HDMI HDR output Shutter button function for movies AF/MF switch Set up 4 menu 263 Shooting information display Display performance Reverse display Help text size Set up 5 menu 264 Custom shooting mode Reset camera Copyright informationSet up 5 menu continued 265 Manual/software URL Certification logo display Firmware Firmware updating 266The custom function menus 267 About custom functions 268 Custom function menus 268 The My Menu Options 271 The My Menu options 272Camera customisations 274 Custom controls 275 Where the buttons are located to customise - Top 276 Where the buttons are located to customise - Rear 277 How to set the options 278 Custom control table 279 What the icons set and why 280 Customising dials 286 Customisation summary 287Using the built in flash 288 Flash and the EOS M6 Mark II 289 Understanding using flash 290 Changes in the flash system 291 Exposure modes and flash 292 Exposure modes ISO and flash 293 The flash control menus 294
Basic movie shooting 296 Basic movie shooting 297 Movie Q screen options 299 Movie Creative filter options 300 Movie shoot 1 menu 302 Movie rec size Sound recording Lens aberrations Movie shoot 1 menu continued 303 Remote control Time lapse movie Video snap shotMovie Shoot 2 menu 304 Movie ISO speed setting Metering timerMovie shoot 3,4,5 menu 304 IS settings Auto level HDMI DisplayMovie shoot 6 menu 305 Movie servo AF Movie servo AF track sens Movie servo AF speed Auto Slow shutter Movie summary 306 Other produces and services 307
Contents PREVIEW
EDITION

77
Displays options
PREVIEW
EDITION

88
Feature and mode guides on the EOS M6 Mark II
The EOS M6 Mark II has some features designed to make its operation easier for the newcomer to photography.
The EOS M6 Mark II as supplied in the box will have the Mode guide and the Feature guide enabled by default. This makes the camera much more user friendly to use and prevents common errors occurring when shooting.
The mode guide (image bottom left) will display brief descriptions of the mode at the time you turn the mode dial on the top of the camera. Plus there will be options on some of the screens to show more detailed information about what that mode actually does. Although useful at first it can quickly become irritating and so there is the option to turn it to disable within the Menu. To do this press the menu button on the rear of the camera, tap on the set up menu (Yellow tab) at the top and go to the sub tab that has a 1 on it. It should appear by default once in the Set up menu. Then tap on the mode guide and then tap the disable option.
The feature guide (image bottom right) will bring up a box that tells you briefly what the feature that is highlighted within the setting you have highlighted when using the Q button options regardless of the setting screen that you are using. It is worth leaving these on whilst learning the camera as they will give you helpful tips whilst out and about shooting. However, very quickly they can become annoying and so the option to turn them off is immediately below the mode guide options and is turned off as described above, except by picking the feature guide option.
PREVIEW
EDITION
99
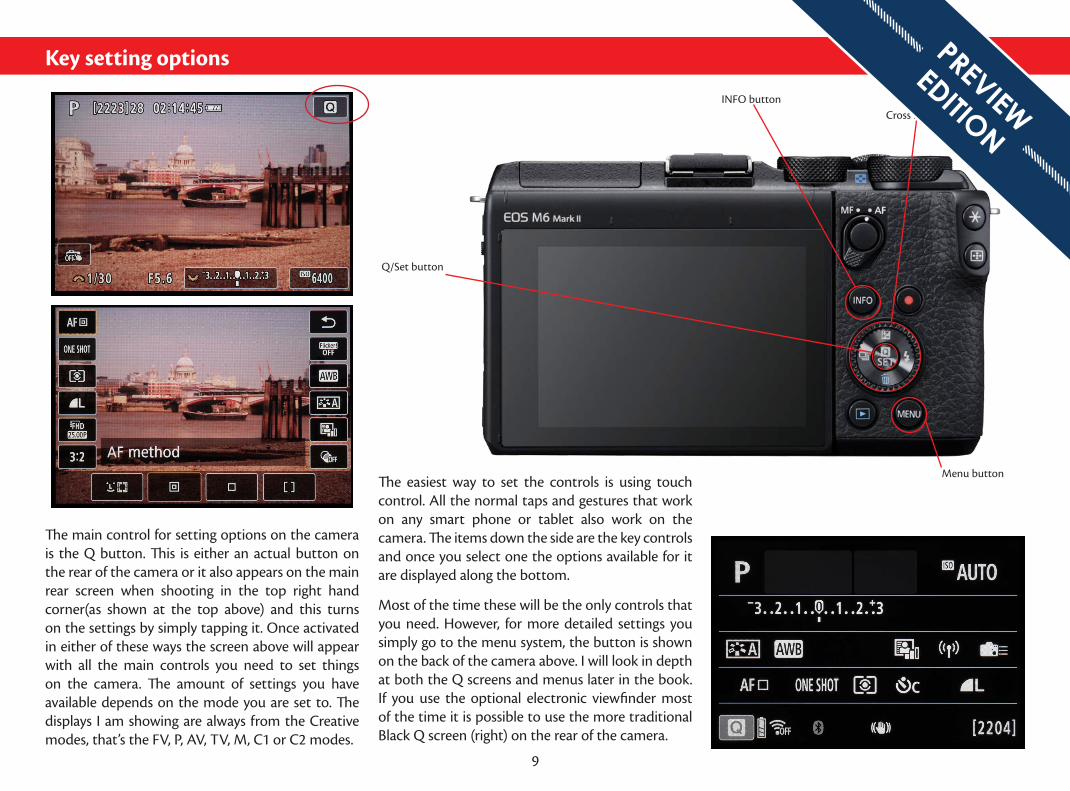
Key setting options
The main control for setting options on the camera is the Q button. This is either an actual button on the rear of the camera or it also appears on the main rear screen when shooting in the top right hand corner(as shown at the top above) and this turns on the settings by simply tapping it. Once activated in either of these ways the screen above will appear with all the main controls you need to set things on the camera. The amount of settings you have available depends on the mode you are set to. The displays I am showing are always from the Creative modes, that’s the FV, P, AV, TV, M, C1 or C2 modes.
The easiest way to set the controls is using touch control. All the normal taps and gestures that work on any smart phone or tablet also work on the camera. The items down the side are the key controls and once you select one the options available for it are displayed along the bottom.
Most of the time these will be the only controls that you need. However, for more detailed settings you simply go to the menu system, the button is shown on the back of the camera above. I will look in depth at both the Q screens and menus later in the book. If you use the optional electronic viewfinder most of the time it is possible to use the more traditional Black Q screen (right) on the rear of the camera.
Menu button
Cross keys
Q/Set button
INFO button
PREVIEW
EDITION

1010
What each option displaysThe INFO button is an important button as it changes the information you are seeing on the rear screen or in the optional viewfinder.
Each time you press the INFO button on the rear of the camera it will enable a different variation of the display that you are seeing. The displays can range from no information at all to lots of details including levels and live histograms. Be aware that the AF method that you are using may affect how many of the displays you are able to use. The information on the displays and how many options there are can be changed in the Set up menu which I look at later.
One of the options that can be brought up is a black Q screen. If you are using the camera without the electronic viewfinder this does not really make sense to use as you are preventing yourself seeing the image. However, if you use the electronic viewfinder all the time then this can make a lot of sense, especially if you have used the Canon DSLR range as it gives you a familiar setting screen which is almost identical to the ones that you have used before.
If playing back images there again is a choice of displays that can be used, again changed by pressing the INFO button on the rear of the camera.
The Q button on the rear of the camera also works in the playback mode and will display options that you can use to control the image when playing back as shown immediately right.
Far right is the normal Q screen when using the rear screen display. It is important to be good at using these controls to successfully use the camera.
SHOOTING DISPLAYS
PLAYBACK DISPLAYS
PREVIEW
EDITION

1111
Basic Camera Layout
PREVIEW
EDITION

1212
Rear camera controlsIt is important to understand the controls on any camera as this will help you set the controls quickly and efficiently. If you have used any DSLR EOS models the controls will look very familiar but be aware that there are a number of differences in how many of the controls operate.
AE LOCK BUTTON (Press to lock the exposure. In Evaluative metering with One Shot AF, the exposure locks automatically at the same time as the focusing with a half-press of the shutter button. Using this button separates out their operation. Use also to lock Spot or Partial metering onto the correct area.
AF POINT SELECTION BUTTON This allows selection of your chosen focusing method. Prompts are shown on-screen after pressing the currently selected AF area icon on-screen or the M-Fn button.
MOVIE SHOOTING BUTTON Starts and stops video recording when in any shooting mode or when using Movie mode.
MENU BUTTON Press to access the camera’s menu system where many options are set.
PLAYBACK BUTTON Will show the most recently taken image; use the Cross keys to scroll.
BUILT-IN FLASH Turned on using slider on side of the camera body. Once popped up, the operation
of the flash is controlled via the flash button on the Cross keys (opposite) and via the SHOOT1 menu.
AF-ON BUTTON When pressed this activates the focusing and metering (like the shutter button).
The use of this for focusing when shooting in Servo AF is often referred to as back button focusing.
Note that the button is not labelled on the camera – the button is positioned inside the AF/MF switch.
AF/MF SWITCH This switches between AF (autofocus) and MF (manual focus).
INFO BUTTON Toggles between displays when the camera is active. Five displays available,
which are all enabled by default. Additionally, pressing the INFO button does as follows when in
certain screens: when in the menu it allows you to jump between the main menu tabs; it brings up additional information and settings when it
appears as a prompt on-screen (right); it gives you different information displays during playback.
REAR SCREEN Image and settings can be viewed here; screen can be tilted for use at low angles and taken through 180º so that you can see yourself if shooting selfies or vlogging.
PREVIEW
EDITION

1313
Top camera controls
SHUTTER BUTTON Half-pressure activates focusing and metering. Same half-press escapes from playback and menus. Fully depress to take the image.
MAIN DIAL Turn to adjust shutter speed or aperture within relevant shooting mode. Can also change settings on Q screen.
M-FN BUTTON A multi-functional button which brings up a specified function on the rear screen. The default function is the ISO setting. As with most buttons it can be customised.
QUICK CONTROL DIAL A multi-functional dial which has a number of different uses. It can be used to set exposure compensation in Program, Tv
and Av modes when the camera is active. (Note that exposure compensation remains set even when you turn off the camera – there is no automatic reset.) In Fv mode use the Quick Control Dial to scroll between settings, then the Main Dial to change the relevant value. When setting functions on the Q screen, the Quick Control Dial will adjust settings for the highlighted function. During playback turning this dial activates the zoom/magnify function.
ON/OFF SWITCH Can be left on during a shoot as the camera goes onto standby after one minute to save power – to wake the camera up press the shutter button.
DIAL FUNCTION BUTTON Press to bring up a range of options on rear screen or in the viewfinder (if attached). Defaults are ISO, Drive, AF mode, White balance and flash compensation settings. This button can be customised to bring up different functions (max. five), such as Exposure compensation, AF method, metering and Picture Style.
MANUAL FOCUS RING Turn to manually focus once AF/MF switch is
on MF (manual focus) position.
ZOOM RING (Only on zoom lenses, i.e. with variable focal length.) Turn to
adjust the focal length – to zoom in on the subject or pull further away.
LOCK BUTTON (Only on selected lenses.)Locks the zoom in place to
prevent the barrel moving when being carried. Must be unlocked to shoot.
LENS ALIGNMENT MARK
MODE DIAL Where you choose the shooting mode.
To attach a compatible lens (or adapter), line up
with the same mark on the camera body to mount the
lens. EF-M lenses – which natively fit the EOS M6
Mark II – have a white dot; EF and EF-S lenses – which can be attached via Mount
Adapter EF-EOS M – have a red dot and a white square
respectively.
LENS RELEASE BUTTON Push and hold this in to
unlock the mechanism, then turn the lens to release.
HOT SHOE Attach the optional Electronic
Viewfinder EVF-DC2 or an external Speedlite flash.
PREVIEW
EDITION

1414
Rear camera controls
CONTROL DIAL Rotate to scroll through menus and through images during playback.
CROSS KEYS Used for navigation within menus, with directional buttons for up, down, left, right. Each button also has a default function, as follows:
Exposure compensation. Drive setting. Flash setting. 1) Erase images in playback: 2) When shooting in
Fv mode, press to reset all settings back to Auto.
Q SET BUTTON Pressing this activates the Quick Set menu where the main settings are made. It’s also used within the menu system to apply settings; within the Q screen pressing it allows you to see a more detailed screen.
DIOPTRIC ADJUSTMENT A rotatable wheel to the rear of the rubber eyecup which you can use to adjust the sharpness to suit your eyesight.
The built-in contacts allow for two way communication with the camera, making it ‘hot’. To release it, press this button and
then slide off to remove.
PREVIEW
EDITION

1515
Touch controls
As we go though the book I will explain the manual navigation controls found on the EOS M6 Mark II, however, by far the easiest way to operate this model is using the touch controls that the camera offers.
Most of the key camera functions can be set directly on the screen on the rear of the camera, they are activated by pressing the Q/Set button, highlighted above. Once this is done a display will superimpose itself over the viewing screen (two top images) where you can select the items that you want to set by simply tapping on them and to choose the control you want, you simply tap on the option at the bottom of the screen. The display adapts to the mode that you are shooting in so if playing back you get different controls to shooting. Also the Exposure mode that you have selected on the top of the camera will control the number of options that you have and what they are.
The other options on the camera are set using the camera’s extensive menu system. Once again this adapts according to the mode that you are in and
when using the basic zone modes there will be far less items to select from. To bring up the menu simply press the menu button on the rear of the camera, also highlighted on the image to the left.
Once the menu is showing, (bottom two images above) tap on the tabs at the top to select the one that you want, tap the numbers underneath to choose which menu you want and then tap on the item that you want which will take you into another menu where you can select from the options shown.
Sometimes you simply tap on the item that you want, at other times once you select the item you want you will need to tap the SET or OK button at the bottom of the screen to confirm your choice.
If playing back images the normal swipe, stretch and pinch options commonly found on smart devices will also work to change, zoom in and zoom out on the images that you are viewing.
PREVIEW
EDITION

1616
Touch shutter
Every time I write one of these books I seem to be adding in additional pages, which are normally prompted by problems that I see whilst working out on events.
All of the mirrorless models have a feature called touch shutter. It’s not a new feature it’s been around since touch controls appeared. What it is designed to do is to turn on a system that when you tap on the screen indicating where you would like the camera to focus, once the camera has achieved focus on that subject the image is taken automatically.
The symbol is found on the screen of the camera and appears to be knocked by accident all too easily. I regularly see customers trying to tap to focus the camera and it keep firing and they do not understand what is causing it.
For me the symbol is fairly obvious, though it has been on the cameras for a number of years.
There are two symbols that you will see:
One shows the back of a camera with somebody tapping it with the word off by it, this indicates that the touch shutter is disabled.
The other is the back of a camera with a finger by it indicating that the touch shutter is enabled.
This option can also be turned on or off within the shoot 6 menu. However, there is no way to permanently disable the option, which is a shame given the amount of times it gets turned on by accident. The quick way to turn it off on and off is to simply tap on the symbol on the screen.
PREVIEW
EDITION

1717
Viewing options
VIEWFINDER This turns on automatically if the camera is switched on and not on standby when the camera is raised to you eye.
DIOPTRE ADJUSTMENT a ring that rotates that allows the viewfinder to be adjusted to your eyesight.
CAMERA SCREEN allows you to view and compose the image on the rear of the camera. Turns off automatically if you look through viewfinder.
The main viewing display on the EOS M6 Mark II is the rear screen. With its direct feed from the sensor, you get a live view of what you’ll be capturing, including real-time feedback from changes to camera settings. If you attach the electronic viewfinder, the same feed is viewable through the viewfinder.
The rear screen is tiltable through 180º and provides the means to view and compose your image on the rear of the camera, giving you a large view. The screen is turned on automatically when the camera is switched on (and when not on standby). If it goes to sleep, reactivate it by simply pressing the shutter button partway. This screen is normally used pushed flat against the camera, but it can be tilted out for low-angle work or flipped up.
When the EVF-DC2 is attached (see right), you get a similar level of information within the viewfinder display to what appears on the rear screen. Using the optional electronic viewfinder makes handling better, giving you a third point of contact when shooting handheld. It also makes finding subjects easier when using a longer lens and is far easier to see in bright light levels. When fitted, a number of extra viewfinder-related menu items are enabled – SETUP4 menu.
The viewfinder and screen cannot both be active at the same time. The viewfinder sensor will automatically pick up anything that’s within 5cm, so if your screen suddenly goes blank, check you’re not blocking the sensor.
The batteries on the EOS M6 Mark II are also quite small and lower capacity than many of the
batteries that we are used to within the larger EOS models, so it may come as a shock to those who are used to models such as the EOS 90D, 80D, 7 and 5 series models, just how quickly this camera can go through a battery on its normal default settings. Though it needs to be said that the M6 Mark II is lower on power consumption than the earlier M series models by a significant amount.
There are two ways to deal with the issues of the higher power consumption, the first is to simply invest in a spare battery or two depending on how much you shoot within a day. This works well providing you have access to charge the battery.
The second option, which if you shoot a lot of images, or have limited access to charging, is to understand and utilise the power saving options that the camera offers, which may be needed as well as several spare batteries.
PREVIEW
EDITION

1818
M6 Mark II power saving options
There are several different options that can be used to reduce the amount of power that is being used:
ECO MODE The displays consume a lot of power and one way to extend the life of the battery is to turn on the Eco Mode. This is found within the set up 2 menu. This has a simple on or off option. This is set to Off as a default.
If turned on this dims the display right down, after about 2 seconds when the camera is not in use. To bring up the full brightness display simply press the shutter button halfway. If this is turned on the power saving options are not available, which are the next item in the menu.
POWER SAVING These control the power down options and are also found within the set up 2 menu. Once you enter the menu you have three options. The Display Off controls how long before turning off the display and then the Auto Power Down governs how long after that the camera powers down. Both have a default of 1 minute. The Display Off can be set between 15 seconds and 10 minutes and the Auto Power Down can be set between 30 seconds and 10 minutes. There is also a option for the viewfinder which appears only if fitted.
Both options are quickly cancelled by pressing the shutter button halfway to reactivate the camera. As the camera is so quick to reactivate, these can be turned down to shorter periods if required and will help to extend the battery life. However the Eco Mode is probably going to give the greatest power saving. These other power saving options only work if the Eco Mode is turned off.
PREVIEW
EDITION

1919
DISPLAY PERFORMANCE This allows you to save power by turning the rear screen or viewfinder if fitted to a setting that consumes less power but which will not be as smooth. The default is the smooth setting that gives a smoother display but consumes more power.
Electronic viewfinders/Rear screens are very different to an optical viewfinder to use as they can have a slight lag as the display refreshes. If shooting static subjects this is not a problem and the power saving option can be used, but if shooting action or any type of moving subject it should be returned to the smooth setting.
VF DISPLAY FORMAT If the viewfinder is attached this allows you to choose between two options for the viewfinder display.
The default display offers a larger area for the image, which if you can get close enough to see it, makes the viewfinder appear to have a very large area. Display 2 gives a slightly smaller area, which may be easier to see right to the edge for those that need to wear glasses when shooting with the camera.
REVERSE DISPLAY This allows the display to reverse so that you can see the image exactly as taken when using the camera to take selfies with the screen flipped to 180o to allow you to operate the camera when looking at the front. If it is turned off then everything will be opposite to what you are doing, so if you raise your left hand it will appear to the right of you. Regardless of which option you choose, the images will still come out identically.
Other display options PREVIEW
EDITION

2020
This allows you to set up the options for how the rear screen and viewfinder are going to appear. The exact menu changes according to if the optional viewfinder is attached or not. If not, then any of the viewfinder options will vanish. When you tap on this menu item the camera will bring up another menu that has three items within it.
Shooting information display
SCREEN INFO. SETTINGS allows you to set the options that will display on the rear screen of the camera, the options that are enabled here are scrolled through by pressing the INFO button on the rear of the camera. Each press will advance to the next display setting.
You have options to turn each display on or off. As
a default all 5 options are enabled. Possibly the most significant for those that shoot using the viewfinder and who are used to using the DSLR EOS models is the ability to make the normal Q screen appear on the rear of the camera (option 5) which will make setting a lot of the options much more familiar.
The other 4 options allow you to choose from displays that show very little information to have the full information plus a live histogram showing.
At the bottom of options 1, 2 and 3 the screen shows that pressing the INFO button or tapping the INFO option on the screen will bring up more options.
This option allows you to customize what will be showing on the screen at the time of shooting.
These options only affect the screen on the rear of
the camera and not the camera’s electronic viewfinder.
VF DISPLAY FORMAT allow you to set up the options
for the electronic viewfinder if it is fitted. There are only three options this time as the Q screen is not available in the viewfinder.
If the viewfinder is not fitted then these options disappear from the menu.
PREVIEW
EDITION

visit: www.eos-magazine.com/ebooks
eBooks for your EOS photography
You’ve just read a free 20-page preview of this eBook, part of a comprehensive series of Canon EOS camera eBooks that I’ve produced, based on years of experience training Canon EOS photographers like you. Thanks for downloading it.
There’s much, much more – most of my eBooks are around 150 pages long, so you’ve had just a small taste of what you can learn about your camera. And it won’t cost you the earth – prices start from just £4.95.
So get the COMPLETE picture – buy the full version of this eBook and, in minutes, you’ll have the key to unlocking your EOS camera and your potential as a photographer.
10% offquote
FULL10
Nina
UNLOCK
THE FULL
VERSION