university of northern british columbia physics … oscilloscope 7 horizontal scale (time/div):...
TRANSCRIPT

University of Northern BritishColumbia
Physics Program
Physics 101
Laboratory Manual
Winter 2012

ii

Contents
1 The Oscilloscope 5
2 Standing Waves in a Tube 11
3 Electric Field Mapping 17
4 Capacitance and Capacitors 23
5 Resistors in Circuits 29
6 Capacitors in Circuits 37
7 Kirchhoff’s Laws 45
8 Two-Slit Interference 49
A Error Analysis 55A.1 Measurements and Experimental Errors . . . . . . . . . . . . . . . . . . . . . . . 55
A.1.1 Systematic Errors: . . . . . . . . . . . . . . . . . . . . . . . . . . . . . . 55A.1.2 Instrumental Uncertainties: . . . . . . . . . . . . . . . . . . . . . . . . . 56A.1.3 Statistical Errors: . . . . . . . . . . . . . . . . . . . . . . . . . . . . . . . 57
A.2 Combining Statistical and Instrumental Errors . . . . . . . . . . . . . . . . . . . 58A.3 Propagation of Errors . . . . . . . . . . . . . . . . . . . . . . . . . . . . . . . . . 59
A.3.1 Linear functions: . . . . . . . . . . . . . . . . . . . . . . . . . . . . . . . 60A.3.2 Addition and subtraction: . . . . . . . . . . . . . . . . . . . . . . . . . . 60A.3.3 Multiplication and division: . . . . . . . . . . . . . . . . . . . . . . . . . 60A.3.4 Exponents: . . . . . . . . . . . . . . . . . . . . . . . . . . . . . . . . . . 60A.3.5 Other frequently used functions: . . . . . . . . . . . . . . . . . . . . . . . 61
A.4 Percent Difference: . . . . . . . . . . . . . . . . . . . . . . . . . . . . . . . . . . 61
1

Introduction to Physics Labs
Lab Report Outline:
Physics 1?? Your Namesection L? Student #date Lab Partner’s Name
Lab #, Lab Title
The best laboratory report is the shortest intelligible report containing ALL the necessaryinformation while maintaining university level spelling and grammar. Use full sentences anddivide the lab into the sections described below.
Object - One or two sentences describing the aim of the experiment. Be specific in regards towhat you hope to prove. (In ink)
Theory - The theory on which the experiment is based. This usually includes an equationwhich is to be verified. Be sure to clearly define the variables used and explain the significanceof the equation. (In ink)
Apparatus - A brief description of the important parts and how they are related. In all but afew cases, a diagram is essential, artistic talent is not necessary but it should be neat (usea ruler) and clearly labeled. (All writing in ink, the diagram itself may be in pencil.)
Procedure - Describes the steps of the experiment so that it can be replicated. This sectionis not required.
Data - Show all your measured values and calculated results in tables. Show a detailed samplecalculation for each different calculation required in the lab. Graphs, which must be plottedby hand on metric graph paper and should be on the page following the related data table.(If experimental errors or uncertainties are to be taken into account, the calculations shouldalso be shown in this section.) Include a comparison of experimental and theoretical results.(Except graphs, this section must be in ink.)
Discussion and Conclusion - What have you proven in this lab? Support all statementswith the relevant data. Was your objective achieved? Did your experiment agree with thetheory? With the equation? To what accuracy? Explain why or why not. Identify and discusspossible sources of error. (In ink)

Introduction to Physics Labs 3
Lab Rules:
Please read the following rules carefully as each student is expected to be aware of and toabide by them. They have been implemented to ensure fair treatment of all the students.
Missed Labs:
A student may miss a lab without penalty if due to illness(a doctor’s note is required) or emer-gency. As well, if an absence is expected due to a UNBC related time conflict (academic orvarsity), arrangements to make up the lab can be made with the Senior Laboratory Instructorin advance. Students will not be allowed to attend sections, other than the one they areregistered in, without the express permission of the Senior Laboratory Instructor. Failure toattend a lab for any other reason will result in a zero (0) being given for that lab.
Late Labs:
Labs will be due 24 hours from the beginning of the lab period, after which labs will be consid-ered late. Late labs will be accepted up until 1 week from the beginning of the lab. Studentswill be allowed 1 late lab without penalty after which all subsequent late labs will be given amark of zero (0). Any labs not received within one week will no longer be accepted for gradingand given a mark of zero (0).
Completing Labs:
To complete the lab report in the lab time students are strongly advised to read and under-stand the lab (the text can be used as a reference) and write-up as much of it as possible beforecoming to the lab. We urge you to stay the entire lab time - it is provided for your benefit, ifyou run into problems writing up the lab, the instructor is there to help you.
Conduct:
Students are expected to treat each other and the instructor with proper respect at all timesand horseplay will not be tolerated. This is for your comfort and safety, as well as your fellowstudents’. Part of your lab mark will be dependent on your lab conduct.

4 Introduction to Physics Labs
Plagiarism:
Plagiarism is strictly forbidden! Copying sections from the lab manual or another person’sreport will result in severe penalties. Some students find it helpful to read a section, close thelab manual and then think about what they have read before beginning to write out what theyunderstand in their own words.
Use Ink:
The lab report, except for diagrams and graphs, must be written in ink, this includes fillingout tables. If your make a mistake simply cross it out with a single, straight line and write thecorrection below. Professional scientists use this method to ensure that they have an accuraterecord of their work and so that they do not discard data which could prove to be useful afterall. For this reason also, you should not have “rough” and “good” copies of your work. Neatlyrecord everything as you go and hand it all in. If extensive mistakes are made when filling outa table, mark a line through it and rewrite the entire table.
Lab Presentation:
Labs must be presented in a paper duotang. Marks will be given for presentation, thereforeneatness and spelling and grammar are important. It makes your lab easier to understandand your report will be evaluated accordingly. It is very likely that, if the person marking yourreport has to search for information or results, or is unable to read what you have written, yourmark will be less than it could be!
Contact Information:
If your lab instructor is unavailable and you require extra help, or if you need to speak aboutthe labs for any reason, the Senior Laboratory Instructor, Jon Schneider, is available by email:[email protected] or phone: 250.960.5708. Office hours are posted on the physics lab web pagewww.unbc.ca/physics/labs.html.
Supplies needed:
Clear plastic 30 cm rulerMetric graph paper (1mm divisions)
Paper duotangLined paperCalculator
Pen, pencil and eraser

Experiment 1
The Oscilloscope
Introduction
The oscilloscope may very well be the single most important instrument in an electricity orelectronics laboratory or in any environment where electrical signals are to be inspected. Thepurpose of this laboratory session is for you to gain familiarity with the use and operation ofan oscilloscope. The oscilloscope will prove to be an invaluable instrument for you in the nextlab experiment.
Theory
Despite its apparent complexity, the oscilloscope, in its most frequent application, may be con-sidered as a voltmeter which visually displays an input voltage signal as a curve in time.
Originally, the visual representation of the signal was provided by a cathode-ray tube (CRT)which basically consisted of an electron gun, two pairs of deflection electrode plates which con-trolled the vertical and horizontal deflections of the electron beam and a fluorescent screen (fig.1). When a signal appeared at the scope input, it was split in two. One part was applied to thevertical-deflection plates, while the other was used to trigger the application of a linear rampvoltage to the horizontal-deflection plate. This latter voltage caused the beam to sweep acrossthe screen at a constant speed. The beam was also being deflected vertically in proportion tothe input signal. The result was the production, on the screen, of a curve representing thewaveform of the signal in time. This is the simplest mode of operation of the oscilloscope.
You, however, will be using a more modern oscilloscope which uses digital technology ratherthan a cathode ray tube. You will learn about basic features and modes of operation of thedigital oscilloscope during this lab session.

6 EXPERIMENT 1
The sweep rate is given in time per division. This is the major divisions of about 1cm, notone of the small divisions. To make time measurements on the signal, count the number ofdivisions between two points and multiply the sweep time or rate (time per division, which istypically of the order of ms/div. For example, if there are 5 divisions between the points ofinterest and sweep time is 2ms/div, then
t = (5div)× (2ms/div) = 10ms (1.1)
To measure frequency f , first measure the time for one full wave (one wavelength), which isthe period T . Then use the relationship f = 1
Tto calculate the frequency.
Using the vertical divisions and the voltage/division setting the voltage of the signal can alsobe calculated.
For example:
V = (4div)× (5V/div) = 20V (1.2)
Apparatus
• Digital Oscilloscope
• Function Generator
• Coaxial Cable
Procedure
Getting Familiar With Your Oscilloscope:
1. Turn on your oscilloscope and set the following controls (for CH1) as follows:
• Vertical position: in the middle
• Horizontal position: in the middle
• Triggering source (VERT MODE): CH1
• Trigger mode (SWEEP MODE): AUTO
• Triggering level (LEVEL): in the middle
• Triggering slope (SLOPE): “-”
• Vertical scale (VOLTS/DIV): about 0.2 V

THE OSCILLOSCOPE 7
• Horizontal Scale (TIME/DIV): about 0.5 ms
• Input coupling (AC-GND-DC): AC
Carefully adjust these controls and the FOCUS and INTEN knobs as needed until youobtain a sharp centered trace (horizontal line) on the screen. The horizontal line you seeon the screen is due to the horizontal motion of the electron beam caused by the appli-cation across the horizontal deflection plates of a voltage which is proportional to time(so-called saw tooth voltage). Such a voltage causes the electron beam to sweep acrossthe screen at a constant speed from left to right. You can adjust this speed by turningthe TIME/DIV knob to higher or lower settings (you are changing the sweep voltage, ofcourse). Examine the motion of the beam as you go from the highest setting (slowestsweep) to the lowest (fastest sweep).
Try to understand the different functions and options of the various knobs and controls.Ask your lab instructor for assistance if needed.
Displaying Voltage Signals and Measuring Their Properties:
2. Now you will visually examine the time dependence of a given voltage by feeding thevoltage signal into the input channel of the scope as described earlier. Hook the functiongenerator to the CH1 input and select a sine waveform signal of about 1 kHz. Then setthe Trigger mode (SWEEP MODE) on the oscilloscope to NORM. Adjust the TIME/DIVso that you see an entire wave cycle and the VOLTS/DIV so that the amplitude is at amaximum.
(a) Try varying the amplitude of the signal (on the function generator) and record whathappens. (Remember: the vertical deflection of the electron beam is proportional tothe voltage, while the horizontal axis represents time.
(b) Investigate the effect of triggering the scope. Scope triggering refers to the mecha-nism of determining when the horizontal sweep should start. By turning the triggerknob (LEVEL) you are setting a voltage level that the input voltage must reachbefore the sweep starts. Once you set this level, all the consecutive sweeps will startat the same point of a given waveform (see Figure 2) resulting in a stable display.With the scope triggered on CH1 (CH1 selected in VERT MODE), examine thewhat effect changing the trigger level has on the display of the signal (refer to Figure2 and compare)

8 EXPERIMENT 1
(c) Investigate the effect of selecting a trigger source. In single-trace mode, you canchoose between CH1 or CH2 in VERT MODE. Confirm that when the scope is trig-gered on CH2 then no display of the CH1 signal is seen. Switch VERT MODE backto CH1 and record what happens if EXT is selected in SOURCE. Again, you shouldfind there is no display, as there is no signal being fed into the EXT jack.
(d) Investigate the effect of AC vs DC input coupling. DC coupling means that the inputsignal is directly fed to the signal amplifier in the scope and therefore allows you tosee all the components of the signal. AC coupling means that the input signal is fedto the signal amplifier through a series capacitor; this eliminates the DC portion ofthe signal so that only its time-dependent portion is displayed. (If you don’t see achange, try changing the SWEEP MODE to NORM.) Also check out what happenswhen you select GND (ground) for coupling; here the amplifier input is groundedand the input terminals disconnected.
(e) Sketch the voltage form you see on the scope along with time and amplitude scales.
(f) Measure the peak-to-peak voltage, (Vpp), of the signal by multiplying the number ofdivision from peak to peak by the VOLTS/DIV selected on the vertical scale.

THE OSCILLOSCOPE 9
(g) Measure the frequency of the signal by calculating the inverse of the period of thewave (the period is found by multiplying the number of divisions for a full cycle bythe TIME/DIV selected on the horizontal scale). Compare to the digital reading ofthe function generator by finding the percent difference.
3. Select a square waveform signal of about 1 KHz and repeat step 2.
4. Connect a DC battery to the CH1 input of the oscilloscope and make sure that the Trig-ger mode (SWEEP MODE) on the oscilloscope to AUTO. Sketch the voltage form yousee on the scope along with time and amplitude scales. Is this what you would expect?Calculate the voltage of the battery.
5. Connect a loose wire to the scope input using the lead with the alligator clip on oneend. Obtain a display of the noise signal picked up by the wire from the environmentby adjusting the TIME/DIV and VOLTS/DIV. Examine the amplitude and frequency ofthis signal and suggest what the source of this electric ”noise” may be.
Displaying Lissajous Figures in the X-Y Mode:
The oscilloscope can also be operated in the so-called X-Y mode, where in the internal sweepcircuit is disabled and the horizontal (X) and vertical (Y) deflection plates of the CRT arenow driven by the CH1 and CH2 input voltages. If the applied voltages are sinusoidal, theresulting display on the scope takes the form of what we call a Lissajous figure. Dependingon the frequencies and phase differences involved, Lissajous figures can take many shapes ofvarying degrees of complexity.
6. Use the function generator to generate a sine wave of 60 Hz and feed this signal intoCH1. Set the trigger source (in SOURCE) to LINE. This sets up the oscilloscope to runits internal frequency of 60 Hz as the CH2 signal. Select X-Y on the TIME/DIV scale.Obtain a stable display by fine tuning the CH1 frequency (you may also need to readjustthe VOLTS/DIV scale and the vertical and horizontal POSITIONs). Sketch and describethe display.
7. The shape and stability of the Lissajous patterns depend on the phase relationship be-tween the two input signals and the ratio of their frequencies. Investigate how the Lis-sajous patterns change as you slowly increase the generator frequency up to 300 Hz.Identify the frequencies at which the pattern stabilizes. Sketch and describe what you see(for at least 3 stable frequencies). Draw a conclusion regarding the shape and stability ofthe patterns.

10 EXPERIMENT 1
Discussion and Conclusion
Comment on your proficiency with the oscilloscope and whether you believe it to be a usefultool. Explain. Outline and discuss at least two possible sources of error which may have oc-curred during the collection of the data and how they could have been avoided.

Experiment 2
Standing Waves in a Tube
Introduction
In this experiment you will set up standing sound waves inside a Resonance Tube using aspeaker and function generator. You will then use a miniature microphone and oscilloscope todetermine the characteristics of the standing waves.

12 EXPERIMENT 2
Theory
A sound wave propagating down a tube is reflected back and forth from each end of the tube,and all the waves, the original and the reflections, interfere with each other. If the length ofthe tube and wavelength of the sound wave are such that all of the waves that are moving inthe same direction are in phase with each other, a standing wave pattern is formed. This isknown as a resonance mode for the tube and frequencies at which resonance occurs are calledresonant frequencies.
Knowing the wavelength, λ, and frequency, f , of a wave, one is able to calculate its speed bymultiplying them together:
v = fλ (2.1)
The expected speed of sound can be calculated as follows:
vexpected = 331.5m/s+ (0.607m/sC)T (2.2)
where T is the temperature in Celsius.
Apparatus
• Cathode Ray Oscilloscope
• Function Generator
• PASCO Resonance Tube
• Miniature Microphone
Procedure
Open-ended Tube:
1. Set up the Resonance Tube, oscilloscope, and function generator as shown in Figure 1.Turn on the oscilloscope. Set the sweep speed to 0.5 ms/div and the gain on CH1 toapproximately 5 mV/div.

STANDING WAVES IN A TUBE 13
2. Turn down the function generator amplitude as low as it will go and then turn on thefunction generator. Set the output frequency to approximately 200 Hz and turn on themicrophone.
WARNING: You can destroy the speaker by overdriving it. The sound from the speakershould be audible but not loud. Also note that many signal generators become more ef-ficient and thus produce a larger output as the frequency increases, so you may need toreduce the amplitude as you increase the frequency. The amplitude should not be greaterthan 4 volts peak to peak.
3. Slowly increase the frequency and watch the trace on the oscilloscope carefully. In general,the amplitude of the signal will increase as you increase the frequency because the func-tion generator and speaker are more efficient at higher frequencies. However, watch for arelative maximum in the signal as you hit a resonance frequency (a frequency where thereis a slight decrease in the amplitude as you increase or decrease the frequency slightly).This relative maximum indicates a resonance mode in the tube.
4. Now, slide the microphone slowly until you get a relative maximum signal amplitude asthe microphone signal is displayed on the oscilloscope.
5. Adjust the frequency carefully to find the lowest frequency at which a relative maximumoccurs. You can fine tune the finding of any relative maximum by watching the traceon the oscilloscope. When the signal amplitude is a relative maximum, as you increaseor decrease the frequency very slowly, you have found a resonant frequency. Record thisfrequency, fr, in Data Table 1.
Note: It can be difficult to find resonant frequencies at low frequencies (0-300 Hz). If youhave trouble with this, try finding the higher frequency (about 1 kHz) resonant modesfirst, then use you knowledge of resonance modes in a tube to determine the lower reso-nant frequencies. Make sure that resonance really occurs at those frequencies as above.
6. Once you determine a resonance mode, move the microphone down the length of the tube,note the positions where the oscilloscope signal is a maximum and where it is a minimum.Record these position in the first two columns of Data Table 1. You will not be able tomove the probe completely down the tube because the cord is too short.
7. Repeat the above procedure for three more resonant frequencies and record your resultsfor each different frequency in the appropriate columns of Data Table 1.

14 EXPERIMENT 2
Closed Tube:
8. Insert the piston into the tube, as in Figure 2, until it reaches the maximum point thatthe microphone can reach coming in from the speaker end. Record this piston position,P1, in Data Table 2.
9. Find a resonant frequency around 800 Hz for this new tube configuration.
10. Use the microphone to locate the maxima and minima for this closed tube configuration,record your results in Data Table 2.
11. Keeping the frequency the same, move the piston towards the speaker very carefullyand record the position, P2, at which another resonance mode occurs. Repeat step 10.
12. Repeat steps 10 and 11 for a different resonant frequency.
13. Using the data that you have recorded for the first resonant frequency, sketch the waveactivity along the length of your tube. Label it with the frequency used and indicate thehorizontal scale and piston position. Repeat this for each of the seven other trials.
14. The microphone you are using is sensitive to pressure. The maxima are therefore pointsof maximum pressure and the minima are points of minimum pressure. On each ofyour drawings, indicate where the points of maximum and minimum displacement arelocated.

STANDING WAVES IN A TUBE 15
15. Determine the wavelength for the waves in each of your trials.
16. Given the frequency of the sound wave you used, calculate the speed of sound in yourtube for each configuration using equation (2.1).
17. Find the average speed of sound, v, and its error.
18. Calculate the expected speed of sound using equation (2.2).
Discussion and Conclusion
Comment on whether your results support equations (2.1) and (2.2). Explain. Comment onwhether the piston position affects the wavelength. Explain. Outline and discuss at least twopossible sources of error which may have occurred during the collection of the data and howthey could have been avoided.

16 EXPERIMENT 2
Data Table 1: Open-ended Tube
fr fr fr fr(Hz) (Hz) (Hz) (Hz)Maxima Minima Maxima Minima Maxima Minima Maxima Minima
(m) (m) (m) (m) (m) (m) (m) (m)
Data Table 2: Closed Tube
fr fr(Hz) (Hz)P1 P2 P1 P2
(m) (m) (m) (m)Maxima Minima Maxima Minima Maxima Minima Maxima Minima
(m) (m) (m) (m) (m) (m) (m) (m)
Date:
Instructor’s Name:
Instructor’s Signature:

Experiment 3
Electric Field Mapping
Introduction
The electric field lines between two conductors can be mapped by first mapping the lines ofequipotential. Knowledge of the electric field lines provides insight into the strength of theelectric field at different points in space and also the nature of the charge distribution over thesurfaces of the conductors. In this experiment we will map electric field lines between conduc-tors of various shapes by first mapping the equipotential lines.
Theory
Electrostatics relates charge distributions, lines of equipotential, and electric field lines understatic conditions (no moving charges). Electric charges are the source of the electric field andthe equipotential lines. Electric field lines and lines of equipotential are intrinsically related;indeed, knowledge of one set of lines tells us what the other set must be. More specifically,electric field lines and lines of equipotential are mutually perpendicular.
An interesting example is the case of two conducting spheres, held a fixed distance apart(Figure 1), one of which has a net charge +Q uniformly distributed over its surface, the otherbeing electrically neutral. The light lines in Figure 1 indicate lines of constant electric potential(equipotential lines) and the heavy lines are electric field lines. The density of electric field linesindicates the strength of the field: the greater the density of lines, the stronger the electric field.
The definition of the electric field ~E(~r) at a point ~r in space is
~E(~r) =~F (~r)
qt(3.1)
where ~F (~r) is the net electric force on a positive test charge qt placed at ~r. The source of ~E(~r)is the set of all other charges surrounding qt. Electric field lines originate on positive charges

18 EXPERIMENT 3
and terminate on negative charges; in a figure such as Figure 1, the electric field lines do notactually terminate as shown — in other words, the lines do not simply “vanish into thin air”.
If a positive test charge qt is moved a tiny distance ∆r in the direction of the electric field~E, the work done by the electric force is qtE∆r. Since the electrostatic force is a conservativeforce, energy is conserved in the process, and the corresponding change ∆U in the electrostaticpotential energy U is ∆U = −qtE∆r. The electrostatic potential V is defined in a mannersimilar to that of the electric field:
V ≡ U
qt(3.2)
The difference ∆V in the electrostatic potential between two neighbouring points is given by
∆V ≡ V2 − V1 ≡ −E∆r (3.3)
where V1 is the potential at point “1”, V2 the potential at point “2”, ∆r is the distance betweenthe two points, and the two points lie along a segment which is parallel to the electric field.If, instead, the two points lie along a segment which is perpendicular to the electric field,then the difference in electrostatic potential between the two points is zero. This tells us thatequipotential lines are everywhere perpendicular to electric field lines, just as is indicated inFigure 1.

ELECTRIC FIELD MAPPING 19
Apparatus
• Power Supply and connecting wires
• Digital Multimeter and probes
• 2 pieces of conductive paper with predrawn patterns
Procedure
1. Spend a few moments familiarizing yourself with the experimental setup and apparatusas shown in Figure 2. A power supply and a digital multimeter are connected to twoconductors which are indicated in Figure 2 by the heavy dark lines. Also shown are thesheet of conductive paper on which the two conductors sit, and the red probe with itsconducting tip. Upon examining the conductive sheet you will notice a grid of blue crossesand x– and y– axes along the edges of the sheet. Your lab instructor will supply you withtwo pieces of white paper which are replicas of the grid on the conductive sheet. It is onthese sheets of paper that you are to draw the conducting electrodes, the equipotentiallines, and the electric field lines, not on the conductive paper!
Note: You will need to pace yourself through this experiment. You need totake enough data (coordinates of points of equal potential) to be able to drawsmooth equipotential and electric field lines, but you do not want to take somany that you run out of time!

20 EXPERIMENT 3
2. In this experiment you will obtain the equipotential and electric field lines for two differ-ent conducting electrode shapes, one of which is shown in Figure 2. You will obtain theselines as described below, but before proceeding further, it is essential that you recognizethe following. You are to collect your data by carefully touching the probe to variouspoints on the conductive paper, but you must NOT damage the conductive paperin any way. Your lab instructor will explain further as required.
3. Equipotential lines are obtained and plotted in the following manner. With the powersupply turned on and set to the 15–30 volt range, and the digital multimeter turned on,gently bring the probe into contact with the conductive paper. Begin by placing theprobe roughly midway between the two conducting electrodes. Gently move the probeslightly toward one electrode or the other until a “nice round number” appears on themultimeter — for example, if the potential difference between electrodes is 30.00 volts,you could begin by finding the point where the multimeter reads 15.00 volts. Note the x–and y–coordinates of this first point, and plot the point on the white grid sheet supplied.NOTE: Avoid touching the probe to the printed grid mark on the conductive sheet, asthe ink of the grid mark may prevent proper electrical connection.
4. Next, move the probe until you find another point on the conductive sheet which givesthe same, or almost the same, voltage reading on the digital multimeter. Again note thecoordinates of this point and plot another point on your white grid sheet.
5. Repeat step 4. until you have enough points (minimum 10) to draw a smooth equipotentialline from one side of the white sheet to the other and be sure to label it with its potentialvalue.
6. Choose another potential (e.g. 10.00 volts) and repeat steps 3, 4 and 5 to obtain anotherequipotential line on your white grid sheet.
7. For electrode patterns where there is a conductor with an interior region, such as thatof Figure 2, be sure to measure the values of the potential at points on the inside of theconductor. Also label the positive and negative conductors.
8. Repeat steps 3 through 6 until you have enough (minimum 10 ) equipotential lines spreadout over your white grid sheet to allow you to draw the electric field lines for the conduct-ing electrodes on the conductive sheet. Draw in the electric field lines by exploiting yourknowledge that they are everywhere perpendicular to the equipotential lines. Be sure toinclude arrows to show the direction of the electric field.

ELECTRIC FIELD MAPPING 21
9. Repeat steps 3 through 8 for the other conducting electrode pattern. These conductivegrid sheets will be supplied by the lab instructor. You are to replace one conductive sheetwith another as follows. First remove the 4 pins which hold the sheet to the corkboard atthe corners. Next, very carefully remove the 2 conducting pins and the connecting wiresat each of the two electrodes on the sheet. Remove the sheet and place the new sheet onthe corkboard. Pin the four corners down so the sheet lies smoothly on the board. Then,very carefully, attach the connecting wires to the two electrodes using the 2 conductingpins, as shown below. Be sure to obtain a good electrical contact by pushing the pinsfirmly into the corkboard.
Discussion and Conclusion
Comment on whether your results support that equipotential lines and electric field lines areperpendicular to each other and if electric field lines begin on positive charges and end onnegative ones. Explain. Discuss where the electric field is strongest and where it is weakest.Explain. Outline and discuss at least two possible sources of error which may have occurredduring the collection of the data and how they could have been avoided.

22 EXPERIMENT 3

Experiment 4
Capacitance and Capacitors
Introduction
In this laboratory session you will learn about an important device used extensively in electriccircuits: the capacitor. A capacitor is a very simple electrical device which consists of twoconductors of any shape placed near each other but not touching. While a primary functionof a capacitor is to store electric charge that can be used later, its usefulness goes far beyondthis to include a wide variety of applications in electricity and electronics. A typical capacitor,called the parallel-plate capacitor, consists of two conducting plates parallel to each other andseparated by a nonconducting medium that we call dielectric (see Fig. 1a). However, capacitorscan come in different shapes, configurations and sizes. For example, commercial capacitors areoften made using metal foil interlaced with thin sheets of a certain insulating material androlled to form a small cylindrical package (see Fig. 1b). Some of the properties of capacitorswill be explored in this experiment, including the concept of capacitance and the mounting ofcapacitors in series and in parallel in electric circuits.

24 EXPERIMENT 4
Theory
If a potential difference V is established between the two conductors of a given capacitor, theyacquire equal and opposite charges −Q and +Q. It turns out that the electric charge Q isdirectly proportional to the applied voltage V . The constant of proportionality is a measure ofthe capacity of this capacitor to hold charge when subjected to a given voltage. We call thisconstant the capacitance C of the capacitor and we have:
Q = CV (4.1)
The value of C depends on the geometry of the capacitor and on the nature of the dielectricmaterial separating the two conductors. It is expressed in units of Coulomb/Volt or what wecall the Farad (F). For the parallel-plate capacitor (Fig. 1a) one can show that the capacitanceis given by the formula:
C =εA
d(4.2)
where A is the area of the plate, d the distance separating the two plates, and ε the permittiv-ity of the dielectric material. In case of empty space, the value of ε is ε0 = 8.85×10⁻¹² C2/N.m2.
We can also show that if two capacitors of capacitance C1 and C2 are connected in series (Fig.2a) or in parallel (Fig. 2b), then they are equivalent to one capacitor whose capacitance C isgiven by:
1
C=
1
C1
+1
C2
(series) (4.3)
C = C1 + C2 (parallel) (4.4)
Note that in a series combination each capacitor stores the same amount of charge Q, while ina parallel combination the voltage V across each capacitor is the same.

CAPACITANCE AND CAPACITORS 25
Apparatus
• Large Parallel Plate Capacitor and Insulating Materials
• Digital LCR Meter
• Common Capacitors
Procedure
Measuring the Capacitance of a Parallel-Plate Capacitor:
You are provided with a parallel-plate capacitor which you can use to test equation (4.2). Asystematic approach to this would be to measure how the capacitance changes as you varyone of the parameters upon which the capacitance depends while keeping the others constant.There are two parameters that you can change here, the separation between the two plates andthe insulating medium separating them.
The capacitance can be measured directly using a digital capacitance meter (LCR meter).Note, however, that your reading of a capacitance will have to be corrected for the intrinsiccapacitance of the connecting cables. To see how important this correction may be, connectthe cables to the LCR meter and measure the capacitance of the cables using the 200 pF scaleon the meter. Move the cables around and observe how the readings change, confirming thatcapacitance depends on the distance separating the cables. Also investigate the effect of placingyour hands around the cables. Set the plate separation to d=2 mm. Measure and record thediameter of the plates.
1. Take a capacitance measurement of the cables at a separation equal to their separationwhen connected to the capacitor. Record your reading. Connect the cables to the metalposts of the capacitor and measure the total capacitance. Record your reading and thencorrect for the capacitance of the cables. To apply this correction assume that the cablesbehave as a capacitor connected in parallel with the parallel-plate capacitor and refer toequation (4.4). Record the actual capacitance.
2. Repeat step 1 for separations up to d=2 cm in 2 mm steps and record your results in theData Table.
3. Plot C versus 1/d. Calculate the slope of the best straight-line fit to your data points.Estimate the experimental error on the calculated slope.
26 EXPERIMENT 4
4. From these slope values and using equation (4.2) calculate an experimental value for εand find its corresponding error.
5. Now you can investigate how capacitance changes with ε. You are provided with three dif-ferent slabs of insulating materials. Set the separation between the plates of the capacitorto 3 mm and repeat step 1. Calculate ε with each of the two slabs of known permittivity(#1 and #2) inserted between the plates and compare with ε1 = 11.2× 10⁻¹² C2/N.m2
and ε2 = 14.0× 10⁻¹² C2/N.m2.
6. Insert the slab with unknown permittivity (#3) and repeat step 5. Deduce the value ofε for this material.
Capacitors in series and in parallel:
7. Choose two equal capacitors C1 and C2 from the set you are provided with. Connectthe capacitors in series and measure the resulting capacitance. Calculate the expectedcapacitance using equation (4.3).
8. Now connect the same capacitors in parallel. Again measure the resulting capacitanceand calculate the expected capacitance using equation (4.4).
9. Repeat steps 7 and 8 for another pair of capacitors.
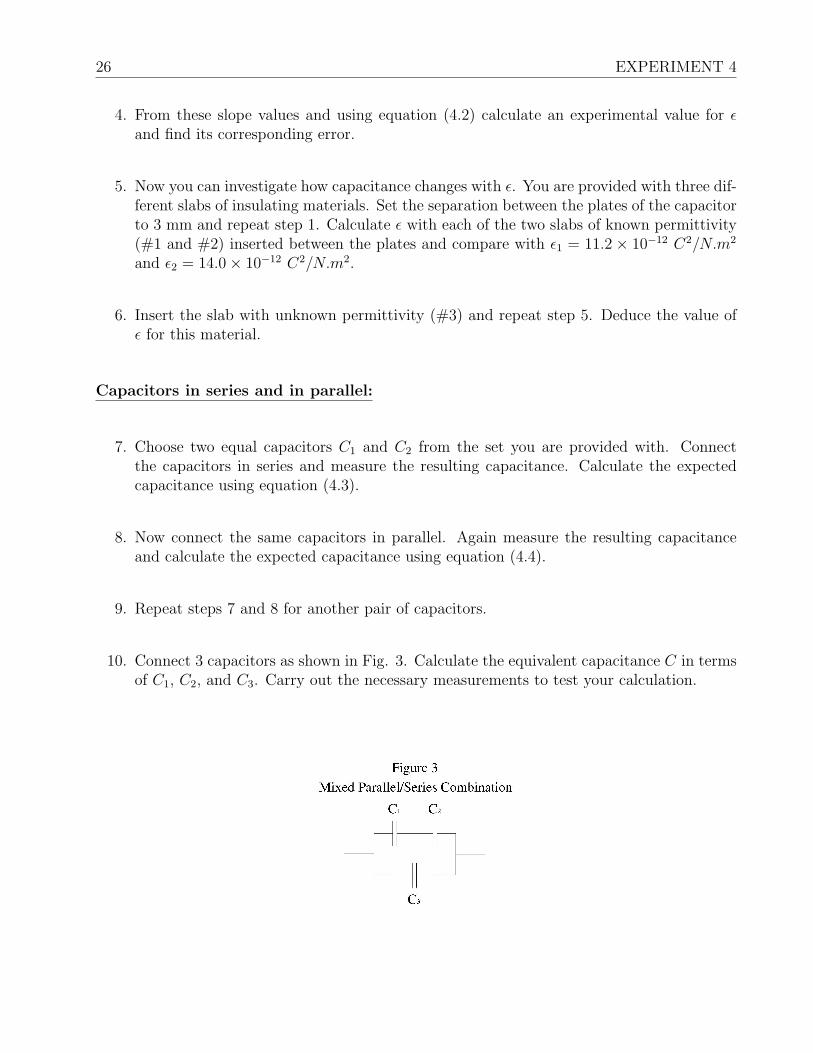
10. Connect 3 capacitors as shown in Fig. 3. Calculate the equivalent capacitance C in termsof C1, C2, and C3. Carry out the necessary measurements to test your calculation.

CAPACITANCE AND CAPACITORS 27
Discussion and Conclusion
Comment on whether your results support equations (4.2), (4.3) and (4.4). Explain. Outlineand discuss at least two possible sources of error which may have occurred during the collectionof the data and how they could have been avoided.

28 EXPERIMENT 4
Data Table: Capacitance
d 1d
Total Capacitance Cable Capacitance Actual Capacitance(m) (m−1) (F) (F) (F)
Date:
Instructor’s Name:
Instructor’s Signature:

Experiment 5
Resistors in Circuits
Introduction
The purpose of this lab is twofold:
• To investigate the validity of Ohm’s Law
• To study the effect of connecting resistors in series and parallel configurations.
Theory
Ohm’s law states that the electric resistance of any device is defined as:
R = V/I (5.1)
where V is the voltage drop across the device and I is the current passing through it.

30 EXPERIMENT 5
If both the voltage across and the current through a device change, while the ratio V/I remainsthe same, this device is said to obey Ohm’s law.
Resistors in Series:
If we have two resistors connected in series (Figure 2), we can replace them by a single equivalentresistance R whose value is given by:
R = R1 +R2 (5.2)
where R1, R2 are the values of the individual resistances.
Resistors in Parallel:
Similarly, if we have two resistors connected in parallel (Figure 3), we can replace them by asingle equivalent resistance R whose value is given by:
1
R=
1
R1
+1
R2
(5.3)
where R1, R2 are the values of the individual resistances

RESISTORS IN CIRCUITS 31
Apparatus
• Ammeter (micro-Amp. range)An ammeter is a device used to measure electric current flowing in a closed loop of a cir-cuit. It has to be connected in series with the rest of the loop. It should have a negligibleresistance as compared to the rest of the electric components that form the circuit. Thisis so in order to keep the current value unchanged when the ammeter is inserted to makea measurement. For this reason, you should never connect an ammeter directlyacross the terminals of a battery.
• Digital MultimeterA voltmeter is an instrument used to measure a potential difference across any givendevice. In order to do so, we have to connect it in parallel with the device as shown. Ithas a much higher internal resistance than any of the circuit elements. This is so in ordernot to alter the current value in the circuit as the voltmeter is connected.
There are two types of meters, DC and AC meters. DC meters are distinguished by ashort bar (–) under V (for voltmeter) or A (for ammeter). Similarly, the AC meters aremarked by (∼). It is very important to use DC meters in DC circuits and AC meters inAC circuits.
• Circuits Experiment Board, Wire Leads and D-cell Battery
• Assorted Resistors

32 EXPERIMENT 5
Standard Colour Codes For Resistors
Procedure
1. After measuring and recording the voltage of the battery, choose one of the resistors thatyou have been given. By looking at the coloured bands on the resistor and using thechart given, decode the resistance value and record that value as Rth in the first columnof Table 1.
2. Construct the circuit shown in Figure 1 by pressing the leads of the resistor into two ofthe springs on the Circuit Board.
3. Connect the micro-ammeter in series with the resistor. Read the current that is flowingthrough the resistor. Record this value in the third column of Data Table 1.
4. Using the multimeter measure the voltage across the resistor. Record this value in thesecond column of Data Table 1.
5. Remove the resistor and choose another. Record its coded resistance value in Data Table1 then measure and record the current and the voltage values as in steps 3 and 4.
6. Repeat step 5 until you have completed the same measurements for all of the resistorsyou have been given. As you have more than one resistor with the same value, keep allresistors in order because you will use them again in the next part of this experiment.
7. Complete the fourth column of Data Table 1 by calculating the ratio of Voltage/Current.Compare each of these values with the corresponding colour coded value of each resistanceby finding the percent difference and entering it in the last column.

RESISTORS IN CIRCUITS 33
8. Calculate 1/Rcalculated. Construct a graph of current (Y-axis) versus [1/Resistance] (X-axis) and calculate the slope and its error from the resulting line.
Resistors in Series:
9. Find two resistors whose resistances are approximately equal to 5 and 10 kΩ. Using themultimeter measure their actual resistances and enter them in the first two columns inTable 2.
10. Using the values you found with the multimeter, calculate the theoretical resistance andenter it in the appropriate column (Rth = R1 + R2).
11. Connect the two resistors in series as shown in Figure 2 and measure the total voltagedrop across them as if they were one resistor. Also measure the current flowing in thecircuit.
12. To find the resistance of this combination, divide the voltage drop by the current flowingin the circuit. Enter this value in Data Table 2. Compare this value to the expected valueby finding the percent difference.
13. Repeat steps 9 through 12 but for resistance values of R1 = R2 = 10 kΩ.
Resistors in Parallel:
14. Choose two resistors having the same value of about 10 kΩ from the set of resistors.
15. Enter the necessary pieces of information as indicated in Data Table 3, including thetheoretical resistance (Rth = R1R2
(R1+R2).
16. Connect these two resistors in parallel as shown in Figure 3. Measure the resistance ofthe combination as one resistor following the same steps as you did in the previous partsof this experiment.
17. Compare your measured value of resistance with the expected value by finding the percentdifference.

34 EXPERIMENT 5
18. Repeat step 15 through 17 for R1= 20 kΩand R2 = 10 kΩ.
Resistors in Combination:
19. Find one resistor whose resistance is approximately R1=20 kΩ and two resistors aboutR2=R3=10 kΩ. Record the values measured using the multimeter values in Data Table 4
20. Showing your work, calculate the theoretical resistance of the combination given in Figure4.
21. Now set up the combination circuit as shown in Figure 4. Measure and record the currentand voltage of the system. Calculate and record V/I and compare it to the theoreticalvalue by finding the percent difference.
Discussion and Conclusion
Comment on whether your results support equation (5.1). Explain. Outline and discuss atleast two possible sources of error which may have occurred during the collection of the dataand how they could have been avoided.

RESISTORS IN CIRCUITS 35
Data Table 1: Resistance
Coded Measured Measured Calculated 1 PercentRth Voltage Current Resistance Rcalculated Difference
(Ohms) (Volts) (Amps) (Ohms) (Ohm)−1 %
Date:
Instructor’s Name:
Instructor’s Signature:

36 EXPERIMENT 5
Data Table 2: Resistors in Series
Measured Measured Theoretical Measured Measured Calculated PercentR1 Value R2 Value Resistance Current Voltage Resistance Difference(Ohms) (Ohms) (Ohms) (Amps) (Volts) (Ohms) %
Data Table 3: Resistors in Parallel
Measured Measured Theoretical Measured Measured Calculated PercentR1 Value R2 Value Resistance Current Voltage Resistance Difference(Ohms) (Ohms) (Ohms) (Amps) (Volts) (Ohms) %
Data Table 4: Resistors in Combination
Measured Measured Measured Theoretical Measured Measured Calculated PercentR1 Value R2 Value R3 Value Resistance Current Voltage Resistance Difference(Ohms) (Ohms) (Ohms) (Ohms) (Amps) (Volts) (Ohms) %
Date:
Instructor’s Name:
Instructor’s Signature:

Experiment 6
Capacitors in Circuits
Introduction
The purpose of this lab is to determine how capacitors behave in RC circuits, and to study themanner in which two capacitors combine.
Theory
When a capacitor is connected to a DC power supply or battery, charge builds up on thecapacitor plates and the potential difference or voltage across the plates increases until it equalsthe voltage of the source, Vo. At any time, the charge on the capacitor is related to the voltageacross the capacitor plates by,
Q = CV (6.1)
where C is the capacitance of the capacitor in farads (F). The rate of voltage rise depends onthe capacitance of the capacitor and the resistance in the circuit. Similarly, when a chargedcapacitor is discharged, the rate of voltage decay depends on the same parameters.
Both the charging and discharging times of a capacitor are characterized by a quantity calledthe time constant, τ , which is the product of the capacitance and the resistance of a givencircuit. In this experiment, the time constant will be determined by studying the dischargingof a capacitor, C, through a resistor, R.
When a fully charged capacitor is discharged through a resistor (Points A and C in Figure 1are connected) the voltage, V , across (and the charge on) the capacitor “decays” or decreaseswith time, t, according to the equation:
V = Voe− tτ (6.2)

38 EXPERIMENT 6
After a time equal to one time constant (at t = τ) the voltage across the capacitor decreases to avalue of Vo/e; that is V = 0.37Vo. This is one way to determine the RC constant experimentally.Another, more accurate, way to get τ is to measure V as a function of time and analyze thedata according to equation (6.2). In order to do that, one has to put equation (6.2) in the formof a straight line equation. Taking the natural logarithm of both sides of equation (6.2) gives:
lnV = − tτ
+ lnVo (6.3)
Therefore, the time constant, τ , can be found from the slope of a graph of lnV versus t.
Apparatus
• Digital Multimeter (DMM)
• LCR Meter
• Stopwatch
• Circuits Experiment Board
• D-cell Battery
• Wire Leads
• Resistors and Capacitors
Procedure
The RC Time Constant
1. Measure the actual values of the capacitors and resistor using the LCR meter and recordthem. Connect the circuit shown in Figure 1, using the capacitor with the larger value.Use one of the spring clips as a “switch” as shown. Select the DC volt function for yourDMM and connect the black “ground” lead is on the side of the capacitor that connectsto the negative terminal of the battery.
2. Start with no voltage across the capacitor and the wire from the “switch” to the circuitdisconnected. If there is a remaining voltage across the capacitor, use a piece of wire to“short” the two leads together, (touch the ends of the wire to points B and C) drainingany remaining charge.

CAPACITORS IN CIRCUITS 39
3. Now close the “switch” by touching the wire to the spring clip labeled as point D, thevoltage over the capacitor should increase with time.
4. If you now open the “switch” by removing the wire from the spring clip, the capacitorshould remain at its present voltage with a very slow drop over time. This indicates thatthe charge you placed on the capacitor has no way to move back to neutralize the excesscharges on the two plates.
5. Close the switch and allow the capacitor to fully charge. Record this value in Data Table1 as the voltage at t = 0. Open the switch, remove the wire between C and the negativebattery terminal and immediately proceed to the next step.
6. Now you need to be very careful in doing two things simultaneously:
• connect the end of the “switch” which was originally connected to point D to pointC to allow the charge to drain back through the resistor and
• start your stopwatch.
7. Record, in Data Table 1, a minimum of 10 voltage readings from the DMM at regulartime intervals. (Choose intervals which will put your last measurement after the theoret-ical value of τ .)
8. Plot a graph of ln(V ) versus t and calculate the slope of the best straight-line fit to yourdata points. Estimate the experimental error in the calculated slope. Calculate an ex-perimental value for τ utilizing the information from the graph and equation (6.3). Alsofind the corresponding error, δτ .

40 EXPERIMENT 6
Capacitors in Parallel
9. Using the same circuit, connect the smaller capacitor in parallel with the larger capacitor.
10. Calculate the total capacitance, CT = C1 + C2.
11. Repeat steps 2 through 8 recording the data in Data Table 2.
12. Calculate the experimental capacitance and its error from the values for τ and δτ deter-mined from the graph.
Capacitors in Series
13. Using the same circuit, connect the capacitors in series. Make the necessary adjustmentsto measure the voltage drop across both of them as if they were one capacitor.
14. Calculate the total capacitance, 1/CT = 1/C1 + 1/C2.
15. Repeat steps 2 through 8 recording the data in Data Table 3.
16. Calculate the experimental capacitance and its error from the values for τ and δτ deter-mined from the graph.
Discussion and Conclusion
Comment on whether your results support equations (6.2) and (6.3). Explain. Outline anddiscuss at least two possible sources of error which may have occurred during the collection ofthe data and how they could have been avoided.

CAPACITORS IN CIRCUITS 41
Data Table 1: Single Capacitor
R(Ω)C
(F )τth(s)
Time (s) Voltage (V) lnV
Date:
Instructor’s Name:
Instructor’s Signature:

42 EXPERIMENT 6
Data Table 2: Capacitors in Parallel
R(Ω)C1
(F )C2
(F )τth(s)Theoretical CT
(f)
Time (s) Voltage (V) lnV
Date:
Instructor’s Name:
Instructor’s Signature:

CAPACITORS IN CIRCUITS 43
Data Table 3: Capacitors in Series
R(Ω)C1
(F )C2
(F )τth(s)Theoretical CT
(f)
Time (s) Voltage (V) lnV
Date:
Instructor’s Name:
Instructor’s Signature:

44 EXPERIMENT 6

Experiment 7
Kirchhoff’s Laws
Introduction
In this experiment we will test the validity of Kirchhoff’s laws for different DC circuits. Wewill take measurements of the currents through and the voltage drops across the resistors inthe multiloop circuits shown in Figures 1 and 2. We will use these measured values to testKirchhoff’s laws.
Theory
Kirchhoff’s laws may be stated as follows:
• The Junction Rule. The algebraic sum of the currents flowing into or out of a node iszero. Alternatively, the sum of currents flowing into a branch point is equal to the sumof the currents flowing out of a branch point.
A branch point or node is a point at which three or more wires meet; a point into or outof three or more currents flow. In Figure 1 points b and e are nodes. In Figure 2 pointsb, c, f and g are nodes.
• The Loop Rule. The sum of the potential drops around any closed loop is equal to zero.Alternatively, the algebraic sum of the changes in potential around any closed loop is zero.
A loop is any closed conducting path. In Figure 1 there are three loops: abeda, acfda andbcfeb. In Figure 2 there are six loops: abfea, acgea, adea, bcgfb, bdfb and cdgc.
By assigning a direction to the current through each of the resistors and voltage sources inFigures 1 and 2, application of Kirchhoff’s laws provide N equations and N unknowns. For

46 EXPERIMENT 7
example, given the values of the resistances and voltages in a multiloop circuit, one may thensolve for the values of the currents in each of the branches or “legs” of the circuit.
Apparatus
• Digital Multimeter (DMM)
• Ammeter
• Circuits Experiment Board
• D-cell Battery
• Wire Leads
• Resistors
Procedure
1. Find resistors of the following values: R1 = 4.7 kΩ, R2 = 8.2 kΩ and R3 = 2.2 kΩ. Drawthe circuit shown in Figure 1, then set it up without connecting the resistors to eachother or the batteries.
2. Using the DMM, measure the value of the resistance of each resistor. (Note that thevalues given above are only approximate.)

KIRCHHOFF’S LAWS 47
3. Now connect the resistors and batteries to each other as illustrated using the wire leadsprovided. Using the microammeter, measure the current in each of the resistors and in-dicate, with an arrow, the direction in which it flows on your drawing.
4. Using the DMM, measure the potential drop across each resistor and indicate which endis at the higher potential on your drawing with a + sign. Also measure and record thevoltage of each battery.
5. Enter your values of resistance, current and voltage drop in the Data Table. Include thecalculated value Vcalculated = IR of the potential drop across each resistor.
6. Find resistors of the following values: R1 = 4.7 kΩ, R2 = 8.2 kΩ, R3 = 2.2 kΩ,R4 = 8.2 kΩ, R5 = 8.2 kΩ and R6 = 4.7 kΩ. Draw the circuit shown in Figure 2,then set it up, again leaving the resistors and batteries disconnected.
7. Repeat steps 2 through 5 for this circuit.
Discussion and Conclusion
Comment on whether your results agree with Kirchhoff’s Laws and explain how the JunctionRule is simply conservation of charge and what would happen if the Loop Rule didn’t hold.Outline and discuss at least two possible sources of error which may have occurred during thecollection of the data and how they could have been avoided.

48 EXPERIMENT 7
Data Table 1: Kirchhoff’s Law for Circuit 1
V1 V2
(V ) (V )Rn Rlabelled Rmeasured I Vmeasured Vcalculated % difference
(Ω) (Ω) (A) (V) (V) in V
Data Table 2: Kirchhoff’s Law for Circuit 2
V1 V2
(V ) (V )Rn Rlabelled Rmeasured I Vmeasured Vcalculated % difference
(Ω) (Ω) (A) (V) (V) in V
Date:
Instructor’s Name:
Instructor’s Signature:

Experiment 8
Two-Slit Interference
Introduction
What is light? There may be no complete answer to this question. However, in certain circum-stances, light behaves exactly as if it were a wave. In fact, in this experiment you will measurethe wavelength of light, and see how that wavelength varies with colour.
Theory
In two-slit interference, light falls on an opaque screen with two closely spaced, narrow slits. AsHuygens principle tells us, each slit acts as a new source of light. Since the slits are illuminatedby the same wave front, these sources are in phase. Where the wave fronts from the two sourcesoverlap, an interference pattern is formed.
The essential geometry of the experiment is shown in Figures 8.1 and 8.2. At the zeroth max-ima, light rays from slits A and B have traveled the same distance from the slits to your eye,so they are in phase and interfere constructively on your retina. At the first order maxima (tothe left of the viewer) light from slit B has traveled one wavelength further than light fromslit A, so the rays are again in phase, and constructive interference occurs at this position as well.
At the nth order maxima, the light from slit B has traveled n wavelengths further than thelight from slit A, so again, constructive interference occurs. In the diagram, the line AC isconstructed perpendicular to the line PB. Since the slits are very, very close together (in theexperiment, not the diagram) lines AP and BP are nearly parallel. Therefore, to a very closeapproximation,
AP = CP (8.1)

50 EXPERIMENT 8
Figure 8.1: Geometry to the LEFT of the Diffraction Grating
This means that, for constructive interference to occur at P , it must be true that
BC = nλ (8.2)
From the right angle triangle ACB, it can be seen that
BC = AB sin θ (8.3)
where AB is the distance between the two slits on the Diffraction Plate. Therefore,
nλ = AB sin θ (8.4)
So, you need only to measure the value of θ for a particular value of n to determine the wave-length of the light.
To measure θ, notice that the dotted lines in the illustration show a projection of the interferencepattern on the Diffraction Scale (as it appears when looking through the slits). Notice that
θ′ = arctan(X/L) (8.5)
It can also be shown from the diagram that, if BP is parallel to AP as we have already assumed,then
θ′ = θ (8.6)
Therefore,
θ = arctan(X/L) (8.7)
and

TWO-SLIT INTERFERENCE 51
Figure 8.2: Geometry to the RIGHT of the Diffraction Grating
nλ = AB sin(arctan(X/L)) (8.8)
So to calculate wavelength:
λ =AB
nsin(arctan(X/L)) (8.9)
Apparatus
• 3 Coloured Filters (red, green, blue)
• Diffraction Plate and Diffraction Scale
• Slit Mask and Light Source
• 2 Component Holders and Optics Bench

52 EXPERIMENT 8
Procedure
1. Set up the equipment as shown in the apparatus diagram. To increase the accuracy ofyour measurements, arrange your equipment such that L is as large as possible. The SlitMask should be centered on the Component Holder on the side closest to the Light Source.
2. While looking through the Slit Mask, adjust the position of the Diffraction Scale so youcan see the filament of the Light Source through the slot in the Diffraction Scale.
3. Attach the Diffraction Plate to the other side of the Component Holder. Center patternD (AB = 0.125mm), on the Diffraction Plate, with the slits vertical (in the aperture ofthe Slit Mask).
4. Now, look through the slits. By centering your eye so that you look through both theslits and the window of the Diffraction Scale, you should be able to see clearly, both theinterference pattern and the illuminated scale on the Diffraction Scale.
Note: In this experiment, you look through the narrow slits at the light source, andthe diffraction pattern is formed directly on the retina of your eye. You then see thisdiffraction pattern superimposed on your view of the illuminated diffraction scale. Thegeometry is therefore slightly more complicated than it would be if the pattern were pro-jected onto a screen, as in most textbook examples. (A very strong light source, such asa laser, is required in order to project a sharp image of a diffraction pattern onto a screen.)
5. Place the red filter over the Light Source aperture. Then, select a value of n as large aspossible. You will notice that the maxima are not as sharp as n gets larger. So, you mayfind that n = 4 is just about the right choice to optimize the accuracy of n.
6. Look carefully at where your chosen light band lines up with the Diffraction Scale. Recordthis value as X in the Data Table. Now calculate λ for red light.
7. Repeat steps 5 and 6 for the green and blue filters.
8. Repeat steps 5, 6. and 7 for pattern E (AB = 0.250mm).
9. Compare the values of wavelength for the same colour of light by finding the percentdifferences.

TWO-SLIT INTERFERENCE 53
Discussion and Conclusion
Comment on whether your results support equation (8.9) and if the colour bands fall withinthe correct ranges. Explain. Outline and discuss at least two possible sources of error whichmay have occurred during the collection of the data and how they could have been avoided.
Data Table: Two-Slit Interference
Colour n ABslitspacing X L λ(m) (m) (m) (m)
Red
Green
Blue
Red
Green
Blue
Date:
Instructor’s Name:
Instructor’s Signature:

54 EXPERIMENT

Appendix A
Error Analysis
A.1 Measurements and Experimental Errors
The word “error” normally means “mistake”. In physical measurements, however, error means“uncertainty”. We measure quantities like temperature, electric current, distance, time, speed,etc ... using measuring devices like thermometers, ammeters, tape measures, watches etc.When a measurement of a certain quantity is performed, it is important to know how accurateor precise this measurement is. That is, a quantitative evaluation of how close we think thismeasurement is to the “true” value of the quantity must be established. An experimenter mustlearn how to assess the uncertainties or errors associated with a physical measurement so thathe/she can convey a true picture of just how accurately a certain quantity has been measured.In general there are three possible sources or types of experimental errors: systematic, instru-mental, and statistical. The following are guidelines which are commonly followed in definingand estimating these different forms of experimental errors.
A.1.1 Systematic Errors:
These errors occur repeatedly (systematically) every time a measurement is made and in generalwould be present to the same extent in each measurement. They arise because of miscalibrationof a measuring device, ignoring some physical assumptions that should be taken into accountwhen using an instrument, or simply misreading a measuring device. An example of a sys-tematic error due to miscalibration is the recording of time at which an event occurs with awatch that is running late; every event will then be recorded late. Another example is readingan electric current with a meter that is not zeroed properly. If the needle of the meter pointsbelow zero when there is no current, then the reading of any current will be systematically lessthan the true current.
As an example of a systematic error due to ignoring some physical assumptions in a measure-ment, consider an experiment to measure the speed of sound in air by measuring the time ittakes sound (from a gun shot, for example) to travel a known distance. If there is a wind

56 EXPERIMENT A
blowing in the same direction as the direction of travel of the sound then the measured speedof sound would be larger than the speed of sound in still air, no matter how many times werepeated the measurement. Clearly this systematic error is not due to any miscalibration ormisreading of the measuring devices, but due to ignoring some physical factors that could in-fluence the measurement.
An example of a systematic error due to misreading an instrument is parallax error. Parallaxerror is an optical error that occurs when a laboratory meter or similar instrument is read fromone side rather than straight on. The needle of the meter would then appear to point to areading on the side opposite to the side the meter is being looked at.
There is no general rule for the estimation of systematic errors. Each experimental situationhas to be investigated individually for the possible sources and magnitudes of systematic errors.Care should be taken to reduce as much as possible the occurrence of systematic errors in ameasurement. This could be done by making sure that all instruments are calibrated andread properly. The experimenter should be aware of all physical factors that could influencehis/her measurement and attempt to compensate for or at least estimate the magnitude of suchinfluences. A widely used technique for the elimination of systematic errors is to repeat themeasurement in such a way that the systematic error adds to the measured quantity in onecase and subtracts from it in another. In the example about measuring the speed of soundgiven above, if the measurement was repeated with the position of the source and detector ofthe sound interchanged, the wind speed would diminish the sound speed in this case, insteadof adding to it. The effect of the wind speed will thus cancel when the average of the twomeasurements is taken.
A.1.2 Instrumental Uncertainties:
There is a limit to the precision with which a physical quantity can be measured with a giveninstrument. The precision of the instrument (which we call here the instrumental uncertainty)will depend on the physical principles on which the instrument works and how well the instru-ment is designed and built. Unless there is reason to believe otherwise, the precision of aninstrument is taken to be the smallest readable scale division of the instrument. In this coursewe will report the instrumental uncertainty as one half of the smallest readable scale division.Thus if the smallest division on a meter stick is 1 mm, we report the length of an object whoseedge falls between the 250 mm and 251 mm marks as 250.5±0.5 mm. If the edge of the objectfalls much closer to the 250 mm mark than to the 251 mm mark we may report its length as250.0±0.5 mm. Even though we might be able to estimate the reading of a meter to, let’s say,110
of the smallest division we will still use one half of the smallest division as our instrumentaluncertainty. Our assumption will be that had the manufacturer of the instrument thought thathis/her device had a precision of 1
10of the smallest division, then he/she would have told us so
explicitly or else would have subdivided the reading into more divisions. For meters that giveout a digital reading, we will take the instrumental uncertainty again to be one half of the least

ERROR ANALYSIS 57
significant digit that the instrument reads. Thus if a digital meter reads 2.54 mA, we will takethe instrumental error to be ±0.005 mA, unless the specification sheet of the instrument saysotherwise.
A.1.3 Statistical Errors:
Several measurements of the same physical quantity may give rise to a number of differentresults. This random or statistical difference between results arises from the many small andunpredictable disturbances that can influence a measurement. For example, suppose we per-form an experiment to measure the time it takes a coin to fall from a height of two metersto the floor. If the instrumental uncertainty in the stop watch we use to measure the time isvery small, say 1
100second, repetitive measurement of the fall time will reveal different results.
There are many unpredictable factors that influence the time measurement. For example,the reaction time of the person starting and stopping the watch might be slightly differenton different trials; depending on how the coin is released, it might undergo a different num-ber of flips as it falls each different time; the movement of air in the room could be differentfor the different tries, leading to a different air resistance. There could be many more suchsmall influences on the measured fall time. These influences are random and hard to predict;sometimes they increase the measured fall time and sometimes they decrease it. Clearly thebest estimate of the “true” fall time is obtained by taking a large number of measurements ofthe time, say t1, t2, t3, ...tN , and then calculating the average or arithmetic mean of these values.
The arithmetic mean, t is defined as:
t =(t1 + t2 + t3 + ...+ tN)
N=
1
N
N∑i=0
ti (A.1)
where N is the total number of measurements.
To indicate the uncertainty or the spread in these measured values about the mean, a quan-tity called the standard deviation is generally computed. The standard deviation of a set ofmeasurements is defined as:
σsd =
√1
N[(t1 − t)2 + (t2 − t)2 + (t3 − t)2 + ...+ (tN − t)2]
or
σsd =
√√√√ 1
N
N∑i=1
∆t2i (A.2)
where ∆ti = (ti − t)) is the deviation and N is the number of measurements. The standarddeviation is a measure of the spread in the measurements ti. It is a good estimate of the erroror uncertainty in each measurement ti. The mean, however, is expected to have a smaller

58 EXPERIMENT A
uncertainty than each individual measurement. We will show in the next section that theuncertainty in the mean is given by:
δt =σsd√N
(A.3)
According to the above equation, if four measurements are made, the uncertainty in the meanwill be two times smaller than that of each individual measurement; if sixteen measurements aremade the uncertainty in the mean will be four times smaller than that of an individual measure-ment and so on; the large the number of measurements, the smaller the uncertainty in the mean.
Most scientific calculators nowadays have functions that calculate averages and standard devi-ations. Please take the time to learn how to use these statistical functions on your calculator.
Significance of the standard deviation: If a large number of measurements of an observ-able are made, and the average and standard deviation calculated, then 68% of the measure-ments will fall between the average minus the standard deviation and the average plus thestandard deviation. For example, suppose the time it takes a coin to fall from a height oftwo meters was measured one hundred times and the average found to be 0.6389 s and thestandard deviation 0.10 s. Then approximately 68% of those measurements will be between0.5389 s (0.6389-0.10) and 0.7389 s (0.6389+0.10), and of the remaining 32 measurements ap-proximately 16 will be larger than 0.7389 s and 16 will be less than 0.5389 s. In this examplethe statistical uncertainty in the mean will be 0.010 s ( 0.10√
100).
A comment about significant figures: The least significant figure used in reporting a resultshould be at the same decimal place as the uncertainty. Also, it is sufficient in most cases toreport the uncertainty itself to one significant figure. Hence in the example given above, themean should be reported as 0.64±0.01 s.
A.2 Combining Statistical and Instrumental Errors
In the following discussion we will assume that care has been taken to eliminate all gross sys-tematic errors and that the remaining systematic errors are much smaller than the instrumentalor statistical ones. Let IE stand for the instrumental error in a measurement and SE for thestatistical error, then the total error, TE, is given by:
TE =√
(IE)2 + (SE)2 (A.4)
In a good number of cases, either the IE or the SE will be dominant and hence the total errorwill be approximately equal to the dominant error. If either error is less than one half of theother then it can be ignored. For example, if, in a length measurement, SE = 1 mm and IE =0.5 mm, then we can ignore the IE and say TE = SE = 1 mm. If we had done the exact calcu-lation (i.e. calculated TE from the above expression) we would have obtained TE = 1.1 mm.

ERROR ANALYSIS 59
Since it is sufficient to report the error to one significant figure, we see that the approximationwe made in ignoring the IE is good enough.
Equation (3) suggests that the uncertainty in the mean gets smaller as the number of mea-surements is made larger. Can we make the uncertainty in the mean as small as we want bysimply repeating the measurement the requisite number of times? The answer is no; repeatinga measurement reduces the statistical error, not the total error. Once the statistical error isless than the instrumental error, repeating the measurement does not buy us anything, sinceat that stage the total error becomes dominated by the IE. In fact, you will encounter manysituations in the lab where it will not be necessary to repeat the measurement at all becausethe IE error is the dominant one. These cases will usually be obvious. If you are not sure thenrepeat the measurement three or four times. If you get the same result every time then the IEis the dominant error and there is no need to repeat the measurement further.
A.3 Propagation of Errors
Very often in experimental physics a quantity gets “measured” indirectly by computing itsvalue from other directly measured quantities. For example, the density of a given materialmight be determined by measuring the mass m and volume V of a specimen of the materialand then calculating the density as ρ = m
V. If the uncertainty in m is δm and the uncertainty
is V is δV , what is the uncertainty in the density δρ? We will not give a proof here, but theanswer is given by:
δρ = ρ
√δmm
2
+δVV
2
More generally, if N independent quantities x1, x2, x3, ... are measured and their errors δx1, δx2, δx3,... determined, and if we wish to compute a function of these quantities
y = f(x1, x2, x3, ..., xN)
then the error on y is:
σy =
√[∂y
∂x1
δx1]2 + [∂y
∂x2
δx2]2 + [∂y
∂x3
δx3]2 + ... =
√√√√ N∑i=1
[∂y
∂xiδxi]2 (A.5)
Here ∂y∂xi
is the partial derivative of f with respect to xi. Note that the x′is do not have to bemeasurements of the same observable; x1 could be a length, x2 a time, x3 a mass and so forth.It makes the notation easier to call them x′is rather than L,t, m and so forth.
Applying the above formula to the most common functions encountered in the lab, the followingequations can be used in error analysis.

60 EXPERIMENT A
A.3.1 Linear functions:
y = Ax (A.6)
where A is a constant (i.e. has no error associated with it), then
δy = Aδx (A.7)
A.3.2 Addition and subtraction:
z = x± y (A.8)
then
δz =√δx2 + δy2 (A.9)
Clearly if
z = Ax±By (A.10)
where A and B are constants, then
δz =√
(Aδx)2 + (Bδy)2 (A.11)
A.3.3 Multiplication and division:
z = xy or z =x
y(A.12)
then we can show that:
δz
z=
√√√√δxx
2
+δyy
2
(A.13)
Note: This method should not be used in cases including exponents.
A.3.4 Exponents:
z = xn (A.14)
where n is a constant, then we can similarly show that:
δz
z=nδx
x(A.15)

ERROR ANALYSIS 61
For the more general case wherez = Axnym (A.16)
where A, n, m are constants, the error would be given by:
δz
z=
√√√√nδxx
2
+mδy
y
2
(A.17)
Examples on the application of the above formula follow:
z = Axy δzz
=
√ δxx
2+
δyy
2
z = Ax2 δzz
= 2 δx
x
z = A
√x δz
z= 1
2
δxx
z = A
xδzz
= δxx
A.3.5 Other frequently used functions:
y = Asin(Bx) δy = ABcos(Bx)δx
y = ex δy = exδx
y = lnx δy = 1xδx
Often, the uncertainty in a quantity y is not reported as the absolute uncertainty δy but ratheras a percentage uncertainty, 100%× δy
y. For example, if the length of an object is measured to be
25.6 mm, with an uncertainty of 0.3 mm, then the percentage uncertainty is 1% (100%× 0.325.6
).
A.4 Percent Difference:
Calculating percent difference when comparing results is often useful. The appropriate formulais:
Percent Difference =|Theoretical V alue − Experimental Result|
|Theoretical V alue|· 100% (A.18)