user guide - grady management · user guide . 2015 . ... work out of the “leads” tab and your...
TRANSCRIPT

User Guide
2015
www.Lead2Lease.com
This Manual and the policies and procedures contained herein are the confidential and proprietary information of RealPage, Inc. This Manual may not be copied, distributed, or otherwise disclosed outside of RealPage’s facilities, and may not be used in any way unless expressly authorized by RealPage. © RealPage 2015. All rights reserved.

Table of Contents
Section Page
Introduction 3
Home Tab 3
SmartAlert 6
Leads Tab 7
Managing an Unmanaged Lead 9
Adding Leads 12
Following Up with Leads 14
Quoting a Price 20
Emailing a Prospect through Lead2Lease 21
Attachment Library 25
Editing your Policies 26
Phone Leads 33
Settings 38
Reporting 44
Source Cost 47
Training and Events 48
This Manual and the policies and procedures contained herein are the confidential and proprietary information of RealPage, Inc. This Manual may not be copied, distributed, or otherwise
disclosed outside of RealPage’s facilities, and may not be used in any way unless expressly authorized by RealPage. © RealPage 2015. All rights reserved.

Welcome to Lead2Lease!
Introduction:
Lead2Lease is a lead management tool designed to help you manage all of your leads from all sources. Lead2Lease will help you organize all of your guest cards, track all of your leads and will help you follow up with all of your prospects. This is an internal tool designed for the on-site staff. Lead2Lease is not an advertising source, but works alongside all of your advertising sources! Keep in mind that when you start using a new advertising source it is important to notify Lead2Lease so that every lead that comes in through the new source goes into your Lead2lease account.
Home Tab:
Log into Lead2Lease: http://www.lead2lease.com/ with your username and password provided to you.
This Manual and the policies and procedures contained herein are the confidential and proprietary information of RealPage, Inc. This Manual may not be copied, distributed, or otherwise disclosed outside of RealPage’s facilities, and may not be used in any way unless expressly authorized by RealPage. © RealPage 2015. All rights reserved.

Below is your opening screen, this is where you will begin your day. Your “Home” tab shows you the leads you will need to follow up with as well as the appointments you have scheduled for the day. Your “Home” tab is essentially your virtual To Do List for prospect follow-up.
Lead Follow-up Optimization:
On a user’s property dashboard, lead follow-up has been optimized to target the logged-in user’s set follow-ups and appointments. The optimization groups leads by the user who set the follow-up event or appointment, when just mine is selected in the drop-down. To see all follow-ups and appointments chose Show All from the dropdown. The site activity stream holds the last 60 actions performed onsite. It names the user who performed the last action and on which guest card.
This Manual and the policies and procedures contained herein are the confidential and proprietary information of RealPage, Inc. This Manual may not be copied, distributed, or otherwise
disclosed outside of RealPage’s facilities, and may not be used in any way unless expressly authorized by RealPage. © RealPage 2015. All rights reserved.
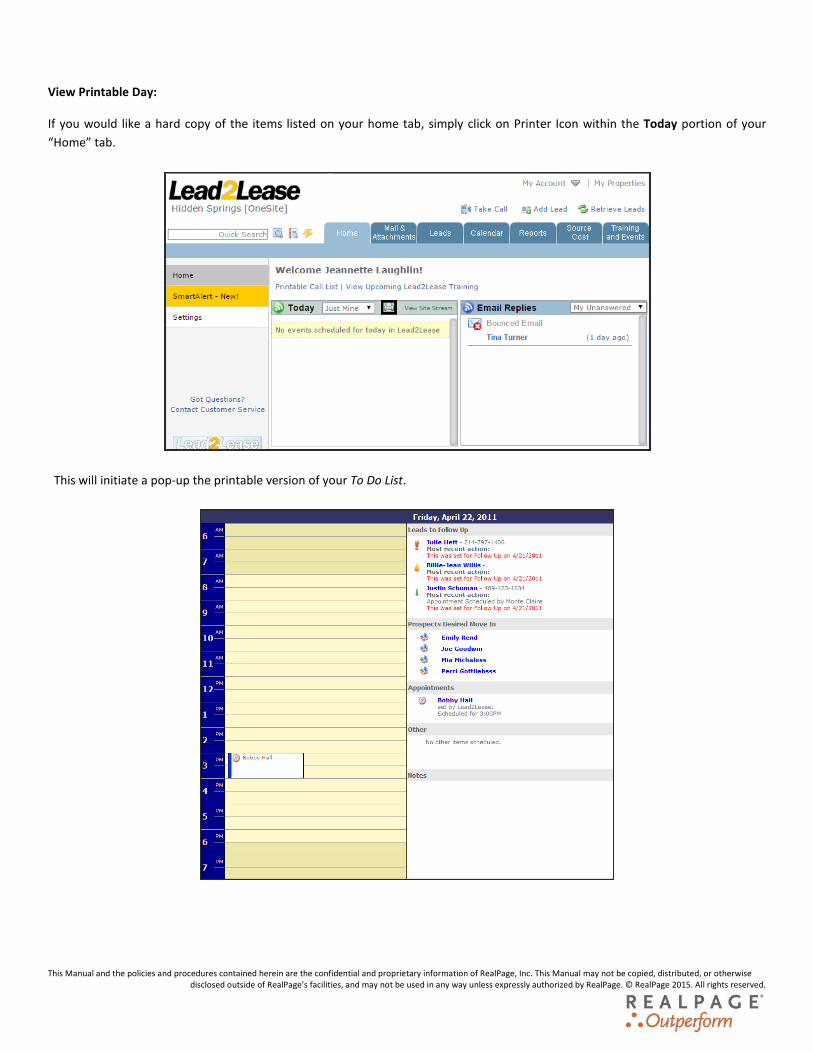
View Printable Day:
If you would like a hard copy of the items listed on your home tab, simply click on Printer Icon within the Today portion of your “Home” tab.
This will initiate a pop-up the printable version of your To Do List.
This Manual and the policies and procedures contained herein are the confidential and proprietary information of RealPage, Inc. This Manual may not be copied, distributed, or otherwise disclosed outside of RealPage’s facilities, and may not be used in any way unless expressly authorized by RealPage. © RealPage 2015. All rights reserved.

SmartAlert Smart Alert is a desk-top installed feature that assists with reminding you of follow-up and alerts you of new leads. With the permission of your management company this can be installed for free by contacting our support team. Please see the see the SmartAlert user’s guide for more detail on this functionality.
This Manual and the policies and procedures contained herein are the confidential and proprietary information of RealPage, Inc. This Manual may not be copied, distributed, or otherwise disclosed outside of RealPage’s facilities, and may not be used in any way unless expressly authorized by RealPage. © RealPage 2015. All rights reserved.

Leads Tab:
Work out of the “Leads” tab and your “My Leads” sub-tab when following up with prospects. Your “Leads” tab is defaulted to the “Unmanaged” sub-tab. The “Unmanaged” sub-tab will display all of your leads that have not yet had follow-up action performed. In addition, when viewing the “All Leads” tab you will be able to determine which leads are unmanaged by the red flag posted next to
them:
If you would like to view the today dashboard within the Leads tab click Show Dashborad Widgets.
This Manual and the policies and procedures contained herein are the confidential and proprietary information of RealPage, Inc. This Manual may not be copied, distributed, or otherwise
disclosed outside of RealPage’s facilities, and may not be used in any way unless expressly authorized by RealPage. © RealPage 2015. All rights reserved.

Below is a Priority icon legend and definitions
: The red exclamation point means this prospect needs immediate attention and is looking for an apartment when a move-in date is recognized of 10 days or sooner. These leads will automatically be pushed to the top of your “Unmanaged” list.
: The orange fire drop means this prospect is a Hot Lead. The “hot lead” priority is not assigned automatically, but can be assigned within the prospect guest card as you see fit.
: The green downward indicates a “Mild Inquiry”. The Mild Inquiry priority is not assigned automatically, but can be assigned within the prospect guest card as you see fit.
There are also type icons. These icons inform you how the lead reached out to the community initially.
Below is a Lead Type icon legend
: This green man signifies your walk-in leads.
: This envelope signifies your e-mail leads.
: This phone signifies your phone call leads.
This Manual and the policies and procedures contained herein are the confidential and proprietary information of RealPage, Inc. This Manual may not be copied, distributed, or otherwise disclosed outside of RealPage’s facilities, and may not be used in any way unless expressly authorized by RealPage. © RealPage 2015. All rights reserved.

Managing an Unmanaged Lead Unmanaged Leads: In order to remove a lead from the “Unmanaged” sub-tab you must perform a follow up action under the Lead Progress bar. Also, please be aware that the notes field is available for any comments you have about the communication between you and the prospect. You are also able to set a reminder for this prospect. Once you add the action and your notes simply click the ‘Add Action’ button and your action will be recorded under the Lead History bar. The following actions count as follow-ups on Lead2Lease reports; e-mailed, phoned, sent follow-up and toured property. Concluding a lead that is no longer active or not an actual prospect does count toward your managed percentage.
Once an action is added the unmanaged guest card will then be removed from your “Unmanaged” sub-tab. In addition, any follow-up reminder that was scheduled for the guest card will automatically be removed once the action is logged into the system due to the option of Remove existing follow-up reminder automatically being checked in the Lead Progress section. A copy of the guest card will then be available in your “My Leads” tab as well as the “All Leads” tab. With a copy of this guest card in your “My Leads” sub-tab it will allow you to perform subsequent follow ups. Assigning Leads: Another way to transfer leads from the unmanaged tab is to give them to an agent. Check the box in the ! column, select the site member you want to manage the lead from the drop down, then click give. The lead will no longer appear in the unmanaged view but will be in the “My Leads” tab of that team member. It will have a new icon on it and still is unmanaged until an agent follows up.
This Manual and the policies and procedures contained herein are the confidential and proprietary information of RealPage, Inc. This Manual may not be copied, distributed, or otherwise
disclosed outside of RealPage’s facilities, and may not be used in any way unless expressly authorized by RealPage. © RealPage 2015. All rights reserved.

Setting a Follow-up Reminder: There are two ways to set a follow up reminder in Lead2Lease. The first way is to check the box while adding an action.
An automatic follow-up will be set for all brand new leads the day of creation to remind you to perform initial outreach. The second way to set a follow up is manually by clicking on the Change link in the Lead-Follow-up bar
This will open this box where you can specify, date, time and notes. In order to save your follow-up reminder always click the ‘Set Follow-up’ button.
This Manual and the policies and procedures contained herein are the confidential and proprietary information of RealPage, Inc. This Manual may not be copied, distributed, or otherwise disclosed outside of RealPage’s facilities, and may not be used in any way unless expressly authorized by RealPage. © RealPage 2015. All rights reserved.

Searching for a lead: Lead2Lease provides three different methods to assist you with locating a prospect. To find a guest card within the leads tab, use the search by and use the criteria of the prospect’s first or last name.
Quick Search is located at the top left hand corner of the screen. This search function is helpful because it allows you to enter partial or full first or last name, email addresses, and phone numbers in xxx-xxx-xxxx format. Simply enter the search term and press the magnifying glass. Quick search will go through the entire database to help you find the lead.
Advanced Search is useful when you are having difficulty locating a lead. All leads created longer than one year ago will only be found via Advanced Search. Another benefit of the Advanced Search is to use specific criteria to find a grouping of leads. For example you can filter all the prospects interested in two bedrooms so that you can update them on availability.
This Manual and the policies and procedures contained herein are the confidential and proprietary information of RealPage, Inc. This Manual may not be copied, distributed, or otherwise disclosed outside of RealPage’s facilities, and may not be used in any way unless expressly authorized by RealPage. © RealPage 2015. All rights reserved.

Adding Leads To create a New Lead simply click the Add Lead link in the top of the screen
Once the page has had a chance to load the New Lead Guest Card page will be visible and you can begin to enter all of your prospects information. Please note, all starred fields and at least one piece of contact information is required in order to save your new guest card along with a first or last name. Unit-type and Move-in dates can now be made required fields company wide. You also have the ability to set an appointment while setting up your new guest card, simply check the Set an Appointment box.
This Manual and the policies and procedures contained herein are the confidential and proprietary information of RealPage, Inc. This Manual may not be copied, distributed, or otherwise disclosed outside of RealPage’s facilities, and may not be used in any way unless expressly authorized by RealPage. © RealPage 2015. All rights reserved.

Lead2Lease recognizes when similar leads match in the system. A yellow box with a warning will appear if Lead2Lease finds a match in the system as you create your guest card. If the lead is already in the system simply select the name from the options provided. If this is not the case and this is a unique lead, you can press the ‘Prospect not listed -> Continue with New Lead Creation’ button to add the guest card.
Once you have filled out all the details you have about your prospect , click save.
This Manual and the policies and procedures contained herein are the confidential and proprietary information of RealPage, Inc. This Manual may not be copied, distributed, or otherwise disclosed outside of RealPage’s facilities, and may not be used in any way unless expressly authorized by RealPage. © RealPage 2015. All rights reserved.

Following Up with Leads Now that you are familiar with adding leads, let’s learn how to follow up with your existing leads!
Below is a Status icon legend and brief descriptions:
:The open door indicates a status of Active Lead.
:The green dollar sign indicates a status of a Sucessful or Leased Lead.
:The closed door indicates a status of Dead Lead.
The “My Leads” tab is optimized for the Leasing Agent. This view empowers users to detect which leads they have not yet viewed by
bolding them. Leads that the leasing agent has not followed-up with are marked with a New icon. Follow-up actions are defined as (emailed, phoned, toured property, set appointment, and sent follow-up). Additional follow-up reminder details are visible by hovering over the follow-up date. The page also includes individual inquiry preferences such as move-in date, desired bed/bath mix and desired floor plan.
This Manual and the policies and procedures contained herein are the confidential and proprietary information of RealPage, Inc. This Manual may not be copied, distributed, or otherwise
disclosed outside of RealPage’s facilities, and may not be used in any way unless expressly authorized by RealPage. © RealPage 2015. All rights reserved.

Managing an existing lead is as simple as going into your “My Leads” tab and selecting a prospect and adding an action. Don’t forget to add your notes! The notes section will help you recall any information about your prospects. All of the actions and information you have collected will be logged in your Lead History bar.
Your lead’s history also records your appointments that were scheduled. You can schedule appointments upon adding the lead or the set appointment button.
This Manual and the policies and procedures contained herein are the confidential and proprietary information of RealPage, Inc. This Manual may not be copied, distributed, or otherwise disclosed outside of RealPage’s facilities, and may not be used in any way unless expressly authorized by RealPage. © RealPage 2015. All rights reserved.

In your Calendar view you have access to see what times are available for the entire community. You can also view by month if you need to schedule a future appointment.
You are able to view the notes for your appointments by clicking on the either the Made an Appointment or View Details links.
This Manual and the policies and procedures contained herein are the confidential and proprietary information of RealPage, Inc. This Manual may not be copied, distributed, or otherwise disclosed outside of RealPage’s facilities, and may not be used in any way unless expressly authorized by RealPage. © RealPage 2015. All rights reserved.

Lead Closure Prompt: When you mark an active lead as a non-lead or duplicate in the lead category drop-down, you have the option of automatically closing that lead. In order for the non-lead or duplicate reason to integrate to your PMS system, there must be a match to that reason in your PMS. For example for Non-Lead there must be a term beginning with not a prospect, non-lead, non-prospect, non-lead, and not a lead.
This Manual and the policies and procedures contained herein are the confidential and proprietary information of RealPage, Inc. This Manual may not be copied, distributed, or otherwise
disclosed outside of RealPage’s facilities, and may not be used in any way unless expressly authorized by RealPage. © RealPage 2015. All rights reserved.

Lead Transfer:
You have the ability to give a lead to another leasing agent via the prospect guest card. Users can transfer a prospect to another leasing agent or another property from within the lead details page. To initiate this, the user simply needs to click the “Transfer Lead” button and choose either Agent or Another Property. Then choose the agent or property in the drop down list.
Upon transferring to a new property the lead is automatically synced to that property’s PM system as long as the box is left checked.
This Manual and the policies and procedures contained herein are the confidential and proprietary information of RealPage, Inc. This Manual may not be copied, distributed, or otherwise
disclosed outside of RealPage’s facilities, and may not be used in any way unless expressly authorized by RealPage. © RealPage 2015. All rights reserved.

Lead Details: Save & Return Buttons in the lead details page allow a user to ‘Save’ and then return to the last page they were on. If the user clicked directly into the lead (from an external application) the buttons will not be available.
This Manual and the policies and procedures contained herein are the confidential and proprietary information of RealPage, Inc. This Manual may not be copied, distributed, or otherwise disclosed outside of RealPage’s facilities, and may not be used in any way unless expressly authorized by RealPage. © RealPage 2015. All rights reserved.

Quoting a Price
Prospect Guest Card – Check Availability Button & YieldStar Quoting Lead2Lease gives you the ability to quote YieldStar Direct and OneSite pricing and availability based on your prospect’s desired move in date and lease term preferences. For more specifics please see the User’s Guide for your particular quoting system. Quoting is enabled in your account if you see the “Check Availability” button below. If you do not see this button and would like this feature enabled, please contract our Product Support team, additional information from you may be required to complete the setup.
This Manual and the policies and procedures contained herein are the confidential and proprietary information of RealPage, Inc. This Manual may not be copied, distributed, or otherwise disclosed outside of RealPage’s facilities, and may not be used in any way unless expressly authorized by RealPage. © RealPage 2015. All rights reserved.

Emailing a Prospect through Lead2Lease Email Lead: You have the ability to e-mail your prospect directly from your Lead2Lease Account. To email a lead when first entering a guest card, press the “Save and Email’” button
To send an email to an existing guest card: Go into the guest card of the prospect you wish to e-mail, and click on the “Email Lead” button directly under the Lead Comments box.
This Manual and the policies and procedures contained herein are the confidential and proprietary information of RealPage, Inc. This Manual may not be copied, distributed, or otherwise disclosed outside of RealPage’s facilities, and may not be used in any way unless expressly authorized by RealPage. © RealPage 2015. All rights reserved.

Your e-mail screen will then appear. You have the option of selecting yourself to be copied on the e-mail that is sent out to your prospect. If your name is not available in the drop down, that simply means we do not have your e-mail address on file. When your prospect replies to your e-mail the response will then go to your property e-mail address. In your settings tab you can save a default subject for your emails. Lead2Lease also has drop down menus that will help you to compose your e-mail in a few clicks of a button! This is possible because your Lead2Lease account has property specific policies that will allow you to auto-populate your email with information specific to your leads inquiry. The first drop-down menu allows you to select the specific category that your policy is housed under and the second drop-down menu allows you to select the policy that you would like to include in your email. For example: to enter in a One Bedroom Policy, simply click on Apartment Unit/Mix Details category from the first drop-down menu and then select the One Bedroom policy and click the ‘Add’ button. This will insert the current policy you have available in your Lead2Lease Account. When composing the email you will have the option to toggle back and forth between the guest card Lead Detail and Email History. Email history will show you all the emails sent to and from your lead. When typing a message in the email body, you can reference the “Email History” without losing the message you were typing. For more details regarding 2-way emailing, please reference the 2-way emailing guide.
This Manual and the policies and procedures contained herein are the confidential and proprietary information of RealPage, Inc. This Manual may not be copied, distributed, or otherwise disclosed outside of RealPage’s facilities, and may not be used in any way unless expressly authorized by RealPage. © RealPage 2015. All rights reserved.

Lead2Lease gives you the ability to attach files from your computer or from your attachment library! When you click Your Computer you are able to upload any file saved on your computer that is less than 4MB in size.
When you click Attachment Library, you will be able to upload previously saved documents stored in Lead2Lease. You also have the option of including the attachment as a link.
This Manual and the policies and procedures contained herein are the confidential and proprietary information of RealPage, Inc. This Manual may not be copied, distributed, or otherwise disclosed outside of RealPage’s facilities, and may not be used in any way unless expressly authorized by RealPage. © RealPage 2015. All rights reserved.

Before you send your e-mail you are able to preview it, you can see it is not just a plain text e-mail that is sent out. Your e-mail is rich with graphics that are customizable by you! If you would like to change your template or add pictures simply send a request through to our Product Support Team and they will be more than happy to work with you to create a custom template for your property.
After an email is composed the user is redirected to the lead detail pages.
This Manual and the policies and procedures contained herein are the confidential and proprietary information of RealPage, Inc. This Manual may not be copied, distributed, or otherwise disclosed outside of RealPage’s facilities, and may not be used in any way unless expressly authorized by RealPage. © RealPage 2015. All rights reserved.

Attachment Library Lead2Lease gives you the ability to load and reuse your most used attachments when composing emails. All files will also go through virus scanning to improve safety and email deliverability.
Please note that any attachment that is uploaded into Lead2Lease will go through McAfee virus scanning. To upload documents to your attachment library first click the “Mail & Attachment” tab and select the Attachment Library link. Click the ‘Add Attachment’ button
Click the ‘Add Attachment’ button
1. You will then be prompted to enter a title for your document and select a category to store it in. 2. Then click browse to add a file that was saved on your computer. 3. Then click upload to save that file for future use. If its downloading too slow you may click the ‘Refresh Upload’ button.
This Manual and the policies and procedures contained herein are the confidential and proprietary information of RealPage, Inc. This Manual may not be copied, distributed, or otherwise disclosed outside of RealPage’s facilities, and may not be used in any way unless expressly authorized by RealPage. © RealPage 2015. All rights reserved.

Editing your Policies
Mail & Attachments Tab – Policy Information: All of your policies are editable by you or anyone with access to your property settings in your account. First click the “Mail & Attachments” tab.
When your page has finished loading select the “Policy Manager” sub tab on the left hand side of the screen. You will then have categories to choose from, and you can click on the category you wish to edit. Out of the policies listed you are able to Add, Edit, or Delete them.
This Manual and the policies and procedures contained herein are the confidential and proprietary information of RealPage, Inc. This Manual may not be copied, distributed, or otherwise disclosed outside of RealPage’s facilities, and may not be used in any way unless expressly authorized by RealPage. © RealPage 2015. All rights reserved.

If you currently do not have a signature, go to the Thank You category and select ‘Add’ to create your own personal signature.
Once the page reloads an edit box will appear and allowing you to insert any text you wish. Make sure you click on the ‘Add Policy’ button at the bottom of the screen to ensure your information was saved.
This Manual and the policies and procedures contained herein are the confidential and proprietary information of RealPage, Inc. This Manual may not be copied, distributed, or otherwise disclosed outside of RealPage’s facilities, and may not be used in any way unless expressly authorized by RealPage. © RealPage 2015. All rights reserved.

Auto Response: When prospects inquire via your online sources, they will automatically receive an auto-response email 24 hours a day, 7 days a week in real time! To view this, click the “Mail & Attachments” tab which defaults to “Overview”. Click the Preview your outbound email link. If you have a pop up blocker installed, you may not be able to see the preview. Please allow pop ups from Lead2Lease to view your email template.
This Manual and the policies and procedures contained herein are the confidential and proprietary information of RealPage, Inc. This Manual may not be copied, distributed, or otherwise disclosed outside of RealPage’s facilities, and may not be used in any way unless expressly authorized by RealPage. © RealPage 2015. All rights reserved.

Your Auto Response will have pictures of your property and links to your live website. Lead2Lease offers several template styles for you to use or you can customize your email template for a fee. If you want to change the pictures reflected on your Auto Response email, simply email the photos to our Product Support team in JPG format and we will update it for you.
The verbiage of your Auto Response email is customizable. To edit the verbiage simply click the “Preferences” sub tab in your “Mail & Attachments” tab.
This Manual and the policies and procedures contained herein are the confidential and proprietary information of RealPage, Inc. This Manual may not be copied, distributed, or otherwise disclosed outside of RealPage’s facilities, and may not be used in any way unless expressly authorized by RealPage. © RealPage 2015. All rights reserved.

For your Auto Response to be automatically sent out to prospects the circle next to Auto respond to emails in the Auto Reply section must be selected
Select send in HTML format in order to send rich graphic emails.
OneSite users have the option of adding availability to their auto response. Please contact Product Support to enable this feature.
You have the option of including your specials. Please note that you manage your specials and will need to update them as they expire. To ensure your specials are included in your Auto Response click the box above the Specials text box.
This Manual and the policies and procedures contained herein are the confidential and proprietary information of RealPage, Inc. This Manual may not be copied, distributed, or otherwise disclosed outside of RealPage’s facilities, and may not be used in any way unless expressly authorized by RealPage. © RealPage 2015. All rights reserved.
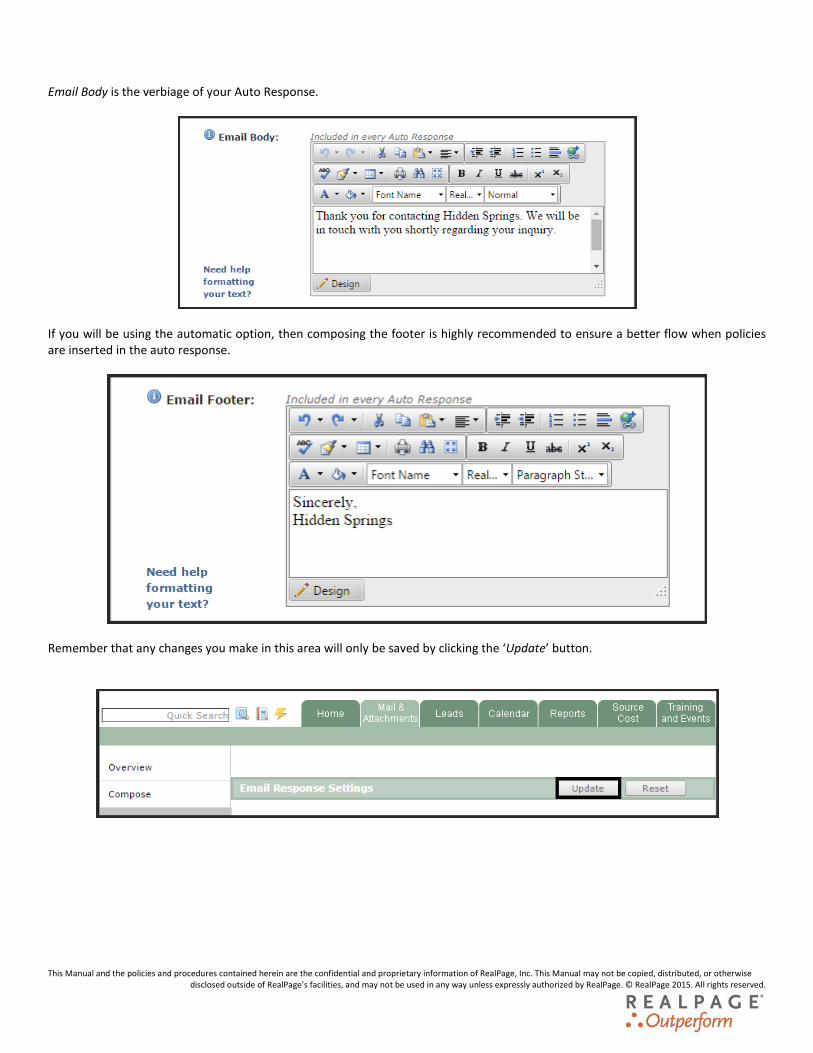
Email Body is the verbiage of your Auto Response.
If you will be using the automatic option, then composing the footer is highly recommended to ensure a better flow when policies are inserted in the auto response.
Remember that any changes you make in this area will only be saved by clicking the ‘Update’ button.
This Manual and the policies and procedures contained herein are the confidential and proprietary information of RealPage, Inc. This Manual may not be copied, distributed, or otherwise disclosed outside of RealPage’s facilities, and may not be used in any way unless expressly authorized by RealPage. © RealPage 2015. All rights reserved.

Search Terms: Lead2lease utilizes smart responses to your initial email inquiries when you have the Auto Response feature on. This means that any questions that your email leads ask will be answered automatically in your Auto Response email reply. You control the search terms. To access them within your policies click the “Mail & Attachments” tab and the Policy Manager link. Click ‘Edit’ to Add or Remove search terms. Remember to save your changes you must click the ‘Update Policy’ button.
This Manual and the policies and procedures contained herein are the confidential and proprietary information of RealPage, Inc. This Manual may not be copied, distributed, or otherwise
disclosed outside of RealPage’s facilities, and may not be used in any way unless expressly authorized by RealPage. © RealPage 2015. All rights reserved.

Phone Leads This section will apply only to properties using tracking numbers.
To activate the Click on Call feature of Lead2Lease, go to your “Home” tab and access your Click on Call option under the Settings link. In order to save the setting of enabling the Click on Call feature, please click on your ‘Update Settings’ button.
The Take Call link is located at the top of the screen
This Manual and the policies and procedures contained herein are the confidential and proprietary information of RealPage, Inc. This Manual may not be copied, distributed, or otherwise
disclosed outside of RealPage’s facilities, and may not be used in any way unless expressly authorized by RealPage. © RealPage 2015. All rights reserved.

There are two different ways to use the Take a Call feature:
1. When you press the Take Call link while the phone is ringing onsite (and the caller is using one of your published tracking numbers) Lead2Lease will also pull up the most current guest card, so you are able to use this feature to pull up the guest card of the prospect you are speaking with. If this is a new caller Lead2Lease will open a new guest card with the caller’s name and phone number. Please note that cell phone providers do not release caller names to tracking services. The number will be provided, but the name will be listed as Anonymous Caller or perhaps the state and city that their cell phone came from. Just enter in the appropriate name and contact information as you speak to the person over the phone. Private or Blocked callers will not list a phone number and the name will read Anonymous Caller.
This Manual and the policies and procedures contained herein are the confidential and proprietary information of RealPage, Inc. This Manual may not be copied, distributed, or otherwise disclosed outside of RealPage’s facilities, and may not be used in any way unless expressly authorized by RealPage. © RealPage 2015. All rights reserved.

2. When the phone is not ringing onsite click the Take Call link and you will be able to view the last 5 incoming calls from advertised call tracking numbers. The list of the last 5 incoming call will show you the lead’s name, call date and the lead source, assuming it was not an anonymous caller. There will also be a recorded message of the conversation between the caller and the person who answered your phone or a voicemail if the prospect left one. If you use Level One, you will also be able to hear the conversation your prospect had with the call center. Lead2Lease tracking numbers, Call Source & G5 record all phones and voicemails that come in via your published call tracking numbers. Simply press the ‘Play’ button to listen to the recordings. To save recordings right click the speaker icon and download.
Call Recording – Tracking and Performance Rating: Tracking Icons It is easy to know if a call has been listened to by viewing the recording icon.
: New recording
: Reviewed recording
: Rated recording
Clicking on either of the icons above now brings up the call recording in a new pop up window for easier interaction. This window includes the top portion of the guest card for your reference or documentation while listening to the call. You must click save guest card to keep any changes made to it during call review.
This Manual and the policies and procedures contained herein are the confidential and proprietary information of RealPage, Inc. This Manual may not be copied, distributed, or otherwise disclosed outside of RealPage’s facilities, and may not be used in any way unless expressly authorized by RealPage. © RealPage 2015. All rights reserved.

Reviewing (listening to) a call: The call rating workflow is accessed by clicking on the speaker icons in property inbound call list or the regional property inbound call list if you have access to multiple properties.
Tagging a Call: A user listening to a call can identify the agent handling the call by simply tagging the call in the pop up window. This information is used later to allow you to filter a list of calls by one specific agent.
Share audio link: You can share a call with someone else on your team. Simply click [Share Audio Link] – right click and select copy – then paste the link into an email or other document.
This Manual and the policies and procedures contained herein are the confidential and proprietary information of RealPage, Inc. This Manual may not be copied, distributed, or otherwise
disclosed outside of RealPage’s facilities, and may not be used in any way unless expressly authorized by RealPage. © RealPage 2015. All rights reserved.

Rating a Call: A simple 1-5 star rating system is available. This is not meant for scoring the quality of a lead, but for rating the performance of the agent that took the call. Always click save after entering a rating. This is a setting that can be enabled upon request by the Product Support team to single property users.
You have the ability to view and export your tracking numbers if you have purchased call tracking through Lead2Lease. Click on the Settings sub tab and click on the excel icon if you’d like to export the numbers.
This Manual and the policies and procedures contained herein are the confidential and proprietary information of RealPage, Inc. This Manual may not be copied, distributed, or otherwise disclosed outside of RealPage’s facilities, and may not be used in any way unless expressly authorized by RealPage. © RealPage 2015. All rights reserved.

Settings
Tour Hours: Your prospects have the ability to schedule their own appointments. Therefore, to ensure that multiple appointments are not scheduled on top of one another there is a function that limits how many appointments you are able to accept within one hour. Click onto the “Home” tab and select “Settings” sub tab on the left-hand side of the page. This screen will show you the Tour Hours bar and lists the closing and opening time of your property. If these hours do not coincide with your tour hours, you will need to put update them accordingly. Opening Time indicates the first time you would like to allow a prospect to go on tour. Closing Time indicates the last time of the day you would like to take a prospect on tour. If your office is closed for an entire day simply check the box on the corresponding day under the Office Closed Column. Also, please note, the Num of Appts section displays how many appointment you can allow within one hour. Prospects must give a two-hour window when booking tours on the same day. An email will be emailed to your property email address and you will have two-hours to assign a staff member to tour the prospect.
This Manual and the policies and procedures contained herein are the confidential and proprietary information of RealPage, Inc. This Manual may not be copied, distributed, or otherwise
disclosed outside of RealPage’s facilities, and may not be used in any way unless expressly authorized by RealPage. © RealPage 2015. All rights reserved.

If your property is closed for a full day or partial day due to an event or holiday, we have a separate area where you are able to log that information. You will need to go into your “Calendar” tab and click on the “Schedule Events” sub tab on the left-hand side.
Click the ‘Add New Event’ button
This Manual and the policies and procedures contained herein are the confidential and proprietary information of RealPage, Inc. This Manual may not be copied, distributed, or otherwise disclosed outside of RealPage’s facilities, and may not be used in any way unless expressly authorized by RealPage. © RealPage 2015. All rights reserved.

Your edit screen will then be available. You will be able to specify an event date and time, as well as enter a description of the event. If you don’t want tours scheduled during your event, you must uncheck the Allow Prospect Appointment box. The option to set a reminder for your event is available on this screen as well. To save your event, click the ‘Add Event’ button.
This Manual and the policies and procedures contained herein are the confidential and proprietary information of RealPage, Inc. This Manual may not be copied, distributed, or otherwise disclosed outside of RealPage’s facilities, and may not be used in any way unless expressly authorized by RealPage. © RealPage 2015. All rights reserved.

Lead Notification: Lead2Lease gives you the ability to receive an email each time a new email lead comes into your account. To access this function, select the “Home” tab and the Settings link located on the left-side of the screen. Scroll down to General Settings. Click the circle next to Receive an email every time a lead is processed. Press the ‘New’ button and the Add Recipient box will appear. Fill in the name and email address and click add.
Lead Follow-up Filter: Within the Settings page of Lead2Lease, you have the ability to include/exclude leased or dead leads on the home page’s lead follow-up section.
This Manual and the policies and procedures contained herein are the confidential and proprietary information of RealPage, Inc. This Manual may not be copied, distributed, or otherwise
disclosed outside of RealPage’s facilities, and may not be used in any way unless expressly authorized by RealPage. © RealPage 2015. All rights reserved.

Lead Ownership Model: Select the ownership style your property desires. The model chosen will affect the “My Leads” tab. Declarative: If you want only one agent owning a lead at a time, chose Declarative. Actions on leads don’t dictate ownership when using Declarative. Ownership of a lead must be taken manually by selecting the leasing agent’s name in the Lead Owner drop down menu within the guest card. Click save to finalize the ownership change Once an agent transfers a guest card that he or she owned to another agent, that guest card will no longer appear in his or her “My Leads” tab.
In order to determine who the lead owner is, simply veiw the Lead Owner field in the guest card
Save the guest card after the owner has been changed.
Shared: If you want multiple agents to have ownership and access to the same lead within their “My Leads” tab, chose the Shared model. In the Shared model any action taken on a lead puts that lead into the “My Leads” tab of that individual. Once a lead has been acted upon it cannot be removed from a user’s “My Leads” tab. Thus there are multiple lead owners in the Shared model. Always remember to click ‘Update Settings’ to save your changes.
This Manual and the policies and procedures contained herein are the confidential and proprietary information of RealPage, Inc. This Manual may not be copied, distributed, or otherwise
disclosed outside of RealPage’s facilities, and may not be used in any way unless expressly authorized by RealPage. © RealPage 2015. All rights reserved.

Lease Terms: Within the Settings page of Lead2Lease, you will see the same lease terms that exist in your OneSite system. Properties that are not integrated or use a PM system other than OneSite have the ability to choose the lease terms they would like to have available on their prospect guest card. Make this selection by checking the boxes to the corresponding months your property offers. Always remember to click ‘Update Settings’ to save your changes.
Default Email Subject: Enter the email subject here that you frequently send out to prospects. This can be adjusted in the compose email screen as needed. Always remember to click ‘Update Settings’ to save your changes.
Text Notification: Lead2Lease can also notify you via text message each time a new lead comes into your community. This is also located in the “Home” tab within the Settings link. Scroll down to Text Messaging Settings. Click the circle next to Receive a text message every time a lead is processed. Enter your cell phone number and service provider in the dropdown. Click Update Settings to save your number in Lead2Lease. This feature will only accommodate sending text messages to one phone number.
This Manual and the policies and procedures contained herein are the confidential and proprietary information of RealPage, Inc. This Manual may not be copied, distributed, or otherwise disclosed outside of RealPage’s facilities, and may not be used in any way unless expressly authorized by RealPage. © RealPage 2015. All rights reserved.

Reporting Lead2Lease has a number of reports available; to view these reports you will need to go into your “Reports” tab or the View Reports Selector in the Management Overview if you have access to multiple properties. The Reports Selection menu lists all of the reports currently available to all properties.
This Manual and the policies and procedures contained herein are the confidential and proprietary information of RealPage, Inc. This Manual may not be copied, distributed, or otherwise disclosed outside of RealPage’s facilities, and may not be used in any way unless expressly authorized by RealPage. © RealPage 2015. All rights reserved.

Each report, when hovered over, will display a brief description of the information it provides.
After selecting the report you would like to pull, you can select a specific date.
Within Additonal Options you have the ability to exclude Anonaymous Callers, phone leads in which a name wasn’t provided and non-lead callers,guest cards that’s total duration was not ten seconds, likely misdials. You can also change the report’s lease logic Lead2Lease default report logic is Net Lease Logic; a Successful Lease will only be reflected on the move-in date entered during the application phase for Yardi, MRI, and AMSI systems. Although Lead2Lease reports reflect Net Lease logic; Lead2Lease offers the option to generate reports based on Gross Lease Logic. Gross Lease Logic counts a prospect as a successful lease once their application is approved.
This Manual and the policies and procedures contained herein are the confidential and proprietary information of RealPage, Inc. This Manual may not be copied, distributed, or otherwise
disclosed outside of RealPage’s facilities, and may not be used in any way unless expressly authorized by RealPage. © RealPage 2015. All rights reserved.

Click the ‘Generate Report’ button
Reports – Prospect Inquiry Reports : When categorizing leads as Non Lead or Duplicate Lead in your prospect guest card, you can now remove these leads from your Prospect Inquiry Follow-up Reports.
There are two sub-categories of report logic. Create Date: Certain reports are generated based on Create Date logic which means any actions performed on a lead will be counted and reflected on that report as long as the lead itself was created within the selected date range of the report.
Activity Date: Certain reports are generated based on Activity Date logic which means any lead, follow-up, tour, applications or lease action that occurs within the select date ranges will be counted. These action totals may have been performed on leads that were created outside of the date range.
This Manual and the policies and procedures contained herein are the confidential and proprietary information of RealPage, Inc. This Manual may not be copied, distributed, or otherwise disclosed outside of RealPage’s facilities, and may not be used in any way unless expressly authorized by RealPage. © RealPage 2015. All rights reserved.

Source Cost Within this tab you have the ability to set costs for your sources on a monthly basis. Based on performance of lead generation and leases you can determine the benefits of each source. This allows you to make changes to your advertising spend so that appropriate funds are attributed to the most effective sources. This is available in both advanced and basic mode along with the user guides to download.
This Manual and the policies and procedures contained herein are the confidential and proprietary information of RealPage, Inc. This Manual may not be copied, distributed, or otherwise disclosed outside of RealPage’s facilities, and may not be used in any way unless expressly authorized by RealPage. © RealPage 2015. All rights reserved.

Training and Events This tab allows you to sign up for training for Lead2Lease Introduction, Integration, PropertylinkOnline Introduction and Lease Star Syndication. Just click the Training and Events tab and select a class under topic. Then click ‘Sign Up’ enter your name, position and email, click ‘Add,’ and you will be sent instructions on how to join the training.
This Manual and the policies and procedures contained herein are the confidential and proprietary information of RealPage, Inc. This Manual may not be copied, distributed, or otherwise disclosed outside of RealPage’s facilities, and may not be used in any way unless expressly authorized by RealPage. © RealPage 2015. All rights reserved.