user manual - medrx precision audiometric …€¦ · for ite (in the ear), itc (in the canal) and...
TRANSCRIPT
USER MANUAL

AHT-I-MPHITU-2 MedRx AVANT HIT+ Training Manual Effective 11-16-12
2
Contents
Introduction …………………………………………………………………………………………...... 3
AVANT HIT™ Software Overview ………………………………………………………….……. 4
AVANT HIT™ Software Options …………………………………………………….…………… 5
Preparing for Testing ………………………………………………………………………………….. 7
Making HIT Measurements …………………………………………………………………………… 10
Sample HIT Measurements …………………………………………………………………………… 12
Printing ………………………………………………………………………………………………….. 13
Limited Warranty ………………………………………………………………………………………. 14
#0086
www.medrx-usa.com
1200 Starkey Rd., #105, Largo FL 33771 U.S.A.
Toll Free: (888) 392-1234 • (727) 584-9600
Fax: (727) 584-9602 • Email: [email protected]
MedRx's Authorized Representative in Europe
(Regulatory affairs only)
Emergo Europe, Molenstraat 15
2513 BH The Hague, The Netherlands
Tel: (31) (0) 70 345-8570 • Fax: (31) (0) 70 346-7299

AHT-I-MPHITU-2 MedRx AVANT HIT+ Training Manual Effective 11-16-12
3
Introduction
Hearing Instrument Testing (HIT) measures the hearing instrument response in a 2cc coupler in the test chamber. The coupler response is then compared to the manufacturer specification to ensure quality performance or to detect possible malfunctions of the hearing instrument.
This system follows the ANSI S3.22 and IEC 60118-7 standards for hearing aid measurement methods.
The Avant HIT+ supports the following measurements:
OSPL-90 Frequency Response Input/Output (AGC) Induction Coil
Full on Gain Equivalent Input Noise Battery Current
Reference Test Gain Harmonic Distortion Attack/Release
The AVANT HIT+ represents a new era of precision Hearing Instrument Testing for your office. Compact yet rugged, this PC-Based system is USB powered and performs all required ANSI and IEC tests. This manual will explain the available tests and provide step-by-step instructions for all supported tests.
This manual assumes that the system hardware, software and drivers are installed and working properly. Please refer to the MedRx Avant HIT+ Installation Manual for assistance. The scope of this manual is to get you “up and running” with the AVANT HIT+ System. Please consult the interactive Help System within the software for more detailed information of features and functionality. To access this tool, press the F1 key at any time or click the Help icon or text menu with your mouse.

AHT-I-MPHITU-2 MedRx AVANT HIT+ Training Manual Effective 11-16-12
4
The AVANT HIT Software
General Overview The AVANT HIT software will either run as a part of the AVANT Software Suite (figure 1), or as a stand-alone module (figure 2). The AVANT Software Suite can run stand-alone or from within the NOAH™ System or the TIMS
® NOAH™-Compatible Office System.
Figure 1 The AVANT Software Suite Main Screen.
Figure 2 The AVANT HIT+ Stand-Alone Main
Screen.
Launching the HIT Software
Stand Alone NOAH™ and TIMS®
1. Double click the AVANT HIT shortcut on your Windows Desktop.
1. Launch NOAH. 2. Click the Module Selection icon. 3. Click the Measurement Tab. 4. Double click the AVANT icon.

AHT-I-MPHITU-2 MedRx AVANT HIT+ Training Manual Effective 11-16-12
5
Software Options Basic Options
The software allows you to set several default options as described below. To access the Options screen, click File, then Options from the Avant HIT main window. Options may also be accessed using the Options menu once inside the HIT software.
The View tab allows you to set the default appearance of the HIT+ test environment. Values can be changed by using the check boxes and pull-down menus shown above. Consult the interactive help system in the product you are using for explanations of parameters. The HIT Tab allows you to select the relevant Standard for your measurements (ANSI S3.22 or IEC 60118-7) as well as the general parameters for your HIT+ measurements. Consult the interactive help system in the product you are using for explanations of parameters. Note: HIT functionality is available in several MedRx products. These screens may vary slightly depending on the product. Consult the interactive help system in the product you are using.

AHT-I-MPHITU-2 MedRx AVANT HIT+ Training Manual Effective 11-16-12
6
Advanced Options
The Advanced Options screen allows you to configure your system to meet your individual clinical needs. It also provides MedRx Technical Support with tools for helping you with technical issues. Access this screen from the File Menu on the Avant Main Screen as shown to the right.
The key features of each tab are described below. For more in-depth information, consult the interactive Help system (F1) within the software. The General Tab configures the overall Avant HIT+ environment and behavior with respect to other Windows programs, specifically NOAH
Use the Audio Tab to select the proper audio device for your Avant HIT+. If necessary, this tab also provides access to the Windows Audio controls.
If your system has a Video Otoscope, the Video Tab allows you to select the appropriate device driver.

AHT-I-MPHITU-2 MedRx AVANT HIT+ Training Manual Effective 11-16-12
7
Preparing for ANSI/IEC
Hearing Instrument Testing Attaching Hearing Instruments to the Coupler
For ITE (In The Ear), ITC (In The Canal) and MIC (Mini Canal) Hearing Instruments
1. Seal acoustic vents. 2. Wrap the canal portion of the instrument with a hermetic sealing material such as Bostik Blu-
Tack (see Figure 1). 3. Align the sound bore with the opening of the ITE coupler adapter. Press the sealing material
firmly into the ITE adapter (see figure 2). 4. Ensure that the black O-ring is installed in the 2cc coupler and snap the ITE adapter in place
(see Figure 3).
Figure 1 Figure 2 Figure 3
Calibrate Coupler Response
Place the coupler microphone as shown, between 2 and 8mm from the reference microphone, raised to the same level as the reference microphone, then press “Start”. (Tools – Calibrate Coupler Response)

AHT-I-MPHITU-2 MedRx AVANT HIT+ Training Manual Effective 11-16-12
8
Attaching Hearing Instruments to the Coupler (cont.)
BTE (Behind The Ear) Hearing Instruments
1. Remove earmold from hearing instrument. 2. Attach ear hook to 20mm long Tygon tube on BTE Coupler Adapter (see Figure 4). 3. Snap the BTE Coupler Adapter onto the 2cc Coupler (see Figure 5).
Figure 4
Figure 5
Hearing Instruments with Button Receivers
1. Remove earmold from hearing instrument. 2. Attach the button receiver to the Coupler Adapter and seal with blue tack (see Figure 6). 3. Snap the Button Receiver Coupler Adapter onto the 2cc Coupler (see Figure 7).
Figure 6
Figure 7
AHT-I-MPHITU-2 MedRx AVANT HIT+ Training Manual Effective 11-16-12
9
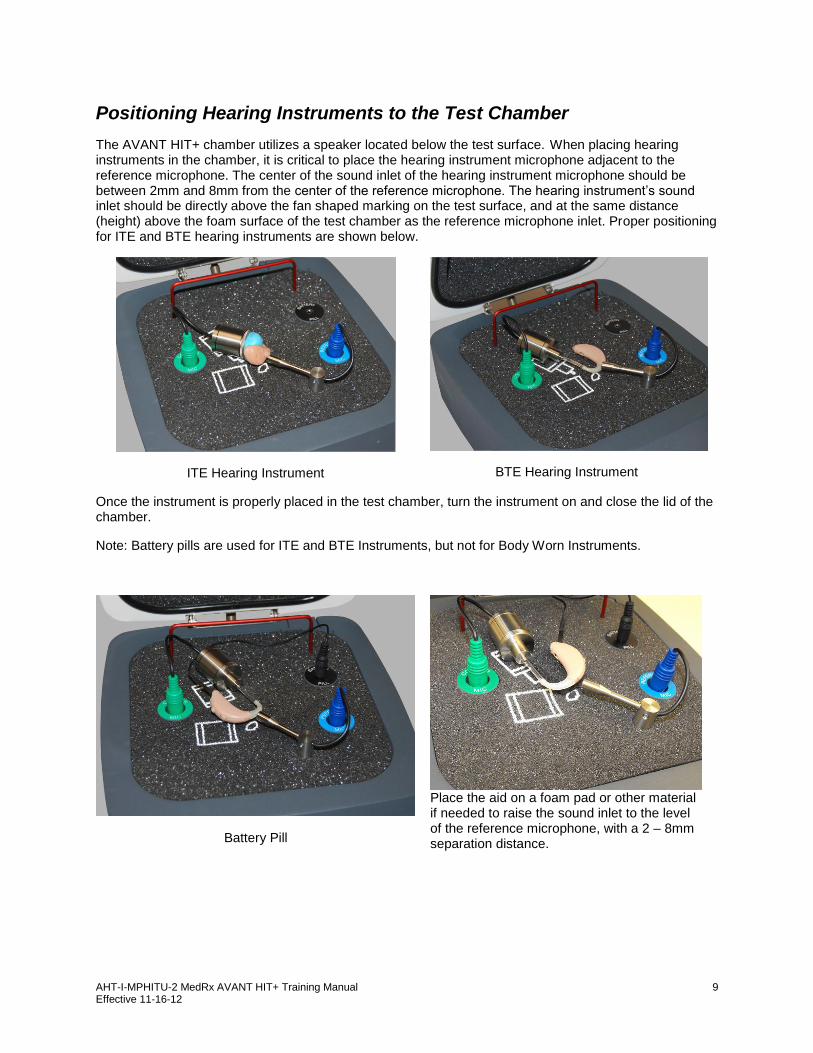
Positioning Hearing Instruments to the Test Chamber
The AVANT HIT+ chamber utilizes a speaker located below the test surface. When placing hearing instruments in the chamber, it is critical to place the hearing instrument microphone adjacent to the reference microphone. The center of the sound inlet of the hearing instrument microphone should be between 2mm and 8mm from the center of the reference microphone. The hearing instrument’s sound inlet should be directly above the fan shaped marking on the test surface, and at the same distance (height) above the foam surface of the test chamber as the reference microphone inlet. Proper positioning for ITE and BTE hearing instruments are shown below.
ITE Hearing Instrument
BTE Hearing Instrument
Once the instrument is properly placed in the test chamber, turn the instrument on and close the lid of the chamber.
Note: Battery pills are used for ITE and BTE Instruments, but not for Body Worn Instruments.
Battery Pill
Place the aid on a foam pad or other material if needed to raise the sound inlet to the level of the reference microphone, with a 2 – 8mm separation distance.

AHT-I-MPHITU-2 MedRx AVANT HIT+ Training Manual Effective 11-16-12
10
Making HIT Measurements
General overview
The AVANT HIT software is designed to make the process of making HIT measurements simple. The easiest way to complete them is to use the Auto Test feature.
Setting Auto Test Preferences
1. From the AVANT HIT Main screen, click HI Test.
2. Click the Setup button below the list of tests.
3. In the Test Setup Window, add or remove the tests you want to include in your Auto Test battery.
4. Select the appropriate hearing aid, battery type and voltage.
5. Select the test frequencies you wish to use.
6. Select your default stimulus.
For ANSI and IEC tests, select Tone.
To evaluate the performance of noise reduction circuits, select Speech Noise.
Select other stimuli as dictated by your clinic policies or jurisdiction’s regulations.
7. Click Save to store your preferred settings
8. Click OK to close this window.
Signal Type Toolbar
The signal type can be selected from this toolbar. The noise signal buttons can be re-assigned with desired noise types and weights from drop down lists. These assignments will be stored for quick signal selection. For detailed description of signal types and weightings, consult the interactive Help system within the software. Precalibrate function allows you to calibrate the reference level without the hearing aid turned on and then run tests without referencing. This function can be used if it is suspected that a high gain hearing aid is leaking sound thus affecting the reference microphone.
2
3
4
5 7
1
6
8

AHT-I-MPHITU-2 MedRx AVANT HIT+ Training Manual Effective 11-16-12
11
Starting Test
After setting your default preferences, simply place the hearing instrument into the test chamber as described in the Avant HIT+ Installation Manual
Click Start to start a single test in automatic mode. The test will finish after the measurement is complete. Click MSC (Manual Signal Control) to start a single test in continuous mode. The test will not finish by itself and will have to be stopped by clicking Stop icon. Click Auto to run the selected tests in sequence.

AHT-I-MPHITU-2 MedRx AVANT HIT+ Training Manual Effective 11-16-12
12
Sample HIT Measurements
The screenshots below illustrate the Avant HIT+ representations of the ANSI S3.22-2009 Hearing Instrument Test Battery. The system also supports the IEC 60118-7 2005-10.
OSPL90
Full-On Gain
Reference Test Gain Frequency Response
Equivalent Input Noise Total Harmonic Distortion
Battery Current Input/Output
Attack/Release Induction Coil

AHT-I-MPHITU-2 MedRx AVANT HIT+ Training Manual Effective 11-16-12
13
Printing
The AVANT HIT software allows you to print tests individually or as a complete multi-test report.
Printing Individual Tests Printing Multi-Test Reports
1. Click File 2. Click Print
1. Click File 2. Click Print Report

AHT-I-MPHITU-2 MedRx AVANT HIT+ Training Manual Effective 11-16-12
14
Limited Warranty MedRx, Inc warrants this product to be free from defects in material and workmanship for one year from the time of purchase. If this system fails to perform as specified during this period, the purchaser is responsible for calling MedRx at (888) 392-1234 or (727) 584-9600. The company's representative will advise the owner to either return specific components or the entire system to:
MedRx, Inc.
1200 Starkey Road #105
Largo, FL 33771 USA
MedRx will repair or replace any defective devices, fully test the system and/or components and ship the system promptly back to the owner. There is no cost for the repair or return shipping, provided the system is one year old or less and has not been misused, abused or damaged. Such damage includes, but is not limited to, dropping, exposure to excessive heat greater than 100ºF and water/liquid damage.
Repair or replacement of the system as provided under this warranty is the sole and exclusive remedy of the purchaser. MedRx shall not be liable for any consequential or incidental damages or for breach of any express or implied warranty. Except to the extent of applicable law, any implied warranty, merchantability or fitness of this product is limited to the duration of this warranty.
MedRx will, at its discretion, service and repair out of warranty products at the purchaser's request, charging for parts and labor as necessary.
The limited warranty is deemed void if software or hardware is installed on this product which is not pre-approved by MedRx, Inc. Approved software includes NOAH
™ and HIMSA approved hearing aid manufacturer programming modules for
fitting hearing aids.
MedRx, Inc is not responsible for problems resulting from installation of unapproved software or hardware. In the event of unapproved software or hardware installed on the system causing a conflict, MedRx will service the product for a fee to be determined at the time of service.
Any extension of this warranty past the initial one-year warranty is subject to the following (where applicable). 1. A $300 deductible per repair. 2. Extended warranty does not include cables, connectors or peripherals. 3. Extended warranty of the Video Otoscope covers optics only.