user manual of kd900 remote maker and remote generator
TRANSCRIPT

KeyDiy User Guide
Selec0on of KeyDiy remotes
1

KD900 – Handheld Remote Maker
2

KD900 – Standalone Func0ons
Func0on buCon
Direc0onal buCons and
OK / Enter buCon
Escape / Back a step
Frequency Check Area
3

KD900 – Standalone Func0ons
Connec0on port for connec0on to KeyDiy remote
Power On / Off
USB Connec0on port for PC connec0on
4

KD900 – Standalone Func0ons
Open baCery compartment to fit or replace baCeries.
4 x AA BaCeries are required
BaCery power status can be seen on
the main screen
The KD900 can also be powered by a USB connec0on
5
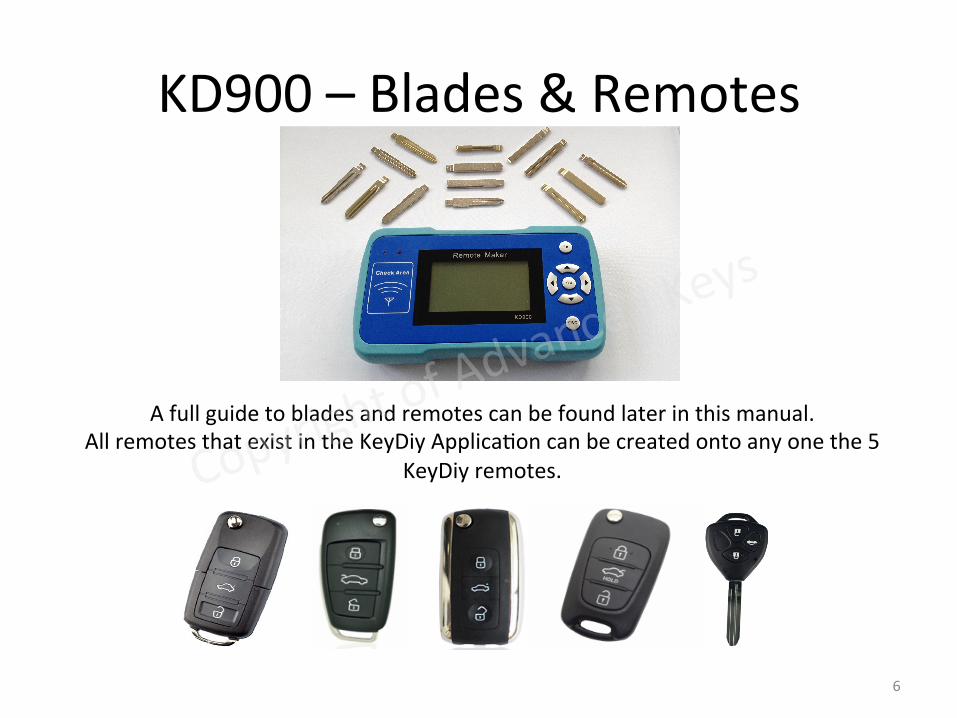
KD900 – Blades & Remotes
A full guide to blades and remotes can be found later in this manual. All remotes that exist in the KeyDiy Applica0on can be created onto any one the 5
KeyDiy remotes.
6

KD900 – Menus – Frequency Test
Frequency Test – This is a built in Frequency tester to all ASK and FSK frequencies. Be sure to place the remote flat in the ‘Check Area’ whilst performing this test
7

KD900 – Menus – Remote Make
Remote Make – This sec0on has many func0ons.
First select manufacturer required then select remote required
8

KD900 – Menu’s – Remote Make Con0nued..
A summary of the selected remote is seen. Frequency, Token cost and part number
Press ‘OK’
The next set of func0ons are seen. First we will visit ‘Remote Simulate’
Make sure remote is connected and baCery of remote is removed.
Press ‘OK’ – Successful should be seen. You can now program to the car to ensure the selec0on is correct without using any
tokens. 9

KD900 – Menus – Device Simulate Device Simulate – This func0on allows simula0on of the remote without the
need of any remote. Simply use the direc0onal buCons in place of the remote buCons as indicated on the
screen. Again this allows you to check the correct remote selec0on has been used without
using tokens.
10
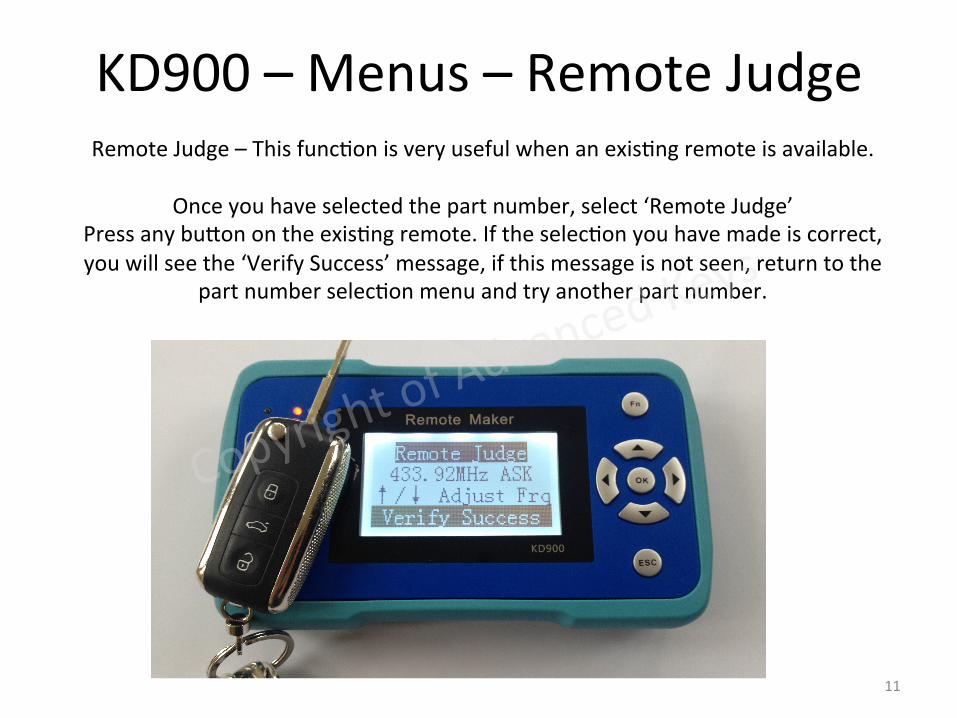
KD900 – Menus – Remote Judge Remote Judge – This func0on is very useful when an exis0ng remote is available.
Once you have selected the part number, select ‘Remote Judge’
Press any buCon on the exis0ng remote. If the selec0on you have made is correct, you will see the ‘Verify Success’ message, if this message is not seen, return to the
part number selec0on menu and try another part number.
11

KD900 – Menus – Remote Make (sub menu)
Once your are happy that the correct part number has been selected, connect your chosen style of remote, highlight ‘Remote Make’ in the sub menu and
press ‘Ok’ buCon
You will now see Token cost, Tokens remaining and the Successful message.
Should you see any error messages please follow the onscreen instruc0ons. Error messages are normally seen if the baCery has been lef in the remote or
the connec0ng cable isn’t connected correctly. 12

KD900 – Now that the remote is created Now that the remote has been created you need to do the following:-‐ • Select and fit the Blade to suit the vehicle • Select and fit the Transponder to suit the vehicle • Program the remote and if required the transponder Remotes need to be matched to the vehicle in the same manner as the OE remote. This is normally done either by a ‘Manual’ method or using a ‘Diagnos0c Programmer’.
Typical ‘Manual Method’ Typical ‘Diagnos0c programmer’
13

KD900 – Menus – Other Func0ons
PC Connect is rarely used as connec0ng the KD900 to the PC via USB usually creates an automa0c connec0on. PC Connect is only required if the auto
connec0on fails.
Selec0ng ‘System Info’ displays:-‐ Serial ID
Current version of sofware installed Language of unit and Remaining Tokens
14

KD900 – Menus – Other Func0ons Cont..
Recharge allows you to top up the tokens of the unit. Highlight ‘Recharge’ and click
‘OK’
Simply enter your recharge Incode and the Tokens will be added.
Please remember that serial number of the unit needs to be supplied to your distributor before an incode can be
obtained
15

KD900 – Menu’s – Other Func0ons Cont..
Highlight ‘History’ and click ‘OK’
You can now view a history of remotes that you have made on your unit
16

KD900 – Menus – Sekngs Highlight the sekng you wish to alter or view, Click
‘OK’. For adjustable sekngs use the
direc0onal keys to adjust.
Language sekngs will be Preset to your country’s na0ve language.
17
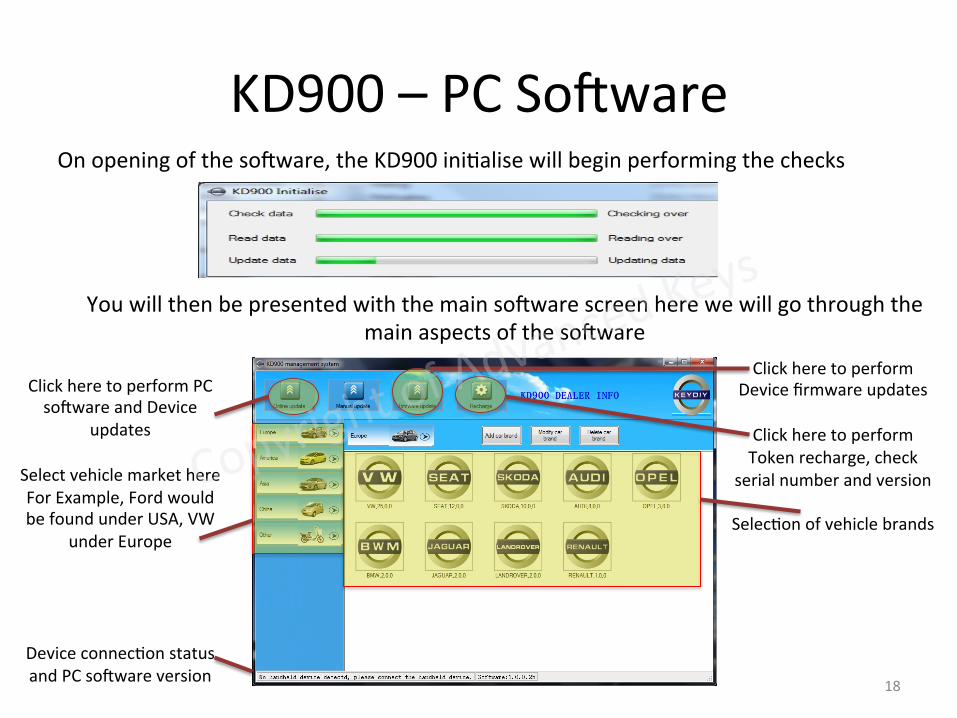
KD900 – PC Sofware On opening of the sofware, the KD900 ini0alise will begin performing the checks
You will then be presented with the main sofware screen here we will go through the main aspects of the sofware
Click here to perform PC sofware and Device
updates
Select vehicle market here For Example, Ford would be found under USA, VW
under Europe
Device connec0on status and PC sofware version
Click here to perform Device firmware updates
Click here to perform Token recharge, check
serial number and version
Selec0on of vehicle brands
18
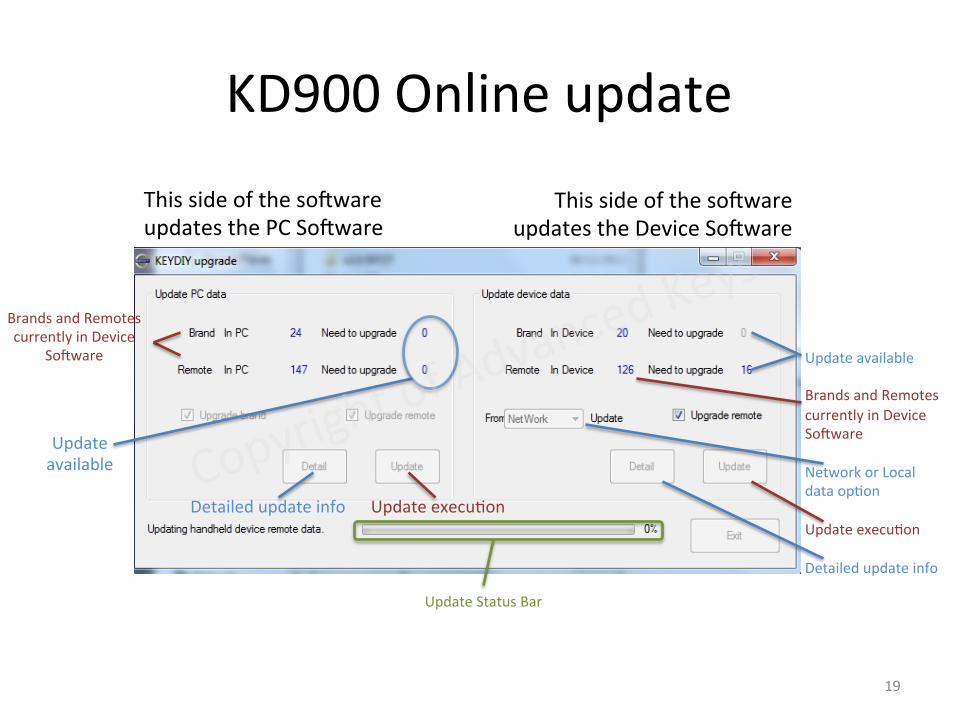
KD900 Online update
This side of the sofware updates the PC Sofware
This side of the sofware updates the Device Sofware
Update available Brands and Remotes currently in Device Sofware Network or Local data op0on Update execu0on Detailed update info
Brands and Remotes currently in Device
Sofware
Update available
Detailed update info Update execu0on
Update Status Bar
19

KD900 Firmware Update 1. Ensure the KD900 is connected
to the PC and displays PC Connected on device screen
2. Click the Firmware update buCon from Main Screen
3. You will be prompted of wait 0me select ‘Yes’ to con0nue
4. Highlight the relevant PEC file then click ‘Open’
5. Wait for the status bar to complete
6. Firmware should now be fully updated
20
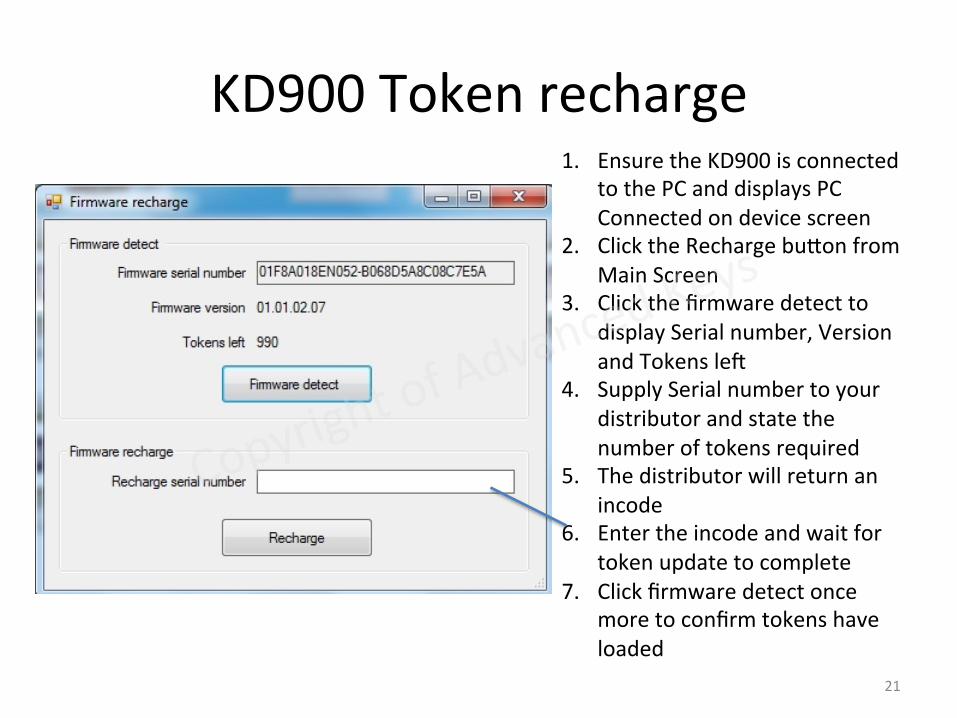
KD900 Token recharge 1. Ensure the KD900 is connected
to the PC and displays PC Connected on device screen
2. Click the Recharge buCon from Main Screen
3. Click the firmware detect to display Serial number, Version and Tokens lef
4. Supply Serial number to your distributor and state the number of tokens required
5. The distributor will return an incode
6. Enter the incode and wait for token update to complete
7. Click firmware detect once more to confirm tokens have loaded
21
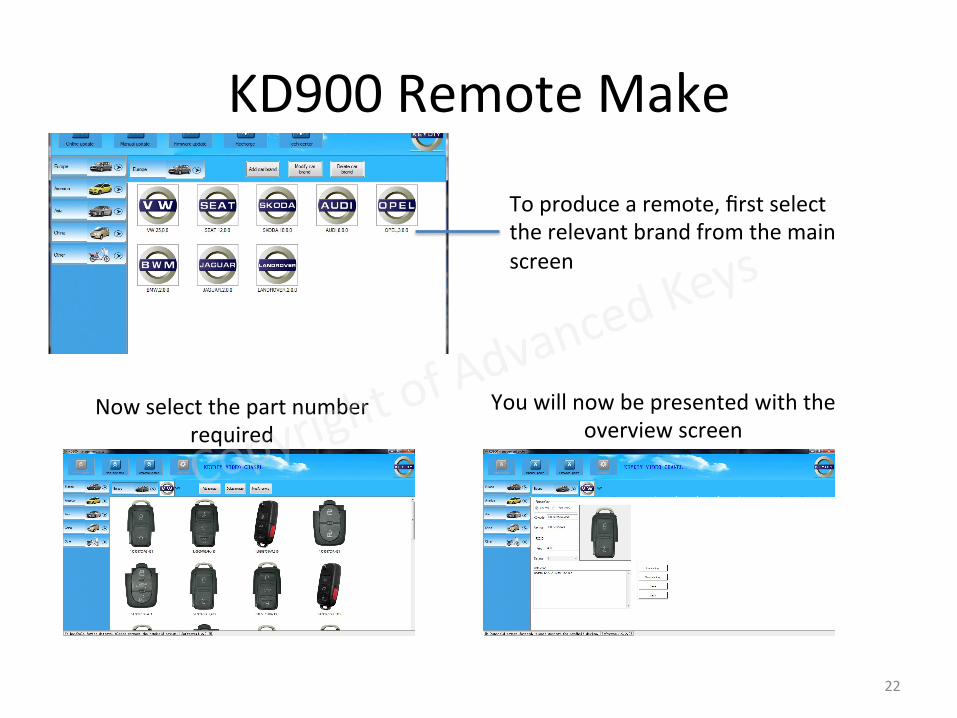
KD900 Remote Make
To produce a remote, first select the relevant brand from the main screen
Now select the part number required
You will now be presented with the overview screen
22

KD900 Remote Make con0nued..
Here you can select Create key or Simulate key
Detailed informa0on regarding the selected remote
Picture of OE remote for a visual reference
Specific informa0on may appear here
23

KD900 – Simulate Key
Ensure the KD900 is connected to the PC. Third party remotes can not be simulated
Simulate key allows you to create a remote without using Tokens. This allows you to test the remote on the vehicle to ensure you create the
correct remote required. Once you are confident the remote is collect, simply then use the ‘Create Key’
func0on to make a fully working remote. Simulated remotes only last for 50 presses.
24

KD900 – Create Key
Ensure the KD900 is connected to the PC. Third party* remotes will require an internet connec0on. Please follow on screen prompts.
When selec0ng ‘Create Key’ You will be prompted that Tokens will be used. Click ‘Yes’. The next screen confirms the remote is created and the amount of Tokens reduced. Click OK. The remote is ready for programming to the vehicle.
25
*Third party remotes such as Toyota Corolla are provided by a third party service via an internet connec0on and PC sofware.

KD900 – Now that the remote is created Now that the remote has been created you need to do the following:-‐ • Select and fit the Blade to suit the vehicle • Select and fit the Transponder to suit the vehicle • Program the remote and if required the transponder Remotes need to be matched to the vehicle in the same manner as the OE remote. This is normally done either by a ‘Manual’ method or using a ‘Diagnos0c Programmer’.
Typical ‘Manual Method’ Typical ‘Diagnos0c programmer’
26
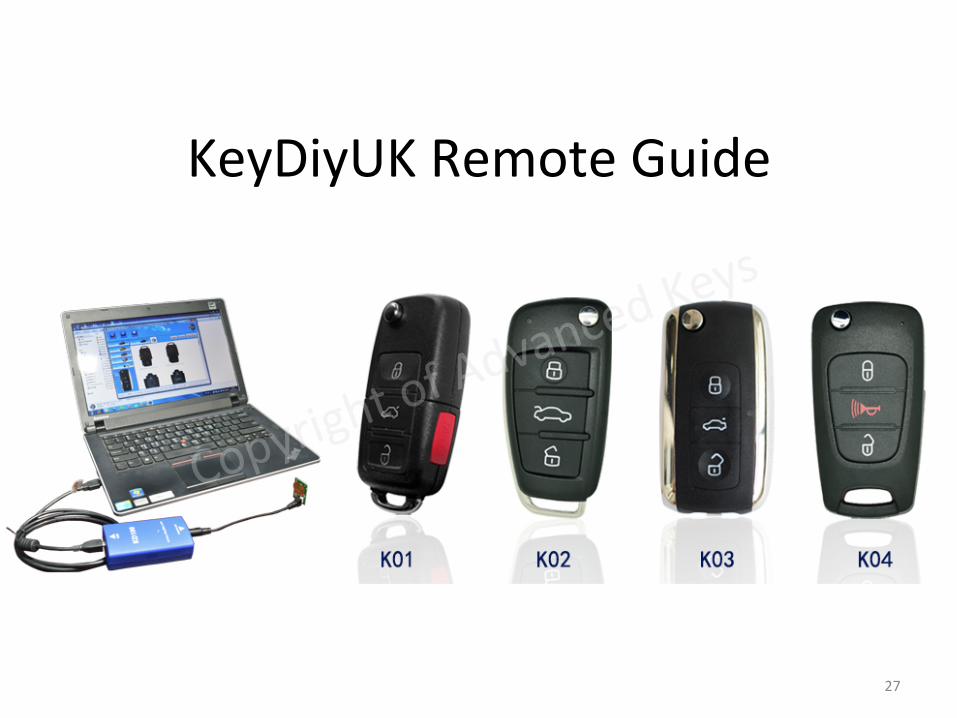
KeyDiyUK Remote Guide
27

Important Notes
• Please following the instruc0ons carefully for the removal of the backs of the remotes, failure to do so will result in damage not covered by the warranty.
• Help videos can be found on main website www.keydiyuk.com
28
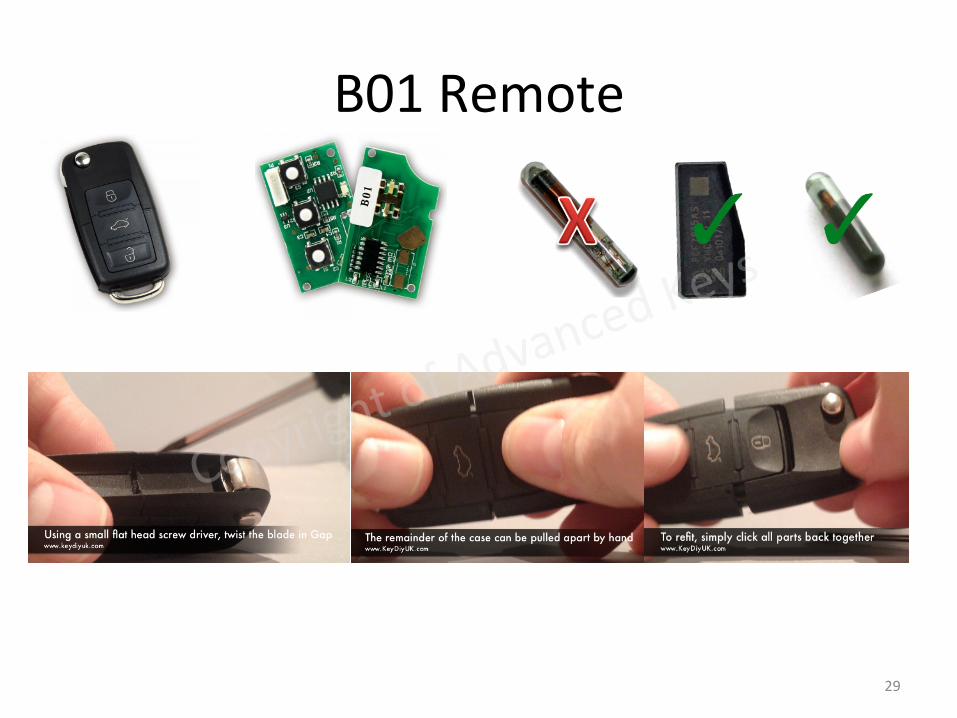
B01 Remote
29

B02 Remote
Remove
Refit
30
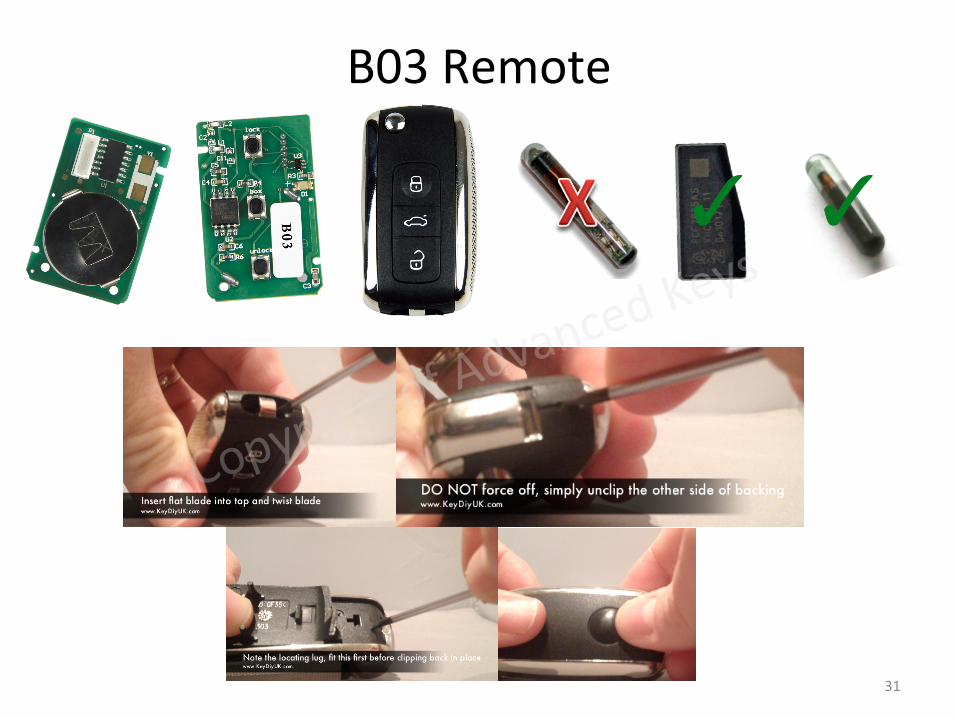
B03 Remote
31
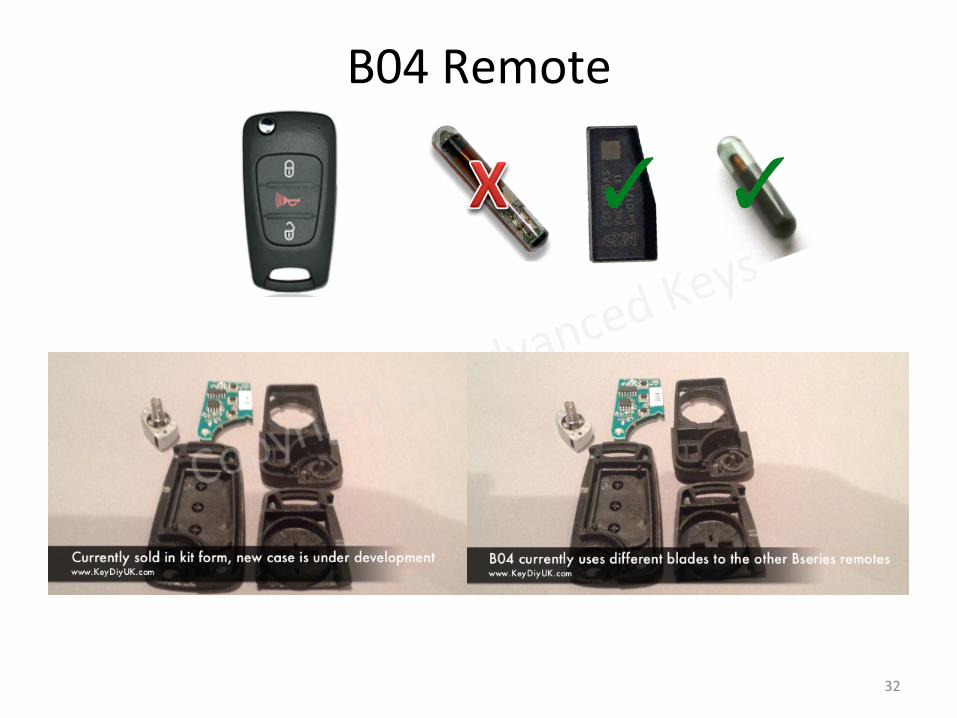
B04 Remote
32

33
Part number = KD + Part number so FO21 is KDFO21 This is a selec0on of available blades
Please check distributors website for a full range of available blades
Blades
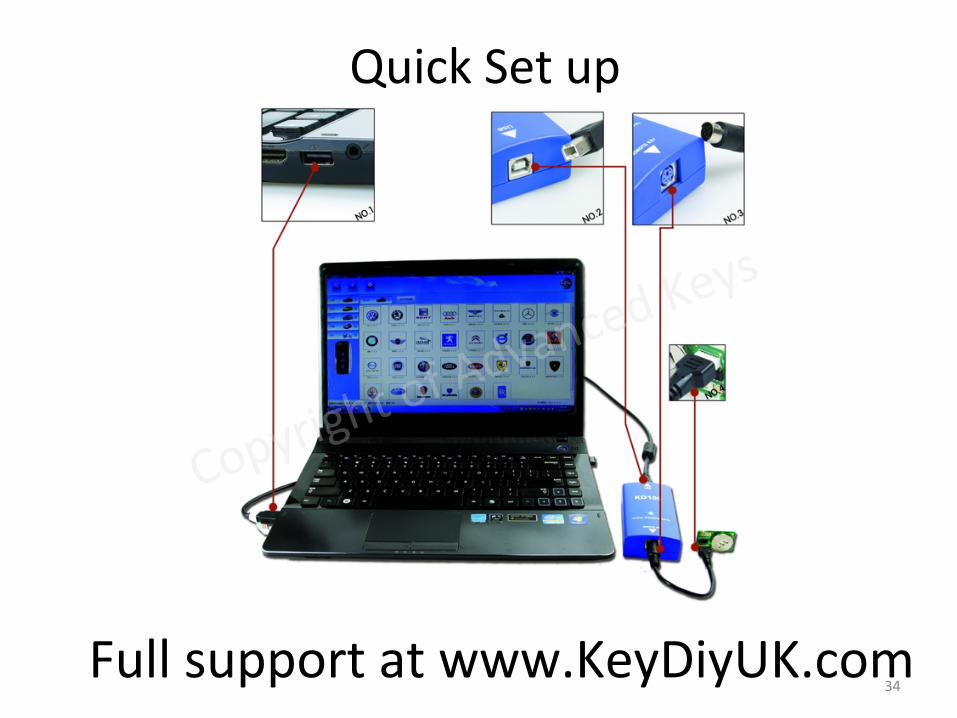
Quick Set up
Full support at www.KeyDiyUK.com 34