user manual - tracking usa - gps tracking solutions system fuel consumption statistics may vary from...
TRANSCRIPT
User Manual
System overview:• Top panel.• Left Panel.• Vehicle details panel.
Configuration:• Vehicles management.• Edit Vehicle.• Icon.• Fuel consumption.• Accuracy.• Service.• Info.
Events management:• Main settings.
• Time.
• Objects.
• Routes.
• Zones.
• Notification about event.
My account.
• Password.
Sub accounts .
Reports.
History.
Places.
Markers.
Routes.
Zone.
www.trackingusa.net 4401 SW 75th Ave #1, Miami, FL 33155, EE. UU.
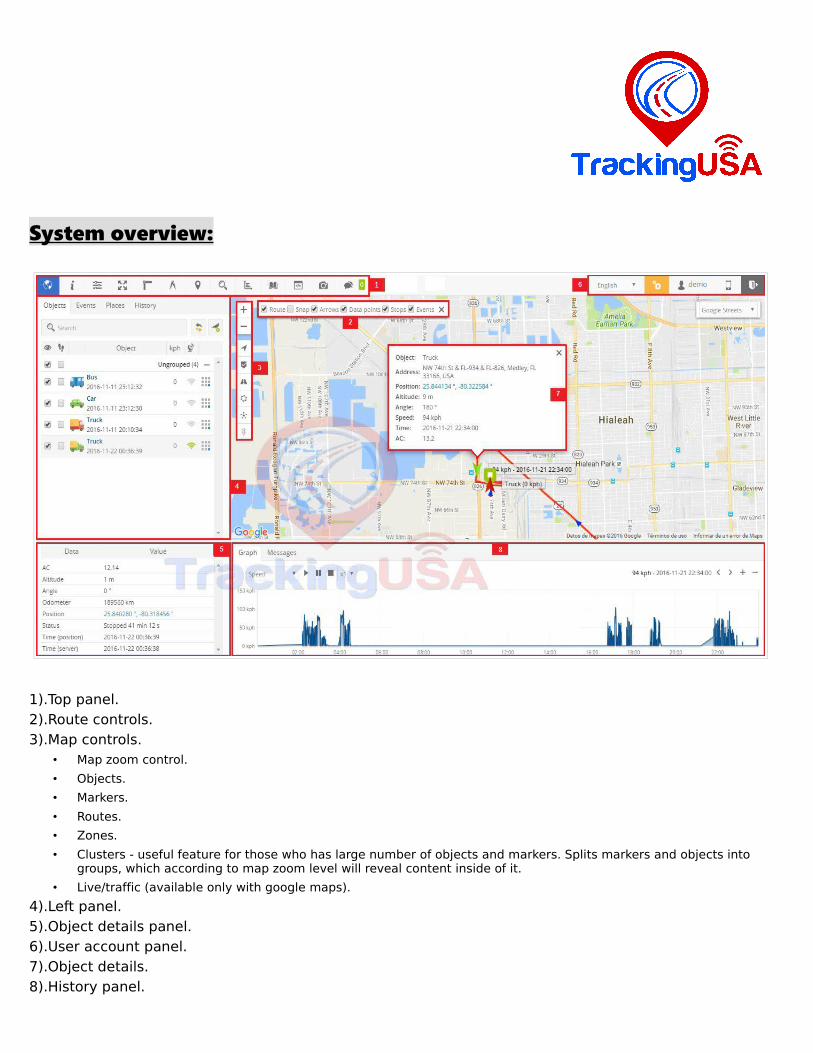
System overview:
1).Top panel.2).Route controls.3).Map controls.
• Map zoom control.
• Objects.
• Markers.
• Routes.
• Zones.
• Clusters - useful feature for those who has large number of objects and markers. Splits markers and objects into groups, which according to map zoom level will reveal content inside of it.
• Live/traffic (available only with google maps).
4).Left panel.5).Object details panel.6).User account panel.7).Object details.8).History panel.
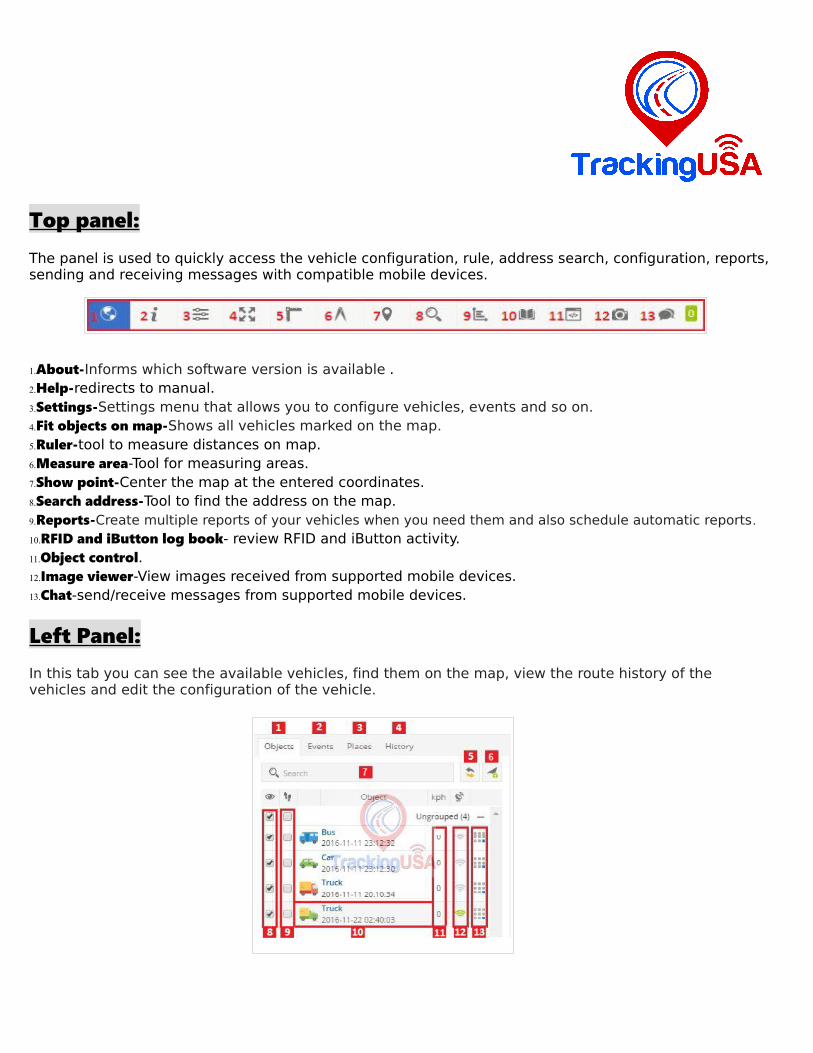
Top panel:
The panel is used to quickly access the vehicle configuration, rule, address search, configuration, reports,sending and receiving messages with compatible mobile devices.
1.About-Informs which software version is available .2.Help-redirects to manual.3.Settings-Settings menu that allows you to configure vehicles, events and so on.4.Fit objects on map-Shows all vehicles marked on the map.5.Ruler-tool to measure distances on map.6.Measure area-Tool for measuring areas.7.Show point-Center the map at the entered coordinates.8.Search address-Tool to find the address on the map.9.Reports-Create multiple reports of your vehicles when you need them and also schedule automatic reports. 10.RFID and iButton log book- review RFID and iButton activity.11.Object control.12.Image viewer-View images received from supported mobile devices.13.Chat-send/receive messages from supported mobile devices.
Left Panel:In this tab you can see the available vehicles, find them on the map, view the route history of the vehicles and edit the configuration of the vehicle.
1. bjects tab - view current vehicles statistics.2. Events tab - history of events.3. Places tab - allows to create, edit and delete zones and markers.4. History tab - view history, create reports, export them to various formats etc.5. Reload - reloads objects list.6. Add object - allows to add new object.7. Search - allows to find objects by name.8. Visibility checkbox - turns on or off vehicles visibility on map.9. Follow checkbox – Center the selected vehicle on the map.10.Object information - Name, date and time of last received location.11. Speed indicator - shows current Vehicle speed.12.GPRS indicator - shows GPRS and GPS status.1. Grey icon - no GPRS and GPS2. Orange icon - no GPS signal3. Green icon - GPRS and GPS are OK13.Quick access - allows to see object history and edit object settings.
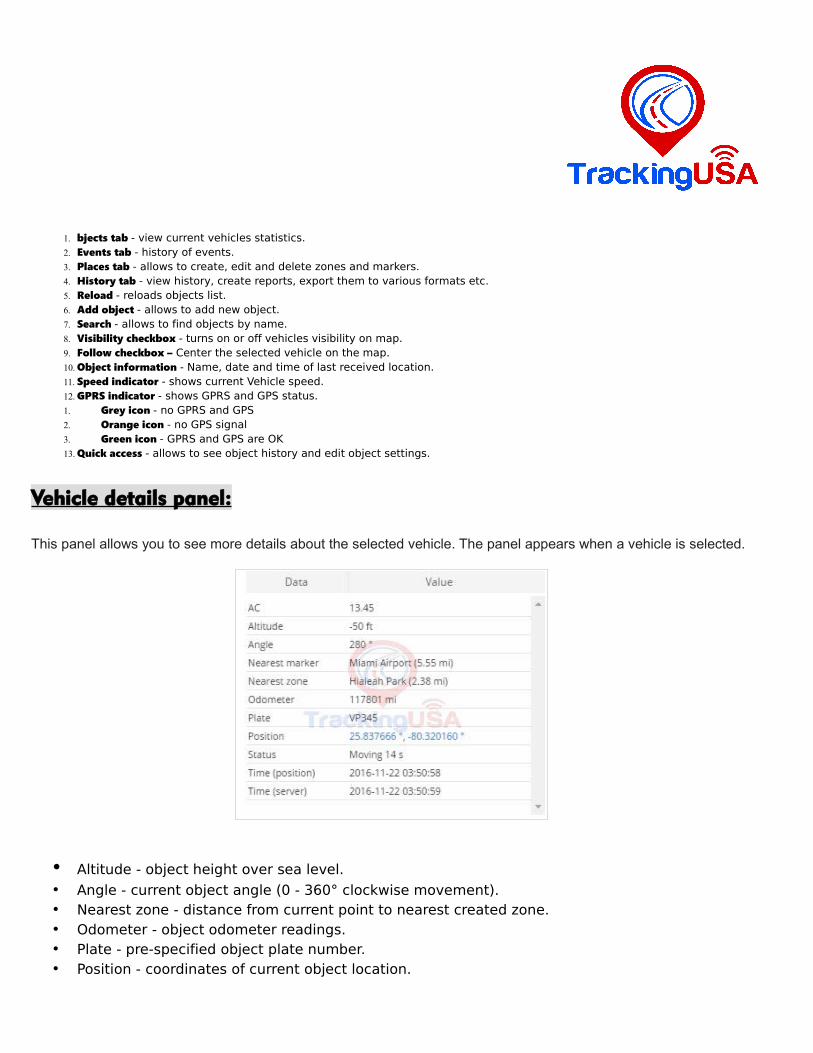
Vehicle details panel:
This panel allows you to see more details about the selected vehicle. The panel appears when a vehicle is selected.
• Altitude - object height over sea level.
• Angle - current object angle (0 - 360° clockwise movement).• Nearest zone - distance from current point to nearest created zone.• Odometer - object odometer readings.• Plate - pre-specified object plate number.• Position - coordinates of current object location.
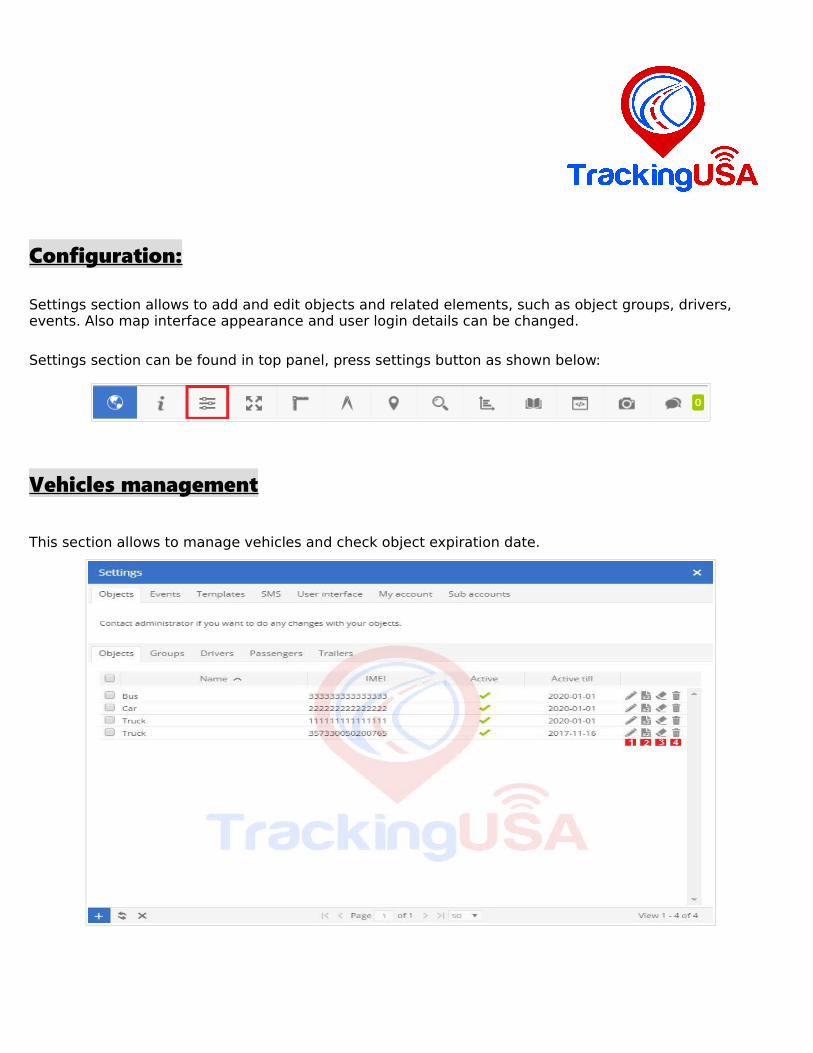
Configuration:
Settings section allows to add and edit objects and related elements, such as object groups, drivers, events. Also map interface appearance and user login details can be changed.
Settings section can be found in top panel, press settings button as shown below:
Vehicles management
This section allows to manage vehicles and check object expiration date.
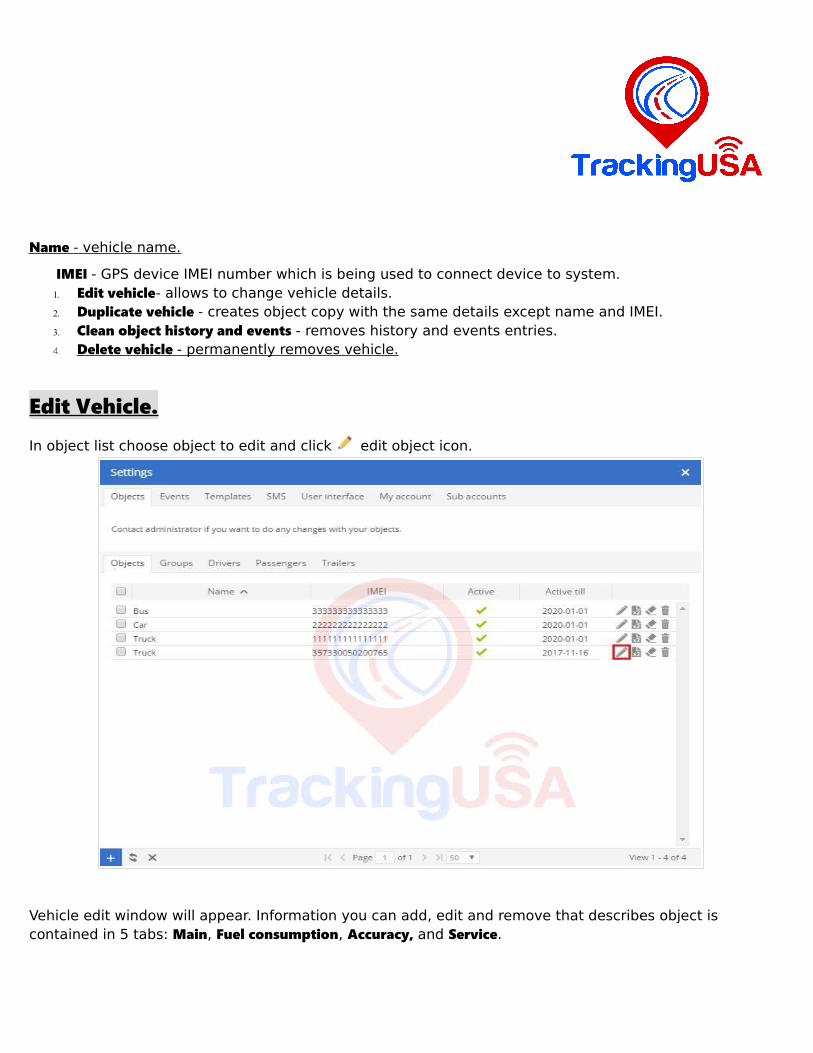
Name - vehicle name.
IMEI - GPS device IMEI number which is being used to connect device to system.1. Edit vehicle- allows to change vehicle details.2. Duplicate vehicle - creates object copy with the same details except name and IMEI.3. Clean object history and events - removes history and events entries.4. Delete vehicle - permanently removes vehicle.
Edit Vehicle.
In object list choose object to edit and click edit object icon.
Vehicle edit window will appear. Information you can add, edit and remove that describes object is contained in 5 tabs: Main, Fuel consumption, Accuracy, and Service.
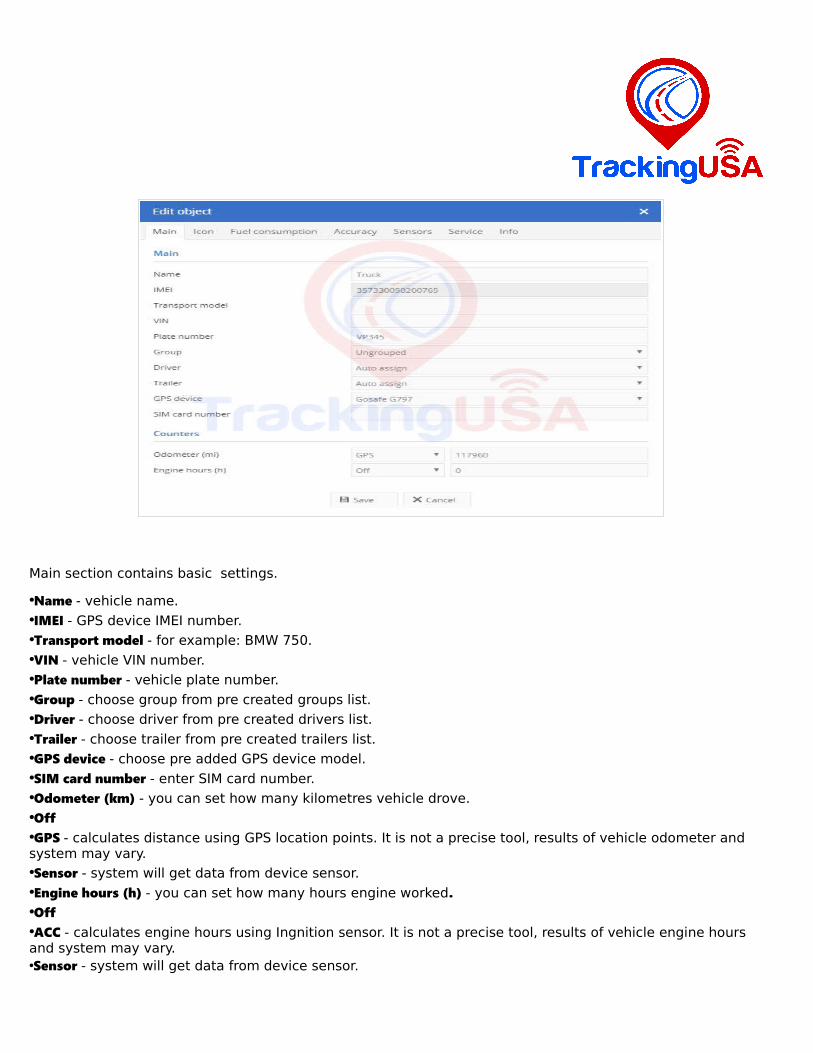
Main section contains basic settings.
•Name - vehicle name.
•IMEI - GPS device IMEI number.
•Transport model - for example: BMW 750.
•VIN - vehicle VIN number.
•Plate number - vehicle plate number.
•Group - choose group from pre created groups list.
•Driver - choose driver from pre created drivers list.
•Trailer - choose trailer from pre created trailers list.
•GPS device - choose pre added GPS device model.
•SIM card number - enter SIM card number.
•Odometer (km) - you can set how many kilometres vehicle drove.
•Off•GPS - calculates distance using GPS location points. It is not a precise tool, results of vehicle odometer and system may vary.
•Sensor - system will get data from device sensor.
•Engine hours (h) - you can set how many hours engine worked.•Off•ACC - calculates engine hours using Ingnition sensor. It is not a precise tool, results of vehicle engine hours and system may vary.•Sensor - system will get data from device sensor.
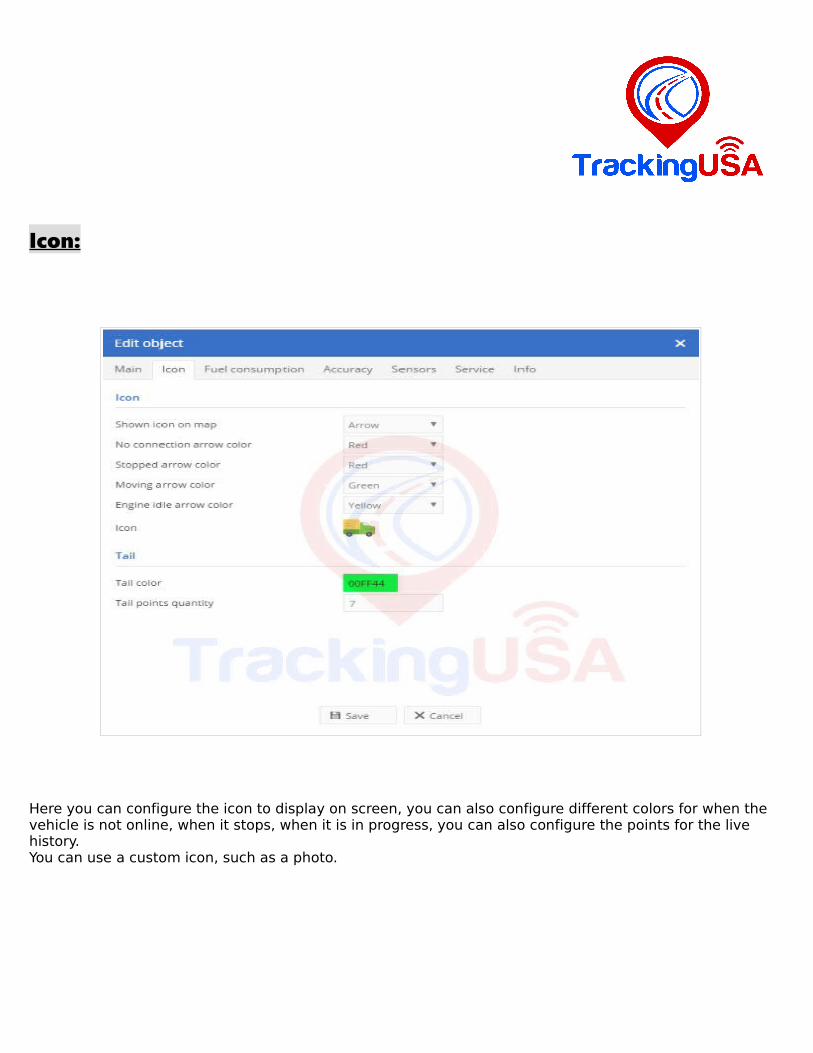
Icon:
Here you can configure the icon to display on screen, you can also configure different colors for when the vehicle is not online, when it stops, when it is in progress, you can also configure the points for the live history.You can use a custom icon, such as a photo.
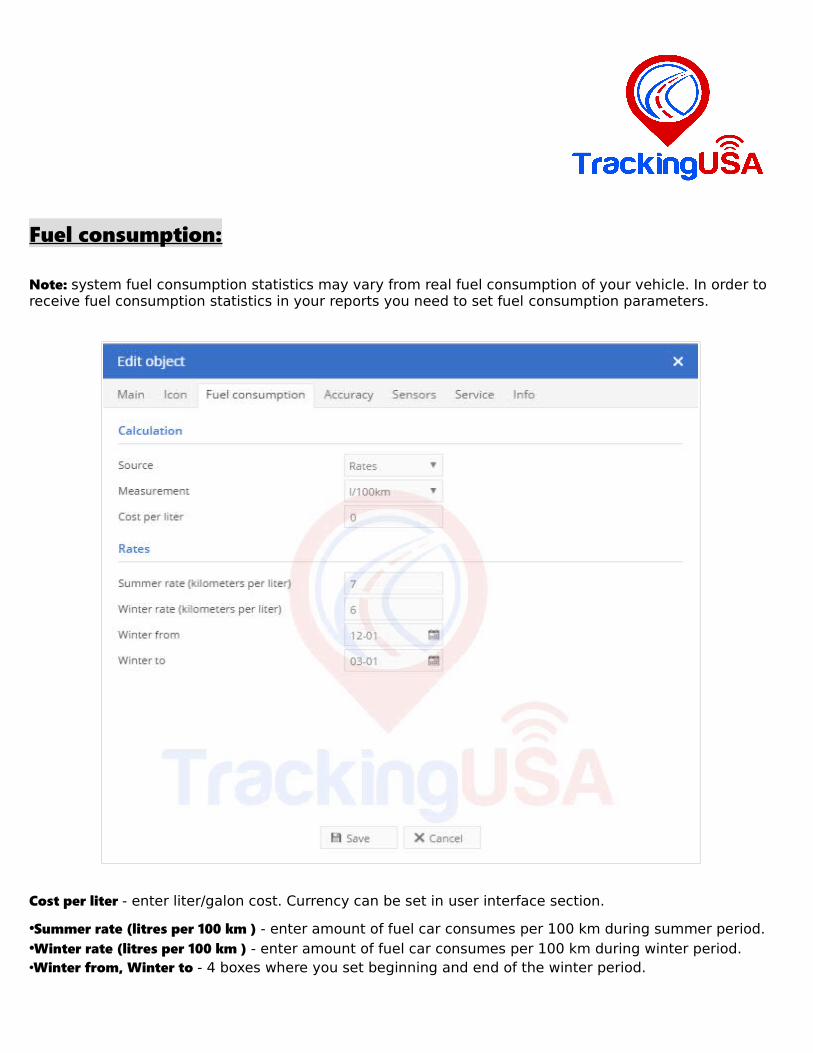
Fuel consumption:
Note: system fuel consumption statistics may vary from real fuel consumption of your vehicle. In order to receive fuel consumption statistics in your reports you need to set fuel consumption parameters.
Cost per liter - enter liter/galon cost. Currency can be set in user interface section.
•Summer rate (litres per 100 km ) - enter amount of fuel car consumes per 100 km during summer period.•Winter rate (litres per 100 km ) - enter amount of fuel car consumes per 100 km during winter period.•Winter from, Winter to - 4 boxes where you set beginning and end of the winter period.
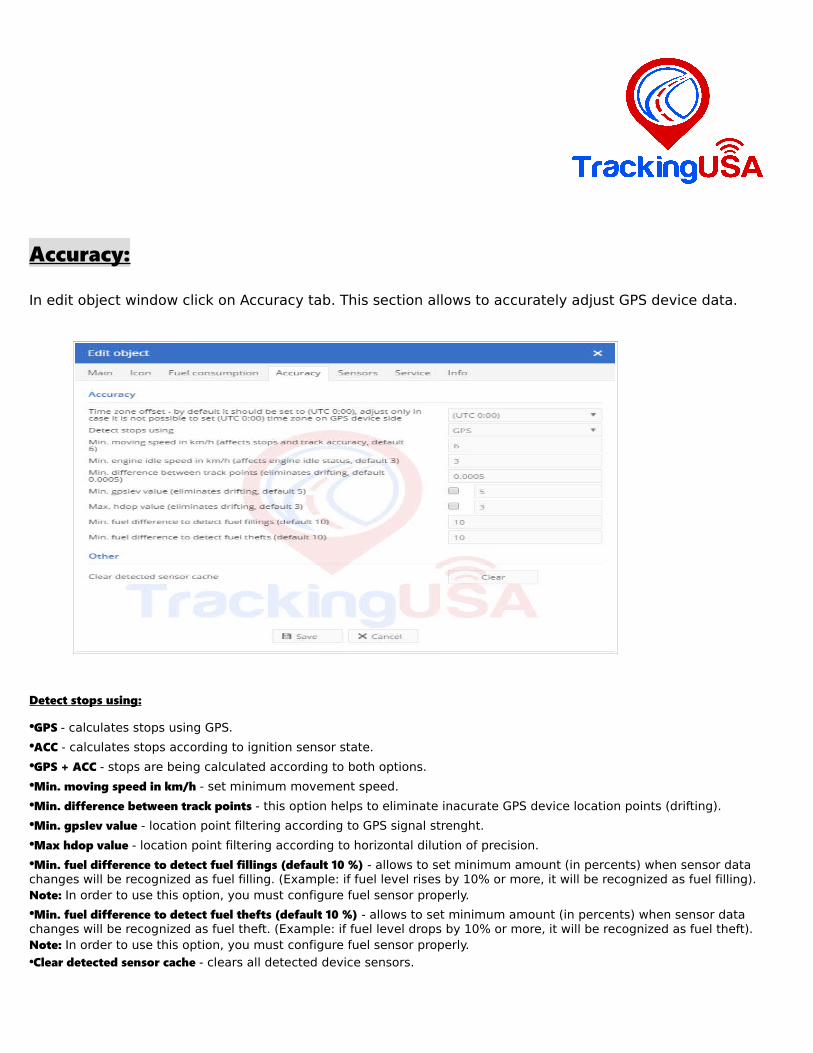
Accuracy:
In edit object window click on Accuracy tab. This section allows to accurately adjust GPS device data.
Detect stops using:
•GPS - calculates stops using GPS.
•ACC - calculates stops according to ignition sensor state.
•GPS + ACC - stops are being calculated according to both options.
•Min. moving speed in km/h - set minimum movement speed.
•Min. difference between track points - this option helps to eliminate inacurate GPS device location points (drifting).
•Min. gpslev value - location point filtering according to GPS signal strenght.
•Max hdop value - location point filtering according to horizontal dilution of precision.
•Min. fuel difference to detect fuel fillings (default 10 %) - allows to set minimum amount (in percents) when sensor data changes will be recognized as fuel filling. (Example: if fuel level rises by 10% or more, it will be recognized as fuel filling). Note: In order to use this option, you must configure fuel sensor properly.
•Min. fuel difference to detect fuel thefts (default 10 %) - allows to set minimum amount (in percents) when sensor data changes will be recognized as fuel theft. (Example: if fuel level drops by 10% or more, it will be recognized as fuel theft). Note: In order to use this option, you must configure fuel sensor properly.
•Clear detected sensor cache - clears all detected device sensors.
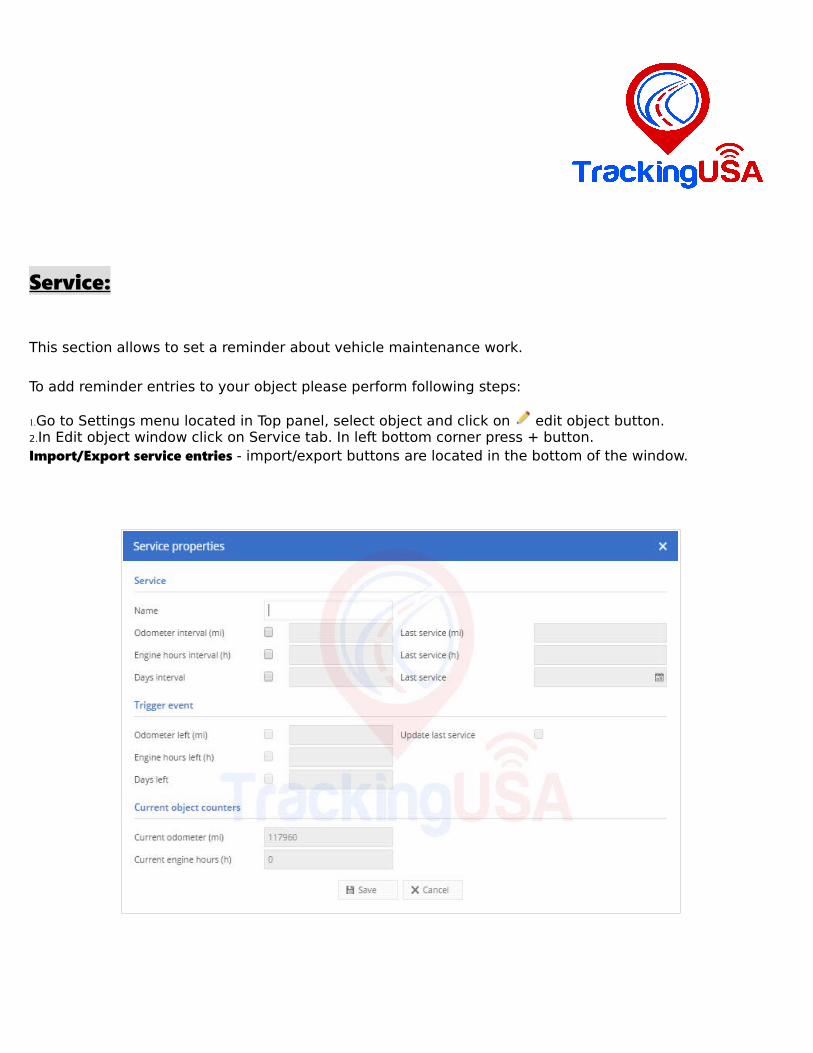
Service:
This section allows to set a reminder about vehicle maintenance work.
To add reminder entries to your object please perform following steps:
1.Go to Settings menu located in Top panel, select object and click on edit object button.2.In Edit object window click on Service tab. In left bottom corner press + button.Import/Export service entries - import/export buttons are located in the bottom of the window.
Name - service name (example: Change engine oil).Calculations are made according to odometer results:•Odometer interval (km) - distance after which service must be applied.
•Last service (km) - enter distance when the last time service was done.Calculations are made according to engine run time:•Engine hours (h) - time interval after which service must be applied.
•Last service (h) - enter the last time service was done.Calculations are made according to days:•Days interval - number of days after which service.
•Last service - choose last service date.
Trigger event
•Odometer left (km) - event will be triggered if chosen distance reached. Option available only if Odometer interval (km) is checked.
•Engine hours left (h) - event will be triggered if chosen time reached. Option available only if Engine hours interval (h) is checked.
•Days left - event will be triggered if specified days reached. Option available only if Days interval is checked.
•Update last service - automatically updates information.
Current object counters
•Current odometer (km) - current odometer results.
•Current engine hours (h) - current engine hours results.
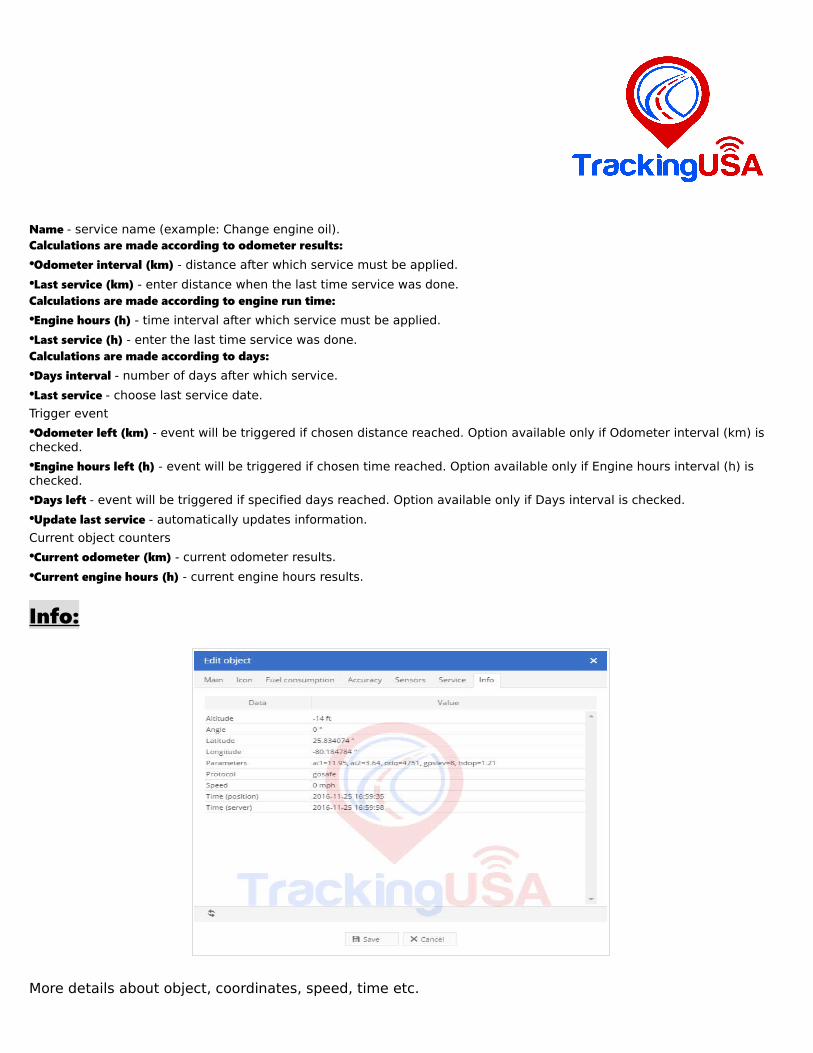
Info:
More details about object, coordinates, speed, time etc.
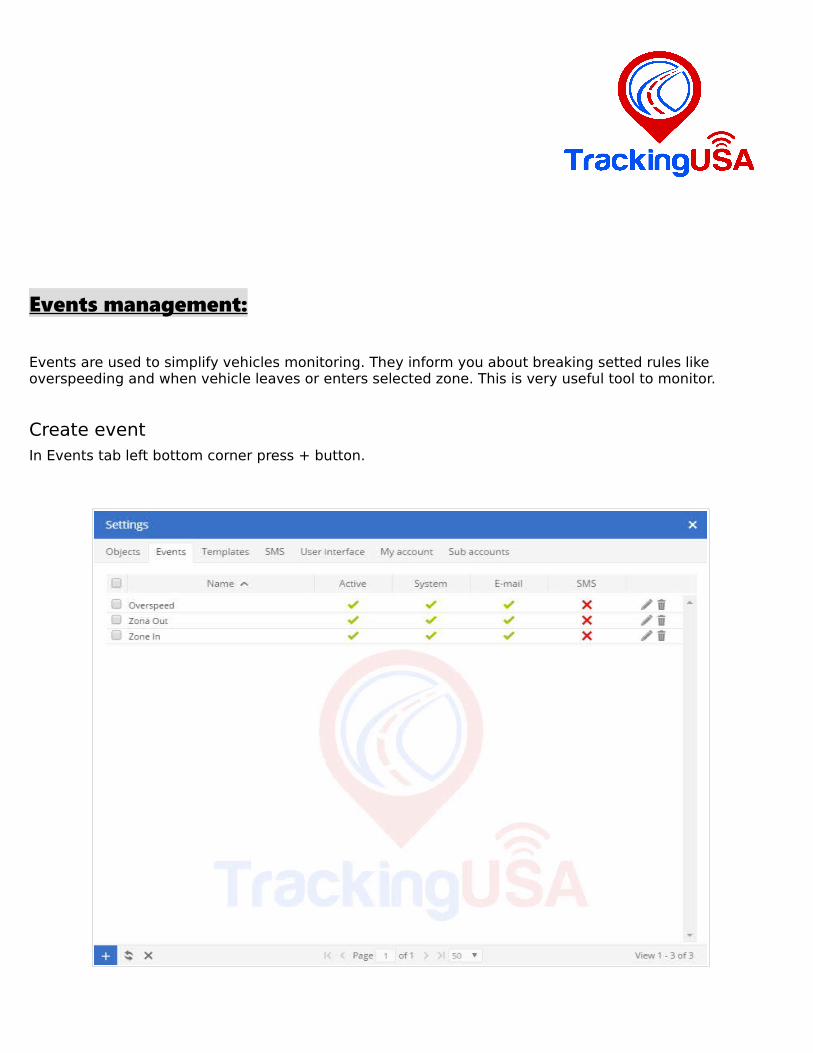
Events management:
Events are used to simplify vehicles monitoring. They inform you about breaking setted rules like overspeeding and when vehicle leaves or enters selected zone. This is very useful tool to monitor.
Create eventIn Events tab left bottom corner press + button.
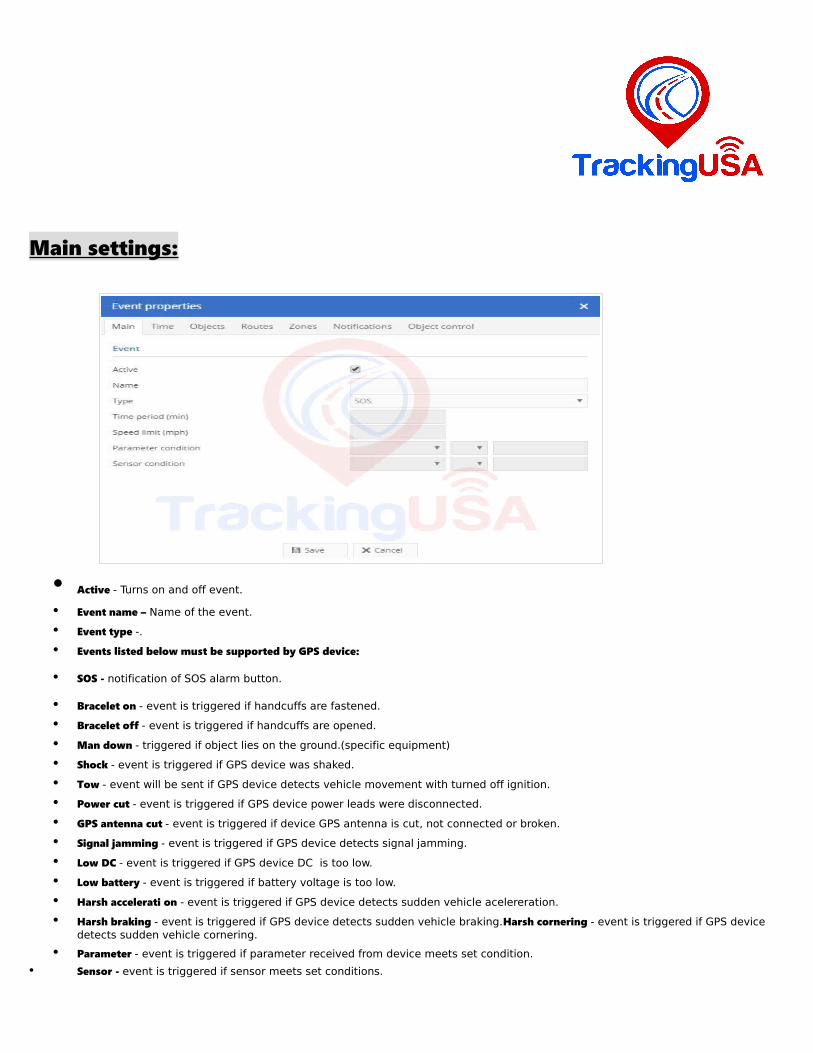
Main settings:
• Active - Turns on and off event.
• Event name – Name of the event.
• Event type -.
• Events listed below must be supported by GPS device:
• SOS - notification of SOS alarm button.
• Bracelet on - event is triggered if handcuffs are fastened.
• Bracelet off - event is triggered if handcuffs are opened.
• Man down - triggered if object lies on the ground.(specific equipment)
• Shock - event is triggered if GPS device was shaked.
• Tow - event will be sent if GPS device detects vehicle movement with turned off ignition.
• Power cut - event is triggered if GPS device power leads were disconnected.
• GPS antenna cut - event is triggered if device GPS antenna is cut, not connected or broken.
• Signal jamming - event is triggered if GPS device detects signal jamming.
• Low DC - event is triggered if GPS device DC is too low.
• Low battery - event is triggered if battery voltage is too low.
• Harsh accelerati on - event is triggered if GPS device detects sudden vehicle acelereration.
• Harsh braking - event is triggered if GPS device detects sudden vehicle braking.Harsh cornering - event is triggered if GPS device detects sudden vehicle cornering.
• Parameter - event is triggered if parameter received from device meets set condition.
• Sensor - event is triggered if sensor meets set conditions.
Events listed below are independent from GPS device:
•Connection yes - event is triggered if GPRS connection with GPS device was established.
•Connection no - event is triggered if GPRS connection with GPS device was lost.
•GPS yes - event is triggered if connection with GPS device was established.
•GPS no - event is triggered if connection with GPS device was lost.
•Overspeed - vehicle exceeded predefined speed.
•Underspeed - vehicle have slowed down below the specified speed.
•Service - allows to set a reminder about vehicle maintenance work (example: change engine oil).
•Route in - vehicle crossed predefined route.
•Route out - vehicle distanced from predefined route.
•Zone in - vehicle entered zone.
•Zone out - vehicle left zone.
•Time period (min) - event will be trigerred if there is no GPRS connection for set period of time. Event works with "connection: no" event.
•Speed limit (kph) - sets speed limit, works with overspeed and underspeed events.
•Parameter condition - select event type "parameter" and set conditions of event triggering.
•Sensor condition - select event type "sensor" and set conditions of event triggering.
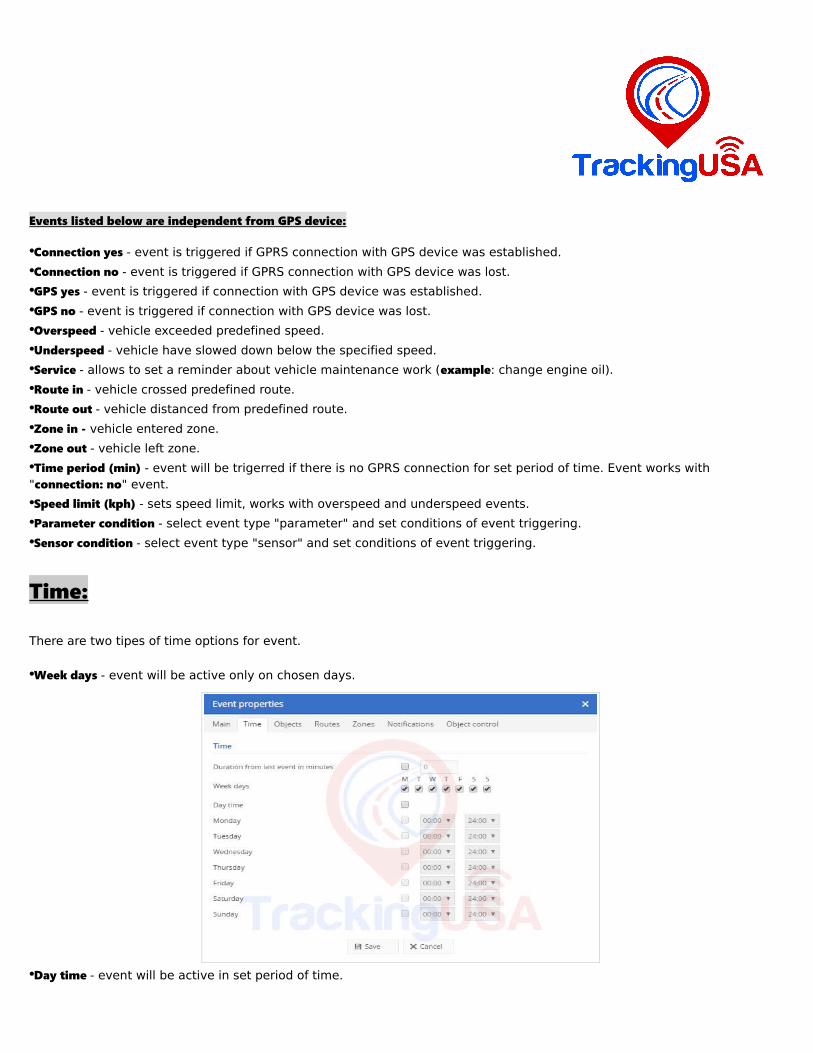
Time:
There are two tipes of time options for event.
•Week days - event will be active only on chosen days.
•Day time - event will be active in set period of time.
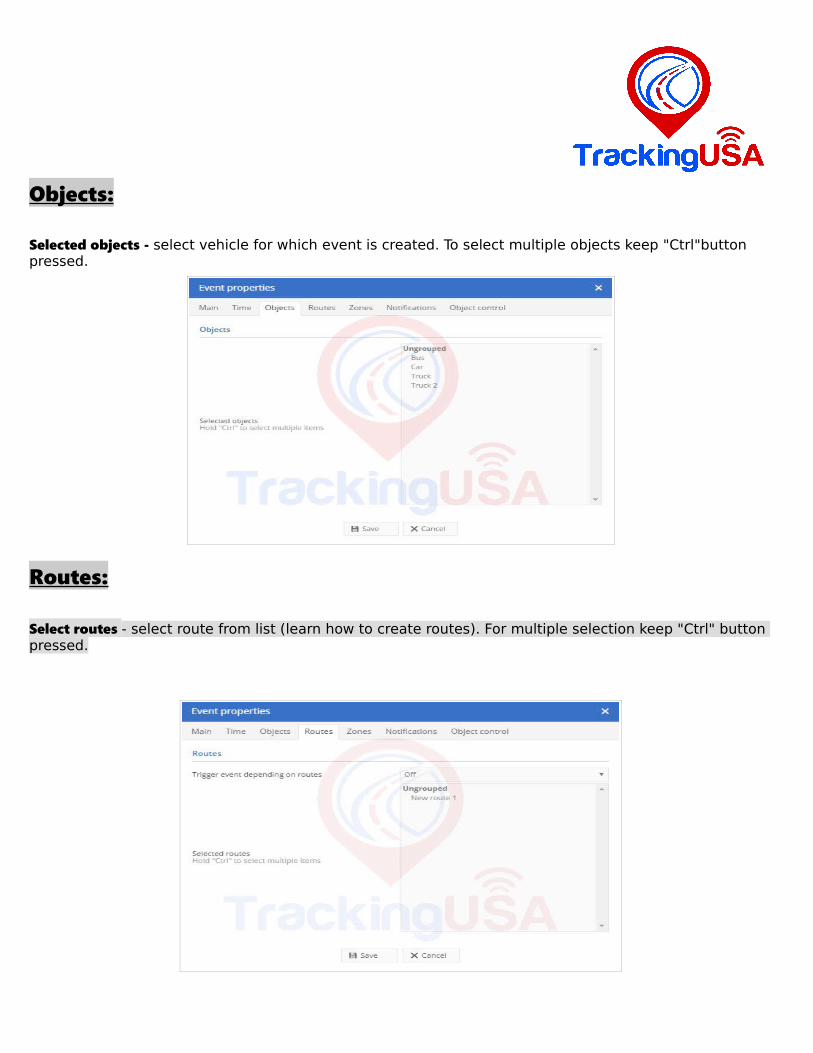
Objects:
Selected objects - select vehicle for which event is created. To select multiple objects keep "Ctrl"button pressed.
Routes:
Select routes - select route from list (learn how to create routes). For multiple selection keep "Ctrl" button pressed.
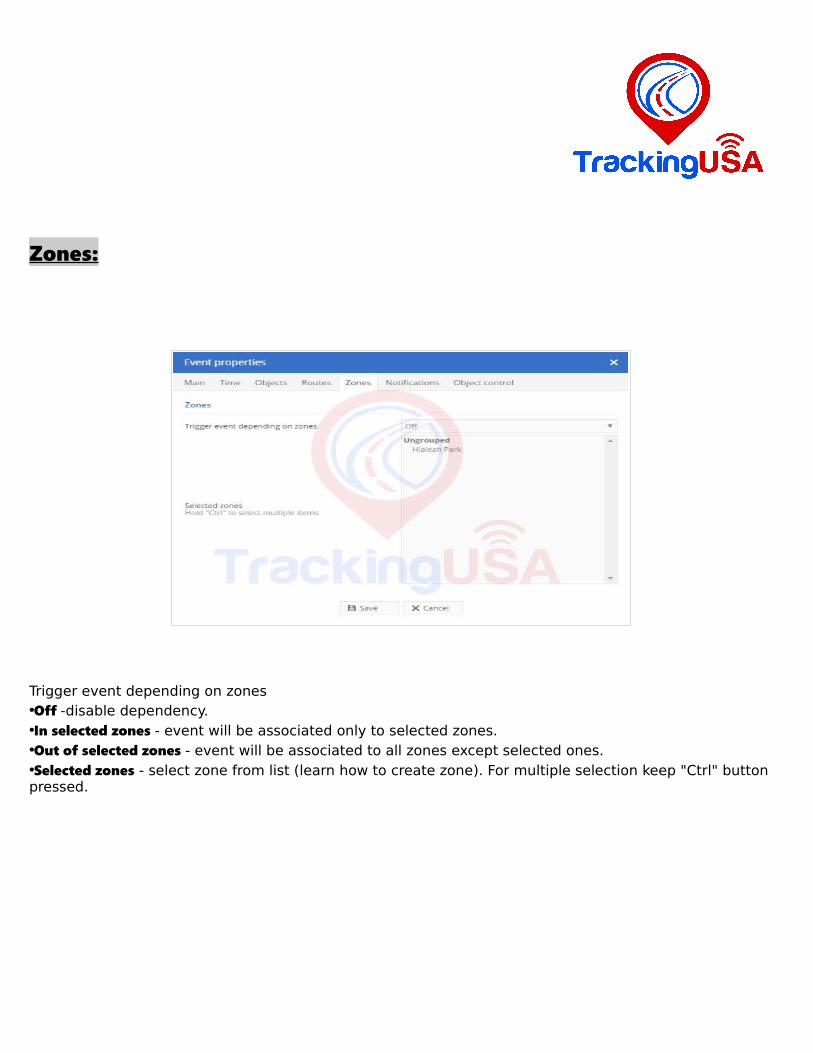
Zones:
Trigger event depending on zones•Off -disable dependency.•In selected zones - event will be associated only to selected zones.•Out of selected zones - event will be associated to all zones except selected ones.•Selected zones - select zone from list (learn how to create zone). For multiple selection keep "Ctrl" buttonpressed.
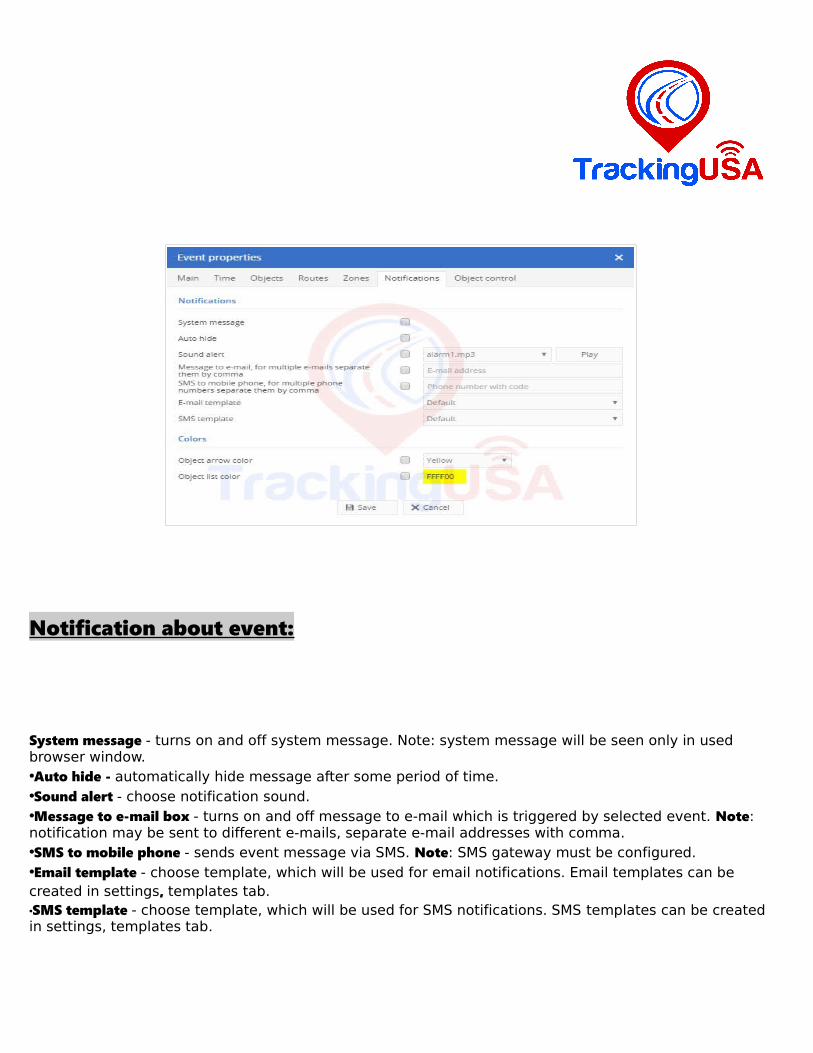
Notification about event:
System message - turns on and off system message. Note: system message will be seen only in used browser window.•Auto hide - automatically hide message after some period of time.•Sound alert - choose notification sound.•Message to e-mail box - turns on and off message to e-mail which is triggered by selected event. Note: notification may be sent to different e-mails, separate e-mail addresses with comma.•SMS to mobile phone - sends event message via SMS. Note: SMS gateway must be configured.•Email template - choose template, which will be used for email notifications. Email templates can be created in settings, templates tab.•SMS template - choose template, which will be used for SMS notifications. SMS templates can be created in settings, templates tab.
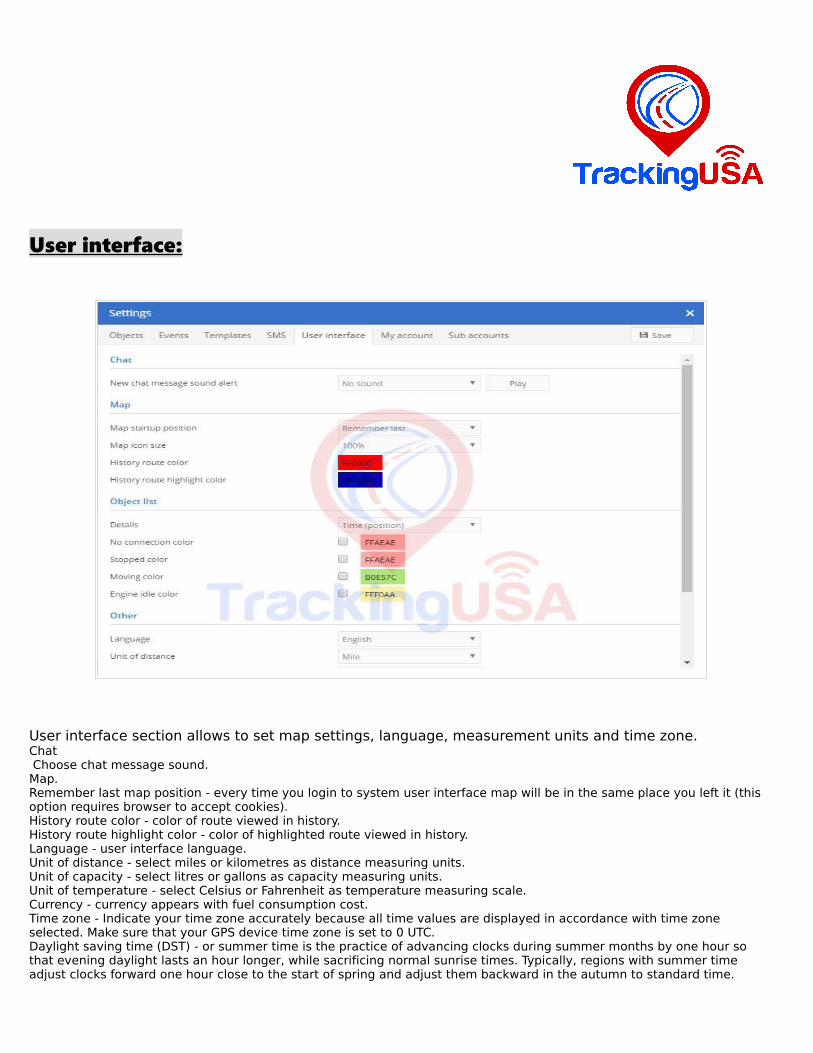
User interface:
User interface section allows to set map settings, language, measurement units and time zone.Chat Choose chat message sound.Map.Remember last map position - every time you login to system user interface map will be in the same place you left it (this option requires browser to accept cookies).History route color - color of route viewed in history.History route highlight color - color of highlighted route viewed in history.Language - user interface language.Unit of distance - select miles or kilometres as distance measuring units.Unit of capacity - select litres or gallons as capacity measuring units.Unit of temperature - select Celsius or Fahrenheit as temperature measuring scale.Currency - currency appears with fuel consumption cost.Time zone - Indicate your time zone accurately because all time values are displayed in accordance with time zone selected. Make sure that your GPS device time zone is set to 0 UTC.Daylight saving time (DST) - or summer time is the practice of advancing clocks during summer months by one hour so that evening daylight lasts an hour longer, while sacrificing normal sunrise times. Typically, regions with summer time adjust clocks forward one hour close to the start of spring and adjust them backward in the autumn to standard time.
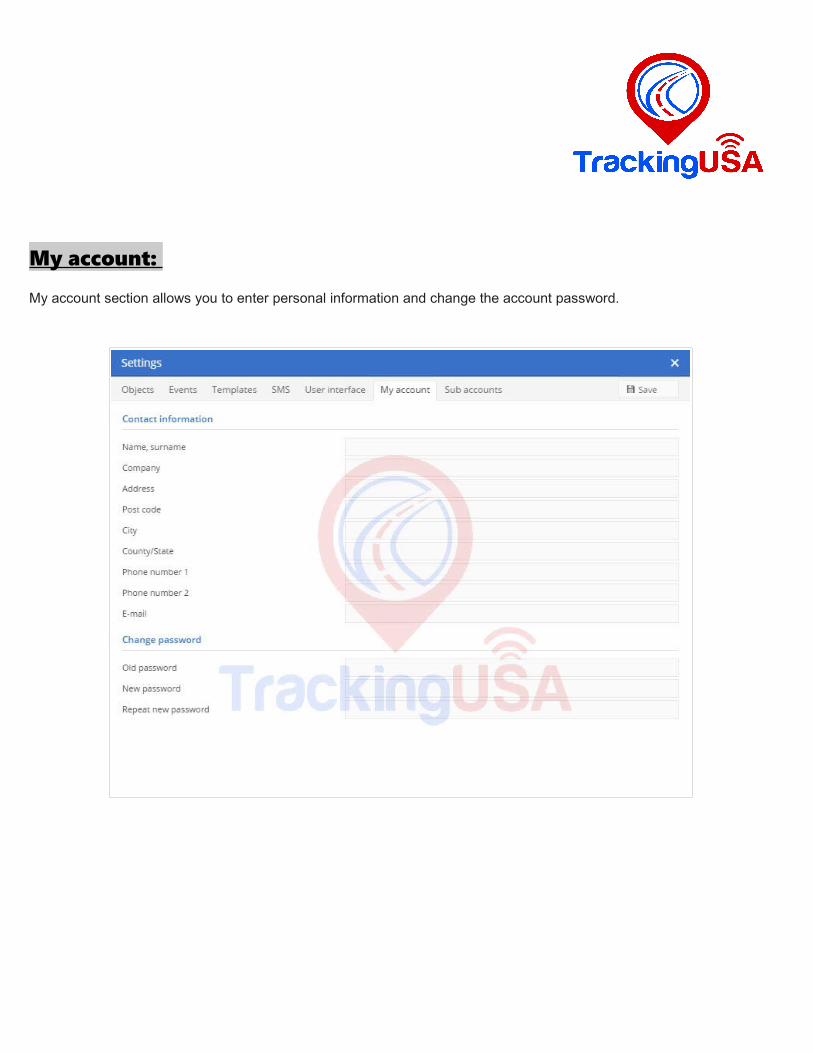
My account:
My account section allows you to enter personal information and change the account password.
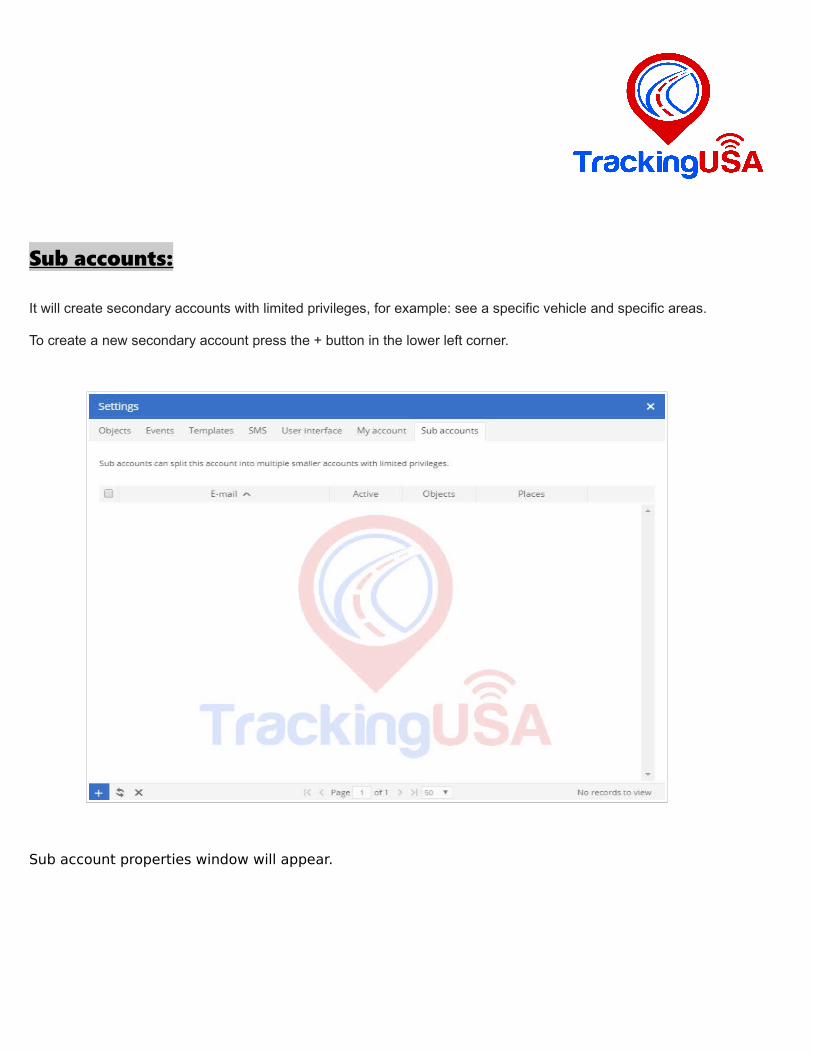
Sub accounts:
It will create secondary accounts with limited privileges, for example: see a specific vehicle and specific areas.
To create a new secondary account press the + button in the lower left corner.
Sub account properties window will appear.
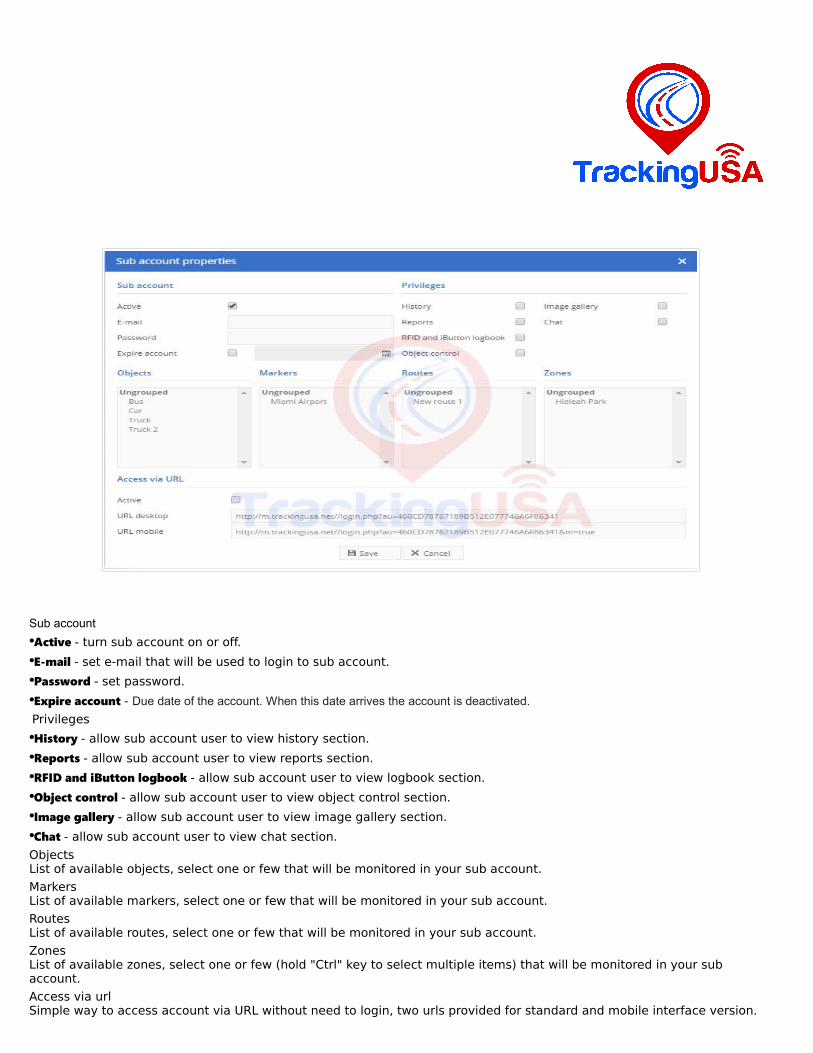
Sub account
•Active - turn sub account on or off.
•E-mail - set e-mail that will be used to login to sub account.
•Password - set password.
•Expire account - Due date of the account. When this date arrives the account is deactivated.
Privileges
•History - allow sub account user to view history section.
•Reports - allow sub account user to view reports section.
•RFID and iButton logbook - allow sub account user to view logbook section.
•Object control - allow sub account user to view object control section.
•Image gallery - allow sub account user to view image gallery section.
•Chat - allow sub account user to view chat section.
ObjectsList of available objects, select one or few that will be monitored in your sub account.
MarkersList of available markers, select one or few that will be monitored in your sub account.
RoutesList of available routes, select one or few that will be monitored in your sub account.
ZonesList of available zones, select one or few (hold "Ctrl" key to select multiple items) that will be monitored in your sub account.
Access via urlSimple way to access account via URL without need to login, two urls provided for standard and mobile interface version.
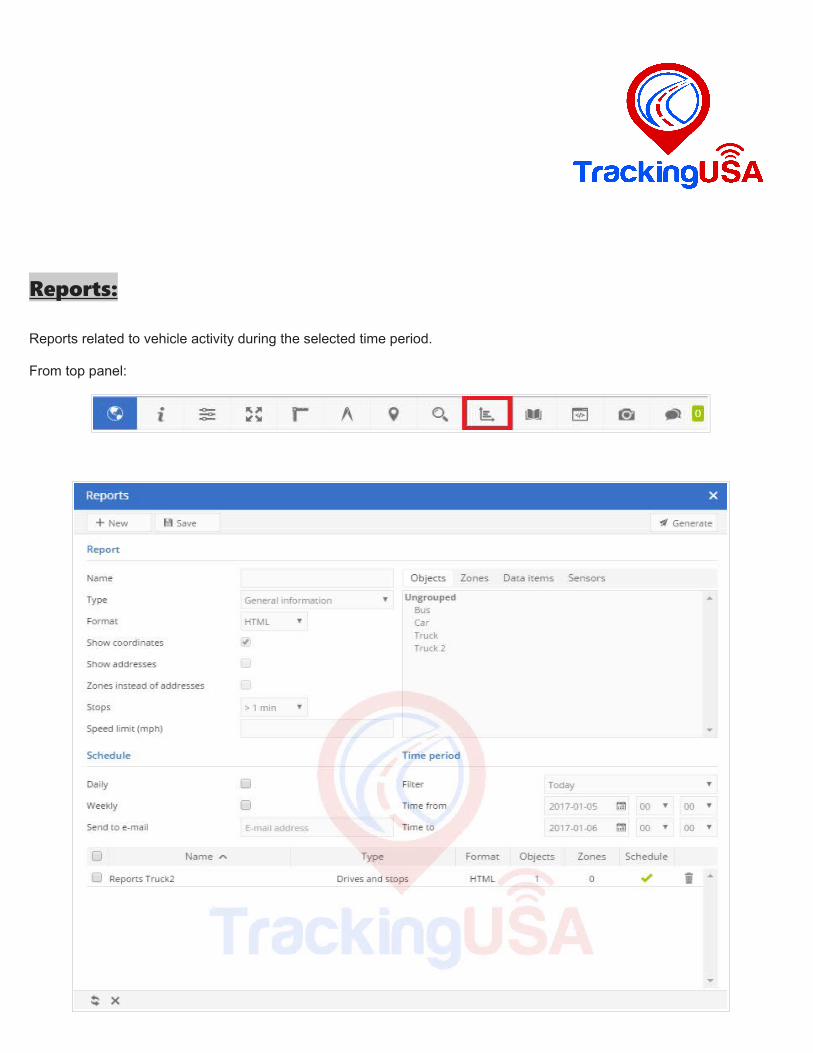
Reports:
Reports related to vehicle activity during the selected time period.
From top panel:
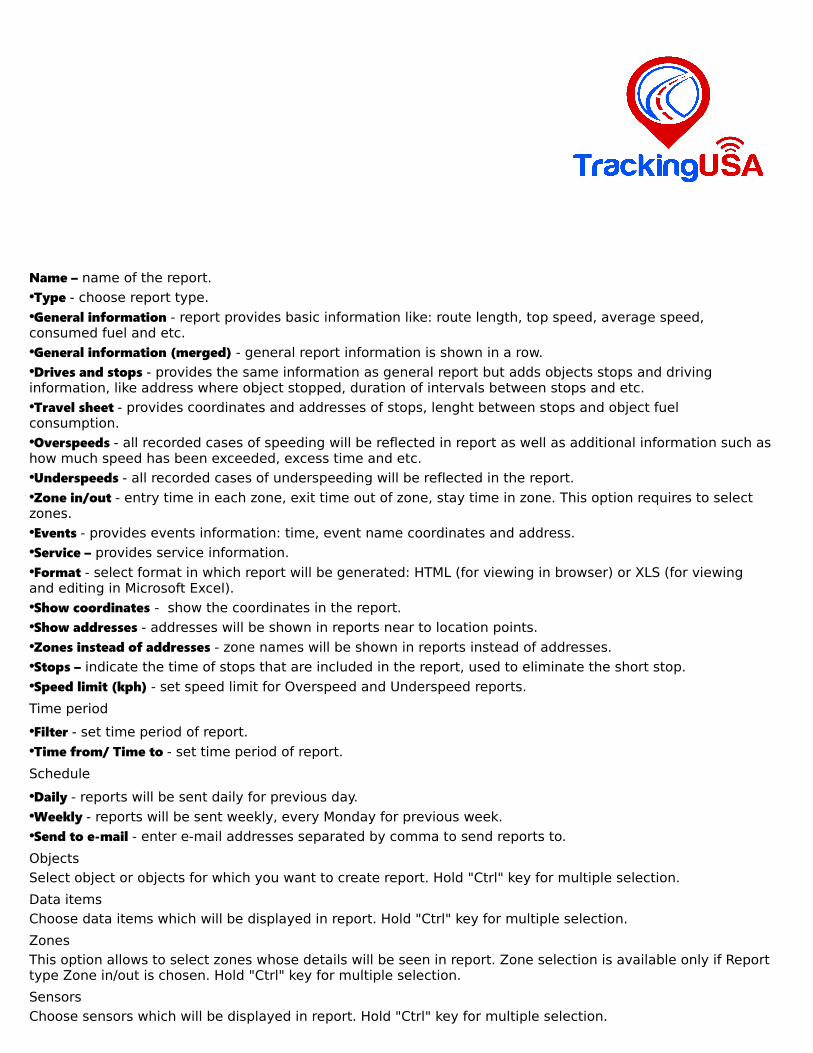
Name – name of the report.
•Type - choose report type.
•General information - report provides basic information like: route length, top speed, average speed, consumed fuel and etc.
•General information (merged) - general report information is shown in a row.
•Drives and stops - provides the same information as general report but adds objects stops and driving information, like address where object stopped, duration of intervals between stops and etc.
•Travel sheet - provides coordinates and addresses of stops, lenght between stops and object fuel consumption.
•Overspeeds - all recorded cases of speeding will be reflected in report as well as additional information such ashow much speed has been exceeded, excess time and etc.
•Underspeeds - all recorded cases of underspeeding will be reflected in the report.
•Zone in/out - entry time in each zone, exit time out of zone, stay time in zone. This option requires to select zones.
•Events - provides events information: time, event name coordinates and address.
•Service – provides service information.
•Format - select format in which report will be generated: HTML (for viewing in browser) or XLS (for viewing and editing in Microsoft Excel).
•Show coordinates - show the coordinates in the report.
•Show addresses - addresses will be shown in reports near to location points.
•Zones instead of addresses - zone names will be shown in reports instead of addresses.
•Stops – indicate the time of stops that are included in the report, used to eliminate the short stop.
•Speed limit (kph) - set speed limit for Overspeed and Underspeed reports.
Time period
•Filter - set time period of report.
•Time from/ Time to - set time period of report.
Schedule
•Daily - reports will be sent daily for previous day.
•Weekly - reports will be sent weekly, every Monday for previous week.
•Send to e-mail - enter e-mail addresses separated by comma to send reports to.
ObjectsSelect object or objects for which you want to create report. Hold "Ctrl" key for multiple selection.
Data itemsChoose data items which will be displayed in report. Hold "Ctrl" key for multiple selection.
ZonesThis option allows to select zones whose details will be seen in report. Zone selection is available only if Reporttype Zone in/out is chosen. Hold "Ctrl" key for multiple selection.
SensorsChoose sensors which will be displayed in report. Hold "Ctrl" key for multiple selection.
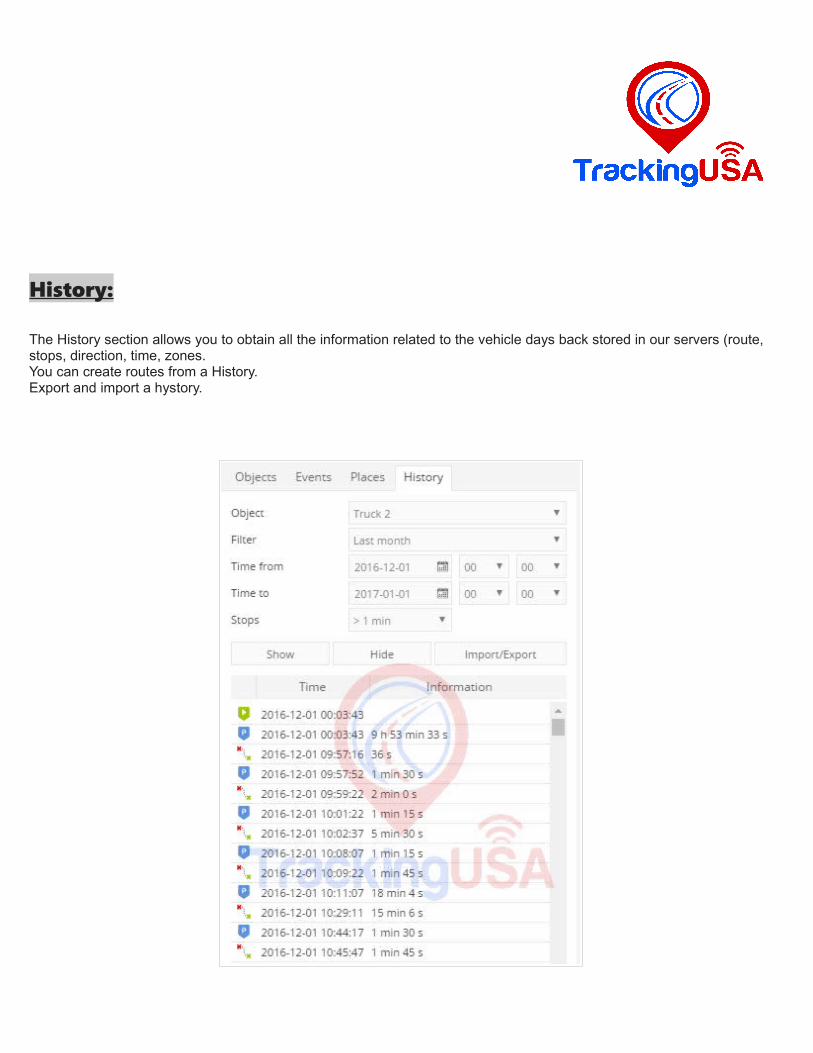
History:
The History section allows you to obtain all the information related to the vehicle days back stored in our servers (route, stops, direction, time, zones. You can create routes from a History.Export and import a hystory.
Object - select vehiclewhose history you want to display.
•Filter - simple way to set time period of report.
•Time From/Time to - precise way to set time period of report.
•Stops - set time of stops that will be included in report, used to eliminate traffic light stops.
•Events - include/exclude events in reports.
•Show - show history.
•Hide - hide history.
•Load GSR - load history data from .gsr file.
•Export GSR - export history data to .gsr file.
•Export to KML - export history data to .kml file.
•Export to GPX - export history data to .gpx file.
•Ezport to CSV – export history to .csv file.
Explanation of graphic elements
Each object action is marked with icon.
•Route start - beginning of the route.•Route end - the end of the route.•Route drive - object is moving.•Route stop - object doesn't move.•Event - event information.
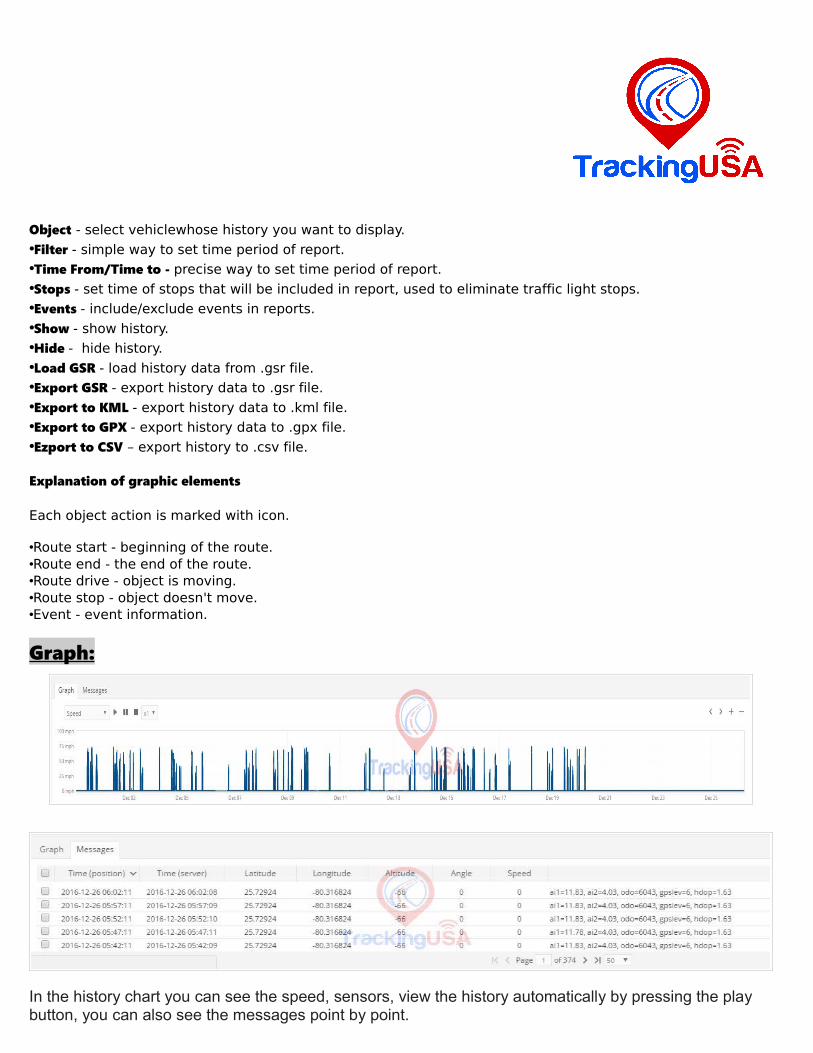
Graph:
In the history chart you can see the speed, sensors, view the history automatically by pressing the play button, you can also see the messages point by point.

Places:
In this section we can mark important places on the map, create routes and zones.these can then be used in events to control vehicles, in reports to get detailed information on a particular vehicle. For example, when the vehicle reaches thedesired point, when entering and exiting an area.
1).Markers.2).Search.3).Routes.4).Zones.5).reload entries.6).Create entry.7).Groups.8).Import.9).Export.10).Delete all entries.11).Visibility checkbox.12).Marker icon or color zone.13).Place name.14).Edit.15).Delete marker or zone.
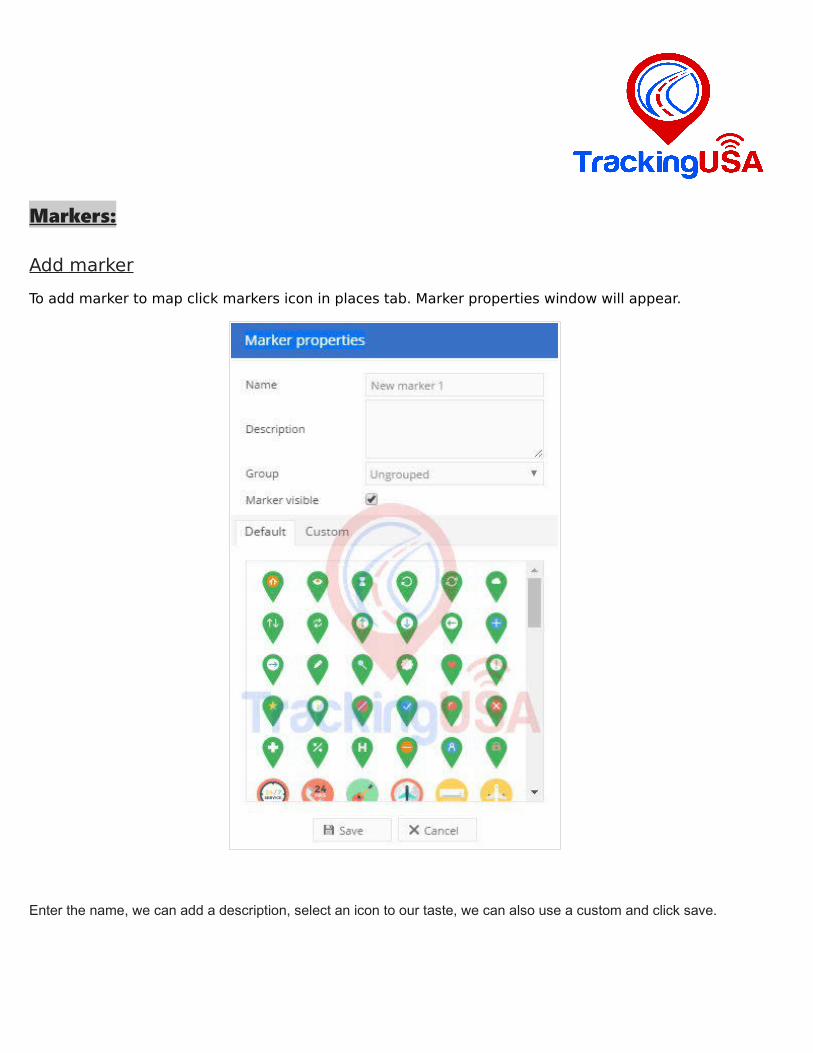
Markers:
Add marker
To add marker to map click markers icon in places tab. Marker properties window will appear.
Enter the name, we can add a description, select an icon to our taste, we can also use a custom and click save.
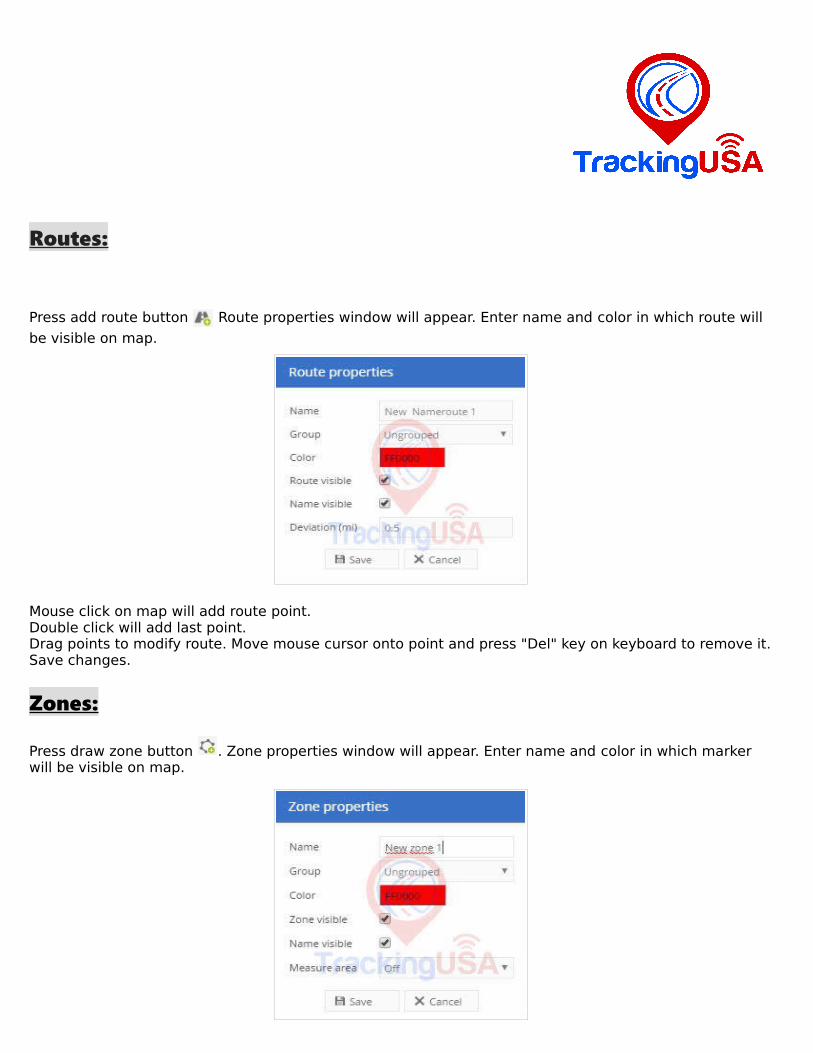
Routes:
Press add route button Route properties window will appear. Enter name and color in which route will
be visible on map.
Mouse click on map will add route point.Double click will add last point.Drag points to modify route. Move mouse cursor onto point and press "Del" key on keyboard to remove it.Save changes.
Zones:
Press draw zone button . Zone properties window will appear. Enter name and color in which marker will be visible on map.
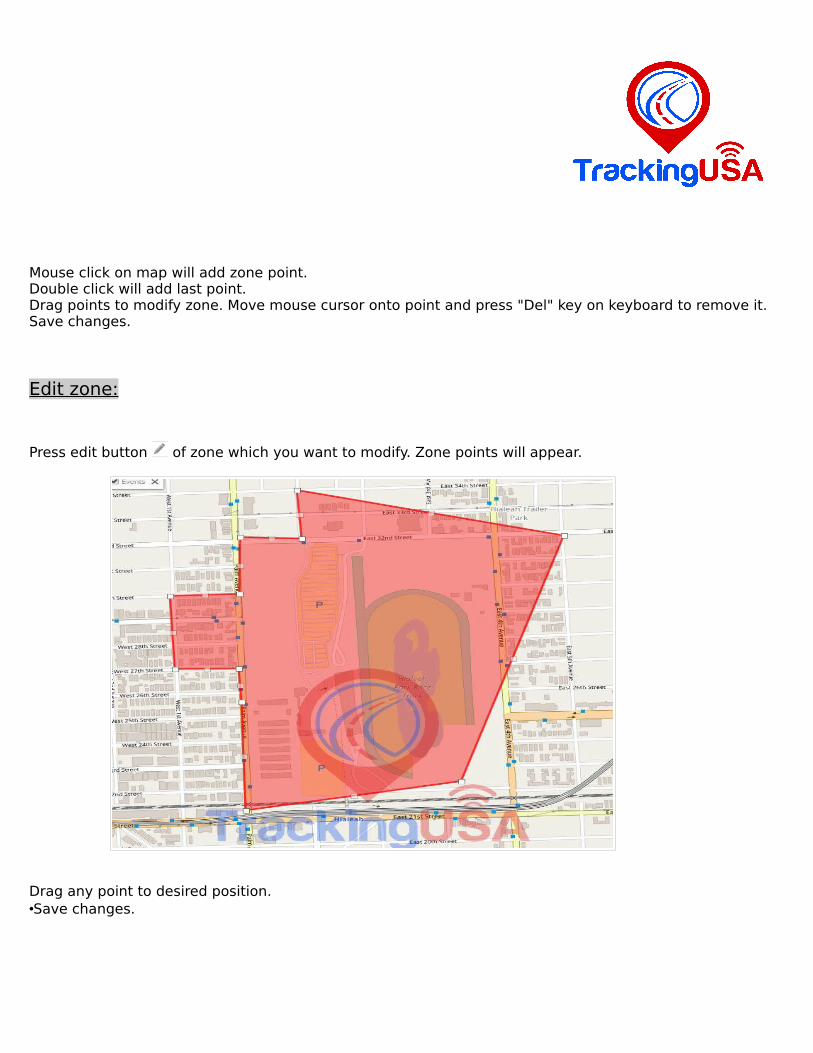
Mouse click on map will add zone point.Double click will add last point.Drag points to modify zone. Move mouse cursor onto point and press "Del" key on keyboard to remove it.Save changes.
Edit zone:
Press edit button of zone which you want to modify. Zone points will appear.
Drag any point to desired position.•Save changes.