user guidea4007.actonsoftware.com/acton/attachment/4007/f-0859/1... · obd port. it links instantly...
TRANSCRIPT

1
A L L D A T A® D I A G N O S T I C S TM
U S E R G U I D E
A L L D A T A D I A G N O S T I C S TM
The only scan tool solution with the power of ALLDATA built in
2
O V E R V I E W
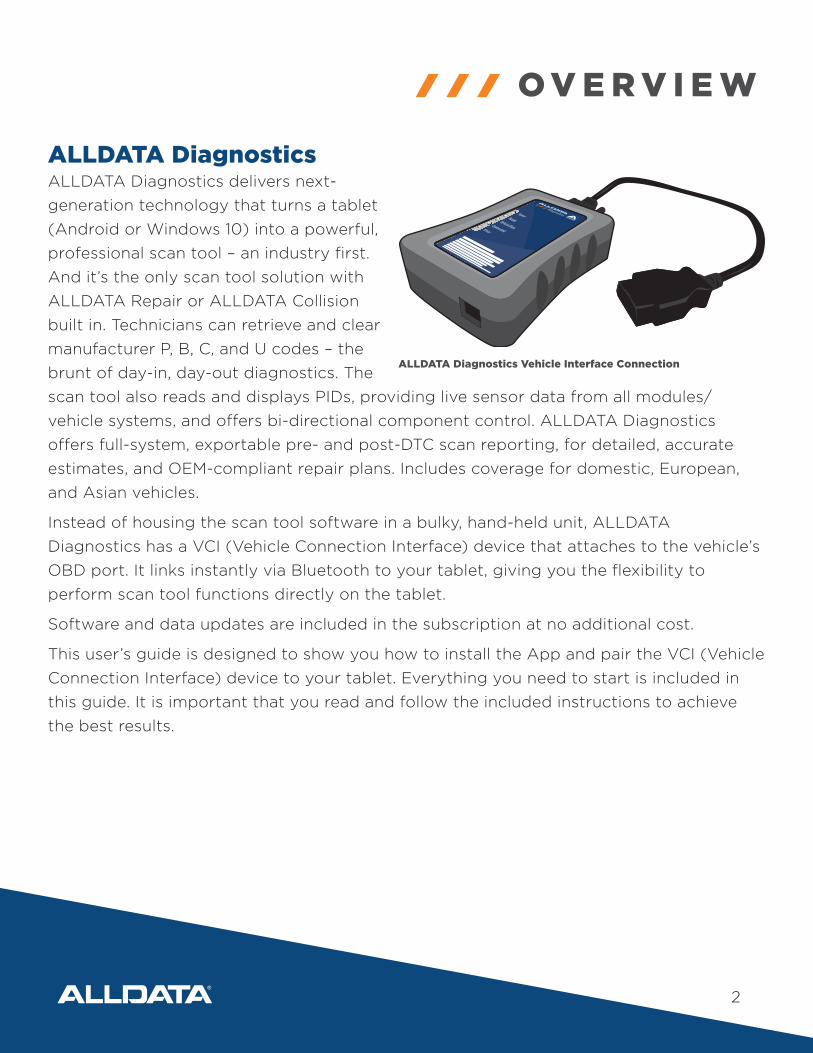
ALLDATA DiagnosticsALLDATA Diagnostics delivers next-
generation technology that turns a tablet
(Android or Windows 10) into a powerful,
professional scan tool – an industry first.
And it’s the only scan tool solution with
ALLDATA Repair or ALLDATA Collision
built in. Technicians can retrieve and clear
manufacturer P, B, C, and U codes – the
brunt of day-in, day-out diagnostics. The
scan tool also reads and displays PIDs, providing live sensor data from all modules/
vehicle systems, and offers bi-directional component control. ALLDATA Diagnostics
offers full-system, exportable pre- and post-DTC scan reporting, for detailed, accurate
estimates, and OEM-compliant repair plans. Includes coverage for domestic, European,
and Asian vehicles.
Instead of housing the scan tool software in a bulky, hand-held unit, ALLDATA
Diagnostics has a VCI (Vehicle Connection Interface) device that attaches to the vehicle’s
OBD port. It links instantly via Bluetooth to your tablet, giving you the flexibility to
perform scan tool functions directly on the tablet.
Software and data updates are included in the subscription at no additional cost.
This user’s guide is designed to show you how to install the App and pair the VCI (Vehicle
Connection Interface) device to your tablet. Everything you need to start is included in
this guide. It is important that you read and follow the included instructions to achieve
the best results.
ALLDATA Diagnostics Vehicle Interface Connection

3
TA B L E O F C O N T E N T S
Requirements ..................................................................................................................................................4Hardware .......................................................................................................................................................................4Software ........................................................................................................................................................................4Internet Connection .................................................................................................................................................4Tablet ...............................................................................................................................................................................4
Setup – Android ............................................................................................................................................ 5Download and Install the ALLDATA app ....................................................................................................... 5Pairing to a tablet .....................................................................................................................................................6
Setup – Windows ......................................................................................................................................... 7Download and install the ALLDATA app ....................................................................................................... 7Pairing to a tablet ..................................................................................................................................................... 8
Connecting to a vehicle ......................................................................................................................9Status Indicators ........................................................................................................................................................9Power up ALLDATA Diagnostics .......................................................................................................................9Vehicle Connection ................................................................................................................................................ 10Vehicle Selection ....................................................................................................................................................... 11System Selection ......................................................................................................................................................12
Navigation ......................................................................................................................................................... .13Viewing Diagnostic Trouble Codes ................................................................................................................13Viewing Emissions Readiness Monitors ........................................................................................................15Viewing PID Information .......................................................................................................................................16Using the Toolbar .....................................................................................................................................................17
Updating the VCI ........................................................................................................................................18Support ................................................................................................................................................................ 20Technical Support .................................................................................................................................................. 20Troubleshooting ........................................................................................................................................................21FAQs ..............................................................................................................................................................................22

4
Tablet
Android• Screen Size: 7 inches or larger• Memory (ROM): 8GB or more• Connectivity: Bluetooth• Camera: Autofocus• Operating System: Android 5.0 or later
Windows• Screen Size: 7 inches or larger• Memory (RAM): 2GB or more• Connectivity: Bluetooth• Camera: Autofocus• Operating System: Windows 10
NOTE: Low-cost tablets that lack basic services, or include parts based on older technology, will not reliably meet the requirements. If you cannot access ALLDATA Mobile in the app store through a low-cost tablet, it probably means that tablet does not have basic features, such as GPS tracking or Bluetooth using current technology standards.
R E Q U I R E M E N T S
HardwareVehicle Connection Interface (VCI)
SoftwareALLDATA Diagnostics
Internet ConnectionHigh-speed /broadband such as cable DSL or satellite

5
S E T U P
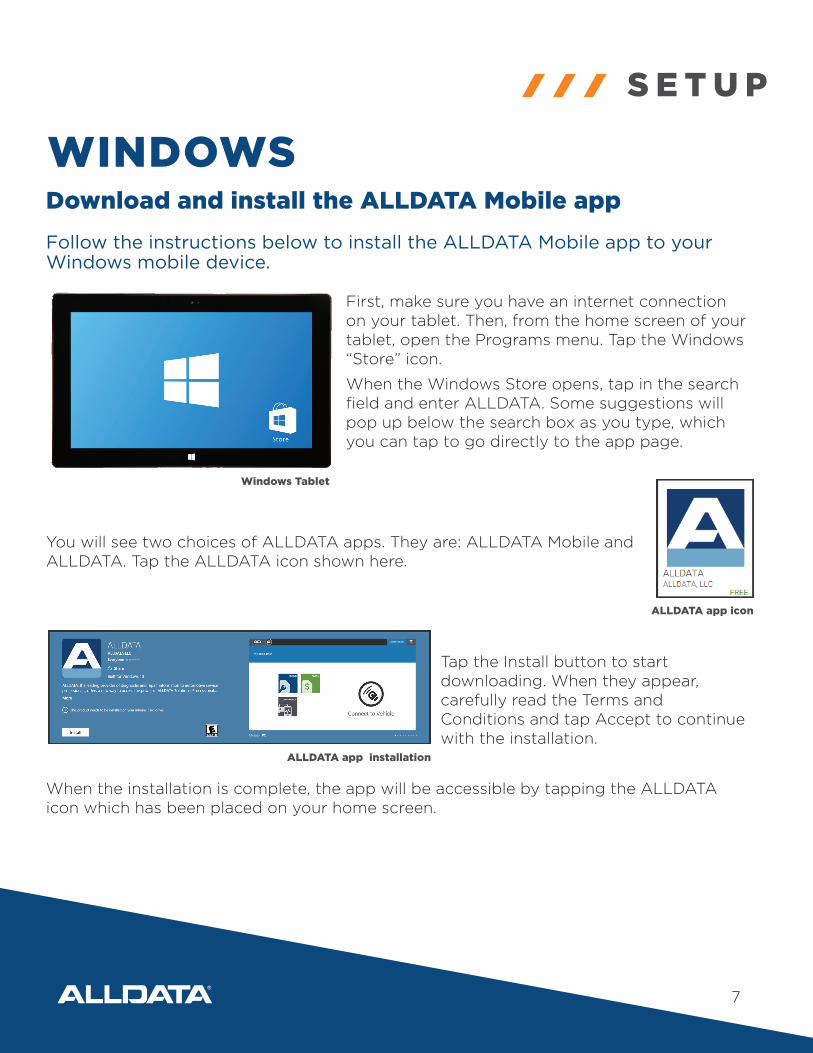
ANDROIDDownload and install the ALLDATA Mobile app
Follow the instructions below to install the ALLDATA Mobile app to your Android mobile device.
First, make sure you have an internet connection on your tablet. Then, from the home screen of your tablet, locate and tap the Play Store icon. If it is not on the home screen tap the Apps icon in the bottom-right. Swipe right or left until you find the icon and tap it.
When the Play Store opens, tap in the search field and enter ALLDATA. Some suggestions will pop up below the search box as you type, which you can tap to go directly to the app page.
You will see two choices of ALLDATA apps. They are: ALLDATA Mobile and ALLDATA. Tap the ALLDATA icon shown here.
Tap the Install button to start downloading. When they appear, carefully read the Terms and Conditions and tap Accept to continue with the installation.
When the installation is complete, the app will be accessible by tapping the ALLDATA icon which has been placed on your home screen. You can also find it by tapping the apps icon in the bottom-right of your home screen, and swiping left and right to locate the app as described above.
ALLDATA app icon
ALLDATA app installation
Android Tablet

6
S E T U P
ANDROID (CONTINUED)
Pairing to a tablet
Follow the instructions below to pair your tablet to the VCI (Vehicle Connection Interface).
To begin, locate the vehicle’s OBD port. It is typically located in the driver’s area, within reach of the driver’s seat (i.e., under the steering column or dash). Plug in the VCI to the vehicle’s OBDII port and allow the unit to boot up. The five lights will begin to blink on and off during this process. Wait until the Power (red), and Ready (blue) lights are solid and no other lights are illuminated.
Swipe from the edge of your screen across the system status bar. Press and hold the Bluetooth icon until the settings menu opens. You will see a list of devices you can connect to. Locate the ALLDATA-OBD option and tap it.
The orange Connected icon on the VCI will illuminate. When prompted by your tablet, enter the PIN 1234 and then select Pair.
Your devices are now paired.
Connect VCI to OBD II Port
Bluetooth icon
Bluetooth settings
VCI (Vehicle Connection Interface)
7
WINDOWSDownload and install the ALLDATA Mobile app
Follow the instructions below to install the ALLDATA Mobile app to your Windows mobile device.
First, make sure you have an internet connection on your tablet. Then, from the home screen of your tablet, open the Programs menu. Tap the Windows “Store” icon.
When the Windows Store opens, tap in the search field and enter ALLDATA. Some suggestions will pop up below the search box as you type, which you can tap to go directly to the app page.
You will see two choices of ALLDATA apps. They are: ALLDATA Mobile and ALLDATA. Tap the ALLDATA icon shown here.
Tap the Install button to start downloading. When they appear, carefully read the Terms and Conditions and tap Accept to continue with the installation.
When the installation is complete, the app will be accessible by tapping the ALLDATA icon which has been placed on your home screen.
Windows Tablet
ALLDATA app icon
ALLDATA app installation
S E T U P

8
To begin, locate the vehicle’s OBD port. It is typically located in the driver’s area, within reach of the driver’s seat (i.e., under the steering column or dash). Plug in the VCI (Vehicle Connection Interface) to the vehicle’s OBDII port and allow the unit to boot up. The five lights will begin to blink on and off during this process. Wait until the Power (red), and Ready (blue) lights are solid and no other lights are illuminated.
Swipe across your screen from the right edge to open the Action Center. Tap the “All Settings” icon. When the settings page opens tap Devices.
Next, select the Bluetooth tab. You will see a list of devices you can connect to. Locate the ALLDATA-OBD option, select it then tap “Pair”.
Tap “Yes” to allow the VCI to connect to your tablet
The orange Connected icon on the VCI will illuminate. When prompted by your tablet, enter the Passcode 1234 and then select Next. The status of the ALLDATA-OBD device will change to “Paired”.
VCI (Vehicle Connection Interface)
Connect VCI to OBD II Port
Action CenterTap Devices
Bluetooth settings
Tap Yes
WINDOWS (CONTINUED)
S E T U P

9
C O N N E C T I N G
CONNECTING TO A VEHICLEStatus Indicators
Power – Indicates the VCI (Vehicle Connection Interface) is connected to a power supply
Ready – Indicates the VCI has completed the booting process and is ready to use
Vehicle data – Indicates data is being communicated from the vehicle to the VCI
Connected – Indicates that the VCI is paired (connected) to a mobile device
Error – Indicates there is a system error
To power up ALLDATA Diagnostics
1. Plug the device into the OBDII Port.
2. During the boot process, all five light indicators will illuminate.
3. After initial boot, only the Power and Vehicle Data indicators will illuminate.
4. When only Power and Ready indicators are illuminated, the device is ready for use.
VCI (Vehicle Connection Interface)
10
Vehicle Connection
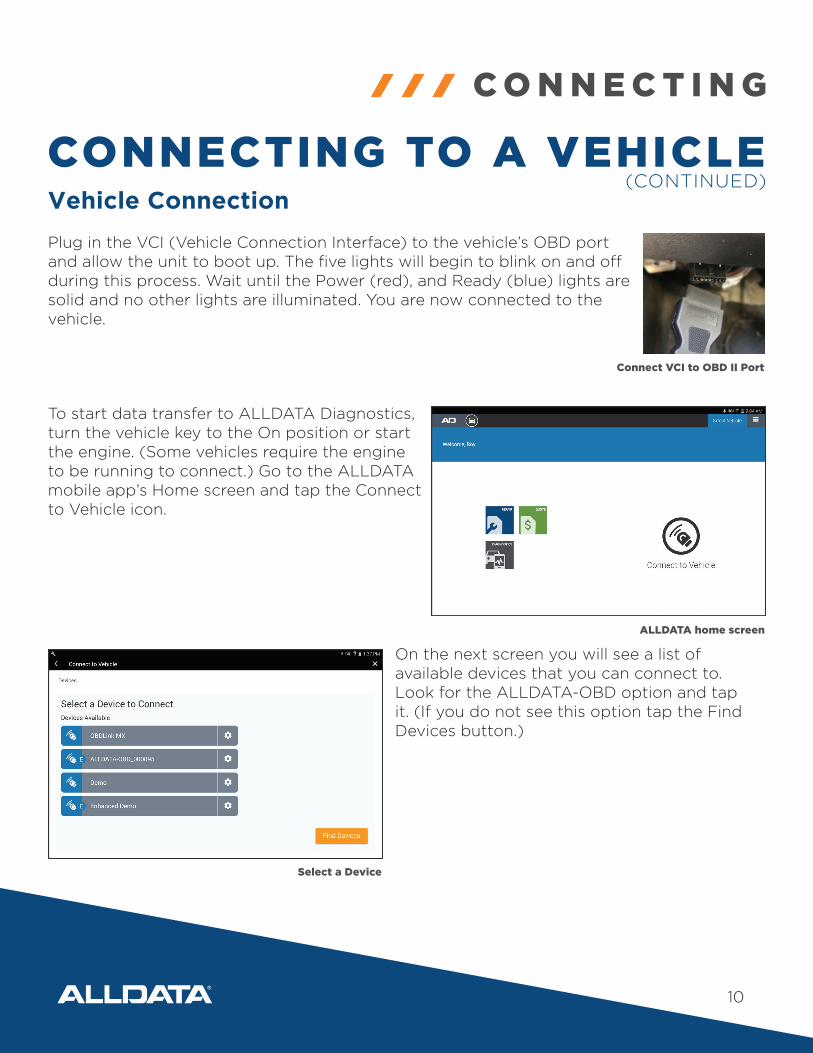
Plug in the VCI (Vehicle Connection Interface) to the vehicle’s OBD port and allow the unit to boot up. The five lights will begin to blink on and off during this process. Wait until the Power (red), and Ready (blue) lights are solid and no other lights are illuminated. You are now connected to the vehicle.
To start data transfer to ALLDATA Diagnostics, turn the vehicle key to the On position or start the engine. (Some vehicles require the engine to be running to connect.) Go to the ALLDATA mobile app’s Home screen and tap the Connect to Vehicle icon.
On the next screen you will see a list of available devices that you can connect to. Look for the ALLDATA-OBD option and tap it. (If you do not see this option tap the Find Devices button.)
Connect VCI to OBD II Port
Select a Device
ALLDATA home screen
C O N N E C T I N G
CONNECTING TO A VEHICLE (CONTINUED)

11
Vehicle Selection
When the device is selected, the Connected (orange) light on the VCI will illuminate and the Select Make of Vehicle screen will appear. Choose the appropriate Make.
The next page is where you will select the vehicle. Tap Get VIN. Vehicles that do not provide VIN data will require you to use your devices camera to scan the vehicles VIN bar code or manually enter the VIN. Once the VIN is displayed, verify all of the vehicle information is correct and tap Next.
VCI (Vehicle Connection Interface)
Select Make of Vehicle
Get VIN
C O N N E C T I N G
CONNECTING TO A VEHICLE (CONTINUED)

12
System Selection
Select the vehicle system you want to scan and tap Next.
Selecting Generic Powertrain will only display basic emissions related P-Codes.
Select your scan options and tap Start Scanning Vehicle. The Vehicle Data (green) light will illuminate and blink when data is being transferred between the vehicle and the VCI.
You are now connected to the vehicle and ready to start viewing vehicle data.
VCI (Vehicle Connection Interface)
Select Vehicle System
Select Scan Options
Green Icon indicates “Connected”
C O N N E C T I N G
CONNECTING TO A VEHICLE (CONTINUED)

13
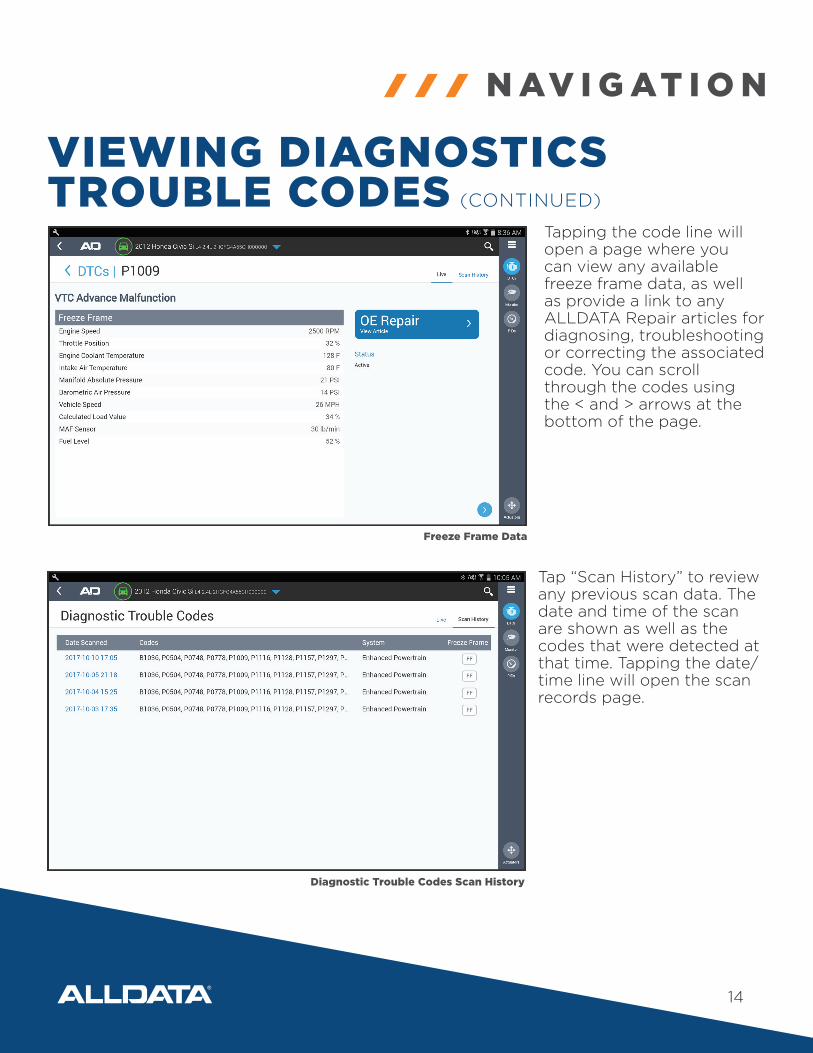
Selecting the DTCs icon will display all detected DTC codes. When viewing Diagnostic Trouble Codes, you can view Live data as well as review any previous scans. Both active (Mode 1) and pending (Mode 7) data will be displayed. Active codes are listed first and shown in blue. Pending codes are shown below the active codes in grey. If any freeze frame (Mode 2) data has been captured it will be denoted on the code line with FF. From this page, you can also clear any active codes by tapping the Clear button. The export button will save the DTC report to your device’s local storage.
N AV I G AT I O N
VIEWING DIAGNOSTICS TROUBLE CODES
Diagnostic Trouble Codes
14
Tap “Scan History” to review any previous scan data. The date and time of the scan are shown as well as the codes that were detected at that time. Tapping the date/time line will open the scan records page.
Diagnostic Trouble Codes Scan History
Tapping the code line will open a page where you can view any available freeze frame data, as well as provide a link to any ALLDATA Repair articles for diagnosing, troubleshooting or correcting the associated code. You can scroll through the codes using the < and > arrows at the bottom of the page.
Freeze Frame Data
N AV I G AT I O N
VIEWING DIAGNOSTICS TROUBLE CODES (CONTINUED)

15
The Emissions Monitors page will indicate whether or not a vehicle is ready to run an emissions test. It shows the status of both continously and non-continuosly monitored systems. A green bar means the system test has been run and completed. A red bar means the test has not been run or is not complete. If the bar is gray, this indicates the system or test is not available on the selected vehicle. At the bottom of the page is a grid which displays Mode 6 data.
NOTE: You must be in Generic Powertrain mode to view emissions monitor information.
Emissions Monitors
N AV I G AT I O N
VIEWING EMISSIONS MONITORS

16
VIEWING PID INFORMATION
To view live sensor (Mode 1) data tap the PIDs icon. On the page that opens choose the sensors you want to view by tapping the slider next to its name. The sensors available for selection will depend on the system you selected during the initial connection process. Additional PIDs may be available by selecting a different system. At the top right of the screen, choose how you want to see the information. Your choices are: Grid, Graphs and Meter. Samples of each are shown below.
Choose the sensors to monitor
Grid view Meter view
Graph view
N AV I G AT I O N

17
USING ACTUATORS FORBI-DIRECTIONAL CONTROL
Tap the “Actuators” icon to open the Actuations panel. This panel facilitates bi-directional control of modules, motors, solenoids, switches, relays etc. The available items will vary by vehicle. Tap the icon again to close the panel.
Actuators
N AV I G AT I O N

18
USING THE TOOLBAR
Disconnect or Change Vehicle System
Select Vehicle System
Tool Bar
At the top of each page is the toolbar. Tap on it to open the options page.
From here you can access other ALLDATA applications such as Repair, Community, and Quotes.
This is also where you can disconnect the VCI from the vehicle and change the vehicle system you are viewing.
Tapping the Change button on the Current System bar opens the Select Vehicle System page, where you select the new system to view.
N AV I G AT I O N

19
U P D AT I N G
UPDATING THE VCITo update the VCI, power up the device using the provided power supply.
On the opposite end of the VCI, use the provided USB cable to connect the VCI to a Windows PC.
Open a web browser and enter 192.168.30.1 in the address bar. When the page opens click the Update tab.
Vehicle Connection Interface
Admin Screen Home Page

20
UPDATING THE VCIClick “Choose File” and navigate to the provided update file, and click “Open.” Click “Upload File.” The Power (red) light on the VCI will illuminate.
When the Connected (orange) light on the VCI begins blinking and the Update Agent Status message reads “Rebooting to finalize update,” unplug the VCI from the power supply. Wait 5 seconds and plug the VCI back into the power supply. Verify that the Scan Tool version matches the update documentation.
Admin Screen Home Page
Admin Screen Update Page
U P D AT I N G

21
S U P P O R T
TROUBLESHOOTINGInitial troubleshooting1. Turn the vehicle off.
2. Unplug the connection device.
3. Close the ALLDATA Mobile app.
a. Android
i. Press the Recent Apps button to reveal all of the apps that are running.
ii. Drag the app to the side of the screen to close it.
b. Windows
i. Select the Task View icon in the Task Bar to reveal all of the apps that are running.
ii. Tap the X at the top right of the app you want to close.
4. Verify that the most current version of the ALLDATA Mobile app is installed and update as required.
5. Reset the tablet’s Bluetooth connection:
a. Android
i. Swipe from the edge of your screen across the system status bar.
ii. If Bluetooth is on, tap the Bluetooth icon to disable Bluetooth.
iii. Tap the Bluetooth icon again to turn Bluetooth on.
b. Windows
i. Open the Action Center.
ii. If Bluetooth is on, tap the toggle button to disable it.
iii. Tap the toggle button to enable Bluetooth.

22
Problem connecting to the vehicle1. The connection device…
a. is already connected to another tablet.
b. has not completed the startup cycle.
c. is not working properly.
d. has not been paired properly within the device Bluetooth settings.
2. The tablet…
a. has an outdated version of the ALLDATA mobile app installed.
b. has weak or no internet connection.
c. Bluetooth is not set up or working properly.
3. The vehicle…
a. ignition switch is not turned on.
b. engine is not running (certain vehicles only.)
c. OBDII port is not working properly.
After all troubleshooting options have been exhausted:Verify the connection device works on a different vehicle.
1. If the connection is successful:
a. The device is working properly. Retry the connection on the original vehicle.
b. If the connection fails a second time on the original vehicle, there may be a problem with the vehicle’s OBDII connector. Vehicle troubleshooting should be completed before attempting connection again.
2. If the connection is unsuccessful:
a. Check out support.alldata.com or call 800-859-3282 for additional assistance.
.
S U P P O R T
TROUBLESHOOTING

23
©2017-2018 ALLDATA LLC. All rights reserved. Automotive Intelligence is a Service Mark of ALLDATA LLC. All other marks are the property of their respective holders.
v. 11/2017