user’sguide - husqvarna viking · •...
TRANSCRIPT

User’s Guide
KEEPING THE WORLD SEWING™

This household sewing machine is designed to comply with IEC/EN 60335-2-28 and UL1594.
IMPORTANT SAFETY INSTRUCTIONSWhen using an electrical appliance, basic safety precautions should always be followed, including thefollowing:
Read all instructions before using this household sewing machine. Keep the instructions at a suitableplace close to the machine. Make sure to hand them over if the machine is given to a third party.
DANGER –TO REDUCE THE RISKOF ELECTRIC SHOCK:• A sewing machine should never be left unattended when plugged in. Always unplug this sewingmachine from the electric outlet immediately after using and before cleaning, removing covers,lubricating or when making any other user servicing adjustments mentioned in the instructionmanual.
WARNING –TO REDUCE THE RISKOF BURNS, FIRE,ELECTRIC SHOCK, OR INJURY TO PERSON:• Do not allow to be used as a toy. Close attention is necessary when this sewing machine is used byor near children.
• Use this sewing machine only for its intended use as described in this manual. Use onlyattachments recommended by the manufacturer as contained in this manual.
• Never operate this sewing machine if it has a damaged cord or plug, if it is not working properly, ifit has been dropped or damaged, or dropped into water. Return the sewing machine to the nearestauthorized dealer or service center for examination, repair, electrical or mechanical adjustment.
• Never operate the sewing machine with any air openings blocked. Keep ventilation openings ofthe sewing machine and foot control free from the accumulation of lint, dust, and loose cloth.
• Keep fingers away from all moving parts. Special care is required around the sewing machineneedle.
• Always use the proper needle plate. The wrong plate can cause the needle to break.• Do not use bent needles.• Do not pull or push fabric while stitching. It may deflect the needle causing it to break.• Wear safety glasses.• Switch the sewing machine off (“0”) when making any adjustment in the needle area, such asthreading needle, changing needle, threading bobbin, or changing presser foot, etc.
• Never drop or insert any object into any opening.• Do not use outdoors.• Do not operate where aerosol (spray) products are being used or where oxygen is beingadministrated.
• To disconnect, turn all controls to the off (“0”) position, then remove plug from outlet.• Do not unplug by pulling on cord. To unplug, grasp the plug, not the cord.• The foot control is used to operate the machine. Avoid placing other objects on the foot control.• Do not use the machine if it is wet.

• If the LED lamp is damaged or broken, it must be replaced by the manufacturer or its serviceagent or a similarly qualified person, in order to avoid a hazard.
• If the cord connected with the foot control is damaged, it must be replaced by the manufactureror its service agent or a similarly qualified person, in order to avoid a hazard.
• This sewing machine is provided with double insulation. Use only identical replacement parts. Seeinstructions for Servicing of Double-Insulated Appliances.
SAVE THESE INSTRUCTIONS
FOR EUROPE ONLY:This appliance can be used by children aged from 8 years and above and persons with reducedphysical, sensory or mental capabilities or lack of experience and knowledge if they have been givensupervision or instruction concerning use of the appliance in a safe way and understand the hazardsinvolved. Children shall not play with the appliance. Cleaning and user maintenance shall not be madeby children without supervision.
The noise level under normal operating conditions is less than 70 dB.
The machine must only be used with foot control of type C-9002 manufactured by CHIEN HUNGTAIWAN Ltd.
FOR OUTSIDE EUROPE:This sewing machine is not intended for use by persons (including children) with reduced physical,sensory or mental capabilities, or lack of experience and knowledge, unless they have been givensupervision or instruction concerning use of the sewing machine by a person responsible for theirsafety. Children should be supervised to ensure that they do not play with the sewing machine.
The noise level under normal operating conditions is less than 70 dB.
The machine must only be used with foot control of type C-9002 manufactured by CHIEN HUNGTAIWAN Ltd.
SERVICING OF DOUBLE INSULATED PRODUCTSIn a double-insulated product, two systems of insulation are provided instead of grounding. Noground means is provided on a double-insulated product, nor should a means for grounding beadded to the product. Servicing of a double-insulated product requires extreme care and knowledgeof the system and should be done only by qualified service personnel. Replacement parts for adouble-insulated product must be identical to those parts in the product. A double-insulated productis marked with the words ‘DOUBLE INSULATION’ or ‘DOUBLE INSULATED’.
TABLE OF CONTENTS1 Introduction .................................................. 5
Machine Overview .. . . . . . . . . . . . . . . . . . . . . . . . . . . . . . . . . . . . . . . . .5Front ..... . . .. . .. . . .. . . .. . .. . . .. . .. . . .. . .. . . .. . . .. . .. . . .. . .. . . .. .5Needle Area .... . .. . . .. . .. . . .. . .. . . .. . .. . . .. . . .. . .. . . .. . .. . . .. .6Rear Side .... . .. . . .. . . .. . .. . . .. . .. . . .. . .. . . .. . . .. . .. . . .. . .. . . .. .6Storage Box ..... .. . . .. . .. . . .. . .. . . .. . .. . . .. . . .. . .. . . .. . .. . . .. .6Accessory Tray .... . .. . .. . . .. . .. . . .. . .. . . .. . . .. . .. . . .. . .. . . .. .6
Accessories. . . . . . . . . . . . . . . . . . . . . . . . . . . . . . . . . . . . . . . . . . . . . . . . . . . . . .7Included Accessories .... .. . .. . . .. . .. . . .. . . .. . .. . . .. . .. . . .. .7
Presser Feet . . . . . . . . . . . . . . . . . . . . . . . . . . . . . . . . . . . . . . . . . . . . . . . . . . . . .8Stitch Overview.. . . . . . . . . . . . . . . . . . . . . . . . . . . . . . . . . . . . . . . . . . . . . .9Utility Stitches .... . . .. . .. . . .. . .. . . .. . .. . . .. . . .. . .. . . .. . .. . . .. .9Quilt Stitches.... .. . . .. . .. . . .. . .. . . .. . .. . . .. . . .. . .. . . .. . .. . . . 11Decorative Stitches ..... . . .. . .. . . .. . .. . . .. . . .. . .. . . .. . .. . . . 11
2 Preparations ................................................ 12Unpacking.. . . . . . . . . . . . . . . . . . . . . . . . . . . . . . . . . . . . . . . . . . . . . . . . . . . . .12Connect the Power Cord and FootControl. . . . . . . . . . . . . . . . . . . . . . . . . . . . . . . . . . . . . . . . . . . . . . . . . . . . . . . . . .13Pack Away After Sewing . . . . . . . . . . . . . . . . . . . . . . . . . . . . . . . .13LED Lights . . . . . . . . . . . . . . . . . . . . . . . . . . . . . . . . . . . . . . . . . . . . . . . . . . . . .13Free Arm.. . . . . . . . . . . . . . . . . . . . . . . . . . . . . . . . . . . . . . . . . . . . . . . . . . . . . .14Mounting Machine in Sewing Cabinet . . . . . . . . . . . .14Spool Pins . . . . . . . . . . . . . . . . . . . . . . . . . . . . . . . . . . . . . . . . . . . . . . . . . . . . . .14Threading the Machine . . . . . . . . . . . . . . . . . . . . . . . . . . . . . . . . . .15Needle Threader ..... . .. . . .. . .. . . .. . .. . . .. . . .. . .. . . .. . .. . . . 16Cutting the Thread ..... . . .. . .. . . .. . .. . . .. . . .. . .. . . .. . .. . . . 16Threading for Twin Needle ..... . .. . . .. . . .. . .. . . .. . .. . . . 17
Bobbin Winding. . . . . . . . . . . . . . . . . . . . . . . . . . . . . . . . . . . . . . . . . . . . .18Winding From Horizontal Position ..... . .. . . .. . .. . . . 18Winding Through the Needle ..... . . .. . . .. . .. . . .. . .. . . . 19
Inserting the Bobbin. . . . . . . . . . . . . . . . . . . . . . . . . . . . . . . . . . . . . . .19Thread Tension.. . . . . . . . . . . . . . . . . . . . . . . . . . . . . . . . . . . . . . . . . . . . .20Lowering the Feed Teeth . . . . . . . . . . . . . . . . . . . . . . . . . . . . . . .20Needles . . . . . . . . . . . . . . . . . . . . . . . . . . . . . . . . . . . . . . . . . . . . . . . . . . . . . . . . .21Important Needle Information .... . .. . . .. . .. . . .. . .. . . . 21
Changing the Needle .. . . . . . . . . . . . . . . . . . . . . . . . . . . . . . . . . . . .22Presser Foot Pressure . . . . . . . . . . . . . . . . . . . . . . . . . . . . . . . . . . . .22Presser Foot Lift. . . . . . . . . . . . . . . . . . . . . . . . . . . . . . . . . . . . . . . . . . . . .22Changing the Presser Foot.. . . . . . . . . . . . . . . . . . . . . . . . . . . .22Function Buttons.. . . . . . . . . . . . . . . . . . . . . . . . . . . . . . . . . . . . . . . . . . .23Needle Stop Up/Down With Indicator .... . .. . .. . . . 23STOP Function .... .. . .. . . .. . .. . . .. . .. . . .. . . .. . .. . . .. . .. . . . 23FIX Function ..... . . .. . .. . . .. . .. . . .. . .. . . .. . . .. . .. . . .. . .. . . . 23Speed + and – ..... . .. . .. . . .. . .. . . .. . .. . . .. . . .. . .. . . .. . .. . . . 23Start/Stop...... . . .. . . .. . .. . . .. . .. . . .. . .. . . .. . . .. . .. . . .. . .. . . . 24Reverse .... .. . .. . . .. . . .. . .. . . .. . .. . . .. . .. . . .. . . .. . .. . . .. . .. . . . 24Stitch Selection Buttons.... .. . . .. . .. . . .. . . .. . .. . . .. . .. . . . 24Stitch Length.... .. . . .. . .. . . .. . .. . . .. . .. . . .. . . .. . .. . . .. . .. . . . 24Stitch Width/Needle Position..... . . .. . . .. . .. . . .. . .. . . . 24Mirror Side to Side ..... . . .. . .. . . .. . .. . . .. . . .. . .. . . .. . .. . . . 24View Presser Foot Recommendation .... .. . . .. . .. . . . 24
Warning Messages . . . . . . . . . . . . . . . . . . . . . . . . . . . . . . . . . . . . . . . . .25
3 Sewing .......................................................... 26Selecting a Stitch . . . . . . . . . . . . . . . . . . . . . . . . . . . . . . . . . . . . . . . . . . . .26Stitch Settings . . . . . . . . . . . . . . . . . . . . . . . . . . . . . . . . . . . . . . . . . . . . . . . .26Stitch Length/Stitch Density .... . .. . . .. . .. . . .. . .. . . .. . . 26Stitch Width/Needle Position.... .. . . .. . .. . . .. . .. . . .. . . 27Mirror Side to Side .... .. . .. . . .. . .. . . .. . . .. . .. . . .. . .. . . .. . . 27
Sewing Guide .. . . . . . . . . . . . . . . . . . . . . . . . . . . . . . . . . . . . . . . . . . . . . . .28Fabric Selection .... .. . . .. . .. . . .. . .. . . .. . . .. . .. . . .. . .. . . .. . . 28Sewing Techniques .... .. . .. . . .. . .. . . .. . . .. . .. . . .. . .. . . .. . . 29
Basic Sewing Techniques .. . . . . . . . . . . . . . . . . . . . . . . . . . . . . . .30Seam..... .. . .. . . .. . . .. . .. . . .. . .. . . .. . .. . . .. . . .. . .. . . .. . .. . . .. . . 30Overcast ... .. . . .. . . .. . .. . . .. . .. . . .. . .. . . .. . . .. . .. . . .. . .. . . .. . . 31Seam and Overcast ... . .. . .. . . .. . .. . . .. . . .. . .. . . .. . .. . . .. . . 31Baste.... . .. . .. . . .. . . .. . .. . . .. . .. . . .. . .. . . .. . . .. . .. . . .. . .. . . .. . . 32Blind Hem ...... . . .. . .. . . .. . .. . . .. . .. . . .. . . .. . .. . . .. . .. . . .. . . 32Hem ..... .. . .. . . .. . . .. . .. . . .. . .. . . .. . .. . . .. . . .. . .. . . .. . .. . . .. . . 33Sewing Buttonholes ..... . .. . . .. . .. . . .. . . .. . .. . . .. . .. . . .. . . 34Sewing on Buttons .... .. . .. . . .. . .. . . .. . . .. . .. . . .. . .. . . .. . . 37Sewing Zippers .... . .. . . .. . .. . . .. . .. . . .. . . .. . .. . . .. . .. . . .. . . 38Darning and Mending ..... . . .. . .. . . .. . . .. . .. . . .. . .. . . .. . . 39Bartack (Manual) ... .. . . .. . .. . . .. . .. . . .. . . .. . .. . . .. . .. . . .. . . 39Quilting.... .. . . .. . . .. . .. . . .. . .. . . .. . .. . . .. . . .. . .. . . .. . .. . . .. . . 40
4 Maintenance ................................................ 42Cleaning the Machine .. . . . . . . . . . . . . . . . . . . . . . . . . . . . . . . . . . .42Cleaning the Bobbin Area.... . .. . . .. . . .. . .. . . .. . .. . . .. . . 42Cleaning Under the Bobbin Area ..... . .. . . .. . .. . . .. . . 42
Replacing the Needle Plate . . . . . . . . . . . . . . . . . . . . . . . . . . . .43Troubleshooting. . . . . . . . . . . . . . . . . . . . . . . . . . . . . . . . . . . . . . . . . . . . .43Technical Specification . . . . . . . . . . . . . . . . . . . . . . . . . . . . . . . . . . .45
Index ............................................................ 47

1 Introduction
Machine Overview
Front
1
6
7
8
10
11
12
9
2345
131415
16171819
20
21
1. Lid with stitch overview
2. Thread guide
3. Thread tension dial
4. Thread tension discs
5. Thread take-up lever
6. Presser foot pressure dial
7. Buttons and LED display
8. Thread cutter
9. LED lights
10. Needle plate
11. Bobbin cover
12. Free arm
13. Thread guide for auxiliary spool
14. Bobbin winder thread guide and tension disc
15. Spool pin
16. Thread cutter for bobbin thread
17. Bobbin spindle, bobbin stop
18. Hole for auxiliary spool pin
19. Thread guide for bobbin winding through the needle
20. Handwheel
21. ON/OFF switch, sockets for power cord and footcontrol
1 Introduction 5
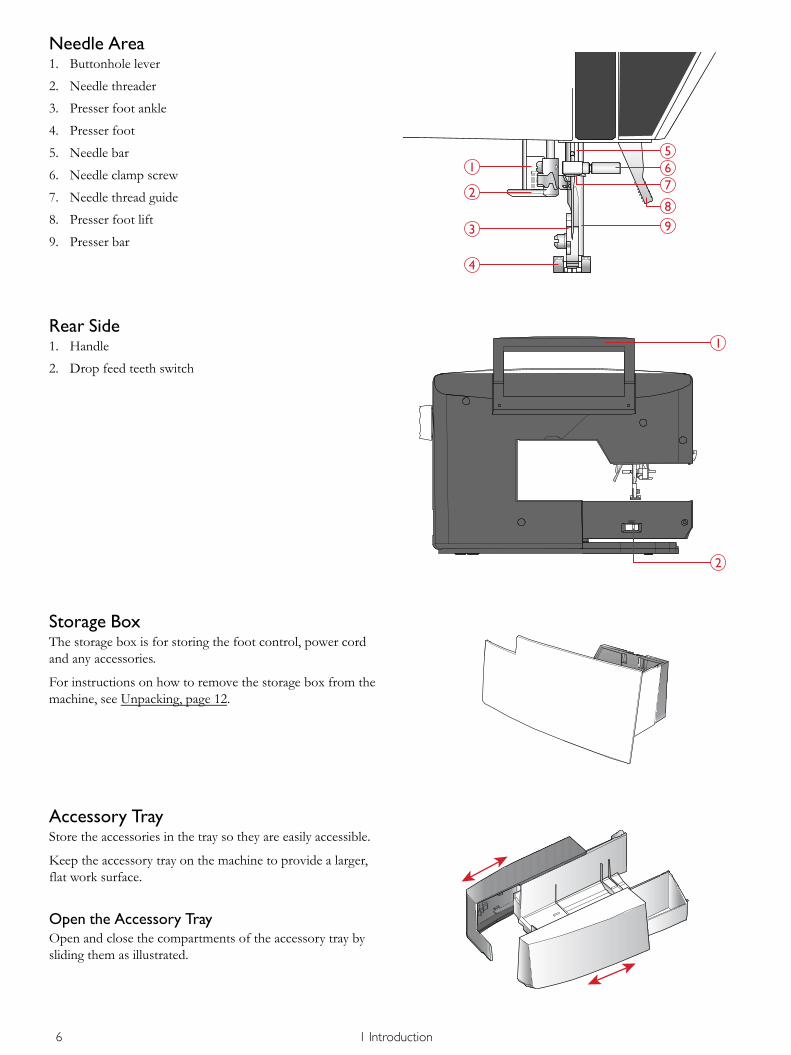
Needle Area
567
89
1
2
3
4
1. Buttonhole lever
2. Needle threader
3. Presser foot ankle
4. Presser foot
5. Needle bar
6. Needle clamp screw
7. Needle thread guide
8. Presser foot lift
9. Presser bar
Rear Side1. Handle
2. Drop feed teeth switch
Storage BoxThe storage box is for storing the foot control, power cordand any accessories.
For instructions on how to remove the storage box from themachine, see Unpacking, page 12.
Accessory TrayStore the accessories in the tray so they are easily accessible.
Keep the accessory tray on the machine to provide a larger,flat work surface.
Open the Accessory TrayOpen and close the compartments of the accessory tray bysliding them as illustrated.
6 1 Introduction
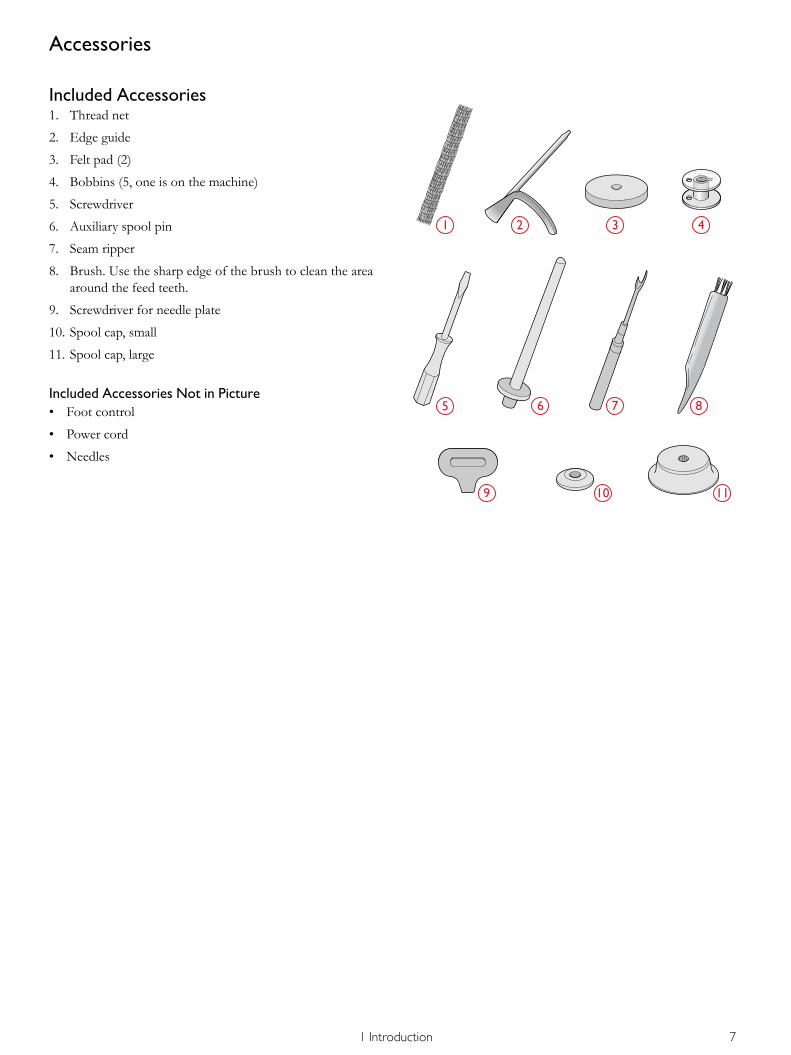
Accessories
Included Accessories1. Thread net
2. Edge guide
3. Felt pad (2)
4. Bobbins (5, one is on the machine)
5. Screwdriver
6. Auxiliary spool pin
7. Seam ripper
8. Brush. Use the sharp edge of the brush to clean the areaaround the feed teeth.
9. Screwdriver for needle plate
10. Spool cap, small
11. Spool cap, large
Included Accessories Not in Picture• Foot control
• Power cord
• Needles
1 Introduction 7

Presser FeetUtility Foot AAttached on the machine upon delivery. This foot is used mainly for straight stitching and zigzagstitching with a stitch length longer than 1.0.
Decorative Stitch Foot BWhen sewing decorative stitches or short zigzag stitches and other utility stitches with less than 1.0mm stitch length, use this foot. The tunnel on the underside of the foot is designed to feed smoothlyover the stitches.
Buttonhole Foot CThis foot is used for sewing buttonholes step by step. Use the guide lines on the toe of the foot toposition the garment edge. The two tunnels on the bottom of the foot ensures a smooth feed overthe buttonhole columns. The finger on the back of the foot holds cording for corded buttonhole.
Blind Hem Foot DThis foot is used for blind hem stitches. The inner edge of the foot guides the fabric. The right toeof the foot is designed to ride along the hem edge.
Zipper Foot EThis foot can be snapped on either to the right or to the left of the needle, making it easy to sewclose to both sides of the zipper teeth. Move needle position to the right or left to sew closer to thezipper teeth or for covering large cording.
Edging Foot JThis foot is used for overcasting and seam/overcasting. Stitches form over the pin which preventspuckering at the edge of the fabric.
One-Step Buttonhole Foot CThis foot has a space in the back for a button used to set the size of the buttonhole. The machinewill sew a buttonhole to fit that button size. Used to sew buttonholes up to 25 mm.
Self-Adhesive Glide PlateIf sewing on foam, vinyl, plastic, or leather, the material can stick to the foot and prevent the sewingmachine from feeding properly. When using any of the above materials, sew on a piece of scrapfabric, to make sure the machine feeds smoothly. If not, fasten the self-adhesive glide plate to theunderside of the presser foot.
8 1 Introduction

Stitch Overview
Utility StitchesStitch № Presser foot Thread
tensionName Description
0 One-StepButtonhole Foot/C
3–4 Bartack buttonhole Standard buttonhole for most fabric weights.
1 A 4–5 Straight stitch, centerneedle position
For all types of sewing.
2 A 3–5 Stretch stitch, leftneedle position
For seams in tricot and stretch fabrics.
3 A 3–4 Reinforced straightstitch, center needleposition
Triple and elastic, for reinforced seams. Fortopstitch, increase the stitch length.
4 J 3–5 Three-step zigzag For overcasting, mending, sewing on patches andelastic. Suitable for light and medium weightfabrics.
5 A 3–4 Zigzag For sewing on lace, trims and appliqués.
6 B 4–5 Flatlock stitch Decorative hems and overlapped seams, belts andbands. For medium/heavy stretch fabrics.
7 J 4–5 Seam/overcast stitch Seam and overcast in one step along the edge ortrim later. For light stretch and non-stretch fabrics.
8 B 4–5 Stretch seam/overcast stitch
Seam and overcast in one step along the edge ortrim later. For medium and heavy stretch fabrics.
9 – 3–4 Automatic buttonsewing
For sewing on buttons.
10 A 3–5 Two-step zigzag For joining two pieces of lace, and for elasticshirring.
11 A 3–4 Reinforced zigzag For joining fabric edge to edge or overlapping inleather. For decorative sewing.
12 B 4–5 Double overlockstitch
Seam and overcast in one step along the edge ortrim later. For heavy stretch and heavy wovenfabrics.
13 D 2–4 Woven blind hemstitch
Blind hems in medium and heavy woven fabrics.
14 D 3–4 Stretch blind hemstitch
Blind hems in medium and heavy stretch fabrics.
15 B 4–5 Elastic/casing stitch For overlapped seams in tricot. To sew casing overnarrow elastic.
16 B 3–5 Honeycomb stitch Decorative stitch for stretch fabrics and hems. Alsoused with elastic thread in the bobbin.
17 B 2–4 Cross stitch Decorative stitch.
18 B 2–4 Double cross stitch Decorative stitch.
19 B 3–4 Herringbone stitch Elastic decorative hem for stretch fabrics.
1 Introduction 9

Stitch № Presser foot Threadtension
Name Description
20 A 4–5 ¼″ seam stitch Sews straight stitch ¼″ from the right edge of thepresser foot A.
21 *P/A 6–8 Hand-look quilt stitch Imitates hand quilt stitch. Thread the needle withinvisible thread and the bobbin with light weightsoft cotton thread in a color to compliment quilt.
22 B 3–5 Serpentine stitch For mending and elastic applications.
23 B 3–4 Straight stitch scallop Creates beautiful rows of channel quilting.
24 A 3–4 Appliqué stitch For appliqués.
25 B 3–4 Appliqué stitch For appliqués.
26 A 3–5 Appliqué stitch For appliqués.
27 B 2–3 Satin/appliqué stitch For appliqués, rounded edge, sewing on laces andbands.
28 B 3–4 Darning stitch Darn and mend small holes in work clothes, jeans,tablecloths and linen towels. Stitch over the hole,press reverse for continuous darning and auto stop.
29 B 3–4 Bartack, manual Reinforce pockets, shirt openings, belt loops aswell as at lower end of a zipper.
30 One-StepButtonhole Foot/C
3–4 Round endbuttonhole
For blouses and children’s garments.
31 One-StepButtonhole Foot/C
3–4 Medium/heavyreinforced buttonhole
For medium and heavy fabrics
32 One-StepButtonhole Foot/C
3–4 Heirloom buttonhole For hand look on fine and delicate fabrics.
Tip: For jeans buttonholes, increase length and width of thebuttonhole. Use thicker thread.
33 One-StepButtonhole Foot/C
3–4 Keyhole buttonhole Square end for tailored jackets, coats, etc.
*P: Quilter’s ¼″ Piecing Foot (optional accessory, partnumber 4127855-45).
10 1 Introduction

Quilt Stitches
3-4 3-4 3-4 3-4 3-4 3-4 3-4 3-4 2-4 3-4 3-4 2-3 2-3 3-4 3-4 2-4 3-4 3-4 3-4 2-4 3-4 3-4 3-4 3-4
Note: The numbers below the stitch number is the recommended thread tension setting for each stitch.
Tip: Stitches 53–57 are meant to be sewn with a wing needle for a special effect.
Decorative Stitches
2-3 2-3 2-3 2-3 2-3 2-3 2-3 2-3 2-3 2-4 2-4 3-4 2-4 2-4 3-4 3-4 3-4 3-4 3-4 3-4 3-4 3-4 3-4 3-4
Note: The numbers below the stitch number is the recommended thread tension setting for each stitch.
1 Introduction 11
2 Preparations
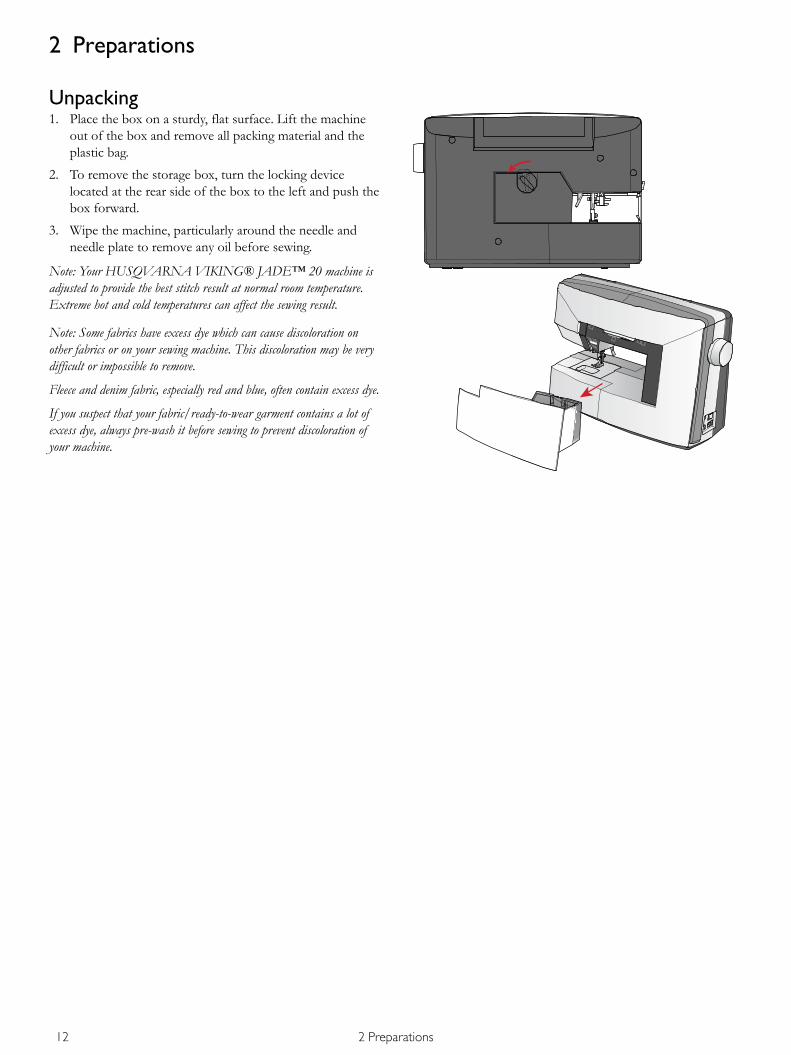
Unpacking1. Place the box on a sturdy, flat surface. Lift the machine
out of the box and remove all packing material and theplastic bag.
2. To remove the storage box, turn the locking devicelocated at the rear side of the box to the left and push thebox forward.
3. Wipe the machine, particularly around the needle andneedle plate to remove any oil before sewing.
Note: Your HUSQVARNAVIKING® JADE™ 20 machine isadjusted to provide the best stitch result at normal room temperature.Extreme hot and cold temperatures can affect the sewing result.
Note: Some fabrics have excess dye which can cause discoloration onother fabrics or on your sewing machine. This discoloration may be verydifficult or impossible to remove.
Fleece and denim fabric, especially red and blue, often contain excess dye.
If you suspect that your fabric/ready-to-wear garment contains a lot ofexcess dye, always pre-wash it before sewing to prevent discoloration ofyour machine.
12 2 Preparations

Connect the Power Cord and FootControlAmong the accessories you will find the power cord and thefoot control.
Note: Consult a qualified electrician if you are in doubt about how toconnect the machine to the power source. Unplug the power cord whenthe machine is not in use.
For this sewing machine, foot control model C-9002manufactured by CHIEN HUNG TAIWAN Ltd must beused.
1. Connect the foot control cord to the front socket on thebottom right side of the machine (A).
2. Connect the power cord to the rear socket on the bottomright side of the machine (B). Plug the cord into the wallsocket.
3. Press the ON/OFF switch to ON to turn on power andlight (C).
For the USA and Canada
This sewing machine has a polarized plug (one blade widerthan the other). To reduce the risk of electric shock, thisplug is intended to fit in a polarized outlet only one way. Ifthe plug does not fit fully in the outlet, reverse the plug. Ifit still does not fit, contact a qualified electrician to installthe proper outlet. Do not modify the plug in any way.
Pack Away After Sewing1. Press the ON/OFF switch to “O”.
2. Unplug the cord from the wall socket and then from themachine.
3. Unplug the foot control cord from the machine. Windthe cord around the foot control and place it inside thestorage box.
4. Place all accessories in the accessory tray. Slide the trayon to the machine around the free arm.
5. Place the storage box on the machine and turn thelocking device to lock the box in place.
LED LightsYour machine has LED lights which distribute the lightevenly over the sewing area and eliminate shadows.
2 Preparations 13

Free ArmTo use the free arm, slide off the accessory tray. Remove thetray by sliding it to the left.
Use the free arm to facilitate sewing pant legs and sleevehems.
To replace the accessory tray, slide it onto the machine until itfits in place.
Mounting Machine in Sewing CabinetThere are two holes on the underside of the machinedesigned for mounting the machine into a sewing cabinet.Attach the machine with M6 screws.
Spool PinsYour machine has two spool pins, a main spool pin and anauxiliary spool pin. The spool pins are designed for all typesof thread. The main spool pin is adjustable and can be usedboth in a horizontal position (the thread reels off the spool)and a vertical position (the thread spool rotates). Use thehorizontal position for normal threads and the verticalposition for large spools or specialty threads.
Horizontal PositionPlace a felt pad and the thread spool on the spool pin. Makesure that the thread reels off from the front of the spool (A)and slide on a spool cap.
Note: Not all thread spools are manufactured in the same way. If youexperience problems with the thread, turn the spool so that the threadreels off in the opposite direction or place the thread in the verticalposition.
Depending on the size of thread spool, reverse the directionof the spool cap (B).
Use the small cap when you use cross wound thread (C).
Set the thread net over the spool if thread reels off too easily(D).
14 2 Preparations
Vertical PositionRaise the spool pin to the vertical position. Place a felt padunder the thread spool. This is to prevent the thread fromreeling off too fast. Do not place a spool cap on top of thespool pin as that would prevent the spool from rotating.
Auxiliary Spool PinThe auxiliary spool pin is used when winding a bobbinthread from a second spool of thread or for a second spoolwhen sewing with a twin needle. Insert the auxiliary spool pininto the hole at the top of the machine (A). Place a felt padunder the thread spool.
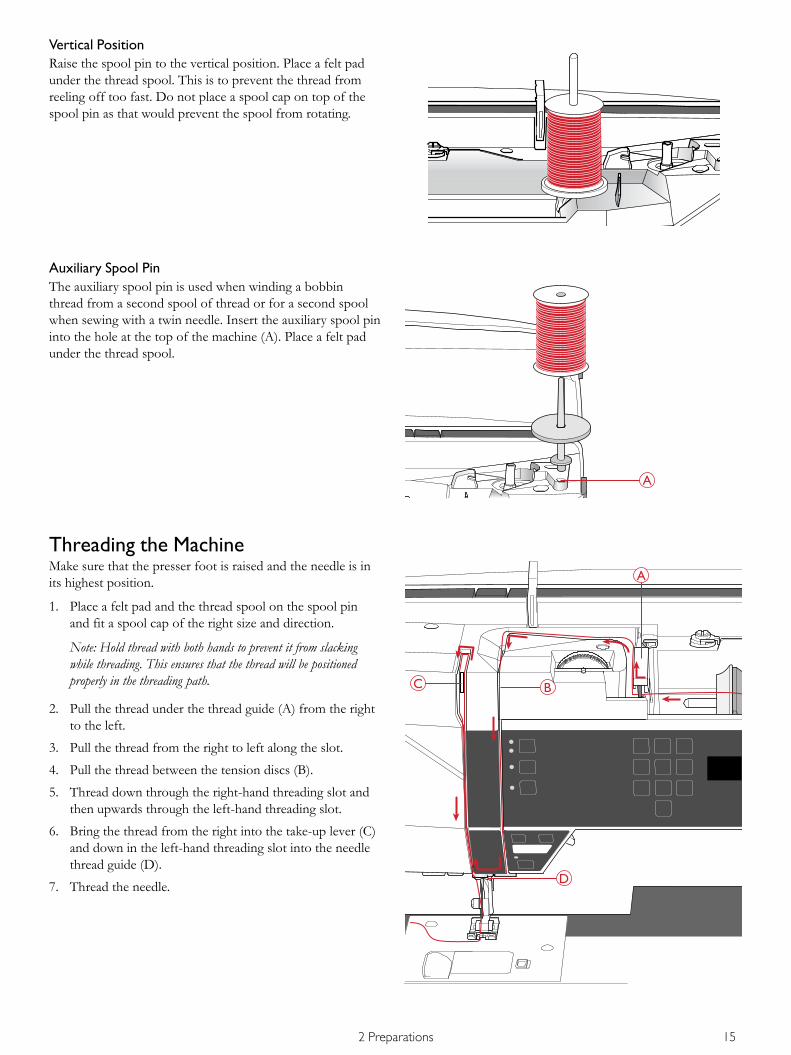
Threading the MachineMake sure that the presser foot is raised and the needle is inits highest position.
1. Place a felt pad and the thread spool on the spool pinand fit a spool cap of the right size and direction.
Note: Hold thread with both hands to prevent it from slackingwhile threading. This ensures that the thread will be positionedproperly in the threading path.
2. Pull the thread under the thread guide (A) from the rightto the left.
3. Pull the thread from the right to left along the slot.
4. Pull the thread between the tension discs (B).
5. Thread down through the right-hand threading slot andthen upwards through the left-hand threading slot.
6. Bring the thread from the right into the take-up lever (C)and down in the left-hand threading slot into the needlethread guide (D).
7. Thread the needle.
2 Preparations 15

Needle ThreaderThe needle threader allows you to thread the needleautomatically. The needle must be in its highest position touse the built-in needle threader. Press the needle up/ downbutton to make sure the needle is fully raised.
We also recommend lowering the presser foot.
1. Use the handle (A) to pull the needle threader all the waydown. Metal flanges encase the needle and a small hookwill pass through the needle eye.
2. Place the thread from the back over the thread guide (B)and under the small hook (C).
3. Let the needle threader gently swing back. The hookpulls the thread through the needle eye and forms a loopbehind the needle. Pull the thread loop out behind theneedle.
4. Raise the presser foot and place the thread under it.
Note: The needle threader is designed to be used for size 70-120needles. You cannot use the needle threader for size 60 needles orsmaller, wing needles or twin needles.
There are also some optional accessories that require manual threadingof the needle.
When threading the needle manually, make sure that the needle isthreaded from front to back.
Cutting the ThreadOnce you have finished sewing, cut the threads by raising thepresser foot and pulling the threads from the front to theback into the thread cutter on the left side of the machine.
16 2 Preparations
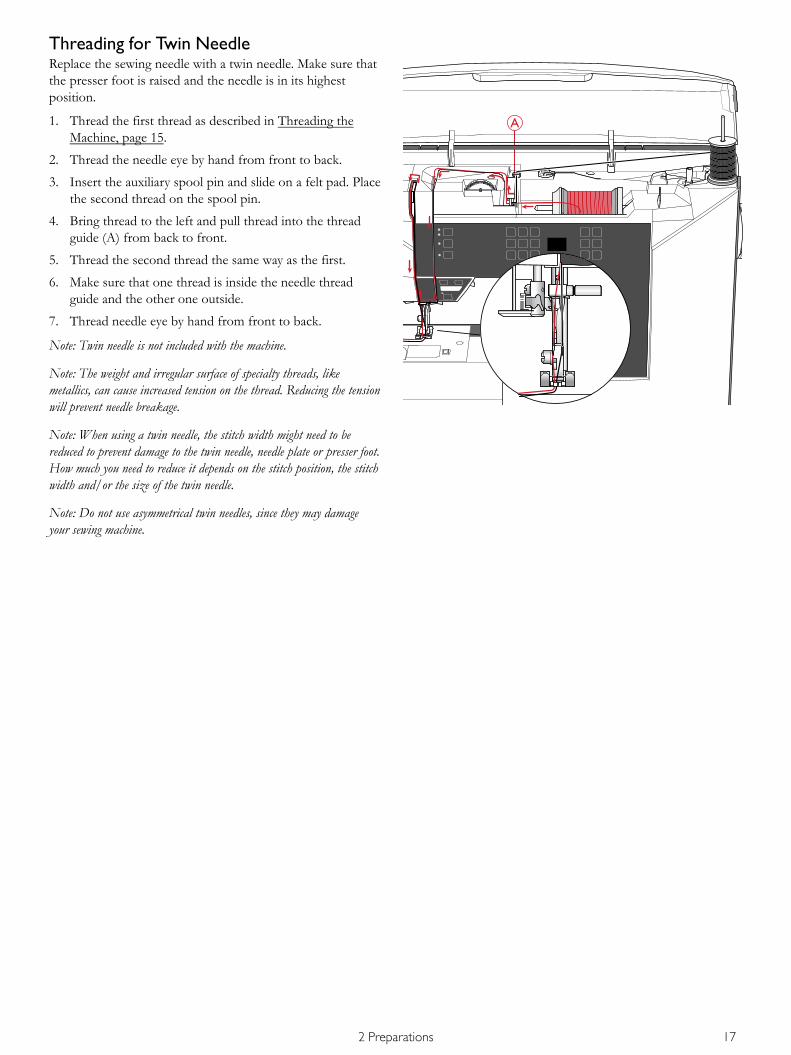
Threading for Twin NeedleReplace the sewing needle with a twin needle. Make sure thatthe presser foot is raised and the needle is in its highestposition.
1. Thread the first thread as described in Threading theMachine, page 15.
2. Thread the needle eye by hand from front to back.
3. Insert the auxiliary spool pin and slide on a felt pad. Placethe second thread on the spool pin.
4. Bring thread to the left and pull thread into the threadguide (A) from back to front.
5. Thread the second thread the same way as the first.
6. Make sure that one thread is inside the needle threadguide and the other one outside.
7. Thread needle eye by hand from front to back.
Note: Twin needle is not included with the machine.
Note: The weight and irregular surface of specialty threads, likemetallics, can cause increased tension on the thread. Reducing the tensionwill prevent needle breakage.
Note: When using a twin needle, the stitch width might need to bereduced to prevent damage to the twin needle, needle plate or presser foot.How much you need to reduce it depends on the stitch position, the stitchwidth and/or the size of the twin needle.
Note: Do not use asymmetrical twin needles, since they may damageyour sewing machine.
2 Preparations 17

Bobbin Winding
Winding From Horizontal Position
1. Place the felt pad and thread spool on the spool pin inhorizontal position. Slide on a spool cap of the right typeand direction.
2. Place the thread under the thread guide (A) from right toleft. Pull the thread to the rear and around the threadguide (B) from left to right, then around thread guide (C)and into the notch (D).
3. Pull thread to the right and then through the thread guide(E) from front to back. Pass thread under tension disc (F)in clockwise direction.
Note: Make sure the thread is pulled securely inside the tension discfor correct thread tension.
4. Thread through the hole in the empty bobbin (G) fromthe inside to the outside.
5. Place the bobbin on the bobbin winder spindle.
6. Push the bobbin spindle to the right to wind. The letters"SP" is shown on the LED display, indicating that bobbinwinding is active. Press the foot control or the start/stopbutton to start winding the bobbin. Hold the end of thethread firmly when starting to wind.
When the bobbin is full, release the foot control or pressthe start/stop button again to stop. Push the bobbinspindle to the left. Remove the bobbin and cut the threadusing the bobbin thread cutter (H).
Note: When winding the bobbin from auxiliary spool pin, do not hookthread to the guide (C) and notch (D).
18 2 Preparations

Winding Through the NeedleMake sure the presser foot is raised and the needle is in itshighest position.
Note: Use a metal presser foot when bobbin winding from the needle.
Pull the thread from the needle under the presser foot and tothe right through the thread guide (A).
Follow step 4–6 under Winding From Horizontal Position.
Inserting the BobbinMake sure the needle is fully raised and the machine is turnedoff before inserting or removing the bobbin.
1. Open the bobbin cover by pushing the release button tothe right (A). Remove the cover (B).
2. Insert the bobbin in the bobbin case with the threadrunning in a counterclockwise direction.
3. With a finger held gently on top of the bobbin, pull thethread into notch (C). Then pull the thread at arrowmarkings into the needle plate thread guide from (C) to(D). Pull the thread at the arrow markings into the needleplate thread guide from (D) to (E). To cut off excessthread, pull thread to the right, over the blade (E).
4. Replace the bobbin cover.
2 Preparations 19
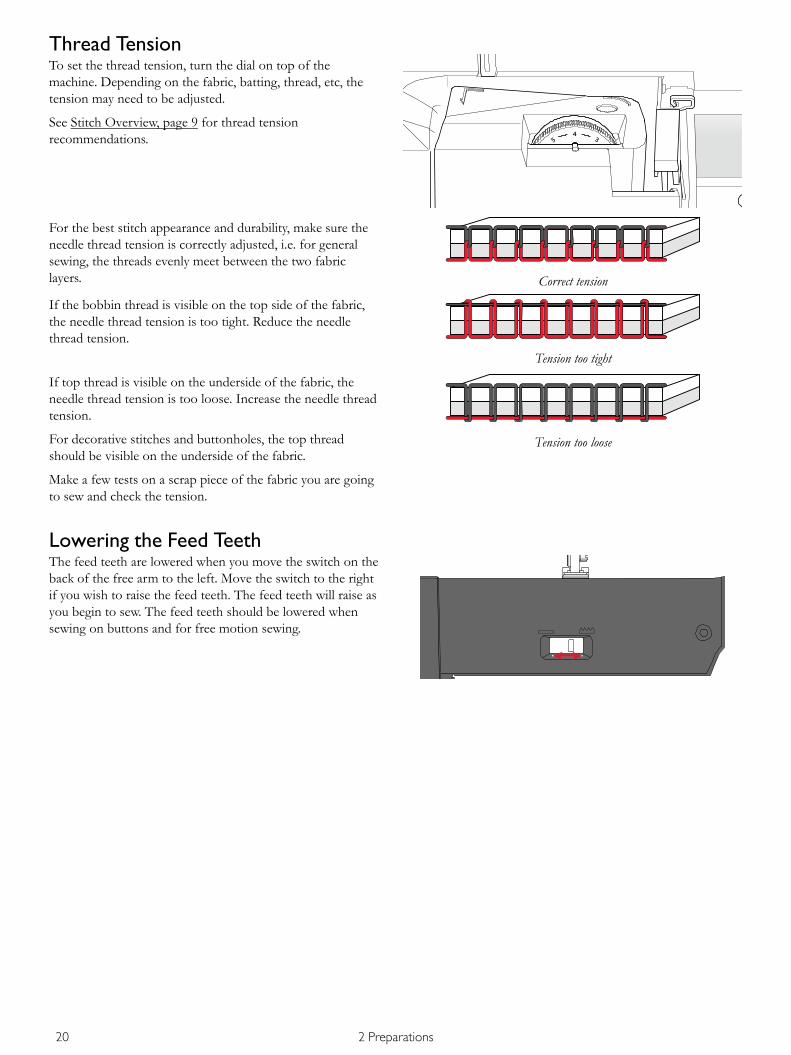
Thread TensionTo set the thread tension, turn the dial on top of themachine. Depending on the fabric, batting, thread, etc, thetension may need to be adjusted.
See Stitch Overview, page 9 for thread tensionrecommendations.
Correct tension
For the best stitch appearance and durability, make sure theneedle thread tension is correctly adjusted, i.e. for generalsewing, the threads evenly meet between the two fabriclayers.
Tension too tight
If the bobbin thread is visible on the top side of the fabric,the needle thread tension is too tight. Reduce the needlethread tension.
Tension too loose
If top thread is visible on the underside of the fabric, theneedle thread tension is too loose. Increase the needle threadtension.
For decorative stitches and buttonholes, the top threadshould be visible on the underside of the fabric.
Make a few tests on a scrap piece of the fabric you are goingto sew and check the tension.
Lowering the Feed TeethThe feed teeth are lowered when you move the switch on theback of the free arm to the left. Move the switch to the rightif you wish to raise the feed teeth. The feed teeth will raise asyou begin to sew. The feed teeth should be lowered whensewing on buttons and for free motion sewing.
20 2 Preparations

NeedlesThe sewing machine needle plays an important role insuccessful sewing. Use only quality needles. We recommendneedles of system 130/705H. The needle package includedwith your machine contains the most frequently used sizes.
Universal Needle
Universal needle.
Universal needles have a slightly rounded point and come ina variety of sizes. For general sewing on a variety of fabrictypes and weights.
Stretch Needle
Stretch needle - marked yellow.
Stretch needles have a special scarf to eliminate skippedstitches when there is a flex in the fabric. For knits,swimwear, fleece, synthetic suedes and leathers.
Denim Needle
Denim needle - marked blue.
Denim needles have a sharp point to penetrate tightly wovenfabrics without deflecting the needle. For canvas, denim,microfibers.
Wing Needle
Wing needle.
The wing needle has wide wings on the side of the needle topoke holes in the fabric when sewing entredeux and otherhemstitches on natural fiber fabrics.
Note: For this machine, use wing needle size 100. Wing needle is notincluded with the machine.
Important Needle InformationChange the needle often. Always use a straight needle with asharp point (A).
A damaged needle (B) can cause skipped stitches, breakage orsnapping of the thread. It can also damage the needle plate.
Do not use asymmetrical twin needles (C), they can damageyour sewing machine.
2 Preparations 21
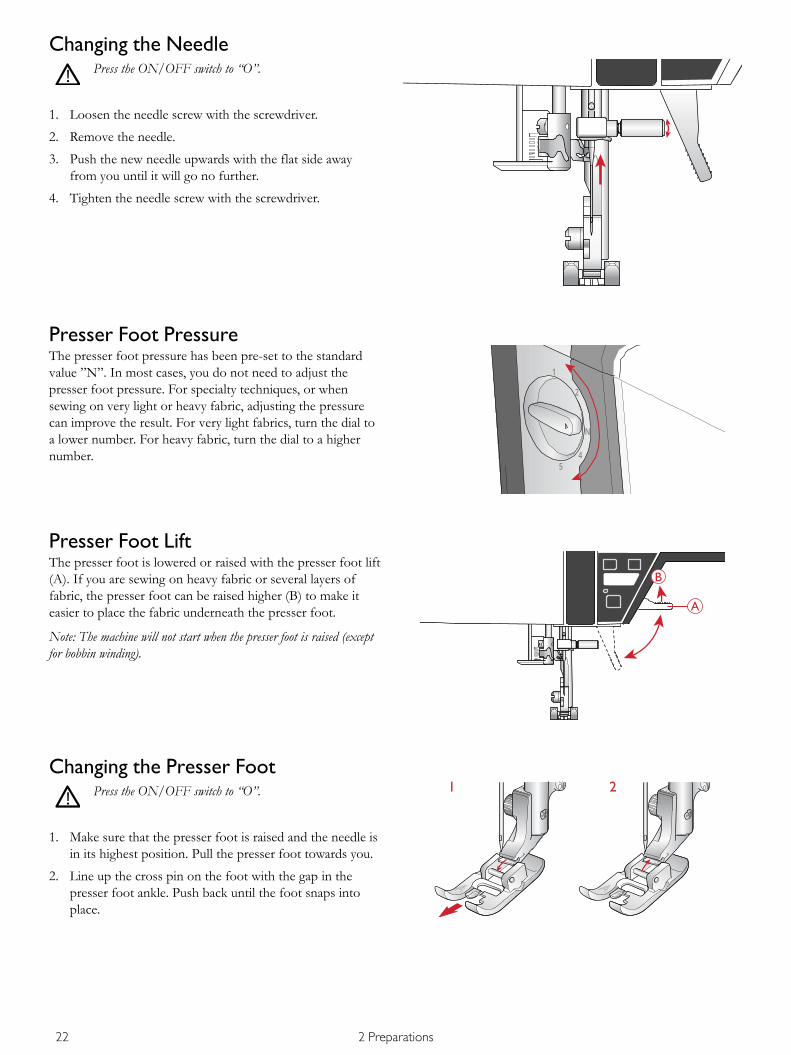
Changing the NeedlePress the ON/OFF switch to “O”.
1. Loosen the needle screw with the screwdriver.
2. Remove the needle.
3. Push the new needle upwards with the flat side awayfrom you until it will go no further.
4. Tighten the needle screw with the screwdriver.
Presser Foot PressureThe presser foot pressure has been pre-set to the standardvalue ”N”. In most cases, you do not need to adjust thepresser foot pressure. For specialty techniques, or whensewing on very light or heavy fabric, adjusting the pressurecan improve the result. For very light fabrics, turn the dial toa lower number. For heavy fabric, turn the dial to a highernumber.
Presser Foot Lift
A
BThe presser foot is lowered or raised with the presser foot lift(A). If you are sewing on heavy fabric or several layers offabric, the presser foot can be raised higher (B) to make iteasier to place the fabric underneath the presser foot.
Note: The machine will not start when the presser foot is raised (exceptfor bobbin winding).
Changing the Presser FootPress the ON/OFF switch to “O”.
1. Make sure that the presser foot is raised and the needle isin its highest position. Pull the presser foot towards you.
2. Line up the cross pin on the foot with the gap in thepresser foot ankle. Push back until the foot snaps intoplace.
22 2 Preparations
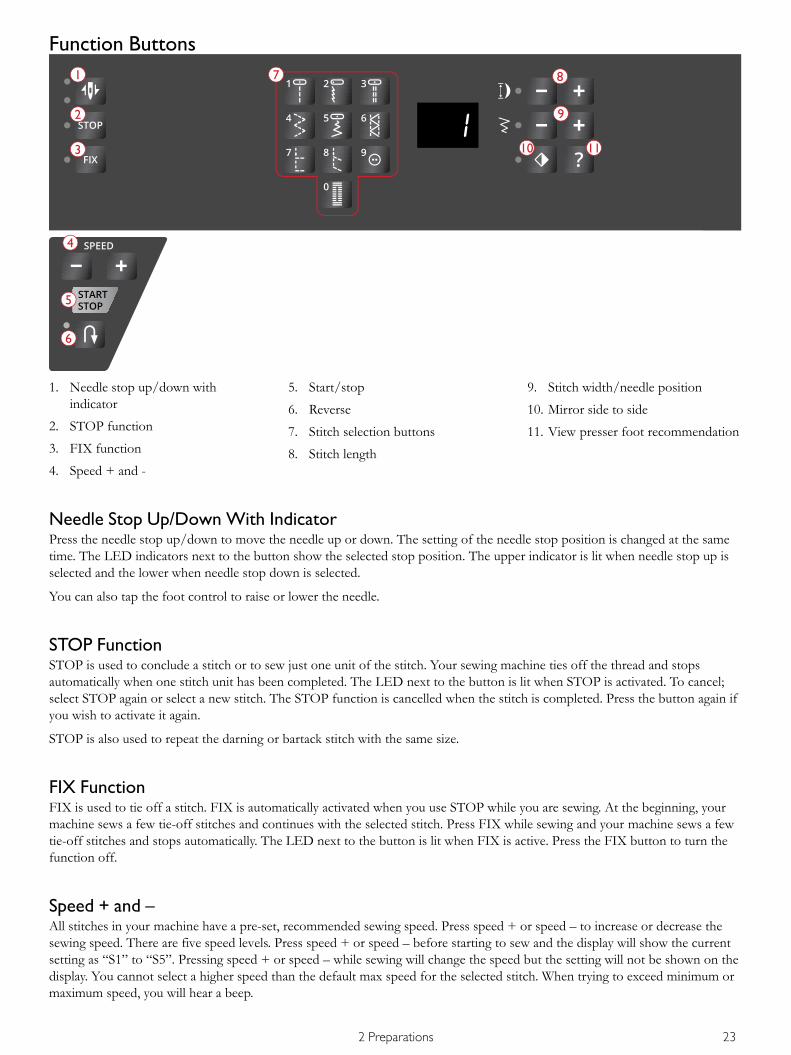
Function Buttons
2
3
4
5
6
1 87
10
9
11
1. Needle stop up/down withindicator
2. STOP function
3. FIX function
4. Speed + and -
5. Start/stop
6. Reverse
7. Stitch selection buttons
8. Stitch length
9. Stitch width/needle position
10. Mirror side to side
11. View presser foot recommendation
Needle Stop Up/Down With IndicatorPress the needle stop up/down to move the needle up or down. The setting of the needle stop position is changed at the sametime. The LED indicators next to the button show the selected stop position. The upper indicator is lit when needle stop up isselected and the lower when needle stop down is selected.
You can also tap the foot control to raise or lower the needle.
STOP FunctionSTOP is used to conclude a stitch or to sew just one unit of the stitch. Your sewing machine ties off the thread and stopsautomatically when one stitch unit has been completed. The LED next to the button is lit when STOP is activated. To cancel;select STOP again or select a new stitch. The STOP function is cancelled when the stitch is completed. Press the button again ifyou wish to activate it again.
STOP is also used to repeat the darning or bartack stitch with the same size.
FIX FunctionFIX is used to tie off a stitch. FIX is automatically activated when you use STOP while you are sewing. At the beginning, yourmachine sews a few tie-off stitches and continues with the selected stitch. Press FIX while sewing and your machine sews a fewtie-off stitches and stops automatically. The LED next to the button is lit when FIX is active. Press the FIX button to turn thefunction off.
Speed + and –All stitches in your machine have a pre-set, recommended sewing speed. Press speed + or speed – to increase or decrease thesewing speed. There are five speed levels. Press speed + or speed – before starting to sew and the display will show the currentsetting as “S1” to “S5”. Pressing speed + or speed – while sewing will change the speed but the setting will not be shown on thedisplay. You cannot select a higher speed than the default max speed for the selected stitch. When trying to exceed minimum ormaximum speed, you will hear a beep.
2 Preparations 23

When sewing with metallic threads, or when sewing on delicate fabrics, lower the speed for optimal results.
Start/StopPress this button to start or stop the machine sewing when you are not using the foot control. Press start/stop to begin andpress again to stop.
ReverseFor permanent reverse, press the reverse button once before starting to sew. The reverse indicator will be lit and the machinesews in reverse until you press the button again to cancel. If you press the reverse button while sewing, the machine will sew inreverse for as long as you keep the button pressed. The reverse indicator is lit when the reverse button is pressed.
Reverse is also used when sewing bartacks and darning stitches to step between the parts of the stitch.
Stitch Selection ButtonsBy pressing any of the 0 to 9 buttons you select the stitch illustrated on that button immediately.
By pressing two digits in quick succession you will be able to select a stitch from 10 and up. If the stitch number does not existyou will hear a beep and the previous stitch selection will be kept.
Stitch LengthReduce or increase the stitch length by pressing – or +. See Stitch Length/Stitch Density, page 26.
Stitch Width/Needle PositionAdjust the stitch width/needle position by pressing – or +. See Stitch Width/Needle Position, page 27.
Mirror Side to SidePress to mirror the selected stitch side to side. In straight stitch, with a left needle position, pressing this button will move theneedle from the left to the right symmetrically across the center position. The LED next to the button is lit when this function isactivated.
View Presser Foot RecommendationPress this button to show the presser foot recommendationfor the selected stitch on the LED display.
A: Utility Foot A
b: Decorative Stitch Foot B
C: One-Step Buttonhole Foot C
d: Blind Hem Foot D
J: Edging Foot J
-: Snap off the presser foot
P: Quilter’s ¼″ Piecing Foot (optional accessory, part number4127855-45)
24 2 Preparations
Warning Messages
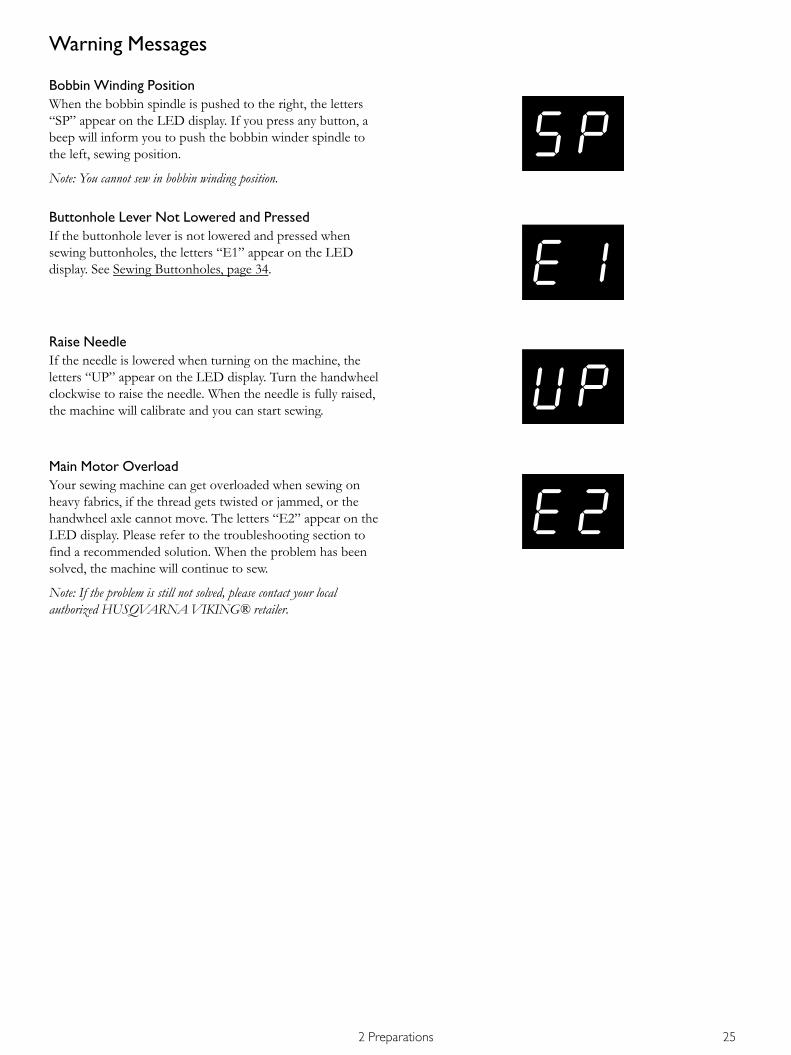
Bobbin Winding PositionWhen the bobbin spindle is pushed to the right, the letters“SP” appear on the LED display. If you press any button, abeep will inform you to push the bobbin winder spindle tothe left, sewing position.
Note: You cannot sew in bobbin winding position.
Buttonhole Lever Not Lowered and PressedIf the buttonhole lever is not lowered and pressed whensewing buttonholes, the letters “E1” appear on the LEDdisplay. See Sewing Buttonholes, page 34.
Raise NeedleIf the needle is lowered when turning on the machine, theletters “UP” appear on the LED display. Turn the handwheelclockwise to raise the needle. When the needle is fully raised,the machine will calibrate and you can start sewing.
Main Motor OverloadYour sewing machine can get overloaded when sewing onheavy fabrics, if the thread gets twisted or jammed, or thehandwheel axle cannot move. The letters “E2” appear on theLED display. Please refer to the troubleshooting section tofind a recommended solution. When the problem has beensolved, the machine will continue to sew.
Note: If the problem is still not solved, please contact your localauthorized HUSQVARNAVIKING® retailer.
2 Preparations 25
3 SewingWhen the machine is turned on, straight stitch 1 is selectedby default.
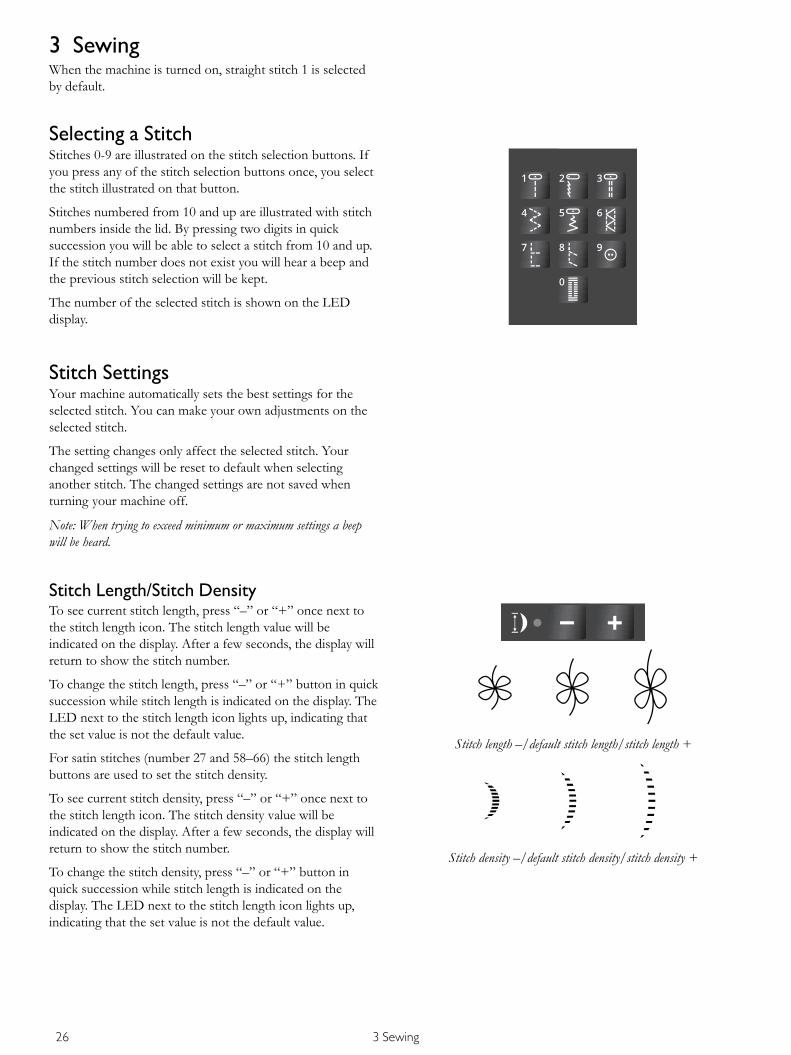
Selecting a StitchStitches 0-9 are illustrated on the stitch selection buttons. Ifyou press any of the stitch selection buttons once, you selectthe stitch illustrated on that button.
Stitches numbered from 10 and up are illustrated with stitchnumbers inside the lid. By pressing two digits in quicksuccession you will be able to select a stitch from 10 and up.If the stitch number does not exist you will hear a beep andthe previous stitch selection will be kept.
The number of the selected stitch is shown on the LEDdisplay.
Stitch SettingsYour machine automatically sets the best settings for theselected stitch. You can make your own adjustments on theselected stitch.
The setting changes only affect the selected stitch. Yourchanged settings will be reset to default when selectinganother stitch. The changed settings are not saved whenturning your machine off.
Note: When trying to exceed minimum or maximum settings a beepwill be heard.
Stitch Length/Stitch Density
Stitch length –/default stitch length/stitch length +
To see current stitch length, press “–” or “+” once next tothe stitch length icon. The stitch length value will beindicated on the display. After a few seconds, the display willreturn to show the stitch number.
To change the stitch length, press “–” or “+” button in quicksuccession while stitch length is indicated on the display. TheLED next to the stitch length icon lights up, indicating thatthe set value is not the default value.
Stitch density –/default stitch density/stitch density +
For satin stitches (number 27 and 58–66) the stitch lengthbuttons are used to set the stitch density.
To see current stitch density, press “–” or “+” once next tothe stitch length icon. The stitch density value will beindicated on the display. After a few seconds, the display willreturn to show the stitch number.
To change the stitch density, press “–” or “+” button inquick succession while stitch length is indicated on thedisplay. The LED next to the stitch length icon lights up,indicating that the set value is not the default value.
26 3 Sewing
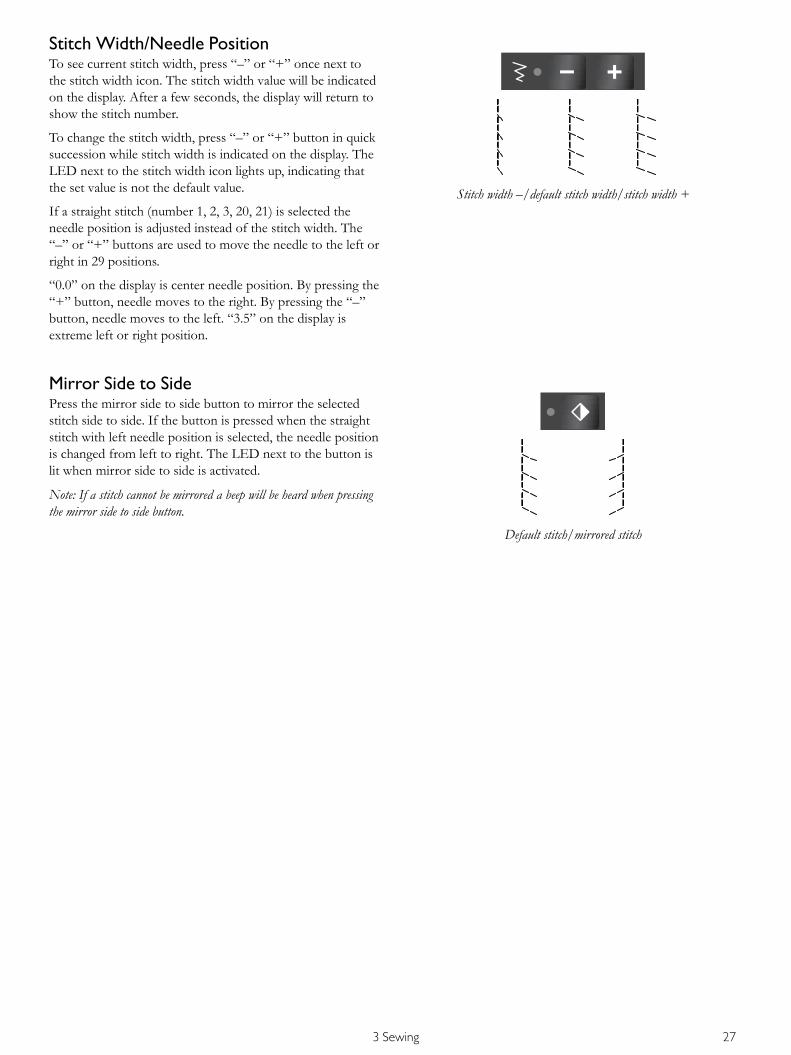
Stitch Width/Needle Position
Stitch width –/default stitch width/stitch width +
To see current stitch width, press “–” or “+” once next tothe stitch width icon. The stitch width value will be indicatedon the display. After a few seconds, the display will return toshow the stitch number.
To change the stitch width, press “–” or “+” button in quicksuccession while stitch width is indicated on the display. TheLED next to the stitch width icon lights up, indicating thatthe set value is not the default value.
If a straight stitch (number 1, 2, 3, 20, 21) is selected theneedle position is adjusted instead of the stitch width. The“–” or “+” buttons are used to move the needle to the left orright in 29 positions.
“0.0” on the display is center needle position. By pressing the“+” button, needle moves to the right. By pressing the “–”button, needle moves to the left. “3.5” on the display isextreme left or right position.
Mirror Side to Side
Default stitch/mirrored stitch
Press the mirror side to side button to mirror the selectedstitch side to side. If the button is pressed when the straightstitch with left needle position is selected, the needle positionis changed from left to right. The LED next to the button islit when mirror side to side is activated.
Note: If a stitch cannot be mirrored a beep will be heard when pressingthe mirror side to side button.
3 Sewing 27
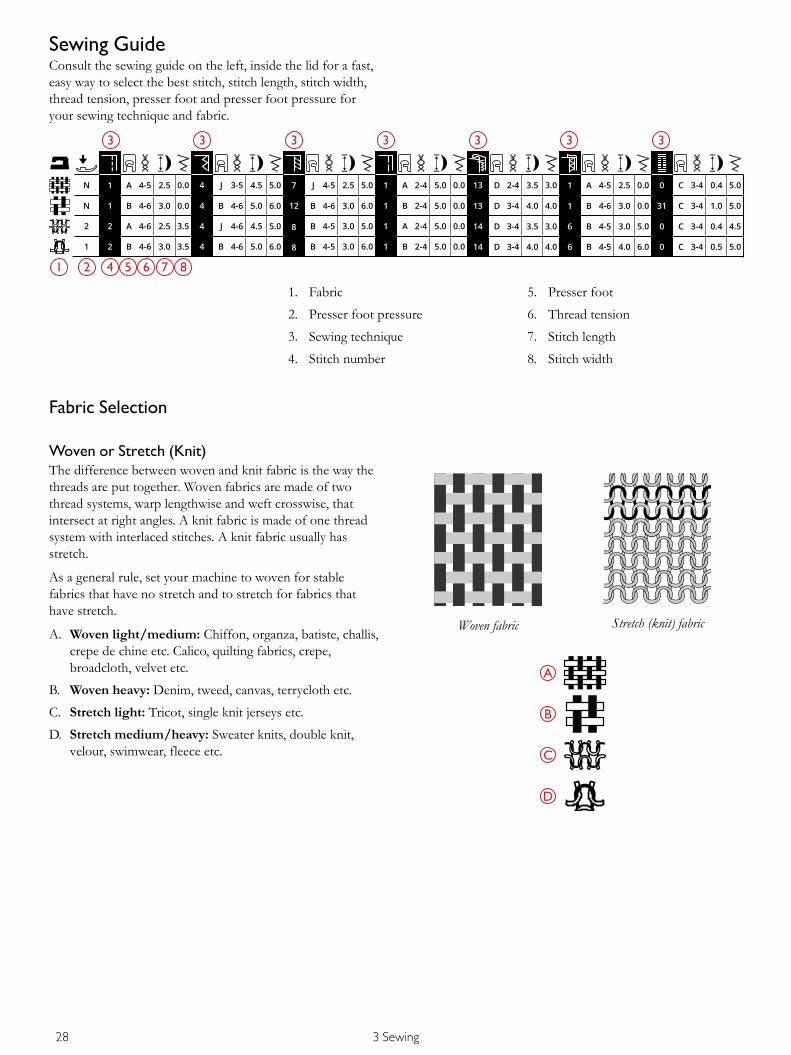
Sewing GuideConsult the sewing guide on the left, inside the lid for a fast,easy way to select the best stitch, stitch length, stitch width,thread tension, presser foot and presser foot pressure foryour sewing technique and fabric.
1. Fabric
2. Presser foot pressure
3. Sewing technique
4. Stitch number
5. Presser foot
6. Thread tension
7. Stitch length
8. Stitch width
Fabric Selection
Woven or Stretch (Knit)
Woven fabric Stretch (knit) fabric
The difference between woven and knit fabric is the way thethreads are put together. Woven fabrics are made of twothread systems, warp lengthwise and weft crosswise, thatintersect at right angles. A knit fabric is made of one threadsystem with interlaced stitches. A knit fabric usually hasstretch.
As a general rule, set your machine to woven for stablefabrics that have no stretch and to stretch for fabrics thathave stretch.
A. Woven light/medium: Chiffon, organza, batiste, challis,crepe de chine etc. Calico, quilting fabrics, crepe,broadcloth, velvet etc.
B. Woven heavy: Denim, tweed, canvas, terrycloth etc.
C. Stretch light: Tricot, single knit jerseys etc.
D. Stretch medium/heavy: Sweater knits, double knit,velour, swimwear, fleece etc.
28 3 Sewing

Sewing Techniques1. Seam: sews two pieces of fabric together.
2. Overcast: finish fabric edges to prevent them fromfraying and help them lay flat.
3. Seam/overcast: sews the seam and overcasts the edgeall at one time.
4. Baste: a temporary stitching for fitting garments,gathering and marking. Use maximum stitch length andreduce the tension so the threads are easy to remove orto pull for gathering.
Note: Basting will leave permanent holes in leather and vinyl.
5. Blind hem: creates an invisible hem on garments. Is notrecommended for light weight fabric.
6. Hem: the sewing guide recommends the best visible ortop stitch hem for your fabric type and weight.
7. Buttonhole: the sewing guide recommends the bestbuttonhole possible for your fabric.
3 Sewing 29
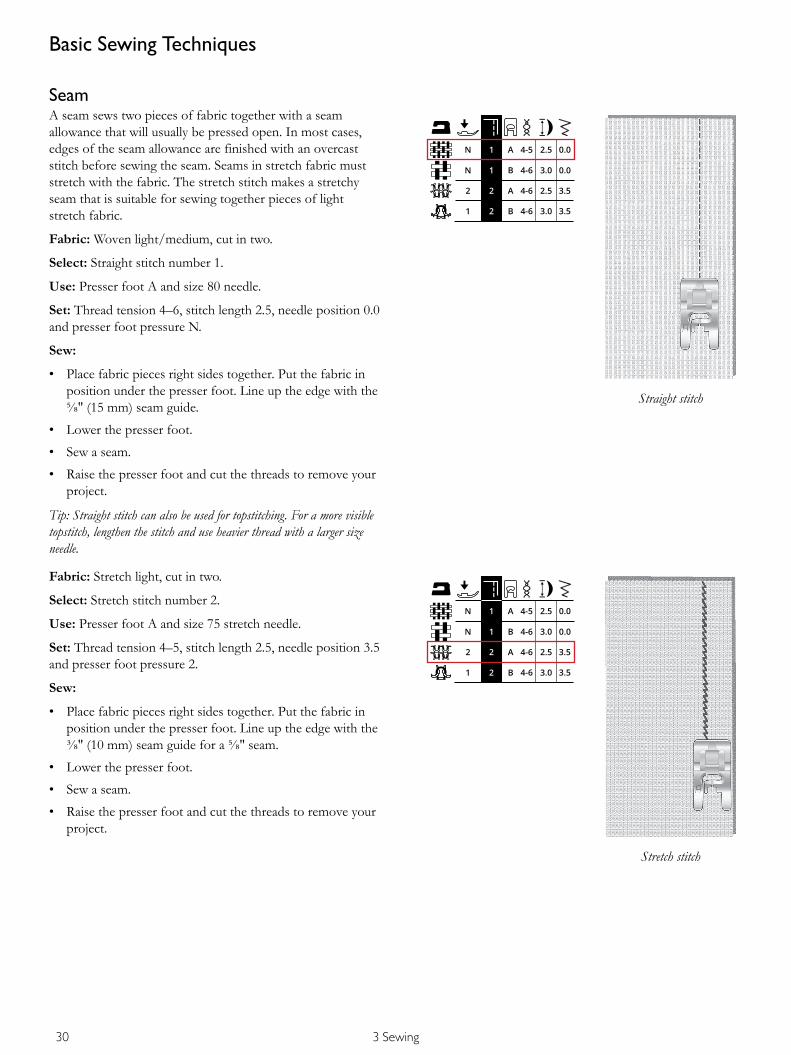
Basic Sewing Techniques
Seam
Straight stitch
A seam sews two pieces of fabric together with a seamallowance that will usually be pressed open. In most cases,edges of the seam allowance are finished with an overcaststitch before sewing the seam. Seams in stretch fabric muststretch with the fabric. The stretch stitch makes a stretchyseam that is suitable for sewing together pieces of lightstretch fabric.
Fabric:Woven light/medium, cut in two.
Select: Straight stitch number 1.
Use: Presser foot A and size 80 needle.
Set: Thread tension 4–6, stitch length 2.5, needle position 0.0and presser foot pressure N.
Sew:
• Place fabric pieces right sides together. Put the fabric inposition under the presser foot. Line up the edge with the⅝″ (15 mm) seam guide.
• Lower the presser foot.
• Sew a seam.
• Raise the presser foot and cut the threads to remove yourproject.
Tip: Straight stitch can also be used for topstitching. For a more visibletopstitch, lengthen the stitch and use heavier thread with a larger sizeneedle.
Stretch stitch
Fabric: Stretch light, cut in two.
Select: Stretch stitch number 2.
Use: Presser foot A and size 75 stretch needle.
Set: Thread tension 4–5, stitch length 2.5, needle position 3.5and presser foot pressure 2.
Sew:
• Place fabric pieces right sides together. Put the fabric inposition under the presser foot. Line up the edge with the⅜″ (10 mm) seam guide for a ⅝″ seam.
• Lower the presser foot.
• Sew a seam.
• Raise the presser foot and cut the threads to remove yourproject.
30 3 Sewing

OvercastOvercast fabric edges to prevent fraying and to help them layflat. It is easier to overcast before the garment is sewntogether. Presser foot J is recommended for light andmedium weight fabric to prevent puckering along the edge.Presser foot B is used for heavy weight fabric.
Fabric:Woven light/medium.
Select: Three-step zigzag stitch number 4
Use: Presser foot J and size 80 needle.
Set: Thread tension 3–5, stitch length 4.5, stitch width 5.0and presser foot pressure N.
Place the edge of a single thickness of fabric under presserfoot J with the wire guide along the edge of the fabric. Thethree-step zigzag stitch sews over the wire guide to keep theedge of the fabric flat.
Sew:
• Lower the presser foot.
• Sew to overcast the edge of the fabric.
• Raise the presser foot and cut the threads to remove yourproject.
Seam and Overcast
Woven medium and seam/overcast
Woven heavy and seam/overcast
The seam/overcast stitch sews the seam and overcasts theedges all at one time. There are a number of different seam/overcast stitches on your machine. Refer to the sewing guideto select the best stitch for your fabric.
Fabric: Stretch medium, cut in two.
Select: Stitch number 8.
Use: Presser foot B and size 75 stretch needle.
Set: Thread tension 4–5, stitch length 3.0, stitch width 5.0and presser foot pressure 2.
Sew:
• Place fabric pieces right sides together. Put the fabric inposition under the presser foot to seam along the edge ofthe fabric.
• Lower the presser foot.
• Seam/overcast along the edge.
• Raise the presser foot and cut the threads to remove yourproject.
Repeat the Seam/Overcast technique on stretch heavy fabricand on woven heavy fabric. Refer to the sewing guide toselect the best stitch, stitch length, stitch width and threadtension for each fabric type.
3 Sewing 31

BasteBasting is temporary stitching for fitting garments, gatheringand marking.
Set the machine to a long stitch length and reduce thetension so the threads are easy to remove or to pull forgathering.
Fabric: All types of fabric.
Select: Stitch number 1.
Use: Presser foot A/B and needle suitable for your fabric.
Set: Presser foot pressure as recommended for your fabric.
Sew:
• Place fabric pieces right sides together. Put the fabric inposition under the presser foot with ⅝″ (15 mm) seamallowance.
• Lower the presser foot.
• Sew along the seam line.
• Raise the presser foot and cut the threads to remove yourproject.
• To remove stitching, pull the bobbin thread.
Blind HemThe blind hem creates an invisible hem on garments. Thereare two types of blind hem; one is recommended for mediumto heavy woven fabrics, the other for stretch.
Fabric: Stretch medium/heavy or woven medium/heavy.
Select: Stitch number 13 for woven fabric. Stitch number 14for stretch fabric.
Use: Blind Hem Foot D and a needle suitable for yourfabric.
Set: Presser foot pressure as recommended for your fabric.
Sew:
• Fold the fabric as illustrated. Make sure the folded edge ofthe fabric follows the inside of the right “toe” of BlindHem Foot D.
• Lower the presser foot.
• The left swing of the needle should just catch the edge ofthe folded fabric. If necessary, adjust the stitch width asneeded to barely “catch” the fold.
• Sew the blind hem.
• Raise the presser foot and cut the threads to remove yourproject.
32 3 Sewing
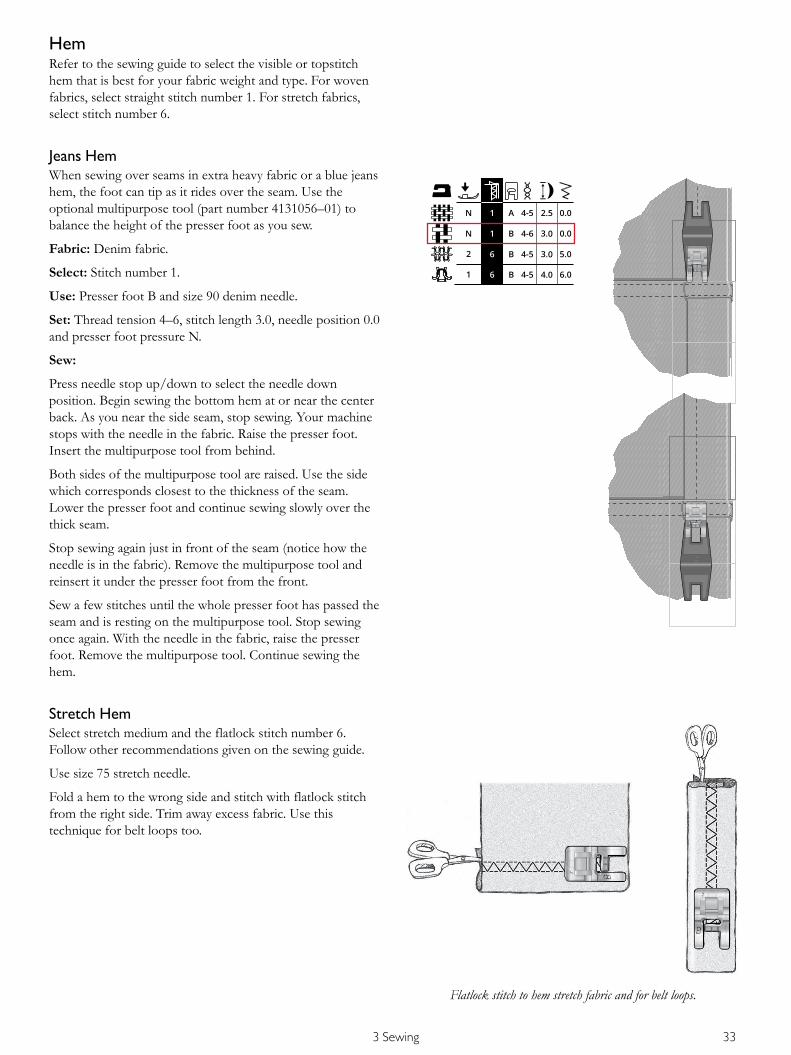
HemRefer to the sewing guide to select the visible or topstitchhem that is best for your fabric weight and type. For wovenfabrics, select straight stitch number 1. For stretch fabrics,select stitch number 6.
Jeans HemWhen sewing over seams in extra heavy fabric or a blue jeanshem, the foot can tip as it rides over the seam. Use theoptional multipurpose tool (part number 4131056–01) tobalance the height of the presser foot as you sew.
Fabric: Denim fabric.
Select: Stitch number 1.
Use: Presser foot B and size 90 denim needle.
Set: Thread tension 4–6, stitch length 3.0, needle position 0.0and presser foot pressure N.
Sew:
Press needle stop up/down to select the needle downposition. Begin sewing the bottom hem at or near the centerback. As you near the side seam, stop sewing. Your machinestops with the needle in the fabric. Raise the presser foot.Insert the multipurpose tool from behind.
Both sides of the multipurpose tool are raised. Use the sidewhich corresponds closest to the thickness of the seam.Lower the presser foot and continue sewing slowly over thethick seam.
Stop sewing again just in front of the seam (notice how theneedle is in the fabric). Remove the multipurpose tool andreinsert it under the presser foot from the front.
Sew a few stitches until the whole presser foot has passed theseam and is resting on the multipurpose tool. Stop sewingonce again. With the needle in the fabric, raise the presserfoot. Remove the multipurpose tool. Continue sewing thehem.
Stretch Hem
Flatlock stitch to hem stretch fabric and for belt loops.
Select stretch medium and the flatlock stitch number 6.Follow other recommendations given on the sewing guide.
Use size 75 stretch needle.
Fold a hem to the wrong side and stitch with flatlock stitchfrom the right side. Trim away excess fabric. Use thistechnique for belt loops too.
3 Sewing 33

Sewing ButtonholesThe buttonholes in your sewing machine are speciallyadjusted for different types of fabric and garments. Learnabout different buttonholes and when to use them bystudying the stitch table in the overview chapter.
Refer to the sewing guide to select the best buttonhole andstitch settings for your fabric. Fabric should be interfacedand/or stabilized where buttonholes are sewn.
One-Step ButtonholeNote: Always sew a test buttonhole on a scrap piece of fabric.
1. Mark the position of the buttonhole on your project.
2. Attach One-Step Buttonhole Foot C and pull out thebutton holder plate (A). Insert the button. The buttonwill determine the length of the buttonhole.
3. Make sure that the thread is pulled through the hole inthe presser foot and placed under the foot.
4. Position your project under the presser foot so that themarking on the fabric is aligned with the center of thebuttonhole foot.
5. Lower the buttonhole lever (B) all the way down.
Note: The machine will not start to sew if the buttonhole lever isnot lowered properly or the frame of buttonhole foot is not positionedall the way forward. (The letters “E1” appears on the display.)
6. Hold the end of the upper thread and start sewing. Thebuttonholes are sewn from the front of the presser footto the back.
7. Once the machine has sewn the buttonhole, raise thepresser foot.
8. Use the seam ripper to carefully open the buttonhole.
34 3 Sewing

Manual Buttonhole1 2 3 4
1 2 3 4
1 2 3 4
1 2 3 4
1 2 3 4
5
Sewing sequences for buttonhole stitches 0 and 30–33.
To sew a buttonhole longer than 25mm, use the manualbuttonhole foot C.
1. Lower the buttonhole lever and presser foot. Press thestart/stop button or the foot control to start sewingwhile pushing the buttonhole lever away from you untilthe machine starts sewing a straight stitch backwards. Sewuntil you reach the desired length of the buttonhole.
2. Pull the buttonhole lever towards you until the machinestarts sewing the first column forwards.
3. When the column stitching has reached your desiredlength, push the buttonhole lever away from you until themachine starts sewing a straight stitch backwards.
4. Pull the buttonhole lever towards you until the machinestarts sewing the bar tack and second column forwards.
5. When the columns are aligned, push the buttonhole leveraway from you until the machine starts sewing the bartack. The machine will sew a few tie-off stitches and stopautomatically.
6. Use the seam ripper to carefully open the buttonhole.
Depending on the style of buttonhole selected, the sewingsequence will differ, see illustration.
3 Sewing 35

Corded Buttonhole (Stretch Fabrics)When sewing buttonholes in stretch fabrics we recommendcording the buttonhole to increase the stability and keep thebuttonhole from stretching out.
1. Loop a piece of heavy thread or pearl cotton over themetal bar extending from the center back of the manualbuttonhole foot or of the plastic bar of the One-StepButtonhole Foot. Pull the thread tails under the foot,towards the front, then secure around the finger at thefront of the foot.
2. Stitch a buttonhole. The satin buttonhole columns willstitch over the cord.
3. When the buttonhole is finished, lift the cord off thefinger and pull out the slack.
4. Cross the cord in front of the needle and thread cordends into a large needle, pull to the wrong side and knotends before cutting excess.
5. Use the seam ripper to carefully open the buttonhole.
36 3 Sewing

Sewing on ButtonsSew buttons and snaps quickly with your sewing machineusing and the stitch for sewing on buttons (number 9).
1. Snap off the presser foot and lower the feed teeth.
2. Place the fabric, multipurpose tool (optional accessory,part number 4131056–01) and button under the anklewith the holes in the button lined up with the swing ofthe needle. Check the swing of the needle by pressing themirror side to side button to be sure the needle will nothit the button. Bring the needle down into the holes ofthe button with the handwheel to verify.
Tip: When using the multipurpose tool, the button is stitched to thefabric leaving a shank. If stitching without the multipurpose tool thebutton is stitched to the fabric without distance.
Tip: You can also use a sew-on button foot (part number 412934545),available as an optional accessory at your local authorizedHUSQVARNAVIKING® retailer.
Note: The pre-set width of 3mm is recommended for most buttons.When sewing a tiny button or a very large coat button, decrease orincrease the stitch width until the swing of the needle matches the holes ofthe button.
3. You can increase or decrease the number of stitches thatwill fasten the button on the fabric in steps of two, usingthe stitch length buttons. The set number of stitches isindicated on the display. 8 stitches is default.
4. Press the foot control. The sewing machine will sew theset number of stitches and then tie off and stop.
5. Raise feed teeth when button sewing is completed.
Tip: Place the thin end of the multipurpose tool under the button whensewing on light fabrics. Use the thick end for heavier fabrics. Hold inplace on the fabric with transparent tape.
3 Sewing 37

Sewing ZippersThe Zipper Foot E can be snapped on either the right or theleft of the needle, making it easy to sew both sides of thezipper. To sew the other side of the zipper, reposition theZipper Foot.
Move the needle position to the far left or right to stitchclose to the zipper teeth or cording.
Center Zipper1. Sew the two fabrics right sides together along the ⅝″(15
mm) seam line, stopping at the notch for the zipperplacement.
2. Baste the remaining seam where the zipper will be placed.Press the seam open. Place the zipper right side to thepressed open seam allowance, placing the zipper stop atthe notch. Pin the zipper on the right side so it stays inplace (A).
3. Select straight stitch and move the needle position to theleft. Snap on the Zipper Foot E so the needle is on theleft side of the foot. Place fabric under the foot right sideup with the zipper foot on the right side of the zipper.
4. Begin stitching across the bottom, turn the fabric andstitch the right side of the zipper to the top (B).
5. To avoid fabric shifting, sew the left side of the zipper inthe same direction. Snap on the Zipper Foot E so theneedle is on the right side of the foot. Move the needleposition to the right.
6. Begin stitching across the bottom, turn the fabric andstitch the left side of the zipper sewing from the bottomto the top (C).
7. Remove the basting stitches.
Note: To adjust the position of the stitching line, adjust the needleposition with the +/– buttons.
38 3 Sewing
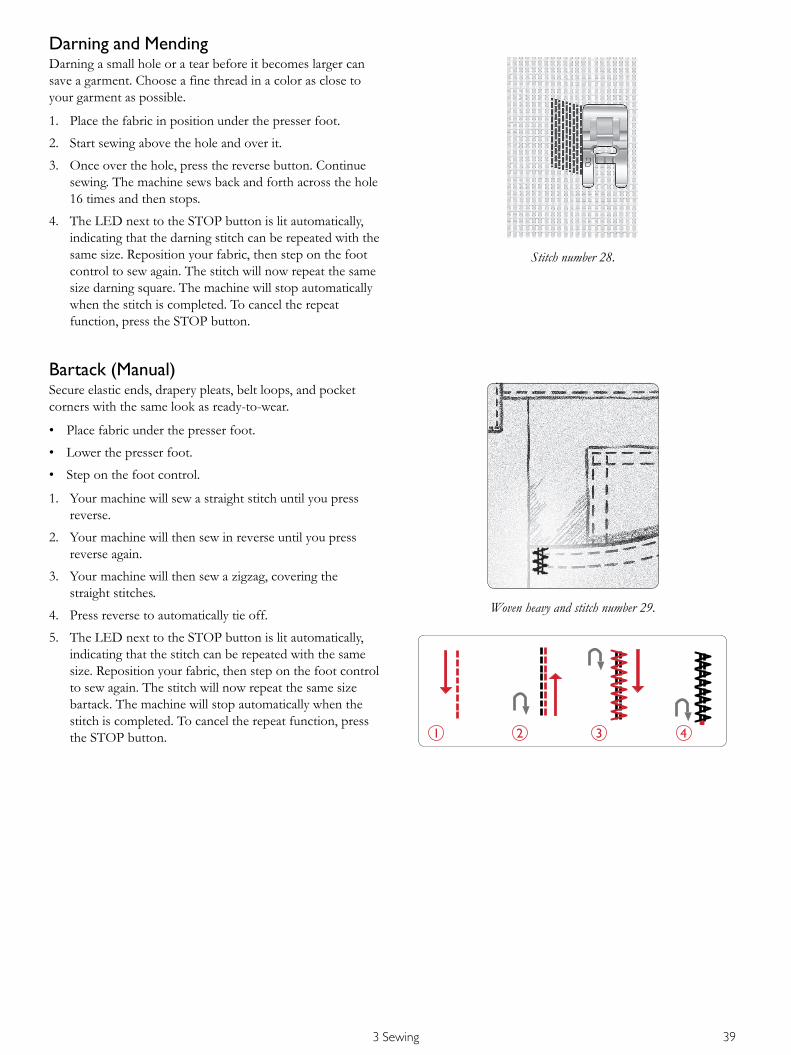
Darning and Mending
Stitch number 28.
Darning a small hole or a tear before it becomes larger cansave a garment. Choose a fine thread in a color as close toyour garment as possible.
1. Place the fabric in position under the presser foot.
2. Start sewing above the hole and over it.
3. Once over the hole, press the reverse button. Continuesewing. The machine sews back and forth across the hole16 times and then stops.
4. The LED next to the STOP button is lit automatically,indicating that the darning stitch can be repeated with thesame size. Reposition your fabric, then step on the footcontrol to sew again. The stitch will now repeat the samesize darning square. The machine will stop automaticallywhen the stitch is completed. To cancel the repeatfunction, press the STOP button.
Bartack (Manual)
Woven heavy and stitch number 29.
Secure elastic ends, drapery pleats, belt loops, and pocketcorners with the same look as ready-to-wear.
• Place fabric under the presser foot.
• Lower the presser foot.
• Step on the foot control.
1. Your machine will sew a straight stitch until you pressreverse.
2. Your machine will then sew in reverse until you pressreverse again.
3. Your machine will then sew a zigzag, covering thestraight stitches.
4. Press reverse to automatically tie off.
5. The LED next to the STOP button is lit automatically,indicating that the stitch can be repeated with the samesize. Reposition your fabric, then step on the foot controlto sew again. The stitch will now repeat the same sizebartack. The machine will stop automatically when thestitch is completed. To cancel the repeat function, pressthe STOP button.
3 Sewing 39

QuiltingA quilt usually consists of three layers, two layers of fabricwith a layer of batting sandwiched between. To sew threelayers together, you have a wide variety of stitches andtechniques to choose from. When the quilting is finishedsimply bind the edges or make it into cushions, wearable artor other smaller projects.
Crazy Quilt StitchingEmbellish your quilt with decorative stitches. The stitchescan be sewn in a coordinating or contrasting color.Decorative threads like rayon embroidery or heavy cottonthreads are sometimes used.
Stitches number 34–57 are perfect for crazy quilting.
Hand-Look QuiltingSimulate the look of handmade quilting with invisible threadand the hand-look quilting stitch (21). Increase the threadtension to 6–8 to get the accurate hand stitched look. Threadthe needle with clear invisible thread and the bobbin with acolor of thread that coordinates with your fabric.
Stitch along one of the seams of your project. The hand-lookeffect is created as the bobbin thread is pulled up to the topof the quilt.
Note: When sewing with the hand-look quilting stitch, the resultdepends on what fabric, batting and thread you are using. Be sure to trythe stitch on a sample first. Adjust the thread tension as needed for yourproject.
Note: Use the edge guide to sew successive rows. Insert the edge guideinto the hole of the presser foot holder. Set the desired spacing by slidingthe edge guide.
Free Motion Quilting
Free motion stippling. Free motion with circularmotions.
Free motion quilting not only keeps the top, batting andbacking together, but it also adds texture and interest to yourquilt.
There are several techniques to use when free motionquilting. Decorate your quilt as you like, only yourimagination sets the limits. Two free motion techniques arestippling and circles.
Free motion stippling is typically a tightly and evenly spacedmeandering stitch line. When stippling, draw squiggles withthe needle as you sew. Another technique is to make circularmotions on the fabric as you sew creating a stone shapedpattern.
40 3 Sewing

Open Toe Free Motion Spring Foot (optional accessory, part number4130376-46).
Free motion quilting is done with the feed teeth lowered.You move the fabric manually to determine the stitch length.When free motion quilting, use the Open Toe Free MotionSpring Foot (optional accessory, part number 4130376-46).
Begin by basting your quilt through all layers, starting fromthe center of your quilt and working out.
1. Attach the Open Toe Free Motion Spring Foot and lowerthe feed teeth. Select needle stop up/down to put theneedle in down position.
2. Sew at a constant medium speed, moving the fabric at aconsistent speed, this will help to keep the stitches even.The length of the stitch is created as you move the fabric.
Tip: Practice free motion sewing on scraps of the fabric and batting fromyour quilt. It is important to move your hands at the same speed as theneedle to prevent stitches that are too long or too short. Maintaining aconsistent speed while free-motion sewing will keep stitches even.
3 Sewing 41

4 Maintenance
Cleaning the MachineTo keep your sewing machine operating well, clean it often.No lubrication (oiling) is needed. Wipe the exterior surface ofyour machine with a soft cloth to remove any dust or lintbuilt up.
Cleaning the Bobbin AreaLower the feed teeth and turn off the machine.
Remove the presser foot. Push the bobbin cover releasebutton (A) to the right and remove the bobbin cover (B) andthe bobbin. Use the screwdriver for the needle plate toremove the two screws (C) in the needle plate. Lift up theneedle plate. Clean the feed teeth and bobbin area with thebrush included with the accessories.
Cleaning Under the Bobbin Area
A
Clean the area under the bobbin case after sewing severalprojects or any time you notice an accumulation of lint in thebobbin case area. Remove the bobbin case by lifting it up.Clean the area with the brush or a dry cloth.
Put the bobbin case in place so that the tip (A) fits into thestopper (B).
Note: Do not blow air into the bobbin case area. The dust and lint willbe blown into your machine.
42 4 Maintenance
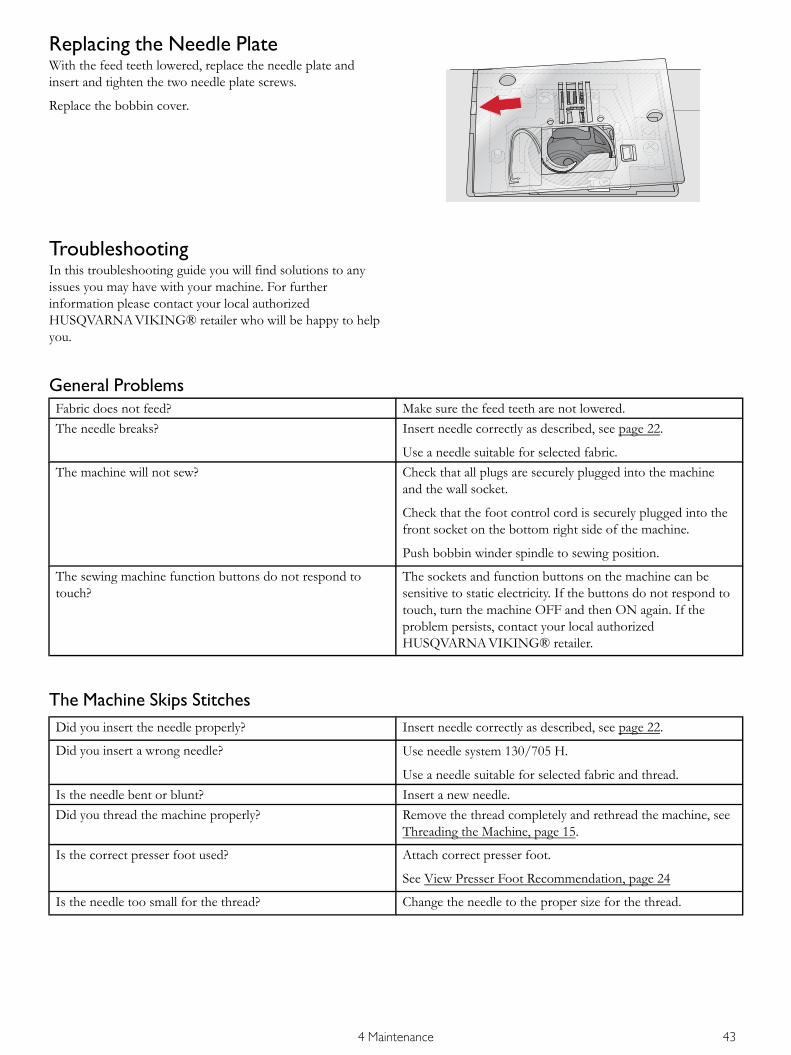
Replacing the Needle PlateWith the feed teeth lowered, replace the needle plate andinsert and tighten the two needle plate screws.
Replace the bobbin cover.
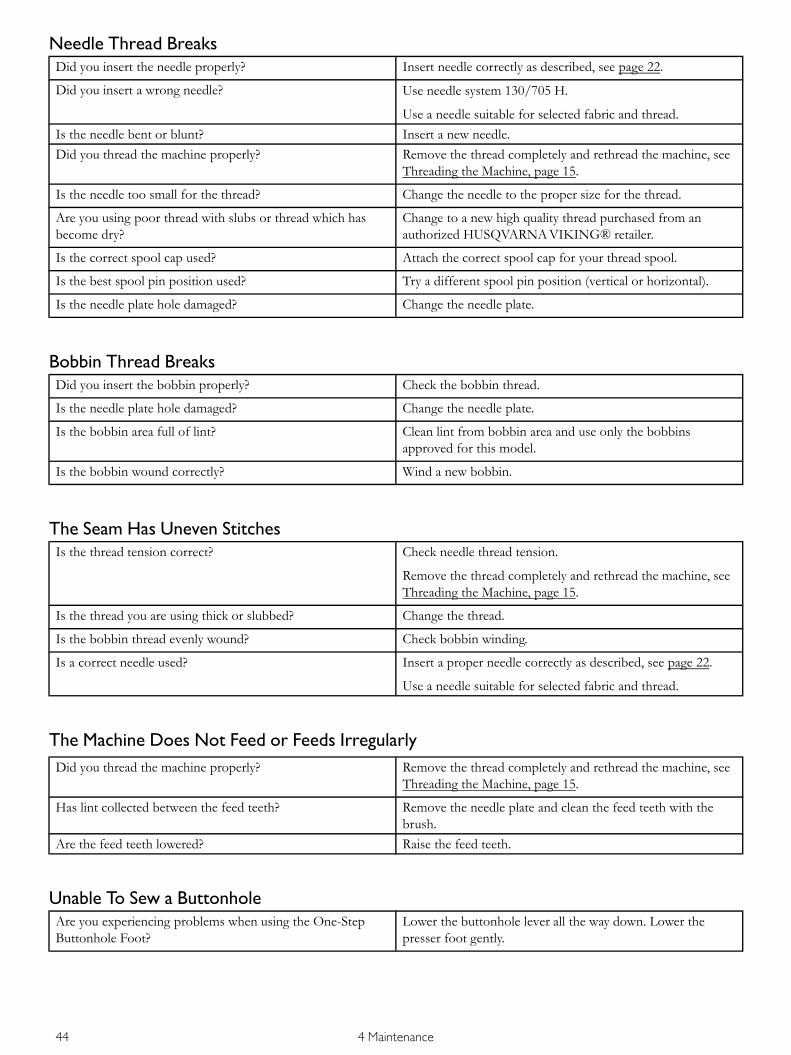
TroubleshootingIn this troubleshooting guide you will find solutions to anyissues you may have with your machine. For furtherinformation please contact your local authorizedHUSQVARNAVIKING® retailer who will be happy to helpyou.
General ProblemsFabric does not feed? Make sure the feed teeth are not lowered.The needle breaks? Insert needle correctly as described, see page 22.
Use a needle suitable for selected fabric.The machine will not sew? Check that all plugs are securely plugged into the machine
and the wall socket.
Check that the foot control cord is securely plugged into thefront socket on the bottom right side of the machine.
Push bobbin winder spindle to sewing position.
The sewing machine function buttons do not respond totouch?
The sockets and function buttons on the machine can besensitive to static electricity. If the buttons do not respond totouch, turn the machine OFF and then ON again. If theproblem persists, contact your local authorizedHUSQVARNAVIKING® retailer.
The Machine Skips StitchesDid you insert the needle properly? Insert needle correctly as described, see page 22.
Did you insert a wrong needle? Use needle system 130/705 H.
Use a needle suitable for selected fabric and thread.Is the needle bent or blunt? Insert a new needle.Did you thread the machine properly? Remove the thread completely and rethread the machine, see
Threading the Machine, page 15.
Is the correct presser foot used? Attach correct presser foot.
See View Presser Foot Recommendation, page 24
Is the needle too small for the thread? Change the needle to the proper size for the thread.
4 Maintenance 43
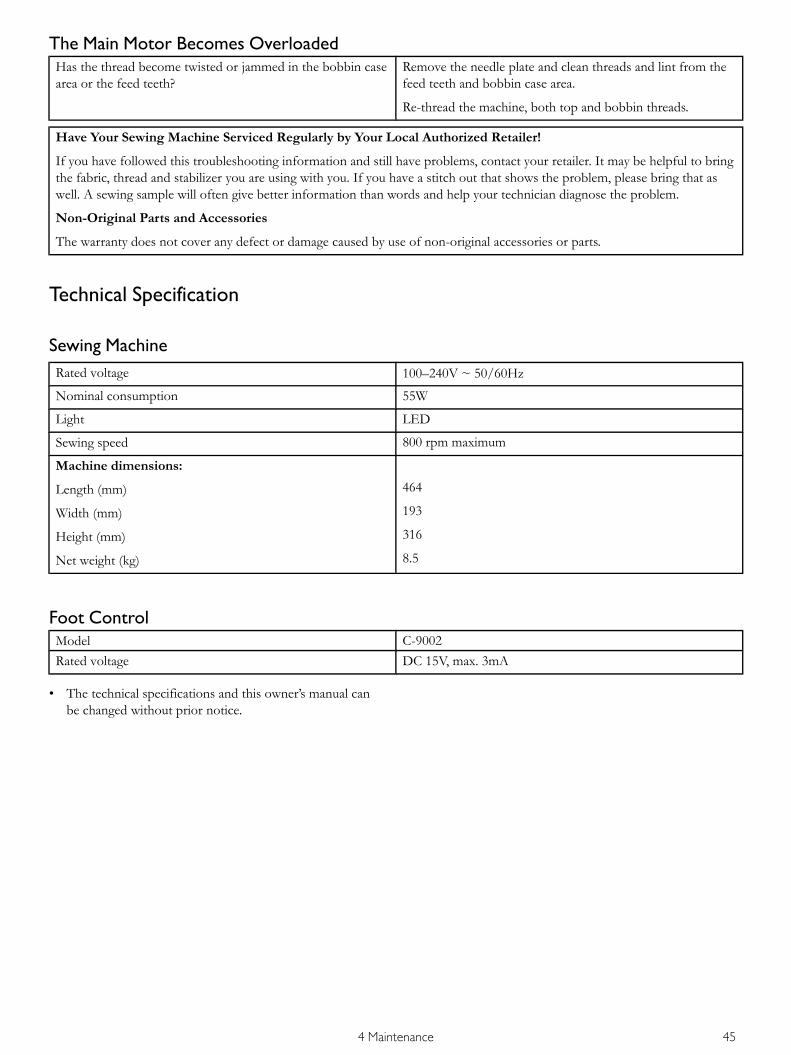
Needle Thread BreaksDid you insert the needle properly? Insert needle correctly as described, see page 22.
Did you insert a wrong needle? Use needle system 130/705 H.
Use a needle suitable for selected fabric and thread.Is the needle bent or blunt? Insert a new needle.Did you thread the machine properly? Remove the thread completely and rethread the machine, see
Threading the Machine, page 15.
Is the needle too small for the thread? Change the needle to the proper size for the thread.
Are you using poor thread with slubs or thread which hasbecome dry?
Change to a new high quality thread purchased from anauthorized HUSQVARNAVIKING® retailer.
Is the correct spool cap used? Attach the correct spool cap for your thread spool.
Is the best spool pin position used? Try a different spool pin position (vertical or horizontal).
Is the needle plate hole damaged? Change the needle plate.
Bobbin Thread BreaksDid you insert the bobbin properly? Check the bobbin thread.
Is the needle plate hole damaged? Change the needle plate.
Is the bobbin area full of lint? Clean lint from bobbin area and use only the bobbinsapproved for this model.
Is the bobbin wound correctly? Wind a new bobbin.
The Seam Has Uneven StitchesIs the thread tension correct? Check needle thread tension.
Remove the thread completely and rethread the machine, seeThreading the Machine, page 15.
Is the thread you are using thick or slubbed? Change the thread.
Is the bobbin thread evenly wound? Check bobbin winding.
Is a correct needle used? Insert a proper needle correctly as described, see page 22.
Use a needle suitable for selected fabric and thread.
The Machine Does Not Feed or Feeds IrregularlyDid you thread the machine properly? Remove the thread completely and rethread the machine, see
Threading the Machine, page 15.
Has lint collected between the feed teeth? Remove the needle plate and clean the feed teeth with thebrush.
Are the feed teeth lowered? Raise the feed teeth.
Unable To Sew a ButtonholeAre you experiencing problems when using the One-StepButtonhole Foot?
Lower the buttonhole lever all the way down. Lower thepresser foot gently.
44 4 Maintenance
The Main Motor Becomes OverloadedHas the thread become twisted or jammed in the bobbin casearea or the feed teeth?
Remove the needle plate and clean threads and lint from thefeed teeth and bobbin case area.
Re-thread the machine, both top and bobbin threads.
Have Your Sewing Machine Serviced Regularly by Your Local Authorized Retailer!
If you have followed this troubleshooting information and still have problems, contact your retailer. It may be helpful to bringthe fabric, thread and stabilizer you are using with you. If you have a stitch out that shows the problem, please bring that aswell. A sewing sample will often give better information than words and help your technician diagnose the problem.
Non-Original Parts and Accessories
The warranty does not cover any defect or damage caused by use of non-original accessories or parts.
Technical Specification
Sewing MachineRated voltage 100–240V ~ 50/60Hz
Nominal consumption 55W
Light LED
Sewing speed 800 rpm maximum
Machine dimensions:
Length (mm)
Width (mm)
Height (mm)
Net weight (kg)
464
193
316
8.5
Foot ControlModel C-9002Rated voltage DC 15V, max. 3mA
• The technical specifications and this owner’s manual canbe changed without prior notice.
4 Maintenance 45


Index
AAccessories .... . . .. . .. . . .. . .. . . .. . . .. . .. . . .. . .. . . .. . .. . . .. . . .. . .. . . .. . .. . . .. .7Accessory Tray .... .. . . .. . .. . . .. . . .. . .. . . .. . .. . . .. . .. . . .. . . .. . .. . . .. . .. . . .. .6Auxiliary spool pin ..... . .. . . .. . . .. . .. . . .. . .. . . .. . .. . . .. . . .. . .. . . .. . .. . . .. .7Auxiliary Spool Pin..... . .. . . .. . . .. . .. . . .. . .. . . .. . .. . . .. . . .. . .. . . .. . .. . . . 15
BBartack (Manual).... . . .. . .. . . .. . . .. . .. . . .. . .. . . .. . .. . . .. . . .. . .. . . .. . .. . . . 39Baste.... .. . . .. . .. . . .. . .. . . .. . .. . . .. . . .. . .. . . .. . .. . . .. . .. . . .. . . .. . .. . . .. . .. . . . 32Blind Hem ..... . . .. . .. . . .. . .. . . .. . . .. . .. . . .. . .. . . .. . .. . . .. . . .. . .. . . .. . .. . . . 32Blind Hem Foot D ..... . .. . . .. . . .. . .. . . .. . .. . . .. . .. . . .. . . .. . .. . . .. . .. . . .. .8Bobbin cover.... .. . .. . . .. . .. . . .. . . .. . .. . . .. . .. . . .. . .. . . .. . . .. . .. . . .. . .. . . .. .5Bobbin spindle, bobbin stop ...... . . .. . .. . . .. . .. . . .. . . .. . .. . . .. . .. . . .. .5Bobbin Thread Breaks .... . .. . . .. . .. . . .. . .. . . .. . .. . . .. . . .. . .. . . .. . .. . . . 44Bobbin winder thread guide and tension disc .... .. . .. . . .. . .. . . .. .5Bobbin Winding .... . . .. . .. . . .. . . .. . .. . . .. . .. . . .. . .. . . .. . . .. . .. . . .. . .. . . . 18Bobbins.... .. . .. . . .. . .. . . .. . .. . . .. . . .. . .. . . .. . .. . . .. . .. . . .. . . .. . .. . . .. . .. . . .. .7Brush..... . . .. . .. . . .. . .. . . .. . .. . . .. . . .. . .. . . .. . .. . . .. . .. . . .. . . .. . .. . . .. . .. . . .. .7Buttonhole Foot C ..... . .. . . .. . . .. . .. . . .. . .. . . .. . .. . . .. . . .. . .. . . .. . .. . . .. .8Buttonhole lever .... . . .. . .. . . .. . . .. . .. . . .. . .. . . .. . .. . . .. . . .. . .. . . .. . .. . . .. .6buttonholes.... . . .. . .. . . .. . .. . . .. . . .. . .. . . .. . .. . . .. . .. . . .. . . .. . .. . . .. . .. . . . 34Buttons and LED display .... . .. . .. . . .. . .. . . .. . .. . . .. . . .. . .. . . .. . .. . . .. .5
CCenter Zipper..... . .. . . .. . .. . . .. . . .. . .. . . .. . .. . . .. . .. . . .. . . .. . .. . . .. . .. . . . 38Changing the Needle ..... . . .. . . .. . .. . . .. . .. . . .. . .. . . .. . . .. . .. . . .. . .. . . . 22Changing the Presser Foot .... .. . .. . . .. . .. . . .. . .. . . .. . . .. . .. . . .. . .. . . . 22Cleaning the Bobbin Area.... . .. . .. . . .. . .. . . .. . .. . . .. . . .. . .. . . .. . .. . . . 42Cleaning the Machine..... . . .. . . .. . .. . . .. . .. . . .. . .. . . .. . . .. . .. . . .. . .. . . . 42Cleaning Under the Bobbin Area .... . .. . . .. . .. . . .. . . .. . .. . . .. . .. . . . 42Connect the foot control cord .... . . .. . .. . . .. . .. . . .. . . .. . .. . . .. . .. . . . 13Connect the power cord ..... . . .. . .. . . .. . .. . . .. . .. . . .. . . .. . .. . . .. . .. . . . 13Corded Buttonhole (Stretch Fabrics). .. . . .. . .. . . .. . . .. . .. . . .. . .. . . . 36Crazy Quilt Stitching.... .. . . .. . . .. . .. . . .. . .. . . .. . .. . . .. . . .. . .. . . .. . .. . . . 40Cutting the Thread ..... . .. . . .. . . .. . .. . . .. . .. . . .. . .. . . .. . . .. . .. . . .. . .. . . . 16
DDarning and Mending .... . . .. . . .. . .. . . .. . .. . . .. . .. . . .. . . .. . .. . . .. . .. . . . 39Decorative Stitch Foot B ..... . .. . .. . . .. . .. . . .. . .. . . .. . . .. . .. . . .. . .. . . .. .8Decorative Stitches..... . .. . . .. . . .. . .. . . .. . .. . . .. . .. . . .. . . .. . .. . . .. . .. . . . 11Drop feed teeth switch.... . .. . . .. . .. . . .. . .. . . .. . .. . . .. . . .. . .. . . .. . .. . . .. .6
Eedge guide.... .. . . .. . .. . . .. . .. . . .. . . .. . .. . . .. . .. . . .. . .. . . .. . . .. . .. . . .. . .. . . . 40Edge guide..... . . .. . .. . . .. . .. . . .. . . .. . .. . . .. . .. . . .. . .. . . .. . . .. . .. . . .. . .. . . .. .7Edging Foot J ..... . .. . . .. . .. . . .. . . .. . .. . . .. . .. . . .. . .. . . .. . . .. . .. . . .. . .. . . .. .8
FFabric Selection .... .. . .. . . .. . . .. . .. . . .. . .. . . .. . .. . . .. . . .. . .. . . .. . .. . . .. . . 28feed teeth.... . . .. . .. . . .. . .. . . .. . . .. . .. . . .. . .. . . .. . .. . . .. . . .. . .. . . .. . .. . . .. . . 20felt pad.... . .. . . .. . .. . . .. . .. . . .. . . .. . .. . . .. . .. . . .. . .. . . .. . . .. . .. . . .. . .. . . .. . . 14Felt pad .... .. . . .. . .. . . .. . .. . . .. . . .. . .. . . .. . .. . . .. . .. . . .. . . .. . .. . . .. . .. . . .. . .. . 7FIX Function ..... . . .. . .. . . .. . . .. . .. . . .. . .. . . .. . .. . . .. . . .. . .. . . .. . .. . . .. . . 23Free arm..... . . .. . .. . . .. . .. . . .. . . .. . .. . . .. . .. . . .. . .. . . .. . . .. . .. . . .. . .. . . .. . .. . 5Free Arm..... . .. . .. . . .. . .. . . .. . . .. . .. . . .. . .. . . .. . .. . . .. . . .. . .. . . .. . .. . . .. . . 14Free Motion Quilting .... .. . . .. . .. . . .. . .. . . .. . .. . . .. . . .. . .. . . .. . .. . . .. . . 40Front .... .. . .. . . .. . .. . . .. . .. . . .. . . .. . .. . . .. . .. . . .. . .. . . .. . . .. . .. . . .. . .. . . .. . .. . 5Function Buttons .... . .. . . .. . . .. . .. . . .. . .. . . .. . .. . . .. . . .. . .. . . .. . .. . . .. . . 23
GGeneral Problems ...... . . .. . . .. . .. . . .. . .. . . .. . .. . . .. . . .. . .. . . .. . .. . . .. . . 43
HHand-Look Quilting .... . .. . . .. . .. . . .. . .. . . .. . .. . . .. . . .. . .. . . .. . .. . . .. . . 40Handle .... . .. . . .. . .. . . .. . .. . . .. . . .. . .. . . .. . .. . . .. . .. . . .. . . .. . .. . . .. . .. . . .. . .. . 6Handwheel... . .. . .. . . .. . .. . . .. . . .. . .. . . .. . .. . . .. . .. . . .. . . .. . .. . . .. . .. . . .. . .. . 5Hem ..... .. . .. . . .. . .. . . .. . .. . . .. . . .. . .. . . .. . .. . . .. . .. . . .. . . .. . .. . . .. . .. . . .. . . 33Hole for auxiliary spool pin..... . . .. . .. . . .. . .. . . .. . . .. . .. . . .. . .. . . .. . .. . 5
IImportant Needle Information .... . .. . . .. . .. . . .. . . .. . .. . . .. . .. . . .. . . 21Inserting the Bobbin.... . .. . . .. . .. . . .. . .. . . .. . .. . . .. . . .. . .. . . .. . .. . . .. . . 19
JJeans Hem ...... . .. . . .. . .. . . .. . . .. . .. . . .. . .. . . .. . .. . . .. . . .. . .. . . .. . .. . . .. . . 33
LLED lights .... .. . .. . . .. . .. . . .. . . .. . .. . . .. . .. . . .. . .. . . .. . . .. . .. . . .. . .. . . .. . .. . 5LED Lights..... . .. . . .. . .. . . .. . . .. . .. . . .. . .. . . .. . .. . . .. . . .. . .. . . .. . .. . . .. . . 13Lid with stitch overview ...... . .. . . .. . .. . . .. . .. . . .. . . .. . .. . . .. . .. . . .. . .. . 5Lowering the Feed Teeth ..... . .. . . .. . .. . . .. . .. . . .. . . .. . .. . . .. . .. . . .. . . 20
MMachine Overview ..... . . .. . . .. . .. . . .. . .. . . .. . .. . . .. . . .. . .. . . .. . .. . . .. . .. . 5Manual Buttonhole..... . . .. . . .. . .. . . .. . .. . . .. . .. . . .. . . .. . .. . . .. . .. . . .. . . 35Mirror Side to Side ..... . . .. . . .. . .. . . .. . .. . . .. . .. . . .. . . .. . .. . . .. . .. . . .. . . 27Mounting Machine in Sewing Cabinet ..... . . .. . . .. . .. . . .. . .. . . .. . . 14
47

NNeedle Area .... . .. . .. . . .. . .. . . .. . . .. . .. . . .. . .. . . .. . .. . . .. . . .. . .. . . .. . .. . . .. .6Needle bar ..... . . .. . .. . . .. . .. . . .. . . .. . .. . . .. . .. . . .. . .. . . .. . . .. . .. . . .. . .. . . .. .6Needle clamp screw..... .. . . .. . . .. . .. . . .. . .. . . .. . .. . . .. . . .. . .. . . .. . .. . . .. .6Needle plate .... . .. . .. . . .. . .. . . .. . . .. . .. . . .. . .. . . .. . .. . . .. . . .. . .. . . .. . .. . . .. .5Needle Position ..... . . .. . .. . . .. . . .. . .. . . .. . .. . . .. . .. . . .. . . .. . .. . . .. . .. . . . 27Needle Stop Up/Down...... . . .. . .. . . .. . .. . . .. . .. . . .. . . .. . .. . . .. . .. . . . 23Needle Thread Breaks.... . . .. . . .. . .. . . .. . .. . . .. . .. . . .. . . .. . .. . . .. . .. . . . 44Needle thread guide.... . .. . . .. . . .. . .. . . .. . .. . . .. . .. . . .. . . .. . .. . . .. . .. . . .. .6Needle threader ..... . . .. . .. . . .. . . .. . .. . . .. . .. . . .. . .. . . .. . . .. . .. . . .. . .. . . .. .6Needle Threader .... . . .. . .. . . .. . . .. . .. . . .. . .. . . .. . .. . . .. . . .. . .. . . .. . .. . . . 16Needles .... .. . .. . . .. . .. . . .. . .. . . .. . . .. . .. . . .. . .. . . .. . .. . . .. . . .. . .. . . .. . .. . . . 21
OON/OFF switch.... . . .. . .. . . .. . . .. . .. . . .. . .. . . .. . .. . . .. . . .. . .. . . .. . .. 5, 13One-Step Buttonhole..... . . .. . . .. . .. . . .. . .. . . .. . .. . . .. . . .. . .. . . .. . .. . . . 34One-Step Buttonhole Foot C ..... . . .. . .. . . .. . .. . . .. . . .. . .. . . .. . .. . . .. .8Open the Accessory Tray.... . . .. . .. . . .. . .. . . .. . .. . . .. . . .. . .. . . .. . .. . . .. .6Overcast ... .. . .. . . .. . .. . . .. . .. . . .. . . .. . .. . . .. . .. . . .. . .. . . .. . . .. . .. . . .. . .. . . . 31
PPack Away After Sewing..... . . .. . .. . . .. . .. . . .. . .. . . .. . . .. . .. . . .. . .. . . . 13Presser bar ..... . . .. . .. . . .. . .. . . .. . . .. . .. . . .. . .. . . .. . .. . . .. . . .. . .. . . .. . .. . . .. .6Presser Feet.... . . .. . .. . . .. . .. . . .. . . .. . .. . . .. . .. . . .. . .. . . .. . . .. . .. . . .. . .. . . .. .8Presser foot.... . . .. . .. . . .. . .. . . .. . . .. . .. . . .. . .. . . .. . .. . . .. . . .. . .. . . .. . .. . . .. .6Presser foot ankle.... . .. . .. . . .. . . .. . .. . . .. . .. . . .. . .. . . .. . . .. . .. . . .. . .. . . .. .6Presser foot lift ... . .. . . .. . .. . . .. . . .. . .. . . .. . .. . . .. . .. . . .. . . .. . .. . . .. . .. . . .. .6Presser Foot Lift .... . . .. . .. . . .. . . .. . .. . . .. . .. . . .. . .. . . .. . . .. . .. . . .. . .. . . . 22Presser Foot Pressure..... . . .. . . .. . .. . . .. . .. . . .. . .. . . .. . . .. . .. . . .. . .. . . . 22Presser foot pressure dial .... . . .. . .. . . .. . .. . . .. . .. . . .. . . .. . .. . . .. . .. . . .. .5Presser Foot Recommendation .... . .. . .. . . .. . .. . . .. . . .. . .. . . .. . .. . . . 24
QQuilt Stitches.... .. . .. . . .. . .. . . .. . . .. . .. . . .. . .. . . .. . .. . . .. . . .. . .. . . .. . .. . . . 11Quilting.... .. . .. . . .. . .. . . .. . .. . . .. . . .. . .. . . .. . .. . . .. . .. . . .. . . .. . .. . . .. . .. . . . 40
RRear Side .... . .. . . .. . .. . . .. . .. . . .. . . .. . .. . . .. . .. . . .. . .. . . .. . . .. . .. . . .. . .. . . .. .6Replacing the Needle Plate.... .. . .. . . .. . .. . . .. . .. . . .. . . .. . .. . . .. . .. . . . 43Reverse .... .. . .. . . .. . .. . . .. . .. . . .. . . .. . .. . . .. . .. . . .. . .. . . .. . . .. . .. . . .. . .. . . . 24
SScrewdriver .... . . .. . .. . . .. . .. . . .. . . .. . .. . . .. . .. . . .. . .. . . .. . . .. . .. . . .. . .. . . .. .7Screwdriver for needle plate .... . .. . . .. . .. . . .. . .. . . .. . . .. . .. . . .. . .. . . .. .7Seam...... . . .. . .. . . .. . .. . . .. . .. . . .. . . .. . .. . . .. . .. . . .. . .. . . .. . . .. . .. . . .. . .. . . . 30Seam and Overcast ... .. . .. . . .. . . .. . .. . . .. . .. . . .. . .. . . .. . . .. . .. . . .. . .. . . . 31
Seam ripper..... . .. . . .. . .. . . .. . . .. . .. . . .. . .. . . .. . .. . . .. . . .. . .. . . .. . .. . . .. . .. . 7Selecting a Stitch ..... . .. . . .. . . .. . .. . . .. . .. . . .. . .. . . .. . . .. . .. . . .. . .. . . .. . . 26Self-Adhesive Glide Plate .... . .. . . .. . .. . . .. . .. . . .. . . .. . .. . . .. . .. . . .. . .. . 8Sewing Buttonholes .... . . .. . . .. . .. . . .. . .. . . .. . .. . . .. . . .. . .. . . .. . .. . . .. . . 34Sewing Guide ..... . . .. . .. . . .. . . .. . .. . . .. . .. . . .. . .. . . .. . . .. . .. . . .. . .. . . .. . . 28Sewing on Buttons ..... . . .. . . .. . .. . . .. . .. . . .. . .. . . .. . . .. . .. . . .. . .. . . .. . . 37Sewing Techniques ..... . . .. . . .. . .. . . .. . .. . . .. . .. . . .. . . .. . .. . . .. . .. . . .. . . 29Sewing Zippers .... . .. . .. . . .. . . .. . .. . . .. . .. . . .. . .. . . .. . . .. . .. . . .. . .. . . .. . . 38sockets for power cord and foot control... . .. . . .. . .. . . .. . .. . . .. . .. . 5Speed + and – ..... . .. . .. . . .. . . .. . .. . . .. . .. . . .. . .. . . .. . . .. . .. . . .. . .. . . .. . . 23spool cap .... . . .. . .. . . .. . .. . . .. . . .. . .. . . .. . .. . . .. . .. . . .. . . .. . .. . . .. . .. . . .. . . 14Spool cap, large.... . .. . .. . . .. . . .. . .. . . .. . .. . . .. . .. . . .. . . .. . .. . . .. . .. . . .. . .. . 7Spool cap, small ... . .. . .. . . .. . . .. . .. . . .. . .. . . .. . .. . . .. . . .. . .. . . .. . .. . . .. . .. . 7Spool pin .... . . .. . .. . . .. . .. . . .. . . .. . .. . . .. . .. . . .. . .. . . .. . . .. . .. . . .. . .. . . .. . .. . 5Spool Pins .... .. . .. . . .. . .. . . .. . . .. . .. . . .. . .. . . .. . .. . . .. . . .. . .. . . .. . .. . . .. . . 14Start/Stop..... .. . .. . . .. . .. . . .. . . .. . .. . . .. . .. . . .. . .. . . .. . . .. . .. . . .. . .. . . .. . . 24Stitch Length/Stitch Density .... . .. . .. . . .. . .. . . .. . . .. . .. . . .. . .. . . .. . . 26Stitch Overview ...... . .. . . .. . . .. . .. . . .. . .. . . .. . .. . . .. . . .. . .. . . .. . .. . . .. . .. . 9Stitch Selection Buttons.... . .. . .. . . .. . .. . . .. . .. . . .. . . .. . .. . . .. . .. . . .. . . 24Stitch Settings..... . . .. . .. . . .. . . .. . .. . . .. . .. . . .. . .. . . .. . . .. . .. . . .. . .. . . .. . . 26Stitch Width .... . .. . . .. . .. . . .. . . .. . .. . . .. . .. . . .. . .. . . .. . . .. . .. . . .. . .. . . .. . . 27STOP Function .... .. . .. . . .. . . .. . .. . . .. . .. . . .. . .. . . .. . . .. . .. . . .. . .. . . .. . . 23Storage Box ..... .. . . .. . .. . . .. . . .. . .. . . .. . .. . . .. . .. . . .. . . .. . .. . . .. . .. . . .. . .. . 6Stretch (knit) fabric..... . . .. . . .. . .. . . .. . .. . . .. . .. . . .. . . .. . .. . . .. . .. . . .. . . 28Stretch Hem..... .. . . .. . .. . . .. . . .. . .. . . .. . .. . . .. . .. . . .. . . .. . .. . . .. . .. . . .. . . 33
TTechnical Specification.... . . .. . .. . . .. . .. . . .. . .. . . .. . . .. . .. . . .. . .. . . .. . . 45The Machine Does Not Feed or Feeds Irregularly .... . .. . . .. . . 44The Machine Skips Stitches..... . . .. . .. . . .. . .. . . .. . . .. . .. . . .. . .. . . .. . . 43The Main Motor Becomes Overloaded ..... .. . . .. . .. . . .. . .. . . .. . . 45The Seam Has Uneven Stitches .... .. . . .. . .. . . .. . . .. . .. . . .. . .. . . .. . . 44Thread cutter.... .. . . .. . .. . . .. . . .. . .. . . .. . .. . . .. . .. . . .. . . .. . .. . . .. . .. . . .. . .. . 5Thread cutter for bobbin thread ..... . . .. . .. . . .. . . .. . .. . . .. . .. . . .. . .. . 5Thread guide .... .. . . .. . .. . . .. . . .. . .. . . .. . .. . . .. . .. . . .. . . .. . .. . . .. . .. . . .. . .. . 5Thread guide for auxiliary spool.... .. . . .. . .. . . .. . . .. . .. . . .. . .. . . .. . .. . 5Thread guide for bobbin winding through the needle .... .. . .. . 5thread net .... . .. . .. . . .. . .. . . .. . . .. . .. . . .. . .. . . .. . .. . . .. . . .. . .. . . .. . .. . . .. . . 14Thread net .... .. . .. . . .. . .. . . .. . . .. . .. . . .. . .. . . .. . .. . . .. . . .. . .. . . .. . .. . . .. . .. . 7Thread take-up lever .... . .. . . .. . .. . . .. . .. . . .. . .. . . .. . . .. . .. . . .. . .. . . .. . .. . 5Thread Tension ...... . .. . . .. . . .. . .. . . .. . .. . . .. . .. . . .. . . .. . .. . . .. . .. . . .. . . 20Thread tension dial ... .. . . .. . . .. . .. . . .. . .. . . .. . .. . . .. . . .. . .. . . .. . .. . . .. . .. . 5Thread tension discs .... . .. . . .. . .. . . .. . .. . . .. . .. . . .. . . .. . .. . . .. . .. . . .. . .. . 5Threading for Twin Needle ..... . . .. . .. . . .. . .. . . .. . . .. . .. . . .. . .. . . .. . . 17Threading the Machine .... . .. . .. . . .. . .. . . .. . .. . . .. . . .. . .. . . .. . .. . . .. . . 15Troubleshooting ..... . .. . . .. . . .. . .. . . .. . .. . . .. . .. . . .. . . .. . .. . . .. . .. . . .. . . 43twin needle ..... . .. . . .. . .. . . .. . . .. . .. . . .. . .. . . .. . .. . . .. . . .. . .. . . .. . .. . . .. . . 17
UUnable To Sew a Buttonhole .... . .. . .. . . .. . .. . . .. . . .. . .. . . .. . .. . . .. . . 44Unpacking .... .. . .. . . .. . .. . . .. . . .. . .. . . .. . .. . . .. . .. . . .. . . .. . .. . . .. . .. . . .. . . 12Utility Foot A ..... . . .. . .. . . .. . . .. . .. . . .. . .. . . .. . .. . . .. . . .. . .. . . .. . .. . . .. . .. . 8Utility Stitches .... . . .. . .. . . .. . . .. . .. . . .. . .. . . .. . .. . . .. . . .. . .. . . .. . .. . . .. . .. . 9
48

WWarning Messages .... .. . .. . . .. . . .. . .. . . .. . .. . . .. . .. . . .. . . .. . .. . . .. . .. . . . 25Winding From Horizontal Position .... . . .. . .. . . .. . . .. . .. . . .. . .. . . . 18Winding Through the Needle ..... . . .. . .. . . .. . .. . . .. . . .. . .. . . .. . .. . . . 19Woven fabric .... .. . .. . . .. . .. . . .. . . .. . .. . . .. . .. . . .. . .. . . .. . . .. . .. . . .. . .. . . . 28
ZZipper Foot E ..... .. . . .. . .. . . .. . . .. . .. . . .. . .. . . .. . .. . . .. . . .. . .. . . .. . .. . . .. .8
49

INTELLECTUAL PROPERTYJADE, VIKING and KEEPING THE WORLD SEWING & Design are trademarks ofKSIN Luxembourg II, S.ar.l.HUSQVARNA and the "crowned H-mark" are trademarks of Husqvarna AB. All trademarksare used under license by VSM Group AB.
We reserve the right to change the machine equipment and the assortment of accessorieswithout prior notice, or make modifications to the performance or design. Suchmodifications, however, will always be to the benefit of the user and the product.
Please note that on disposal, this product must be safely recycled inaccordance with relevant National legislation relating to electrical/electronicproducts. Do not dispose of electrical appliances as unsorted municipal waste,use separate collection facilities. Contact your local government forinformation regarding the collection systems available. When replacing oldappliances with new ones, the retailer may be legally obligated to take backyour old appliance for disposal free of charge.
If electrical appliances are disposed of in landfills or dumps, hazardoussubstances can leak into the groundwater and get into the food chain,damaging your health and well-being.
CE – Authorised Representative
VSM GROUPAB, SVP Worldwide
Drottninggatan 2, SE-56184, Huskvarna, SWEDEN

4710185-26A·Inhouse·©
2016
KSINLuxembourgII,S.ar.l.·A
llrightsreserved·PrintedinTaiwan
onenvirom
entalfriendlypaper.
www.husqvarnaviking.com