using gmail with selected process: mail fetcher kevin mackowick, tolgahan kurt, matthew wessel,...
TRANSCRIPT

Using GmailUsing GmailWith Selected Process: With Selected Process:
Mail FetcherMail FetcherKevin Mackowick, Tolgahan Kurt, Matthew Kevin Mackowick, Tolgahan Kurt, Matthew
Wessel, Michael Hincke, and Brian Thackston. Wessel, Michael Hincke, and Brian Thackston.

Introduction: Gmail Introduction: Gmail BasicsBasics
Gmail is a free webmail service provided by Gmail is a free webmail service provided by Google Google It was the first large webmail provider to It was the first large webmail provider to
provide at least one gigabyte of storage space provide at least one gigabyte of storage space for emails for emails
It was designed to be a personal archive that It was designed to be a personal archive that contains a wealth of information contains a wealth of information

Selected Process: Mail Selected Process: Mail FetcherFetcher
Gmail can be used as an email client, similar to Gmail can be used as an email client, similar to Microsoft’s Outlook Express, to regularly check Microsoft’s Outlook Express, to regularly check email accounts you may have with other service email accounts you may have with other service providers. providers. As a student at UMBC, important messages are As a student at UMBC, important messages are
sent to your University-supplied @umbc.edu email sent to your University-supplied @umbc.edu email address. address.
Rather than logging in to both your Gmail and Rather than logging in to both your Gmail and UMBC email accounts separately, you can use UMBC email accounts separately, you can use Gmail’s “Mail Fetcher” to automatically download Gmail’s “Mail Fetcher” to automatically download messages from the UMBC server to your Gmail messages from the UMBC server to your Gmail inbox.inbox.

Setting Up Mail Setting Up Mail FetcherFetcher
In order to set up Mail Fetcher, you must In order to set up Mail Fetcher, you must first log into Gmail (fig. 1), and then select first log into Gmail (fig. 1), and then select the settings tab (fig. 2).the settings tab (fig. 2).

Setting Up Mail Setting Up Mail FetcherFetcher
Once the settings page has loaded, click onOnce the settings page has loaded, click on Add POP3 email accountAdd POP3 email account under the under the Check Check mail using POP3mail using POP3 heading. (See fig. 11). heading. (See fig. 11).
Setting Up Mail Setting Up Mail FetcherFetcher
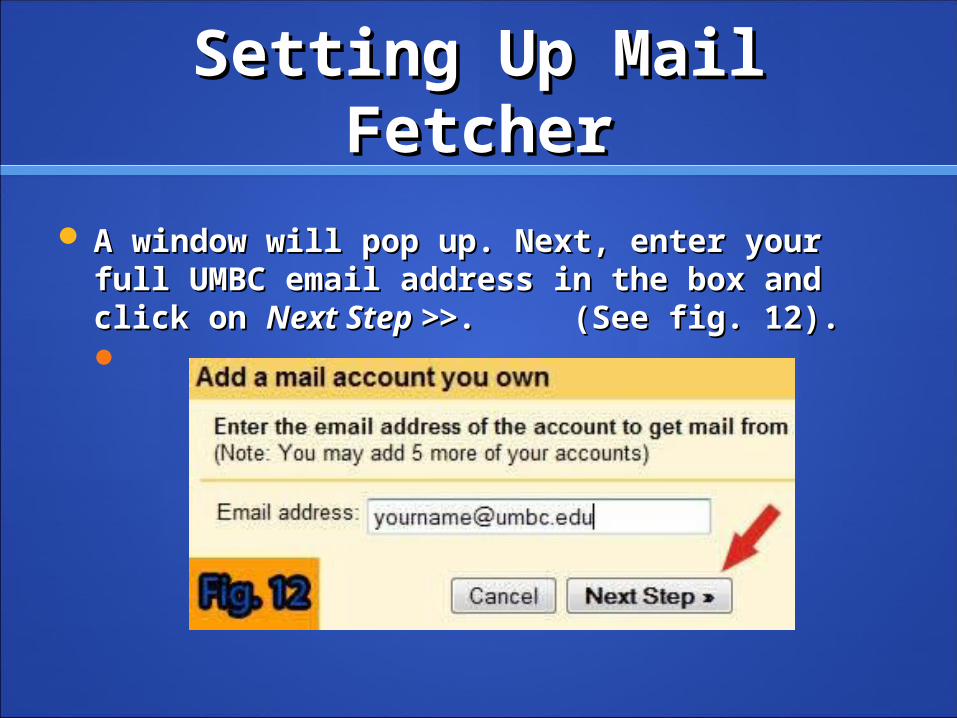
A window will pop up. Next, enter your full A window will pop up. Next, enter your full UMBC email address in the box and click on UMBC email address in the box and click on Next Step >>Next Step >>. (See fig. 12).. (See fig. 12).

Setting Up Mail Setting Up Mail FetcherFetcher
In the new window that appears, you will In the new window that appears, you will notice that your username has already been notice that your username has already been filled in. Enter your myUMBC directory filled in. Enter your myUMBC directory password in the password in the Password:Password: box. (See fig. box. (See fig. 13).13).

Setting Up Mail Setting Up Mail FetcherFetcher
Next, select Next, select imap.umbc.edu imap.umbc.edu from thefrom the Pop Pop Server:Server: drop down list. (See fig. 14). drop down list. (See fig. 14).
Setting Up Mail Setting Up Mail FetcherFetcher
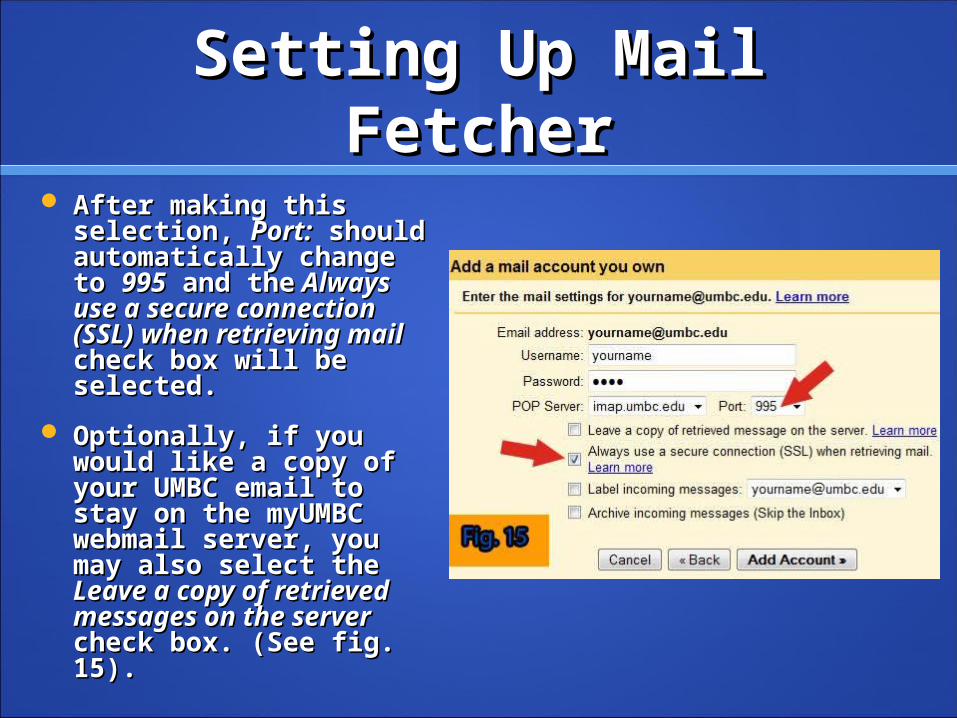
After making this After making this selection, selection, Port:Port: should should automatically change automatically change to to 995995 and the and the Always Always use a secure use a secure connection (SSL) when connection (SSL) when retrieving mailretrieving mail check check box will be selected.box will be selected.
Optionally, if you Optionally, if you would like a copy of would like a copy of your UMBC email to your UMBC email to stay on the myUMBC stay on the myUMBC webmail server, you webmail server, you may also select the may also select the Leave a copy of Leave a copy of retrieved messages on retrieved messages on the server the server check box. check box. (See fig. 15). (See fig. 15).

Setting Up Mail Setting Up Mail FetcherFetcher
Select Select Add Account Add Account >>>> and a new window and a new window will appear notifying will appear notifying you that your account you that your account has been successfully has been successfully added. You can now added. You can now receive messages receive messages from the UMBC server. from the UMBC server.
To send messages To send messages from Gmail using your from Gmail using your UMBC email address, UMBC email address, click click Next Step>>Next Step>>. . (See fig. 16).(See fig. 16).

Setting Up Mail Setting Up Mail FetcherFetcher
In the In the Name:Name: field, enter your name as field, enter your name as you would like it to appear in outgoing you would like it to appear in outgoing emails, then click emails, then click Next Step>>Next Step>>. (See . (See fig. 17).fig. 17).

Setting Up Mail Setting Up Mail FetcherFetcher
In the next window, leave the default In the next window, leave the default option selected: option selected: Send through GmailSend through Gmail, , then click then click Next Step>>Next Step>>. (See fig. 18).. (See fig. 18).

Setting Up Mail Setting Up Mail FetcherFetcher
A new window will now appear. SelectA new window will now appear. Select Send Send VerificationVerification and the window will close. (See fig. and the window will close. (See fig. 19). You must now check your UMBC email either 19). You must now check your UMBC email either by logging in to myUMBC or waiting for Gmail to by logging in to myUMBC or waiting for Gmail to download your UMBC mail. download your UMBC mail.
You will receive a verification email from Gmail You will receive a verification email from Gmail that contains a link to activate the sending that contains a link to activate the sending feature. Clicking on this link completes the setup feature. Clicking on this link completes the setup process.process.

Questions?Questions?
The group will now take any questions you The group will now take any questions you may have.may have.