using legitronic to design and print labels legitronic 3_6_2 to design and... · using legitronic...
TRANSCRIPT

Using Legitronic to Design and Print Labels
Copyright © 2008 Weber Packaging Solutions, Inc.
Legitronic is a registered trademark of Weber Packaging Solutions, Inc.
This program or documentation contains confidential information and trade secrets of Weber
Packaging Solutions, Inc. and its suppliers.
Reverse engineering of object code prohibited.
For Legitronic Labeling Software Version 3.6.2
Weber Packaging Solutions, Inc.
711 W. Algonquin Road Arlington Heights, IL 60005-4457
Phone: 847-364-8500 • www.weberpackaging.com

i
Table of Contents
1. INTRODUCTION 1
ABOUT LEGITRONIC ................................................................................................................................................. 1 HOW THIS GUIDE IS ORGANIZED.............................................................................................................................. 1 CONVENTIONS USED IN THIS GUIDE ........................................................................................................................ 2 CUSTOMER SUPPORT .............................................................................................................................................. 2
2. GETTING STARTED 3
LEGITRONIC UNDER WINDOWS................................................................................................................................. 3 Using the Mouse .....................................................................................................................................................3 Using Keyboard Shortcuts and the Mouse............................................................................................................4 Entering Field Data .................................................................................................................................................6 Working with Tab Displays .....................................................................................................................................8 Accessing Online Help............................................................................................................................................8 Using Dialog Boxes and Command Buttons.........................................................................................................9
OPENING LEGITRONIC ............................................................................................................................................ 10 The Legitronic Window .........................................................................................................................................10 Title Bar..................................................................................................................................................................11 Status Bar ..............................................................................................................................................................11 Menu Bar ...............................................................................................................................................................11 Tool Bar .................................................................................................................................................................15
3. DESIGNING LABELS 18
OPENING THE LABEL DESIGN WINDOW .................................................................................................................. 18 Creating a New Label Design ..............................................................................................................................19 Using an Existing Label Design ...........................................................................................................................20
SPECIFYING LABEL PROPERTIES............................................................................................................................ 21 Label Properties — Procedure.............................................................................................................................21
SPECIFYING THE LABEL FIELDS .............................................................................................................................. 29 Text Fields .............................................................................................................................................................33 Barcode Fields ......................................................................................................................................................38 Graphics Fields .....................................................................................................................................................43 Line Fields .............................................................................................................................................................46 Box Fields ..............................................................................................................................................................48 Raw Fields.............................................................................................................................................................50 Data Types ............................................................................................................................................................52 OLE DB Database Support ..................................................................................................................................55
OBJECT LINKING AND EMBEDDING (OLE) .............................................................................................................. 66 SAVING THE LABEL................................................................................................................................................. 68 PRINTING A TEST LABEL......................................................................................................................................... 68 PRINTING A DRAFT OF THE LABEL .......................................................................................................................... 69
4. PRINTING LABELS 70
OPENING A LABEL FOR PRINTING ........................................................................................................................... 70 SPECIFYING THE PRINT PROPERTIES ..................................................................................................................... 71
Job Settings...........................................................................................................................................................71 Queried Printing ....................................................................................................................................................74 Ports.......................................................................................................................................................................75
PRINTING THE LABELS............................................................................................................................................ 75

1. Introduction
1
1. Introduction
Welcome to the Using Legitronic to Design and Print Labels. This guide, an abridgement of the
Legitronic Labeling Software/ Legitronic Secure Series Labeling Software, provides an overview of
Legitronic, describes its windows and dialog boxes, and explains how to use its basic functions.
About Legitronic
Legitronic enables you to design labels on any PCs running under Microsoft Windows®. You can print
those labels on the industrial-grade printers supplied by Weber Marking Systems.
Legitronic is a flexible system that allows you to:
� Create label formats that include varied combinations of barcodes, graphics, constant data, date
and time, lines, and boxes. You can also link label fields to database tables and print labels only
for those records that match the print queries you create. You can print label fields in four
orientations and in reverse print.
� Create label print jobs and save them for future use.
� Use Windows® Print Manager to delete, pause, restart, and change the order of print jobs stored
in the print queue.
How This Guide Is Organized
This guide contains four chapters:
� Chapter 1, Introduction, explains how this document is structured, defines the conventions used
within and gives contact information for support.
� Chapter 2, Getting Started, explains the basic concepts and terms required to use Legitronic. It
provides a brief review of Windows® conventions used in Legitronic, describes the Legitronic
application window, and explains the use of dialog boxes and command buttons.
� Chapter 3, Designing Labels, explains how to design label formats using text, barcode, graphic,
line, box, and raw data fields.
� Chapter 4, Printing Labels, explains how to print labels.

1. Introduction
2
Conventions Used In This Guide
The table below explains how this guide uses type as visual cues to certain Legitronic components,
special keying techniques, or documentation conventions.
This Represents
SMALL CAPITAL
LETTERS
Keys on your keyboard, such as the ENTER key or the ALT key.
italic Emphasized words and variables (names used to represent data
items whose value can change).
Italic Menus and menu options. The shortcut key is underlined. For
example, the Tools menu can be selected by pressing ALT+T.
Italic Italic A sequence of menu selections that can be used to open a window
or dialog box. For example, File New means “click the File menu and select the New option.” Using the keyboard, you
would press ALT+F and then N.
Command Command buttons in dialog boxes. For example, OK, Cancel, and Help. The underlined letter on a button label identifies the
shortcut key used in conjunction with the ALT key. For example, pressing ALT+H is the same as clicking the Help command
button.
Note: This guide includes sample displays of representative data that will not exactly match specific
data displayed on your screen.
Customer Support
For Legitronic technical support, call 847-364-8500 (ext. 773) between the hours of 8:00 AM and 4:30
PM, Monday through Friday. For hardware-related problems, call 847-364-8500 (ext. 776)
2. Getting Started
3
2. Getting Started
Legitronic follows standard Windows® conventions for display, data entry, and navigation. This
chapter contains a brief review of Windows® conventions used in Legitronic
This chapter also describes the Legitronic application window, where you do all of your Legitronic
work. It includes a description of each area that appears in most of the Legitronic windows:
� Title bar
� Menu bar
� Tool bar
� Status bar
Legitronic under Windows
Legitronic runs just like any other Microsoft Windows® application. This guide assumes that you are
familiar with Windows and know how to navigate within and among applications. Refer to your
Microsoft Windows® documentation for detailed information about using Windows.
Using the Mouse
You use the left (dominant) mouse button for most of your work in Legitronic. Instructions to click or
double-click refer to the left mouse button. When the right mouse button can be used, you are instructed
to right-click.

2. Getting Started
4
Using Keyboard Shortcuts and the Mouse
Although you can use Legitronic without a mouse, most people are comfortable using a combination of
the mouse and keyboard.
Dropping down a menu. The options in a menu can be dropped down (displayed) by clicking the
menu name or by holding down the ALT key and pressing the underlined letter in the menu name. For
example, to drop down the list of options in the File menu, you can press ALT+F.
Selecting a menu option. When a menu’s options are dropped down, click the option you want or press
the key that corresponds to the underlined letter in the option name. For example, if the File menu is
dropped down, you can simply press N to select the New option.
Note: Some options have shortcuts defined so you can access them without dropping down the menus.
For example, you can select the New option without dropping down the menus shown above by holding
down the CTRL key and pressing N.

2. Getting Started
5
When an ellipsis (…) appears to the right of a menu option name, a dialog box opens when you click or
select that option. For example, when you drop down the File menu and click Open Label for Design…
or press D to select the Open Label for Design option, the Open Label for Design dialog box opens.
When the4symbol appears to the right of a menu option name, an additional menu drops down when
you click or select that option. For example, when you drop down the View menu and click Toolbars or
press T to select the Toolbars option, an additional menu drops down.
Selecting a command button. The buttons you click to perform functions provided by dialog boxes
are called command buttons. Some command buttons have a corresponding shortcut key. When a
command button label includes an underlined letter, its command may be invoked by pressing ALT +
the underlined letter or by clicking the command button. For example, the shortcut key for the Open
command button is ALT+O. Standard command buttons are described on page 9.

2. Getting Started
6
Scrolling. When a window contains more items, rows, or columns than will fit in the display, you can
use the mouse and scroll bars to display additional data. You can also use the arrow keys to scroll up,
down, right, or left in the display.
Minimizing a window. To reduce the window to an icon at the bottom of the application window, click
the 0 button at the right end of the title bar.
Maximizing a window. To expand a window to its full size, click the 1 button at the right of the
title bar. (The presence of the 1 button indicates that the window is not at its maximum size. When
this button is displayed, you can resize the window by dragging its corners.)
Reducing window size. To reduce a window from its maximum size to its most previous reduced size,
click the 2 button at the right of the title bar. (The presence of the 2 button indicates that the
window is at its maximum size.)
Closing a window. To close a window, select Close from the File menu, or simply click the r button
at the right end of the title bar.
Entering Field Data
A field is a specified area in which you enter, or the system displays, a valid value for a particular data
element. Several data entry methods are used in Legitronic, depending on the type of field. Legitronic
uses the following types of fields:
Text box — a box into which you can type data. When you click inside a text box, the cursor changes
to an I-beam.
Drop-down list — a text box with a down-pointing arrow at its right end. Clicking the arrow drops
down a list of values so that you can select a value by clicking it.

2. Getting Started
7
Combo box — a drop-down list that allows you to select a value by clicking it in the list or by typing
the value directly into the text box. When you click inside the combo box, the cursor changes to an I-
beam.
Check box — a small box to the left of a field name used as a toggle to turn an option on or off.
Simply click the box to insert a checkmark in the box and turn the option on. Click it again to clear the
box and turn the option off. Without the mouse, pressing the spacebar performs the toggle between on
and off.
Spin box — a text box with both an up arrow and a down arrow at its right end. You can type a value
in the field, or you can change the current value by using the mouse to spin a list of valid values up or
down until the value you want is displayed. Spin boxes are used with numeric fields.
Radio button ― a small round button that appears with others in a section of a display where you can
select only one of several options. To select an option, simply click its label or its radio button. In the
example below, you click one of the three radio buttons to select the Preview ― none, first label only,
or every label.

2. Getting Started
8
Working with Tab Displays
Several windows in Legitronic include multiple displays that are accessed by clicking tabs that look like
the tabs on file folders. Each tab has a label that identifies the function of that tab’s display. Simply
click the tab for the display you want to see or press CTRL-TAB. The example below shows five tab
displays ― Settings, Options, Size, Summary, and Queried.
Accessing Online Help
Legitronic’s online help system allows you to display most of the information contained in this guide.
You can access help by selecting an option from the Help menu.

2. Getting Started
9
Using Dialog Boxes and Command Buttons
The Configuration dialog box, shown below, is typical of all dialog boxes in that you must respond to
whatever the box is presenting before you can do any other work. You respond by entering data or
making selections, and eventually clicking a command button in the dialog box to close the box.
Each of the Legitronic dialog boxes serves a specific purpose and includes one or more command
buttons. However, each command button always performs the same function, regardless of the dialog
box it appears in. The following table describes the standard command buttons.
Command Button Label
Action
Apply Applies your selections to the label format displayed.
Close or OK Closes the dialog box. If you have made changes that you have
not saved, the system first gives you the opportunity to save
them. You can press the ENTER key as a substitute for clicking
the OK button.
Cancel Closes the dialog box, ignoring any changes since you last saved data in the dialog box. Pressing the ESC key has the same
effect as clicking the Cancel button.
Help Opens the online help topic that explains the dialog box. The
dialog box remains open.

2. Getting Started
10
Opening Legitronic
To access any of the Legitronic functions, you must open the application. You start by double-clicking
the Legitronic icon on the Windows® desktop. Alternatively, highlight the icon and press the ENTER
key, or select Legitronic from the Windows® Start menu.
The Legitronic Window
The window shown below is the Legitronic window. All your work in Legitronic is done with this
displayed as the background. During your Legitronic work sessions, you select menu options or click
buttons that display secondary windows or dialog boxes within the application workspace (the area
below the tool bar at the top of the window).
The layout of the application window remains the same even when different windows and dialog boxes
are displayed. The common areas are the title bar, the menu bar, the tool bar, and the status bar.
The following sections describe the common areas of the Legitronic application window, moving from
the top to the bottom of the window.
Title Bar
Menu Bar
Workspace
Tool Bar
Status Bar

2. Getting Started
11
Title Bar
Every window is bordered at the top by a title. The title bar of the Legitronic application window
identifies the Legitronic application. The Legitronic icon is displayed at the left end of the tool bar. The
buttons for minimizing, maximizing, and reducing the size of the application window are at the right
end of the tool bar.
Status Bar
The status bar, located at the bottom of the window provides information about the current state of what
you are viewing in the window and any other contextual information, such as the coordinates of the
cursor position. You can show or hide the status bar by selecting or deselecting it through the View
menu.
Menu Bar
The menu bar, located immediately below the title bar, is a horizontal list of items. Each item contains
one or more options. When selected, each option invokes a function, opens a dialog box, or displays a
list of additional options. Options in dimmed text are not available for the work you are currently doing.
Seven menus display in the Legitronic menu bar. These menus, discussed in the next seven sections,
are:
File Menu
Menu Option Action When Selected
New Allows you to design a new label.
Open Label for Design… Allows you to select the label you want to open.
Open Label for Printing… Allows you to select the label you want to print.

2. Getting Started
12
Menu Option Action When Selected
Close Closes the active window. (There is only one active window, the window you are currently working in. Other windows may
be open, but they are inactive.)
Save Saves any changes you made since the last time you saved changes.
Save As… Saves any changes you made since the last time you saved
changes, under the name you specify.
Printer Setup… Allows you to specify parameters for printing your label.
Test Print… Prints a test print of the label in the active window.
Print Label Report… Prints a label report.
Exit Closes the Legitronic application. If you have unsaved changes, the system allows you to save them before closing the
application.
Edit Menu
Menu Option Action When Selected
Undo Reverses the last add, change, or delete you made.
Redo Reverses the action of the Undo option.
Cut Deletes the selected item from the display and moves it to the clipboard.
Copy Copies the selected item to the clipboard.
Paste Inserts an item from the clipboard into the display.
Paste Special… Allows you to paste an OLE object or link to an OLE object from the clipboard.
Duplicate Creates an exact copy of the selected field.
Delete Removes the selected item from the display.
Select Allows you to select all or none of the fields in the label.
Change Icon… Changes the icon that represents the OLE object in Label
Design.
Change Source… Changes the source of the OLE Object.
Properties… When no field is selected, displays the Label Properties dialog box. When a field is selected, displays the Field
Properties dialog box.
2. Getting Started
13
Menu Option Action When Selected
Links… Manages an OLE object in the label, by allowing the link to be removed or updated.
Insert New Object… Opens the Insert Object dialog box so that you can insert a new OLE object.
Object Allows you to open or edit an OLE Object.
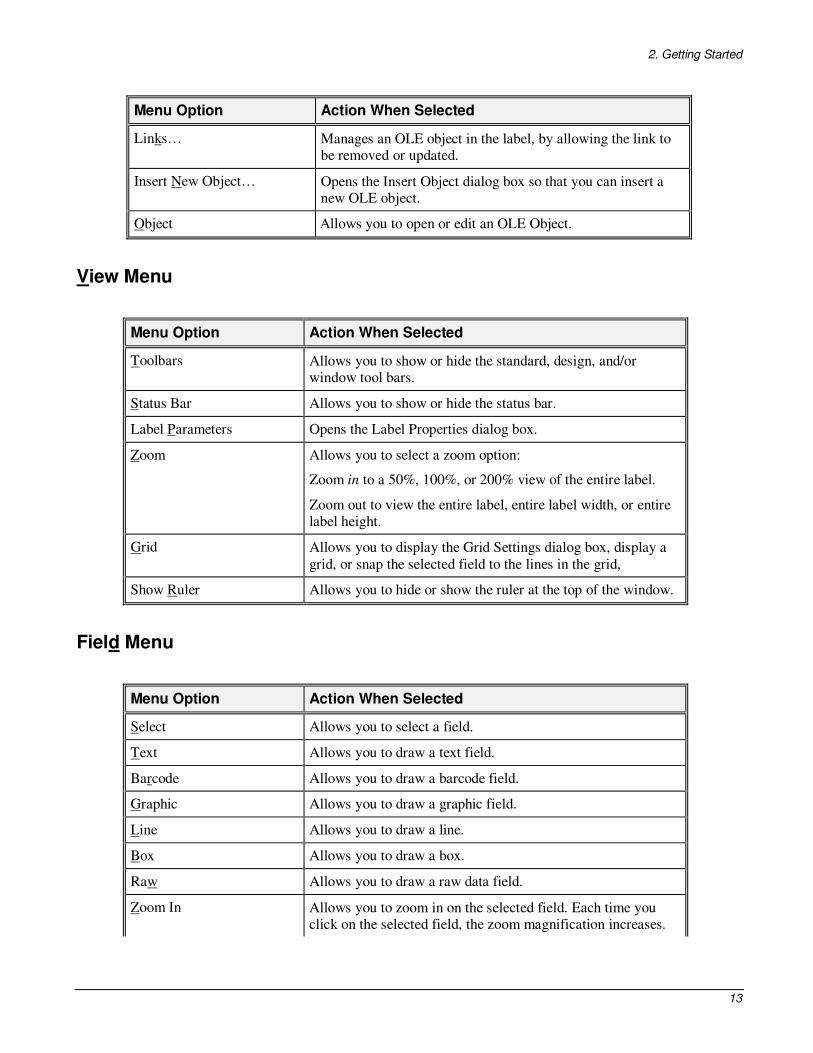
View Menu
Menu Option Action When Selected
Toolbars Allows you to show or hide the standard, design, and/or window tool bars.
Status Bar Allows you to show or hide the status bar.
Label Parameters Opens the Label Properties dialog box.
Zoom Allows you to select a zoom option:
Zoom in to a 50%, 100%, or 200% view of the entire label.
Zoom out to view the entire label, entire label width, or entire label height.
Grid Allows you to display the Grid Settings dialog box, display a
grid, or snap the selected field to the lines in the grid,
Show Ruler Allows you to hide or show the ruler at the top of the window.
Field Menu
Menu Option Action When Selected
Select Allows you to select a field.
Text Allows you to draw a text field.
Barcode Allows you to draw a barcode field.
Graphic Allows you to draw a graphic field.
Line Allows you to draw a line.
Box Allows you to draw a box.
Raw Allows you to draw a raw data field.
Zoom In Allows you to zoom in on the selected field. Each time you click on the selected field, the zoom magnification increases.

2. Getting Started
14
Menu Option Action When Selected
Move to Front Moves the selected field to the front layer of the label.
Move to Rear Moves the selected field to the rear layer of the label.
Move Forward Moves the selected field forward in the layers of the label.
Move Back Moves the selected field backward in the layers of the label.
Options Menu
Menu Option Action When Selected
Configuration Allows you to update your Legitronic system configuration.
Window Menu
In addition to the options listed below, the Window menu lists all open windows. Numbers next to the
window names indicate the order in which they were opened or last active.
Menu Option Action When Selected
New Window Opens a new window whose contents are identical to the
active window.
Close Closes the active window.
Close All Closes all open windows.
Cascade Rearranges open windows so that they overlap, one on top of another. Shows a full view of the active window and only the
title bar of inactive windows.
Tile Horizontal Rearranges open windows in a horizontal tile pattern, from top to bottom.
Tile Vertical Rearranges open windows in a vertical tile pattern, from left to right.
Arrange Icons Neatly arranges the icons of minimized Legitronic windows.
Help Menu
Menu Option Action When Selected
Help Topics Displays the Legitronic online help system’s table of contents.
About Legitronic Opens the About Legitronic dialog box, which identifies the version of Legitronic that is installed on your computer.

2. Getting Started
15
Tool Bar
The tool bar is located directly below the menu bar. The tool bar functions are always the same,
regardless of which window appears below. This tool bar provides quick access to Legitronic windows
and major print functions. Each button contains an icon representing its function. Pass the cursor over
the button to display its description. All functions in the tool bar can also be accessed through the menu
bar.
The tool bar is actually made up of three tool bars:
• Standard ― the leftmost tool bar allows you to design a new label, open an existing label for
design or printing, and exit Legitronic.
• Design ― the middle tool bar allows you to insert various types of fields in your label and to test
print the label.
• Window ― the rightmost tool bar allows you to open new windows and specify how the open
windows should be displayed.
Note: You can show or hide each of the three tool bars by selecting or deselecting it through the View
menu.
Icon Description Action When Clicked
Standard Tool Bar
New Allows you to design a new label.
Open for Design Allows you to select the label you want to open.
Open for Printing Allows you to select the label you want to print.
Save Saves any changes you made since the last time you saved
changes.
Configuration Allows you to update your Legitronic system
configuration.
Exit Closes Legitronic. If you have unsaved changes, the system allows you to save them before closing the
application.

2. Getting Started
16
Icon Description Action When Clicked
Design Tool Bar
Test Print Prints a test print of the label in the active window.
Undo Reverses the last add, change, or delete you made.
Redo Reverses the action of the Undo option.
Cut Deletes the selected item from the display and moves it to the clipboard.
Copy Copies the selected item to the clipboard.
Paste Inserts an item from the clipboard into the display.
Delete Removes the selected item from the display.
Select Allows you to select all or none of the fields in the label.
Text Allows you to draw a text field.
Barcode Allows you to draw a barcode field.
Graphic Allows you to draw a graphic field.
Line Allows you to draw a line.
Box Allows you to draw a box.
Raw Allows you to draw a raw data field.
Zoom In Allows you to zoom in on the selected field. Each time you click on the selected field, the zoom magnification
increases.

2. Getting Started
17
Icon Description Action When Clicked
Zoom Out Allows you to zoom out for a larger view of the selected field. Each time you click on the selected field, the view
enlarges.
Move to Front Moves the selected field to the front layer of the label.
Move to Rear Moves the selected field to the rear layer of the label.
Move Forward Moves the selected field forward in the layers of the label.
Move Back Moves the selected field backward in the layers of the label.
Window Tool Bar
New Window Opens a new window whose contents are identical to the active window.
Close Closes the active window.
Close All Closes all open windows.
Cascade Windows
Rearranges open windows so that they overlap, one on top of another. Shows a full view of the active window and
only the title bar of inactive windows.
Tile Horizontally Rearranges open windows in a horizontal tile pattern, from
top to bottom.
Tile Vertically Rearranges open windows in a vertical tile pattern, from left to right.

4. Printing Labels
Legitronic User Manual (v3.6.0) 18
3. Designing Labels
Label design requires advance planning. It is a good idea to finalize the label content and format before
you begin creating the design in Legitronic.
When you are ready to use Legitronic, you can create an entirely new label format, or use the format for
an existing label as the basis for your design. This chapter provides the detailed information you need to
perform each of the label design steps:
• Opening the Label Design window
• Specifying the label properties
• Specifying the label fields
• Saving the label
• Printing a test label
This chapter also discusses object linking and embedding (OLE), a feature that allows you to link a file
created in another application to a specific field.
Opening the Label Design Window
When you open the Label Design window, you must indicate whether you are creating a new label
design or using an existing label as the basis for your design.

3. Designing Labels
19
Creating a New Label Design
To create a new label design, click in the tool bar or select File New from the menu bar to open a
blank Label Design window.

3. Designing Labels
20
Using an Existing Label Design
Follow these steps to use an existing label as the basis for your design:
1. Click in the tool bar or select File Open Label for Design… from the menu bar. The Open
Label for Design dialog box opens.
2. Locate and select the file name for the label format you want to use.
3. Click Open. The label you selected is displayed in the Label Design window.

3. Designing Labels
21
Specifying Label Properties
To specify the properties for a label, you either specify the properties you want for a new label design
or modify the properties of an existing label design.
Label Properties — Procedure
Follow these steps to specify the properties for a label:
1. Open a new or existing label in the Label Design window.
2. Right-click to display the following menu. (Before you right-click, make sure that the cursor is not
positioned within any of the label fields and that no field is selected.)

3. Designing Labels
22
The tabs in the Label Properties dialog box are listed at the top of the menu. If you select a tab name,
the Label Properties dialog box opens with that tab activated. If you select Properties, the Label
Properties dialog box opens with the Settings tab activated.
3. Select the appropriate option. The Label Properties dialog box opens.
4. On each relevant tab of the Label Properties dialog box, specify new properties or modify existing
properties, as necessary. (The specifications on each tab are described in the following sections.)
5. When you have completed your property selections, click OK.
Label Properties — Settings Tab
Specification Description
Label Label description.
Label Stock Stock to be used for the label.
Printer Type of printer that will print the label.
Print Mode Print mode to be used for printing the label.
Print Log – the print log feature allows you to capture information from one or more fields on a label.
Database Provider Launches the Data Link tool for establishing a connection to the Print Log database.
Data Source Shows the data source selected using the Data Link tool.
Table Name Name of table contains the print log
Clear Clears data entered above.

3. Designing Labels
23
Label Properties — Options Tab
Specification Description
On-Screen Label Background
Label background color for on-screen display.
On-Screen Field Foreground
Field color for on-screen display.
On-Screen Field Background
Field background color for on-screen display.
Printed Field Foreground
Field text color for printed labels.
Printed Field Background
Field background color for printed labels.
Preview
None No label preview will occur prior to printing a label.
First Label Label preview will occur prior to printing the first label in a job.
Every Label Label preview will occur prior to printing every label in a job.
Checkboxes
Display Graphic Fields
When checked, graphic fields display on the screen.
Show Fields as Transparent
When checked, the topmost field is transparent so that the field below it is visible when fields overlap.
Dynamic Database Updates
When checked, the Label Design window is automatically updated as changes are made in the Field Properties dialog box for text and barcode fields.
Template When checked, the Label Design is saved as a template.
3. Designing Labels
24
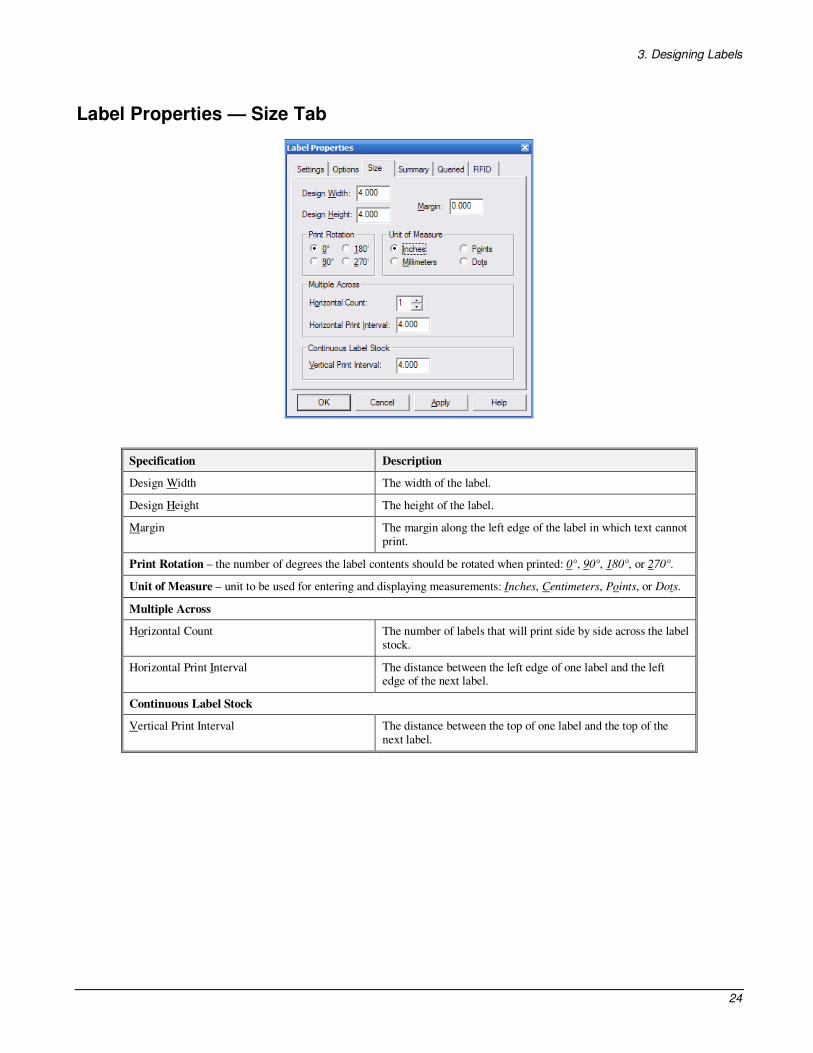
Label Properties — Size Tab
Specification Description
Design Width The width of the label.
Design Height The height of the label.
Margin The margin along the left edge of the label in which text cannot print.
Print Rotation – the number of degrees the label contents should be rotated when printed: 0°, 90°, 180°, or 270°.
Unit of Measure – unit to be used for entering and displaying measurements: Inches, Centimeters, Points, or Dots.
Multiple Across
Horizontal Count The number of labels that will print side by side across the label stock.
Horizontal Print Interval The distance between the left edge of one label and the left edge of the next label.
Continuous Label Stock
Vertical Print Interval The distance between the top of one label and the top of the next label.

3. Designing Labels
25
Label Properties — Summary Tab
Specification Description
Author User name used when signing into Legitronic. When no user name was
used, Unknown appears as the author.
Creation Date The date and time the label was created.
Automatically save history When checked, revision history is saved automatically.
Revision Date Date of label revision.
Author User name associated with the revision.
Comments Free-form remarks about the revision.
Command Buttons
In addition to the standard command buttons, the Label Properties dialog box contains these command
buttons:
Make Revision – used to log a revision and enter a comment.
Delete – used to delete a highlighted revision.
(For a description of the standard command buttons, refer to “Using Dialog Boxes and Command
Buttons” in Chapter 2.)

3. Designing Labels
26
Label Properties — Queried Tab
Specification Description
Database Providers Launches the Data Link tool for establishing a connection to the Print Log database.
Clear Clears data entered on the tab.
Data Source Shows the data source selected using the Data Link tool.
Table Name Name of the table that contains the data you want to use.
Search Field The field in the table to search for particular values.
Start Value The first value for which a label should be printed.
End Value The last value for which a label should be printed.
Use SQL Expression When checked, the SQL expression entered in the SQL Expression box is used to select labels for printing. If this field is checked when start and end
values have been specified, those values are converted to an SQL expression.
Reevaluate Auto Counts When checked, the field value is re-evaluated for every database record. Otherwise, the value for the first database record is used for all labels
printed.
SQL Expression The SQL expression that will be used to select labels for printing.

3. Designing Labels
27
Label Properties — RFID Tab
Specify RFID label details as follows.
Tag
• Type: Select the type of inlay embedded in the label.
• Tag Encoding: Select the encoding scheme required by the label.
Options
• Tag Offset: Tag Offset has three possible values as follows:
1. Tag Offset = 0 This value (zero) indicates the RFID tag is positioned in the effective
area, per the printer manufacturers specification, and the label will not be retarded or
advanced prior to encoding the tag.
2. Tag Offset = -1 This value (negative one) instructs the printer to use it’s internal setting
for the tag position and the label may be retarded or advanced prior to encoding the tag.
3. Tag Offset = >0 A value greater than zero instructs the printer to advance the label the
specified distance prior to encoding the tag.
• Antenna margin: Distance from label edge to transponder. Set to zero to use the printer’s default
distance.
• Void print length: Length of image printed on label to indicate a transponder failure.
• Write protect: Select to prevent additional write cycles and protect the encoded data.
• Number of tries per tag: Specifies how many times the printer attempts to write and read a
transponder before determining a transponder failure.
• Number of labels to try: Specifies how many labels the printer attempts to produce before
determining a failure.
• Error Handling: Specifies the printer action when there is a failure producing an RFID label.

3. Designing Labels
28
• Verify: Instructs the printer to verify the transponder is an Alien® qualified transponder.
• Pre-Read RFID Tag: Instructs the printer to pre-read the tag prior to performing a write/read
test.
• Applicator Signal: Instructs the printer to use two print start signals. Weber applicators must use one
print start signal.
RFID Data Sources Data fields in an encoding scheme can be:
• Constant data
• Referenced from a label format field
Enter constant data directly or select a field from the label format to reference.

3. Designing Labels
29
Specifying the Label Fields
Each label you design is made up of elements called fields. There are six types of fields:
• Text
• Barcode
• Graphic
• Line
• Box
• Raw Data
New Label Design
When you are creating a new label design, you begin your work in a blank Label Design window. You
create new fields by defining the space they will occupy, specifying their properties, and entering their
content. Once you have created a field, you may need to delete it or change its position, properties, or
content.
Existing Label Design
When you are using an existing label as the basis for your design, you work with the existing fields
displayed in the Label Design window. You can change the position, properties, and content of the
existing fields. You may also need to delete certain fields and create new ones.
Positioning a Field and Defining Its Space
Follow these steps to create a new field:
1. Specify the type of field you want to create by clicking the appropriate tool bar button or by
selecting the field type from the Field menu.
2. Move the cursor to the appropriate position on the label. The cursor changes to the crosshairs
symbol (+).
3. Depress the left mouse button while dragging the cursor to define the area to be occupied by the
field.
3. Designing Labels
30
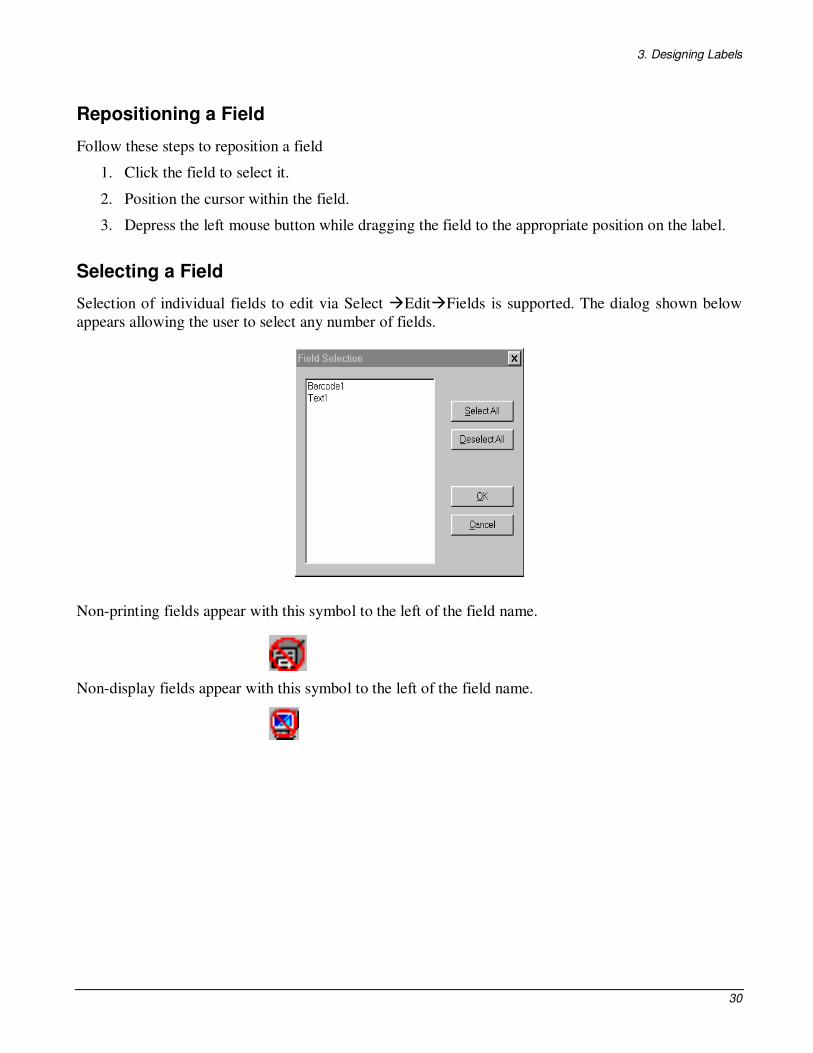
Repositioning a Field
Follow these steps to reposition a field
1. Click the field to select it.
2. Position the cursor within the field.
3. Depress the left mouse button while dragging the field to the appropriate position on the label.
Selecting a Field
Selection of individual fields to edit via Select �Edit�Fields is supported. The dialog shown below
appears allowing the user to select any number of fields.
Non-printing fields appear with this symbol to the left of the field name.
Non-display fields appear with this symbol to the left of the field name.

3. Designing Labels
31
Resizing a Field
Follow these steps to resize a field:
1. Click the field to select it.
2. Position the cursor over one of the six black squares on the perimeter of the field.
The cursor changes to a double-ended arrow (↔).
3. Depress the left mouse button while dragging the cursor to enlarge the field.
Note: Resizing a text or graphic field does not change the size of the text or graphic it contains unless
the dynamic fit or fixed aspect ratio options are selected. When resizing a barcode field, the barcode
will grow taller, but can grow only as wide as the type of barcode allows. When resizing line and box
fields, the line or box will be the same size as the field.
Field Alignment Tool
The alignment feature users to align a group of fields along any side (top, bottom, left, and right) of the
dominant field’s boundary. The dominant field is the last field selected.
The alignment tool is available in Edit � Alignment or via the alignment toolbar shown below.
Deleting a Field
Follow these steps to delete a field:
1. Select the field.
2. Select Edit Delete from the menu bar or press the Delete key on your keyboard.

3. Designing Labels
32
Specifying Field Properties
Field properties are specified in the Field Properties dialog box. The number of tabs in the Field
Properties dialog box and the contents of each tab vary according to the type of field
Follow these steps to specify the properties for a field:
1. Click the field to select it.
2. Position the cursor within the field and right-click to display the following menu.
The tabs in the Field Properties dialog box are listed at the bottom of the menu. If you select a tab
name, the Field Properties dialog box opens with that tab activated. If you select Properties, the Field
Properties dialog box opens with the Settings tab activated.
Note: The menu options displayed will vary according to the type of field selected.
3. Select the appropriate option. The Field Properties dialog box opens.
4. On each relevant tab of the Field Properties dialog box, specify new properties or modify
existing properties, as necessary. (The specifications on each tab are described in the following
sections, by type of field.)
5. When you have completed your property specifications, click OK.
Menu Options
Field Properties Tabs

3. Designing Labels
33
Text Fields
For text fields, the Field Properties dialog box contains five tabs – Settings, Options, Font, Data, and
Serial.
Text Fields — Settings Tab
Specification Description
Field Name For each new field you create, Legitronic displays a default field name that
automatically increments the name. Change the name to something
meaningful, to eliminate mistakes when choosing or referencing
individual fields. (See pages 30 and 53)
Data Result For a field that uses a data expression, the result of that expression. For a field that uses supplied data, the default data entered, if any.
Display Field When checked, the field displays on the screen.
Print Field When checked, the field prints on the label.
Design Orientation The number of degrees the field contents should be rotated when printed: 0°, 90°, 180°, or 270°.
Unit of Measure Unit to be used for entering and displaying measurements: Inches, Centimeters, Points, or Dots.
Position
Horizontal The horizontal position of the upper left corner of the field.
Vertical The vertical position of the upper left corner of the field.
Size
Horizontal The horizontal length of the field.
Vertical The vertical length of the field.

3. Designing Labels
34
Text Fields — Options Tab
Specification Description
Field Type Type of field — Text, Barcode, Graphic, Line, Box, or Raw.
Alignment
Horz Horizontal justification to be used — Left, Right, Center, or Justify (left and right justification).
Vert Vertical justification to be used — Top, Bottom, Center, or Justify (top and bottom justification).
Paragraph
Auto Wrap When checked, text is automatically separated into lines based on the width of the field.
Dynamic Fit When checked, the font size is automatically adjusted so that the text fills the entire field.
Object Wrap When checked, the paragraph field is wrapped around another field, known as the object field when it is dragged against any side of the object field.
Single Line Single Line of text used with variable fields and label templates.
Color
Screen Foreground Field text color for on-screen display.
Screen Background Field background color for on-screen display.
Printed Foreground Field text color for printed labels.
Printed Background Field background color for printed labels.
Variable
Variable When checked, the field is processed as a variable field on a label template.
Designator Enter a unique designator for the field.
Max Chars Enter the maximum number of characters in the variable field.
Auto Calc When checked, Legitronic automatically calculates the maximum number of characters based on the size of the field rectangle.

3. Designing Labels
35
Text Fields — Font Tab
The Font property page, as shown below, allows the user to select any installed character set for system
TrueType fonts.
Specification Description
[Selected Font] The font to be used in the selected field.
Text Size
Height For a scalable font, the exact height of the text.
Width For a scalable font, the exact width of the text.
Use point sizes When checked, point size is used for the Height and Width specifications.
Style
Inverse When checked, the foreground and background colors will be reversed.
Italic When checked, the text will print in italic. (Available for soft fonts only.)
Bold When checked, the text will print in bold. (Available for soft fonts only.)
Underline When checked, the text will print underlined. (Available for soft fonts only.)
Strikeout When checked, the text will print with strikeout characters through it.
(Available for soft fonts only.)
Magnification
Height For a non-scalable font, the amount of height magnification.
Width For a non-scalable font, the amount of width magnification.
Preview Results of your font specifications.

3. Designing Labels
36
Text Fields — Data Tab
Expression Type identifies the type of data the field will contain – Constant, Reference Field,
Database, Text File, Date or Time, String Builder, or Supplied Input. The control fields that appear
below vary according to the type of data selected. The types of data and their respective control fields
are described in Data Types on page 52.
3. Designing Labels
37
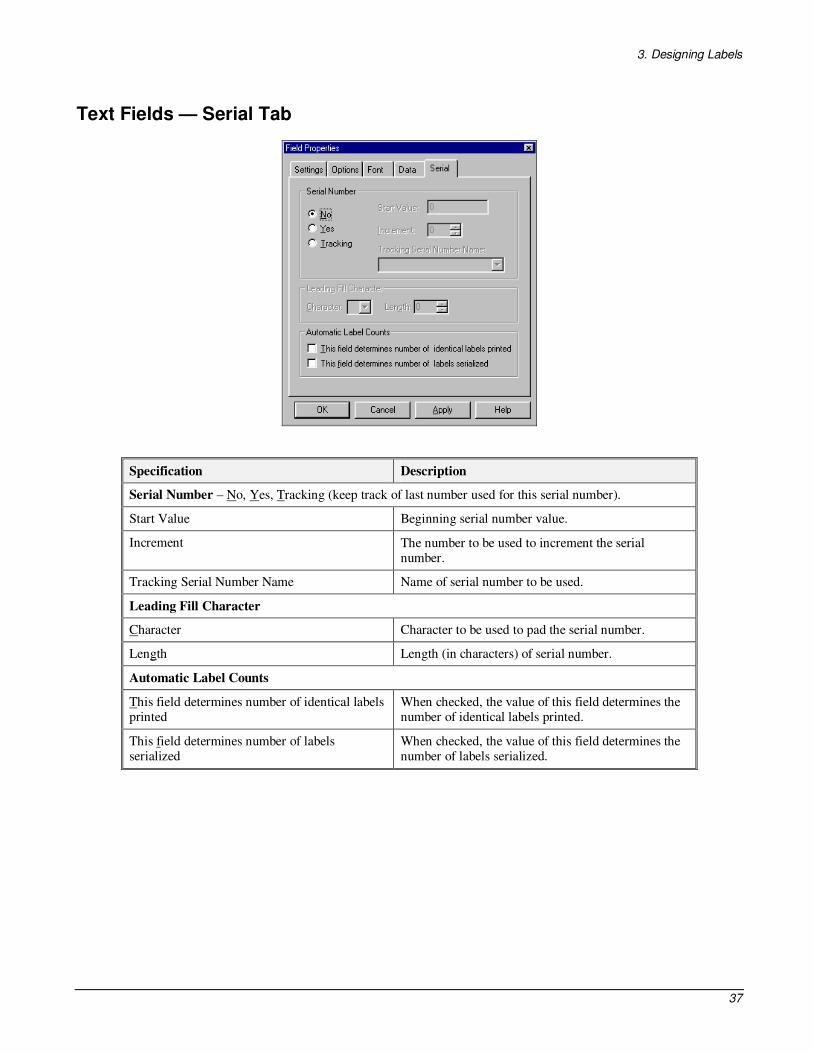
Text Fields — Serial Tab
Specification Description
Serial Number – No, Yes, Tracking (keep track of last number used for this serial number).
Start Value Beginning serial number value.
Increment The number to be used to increment the serial number.
Tracking Serial Number Name Name of serial number to be used.
Leading Fill Character
Character Character to be used to pad the serial number.
Length Length (in characters) of serial number.
Automatic Label Counts
This field determines number of identical labels printed
When checked, the value of this field determines the number of identical labels printed.
This field determines number of labels serialized
When checked, the value of this field determines the number of labels serialized.

3. Designing Labels
38
Barcode Fields
For barcode fields, the Field Properties dialog box contains five tabs – Settings, Options, Data, Serial
and Symbology.
Barcode Fields — Settings Tab
Specification Description
Field Name For each new field you create, Legitronic displays a default field name that automatically increments the name. Change the name to something
meaningful, to eliminate mistakes when choosing or referencing
individual fields. (See pages 30 and 53)
Data Result Does not apply to barcode fields.
Display Field When checked, the field displays on the screen.
Print Field When checked, the field prints on the label.
Design Orientation The number of degrees the field contents should be rotated when printed: 0°, 90°, 180°, or 270°.
Unit of Measure Unit to be used for entering and displaying measurements: Inches, Centimeters, Points, or Dots.
Position
Horizontal The horizontal position of the upper left corner of the field.
Vertical The vertical position of the upper left corner of the field.
Size
Horizontal The horizontal length of the field.
Vertical The vertical length of the field.

3. Designing Labels
39
Barcode Fields — Options Tab
Specification Description
Field Type Type of field – Text, Barcode, Graphic, Line, Box, or Raw.
Color
Screen Foreground Field foreground color for on-screen display.
Printed Foreground Field foreground color for printed labels.
Alignment
Horizontal Horizontal justification to be used — Left, Right, Center, or Justify (left and
right justification).
Vertical Vertical justification to be used — Top, Bottom, Center, or Justify (top and bottom justification).

3. Designing Labels
40
Barcode Fields — Data Tab
The Expression Type field displays the type of data the field will contain --Constant, Reference Field,
Database, Text File, Date or Time, String Builder, or Supplied Input. The control fields that appear
below vary according to the type of data selected. The types of data and their respective control fields
are described in Data Types on page 52.
Note: A wizard is available for constructing the data for UCC/EAN128 (GS1-128) bar codes. The
wizard allows you to select Application Identifiers (AI), check digits, and other parameters associated
with these bar codes. To access the wizard, click the bar code field to select it, position the cursor
within the field, and right-click to display the menu shown below. Then select Wizard.
3. Designing Labels
41
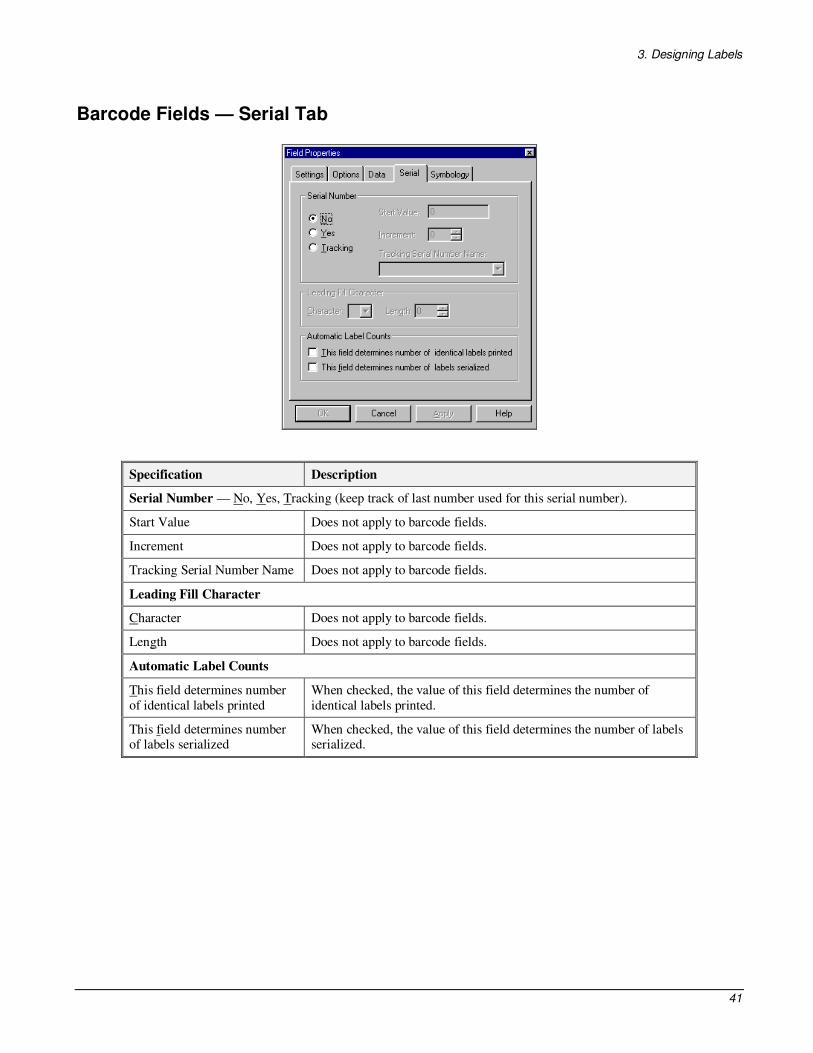
Barcode Fields — Serial Tab
Specification Description
Serial Number — No, Yes, Tracking (keep track of last number used for this serial number).
Start Value Does not apply to barcode fields.
Increment Does not apply to barcode fields.
Tracking Serial Number Name Does not apply to barcode fields.
Leading Fill Character
Character Does not apply to barcode fields.
Length Does not apply to barcode fields.
Automatic Label Counts
This field determines number
of identical labels printed
When checked, the value of this field determines the number of
identical labels printed.
This field determines number of labels serialized
When checked, the value of this field determines the number of labels serialized.

3. Designing Labels
42
Barcode Fields — Symbology Tab
Specification Description
Symbology The barcode symbology (type) to be used.
NBE Size The size of the barcode.
Overall size characteristics Summary of size characteristics.
Checksum Checksum formula to be used for verification of barcode data.
HRI (Human Readable Info) Fonts available for display of the text associated with the barcode.
When NO HRI is selected, the text associated with the barcode is not
displayed.

3. Designing Labels
43
Graphics Fields
Legitronic supports the following graphic file formats:
• Windows Bitmap (.BMP) • Windows Metafile (.WMF – a vector format)
• JPEG (Joint Photo Experts Group – JPG) • Targa (.TGA)
• Zsoft PCS (.PCX) • WordPerfect Graphic (.WPG)
• TIFF
Graphics Fields — Settings Tab
Specification Description
Field Name For each new field you create, Legitronic displays a default field name that
automatically increments the name. Change the name to something
meaningful, to eliminate mistakes when choosing or referencing individual
fields. (See pages 30 and 53)
Data Result Does not apply to graphics fields.
Display Field When checked, the field displays on the screen.
Print Field When checked, the field prints on the label.
Design Orientation The number of degrees the field contents should be rotated when printed: 0°, 90°, 180°, or 270°.
Unit of Measure Unit to be used for entering and displaying measurements: Inches, Centimeters, Points, or Dots
Position
Horizontal The horizontal position of the upper left corner of the field.
Vertical The vertical position of the upper left corner of the field.

3. Designing Labels
44
Specification Description
Size
Horizontal The horizontal length of the field.
Vertical The vertical length of the field.
Graphics Fields — Options Tab
Specification Description
Field Type Type of field — Text, Barcode, Graphic, Line, Box, or Raw.
Sizing
Dynamic Fit When checked, the graphic is automatically sized to fill the entire field.
Magnification When checked, the graphic is automatically sized as specified by the Horizontal and Vertical percentages.
Fixed Aspect Ratio When checked, the graphic’s proportions are maintained during resizing.
Horizontal The amount of height magnification.
Vertical The amount of width magnification.
Color
Screen Foreground Field foreground color for on-screen display.
Screen Background Field background color for on-screen display.
Printed Foreground Field foreground color for printed labels.
Printed Background Field background color for printed labels.
3. Designing Labels
45
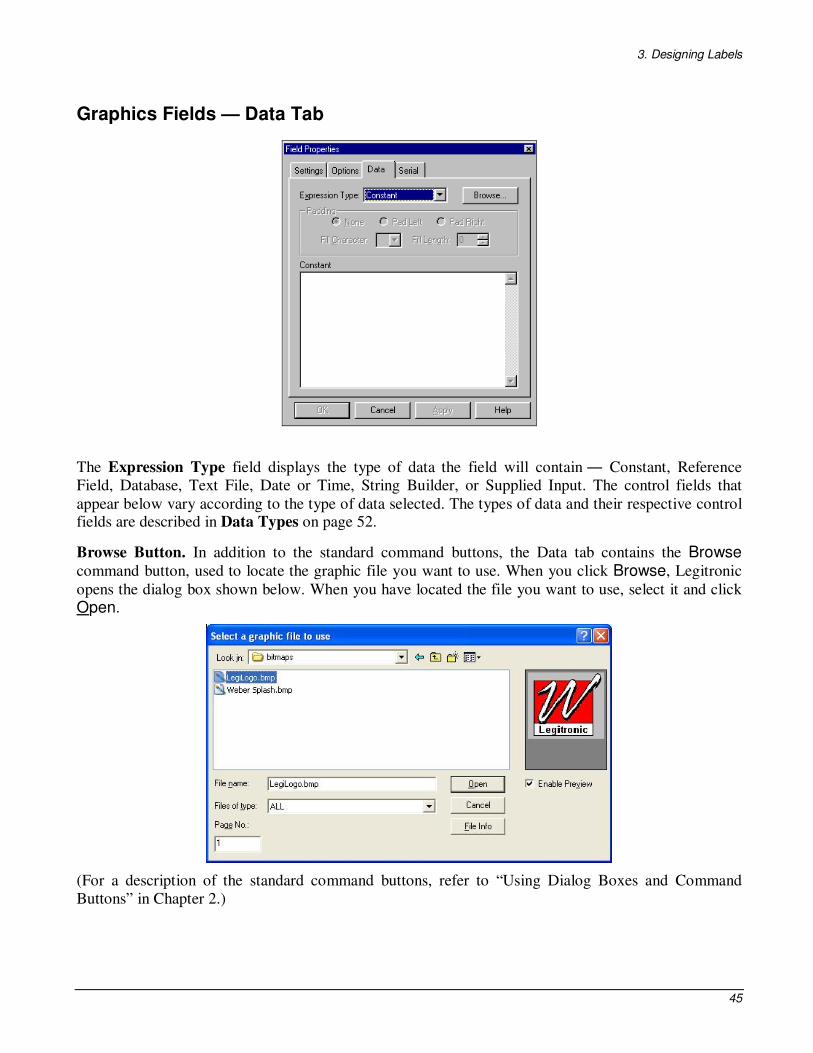
Graphics Fields — Data Tab
The Expression Type field displays the type of data the field will contain ― Constant, Reference
Field, Database, Text File, Date or Time, String Builder, or Supplied Input. The control fields that
appear below vary according to the type of data selected. The types of data and their respective control fields are described in Data Types on page 52.
Browse Button. In addition to the standard command buttons, the Data tab contains the Browse
command button, used to locate the graphic file you want to use. When you click Browse, Legitronic
opens the dialog box shown below. When you have located the file you want to use, select it and click
Open.
(For a description of the standard command buttons, refer to “Using Dialog Boxes and Command
Buttons” in Chapter 2.)

3. Designing Labels
46
Line Fields
Line Fields — Settings Tab
Specification Description
Field Name For each new field you create, Legitronic displays a default field name that automatically increments the name. Change the name to something
meaningful, to eliminate mistakes when choosing or referencing
individual fields. (See pages 30 and 53)
Data Result Does not apply to line fields.
Display Field When checked, the field displays on the screen.
Print Field When checked, the field prints on the label.
Design Orientation The number of degrees the field contents should be rotated when printed: 0°, 90°, 180° or 270°.
Unit of Measure Unit to be used for entering and displaying measurements: Inches,
Centimeters, Points, or Dots.
Position
Horizontal The horizontal position of the upper left corner of the field.
Vertical The vertical position of the upper left corner of the field.
Size
Horizontal The horizontal length of the field.
Vertical The vertical length of the field.
3. Designing Labels
47
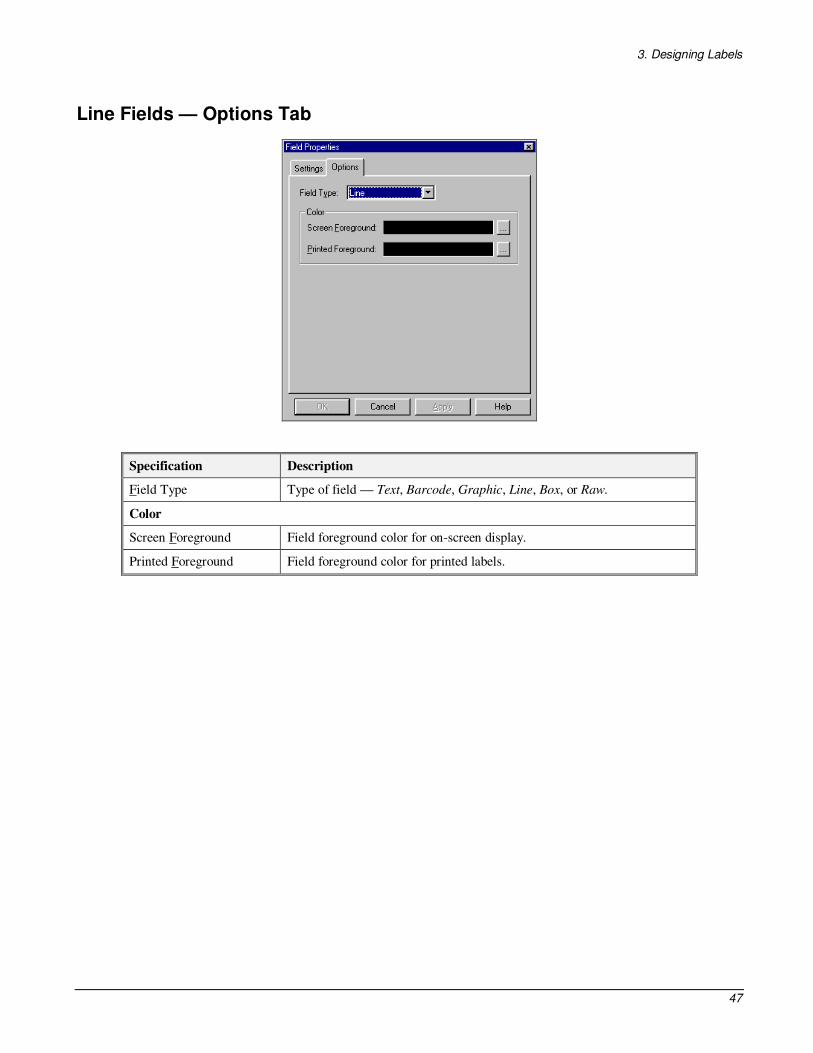
Line Fields — Options Tab
Specification Description
Field Type Type of field — Text, Barcode, Graphic, Line, Box, or Raw.
Color
Screen Foreground Field foreground color for on-screen display.
Printed Foreground Field foreground color for printed labels.
3. Designing Labels
48
Box Fields
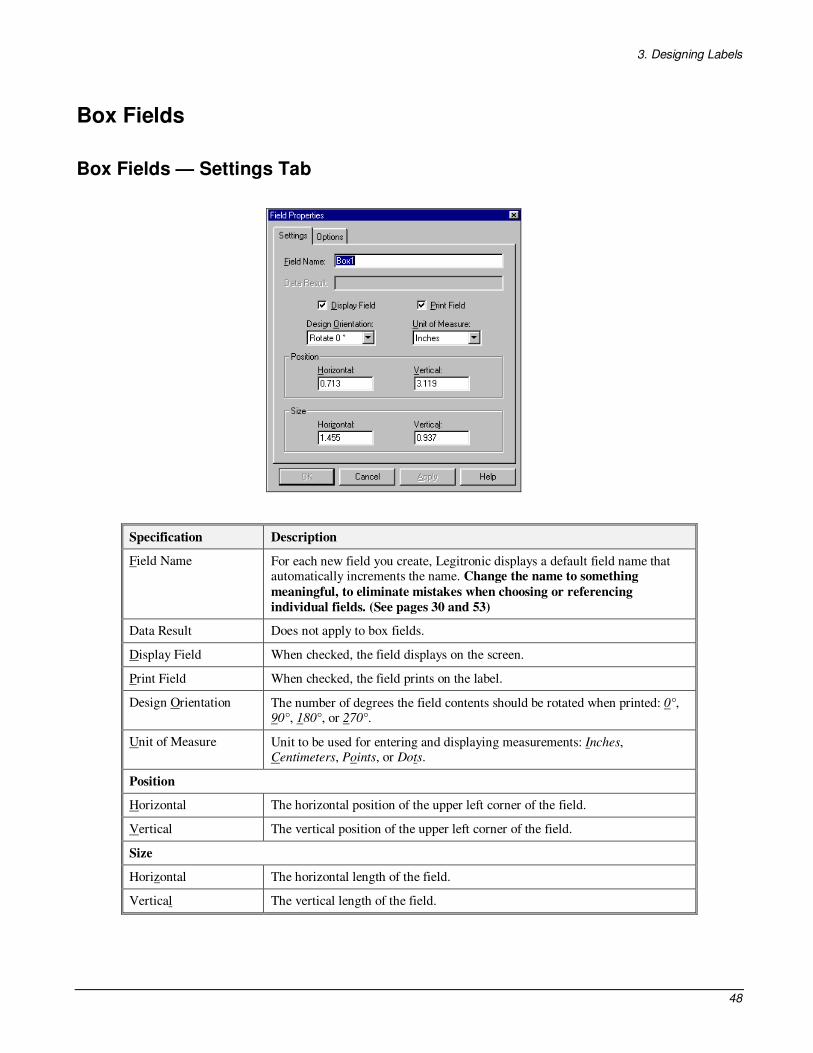
Box Fields — Settings Tab
Specification Description
Field Name For each new field you create, Legitronic displays a default field name that automatically increments the name. Change the name to something
meaningful, to eliminate mistakes when choosing or referencing
individual fields. (See pages 30 and 53)
Data Result Does not apply to box fields.
Display Field When checked, the field displays on the screen.
Print Field When checked, the field prints on the label.
Design Orientation The number of degrees the field contents should be rotated when printed: 0°, 90°, 180°, or 270°.
Unit of Measure Unit to be used for entering and displaying measurements: Inches, Centimeters, Points, or Dots.
Position
Horizontal The horizontal position of the upper left corner of the field.
Vertical The vertical position of the upper left corner of the field.
Size
Horizontal The horizontal length of the field.
Vertical The vertical length of the field.

3. Designing Labels
49
Box Fields — Options Tab
Specification Description
Field Type Type of field — Text, Barcode, Graphic, Line, Box, or Raw.
Color
Screen Foreground Field foreground color for on-screen display.
Printed Foreground Field foreground color for printed labels.
Border
Horizontal Thickness Thickness of the horizontal lines that make up the box.
Vertical Thickness Thickness of the vertical lines that make up the box.
Unit of Measure Unit to be used for entering and displaying measurements: Inches,
Centimeters, or Points.

3. Designing Labels
50
Raw Fields
Raw fields contain data to be used by the printer when the labels are printed. This is an extremely
advanced feature of Legitronic, so it is not covered in this document. For detailed information about
raw field command strings, refer to the Programmers Guide for the Brand/ Model of printer you are
using.
Raw Fields — Settings Tab
Specification Description
Field Name For each new field you create, Legitronic displays a default field name that automatically increments the name. Change the name to something meaningful,
to eliminate mistakes when choosing or referencing individual fields. (See
pages 30 and 53)
Data Result Does not apply to raw fields.
Display Field When checked, the field displays on the screen.
Print Field When checked, the field prints on the label.
Design Orientation The number of degrees the field contents should be rotated when printed: 0°, 90°,
180°, or 270°.
Unit of Measure Unit to be used for entering and displaying measurements: Inches, Centimeters,
Points, or Dots.
Position
Horizontal The horizontal position of the upper left corner of the field.
Vertical The vertical position of the upper left corner of the field.

3. Designing Labels
51
Specification Description
Size
Horizontal The horizontal length of the field.
Vertical The vertical length of the field.
Raw Fields — Options Tab
Specification Description
Field type Type of field – Text, Barcode, Graphic, Line, Box, or Raw.
Color
Screen Foreground Field foreground color for on-screen display.
Screen Background Field background color for on-screen display.
Send Data Selection of when the content of the raw data field is to be sent to the printer:
After label is sent
At beginning of label data
At end of label data
Send field origin When checked, the coordinates of the raw data will be sent to the printer.

3. Designing Labels
52
Data Types
This section describes the controls for the various data types available on the Data tab of the Field Properties
dialog box.
Constant
Constant data remains unchanged every time the label is printed
Specification Description
Padding Type of padding desired when the field content is shorter than the length specified in the Fill Length field – none, pad left, or pad right.
Fill Character Character to be used to pad the field.
Fill Length The maximum allowable length of the field.
Constant For text fields, the text that will print on each label.
For barcode fields, the data that sill be translated into a barcode printed on each
label.
For graphic fields, the file name that contains the graphic (including path). When
you don’t know the graphic name, click the Browse button, select the file name, and click Open.
For raw fields, the printer commands for each label.
3. Designing Labels
53
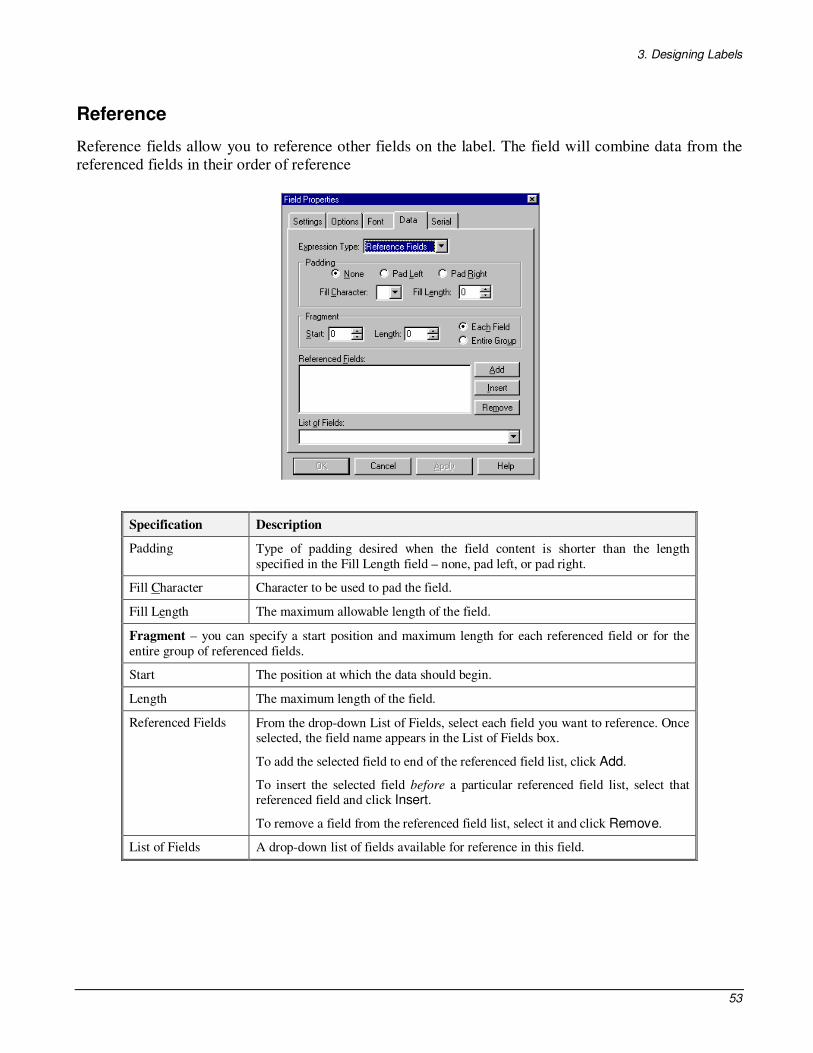
Reference
Reference fields allow you to reference other fields on the label. The field will combine data from the
referenced fields in their order of reference
Specification Description
Padding Type of padding desired when the field content is shorter than the length
specified in the Fill Length field – none, pad left, or pad right.
Fill Character Character to be used to pad the field.
Fill Length The maximum allowable length of the field.
Fragment – you can specify a start position and maximum length for each referenced field or for the
entire group of referenced fields.
Start The position at which the data should begin.
Length The maximum length of the field.
Referenced Fields From the drop-down List of Fields, select each field you want to reference. Once selected, the field name appears in the List of Fields box.
To add the selected field to end of the referenced field list, click Add.
To insert the selected field before a particular referenced field list, select that referenced field and click Insert.
To remove a field from the referenced field list, select it and click Remove.
List of Fields A drop-down list of fields available for reference in this field.

3. Designing Labels
54
Database
Database fields allow you to obtain field data from a selected database.
Specification Description
Padding Type of padding desired when the field content is shorter than the length
specified in the Fill Length field – none, pad left, or pad right.
Fill Character Character to be used to pad the field.
Fill Length The maximum allowable length of the field.
Fragment – you can specify a start position and maximum length for the field.
Start The position at which the data should begin.
Length The maximum length of the field.
Queried Print When checked, the field will get its data from the data source identified below.
Database Providers Launches the Data Link tool for establishing a connection to the Print Log database.
Data Source Shows the data source selected using the Data Link tool.
Table Name of the table that contains the data you want to use.
Search Col The database column to be searched for the appropriate record.
Return Col The database field in the selected record that contains the data to be used in the label field.
Key Field on Label The label field that contains the data used to select the database record.

3. Designing Labels
55
OLE DB Database Support
OLE DB is the most direct and reliable method for database connectivity today. Developed by
Microsoft, OLE DB is a set of interfaces that expose data from a variety of diverse information sources.
OLE DB enables Legitronic to connect to a wider variety of data sources than ODBC. OLE DB also
enables Legitronic to connect to Unicode data sources to provide multi-lingual label printing.
Legitronic continues to provide support for ODBC as well.
The database field property page now includes a Database Provider button to start the Data Link tool.

3. Designing Labels
56
Use the Data Link tool to select the database provider for the target database. Many database providers
are included and others are available from database application publishers.
Click the Connection tab to select the database server and the database located on the selected server.
3. Designing Labels
57
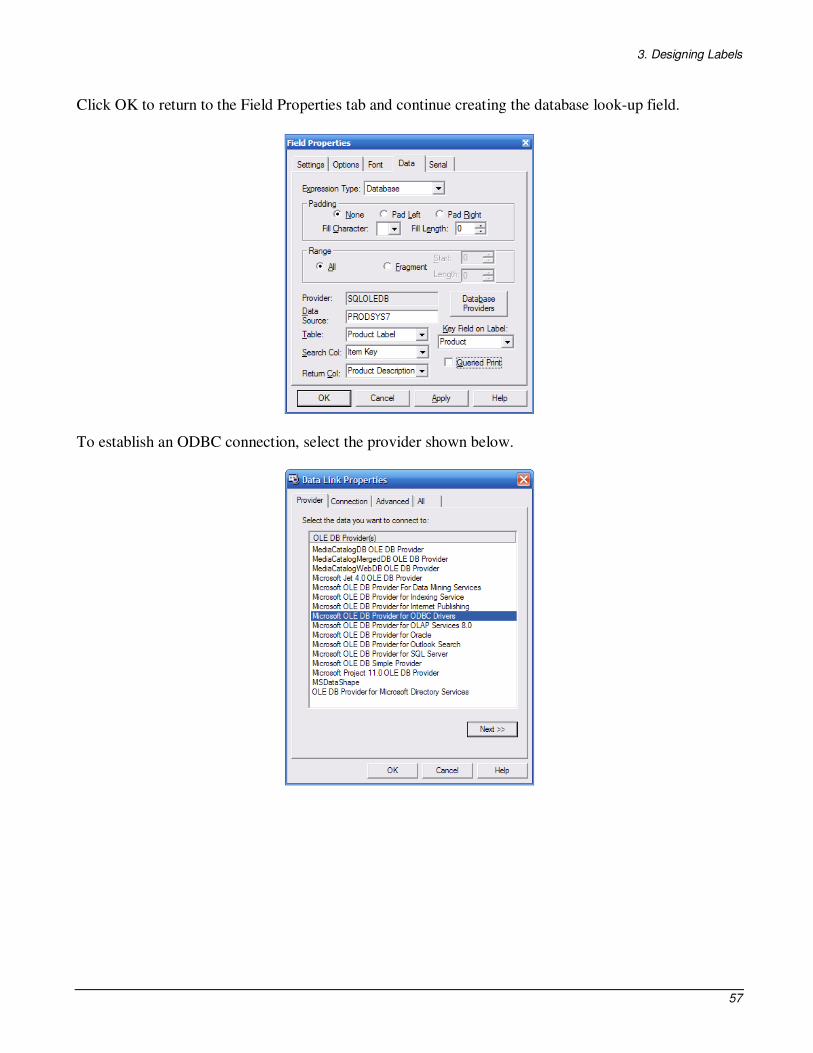
Click OK to return to the Field Properties tab and continue creating the database look-up field.
To establish an ODBC connection, select the provider shown below.

3. Designing Labels
58
Next, select the data source name (DSN) previously setup using Windows’ ODBC manager facility.
Click OK to proceed.
The Provider and DSN are now established and the remaining field information can be specified.
3. Designing Labels
59
Text File
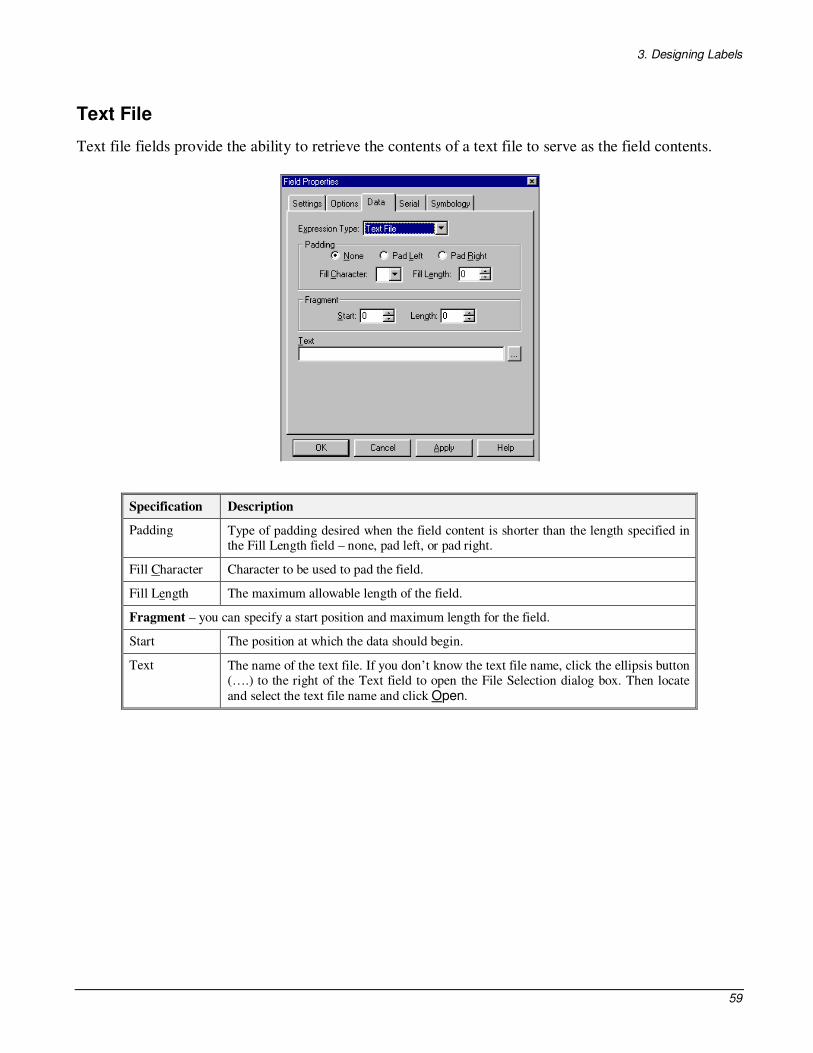
Text file fields provide the ability to retrieve the contents of a text file to serve as the field contents.
Specification Description
Padding Type of padding desired when the field content is shorter than the length specified in the Fill Length field – none, pad left, or pad right.
Fill Character Character to be used to pad the field.
Fill Length The maximum allowable length of the field.
Fragment – you can specify a start position and maximum length for the field.
Start The position at which the data should begin.
Text The name of the text file. If you don’t know the text file name, click the ellipsis button (….) to the right of the Text field to open the File Selection dialog box. Then locate
and select the text file name and click Open.

3. Designing Labels
60
Date or Time
Date or Time fields allow you to select a date or time format to print on the labels, calculate expiry
dates, and print four-digit year fields.
Specification Description
Expiry Date Offset When checked, the current date is offset by the number of days (1-9999)
specified in the spin box below, and the resulting date prints on the label. For
example, assume that Expiry Date Offset is checked and an offset of 30 days is specified. If the label is printed on January 1, the date printed on the label will
be January 31.
Date or Time Setting List of available date formats. Highlight the format you want to use on the label.

3. Designing Labels
61
String Builder
String builder allows you to build data expressions. This is an extremely advanced feature of Legitronic, so it is not covered in this document. For detailed information about string builder data expression functions, refer to the Legitronic Labeling Software/ Legitronic Secure Series Labeling Software User Manual on the CD your software came on.
Specification Description
Function Category Available functions.
Function Name The elements that can be included in the string for the Function selected. To
paste a function in the Expression box, double-click the function.
Expression The expression you are building. To evaluate the validity of the expression, click
Evaluate. If the expression is valid, the results of the data expression is
displayed below the Fields list box.
Fields The fields that can be included in the string.

3. Designing Labels
62
Supplied Input
Supplied input is provided at the time the labels are printed. The supplied input controls specify the
source of the supplied input and its properties. There are two pages to this tab. Click Next Page and
Prev Page to navigate between them.
Page 1
Specificatio
n
Description
Data Source The source of the supplied input:
Keyboard – Data will be entered at the keyboard.
DDE – a Dynamic Data Exchange (DDE) server application is the data source. The
actual server name and link information are set up in Print Labels by clicking Paste Link.
Remote input – a COM port is the data source.
Table Lookup – a Paradox table is the input source. Click Table Lookup to select the
table and field to be used.
Entry Time When the input will be supplied – for the first label only or for every label.
Prompt The prompt to be displayed for keyboard data.
Default Default data for the field.
DDE Data Data to supplied by the other application.

3. Designing Labels
63
Page 2
Specification Description
Padding Type of padding desired when the field content is shorter than the length specified
in the Fill Length field – none, pad left, or pad right.
Fill Character Character to be used to pad the field.
Fill Length The maximum allowable length of the field.
Remote Source For supplied input, the remote source (device) number.
Input Length The minimum and maximum number of characters that will be accepted.
Custom Filter Series of special characters (tokens) that control the types of characters that can be entered.
3. Designing Labels
64
Custom Filter Characters
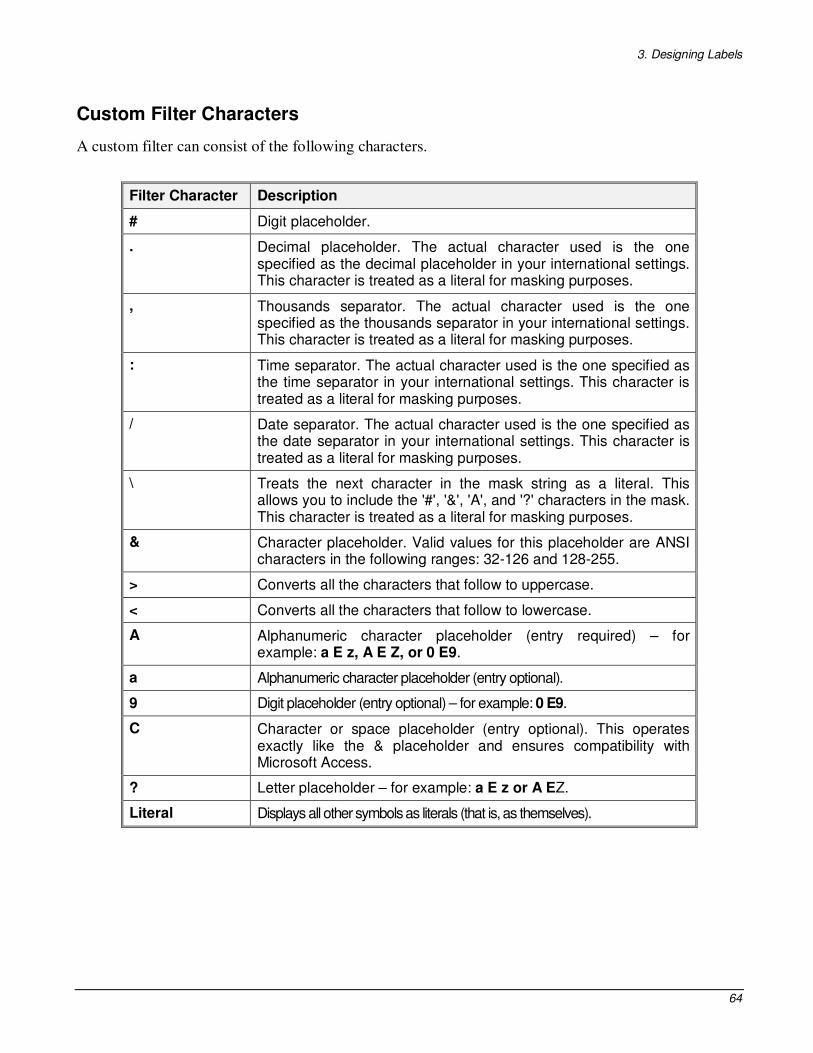
A custom filter can consist of the following characters.
Filter Character Description
# Digit placeholder.
. Decimal placeholder. The actual character used is the one specified as the decimal placeholder in your international settings. This character is treated as a literal for masking purposes.
, Thousands separator. The actual character used is the one specified as the thousands separator in your international settings. This character is treated as a literal for masking purposes.
: Time separator. The actual character used is the one specified as the time separator in your international settings. This character is treated as a literal for masking purposes.
/ Date separator. The actual character used is the one specified as the date separator in your international settings. This character is treated as a literal for masking purposes.
\ Treats the next character in the mask string as a literal. This allows you to include the '#', '&', 'A', and '?' characters in the mask. This character is treated as a literal for masking purposes.
& Character placeholder. Valid values for this placeholder are ANSI characters in the following ranges: 32-126 and 128-255.
> Converts all the characters that follow to uppercase.
< Converts all the characters that follow to lowercase.
A Alphanumeric character placeholder (entry required) – for example: a E z, A E Z, or 0 E9.
a Alphanumeric character placeholder (entry optional).
9 Digit placeholder (entry optional) – for example: 0 E9.
C Character or space placeholder (entry optional). This operates exactly like the & placeholder and ensures compatibility with Microsoft Access.
? Letter placeholder – for example: a E z or A EZ.
Literal Displays all other symbols as literals (that is, as themselves).

3. Designing Labels
65
Real Time Clock Data Type
In the Field Properties screen, click the "Evaluate" button to display an example of the resulting string,
based on current computer time and date, in the text box below the offset value field.
The time unit options in the dropdown list are: Years, Months, Weeks, Days, Hours, Minutes and
Seconds. The master list for Printer Date Time Codes is:
Code Printer Date Time Code Printer Date Time
[dw] [d3] [D3] [d0] [dn] [w0] [wn] [dd] [d2] [ma] [m3] [M3] [mn [m2] [y2]
"Day of week (Monday)" "Day of week (Mon - Sun)" "Day of week (MON - SUN)" "Numeric day of week (0-6)" "Numeric day of week (1-7)" "Week (00 - 53)" "Week (01 - 54)" "Numeric day (1 - 31)" "Numeric day (01 - 31)" "Month (January-December)" "Month (Jan - Dec)" "Month (JAN - DEC)" "Numeric month (1 - 12)" "Numeric month (01 - 12)" "Year (00 - 99)"
[y4] [jd] [jb] [jz] [TM] [TZ] [tm] [tz] [mt] [mz] [sc] [s2] [ap] [AP] [si]
"Year (2000 - 2099)" "Julian date (1 - 366)" "Julian date (leading blanks)" "Julian date (leading zeros)" "12 hour time (1 - 12)" "12 hour time (01 - 12)" "24 hour time (0 - 23)" "24 hour time (00 - 23)" "Minutes (0 - 59)" "Minutes (00 - 59)" "Seconds (0 - 59)" "Seconds (00 - 59)" "am/pm" "AM/PM" "Shift Information"

3. Designing Labels
66
Object Linking and Embedding (OLE)
Object linking and embedding (OLE) allows you to create an object – such as a graphic or Microsoft
Word document – in any Windows® application that supports OLE and use that object as the content of
a label field. To use the OLE function, make sure the application you want to create the object in is
active. You can insert an existing object or create a new object by following the steps below
Inserting an Existing Object
1. Select the field that will contain the object.
2. Select Edit Insert New Object.
The Insert Object dialog box opens
3. Click Create from File.
4. Type the name of the file that contains the object. If you don’t know the file name, click Browse. When you locate the file name, select it and click Insert.
5. If you want the object to display as an application icon, check Display As Icon.
6. If you want to link to the file so that the contents of the field always reflects the contents of the file,
check Link.
7. Click OK.
The contents of the file will be inserted into the field.
3. Designing Labels
67
Creating a New Object
1. Select the field that will contain the object
2. Select Edit Insert New Object.
The Insert Object dialog box opens.
3. Click Create New.
4. If you want the object to display as an application icon, check Display As Icon.
5. Select the type of object you want to create and click OK.
The application you selected is activated so that you can create the object.
6. When you have created the object, click inside the field to insert the object.
Editing an Object
To edit an object embedded in a field, just double-click the object. The application it was created in
activates so that you can edit it
Dragging File Names From Explorer or Your Desktop
You can also insert a file as an object in a label field by dragging the file name to the field from
Explorer or from your desktop. The file contents is inserted into the field and linked.

3. Designing Labels
68
Saving the Label
When saving the label under the same name, simply click in the tool bar or select from File Save
from the menu bar.
Note: When you have not made any changes to a label, the Save function is inactive.
Follow these steps to save the label under a different name:
1. Select File Save As from the menu bar.
The Save As dialog box opens.
2. Enter a file name for the label.
3. Click the Save button.
Printing a Test Label
You can print a test label in one of three ways:
1. Select File Test Print… from the menu bar.
2. Right-click the label and select Test Print from the menu that displays.
3. Click in the tool bar.

3. Designing Labels
69
Printing a Draft of the Label
The draft print feature allows the user to print a copy of the label to any installed printer. Generally, the
feature is used to print copies of the label to an office-type laser or ink-jet printer for review. A Draft
Print is initiated by clicking File� Draft Print. See below.

4. Printing Labels
Legitronic User Manual (v3.6.0) 70
4. Printing Labels
This chapter provides the detailed information you need to perform each of the printing steps:
1. Opening a label for printing
2. Specifying the print properties
3. Printing the labels
Opening a Label for Printing
Follow these steps to open a label for printing:
1. Click in the tool bar or select File Open Label for Printing… from the menu bar.
The Open Label for Printing dialog box opens.
2. Locate and select the file name for the label you want to print.
3. Click Open.
4. The print properties dialog box opens, with the label name displayed in the title bar.

4. Printing Labels
71
Specifying the Print Properties
The print properties dialog box includes three tab displays:
� Job Settings – general information about the label print job.
� Query – information about where to obtain queried input.
� Ports – information about supplied input sources.
On each relevant tab of the print properties dialog box, specify the appropriate print properties. (The
specifications on each tab are described in the following sections.)
Job Settings
Specification Description
Print Job Description Name of label print job. This is the job name that will appear in Windows® Print Manager.
Label Stock Stock to be used for printing the label.
Submit Job Suspended When checked, the print job goes to the Windows® print queue as a paused
document, to be released later.
Clear Printer Buffer When checked, the currently printing job is cleared from the printer memory.
Auto Repeat When checked, the print job automatically starts printing again upon
completion.
Disable Auto Print When checked, the label does not automatically print after the last supplied
input field is entered. You must click Print to continue printing.
Submit job ASAP When checked, the print job is submitted immediately. When not checked,
the Windows® Print Manager must be empty before the print job is
submitted.
Note: When a label format includes time fields, leaving this box unchecked will result in more accurate time information on the labels.
Send Template When checked, the open label template is downloaded to the printer.
Send Variable Data When checked, variable fields on the open label template are sent to the printer where they are merged with a previously downloaded label template
to initiate printing of labels.
Preview Type of preview desired: none, preview of first label only, or preview of every label.
Print Count Number of labels to print:
Number of Identical – number of identical (duplicate) labels to print.
Number of Serial – number of serial labels (identical except for serial number) to print.
Cut / Pause – number of labels to print before cutting or pausing.
Multiple Across Horizontal serialization – across the web specification at print time.
Vertical serialization down the web specification at print time.
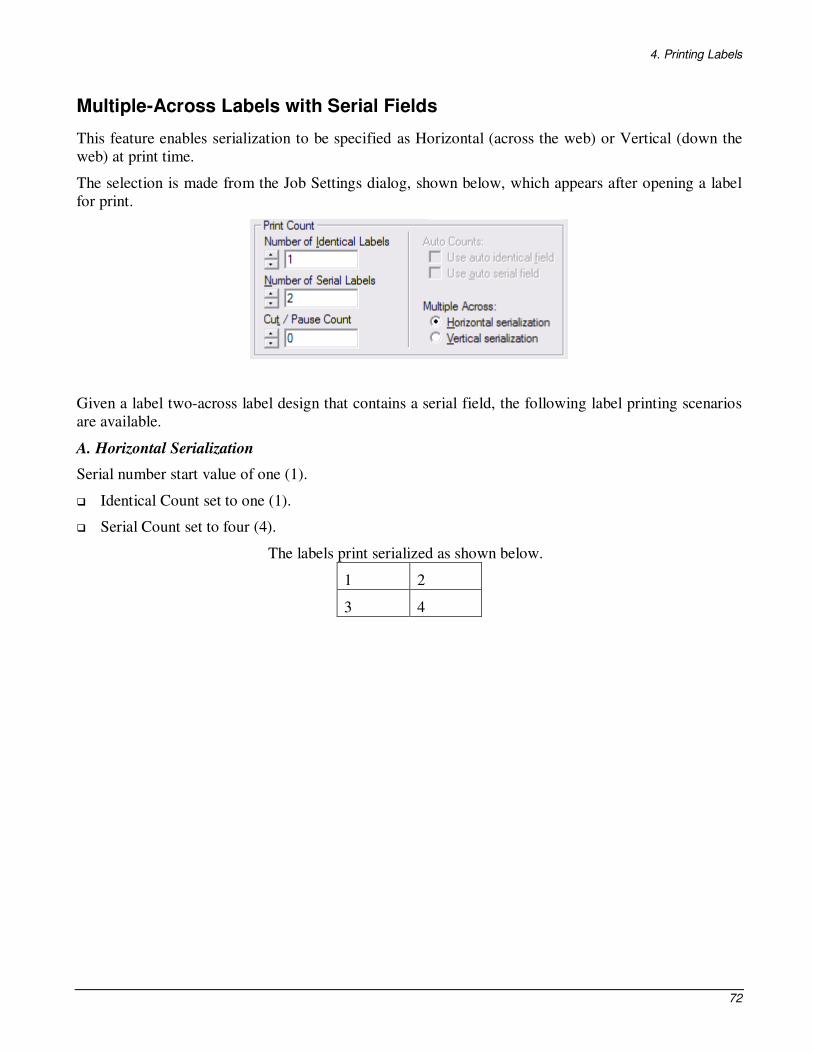
4. Printing Labels
72
Multiple-Across Labels with Serial Fields
This feature enables serialization to be specified as Horizontal (across the web) or Vertical (down the
web) at print time.
The selection is made from the Job Settings dialog, shown below, which appears after opening a label
for print.
Given a label two-across label design that contains a serial field, the following label printing scenarios
are available.
A. Horizontal Serialization
Serial number start value of one (1).
� Identical Count set to one (1).
� Serial Count set to four (4).
The labels print serialized as shown below.
1 2
3 4

4. Printing Labels
73
B. Horizontal Serialization
Serial number start value of one (1).
� Identical Count set to two (2).
� Serial Count set to four (4).
The labels print serialized as shown below.
1 2
1 2
3 4
3 4
C. Vertical Serialization
Serial number start value of one (1).
� Identical Count set to two (2).
� Serial Count set to two (2).
The labels print serialized as shown below.
1 1
2 2
D. Vertical Serialization
Serial number start value of one (1).
� Identical Count set to four (4).
� Serial Count set to three (3).
The labels print serialized as shown below.
1 1
1 1
2 2
2 2
3 3
3 3
Notes:
With Horizontal Serialization, the Serial-Count value must be an even multiple of the Horizontal Label
Count set in Label Design.
With Vertical Serialization, the Identical-Count value must be an even multiple of the Horizontal Label
Count set in Label Design.

4. Printing Labels
74
Queried Printing
Specification Description
Database Providers Launches the Data Link tool for establishing a connection to the Print Log
database.
Provider Shows the Provider selected using the Data Link tool.
Data Source Shows the data source selected using the Data Link tool.
Table Name Name of the table that contains the data you want to use.
Search Field The field in the table to search for particular values.
Start Value The first value for which a label should be printed.
End Value The last value for which a label should be printed.
Use SQL Expression When checked, the SQL expression entered in the SQL Expression box is
used to select labels for printing. If this field is checked when start and end
values have been specified, those values are converted to an SQL
expression.
Reevaluate Auto Counts When checked, the field value is re-evaluated for every database record. Otherwise, the value for the first database record is used for all labels
printed.
Test Button Tests the query and returns the number of records found.
SQL Expression The SQL expression that will be used to select labels for printing.

4. Printing Labels
75
Ports
Specification Description
Printer Printer that will be used to print the labels. The printer specified in Label Design is the default printer, but you can change the printer
selection.
Remote Input For remote supplied fields, the port number for the remote device.
Note: The port number must correspond to the remote sources
specified in Label Design, on page 2 of the Data tab for Supplied
Input field properties.
Printing the Labels
When you have completed your print property specifications, follow these steps to print the labels:
1. Click Print. If no Preview option was selected, the print job is added to the print queue.
2. If a Preview option was selected, the label is previewed. You can click Print to add the print job to
the print queue, or click Abort to cancel the print job.
3. Monitor the print job via the Windows® Print Manager.