using the dawg alert systemtmws.tmwsystems.com/learningcenter/tmws/docs/thedawg/01.thedawg.doc ·...
TRANSCRIPT

1. Using The Dawg™ alert systemThe Dawg is a web-based, performance notification application that generates and sends e-mails to members of your organization when operational, billing, or costing conditions exceed the tolerances you have defined.The following pages provide information on The Dawg setup and the default active alerts:Overview 1.2
Layout of The Dawg™ Configuration page 1.3Setting up an alert 1.6
Specifying the columns to be used in the alert 1.10Deactivating an alert 1.13Deleting an alert 1.13
Overview of default active alerts 1.14Dawg Setup 1.14Alert Deactivation 1.14
Key parameters that affect all Dawg alerts 1.15Using Web-based Help for The Dawg 1.17
Overview Help 1.17Alert Help 1.17
Copyright © 2014 TMW Systems, Inc. 1 Revised: 9/2012A Business Confidential Document.
Using The Dawg alert system
OverviewThe Dawg is geared toward the everyday users of TMWSuite who actively execute key tasks that drive your business-customer service representatives, dispatchers, and billing and payroll personnel. Their decisions and attention to detail determine the quality, accuracy, and timeliness of the data that ultimately is used to judge the effectiveness and profitability of your organization. By sending in your face notifications of potential problem situations, the Dawg helps these key employees stay on top of the details that, collectively, lead to your business' success. The Dawg is installed on your company's intranet so that it can be accessed internally via Internet Explorer V.6 or higher. The application consists of SQL-driven metrics that are used to measure key areas of your business. Depending on its configuration, alert information can be updated hourly, daily, every x minutes, or at will, based on data recorded in TMWSuite.Each alert consists of the following:
A set of standard, configurable parametersParameters are restrictions that allow you to filter data according to your reporting requirements. Configuration options for these parameters allow you to customize the alert so that it retrieves the data you want as it monitors business performance.Note: Key parameters are noted for each alert in "Appendix A: The Dawg™ Alerts" and all parameters are defined in "Appendix B: The Dawg™ parameters glossary." Defined tolerancesThe application compares your established business goals with real-time data so that your direct line employees know how close to plan your business is operating. E-mail addresses of the employees who are to be notified of potential problem situationsWhen an alert detects a situation that is beyond the alert threshold, it provides those employees with an e-mail alert to make them aware of the issue immediately. This allows them to proactively investigate and head off problems before they start.
You can use the pre-defined alerts as is, or you can use them as templates for new alerts. All alerts are listed by category in "Appendix A: The Dawg™ Alerts."
Note: If you need to install The Dawg as a stand-alone product, contact your TMW Support representative.
User guide 2 Revised: 9/2012The Dawg™

Using The Dawg alert system
Layout of The Dawg™ Configuration pageEach alert has a configuration page similar to the one shown here:
The features are grouped under these sections:
Alerts The drop-down list displays all available alerts. The Active and All radio buttons allow you to limit/expand the list of alerts displayed in the drop-down list.Note: By default, the Configuration page opens to the first Active alert listed alphabetically. The Alert command buttons allow you to determine what action you will complete in the Configuration window. You can modify or delete an existing alert, or create a new one.
SaveSave the alert configuration displayed on the page. DeleteDelete the alert configuration displayed on the page. Make CopyUse the current configuration as a starting point for creating a new alert.
Description This field is used to enter free-form text that identifies the purpose of the alert. It is for your reference while working on the configuration, and does not appear in alert e-mail.
User guide 3 Revised: 9/2012The Dawg™

Using The Dawg alert system
Email To Record the e-mail addresses of those who will receive notifications generated by this alert when metric results are beyond the specified tolerance.
Status Select Active to activate the current alert. Clear the check box to deactivate the current alert.
Schedule The Run on Schedule field allows you to link the alert to a predefined alert schedule. You can enter the date/time the alert is to begin using the schedule in the Starting/Next Run field. See the "Maintaining schedules for The Dawg™" chapter for more information on linking a schedule to an alert. The Schedules button displays the Dawg Schedule Configuration page. You can create a new schedule or edit an existing schedule. See the "Maintaining schedules for The Dawg™" chapter.
Starting/Next Run
The next date/time the alert is scheduled to run.
Consecutive Failures
The Count field displays how many times the current alert failed.The Limit field identifies the number of failures that will cause the alert to disable.
Procedure Data Source
The Procedure Data Source drop-down list displays any data sources from which you can access stored procedures. The Data Sources button displays The Dawg - Data Sources page. You can add new connections or access the stored procedures from the listed connections.
Procedure The Unlock button allows you to enable the stored procedure drop-down list to select a different stored procedure. Once selected, it is recommended that you again to Lock the drop-down list to prevent accidentally changing it.
Format These check boxes define how the alert is to be used: Select HTML Template to use the default e-mail format. Select Excel Attachment to determine whether the information in alert is to be made available as an Excel workbook (.xls) file. Template File: List alternative template to be used. See the Using custom templates section. Attachment File Name Override: Allows you to specify the naming convention of file attachments sent with emails. See the Using Alternate file Names section.
User guide 4 Revised: 9/2012The Dawg™

Using The Dawg alert system
Displayed Columns
The Columns button displays the Watch Dog Columns page on which you can specify which columns are to be displayed for the currently selected alert. You may also define the order in which they are displayed. See the Specifying the columns to be used in the alert section.
Diagnostic Use the Run Dawg to Screen button to 'test run' the current alert's results to your monitor.Use the Show Log button to display the log for the current alert's runs.
Parameters Parameters allow you to set an alert threshold, and to specify restrictions regarding the data to be used when the alert monitors business performance.Notes:1. The parameters change from alert to alert. General
instructions for specifying criteria are provided in the Performing the general setup for an alert section.
2. Use the scroll bar on the right side of the window to view all available parameters for an alert.
Version View the version of The Dawg that you are using.
Help This section provides instructions on how to access The Dawg
help information.
User guide 5 Revised: 9/2012The Dawg™
Using The Dawg alert system
Setting up an alertAlthough each alert has a unique purpose, the set up process is the same for all alerts in The Dawg Configuration page. Use this procedure to create a new or modify an existing alert.1. Select the existing alert to modify or from which you want to base a new alert.2. Select the Active or All radio button to list all alerts or only those that have an
Active status.
Note: Only active alerts will process when schedules run.3. From the drop-down list, select the alert that you want to view. 4. To create a new alert by copying the one you have displayed, do the following:
a. Click Make Copy.
A prompt window opens.b. Enter the name of the new alert.
Notes:1. The name can have a maximum of 255 alphanumeric characters.2. No spaces are allowed when creating a new alert name.3. All the characteristics of the original alert apply to the new one. For
example, if the original alert had a status of Active and was set to provide the alert information as an Excel workbook file, the new alert will also.
4. The new alert will be saved and added to the list of alerts when you click the Save button. Before doing so, make any necessary changes.
c. Click OK.
User guide 6 Revised: 9/2012The Dawg™

Using The Dawg alert system
5. If desired, in the Description field, enter a text description or reason for the alert.
Notes:1. This field accepts up to 500 characters.2. The information is for your reference while working on the configuration, and
does not appear in alert e-mail.6. In the Email To field, enter the e-mail addresses of the individuals or groups
that are to receive notifications for this alert.
Notes:1. Separate multiple recipients with a semicolon (;) or comma (,). Do not include
spaces between entries.2. You may want to set up e-mail recipients in address groups using Exchange
Server.7. To include the alert when the scheduled job is run, select the Active check box.
Note: To disable the alert, clear the Active check box. 8. Using the Schedules fields, determine how often the displayed alert is to run.
9. In the Run on field, select the schedule that best matches how frequently the displayed alert should run.Notes:1. OncePerHour and Daily schedules are provided for you.2. See the "Maintaining schedules for The Dawg™" chapter for information on
creating or modifying a schedule.
User guide 7 Revised: 9/2012The Dawg™

Using The Dawg alert system
10.In the Starting/Next Run field, identify the starting date/time the alert should begin using the selected schedule.
Note: If you set the date/time in the past, the alert will run during the next cycle (within 2 4 minutes). It will thereafter process according to the date/time of the specified schedule. This can quickly be done by clicking On Next Cycle.
11.Using the Procedure fields, identify the stored procedure that will be run for the selected alert.
Warning: Do not change the data source and stored procedure unless you are creating a new alert and have already created a stored procedure for it.a. From the Procedure Data Source drop-down list, select the data source
from which you can access stored procedures.b. To change the selected stored procedure, click Unlock and select the stored
procedure from the drop-down list.Notes:1. The Unlock button is a safeguard against inadvertently changing to
another stored procedure.2. For information on creating a stored procedure for a new alert, see
"Appendix C: Creating a stored procedure for a new alert."c. Click Lock to turn on the safeguard.
12.Select the HTML Template check box to use the e-mail format when notification messages are sent.
Note: By default, the HTML Template check box is selected. With this option, the format will be based on the default Dawg HTML e-mail template.
13.Select the Excel Attachment check box to indicate the alert e-mail is to always include the alert information as an Excel workbook attachment.
Note: By default, the Excel Attachment check box is cleared.
User guide 8 Revised: 9/2012The Dawg™

Using The Dawg alert system
14.Set the restriction criteria for the alert by making entries for each applicable parameter listed. Parameters may change the way an alert is calculated or act as a filter for the alert.
Notes:1. In list parameters, separate multiple entries with a comma (,). Do not include
spaces between entries.2. For a list of all parameters, their definitions, and in which alerts they are
used, refer to "Appendix B: The Dawg™ parameters glossary."3. Key parameters for each alert are noted in "Appendix A: The Dawg™ Alerts."
15.If necessary, select the Display check box to include the parameter in the alert e-mail.The remaining parameters vary from alert to alert. Each parameter represents a field from your TMW software. Your entry for a particular parameter restricts The Dawg to look at only items that have the same value set for that parameter.
16.When your entries are complete, click Save.The Dawg will save your entries and use them the next time the alert is run.
17.To verify that the alert configuration is what you intended, under Diagnostics, select Run Dawg to Screen.
18.Review the results, and then click Close.
User guide 9 Revised: 9/2012The Dawg™

Using The Dawg alert system
Specifying the columns to be used in the alertEach alert has a default list of columns in which alert information can display. For example, DawgSetupAlert contains these columns, all of which are selected to display by default:
Alert Recipient Stored Procedure LastRunDate ScheduleName ScheduleDescription
Note: You may not want all of these columns to display in an alert.
Use this procedure to specify which columns The Dawg should use in the selected alert and the order in which they should display.1. Under Alerts, select the alert to modify from the drop-down list. 2. Under Displayed Columns, click the Columns button.
User guide 10 Revised: 9/2012The Dawg™

Using The Dawg alert system
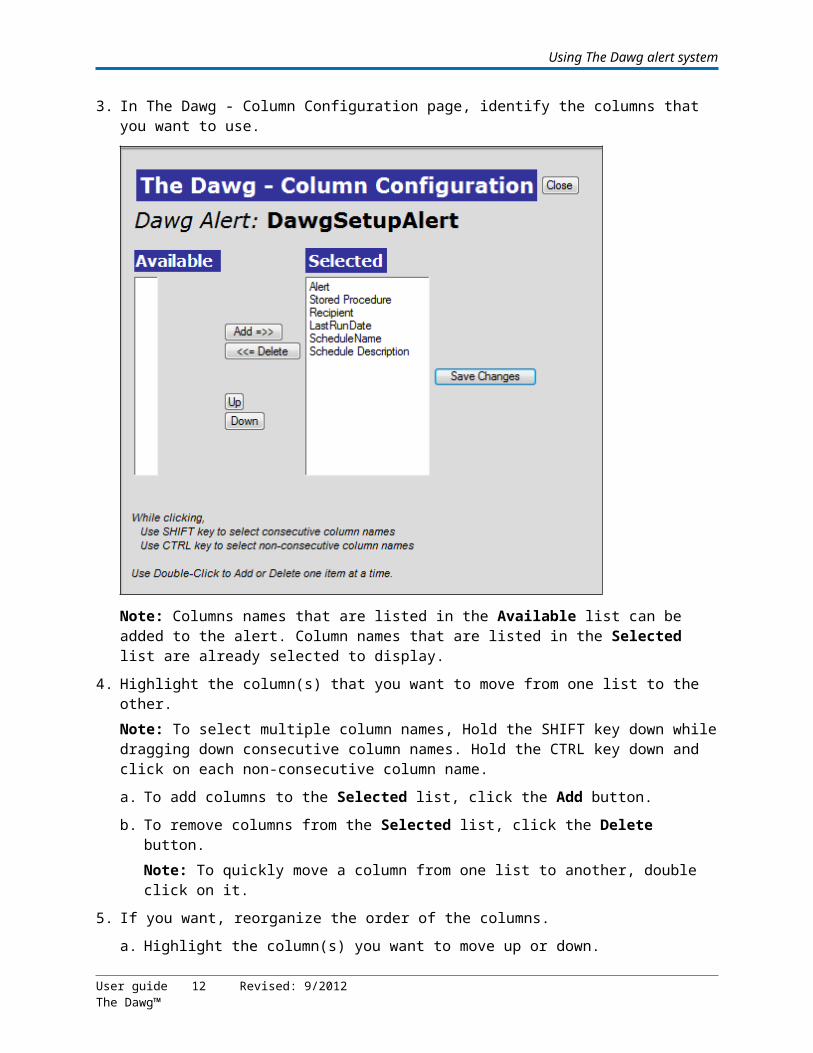
3. In The Dawg - Column Configuration page, identify the columns that you want to use.
Note: Columns names that are listed in the Available list can be added to the alert. Column names that are listed in the Selected list are already selected to display.
4. Highlight the column(s) that you want to move from one list to the other.Note: To select multiple column names, Hold the SHIFT key down while dragging down consecutive column names. Hold the CTRL key down and click on each non-consecutive column name.a. To add columns to the Selected list, click the Add button.b. To remove columns from the Selected list, click the Delete button.
Note: To quickly move a column from one list to another, double click on it.5. If you want, reorganize the order of the columns.
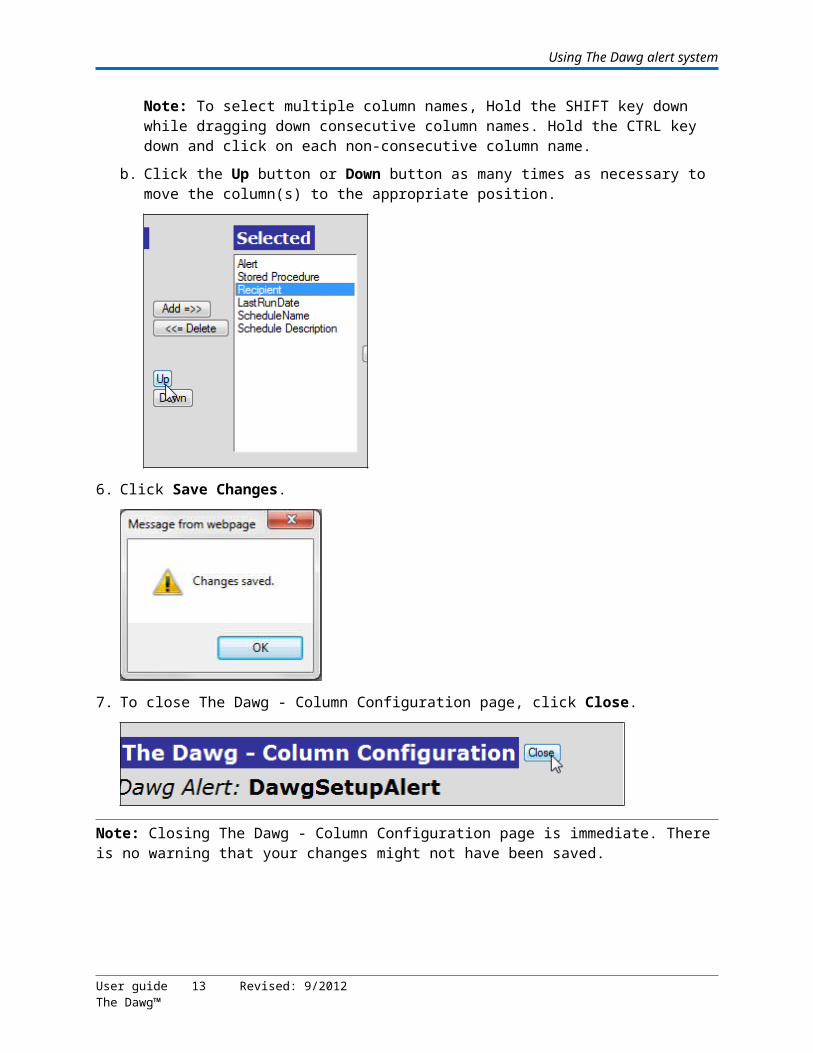
a. Highlight the column(s) you want to move up or down.Note: To select multiple column names, Hold the SHIFT key down while dragging down consecutive column names. Hold the CTRL key down and click on each non-consecutive column name.
User guide 11 Revised: 9/2012The Dawg™
Using The Dawg alert system
b. Click the Up button or Down button as many times as necessary to move the column(s) to the appropriate position.
6. Click Save Changes.
7. To close The Dawg - Column Configuration page, click Close.
Note: Closing The Dawg - Column Configuration page is immediate. There is no warning that your changes might not have been saved.
Deactivating an alertUse this procedure to temporarily stop an alert from running. 1. Select the existing alert to inactivate.2. Select the Active button to list all alerts that have an Active status.
User guide 12 Revised: 9/2012The Dawg™
Using The Dawg alert system
3. From the drop-down list, select the alert that you want to deactivate.4. Clear the Active check box.
5. Click Save.
Deleting an alertUse this procedure to permanently remove an alert.
Warning: Deleting an alert is not recommended. Instead, you should change its status to Inactive. After an alert has been deleted, you must reinstall the stored procedure and initialize the alert to restore it.For information on creating a stored procedure for a new alert, see "Creating custom alerts."
1. Under Alerts, from the drop-down list, select the alert that you want to delete. 2. Click Delete.3. In the prompt, type the word DELETE in uppercase letters.
4. Click OK.
Notes:1. The alert will be deleted when the prompt window closes.2. Deleted alerts no longer display in the drop-down list.
Overview of default active alertsThe following sections provide information on some of the default alerts.
Dawg SetupThe Dawg setup alert provides the details behind all currently active alerts. This was designed for administrators to have a record of active alerts on a regular basis. This
User guide 13 Revised: 9/2012The Dawg™

Using The Dawg alert system
is very useful when multiple users have access to The Dawg configuration screens. This alert will always have results.The default columns in this alert are:
Alert (Alert Name) StoredProcedure (The SQL based procedure called when this alert is fired.) Recipient (The list of addresses currently being emailed this alert.) LastRunDate (When this alert last processed.) ScheduleName (Current schedule assigned to this alert.) ScheduleDescription (Details about the schedule name.)
Alert DeactivationThe Alert Deactivation alert is design to notify you to when other alerts are in the process of failing or have failed as a result of an issue with the Stored Procedure triggered by the alert. This alert will send an e-mail when another alert is in danger of failing or has been disabled as result of a stored procedure failure.The default columns in this alert are:
WatchName (Alert Name) DataSourceSN (Data Source ID Number) StoredProcedure (The SQL based procedure called when this alert is fired.) ConsecutiveFailures (Current connect of consecutive failures on this alert.) ConsecutiveFailuresLimit (Number of times the Stored procedure can fail before the alert will be deactivated.) AlertStatus (Active status in The Dawg - True = Active) FailureStatus Deactivated - Stored procedure failed >= ConsecutiveFailuresLimit Warning - about to be deactivated Notification - Stored procedure has recorded a failure
Key parameters that affect all Dawg alertsThe following parameters are listed for each alert on the Configuration page. See "Appendix B: The Dawg™ parameters glossary" to verify if the parameter applies to your set up.
Notes: 1. You can enter only one value per parameter field, unless it is a list field.2. Builds 9.189 and later offer alternative methods of Dawg Creation that do not
require key parameter fields. See Setting up an alert for how to create these types of alerts.
User guide 14 Revised: 9/2012The Dawg™

Using The Dawg alert system
3. The following Key Parameters apply when you creating "Watchdog" prefixed Alerts.
Parameter Description
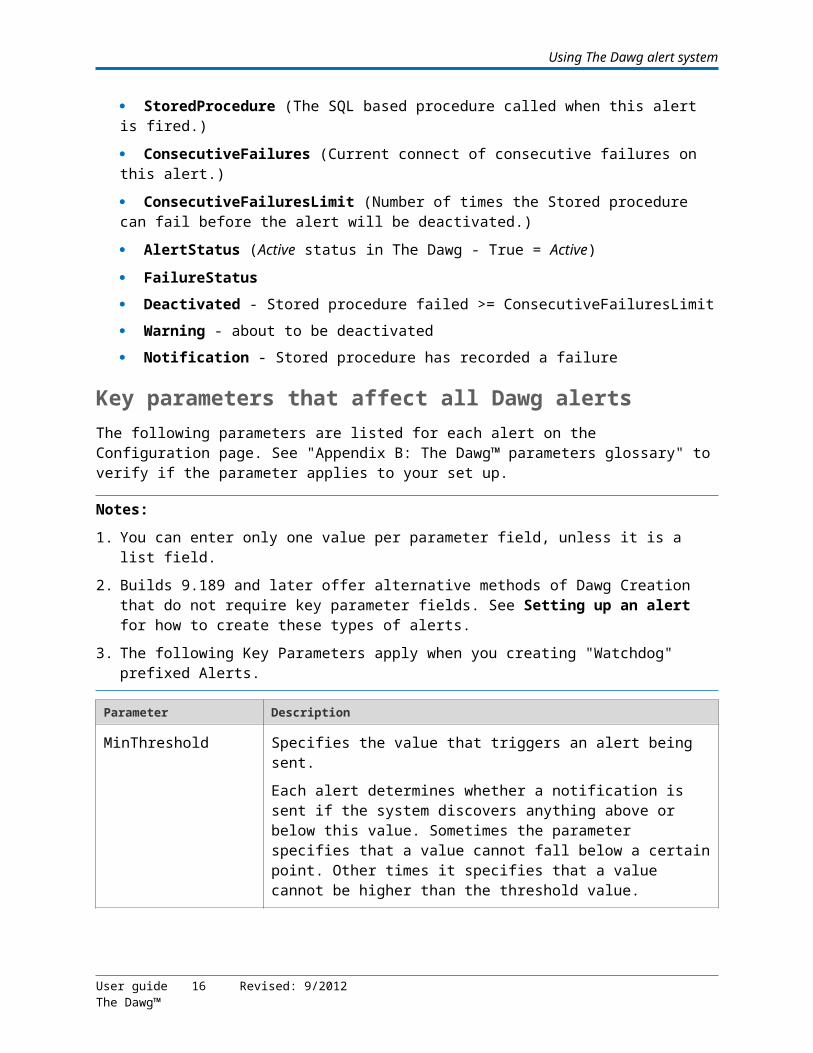
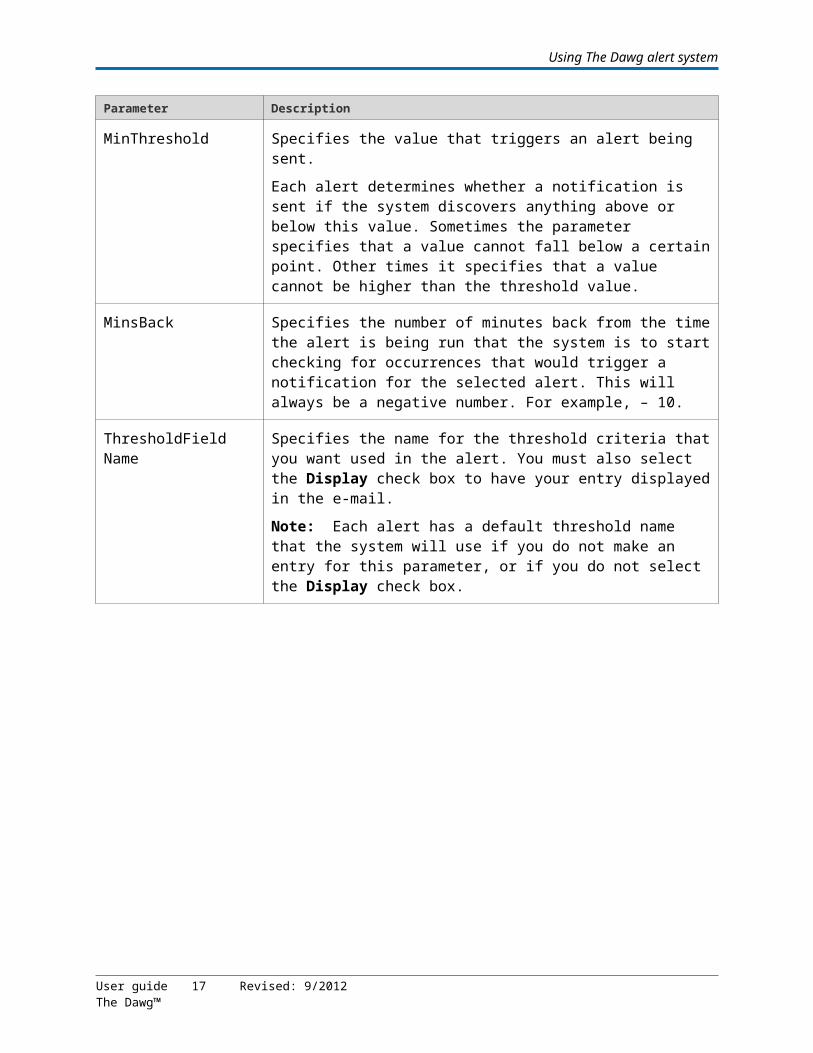
MinThreshold Specifies the value that triggers an alert being sent. Each alert determines whether a notification is sent if the system discovers anything above or below this value. Sometimes the parameter specifies that a value cannot fall below a certain point. Other times it specifies that a value cannot be higher than the threshold value.
MinThreshold Specifies the value that triggers an alert being sent. Each alert determines whether a notification is sent if the system discovers anything above or below this value. Sometimes the parameter specifies that a value cannot fall below a certain point. Other times it specifies that a value cannot be higher than the threshold value.
MinsBack Specifies the number of minutes back from the time the alert is being run that the system is to start checking for occurrences that would trigger a notification for the selected alert. This will always be a negative number. For example, – 10.
ThresholdFieldName
Specifies the name for the threshold criteria that you want used in the alert. You must also select the Display check box to have your entry displayed in the e-mail.Note: Each alert has a default threshold name that the system will use if you do not make an entry for this parameter, or if you do not select the Display check box.
ParameterToUseForDynamicEmail
Used to specify which label file the system will look at to find the targeted e-mail contact for the alert notification.In addition to the summary copy of the notification being sent to the contacts that are listed in the alert’s Email To field on the Configuration page, you can also have a notification sent to the person in charge of a specific area of business. For more information, contact your TMW Support representative.The Dawg looks at all values that are included on the alert. If the defined ParameterToUseForDynamicEmail value has been triggered on the alert, the system searches the for the label options in the returned data. If a match is found, the system then uses the associated e-mail address.
User guide 15 Revised: 9/2012The Dawg™
Using The Dawg alert system
Parameter Description
CacheResultsWith"NoRepetitionYN
Set this parameter to Y to restrict when notifications will be sent to the listed contacts. If set to Y, and the notification has been sent at least once for the alert, the notification will not be sent again until criteria matching one of the key fields has been updated. Note: You can use the DaysToMaintainCache parameter to determine how long you want to store the cached information gathered from the CacheResultsWithNoRepetitionYN parameter. This value determines how many days the cache data will accumulate before it is purged.
Using Web-based Help for The DawgThe Dawg has two types of Help available within the application. The first type is a single-screen, general overview, accessible in the Configuration page. The second type of Help relates to the alert you have selected in the Configuration page.
Overview HelpTo access the overview-type Help windows, press Ctrl+H. It displays information about The Dawg application in general. Use the scroll bar on the right side to read more information. You can enter information in the Additional notes section of the Help window. To save your changes, click Save.
Notes:1. If you cannot see the Save button, use your mouse to stretch the corners of the
window. 2. You must have security rights within Internet Explorer to save changes in this
window. If you do not have rights, a message alerts you in the Internet Explorer window when you try to save.
Alert HelpTo access alert-specific Help, press CTRL+D. The Help window displays information about the alert you currently have selected in the Configuration page. Use the scroll bar on the right side of each window to read additional information about the alert. You can enter information in the Additional notes section of the Help window. To save your changes, click Save.
Notes:1. If you cannot see the Save button, use your mouse to stretch the corners of the
window.
User guide 16 Revised: 9/2012The Dawg™
Using The Dawg alert system
2. You must have security rights within Internet Explorer to save changes in this window. If you do not have rights, a message alerts you in the Internet Explorer window when you try to save.
User guide 17 Revised: 9/2012The Dawg™