variable speed scroll saw - … you for purchasing this clarke variable speed scroll saw. before...
TRANSCRIPT

VARIABLE SPEED SCROLL SAWMODEL NO: CSS16VB
PART NO: 6462147
OPERATION & MAINTENANCEINSTRUCTIONS
LS0216

P
INTRODUCTION
Thank you for purchasing this CLARKE Variable Speed Scroll Saw.
Before attempting to use this product, please read this manual thoroughly and follow the instructions carefully. In doing so you will ensure the safety of yourself and that of others around you, and you can look forward to your purchase giving you long and satisfactory service.
GUARANTEE
This product is guaranteed against faulty manufacture for a period of 12 months from the date of purchase. Please keep your receipt which will be required as proof of purchase.
This guarantee is invalid if the product is found to have been abused or tampered with in any way, or not used for the purpose for which it was intended.
Faulty goods should be returned to their place of purchase, no product can be returned to us without prior permission.
This guarantee does not effect your statutory rights.
IN THE BOX.
ENVIRONMENTAL PROTECTION
Recycle unwanted materials instead of disposing of them as waste. All tools, accessories and packaging should be sorted, taken to a recycling centre and disposed of in a manner which is compatible with the environment.
1 x Scroll Saw 2 x 'Pin-less' Blade Clamp Adaptors
1 x 2.5 mm Hexagon Key 1 x Blade 133mm x 2.5mm x 15 t.p.i
1 x Blade Guard Assembly 1 x Blade 133mm x 2.5mm x 18 t.p.i.
1 x T-handled 3.0 mm Hex Key
2arts & Service: 020 8988 7400 / E-mail: [email protected] or [email protected]
P
GENERAL SAFETY INSTRUCTIONS
1. Keep work area clear - Cluttered areas and benches invite injuries.
2. Consider work area environment
• Do not expose tools to rain.
• Do not use tools in damp or wet locations.
• Keep work area well lit.
• Do not use tools in the presence of flammable liquids or gases.
3. Guard against electric shock - Avoid body contact with earthed or grounded surfaces (e.g. pipes, radiators, ranges, refrigerators).
4. Keep other persons away - Do not let persons, especially children, not involved in the work touch the tool or the extension cord and keep them away from the work area.
5. Store idle tools - When not in use, tools should be stored in a dry locked-up place, out of reach of children.
6. Do not force the tool - It will do the job better and safer at the rate for which it was intended.
7. Use the right tool
• Do not force small tools to do the job of a heavy duty tool.
• Do not use tools for purposes not intended; for example do not use circular saws to cut tree limbs or logs.
8. Dress properly
• Do not wear loose clothing or jewellery, they can be caught in moving parts.
• Non-skid footwear is recommended when working outdoors.
• Wear protective hair covering to contain long hair.
9. Use protective equipment
• Use safety glasses.
• Use face or dust mask if working operations create dust. <II
10. Connect dust extraction equipment - If the tool is provided for the connection of dust extraction and collecting equipment, ensure these are connected and properly used.
11. Do not abuse the cord - Never yank the cord to disconnect it from the socket. Keep the cord away from heat, oil and sharp edges.
12. Secure work - Where possible use clamps or a vice to hold the work. It is safer than using your hand.
13. Do not overreach - Keep proper footing and balance at all times.
3arts & Service: 020 8988 7400 / E-mail: [email protected] or [email protected]
P
14. Maintain tools with care
• Keep cutting tools sharp and clean for better and safer performance.
• Follow instruction for lubricating and changing accessories.
• Inspect tool cords periodically and if damaged have them repaired by an authorized service facility.
• Inspect extension cords periodically and replace if damaged.
• Keep handles dry, clean and free from oil and grease.
15. Disconnect tools - When not in use, before servicing and when changing accessories such as blades, bits and cutters, disconnect tools from the power supply.
16. Remove adjusting keys and wrenches - Form the habit of checking to see that keys and adjusting wrenches are removed from the tool before turning it on.
17. Avoid unintentional starting - Ensure switch is in "off' position when plugging in.
18. Use outdoor extension leads - When the tool is used outdoors, use only extension cords intended for outdoor use and so marked.
19. Stay alert - Watch what you are doing, use common sense and do not operate the tool when you are tired.
20. Check damaged parts
• Before further use of tool, it should be carefully checked to determine that it will operate properly and perform its intended function.
• Check for alignment of moving parts, binding of moving parts, breakage of parts, mounting and any other conditions that may affect its operation.
• A guard or other part that is damaged should be properly repaired or replaced by an authorized service centre unless otherwise indicated in this instruction manual.
• Have defective switches replaced by an authorized service centre.
• Do not use the tool if the switch does not tum it on and off.
21. Warning - The use of any accessory or attachment other than one recommended in this instruction manual may present a risk of personal injury.
22. Have your tool repaired by a qualified person - This electric tool complies with the relevant safety rules. Repairs should only be carried out by qualified persons using original spare parts, otherwise this may result in considerable danger to the user.
4arts & Service: 020 8988 7400 / E-mail: [email protected] or [email protected]
P
SCROLL SAW SAFETY INSTRUCTIONS
1. Wear safety goggles as protection against flying wood chips and saw dust. In many cases, a full face shield offers even better protection.
2. A dust mask is recommended to keep saw dust out of your lungs.
3. The scroll saw must be bolted securely to a stand or workbench. If the saw has a tendency to move during certain operations, bolt the stand or workbench to the floor.
4. A solid wood workbench is stronger and more stable than a workbench with a plywood table.
5. This scroll saw is for indoor use only.
6. Do not cut pieces of material which are too small to be held by hand.
7. Clear the work table of all objects except the workpiece (tools, scraps, rulers etc.) before turning the saw on.
8. Make sure the blades’ teeth are pointing down, toward the table, and that the blade tension is correct.
9. When cutting a large piece of material, support it at the height of the table.
10. Do not feed the workpiece through the blade too fast. Feed only as fast as the blade will cut.
11. Keep your fingers away from the blade. Use a push stick as you near the end of the cut.
12. Take care when cutting a workpiece which is irregular in cross section. Mouldings for example must lie flat, and not ‘rock’ on the table while being cut. A suitable support must be used.
13. Switch off the saw, and make sure the blade has come to a complete stop before clearing sawdust or off-cuts from the table.
14. Make sure there are no nails or foreign objects in the part of the workpiece to be sawn.
15. Be extra cautious with very large or small, or irregularly shaped workpieces.
16. Set up the machine and make all adjustments with the power OFF, and disconnected from the supply.
17. DO NOT operate the machine with the covers off. They must all be in place and securely fastened when performing any operation
18. Be sure to use the correct blade size and type.
19. Use ONLY approved replacement saw blades. Contact your local CLARKE dealer for advice. The use of inferior blades may increase the risk of injury.
5arts & Service: 020 8988 7400 / E-mail: [email protected] or [email protected]

6Parts & Service: 020 8988 7400 / E-mail: [email protected] or [email protected]
ELECTRICAL CONNECTIONS
Before switching the product on, make sure that the voltage of your electricity supply is the same as that indicated on the rating plate. This product is designed to operate on 230VAC 50Hz. Connecting it to any other power source may cause damage.
This product may be fitted with a non-rewireable plug. If it is necessary to change the fuse in the plug, the fuse cover must be refitted. If the fuse cover becomes lost or damaged, the plug must not be used until a suitable replacement is obtained.
If the plug has to be changed because it is not suitable for your socket, or due to damage, it should be cut off and a replacement fitted, following the wiring instructions shown below. The old plug must be disposed of safely, as insertion into a mains socket could cause an electrical hazard.
If the colours of the wires in the power cable of this product do not correspond with the markings on the terminals of your plug, proceed as follows.
• The wire which is coloured Blue must be connected to the terminal which is marked N or coloured Black.
• The wire which is coloured Brown must be connected to the terminal which is marked L or coloured Red.
• The wire which is coloured Yellow and Green must be connected to the
terminal which is marked E or or coloured Green.
We strongly recommend that this machine is connected to the mains supply via a Residual Current Device (RCD)
If in any doubt, consult a qualified electrician. DO NOT attempt any repairs yourself.
WARNING: READ THESE ELECTRICAL SAFETY INSTRUCTIONS THOROUGHLY BEFORE CONNECTING THE PRODUCT TO THE MAINS SUPPLY.
The wires in the power cable of this product are coloured in accordance with the following code:Blue = Neutral Brown = Live Yellow and Green = Earth
Plug must be BS1363/A approved.
Always fit a 13 Amp fuse.
Ensure that the outer sheath of the cable is firmly held by the clamp
Neutral(Blue)
Live(Brown)
Earth(Green and Yellow)
7Parts & Service: 020 8988 7400 / E-mail: [email protected] or [email protected]
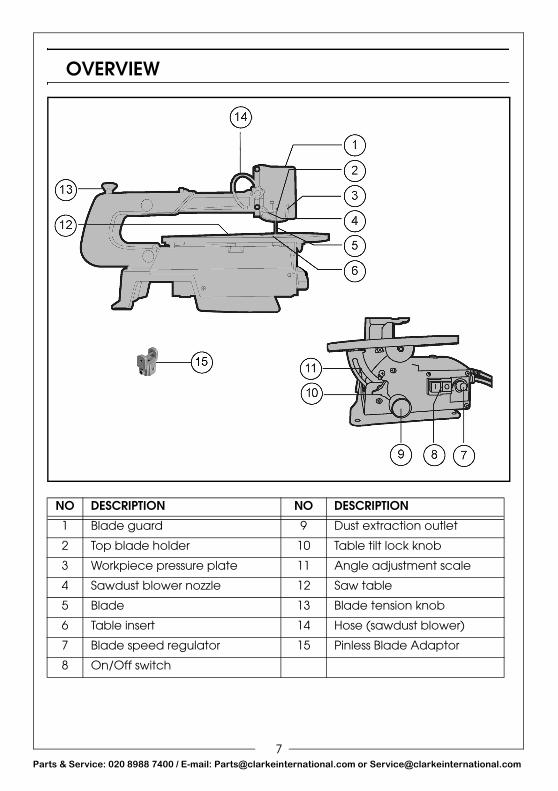
OVERVIEW
NO DESCRIPTION NO DESCRIPTION
1 Blade guard 9 Dust extraction outlet
2 Top blade holder 10 Table tilt lock knob
3 Workpiece pressure plate 11 Angle adjustment scale
4 Sawdust blower nozzle 12 Saw table
5 Blade 13 Blade tension knob
6 Table insert 14 Hose (sawdust blower)
7 Blade speed regulator 15 Pinless Blade Adaptor
8 On/Off switch
8Parts & Service: 020 8988 7400 / E-mail: [email protected] or [email protected]
MOUNTING THE SCROLL SAW
BOLTING THE SCROLL SAW ONTO A WORKBENCH1. It is recommended that this saw is securely mounted onto a robust
workbench. We recommend that you use the following fixings (not supplied).
• 4 x Hex bolts M8
• 4 x Hex nuts M8
• 4 x Flat washer Ø 8 mm
2. We recommend that a rubber fine rib matt 420 x 250 x 3 mm (minimum) 13 mm (maximum) is fixed between the workbench and scroll saw to help minimise vibrations and noise. This mat is not supplied.
• Suitable rubber matting of various thicknesses is available from your Clarke dealer.
NOTE: Do not over-tighten the screws. Leave enough give for the rubber mat to absorb any vibration.
WARNING: DO NOT PLUG SAW INTO MAINS UNTIL THE SAW HAS BEEN FIRMLY MOUNTED TO WORK SURFACE.

P
BEFORE CONNECTING TO THE ELECTRICAL SUPPLY
CHOOSING THE RIGHT BLADENOTE: As a rule, select narrow blades for intricate curve cutting and
wide blades for straight and large curve cutting.
Scroll saw blades wear out and must be replaced frequently for optimum cutting results.
Scroll saw blades generally become dull after 1/2 hour to 2 hours of cutting, depending on the type of material and speed of operation.
Best results are achieved with pieces less than one inch (25 mm) thick.
When cutting workpieces thicker than one inch (25 mm), you must guide the blade into the workpiece very slowly and take extra care not to bend or twist the blade while cutting.
PINLESS BLADE ADAPTORThe pinless blade adaptor allows you to use blades that don't have locating pins at each end of the blade.
1. Adjust one set screw on each adaptor until it covers approximately half the hole when viewed from above
2. Loosen the other set screw just enough to slide an adaptor onto each end of the blade.
9arts & Service: 020 8988 7400 / E-mail: [email protected] or [email protected]
P
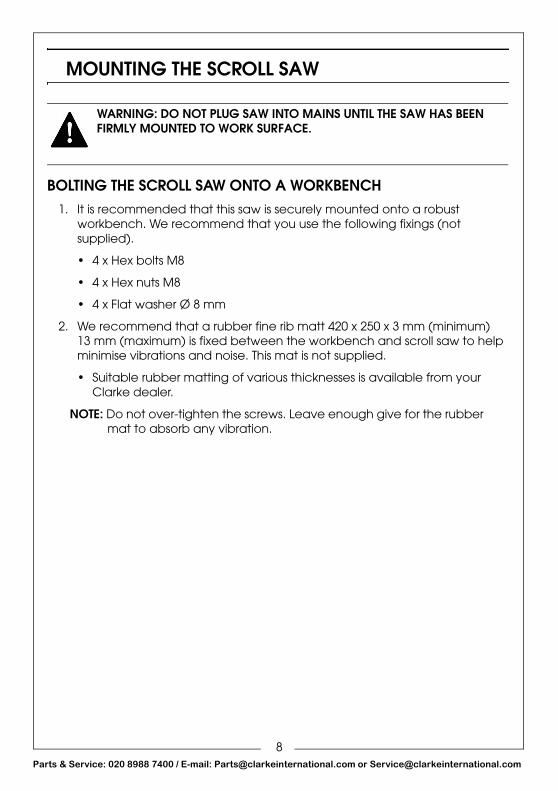
3. Place the blade and adaptors into the gauge on top of the machine to set the blade to the proper length.
CUTTING AT RIGHT ANGLES TO THE UPPER ARM WHEN USING PINLESS BLADES
• Cutting from the side of the saw will be necessary when your workpiece exceeds 405mm in length. With the blade positioned for side cutting the table must always remain in the 0° bevel position.
1. Remove both set screws from each blade adaptor, thread them into the opposite holes in the blade adaptor perpendicular to the adjustment pin.
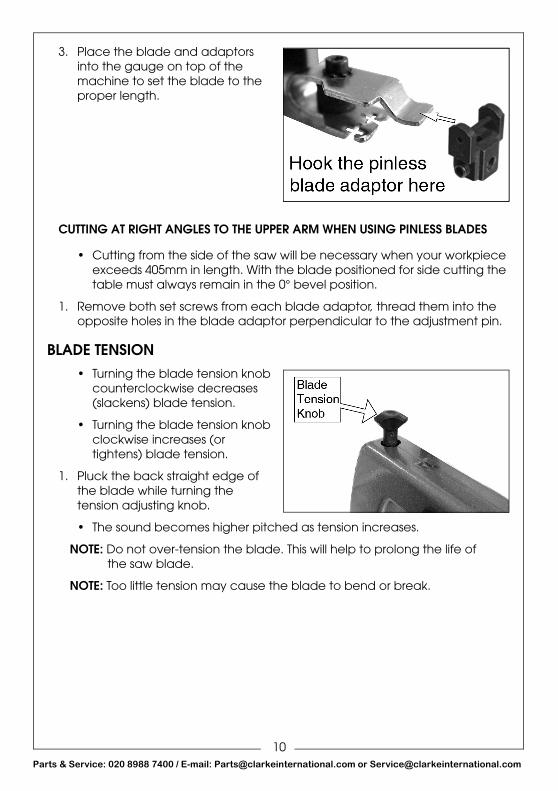
BLADE TENSION• Turning the blade tension knob
counterclockwise decreases (slackens) blade tension.
• Turning the blade tension knob clockwise increases (or tightens) blade tension.
1. Pluck the back straight edge of the blade while turning the tension adjusting knob.
• The sound becomes higher pitched as tension increases.
NOTE: Do not over-tension the blade. This will help to prolong the life of the saw blade.
NOTE: Too little tension may cause the blade to bend or break.
10arts & Service: 020 8988 7400 / E-mail: [email protected] or [email protected]
P
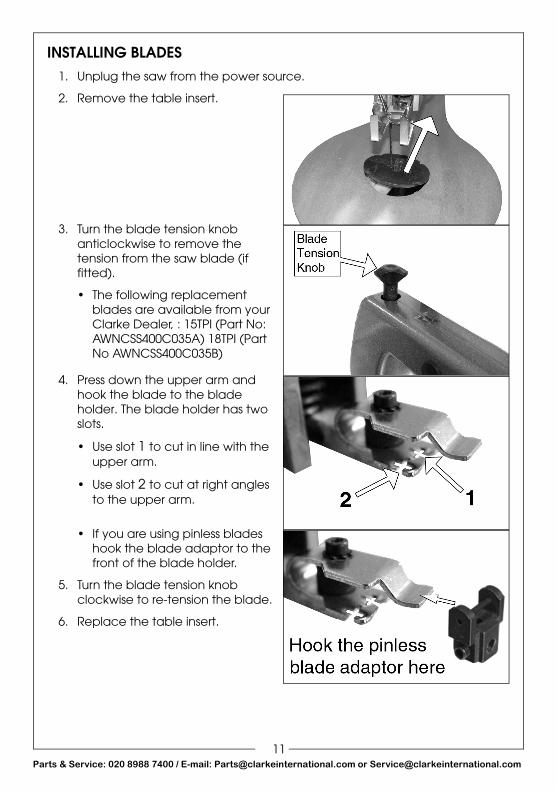
INSTALLING BLADES1. Unplug the saw from the power source.
2. Remove the table insert.
3. Turn the blade tension knob anticlockwise to remove the tension from the saw blade (if fitted).
• The following replacement blades are available from your Clarke Dealer, : 15TPI (Part No: AWNCSS400C035A) 18TPI (Part No AWNCSS400C035B)
4. Press down the upper arm and hook the blade to the blade holder. The blade holder has two slots.
• Use slot 1 to cut in line with the upper arm.
• Use slot 2 to cut at right angles to the upper arm.
• If you are using pinless blades hook the blade adaptor to the front of the blade holder.
5. Turn the blade tension knob clockwise to re-tension the blade.
6. Replace the table insert.
11arts & Service: 020 8988 7400 / E-mail: [email protected] or [email protected]
P
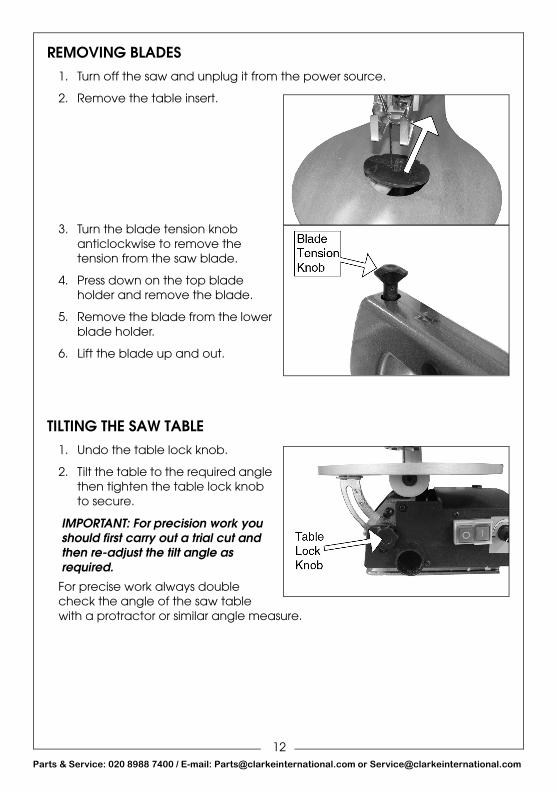
REMOVING BLADES1. Turn off the saw and unplug it from the power source.
2. Remove the table insert.
3. Turn the blade tension knob anticlockwise to remove the tension from the saw blade.
4. Press down on the top blade holder and remove the blade.
5. Remove the blade from the lower blade holder.
6. Lift the blade up and out.
TILTING THE SAW TABLE1. Undo the table lock knob.
2. Tilt the table to the required angle then tighten the table lock knob to secure.
IMPORTANT: For precision work you should first carry out a trial cut and then re-adjust the tilt angle as required.
For precise work always double check the angle of the saw table with a protractor or similar angle measure.
12arts & Service: 020 8988 7400 / E-mail: [email protected] or [email protected]

P
SQUARING THE SAW TABLE TO THE BLADE
1. Loosen the pressure plate adjustment knob.
2. Raise the pressure plate and lock it in the raised position.
3. Loosen the table lock knob and tilt the table until it is approximately at right angles to the blade.
4. Place a small square on the saw table next to blade and lock the table at 90° to square.
5. Retighten the table lock knob
SETTING THE SCALE INDICATOR
6. Loosen the securing screw holding the scale indicator. Move the indicator to the 0° mark and securely tighten the screw.
• Remember, the scale is a guide only and should not be relied upon for precision.
• Make practice cuts on scrap material to ensure your angle settings are correct.
7. Lower the pressure plate so it just rests on top of the workpiece and secure in place.
WARNING: TO AVOID ACCIDENTAL STARTING WHICH COULD RESULT IN SERIOUS INJURY, TURN THE SAW OFF, AND UNPLUG THE SAW FROM THE POWER SOURCE.
13arts & Service: 020 8988 7400 / E-mail: [email protected] or [email protected]

P
ON / OFF SWITCH To start the saw, press the ON button (I). To stop, press the OFF button (O).
NOTE: The machine is equipped with a magnetic switch to prevent it being switched on again accidentally after a power failure.
SPEED SETTING
The speed regulator allows you to set the blade speed appropriate to the material to be cut.
The speed may be adjusted from 550 to 1600 SPM (Strokes Per Minute).
• To increase the strokes per minute, turn the speed selector clockwise.
• To decrease the strokes per minute, turn the speed selector counterclockwise.
SAWDUST BLOWERThe sawdust blower is designed and preset to direct air to the most effective point on the cutting line. Make sure the pressure plate is adjusted to secure the workpiece and direct air at the cutting surface.
14arts & Service: 020 8988 7400 / E-mail: [email protected] or [email protected]
P
OPERATION
Before starting a cut, turn the saw on and listen to the sound it makes. If you notice excessive vibration or an unusual noise, stop the saw immediately and unplug it. Do not restart the saw until you have corrected the problem.
• It is expected that some blades may break until you learn how to use and adjust the saw correctly. Plan the way you will hold the workpiece from start to finish.
• Hold the workpiece firmly against the saw table.
• Use gentle pressure and both hands when feeding the workpiece into the blade. Do not force the cut.
• Guide the blade into the workpiece slowly because the teeth are very small and can only remove material on the down stroke.
• Avoid awkward operations and hand positions where a sudden slip could cause serious injury from contact with the blade. Never place your hands in the blade path.
• When cutting irregularly shaped workpieces, plan your cut so the workpiece will not pinch the blade.
CARRYING OUT INTERNAL CUTSOne feature of a scroll saw is that it can be used to make scroll cuts within a workpiece without breaking or cutting through the edge or perimeter of the workpiece.
1. To carry out internal cuts in a workpiece, firstly remove the blade.
2. Drill a 6.3 mm (1/4”) hole inside the boundary of the aperture to be cut from the workpiece.
3. Place the workpiece on the saw table with the drilled hole above the blade access hole.
4. Install the blade through the hole in the workpiece and adjust the blade tension.
5. When you have completed the internal cuts, remove the blade from the blade holders and take the workpiece off the table.
WARNING: BEFORE REMOVING OFFCUTS FROM THE TABLE, TURN THE SAW OFF AND WAIT FOR THE BLADE TO COME TO A FULL STOP TO AVOID SERIOUS PERSONAL INJURY.
15arts & Service: 020 8988 7400 / E-mail: [email protected] or [email protected]
P
STACK CUTTINGStack cutting may be used when several identical shapes need to be cut. Several workpieces may be stacked one on top of the other and secured to each other before cutting.
Pieces of wood may be joined together by placing double sided tape between each piece or by wrapping tape around the corners or ends of the stacked wood.
The stacked pieces must be attached to each other in such a way that they can be handled on the table as a single workpiece.
WHAT TO DO IF THE SAW BLADE JAMS IN THE WORKPIECEWhen withdrawing the workpiece, the blade may bind in the kerf (cut). This is usually caused by sawdust clogging the kerf or by the blade coming out of the blade holders. If this happens:
1. Place the switch in the OFF position.
2. Wait until the saw has stopped and unplug it from the power source.
3. Remove the blade and the workpiece.
Wedge the kerf open with a small flat screwdriver or wooden wedge then remove the blade from the workpiece.
WARNING: TO AVOID SERIOUS PERSONAL INJURY, DO NOT CUT SEVERAL WORKPIECES AT A TIME UNLESS THEY ARE PROPERLY ATTACHED TO EACH OTHER.
16arts & Service: 020 8988 7400 / E-mail: [email protected] or [email protected]
P
MAINTENANCE
GENERAL MAINTENANCE• Keep your scroll saw clean.
• Do not allow pitch to accumulate on the saw table. Clean it with gum and pitch remover.
POWER CABLE
CLEANING
• Never use water or chemical cleaners to clean your scroll saw. Wipe clean with a dry cloth.
• Always store your scroll saw in a dry place. Keep all working controls free of dust.
LUBRICATIONLubricate the arm bearings with oil after 10 hours of use. Re-oil after every 50 hours of use or whenever there is a squeak coming from the bearings as follows:
1. Turn saw on its side.
2. Prise off the rubber caps covering the pivot shafts.
3. Squirt a small amount of SAE 20 oil around the shaft end and bronze bearing.
4. Let the oil soak in overnight in this condition. Next day repeat the above procedure for the opposite side of the saw.
WARNING: TURN OFF AND UNPLUG THE SAW BEFORE CARRYING OUT ANY MAINTENANCE WORK ON YOUR SCROLL SAW.
WARNING: IF THE POWER CABLE IS WORN, CUT, OR DAMAGED IN ANY WAY, HAVE IT REPLACED IMMEDIATELY BY A QUALIFIED SERVICE TECHNICIAN. FAILURE TO DO SO COULD RESULT IN SERIOUS PERSONAL INJURY.
17arts & Service: 020 8988 7400 / E-mail: [email protected] or [email protected]

P
REPLACE CARBON BRUSHES
Your saw has externally accessible carbon brushes that should be checked periodically for wear.
1. Using a flat blade screwdriver, remove the top brush assembly cap from the top of the motor.
2. Gently pry the brush assembly out using a small screwdriver.
3. The second carbon brush can be accessed through the access port on the bottom of the motor. Remove this in the same way.
• If either of the brushes are shorter than 1/4 in. (6 mm), replace both brushes as a pair.
4. Make sure the brush cap is positioned correctly (straight). Tighten the carbon brush cap using a hand screwdriver only. Do not overtighten.
SPECIFICATIONS
WARNING: TURN OFF AND UNPLUG THE SAW BEFORE CARRYING OUT ANY MAINTENANCE WORK ON YOUR SCROLL SAW.
Model Number CSS16VB
Rated Voltage (V) 230 V
Input Power 90 W
Throat Depth 406 mm
Max. Cut 50 mm
Stroke 15 mm
Speed 550 - 1600 strokes per minute
Table Size 415 x 255 mm
Table Tilt 0-45o
Sound Power (Lwa dB) 87.4 dB
Dimensions (L x W x H) 610 x 320 x 360 mm
Weight 10 kg
18arts & Service: 020 8988 7400 / E-mail: [email protected] or [email protected]

19Parts & Service: 020 8988 7400 / E-mail: [email protected] or [email protected]
DECLARATION OF CONFORMITY