version 1.0.2 - 19.10 - wolfgang...
TRANSCRIPT
Key Features
• Creation of your own waves and wavetables. • Playful sound creation simply by drawing or picking
harmonics • 3D page, visualization of the wavetables, transformation
from photos into wavetables. • 256 waves assembled within a wave grid • 3 Audio Oscillators • 3 Noise generators, for audio and modulations • Classic 24 dB Lowpass Filter, combined with an overdrive
simulation. • Dual amplifier, for versatile control of 2 audio signals as
well as panning. • 13 Envelopes, for independent control of pitch,
waveform, filter and noise gain and panning • 4 LFOs • Arpeggiator • Delay/Reverb effect • Audio engine with 2 synthesis modes, and variable wave
blending quality. • Directly accessible context help inside the app • Use a camera, to shoot a picture and then transform it
into a sound! • Using state of the art technologies, but still the versatile
and efficient synthesis system.
Introduction Content
1 Introduction
1 Key Features
1 Description
2 Keyboard
4 Audio Recorder
5 Wave page
5 The wave grid
8 Spectrum editor
9 Wave editor
10 Parameter Page
10 The parameter panel
11 Oscillators
13 Envelopes
14 Filter
15 Dual Amplifier
16 LFO
17 Arpeggiator
18 Delay
19 3D page
19 Image Transformer
19 Setup page
20 Setup
22 CC display
26 Browser page
28 Browser
Version 1.0.2 - 19.10.2012
PAGE 2 PPG WAVEGENERATOR
Description PPG WaveGenerator is the latest development from the inventor of wavetable synthesis, Wolfgang Palm. It is a next generation synthesizer, building on the heritage of the PPG Wave keyboards. The PPG WaveGenerator comes with a multitude of wavetables. The sound material contains the typical sounds from the original PPG wave models, as well as many new sounds generated by versatile analysis tools and also hand edited waves. This app enables the user, to create his own wavetables in a playful way, and to hear the result immediately. Also you can construct the waves by adding harmonics very precise. Another way is to transform a picture into a wavetable. You can load photos from your album or even shoot a picture with the camera. The waves are collected in a grid of 256 fields, to which the 3 oscillators of the synthesizer have arbitrary and independent access. In a 3D display you get a visual impression on how the sound evolves. You can turn around the 3D object and zoom in and out, The Parameters of the synthesizer are divided into modules, which allows easy, yet powerful editing. It contains 3 oscillators with independent control of pitch and waveform. Each oscillator has its own glide, which gives a very dynamic sound. With a sophisticated routing system, the diverse modulation sources can be connected to all important control points. The keyboard is configurable totally freely, so you can setup all well-known musical scales, but also all imaginable custom scales that best fit into your music. PPG WaveGenerator benefits all advantages of the iPad, like X/Y control after the key on event, or two finder gestures for spectrum control. After a key is hit, the tone may be modified and modulated in various ways, just by moving your finger. A browser lets you sort the sound programs; you can categorize and rate them. Also complete custom sound banks may be created. All significant parameters are controllable via MIDI. There is a built in context specific help for all pages and modules.
PAGE 3 PPG WAVEGENERATOR
Keyboard The keyboard can be configured in various ways. Basically there are two styles: the single row and the double row style. Additionally you may setup your own scales, like Pentatonic or Lydian or totally free. To make your own scales, you start with the full 12 key scale and then delete the notes you don't need. Use Reset to get all 12 notes. Then select Edit from the mode menu, and delete the keys you want by tapping on them. When finished, switch back to one of the play modes. To shift the keyboard up or down in octaves, select the Shift mode, and shift the keyboard to the left or right. You see how the note octave values change. Then switch back to your play mode. Using Copy and Paste you can easily change the keyboard of other programs. The X and Y controls The iPad offers many nice features, which you won't find on hardware synths, such as polyphonic control after the key-on event! In WaveGenerator the CX and CY controllers allow you to configure various types of modulation. After touching the key, the CX value rises or falls as you move your finger to the right or left. Similarly, the CY value rises or falls as you move your finger vertically. Several CX and CY routings can be found in the controls of various routing lists on the Para page. These include controls for: Pitch, wave, filter or gain. Please note that the CX value does not work if you are in Legato mode. The CV control CV stands for velocity control. This is normally sent from a MIDI keyboard, and depends on how hard you hit the key. In WaveGenerator this works also, but if you are using just the iPad touch-keys, we have built in a feature that lets you play the keys with velo too. It depends on the vertical position on the key-pads where you touch the key, which controls the velo. If you tap in the low part, you get soft velo, if you tap in the upper part, hard velo.
PAGE 4 PPG WAVEGENERATOR
Audio Recorder In order to export audio, WaveGenerator has a built in audio recorder. Enter Rec mode, and play some notes or start the Arptor. When you tap on the Rec button again the recording stops, and you may select Play mode. The mini display shows the recorded material. Exporting the audio. There are two ways to export audio. One is via the iOS Pasteboard, the other is via file sharing and iTunes. In the context menu , you find the Copy function, which moves the audio into the iPad's Clipboard, and you can Paste it into another app. You may record up to 10 minutes stereo audio at 44.1 kHz. Please note that copying a long recording to the clipboard may take a short while. To use file sharing, you first have to save your recording to a temporary file, using the Save command. Then open iTunes on your computer. Under Devices, click on the iPad, Go to the Apps tab Scroll down until you see File Sharing. Select WaveGenerator from the list and you see temprec.wav You can Save the file to your computer from here.
PAGE 5 PPG WAVEGENERATOR
Wave Page The wave grid The wave grid contains 16 rows with 16 places each, which can be filled up with waveforms. These waves are the basic sound-material for your programs. The way you access these waves, depends on the envelope settings and a path which connects single waves out of the grid. Above the grid is the title bar, which shows the name of the currect wavetable, the Load button, the load mode and the context menu with the tools. More on that later. When you change the program, a new wavetable is loaded from the bottom of the grid upward. When you manually load a wavetable via the load icon, you have 3 options available in the popover box just to the right of the load icon: Exchange - The old wavetable is erased and the new one is loaded. Append - The new wavetable is loaded directly after the current content of the grid. Over - The new wavetable is overloaded, starting at the current selection point. The Load file list, is grouped in 3 areas: PPG - Here you find all the wavetables which belong to the factory presets. The grey text shows the method which was used to create the wavetable. SndD - These are wavetables which our sound-designers have created. User - Here your own wavetables will show up. Touching the small category label on the right, will bring you directly to that part of the list.
PAGE 6 PPG WAVEGENERATOR
The wave grid operates in 7 modes: Browse - In this mode, you may check out single waves, listen to them and get a feeling for the waveforms. You also may change the spectrum or the wave-shape directly, by using the controllers on the left side. Note that this mode is quite slow due to the grafic power required. If you want to create new waves it might be better to do so in Record or Modify mode. Path - Here you can define the path on which the envelopes will control the wave-access. Linear - This is an easy way to create linear paths, which run through all points of one column. If you touch a point in the grid, the whole column will be selected. If you move from left to right, more columns will be added to the path. Edit - Tap and drag a column of waves to another position. This is especially usable when the columns are wavetables itself, or contain material of a certain kind. Record - In this mode, you can quickly create your own wavetables. Just drag inside the wave editor or in the spectrum view, and watch the new waves getting stored into the grid. when finished recording, switch to Linear, and you can play through your new waves. Note, that the record starts from the active point inside the grid. Overdub - Here you can make changes (overdubs) to an existing wavetable. Each time you pick a point in the wave or spectrum, one wave from the wavetable is modified. The same works in Draw or Over modes of the wave and spectrum controllers. Note, that the overdub starts from the active point inside the grid. Modify - Select a single wave from the path, and change its waveform or spectrum. You still play the complete path. When you do changes to the waves or add more waves to the set, there appears a * behind the wavetable name. When you save the program, you will be asked to enter a new filename for the wavetable.
PAGE 7 PPG WAVEGENERATOR
The wave grid tools The context menu contains tools, which help you change the content of your wavetable. Save - Saves the current wavetable under the name which you might have edited inside the name editor. (Note: you cannot change the factory wavetables!) Save Path - This saves the new wavetable, but only the points which are contained in the current path. This is very helpful, when you want to compact a wave selection. Clear - Erases all the waves from the grid. Reset Path - Resets the path, so you can start a new one. You have to select the Path mode to do that (see above). Delete Last - Deletes the last point in the path. Normalize - corrects the gains of all waves in the grid. This is useful if you have adjusted the gains in the spectrum or wave editor too high.
PAGE 8 PPG WAVEGENERATOR
Spectrum editor The spectrum editor lets you change the waveform inside the wavegrid. This is in conjunction with the mode you have selected for the wavegrid. If you have selected Modify or Browse, you may change the wave which you last touched. You can zoom in and out to the resolution you prefer and scroll to any position inside the spectrum. The controller has three modes: Pick You pick a single bar from the spectrum and change its amplitude. In this mode, you always stay on the selected bar. Draw In this mode, you can also change the gain, but when you move horizontally, the controller switches to another bar. Over You overwrite bars on the selected wave. This can be recorded into a new wavetable, using Record mode in the wavegrid. Please take care, that your waves don't get too high in amplitude. This can happen if you start with a sine, and add more and more harmonics. The resulting waveform should not exceed the frame of the wave editor! If this happens, you may correct the complete wavetable with the Normalize tool in the grid context menu. Spectrum Balancer If you tab the controller with two fingers, you may change the overall spectrum tilt and gain.
PAGE 9 PPG WAVEGENERATOR
Wave editor The Wave editor lets you change the waveform directly. It works similar to the spectrum editor, but has no zoom. The display always shows a half wave. The other half is mirrored. If you set the wavegrid into Browse mode, you may see the full cycle waveform, while you edit it. The controller has three modes: Pick You pick a single bar (sample) from the wave and change its amplitude. In this mode, you always stay on the selected bar. Draw In this mode, you can also change the gain, but when you move horizontally, the controller switches to another bar. Over You overwrite bars on the selected wave. This can be recorded into a new wavetable, using Record mode in the wavegrid.
PAGE 10 PPG WAVEGENERATOR
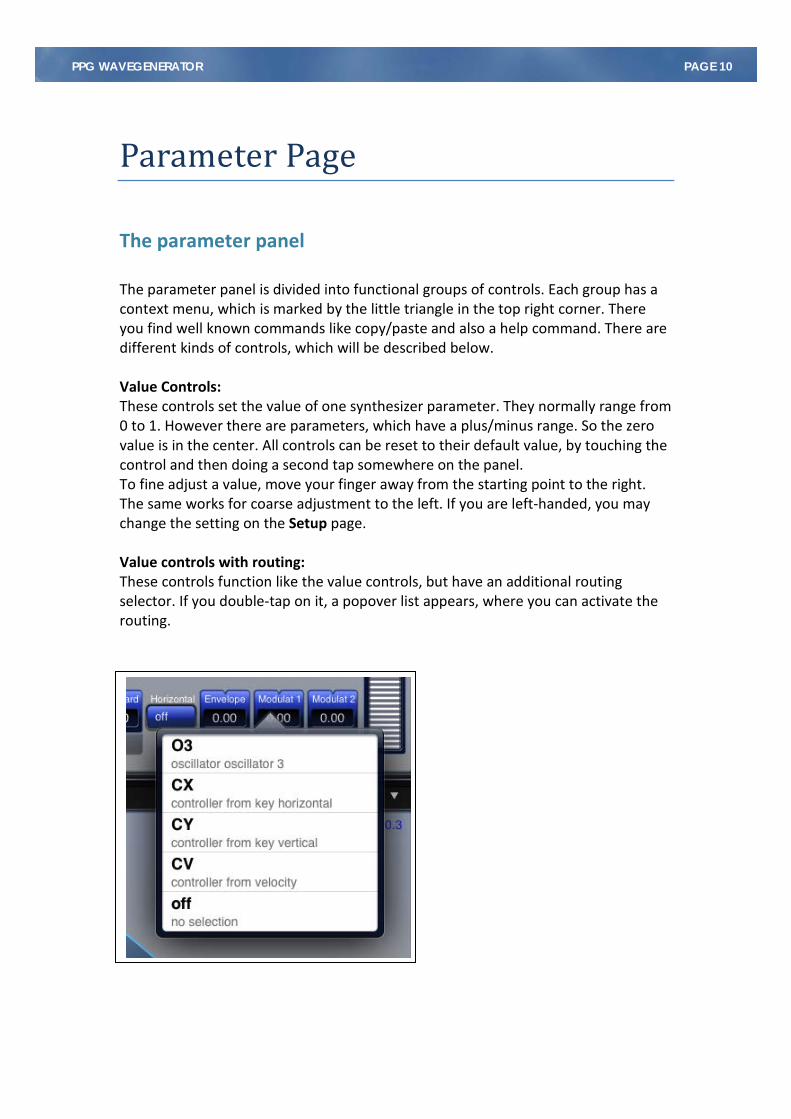
Parameter Page The parameter panel The parameter panel is divided into functional groups of controls. Each group has a context menu, which is marked by the little triangle in the top right corner. There you find well known commands like copy/paste and also a help command. There are different kinds of controls, which will be described below. Value Controls: These controls set the value of one synthesizer parameter. They normally range from 0 to 1. However there are parameters, which have a plus/minus range. So the zero value is in the center. All controls can be reset to their default value, by touching the control and then doing a second tap somewhere on the panel. To fine adjust a value, move your finger away from the starting point to the right. The same works for coarse adjustment to the left. If you are left-handed, you may change the setting on the Setup page. Value controls with routing: These controls function like the value controls, but have an additional routing selector. If you double-tap on it, a popover list appears, where you can activate the routing.
PAGE 11 PPG WAVEGENERATOR
Oscillators Wave Generator has 3 audio oscillators, which can be very flexibly controlled and routed. Each oscillator may use its own envelope to control the wave access, and its own LFO to control the pitch. The oscillators have four modes of operation. Audio 1 is the standard audio mode which has the most possible overtones. However in some cases it may be more useful to use the Audio 2 mode, which has a softer sound. Especially for high pitches it may be better to use mode 2. There is also a sub-audio mode, which sets the pitch below audio range, so it can be used as an adaptable waveform LFO. Finally there is an off mode, which simply saves processor power. The pitch section: Here you find the standard parameters like Octave and Semitones. The Keyboard tracking para is used to setup precise tracking of the oscillators. In this way very fine detunings spread across the keyboard are possible. Modulat 1 has noise and frequency modulation. Double tap on the control to open a popup list and select from a list of modulation sources. Modulat 2 works in the same way. Please note, that the Glide only works in Legato keyboard mode. The wave section: Here you will find various options for controlling wave access of the 3 oscillators. The W Offset para shifts the path you have setup inside the wave-grid. If you tap the Para page selector a second time, you see the wave-grid together with the oscillator and envelopes. This way it is easy to see, how the wave controls affect the actual path in the grid. The display changes with the oscillator selected.
The Blending parameter works as a smoothing function as the oscillator progresses through the waves. When set to 1, it gives you hard switching, 0 gives the smoothest blend.
PAGE 12 PPG WAVEGENERATOR
The Horizontal switch, also controls the wave offset. To demonstrate this, select preset "3 Point", and switch the para page to half-mode, so that you can watch the green light point. The point moves on the path. Now set the W Offset to -1. you see, that the played path now is offset 1 wave. If you set -2 the offset increases. At -16 the offset is a full grid column, so the path is now parallel shifted to the left. Now if you activate the Horizontal switch, the path is only allowed to offset in horizontal direction. If you change the Offset, you can verify this. Each time the offset is another 16 steps away, the light point moves more sideways. Of course the most important controller for the waveform, is the envelope. Here you have three envelopes, which can be assigned to the oscillators. If you select Own this oscillator uses its own envelope. For oscillators 2 and 3, you also can select the envelope from oscillator one. If you tap on the control, the envelope display switches to the corresponding envelope, so you have immediate access to it. If you set the routing to off then a constant value is used which can be adjusted by the value of the envelope parameter.
PAGE 13 PPG WAVEGENERATOR
Envelopes In WaveGenerator you may use up to 13 independent Envelopes. In the popover list you find short descriptions on how each envelope is used as default. However a single envelope can also be used by other modules. E.g. you can also use envelope W 1 for the wave control of oscillator 2 and 3. The envelope types: The envelopes can be configured as normal ADSR type envelopes, or as a endless looping type. In the loop mode, the envelope goes into decay and then rises again to a second peak level, where it decays again and so on. However not all envelopes have this feature. e.g. the gain envelope must always decay to zero after some time, so it doesn't have the loop mode. For the wave controls a loop can be very useful, as it creates a lively sustain sound, like a sampler does when it loops. You can activate the loop via the context menu, in the envelope module. The control points: The envelope has 3 to 5 control points, dependant on its mode. If you select the gain envelope G1 you see only the normal three control points needed for an ADSR envelope. With the peak you control the Attack time, with the second point, the Sustain as well as the decay time, with the third point the release time. Nothing special here. If you look at a wave controller envelope, like W1, you have 4 points, if it has no loop. Additional to the normal ADSR you have a point at time zero. This point shifts the base level of the envelope up and down. Which is very important for the wave control, because you don't have an extra base parameter there. You may even move this point higher than the peak ! Which then inverts the envelope. Also the 4th point behaves different, as in ADSR. You may move this point up and down also, but it acts somewhat different than the zero point. Now if you are in loop mode, you have 5 points. The 4th point controls the width of the loop, and the 5th point offers a random component to the loop. If you move point 5 up, the random effect increases, move it down and you get more regular periods. Just try it out. Besides all this, there are control points between the main points, which let you bend the envelope curves. If two or more control-points come too close to each other, there is another way to select the point you want to use. Therefore double-tap near the points, and leave the finger on the screen on the second tap. Now move the point as desired. The active point is always highlighted. The envelope time scale automatically changes according to the release endpoint. The end time of the scale is shown in the little TIME field in the top right corner. Each envelope has its own velocity attenuator, which you may adjust in the top right corner of the envelope display. The velocity is controlled either by external MIDI keyboard, or by the vertical position where you tap the key.
PAGE 14 PPG WAVEGENERATOR
Filter The filter module is used to filter spectral parts of the oscillator and noise signals. The audio input of the filter is fed by a mixer. This mixer is not displayed in an extra module, its inputs are controlled by the gain faders in the oscillators and the noise module. Note, that Noise 1 is the audio noise source, while Noise 2 and 3 are only used for modulation purposes. The base section: Here you find the main filter parameters, like Cutoff frequency and Emphasis. The filter can operate in one of three modes: Normal This is the well known 24dB lowpass. Drive In this mode the filter is overdriven and goes into saturation. Bypass The filter is not used and the mixer signal is routed directly to the output side of the filter. The modulation section: Here you find the Keyboard tracking para and two Modulation inserts. These work similar to the other routing selectors in the other modules. Double tap opens the selection popover box, and offers various modulation sources. Note, that the selected source is always attenuated by the value inside the control. Here we have bipolar controls, meaning that the source signals may be inverted if you select negative values.
PAGE 15 PPG WAVEGENERATOR
Dual Amplifier The Dual Amplifier module controls two independent gain controls, also known as VCAs in analog systems. The Audio section: The Audio 1 / 2 inputs select the audio sources for each VCA. Note that the Osc1,2,3 signals are taken directly from the oscillator waveforms, they are not attenuated by the Volume faders inside the oscillator modules. The noise signal is always Noise 1, with its Gain and Color controls. With the Spread you can separate the 2 outputs to the left and right channel. The Control section: VCA 1 is always controlled by envelope #1. For VCA 2 you may select another envelope. The panning may be dynamically controlled by parameter Pan Mod. The Velocity control sets the velocity gain for both VCAs.
PAGE 16 PPG WAVEGENERATOR
LFO WaveGenerator comes with 4 LFO's, which may be selected in the header bar of the module. If you tap on a routing controller inside another module, which uses a LFO as modulation source, the corresponding LFO will also be selected. Each LFO may be controlled by an envelope, another LFO or the CX, CY and velocity controllers. You select the modulation source by double tapping the Intensity control. The Shape has a special feature besides the standard waveforms, in that you may vary the ON/OFF ratio of the waveforms. Something which is common for rectangular waves, is also applicable here for the sawtooth and sine waveforms. The Speed parameter may be synced from an external MIDI clock. The Offset selector makes it possible either to have the LFO wave centered around zero, or to have it only above zero, or below.
PAGE 17 PPG WAVEGENERATOR
Arpeggiator The Arpeggiator module (abbrev. Arptor) is a combination of a small step sequencer and arpeggiated playback. You may record up to 16 notes, then switch to Play and select the appropriate play mode. The Range parameter defines the overall length of the arpeggio. If you record 3 notes, and set the Range to 8 and use UP mode, the sequence of notes will be: 1,2,3,1,2,3,1,2, now repeat 1,2,3... The mode can be changed by double tapping on the Range control and selecting it from the popup menu. For info on synchronisation, please look on the Setup page help.

PAGE 18 PPG WAVEGENERATOR
Delay WaveGenerator comes with a simple delay effect. The delay times control the overall duration of the effect. Taps 1 controls the delay time of the reverb part, while Taps 2 the pre-delay part. With Mix you setup the reverb part of the sound compared to the original signal. Also in this section you find the Master Volume control for the whole program.
PAGE 19 PPG WAVEGENERATOR
3D Page Image Transformer Image Transformer can transform an image into a wavetable. You may select a photo from your album or even take a pic with the camera. There are two ways the transformer works: Wave: In wave mode, the image is taken row by row, and directly copied into the wavetable. Spectrum: In spectrum mode, the rows of the image are interpreted as spectra, and then transformed into waves. So the 3D always shows the resulting waveforms. The transformer always occupies the left half of the wavegrid. The previously loaded content is erased. To display the first 128 waves of your wavetable (independent of the path, and synth settings) use "Display All".
PAGE 20 PPG WAVEGENERATOR
Setup Page Setup This page lets you setup your basic system parameters, like sample rate and MIDI input. You should enter your personal signature, which will be shown in the sound programs you create. There is also a little MIDI monitor built in, which shows the incoming CC and MIDI clock. If you use MIDI via the Network, ensure that the iPad is connected (settings -> bluetooth), not forgetting your host as well. Number of voices The maximum number of voices you can play is limited by the system power. It is lower in an iPad 1 than in the second and third generation devices. If you setup the highest quality, which is 44100 Hz, and set the number of voices too high, then you may get dropouts in the audio signal. If that happens, then you will have to reduce either the sample rate or the number of voices. Audio Mix mode This is important, if you want to combine WaveGenerator with other synth, or sequencer apps. If Mix is set to off, then WG is the only app that may generate audio. This means if you close WG and open another audio app, WG will stop playing and cannot receive MIDI anymore. If Mix is set to on, then the audio is mixed with other apps. Now you can control WG from sequencers or other synths which feature MIDI out. MIDI input WaveGenerator has two MIDI inputs. One is exposed to other apps, the other is active only if you select a MIDI source with the MIDI selector. It depends on the other app you use, which method is best and possible. Some seq. apps show a list of MIDI inputs, and you can select which one should play the sequence. Other apps just expose their MIDI out, and you must select that one in WG's MIDI selector. MIDI receive channel If this parameter is set to zero, WaveGenerator operates in Omni mode, otherwise in Poly mode with the selected channel. MIDI Mod-wheel is routed to the CY control, and channel aftertouch to CX. Synchronisation The Arptor and the LFOs may be synced to external MIDI. You can verify that the external signals are received by your iPad, using the little

PAGE 21 PPG WAVEGENERATOR
MIDI monitor display on the setup page. When the BPM display shows the correct value, you may activate the sync with the Arptor sync and LFO's sync buttons. In this case the speed parameters act as ratio for the clock speed. So if the external sequencer is running on 120 BPM and you set the Arptor speed to 120 or 130 the arpeggio runs on the same speed as the sequencer bars. If you turn up the speed, lets say to 200, the Arptor will sync into double rate.
PAGE 22 PPG WAVEGENERATOR
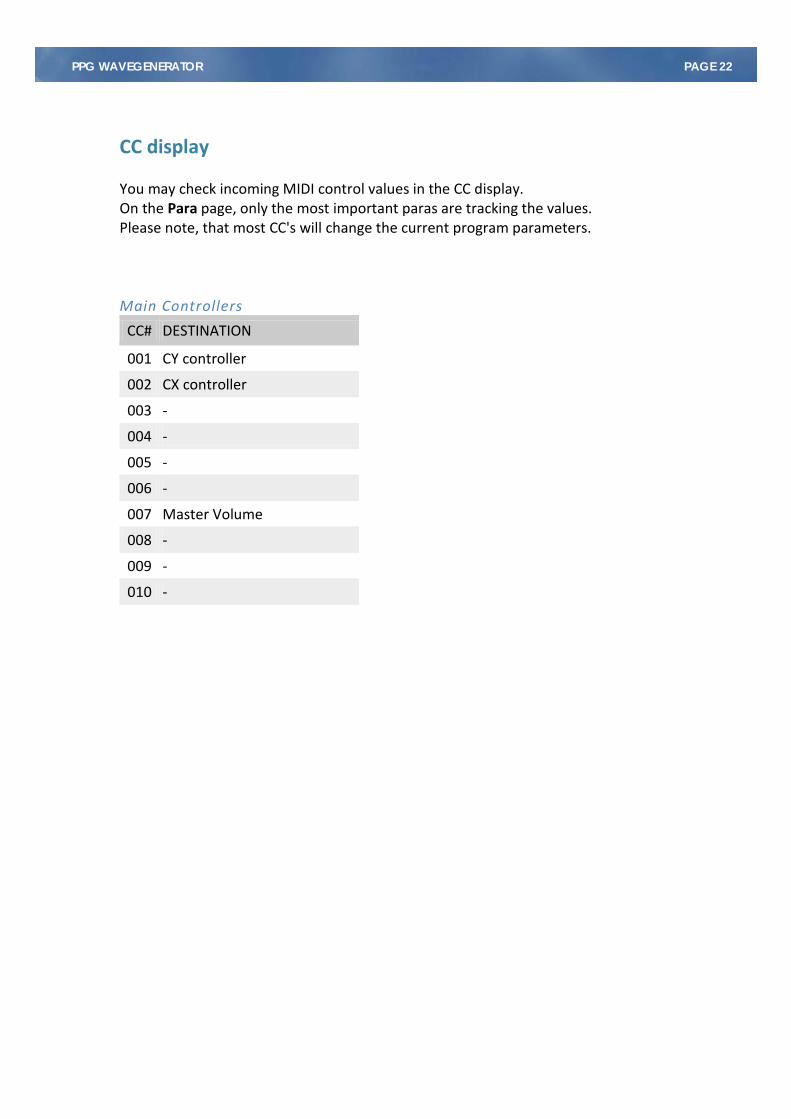
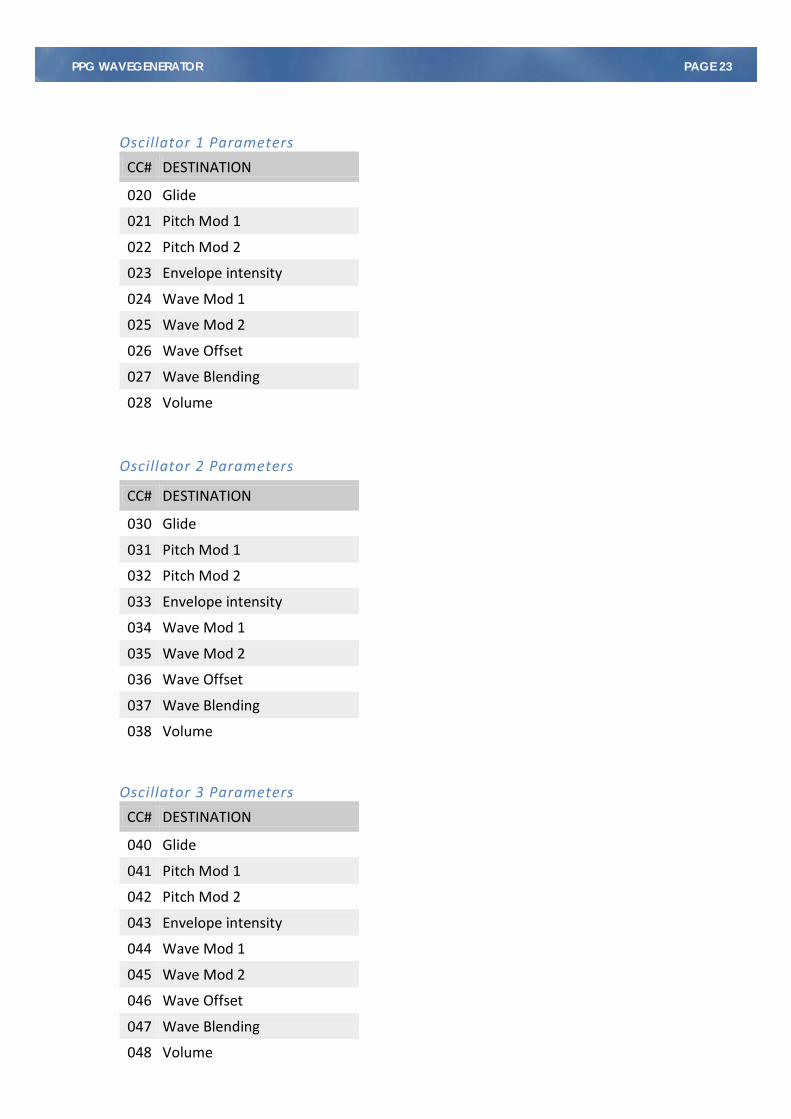
CC display You may check incoming MIDI control values in the CC display. On the Para page, only the most important paras are tracking the values. Please note, that most CC's will change the current program parameters. Main Controllers
CC# DESTINATION
001 CY controller
002 CX controller
003 -
004 -
005 -
006 -
007 Master Volume
008 -
009 -
010 -
PAGE 23 PPG WAVEGENERATOR
Oscillator 1 Parameters
CC# DESTINATION
020 Glide
021 Pitch Mod 1
022 Pitch Mod 2
023 Envelope intensity
024 Wave Mod 1
025 Wave Mod 2
026 Wave Offset
027 Wave Blending
028 Volume
Oscillator 2 Parameters
CC# DESTINATION
030 Glide
031 Pitch Mod 1
032 Pitch Mod 2
033 Envelope intensity
034 Wave Mod 1
035 Wave Mod 2
036 Wave Offset
037 Wave Blending
038 Volume
Oscillator 3 Parameters
CC# DESTINATION
040 Glide
041 Pitch Mod 1
042 Pitch Mod 2
043 Envelope intensity
044 Wave Mod 1
045 Wave Mod 2
046 Wave Offset
047 Wave Blending
048 Volume

PAGE 24 PPG WAVEGENERATOR
Noise 1 (audio) Parameters
CC# DESTINATION
050 Gain
051 Color
Filter Parameters
CC# DESTINATION
055 Cutoff
056 Emphasis
057 Modulation 1
058 Modulation 2
Pedals
CC# DESTINATION
060 Sustain Pedal
061 reserved
062 reserved
063 reserved
LFO 1 Parameters
CC# DESTINATION
070 Intensity
071 Shape
072 Speed
LFO 2 Parameters
CC# DESTINATION
073 Intensity
074 Shape
075 Speed
PAGE 25 PPG WAVEGENERATOR
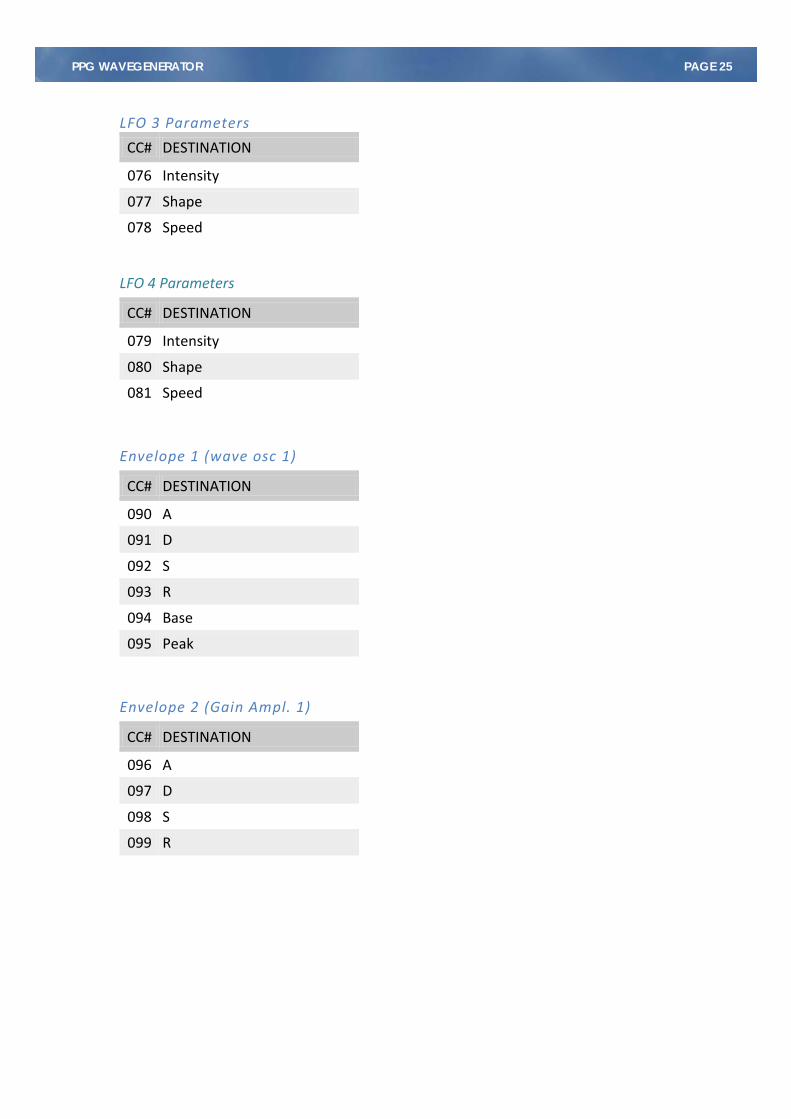
LFO 3 Parameters
CC# DESTINATION
076 Intensity
077 Shape
078 Speed
LFO 4 Parameters
CC# DESTINATION
079 Intensity
080 Shape
081 Speed
Envelope 1 (wave osc 1)
CC# DESTINATION
090 A
091 D
092 S
093 R
094 Base
095 Peak
Envelope 2 (Gain Ampl. 1)
CC# DESTINATION
096 A
097 D
098 S
099 R
PAGE 26 PPG WAVEGENERATOR
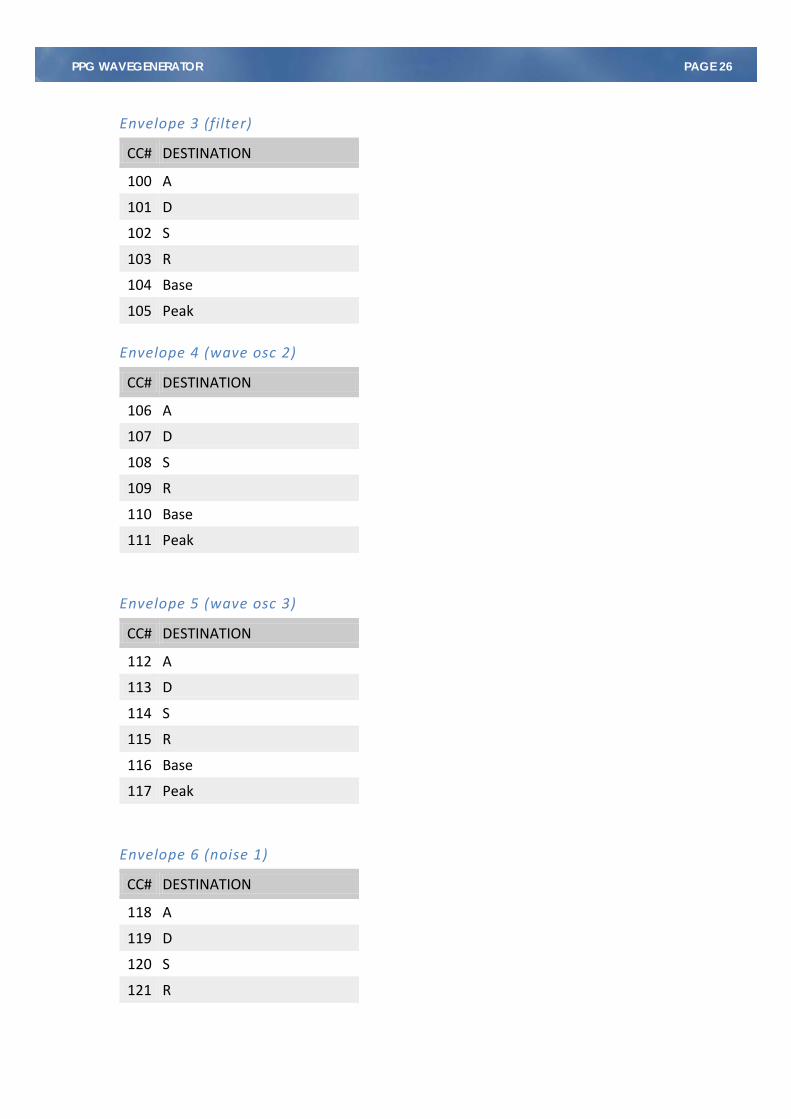
Envelope 3 (filter)
CC# DESTINATION
100 A
101 D
102 S
103 R
104 Base
105 Peak
Envelope 4 (wave osc 2)
CC# DESTINATION
106 A
107 D
108 S
109 R
110 Base
111 Peak
Envelope 5 (wave osc 3)
CC# DESTINATION
112 A
113 D
114 S
115 R
116 Base
117 Peak
Envelope 6 (noise 1)
CC# DESTINATION
118 A
119 D
120 S
121 R

PAGE 27 PPG WAVEGENERATOR
Dual Amplifiers
CC# DESTINATION
122 Audio 1 gain
123 Audio 2 gain
124 Spread
125 Gain Mod
126 Panning Mod
127 VCA 2 envelope gain
PAGE 28 PPG WAVEGENERATOR
Browser Page Browser The browser page offers a number of easy ways to manage your program and sound banks. This includes the copying and sorting of individual programs into other, or new program banks. The page is divided into three parts: The Program browser, the Program manager and the Bank manager. The Program Browser The order of the programs inside the browser is controlled by the mode selector, left above the browser. This mode acts like a filter. The default setting is All this means that all categories are displayed at once. In this case the programs are grouped into categories. Each one has a grey bar above the list of programs. On the right side there is an extra vertical scale, which shows all the available categories. If you tap on one, the browser scrolls to the beginning of that category. When you select a category as filter, the browser only displays programs from that category. If you set the filter to Unsorted, then the list shows all programs as they are ordered in the bank, which is the order you get when you step through the programs. You may change the category in which your program appears, inside the browser itself. Therefore the selector must be set to Unsorted and the first property selector must be set to Category. Now you simply tap inside the browser line of the desired program, and shift sideways. If you copy a program, with Copy and Paste New, the new program has the old category. Right above the browser, there are column filters, which you can use, to display certain information about the programs, like create date, or keyboard info.
PAGE 29 PPG WAVEGENERATOR
The Program Manager The top left field contains tools to manage the programs inside the active bank. You may select the active bank, with the popup list. The Delete button, deletes the active program. Copy makes a copy and puts it inside the destination bank. That is the bank, you have selected in the Bank Manager. The text input field allows you to write a comment for your bank. The Bank Manager Here you administer your bank files. Each bank contains up to 100 programs. To create a new bank, tap New. Then you have an empty bank as destination. Now you may copy programs from your current bank into the new one. Delete removes the selected target bank from the file system. Save As makes a copy with a new name. https://www.facebook.com/PPGWaveGenerator http://wolfgangpalm.com