vertical induction motors - high thrust hollow & solid shaft and in
TRANSCRIPT

GEI-M1011A
!"
GE Industrial Systems
Installation Instructions
Vertical Induction Motors High Thrust Hollow & Solid-Shaft and In-Line Solid-Shaft Frames 182-5013 NEMA Type P Base TEFC

GEI-M1011A
Table of Contents Subject Page I. General Information ..........................................................................................................................................................3 A. How to Properly Use This Instruction Manual.............................................................................................................3 B. Safety Symbol Legend ...............................................................................................................................................3 C. Safety Precautions......................................................................................................................................................4 D. Introduction ...............................................................................................................................................................5 E. Description of Labels and Nameplates ........................................................................................................................5 F. Model and Serial Numbers .........................................................................................................................................5 II. Receiving, Handling and Storage.......................................................................................................................................5 A. Unpacking..................................................................................................................................................................6 III. Installation ........................................................................................................................................................................6 A. Location and Mounting ..............................................................................................................................................6 B. Pump and System Precautions ....................................................................................................................................6 C. Alignment of Solid Shaft Motors ................................................................................................................................7 D. Couplings for Hollow Shaft Motors ............................................................................................................................7 1. General ...............................................................................................................................................................7 2. Self-Release Couplings........................................................................................................................................7 3. Bolted Couplings.................................................................................................................................................8 4. Non-Reverse Couplings.......................................................................................................................................8 E. Power Supply and Connections...................................................................................................................................9 1. Wiring and Grounding.........................................................................................................................................9 2. Allowable Voltage and Frequency .....................................................................................................................10 3. Position of the Conduit Box...............................................................................................................................10 F. Lubrication...............................................................................................................................................................10 G. Water Cooling..........................................................................................................................................................10 1. Oil Cooling Coil Connections............................................................................................................................10 IV. Operation........................................................................................................................................................................11 A. Steps Prior to Initial Start-Up After a Long Idle Period .............................................................................................11 B. Initial Start ...............................................................................................................................................................12 C. Jogging and Repeat Starts.........................................................................................................................................12 V. Maintenance ...................................................................................................................................................................12 A. General ....................................................................................................................................................................12 B. General Cleanliness..................................................................................................................................................13 C. Coupling Maintenance..............................................................................................................................................13 D. Relubrication............................................................................................................................................................13 1. Oil Lubricated Bearings.....................................................................................................................................13 2. Grease Lubricated Bearings ...............................................................................................................................14 E. End-Play Adjustment ...............................................................................................................................................15 1. General .............................................................................................................................................................15 2. Lower Thrust Bearings – 182-286 Frames, Grease Lubricated ............................................................................15 3. Upper Ball Thrust Bearing – 324-5011 Frames, Oil Lubricated ..........................................................................15 4. End Play Adjustment – Spherical Roller Thrust Bearing.....................................................................................15 F. Bearing Replacement ...............................................................................................................................................16 G. Oil Cooling Coil Maintenance ..................................................................................................................................16 H. Insulation and Winding Maintenance........................................................................................................................17 1. General .............................................................................................................................................................17 2. Vacuum and Compressed Air Cleaning..............................................................................................................17 3. Cleaning with Water and Detergent....................................................................................................................17 4. Cleaning with Solvents ......................................................................................................................................17 5. Revarnishing Windings .....................................................................................................................................18 VI. Renewal Parts .................................................................................................................................................................18 VII. Trouble Shooting Chart ...................................................................................................................................................19
2

GEI-M1011A
I. GENERAL INFORMATION A. How to Properly Use This Instruction Manual
This manual has been written to assist the user with proper procedures when handling, installing, operating and maintaining the equipment. All of the safety warnings and instructions in this book must be followed to prevent injury to personnel. The installation and maintenance manual must be kept for future reference during installation, operation and maintenance. Below is a safety symbol table that identifies the safety symbols that will appear in this manual and on the equipment.
B. Safety Symbol Legend
The use of a lightning bolt within an arrowhead symbol, enclosed in a yellow triangle, indicates warning of dangerous electrical voltage that could cause an electric shock to a person.
The use of an exclamation point within a yellow triangle, indicates to the user that important installation operating and maintenance instructions must be followed.
The use of wavy lines enclosed in a yellow triangle, indicates that the motor can be hot and should not be touched without taking proper precautions.
This symbol instructs one to read the manufacturer’s instruction manual before installation, operation and maintenance.
This symbol identifies any terminal which is intended for connection to an external grounding conductor for protection against electric shock in case of a fault.
The use of a small case “i” enclosed in a square indicates a general note.
WARNING:
Indicates a procedure or condition that, if not strictly observed, could result in personal injuries or death.
CAUTION:
Indicates a procedure or condition that, if not strictly observed, could result in minor injuries to personnel.
This symbol represents the need to wear hearing protection.
3

GEI-M1011A
C. Safety Precautions
WARNING: High voltage and rotating parts can cause seri ous or fatal injuries. Installation, operation, and mainte- nance of electric machinery should be performed by qualified personnel. Familiarization with NEMA Publication MG-2, Safety Standard for Construction and Guide for Selection, Installation and Use of Electric Motors and Generators, the National Electrical Code, and sound local practices is recommended. For equipment covered in this instruction book, it is important to observe safety precautions to protect personnel from possible injury. Among the many considerations, personnel should be instructed to: • Avoid contact with energized circuits or
rotating parts. • Avoid bypassing or rendering inoperative any
safeguards or protective devices. • Avoid use of automatic-reset thermal
protection where unexpected starting of equipment might be hazardous to personnel.
• Avoid contact with capacitors until safe
discharge procedures have been followed.
• Be sure that the shaft key is fully captive before the motor is energized.
• Avoid extended exposure in close proximity to
machinery with high noise levels. • Use proper care and procedures in handling,
lifting, installing, operating, and maintaining the equipment.
• Do not lift anything but the motor with the
motor lifting means. Safe maintenance practices by qualified personnel are imperative. Before starting maintenance procedures, be positive that: • Equipment connected to the shaft will not
cause mechanical rotation. • Main machine windings and all accessory
devices associated with the work area are disconnected from electrical power sources.
If a high-potential insulation test is required, procedure and precautions outlined in NEMA Standards MG-1 and MG-2 should be followed. Failure to properly ground the frame of this machine can cause serious injury to personnel. Grounding should be in accordance with the National Electrical Code and consistent with sound local practice.
These instructions do not purport to cover all of the details or variations in equipment nor to provide for every possible contingency to be met in connection with installation, operation, or maintenance. Should further information be desired or should particular problems arise which are not covered sufficiently for the purchaser’s purposes, the matter should be referred to the General Electric Company. © Copyright 2002 General Electric Company
4

GEI-M1011A
D. INTRODUCTION General Electric high thrust vertical motors covered by these instructions are carefully constructed of high quality materials and are designed to give long and trouble-free service when properly installed and maintained. These motors are generally used to drive pumps.
Both HOLLOW-SHAFT and SOLID-SHAFT motors are described in this instruction book. Hollow-shaft construction is available in frame sizes 213 and larger whereas solid-shaft construction is available in 182 and larger. Figures 4-6 show typical hollow-shaft high thrust motors and Figures 7-9 show typical solid-shaft high thrust construction. Solid-shaft high thrust motors are not suitable for driving loads that impose significant radial load on the motor shaft; they should not, for example, be used for belt drive applications.
Figure 9 shows a typical solid shaft high thrust construction (on right side) for applications requiring continuous up and down thrust capability. In this type of motor, three angular contact ball bearings are mounted in opposed mounting with one bearing oriented to carry up thrust and two oriented to carry down thrust. If greater down-thrust capacity is required, motors may use two standard angular contact ball bearings and one split-race bearing which gives the capacity of 3 bearings down and one bearing up. This does, however, give more endplay than normal.
Motors may be supplied with different bearing arrangements for various external thrust conditions imposed by the pump, such as different magnitudes of down thrust and either momentary or continuous up thrust. This standard construction is for high continuous down thrust and is suitable for momentary up thrust equal to 30% of the rated down-thrust capacity of a high thrust motor. NOTE THAT ANGULAR CONTACT BEARINGS CAN ONLY CARRY THRUST IN ONE DIRECTION.
IN-LINE motors (designed to be mounted on pumps which are directly in the pipe line, and hence called IN-LINE motors) are also covered by this instruction book. These motors have two opposed-mounted angular contact ball thrust bearings at the top end of the motor so they can carry either up or down thrust. The lower guide bearing is a radial-ball type and also carries any radial load imposed by the pump. IN-LINE motors are always of the solid-shaft type. This clamped construction is shown on Figures 7A and 8A.
Spherical roller bearings are sometimes used for applications requiring extra high down-thrust capacity and/or extra bearing life; these bearings may require water cooling. See Figure 10. Motors with spherical roller thrust bearings also require a certain minimum down thrust during all continuous operations. Since overloading greatly reduces bearing life, the amount of thrust applied should not exceed the recommended values.
This instruction book applies to motors with Totally Enclosed Fan Cooled enclosures as defined by NEMA. Enclosed motors are characterized by an enclosure and ventilating system that prevents the free exchange of air between the inside and outside of the motor. The air inside the motor is circulated by the rotor fans to carry heat to the enclosed parts, while an external fan blows ambient air over the motor to complete the cooling process. E. Description of Labels and Nameplates Motor ratings and identification data are furnished on labels and nameplates. Labels provide basic motor characteristics. Nameplates provide a permanent record of motor characteristics, plant identification and date of manufacture. Below is an example of a label that is attached to the shipping package.
Figure 1 – Packing Label F. Model and Serial Numbers As discussed in Section E, every motor that is manufactured by GE Industrial Systems will be provided with a model and serial number, which is permanently marked on the motor nameplate and shipping pack. These numbers identify basic motor characteristics and pertinent data. When contacting a GE Industrial Systems Service Shop or representative, please refer to the model and serial number. In the note section of this book, space has been provided for you to record these numbers. II. RECEIVING, HANDLING, AND STORAGE Each motor should be carefully examined when received and a claim filed with the carrier for any damage. The nearest office of the General Electric Company may offer guidance.
WARNING: The motor should be lifted by the lugs provided. These lugs are intended for lifting the motor only and must not be used to
lift any additional weight. Be careful not to touch overhead power lines with lifting equipment. Failure to observe this warning may result in personal injury or death.
If the motor is not to be installed immediately, it should be stored in a clean, dry location. Precautions should be taken
5

GEI-M1011A
to prevent the entrance of moisture, dust, or dirt during storage and installation. Precautions are taken by the factory to guard against corrosion. The machined parts are slushed to prevent rust during shipment. Examine the parts carefully for rust and moisture if the equipment is to be stored and reslush where necessary. Oil-lubricated motors are shipped without oil in the bearing reservoirs. An oil film remains on the bearings, but if the storage period is to exceed three months, the reservoirs should be filled. It is suggested that such oil-filled motors be conspicuously tagged in order to prevent mishandling, which would cause oil spillage and subsequent damage to the internal parts of the motor. When filling for storage, fill to the maximum level shown on the gage or approximately 1 cm (0.5 in.) over the mark showing the standstill level. Before operating the motor, drain this oil and refill with fresh oil. See instructions under Relubrication for oil recommendations. The bearings of grease-lubricated motors are greased at the factory with the grease cavity approximately 50% full. Rotate the shaft of all grease-lubricated motors 10-20 revolutions at two month intervals. During storage, windings should be protected from excessive moisture absorption by some safe and reliable method of heating. Space heaters, if supplied, may be used for this purpose. The temperature of the windings should always be maintained a few degrees above the temperature of the surrounding air. It is recommended that motors in storage be inspected, the windings meggered, and a log of pertinent data kept. Any significant decrease in insulation resistance should be investigated. If a motor is to be in storage for over one year, it is recommended that competent technical inspection service be obtained to ensure that the storage has been adequate and that the motor is suitable for service. Contact your nearest General Electric Sales office to arrange for inspection service. A. Unpacking If the machine or machine parts have been exposed to low temperatures, unpack it only after it has reached the temperature of the room in which it will be unpacked or located; otherwise sweating will occur.
III. INSTALLATION
WARNING: Installation should be in accordance with the National Electrical Code and consistent with sound local practices. Coupling
guards should be installed as needed to protect against accidental contact with moving parts. Machines accessible to personnel should be further guarded by screening, guardrails or other suitable enclosure to prevent anyone from coming into contact with the equipment. This is especially important for motors that are remotely or automatically controlled or have automatic re-setting overload relays, since such motors may start unexpectedly. Failure to observe these precautions may result in injury or death to personnel.
A. Location and Mounting Allow enough space around the motor to permit free flow of ventilating air and to maintain an ambient temperature not over 40ºC. Where a choice of locations is possible, install the motor so that it will be subjected to the least amount of dirt, dust, liquids, or other harmful materials. Mount the motor securely on a level, firm foundation, align accurately with the driven equipment, and tighten mounting bolts securely. Because of their special enclosure features, enclosed motors can be operated out-of-doors and in dirty locations. B. Pump and System Precautions Some precautions are necessary to assure satisfactory operation of motors in pumping service. The packing gland in the pump head should be kept in good condition so that the liquid being pumped will not be forced out along the shaft and enter the motor through the lower bearing housing. Motors driving pumps in pressure systems where the pressure is maintained after shutdown should be protected from overspeeding by check valves or non-reverse couplings. The SYSTEM REED CRITICAL FREQUENCY should be 25% above or below motor operating speed in order to avoid excessive vibration.
6

GEI-M1011A
C. Alignment of Solid Shaft Motors Accurate mechanical lineup is essential for successful operation. Mechanical vibration and roughness when the motor is running may indicate poor alignment. In general, lineup by straight edge across, and feeler gages between coupling halves is not sufficiently accurate. It is recommended that the lineup be checked with dial indicators. The space between coupling hubs should be maintained as recommended by the coupling manufacturer. D. Couplings for Hollow Shaft Motors 1. General Vertical hollow-shaft motors are designed for driving deep-well, turbine type pumps and can be equipped with either self-release, bolted, or non-reverse couplings as described in the following sections. These couplings are located at the top of the motor and allow pump impeller position to be adjusted easily. The type of coupling is specified by the customer. Remove the top cover and fan casing for access to the coupling Two slots are provided in the outside rim of the coupling so that a bar can be inserted to keep the assembly from turning while the adjustment of pump impeller clearance is being made. The motor fan must be removed for access to these holes, but fan removal is a normal step during motor installation since it is mounted on the upper half-coupling. A coupling bolt can be screwed into one of the extra tapped holes in the top end shield to provide a stop for the bar. To prevent breakage, coupling bolts must be tightened to torque values indicated below for bolted or non-reverse couplings.
Required Bolt Torques
Bolt Size (In.) Torque
1/4 15 N•m (10 lb-ft) 5/16 25 N•m (20 b-ft) 3/8 50 N•m (37 lb-ft) 1/2 120 N•m (90 lb-ft) 5/8 240 N•m (180 lb-ft) 3/4 430 N•m (320 lb-ft) 1 960 N•m (710 lb-ft)
Note: 1 in. = 25.4 mm
CAUTION: It shall be the installer’s responsibility in all cases to ascertain that these torque values are used and maintained. This shall
include those instances when the coupling comes mounted in the motor. Failure to comply may cause the coupling blots to break with resultant extensive damage to the equipment.
2. Self-Release Couplings Should the motor accidentally be run in the reverse direction, the pump line-shaft joints may unscrew. The self-release coupling acts to limit the amount of this unscrewing. In normal operation, torque from the motor is transmitted by the lower half-coupling through the driving pins to the upper half-coupling, and then to the pump shaft. If reversal occurs and the pump shaft starts to unscrew and lengthen, the up per half of the self-release coupling is lifted off of the driving pins, thus uncoupling the pump from the motor. See Figures 4-6, where a self-release coupling is shown to the left of the shaft centerline.
NOTE: Self-release couplings cannot carry up-thrust.
To install a motor with a self-release coupling, first lift off the upper half-coupling and the fan attached to it, and remove the fan from the coupling. Then lower the motor onto the pump with pump shaft through motor shaft. Next, set the upper half-coupling into place on the lower half-coupling and put the gib key in place. Then put the pump shaft nut in place, adjust the pump and lock the nut. Finally, set the fan on top of the upper half-coupling and secure it with its 3 cap screws. Proper functioning of a self-release coupling depends upon several factors. The pump shaft adjusting nut must be securely attached to the top half-coupling, and the top half-coupling must not bind on the lower half. Otherwise, the adjusting nut lock-screw may break instead of the coupling halves separating. Should this happen, the motor would continue to unscrew. Serious damage to both motor and line shaft may result. Clearance between the coupling halves should be checked by placing the top half-coupling in position prior to installing the motor. It should drop into place, and rest solidly on the lower half-coupling, without forcing. Proper alignment of the pump head shaft within the motor hollow shaft is also important. After the coupling releases, it no longer holds the pump shaft centered. If the alignment is not good, the motor shaft which is still rotating may rub the pump shaft which has stopped, and damage will result. A third requirement is that the distance between the top of the pump shaft and the inside of the top cap be at least enough to allow the top half-coupling, when it tries to release, to clear the pins before the shaft hits the cap. Check this clearance after the adjusting nut has been drawn up to its final position. To facilitate making the check, the motor outline print shows a maximum dimension “XH” from the top of the coupling to the top of the pump shaft. Adhering to this design limit will allow the shaft and coupling to lift enough to clear the pins and still leave a small clearance between the shaft and cap. For standard motors, “XH” is as shown in Table 1.
7

GEI-M1011A
Table 1
Frame Size
XH
213-215 50.8 mm (2.00 in.) 254-256 57.15 mm (2.25 in.) 284-286 63.5 mm (2.50 in.) 324-326 95.25 mm (3.75 in.) 364-365 95.25 mm (3.75 in.) 404-405 101.6 mm (4.00 in.) 444-449 111 mm (4.38 in.) 509-5011 123.825 mm (4.88 in.)
Depending upon the circumstances causing reversal and upon which line-shaft joint unscrew, there may be enough energy stored in the rotating parts, at the time the coupling clears the pins, to cause the pump shaft to continue to rise and strike the top cap. However, if the above conditions are met, damage, even in the most severe cases, should be limited to a broken top cover or fan. It is intended that self-release couplings will be called upon to uncouple only infrequently.
NOTE: Anytime a self-release coupling uncouples, it is necessary to remove all power and manually recouple.
Uncoupling is most frequently caused by application of single-phase power after a power supply disturbance, while the motor is being driven in the reverse direction by the pump; this single phase power causes the motor to take over and drive the pump in the reverse direction and the pump shaft joints will then unscrew. To prevent this, select a motor starter which requires a manual start after any stop (rather than allowing automatic re-start as soon as power is applied to the starter), or incorporates a back spin timer to keep power from being automatically reapplied to the motor until enough time has elapsed for water back-flow through the pump to stop and for the motor to completely stop. Power supply phase-sequence reversal will also cause the motor to reverse and unscrew the pump shaft, but this rarely occurs. An antiphase-reversal relay can be incorporated in the motor controller if desired. To prevent uncoupling on initial start-up, check motor rotation direction before installing the upper half-coupling to be sure direction is correct. To reverse direction of rotation, interchange any two power leads. 3. Bolted Couplings Bolted couplings allow up thrust from the pump to be taken by the motor bearings. This type of coupling is similar to a self-release coupling except that the driving pins are replaced by bolts, which should be securely tightened to hold the two halves of the coupling solidly
together so that torque is transmitted by face friction. See Torque Requirements. This type of coupling does not have the self-release feature and allows reverse rotation. See the self-release coupling shown to the left of the motor center line in Figures 4-6 which is applicable to bolted couplings except that the headless drive pins are replaced by bolts as explained above. To install a motor with a bolted coupling, first unbolt and remove the fan, thus exposing the coupling bolts. Then unbolt and remove the upper half-coupling. Next, lower the motor onto the pump with pump shaft through the motor shaft. Then set the upper half-coupling into place on the lower half-coupling and put the gib key in place, tightening the bolts. Then put the pump nut in place, adjust the pump and lock the nut. Finally, put the fan in place on the upper half-coupling and secure it with the 3 cap screws provided. 4. Non-Reverse Couplings The non-reverse type of coupling, as shown to the right of the motor centerline in Figures 4-6, is also a bolted type, and, in addition, it keeps the pump and motor from rotating in the reverse direction. Thus, it not only prevents the pump shaft from unscrewing, but it also prevents damage from over speeding and damage to water lubricated pump shaft bearings, when during shutdown the residual water in the system drives the pump in the reverse direction. This type of coupling also allows up thrust from the pump to be carried by the motor bearings. Motor torque is transmitted to the pump shaft through the two halves of the coupling which are bolted together. See Required Bolt Torques. To install a motor with a non-reverse coupling, first unbolt and remove the fan, thus exposing the coupling bolts. Next, put the fan bolts back in place to secure the pin retaining plate to the pin carrier and keep the non-reverse assembly from flying apart. Then, unbolt and remove the upper half-coupling and non-reverse assembly. Next, lower motor onto the pump with pump shaft through the motor shaft. Then set the upper half-coupling and non-reverse assembly into place on the lower half-coupling and bolt it to the lower half-coupling, tightening the bolts. Then install the gib key and pump shaft nut, adjust the pump and lock the nut. Finally, remove the three small cap screws securing pin retaining plate, put the fan in place and secure it with these same cap screws. The operation of a non-reverse coupling is explained as follows. When the motor is started in the correct or forward direction, the ratchet pins are lifted by the ratchet teeth and are held up by centrifugal force and friction when motor speed becomes high enough. When power is removed, the speed decreases, and the pins fall. At the instant of reversal, a pin will catch on a ratchet tooth and prevent backward rotation. The number of pins differs from the number of teeth to multiply the number of stopping positions.
8

GEI-M1011A
A very rapid decrease in speed can result in acceleration forces great enough to prevent the pins from dropping. This condition is further aggravated when the pins become dirty and their action sluggish. If the time from shutdown (the instant the “stop” button is pressed) to zero speed is greater than two seconds, operation will be satisfactory. To permit operation when stopping time is less than two seconds, the pins are spring loaded. For those cases involving cycling (frequent starting and stopping) and stopping times greater than two seconds, the springs may be removed to decrease wear on the ratchet plate. Pins and springs are made of heat-treated stainless steel. A complete non-reverse coupling consists of a self-release coupling plus a non-reverse assembly, which includes pin carrier, pins, springs, pin retaining plate, and cap screws. On motors covered by this instruction book, the ratchet teeth are an integral part of the end shield cover casting. A self-release or a bolted coupling can be converted to a non-reverse coupling on 324-5011 frame motors without disturbing the adjustment of the pump shaft nut. The non-reverse assembly will normally be received as a unit. To assemble it onto the motor, unbolt and remove the fan, thus exposing the coupling pins or bolts. Next, remove the drive-pins or bolts from the lower half-coupling. Then slide the non-reverse assembly down over the top half-coupling. Next, insert the long cap screws through the plate, pin carrier, and top coupling and into the lower coupling. Tighten them securely so that torque will be transmitted by friction between the coupling faces rather than through the bolts. See Required Bolt Torques. Next, remove the three smaller cap screws securing the pin retaining plate to the pin-carrier. Finally, put the fan into place on top of the pin-retaining plate and secure it with the three cap screws just removed. On 213-286 frame machines, the pump shaft nut must be removed and the bolted or self-release coupling replaced with a non-reverse coupling. The top half of the coupling should seat solidly on the lower half and the pins should touch the bottom of the pockets between the teeth in the ratchet. The clearance between the pin-carrier and the top of the ratchet teeth should be between 1.5 mm (1/16 in.) and 3 mm (1/8 in.).
When installing a non-reverse coupling do not use lubricant. Lubrication will lower the coefficient of friction between pins and pin carrier, and the pins may not stay up when motor reaches full speed. Motors shipped from stock may have their top couplings and non-reverse assemblies packaged separately. They can be installed as described in previous paragraphs. E. Power Supply and Connections 1. Wiring and Grounding
WARNING: Motor and control wiring, overload protection and grounding should be in accordance
with the National Electrical Code and consistent with sound local practices. Failure to observe these precautions may result in damage to the equipment, injury to personnel, or both.
Stator winding connections should be made as shown on the connection diagram supplied in the Data pack or as shown on the label attached to the inside of the conduit box cover. For motors with terminal boards, the standard connection diagrams for three-phase motors of basic design are shown in Figure 2. With all other versions, the respective connection diagram is mounted on the inside of the box cover. Before the conduit box cover is closed be sure that: a. All terminal box connections are fixed tightly. b. The minimum air distances are met. c. The interior of the terminal box is clean and free from foreign materials. d. Cable openings not used should be closed and the closing screws should be fixed tightly. e. The gasket in the terminal box cover should be clean and tightly sealed to the cover. f. The condition of all gaskets should be in accordance to protective regulations.
9

GEI-M1011A
(Delta) Low Voltage
Y (Star) High Voltage
Figure 2 – Terminal Board Connections Squirrel Cage Motor With One Speed
Before starting the motor, make sure that all safety regulations are strictly met. This is also important for motor service and for disconnection. When the motor is put into service, check operating current against nameplate current.
CAUTION: Do not exceed the value of nameplate current multiplied by the motor service factor.
The motor frame may be grounded by attaching a ground strap from a known ground point to the bronze grounding bolt in the conduit box or on the motor frame. 2. Allowable Voltage and Frequency The power supply must agree with the motor nameplate voltage and frequency. Motors will operate (but with characteristics somewhat different from nameplate values) on line voltages within ±10% of nameplate value or frequency within ±5%, and a combined variation not to exceed ±10%. 3. Position of the Conduit Box When mounting conditions permit, the conduit box may be turned so that entrance can be made upward, downward, or from either side.
F. Lubrication Motors with oil lubricated bearings (324-5011 frames) are shipped without oil. Before starting the motor, fill each reservoir to the standstill level shown on the sight gage. Be careful to keep dirt out of the lubricant and bearing housing. Use only the oil specified on the lubrication nameplate or the lubrication instruction supplied with each motor. See Relubrication, Table 2 and Lube Nameplate for oil grade and viscosity and further instructions. If reservoirs have had oil in them during storage period, drain out this old oil and refill reservoir with fresh oil when installing the motor for operation. G. Water Cooling If a bearing requires auxiliary water cooling, the oil reservoir will be provided with a cooling coil whose ends are brought out to fittings in the end shield wall (see Figure 10). The lubrication nameplate or instructions will specify the required water flow and the maximum water flow in gallons per minute. Exceeding this maximum flow could cause deterioration of the cooling coil. Whenever the motor is running, enough water should be circulated through the coil to keep the steady oil-bath temperature below 65°C (150°F). The maximum pressure and maximum temperature allowable for the cooling water are also shown on the nameplate or instructions. Exceeding these values may damage the coil or give insufficient cooling of the lubricating oil. Use only pure, clean water unless the motor was specifically ordered to have a coil and fittings of special material to withstand corrosive water. Standard cooling coils are made from type “K” copper tubing with wall thickness of 1.25 mm (0.050 in.). When the motor is shut down during freezing weather, blow any remaining water out of the coil. Oil Cooling Coil Connections As indicated above, a cooling coil is used to keep oil in the bearing reservoir cool. Water at pressures as high as 700 kPa (100 PSI) is circulated through the coil. It is imperative, therefore, that all joints be tight and that there be no leaks. A pinhole leak will quickly allow water to get into the oil to cause oil and water to overflow into interior of motor and cause motor failure. See Figure 3 and the following paragraphs for further instructions. Also see Maintenance Instructions.
10

GEI-M1011A
Figure 3 Cooling Coil Connection Fittings
To make water connections, simply remove the pipe plugs (furnished for shipping) from brass fittings B and make connection to female pipe tapped hole in accordance with applicable codes and good practice. TIGHTEN CONNECTIONS SECURELY BUT NOT EXCESSIVELY. It is recommended that the upper fitting be used for inlet and lower fitting for drain. DO NOT LOOSEN SCREWS F OR REMOVE PART B WHEN CONNECTION WATER SUPPLY TO MOTOR: PART B MUST BE FULLY SEATED AGAINST PART A TO COMPRESS THE WATER/OIL SEALING O-RING. Part A is screwed into the end shield wall and locked with set screws E – when making water connections check Part A to be sure it is tight and there are no oil leaks around it. Since there is no solid connection between parts A and C, inadvertent loosening of internal connections is minimized. IV. OPERATION
CAUTION: Before energizing the motor for the first time or after an extended shutdown, it is advisable to check insulation resistance,
power supply and mechanical freedom of the motor. If the motor has been stored in a damp location, dry it out thoroughly before operating.
WARNING: Be sure that the motor is not running and the power supply is disconnected before working on motor.
A. Steps Prior to Initial Start-Up After a Long Idle Period 1. Check insulation resistance as indicated in the caution above.
WARNING: Before measuring insulation resistance, the machine must be at stand-still and
all windings to be tested must be electrically connected to the frame and to ground for a time sufficient to remove all residual
In accordance with established standards, the recommended minimum insulation resistance for the stator winding is as follows: RS = VS +1 1000 Where RS is the recommended minimum insulation resistance in meobtained by applying direct potential to the entire winding for one minute, and VS is rated machine voltage.
See IEEE Recommended Practice for Testing Insulation Resistance of Rotating Machines Publication No. 43 for more complete information.
If the insulation resistance is lower than this value, it may be wet and it is advisable to eliminate the moisture in one of the following ways a. Dry the stator in an air circulating oven with the air surrounding the part at 95ºC to 115ºC. until the stator has been above 90ºC for at least four hours. Then the air temperature may be raised to 135ºC to 115ºC. Continue to heat until the insulation resistance is constant for a one half hour period. b. Enclose the motor with canvas or similar covering, leaving a hole at the top for moisture to escape. Insert heating units or lamps and leave them on until the insulation resistance is constant for one-half our period. Be careful not to get heating units so close to the winding that they cause localized damage. c. With the rotor locked and using approximately 10% of rated voltage, pass a current through the stator windings. Increase the current gradually until the temperature reaches 90ºC. Do not exceed this temperature. Maintain a temperature of 90ºC until the insulation resistance becomes constant for a one-half hour period. 2. Check bearing oil reservoirs to be sure they have been filled to the proper level with fresh oil. See Relubrication section, Table 2 and Lube Nameplate on motor for oil grade and viscosity and further instructions. Be sure filler caps and drain plugs are securely tightened.
11

GEI-M1011A
3. Examine the motor for loose objects or debris which may have accumulated and remove any foreign material. 4. If possible, turn the rotor by hand to be sure that it rotates freely. 5. Check all connections with the connection diagram. Check all accessible factory made connections for tightness to make sure none has become loose during shipment. 6. Check water cooling connections, flow and temperature. 7. If possible, leave motor uncoupled (or uncouple it) for initial operation so that motor vibration, noise, current, and bearings can be checked uncoupled before they are masked by the pump. To run a VHS motor uncoupled, it is recommended that the pump head-shaft be removed. If this cannot be done, remove the upper half-coupling and be sure the pump shaft is well centered in the motor shaft so it will not rub. IF THIS IS DONE, ROTATE MOTOR BY HAND TO BE SURE THERE IS NO INTERFERENCE BETWEEN SHAFTS. Do not try to run motor uncoupled by just removing gib key. 8. When the driven machine is likely to be damaged by the wrong direction of rotation, it is imperative to uncouple the motor from its load during the initial start and make certain that it rotates in the correct direction. If it is necessary to change rotation, interchange any two line leads. For multispeed motors, check each speed independently. On VHS motors, do this before installing pump head-shaft and upper half-coupling. Some motors are designed for unidirectional rotation. Rotation of these motors must be in accordance with the rotation indicated on the nameplate and the outline furnished with the equipment. B. Initial Start 1. After inspecting the machine carefully as outlined above, make the initial start by following the regular sequence of starting operations in the control instructions. 2. Run the motor uncoupled initially, if possible, checking for abnormal noise, vibration, or bearing temperatures and for current and voltage balance. Then check motor operation under load for an initial period of at least one hour to observe whether any unusual noise or hotspots develop. 3. In the event of excessive vibration or unusual noise, remove all power and disconnect the machine from the load and check the mounting and alignment. 4. Space heaters should be de-energized during motor operation.
5. Check line voltage on all three phases to be sure it is balanced and within 10% of motor rated voltage with motor drawing load current. 6. Check the operating current against the nameplate value. Do not exceed the value of nameplate amperes X service factor (if any) under steady continuous load. Also, check to be sure that current in all three lines is balanced. C. Jogging and Repeat Starts
CAUTION: Repeated starts and/or jogs of induction motors greatly reduce the life of the winding insulation. The heat produced by
each acceleration or job is much more than that dissipated by the motor at full load. If it is necessary to repeatedly start or jog a motor, it is advisable to check the application with the local general electric sales office.
Check motor heating but do not depend on your hand to determine temperature. Use the temperature detectors furnished in the motor if there are any (e.g., RTD’s or thermocouples), or use a thermometer. If there is any doubt about the safe operating temperature, take the temperature of the part in question and confer with the nearest sales office of the General Electric Company. Give full details, including all nameplate information. Overheating of the motor may be caused by improper ventilation, excessive ambient temperature, dirty conditions, excessive current due to overload, unbalanced AC voltage, or (if a variable speed controller is used) harmonics in power supplied to the motor. V. MAINTENANCE
WARNING: Before initiating maintenance procedures, disconnect all power sources to the motor and
accessories. For machines equipped with surge capacitors, do not handle capacitor until it is discharged by a conductor simultaneously touching all terminals and leads, including ground. This discharge conductor should be insulated for handling. Replace all normal grounding connections prior to operating. Failure to observe these precautions may result in injury to personnel.
A. General Inspect the motor at regular intervals, as determined by service conditions. Keep the motor clean and the ventilation openings clear.
12

GEI-M1011A
In addition to a daily observation of the overall condition, it is recommended that a regular inspection routine be set up to check periodically the following items:
1. General Cleanliness
2. Insulation and Windings
3. Lubrication and Bearings
4. Coupling Bolt Tightness
B. General Cleanliness
While TEFC motors are enclosed for protection against adverse conditions of service, they should be kept reasonably clean for longer trouble-free life. External air passages in the top end shield and stator frame should be cleaned periodically to prevent overheating of the motor. Oily vapor, debris, or dust may build up and block off ventilation. Any of these contaminants can lead to early motor failure. Motors should be disassembled and thoroughly cleaned periodically as needed.
Motors may be blown out with dry, compressed air of moderate pressure. However, cleaning by suction is preferred because of the possibility of water in the compressed air lines and the danger of blowing metal chips into the insulation with compressed air.
WARNING: To prevent injury to eyes and respiratory organs, safety glasses and suitable ventilation or other protective equipment should be
used. Operator must not use compressed air to remove dirt or dust from his person or clothing.
Covers are provided as necessary for protection of the equipment personnel. If screens are furnished (non-standard) they must be kept free of dirt and debris to ensure proper ventilation. C. Coupling Maintenance The condition of non-reverse couplings should be checked periodically by removing the tip cap. If dirt has caused the action of the pins to become sluggish, the pin carrier should be removed, disassembled, and thoroughly cleaned with a suitable solvent. The parts should then be dried and reassembled in accordance with the instructions given under Non-Reverse Couplings. Sometimes, after a long period of operation with frequent stops and starts, the surface of the holes in the pin carrier becomes polished, so that friction forces will no longer hold the pins clear of the ratchet teeth when the motor is running. This condition can be remedied by roughening these surfaces with a piece of emery paper wrapped around a rod.
NOTE: Whenever the dismantling of couplings is necessary, the use of witness marks will assure a balanced condition when reassembly is complete.
Bolts on both bolted couplings and non-reverse couplings should be checked periodically to be sure they are tight. See Required Bolt Torques. D. Relubrication 1. Oil Lubricated Bearings Motors 320 frame sizes and larger have an oil lubricated upper bearing. The following instructions apply to that bearing. Grease lubricated instructions for all other bearings are included in the following section. Maintain proper lubrication by checking the oil level periodically and adding oil when necessary. Because of the clearing action of the bearing as the motor accelerates up to speed and the expansion of the oil as it comes up to operating temperature, the oil level will be higher after the motor has been in operation for a while than it is with the motor at standstill. The normal level, with the motor stopped and the oil cold, is marked STANDSTILL LEVEL on the sight gage. Overfilling should be avoided not only because of the possibility that expansion may force the oil over the oil sleeve and into the motor, but also because operating with the oil level too high prevents the bearing from clearing itself of excess oil. The resultant churning can cause extra loss, high temperatures, and oxidized oil. If, during operation, the oil level goes above the maximum shown on the sight gage, drain enough oil to bring the level back within the operating range. A hole is provided inside the drain plug to make it possible to do this without completely removing the plug. Do not permit the operating oil level to fall below the minimum shown on the gage. Should it ever become necessary to add excessive amounts of make-up oil. investigate immediately for oil leaks. Change oil at regular intervals. The time between oil changes depends upon the severity of operating conditions and, hence, must be determined by the motor user. One or two changes a year is average, but special conditions, such as high ambient temperature, may require more frequent changes. Avoid operating motor with oxidized oil. Use only best grade, oxidation and corrosion inhibited turbine oil produced by reputable oil companies. The viscosity (weight) of the oil to be used depends upon the type and size of the bearing, its load and speed, the ambient temperature, and the amount and temperature of the cooling water (if used). The lubrication nameplate or instruction with each motor specifies the viscosity range of oil suitable for average conditions. The usual recommendations are summarized in Table 2, Oil Viscosity. Operation in ambient temperatures that are near or below freezing may require preheating the oil or the use of a special oil.
13

GEI-M1011A
Table 2
OIL VISCOSITY (For a particular motor, refer to the lubrication nameplate or instructions)
Oil Viscosity – SUS Bearing Function and Location Bearing Type @ 40°C (100°F) @ 100°C (210°F) GE Spec
Thrust Bearing (In top end shield) 320-5013 Frame
Angular Contact Ball
Spherical Roller
150
600 or 300
45
70 53
D6B6A
D6B14C1 D6B6B
Guide Bearing (in base end shield) For motors with oil lubrication in lower bearing.
Ball 150 45 D6B6A
In some cases, water-cooling for the oil is impractical or undesirable and the normal operating oil temperature will be in range of 75-100°C (170-210ºF). Also, in some cases, the bearing size, thrust-load and speed are so high that even with water cooling the normal oil temperature may be as high as 100°C (210ºF). In these cases, it is especially important that proper viscosity, high-grade oil containing an oxidation inhibitor be used. Observe the condition of the oil frequently and change oil when it begins to show signs of deterioration. Oil-lubricated bearing housings are provided with large settling chambers in which dust, dirt, and sludge collect. Unless the oil has been permitted to oxidize, the draining of the old oil during regular changes will usually provide sufficient flushing action to clean out the reservoir. Whenever the motor is disassembled for general cleaning and reconditioning, the bearing housing may be washed out with a suitable cleaning solvent. 1,1,1, Trichloroethane may be used, following the same instructions and cautions as shown for cleaning windings. Avoid using any solvent that
will soften the paint used on the interior of the oil reservoir. Be sure that the oil-metering hole is clear, and then dry the housing thoroughly before reassembly. 2. Grease Lubricated Bearings
WARNING: Relubrication should be performed with the motor stationary and disconnected from the power source. Failure to observe these
precautions may result in damage to the equipment, injury to personnel or both.
Top and bottom bearing on 182-286 frame and bottom bearing on 320 frame sizes and larger are generally grease lubricated. The thrust bearings of motors with speeds above 1800 RPM should be regreased every 1000 hours of operation with an interval not to exceed three months. For motors with speeds 1800 RPM and below, regrease every 2000 hours of operation with the interval not to exceed 6 months. The guide bearings should be regreased in accordance with Table 3.
TABLE 3
RECOMMENDED FREQUENCY OF REGREASING
Type of HP Lubrication Service Typical Examples Range Interval
Easy Valves; door openers; portable floor sanders; motor operating infrequently (one hour per day)
1.0 – 7.5 10 – 40 50 – 150
200 – 1000
9 years 3 years
1.5 years 9 months
Standard Machine tools; air conditioning apparatus; conveyors, one or two shifts; garage compressors; refrigeration machinery; oil well pumps; water pumps, wood working machinery
1.0 – 7.5 10 – 40 50 – 150
200 – 1000
3 years 1 year
6 months 3 months
Severe Motors for fans, machine tools, M-G sets, etc. that run 24 hours per day, 365 days per year; coal and mining machinery; motors subject to severe vibration; steel mill machinery
1.0 – 7.5 10 – 40 50 – 150
200 – 1000
1.5 years 6 months 3 months
1.5 months
Very Severe
Dirty, vibrating applications, where end of shaft is hot (pumps and fans); high ambient temperature
1.0 – 7.5 10 – 40 50 – 150
200 – 1000
6 months 3 months 2 months 1 month
NOTE: Table 3 is intended as a guideline, but the user is ultimately responsible for regreasing the motor and maintaining adequate grease at the bearings. If in doubt, refer to the General Electric Company.
14

GEI-M1011A
To obtain optimum results, use Exxon POLYREX EM (General Electric Specification D6A2C23) polyurea grease should be used for relubrication, unless a special grease is specified on the motor nameplate. The regreasing procedure that follows must be followed for safe and effective regreasing. 1. Run the motor until warm. 2. Stop the motor and disconnect is from the power supply. 3. Clean dirt and debris from around the inlet lubrication fitting and the grease relief plug. 4. Remove the relief plug and clear the opening and relief tube of hardened grease. This may be accomplished with a twisted wire brush or sturdy pipe cleaner.
5. Insert brush into relief hole. While the motor is still warm, add grease with a hand operated grease gun until fresh grease appears on the end of the brush or until grease has been added up to the amount listed in Table 4. Do not exceed recommended amounts listed in Table 4. 6. Leave the relief plug temporarily off. Start the motor and run for 10 to 20 minutes to expel any excess grease. 7. Stop the motor. Replace the relief plug. 8. Restart the motor and resume operation.
WARNING: Warranty may be voided if internal maintenance or repairs are not performed by an Authorized General Electric Service Shop during
the warranty period.
TABLE 4
NUMBER OF GREASE GUN PUMPS
Number of Pumps Number of Pumps Bearing Size on 16 Oz. Gun 24 Oz. Gun Bearing Size on 16 Oz. Gun 24 Oz. Gun
Motor Nameplate (Approx. 473 mL) (Approx. 710 mL) Motor Nameplate (Approx. 473 mL) (Approx. 710 mL) 6205 5 3 6312 40 27 6206 6 4 6314 50 35 6208 10 7 6315 65 45 6210 25 17 6316 60 40 6213 35 23 6318; NU 318 75 50 6217 65 45 6320; NU 320 95 65 6220 58 39 6321 153 102 6309 20 13 NU 324 246 164 6310 25 17
NOTE: A standard 10,000 PSI (68,950 kPa) 16 ounce (473 mL) grease gun delivers approximately 0.04 oz. (1.18 mL) of grease with each pump, and a 24 oz. (710 mL) gun delivers approximately 0.06 oz. (1.77 mL) of grease. The number of pumps listed represents approximately 20% of the total grease cavity volume in the end shield.
CAUTION: Failure to observe the foregoing instructions for regreasing may result in grease leakage and/or bearing damage. Excessive or too
frequent lubrication may damage the motor. To avoid damage to equipment, bearings and grease must be kept free of dirt.
Since this method of greasing anti-friction bearings tends to purge the housing of used grease over a period of time, removal of all grease should be required infrequently. A GE Authorized Electric Motor Servicenter can clean the bearing cavity and replace the bearings and grease when the motor is removed from service for maintenance or reconditioning.
E. End-Play Adjustment 1. General
Most high thrust motors are designed to withstand only momentary up thrust. This up thrust, which can exist for a
few seconds during starting, is taken by the guide bearing. To prevent the thrust bearing from losing radial stability during this time, the motor endplay is limited to a small amount by adjustment of the motor shaft nut or by shimming. This adjustment is made at the factory and need not be disturbed on a new motor. However, should the motor be diassembled for any reason, the adjustment must be made during reassembly to avoid damaging the bearings or having some rotating part rub against a stationary part. The procedure depends upon the type of thrust bearing. 2. Lower Thrust Bearings – 182-449 Frames, Grease Lubricated Standard high thrust motors are designed to withstand only momentary up thrust. This up thrust which can exist for a few seconds during starting, is taken by the guide bearing. To prevent the thrust bearing from losing radial stability during this time, the motor endplay is limited to a few thousandths of an inch by shims inserted in the housing
15

GEI-M1011A
above the upper bearing. This adjustment is made at the factory and need not be disturbed on a new motor. However, should the motor be disassembled for any reason, the adjustment must be made upon reassembly to avoid damaging the bearings. Whenever these motors are reassembled, the shims should be replaced and the endplay checked to see that it falls within the allowable 0.125 mm-0.175 mm (0.005-0.007 in.). See Figures 1 and 3. Motors which must withstand continuous up thrust have a somewhat different construction. The thrust bearing is arranged to take this up-thrust and is clamped in the bearing housing. No shims are used in these motors since the lower bearing is of the type which can withstand axial load in both directions. See Figure 7A. 3. Upper Ball Thrust Bearing – 324-5013 Frames, Oil Lubricated For a motor with angular-contact ball thrust bearings, refer to Figures 5, 6, 8 and 9. When the motor shaft nut is tightened, the rotor, shaft and lower bearing are drawn up until the outer ring of the lower bearing seats against the lower bearing cover. Further tightening of the nut preloads the bearings. (Note that the shoulder on the shaft below the lower half-coupling is purposely located so that it does not seat against the coupling.) The best way to adjust the nut is by trial, using an indicator between the lower half-coupling and top end shield, and lifting the rotor to check the endplay after each setting of the nut until between 0.050 mm and 0.125 mm (0.002 in. and 0.005 in.) is obtained. The nut should then be locked with its lock washer. If equipment is not available to use this method, the following procedure may be used. Tighten the motor shaft nut carefully until all endplay is removed and the rotor just fails to turn freely. Then back the nut off 1/6 turn and lock with its washer. An assembly nameplate giving this information is mounted on the motor. Motors which must withstand continuous up-thrust have a somewhat different construction. The upper (thrust) bearing is arranged to take this up-thrust; it consists of angular-contact thrust bearings mounted back to back (DB). (See Figure 8A). The inner rings are locked on the lower half-coupling with a nut and the outer rings are clamped in the end shield with a ring. The shaft shoulder below the lower half-coupling is so located that it seats against the lower half-coupling before the lower bearing comes up against its cover. No special adjustment is necessary when reassembling this type of motor, and the motor shaft nut can be pulled down tight and locked. The endplay of the motors using DB mounted bearings will then be very small, 0.125 mm (0.005 in.) or less. 4. End-Play Adjustment Spherical-Roller Thrust Bearing Springs are used under spherical-roller thrust bearings to keep them axially loaded during momentary up thrust
periods. See Figure 10. This puts an up thrust load on the lower guide bearing. The springs (and spacers if a full circle of springs is not used) are located in a “chair” which is in turn located in the upper end shield. This “chair” and the captive springs can be removed and cleaned as a unit if necessary; it should not be taken apart unless it or a spring is damaged. End-play is provided in the motor so that the application of down-thrust during normal operation will cause the thrust bearing to move down and seat in its housing and relieve the up-thrust load on the lower bearing. Thus, to avoid premature failure of the lower bearing, the minimum total external down thrust that is applied continuously to the motor during operation should always be greater than the spring-load listed on the individual outline provided with the motor. This value may range from 13300 N (3000 pounds) to 26700 N (6000 pounds), depending on the size of the bearing. Adjust the endplay by adjusting the motor shaft nut. Tighten the nut until the lower bearing comes up against its cover and the springs are being compressed, as indicated by downward movement of the lower half-coupling. Check the end-play by placing a dial indicator between the end shield cover and the lower half-coupling and pressing down on the latter with a jack until the bearing seats in its housing. Repeat this process of tightening the nut and checking the endplay until 0.380 mm to 0.500 mm (0.015 in. to 0.020 in.) endplay is obtained; then lock the nut with its setscrew. There are six holes in the nut and five holes in the lower half-coupling, making a total of 30 “locking positions” where two holes line up. Turning the nut from one locking position to the next represents a change of endplay of approximately 0.071 mm (0.0028 in.). When run uncoupled from the pump, the motor may have excessive vibration. If so, it should be checked with zero endplay. The thrust bearing will then be more nearly in the position it will assume when down thrust is applied during normal operation. After the check run, set the endplay as described previously. Do not run motors with spherical roller thrust bearings uncoupled for long periods because the lower bearing may over heat or fail because of the up thrust load imposed by the springs. F. Bearing Replacement In general, replacement bearings should be of the same type and installed in the same relative position as the original bearings. When removing bearings, apply steady, even pressure parallel to the shaft or lower half coupling centerline. Apply this pressure to the inner race whenever possible. Angular contact bearings which have failed and are especially tight on the coupling, can sometimes be removed by using the following procedure: separate the bearing by forcing the outer race over the balls; then, with a torch, apply quick heat to the inner race while also applying pulling pressure.
16

GEI-M1011A
Angular-contact bearings which are to be stacked together should have their high points of eccentricity (indicated by a burnished spot on the inner race) lined up. All bearings should be of the same manufacturer and of the type that permits stacking. Some motors with angular-contact ball bearings are supplied with removable spacer rings under the outer race of the thrust bearing so that the thrust capacity can be increased by adding an extra bearing or bearings. When these bearings are installed, the high points of eccentricity should be lined up with the keyway in the lower half-coupling. If the original bearings have been in service, they should be replaced at the time this conversion is made. G. Oil Cooling Coil Maintenance See general description of cooling coil connection fittings and Figure 3. As part of ongoing preventative maintenance check for oil leaks around the cooling coil fittings, and check for possible internal water leakage as indicated by an unexplained rise in oil level or a change in oil color. Parts A, B, E and F should always be tight and part B should always be seated against part A to ensure the sealing O-Ring is properly compressed. If cooling coil is to be removed, first remove supply pipes and drain water out of coil. Next remove parts F, B, E and A in that order. Then remove the end shield cover and unscrew the inlet and outlet pipes (part C) from the cooling coil, being careful to hold the elbows on the ends of the cooling coil to prevent damage. Finally, remove the oil-baffle and the cooling coil. To reinstall the cooling coil proceed as follows: 1. Obtain a new o-ring unless you are certain the old o-ring is undamaged and has not aged or taken a compression set. 2. Place coil (without inlet/outlet pipes C) in end shield and secure loosely. 3. Stick inlet/outlet pipes C through holes in end shield wall and check line up of pipes and end shield holes by screwing pipes loosely into cooling coil elbow . . . pipes should be centered in holes in end shield wall. Adjust cooling coil as needed but Do Not Tighten Parts Yet. 4. Thread Part A over pipes and screw A into end shield loosely. Adjust position of cooling coil as necessary to let pipes exit without strain and then secure cooling coil into end shield. 5. Remove parts A and C and put pipe joint compound on threads. Inspect outer end and slots in C pipes and remove any burrs or sharp edges to prevent damage to O-Ring during assembly. Then screw pipes C hand-tight into cooling coil elbows, being careful not to bend or damage the cooling coil when tightening C. Next, tighten C
by using wrench on hex fitting at inner end of C. 6. Next, slide part A into place and screw tightly into end shield, being careful not to damage outer surface of C where O-Ring will seat. 7. Check gap between end shield wall and inner surface of A, if this exceeds 6.35 mm (1/4 in.), the end shield hole should be tapped deeper. 8. Check position of end of C with respect to outer face of A. See Figure 3 for limiting dimensions. 9. Install three (3) setscrews E in A 120° apart and tighten securely to lock A into position and keep it from unscrewing. Setscrews should bite into surface of end shield. 10. Be very careful not to damage or mar outer surface of C where O-Rings seats. 11. Recheck outer end and slot of C and remove any burrs or sharp edges to prevent damage to O-Ring during assembly. Then lubricate O-Ring and slide it into position shown in Figure 3. Be sure to push it in until it seats against A. 12. Slide Part B into place and secure with three (3) socket-head screws. Tighten F screws until flange of B seats solidly against A. There should never be a gap between A and B. Use “Loc-Tite” on threads of F screws to prevent their unscrewing. Parts A and B compress the O-Ring against C and seal oil into the motor and water into the coil. 13. Pressure check the entire system. H. Insulation and Winding Maintenance 1. General For long life and satisfactory operation, insulated windings should be kept clean and free of dirt, oil, metal particles, and other contaminants. A variety of satisfactory and acceptable methods are available for keeping equipment clean. The choice of method will depend greatly on time, availability of equipment, and on the insulation system. However, vacuum and/or compressed air cleaning with nonmetallic hose tips should precede cleaning with water and detergent or with solvents. Tightly adhering dirt may require gently brushing or wiping to get it loose.
WARNING: To prevent injury to eyes and respiratory organs, safety glasses and suitable ventilation or other protective equipment should be used.
2. Vacuum and Compressed Air Cleaning Compressed air may be used to remove loose dirt and dust from air passages such as air ducts.
17

GEI-M1011A
Suction should be used to remove dirt and dust particles from windings to avoid driving particles into the windings and damaging the coils.
CAUTION: Care must be taken to make sure that the air supply is dry and that excessive air pressure is not used. Generally a pressure of not more
than 200 kPa (30 PSI) is recommended.
WARNING: Operator must not use compressed air to remove dirt or dust from his person or clothing.
3. Cleaning with Water and Detergent This method is very effective in cleaning windings when used with a low pressure steam jenny (maximum steam flow 206 kPa (30 PSI) and 90ºC).
CAUTION: To minimize possible damage to varnish and insulation, a fairly neutral, non-conducting type of detergent such as Dubois Flow should
be used. 0.5 liters (1 pint) of detergent to 75 liters (20 gallons) of water is recommended. If a steam jenny is not available, the cleaning solution may be applied with warm water by a spray gun. After the cleaning operation, the windings should be rinsed with water or low pressure steam. It is advisable to dry the windings. Refer back to Insulation Resistance section for instructions on how to proceed. 4. Cleaning With Solvents
WARNING: Many cleaning fluids are flammable and/or toxic to prevent injury to personnel and property. Care should be taken to avoid
flames, sparks, etc. Safety glasses should be used and contact with the skin should be avoided. The area should be well ventilated or protective equipment should be used.
Although cleaning with water and detergent is the preferred method, solvent cleaning may be used when heat drying facilities are not available. 1,1,1 Trichloroethane is recommended for use as the cleaning solvent. Solvent cleaning of silicone insulated windings (Class H insulated machines) is not recommended.
WARNING: While 1,1,1, trichloroethane is considered to be non-flammable and has a relatively low order of toxicity, it should be
used only in a well ventilated area that is free from open flames. Avoid prolonged exposure to its vapor. Failure to observe these precautions may result in injury to personnel.
Windings cleaned with solvent should be dried thoroughly by circulation of dry air before voltage is applied. 5. Revarnishing Windings After several cleanings with water and detergent, it may be necessary to revarnish the windings. Varnish is available from the General Electric Company Insulating Materials Department of GE Service Shops. VI. RENEWAL PARTS To order parts visit GE Support Services at http://www.gess.ge.com. When ordering parts, give description and state quantity of parts desired, together with the nameplate rating, model, and serial number of the motor. For couplings, also specify the type, bore, and keyway size. Requests for additional copies of these instructions or inquiries for specific information should be addressed to the nearest sales office of the General Electric Company. * One commercial source of 1,1,1 Trichloroethane is
Chlorothene NU, which is a trademark of the Dow Chemical Company, Midland, Michigan.
18

GEI-M1011A
VII. TROUBLE SHOOTING CHART
Affected Parts Difficulty What to Check Windings Overheating • Calibration of measuring instrument • Excessive load • Unbalanced AC current • Improper or restricted ventilation • Excessive ambient temperature • Short circuited coil or windings • Dirty windings • Unbalanced voltage • Harmonics in Power Supply (Variable Frequency Control • Fan Broken Bearings Overheating • Calibration of measuring instrument • Worn out or dirty oil or grease • Insufficient oil or grease • Misalignment • Excessive thrust or radial loading • Shaft currents • Improper end-play • Fan broken • Insufficient cooling water • Insufficient down thrust (on SRB) Bearing Housing Oil Leaks • Incorrect grade of oil (type or viscosity) • Loose fittings • Cracked/porous casting • Over-filled • Water in oil Motor Excessive Vibration • Unbalance • Misalignment • Improper or settled foundation • Non-uniform air gap • Rubbing parts • Bent shaft • Unbalanced stator current • Damaged bearings • Reed Critical Frequency • Incorrect end-play • Fan broken Motor Failure to Start • Wrong transformer taps • Wrong connections • Open circuit • Excessive line drop (low voltage at motor) • Excessive load • Rotor rubs • Wrong direction of rotation Insulation Low Insulation
Resistance or • Moisture, dirt, metal particles, oil, or other contaminants on
the insulated windings Insulation Failure • Wrong voltage • Excessive temperature • Voltage surges/lightning • Mechanical damage • Excessive vibration with resultant mechanical damage • Single-phasing
19

GEI-M1011A
Figure 4 213-286 Frame Motors
Typical Hollow-Shaft High-Thrust, Totally Enclosed Fan Cooled Motor
With Angular Contact Ball Lower Thrust Bearing
20
GEI-M1011A
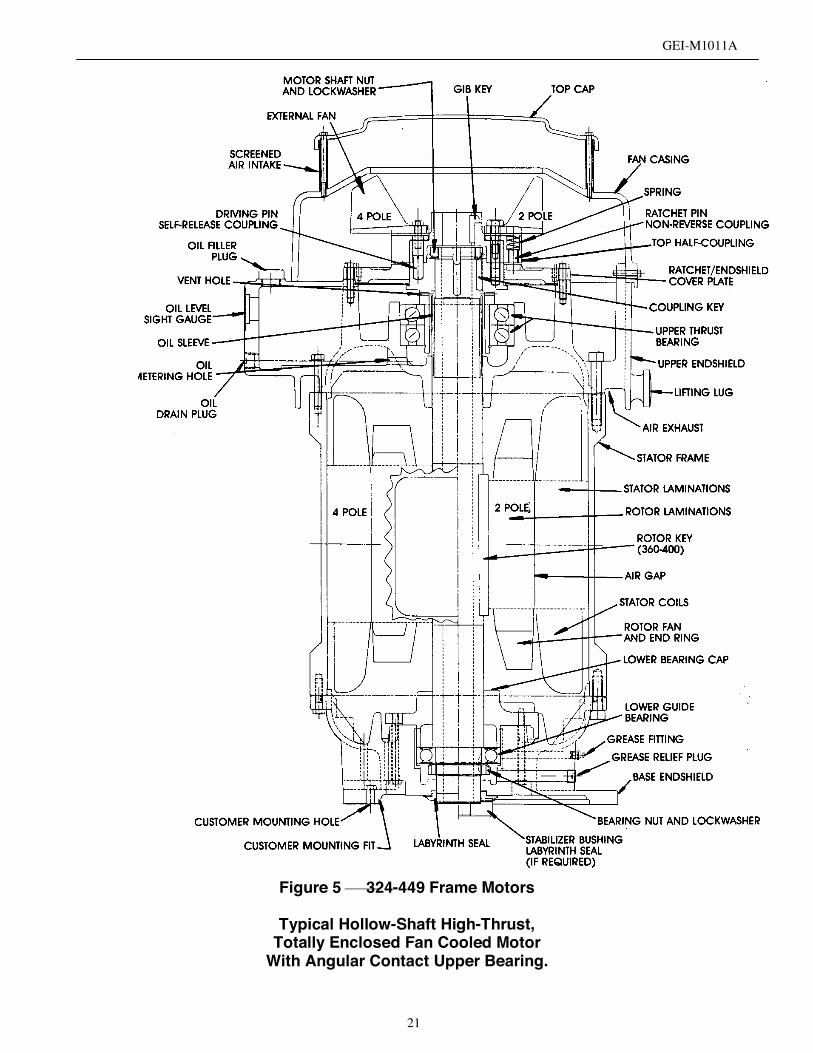
Figure 5 324-449 Frame Motors
Typical Hollow-Shaft High-Thrust,
Totally Enclosed Fan Cooled Motor With Angular Contact Upper Bearing.
21

GEI-M1011A
FIGURE 6 – 509-5011 FRAME MOTORS
TYPICAL HOLLOW-SHAFT, HIGH-THRUST TEFC MOTOR
WITH ANGULAR ONTACT BALL UPPER THRUST BEARING. SELF-RELEASE COUPLING IS SHOWN ON LEFT SIDE
AND NON-REVERSE COUPLING IS SHOWN ON RIGHT SIDE.
22

GEI-M1011A
Figure 7 182-286 Frame Motors
Typical Solid Shaft High-Thrust, Totally Enclosed Fan Cooled
Motor With Angular Contact Lower Bearing. Typical Solid Shaft Construction For Continuous Up And Down Thrust Is Shown In Figure 3A.
Figure 7A
23

GEI-M1011A
Figure 8 324-449 Frame Motors
Typical Upper Bearing And Fan Construction For TEFC Solid Shaft Motors Suitable For High Down Thrust,
Momentary Up Thrust And Limited Endplay. Typical Solid Shaft And Inline Pump Motor Construction For Continuous Up
And Down Thrust Are Shown In Figure 8A.
24

GEI-M1011A
FIGURE 9 – 444-5011 FRAME MOTORS
TYPICAL UPPER BEARING AND FAN CONSTRUCTION FOR SOLID-SHAFT TEFC MOTOR. HIGH UP AND DOWN THRUST
CONSTRUCTION IS SHOWN ON RIGHT AND IN-LINE CONSTRUCTION IS SHOWN ON LEFT. EXTERNAL FAN MOUNTING IS TYPICAL OF 2 POLE,
509-5011 FRAME MOTORS AND ALL 444-449 FRAME MOTORS.
25

GEI-M1011A
FIGURE 10
TYPICAL SOLID-SHAFT, HIGH THRUST TEFC 509-5011 FRAME MOTOR WITH SPHERICAL ROLLER UPPER THRUST BEARING
26

GEI-M1011A
!
General Electric Company We welcome comments and suggestions to make this publication more useful. Your Name Today’s Date If needed, how can we contact you? Your Company’s Name and Address Job Site Fax No. GE Requisition No. Phone No. Your Job Function / How You Use This Publication Publication No. E-Mail Publication Issue / Revision Date Address General Rating Excellent Good Fair Poor Additional Comments Contents Organization Technical Accuracy Clarity Completeness Drawings / Figures Tables Referencing Readability Specific Suggestions (Corrections, information that could be expanded on, and such.) Page No. Comments Other Comments (What you like, what could be added, how to improve, and such.) Overall Grade (Compared to publications from other manufacturers of similar products, how do you rate this publication?) Superior Comparable Inferior Do not know Comment Detach and fax or mail to the address noted above.
To: GE Industrial Systems Attn: Industrial Engineering Technical Publications Editor 2000 Taylor Street Fort Wayne IN 46801-2205 Fax: 1-260-439-3881 (GE Internal DC: 8*380-3881)
27

GEI-M1011A
……………………………………………….…………………Fold here and close with staple or tape………………………………….…………………. Place
Stamp
Here
GE INDUSTRIAL SYSTEMS INDUSTRIAL ENGINEERING TECHNICAL PUBLICATIONS EDITOR 2000 TAYLOR STREET FORT WAYNE IN 46801-2205 USA
…………………………………………………..………….………………..Fold here first……………………………………………………………….
28

GEI-M1011A
Document Revision History Rev # Date Author ISAAC # Description
0 04/30/02 SL N/A New document. 1 05/21/02 LP 02-1399 Added grease bottom bearing to accommodate the new grease
bottom HT construction and relocated relubrication tables.