€¦ · web viewusers access the mysource matrix cms through a web browser ... pdf document . ms...
TRANSCRIPT
CONTENT MANAGEMENT SYSTEMMySource Matrix
M A N U A L 2 0 0 8
Version 1.0
04/07/2008

Table of Contents
About this Manual………………………………………………….. 3About the UWS Content Management System………………… 3The UWS Public Site……………………………………………… 4CMS User Groups………………………………………………… 5UWS Publication Workflow (overview)………………………….. 6The UWS Simple Edit Interface…………………………………. 7Tabs on the UWS Simple Edit Interface (overview)…………… 9The Status and Workflow Tab…………………………………… 11
How to Apply for Approval……………………………………. 13Workflow for Subsite Managers………………………………….. 14The Details Tab………………………………………………........ 18The Metadata Tab……………………………………………........ 20
Adding Metadata……………………………………………..... 21Selecting Terms from the CMS Thesaurus…………………. 23Metadata Table………………………………………………… 25
The Account Tab…………………………………………………… 27Changing your Account Details………………………………. 27Viewing Recently Uploaded Documents and Pages………. 28Updating a Recently Uploaded Page………………………… 29Replacing an Existing Document…………………………….. 29
The Content Tab……………………………………………………. 31Entering the WYSIWYG Editor to Edit Content ……………. 31The WYSIWYG Editor…………………………………………. 32Adding Content from a MS Word, Web or Email Document 33Adding Hyperlinks……………………………………………… 34Adding Anchor Links…………………………………………… 35
The Create Tab…………………………………………………….. 36Creating a New Page………………………………………….. 36Adding a New Image………………………………………….. 38Adding a New Document……………………………………… 39
Glossary……………………………………………………………… 40Appendix 1 – Proxy Settings for CMS access…………………… 43Appendix 2 – Image Specifications……………………………….. 44
2
About this Manual
Welcome to the UWS Content Management System (CMS) Manual 2008.
The purpose of the guide is to provide authorised CMS users with an
understanding of how to use the CMS to add or update web pages on the
University’s public site.
About the UWS Content Management System
The UWS CMS enables authorised UWS staff to contribute content for publication
to the University’s public website. The name of the new CMS for the UWS website
is MySource Matrix.
Users access the MySource Matrix CMS through a web browser (e.g. Internet
Explorer, Firefox) on a computer that is connected to the internet.
Each CMS user is assigned a CMS profile with a corresponding username and
password. This enables the CMS user to access the CMS and use its pre-defined
templates to publish content (text, images and attachments).
CMS users can add a:
Primary Page (shows in menus)
Secondary Page (does not show in menus)
Image
PDF Document
MS Word Document
MS Excel Document
MS PowerPoint Document
3

The UWS Public Site
The UWS Public Site home page at http://www.uws.edu.au
Content suitable for public viewing should be published on the UWS Public Site.
The main entry page to the public site is the University home page at
http://www.uws.edu.au
As the name implies, pages on the public site are openly available – anyone using
a computer that is connected to the internet can access these pages and no login
is required.
CMS User Groups
4

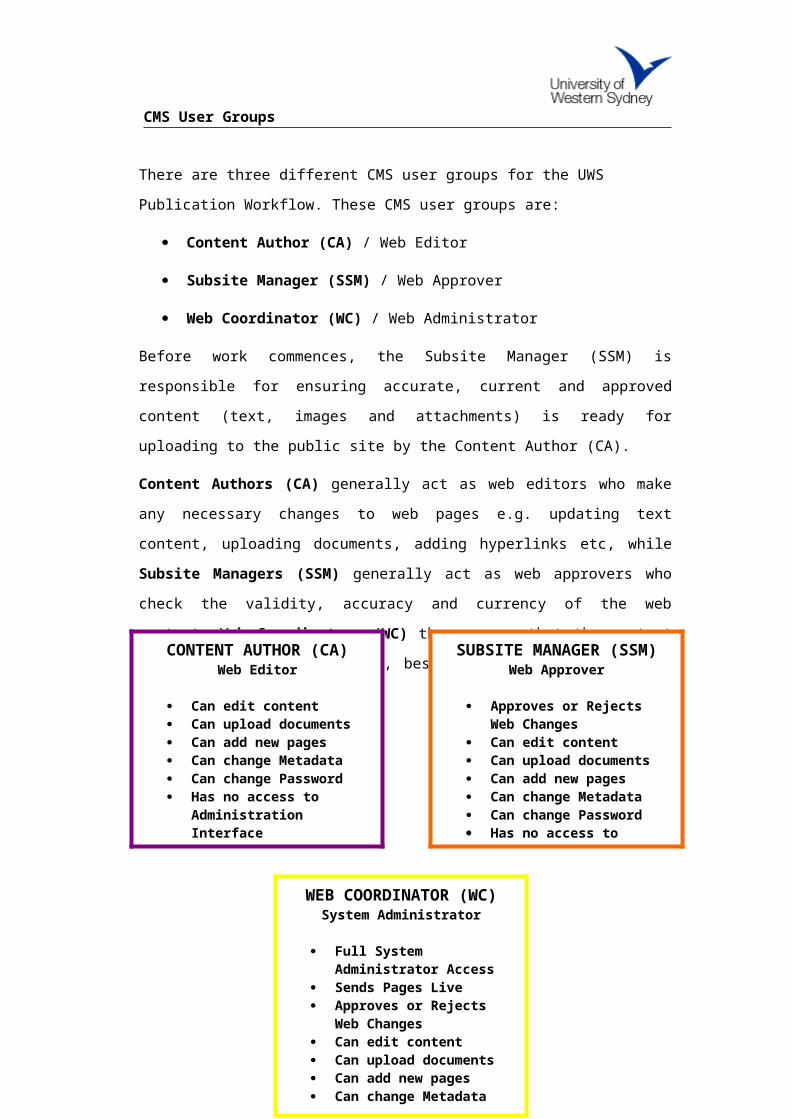
There are three different CMS user groups for the UWS Publication Workflow.
These CMS user groups are:
Content Author (CA) / Web Editor
Subsite Manager (SSM) / Web Approver
Web Coordinator (WC) / Web Administrator
Before work commences, the Subsite Manager (SSM) is responsible for ensuring
accurate, current and approved content (text, images and attachments) is ready
for uploading to the public site by the Content Author (CA).
Content Authors (CA) generally act as web editors who make any necessary
changes to web pages e.g. updating text content, uploading documents, adding
hyperlinks etc, while Subsite Managers (SSM) generally act as web approvers
who check the validity, accuracy and currency of the web content. Web Coordinators (WC) then ensure that the content complies with web standards,
best practice and the UWS web policy.
UWS Publication Workflow (overview)
5
CONTENT AUTHOR (CA)Web Editor
Can edit content Can upload documents Can add new pages Can change Metadata Can change Password Has no access to
Administration Interface
SUBSITE MANAGER (SSM)Web Approver
Approves or Rejects Web Changes
Can edit content Can upload documents Can add new pages Can change Metadata Can change Password Has no access to
Administration Interface
WEB COORDINATOR (WC)System Administrator
Full System Administrator Access
Sends Pages Live Approves or Rejects Web
Changes Can edit content Can upload documents Can add new pages Can change Metadata Can change Password
The UWS Publication Workflow has been set up to ensure all changes and
updates made on web pages are accurate, current and comply with the University
web policy, web standards and web best practice. The UWS Publication Workflow
is generally an approval (or rejection) process that goes through the Subsite
Manager(s) (SSM) and Web Coordinator (WC) assigned to your area, before the
page is published on the UWS website, or sent Live.
Generally, the UWS Publication Workflow begins when a Content Author (CA)
receives instruction to make changes to a web page. The CA makes these
changes then sends the page for approval to their designated SSM. The SSM
either approves or rejects these changes. If approved, the SSM sends the page
for approval to their assigned WC. The WC either approves or rejects the
changes. If approved, the WC then sends the page Live, or publishes the changes
that were made.
The UWS Publication Workflow model for most areas of the UWS Public Site is:
The UWS Simple Edit Interface
6
CONTENT AUTHOR (CA)Web Editor
SUBSITE MANAGER (SSM)Web Approver
Email advising SSM that page requires Approval
WEB COORDINATOR (WC)System Administrator
SEND LIVEMake Asset Live
Insert ‘Workflow Message’ and ‘Make Live’
Insert ‘Workflow Message’ and ‘Approve Changes’
Email advising WC that page needs to be made Live

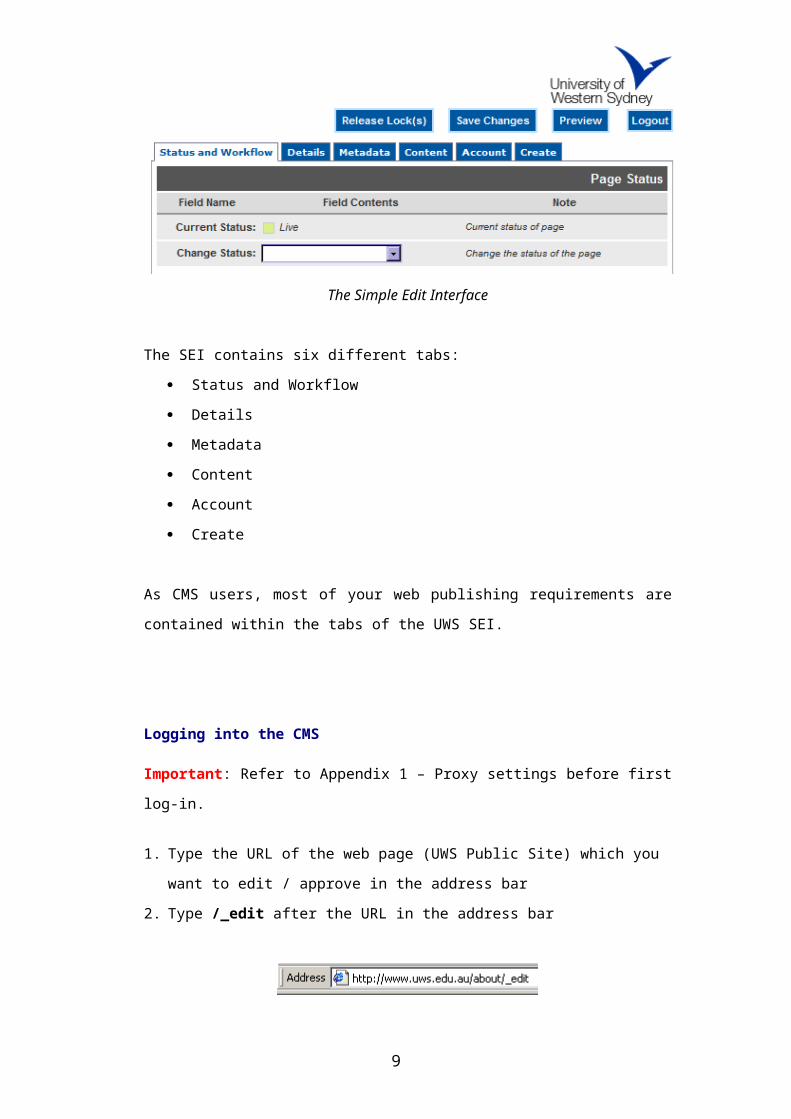
The UWS Simple Edit Interface (SEI) is a basic and simpler version of the
Administration Interface of the MySource Matrix CMS. The SEI is displayed on
the front end of the UWS website and eliminates the need for CMS users to
access the CMS from the backend, or via the Administration Interface.
The SEI is accessed by typing /_edit at the end of the URL (on the address bar)
of the web page you need to edit. The CMS user will then be prompted to log in
to the MySource Matrix CMS by using their username and password.
Once the CMS user enters their username and password, they will be directed to
the SEI of that web page.
The Simple Edit Interface
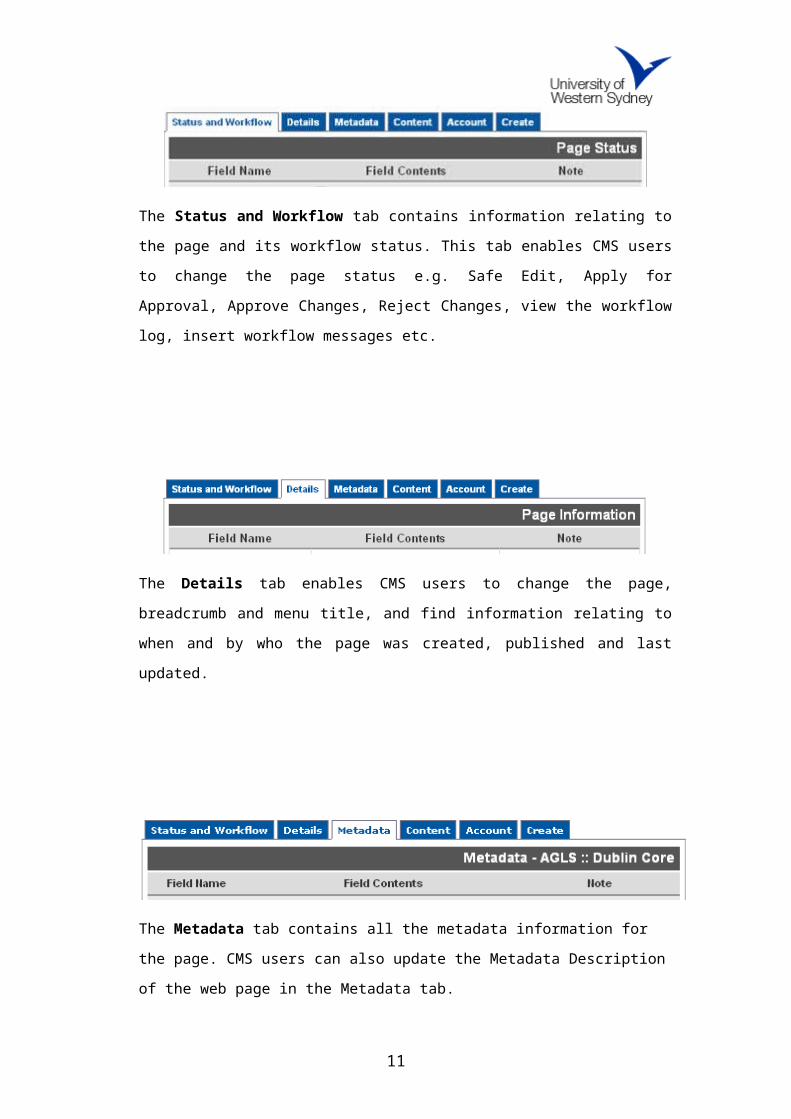
The SEI contains six different tabs:
Status and Workflow
Details
Metadata
Content
Account
Create
As CMS users, most of your web publishing requirements are contained within
the tabs of the UWS SEI.
Logging into the CMS
Important: Refer to Appendix 1 – Proxy settings before first log-in.
7

1. Type the URL of the web page (UWS Public Site) which you want to edit /
approve in the address bar
2. Type /_edit after the URL in the address bar
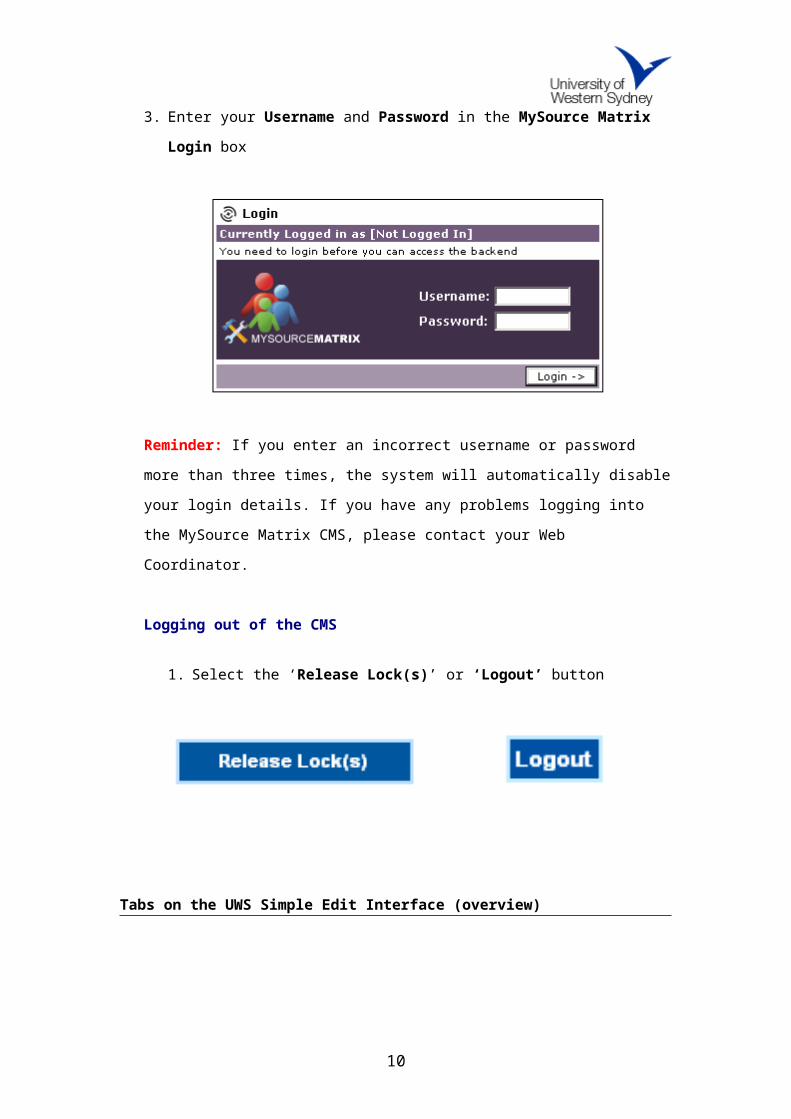
3. Enter your Username and Password in the MySource Matrix Login box
Reminder: If you enter an incorrect username or password more than three
times, the system will automatically disable your login details. If you have any
problems logging into the MySource Matrix CMS, please contact your Web
Coordinator.
Logging out of the CMS
1. Select the ‘Release Lock(s)’ or ‘Logout’ button
Tabs on the UWS Simple Edit Interface (overview)
8
The Status and Workflow tab contains information relating to the page and its
workflow status. This tab enables CMS users to change the page status e.g. Safe
Edit, Apply for Approval, Approve Changes, Reject Changes, view the workflow
log, insert workflow messages etc.
The Details tab enables CMS users to change the page, breadcrumb and menu
title, and find information relating to when and by who the page was created,
published and last updated.
The Metadata tab contains all the metadata information for the page. CMS users
can also update the Metadata Description of the web page in the Metadata tab.
9
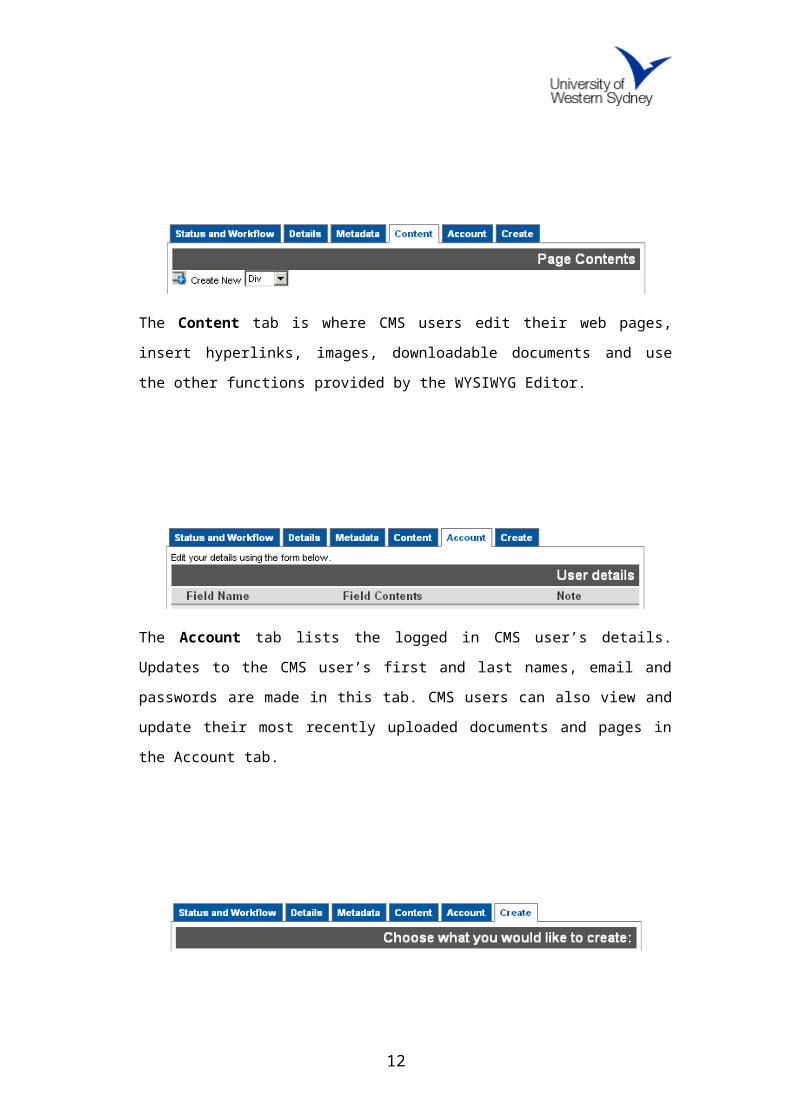
The Content tab is where CMS users edit their web pages, insert hyperlinks,
images, downloadable documents and use the other functions provided by the
WYSIWYG Editor.
The Account tab lists the logged in CMS user’s details. Updates to the CMS
user’s first and last names, email and passwords are made in this tab. CMS users
can also view and update their most recently uploaded documents and pages in
the Account tab.
The Create tab enables CMS users to add a primary page (shows in menus),
secondary page (does not show in menus), image, PDF document, MS Word
document, MS Excel document and MS PowerPoint document.
The Status and Workflow Tab
10
The Status and Workflow tab shows CMS users the current status of the web
page they are on. This is also the tab where CMS users can change the status of
the page from Live to Safe Edit, as well as Apply for Approval, and Accept or
Reject Changes.
Page StatusThere are generally three main statuses for pages within the CMS:
Safe Edit Apply for Approval / Safe Editing Pending Approval Live
Safe EditBefore making any changes to a page, the page status must be changed to Safe Edit. When a page is in Safe Edit, CMS users can edit their web content safely –
the public will only see the current or Live version of the web page. All CMS user
groups can change the status of the page to Safe Edit.
Changing the Page Status to Safe Edit
1. Select the Status and Workflow tab on the Simple Edit Interface
2. Select Safe Edit in the Change Status drop down menu
3. Select Save Changes
4. The Current Status should now be Safe Editing
Apply for Approval / Safe Editing Pending Approval
When content authors and subsite managers Apply for Approval, the status of
the page becomes Safe Editing Pending Approval. If a page is Safe Editing
11
Approval, it means the page is awaiting approval from either a subsite manager
or web coordinator and is currently in the UWS Publication Workflow. The public
will see the current or Live version of the page, and changes will not be shown on
the UWS website until the page has been approved and sent Live by a web
coordinator. No changes can be made to the page when its status is Safe Editing
Pending Approval.
LiveA page needs to be made Live before any changes made by content authors and
subsite managers are seen on the UWS website. Only web coordinators have
access to making pages Live. The UWS Publication Workflow is complete once
a page is made Live. When a page is Live, content authors and subsite managers
can again return to the web page to make any necessary updates.
All web coordinators, subsite managers and content authors of a page are
notified by email when the page has been made Live.
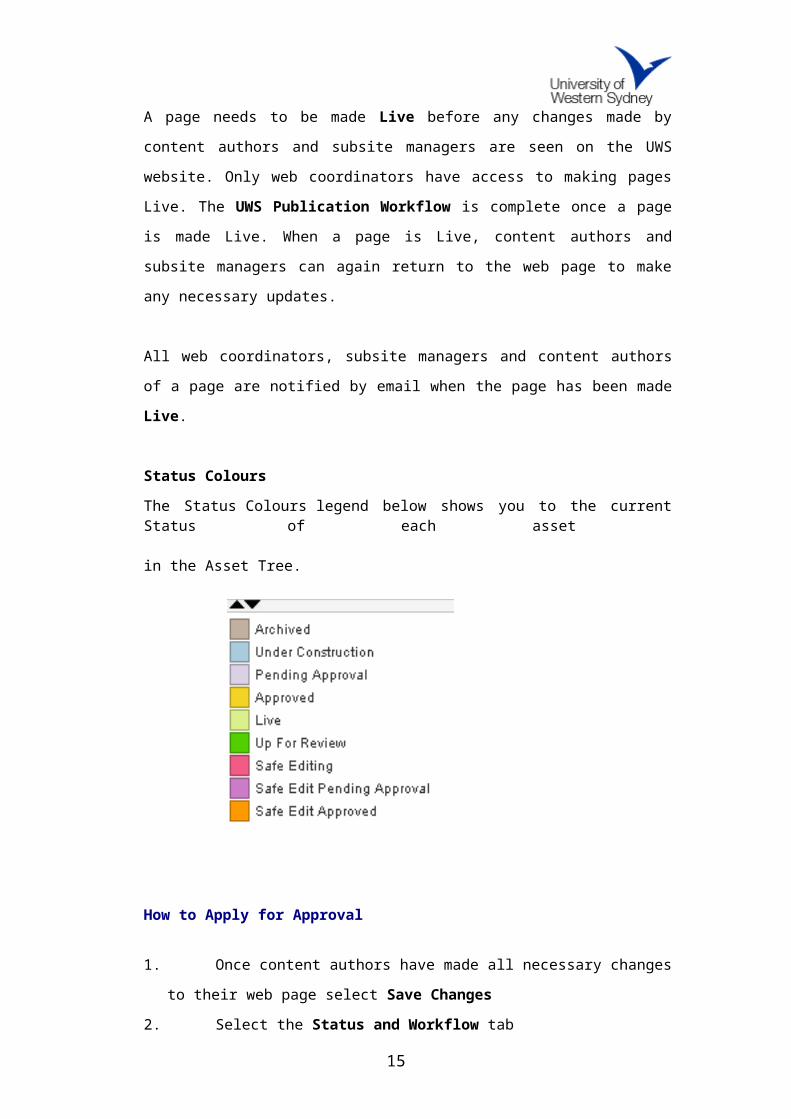
Status ColoursThe Status Colours legend below shows you to the current Status of each asset
in the Asset Tree.
How to Apply for Approval
1. Once content authors have made all necessary changes to their web
page select Save Changes2. Select the Status and Workflow tab
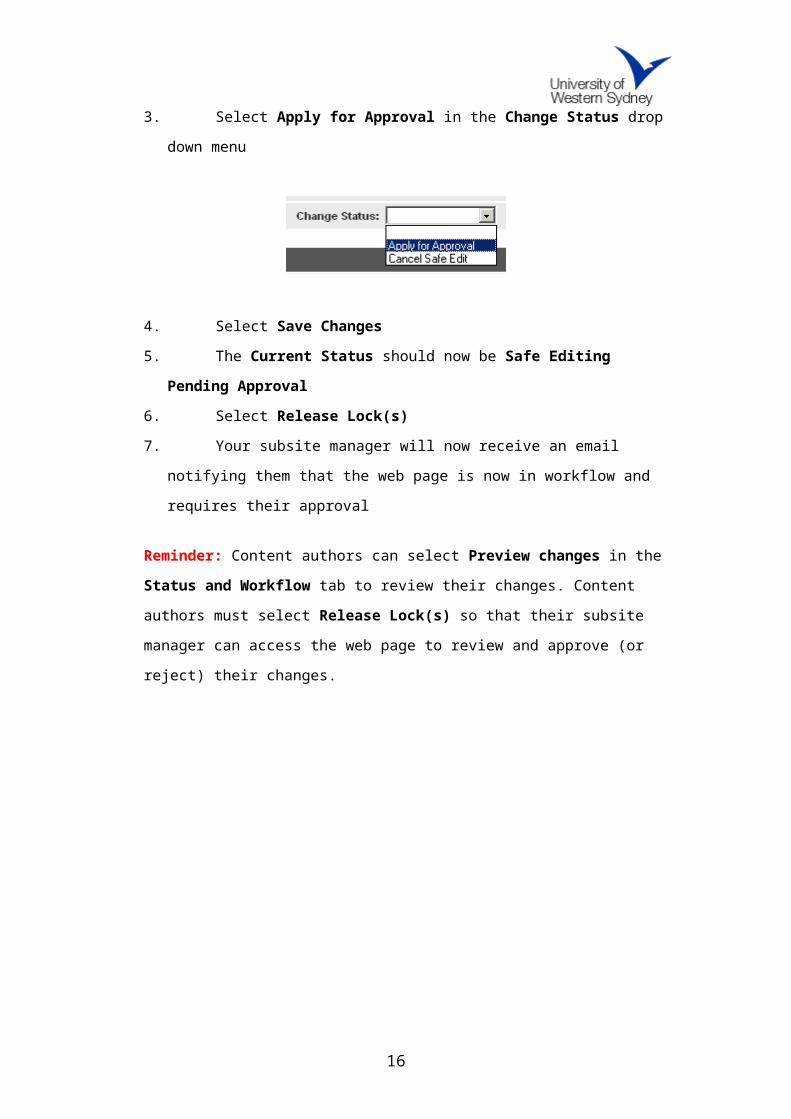
3. Select Apply for Approval in the Change Status drop down menu
12

4. Select Save Changes5. The Current Status should now be Safe Editing Pending Approval6. Select Release Lock(s)7. Your subsite manager will now receive an email notifying them that
the web page is now in workflow and requires their approval
Reminder: Content authors can select Preview changes in the Status and Workflow tab to review their changes. Content authors must select Release Lock(s) so that their subsite manager can access the web page to review and
approve (or reject) their changes.
Workflow for Subsite Managers
Once content authors have applied for approval of changes made to a web page,
their subsite manager will receive an email notifying them that the web page is in
workflow and requires their approval before it is sent to a web coordinator to be
made Live.
13

Preview Changes made by Content Author
1. In the email that you were sent, select the preview this asset link
2. You will be directed to the MySource Matrix CMS Login screen
3. Enter your Username and Password. You will be directed to the CMS
Preview Page4. The updated version of the web page requiring your approval will be
displayed in a small window at the bottom of the Preview Page
5. To view the changes made, check the Show Diff: Show the difference between the system version and the edited version box
6. Select Preview
7. The Preview Page will refresh and the updated version of the web page will
show the changes that were made. Reminder: Text highlighted in red is the
original content while text highlighted in green is the new or updated content
14
8. To view the changes in a full screen, select show in new window. This will
load the page with its highlighted changes in a new window
Reminder: You cannot Approve or Reject Changes from this page
Approving Changes
1. Return to the email you were sent notifying you that the web page requires
your approval before being sent to a web coordinator to be made Live
2. Select the Workflow Screen link. Reminder: If you have not previewed the
web page as outlined in Preview Changes made by Content Author, you
will be directed to the MySource Matrix CMS Login box where you will be
prompted to enter your Username and Password to access the Workflow Screen. If you have previewed the web page, the system will remember you
from when you previously logged in
3. You can also preview the changes made on the web page in the Workflow Screen.
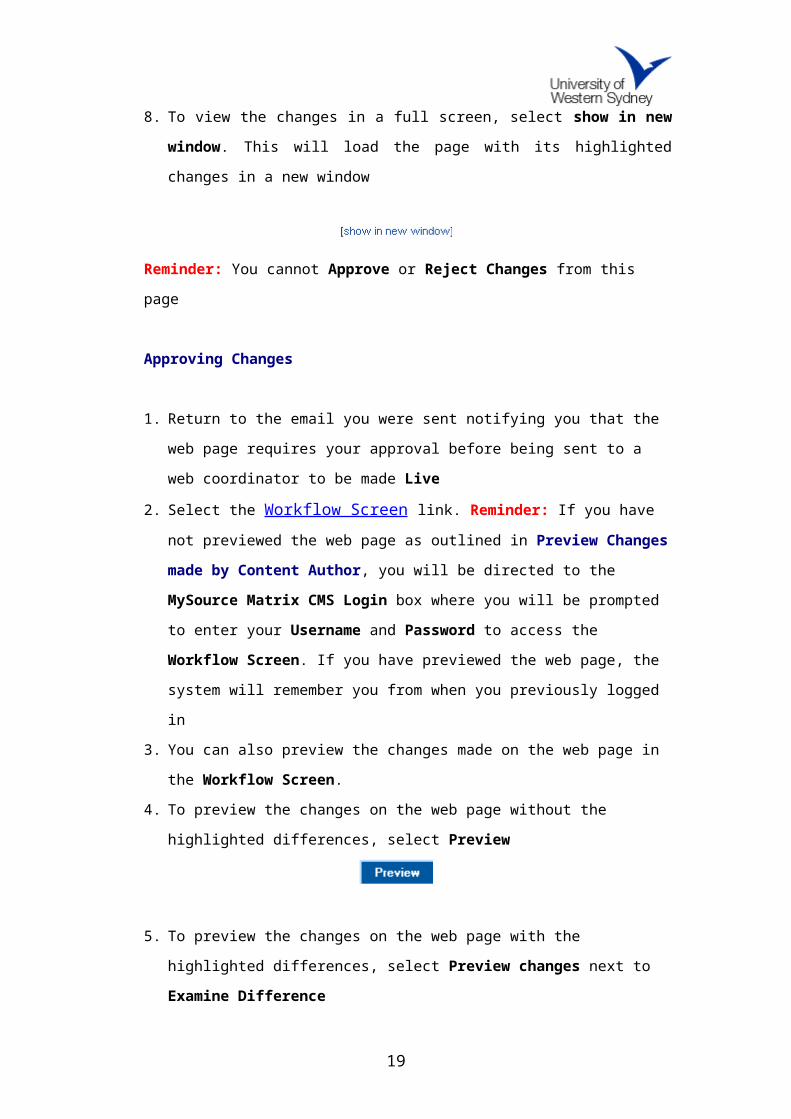
4. To preview the changes on the web page without the highlighted differences,
select Preview
5. To preview the changes on the web page with the highlighted differences,
select Preview changes next to Examine Difference
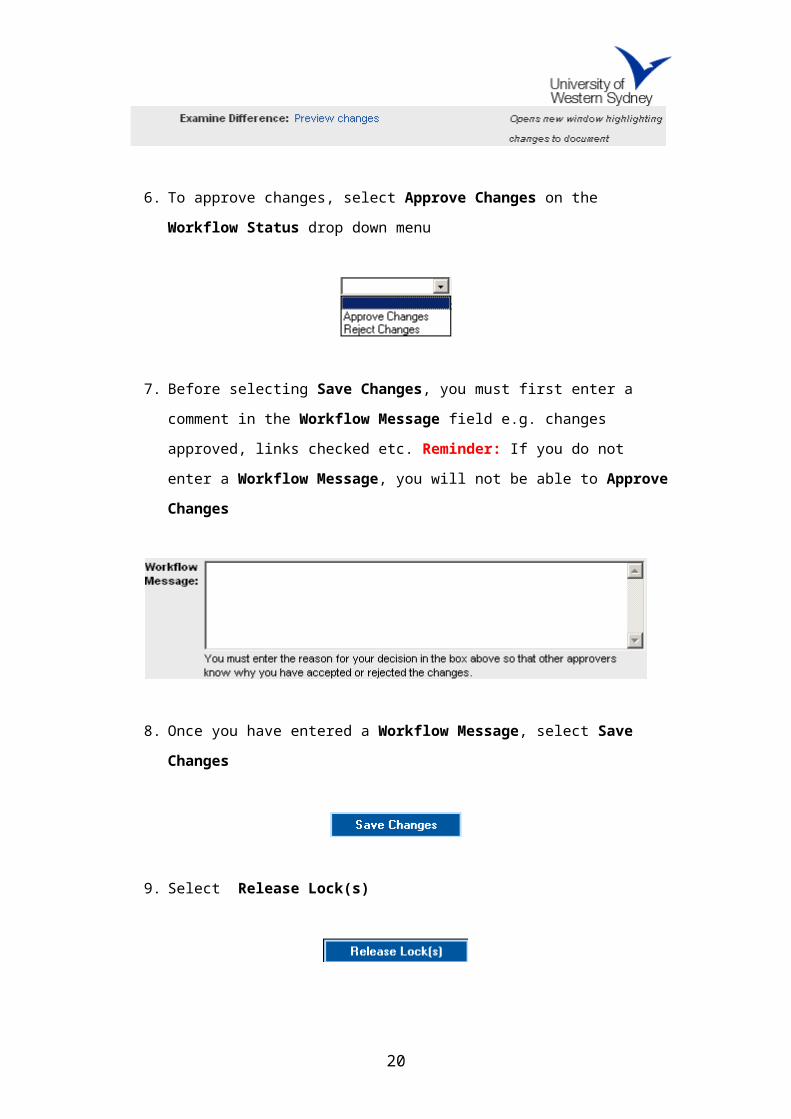
6. To approve changes, select Approve Changes on the Workflow Status
drop down menu
7. Before selecting Save Changes, you must first enter a comment in the
Workflow Message field e.g. changes approved, links checked etc.
15
Reminder: If you do not enter a Workflow Message, you will not be able to
Approve Changes
8. Once you have entered a Workflow Message, select Save Changes
9. Select Release Lock(s)
10. Your web coordinator will now receive an email notifying them that the web
page has been approved to be made Live
Reminder: Subsite managers must select Release Lock(s) before exiting the
Workflow Screen so that their web coordinator can access the web page to
send the page Live
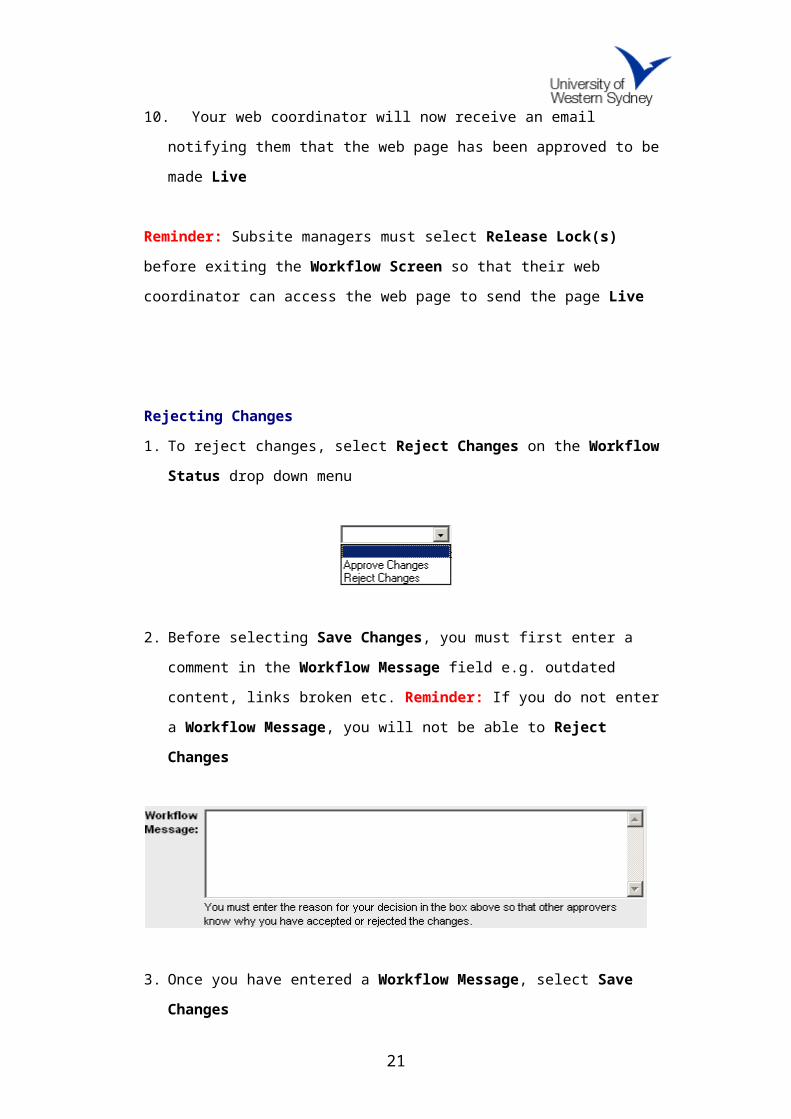
Rejecting Changes1. To reject changes, select Reject Changes on the Workflow Status drop
down menu
2. Before selecting Save Changes, you must first enter a comment in the
Workflow Message field e.g. outdated content, links broken etc. Reminder:
16
If you do not enter a Workflow Message, you will not be able to Reject Changes
3. Once you have entered a Workflow Message, select Save Changes
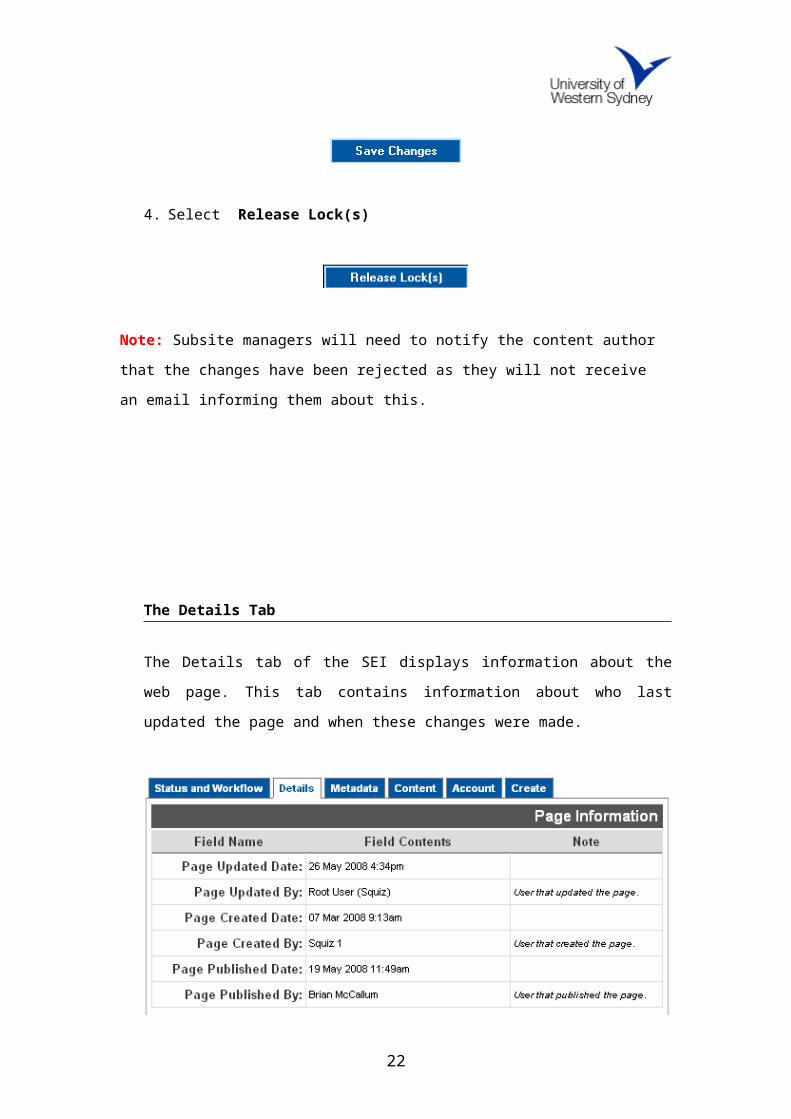
4. Select Release Lock(s)
Note: Subsite managers will need to notify the content author that the changes have
been rejected as they will not receive an email informing them about this.
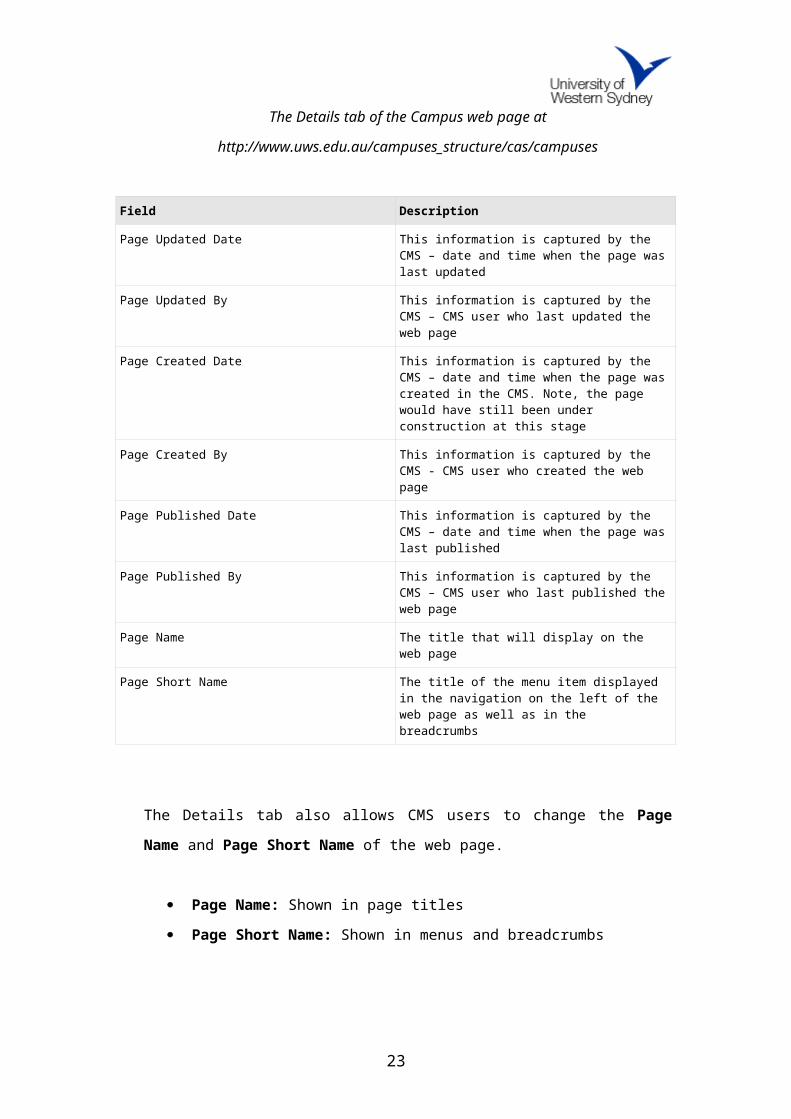
The Details Tab
The Details tab of the SEI displays information about the web page. This tab
contains information about who last updated the page and when these changes
were made.
17

The Details tab of the Campus web page at
http://www.uws.edu.au/campuses_structure/cas/campuses
Field Description
Page Updated Date This information is captured by the CMS – date and time when the page was last updated
Page Updated By This information is captured by the CMS – CMS user who last updated the web page
Page Created Date This information is captured by the CMS – date and time when the page was created in the CMS. Note, the page would have still been under construction at this stage
Page Created By This information is captured by the CMS - CMS user who created the web page
Page Published Date This information is captured by the CMS – date and time when the page was last published
Page Published By This information is captured by the CMS – CMS user who last published the web page
Page Name The title that will display on the web page
Page Short Name The title of the menu item displayed in the navigation on the left of the web page as well as in the breadcrumbs
The Details tab also allows CMS users to change the Page Name and Page Short Name of the web page.
Page Name: Shown in page titles
Page Short Name: Shown in menus and breadcrumbs
18
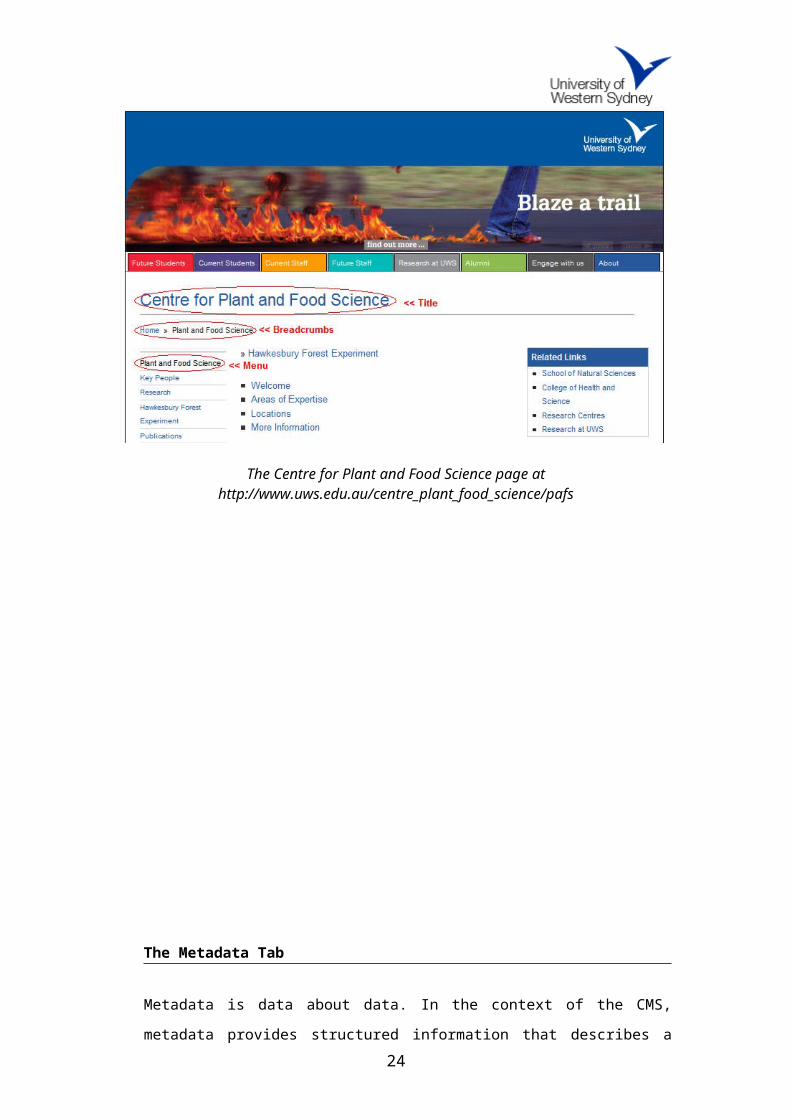
The Centre for Plant and Food Science page at http://www.uws.edu.au/centre_plant_food_science/pafs
The Metadata Tab
Metadata is data about data. In the context of the CMS, metadata provides
structured information that describes a web page or file, such as a PDF
document or image. Metadata is designed to improve the visibility, accessibility
and interoperability of online information and is a very important part of authoring
content within the CMS.
19
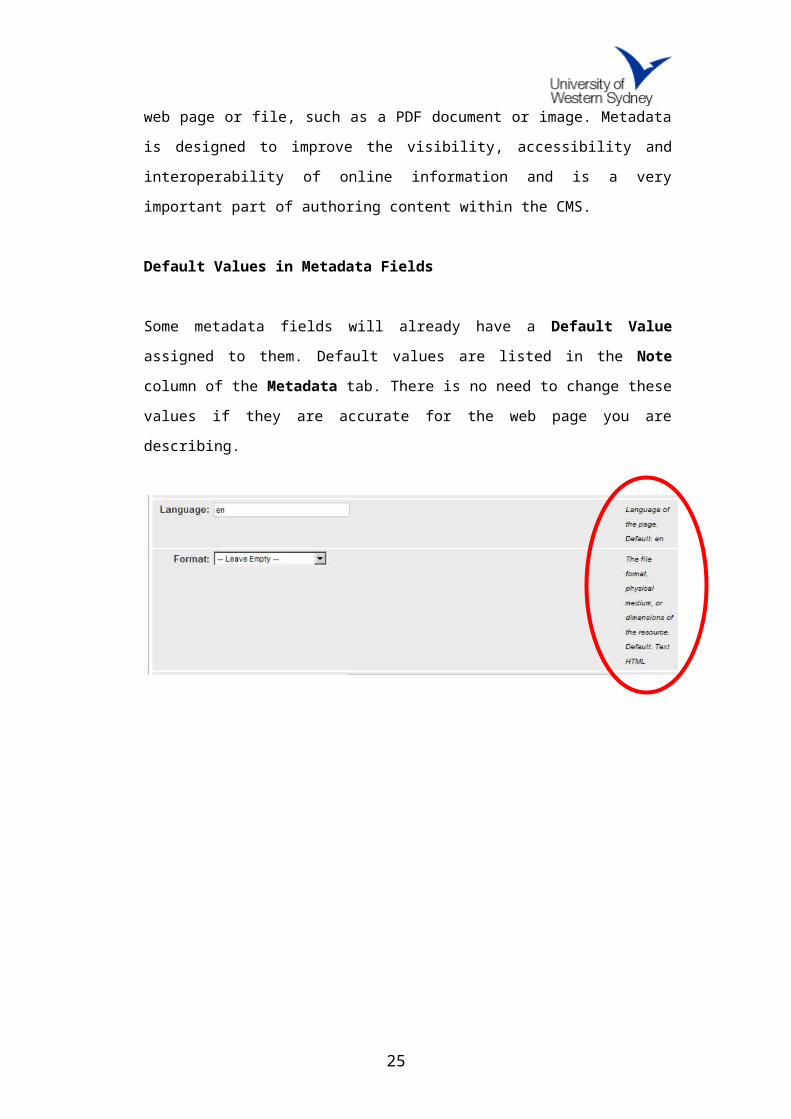
Default Values in Metadata Fields
Some metadata fields will already have a Default Value assigned to them.
Default values are listed in the Note column of the Metadata tab. There is no
need to change these values if they are accurate for the web page you are
describing.
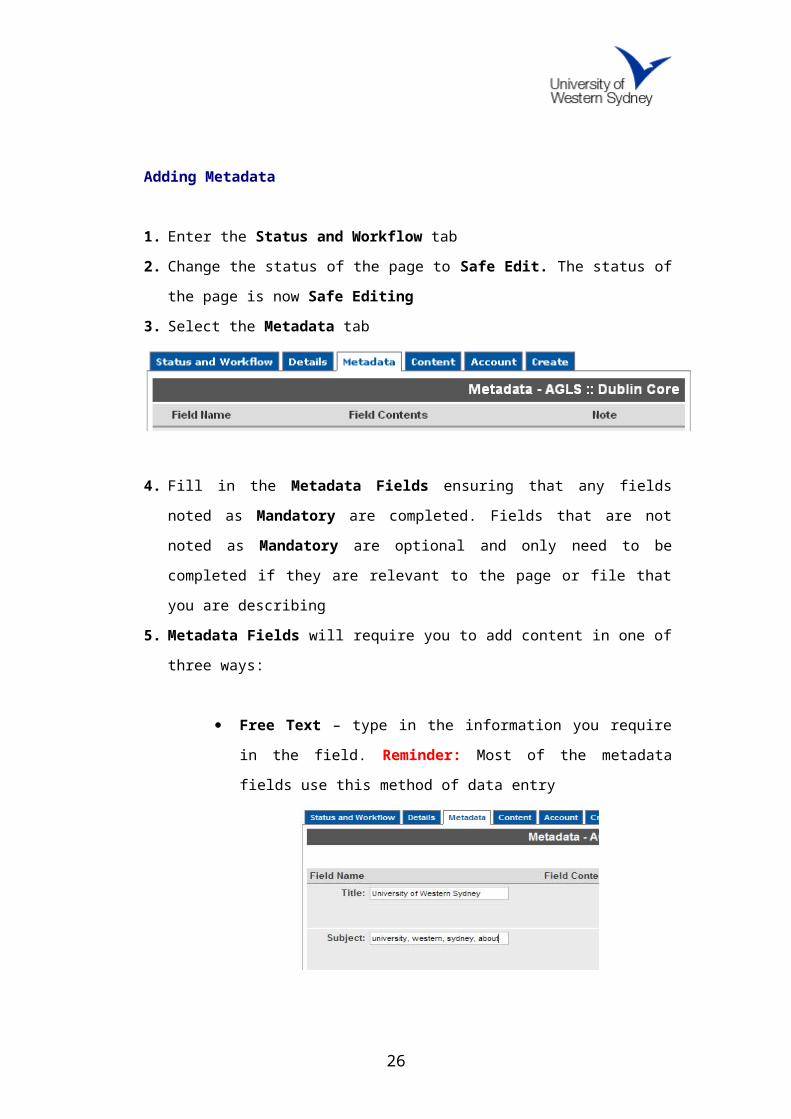
Adding Metadata
1. Enter the Status and Workflow tab
2. Change the status of the page to Safe Edit. The status of the page is now
Safe Editing3. Select the Metadata tab
20
4. Fill in the Metadata Fields ensuring that any fields noted as Mandatory are
completed. Fields that are not noted as Mandatory are optional and only
need to be completed if they are relevant to the page or file that you are
describing
5. Metadata Fields will require you to add content in one of three ways:
Free Text – type in the information you require in the field.
Reminder: Most of the metadata fields use this method of data
entry
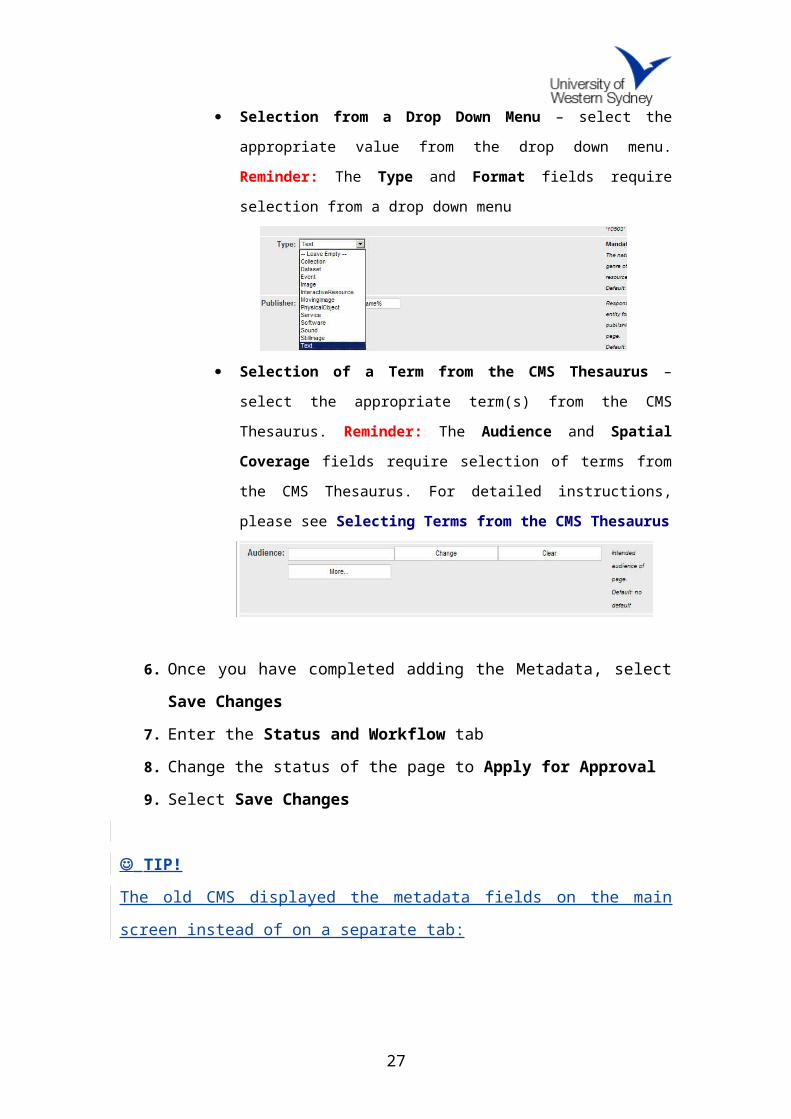
Selection from a Drop Down Menu – select the appropriate
value from the drop down menu. Reminder: The Type and
Format fields require selection from a drop down menu
Selection of a Term from the CMS Thesaurus – select the
appropriate term(s) from the CMS Thesaurus. Reminder: The
Audience and Spatial Coverage fields require selection of terms
from the CMS Thesaurus. For detailed instructions, please see
Selecting Terms from the CMS Thesaurus
21
6. Once you have completed adding the Metadata, select Save Changes7. Enter the Status and Workflow tab
8. Change the status of the page to Apply for Approval9. Select Save Changes
TIP!The old CMS displayed the metadata fields on the main screen instead of on
a separate tab:
The new CMS uses the fields Subject for keywords, and Description for – you
guessed it – a description of the page contents. You should replace the
default value in these fields with relevant text including the kinds of terms
which people searching for the page may use.
22
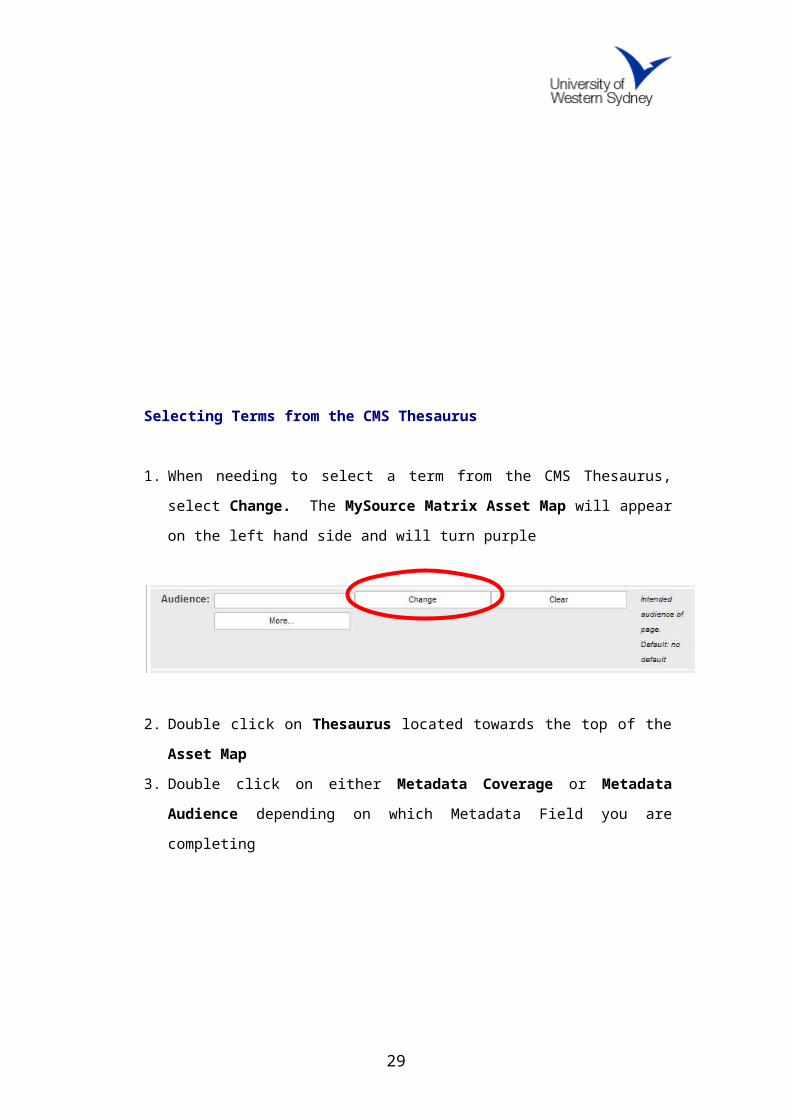
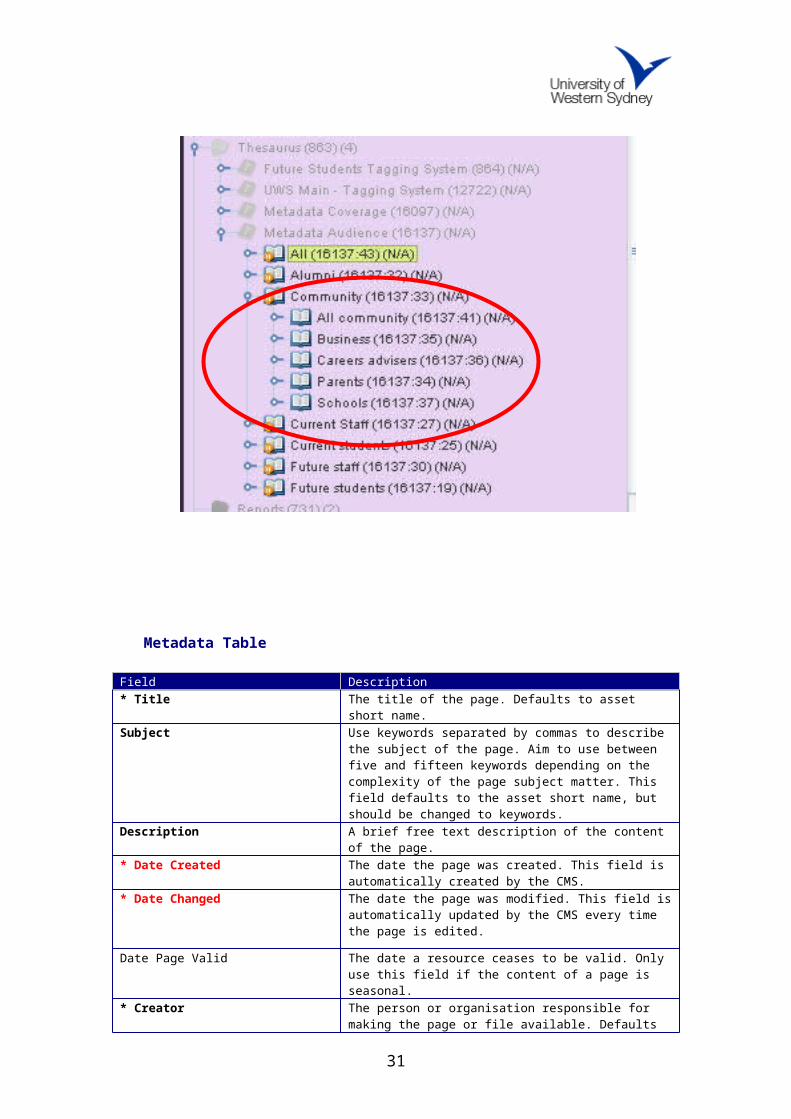
Selecting Terms from the CMS Thesaurus
1. When needing to select a term from the CMS Thesaurus, select Change. The MySource Matrix Asset Map will appear on the left hand side and will
turn purple
2. Double click on Thesaurus located towards the top of the Asset Map3. Double click on either Metadata Coverage or Metadata Audience
depending on which Metadata Field you are completing
23
4. Highlight the appropriate term by left clicking the term. The term should now
be highlighted green
5. Right click on the term
6. Select Use Me
7. To add additional terms from the CMS Thesaurus, select More…
Reminder: The Metadata Audience Thesaurus is hierarchical so CMS Users
may need to browse down to the appropriate audience level to locate the most
appropriate term. For example, to select Schools as a term, CMS Users would
need to expand the Community thesaurus term first
24
Metadata Table
Field Description* Title The title of the page. Defaults to asset short name.Subject Use keywords separated by commas to describe the subject
of the page. Aim to use between five and fifteen keywords depending on the complexity of the page subject matter. This field defaults to the asset short name, but should be changed to keywords.
Description A brief free text description of the content of the page.* Date Created The date the page was created. This field is automatically
created by the CMS.* Date Changed The date the page was modified. This field is automatically
updated by the CMS every time the page is edited.
Date Page Valid The date a resource ceases to be valid. Only use this field if the content of a page is seasonal.
* Creator The person or organisation responsible for making the page or file available. Defaults to the University of Western Sydney. Do not change unless the page or file belongs to an outside organisation that UWS is acting as the host for.
* Identifier The asset ID of the page. This field is automatically populated by the CMS. Do not edit this field
* Type Uses the DCMI controlled vocabulary to describe the genre of the resource. Defaults to text. Change according to file type if you are uploading a file e.g. Image for images. Leave as Text for PDFs and MS Word documents and web pages.For definitions of each of the types listed in the controlled vocabulary see http://dublincore.org/documents/2000/07/11/dcmi-type-vocabulary/
25
Publisher Used to describe the organisation that owns the resource. Leave blank unless the page or file that you’re describing is specifically published by a division or unit within UWS rather than UWS as a whole.
Audience This field uses a controlled vocabulary to describe the audience of the page or file. Change this field if your page relates to a specific audience or specific audiences.
Contributor Used to describe an entity that contributed to the page or file being described, e.g. a non-UWS partner. Leave blank unless required.
Language Describes the language of the page or file being described. This field defaults to ‘en’ for English. Only change this field if you are describing a file or page written in a language other than English. Use the appropriate language code selected from the RFC 4646 Tags for Identifying Languages. Visit the RFC Editor website to search for codes.
Format The format of the page or file. Defaults to Text html. Use the drop down list to select the appropriate value for images or files.
Spatial coverage This field uses a controlled vocabulary to describe the geographical location to which the page or file relates, e.g. Campbelltown Campus, External. This field is only required if the page or file you are describing relates to a specific area.
Temporal coverage This field is used to describe the time span of the page or file you are describing, e.g. for a resource project that runs from 2004 to 2008. This field is only required if the page or file you are describing relates to a specific span of time.
* Rights Describes the copyright and IPR held over the page or file being described. Defaults to the University of Western Sydney. Do not change for web pages and only change for files if there is a clear owner that is not UWS. Please note that images that are not owned by UWS should not be uploaded to the website.
Source This field is used to reference a resource from which your page of file is derived in whole or in part. Examples include statistical highlights from an official report, an html version of a hard copy document such as an Annual Report, lists of personnel from a hard copy document, etc. If this field is required try to use the ISBN or ISSN of the source document if possible.
Metadata Table Key
* - indicates a metadata field with a default valueBold - indicates a mandatory metadata fieldBold and Red - indicates a metadata field that should not be edited
Phew! DIB - (Digestion of information break)
26
The Account Tab
The Account tab on the SEI is used to update a CMS user’s account details, as
well as any documents they recently uploaded or web pages they recently
created.
CMS users can update and change their name, last name, email and password
on the Account tab.
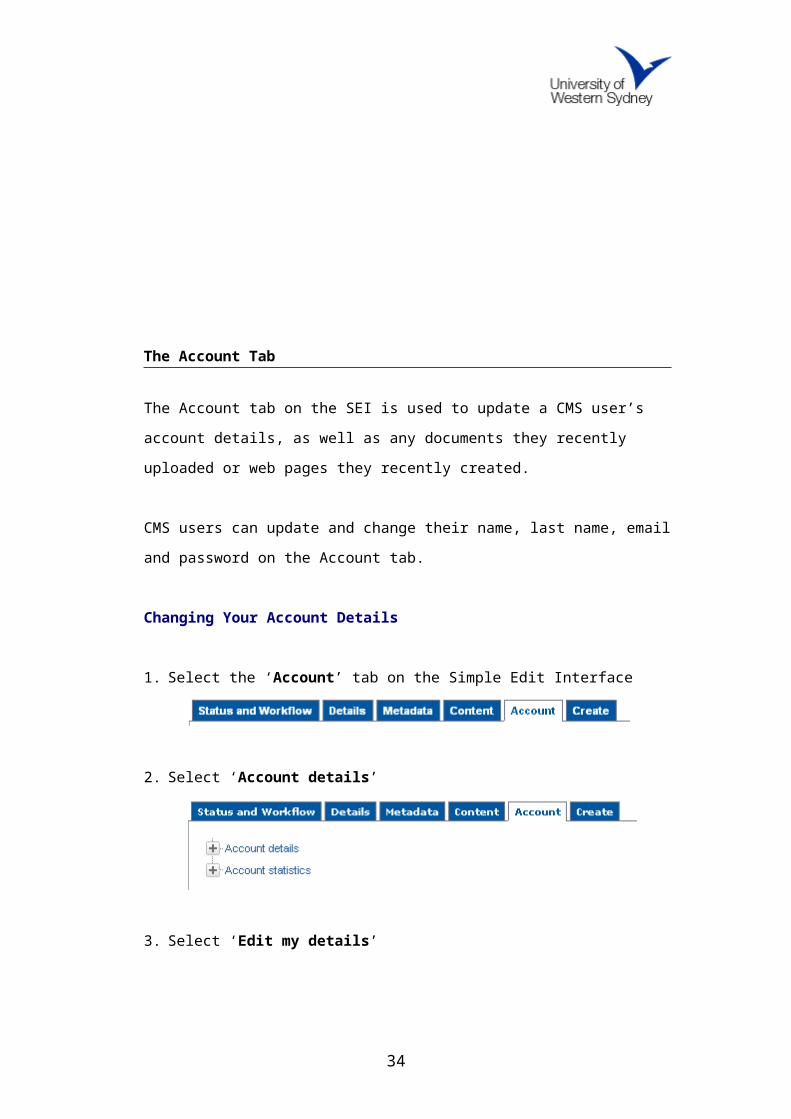
Changing Your Account Details
1. Select the ‘Account’ tab on the Simple Edit Interface
2. Select ‘Account details’
27

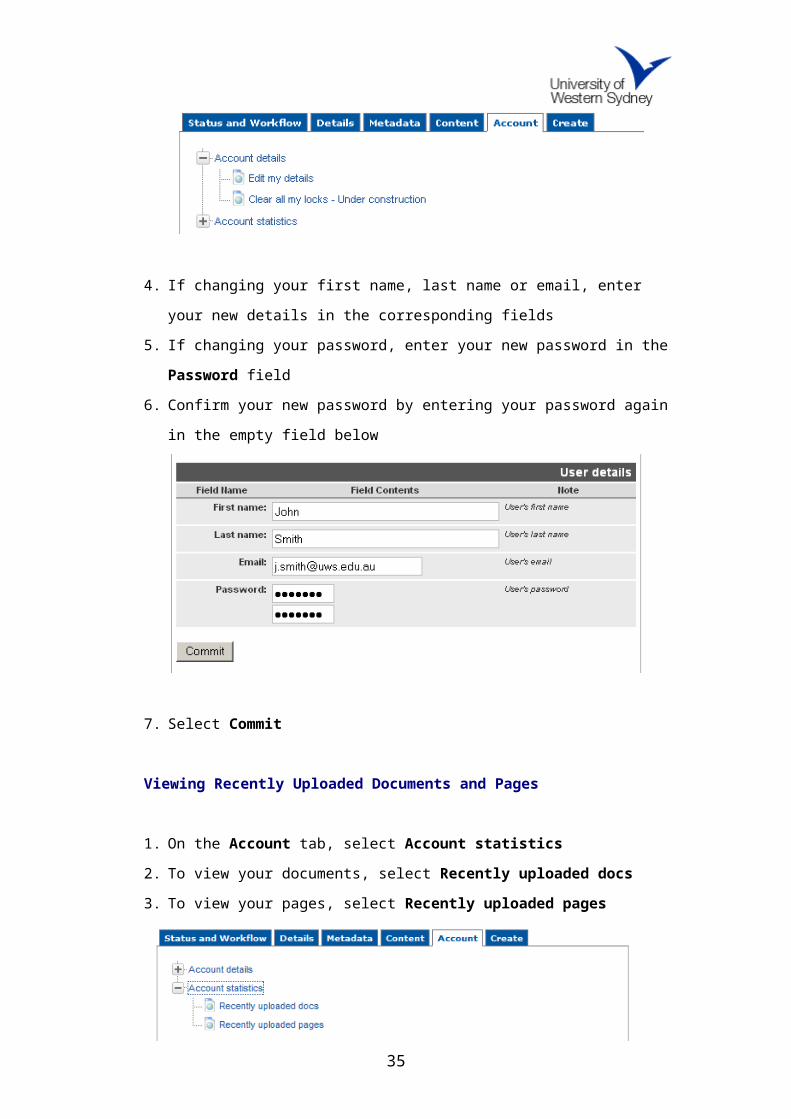
3. Select ‘Edit my details’
4. If changing your first name, last name or email, enter your new details in the
corresponding fields
5. If changing your password, enter your new password in the Password field
6. Confirm your new password by entering your password again in the empty
field below
7. Select Commit
Viewing Recently Uploaded Documents and Pages
1. On the Account tab, select Account statistics2. To view your documents, select Recently uploaded docs3. To view your pages, select Recently uploaded pages
4. Select the document or page you want to view
28
Updating a Recently Uploaded Page
1. On the Account tab under Account statistics, select Recently uploaded pages
2. Select Edit next to the page you need to update
3. You will then be directed to the SEI of that web page. You can now update
and edit that page
Replacing an Existing Document
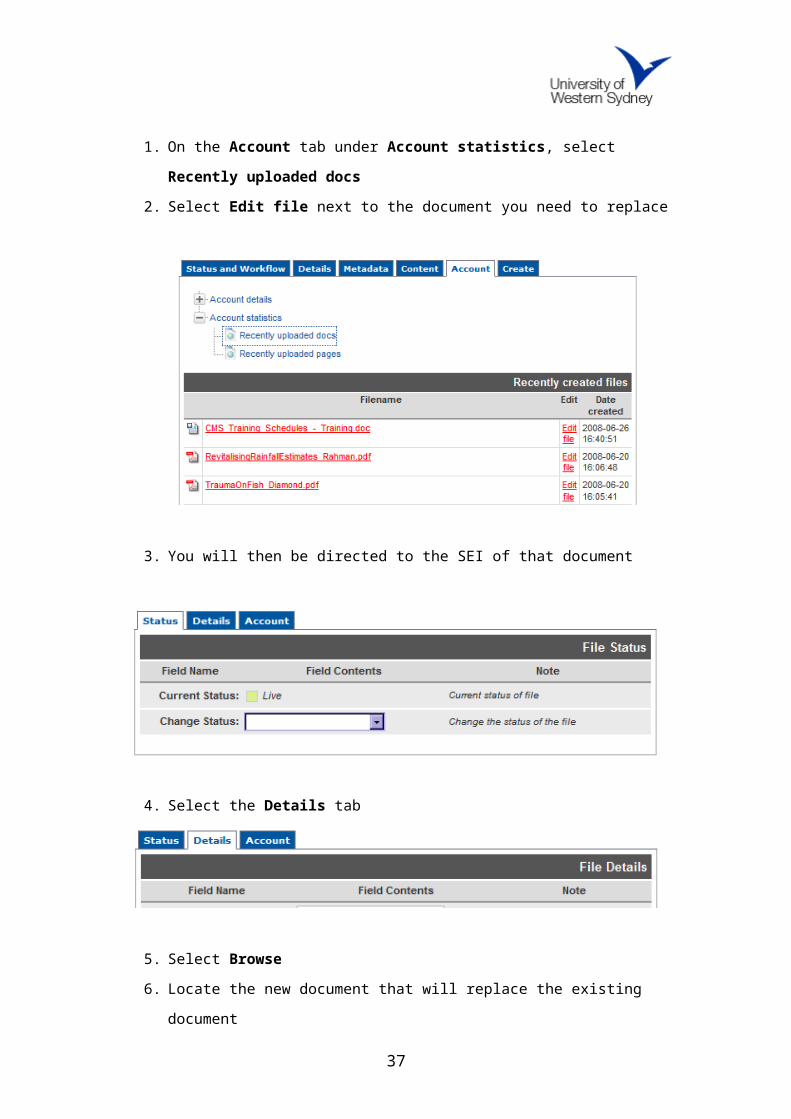
1. On the Account tab under Account statistics, select Recently uploaded docs
2. Select Edit file next to the document you need to replace
29

3. You will then be directed to the SEI of that document
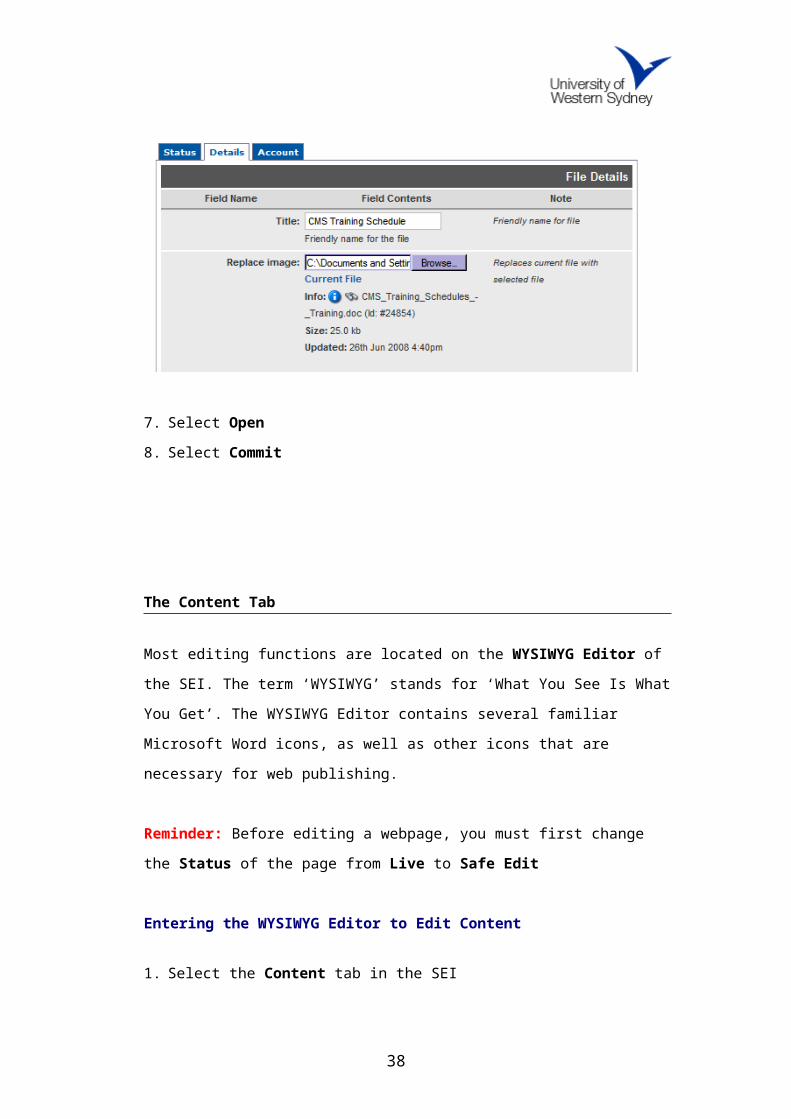
4. Select the Details tab
5. Select Browse6. Locate the new document that will replace the existing document
30
7. Select Open8. Select Commit
The Content Tab
Most editing functions are located on the WYSIWYG Editor of the SEI. The term
‘WYSIWYG’ stands for ‘What You See Is What You Get’. The WYSIWYG Editor
contains several familiar Microsoft Word icons, as well as other icons that are
necessary for web publishing.
Reminder: Before editing a webpage, you must first change the Status of the
page from Live to Safe Edit
Entering the WYSIWYG Editor to Edit Content
1. Select the Content tab in the SEI
2. Enter the WYSIWYG Editor by selecting the green WYSIWYG icon
31

3. The WYSIWYG Editor will now appear
4. You are now ready to start editing content in the WYSIWYG Editor
The WYSIWYG Editor
Formatting Content
BOLD – Highlight text then select the icon
ITALIC – Highlight text then select the icon
UNDERLINE – Highlight text then select the icon
To create Numbered (1, 2, 3…) or Bulleted Lists – Place cursor at the
beginning of text that will be listed using Numbers or Bullets then select
the (Numbered List) or (Bulleted List) icon
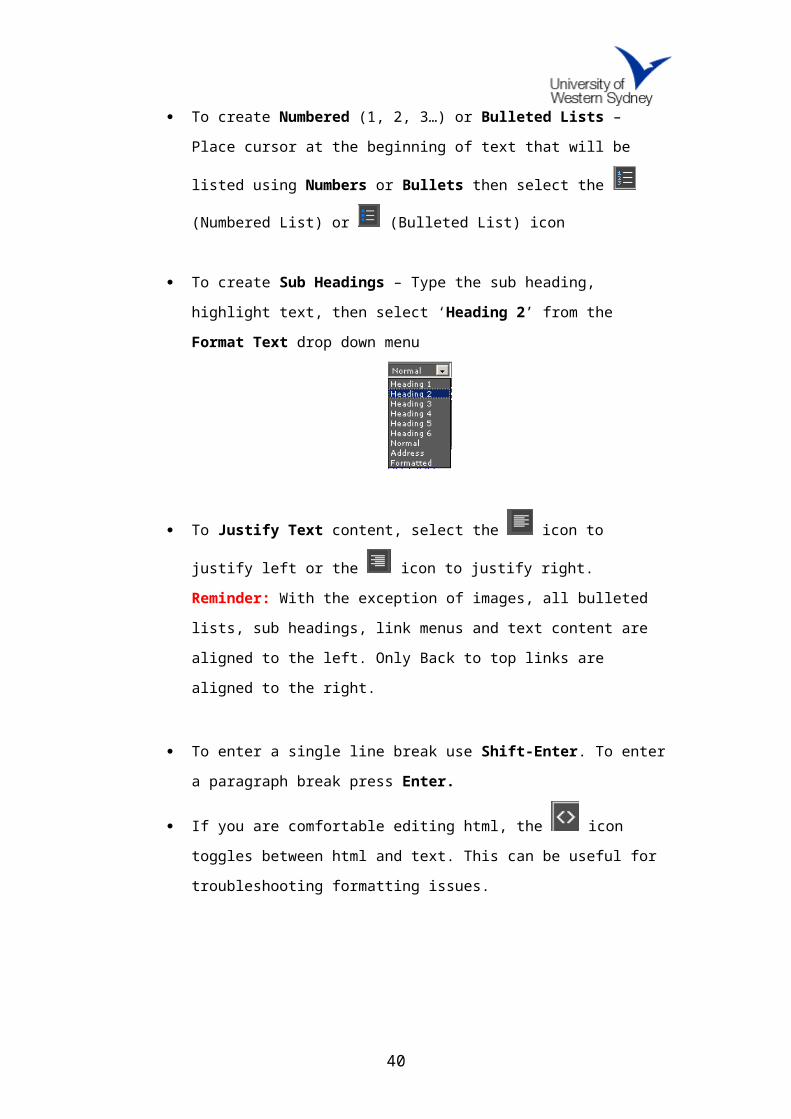
To create Sub Headings – Type the sub heading, highlight text, then
select ‘Heading 2’ from the Format Text drop down menu
32
To Justify Text content, select the icon to justify left or the icon
to justify right. Reminder: With the exception of images, all bulleted lists,
sub headings, link menus and text content are aligned to the left. Only
Back to top links are aligned to the right.
To enter a single line break use Shift-Enter. To enter a paragraph break
press Enter.
If you are comfortable editing html, the icon toggles between html
and text. This can be useful for troubleshooting formatting issues.
Adding Content from MS Word, Web or Email Document
Reminder: Please follow these steps if you are copying and pasting text content
from a MS Word document, web source or email i.e. not entering text content
straight into the WYSIWYG Editor
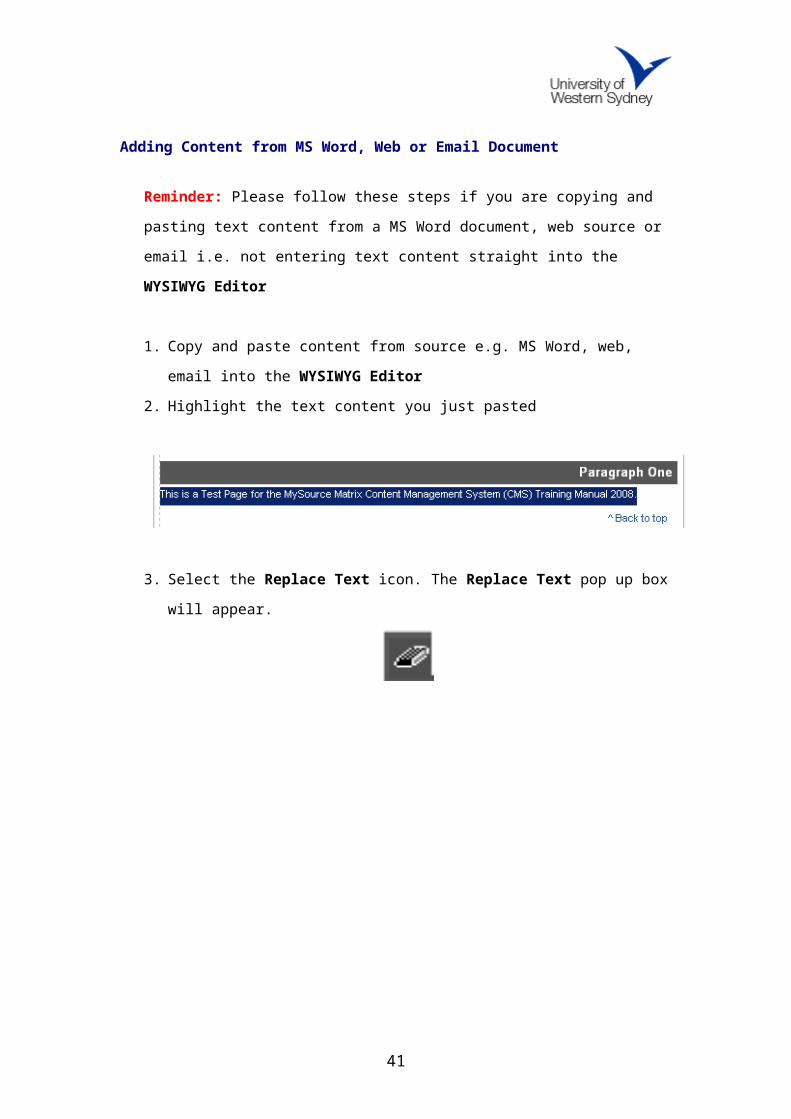
1. Copy and paste content from source e.g. MS Word, web, email into the
WYSIWYG Editor2. Highlight the text content you just pasted
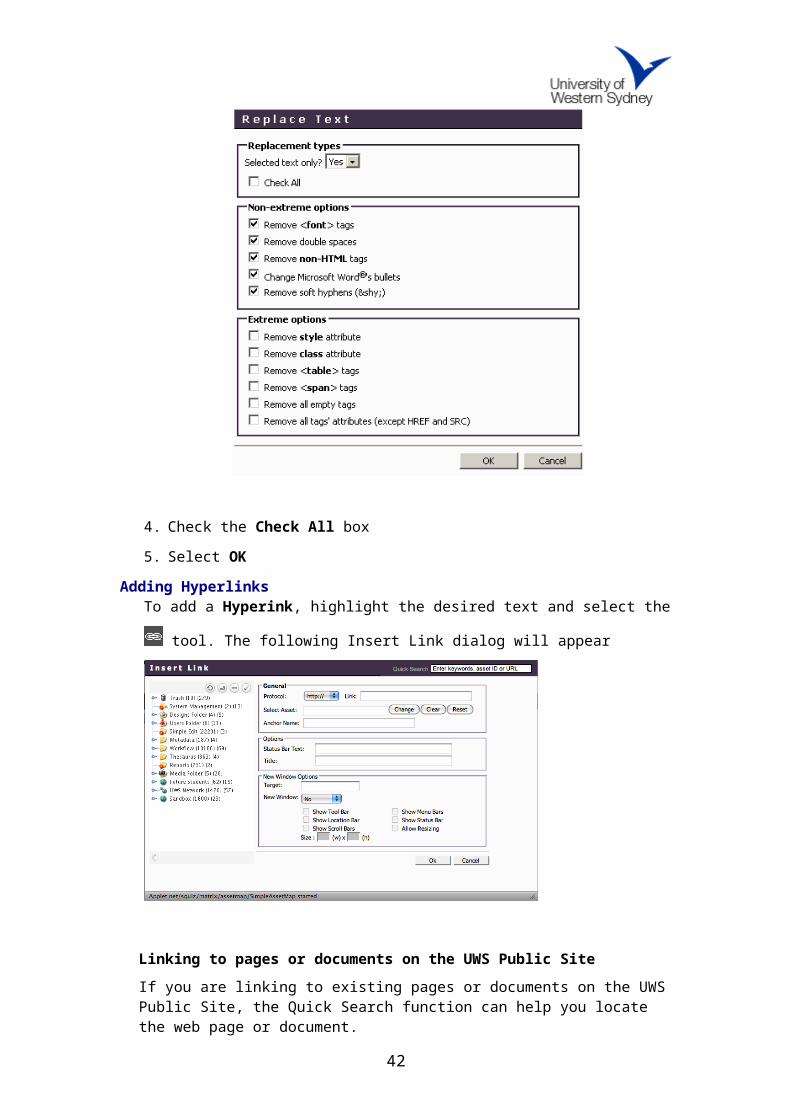
3. Select the Replace Text icon. The Replace Text pop up box will appear.
33
4. Check the Check All box
5. Select OKAdding Hyperlinks
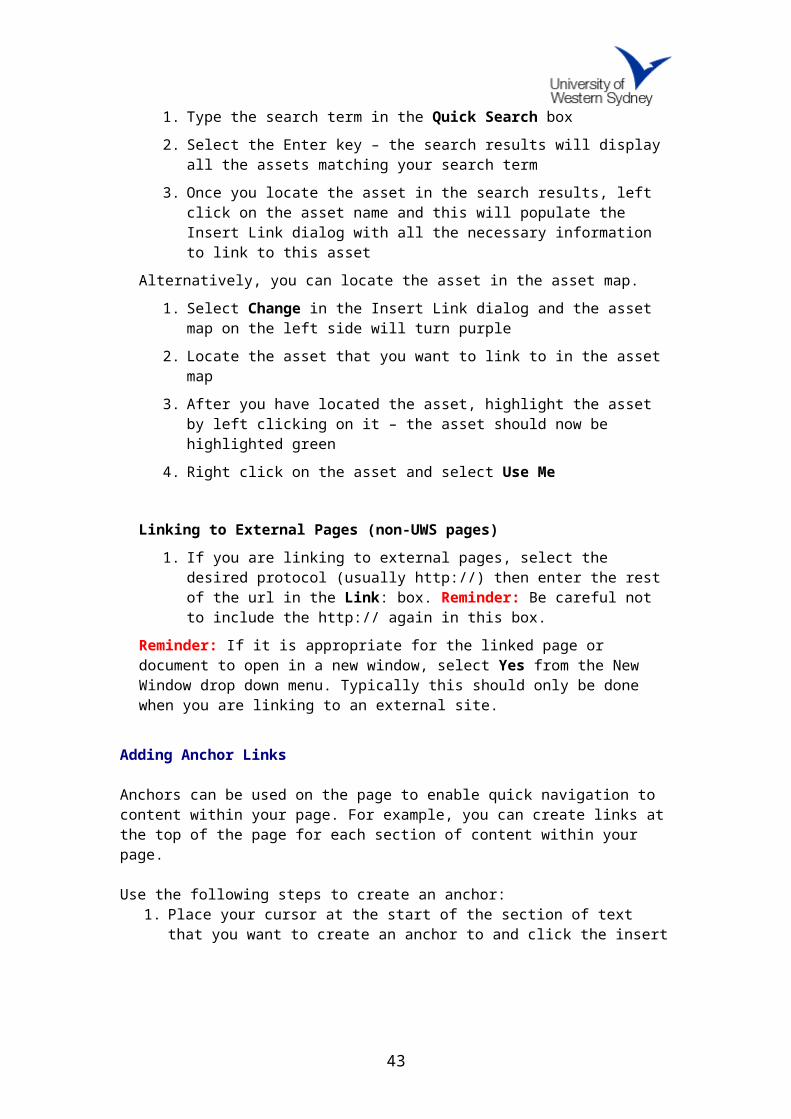
To add a Hyperink, highlight the desired text and select the tool. The
following Insert Link dialog will appear
Linking to pages or documents on the UWS Public SiteIf you are linking to existing pages or documents on the UWS Public Site, the Quick Search function can help you locate the web page or document.
1. Type the search term in the Quick Search box
2. Select the Enter key – the search results will display all the assets matching your search term
34
3. Once you locate the asset in the search results, left click on the asset name and this will populate the Insert Link dialog with all the necessary information to link to this asset
Alternatively, you can locate the asset in the asset map.
1. Select Change in the Insert Link dialog and the asset map on the left side will turn purple
2. Locate the asset that you want to link to in the asset map
3. After you have located the asset, highlight the asset by left clicking on it – the asset should now be highlighted green
4. Right click on the asset and select Use Me
Linking to External Pages (non-UWS pages)1. If you are linking to external pages, select the desired protocol (usually
http://) then enter the rest of the url in the Link: box. Reminder: Be careful not to include the http:// again in this box.
Reminder: If it is appropriate for the linked page or document to open in a new window, select Yes from the New Window drop down menu. Typically this should only be done when you are linking to an external site.
Adding Anchor Links
Anchors can be used on the page to enable quick navigation to content within your page. For example, you can create links at the top of the page for each section of content within your page.
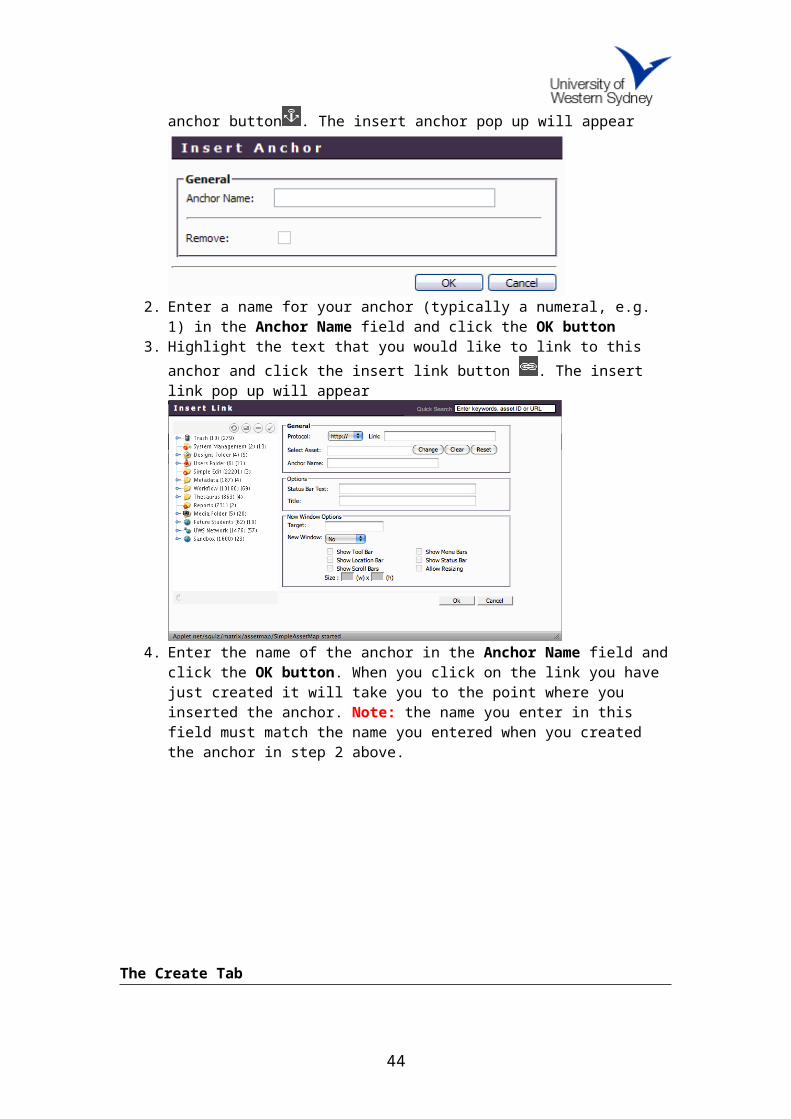
Use the following steps to create an anchor:1. Place your cursor at the start of the section of text that you want to create an
anchor to and click the insert anchor button . The insert anchor pop up will appear
2. Enter a name for your anchor (typically a numeral, e.g. 1) in the Anchor Name field and click the OK button
35

3. Highlight the text that you would like to link to this anchor and click the insert link button . The insert link pop up will appear
4. Enter the name of the anchor in the Anchor Name field and click the OK button. When you click on the link you have just created it will take you to the point where you inserted the anchor. Note: the name you enter in this field must match the name you entered when you created the anchor in step 2 above.
The Create Tab
New pages are created via this tab, and files such as PDFs, MS Word documents
and images can be uploaded into the system.
Creating a New Page
CMS users can create either a Primary or Secondary page.
36
Reminder: When adding pages, ensure you open up the SEI of the parent page
to which you are creating the new child page.
A primary page will display in the navigation menu on the left of the page and a
secondary (floating) page can only be accessed via links found in the content of a
page or in the related links feature panes on the right side of the page.
Reminder: Before new pages are created, CMS users must first get the approval
from their assigned Web Coordinator.
To create a new page:
1. Select the Create tab
2. Select the + button alongside Pages and depending on the page you are
creating, select Primary page (shows in menus) or Secondary page (does not show in menus)
3. Enter the New Page Name (the title that will display on the web page)
and the New Short Name (the title of the menu item displayed in the
navigation on the left of the page, as well as in the breadcrumbs)
4. Select Commit
5. The page will re-load and the following message will display. Select edit to
begin populating the page.
After selecting edit, the SEI refreshes and you can now begin editing the newly
created page. The status of the new page will be Under Construction so it will
not be visible to the public. The Content tab will give you access to the WYSIWIG
editor to begin populating the web page.
Reminder: All new pages will need to have the Metadata fields completed.
37
Adding a New Image
1. Under the Create Tab, select Image and choose a suitable location for the
image file.
2. Complete the Title and Alt Tags fields (the title is also suitable for the alt tag)
and browse to the image file you wish to upload.
Note: Image Files must be of type .gif, .jpg or .jpeg and must be smaller than
20MB in size. Refer to Appendix 2 – Image specifications.
Once the file has been successfully uploaded it can be added to pages using the
Insert Image tool in the WYSIWIG. Use the Quick Search tool to locate the
image, or you can navigate to the appropriate folder in the Asset Map as shown:
38

Adding a New Document
1. Under the Create tab, select the type of document you wish to upload. Select
the location where the document will be placed.
2. Complete the Title, and Browse to the file you wish to upload.
3. Select Upload Document. The following dialog should appear.
By default the status of the new document will be set to Live, so you can now
return to the page you were editing and link to the document using the Link
Tool. However if you choose to select red edit link in the dialog above, you will be
directed to the SEI for the document file itself. You can use this interface to
replace a document that has already been uploaded.
Documents are created in one of the locations within the UWS Documents folder:
39
Glossary
Anchors
Anchors are bookmarks you can add to a page so that you can navigate to a particular point. For example, to navigate directly to the third heading on the Research Directions page, the url would be http://www.uws.edu.au/research/success/national_priorities2#3 (with the #3 showing the name of the anchor). You can add anchors yourself using the Anchor link in the WYSIWYG editor, or ask your Web Coordinator to help.
Asset
An asset is what the CMS calls each and every little thing which is a part of a webpage. Each image, document, page (and even each page component) is an asset. Each asset has a unique ID number, and it's this, rather than the url address, which the system uses when it links to things. For example, when the home page looks for the logo, it actually looks for asset ‘./1234’ so it shouldn't matter where in the website it has been moved to.
Breadcrumbs
A breadcrumb trail shows you where you are in the website using a link sequence like Home » UWS » Governance » Academic Senate where the links are clickable, so you can return to higher levels easily. In the UWS website, many of the areas are ‘mini sites’, so you may have a fresh breadcrumb trail when you land inside the mini site.
CA - Content Author
The person in your area who updates the web pages and sends them to the Subsite Managers for approval.
Embedded link
Hyperlinked text that does not visibly state the linked URL, for example, on the home page where you select the words ‘More events’ it actually goes to http://corpapps.uws.edu.au/media/events_diary/calendar.php
Information Architecture (IA)
The structure of information and pages on a website. Good IA enables end-users to find information easily.
Intranet versus Internet
40
The network within an organisation versus the World Wide Web (WWW). For example, our ‘Current Staff’ pages are accessible only to staff with a UWS login, while our ‘Engage with us’ pages are available to anyone who is connected to the WWW. Shared drives, Outlook and public folders are also part of the UWS intranet.
Metadata
Metadata is by definition data about data. What that means for us is that each page has information about when it was created, by whom, what the page is about, and several other fields that you've encountered in the Metadata chapter of this manual. The purpose of metadata is to allow pages to be categorised both internally and by web-based crawlers, and search engines often use the ‘Description’ tag as the text which appears under the page name in search results.
Mini sites
Parts of the website which are self-contained. For example, once you move through About | Colleges and Schools to the College of Arts, you are in the College of Arts mini site. You'll see the breadcrumb trail change to reflect that you're now at the top of that minisite, and can only navigate back up by clicking on the ‘Home’ link in the top left corner of the screen.
On this page
On this page are hyperlinks to anchors on the current page. Pulling them into a box on the side of the page elevates the page content visually and makes it quicker to scan.
Other Places
Other Places are hyperlinks to pages which the visitor may have intended to visit, but found themselves on another page instead. For example, a visitor looking for information about enrolling in a course to qualify as a school teacher may find themselves in the Learning and Teaching divisional area of the website instead, and appreciate a quick way to navigate to their intended destination.
Page
41
A document or file which is accessible on the web and is identified by its own URL. There are different types of pages: static (look for .htm or .html) and dynamic (look for .asp or .php). Static pages are usually created, uploaded and displayed with unchanging information, where dynamic pages are often generated by a database in response to a search or the submission of form data. For example, if you search for course 1604 in the Handbook, the resulting page will have the URL http://handbook.uws.edu.au/hbook/course.asp?course=1604.4, letting you know that the information displayed has used ‘1604’as a search term and it is presenting you with that result. If you used ‘1605’, the url and the information displayed would be different.
Primary Page (also known as Type 1)
A primary page will appear in the menu on the left side of the page.
Related Links
Related Links are hyperlinks to pages which have content that is closely related to the content on the web page.
Secondary Page (also known as Type 2)
A secondary page will NOT appear in the menu on the left side of the page. Instead, it can be accessed via a hyperlink in the content on a page.
SSM - Subsite Manager
The person in your area (or in the Web Services Unit) who approves pages to send them to the next level before going live.
URL
Universal Resource Locator, or web address, like http://www.uws.edu.au
WC- Web Coordinator
The Web Services Unit staff who can help you with your web pages.
Appendix 1 – Proxy Settings for CMS access
42
For the asset map to display correctly it is vital that your computer has these proxy settings entered:
1. Select Start > Settings > Control Panel > Java
2. Select ‘Network Settings...’
3. Check ‘Use proxy server’ and ‘Bypass proxy server for local addresses’
4. Select ‘Advanced...’
5. In the ‘HTTP:’ field under ‘Proxy Address’ type:
proxy.uws.edu.au6. In the ‘HTTP:’ field under ‘Port’ type:
31287. In the ‘Exceptions: Do not use proxy server for addresses beginning with’
field type:
*uws.edu.au8. Select OK > OK > Apply > OK
If problems are still encountered, check that LAN Settings are set to ‘Auto Detect’ in Internet Explorer.
1. In the Internet Explorer Tools menu, go toTools > Internet Options > Connections > LAN Settings
2. Check the box marked ‘Auto Detect’
Appendix 2 - Specifications for Images on the UWS Website
To maintain consistency of user experience across the new UWS website, all content authors are requested to adhere to the following guidelines for images. Authors are advised to liaise with their web coordinators to ensure all images meet the required standard.
43
GuidelinesThe quality of images on mainstream media sites should be used as a benchmark for images published on the UWS website e.g. www.smh.com.au, www.news.com.au/dailytelegraph.
Images should only be used where they provide a clear benefit for end-users e.g. convey information better than using text, provide context to the text etc.
Pages should not be overloaded with images to ensure pages load quickly. Images should be resized/cropped in an image editing program e.g. PhotoShop and not within the CMS. Photographs should be saved as high quality (80%) image .jpg files.
Graphic images with large areas of solid colour e.g. logos, images with transparent areas, should be saved as 128 dithered .gif files.
A text equivalent should be provided for all images using alt text and a caption inserted.
The recommended dimensions contained in this document ensure images can be viewed at an 800 x 600 screen resolution without the image wrapping underneath the left navigation which may result from the use of large images.
Portrait PhotographsPortrait photographs should be head and shoulder shots and resized/cropped to a ratio of 2:3 e.g. 100 x 150 pixels, not exceeding 180 pixels on either dimension. Preferred size is 100 x 150 pixels.Photographs should be aligned to the right and contain no border or frame.
The photograph should be aligned to the right with its class set to “right” in the Matrix “insert image” dialog. This will create a 10 pixel boundary around the image
The positioning of the photograph should be in line with the text layout i.e. the right side of the image should not exceed the last character in the longest line of text on the page.
Borders and FramesTo maintain a consistent look across UWS web pages, it is recommended that borders and frames are not added to images in the same way borders and frames are not used in the Future Students site.
Graphs and ChartsIt is recommended that graphs and charts be added as PDFs to the UWS website rather than uploaded as graphics. This way these can be easily resized to suit the end-user who can either view or print the graphs and charts without the web page content getting in the way.
Other Image DimensionsFor images other than portrait photos, it is recommended that the image intended to be used on the web page is inserted in the body copy, aligned to the right, and a 10 pixel vertical and horizontal space is specified between the text and the image. The width of images, should measure 25% or 50% of the width of the body copy i.e. 90 pixels or 180 pixels respectively.
Banner-Type Images in Body CopyBanners added in the body copy are no wider than 360 pixels (the width of the body text) and the height no more than 250 pixels and no less than 60 pixels.
44