vms user’s manual - aylook · _____ antek page 5 of 30 print it prints a grid with the...
TRANSCRIPT
www.aylook.com _______________________________________________________________________________________
antek Page 1 of 30
VMS USER’S MANUAL
(version 6.4)

www.aylook.com _______________________________________________________________________________________
antek Page 2 of 30
1. INTRODUCTION TO THE VMS SOFTWARE................................................................3
2. FIRST LOGIN TO VMS ………....................................................................................3
3. PROGRAM LAYOUT ……………..................................................................................4
3.1 Tabs .....................................................................................................................4
3.2 Toolbar ................................................................................................................5
3.3 “Tickets” tab: Filters ............................................................................................6
3.4 "Devices" tab .......................................................................................................7
3.5 Video camera zone association ..........................................................................17
3.6 "Live" tab...........................................................................................................18
3.7 "Search" tab ......................................................................................................18
3.8 "Setup" tab ........................................................................................................21
TABLE OF CONTENTS

www.aylook.com _______________________________________________________________________________________
antek Page 3 of 30
VMS is a centralization software program which, through a single Web interface, offers an
overview of all video recorders (Aylook, Hikvision, Avermedia, etc.) and central alarms (Bentel,
Risco, INIM, Satel, AVS, Ksenia, Tecnoalarm, etc.) connected with it.
By connecting to the Internet or a through a LAN network, it is possible to attribute a
geographic area to each device, in order to simplify maintenance operations, check their
functions and receive feedback on the device status.
VMS does not need any client software, since it can fully be managed through Firefox
and can be adjusted to the browser language.
The data to login to the VMS for the first time is the following:
IP ADDRESS AND VSM SERVER: 192.168.5.200
LOGIN AND PASSWORD: admin – admin
To use the VMS software, you need to open Firefox from a PC with Linux or Windows as
operating system and enter the default IP address (192.168.5.200).
Enter the Address (Default: 192.168.5.200), User (Default: admin) and Password (Default:
admin) and click on “Login".
If an incorrect login or password is entered, an error massage will be shown.
1. INTRODUCTION TO THE VMS SOFTWARE
2. FIRST LOGIN TO VMS

www.aylook.com _______________________________________________________________________________________
antek Page 4 of 30
By clicking on the relative tabs, the various management areas will be accessed.
Tickets It shows the tickets generated by video recorders or alarm panels.
Devices It allows to enter geographic sites, recorders and alarm panels.
Live It allows to view the cameras of each recorder live.
Search It allows to search for images and events recorded by the cameras.
Setup It allows to modify the VMS settings.
3. PROGRAM LAYOUT
3.1 Tabs

www.aylook.com _______________________________________________________________________________________
antek Page 5 of 30
Print It prints a grid with the notifications received in the Tickets.
Export It exports the grid with the notifications to the Tickets tab in csv format;
It exports the videos in the Live and Search tabs.
Edit It enables/disables the editor to modify the VMS configuration.
Sound It enables/disables the sound when events take place.
Detach It opens a new window, e.g. Tickets, to associate with a service monitor.
Help It shows the manual.
Admin* It shows the username used to login and allows to change user, password or quit.
* variable field depending on the username used to login.
3.2 Toolbar
www.aylook.com _______________________________________________________________________________________
antek Page 6 of 30
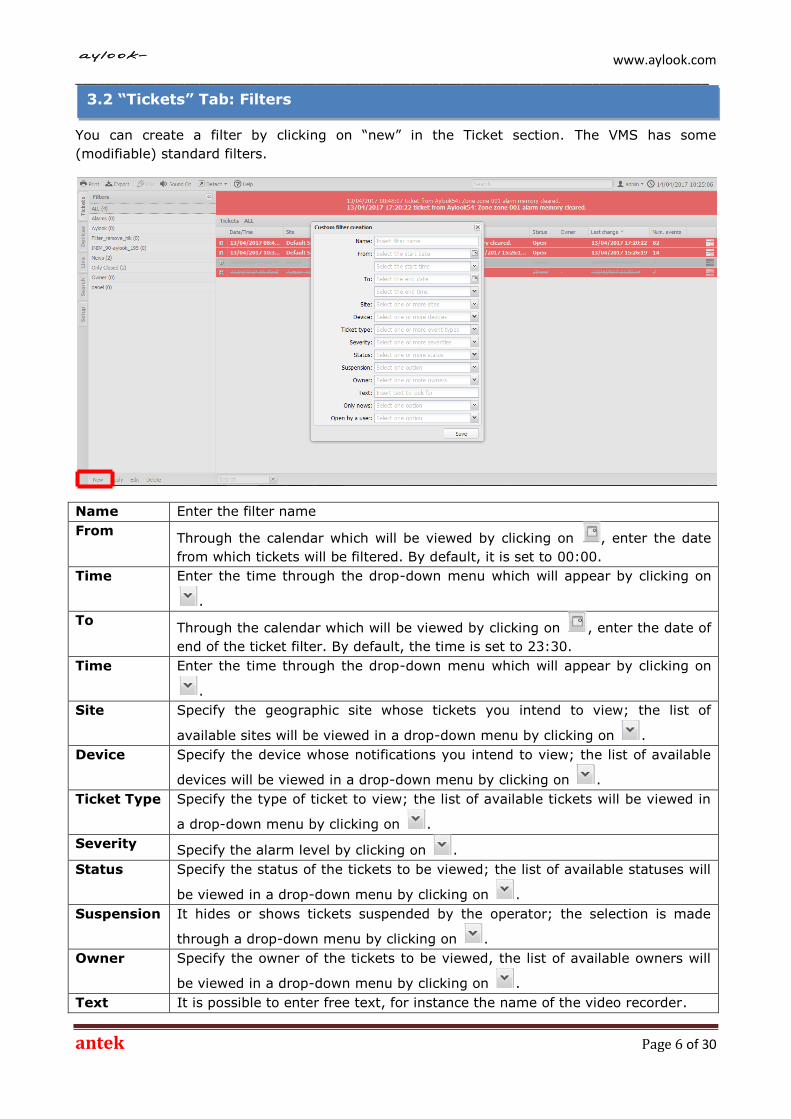
You can create a filter by clicking on “new” in the Ticket section. The VMS has some
(modifiable) standard filters.
Name Enter the filter name
From Through the calendar which will be viewed by clicking on , enter the date
from which tickets will be filtered. By default, it is set to 00:00.
Time Enter the time through the drop-down menu which will appear by clicking on
.
To Through the calendar which will be viewed by clicking on , enter the date of
end of the ticket filter. By default, the time is set to 23:30.
Time Enter the time through the drop-down menu which will appear by clicking on
.
Site Specify the geographic site whose tickets you intend to view; the list of
available sites will be viewed in a drop-down menu by clicking on .
Device Specify the device whose notifications you intend to view; the list of available
devices will be viewed in a drop-down menu by clicking on .
Ticket Type Specify the type of ticket to view; the list of available tickets will be viewed in
a drop-down menu by clicking on .
Severity Specify the alarm level by clicking on .
Status Specify the status of the tickets to be viewed; the list of available statuses will
be viewed in a drop-down menu by clicking on .
Suspension It hides or shows tickets suspended by the operator; the selection is made
through a drop-down menu by clicking on .
Owner Specify the owner of the tickets to be viewed, the list of available owners will
be viewed in a drop-down menu by clicking on .
Text It is possible to enter free text, for instance the name of the video recorder.
3.2 “Tickets” Tab: Filters

www.aylook.com _______________________________________________________________________________________
antek Page 7 of 30
Only News It filters tickets which have not been treated by the operator yet, a drop-down
menu is viewed by clicking on .
Open by a
user
It hides tickets opened by another operator to avoid simultaneous
management, a drop-down menu is viewed by clicking on .
In order to retrieve a filter which has just been created, you just need to click on the name
which will appear on the left-hand side of the screen.
In the "devices" Tab you can enter geographic sites, video recorders and alarm panels.
3.4 “Devices” tab
www.aylook.com _______________________________________________________________________________________
antek Page 8 of 30
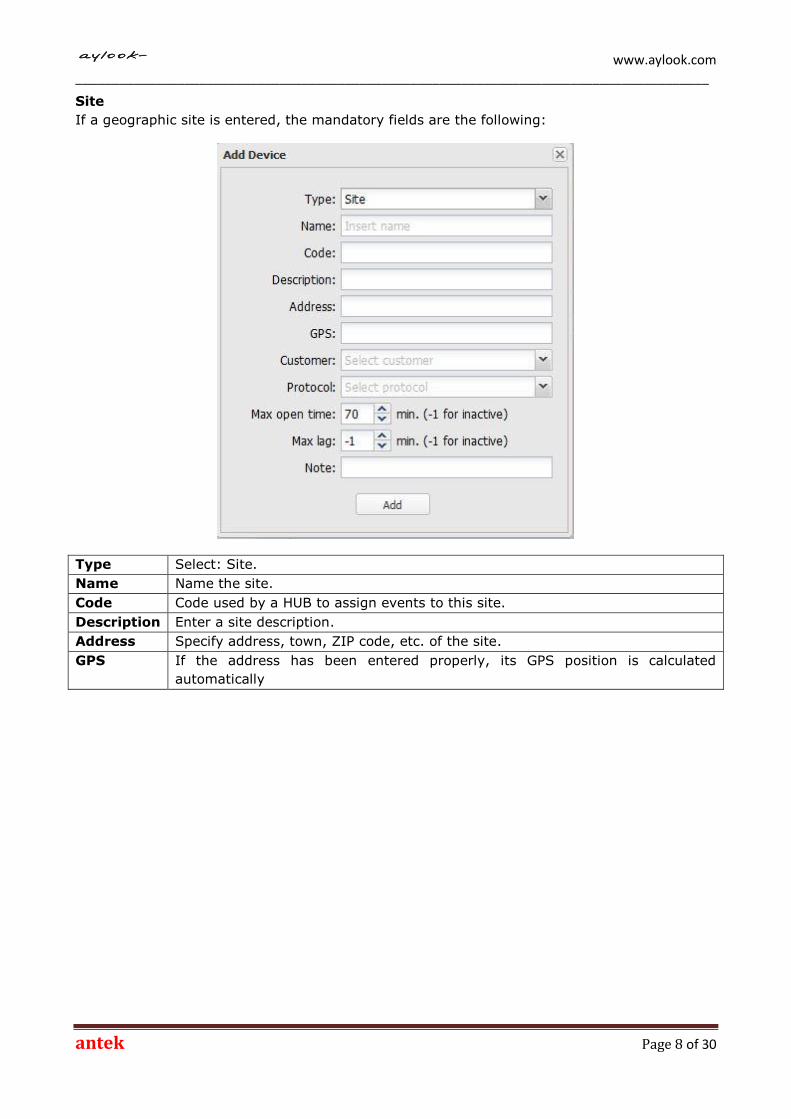
Site
If a geographic site is entered, the mandatory fields are the following:
Type Select: Site.
Name Name the site.
Code Code used by a HUB to assign events to this site.
Description Enter a site description.
Address Specify address, town, ZIP code, etc. of the site.
GPS If the address has been entered properly, its GPS position is calculated
automatically
www.aylook.com _______________________________________________________________________________________
antek Page 9 of 30
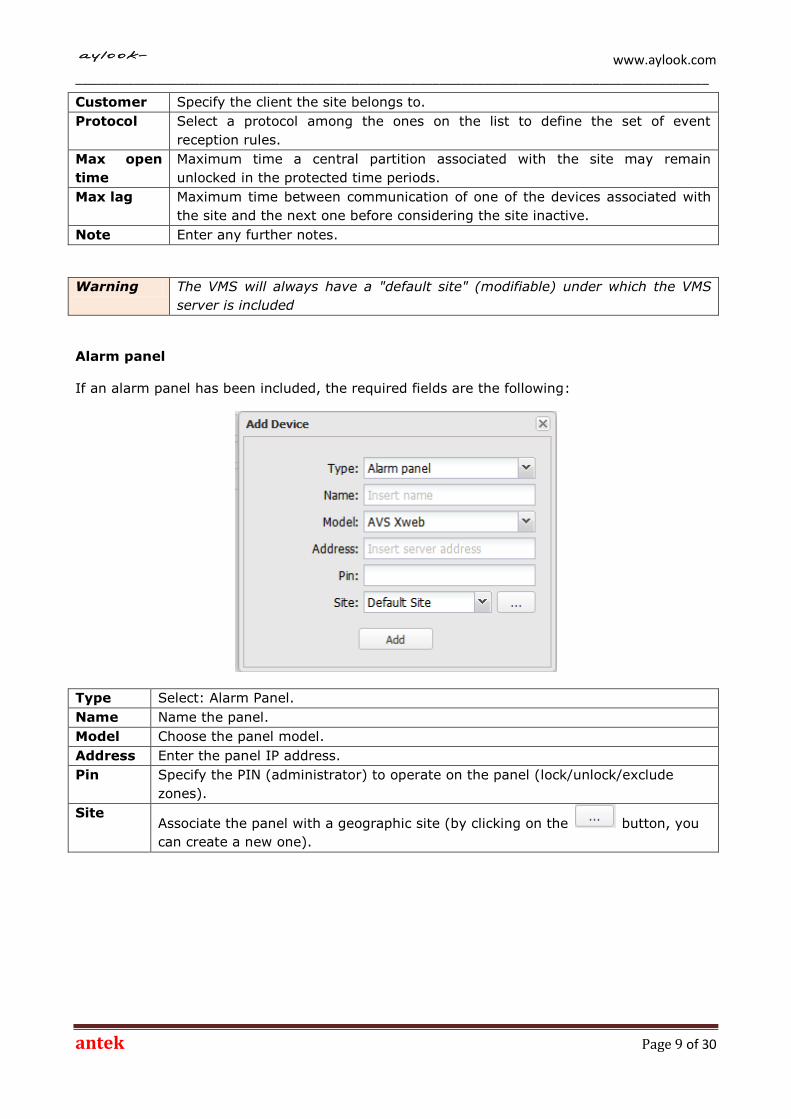
Customer Specify the client the site belongs to.
Protocol Select a protocol among the ones on the list to define the set of event
reception rules.
Max open
time
Maximum time a central partition associated with the site may remain
unlocked in the protected time periods.
Max lag Maximum time between communication of one of the devices associated with
the site and the next one before considering the site inactive.
Note Enter any further notes.
Warning The VMS will always have a "default site" (modifiable) under which the VMS
server is included
Alarm panel
If an alarm panel has been included, the required fields are the following:
Type Select: Alarm Panel.
Name Name the panel.
Model Choose the panel model.
Address Enter the panel IP address.
Pin Specify the PIN (administrator) to operate on the panel (lock/unlock/exclude
zones).
Site Associate the panel with a geographic site (by clicking on the button, you
can create a new one).

www.aylook.com _______________________________________________________________________________________
antek Page 10 of 30
Video recorder
If a recorder is included, the required fields are the following:
Type Select: NVR.
Name Name the recorder.
Address Specify the recorder IP address.
Port Specify the recorder IP port.
Username Specify the recorder username.
Password Specify the recorder password.
Site Associate the recorder with a geographic site (by clicking on the button,
you can create a new one).
Quality Specify the maximum resolution to receive images (only available on Aylook).
www.aylook.com _______________________________________________________________________________________
antek Page 11 of 30
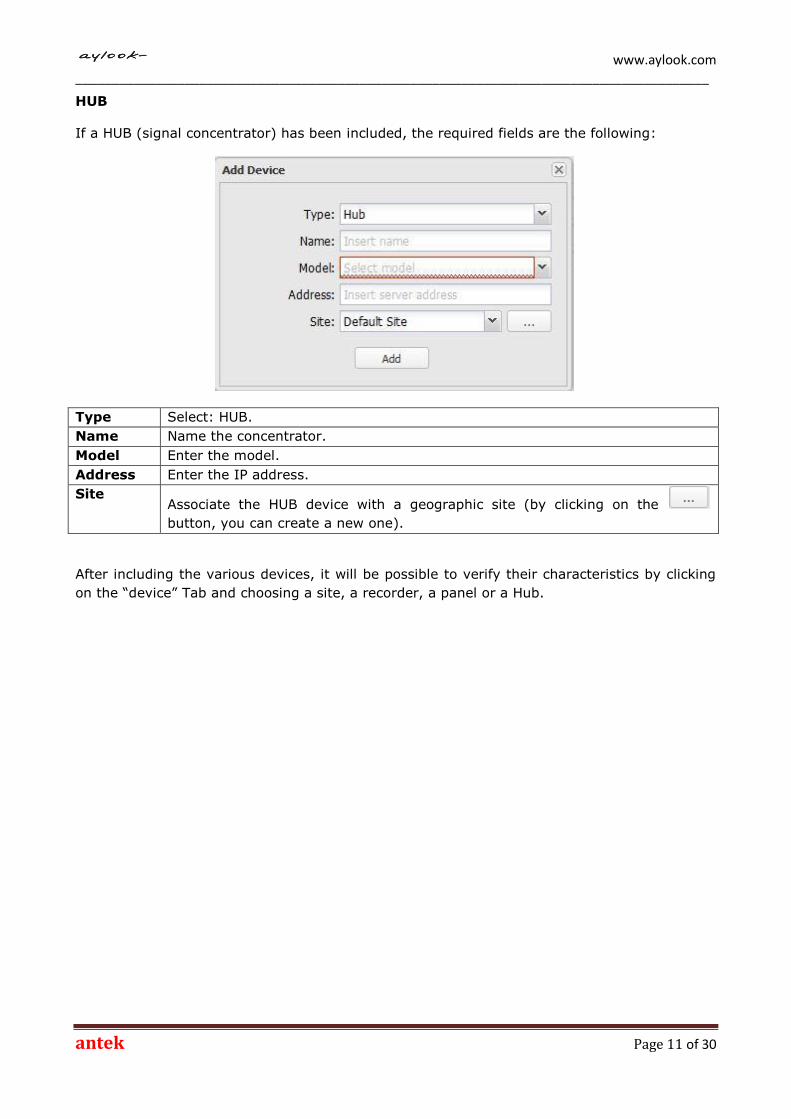
HUB
If a HUB (signal concentrator) has been included, the required fields are the following:
Type Select: HUB.
Name Name the concentrator.
Model Enter the model.
Address Enter the IP address.
Site Associate the HUB device with a geographic site (by clicking on the
button, you can create a new one).
After including the various devices, it will be possible to verify their characteristics by clicking
on the “device” Tab and choosing a site, a recorder, a panel or a Hub.
www.aylook.com _______________________________________________________________________________________
antek Page 12 of 30
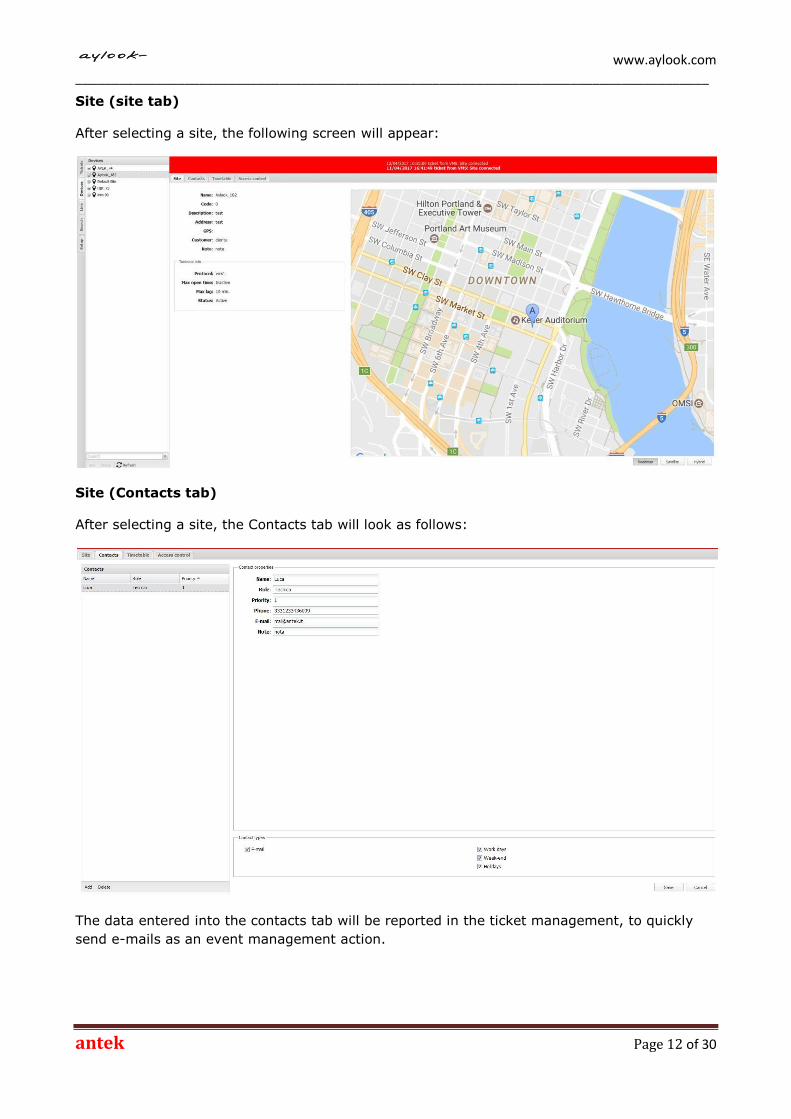
Site (site tab)
After selecting a site, the following screen will appear:
Site (Contacts tab)
After selecting a site, the Contacts tab will look as follows:
The data entered into the contacts tab will be reported in the ticket management, to quickly
send e-mails as an event management action.

www.aylook.com _______________________________________________________________________________________
antek Page 13 of 30
Site (Timetable tab)
After selecting a site, the Timetable tab will look as follows:
The time periods specified in the timetable show the times when the site panels should not
have any unlocked partitions. The “holidays” line is used for the days entered into the right-
hand column.
Site (Access Control tab)
After selecting a site, the Access Control tab will look as follows:
While generating access control events, the code sent to the panel is associated with the
name, thanks to their matching in the Code field.
www.aylook.com _______________________________________________________________________________________
antek Page 14 of 30
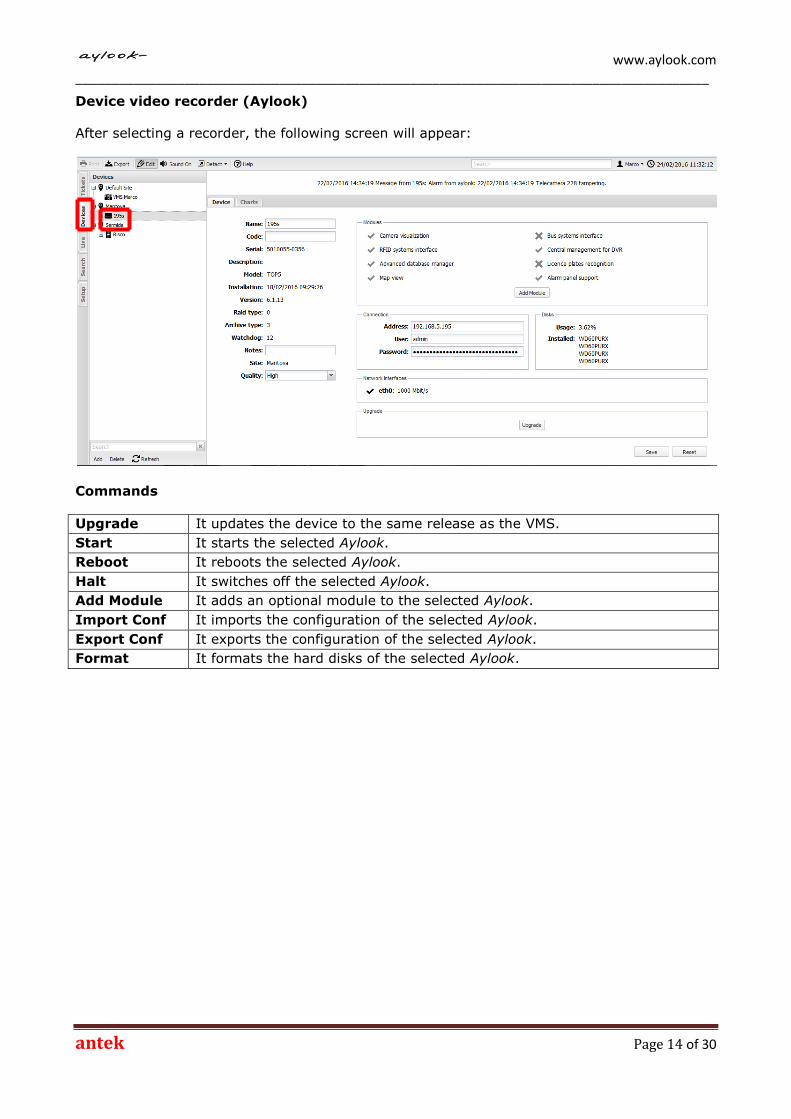
Device video recorder (Aylook)
After selecting a recorder, the following screen will appear:
Commands
Upgrade It updates the device to the same release as the VMS.
Start It starts the selected Aylook.
Reboot It reboots the selected Aylook.
Halt It switches off the selected Aylook.
Add Module It adds an optional module to the selected Aylook.
Import Conf It imports the configuration of the selected Aylook.
Export Conf It exports the configuration of the selected Aylook.
Format It formats the hard disks of the selected Aylook.
www.aylook.com _______________________________________________________________________________________
antek Page 15 of 30
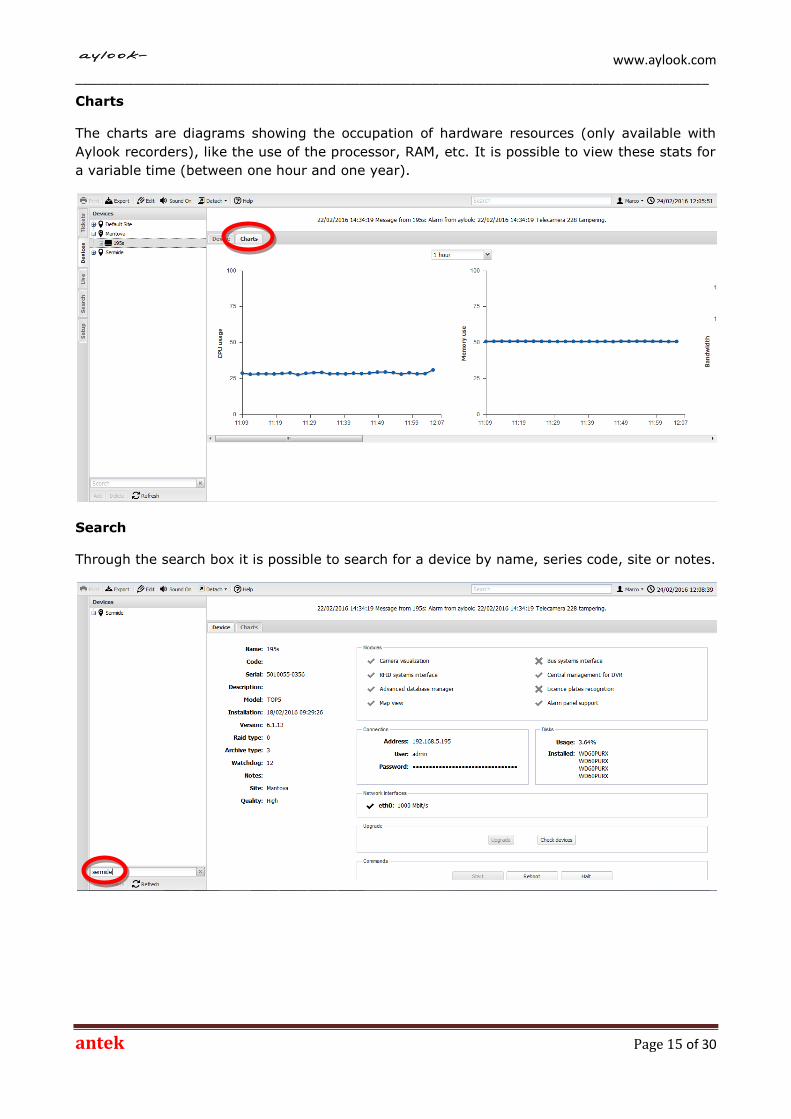
Charts
The charts are diagrams showing the occupation of hardware resources (only available with
Aylook recorders), like the use of the processor, RAM, etc. It is possible to view these stats for
a variable time (between one hour and one year).
Search
Through the search box it is possible to search for a device by name, series code, site or notes.

www.aylook.com _______________________________________________________________________________________
antek Page 16 of 30
Device Alarm Panel
After selecting an alarm panel, the following screen will appear:
In the device tree it is possible to view the status of the panel partitions, zones and outputs.
The “Objects” window allows to change the status of the panel partitions, zones and outputs.
The symbol makes it possible to unlock the selected item (whole panel or a partition of it).
The symbols are used to partially lock the panel. The symbol is used to lock the
selected item (whole panel or a partition of it). The symbol is used to cancel the alarm
memory of the whole panel or its selected partition. The symbols refer to the
exclusion/inclusion of zones. The symbols are used to enable or disable the panel
outputs.

www.aylook.com _______________________________________________________________________________________
antek Page 17 of 30
It is possible to associate cameras coming from the recorders to each zone:
In this case, when there is an alarm in that zone, the received ticket will contain this symbol
...
...by clicking on it, you can view the recording of the camera associated with the alarmed
zone.
3.5 Video camera zone association
www.aylook.com _______________________________________________________________________________________
antek Page 18 of 30
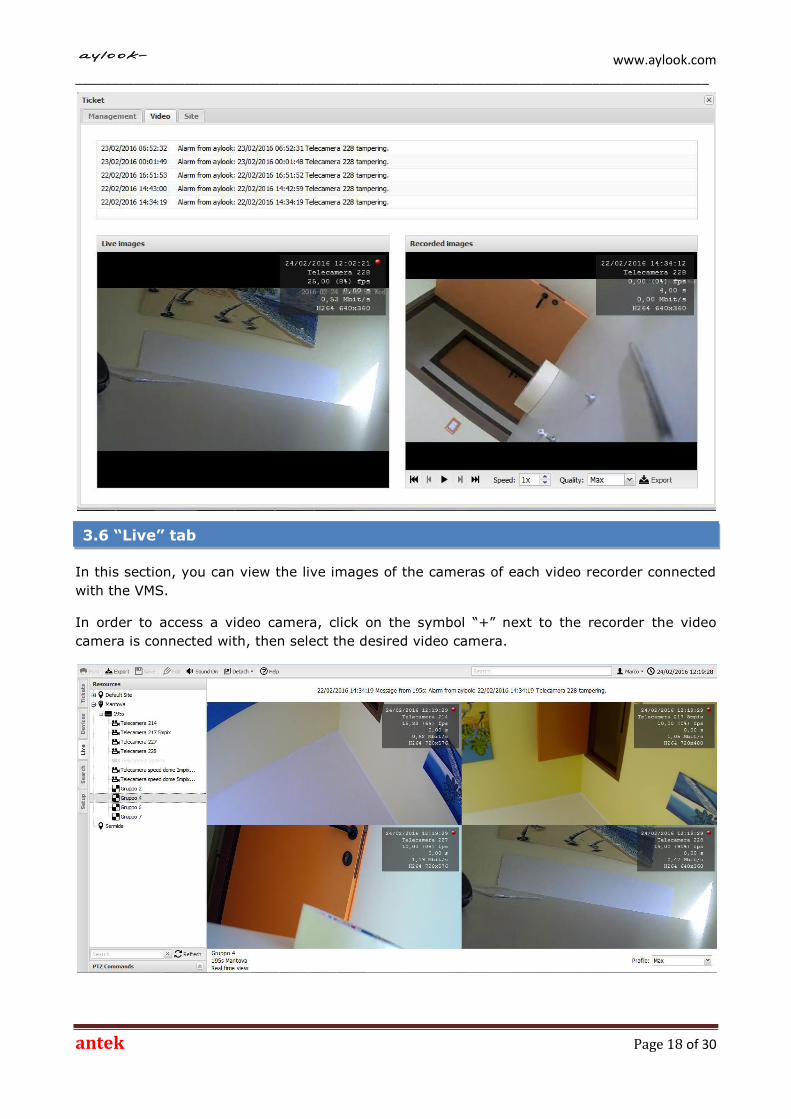
In this section, you can view the live images of the cameras of each video recorder connected
with the VMS.
In order to access a video camera, click on the symbol “+” next to the recorder the video
camera is connected with, then select the desired video camera.
3.6 “Live” tab

www.aylook.com _______________________________________________________________________________________
antek Page 19 of 30
Group
By clicking on the “Group” entry, you can view all the video cameras included in the group
selected in the reference video recorder live:
In this section, you can view the recordings of the cameras of the video recorders associated
with the VMS.
Select a video camera and click on the chart showing the time. It is possible to shift the chart
and, therefore, the time bar, using the mouse. In order to view a motion event directly from a
camera, you need to click on the button “+” next to the video recorder the camera which
recorded the event is associated with, select the video camera and in the Event Log window
select the event. This will open the part of the recording containing the event in the view
window.
Push the button to start playing the recording, press the buttons and to move
from one frame to another; press the buttons and to go to the beginning and the end
of the recording, respectively.
3.7 “Search” tab
www.aylook.com _______________________________________________________________________________________
antek Page 20 of 30
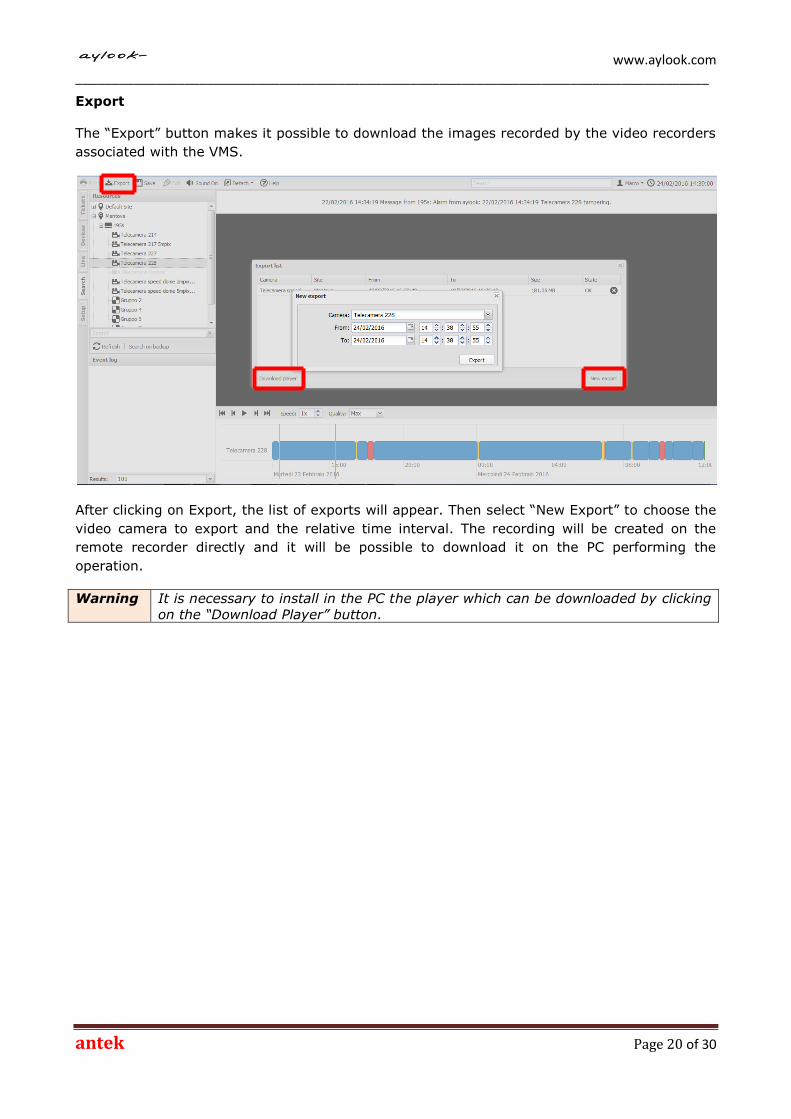
Export
The “Export” button makes it possible to download the images recorded by the video recorders
associated with the VMS.
After clicking on Export, the list of exports will appear. Then select “New Export” to choose the
video camera to export and the relative time interval. The recording will be created on the
remote recorder directly and it will be possible to download it on the PC performing the
operation.
Warning It is necessary to install in the PC the player which can be downloaded by clicking
on the “Download Player” button.
www.aylook.com _______________________________________________________________________________________
antek Page 21 of 30
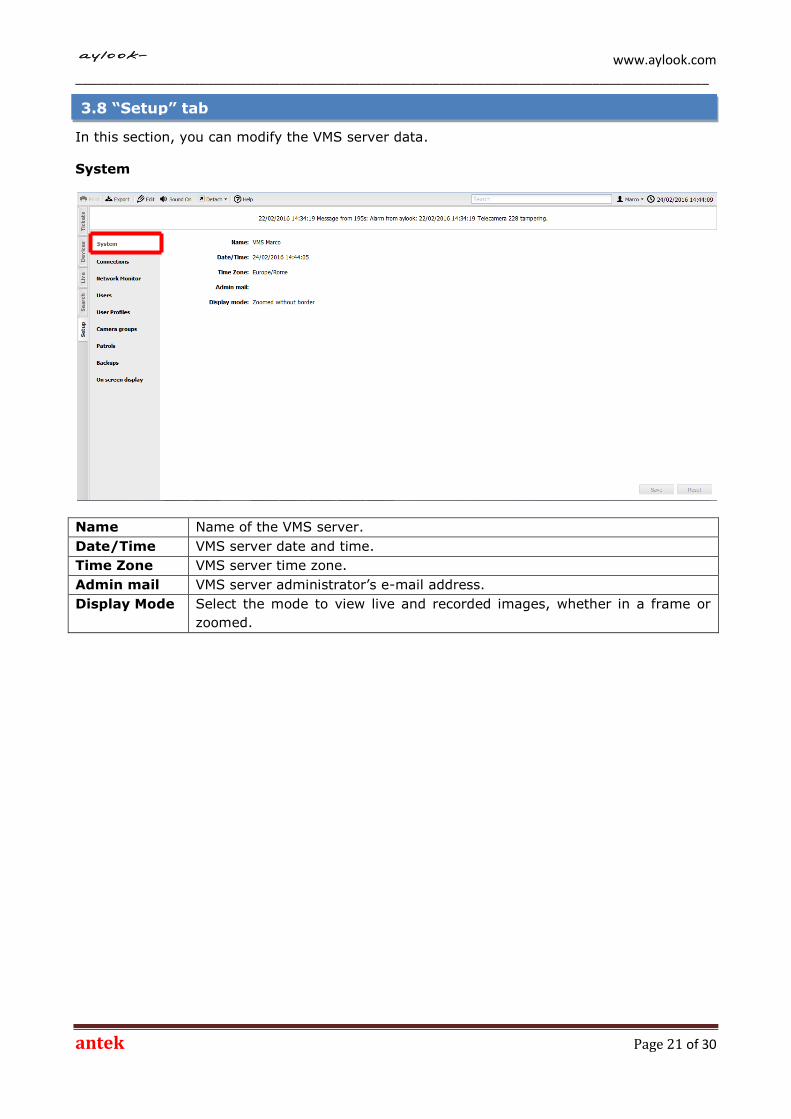
In this section, you can modify the VMS server data.
System
Name Name of the VMS server.
Date/Time VMS server date and time.
Time Zone VMS server time zone.
Admin mail VMS server administrator’s e-mail address.
Display Mode Select the mode to view live and recorded images, whether in a frame or
zoomed.
3.8 “Setup” tab

www.aylook.com _______________________________________________________________________________________
antek Page 22 of 30
Connections
In this section, you can modify the VMS server IP address.
Address VMS server IP address.
Netmask Netmask (Default: 255.255.255.0).
Gateway Gateway IP address.
Primary DNS IP address of the primary DNS server used.
Secondary DNS IP address of the secondary DNS server used.
Primary NTP IP address of the primary NTP server used.
Secondary NTP IP address of the secondary NTP server used.
SMTP Server IP address of the electronic mail server used.
Warning It is possible to install a second network card to make a private LAN (it is not
possible to set the gateway to the second network card) and dedicate the first
network card to the system publication.

www.aylook.com _______________________________________________________________________________________
antek Page 23 of 30
Network Monitors
The VMS can manage network video decoders called Network Monitors. These devices are used
to have physical monitors dedicated to viewing video cameras or directly receiving alarm
events. Network monitors are automatically captured by the VMS through the LAN network:
add a flag next to those to associate with the system (left-hand side window).
Note. The functioning of network monitors is reported in the Aylook handbook on page 79.
Right-hand side column:
Name Enter the monitor network name.
MAC It shows the network monitor Mac Address.
Version The network monitor release version is shown. Note: network monitors are
automatically updated at the VMS release.
Quality Select the viewing profile of the images present in the video recorders.
Resolution Select the resolution of the monitor connected with the video output.
Event Monitor Specify if the network monitor must be exclusively dedicated to alarm
reception (motion detect).
www.aylook.com _______________________________________________________________________________________
antek Page 24 of 30
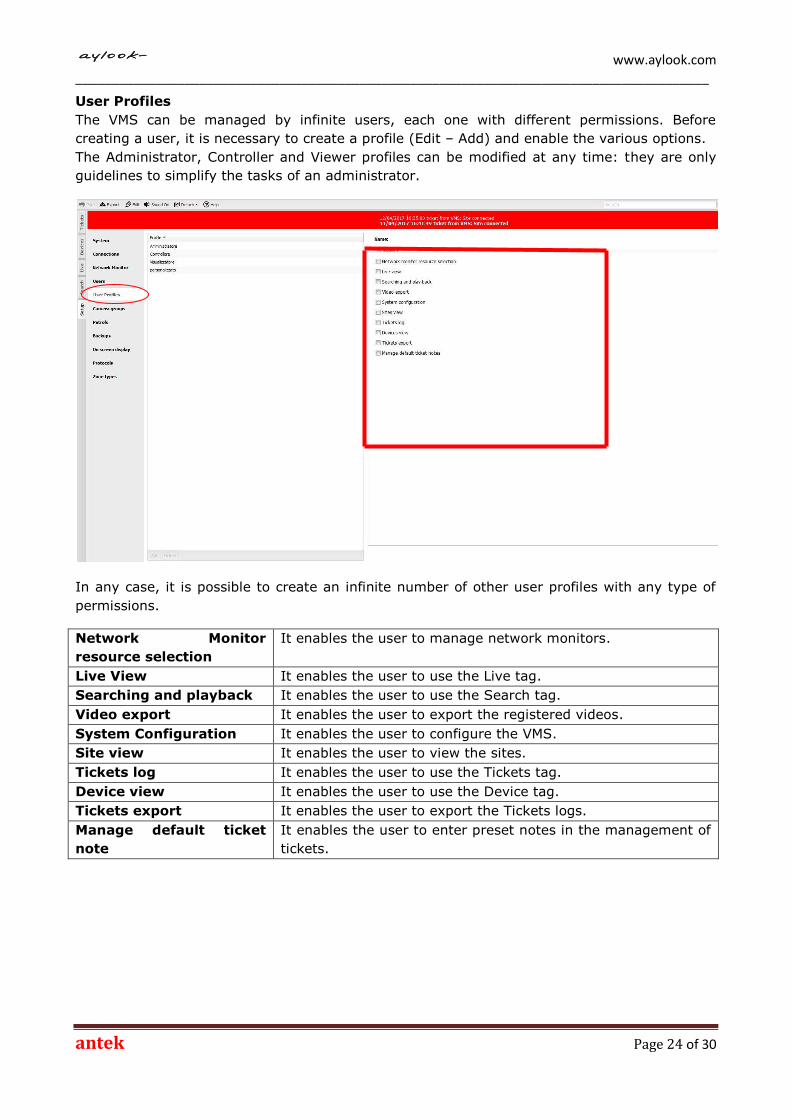
User Profiles
The VMS can be managed by infinite users, each one with different permissions. Before
creating a user, it is necessary to create a profile (Edit – Add) and enable the various options.
The Administrator, Controller and Viewer profiles can be modified at any time: they are only
guidelines to simplify the tasks of an administrator.
In any case, it is possible to create an infinite number of other user profiles with any type of
permissions.
Network Monitor
resource selection
It enables the user to manage network monitors.
Live View It enables the user to use the Live tag.
Searching and playback It enables the user to use the Search tag.
Video export It enables the user to export the registered videos.
System Configuration It enables the user to configure the VMS.
Site view It enables the user to view the sites.
Tickets log It enables the user to use the Tickets tag.
Device view It enables the user to use the Device tag.
Tickets export It enables the user to export the Tickets logs.
Manage default ticket
note
It enables the user to enter preset notes in the management of
tickets.

www.aylook.com _______________________________________________________________________________________
antek Page 25 of 30
Users
After creating the user profiles, it is possible to create infinite users (operators) and associate
them to newly created profiles. Users associated with a profile will automatically inherit the
permissions relative to that profile.
To create a new user (Edit – Add).
First Name Enter the user’s first name.
Last Name Enter the user’s last name.
Login Enter the access user.
Profile Select the user’s profile.
Language Select the language to manage the VMS: Italian/English.
2nd Password Specify if the user must have a second authorization password.

www.aylook.com _______________________________________________________________________________________
antek Page 26 of 30
Camera Groups
In this VMS section it is possible to create (Edit – Add) groups of cameras from different sites
and video recorders (e.g. a group with all the cameras watching the entrance to one of the
bank branches).
After selecting Add, specify a name for the group, choose the desired layout, the site the
groups will be associated with and, using the mouse, drag the video resources from the device
window to the layout boxes.
The newly created group is now available in the system Live tag.

www.aylook.com _______________________________________________________________________________________
antek Page 27 of 30
Patrol
In this VMS section it is possible to create (Edit – Add) cycles to be viewed on the PC monitors
or Network Monitors. In order to select the video cameras or groups which will alternately be
viewed, using the mouse draw the devices into the adjacent window. Specify the permanence
time of the viewed resource (Delay), before it is replaced by the following one.

www.aylook.com _______________________________________________________________________________________
antek Page 28 of 30
Backups
In this VMS system it is possible to create (Edit – Add) backup copies of images coming from
an Aylook video recorder connected with the VMS. Before selecting the type of backup to be
performed, check the available band.
Name Enter the backup name.
Devices Select the video camera to backup.
Quality Select the resolution of the images to be saved on the VMS (check
the available band).
Data to backup Select if you intend to backup images continuously, only for events
or only for alarms.
Data pruning Specify the image renewal time during work days.
Holiday data
pruning
Specify the image renewal time during holidays.
Enabled Enable the created backup copy.

www.aylook.com _______________________________________________________________________________________
antek Page 29 of 30
On Screen Display
In this VMS section it is possible to enable the parameters making up the superimposition in
the video camera live show.
Day and Time Date and time.
Camera Name Camera name.
Frame-rate Fps number.
Delay Viewing delay due to band problems.
Bandwidth Band used.
Encoding Compression type (standard=H264).
www.aylook.com _______________________________________________________________________________________
antek Page 30 of 30
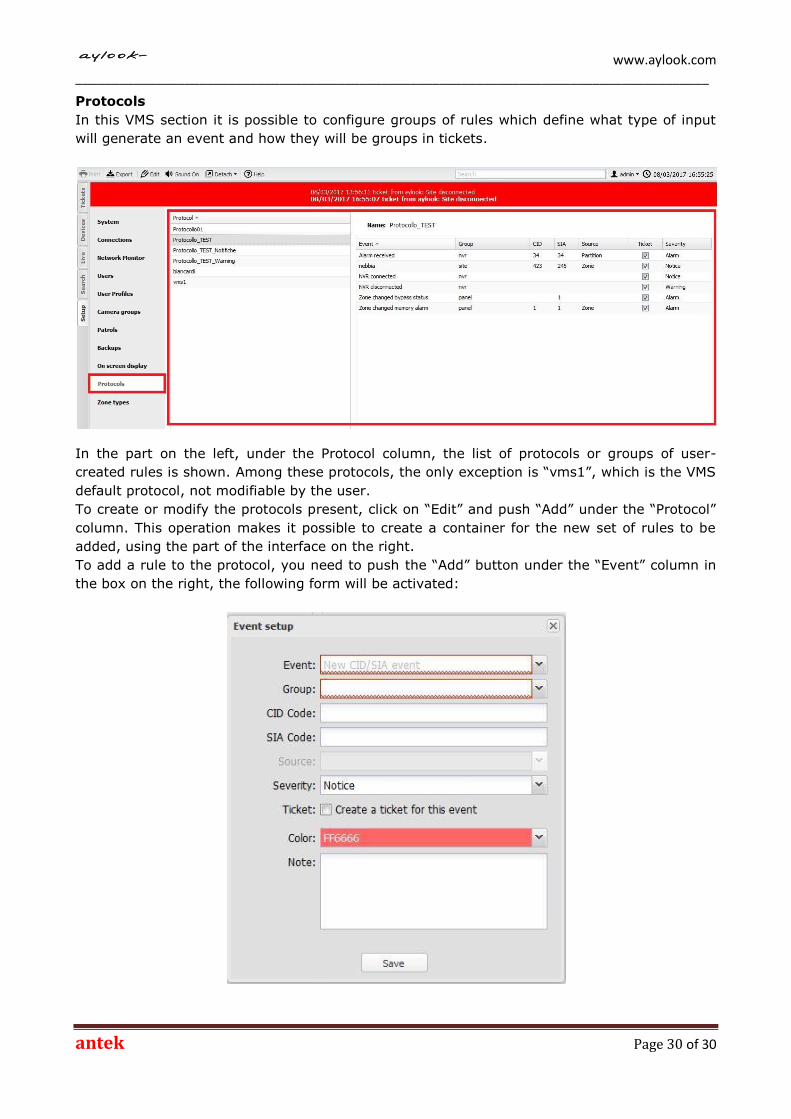
Protocols
In this VMS section it is possible to configure groups of rules which define what type of input
will generate an event and how they will be groups in tickets.
In the part on the left, under the Protocol column, the list of protocols or groups of user-
created rules is shown. Among these protocols, the only exception is “vms1”, which is the VMS
default protocol, not modifiable by the user.
To create or modify the protocols present, click on “Edit” and push “Add” under the “Protocol”
column. This operation makes it possible to create a container for the new set of rules to be
added, using the part of the interface on the right.
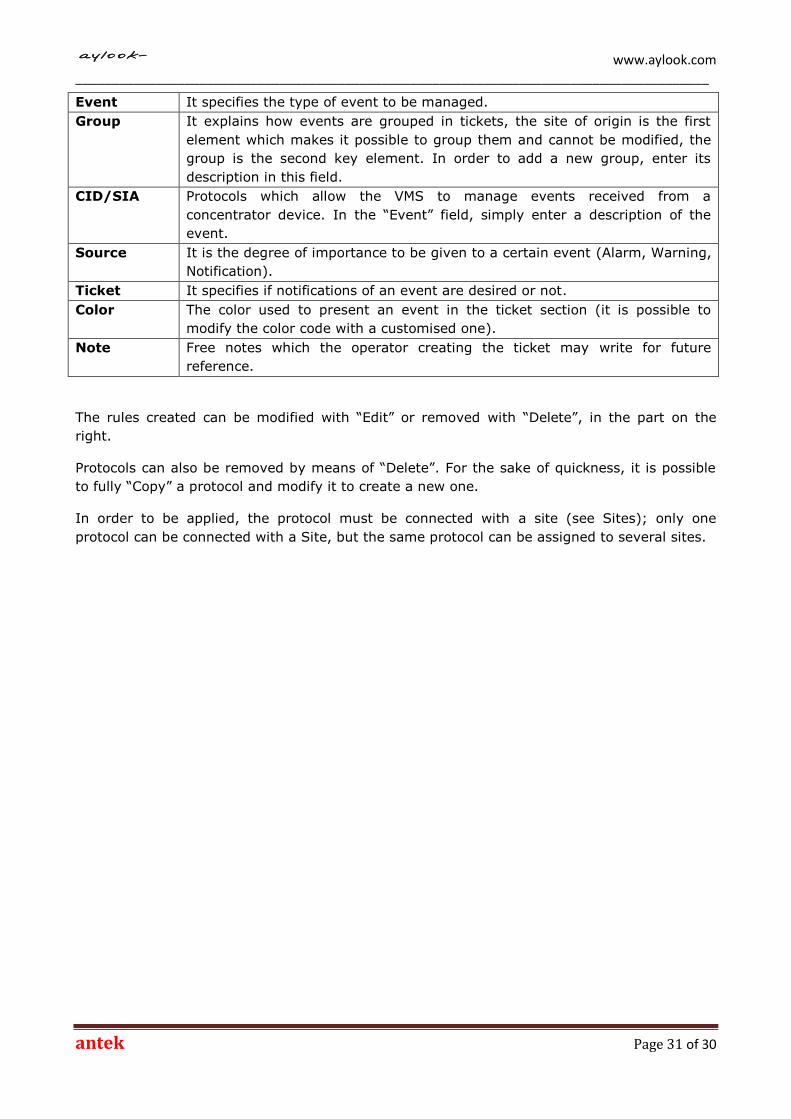
To add a rule to the protocol, you need to push the “Add” button under the “Event” column in
the box on the right, the following form will be activated:
www.aylook.com _______________________________________________________________________________________
antek Page 31 of 30
Event It specifies the type of event to be managed.
Group It explains how events are grouped in tickets, the site of origin is the first
element which makes it possible to group them and cannot be modified, the
group is the second key element. In order to add a new group, enter its
description in this field.
CID/SIA Protocols which allow the VMS to manage events received from a
concentrator device. In the “Event” field, simply enter a description of the
event.
Source It is the degree of importance to be given to a certain event (Alarm, Warning,
Notification).
Ticket It specifies if notifications of an event are desired or not.
Color The color used to present an event in the ticket section (it is possible to
modify the color code with a customised one).
Note Free notes which the operator creating the ticket may write for future
reference.
The rules created can be modified with “Edit” or removed with “Delete”, in the part on the
right.
Protocols can also be removed by means of “Delete”. For the sake of quickness, it is possible
to fully “Copy” a protocol and modify it to create a new one.
In order to be applied, the protocol must be connected with a site (see Sites); only one
protocol can be connected with a Site, but the same protocol can be assigned to several sites.