vmware 3.5 enterprise administration exam study guide v0.2
TRANSCRIPT

8/6/2019 VMware 3.5 Enterprise Administration Exam Study Guide V0.2
http://slidepdf.com/reader/full/vmware-35-enterprise-administration-exam-study-guide-v02 1/73
VMware EnterpriseAdministration Exam study
guide 3.5VMware Enterprise Administration Exam
15-12-2008
Transparent IT
Peter van den Bosch
Versie 0.2

8/6/2019 VMware 3.5 Enterprise Administration Exam Study Guide V0.2
http://slidepdf.com/reader/full/vmware-35-enterprise-administration-exam-study-guide-v02 2/73
VMware 3.5 Enterprise Administration Exam study guide
Transparent IT Pagina 2
InhoudSection 1 – Storage .................................................................................................................................. 4
Objective 1.1 – Create and Administer VMFS datastores using advanced techniques. ..................... 4
Objective 1.2 – Implement and manage complex data security and replication configurations. ...... 9
Objective 1.3 – Troubleshoot Virtual Infrastructure storage components. ...................................... 13
Objective 1.4 – Implement and manage Storage VMotion. .............................................................. 15
Section 2 – Networking ......................................................................................................................... 18
Objective 2.1 – Install and configure Virtual Infrastructure networks. ............................................. 18
Objective 2.2 – Install and configure a virtual networking infrastructure to meet set security design
requirements. .................................................................................................................................... 23
Objective 2.3 – Administer advanced VMkernel networking configurations. .................................. 27
Objective 2.4 – Manage Failover and Failure Detection ................................................................... 29
Objective 2.5 – Administer advanced Service Console networking configurations. ......................... 31
Objective 2.6 – Manage Service Console firewall configurations. .................................................... 38
Objective 2.7 – Administer complex iSCSI configurations. ................................................................ 39
Section 3 – DRS Clusters and Performance Monitoring ........................................................................ 44
Objective 3.2 – Demonstrate advanced performance analysis techniques. ..................................... 44
Section 4 – Business Continuity and Data Protection ........................................................................... 49
Objective 4.1 – Configure Virtual Machine Clustering. ..................................................................... 49
Objective 4.2 – Configure advanced HA deployments ...................................................................... 51
Objective 4.3 – Configure and Administer VMware Consolidated Backup (VCB) ............................. 54
Section 5 – Operational Maintenance ................................................................................................... 58
Objective 5.1 – VMware Update Manager ........................................................................................ 58
Section 6 – Logging ................................................................................................................................ 60
Objective 6.1 – Configure VirtualCenter log behavior ...................................................................... 60
Objective 6.2 – Configure Service Console log behavior ................................................................... 60
Section 7 – ESX Server Security ............................................................................................................. 63
Objective 7.1 – Configure secure remote access. ............................................................................. 63
Objective 7.2 – Delegate administrative privileges ........................................................................... 68
Section 8 – Rapid Provisioning .............................................................................................................. 72
Objective 8.1 – ESX Server Scripted Installation ............................................................................... 72
Additional information and MAN pages................................................................................................ 73
8/6/2019 VMware 3.5 Enterprise Administration Exam Study Guide V0.2
http://slidepdf.com/reader/full/vmware-35-enterprise-administration-exam-study-guide-v02 3/73
VMware 3.5 Enterprise Administration Exam study guide
Transparent IT Pagina 3
MAN pages ESXTOP ........................................................................................................................... 73
CLI .................................................................................................................................................. 73
8/6/2019 VMware 3.5 Enterprise Administration Exam Study Guide V0.2
http://slidepdf.com/reader/full/vmware-35-enterprise-administration-exam-study-guide-v02 4/73

8/6/2019 VMware 3.5 Enterprise Administration Exam Study Guide V0.2
http://slidepdf.com/reader/full/vmware-35-enterprise-administration-exam-study-guide-v02 5/73
VMware 3.5 Enterprise Administration Exam study guide
Transparent IT Pagina 5
images, including snapshots. Multiple servers can read/write the same filesystemsimultaneously, while individual virtual machine files are locked. VMFS volumes canbe logically "grown" (non-destructively increased in size) by spanning multiple VMFSvolumes together.
Add or delete an ESX Server from a VMware VMFS volume without disrupting otherESX Server hosts.Optimize your virtual machine I/O with adjustable volume, disk, file and block sizes.
Metadata Nearly all file systems keep metadata about files out-of-band. Somesystems keep metadata in directory entries; others in specialized structure like inodesor even in the name of a file. Metadata can range from simple timestamps, modebits, and other special-purpose information used by the implementation itself, toicons and free-text comments, to arbitrary attribute-value pairs. With more complexand open-ended metadata, it becomes useful to search for files based on the
metadata contents. The Unix find utility was an early example, although inefficientwhen scanning hundreds of thousands of files on a modern computer system. AppleComputer's Mac OS X operating system supports cataloguing and searching for filemetadata through a feature known as Spotlight, as of version 10.4. Microsoft workedin the development of similar functionality with the Instant Search system inWindows Vista, as well as being present in SharePoint Server. Linux implements filemetadata using extended file attributes.
Multi-access and locking Allows access by multiple ESX Servers at the same timeby implementing per-file locking. SCSI Reservations are only implemented when LUN
meta data is updated (e.g. file name change, file size change, etc.)
Extents LVM allows for adaptive block sizing and addressing for growing files allowsyou to increase a VMFS volume on the fly (only by spanning multiple VMFS volumes;extending a volume by growing a LUN is not supported)
Applicability to clustered environment there is support for Microsoft clusteringusing a combination of virtual servers or physical and virtual servers.
Journaling A journaling file system is a file system that logs changes to a journal(usually a circular log in a dedicated area) before committing them to the main file
system. Such file systems are less likely to become corrupted in the event of powerfailure or system crash.
Explain the process used to align VMFS partitions
To check that your existing partitions are aligned, issue the command:fdisk -lu /dev/sd* The output is similar to:
Device boot Start End Blocks Id System
/dev/sdj1 128 16776 6794 83883333+ fb Unknown
8/6/2019 VMware 3.5 Enterprise Administration Exam Study Guide V0.2
http://slidepdf.com/reader/full/vmware-35-enterprise-administration-exam-study-guide-v02 6/73
VMware 3.5 Enterprise Administration Exam study guide
Transparent IT Pagina 6
Aligned partitions start at 128. If the Start value is 63 (the default), the partition isnot aligned. If you choose not to use the VI Client and create partitions withvmkfstools, or if you want to align the default installation partition before use, takethe following steps to use fdisk to align a partition manually from the ESX Serverservice console:
1. Enter fdisk /dev/sd<x> where <x> is the device suffix.2. Determine if any VMware VMFS partitions already exist. VMware VMFS
partitions are identified by a partition system ID of fb. Type d to delete todelete these partitions.
Note: This destroys all data currently residing on the VMware VMFS partitions youdelete.
3. Ensure you back up this data first if you need it.4. Type n to create a new partition.5. Type p to create a primary partition.
6. Type 1 to create partition No. 1.Select the defaults to use the complete disk.
7. Type t to set the partition’s system ID.8. Type fb to set the partition system ID to fb (VMware VMFS volume).9. Type x to go into expert mode.10. Type b to adjust the starting block number.11. Type 1 to choose partition 1.12. Type 128 to set it to 128 (the array’s stripe element size).13. Type w to write label and partition information to disk.
Use Cases to use Round-Robin Load Balancing ESX Server hosts can usemultipathing for failover. When one path from the ESX Server host to the SANbecomes unavailable, the host switches to another path.ESX Server hosts can also use multipathing for load balancing. To achieve better loadbalancing across paths, administrators can specify that the ESX Server host shouldswitch paths under certain circumstances. Different settable options determine whenthe ESX Server host switches paths and what paths are chosen.When to switch – Specify that the ESX Server host should attempt a path switchafter a specified number of I/O blocks have been issued on a path or after aspecified number of read or write commands have been issued on a path. If anotherpath exists that meets the specified path policy for the target, the active pathto the target is switched to the new path. The --custom-max-commands and --custom-max-blocks options specify when to switch.Which target to use – Specify that the next path should be on the preferred target,the most recently used target, or any target. The --custom-target-policy optionspecifies which target to use.Which HBA to use – Specify that the next path should be on the preferred HBA, themost recently used HBA, the HBA with the minimum outstanding I/O requests, orany HBA. The --custom-HBA-policy option specifies which HBA to use.
Tools Explained
8/6/2019 VMware 3.5 Enterprise Administration Exam Study Guide V0.2
http://slidepdf.com/reader/full/vmware-35-enterprise-administration-exam-study-guide-v02 7/73
VMware 3.5 Enterprise Administration Exam study guide
Transparent IT Pagina 7
CLI
A command-line interface (CLI) is a mechanism for interacting with a computeroperating system or software by typing commands to perform specific tasks. Thistext-only interface contrasts with the use of a mouse pointer with a graphical user
interface (GUI) to click on options, or menus on a text user interface (TUI) toselect options.
Esxcfg- vmhbadevs
Description:
Print the mappings between vmhba names and /dev names
Syntax: esxcfg-vmhbadevs <options>
-m --vmfs Print mappings for VMFS volumes to their Service Console partitions and vmhba names.-f --vfat Print mappings for VFAT volumes to their Service Console partitions and vmhba names.-q --query Print mapping in 2.5 compatibility mode to mimic vmkpcidivy -q vmhba_devs.-a --all Print all devices, regardless of whether they have console device or not.-h --help Show this message.
esxcfg-vmhbadevs examples:
[root@esxvdi01 log]# esxcfg-vmhbadevs -m vmhba0:0:0:3 /dev/cciss/c0d0p3 48c64d26-b496c344-0a0f-001cc4be79c0 vmhba0:1:0:1 /dev/cciss/c0d1p1 48c64f2c-f4eb2f06-df8b-001cc4be79c0
Vdf -h, --human-readable
Print sizes in a format friendly to human readers (e.g., 1.9G instead of 1967156).
Vdf –h Example output
Filesystem Size Used Avail Use% Mounted on
/dev/sda2 4.0G 366M 3.4G 10% / /dev/sda1 244M 29M 202M 13% /boot /dev/sda7 2.0G 33M 1.9G 2% /homenone 131M 0M 131M 0% /dev/shm /dev/sda8 2.0G 33M 1.9G 2% /tmp /dev/sda6 2.0G 1.2G 708M 64% /usr /dev/sda5 4.0G 595M 3.2G 16% /var /vmfs/devices 800G 0 800G 0% /vmfs/devices
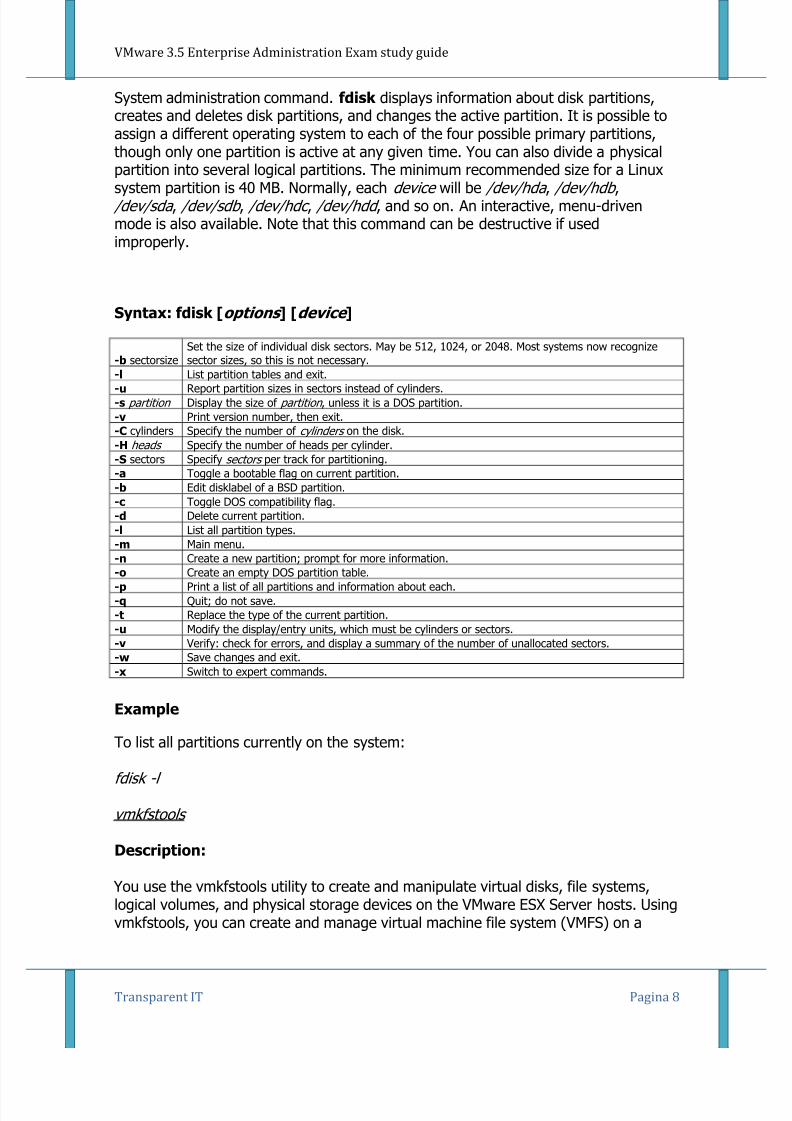
Fdisk
Description:
8/6/2019 VMware 3.5 Enterprise Administration Exam Study Guide V0.2
http://slidepdf.com/reader/full/vmware-35-enterprise-administration-exam-study-guide-v02 8/73
VMware 3.5 Enterprise Administration Exam study guide
Transparent IT Pagina 8
System administration command. fdisk displays information about disk partitions,creates and deletes disk partitions, and changes the active partition. It is possible toassign a different operating system to each of the four possible primary partitions,though only one partition is active at any given time. You can also divide a physicalpartition into several logical partitions. The minimum recommended size for a Linux
system partition is 40 MB. Normally, each device will be /dev/hda , /dev/hdb , /dev/sda , /dev/sdb , /dev/hdc , /dev/hdd , and so on. An interactive, menu-drivenmode is also available. Note that this command can be destructive if usedimproperly.
Syntax: fdisk [options ] [device ]
-b sectorsize
Set the size of individual disk sectors. May be 512, 1024, or 2048. Most systems now recognizesector sizes, so this is not necessary.
-l List partition tables and exit.-u Report partition sizes in sectors instead of cylinders.-s partition Display the size of partition , unless it is a DOS partition.-v Print version number, then exit.-C cylinders Specify the number of cylinders on the disk.
-H heads Specify the number of heads per cylinder.-S sectors Specify sectors per track for partitioning.-a Toggle a bootable flag on current partition.-b Edit disklabel of a BSD partition.-c Toggle DOS compatibility flag.-d Delete current partition.-l List all partition types.-m Main menu.
-n Create a new partition; prompt for more information.-o Create an empty DOS partition table.-p Print a list of all partitions and information about each.-q Quit; do not save.-t Replace the type of the current partition.-u Modify the display/entry units, which must be cylinders or sectors.-v Verify: check for errors, and display a summary of the number of unallocated sectors.-w Save changes and exit.
-x Switch to expert commands.
Example
To list all partitions currently on the system:
fdisk -l
vmkfstools
Description:
You use the vmkfstools utility to create and manipulate virtual disks, file systems,logical volumes, and physical storage devices on the VMware ESX Server hosts. Using
vmkfstools, you can create and manage virtual machine file system (VMFS) on a

8/6/2019 VMware 3.5 Enterprise Administration Exam Study Guide V0.2
http://slidepdf.com/reader/full/vmware-35-enterprise-administration-exam-study-guide-v02 9/73
VMware 3.5 Enterprise Administration Exam study guide
Transparent IT Pagina 9
physical partition of a disk. You can also use the command to manipulate files, suchas virtual disk files, stored on VMFS-2, VMFS-3, and NFS.
Syntax: vmkfstools <option>
<options>
are one or more command line options and associated arguments you use tospecify the activity for vmkfstools to perform — for example, choosing the disk format when creating a new virtual disk.
<partition>
specifies disk partitions. This argument uses a vmhbaA:T:L:P format, where A, T,L, and P are integers representing adapter, target, LUN, and partition numberrespectively. The partition digit must be greater than zero (0) and shouldcorrespond to a valid VMFS partition of type fb.
<device>
specifies devices or logical volumes. This argument uses a path name in the ESXServer 3 device file system. The path name begins with /vmfs/devices, which isthe mount point of the device file system.
<path>
specifies a VMFS file system or file. This argument is an absolute or relative path
that names a directory symbolic link, a raw device mapping, or a file under /vmfs.To specify a VMFS filesystem, use this format: /vmfs/volumes/<file_system_UUID> or /vmfs/volumes/<file_system_label>To specify a VMFS file, usethis format: /vmfs/volumes/<file system label|file system UUID>/[dir]/myDisk.vmdk
Example:
vmkfstools --createfs vmfs3 --blocksize 2m vmhba1:3:0:1creates a VMFS3 partition with a 2 MB blocksize
Objective 1.2 – Implement and manage complex data security andreplication configurations.
Knowledge
• Describe methods to secure access to virtual disks and related storage devices• Distributed Lock Handling• Identify tools and steps necessary to manage replicated VMFS volumes• Resignaturing• Snapshot LUNs• Understand how to configure physical storage adapter properties
Skills and Abilities
• Configure storage network segmentation• FC Zoning• iSCSI/NFS VLAN• Configure LUN masking• Storage device• Host• Configure iSCSI/NFS security options• Use esxcfg-advcfg• Set Resignaturing and Snapshot LUN options
8/6/2019 VMware 3.5 Enterprise Administration Exam Study Guide V0.2
http://slidepdf.com/reader/full/vmware-35-enterprise-administration-exam-study-guide-v02 10/73
VMware 3.5 Enterprise Administration Exam study guide
Transparent IT Pagina 10
• Set ESX Server host-side disk options• Manage RDMs in a replicated environment• Virtual compatibility mode• Physical compatibility mode• Use proc nodes to identify driver configuration and options• Use esxcfg-module• Modify storage adapter settings• Identify and load/unload modules• Get module status
Tools
• VI client• CLI• esxcfg-advcfg
• esxcfg-module
Knowledge
Distributed lock handeling The LUN is a clustered volume, and VMFS provides thedistributed lock management that arbitrates access, allowing each VM and ESXserver to share the clustered pool of storage. Thus, the point of control moves fromthe storage area network (SAN) to the vmkernel with no loss of security.
Resignaturing, Understanding Resignaturing Options
This section discusses how the EnableResignature and DisallowSnapshotLUNoptions interact and explains the three states that result from changing theseoptions:
1. State 1: EnableResignature=0, DisallowSnapshotLUN=1 (the ESX Server 3.xdefault)
2. State 2: EnableResignature=1 (DisallowSnapshotLUN is not relevant)3. State 3: EnableResignature=0, DisallowSnapshotLUN=0 (ESX Server 2.x
behavior)
State 1 - EnableResignature=0, DisallowSnapshotLUN=1 (default) In this state, You cannot bring snapshots or replicas of VMFS volumes by the arrayinto the ESX Server host regardless of whether or not the ESX Server has access tothe original LUN. LUNs formatted with VMFS must have the same ID for each ESXServer host.
State 2 - EnableResignature=1, (DisallowSnapshotLUN is not relevant) In this state, you can safely bring snapshots or replicas of VMFS volumes into thesame servers as the original and they are automatically resignatured.State 3 - EnableResignature=0, DisallowSnapshotLUN=0 This is similar to ESX Server 2.x behavior. In this state, the ESX Server assumes thatit sees only one replica or snapshot of a given LUN and never tries to resignature.
This is ideal in a DR scenario where you are bringing a replica of a LUN to a new

8/6/2019 VMware 3.5 Enterprise Administration Exam Study Guide V0.2
http://slidepdf.com/reader/full/vmware-35-enterprise-administration-exam-study-guide-v02 11/73
VMware 3.5 Enterprise Administration Exam study guide
Transparent IT Pagina 11
cluster of ESX Servers, possibly on another site that does not have access to thesource LUN. In such a case, the ESX Server uses the replica as if it is the original.Do not use this setting if you are bringing snapshots or replicas of a LUN into aserver with access to the original LUN. This can have destructive results including:If you create snapshots of a VMFS volume one or more times and dynamically
bring one or more of those snapshots into an ESX Server, only the first copy isusable. The usable copy is most likely the primary copy. After reboot, it isimpossible to determine which volume (the source or one of the snapshots) isusable. This nondeterministic behavior is dangerous. If you create a snapshot of aspanned VMFS volume, an ESX Server host might reassemble the volume fromfragments that belong to different snapshots. This can corrupt your file system.
Tools Explained
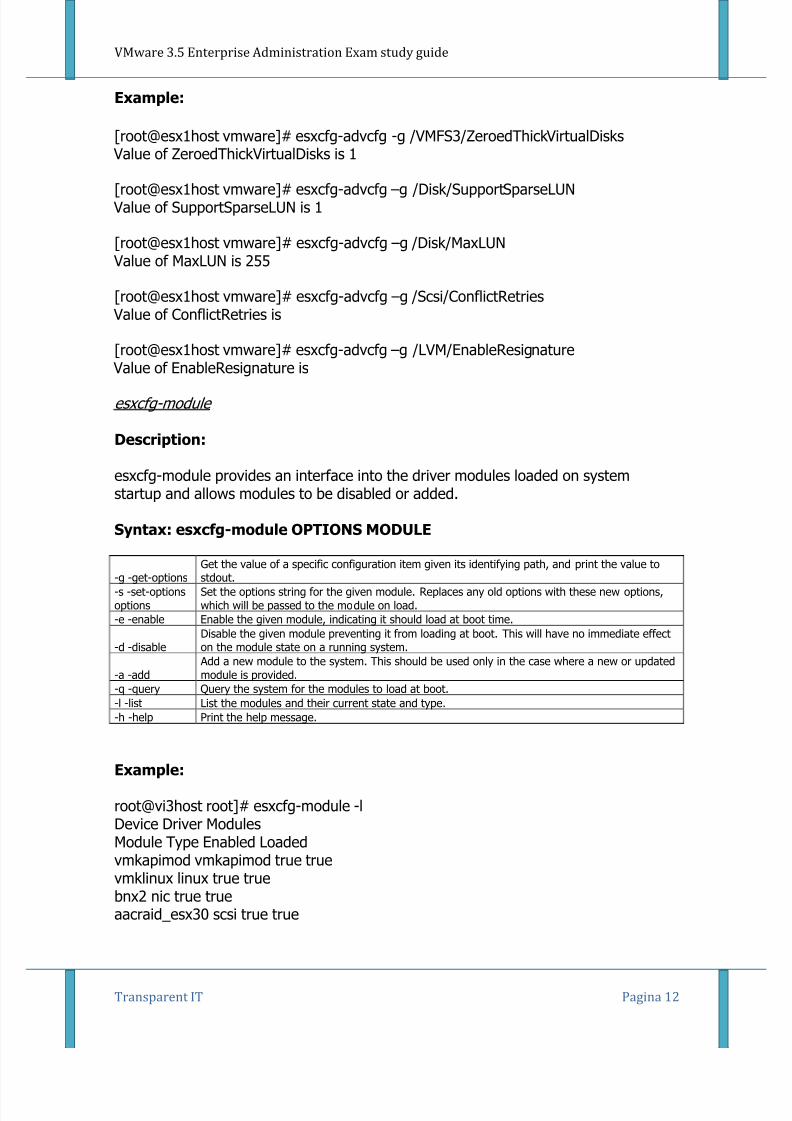
esxcfg-advcfg
Description:
The esxcfg-advcfg command is interesting as there is not a huge amount of helpabout this command. However, we can figure out that it is meant to do advancedconfiguration and we can figure out some settings that can be made. The -g switchis used to "get" settings; the -s switch is used to "set" settings.The question is, how much is configurable? To figure out what is configurable, werecommend that you look in the directory /proc/vmware/config which you will find inthe service console command line and then you will see the following directories
BufferCacheCpuDisk FileSystemIrqLVMMemMigrateMiscNetNFSNumaScsiUser VMFS3
Syntax: esxcfg-advcfg <options> [<adv cfg Path>]
-g|--get Get the value of the config option
-s|--set <value> Set the value of the config option-d|--default Reset Config option to default-q|--quiet Suppress output-k|--set-kernel Set a VMkernel load time option value.-j|--get-kernel Get a VMkernel load time option value.-h|--help Show this message.-r|--restore Restore all advanced options from the configuration file. (FOR INTERNAL USE ONLY).
8/6/2019 VMware 3.5 Enterprise Administration Exam Study Guide V0.2
http://slidepdf.com/reader/full/vmware-35-enterprise-administration-exam-study-guide-v02 12/73
VMware 3.5 Enterprise Administration Exam study guide
Transparent IT Pagina 12
Example:
[root@esx1host vmware]# esxcfg-advcfg -g /VMFS3/ZeroedThickVirtualDisks Value of ZeroedThickVirtualDisks is 1
[root@esx1host vmware]# esxcfg-advcfg –g /Disk/SupportSparseLUN Value of SupportSparseLUN is 1
[root@esx1host vmware]# esxcfg-advcfg –g /Disk/MaxLUN Value of MaxLUN is 255
[root@esx1host vmware]# esxcfg-advcfg –g /Scsi/ConflictRetries Value of ConflictRetries is
[root@esx1host vmware]# esxcfg-advcfg –g /LVM/EnableResignature
Value of EnableResignature is
esxcfg-module
Description:
esxcfg-module provides an interface into the driver modules loaded on systemstartup and allows modules to be disabled or added.
Syntax: esxcfg-module OPTIONS MODULE
-g -get-optionsGet the value of a specific configuration item given its identifying path, and print the value tostdout.
-s -set-optionsoptions
Set the options string for the given module. Replaces any old options with these new options,which will be passed to the module on load.
-e -enable Enable the given module, indicating it should load at boot time.
-d -disableDisable the given module preventing it from loading at boot. This will have no immediate effecton the module state on a running system.
-a -add Add a new module to the system. This should be used only in the case where a new or updatedmodule is provided.
-q -query Query the system for the modules to load at boot.-l -list List the modules and their current state and type.-h -help Print the help message.
Example:
root@vi3host root]# esxcfg-module -lDevice Driver ModulesModule Type Enabled Loadedvmkapimod vmkapimod true truevmklinux linux true truebnx2 nic true trueaacraid_esx30 scsi true true
8/6/2019 VMware 3.5 Enterprise Administration Exam Study Guide V0.2
http://slidepdf.com/reader/full/vmware-35-enterprise-administration-exam-study-guide-v02 13/73
VMware 3.5 Enterprise Administration Exam study guide
Transparent IT Pagina 13
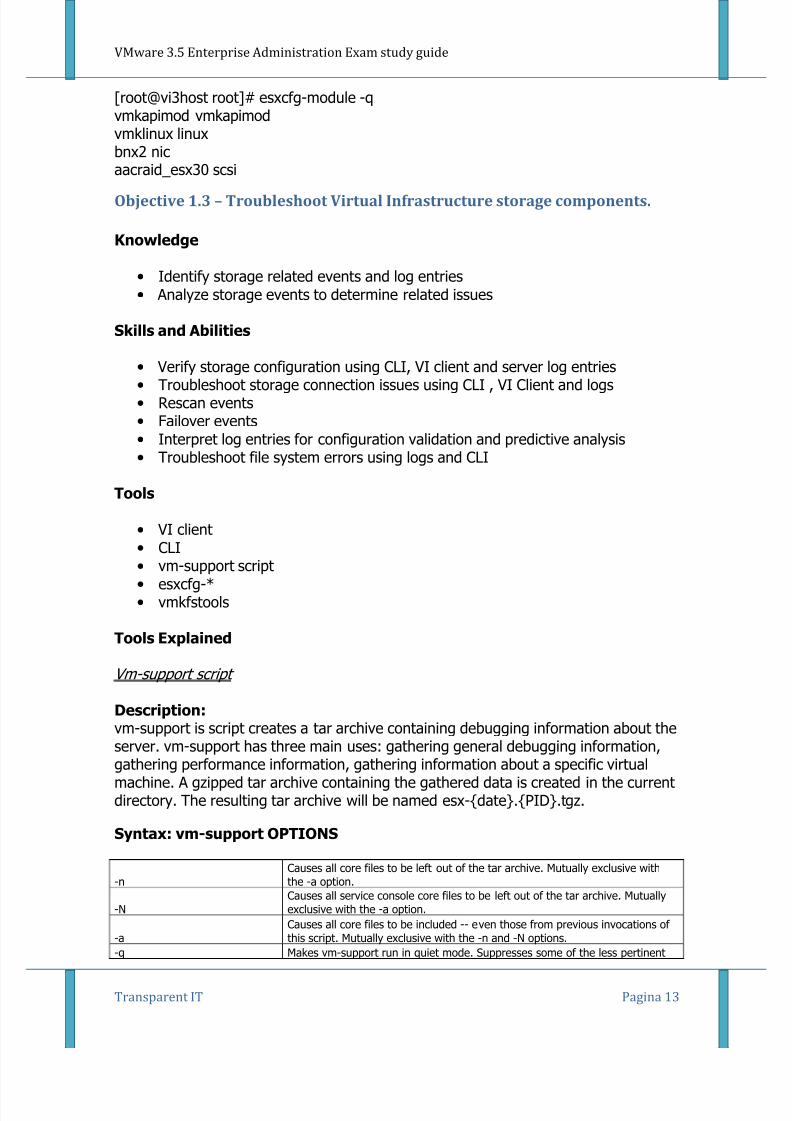
[root@vi3host root]# esxcfg-module -qvmkapimod vmkapimodvmklinux linuxbnx2 nicaacraid_esx30 scsi
Objective 1.3 – Troubleshoot Virtual Infrastructure storage components.
Knowledge
• Identify storage related events and log entries• Analyze storage events to determine related issues
Skills and Abilities
• Verify storage configuration using CLI, VI client and server log entries• Troubleshoot storage connection issues using CLI , VI Client and logs• Rescan events• Failover events• Interpret log entries for configuration validation and predictive analysis• Troubleshoot file system errors using logs and CLI
Tools
• VI client•
CLI• vm-support script• esxcfg-*• vmkfstools
Tools Explained
Vm-support script
Description:vm-support is script creates a tar archive containing debugging information about theserver. vm-support has three main uses: gathering general debugging information,gathering performance information, gathering information about a specific virtualmachine. A gzipped tar archive containing the gathered data is created in the currentdirectory. The resulting tar archive will be named esx-{date}.{PID}.tgz.
Syntax: vm-support OPTIONS
-nCauses all core files to be left out of the tar archive. Mutually exclusive withthe -a option.
-NCauses all service console core files to be left out of the tar archive. Mutuallyexclusive with the -a option.
-aCauses all core files to be included -- even those from previous invocations of this script. Mutually exclusive with the -n and -N options.
-q Makes vm-support run in quiet mode. Suppresses some of the less pertinent

8/6/2019 VMware 3.5 Enterprise Administration Exam Study Guide V0.2
http://slidepdf.com/reader/full/vmware-35-enterprise-administration-exam-study-guide-v02 14/73
VMware 3.5 Enterprise Administration Exam study guide
Transparent IT Pagina 14
printouts.
-w
Sets the working directory used for the output files. This is the directory wherevm-support will save the final tar archive. If this option is not specified, theworking directory will be the directory from which vm-support is run. VMFS isnormally disallowed.Note: Using a working directory on the
-f Allows you to force vm-support to use a VMFS working directory.
-l Prints the list of files that are being collected.-h Prints a friendly help message.
PERFORMANCE OPTIONS
-sTakes performance snapshots in addition to normal debugging information.Mutually exclusive with the -S option.
-S Takes only performance snapshots. Mutually exclusive with the -s option.
-d seconds Duration of snapshot. Default 300 seconds.
-i seconds Time in seconds to sleep between each snapshot. Default: autodetect.
VIRTUAL MACHINE OPTIONS
-xLists available virtual machines and corresponding world ids for use with the -Xoptions.
-X world idTakes only debugging information for the specified world. Will generate corefiles for the virtual machine associated with the specified world
-Z world id
Takes only debugging information for the specified world. Will generate corefiles for the virtual machine associated with the specified world. Will alsosuspend the VM and add the VM's memory state to the support file.
Example:
vm-supportGathers general debugging information.
vm-support -STakes performance snapshots, at the default interval for the default
duration.
vm-support -s -i 10 -d 600Gathers general debugging information and takes a perforamancesnapshot every 10 seconds for 10 minutes.
vm-support -xLists the running virtual machines for use with vm-support -X.
vm-support -X 314
Gathers only virtual machine specific debugging information for thevirtual machine 314.
esxcfg-[TAB][TAB].
Description:
ESX configuration tool various options are explained in this document
Example:

8/6/2019 VMware 3.5 Enterprise Administration Exam Study Guide V0.2
http://slidepdf.com/reader/full/vmware-35-enterprise-administration-exam-study-guide-v02 15/73
VMware 3.5 Enterprise Administration Exam study guide
Transparent IT Pagina 15
[root@vi3host root]# esxcfg-esxcfg-advcfg esxcfg-firewall esxcfg-module esxcfg-pciid esxcfg-swiscsi esxcfg-vswif esxcfg-auth esxcfg-info esxcfg-mpath esxcfg-rescan esxcfg-upgrade esxcfg-vswitchesxcfg-boot esxcfg-init esxcfg-nas esxcfg-resgrp esxcfg-vmhbadevsesxcfg-dumppart esxcfg-linuxnet esxcfg-nics esxcfg-route esxcfg-vmknic
vmkfstools
Description:
You use the vmkfstools utility to create and manipulate virtual disks, file systems,logical volumes, and physical storage devices on the VMware ESX Server hosts. Usingvmkfstools, you can create and manage virtual machine file system (VMFS) on aphysical partition of a disk. You can also use the command to manipulate files, such
as virtual disk files, stored on VMFS-2, VMFS-3, and NFS.
Syntax: vmkfstools <option>
<options>
are one or more command line options and associated arguments you use tospecify the activity for vmkfstools to perform — for example, choosing the disk format when creating a new virtual disk.
<partition>
specifies disk partitions. This argument uses a vmhbaA:T:L:P format, where A, T,L, and P are integers representing adapter, target, LUN, and partition numberrespectively. The partition digit must be greater than zero (0) and shouldcorrespond to a valid VMFS partition of type fb.
<device>
specifies devices or logical volumes. This argument uses a path name in the ESXServer 3 device file system. The path name begins with /vmfs/devices, which isthe mount point of the device file system.
<path>specifies a VMFS file system or file. This argument is an absolute or relative paththat names a directory symbolic link, a raw device mapping, or a file under /vmfs.
To specify a VMFS filesystem, use this format: /vmfs/volumes/<file_system_UUID> or /vmfs/volumes/<file_system_label>To specify a VMFS file, usethis format: /vmfs/volumes/<file system label|file system UUID>/[dir]/myDisk.vmdk
Example:
vmkfstools --createfs vmfs3 --blocksize 2m vmhba1:3:0:1
creates a VMFS3 partition with a 2 MB blocksize
Objective 1.4 – Implement and manage Storage VMotion.
Knowledge
• Describe Storage VMotion operation• Explain implementation process for Storage VMotion• Identify Storage VMotion use cases• Understand performance implications for Storage VMotion
8/6/2019 VMware 3.5 Enterprise Administration Exam Study Guide V0.2
http://slidepdf.com/reader/full/vmware-35-enterprise-administration-exam-study-guide-v02 16/73
VMware 3.5 Enterprise Administration Exam study guide
Transparent IT Pagina 16
Skills and Abilities
• Use Remote CLI to perform Storage VMotion operations• Interactive mode• Non-interactive mode• Implement Storage VMotion based on various use cases• Migration of all virtual disks to target storage location• Migration of virtual disks to independent target storage locations
Tools
• Remote CLI
Tools Explained
Storage VMotion
Description:
How to Use the Remote Command-line Interface to Invoke Storage Vmotion inWindows Server or Desktop. Live VMDK replacement.
Syntax: use the RCLI tool.
1
Download the Remote Command-line Interface from this location:http://www.vmware.com/download/download.do?downloadGroup=VI-RCLI. Be sure to put your
email address and password for the VMware download site. If you do not have, please Registerand then login to download the software.
2Double-click on the VMware-VIRemoteCLI-1.1.0-64644.exe to install the file. Choose the standardoptions and let the install take place.
3 Once this is done, open a command line (go to start > run and type cmd)
4In the command line, navigate to the location of the VMware VI Remote CLI scripts. This isnormally found at c:\program files\vmware\vmware vi remote CLI\bin.
5Once in this directory at the command line to bring up the interactive session for Storage Vmotion.,type in svmotion.pl –-interactive.
6 A command prompt will appear that states “Enter the VirtualCenter service url you wish to connect to (e.g. https://myvc.my corp.com/sdk, or just myvc.mycorp.com):”
7 Enter the url of your Virtual Center Server or your specific ESX server and hit enter.8 Another prompt will ask you to “Enter your username:”
9 Enter your domain username used to access your virtual center server or the username used toaccess the specific ESX server and hit enter.10 The next prompt states “Enter your password:”
11Enter the password of your domain username used to access your virtual center or the passwordused to access the specific ESX server and hit enter.
12The Remote CLI will then attempt to connect to the server. Once it is connect it will state “Connected to server.”
13 A prompt will appear and ask you to “Enter the name of the datacenter:” 14 Please enter the name of your datacenter after this prompt and hit enter.
15 Another prompt will appear and ask you to “Enter the datastore path of the virtual machine (e.g.[datastore1] myvm/myvm.vmx):”
16 At this prompt use the following format [datastorename] VM name/VM name.vmx and hitenter.
17 Another prompt will appear and ask you to “Enter the name of the destination datastore:”
18 After the prompt enter the name of the destination datastore. Do not place the bracketsaround the datastore name at this stage. Hit enter once you are complete.
8/6/2019 VMware 3.5 Enterprise Administration Exam Study Guide V0.2
http://slidepdf.com/reader/full/vmware-35-enterprise-administration-exam-study-guide-v02 17/73
VMware 3.5 Enterprise Administration Exam study guide
Transparent IT Pagina 17
19 A final prompt will state “You can also move disks independently of the virtual machine. If you want the disks to stay with the virtual machine, then skip this step.. "
20 After this, the prompt asks you “Would you like to individually place the disks (yes/no)?” 21 For a standard move choose No and hit enter.
Example:
C:\Program Files\VMware\VMware VI Remote CLI\bin> svmotion.pl --interactive
Entering interactive mode. All other options and environment variables will be ignored.
Enter the VirtualCenter service url you wish to connect to (e.g. https://myvc.my corp.com/sdk, or just myvc.mycorp.com): myserver.testlab.com Enter your username: vmuser Enter your password: vmuser1
Attempting to connect to https://myserver.testlab.com/sdk. Connected to server. Enter the name of the datacenter: TestLab Enter the datastore path of the virtual machine (e.g. [datastore1] myvm/myvm.vmx): [VMFS3] ITV99005/ITV99005.vmx Enter the name of the destination datastore: VMFS4 You can also move disks independently of the virtual machine. If you want the disks to stay with the virtual machine, then skip this step.. Would you like to individually place the disks (yes/no)? noPerforming Storage VMotion.
Storage VMotion completed successfully.
8/6/2019 VMware 3.5 Enterprise Administration Exam Study Guide V0.2
http://slidepdf.com/reader/full/vmware-35-enterprise-administration-exam-study-guide-v02 18/73
VMware 3.5 Enterprise Administration Exam study guide
Transparent IT Pagina 18
Section 2 – Networking
Objective 2.1 – Install and configure Virtual Infrastructure networks.
Knowledge
• Differentiate physical and virtual switch characteristics• Create and modify virtual switches and virtual switch policies• Enable advanced networking capabilities• TCP Segmentation Offload (TSO)• Jumbo Frames• NetQueue
• Identify and understand the impact of various routing protocols
Skills and Abilities
• Configure service console network using CLI• Configure VLANs (virtual networks)• Configure TSO and Jumbo Frames• Enable Cisco Discovery Protocol• Use CLI commands to modify virtual network configuration
Tools
• CLI• esxcfg-nics• esxcfg-vswitch• esxcfg-vmknic• VI client
Knowledge
TCP Segmentation Offload (TSO) At the application level, data transmitted fromone system to another must be segmented to fit into the network packets. Thesize of those packets is limited by the Ethernet specification. Historically,segmentation was performed by the operating system (OS) using the CPU. Modernnetwork interface cards (NIC) try to optimize this TCP segmentation by using largersegment size as well as offloading work from the CPU to NIC hardware. ESX Server3.5 utilizes this concept to provide a virtual NIC with TSO support—without requiringspecialized network hardware. TSO improves networking I/O performance byreducing the CPU overhead involved with sending large amounts of TCP traffic. TSOimproves performance for TCP data coming from a VM and for network traffic sentout of the server, such as VMware VMotion traffic. TSO is supported in both the
guest operating system and in the ESX Server kernel TCP/IP stack, and is enabled

8/6/2019 VMware 3.5 Enterprise Administration Exam Study Guide V0.2
http://slidepdf.com/reader/full/vmware-35-enterprise-administration-exam-study-guide-v02 19/73
VMware 3.5 Enterprise Administration Exam study guide
Transparent IT Pagina 19
by default in the VMkernel. To take advantage of TSO, you must select "Enhanced VMXNET" or "e1000" as the virtual networking device for the guest. When the guestoperating system can utilize TSO, virtual machines running on ESX Server 3.5 willshow lower CPU utilization than virtual machines that lack TSO support, whenperforming the same network activities. When the physical NICs provide TSO
functionality, ESX Server 3.5 can leverage the specialized NIC hardware to improveperformance. However, performance improvements related to TSO need not requireNIC hardware support for TSO. Figure 1 illustrates the percentage network throughput improvement we observed for various message and socket sizeswhen using RedHat Enterprise Linux 5 and Windows Server 2003 guest operatingsystems with TSO-enabled virtual NIC. Figure 1 illustrates the percentage network throughput improvement we observed for various message and socket sizeswhen using RedHat Enterprise Linux 5 and Windows Server 2003 guest operatingsystems with TSO-enabled virtual NIC.
Jumbo Frames Since the Ethernet specification was developed decades ago,packets have been transmitted over the network in sizes no greater than 1,500
bytes. For each packet, the system has to perform a fixed amount of work topackage and transmit the packet. As Ethernet speed increased, so did the amount of work necessary, which resulted in a greater burden on the system. Recent advancesin all areas of the network stack have enabled an increase in the Ethernet packet sizeto 9,000 bytes. These so-called "jumbo frames" decrease the number of packetsrequiring packaging compared to previously sized packets. That decrease results inless work for network transactions which frees up resources for other activities. ESXServer 3.5 has implemented support for jumbo frames up to 9KB (9,000 bytes).When supported by the system software and hardware, as well as switches and hubsin between client and server, ESX Servers using jumbo frames will realize a decrease
in load due to network processing. Like TSO, jumbo frames are supported in both theguest operating system and in the ESX Server kernel TCP/IP stack. To enable jumbo

8/6/2019 VMware 3.5 Enterprise Administration Exam Study Guide V0.2
http://slidepdf.com/reader/full/vmware-35-enterprise-administration-exam-study-guide-v02 20/73
VMware 3.5 Enterprise Administration Exam study guide
Transparent IT Pagina 20
frames in a virtual machine, configure the guest to use "Enhanced VMXNET" network device using VMware Tools. Jumbo frames support is disabled by default in the
VMkernel and needs to be enabled using CLI.
NetQueue ESX Server 3.5 now supports NetQueue, which improves performance of 10 Gigabit Ethernet network communication. NetQueue requires MSI-X support fromthe server platform, so support is limited to specific systems and is turned off by default. Check the VMware ESX Server 3.5 hardware compatibility list (HCL) forinformation on whether support for NetQueue on a particular server is provided.
10 Gigabit Ethernet 10 Gigabit Ethernet (or 10 GigE) is the result of network hardware manufacturers implementing an IEEE standard for faster networks. In thepresence of NICs and interconnecting hardware such as switches that support 10GigE, performance improvements of an order of magnitude can be realized versustraditional 100 Megabit Ethernet. ESX Server 3.5 fully supports10 GigE NICs. Thismeans that NICs and network switches can run in between virtual machines ontwo ESX Server 3.5 hosts supporting 10 GigE.
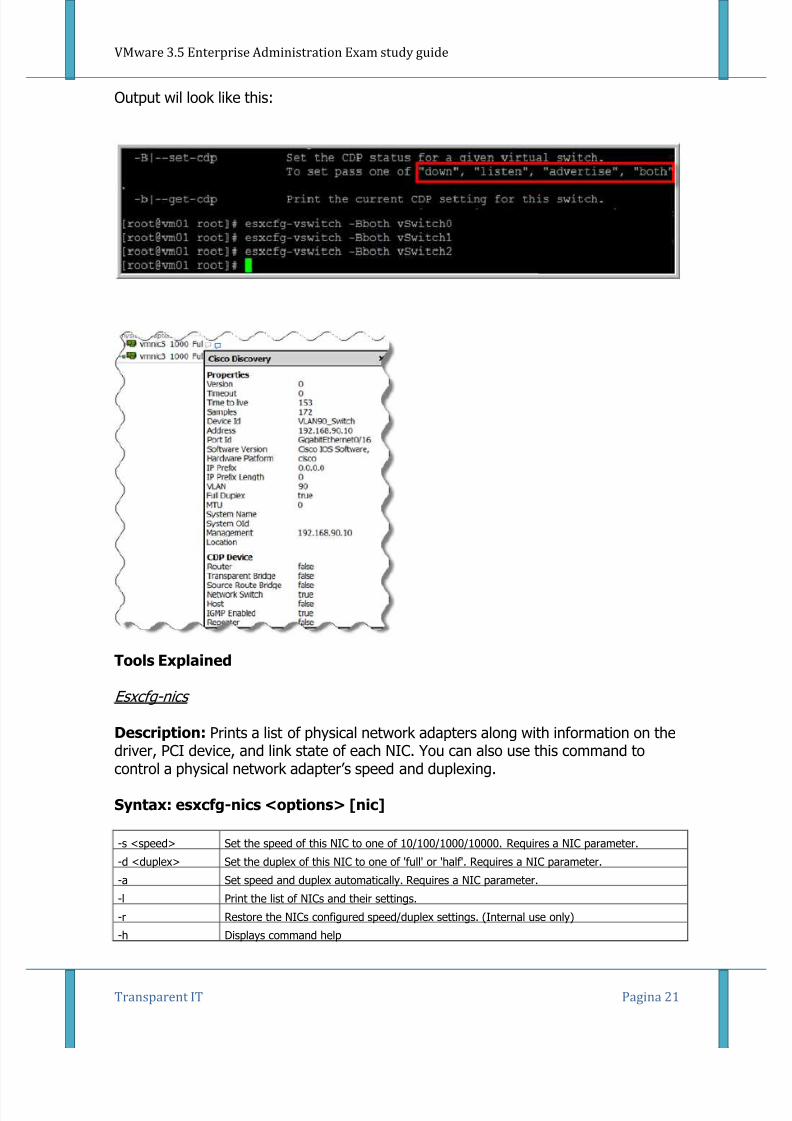
Cisco Discovery Protocol [CDP] CDP allows ESX to capture and broadcast Cisco
related information to and from the switches. Information such as management IP
addresses and switch ports. The type of information that is INVALUABLE when tryingto explain to a network administrator that you need 4 of the 6 network cards coming
out of your 1 ESX host set for VLAN trunking! For new 3.5 users, these features are
ready to go right after installation. No additional configurations necessary.
For users who have upgraded from 3.x to 3.5, the CDP information is turned off by
default.
To Enable CDP, putty into your ESX host and type:
esxcfg-vswitch –Bboth vSwitch[x]
Replace [x] with the number of your vswitches (0,1,2, etc).
esxcfg-vswitch –l to list them out in case you are not sure.
8/6/2019 VMware 3.5 Enterprise Administration Exam Study Guide V0.2
http://slidepdf.com/reader/full/vmware-35-enterprise-administration-exam-study-guide-v02 21/73
VMware 3.5 Enterprise Administration Exam study guide
Transparent IT Pagina 21
Output wil look like this:
Tools Explained
Esxcfg-nics
Description: Prints a list of physical network adapters along with information on thedriver, PCI device, and link state of each NIC. You can also use this command tocontrol a physical network adapter’s speed and duplexing.
Syntax: esxcfg-nics <options> [nic]
-s <speed> Set the speed of this NIC to one of 10/100/1000/10000. Requires a NIC parameter.
-d <duplex> Set the duplex of this NIC to one of 'full' or 'half'. Requires a NIC parameter.
-a Set speed and duplex automatically. Requires a NIC parameter.
-l Print the list of NICs and their settings.
-r Restore the NICs configured speed/duplex settings. (Internal use only)
-h Displays command help
8/6/2019 VMware 3.5 Enterprise Administration Exam Study Guide V0.2
http://slidepdf.com/reader/full/vmware-35-enterprise-administration-exam-study-guide-v02 22/73
VMware 3.5 Enterprise Administration Exam study guide
Transparent IT Pagina 22
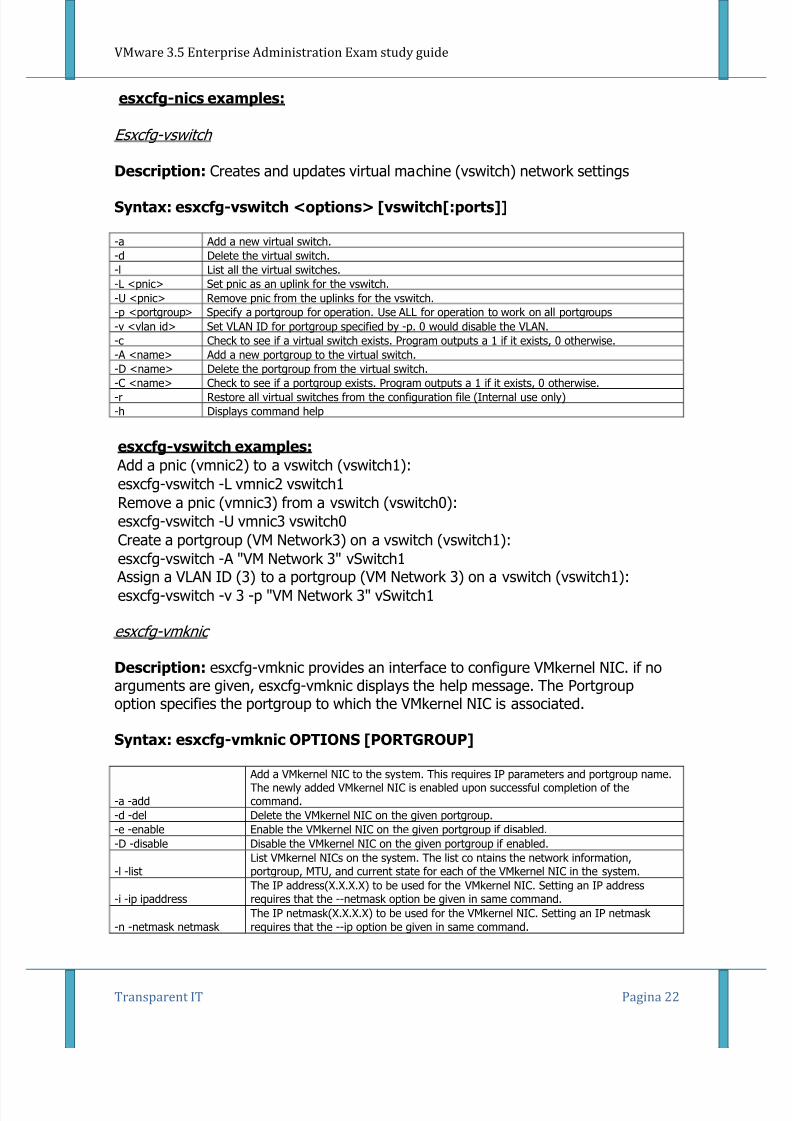
esxcfg-nics examples:
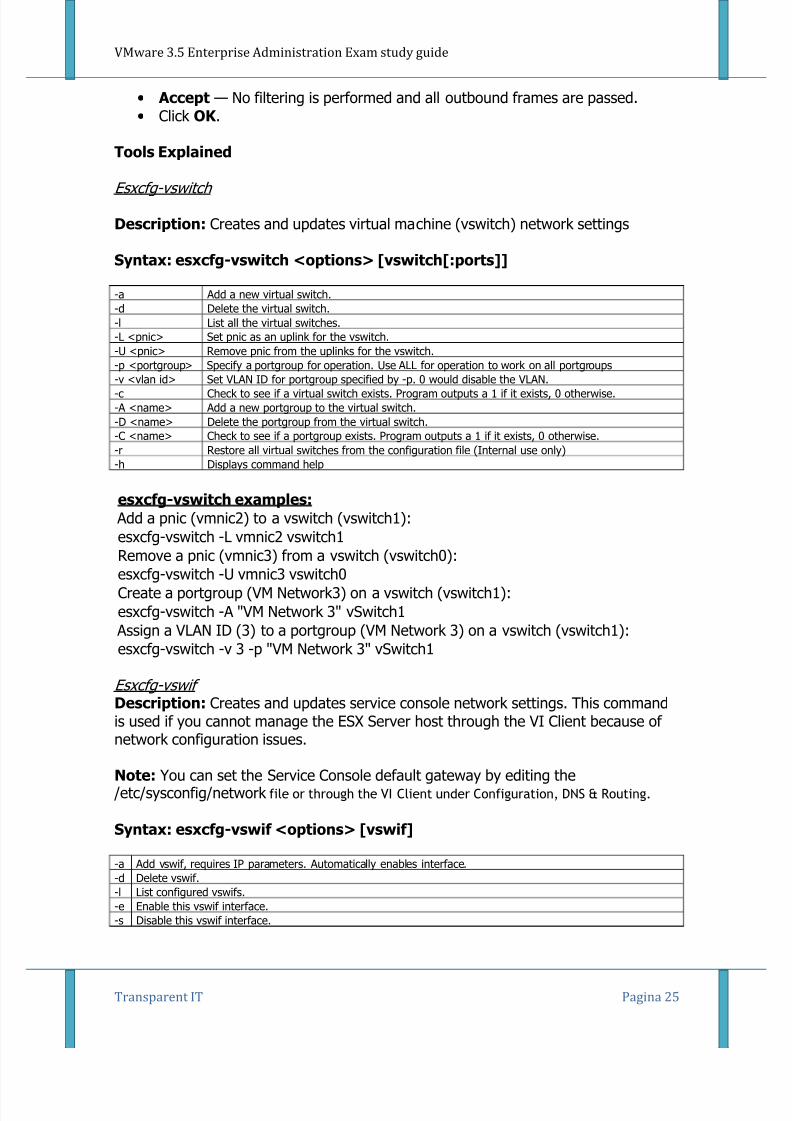
Esxcfg-vswitch
Description: Creates and updates virtual machine (vswitch) network settings
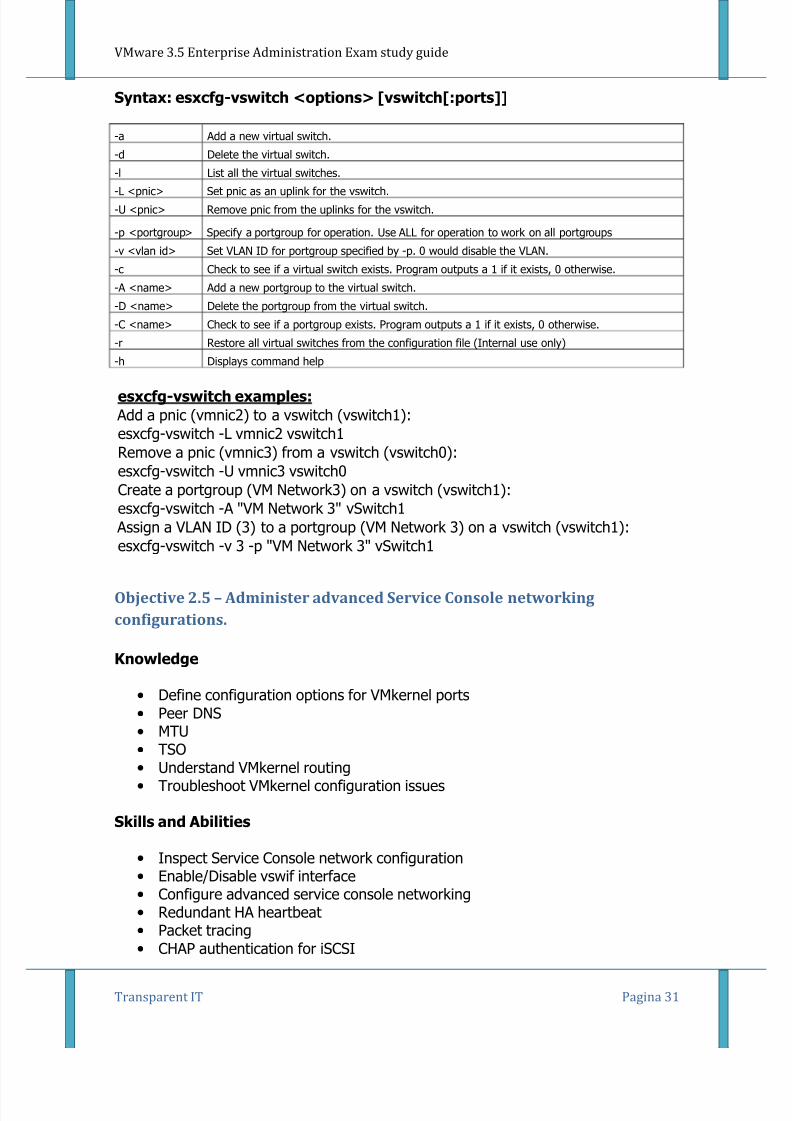
Syntax: esxcfg-vswitch <options> [vswitch[:ports]]
-a Add a new virtual switch.-d Delete the virtual switch.-l List all the virtual switches.-L <pnic> Set pnic as an uplink for the vswitch.-U <pnic> Remove pnic from the uplinks for the vswitch.-p <portgroup> Specify a portgroup for operation. Use ALL for operation to work on all portgroups-v <vlan id> Set VLAN ID for portgroup specified by -p. 0 would disable the VLAN.-c Check to see if a virtual switch exists. Program outputs a 1 if it exists, 0 otherwise.-A <name> Add a new portgroup to the virtual switch.
-D <name> Delete the portgroup from the virtual switch.-C <name> Check to see if a portgroup exists. Program outputs a 1 if it exists, 0 otherwise.-r Restore all virtual switches from the configuration file (Internal use only)-h Displays command help
esxcfg-vswitch examples:
Add a pnic (vmnic2) to a vswitch (vswitch1):esxcfg-vswitch -L vmnic2 vswitch1Remove a pnic (vmnic3) from a vswitch (vswitch0):esxcfg-vswitch -U vmnic3 vswitch0Create a portgroup (VM Network3) on a vswitch (vswitch1):
esxcfg-vswitch -A "VM Network 3" vSwitch1 Assign a VLAN ID (3) to a portgroup (VM Network 3) on a vswitch (vswitch1):esxcfg-vswitch -v 3 -p "VM Network 3" vSwitch1
esxcfg-vmknic
Description: esxcfg-vmknic provides an interface to configure VMkernel NIC. if noarguments are given, esxcfg-vmknic displays the help message. The Portgroupoption specifies the portgroup to which the VMkernel NIC is associated.
Syntax: esxcfg-vmknic OPTIONS [PORTGROUP]
-a -add
Add a VMkernel NIC to the system. This requires IP parameters and portgroup name.The newly added VMkernel NIC is enabled upon successful completion of thecommand.
-d -del Delete the VMkernel NIC on the given portgroup.-e -enable Enable the VMkernel NIC on the given portgroup if disabled.-D -disable Disable the VMkernel NIC on the given portgroup if enabled.
-l -listList VMkernel NICs on the system. The list co ntains the network information,portgroup, MTU, and current state for each of the VMkernel NIC in the system.
-i -ip ipaddressThe IP address(X.X.X.X) to be used for the VMkernel NIC. Setting an IP addressrequires that the --netmask option be given in same command.
-n -netmask netmask
The IP netmask(X.X.X.X) to be used for the VMkernel NIC. Setting an IP netmask
requires that the --ip option be given in same command.

8/6/2019 VMware 3.5 Enterprise Administration Exam Study Guide V0.2
http://slidepdf.com/reader/full/vmware-35-enterprise-administration-exam-study-guide-v02 23/73
VMware 3.5 Enterprise Administration Exam study guide
Transparent IT Pagina 23
ESXCFG-vmknic Example:
esxcfg-vmknic -a -i x.x.x.x -n x.x.x.x portgroup
esxcfg-vmknic -e portgroup
Objective 2.2 – Install and configure a virtual networking infrastructure to
meet set security design requirements.
Knowledge
• Understand network segmentation benefits and best practices• Isolation of Service Console traffic
• Isolation of VMkernel traffic• Define common network security risks and explain their impact to a virtual
network infrastructure• Describe and configure virtual switch security policies
Skills and Abilities
• Configure VLANs• Set virtual networking security attributes• Forged Transmits• Promiscuous Mode• MAC Address Changes• VLAN configuration• Configure switch notification
Tools
• CLI• esxcfg-vswitch• esxcfg-vswif • esxcfg-vmknic• VI client
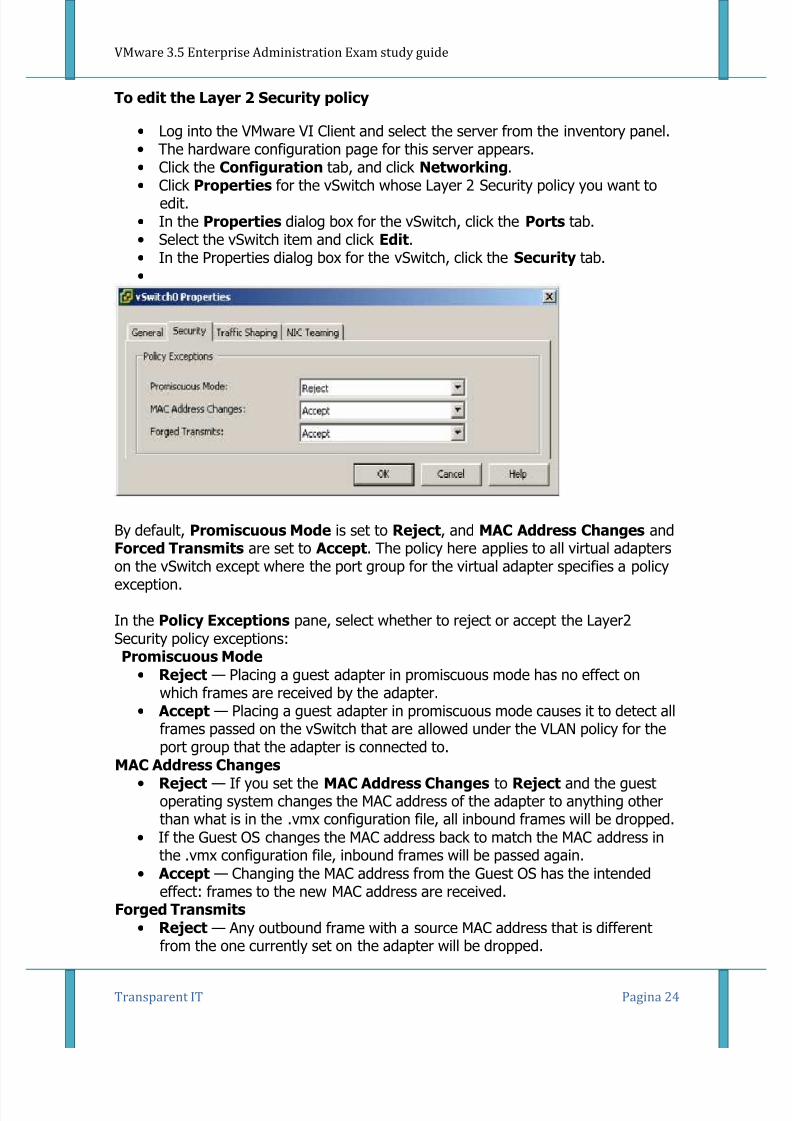
Knowledge
Layer 2 Security Policy Layer 2 is the data link layer. The three elements of the
Layer 2 Security policy are promiscuous mode, MAC address changes, and forged
transmits.
In non-promiscuous mode, a guest adapter listens to traffic only on its own MAC
address. In promiscuous mode, it can listen to all the packets. By default, guestadapters are set to non-promiscuous mode.
8/6/2019 VMware 3.5 Enterprise Administration Exam Study Guide V0.2
http://slidepdf.com/reader/full/vmware-35-enterprise-administration-exam-study-guide-v02 24/73
VMware 3.5 Enterprise Administration Exam study guide
Transparent IT Pagina 24
To edit the Layer 2 Security policy
• Log into the VMware VI Client and select the server from the inventory panel.• The hardware configuration page for this server appears.• Click the Configuration tab, and click Networking.
• Click Properties for the vSwitch whose Layer 2 Security policy you want toedit.
• In the Properties dialog box for the vSwitch, click the Ports tab.• Select the vSwitch item and click Edit.• In the Properties dialog box for the vSwitch, click the Security tab.•
By default, Promiscuous Mode is set to Reject, and MAC Address Changes and
Forced Transmits are set to Accept. The policy here applies to all virtual adapterson the vSwitch except where the port group for the virtual adapter specifies a policyexception.
In the Policy Exceptions pane, select whether to reject or accept the Layer2Security policy exceptions:Promiscuous Mode
• Reject — Placing a guest adapter in promiscuous mode has no effect onwhich frames are received by the adapter.
• Accept — Placing a guest adapter in promiscuous mode causes it to detect allframes passed on the vSwitch that are allowed under the VLAN policy for theport group that the adapter is connected to.
MAC Address Changes • Reject — If you set the MAC Address Changes to Reject and the guest
operating system changes the MAC address of the adapter to anything otherthan what is in the .vmx configuration file, all inbound frames will be dropped.
• If the Guest OS changes the MAC address back to match the MAC address inthe .vmx configuration file, inbound frames will be passed again.
• Accept — Changing the MAC address from the Guest OS has the intendedeffect: frames to the new MAC address are received.
Forged Transmits • Reject — Any outbound frame with a source MAC address that is different
from the one currently set on the adapter will be dropped.
8/6/2019 VMware 3.5 Enterprise Administration Exam Study Guide V0.2
http://slidepdf.com/reader/full/vmware-35-enterprise-administration-exam-study-guide-v02 25/73
VMware 3.5 Enterprise Administration Exam study guide
Transparent IT Pagina 25
• Accept — No filtering is performed and all outbound frames are passed.• Click OK .
Tools Explained
Esxcfg-vswitch
Description: Creates and updates virtual machine (vswitch) network settings
Syntax: esxcfg-vswitch <options> [vswitch[:ports]]
-a Add a new virtual switch.-d Delete the virtual switch.-l List all the virtual switches.-L <pnic> Set pnic as an uplink for the vswitch.-U <pnic> Remove pnic from the uplinks for the vswitch.
-p <portgroup> Specify a portgroup for operation. Use ALL for operation to work on all portgroups-v <vlan id> Set VLAN ID for portgroup specified by -p. 0 would disable the VLAN.-c Check to see if a virtual switch exists. Program outputs a 1 if it exists, 0 otherwise.-A <name> Add a new portgroup to the virtual switch.-D <name> Delete the portgroup from the virtual switch.-C <name> Check to see if a portgroup exists. Program outputs a 1 if it exists, 0 otherwise.-r Restore all virtual switches from the configuration file (Internal use only)-h Displays command help
esxcfg-vswitch examples:
Add a pnic (vmnic2) to a vswitch (vswitch1):esxcfg-vswitch -L vmnic2 vswitch1
Remove a pnic (vmnic3) from a vswitch (vswitch0):esxcfg-vswitch -U vmnic3 vswitch0Create a portgroup (VM Network3) on a vswitch (vswitch1):esxcfg-vswitch -A "VM Network 3" vSwitch1
Assign a VLAN ID (3) to a portgroup (VM Network 3) on a vswitch (vswitch1):esxcfg-vswitch -v 3 -p "VM Network 3" vSwitch1
Esxcfg-vswif Description: Creates and updates service console network settings. This commandis used if you cannot manage the ESX Server host through the VI Client because of
network configuration issues.
Note: You can set the Service Console default gateway by editing the /etc/sysconfig/network file or through the VI Client under Configuration, DNS & Routing.
Syntax: esxcfg-vswif <options> [vswif]
-a Add vswif, requires IP parameters. Automatically enables interface.-d Delete vswif.-l List configured vswifs.-e Enable this vswif interface.
-s Disable this vswif interface.
8/6/2019 VMware 3.5 Enterprise Administration Exam Study Guide V0.2
http://slidepdf.com/reader/full/vmware-35-enterprise-administration-exam-study-guide-v02 26/73
VMware 3.5 Enterprise Administration Exam study guide
Transparent IT Pagina 26
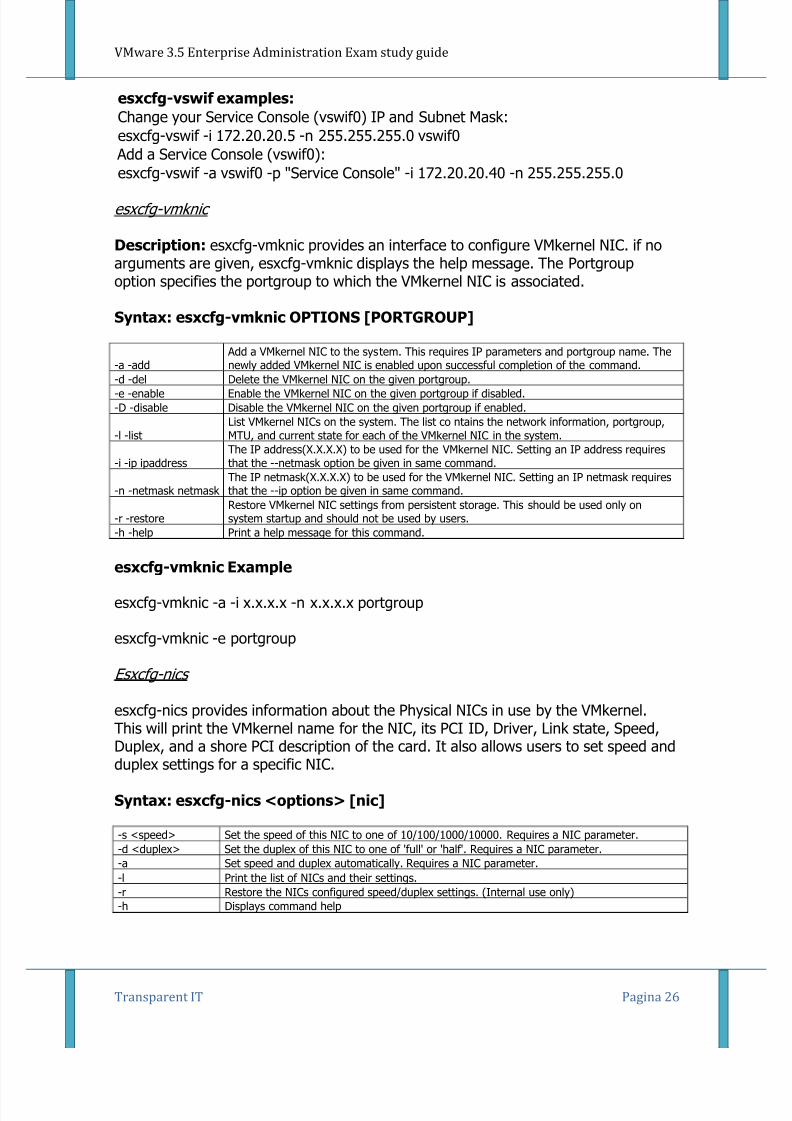
esxcfg-vswif examples:
Change your Service Console (vswif0) IP and Subnet Mask:esxcfg-vswif -i 172.20.20.5 -n 255.255.255.0 vswif0
Add a Service Console (vswif0):esxcfg-vswif -a vswif0 -p "Service Console" -i 172.20.20.40 -n 255.255.255.0
esxcfg-vmknic
Description: esxcfg-vmknic provides an interface to configure VMkernel NIC. if noarguments are given, esxcfg-vmknic displays the help message. The Portgroupoption specifies the portgroup to which the VMkernel NIC is associated.
Syntax: esxcfg-vmknic OPTIONS [PORTGROUP]
-a -add
Add a VMkernel NIC to the system. This requires IP parameters and portgroup name. The
newly added VMkernel NIC is enabled upon successful completion of the command.-d -del Delete the VMkernel NIC on the given portgroup.-e -enable Enable the VMkernel NIC on the given portgroup if disabled.-D -disable Disable the VMkernel NIC on the given portgroup if enabled.
-l -listList VMkernel NICs on the system. The list co ntains the network information, portgroup,MTU, and current state for each of the VMkernel NIC in the system.
-i -ip ipaddressThe IP address(X.X.X.X) to be used for the VMkernel NIC. Setting an IP address requiresthat the --netmask option be given in same command.
-n -netmask netmask The IP netmask(X.X.X.X) to be used for the VMkernel NIC. Setting an IP netmask requiresthat the --ip option be given in same command.
-r -restoreRestore VMkernel NIC settings from persistent storage. This should be used only onsystem startup and should not be used by users.
-h -help Print a help message for this command.
esxcfg-vmknic Example
esxcfg-vmknic -a -i x.x.x.x -n x.x.x.x portgroup
esxcfg-vmknic -e portgroup
Esxcfg-nics
esxcfg-nics provides information about the Physical NICs in use by the VMkernel.This will print the VMkernel name for the NIC, its PCI ID, Driver, Link state, Speed,Duplex, and a shore PCI description of the card. It also allows users to set speed andduplex settings for a specific NIC.
Syntax: esxcfg-nics <options> [nic]
-s <speed> Set the speed of this NIC to one of 10/100/1000/10000. Requires a NIC parameter.-d <duplex> Set the duplex of this NIC to one of 'full' or 'half'. Requires a NIC parameter.-a Set speed and duplex automatically. Requires a NIC parameter.
-l Print the list of NICs and their settings.-r Restore the NICs configured speed/duplex settings. (Internal use only)-h Displays command help
8/6/2019 VMware 3.5 Enterprise Administration Exam Study Guide V0.2
http://slidepdf.com/reader/full/vmware-35-enterprise-administration-exam-study-guide-v02 27/73
VMware 3.5 Enterprise Administration Exam study guide
Transparent IT Pagina 27
Objective 2.3 – Administer advanced VMkernel networking configurations.
Knowledge
• Define configuration options for VMkernel ports• Peer DNS• MTU• TSO• Understand VMkernel routing• Troubleshoot VMkernel configuration issues
Skills and Abilities
• Add and remove VMkernel ports• Enable/Disable VMkernel ports• Configure the VMkernel routing table
Tools
• CLI• esxcfg-vmknic• esxcfg-route• VI client
Knowledge
Peer DNS, local or internal DNS resolving
MTU, In computer networking, the term Maximum Transmission Unit (MTU)refers to the size (in bytes) of the largest packet or frame that a given layer of acommunications protocol can pass onwards. MTU parameters usually appear inassociation with a communications interface (NIC, serial port, etc.). The MTU may befixed by standards (as is the case with Ethernet) or decided at connect time (as isusually the case with point-to-point serial links). A higher MTU brings higherbandwidth efficiency. However, large packets can block up a slow interface for sometime, increasing the lag for further packets. For example, a 1500 byte packet, thelargest allowed by Ethernet at the network layer (and hence most of the Internet),would tie up a 14.4k modem for about one second.
TCP Segmentation Offload (TSO) —TCP Segmentation Offload (TSO) improvesnetworking I/O performance by reducing the CPU overhead involved with sendinglarge amounts of TCP traffic. TSO improves performance for TCP data coming from avirtual machine and for traffic, such as VMotion, that is sent out of the server. It issupported in both the guest operating system and in the ESX Server kernel TCP/IPstack. TSO is enabled by default in the VMkernel. To take advantage of TSO you
must select Enhanced VMXNET or e1000 as the virtual networking device for the
8/6/2019 VMware 3.5 Enterprise Administration Exam Study Guide V0.2
http://slidepdf.com/reader/full/vmware-35-enterprise-administration-exam-study-guide-v02 28/73
VMware 3.5 Enterprise Administration Exam study guide
Transparent IT Pagina 28
guest. In some cases, TSO hardware is leveraged. However, performanceimprovements related to TSO need not require NIC hardware support for TSO.
Tools Explained
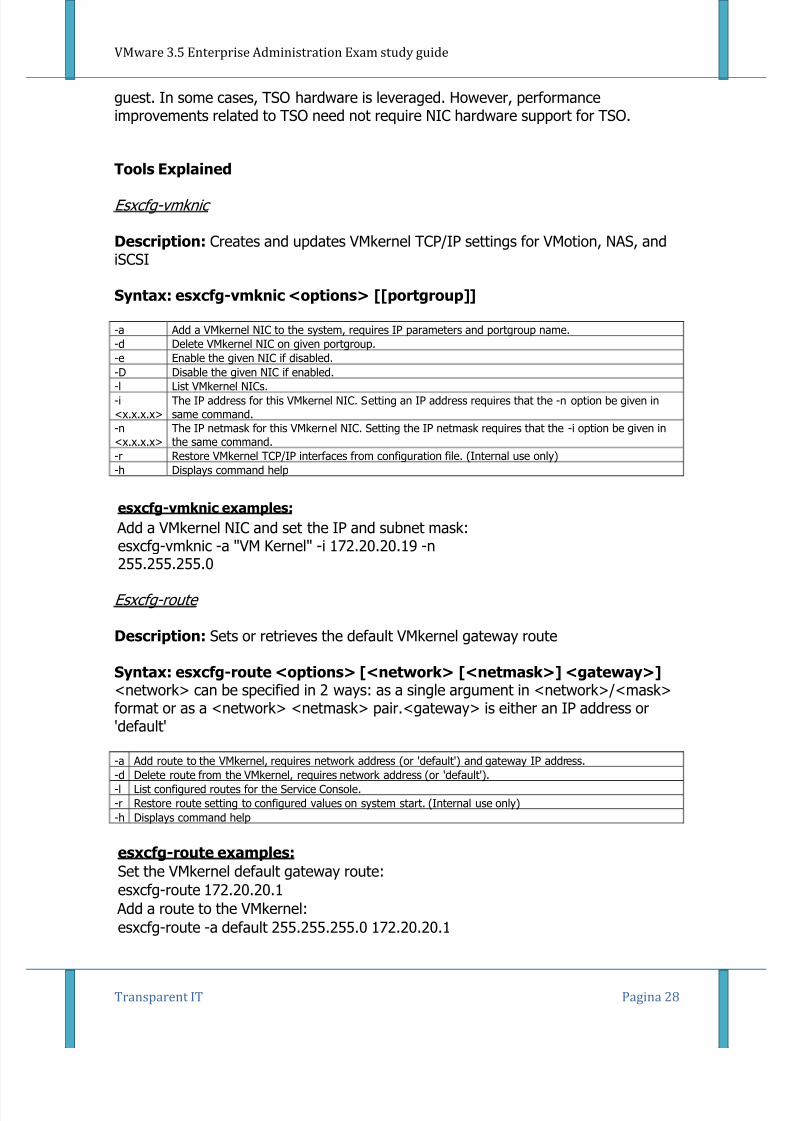
Esxcfg-vmknic
Description: Creates and updates VMkernel TCP/IP settings for VMotion, NAS, andiSCSI
Syntax: esxcfg-vmknic <options> [[portgroup]]
-a Add a VMkernel NIC to the system, requires IP parameters and portgroup name.-d Delete VMkernel NIC on given portgroup.-e Enable the given NIC if disabled.
-D Disable the given NIC if enabled.-l List VMkernel NICs.-i<x.x.x.x>
The IP address for this VMkernel NIC. Setting an IP address requires that the -n option be given insame command.
-n<x.x.x.x>
The IP netmask for this VMkernel NIC. Setting the IP netmask requires that the -i option be given inthe same command.
-r Restore VMkernel TCP/IP interfaces from configuration file. (Internal use only)-h Displays command help
esxcfg-vmknic examples:
Add a VMkernel NIC and set the IP and subnet mask:esxcfg-vmknic -a "VM Kernel" -i 172.20.20.19 -n255.255.255.0
Esxcfg-route
Description: Sets or retrieves the default VMkernel gateway route
Syntax: esxcfg-route <options> [<network> [<netmask>] <gateway>]<network> can be specified in 2 ways: as a single argument in <network>/<mask>format or as a <network> <netmask> pair.<gateway> is either an IP address or'default'
-a Add route to the VMkernel, requires network address (or 'default') and gateway IP address.-d Delete route from the VMkernel, requires network address (or 'default').-l List configured routes for the Service Console.-r Restore route setting to configured values on system start. (Internal use only)-h Displays command help
esxcfg-route examples:
Set the VMkernel default gateway route:esxcfg-route 172.20.20.1
Add a route to the VMkernel:
esxcfg-route -a default 255.255.255.0 172.20.20.1
8/6/2019 VMware 3.5 Enterprise Administration Exam Study Guide V0.2
http://slidepdf.com/reader/full/vmware-35-enterprise-administration-exam-study-guide-v02 29/73
VMware 3.5 Enterprise Administration Exam study guide
Transparent IT Pagina 29
Objective 2.4 – Manage Failover and Failure Detection
Knowledge
• Describe how to map port groups to physical NICs• Understand failover order for physical NICs and attached port groups• Explain options for detecting link failures• Troubleshoot failover operations
Skills and Abilities
• Use CLI commands to manage uplinks• Configure failover order• Active Adapters• Standby Adapters• Unused Adapters• NIC promotion• Configure beacon probing• Configure reverse teaming• Set advanced network failover options• Failover detection• Failback • Link state tracking
Knowledge
Load Balancing — Specify how to choose an uplink
• Route based on the originating port ID — Choose an uplink based on thevirtual port where the traffic entered the virtual switch
• Route based on ip hash — Choose an uplink based on a hash of the sourceand destination IP addresses of each packet. For non-IP packets, whatever isat those offsets is used to compute the hash
• Route based on source MAC hash — Choose an uplink based on a hash of the source Ethernet.
•
Use explicit failover order — Always use the highest order uplink from thelist of Active adapters which passes failover detection criteria
Network Failover Detection — Specify the method to use for failover detection.
• Link Status only – Relies solely on the link status provided by the network adapter. This detects failures, such as cable pulls and physical switch powerfailures, but not configuration errors, such as a physical switch port beingblocked by spanning tree or misconfigured to the wrong VLAN or cable pullson the other side of a physical switch.
• Beacon Probing – Sends out and listens for beacon probes on all NICs in theteam and uses this information, in addition to link status, to determine link
8/6/2019 VMware 3.5 Enterprise Administration Exam Study Guide V0.2
http://slidepdf.com/reader/full/vmware-35-enterprise-administration-exam-study-guide-v02 30/73
VMware 3.5 Enterprise Administration Exam study guide
Transparent IT Pagina 30
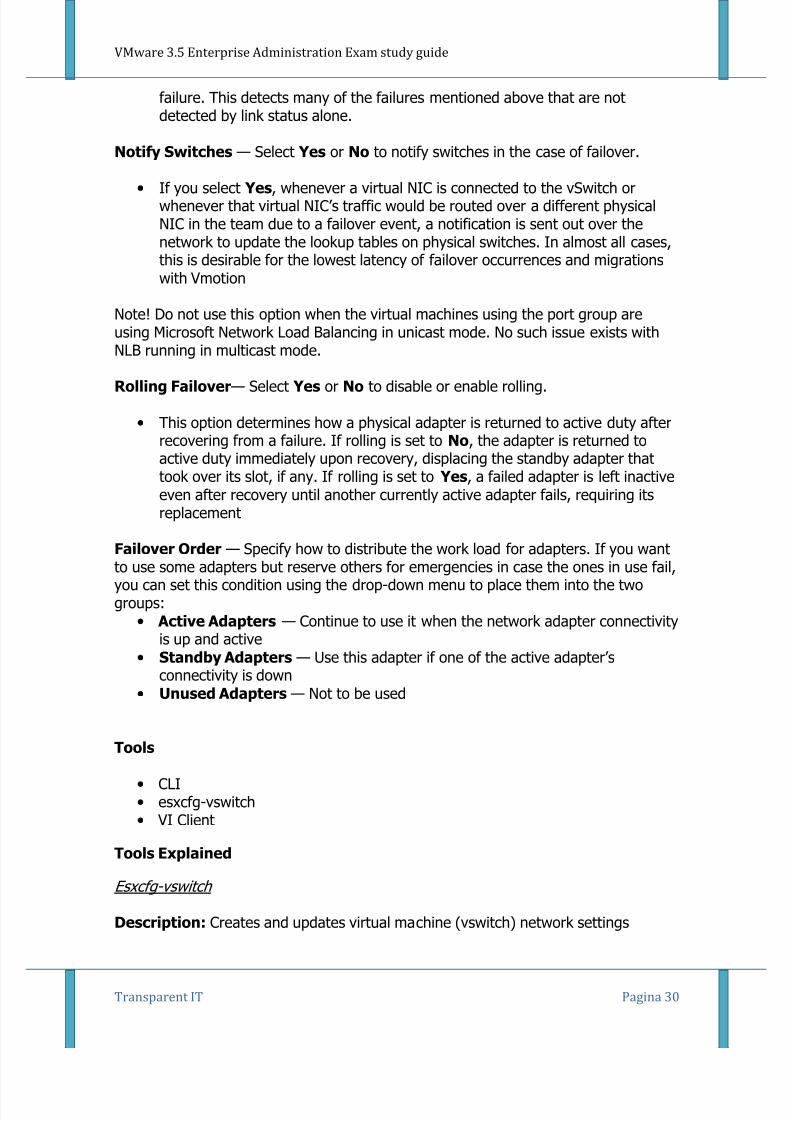
failure. This detects many of the failures mentioned above that are notdetected by link status alone.
Notify Switches — Select Yes or No to notify switches in the case of failover.
• If you select Yes, whenever a virtual NIC is connected to the vSwitch orwhenever that virtual NIC’s traffic would be routed over a different physicalNIC in the team due to a failover event, a notification is sent out over thenetwork to update the lookup tables on physical switches. In almost all cases,this is desirable for the lowest latency of failover occurrences and migrationswith Vmotion
Note! Do not use this option when the virtual machines using the port group areusing Microsoft Network Load Balancing in unicast mode. No such issue exists withNLB running in multicast mode.
Rolling Failover — Select Yes or No to disable or enable rolling.
• This option determines how a physical adapter is returned to active duty afterrecovering from a failure. If rolling is set to No, the adapter is returned toactive duty immediately upon recovery, displacing the standby adapter thattook over its slot, if any. If rolling is set to Yes, a failed adapter is left inactiveeven after recovery until another currently active adapter fails, requiring itsreplacement
Failover Order — Specify how to distribute the work load for adapters. If you wantto use some adapters but reserve others for emergencies in case the ones in use fail,you can set this condition using the drop-down menu to place them into the twogroups:
• Active Adapters — Continue to use it when the network adapter connectivityis up and active
• Standby Adapters — Use this adapter if one of the active adapter’sconnectivity is down
• Unused Adapters — Not to be used
Tools
• CLI• esxcfg-vswitch• VI Client
Tools Explained
Esxcfg-vswitch
Description: Creates and updates virtual machine (vswitch) network settings
8/6/2019 VMware 3.5 Enterprise Administration Exam Study Guide V0.2
http://slidepdf.com/reader/full/vmware-35-enterprise-administration-exam-study-guide-v02 31/73
VMware 3.5 Enterprise Administration Exam study guide
Transparent IT Pagina 31
Syntax: esxcfg-vswitch <options> [vswitch[:ports]]
-a Add a new virtual switch.
-d Delete the virtual switch.
-l List all the virtual switches.
-L <pnic> Set pnic as an uplink for the vswitch.
-U <pnic> Remove pnic from the uplinks for the vswitch.
-p <portgroup> Specify a portgroup for operation. Use ALL for operation to work on all portgroups
-v <vlan id> Set VLAN ID for portgroup specified by -p. 0 would disable the VLAN.
-c Check to see if a virtual switch exists. Program outputs a 1 if it exists, 0 otherwise.
-A <name> Add a new portgroup to the virtual switch.
-D <name> Delete the portgroup from the virtual switch.
-C <name> Check to see if a portgroup exists. Program outputs a 1 if it exists, 0 otherwise.
-r Restore all virtual switches from the configuration file (Internal use only)
-h Displays command help
esxcfg-vswitch examples:
Add a pnic (vmnic2) to a vswitch (vswitch1):esxcfg-vswitch -L vmnic2 vswitch1Remove a pnic (vmnic3) from a vswitch (vswitch0):esxcfg-vswitch -U vmnic3 vswitch0Create a portgroup (VM Network3) on a vswitch (vswitch1):esxcfg-vswitch -A "VM Network 3" vSwitch1
Assign a VLAN ID (3) to a portgroup (VM Network 3) on a vswitch (vswitch1):esxcfg-vswitch -v 3 -p "VM Network 3" vSwitch1
Objective 2.5 – Administer advanced Service Console networking
configurations.
Knowledge
• Define configuration options for VMkernel ports• Peer DNS• MTU• TSO• Understand VMkernel routing• Troubleshoot VMkernel configuration issues
Skills and Abilities
• Inspect Service Console network configuration• Enable/Disable vswif interface• Configure advanced service console networking• Redundant HA heartbeat• Packet tracing• CHAP authentication for iSCSI
8/6/2019 VMware 3.5 Enterprise Administration Exam Study Guide V0.2
http://slidepdf.com/reader/full/vmware-35-enterprise-administration-exam-study-guide-v02 32/73
VMware 3.5 Enterprise Administration Exam study guide
Transparent IT Pagina 32
• Configure hostname resolution• /etc/hosts• /etc/nsswitch.conf • /etc/resolv.conf • Monitor traffic over a Virtual Switch• Bandwidth• Dropped packets• Identify and resolve network issues using network monitoring tools• tcpdump• Snoop
Tools
• CLI• esxcfg-vswif
• dig• netstat• route• nslookup• hostname• vmknic• esxcfg-route• VI client
Knowledge
Peer DNS, local or internal DNS resolving
MTU, In computer networking, the term Maximum Transmission Unit (MTU)refers to the size (in bytes) of the largest packet or frame that a given layer of acommunications protocol can pass onwards. MTU parameters usually appear inassociation with a communications interface (NIC, serial port, etc.). The MTU may befixed by standards (as is the case with Ethernet) or decided at connect time (as isusually the case with point-to-point serial links). A higher MTU brings higherbandwidth efficiency. However, large packets can block up a slow interface for sometime, increasing the lag for further packets. For example, a 1500 byte packet, the
largest allowed by Ethernet at the network layer (and hence most of the Internet),would tie up a 14.4k modem for about one second.
TCP Segmentation Offload (TSO) —TCP Segmentation Offload (TSO) improvesnetworking I/O performance by reducing the CPU overhead involved with sendinglarge amounts of TCP traffic. TSO improves performance for TCP data coming from avirtual machine and for traffic, such as VMotion, that is sent out of the server. It issupported in both the guest operating system and in the ESX Server kernel TCP/IPstack. TSO is enabled by default in the VMkernel. To take advantage of TSO you
must select Enhanced VMXNET or e1000 as the virtual networking device for the
8/6/2019 VMware 3.5 Enterprise Administration Exam Study Guide V0.2
http://slidepdf.com/reader/full/vmware-35-enterprise-administration-exam-study-guide-v02 33/73
VMware 3.5 Enterprise Administration Exam study guide
Transparent IT Pagina 33
guest. In some cases, TSO hardware is leveraged. However, performanceimprovements related to TSO need not require NIC hardware support for TSO.
Tcpdump is frequently used to debug applications that generate or receive network traffic. It can also be used for debugging the network setup itself, by determining
whether all necessary routing is occurring properly, allowing the user to furtherisolate the source of a problem. It is also possible to use tcpdump for the specificpurpose of intercepting and displaying the communications of another user orcomputer. A user with the necessary privileges on a system acting as a router orgateway through which unencrypted traffic such as TELNET or HTTP passes can usetcpdump to view login IDs, passwords, the URLs and content of websites beingviewed, or any other unencrypted information.
snoop captures packets from the network and displays their contents. snoop usesboth the network packet filter and streams buffer modules to provide efficient
capture of packets from the network. Captured packets can be displayed as they arereceived, or saved to a file (which is RFC 1761–compliant) for later inspection.snoop can display packets in a single-line summary form or in verbose multi-lineforms. In summary form, with the exception of certain VLAN packets, only the datapertaining to the highest level protocol is displayed. If a packet has a VLAN headerand its VLAN ID is non-zero, then snoop will show that the packet is VLAN tagged.For example, an NFS packet will have only NFS information displayed. Except for
VLAN information under the condition just described, the underlying RPC, UDP, IP,and Ethernet frame information is suppressed, but can be displayed if either of theverbose options are chosen. In the absence of a name service, such as LDAP or NIS,
snoop displays host names as numeric IP addresses.
Tools Explained
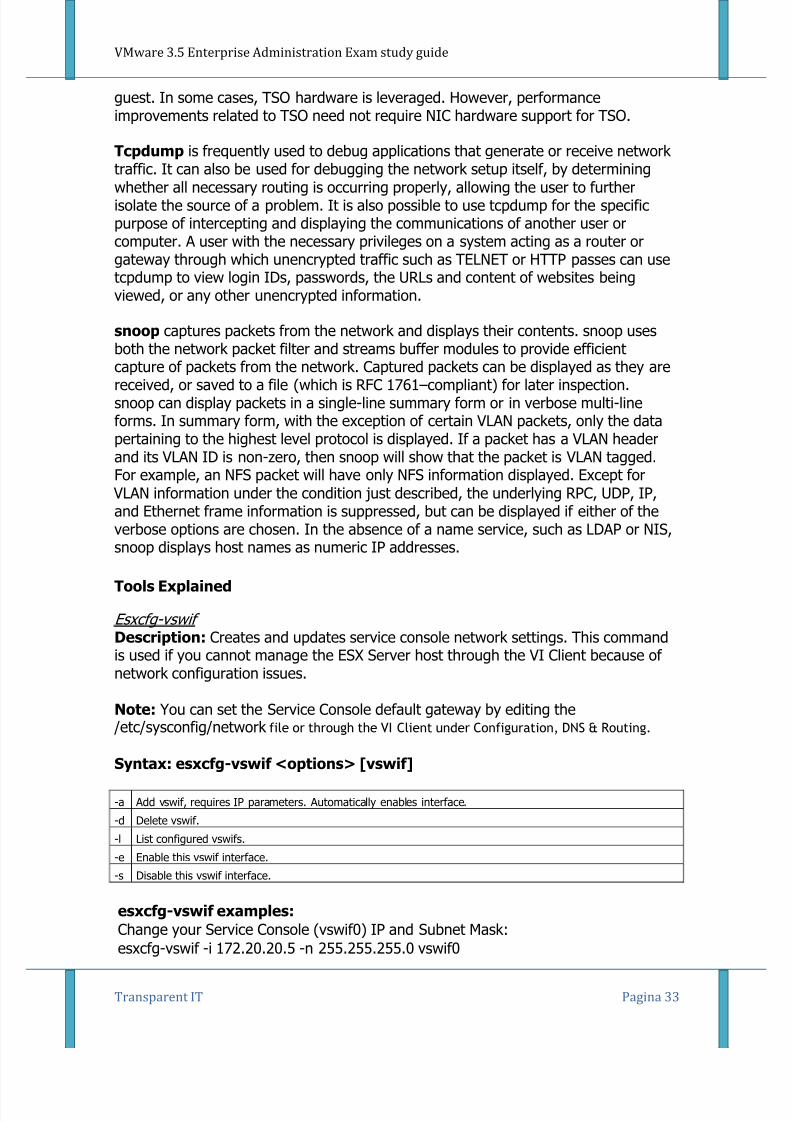
Esxcfg-vswif Description: Creates and updates service console network settings. This commandis used if you cannot manage the ESX Server host through the VI Client because of network configuration issues.
Note: You can set the Service Console default gateway by editing the /etc/sysconfig/network file or through the VI Client under Configuration, DNS & Routing.
Syntax: esxcfg-vswif <options> [vswif]
-a Add vswif, requires IP parameters. Automatically enables interface.
-d Delete vswif.
-l List configured vswifs.
-e Enable this vswif interface.
-s Disable this vswif interface.
esxcfg-vswif examples:
Change your Service Console (vswif0) IP and Subnet Mask:esxcfg-vswif -i 172.20.20.5 -n 255.255.255.0 vswif0
8/6/2019 VMware 3.5 Enterprise Administration Exam Study Guide V0.2
http://slidepdf.com/reader/full/vmware-35-enterprise-administration-exam-study-guide-v02 34/73
VMware 3.5 Enterprise Administration Exam study guide
Transparent IT Pagina 34
Add a Service Console (vswif0):esxcfg-vswif -a vswif0 -p "Service Console" -i 172.20.20.40 -n 255.255.255.0
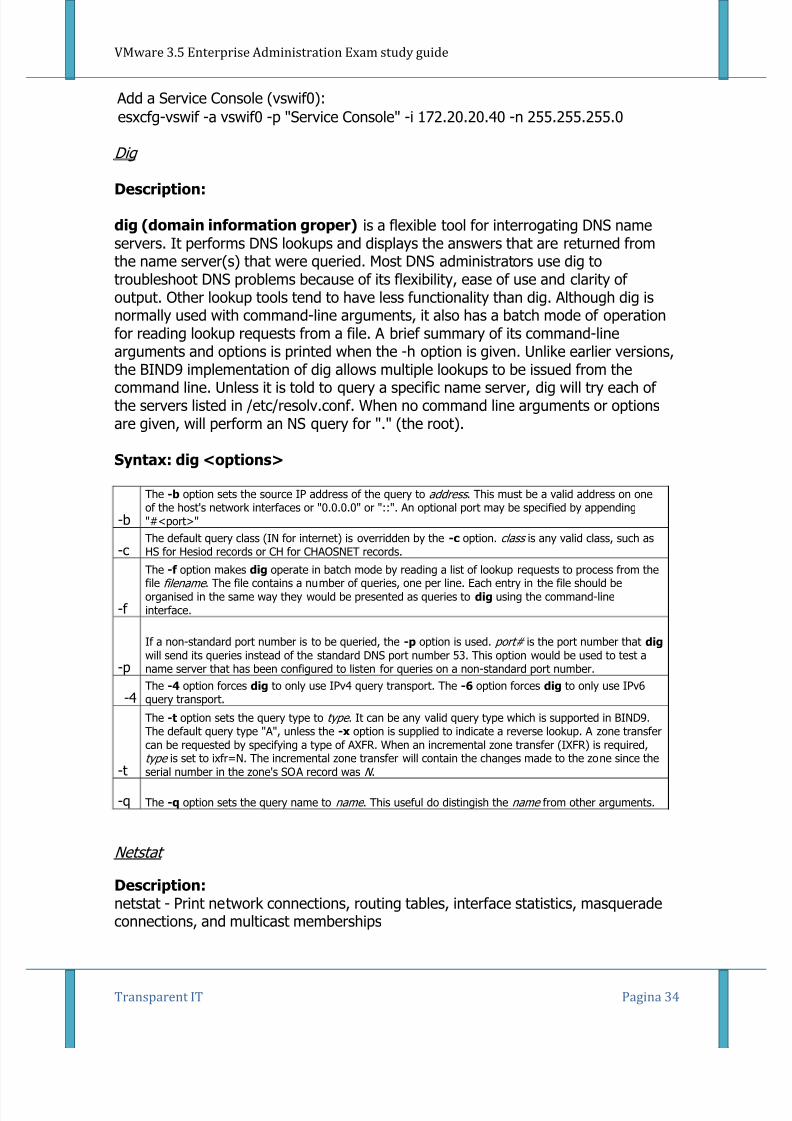
Dig
Description:
dig (domain information groper) is a flexible tool for interrogating DNS nameservers. It performs DNS lookups and displays the answers that are returned fromthe name server(s) that were queried. Most DNS administrators use dig totroubleshoot DNS problems because of its flexibility, ease of use and clarity of output. Other lookup tools tend to have less functionality than dig. Although dig isnormally used with command-line arguments, it also has a batch mode of operationfor reading lookup requests from a file. A brief summary of its command-linearguments and options is printed when the -h option is given. Unlike earlier versions,
the BIND9 implementation of dig allows multiple lookups to be issued from thecommand line. Unless it is told to query a specific name server, dig will try each of the servers listed in /etc/resolv.conf. When no command line arguments or optionsare given, will perform an NS query for "." (the root).
Syntax: dig <options>
-b
The -b option sets the source IP address of the query to address . This must be a valid address on oneof the host's network interfaces or "0.0.0.0" or "::". An optional port may be specified by appending"#<port>"
-c
The default query class (IN for internet) is overridden by the -c option. class is any valid class, such as
HS for Hesiod records or CH for CHAOSNET records.
-f
The -f option makes dig operate in batch mode by reading a list of lookup requests to process from thefile filename . The file contains a number of queries, one per line. Each entry in the file should beorganised in the same way they would be presented as queries to dig using the command-lineinterface.
-p
If a non-standard port number is to be queried, the -p option is used. port# is the port number that dig will send its queries instead of the standard DNS port number 53. This option would be used to test aname server that has been configured to listen for queries on a non-standard port number.
-4The -4 option forces dig to only use IPv4 query transport. The -6 option forces dig to only use IPv6query transport.
-t
The -t option sets the query type to type . It can be any valid query type which is supported in BIND9.The default query type "A", unless the -x option is supplied to indicate a reverse lookup. A zone transfercan be requested by specifying a type of AXFR. When an incremental zone transfer (IXFR) is required,type is set to ixfr=N. The incremental zone transfer will contain the changes made to the zone since theserial number in the zone's SOA record was N .
-q The -q option sets the query name to name . This useful do distingish the name from other arguments.
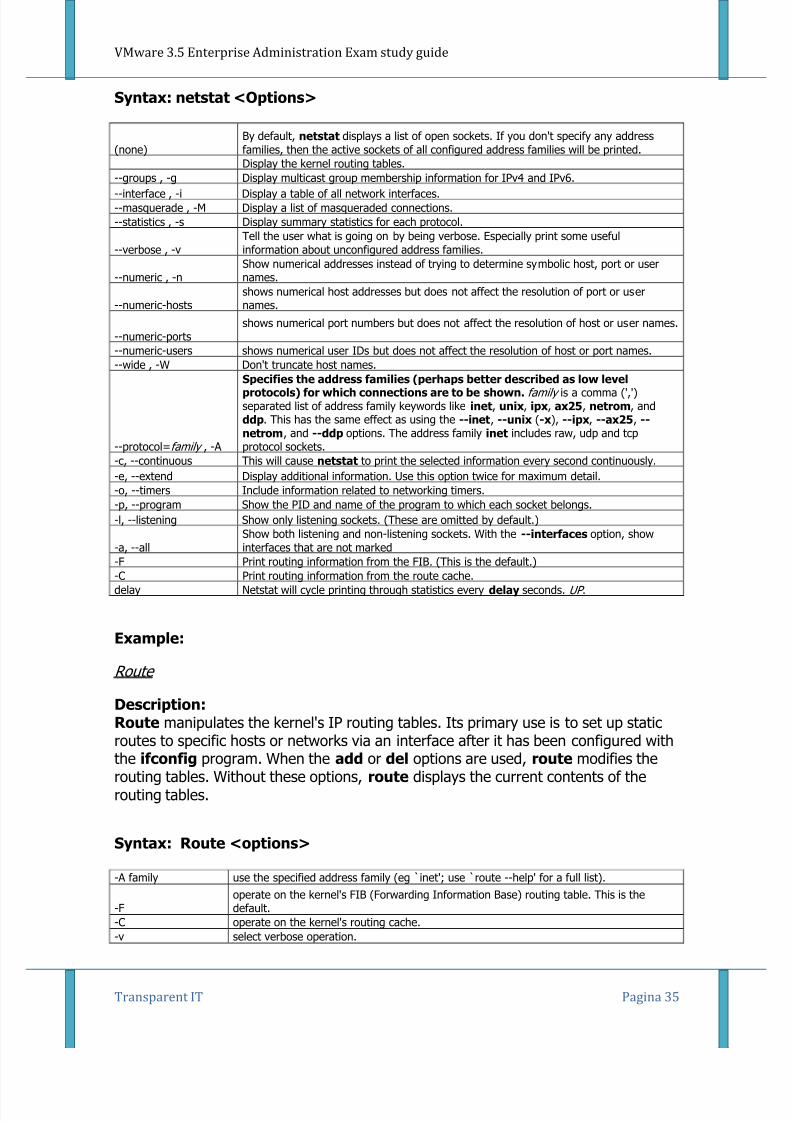
Netstat
Description: netstat - Print network connections, routing tables, interface statistics, masquerade
connections, and multicast memberships
8/6/2019 VMware 3.5 Enterprise Administration Exam Study Guide V0.2
http://slidepdf.com/reader/full/vmware-35-enterprise-administration-exam-study-guide-v02 35/73
VMware 3.5 Enterprise Administration Exam study guide
Transparent IT Pagina 35
Syntax: netstat <Options>
(none)By default, netstat displays a list of open sockets. If you don't specify any addressfamilies, then the active sockets of all configured address families will be printed.Display the kernel routing tables.
--groups , -g Display multicast group membership information for IPv4 and IPv6.
--interface , -i Display a table of all network interfaces.--masquerade , -M Display a list of masqueraded connections.--statistics , -s Display summary statistics for each protocol.
--verbose , -vTell the user what is going on by being verbose. Especially print some usefulinformation about unconfigured address families.
--numeric , -nShow numerical addresses instead of trying to determine symbolic host, port or usernames.
--numeric-hostsshows numerical host addresses but does not affect the resolution of port or usernames.
--numeric-portsshows numerical port numbers but does not affect the resolution of host or user names.
--numeric-users shows numerical user IDs but does not affect the resolution of host or port names.
--wide , -W Don't truncate host names.
--protocol=family , -A
Specifies the address families (perhaps better described as low levelprotocols) for which connections are to be shown. family is a comma (',')separated list of address family keywords like inet, unix, ipx, ax25, netrom, andddp. This has the same effect as using the --inet, --unix (-x), --ipx, --ax25, --netrom, and --ddp options. The address family inet includes raw, udp and tcpprotocol sockets.
-c, --continuous This will cause netstat to print the selected information every second continuously.
-e, --extend Display additional information. Use this option twice for maximum detail.-o, --timers Include information related to networking timers.-p, --program Show the PID and name of the program to which each socket belongs.
-l, --listening Show only listening sockets. (These are omitted by default.)
-a, --allShow both listening and non-listening sockets. With the --interfaces option, showinterfaces that are not marked
-F Print routing information from the FIB. (This is the default.)-C Print routing information from the route cache.delay Netstat will cycle printing through statistics every delay seconds. UP .
Example:
Route
Description: Route manipulates the kernel's IP routing tables. Its primary use is to set up static
routes to specific hosts or networks via an interface after it has been configured withthe ifconfig program. When the add or del options are used, route modifies therouting tables. Without these options, route displays the current contents of therouting tables.
Syntax: Route <options>
-A family use the specified address family (eg `inet'; use `route --help' for a full list).
-Foperate on the kernel's FIB (Forwarding Information Base) routing table. This is thedefault.
-C operate on the kernel's routing cache.-v select verbose operation.
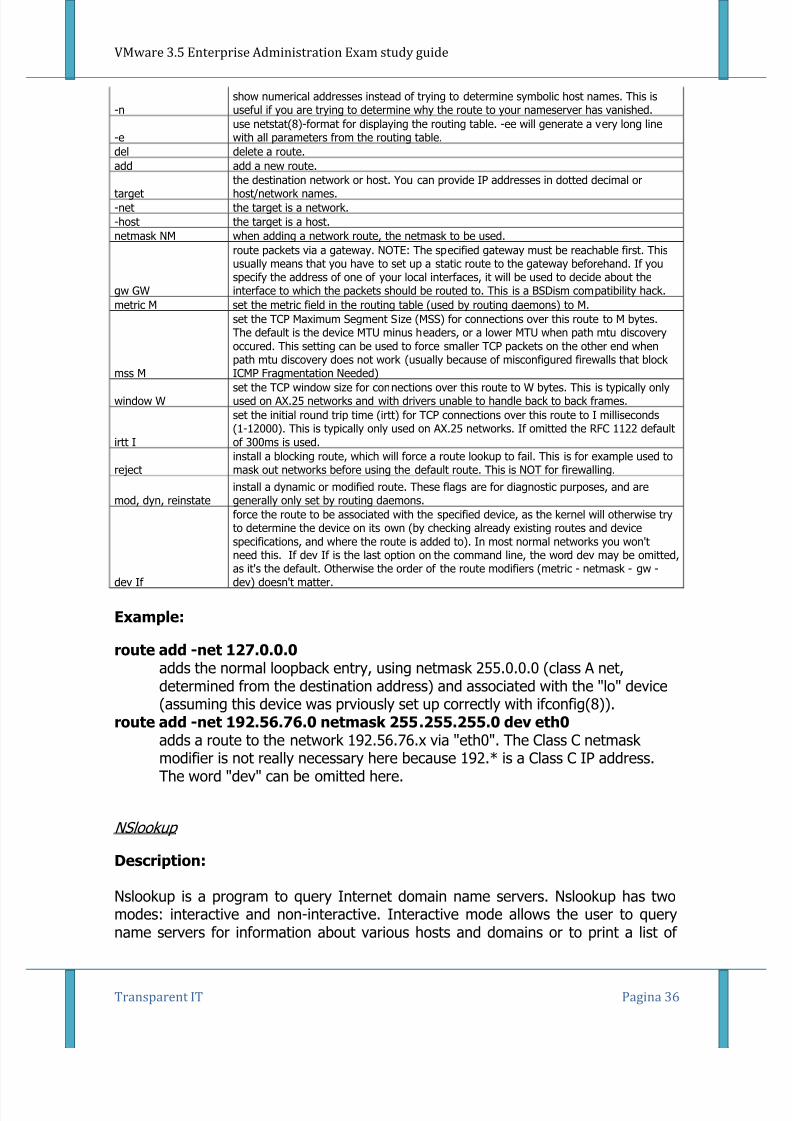
8/6/2019 VMware 3.5 Enterprise Administration Exam Study Guide V0.2
http://slidepdf.com/reader/full/vmware-35-enterprise-administration-exam-study-guide-v02 36/73
VMware 3.5 Enterprise Administration Exam study guide
Transparent IT Pagina 36
-nshow numerical addresses instead of trying to determine symbolic host names. This isuseful if you are trying to determine why the route to your nameserver has vanished.
-euse netstat(8)-format for displaying the routing table. -ee will generate a very long linewith all parameters from the routing table.
del delete a route.add add a new route.
target the destination network or host. You can provide IP addresses in dotted decimal orhost/network names.-net the target is a network.-host the target is a host.netmask NM when adding a network route, the netmask to be used.
gw GW
route packets via a gateway. NOTE: The specified gateway must be reachable first. Thisusually means that you have to set up a static route to the gateway beforehand. If youspecify the address of one of your local interfaces, it will be used to decide about theinterface to which the packets should be routed to. This is a BSDism compatibility hack.
metric M set the metric field in the routing table (used by routing daemons) to M.
mss M
set the TCP Maximum Segment Size (MSS) for connections over this route to M bytes.The default is the device MTU minus headers, or a lower MTU when path mtu discoveryoccured. This setting can be used to force smaller TCP packets on the other end whenpath mtu discovery does not work (usually because of misconfigured firewalls that block
ICMP Fragmentation Needed)
window Wset the TCP window size for connections over this route to W bytes. This is typically onlyused on AX.25 networks and with drivers unable to handle back to back frames.
irtt I
set the initial round trip time (irtt) for TCP connections over this route to I milliseconds(1-12000). This is typically only used on AX.25 networks. If omitted the RFC 1122 defaultof 300ms is used.
rejectinstall a blocking route, which will force a route lookup to fail. This is for example used tomask out networks before using the default route. This is NOT for firewalling.
mod, dyn, reinstateinstall a dynamic or modified route. These flags are for diagnostic purposes, and aregenerally only set by routing daemons.
dev If
force the route to be associated with the specified device, as the kernel will otherwise tryto determine the device on its own (by checking already existing routes and devicespecifications, and where the route is added to). In most normal networks you won't
need this. If dev If is the last option on the command line, the word dev may be omitted,as it's the default. Otherwise the order of the route modifiers (metric - netmask - gw -dev) doesn't matter.
Example:
route add -net 127.0.0.0adds the normal loopback entry, using netmask 255.0.0.0 (class A net,determined from the destination address) and associated with the "lo" device(assuming this device was prviously set up correctly with ifconfig(8)).
route add -net 192.56.76.0 netmask 255.255.255.0 dev eth0
adds a route to the network 192.56.76.x via "eth0". The Class C netmask modifier is not really necessary here because 192.* is a Class C IP address.The word "dev" can be omitted here.
NSlookup
Description:
Nslookup is a program to query Internet domain name servers. Nslookup has twomodes: interactive and non-interactive. Interactive mode allows the user to queryname servers for information about various hosts and domains or to print a list of

8/6/2019 VMware 3.5 Enterprise Administration Exam Study Guide V0.2
http://slidepdf.com/reader/full/vmware-35-enterprise-administration-exam-study-guide-v02 37/73
VMware 3.5 Enterprise Administration Exam study guide
Transparent IT Pagina 37
hosts in a domain. Non-interactive mode is used to print just the name andrequested information for a host or domain.
Syntax: nslookup [-option] [name | -] [server]
Hostname
Description:
Hostname is the program that is used to either set or display the current host,domain or node name of the system. These names are used by many of thenetworking programs to identify the machine. The domain name is also used byNIS/YP.
Syntax: hostname <option>
-a, --alias Display the alias name of the host (if used).
-d, --domain
Display the name of the DNS domain. Don't use the command domainname to get theDNS domain name because it will show the NIS domain name and not the DNS domainname. Use dnsdomainname instead.
-F, --file filename Read the host name from the specified file. Comments (lines starting with a `#') areignored.
-f, --fqdn, --long
Display the FQDN (Fully Qualified Domain Name). A FQDN consists of a short host nameand the DNS domain name. Unless you are using bind or NIS for host lookups you canchange the FQDN and the DNS domain name (which is part of the FQDN) in the /etc/hosts file.
-h, --help Print a usage message and exit.-i, --ip-address Display the IP address(es) of the host.
-n, --node Display the DECnet node name. If a parameter is given (or --file name ) the root canalso set a new node name.-s, --short Display the short host name. This is the host name cut at the first dot.-V, --version Print version information on standard output and exit successfully.-v, --verbose Be verbose and tell what's going on.
Esxcfg-vmknic
Description: Creates and updates VMkernel TCP/IP settings for VMotion, NAS, andiSCSI
Syntax: esxcfg-vmknic <options> [[portgroup]]
-a Add a VMkernel NIC to the system, requires IP parameters and portgroup name.-d Delete VMkernel NIC on given portgroup.-e Enable the given NIC if disabled.-D Disable the given NIC if enabled.-l List VMkernel NICs.-i<x.x.x.x>
The IP address for this VMkernel NIC. Setting an IP address requires that the -n option be given insame command.
-n
<x.x.x.x>
The IP netmask for this VMkernel NIC. Setting the IP netmask requires that the -i option be given in
the same command.-r Restore VMkernel TCP/IP interfaces from configuration file. (Internal use only)
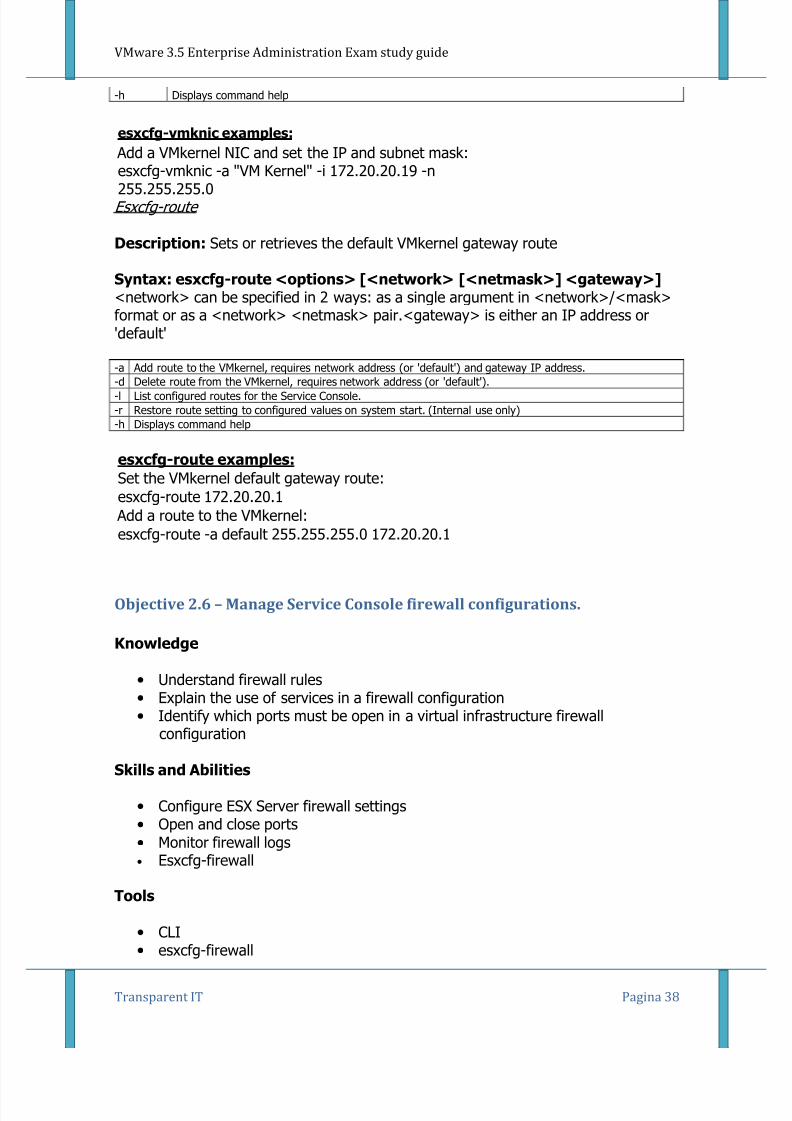
8/6/2019 VMware 3.5 Enterprise Administration Exam Study Guide V0.2
http://slidepdf.com/reader/full/vmware-35-enterprise-administration-exam-study-guide-v02 38/73
VMware 3.5 Enterprise Administration Exam study guide
Transparent IT Pagina 38
-h Displays command help
esxcfg-vmknic examples:
Add a VMkernel NIC and set the IP and subnet mask:esxcfg-vmknic -a "VM Kernel" -i 172.20.20.19 -n
255.255.255.0Esxcfg-route
Description: Sets or retrieves the default VMkernel gateway route
Syntax: esxcfg-route <options> [<network> [<netmask>] <gateway>]<network> can be specified in 2 ways: as a single argument in <network>/<mask>format or as a <network> <netmask> pair.<gateway> is either an IP address or'default'
-a Add route to the VMkernel, requires network address (or 'default') and gateway IP address.-d Delete route from the VMkernel, requires network address (or 'default').-l List configured routes for the Service Console.-r Restore route setting to configured values on system start. (Internal use only)-h Displays command help
esxcfg-route examples:
Set the VMkernel default gateway route:esxcfg-route 172.20.20.1
Add a route to the VMkernel:esxcfg-route -a default 255.255.255.0 172.20.20.1
Objective 2.6 – Manage Service Console firewall configurations.
Knowledge
• Understand firewall rules• Explain the use of services in a firewall configuration• Identify which ports must be open in a virtual infrastructure firewall
configuration
Skills and Abilities
• Configure ESX Server firewall settings• Open and close ports• Monitor firewall logs• Esxcfg-firewall
Tools
• CLI• esxcfg-firewall
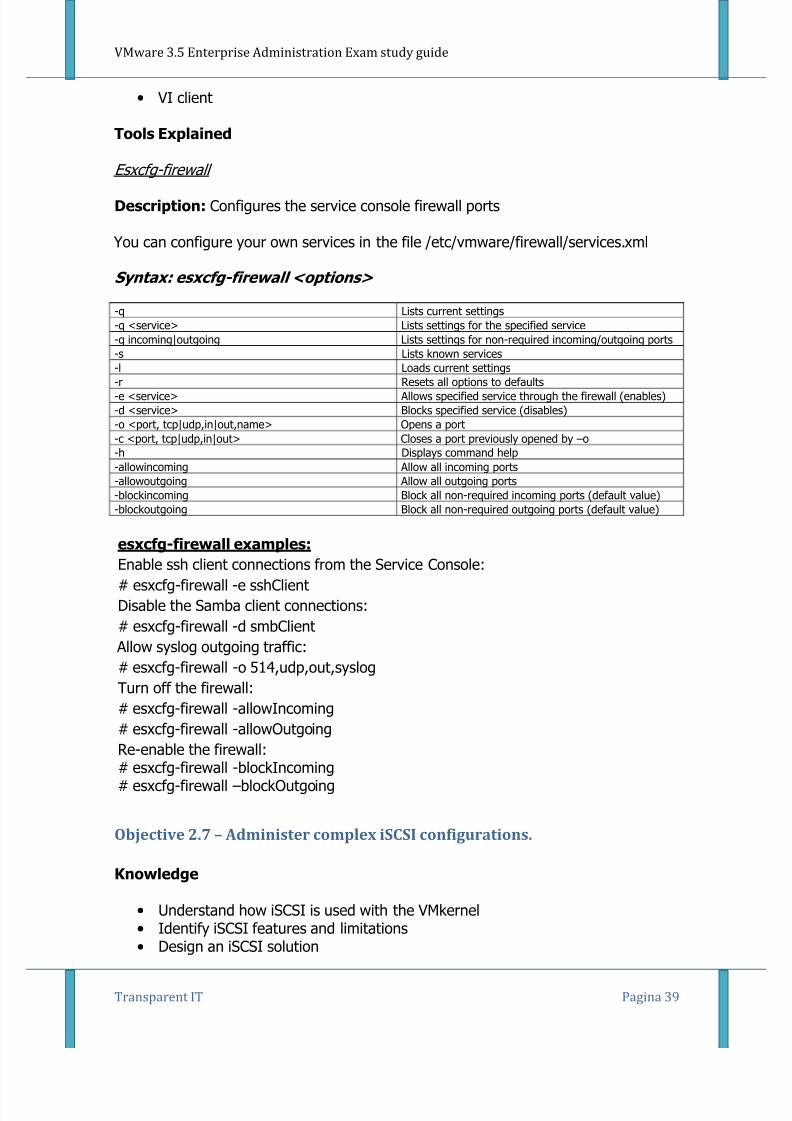
8/6/2019 VMware 3.5 Enterprise Administration Exam Study Guide V0.2
http://slidepdf.com/reader/full/vmware-35-enterprise-administration-exam-study-guide-v02 39/73
VMware 3.5 Enterprise Administration Exam study guide
Transparent IT Pagina 39
• VI client
Tools Explained
Esxcfg-firewall
Description: Configures the service console firewall ports
You can configure your own services in the file /etc/vmware/firewall/services.xml
Syntax: esxcfg-firewall <options>
-q Lists current settings-q <service> Lists settings for the specified service-q incoming|outgoing Lists settings for non-required incoming/outgoing ports-s Lists known services
-l Loads current settings-r Resets all options to defaults-e <service> Allows specified service through the firewall (enables)-d <service> Blocks specified service (disables)-o <port, tcp|udp,in|out,name> Opens a port-c <port, tcp|udp,in|out> Closes a port previously opened by –o-h Displays command help-allowincoming Allow all incoming ports-allowoutgoing Allow all outgoing ports-blockincoming Block all non-required incoming ports (default value)-blockoutgoing Block all non-required outgoing ports (default value)
esxcfg-firewall examples:
Enable ssh client connections from the Service Console:
# esxcfg-firewall -e sshClient
Disable the Samba client connections:
# esxcfg-firewall -d smbClient
Allow syslog outgoing traffic:
# esxcfg-firewall -o 514,udp,out,syslog
Turn off the firewall:
# esxcfg-firewall -allowIncoming
# esxcfg-firewall -allowOutgoing
Re-enable the firewall:# esxcfg-firewall -blockIncoming# esxcfg-firewall –blockOutgoing
Objective 2.7 – Administer complex iSCSI configurations.
Knowledge
• Understand how iSCSI is used with the VMkernel• Identify iSCSI features and limitations• Design an iSCSI solution
8/6/2019 VMware 3.5 Enterprise Administration Exam Study Guide V0.2
http://slidepdf.com/reader/full/vmware-35-enterprise-administration-exam-study-guide-v02 40/73
VMware 3.5 Enterprise Administration Exam study guide
Transparent IT Pagina 40
Skills and Abilities
• Configure the ESX Server iSCSI software initiator• Open the related firewall ports for iSCSI• Manage iSCSI initiator settings• Discovery• CHAP authentication
Tools
• CLI• esxcfg-swiscsi• vmkiscsi-tool• esxcfg-rescan
• esxcfg-firewall• VI client
Knowledge
Challenge-Handshake Authentication Protocol (CHAP) authenticates a user ornetwork host to an authenticating entity. That entity may be, for example, anInternet access provider.
RFC 1994: PPP Challenge Handshake Authentication Protocol (CHAP) defines theprotocol.
CHAP is an authentication scheme used by Point to Point Protocol (PPP) servers tovalidate the identity of remote clients. CHAP periodically verifies the identity of theclient by using a three-way handshake. This happens at the time of establishing theinitial link, and may happen again at any time afterwards. The verification is basedon a shared secret (such as the client user's password).
1. After the completion of the link establishment phase, the authenticator sendsa "challenge" message to the peer.
2. The peer responds with a value calculated using a one-way hash function,
such as an MD5 checksum hash.3. The authenticator checks the response against its own calculation of the
expected hash value. If the values match, the authenticator acknowledges theauthentication; otherwise it should terminate the connection.
4. At random intervals the authenticator sends a new challenge to the peer andrepeats steps 1 through 3.
CHAP provides protection against playback attack by the peer through the use of anincrementally changing identifier and of a variable challenge-value. CHAP requiresthat both the client and server know the plaintext of the secret, although it is never
sent over the network.

8/6/2019 VMware 3.5 Enterprise Administration Exam Study Guide V0.2
http://slidepdf.com/reader/full/vmware-35-enterprise-administration-exam-study-guide-v02 41/73
VMware 3.5 Enterprise Administration Exam study guide
Transparent IT Pagina 41
iSCSI Explained
Internet Small Computer Systems Interface (iSCSI — RFC 3720) is a relatively newSAN technology. Simply put, iSCSI is a means of transport for the SCSI protocol,encapsulating SCSI commands within TCP packets. The commands are encapsulated
at the block I/O level, rather than the file I/O level, making the storage appear localto the host operating system. Since all the commands are at the block level, all SCSIrules still apply. For instance, a SCSI storage device cannot be shared without a filesystem that allows SCSI command sharing. Now that flexible and inexpensivestorage can be connected over a standard Ethernet infrastructure, IT Administratorshave a world of new possibilities for deploying storage solutions.
Initiators An iSCSI initiator provides a means for an iSCSI client (the ESX Server host) toaccess storage on the iSCSI target (the storage device). There are two
implementations of iSCSI initiators: hardware and software.
The software initiator is a driver that interacts with the ESX Server host’s TCP/IPstack to contact the iSCSI target via an existing Ethernet adapter. This adds asignificant amount of workload to the host’s CPUs because the iSCSI protocol needsto be unpackaged and read by the host CPUs, resulting in a performance decreaseunder any type of significant I/O load. Implementations of a software initiator shouldbe restricted to areas where performance is not a requirement, such as fordevelopment. No additional software is needed to configure a software initiator on
VMware ESX Server.
A hardware initiator is an adapter card — commonly referred to as a Host Bus Adapter, or HBA — that implements connectivity from the iSCSI client to the iSCSItarget but does so more efficiently. Rather than utilizing the host’s CPU cycles toprocess the iSCSI protocol, this approach offloads the traffic to the HBA, which doesthe necessary processing. Hardware-initiated iSCSI is supported experimentally withESX Server 3.0
Tools Explained
Esxcfg-swiscsi
Description:
esxcfg-swiscsi provides an interface to configure Software iSCSI. if no arguments aregiven, esxcfg-swiscsi displays the help message.
8/6/2019 VMware 3.5 Enterprise Administration Exam Study Guide V0.2
http://slidepdf.com/reader/full/vmware-35-enterprise-administration-exam-study-guide-v02 42/73
VMware 3.5 Enterprise Administration Exam study guide
Transparent IT Pagina 42
Syntax: esxcfg-swiscsi OPTIONS
-e -enable Enable Software iSCSI on the system, if disabled.-d -disable Disable Software iSCSI on the system, if enabled.-q -query Check if Software iSCSI is enabled or disabled on the system.-s -scan Scan the system for disk(s) available through Software iSCSI interface.
-k -kill Try to forcibly remove iSCSI Software stack.
-r-restoreRestore Software iSCSI settings from persistent storage. This should be used only on systemstartup and should not be used by users.
-h -help Print a help message for this command.
vmkiscsi-tool
Description:
Tool to configure software iscsi targets
Syntax: vmkiscsi-tool <options>
-R –discoveryStatus : Print discovery status.-D –discovery-S –static: Static Discovery Targets-A –Authentication
-T –Target-L –Lun-P –Phba-N –Network: network properties-p –Pnp: Physical Network Portal properties
-t –ipv4AddrType-i –ipv4Address-d –dnsserver-g –gateway-s –subnetmask -I –iSCSIname-k –Alias-e –ethernet: Link Status-c –ipconfig: enable/disable DHCP, ARP redirect-X –ResetSubcommands
-l –list-r –remove-a –add-m –authMethod : specify method for add/remove
-f –flag: set a discovery or authentication flagadapterNameCombine -l with an option to display the current information.
Example:
So if you combine this command, vmkiscsi-tool and esxcfg-rescan, you can automateiscsi setup in scripted installs (useful when combined with UDA).
#Set-up iSCSI Software Emulator and Force a Rescan of vmhba40#Enable software ISCSIesxcfg-swiscsi –e

8/6/2019 VMware 3.5 Enterprise Administration Exam Study Guide V0.2
http://slidepdf.com/reader/full/vmware-35-enterprise-administration-exam-study-guide-v02 43/73
VMware 3.5 Enterprise Administration Exam study guide
Transparent IT Pagina 43
#Add iscsi adres on assigned vmhbavmkiscsi-tool -D -a 192.168.100.139 vmhba40#Scan for ISCSI disksesxcfg-swiscsi –s#Rescan vmhba for new vmfs partition
esxcfg-rescan vmhba40
Esxcfg-rescan
Description:
Rescan for new adapters and vmfs partitions
Syntax: esxcfg-rescan <vmkernel scsi adapter name>
Esxcfg-firewall
Description: Configures the service console firewall ports
You can configure your own services in the file /etc/vmware/firewall/services.xml
Syntax: esxcfg-firewall <options>
-q Lists current settings-q <service> Lists settings for the specified service
-q incoming|outgoing Lists settings for non-required incoming/outgoing ports-s Lists known services-l Loads current settings-r Resets all options to defaults-e <service> Allows specified service through the firewall (enables)-d <service> Blocks specified service (disables)-o <port, tcp|udp,in|out,name> Opens a port-c <port, tcp|udp,in|out> Closes a port previously opened by –o-h Displays command help
-allowincoming Allow all incoming ports-allowoutgoing Allow all outgoing ports-blockincoming Block all non-required incoming ports (default value)-blockoutgoing Block all non-required outgoing ports (default value)
esxcfg-firewall examples:
Enable ssh client connections from the Service Console:
# esxcfg-firewall -e sshClient
Disable the Samba client connections:
# esxcfg-firewall -d smbClient
Allow syslog outgoing traffic:
# esxcfg-firewall -o 514,udp,out,syslog
Turn off the firewall:
# esxcfg-firewall -allowIncoming# esxcfg-firewall -allowOutgoing
8/6/2019 VMware 3.5 Enterprise Administration Exam Study Guide V0.2
http://slidepdf.com/reader/full/vmware-35-enterprise-administration-exam-study-guide-v02 44/73
VMware 3.5 Enterprise Administration Exam study guide
Transparent IT Pagina 44
Re-enable the firewall:
# esxcfg-firewall -blockIncoming# esxcfg-firewall –blockOutgoing
Section 3 – DRS Clusters and Performance Monitoring
Objective 3.1 – Create and administer complex DRS clusters.
Knowledge
• Demonstrate the use or resource pools and child pools with DRS clusters• Understand how to monitor DRS cluster performance and resource utilization
• within the cluster• Explain best practices for DRS cluster design• Understand performance considerations for DRS clusters
Skills and Abilities
• Deploy complex resource pools• Utilize best practice guidelines• Configure expandable reservations where applicable• Deploy a complex DRS cluster• Ensure optimal use of Maintenance Mode• Configure appropriate threshold settings• Implement Distributed Power Management within a DRS cluster• Monitor DRS clusters• Cluster performance• Resource utilization• Troubleshooting
Tools
•
VI client
Objective 3.2 – Demonstrate advanced performance analysis techniques.
Knowledge
• Demonstrate the use of various performance tools• Understand configuration options for performance data collection• line graphs vs. stacked graphs• real-time vs. historical metrics• statistics collection levels• Use performance information to troubleshoot and resolve:
8/6/2019 VMware 3.5 Enterprise Administration Exam Study Guide V0.2
http://slidepdf.com/reader/full/vmware-35-enterprise-administration-exam-study-guide-v02 45/73
VMware 3.5 Enterprise Administration Exam study guide
Transparent IT Pagina 45
• CPU Utilization issues• Memory utilization issues• Disk utilization issues• Network utilization issues
Skills and Abilities
• Use esxtop to monitor the health of the ESX Server• Use vm-support to capture performance snapshots of the ESX Server• Use guest OS performance analysis tools to determine performance
characteristics• within the virtual machine• Generate reports and collate data from VirtualCenter• Alarms• Resource utilization•
Performance• Topology Maps• Diagnose resource utilization issues• CPU ready time/wait time• Memory ballooned/swapped• Disk queue depth/locking• Network dropped packets/
Tools
• CLI• esxtop• vm-support• VI Client• Performance graphs• VirtualCenter management server configuration
Tools Explained
Description:
esxtop provides a fine-grain look at resource utilization in real time. For moreinformation, please refer to the official documentation, available at<http://www.vmware.com/info?id=193>.
Syntax: esxtop [-] [h] [v] [b] [s] [R vm-support_dir_path] [d delay] [niter]
See MAN Pages at bottom of this document
Vm-support script
Description:
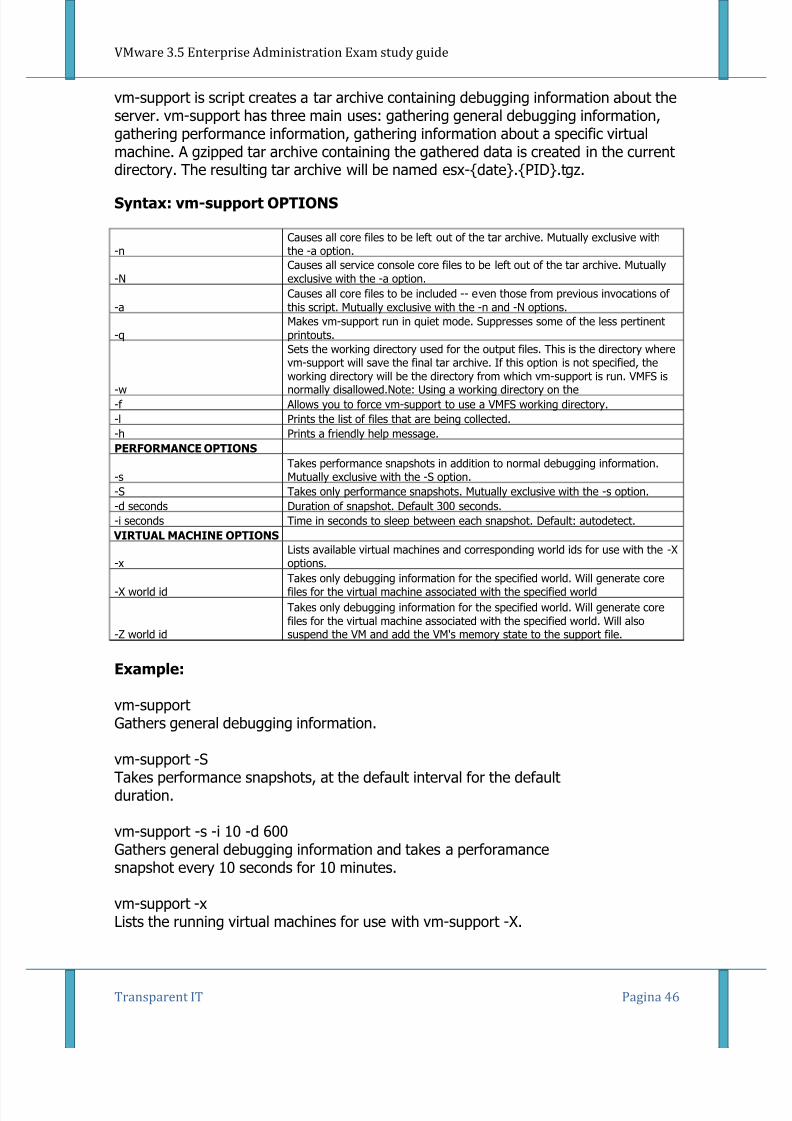
8/6/2019 VMware 3.5 Enterprise Administration Exam Study Guide V0.2
http://slidepdf.com/reader/full/vmware-35-enterprise-administration-exam-study-guide-v02 46/73
VMware 3.5 Enterprise Administration Exam study guide
Transparent IT Pagina 46
vm-support is script creates a tar archive containing debugging information about theserver. vm-support has three main uses: gathering general debugging information,gathering performance information, gathering information about a specific virtualmachine. A gzipped tar archive containing the gathered data is created in the currentdirectory. The resulting tar archive will be named esx-{date}.{PID}.tgz.
Syntax: vm-support OPTIONS
-nCauses all core files to be left out of the tar archive. Mutually exclusive withthe -a option.
-NCauses all service console core files to be left out of the tar archive. Mutuallyexclusive with the -a option.
-aCauses all core files to be included -- even those from previous invocations of this script. Mutually exclusive with the -n and -N options.
-qMakes vm-support run in quiet mode. Suppresses some of the less pertinentprintouts.
-w
Sets the working directory used for the output files. This is the directory wherevm-support will save the final tar archive. If this option is not specified, theworking directory will be the directory from which vm-support is run. VMFS isnormally disallowed.Note: Using a working directory on the
-f Allows you to force vm-support to use a VMFS working directory.
-l Prints the list of files that are being collected.
-h Prints a friendly help message.
PERFORMANCE OPTIONS
-sTakes performance snapshots in addition to normal debugging information.Mutually exclusive with the -S option.
-S Takes only performance snapshots. Mutually exclusive with the -s option.
-d seconds Duration of snapshot. Default 300 seconds.
-i seconds Time in seconds to sleep between each snapshot. Default: autodetect.
VIRTUAL MACHINE OPTIONS
-x Lists available virtual machines and corresponding world ids for use with the -Xoptions.
-X world idTakes only debugging information for the specified world. Will generate corefiles for the virtual machine associated with the specified world
-Z world id
Takes only debugging information for the specified world. Will generate corefiles for the virtual machine associated with the specified world. Will alsosuspend the VM and add the VM's memory state to the support file.
Example:
vm-supportGathers general debugging information.
vm-support -STakes performance snapshots, at the default interval for the defaultduration.
vm-support -s -i 10 -d 600Gathers general debugging information and takes a perforamancesnapshot every 10 seconds for 10 minutes.
vm-support -x
Lists the running virtual machines for use with vm-support -X.
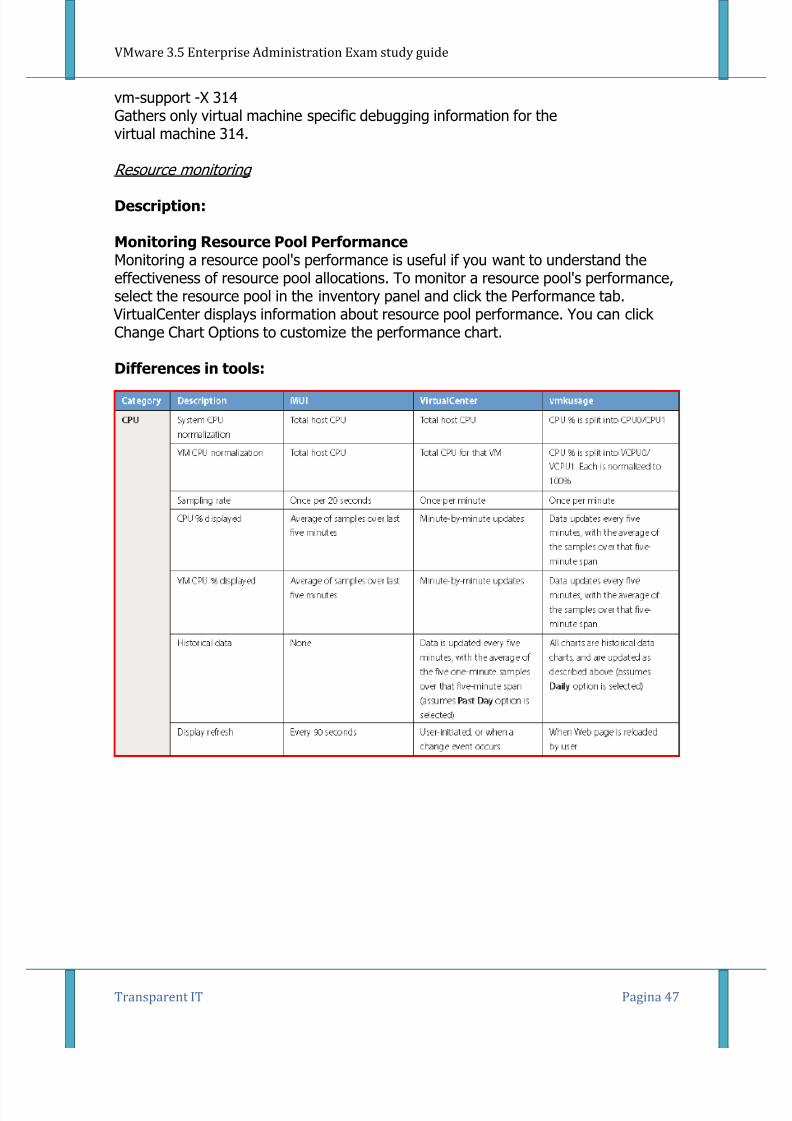
8/6/2019 VMware 3.5 Enterprise Administration Exam Study Guide V0.2
http://slidepdf.com/reader/full/vmware-35-enterprise-administration-exam-study-guide-v02 47/73
VMware 3.5 Enterprise Administration Exam study guide
Transparent IT Pagina 47
vm-support -X 314Gathers only virtual machine specific debugging information for thevirtual machine 314.
Resource monitoring
Description:
Monitoring Resource Pool PerformanceMonitoring a resource pool's performance is useful if you want to understand theeffectiveness of resource pool allocations. To monitor a resource pool's performance,select the resource pool in the inventory panel and click the Performance tab.
VirtualCenter displays information about resource pool performance. You can click Change Chart Options to customize the performance chart.
Differences in tools:

8/6/2019 VMware 3.5 Enterprise Administration Exam Study Guide V0.2
http://slidepdf.com/reader/full/vmware-35-enterprise-administration-exam-study-guide-v02 48/73
VMware 3.5 Enterprise Administration Exam study guide
Transparent IT Pagina 48
8/6/2019 VMware 3.5 Enterprise Administration Exam Study Guide V0.2
http://slidepdf.com/reader/full/vmware-35-enterprise-administration-exam-study-guide-v02 49/73
VMware 3.5 Enterprise Administration Exam study guide
Transparent IT Pagina 49
Section 4 – Business Continuity and Data Protection
Objective 4.1 – Configure Virtual Machine Clustering.
Knowledge
• Explain the different methods of clustering virtual machines• Cluster in a box• Cluster across boxes• Physical to Virtual clustering (N+1 clusters)• Describe how shared storage is configured with clustering• Understand HBA configuration options
Skills and Abilities
• Configure bus sharing options• Physical• Virtual• Configure Raw Device Mappings (RDMs)• Pass-through• Non pass-through•
Configure HBA options• Queue depth• Device/LUN Reset• Timeout value
Tools
• CLI• esxcfg-advcfg• esxcfg-module• VI client
Tools Explained
esxcfg-advcfg
Description:
The esxcfg-advcfg command is interesting as there is not a huge amount of helpabout this command. However, we can figure out that it is meant to do advancedconfiguration and we can figure out some settings that can be made. The -g switch
is used to "get" settings; the -s switch is used to "set" settings.
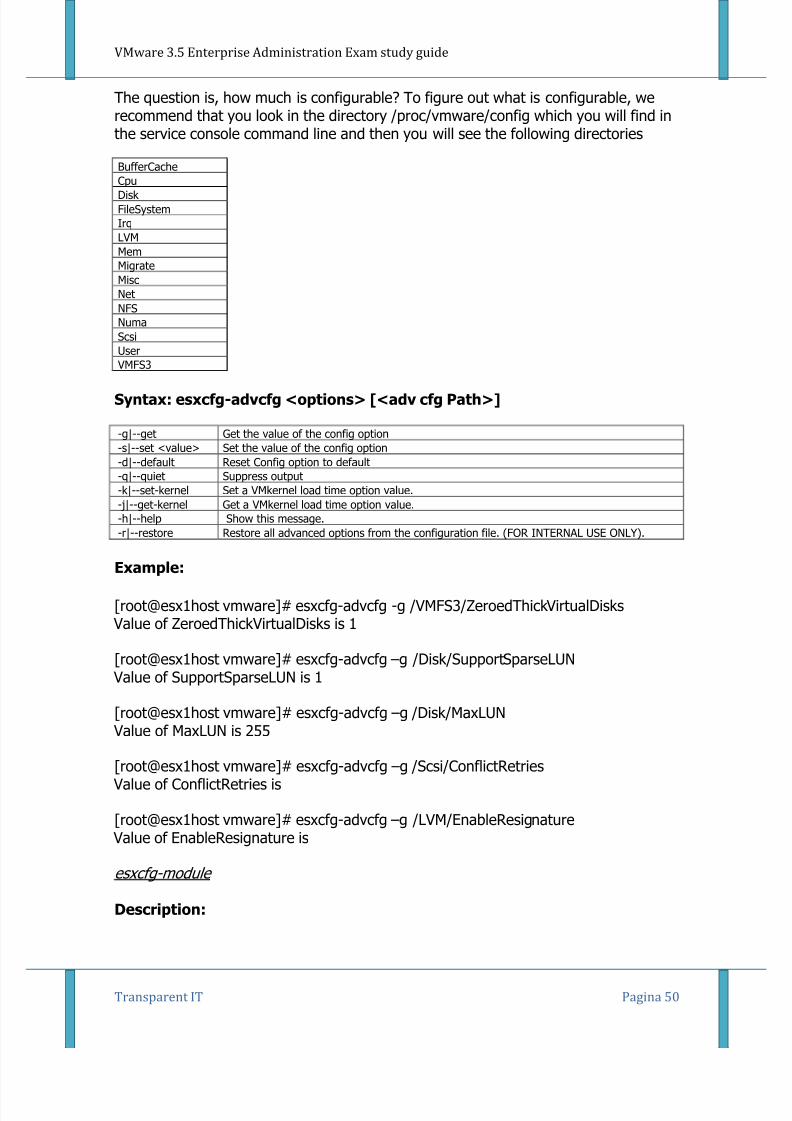
8/6/2019 VMware 3.5 Enterprise Administration Exam Study Guide V0.2
http://slidepdf.com/reader/full/vmware-35-enterprise-administration-exam-study-guide-v02 50/73
VMware 3.5 Enterprise Administration Exam study guide
Transparent IT Pagina 50
The question is, how much is configurable? To figure out what is configurable, werecommend that you look in the directory /proc/vmware/config which you will find inthe service console command line and then you will see the following directories
BufferCache
CpuDisk FileSystemIrqLVMMemMigrateMiscNetNFSNumaScsiUser
VMFS3
Syntax: esxcfg-advcfg <options> [<adv cfg Path>]
-g|--get Get the value of the config option-s|--set <value> Set the value of the config option-d|--default Reset Config option to default-q|--quiet Suppress output-k|--set-kernel Set a VMkernel load time option value.-j|--get-kernel Get a VMkernel load time option value.-h|--help Show this message.-r|--restore Restore all advanced options from the configuration file. (FOR INTERNAL USE ONLY).
Example:
[root@esx1host vmware]# esxcfg-advcfg -g /VMFS3/ZeroedThickVirtualDisks Value of ZeroedThickVirtualDisks is 1
[root@esx1host vmware]# esxcfg-advcfg –g /Disk/SupportSparseLUN Value of SupportSparseLUN is 1
[root@esx1host vmware]# esxcfg-advcfg –g /Disk/MaxLUN Value of MaxLUN is 255
[root@esx1host vmware]# esxcfg-advcfg –g /Scsi/ConflictRetries Value of ConflictRetries is
[root@esx1host vmware]# esxcfg-advcfg –g /LVM/EnableResignature Value of EnableResignature is
esxcfg-module
Description:
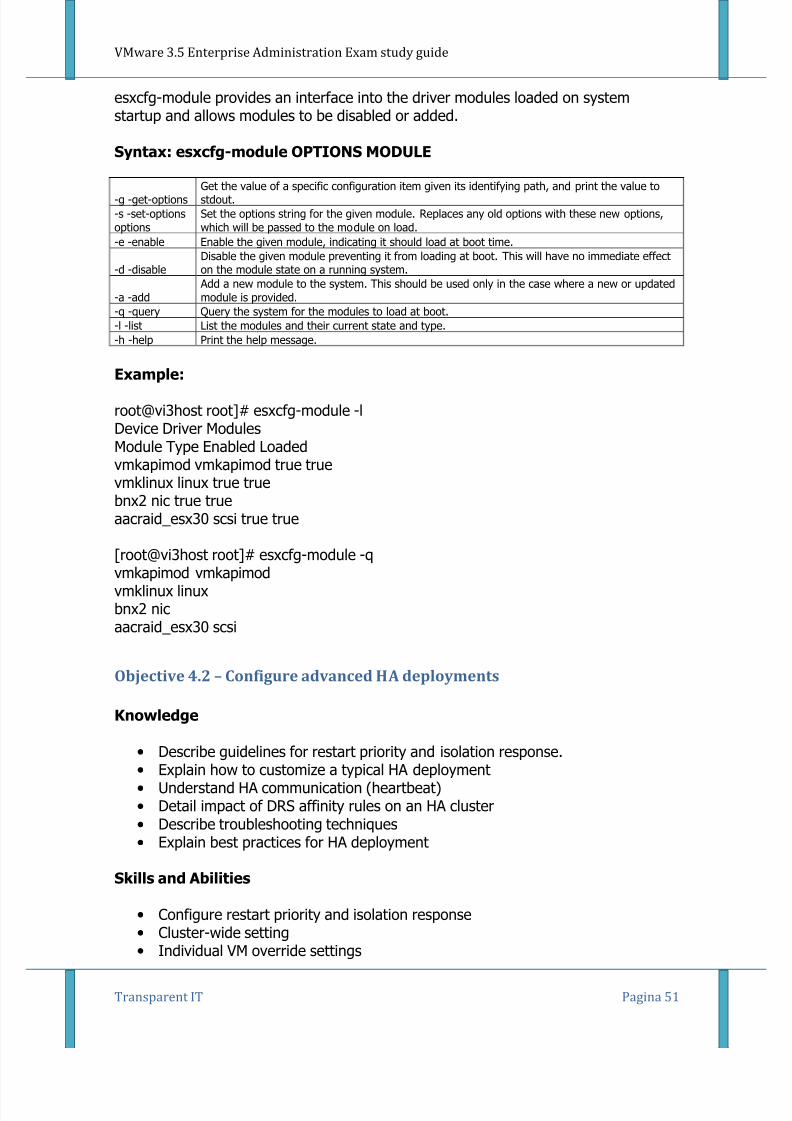
8/6/2019 VMware 3.5 Enterprise Administration Exam Study Guide V0.2
http://slidepdf.com/reader/full/vmware-35-enterprise-administration-exam-study-guide-v02 51/73
VMware 3.5 Enterprise Administration Exam study guide
Transparent IT Pagina 51
esxcfg-module provides an interface into the driver modules loaded on systemstartup and allows modules to be disabled or added.
Syntax: esxcfg-module OPTIONS MODULE
-g -get-optionsGet the value of a specific configuration item given its identifying path, and print the value tostdout.
-s -set-optionsoptions
Set the options string for the given module. Replaces any old options with these new options,which will be passed to the module on load.
-e -enable Enable the given module, indicating it should load at boot time.
-d -disableDisable the given module preventing it from loading at boot. This will have no immediate effecton the module state on a running system.
-a -add Add a new module to the system. This should be used only in the case where a new or updatedmodule is provided.
-q -query Query the system for the modules to load at boot.-l -list List the modules and their current state and type.-h -help Print the help message.
Example:
root@vi3host root]# esxcfg-module -lDevice Driver ModulesModule Type Enabled Loadedvmkapimod vmkapimod true truevmklinux linux true truebnx2 nic true trueaacraid_esx30 scsi true true
[root@vi3host root]# esxcfg-module -qvmkapimod vmkapimodvmklinux linuxbnx2 nicaacraid_esx30 scsi
Objective 4.2 – Configure advanced HA deployments
Knowledge
• Describe guidelines for restart priority and isolation response.• Explain how to customize a typical HA deployment• Understand HA communication (heartbeat)• Detail impact of DRS affinity rules on an HA cluster• Describe troubleshooting techniques• Explain best practices for HA deployment
Skills and Abilities
• Configure restart priority and isolation response• Cluster-wide setting• Individual VM override settings
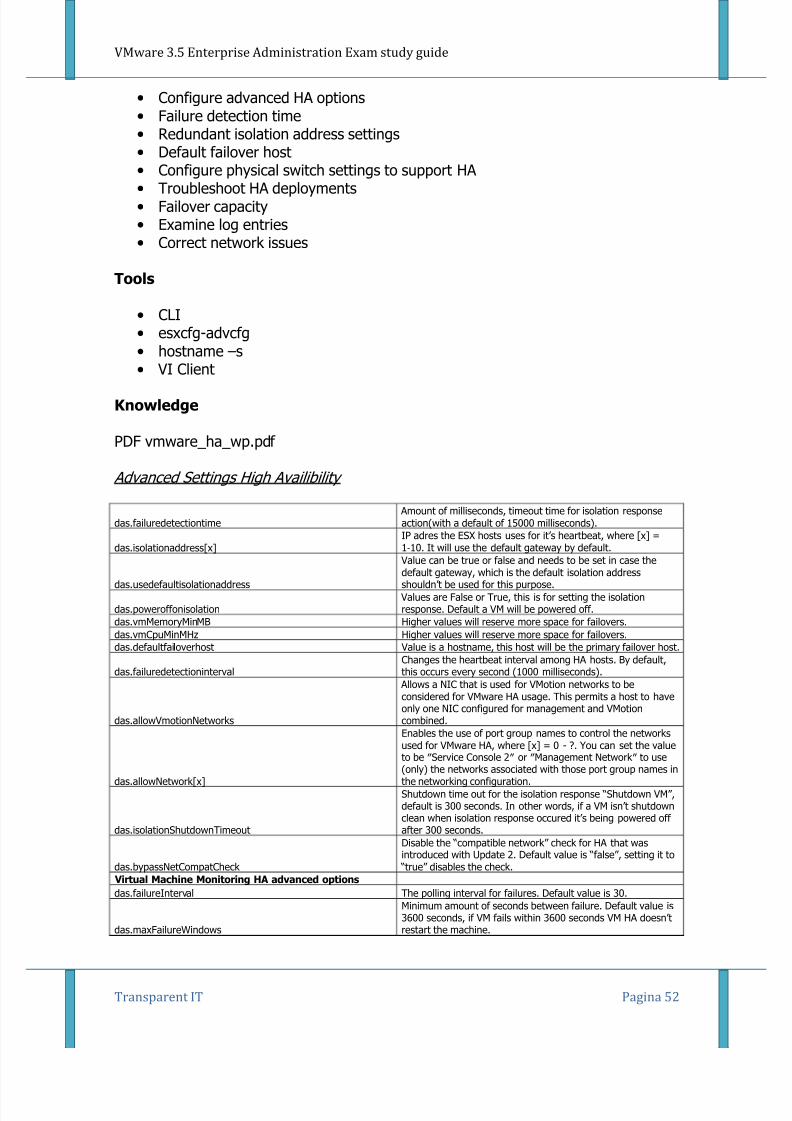
8/6/2019 VMware 3.5 Enterprise Administration Exam Study Guide V0.2
http://slidepdf.com/reader/full/vmware-35-enterprise-administration-exam-study-guide-v02 52/73
VMware 3.5 Enterprise Administration Exam study guide
Transparent IT Pagina 52
• Configure advanced HA options• Failure detection time• Redundant isolation address settings• Default failover host• Configure physical switch settings to support HA • Troubleshoot HA deployments• Failover capacity• Examine log entries• Correct network issues
Tools
• CLI• esxcfg-advcfg• hostname –s
• VI Client
Knowledge
PDF vmware_ha_wp.pdf
Advanced Settings High Availibility
das.failuredetectiontime Amount of milliseconds, timeout time for isolation responseaction(with a default of 15000 milliseconds).
das.isolationaddress[x]IP adres the ESX hosts uses for it’s heartbeat, where [x] =1‐10. It will use the default gateway by default.
das.usedefaultisolationaddress
Value can be true or false and needs to be set in case thedefault gateway, which is the default isolation addressshouldn’t be used for this purpose.
das.poweroffonisolation Values are False or True, this is for setting the isolationresponse. Default a VM will be powered off.
das.vmMemoryMinMB Higher values will reserve more space for failovers.das.vmCpuMinMHz Higher values will reserve more space for failovers.das.defaultfailoverhost Value is a hostname, this host will be the primary failover host.
das.failuredetectionintervalChanges the heartbeat interval among HA hosts. By default,this occurs every second (1000 milliseconds).
das.allowVmotionNetworks
Allows a NIC that is used for VMotion networks to beconsidered for VMware HA usage. This permits a host to haveonly one NIC configured for management and VMotioncombined.
das.allowNetwork[x]
Enables the use of port group names to control the networksused for VMware HA, where [x] = 0 - ?. You can set the valueto be ʺService Console 2ʺ or ʺManagement Networkʺ to use(only) the networks associated with those port group names inthe networking configuration.
das.isolationShutdownTimeout
Shutdown time out for the isolation response “Shutdown VM”,default is 300 seconds. In other words, if a VM isn’t shutdownclean when isolation response occured it’s being powered off after 300 seconds.
das.bypassNetCompatCheck
Disable the “compatible network” check for HA that wasintroduced with Update 2. Default value is “false”, setting it to “true” disables the check.
Virtual Machine Monitoring HA advanced options
das.failureInterval The polling interval for failures. Default value is 30.
das.maxFailureWindows
Minimum amount of seconds between failure. Default value is3600 seconds, if VM fails within 3600 seconds VM HA doesn’trestart the machine.

8/6/2019 VMware 3.5 Enterprise Administration Exam Study Guide V0.2
http://slidepdf.com/reader/full/vmware-35-enterprise-administration-exam-study-guide-v02 53/73
VMware 3.5 Enterprise Administration Exam study guide
Transparent IT Pagina 53
das.maxFailures
Maximum amount of VM failures, if the amount is reached VMHA doesn’t restart the machine automatically. Default value is3.
das.minUptimeThe minimum uptime in seconds before VM HA starts polling.The default value is 120 seconds.
Tools Explained
esxcfg-advcfg
Description:
The esxcfg-advcfg command is interesting as there is not a huge amount of helpabout this command. However, we can figure out that it is meant to do advancedconfiguration and we can figure out some settings that can be made. The -g switchis used to "get" settings; the -s switch is used to "set" settings.
The question is, how much is configurable? To figure out what is configurable, werecommend that you look in the directory /proc/vmware/config which you will find inthe service console command line and then you will see the following directories
BufferCacheCpu
Disk FileSystemIrqLVMMemMigrate
MiscNetNFSNumaScsiUser VMFS3
Syntax: esxcfg-advcfg <options> [<adv cfg Path>]
-g|--get Get the value of the config option-s|--set <value> Set the value of the config option
-d|--default Reset Config option to default-q|--quiet Suppress output-k|--set-kernel Set a VMkernel load time option value.-j|--get-kernel Get a VMkernel load time option value.-h|--help Show this message.-r|--restore Restore all advanced options from the configuration file. (FOR INTERNAL USE ONLY).
Example:
[root@esx1host vmware]# esxcfg-advcfg -g /VMFS3/ZeroedThickVirtualDisks Value of ZeroedThickVirtualDisks is 1
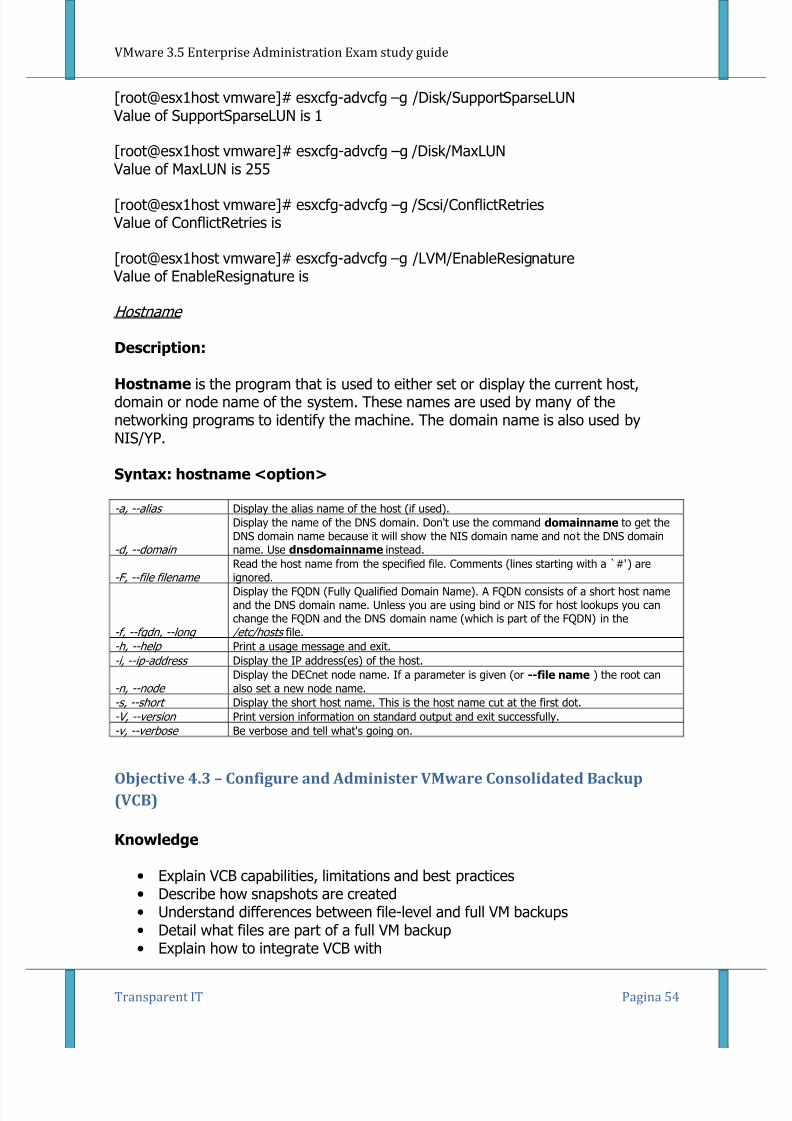
8/6/2019 VMware 3.5 Enterprise Administration Exam Study Guide V0.2
http://slidepdf.com/reader/full/vmware-35-enterprise-administration-exam-study-guide-v02 54/73
VMware 3.5 Enterprise Administration Exam study guide
Transparent IT Pagina 54
[root@esx1host vmware]# esxcfg-advcfg –g /Disk/SupportSparseLUN Value of SupportSparseLUN is 1
[root@esx1host vmware]# esxcfg-advcfg –g /Disk/MaxLUN Value of MaxLUN is 255
[root@esx1host vmware]# esxcfg-advcfg –g /Scsi/ConflictRetries Value of ConflictRetries is
[root@esx1host vmware]# esxcfg-advcfg –g /LVM/EnableResignature Value of EnableResignature is
Hostname
Description:
Hostname is the program that is used to either set or display the current host,domain or node name of the system. These names are used by many of thenetworking programs to identify the machine. The domain name is also used byNIS/YP.
Syntax: hostname <option>
-a, --alias Display the alias name of the host (if used).
-d, --domain
Display the name of the DNS domain. Don't use the command domainname to get theDNS domain name because it will show the NIS domain name and not the DNS domain
name. Use dnsdomainname instead.
-F, --file filename Read the host name from the specified file. Comments (lines starting with a `#') areignored.
-f, --fqdn, --long
Display the FQDN (Fully Qualified Domain Name). A FQDN consists of a short host nameand the DNS domain name. Unless you are using bind or NIS for host lookups you canchange the FQDN and the DNS domain name (which is part of the FQDN) in the /etc/hosts file.
-h, --help Print a usage message and exit.
-i, --ip-address Display the IP address(es) of the host.
-n, --node Display the DECnet node name. If a parameter is given (or --file name ) the root canalso set a new node name.
-s, --short Display the short host name. This is the host name cut at the first dot.-V, --version Print version information on standard output and exit successfully.-v, --verbose Be verbose and tell what's going on.
Objective 4.3 – Configure and Administer VMware Consolidated Backup
(VCB)
Knowledge
• Explain VCB capabilities, limitations and best practices• Describe how snapshots are created• Understand differences between file-level and full VM backups• Detail what files are part of a full VM backup• Explain how to integrate VCB with
8/6/2019 VMware 3.5 Enterprise Administration Exam Study Guide V0.2
http://slidepdf.com/reader/full/vmware-35-enterprise-administration-exam-study-guide-v02 55/73
VMware 3.5 Enterprise Administration Exam study guide
Transparent IT Pagina 55
• Third-party backup software• Multipathing software• VirtualCenter• VMFS Storage• Explain VMware Converter based restores• Describe common VCB log files
Skills and Abilities
• Verify sizing of VCB holding tanks based on full VM backup requirements• Perform integration tests• VCB to VirtualCenter• VCB to Third-party backup software• VCB to VMFS Storage• Analyze VCB logs to verify functionality
• Use VCB command line tools to verify and troubleshoot VCB deployments• Review multipathing configuration• Run performance tests to determine optimal VCB deployment• Configure a VCB backup role into Virtual Center
Tools
• CLI• vcbVmName• vcbSnapshot
• vcbMounter• vcbExport• mountvm• vcbRestore• vcbUtil• VI client• VMware Converter
Tools Explained
Mountvm The mountVM utility is used to mount VMware VMDK (virtual disk) filesthat have been either backed up with the VCBmounter or have been restore to the
VCB server with your backup utility. In other words, the mountvm command takesthe VMDK disk file and mounts it as a virtual disk on top of your existing hard drive'sfilesystem. By doing that, you can go and browse the VMware virtual disk and copyfiles in/out of it.The mountvm tool is a great tool to use to restore a file (or a few files) from a
VMware virtual disk to your local hard drive. Let's take a scenario. Say that you havea virtual file server that is backed up with VCB & your backup application each night.
One day, you are asked to restore 1 file from that virtual disk. You could restore theentire virtual disk, back to the VMware ESX server and have to import the entire disk

8/6/2019 VMware 3.5 Enterprise Administration Exam Study Guide V0.2
http://slidepdf.com/reader/full/vmware-35-enterprise-administration-exam-study-guide-v02 56/73
VMware 3.5 Enterprise Administration Exam study guide
Transparent IT Pagina 56
image. Or, you could use moutnvm to mount the disk image (virtual disk), on yourhard drive, copy the file you need from it, then delete it - restoring only the 1 file.That is a huge time saver, is it not?
VCBMounter Of all these utilities, the most popular and frequently used is
vcbmounter. When you think of VCB, vcbmounter is really the "meat" of VCB - itperforms the core function of VCB. While it may sound similar to vmmount, it is not.vcbmounter doesn't perform virtual disk mounts at all. Vcbmounter can do eitherimage level or file level backups of your VMware ESX servers. Typically, vcbmounterwould do the following:
• Quiesce the file system on the virtual guest operating system• Changes the VM's disks to snapshot mode & takes the snapshot- ensuring that
the current virtual disk is available for backup and any changes are written tothe snapshot file
For image-level backups, the VMDK is moved to the VCB server then backed up with
your backup software. For file level backups, the VMDK is mounted as a directory onyour VCB server, then backed up with your backup software.
All the while the virtual guest OS continues to function as normalWhen the backup is complete, the changes in the snapshot file are reintegrated
As you can imagine, the vcbmounter command has a number of command lineoptions.Here is a sample of what a vcbmounter full backup command looks like for a singlevirtual guest system:
vcbmounter -h virtualcenter -u vcbadmin -p MyPassword1 -a name:blackberry -r
c:\mount\blackberry -t fullvm -m san
vcbVmName It sure would help you know what virtual guest operating systems areout there & their details, wouldn't it? That is what the vcbvmname command tellsyou. It reports the VMware URL, VMware UUID, system name, IP address, and more.Here is an example:
C:\Program Files\VMware\VMware Consolidated Backup Framework> vcbvmname -hvirtualcenter -u vcbadmin -p MyPassword1 -s Any: [2007-08-16 16:12:26.266 'App'3216 info] Current working directory: C:\Program Files\VMware\VMwareConsolidated Backup Framework Found VM: moref:vm-5289 name:blackberry
uuid:50311891-3561-f846-7a87-73a059a40fb6 ipaddr:10.2.1.20 Found VM:moref:vm-337 name:powerpoint uuid:564d9a2d-0b49-aa2a-e0dc-87020ec965a7ipaddr:10.2.1.7
Description:
Syntax:
8/6/2019 VMware 3.5 Enterprise Administration Exam Study Guide V0.2
http://slidepdf.com/reader/full/vmware-35-enterprise-administration-exam-study-guide-v02 57/73
VMware 3.5 Enterprise Administration Exam study guide
Transparent IT Pagina 57
Example:
Description:
Syntax:
Example:
Description:
Syntax:
Example:
Description:
Syntax:
Example:
Description:
Syntax:
Example:
Description:
Syntax:
Example:
Description:
Syntax:
Example:

8/6/2019 VMware 3.5 Enterprise Administration Exam Study Guide V0.2
http://slidepdf.com/reader/full/vmware-35-enterprise-administration-exam-study-guide-v02 58/73
VMware 3.5 Enterprise Administration Exam study guide
Transparent IT Pagina 58
Section 5 – Operational Maintenance
Objective 5.1 – VMware Update Manager
Knowledge
• Describe Update Manager capabilities• Explain VUM architecture and components• Describe DRS-enabled remediation
Skills and Abilities
• Install and Configure Update Manager• VUM Server• VUM Agents• VUM Download Server• VI Client plug-in• Perform Update Manager tasks• Establish baselines• Fixed• Dynamic
• Manage and attach baselines• Schedule and perform scans• Interpret scan status and compliancy• Schedule and perform remediation• Rollback • Troubleshoot remediation failures
Tools
• VI client•
CLI• vmware-umds
Tools Explained
Description:
VMware Update Manager, update tool for Host Certain guest and applications.
Syntax: vmware-umds <options>

8/6/2019 VMware 3.5 Enterprise Administration Exam Study Guide V0.2
http://slidepdf.com/reader/full/vmware-35-enterprise-administration-exam-study-guide-v02 59/73
VMware 3.5 Enterprise Administration Exam study guide
Transparent IT Pagina 59
Example:
To use the Update Manager Download ServiceLog in to the machine on which Update Manager Download Service is installed.
1. Choose Start > Run, type cmd and press Enter.
2. Change to the directory where Download Service is installed.3. Enter commands to start a Download Service process. For example:To download updates: vmware-umds --download To export updates for the year 2007 to e:\export-depot:vmware-umds -E --dest e:\export-depot -s 2007-01-01T00:00:00 -t
2007-12-31 T 23:59:59 1. After exporting downloads to a folder, physically move them to the Update
Manager machine.2. Import the updates to Update Manager using the vmware-
updateDownloadCli.exe utility in the Update Manager installation folder.
For example, to import Windows and ESX host updates from the D: drive,use the following command:vmware-updateDownloadCli.exe --update-path d:\ --config-import windows esx --vc- user administrator
8/6/2019 VMware 3.5 Enterprise Administration Exam Study Guide V0.2
http://slidepdf.com/reader/full/vmware-35-enterprise-administration-exam-study-guide-v02 60/73
VMware 3.5 Enterprise Administration Exam study guide
Transparent IT Pagina 60
Section 6 – Logging
Objective 6.1 – Configure VirtualCenter log behavior
Knowledge
• Identify location of VirtualCenter related log files• Describe options for customizing VirtualCenter log behavior• Describe options for customizing VI Client log behavior• Explain default log file characteristics• Understand log file collection methods
Skills and Abilities
• Modify VirtualCenter Server log configuration• Modify VirtualCenter Agent log configuration• Export VirtualCenter logs
Tools
• VI client•
CLI
Objective 6.2 – Configure Service Console log behavior
Knowledge
• Describe Service Console log consolidation• Identify location of Service Console related log files• Describe options for customizing Service Console log behavior• Explain default log file characteristics• Understand log file collection methods• Define additional third-party log files located on the Service Console
Skills and Abilities
• Configure Service Console log file rotation• Modify VC Server log configuration• Modify VC Agent log configuration• Export VC logs
Tools
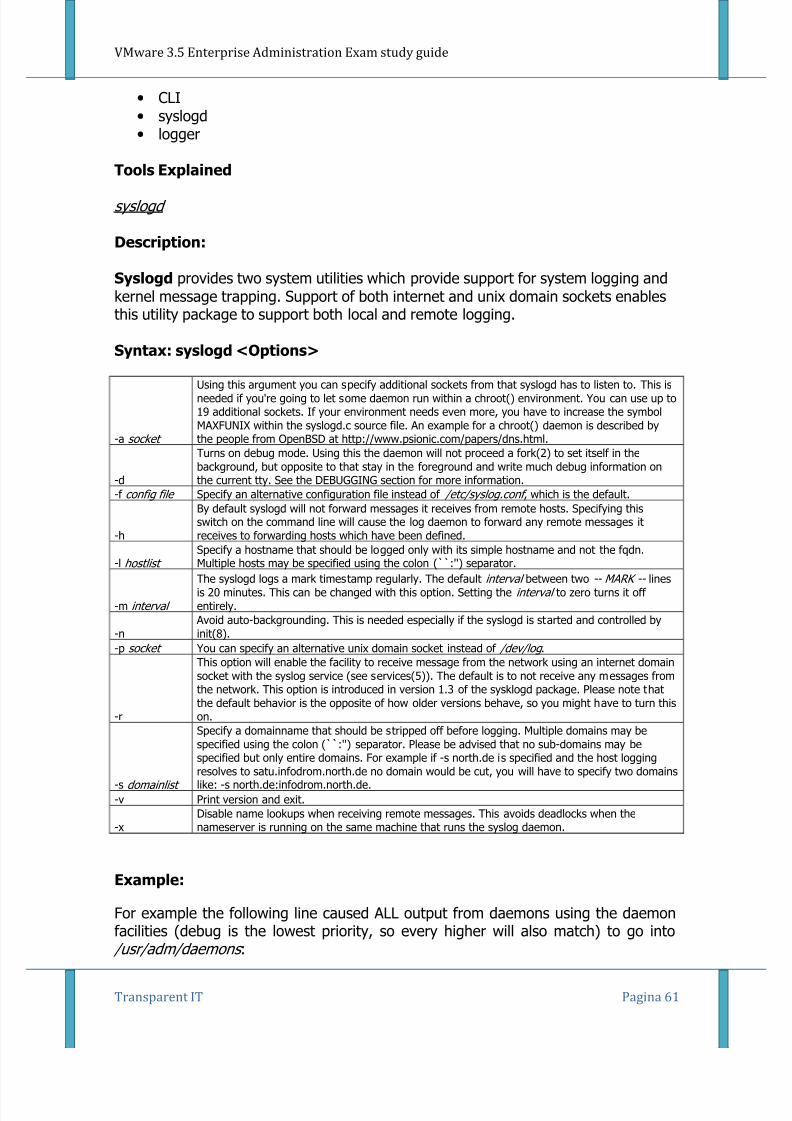
8/6/2019 VMware 3.5 Enterprise Administration Exam Study Guide V0.2
http://slidepdf.com/reader/full/vmware-35-enterprise-administration-exam-study-guide-v02 61/73
VMware 3.5 Enterprise Administration Exam study guide
Transparent IT Pagina 61
• CLI• syslogd• logger
Tools Explained
syslogd
Description:
Syslogd provides two system utilities which provide support for system logging andkernel message trapping. Support of both internet and unix domain sockets enablesthis utility package to support both local and remote logging.
Syntax: syslogd <Options>
-a socket
Using this argument you can specify additional sockets from that syslogd has to listen to. This isneeded if you're going to let some daemon run within a chroot() environment. You can use up to19 additional sockets. If your environment needs even more, you have to increase the symbolMAXFUNIX within the syslogd.c source file. An example for a chroot() daemon is described bythe people from OpenBSD at http://www.psionic.com/papers/dns.html.
-d
Turns on debug mode. Using this the daemon will not proceed a fork(2) to set itself in thebackground, but opposite to that stay in the foreground and write much debug information onthe current tty. See the DEBUGGING section for more information.
-f config file Specify an alternative configuration file instead of /etc/syslog.conf , which is the default.
-h
By default syslogd will not forward messages it receives from remote hosts. Specifying thisswitch on the command line will cause the log daemon to forward any remote messages itreceives to forwarding hosts which have been defined.
-l hostlist Specify a hostname that should be logged only with its simple hostname and not the fqdn.Multiple hosts may be specified using the colon (``:'') separator.
-m interval
The syslogd logs a mark timestamp regularly. The default interval between two -- MARK -- linesis 20 minutes. This can be changed with this option. Setting the interval to zero turns it off entirely.
-n Avoid auto-backgrounding. This is needed especially if the syslogd is started and controlled byinit(8).
-p socket You can specify an alternative unix domain socket instead of /dev/log .
-r
This option will enable the facility to receive message from the network using an internet domainsocket with the syslog service (see services(5)). The default is to not receive any messages fromthe network. This option is introduced in version 1.3 of the sysklogd package. Please note thatthe default behavior is the opposite of how older versions behave, so you might have to turn thison.
-s domainlist
Specify a domainname that should be stripped off before logging. Multiple domains may be
specified using the colon (``:'') separator. Please be advised that no sub-domains may bespecified but only entire domains. For example if -s north.de is specified and the host loggingresolves to satu.infodrom.north.de no domain would be cut, you will have to specify two domainslike: -s north.de:infodrom.north.de.
-v Print version and exit.
-xDisable name lookups when receiving remote messages. This avoids deadlocks when thenameserver is running on the same machine that runs the syslog daemon.
Example:
For example the following line caused ALL output from daemons using the daemonfacilities (debug is the lowest priority, so every higher will also match) to go into /usr/adm/daemons :
8/6/2019 VMware 3.5 Enterprise Administration Exam Study Guide V0.2
http://slidepdf.com/reader/full/vmware-35-enterprise-administration-exam-study-guide-v02 62/73
VMware 3.5 Enterprise Administration Exam study guide
Transparent IT Pagina 62
# Sample syslog.condaemon.debug /usr/adm/daemons
Logger
Description:
Logger makes entries in the system log. It provides a shell commandinterface to the syslog(3) system log module.
Syntax: logger <options>
- i Log the process id of the logger process with each line.-s Log the message to standard error, as well as the system log.-f fil Log the specified file.
-p pri
Enter the message with the specified priority. The priority may be specified numerically or as a``facility.level'' pair. For example, ``-p local3.info'' logs the message(s) as informational level inthe local3 facility. The default is ``user.notice.''
-t tag Mark every line in the log with the specified tag.-u sock Write to socket as specified with socket instead of builtin syslog routines.
-dUse a datagram instead of a stream connection to this socket. End the argument list. This is toallow the message to start with a hyphen (-).
-message Write the message to log; if not specified, and the -f flag is not provided, standard input is logged.
Example:
logger System rebooted
logger -p local0.notice -t HOSTIDM -f /dev/idmc

8/6/2019 VMware 3.5 Enterprise Administration Exam Study Guide V0.2
http://slidepdf.com/reader/full/vmware-35-enterprise-administration-exam-study-guide-v02 63/73
VMware 3.5 Enterprise Administration Exam study guide
Transparent IT Pagina 63
Section 7 – ESX Server Security
Objective 7.1 – Configure secure remote access.
Knowledge
• Explain how to prevent remote root login• Describe the process to allow selected users remote access capabilities• Understand authentication process and options• Describe SSH implementation• Understand how user access is tracked and logged• Explain the use of TCP wrappers to restrict access from specific
hosts/addresses
Skills and Abilities
• Enable/Disable root SSH login• Modify the default settings to allow both incoming and outgoing SSH traffic• Create ESX Server user accounts and assign group memberships• Command Line• VI client
• Configure SSH• AllowUsers/DenyUsers• Banner• Define VI Client roles and user and group assignments• Use Service Console commands to track user access• Use esxcfg-auth to modify authentication settings• Preferred authentication method• Login attempts• Password aging• Configure TCP wrappers•
hosts.allow/hosts.deny
Tools
• CLI• vmware-authd• esxcfg-auth• who• w• last• fuser
Tools Explained
8/6/2019 VMware 3.5 Enterprise Administration Exam Study Guide V0.2
http://slidepdf.com/reader/full/vmware-35-enterprise-administration-exam-study-guide-v02 64/73
VMware 3.5 Enterprise Administration Exam study guide
Transparent IT Pagina 64
Vmware-authd
Description:
VMware ESX Server uses Pluggable Authentication Modules (PAM) for userauthentication in the remote console and the VMware Management Interface. Thedefault installation of ESX Server uses /etc/passwd authentication, just as Linuxdoes, but it can easily be configured to use LDAP, NIS, Kerberos or anotherdistributed authentication mechanism.
The PAM configuration is in /etc/pam.d/vmware-authd.
Every time a connection is made to the server running VMware ESX Server, the inetdprocess runs an instance of the VMware authentication daemon
(vmware-authd). The vmware-authd process requests a user name andpassword, then hands them off to PAM, which performs the authentication.
Once a user is authenticated, vmware-authd accepts a path name to a virtualmachine configuration file. Access to the configuration file is restricted in thefollowing ways:
The user must have read access to the configuration file to see and controlthe virtual machine in the VMware Management Interface and to view theDetails and Event Log pages.
The user must have read access to the configuration file to use the localconsole on the console operating system or to connect to the virtual machinewith the VMware Perl API.
The user must have read and execute access to the configuration file toconnect to and control (start, stop, reset or suspend) a virtual machine in aremote console, with the VMware Perl API or with the managementinterface.
The user must have read and write access to the configuration file to changethe configuration using the Configure VM page in the VMware ManagementInterface.
Note: If you have users with list access, but not read access, they may encountererrors in the VMware Management Interface.
If a vmware process is not running for the configuration file you are trying to use,vmware-authd examines /etc/vmware/vm-list, the file where you register yourvirtual machines. If the configuration file is listed in vm-list, vmware-authd (notnecessarily the user who is currently authenticated) starts VMware ESX Server asowner of this configuration file.
Registered virtual machines (those listed in /etc/vmware/vm-list) also appear in the
VMware Management Interface. The virtual machines you see on the Overview pagemust be listed in vm-list, and you must have read access to their configuration files.
8/6/2019 VMware 3.5 Enterprise Administration Exam Study Guide V0.2
http://slidepdf.com/reader/full/vmware-35-enterprise-administration-exam-study-guide-v02 65/73
VMware 3.5 Enterprise Administration Exam study guide
Transparent IT Pagina 65
The vmware-authd process exits as soon as a connection to a vmware process isestablished. Each vmware process shuts down automatically after the last userdisconnects.
Default Permissions
When you create a virtual machine with VMware ESX Server, its configuration file isregistered with the following default permissions, based on the user accessing it:
Read, execute and write - for the user who created the configuration file (theowner)
Read and execute - for the owner's group Read - for users other than the owner or a member of the owner's group
TCP/IP Ports for Management Access
The TCP/IP ports available for management access to your ESX Server machine vary,depending on the security settings you choose for the server. If you need to manageESX Server machines from outside a firewall, you may need to reconfigure thefirewall to allow access on the appropriate ports. The lists below show which portsare available when you use each of the standard security settings.
The key ports for use of the VMware Management Interface and the remote consoleare the HTTP or HTTPS port and the port used by vmware-authd. Use of otherports is optional.
High Security
443 - HTTPS, used by the VMware Management Interface 902 - vmware-authd, used when you connect with the remote console 22 - SSH, used for a secure shell connection to the console operating system
Medium Security
443 - HTTPS, used by the VMware Management Interface
902 - vmware-authd, used when you connect with the remote console 22 - SSH, used for a secure shell connection to the console operating system 23 - Telnet, used for an insecure shell connection to the console operating
system 21 - FTP, used for transferring files to and from other machines 111 - portmap, used by the NFS client when mounting a drive on a remote
machine
Low Security
80 - HTTP, used by the VMware Management Interface 902 - vmware-authd, used when you connect with the remote console
8/6/2019 VMware 3.5 Enterprise Administration Exam Study Guide V0.2
http://slidepdf.com/reader/full/vmware-35-enterprise-administration-exam-study-guide-v02 66/73
VMware 3.5 Enterprise Administration Exam study guide
Transparent IT Pagina 66
22 - SSH, used for a secure shell connection to the console operating system 23 - Telnet, used for an insecure shell connection to the console operating
system 21 - FTP, used for transferring files to and from other machines 111 - portmap, used by the NFS client when mounting a drive on a remote
machine
Esxcfg-auth
Description:
esxcfg-auth provides an easy way to configure your server to allow network basedauthentication as well as password complexity settings for your machine. It supportssetting up your system to do authentication against an Active Directory Server, butnot user management, as well as authentication against a NIS server, a Kerberos
server, or an LDAP server. You can configure the way that passwords are stored andthe complexity of the password when a user sets a new password. This utility isexperimental. It is likely to change.
Syntax: Esxcfg-auth <options>
--probe
Calling esxcfg-auth with the probe option will print your current configuration to standardout. This is useful if you want to store your configuration for documentation or archivalpurposes. If it is invoked with other options, the changes those options would make aremade. The resulting configuration is printed to standard out. In that case, the configurationdata is not written to disk, and the command is equivalent to a dry run.
--enablemd5 This option sets the system to store the password in MD5 form. The default is shadow.
--disablemd5 This option restores the system to default password storage, which is shadow.
--enableshadowStore user passwords using shadow information. This is the default manner in whichpasswords are stored if no format is specified.
--disableshadowThis option is useful to store the password in MD5 form. If you do not enable MD5 storage,the passwords will remain in shadow form.
--usepamqc
Enables the use of the pam_passwdqc PAM module for password complexity checking. It canbe configured by passing a 6 value tuple as the value. The tuple is formed from the followinginformation:
• minimum length of a password that has characters from 2 character classes• minimum length of a password that has characters from 2 character classes• minimum number of words in a passphrase• minimum length of a password that has characters from 3 character classes• minimum length of a password that has characters from 4 character classes•
This does not fully expose the abilities of this powerful PAM module.•
See the pam_passwdqc man page for more information on how to use this PAMmodule to enforce password rules on the user's password. If you pass a value of -1for any of the six tuple values, that is understood as disable this option. An example of atuple is "8 -1 -1 -1 8 4".
--usecrack
Enables the use of the pam_cracklib PAM module for password complexity checking. It canbe configured by passing a 6 value tuple as the value. The tuple is formed from the followinginformation:
• number of retries given to choose a new password• minimum length of the password• points for lowercase letters• points for uppercase letters• points for digital characters
• points for other charactersIf you pass in a value of -1 for any of the fields in the tuple for the points in the characterclass, it is understood as being required.
8/6/2019 VMware 3.5 Enterprise Administration Exam Study Guide V0.2
http://slidepdf.com/reader/full/vmware-35-enterprise-administration-exam-study-guide-v02 67/73
VMware 3.5 Enterprise Administration Exam study guide
Transparent IT Pagina 67
--enableadSets up the Console OS to authenticate the user against an Active Directory server.addomain and addc are required with this option.
--addomainSets the domain against which the user is to be authenticated when authenticating againstan Active Directory server.
--addc Sets the domain controller against which the user's password should be checked.--disableab Reverts the changes required to authenticate the user against Active Directory.
--enablenis This option can be used to setup the Console OS to authenticate the user against a NISserver. nisserver and nisdomain are required with this option.--nisdomain Specifies the domain name for the NIS server against which users should be authenticated.--nisserver Specifies the IP address where the NIS server is running.--disablenis Reverts the changes required to authenticate users against NIS.
--enablekrb5 Allows the user to be authenticated against a Kerberos Realm. With this option, --krb5realm,--krb5kdc, and --krb5adminserver options are needed.
--krb5realm Defines the realm in which to authenticate the user.--krb5kdc Defines the Key Distribution Center for the Kerberos Realm.
--krb5adminserverDefines the Administrative Server for the Kerberos 5 realm against which user should bechecked.
--disablekrb5 Reverts the changes required to authenticate the user against a Keberos 5 Realm.--enableldap Enables the Console OS to attempt to get user credentials from an LDAP server.--enableldapauth Enables the Console OS to authenticate the user against an LDAP server.--ldapserver Sets the IP address of the server that is running the LDAP Directory.--ldapbasedn Sets the base DN with which to bind to the LDAP server.--disableldap Reverts the changes required to authenticate the user against an LDAP server.
who
Description:
The standard Unix command who displays a list of users who are currently loggedinto a computer. The who command is related to the command w, which providesthe same information but also displays additional data and statistics.
W
Description:
The command w on many Unix-like operating systems provides a quick summary of every user logged into a computer, what that user is currently doing, and what loadall the activity is imposing on the computer itself. The command is a one-commandcombination of several other Unix programs: who, uptime, and ps -a.
Example:
$ w11:12am up 608 day(s), 19:56, 6 users, load average: 0.36, 0.36, 0.37User tty login@ idle whatsmithj pts/5 8:52am w
jonesm pts/23 20Apr06 28 -bashharry pts/18 9:01am 9 pinepeterb pts/19 21Apr06 emacs -nw html/index.html
janetmcq pts/8 10:12am 3days -csh
singh pts/12 16Apr06 5:29 /usr/bin/perl -w perl/test/program.pl

8/6/2019 VMware 3.5 Enterprise Administration Exam Study Guide V0.2
http://slidepdf.com/reader/full/vmware-35-enterprise-administration-exam-study-guide-v02 68/73
VMware 3.5 Enterprise Administration Exam study guide
Transparent IT Pagina 68
Fuser
Description:
fuser is a UNIX command used to show which processes are using a specified file,
file system, or socket.fuser returns a non-zero code if none of the files are accessedor in case of a fatal error. If at least one access has succeeded, fuser returns zero.
The output of "fuser" may be useful in diagnosing "resource busy" messages arising
when attempting to unmount filesystems
Syntax: fuser <option> <target>
c current directory.
e executable being run.
f open file.
F open file for writing.r root directory.
m mmap'ed file or shared library
-k
kills all process accessing a file. For example fuser -k /home/export/ganesh kills all
processes accessing this directory without confirmation. Use -i for confirmation Also note
that -k sends a SIGKILL to all process. Use the -signal to send a different signal. For a list
of signals supported by the fuser run 'fuser -l'
-i interactive mode. Prompt before killing process
-v verbose.
-u append username
-a display all files
Example:
# fuser -m -u /mnt/usb1 /mnt/usb1: 1347c(root) 1348c(guido) 1349c(guido)
Objective 7.2 – Delegate administrative privileges
Knowledge
• Explain how to restrict access to administrative functions• Describe the process to restrict access to specific administrative commands• Understand how attempts to use administrative functions can be logged
Skills and Abilities
• Switch from a standard user account to root• Enable the use of the wheel group• Configure sudo• Users/Groups• Hosts• Commands• Aliases
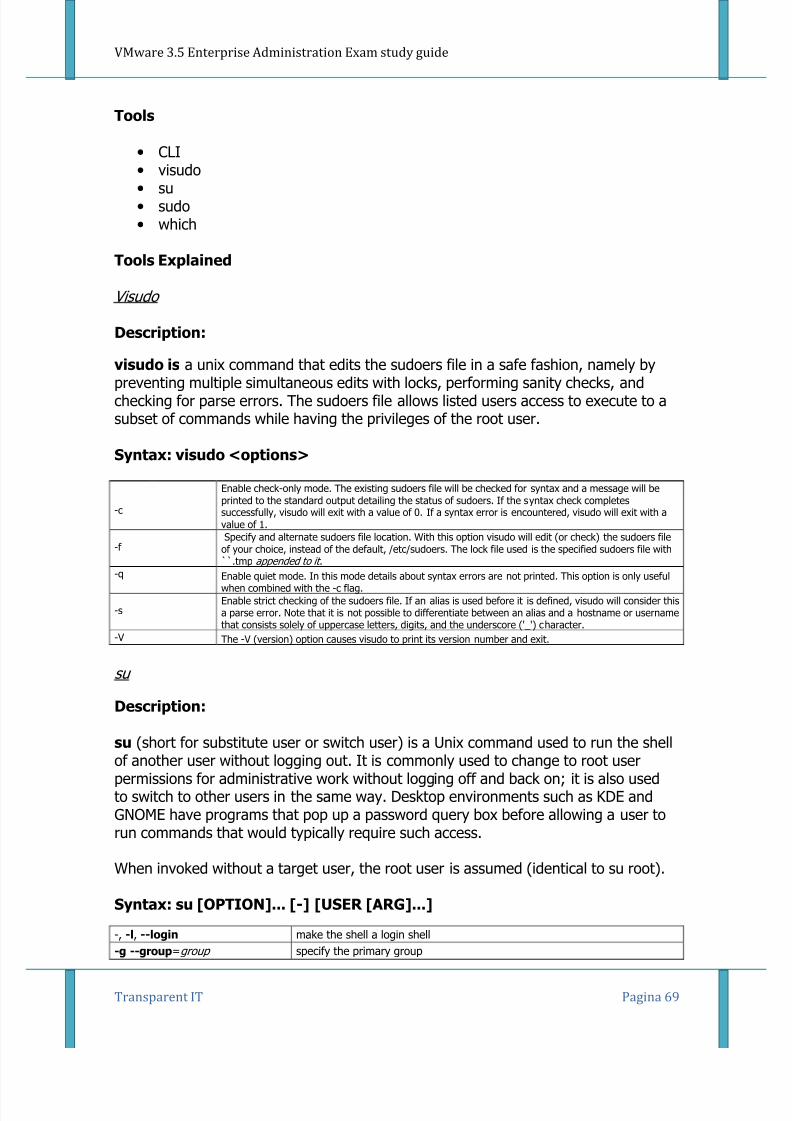
8/6/2019 VMware 3.5 Enterprise Administration Exam Study Guide V0.2
http://slidepdf.com/reader/full/vmware-35-enterprise-administration-exam-study-guide-v02 69/73
VMware 3.5 Enterprise Administration Exam study guide
Transparent IT Pagina 69
Tools
• CLI• visudo• su• sudo• which
Tools Explained
Visudo
Description:
visudo is a unix command that edits the sudoers file in a safe fashion, namely bypreventing multiple simultaneous edits with locks, performing sanity checks, andchecking for parse errors. The sudoers file allows listed users access to execute to asubset of commands while having the privileges of the root user.
Syntax: visudo <options>
-c
Enable check-only mode. The existing sudoers file will be checked for syntax and a message will beprinted to the standard output detailing the status of sudoers. If the syntax check completessuccessfully, visudo will exit with a value of 0. If a syntax error is encountered, visudo will exit with avalue of 1.
-f Specify and alternate sudoers file location. With this option visudo will edit (or check) the sudoers fileof your choice, instead of the default, /etc/sudoers. The lock file used is the specified sudoers file with``.tmp appended to it.
-q Enable quiet mode. In this mode details about syntax errors are not printed. This option is only usefulwhen combined with the -c flag.
-sEnable strict checking of the sudoers file. If an alias is used before it is defined, visudo will consider thisa parse error. Note that it is not possible to differentiate between an alias and a hostname or usernamethat consists solely of uppercase letters, digits, and the underscore ('_') character.
-V The -V (version) option causes visudo to print its version number and exit.
su
Description:
su (short for substitute user or switch user) is a Unix command used to run the shellof another user without logging out. It is commonly used to change to root userpermissions for administrative work without logging off and back on; it is also usedto switch to other users in the same way. Desktop environments such as KDE andGNOME have programs that pop up a password query box before allowing a user torun commands that would typically require such access.
When invoked without a target user, the root user is assumed (identical to su root).
Syntax: su [OPTION]... [-] [USER [ARG]...]
-, -l, --login make the shell a login shell
-g --group=group specify the primary group
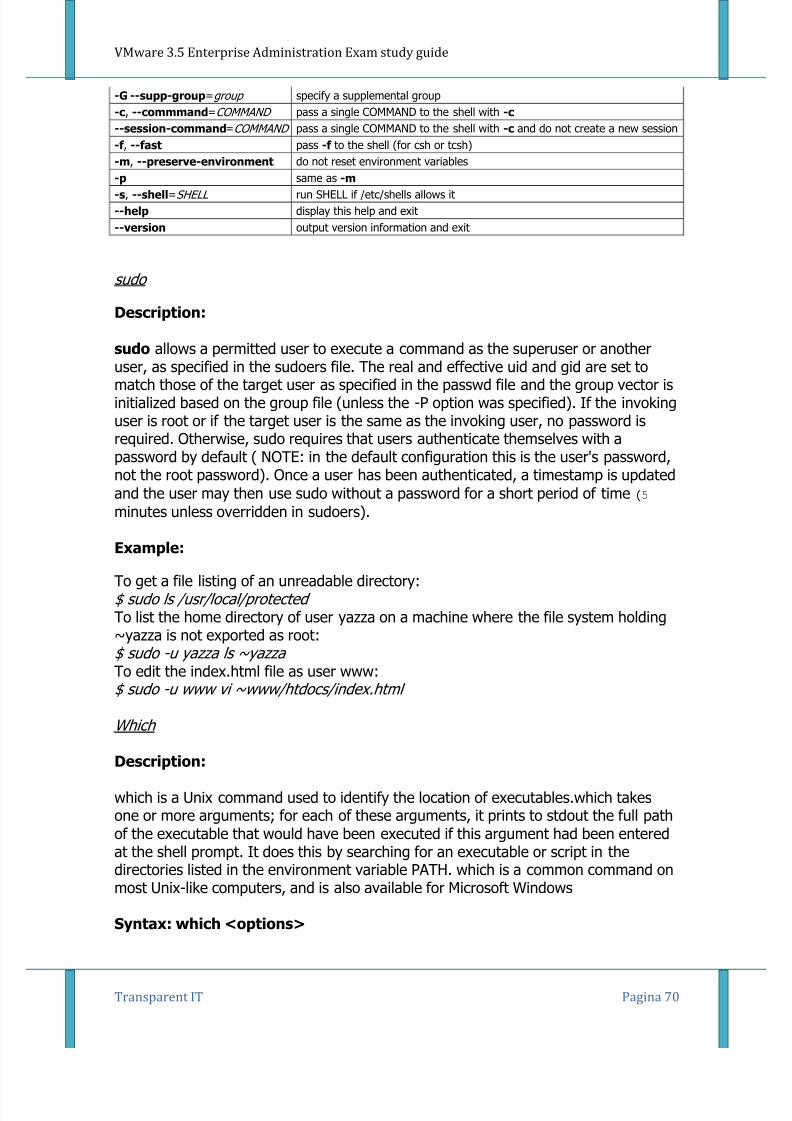
8/6/2019 VMware 3.5 Enterprise Administration Exam Study Guide V0.2
http://slidepdf.com/reader/full/vmware-35-enterprise-administration-exam-study-guide-v02 70/73
VMware 3.5 Enterprise Administration Exam study guide
Transparent IT Pagina 70
-G --supp-group=group specify a supplemental group
-c, --commmand=COMMAND pass a single COMMAND to the shell with -c
--session-command=COMMAND pass a single COMMAND to the shell with -c and do not create a new session
-f , --fast pass -f to the shell (for csh or tcsh)
-m, --preserve-environment do not reset environment variables
-p same as -m
-s, --shell=SHELL run SHELL if /etc/shells allows it
--help display this help and exit
--version output version information and exit
sudo
Description:
sudo allows a permitted user to execute a command as the superuser or another
user, as specified in the sudoers file. The real and effective uid and gid are set tomatch those of the target user as specified in the passwd file and the group vector isinitialized based on the group file (unless the -P option was specified). If the invokinguser is root or if the target user is the same as the invoking user, no password isrequired. Otherwise, sudo requires that users authenticate themselves with apassword by default ( NOTE: in the default configuration this is the user's password,not the root password). Once a user has been authenticated, a timestamp is updatedand the user may then use sudo without a password for a short period of time (5
minutes unless overridden in sudoers).
Example:
To get a file listing of an unreadable directory:$ sudo ls /usr/local/protected To list the home directory of user yazza on a machine where the file system holding~yazza is not exported as root:$ sudo -u yazza ls ~yazza To edit the index.html file as user www:$ sudo -u www vi ~www/htdocs/index.html
Which
Description:
which is a Unix command used to identify the location of executables.which takesone or more arguments; for each of these arguments, it prints to stdout the full pathof the executable that would have been executed if this argument had been enteredat the shell prompt. It does this by searching for an executable or script in thedirectories listed in the environment variable PATH. which is a common command onmost Unix-like computers, and is also available for Microsoft Windows
Syntax: which <options>
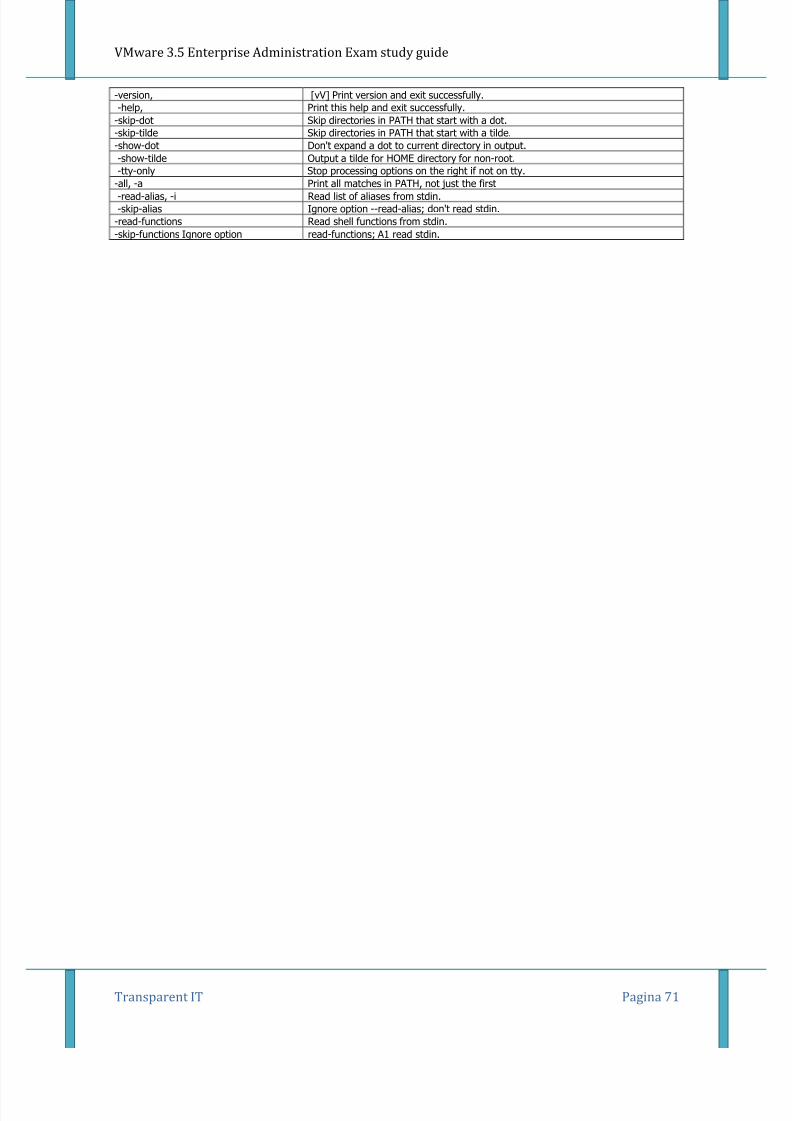
8/6/2019 VMware 3.5 Enterprise Administration Exam Study Guide V0.2
http://slidepdf.com/reader/full/vmware-35-enterprise-administration-exam-study-guide-v02 71/73
VMware 3.5 Enterprise Administration Exam study guide
Transparent IT Pagina 71
-version, [vV] Print version and exit successfully.-help, Print this help and exit successfully.-skip-dot Skip directories in PATH that start with a dot.-skip-tilde Skip directories in PATH that start with a tilde.-show-dot Don't expand a dot to current directory in output.-show-tilde Output a tilde for HOME directory for non-root.-tty-only Stop processing options on the right if not on tty.
-all, -a Print all matches in PATH, not just the first-read-alias, -i Read list of aliases from stdin.-skip-alias Ignore option --read-alias; don't read stdin.-read-functions Read shell functions from stdin.-skip-functions Ignore option read-functions; A1 read stdin.
8/6/2019 VMware 3.5 Enterprise Administration Exam Study Guide V0.2
http://slidepdf.com/reader/full/vmware-35-enterprise-administration-exam-study-guide-v02 72/73
VMware 3.5 Enterprise Administration Exam study guide
Transparent IT Pagina 72
Section 8 – Rapid Provisioning
Objective 8.1 – ESX Server Scripted Installation
Knowledge
• Explain the usage of the Scripted Installation wizard
• Describe the various methods of automated deployment
• CD Rom• HTTP/FTP• NFS• Define the directives contained in the installation script
Skills and Abilities
• Set up hardware and various connections• Boot from SAN• Layout of local drives in various raid configurations• Create an install script and verify the following sections• Command• %packages• %pre• %post• %vmlicense_text• Configure Service Console components of an ESX server• Network Time Protocol (NTP)• DNS• SNMP• Install supported third party agents according to the design plan
Tools
• VI client• CLI

8/6/2019 VMware 3.5 Enterprise Administration Exam Study Guide V0.2
http://slidepdf.com/reader/full/vmware-35-enterprise-administration-exam-study-guide-v02 73/73
VMware 3.5 Enterprise Administration Exam study guide
Additional information and MAN pages
MAN pages ESXTOP
NAME esxtop - display ESX Server resource utilization statistics
COPYRIGHT VMware ESX Server is Copyright 2006 VMware, Inc. All rights reserved.SYNOPSIS esxtop [-] [h] [v] [b] [s] [R vm-support_dir_path] [d delay] [n iter]DESCRIPTION esxtop provides a fine-grain look at resource utilization in real time. For more information, please refer to theofficial documentation, available at <http://www.vmware.com/info?id=193>.
Esxtop runs on the ESX Server Service Console. It can only be run by user root. It can be run in three differentmodes; interactive (default), batch and replay. Worlds in this document refer to ESX Server VMKernel schedulableentities, similar to processes in other operating systems.Interactive Mode This is the default mode for esxtop. This mode displays statistics under four broad categories. Each category isdisplayed on a seperate screen. There are screens displaying CPU, memory, storage and network resource usage. A help menu is available for each of the four screens.In this mode there are several command line options available.Command-line Options h Prints help for esxtop command-line options. v Prints esxtop version number. s Tells esxtop to run in securemode. This disables the interactive command to change delay between screen updates. d Specifies the delaybetween screen updates. Default is 5 seconds. Minimum is 2 seconds. You can change this with the interactive
command 's'. If a delay of less than 2 seconds is specified then the delay is set to 2 seconds. n Number of iterations. Update the display 'n' number of times and then exit.
Common Statistics Description Several statistics are displayed on the different screens while esxtop is running in interactive mode. Statisticslisted in this section are common across all four screens. "uptime" This first line found at the top of each of thefour esxtop screens displays the current time, time since last reboot and number of currently running Worlds.
On this first line CPU load averages are also displayed for the CPU, storage and network screens. The loadaverages over the past 1, 5 and 15 minutes are displayed. Load averages take into account both running andready-to-run Worlds. A load average of 1.00 implies that all the physical CPUs are fully accounted for. A loadaverage of 2.00 implies that the ESX Server may be in need of twice as many physical CPUs as currentlyavailable.
For the memory screen memory overcommit averages are also displayed on the first line. The memoryovercommit averages over the past 1, 5 and 15 minutes are displayed. A memory overcommit average of 0.37implies that the memory is overcommit by 37%.