voter’s guide - vote.nd.gov automark, epollbooks... · automark quality system documentation...
TRANSCRIPT
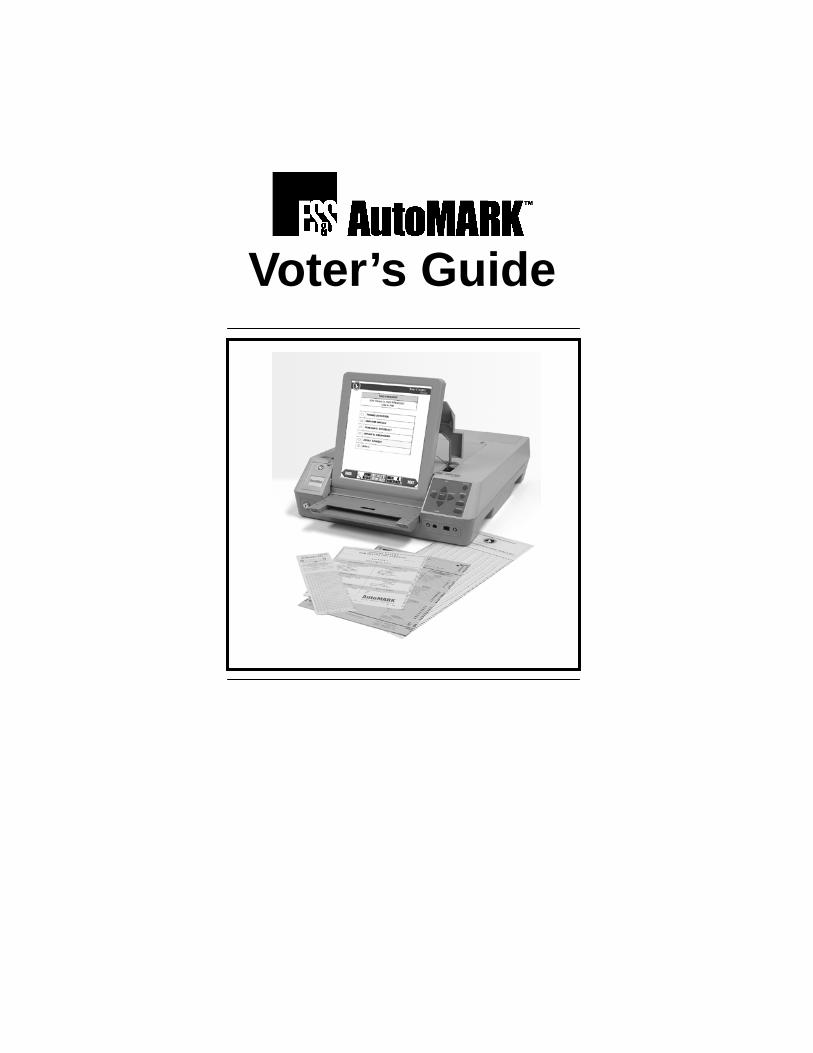
Voter’s Guide
FILENAME and Number Revision DATE RELEASE APPROVAL AutoMARK 3210 Voter’s
Guide AQS-13-5061-001-R
10 1/17/2011 M. Norris
CONFIDENTIAL INFORMATION
The most current active version of this document is maintained electronically in the Automark Quality System documentation database. Printed copies are considered obsolete.
PUBLISHED BY Election Systems & Software Inc. 11208 John Galt Blvd. Omaha, NE 68137 800-247-8683 Copyright 2004-2009, 2011 Election Systems & Software Inc. All rights reserved. No part of this document may be reproduced, transmitted, transcribed, stored in a retrieval system or translated into any language, in any form, by any means without the prior written permission of Election Systems & Software, Inc. Our documentation currently references the use of AutoMARK with Diebold AccuVote tabulators. Elections created by Diebold Gems are currently not federally certified for import. And manual entry of data for use with Diebold Accuvote ballots is not federally certified.
TRADEMARKS AutoMARK, AutoSCAN, and AutoCHECK are trademarks of Election Systems & Software, Inc. WINDOWS, WINDOWS XP and WINDOWS NT are registered trademarks of Microsoft Corporation in the United States and/or other countries. Other product and company names mentioned herein may be the trademarks of their respective owners.
3/20/08 3 AutoMARK 3210 Voter’s Guide AQS-13-5061-001-R
Contents 1 INTRODUCTION TO THE AUTOMARK VAT ................................................. 5
1.1 FEATURES OF THE AUTOMARK VAT ......................................................... 5
1.2 USING THE AUTOMARK VAT KEYS AND BUTTONS...................................... 8
1.3 USING THE AUTOMARK VAT WITH AN AT DEVICE ...................................... 9
2 MARKING YOUR BALLOT ........................................................................... 12
3 VERIFYING A MARKED BALLOT ............................................................... 20
4 FREQUENTLY ASKED QUESTIONS ........................................................... 22
4.1 BALLOT IS NOT READABLE ........................................................................ 22
4.2 BALLOT IS JAMMED ................................................................................. 23
4.3 WHAT IS A POP-UP SCREEN? .................................................................. 24
4.3.1 MORE ALERT ........................................................................... 24
4.3.2 FORCE MORE ALERT .............................................................. 24
4.3.3 WRITE-IN .................................................................................. 25
4.3.4 UNDER-VOTE ........................................................................... 26
4.3.5 OVER-VOTE ............................................................................. 26
4.3.6 Straight Party Warning .............................................................. 27
4.3.7 Cross Endorsement warning ..................................................... 27
4.3.8 EXIT .......................................................................................... 28
4.3.9 EXIT THANK YOU..................................................................... 28
4.4 HOW DO I EXIT WITHOUT MARKING THE BALLOT ? ..................................... 29
5 REVISION HISTORY .................................................................................... 30

3/20/08 4 AutoMARK 3210 Voter’s Guide AQS-13-5061-001-R
This Page Intentionally Left Blank

3/20/08 5 AutoMARK 3210 Voter’s Guide AQS-13-5061-001-R
1 Introduction to the AutoMARK VAT
Note: Three types of tabulators work with the AutoMARK VAT—the ES&S M100, the ES&S Optech and the Diebold Accuvote. Sections specific to the Optech tabulator are clearly identified, usually by a text box or other type of box.
The AutoMARKTM Voter Assist Terminal (VAT) is used to mark
the ballot selections of voters who are visually impaired, have a
disability, or who are more comfortable using an alternative
language.
Ballot choices and instructions are displayed in large text print on
the touch screen monitor, as well as read by the audio system in
the language choice selected by the voter. Voters enter their
selections by touching buttons on the screen, pressing keys on
the keypad, or using an Assistive Technology (AT) device.
The AutoMARK VAT marks your ballot with your selections and
returns them to you. You can then submit your marked ballot in
the normal manner for tabulation. This guide contains all the
information needed to use the AutoMARK Voter Assist Terminal
(VAT).
1.1 Features of the AutoMARK VAT
A voter can use the Automark to mark a ballot by using:

3/20/08 6 AutoMARK 3210 Voter’s Guide AQS-13-5061-001-R
The touch screen
The Braille keypad
An AT device (such as puff-sip or foot pedal)
The AutoMARK VAT has the capability to display your ballot in
alternate languages. Language choices are determined by your
jurisdiction. If you are not able to view the language selection
screen, your jurisdiction has chosen to provide English as the
only language. The audio matches the language selected.
The AutoMARK VAT has several privacy features. Audio volume
can be increased or decreased as desired, and the screen can
be turned on and off for privacy. If you want to use the audio
system to listen to ballot choices and instructions, you will use
the audio keys on the keypad (shown on the following page) to
control audio sound. Headphones with disposable earpieces
may be provided by your election officials.
The AutoMARK VAT also has a ZOOM MODE feature which
enlarges the text on the screen, and a High Contrast mode
which gives contrast to the screen resolution, for those who are
visually impaired.
Note
- In order to see which ballot style you loaded into the VAT with a multiple language election, do not use High Contrast mode until the instructions screen. When using both Zoom mode and High Contrast mode, initiate Zoom mode first on the instructions screen.
3/20/08 7 AutoMARK 3210 Voter’s Guide AQS-13-5061-001-R
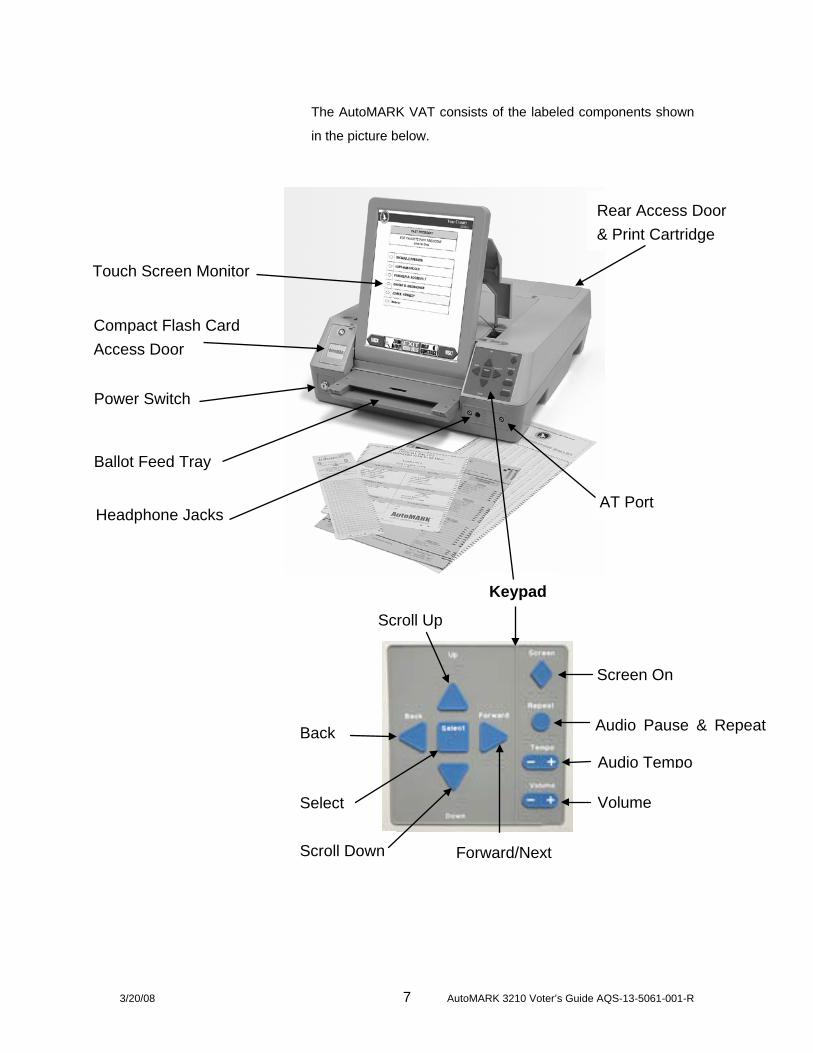
The AutoMARK VAT consists of the labeled components shown
in the picture below.
Touch Screen Monitor
Screen On
Audio Pause & Repeat
Audio Tempo
Volume
Rear Access Door & Print Cartridge
AT Port
Keypad
Scroll Up
Back
Select
Scroll Down
Forward/Next
Compact Flash Card Access Door
Power Switch
Ballot Feed Tray
Headphone Jacks
3/20/08 8 AutoMARK 3210 Voter’s Guide AQS-13-5061-001-R
Note
Audio Repeat and Pause functionality: - Briefly pressing the Repeat button will cause the current spoken label to repeat after a 5 second pause. - Holding down the Repeat button for 3 seconds will cause the
audio to pause. Briefly hit the Repeat button again to resume audio.
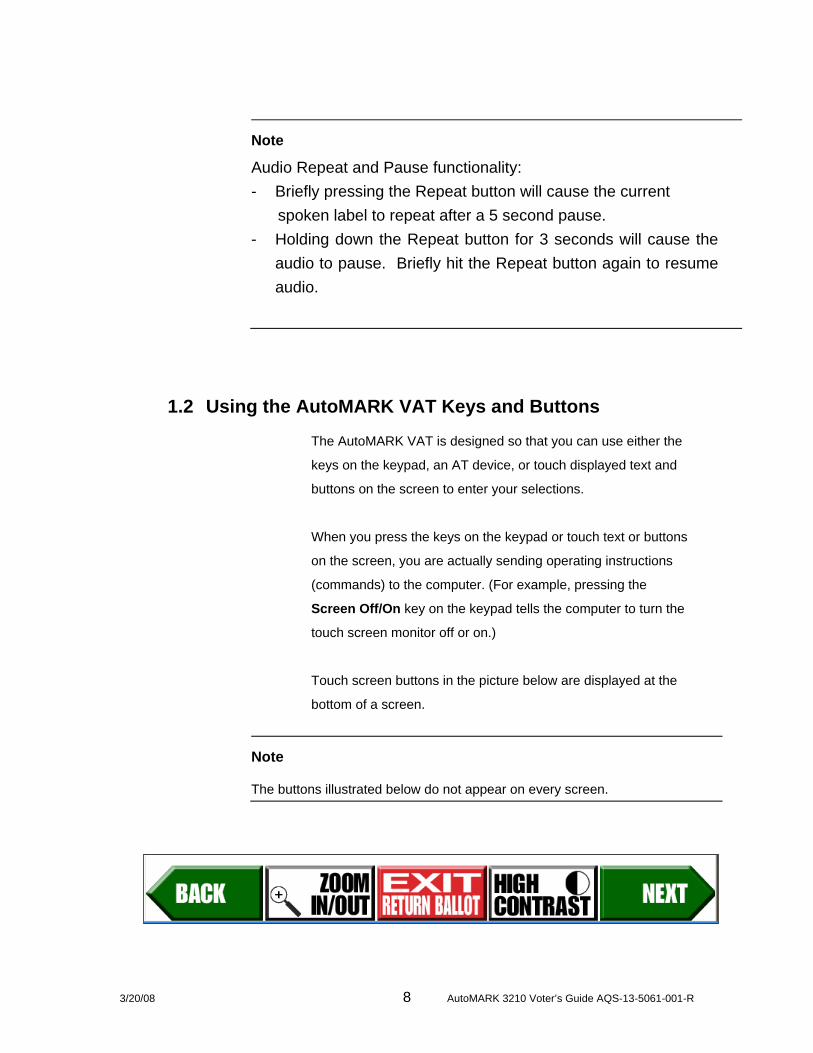
1.2 Using the AutoMARK VAT Keys and Buttons
The AutoMARK VAT is designed so that you can use either the
keys on the keypad, an AT device, or touch displayed text and
buttons on the screen to enter your selections.
When you press the keys on the keypad or touch text or buttons
on the screen, you are actually sending operating instructions
(commands) to the computer. (For example, pressing the
Screen Off/On key on the keypad tells the computer to turn the
touch screen monitor off or on.)
Touch screen buttons in the picture below are displayed at the
bottom of a screen.
Note
The buttons illustrated below do not appear on every screen.

3/20/08 9 AutoMARK 3210 Voter’s Guide AQS-13-5061-001-R
Sample of Touch Screen Buttons
Touching the BACK button displays the previous screen.
Touching the ZOOM IN/OUT button on any screen increases
and decreases the size of the text displayed.
Touching the EXIT RETURN BALLOT button displays the EXIT
screen.
Touching the HIGH CONTRAST button on any screen lightens
or darkens the screen contrast.
Touching the NEXT button enters your selection and displays the
next screen.
If you want to listen to choices and instructions in the language
of your choice and use the keys on the keypad to enter your
selections, plug in your headphones, or use the headphones
provided.
Note
Audio includes keypad instructions. Therefore, no further audio and keypad
information is included in this guide.
1.3 Using the AutoMARK VAT with an AT Device
The AutoMARK VAT is designed to work with AT devices such
as:
Puff-sip
Foot Pedal

3/20/08 10 AutoMARK 3210 Voter’s Guide AQS-13-5061-001-R
The AutoMARK VAT allows a Voter with an AT device to perform
all of the selections available on the key pad or touch screen.
When using an AT device the system responds to a yes or no
action. The AutoMARK VAT allows you to complete a ballot
entirely with the aid of and AT device.
Instructions for Use of an AT device:
When a screen is displayed, you may select NO to bypass that
screen or YES to move to the first selectable choice on that
screen. When you are on a selectable item of the screen, the
item will be highlighted in yellow. Selecting NO will move on to
the next selectable item on the screen. Selecting YES will
provide the same results as if you had clicked on that item.
When on a candidate or question choice YES will select or
deselect that candidate.
When on a MORE scroll bar, YES will cause the screen to scroll
up or down as indicated.
When on a screen button, YES invokes that action. For example,
entering YES when ZOOM is highlighted causes the screen to
ZOOM. Entering YES again, returns the screen to non-zoomed
mode.
Pressing NO at any time will move to the next highlighted item.
As you enter NO repeatedly, the highlight will move down the
screen, across the bottom from right to left and then loop back to
the top.
When you are done making selections on any given screen,
enter NO repeatedly until the yellow highlight is on the NEXT
button and then enter YES to move to the next screen.
If you encounter a problem operating the AutoMARK Voter
Assist Terminal, please ask an election official for assistance.
3/20/08 11 AutoMARK 3210 Voter’s Guide AQS-13-5061-001-R
Note
An AT input device does not provide access to the following functionality.
- Adjusting the volume of the audio.
- Adjusting the tempo of the audio.
- Repeating the audio of the screen.
- Turning the display screen on and off.
It can take up to 6 seconds for the AT device to be recognized by the VAT when
it is plugged in.
When using an AT device with Cantonese, Tagalog, Vietnamese, or Creole it is
recommended that headphones also be used for additional voter feedback

3/20/08 12 AutoMARK 3210 Voter’s Guide AQS-13-5061-001-R
2 Marking your Ballot
The following section tells you how to mark a ballot using the
touch screen, if your ballot is currently unmarked and in a
readable format. You can also use the Braille keypad in place of
the touch screen to make you selections. For more information
on how to use the Braille keypad to make your selections see
section 1.2. If you are using an AT device to make your
selections see Section 1.3. The Please Insert Your Ballot
screen (see picture below) should be displayed on the touch
screen monitor. If not, ask an election official for assistance.
Please Insert your Ballot Screen

3/20/08 13 AutoMARK 3210 Voter’s Guide AQS-13-5061-001-R
Follow the steps below to mark your ballot.
1. Insert your ballot. Insert an unmarked ballot. The
AutoMARK VAT feeds your ballot into the system and
scans the ballot. Note that scanning may take 30
seconds or so and the VAT will be silent during that
process.
Note
If you are using a ballot with a removable “stub”, remove the stub before
inserting the ballot.
Note
If you are having trouble inserting a ballot, ask an election official for assistance.
Marking your Ballot
3/20/08 14 AutoMARK 3210 Voter’s Guide AQS-13-5061-001-R
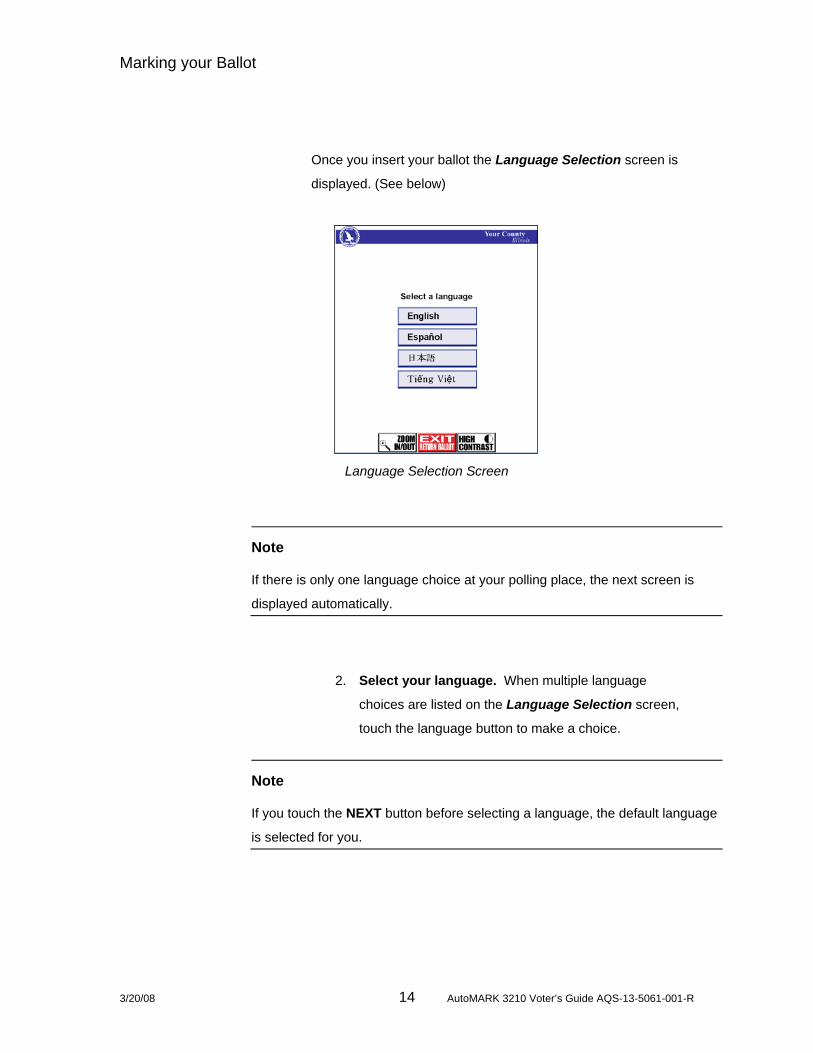
Once you insert your ballot the Language Selection screen is
displayed. (See below)
Language Selection Screen
Note
If there is only one language choice at your polling place, the next screen is
displayed automatically.
2. Select your language. When multiple language
choices are listed on the Language Selection screen,
touch the language button to make a choice.
Note
If you touch the NEXT button before selecting a language, the default language
is selected for you.
3/20/08 15 AutoMARK 3210 Voter’s Guide AQS-13-5061-001-R
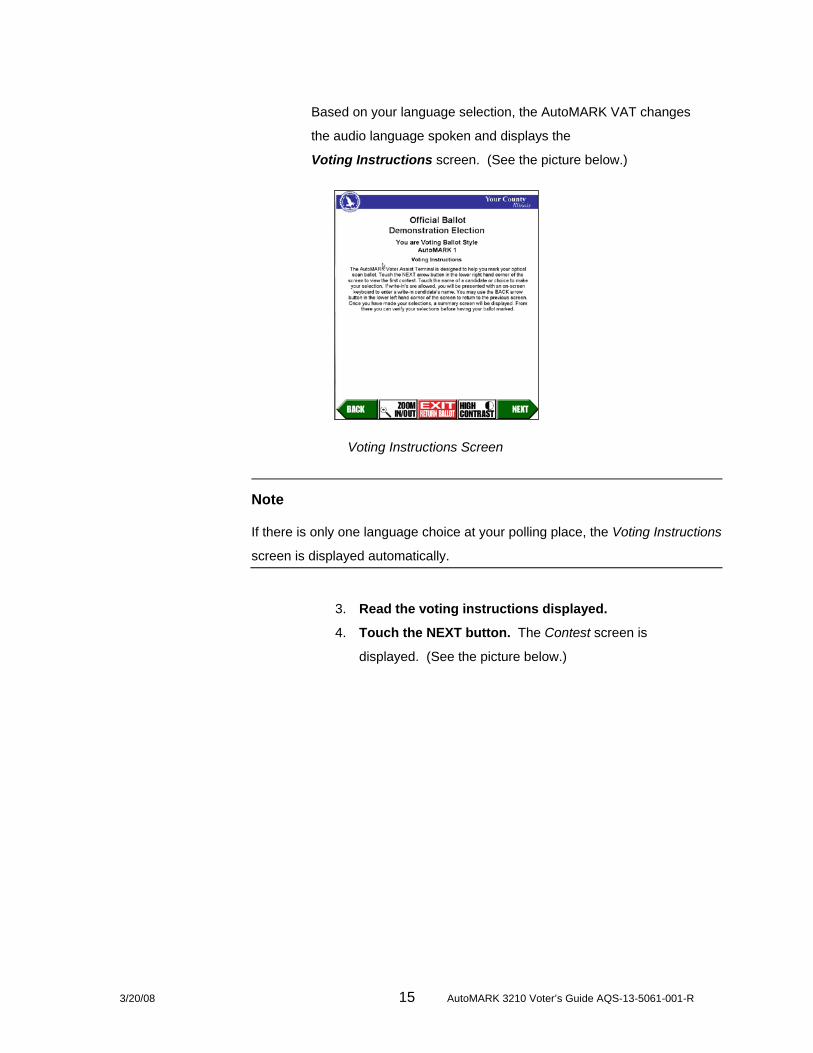
Based on your language selection, the AutoMARK VAT changes
the audio language spoken and displays the
Voting Instructions screen. (See the picture below.)
Voting Instructions Screen
Note
If there is only one language choice at your polling place, the Voting Instructions
screen is displayed automatically.
3. Read the voting instructions displayed.
4. Touch the NEXT button. The Contest screen is
displayed. (See the picture below.)

Marking your Ballot
3/20/08 16 AutoMARK 3210 Voter’s Guide AQS-13-5061-001-R
Contest Screen
The AutoMARK VAT displays the names of candidates or
choices for the first contest listed on your ballot on the Contest
screen.
5. Touch the name of the candidate or choice to
indicate your selection.
The oval displayed next to your choice fills in, indicating your
voting selection.
If one of the choices includes a Write-In and it is selected, a
Write-In Pop-Up screen is displayed. Type in the name of your
write-in and press ok.
6. Touch the NEXT button to enter you selection.
7. Continue voting until you have completed all
contests in this election.
Since AutoMARK VAT displays one Contest screen for each
contest listed on your ballot, several contest screens will be
3/20/08 17 AutoMARK 3210 Voter’s Guide AQS-13-5061-001-R
displayed until you have entered all your selections.
The AutoMARK VAT also displays various pop-up screens to
assist you through this process. For example, if you touch the
NEXT button before you make a selection, the Under-Vote Pop-
Up screen may be displayed. However, if make more selections
than allowed; the Over-Vote Pop-Up screen will be displayed.
If there are more candidates in a contest than can be displayed
at one time on the screen, you may be forced to view all of them
before proceeding to the next contest. (If you touch the NEXT
button before you have seen all of the candidates, the ALERT
MORE Pop-Up screen may be displayed.) If the screen is off,
you may be forced to listen to all of the candidate selections
before proceeding to the next contest.
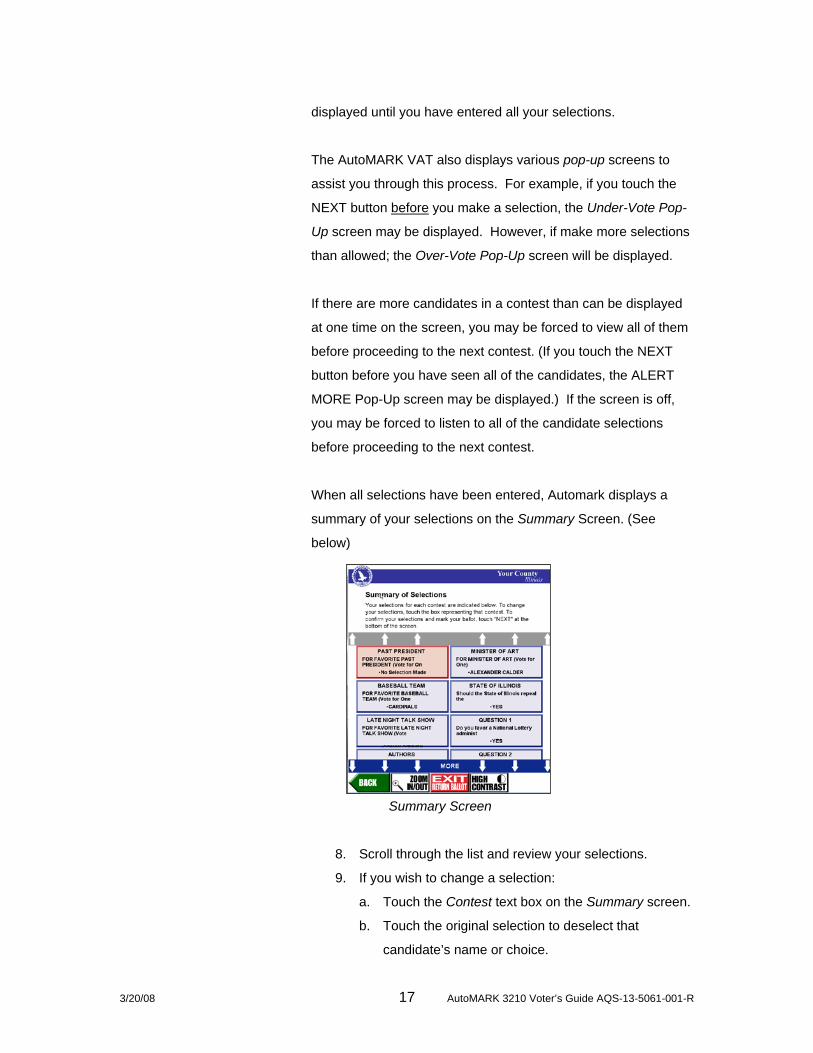
When all selections have been entered, Automark displays a
summary of your selections on the Summary Screen. (See
below)
Summary Screen
8. Scroll through the list and review your selections.
9. If you wish to change a selection:
a. Touch the Contest text box on the Summary screen.
b. Touch the original selection to deselect that
candidate’s name or choice.
Marking your Ballot
3/20/08 18 AutoMARK 3210 Voter’s Guide AQS-13-5061-001-R
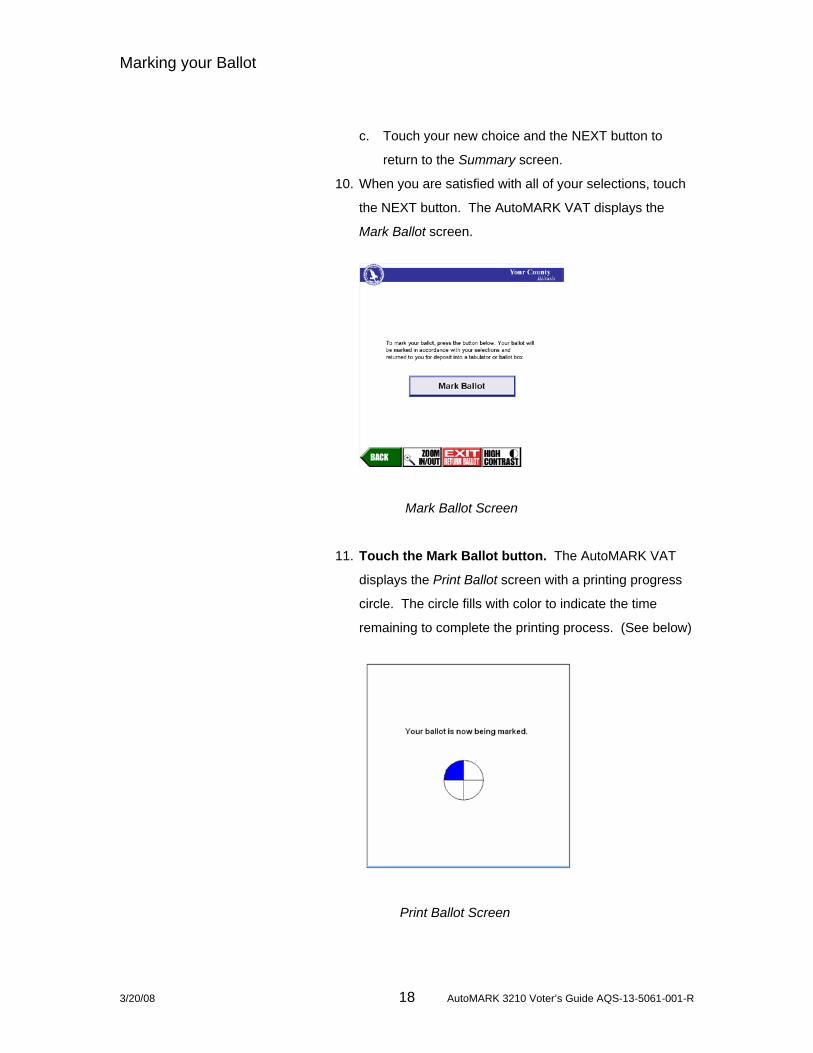
c. Touch your new choice and the NEXT button to
return to the Summary screen.
10. When you are satisfied with all of your selections, touch
the NEXT button. The AutoMARK VAT displays the
Mark Ballot screen.
Mark Ballot Screen
11. Touch the Mark Ballot button. The AutoMARK VAT
displays the Print Ballot screen with a printing progress
circle. The circle fills with color to indicate the time
remaining to complete the printing process. (See below)
Print Ballot Screen
3/20/08 19 AutoMARK 3210 Voter’s Guide AQS-13-5061-001-R
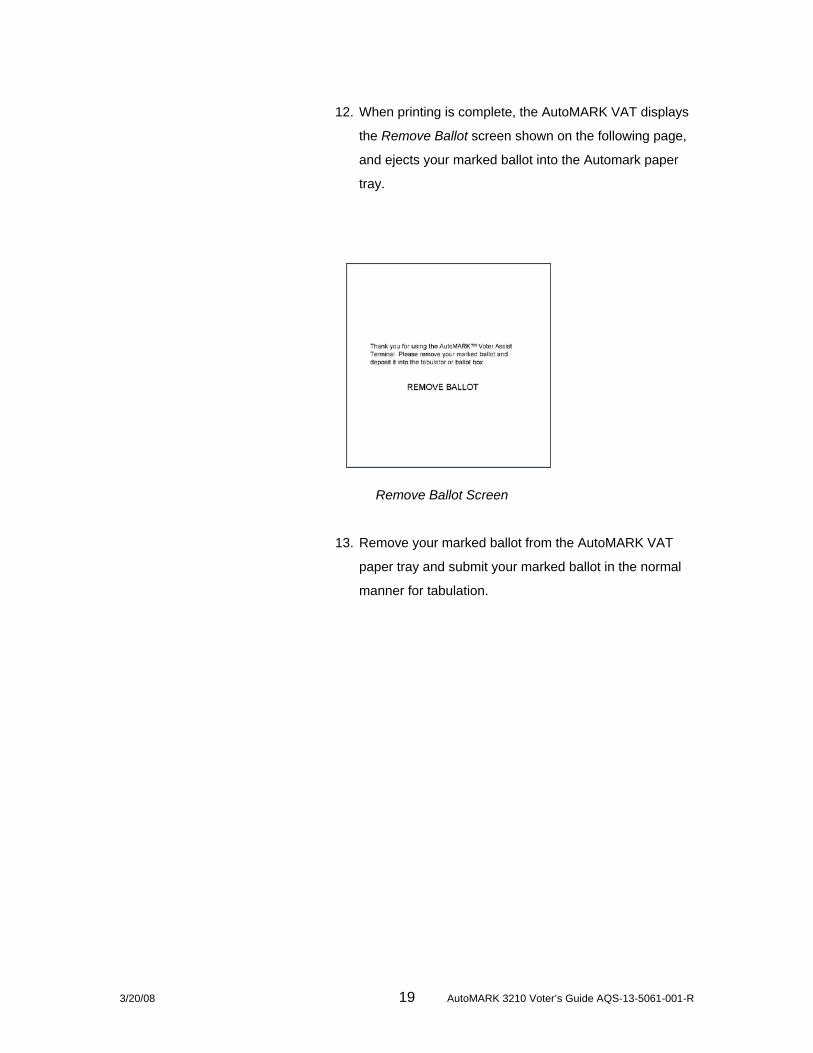
12. When printing is complete, the AutoMARK VAT displays
the Remove Ballot screen shown on the following page,
and ejects your marked ballot into the Automark paper
tray.
Remove Ballot Screen
13. Remove your marked ballot from the AutoMARK VAT
paper tray and submit your marked ballot in the normal
manner for tabulation.
3/20/08 20 AutoMARK 3210 Voter’s Guide AQS-13-5061-001-R
3 Verifying a Marked Ballot
The following section tells you how to use the AutoMARK VAT to
verify your ballot if it already marked and in a readable format.
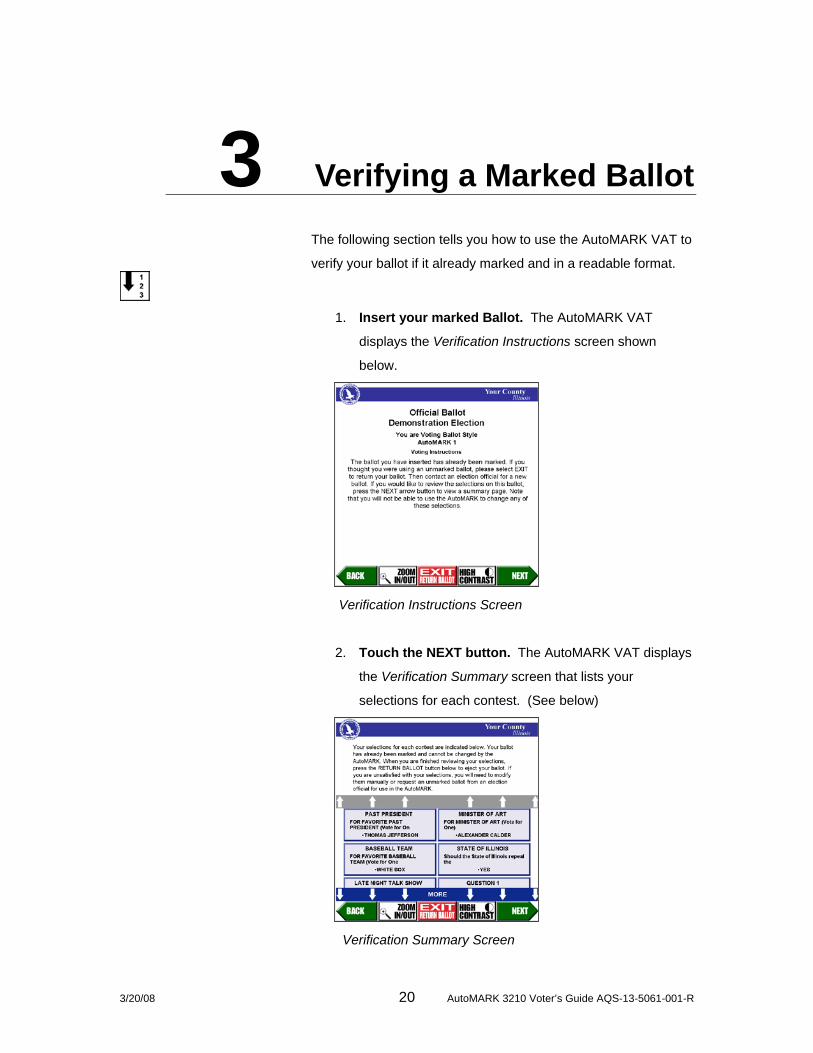
1. Insert your marked Ballot. The AutoMARK VAT
displays the Verification Instructions screen shown
below.
Verification Instructions Screen
2. Touch the NEXT button. The AutoMARK VAT displays
the Verification Summary screen that lists your
selections for each contest. (See below)
Verification Summary Screen

3/20/08 21 AutoMARK 3210 Voter’s Guide AQS-13-5061-001-R
3. Review the selections that are marked on your
ballot.
4. Touch the EXIT button when you are finished
verifying your marked ballot selections. The Remove
Ballot screen is shown below. The AutoMARK VAT
ejects your ballot into the paper tray.
Remove Ballot Screen
5. Remove your marked ballot from the paper tray and
submit your marked ballot in the normal manner for
tabulation.
Note
When verifying a marked ballot, the AutoMARK VAT cannot make any changes
to your ballot. If you are not satisfied with your marked selections, contact an
election official and request a new ballot.

3/20/08 22 AutoMARK 3210 Voter’s Guide AQS-13-5061-001-R
4 Frequently Asked Questions
The following is a list of frequently asked questions and
situations you may encounter while using the AutoMARK VAT to
mark your ballot. The AutoMARK VAT is designed to make
marking your ballot as easy as possible. If you encounter a
situation that is not listed in this section, contact your election
official for help.
4.1 Ballot is not readable
Reasons:
Ballot style is not used at this polling place
Ballot is damaged
The AutoMARK VAT displays the Error - Ballot Not Readable
pop-up screen and ejects the ballot into the paper tray.
Error- Ballot Not Readable Screen
1. Remove your ballot from the paper tray and try inserting
it again or contact an election official for assistance.
3/20/08 23 AutoMARK 3210 Voter’s Guide AQS-13-5061-001-R
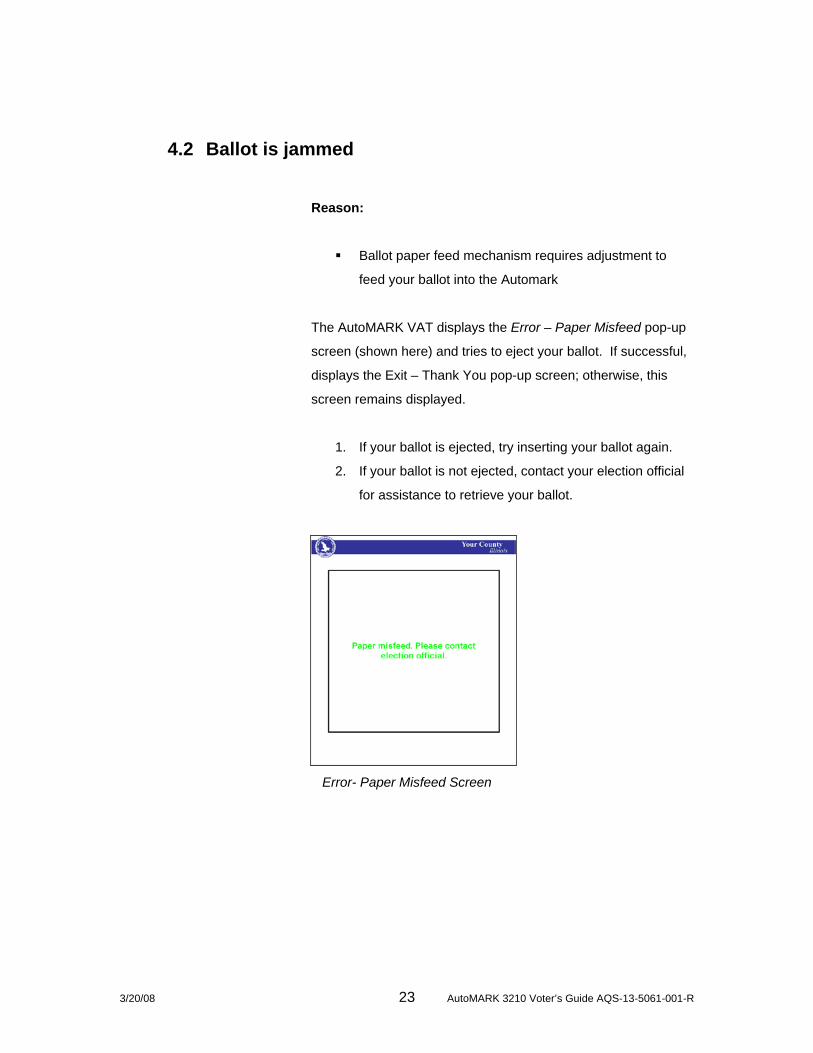
4.2 Ballot is jammed
Reason:
Ballot paper feed mechanism requires adjustment to
feed your ballot into the Automark
The AutoMARK VAT displays the Error – Paper Misfeed pop-up
screen (shown here) and tries to eject your ballot. If successful,
displays the Exit – Thank You pop-up screen; otherwise, this
screen remains displayed.
1. If your ballot is ejected, try inserting your ballot again.
2. If your ballot is not ejected, contact your election official
for assistance to retrieve your ballot.
Error- Paper Misfeed Screen

Frequently Asked Questions
3/20/08 24 AutoMARK 3210 Voter’s Guide AQS-13-5061-001-R
4.3 What Is a Pop-up Screen?
Pop-up screens display messages that require your response
before you can continue marking, verifying, or printing your ballot
selections.
The following pop-up screens may be displayed:
4.3.1 MORE ALERT
The AutoMARK VAT displays the More Alert pop-up screen
when all candidates or choices cannot be seen without scrolling
or you did not scroll down to view all choices and the word More
was listed at the bottom of the list of candidates.
1. Touch the YES button to return to the current Contest
screen and select MORE to review additional candidate
names.
2. Touch the NO button to display the next screen.
More Alert
4.3.2 FORCE MORE ALERT
The AutoMARK VAT displays the Force More Alert pop-up
screen when all candidates or choices cannot be seen without
scrolling or you did not scroll down to view all choices and the
word “More” was listed at the bottom of the list of candidates. In
this case, the system will not let you display the next screen until
you have reviewed all candidates listed.
1. Touch the OK button to return to the current Contest
screen and select MORE to review additional candidate
names.

3/20/08 25 AutoMARK 3210 Voter’s Guide AQS-13-5061-001-R
Force More Alert
4.3.3 WRITE-IN
The AutoMARK VAT displays the Write-In pop-up screen
(Shown below) when you select the word “Write-In” (from the list
of candidates for the contest) on a Contest screen.
1. If you do not want to write-in the name of a candidate,
touch the CANCEL button. The AutoMARK VAT clears
any characters that may have been displayed in the
write-in window, returns to the Contest screen and clears
the oval next to the word Write-In.
2. If you want to write-in the name of a candidate, touch the
letters, space and backspace images on the displayed
keyboard to spell the name of the candidate you want to
write in on your ballot. Then touch the OK button.
As you touch a letter, space or backspace image, the AutoMARK
VAT displays the letters you have touched in the top write-in
window on this screen. When the OK button is touched, the
AutoMARK VAT transfers the Write-In name to the list of
candidates on the Contest screen; then selects the Write-In
candidate name and fills the oval on the Contest screen.
Frequently Asked Questions
3/20/08 26 AutoMARK 3210 Voter’s Guide AQS-13-5061-001-R
Write-In
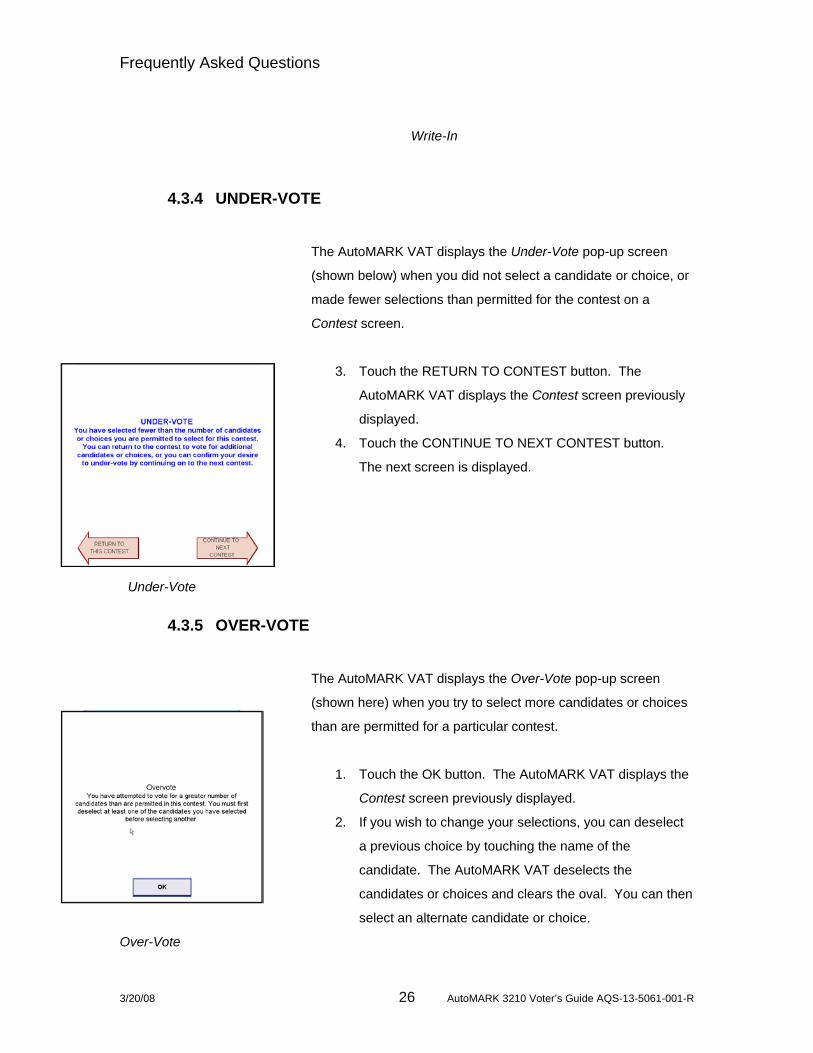
4.3.4 UNDER-VOTE
The AutoMARK VAT displays the Under-Vote pop-up screen
(shown below) when you did not select a candidate or choice, or
made fewer selections than permitted for the contest on a
Contest screen.
3. Touch the RETURN TO CONTEST button. The
AutoMARK VAT displays the Contest screen previously
displayed.
4. Touch the CONTINUE TO NEXT CONTEST button.
The next screen is displayed.
Under-Vote
4.3.5 OVER-VOTE
The AutoMARK VAT displays the Over-Vote pop-up screen
(shown here) when you try to select more candidates or choices
than are permitted for a particular contest.
1. Touch the OK button. The AutoMARK VAT displays the
Contest screen previously displayed.
2. If you wish to change your selections, you can deselect
a previous choice by touching the name of the
candidate. The AutoMARK VAT deselects the
candidates or choices and clears the oval. You can then
select an alternate candidate or choice.
Over-Vote
3/20/08 27 AutoMARK 3210 Voter’s Guide AQS-13-5061-001-R
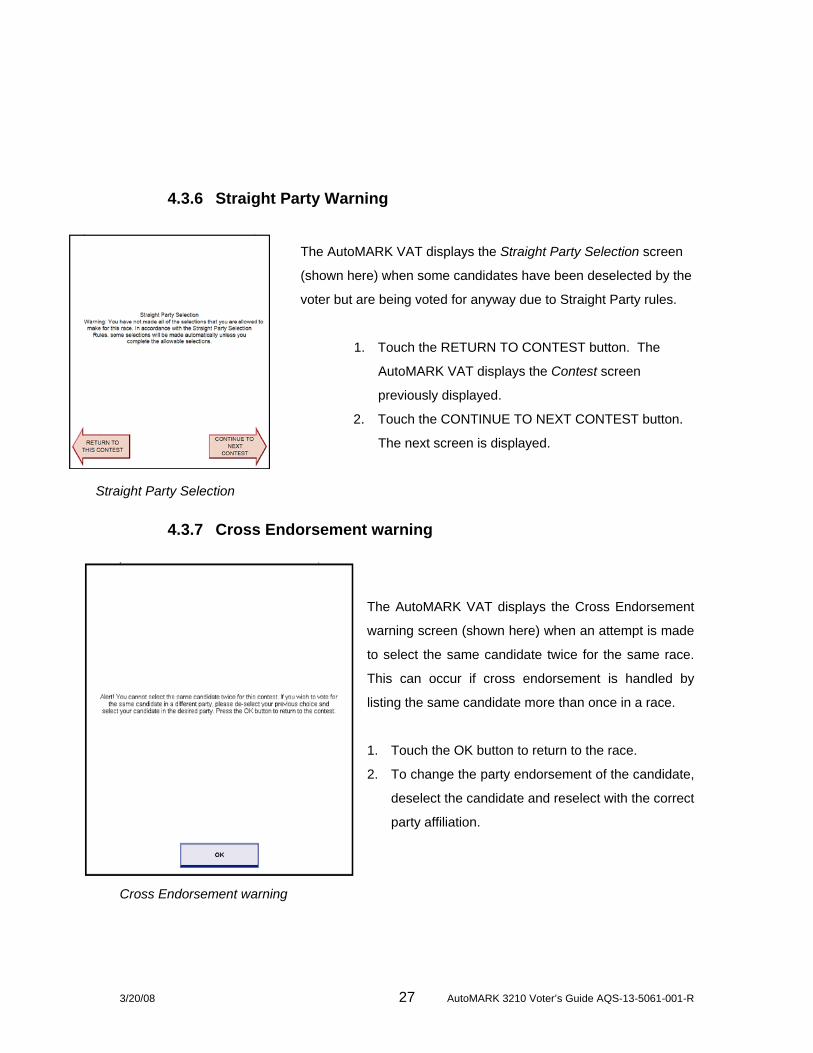
4.3.6 Straight Party Warning
The AutoMARK VAT displays the Straight Party Selection screen
(shown here) when some candidates have been deselected by the
voter but are being voted for anyway due to Straight Party rules.
1. Touch the RETURN TO CONTEST button. The
AutoMARK VAT displays the Contest screen
previously displayed.
2. Touch the CONTINUE TO NEXT CONTEST button.
The next screen is displayed.
Straight Party Selection
4.3.7 Cross Endorsement warning
The AutoMARK VAT displays the Cross Endorsement
warning screen (shown here) when an attempt is made
to select the same candidate twice for the same race.
This can occur if cross endorsement is handled by
listing the same candidate more than once in a race.
1. Touch the OK button to return to the race.
2. To change the party endorsement of the candidate,
deselect the candidate and reselect with the correct
party affiliation.
Cross Endorsement warning
Frequently Asked Questions
3/20/08 28 AutoMARK 3210 Voter’s Guide AQS-13-5061-001-R
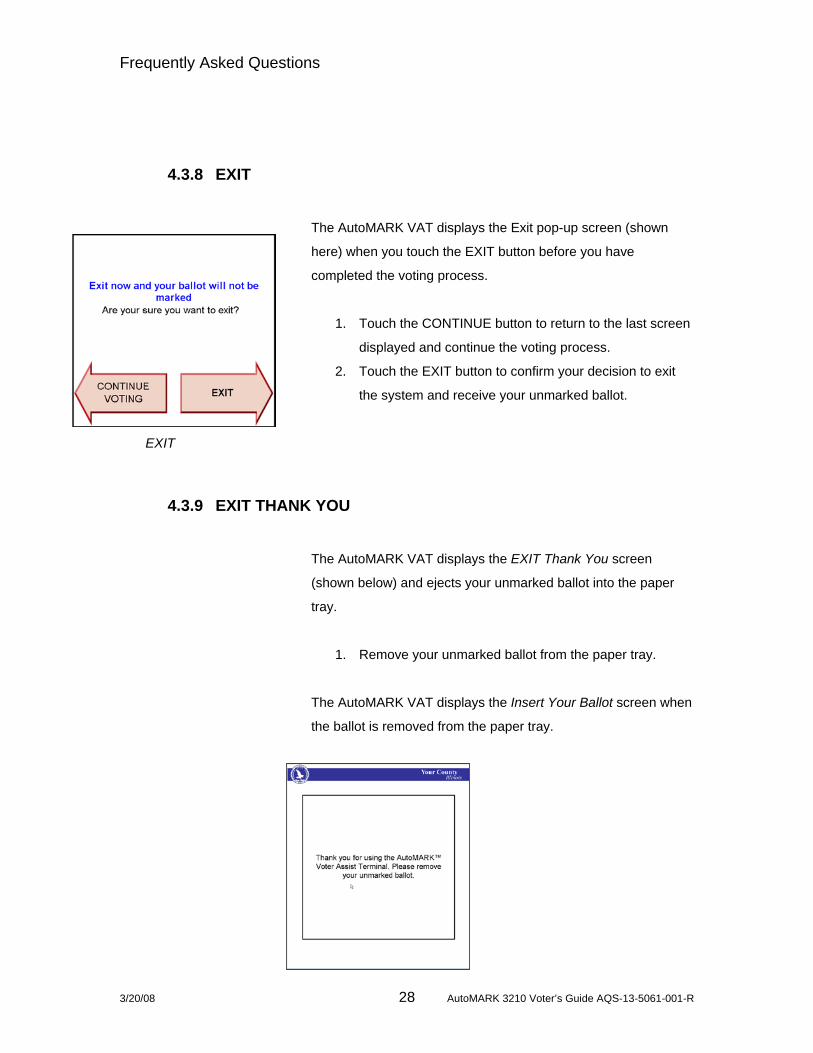
4.3.8 EXIT
The AutoMARK VAT displays the Exit pop-up screen (shown
here) when you touch the EXIT button before you have
completed the voting process.
1. Touch the CONTINUE button to return to the last screen
displayed and continue the voting process.
2. Touch the EXIT button to confirm your decision to exit
the system and receive your unmarked ballot.
EXIT
4.3.9 EXIT THANK YOU
The AutoMARK VAT displays the EXIT Thank You screen
(shown below) and ejects your unmarked ballot into the paper
tray.
1. Remove your unmarked ballot from the paper tray.
The AutoMARK VAT displays the Insert Your Ballot screen when
the ballot is removed from the paper tray.

3/20/08 29 AutoMARK 3210 Voter’s Guide AQS-13-5061-001-R
Exit Thank You
4.4 How Do I Exit without Marking the Ballot ?
To exit without marking the ballot, you can press the BACK key
repeatedly, or you can press the SCREEN Key four times in a
row.
3/20/08 30 AutoMARK 3210 Voter’s Guide AQS-13-5061-001-R
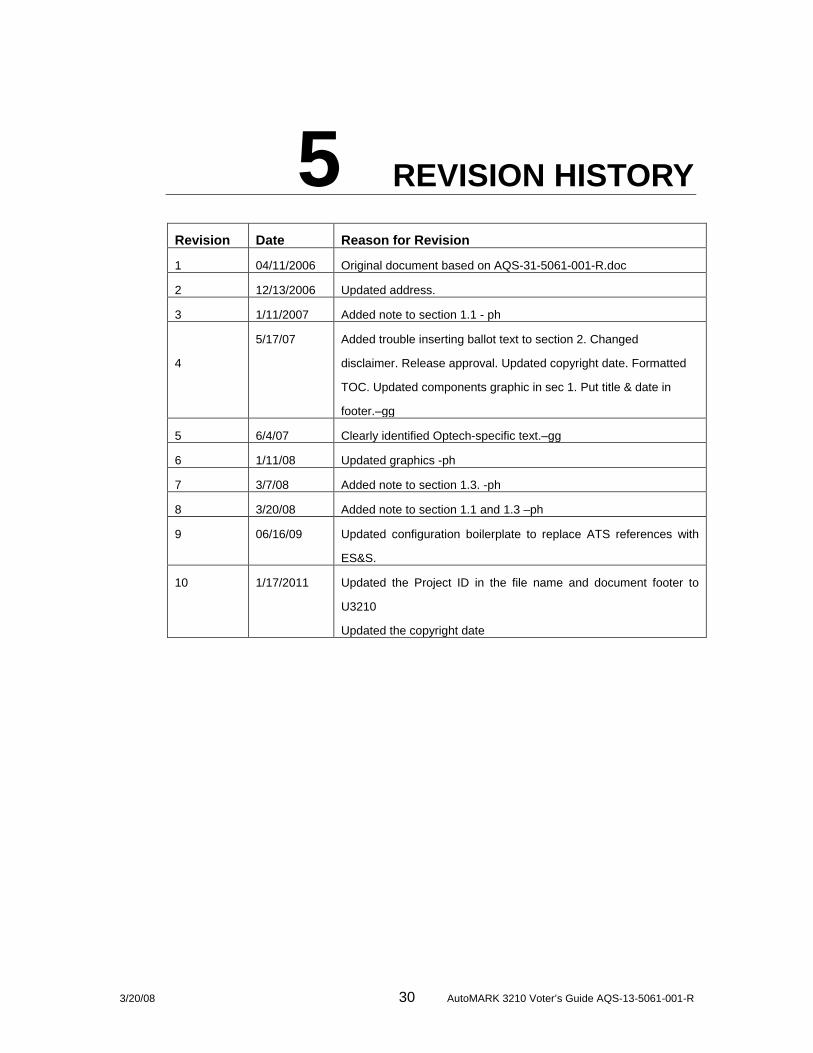
5 REVISION HISTORY
Revision Date Reason for Revision
1 04/11/2006 Original document based on AQS-31-5061-001-R.doc
2 12/13/2006 Updated address.
3 1/11/2007 Added note to section 1.1 - ph
4
5/17/07 Added trouble inserting ballot text to section 2. Changed
disclaimer. Release approval. Updated copyright date. Formatted
TOC. Updated components graphic in sec 1. Put title & date in
footer.–gg
5 6/4/07 Clearly identified Optech-specific text.–gg
6 1/11/08 Updated graphics -ph
7 3/7/08 Added note to section 1.3. -ph
8 3/20/08 Added note to section 1.1 and 1.3 –ph
9 06/16/09 Updated configuration boilerplate to replace ATS references with
ES&S.
10 1/17/2011 Updated the Project ID in the file name and document footer to
U3210
Updated the copyright date