w1918 - washer - operating instructions - 5226210
DESCRIPTION
Operating instructionsfor the W 1918Washing MachineTRANSCRIPT

Operating instructionsfor the W 1918Washing Machine
In order to protect yourself and avoid damage to your machine, ]it is absolutely necessary to read the operating instructions prior to installation and operation. M.-Nr. 05 226 210

ContentsGuide to the machine . . . . . . . . . . . . . . . . . . . . . . . . . . . . . . . . . . . . . . . . . . . . . . . 3Important safety instructions . . . . . . . . . . . . . . . . . . . . . . . . . . . . . . . . . . . . . . . . 5
Preparation for useHelp protect our environment . . . . . . . . . . . . . . . . . . . . . . . . . . . . . . . . . . . . . . . . . 6
Operating InstructionsEconomical usage . . . . . . . . . . . . . . . . . . . . . . . . . . . . . . . . . . . . . . . . . . . . . . . . . . 7Preparing the Laundry . . . . . . . . . . . . . . . . . . . . . . . . . . . . . . . . . . . . . . . . . . . . . . . 8End of programme . . . . . . . . . . . . . . . . . . . . . . . . . . . . . . . . . . . . . . . . . . . . . . . . . 10Changing the programme sequence. . . . . . . . . . . . . . . . . . . . . . . . . . . . . . . . . . . 11Adding detergent . . . . . . . . . . . . . . . . . . . . . . . . . . . . . . . . . . . . . . . . . . . . . . . . . . 12Adding fabric softener or starch . . . . . . . . . . . . . . . . . . . . . . . . . . . . . . . . . . . . . . 13Programmes. . . . . . . . . . . . . . . . . . . . . . . . . . . . . . . . . . . . . . . . . . . . . . . . . . . . . . 14Textile care symbols. . . . . . . . . . . . . . . . . . . . . . . . . . . . . . . . . . . . . . . . . . . . . . . . 19Additional options . . . . . . . . . . . . . . . . . . . . . . . . . . . . . . . . . . . . . . . . . . . . . . . . . 20Delay start/Time remaining indicator . . . . . . . . . . . . . . . . . . . . . . . . . . . . . . . . . . . 21Programmable functions . . . . . . . . . . . . . . . . . . . . . . . . . . . . . . . . . . . . . . . . . . . . 22
USER MAINTENANCE InstructionCleaning and care . . . . . . . . . . . . . . . . . . . . . . . . . . . . . . . . . . . . . . . . . . . . . . . . . 27Problem solving guide . . . . . . . . . . . . . . . . . . . . . . . . . . . . . . . . . . . . . . . . . . . . . . 31After sales service . . . . . . . . . . . . . . . . . . . . . . . . . . . . . . . . . . . . . . . . . . . . . . . . . 36
INSTALLATION INSTRUCTIONS . . . . . . . . . . . . . . . . . . . . . . . . . . . . . . . . . . . . . 37Plumbing . . . . . . . . . . . . . . . . . . . . . . . . . . . . . . . . . . . . . . . . . . . . . . . . . . . . . . . . 42Electrical connection . . . . . . . . . . . . . . . . . . . . . . . . . . . . . . . . . . . . . . . . . . . . . . . 43
Technical data . . . . . . . . . . . . . . . . . . . . . . . . . . . . . . . . . . . . . . . . . . . . . . . . . . . . 45
Contents
2

Guide to the machine
1 Supply cable
2 High pressure inlet hoses
3 Flexible drain hose, with detachableswivel elbow
4 Detergent dispenser drawer
5 Control panel
6 Drum door
7 Panel for access to lint filter and drainpump
8 Four height adjustable feet
Guide to the machine
3

b “Delay start” button.
c Time display “h mins”.
d “Door” button;opens the drum door.
e “ON/OFF” button; to turn machine on or off orto interrupt a programme.The “On” lamp illuminates.
Detergent dispenser drawer
Compartment i - for the pre-wash.
Compartment j - for the main wash.
Compartment p (with lid) - for fabricsoftener or starch.
f Pushbuttons for additional functions.
g SPIN SPEED SETTING switch.
h PROGRAMME SEQUENCE indica-tors (LED indicator lamps).
i Programme SELECTOR switch.
Guide to the machine
4

Important safety instructionsWARNING – To reduce the risk offire, electric shock, or injury to per-sons when using your appliance, fol-low basic precautions, including thefollowing:
1. Read all instructions before usingthe appliance.
2. Do not wash articles that havebeen previously cleaned in,washed in or soaked in gasoline,dry-cleaning solvents, or otherflammable or explosive sub-stances. They give off vapors thatcould ignite or explode.
3. Do not allow children to play on orin the appliance. Close supervi-sion is necessary when the ap-pliance is used near children.
4. Before the appliance is removedfrom service or discarded, removethe door to the washing compart-ment.
5. Do not reach into the appliance ifthe drum is moving.
6. Do not install or store this ap-pliance where it will be exposedto weather.
7. Do not tamper with the controls.
8. Do not repair or replace any part ofthe appliance, or attempt any ser-vicing unless specifically recom-mended in the user-maintenanceinstructions or in published user-repair instructions that you under-stand and have the skills to carryout.
9. Do not add gasoline, dry-cleaningsolvents, or other flammable or ex-plosive substances to the washwater. These substances give offvapors that could ignite or ex-plode.
10. Under certain conditions, hy-drogen gas may be produced in ahot water system that has notbeen used for 2 weeks or more.HYDROGEN GAS IS EXPLOSIVE.If the hot water system has notbeen used for such a period, be-fore using the washing machine,turn on all hot water faucets andlet the water flow from each forseveral minutes. This will releaseany accumulated hydrogen gas.As the gas is flammable, do notsmoke or use an open flame dur-ing this time.
SAVE THESE INSTRUCTIONS
Refer to the Electrical Con-nection Section for ground-ing and installation instruc-tions.
Important safety instructions
5

Help protect our environmentWarning - To reduce the risk of fire,electric shock, or injury to persons,read the IMPORTANT SAFETY IN-STRUCTIONS before operating thisappliance.
Disposal of the packingmaterialThe transport and protective packing ismostly manufactured from the followingrecycled or recyclable materials:
– corrugated paper/cardboard
– polystyrene - CFC-free
– polystyrene foil (transparent)
– Untreated wood
– Polypropylene (PP) strapping
Rather than throwing these materialsaway, please take them to your com-munity recycling center.
Disposal of your old machineOld machines contain materials whichcan be recycled. Please contact yourrecycling center or scrap merchant be-fore disposing of the appliance.
Help protect our environment
6

Economical usageThe key to good wash results is findingthe correct combination of detergentand temperature, and then allowing thewashing machine to optimize theirusage through its programming. Pro-gramme lengths can vary for this rea-son.
With the “Hydromatic” system, thedrum can revolve at various speeds.Faster and slower agitation speeds,along with pauses for soaking, com-bine to ensure excellent results.
The automatic load control feature en-sures the correct water level for thetype of fabric and load being washed(even though it may appear as if thereis too little water in the drum!).
Because of the accurately balanceddrum and special sound insulation, ma-chine noise is minimal while operating.
The fully electronic controls offer a com-bination of simple operation with manyoptional features.
For instance, since a main wash gener-ally gives good results for a normalload, the pre-wash cycle has beenmade a user selectable option, savingtime,water and energy over older fullcycle machines.
EconomyFor optimum economical usage, re-member the following tips:
– The automatic load control featurewill adjust the water level for loadsbetween 1 and 5 kg. However, ifpossible, load the machine to itsmaximum capacity in order to usewater and energy to the best advant-age.
– Use only the correct amount of deter-gent required for the water hardnessin your area. Miele recommends theuse of low-sudsing detergents, astheir characteristics allow them toperform better in front-loading ma-chine than regular powder or liquiddetergents.
If the wash is not heavily stained, selecta lower temperature than indicated onthe wash care label.
Economical usage
7

Preparing the LaundryThe headings numbered (1,2,3,...)show the operating sequence and canbe used as a brief guide.
Before washing
1 Prepare the wash load
Empty all pockets.
Foreign objects inadvertently left inpockets (e.g. nails, coins, paperclips, etc.) can cause damage toclothes and the machine. Damageto the machine can occur if wiresfrom underwire bras come loose.Do not wash underwire bras in themachine without ensuring that wiresare secure.
Sort the laundry
Most garments have a textile care labelin the collar or side seam. Sort thelaundry by care label and color. Only wash items that are labeled ma-chine washable by the manufacturer.
Dark fabrics often contain “excess dye”and should be washed separately sev-eral times before being included in amixed load.
Delicate fabrics should be washed sep-arately using a delicates programme.
Only wash wool or wool mixtures if theyare labeled machine washable on thetextile care label.
Pre-treat the laundry
Badly soiled areas (e.g. collars andcuffs) and water soluble stains can bepre-treated with bar soap, stainremover, or detergent mixed into a solu-tion or paste.Do not use detergents containing sol-vents in the machine.
Preparing the Laundry
8

2 Press the “Door” button to openthe door
3 Load the machine
Unfold the laundry and place it in thedrum. For best results we recommendwashing mixed loads consisting of bothlarge and small items. This improvesthe washing effectiveness and helpsdistribute the load evenly to keep themachine stable and reduce noise dur-ing spinning.
Recommended load sizes are notedbelow:
COTTONS . . . . . . . . . . . . . . . . . . 5.0 kg
PERMANENT PRESS . . . . . . . . . 2.5 kg
DELICATES . . . . . . . . . . . . . . . . . 1.0 kg
HANDWASH/WOOLLENS. . . . . . 1.5 kg
Rinse . . . . . . . . . . . . . . . . . . . . . . 5.0 kg
With curtains: Remove lead weightsand strips and place in a laundry bag.Woollens and knitted garments shouldbe turned inside out if recommendedby the manufacturer.
4 Close the machine door
Make sure there are no clothes caughtbetween the drum door and seal.
5 Add detergent
See section “Adding detergent” for de-tails.
To start a programme
1 Turn the programme selectorto Start / Finish
2 Press the “ON/OFF” button
3 Press any additional optionbuttons desired
(See the “Delay start” section if this fea-ture is desired.)
4 Select spin cycle speed
5 Turn the programme selector to thedesired programme
The programme selector can be turnedto the left or the right.
Preparing the Laundry
9
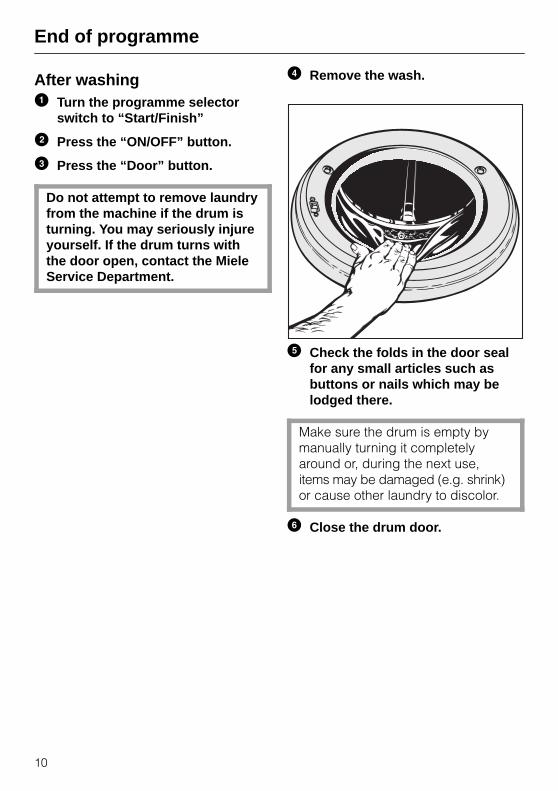
End of programmeAfter washing1 Turn the programme selector
switch to “Start/Finish”
2 Press the “ON/OFF” button.
3 Press the “Door” button.
Do not attempt to remove laundryfrom the machine if the drum isturning. You may seriously injureyourself. If the drum turns withthe door open, contact the MieleService Department.
4 Remove the wash.
5 Check the folds in the door sealfor any small articles such asbuttons or nails which may belodged there.
Make sure the drum is empty bymanually turning it completelyaround or, during the next use,items may be damaged (e.g. shrink)or cause other laundry to discolor.
6 Close the drum door.
End of programme
10

Changing the programme sequenceTo cancel a programme:
Turn the programme selector to“Start/Finish”.
To interrupt a programme:
Press the “ON/OFF” buttton.
To continue the programme, turn themachine back on.
To change an incorrectly selectedprogramme:
Turn the programme selector switchto “Start/Finish”.
When only the “On” lamp is lit, a newprogramme can be selected.
To change a programme which hasbeen “locked” using the Child Safetyfeature, see the “programmable func-tions” section.
To omit a programme stage:
A programme stage must first bereached to be omitted:
Turn the programme selector to “Start/Finish”
As soon as the PROGRAMME SE-QUENCE indicator lamp for the stageyou wish starts flashing:
Turn the programme selector switchto the desired programme.
Changing the programme sequence
11

Adding detergentDetergent should be added to compart-ment j at the beginning of each washcycle.
Miele recommends the use of low-suds-ing detergents, as their characteristicsallow them to perform better in front-loading machines than regular powderor liquid detergents.
Due to the Miele “Eco-System”, approxi-mately 2/3 of the manufacturer’s recom-mended amount of detergent is gener-ally sufficient for excellent wash results.
If you have difficulty finding a low-suds-ing detergent, contact Miele Limited.
Do not use chlorine bleach! Chlorinebleach will damage the machine.
For extremely hard water:
Water is taken in through compartmentj in the main wash. If your water is ex-tremely hard (above 400 ppm CaCO3)and the capacity of compartment j isinsufficient for the amount of detergentneeded, a Service Technician can re-programme the machine so that waterand detergent can also be taken inthrough compartment i.
For small loads:
– Gradually reduce the amount ofdetergent used with each small load.
– Check the wash results and the con-dition of the laundry.
– If the laundry is not clean or if it isgrey or hard to the touch, addslightly more detergent the next timeyou use the machine.
It is important to add the cor-rect amount of detergent, be-cause...
...too little detergent can result in:
– grey laundry
– grease/stains not being removed
– lime deposits on the heater elementsand drum.
...too much detergent can result in:
– excessive foam
– low level of agitation
– poor cleaning and rinsing results.
Water Softeners
If you wish to use a water softener tocut down on detergent usage in hardwater areas:
– add the amount of detergent necess-ary for a soft water area.
– Following the manufacturer’s recom-mendations,add the specifiedamount of water softener.
Always add the detergent first, in com-partments i and j followed by thesoftener, to ensure that both areproperly dispensed.
Adding detergent
12

Adding fabric softener or starchIf fabric softener is desired, it will workmore effectively and be gentler on theclothes if it is dispensed in the finalrinse cycle of the wash, rather than inthe tumble dryer through the use of sof-tener sheets. To automatically dispensefabric softener:
Open the lid of compartment p.
Following the manufacturer’s recom-mendations, pour the specifiedamount of liquid fabric softener intocompartment p. However, do not ex-ceed the maximum fill level markedinside the compartment, as any ex-cess will prematurely activate the si-phon and be wasted.
Close the compartment lid and pushin the dispenser drawer.
The conditioner will automatically bedispensed during the last rinse cycle.
At the end of the programme a smallamount of water will normally remain incompartment p. A high water level inthis compartment, however, may indi-cate that the siphon is clogged or thedispenser drawer was opened duringthe last rinse cycle, thereby interruptingthe distribution of fabric softener. In thiscase, the siphon tube should becleaned as described on Page 21.
StarchIf starch is used for shirts, blouses,table cloths, napkins, etc., pour the liq-uid starch into compartment p (use the some procedure as for fabric sof-tener).
Never mix fabric softener and starchtogether in compartment p. This canlead to a blockage in the washer’s over-flow system.
Using the “Starch” programme fordispensing liquid starch
– Prepare the starch solution in accor-dance with the manufacturer’s in-structions and pour it into compart-ment i.
– Use the normal water level (WaterPlus button “out”) when starching sothat the solution will have the maxi-mum effect.
“Without final spin” can be selected toreduce fabric creasing.
Adding fabric softener or starch
13

ProgrammesThe run time of front-loading machines is longer than that for most top-loading, ver-tical tub machines. This is because front-loading machines balance the 5 basicwashing factors (mechanical action, water, detergent, temperature and time) dif-fently than do vertical tub machines. Miele’s front-loading machines use an ad-vanced hydromatic washing action, precise and steady temperatures, less waterand detergent than vertical tub machines but more time. The longer run time ispart of the equation that produces Miele’s excellent wash results.
COTTONSFor cotton fabrics without special fin-ishes. For most everyday loads, e.g.sheet, towels, jeans, sweatshirts, t-shirts underwear.
1) Water levels used:wash - lowrinse - low
2) Rinse cycles used:Normal programme - fourRapid wash - two
X = additional options
Temperature guidelines:
30 – 40°C – dark coloured items.
40 – 50°C – light coloured items.
60 – 95°C – exclusively white items.
80°C – e.g. whites. such as socks,which would commonly be bleached ina top-loading, vertical tub machine.
95°C – e.g. diapers.
max/load: 5.0 kg (11 lbs.)max/spin: 1600 rpmNormal run time: 1 h 48 minRapid wash time: 1 h 06 min
Programmes
14

PERMANENT PRESSFor cotton blend fabrics, polyesterblends and other synthetics such as ac-rylic, nylon and ramie.
1) Water levels used:wash - lowrinse - high (to reduce wrinkling)
2) Rinse cycles used:Normal programme - threeRapid wash - two
X = additional options
Temperature guidelines:
30°C – dark fabrics which are a blendor 100% synthetic fabrics.
40°C – 50°C – light coloured cotton orsynthetic items.
60°C – white polyester/cottons items.
max/load: 2.0 kg (4.5 lbs.)max/spin: 900 rpmNormal run time: 1 h 07 minRapid wash time: 34 min
Programmes
15

DELICATESFor synthetics, machine washable silks,fine washables commonly washed byhand (e.g. blouses, sweaters, but notwool or wool blends), lace or crocheted(non-woolen) items, curtains and knitgarments.
1) Water levels used:wash - highrinse - high
2) Rinse cycles used:Normal programme - threeRapid wash - two
X = additional options
Temperature guidelines:
cold – 30°C – dark coloured silks andall synthetic items(lingerie)
40 – 50°C – light coloured silks andlace tableclothes.
60°C – white cotton lace and crocheted items.
For machine washable curtains, usecold – 30°C with a pre-wash. Load thedrum loosely up to 1/3 full.
max/load: 1.0 kg (2.2 lbs.)max/spin: 600 rpmNormal run time: 53 minRapid wash time: 32 min
Programmes
16

HANDWASH/WOOLLENS /
For all machine washable woollens orhand-washable wool or wool blends, in-cluding blankets and wool mixtureswith cotton or rayon. Also suitable forwoollens commonly washed by hand(e.g. sweaters) and silks.
1) Water levels used:wash - lowrinse - low
2) Rinse cycles used:Normal programme - two
No additional options can be selectedin this programme.
Reduced agitation is also used.
Temperature guidelines:
cold – 40°C – for all colours of wool.
cold – 30°C – for silk.
For satin, lace and silk manually re-duce the spin speed to the lowespossible setting, or select “withoutfinal spin”.
max/load: 1.5 kg (3.5 lbs.)max/spin: 1200 rpmNormal run time: 38 min
Programmes
17

StarchFor tablecloths, napkins, aprons, shirts.
max/load: 5.0 kg (11 lbs.)max/spin: 1600 rpmNormal run time: 18 min
SpinFor spinning wet items not washed inthe machine (hand washed). Suchitems must be suitable for machinespinning.
max/load: 5.0 kg (11 lbs.)max/spin: 1600 rpmNormal run time: 7 min
DrainFor draining water from the machinewhen “Without final spin” has been se-lected as the spin speed so thatlaundry may be removed wet for dripdrying.
RinseFor hand washed items that can begently rinsed, and if desired, spun.
1) Water levels used:rinse - high
2) Rinse cycles used:Normal programme - two
max/load: 2.0 kg (4.5 lbs.)max/spin: 900 rpmNormal run time: 14 min
NOTE:
If “cold” is selected in “HAND-WASH/WOOLLENS” or “DELICATES”the machine will heat the water to 24°Cto help the detergent dissolve and tocompensate for temperature fluctuation-s in the plumbing system.
To soak clothing, select one of the pro-grammes “COTTONS”, “PERMANENTPRESS”, “DELICATES” or “HAND-WASH/WOOLLENS”; wait for the ma-chine to fill and press the “ON/OFF” but-ton. The machine will turn off. Aftersoaking, select “Drain”.
Programmes
18

Textile care symbolsThe textile care symbols on clothing in-dicate the maximum temperature atwhich the clothing should be washedand are a good guideline when choos-ing a programme. In choosing a pro-gramme, it can be taken into accountthat front-loading machines are gentleron clothing than most top-loading, verti-cal tub machines.
Do not use chlorine bleach!
Chlorine bleach will damage the ma-chine.
The following is an explanation of textilecare symbols:
Washing c
h Do not wash
/ Hand wash in 40°C water
7 Machine wash at 40°C
Chlorine bleach x
Do not use chlorine bleach! Chlorinebleach will damage the machine.
Drying
Dry flat
(Yellow symbol) Tumble dry lowtemperature(Green symbol) Tumble dry mediumto high temperature
Hang to dry
Drip dry
Ironing F
J Do not iron
G Iron at low setting
H Iron at medium setting
I Iron at high setting
Dry cleaning
D Do not dry clean
Dry clean
Textile care symbols
19

Additional optionsBy selecting one or more pushbuttonfunctions, basic programmes can betailored to the type of laundry beingwashed.
When the “Door” button is pressed, allthe other buttons spring out, and theadditional options are cancelled.
“Pre-wash”Use for heavily soiled or stainedlaundry items.Available in the “COTTONS”, “PER-MANENT PRESS” and “DELICATES”programmes.
Add the required amount of powderdetergent to compartment i and j.
“Water plus”This increases the normal water level toa slightly higher level:
for particularly delicate fabrics in ad-dition to the “Gentle wash” option,
in hard water areas, if more water isrequired for dispensing the deter-gent,
In soft water areas to enhance wash-ing and rinsing results.
For people who are skin sensitive todetergents.
The “Water plus” option is available inthe following programmes:
The wash and rinse cycles for COT-TONS.
The wash cycle for PERMANENTPRESS.
“Gentle action”For actioning of lightly soiled items,or delicate fabrics which tend to pill.Drum movement is reduced by half.
Available in the “COTTONS”and “PER-MANENT PRESS” programmes.
“Rapid wash”Offers a quick wash cycle (approx.38 minutes)Can be used with or without a pre-wash.
To operate:
1Push in the ON/OFF button to turn onthe machine.
2Push in the Pre-wash button if desired.
3Push in the Rapid wash button. No-tice the thick grey ring surroundingthe button. This grey ring corre-sponds to the grey ring surroundingthe COTTONS, PERMANENT PRESSand DELICATES programmes on theSelector switch. As long as the pro-gramme selected is within this ring,the actual wash times will be close towhat is displayed.
4Choose the desired programme andthe machine will start.
Additional options
20

Delay start/Time remaining indicatorTime display “H:min”The Time display has a dual function.
The Delayed start is activated bypressing the button, or;
It shows the time remaining in thewash programme.
Delay Start
If the “Delay start” lamp is blinking, thestart of the programme can be delayedup to 9 hours and 30 minutes.
Entering the start delay:
– Press the button to the left of the“Delay start” lamp as many times asnecessary until the desired delaytime appears. Each time the buttonis pressed, the time of delay will in-crease by 30 minutes.
Select the programme
– The display will begin counting thedelayed time backwards in oneminute increments.The “Delay start”lamp will remain lit.
Programme start
– When the delay time reaches zero,the “Time remaining” lamp illumi-nates, and the “Delay start” lampgoes out. The duration of the se-lected programme will be shown onthe display.
Deleting the start delay
– When the display reaches “9 h 30min”, press the button to the left ofthe “Delay start” lamp and the startdelay will be deleted.
Remaining time
The remaining time for programmecompletion is shown in hours andminutes as soon as:
– A programme is selected.
– The time delay reaches zero.
The display counts backwards in 1minute increments.
Delay start/Time remaining indicator
21

Programmable functionsWarning - To reduce the risk of fire,electric shock, or injury to persons,read the IMPORTANT SAFETY IN-STRUCTIONS before operating thisappliance.
Additional functions can be pro-grammed into the machine if desired:
A High water level (only in“Cottons” rinses)
Where rinse results are particularly im-portant (e.g. Soap allergies).
B 5th Rinse in the “Cottons”programme
For soft water areas (up to 135 ppm cal-cium carbonate).
In soft water areas, a higher water levelcan be selected in addition to a 5thrinse cycle, if required.
C No water intake throughcompartment i
The 10 second water intake throughcompartment i during the main washis omitted.
D Programme lock(Child safety feature)
When activated, the washing machinewill ignore any changes made after thefirst three minutes of operation. Forexample if the programme selectorswitch is moved to a different setting oran additional function is selected, the“On” lamp will flash, notifying you thatthe Child safety feature has been acti-
vated, but the programme will continueuninterrupted. This prevents childrenfrom inadvertently changing or stop-ping a wash programme by playingwith the dials.
If the programme selector switch isturned to its original position, the “On”lamp will stop flashing.
To change a programme once the pro-gramme lock is activated:
Turn the programme selector switchto “Start/Finish”.
The PROGRAMME SEQUENCE indica-tor lamps will start flashing in suc-cession after about 30 seconds. A newprogramme can be selected as soonas the “On” lamp is the only one remain-ing lit.
The functions described above canbe programmed by the Customerusing the steps shown on the follow-ing pages.There are other programmable func-tions which are reserved for MieleService Engineers. They are not nor-mally activated, and require accessto internal machine components.
E Additional rinse in Rapidwash
For soft water areas.
For an extra thorough rinse.
Programmable functions
22

Step 1:Turn off the machine, close the door, and release all pushbuttons. Set the progamselector switch to “Start/Finish”.
Step 2: Carry out steps 2 and 3 within 4 seconds .
Press the “ON/OFF”button
Step 3:Press the “Water plus”button 4 times (i.e.press in and out twice)
The “ON” lamp willilluminate and the “Pre-wash” and “Main wash”lamps will flash.
Programmable functions
23

Step 4 : Select the function desired:
Desired function:AHigh water level
Set the programmeselector to “Rinse”.Continue with Step 5 toactivate.
B 5th rinse cycleSet the programmeselector to “Drain”.Continue with Step 5 toactivate.
CNo water intakethrough compartmenti
Set the programmeselector to “Starch”.Continue with Step 5 toactivate.
DProgramme lock(Child safety feature)
Set the programmeselector to “HANDWASH/WOOLLENS cold”.Continue with Step 5 toactivate.
Programmable functions
24
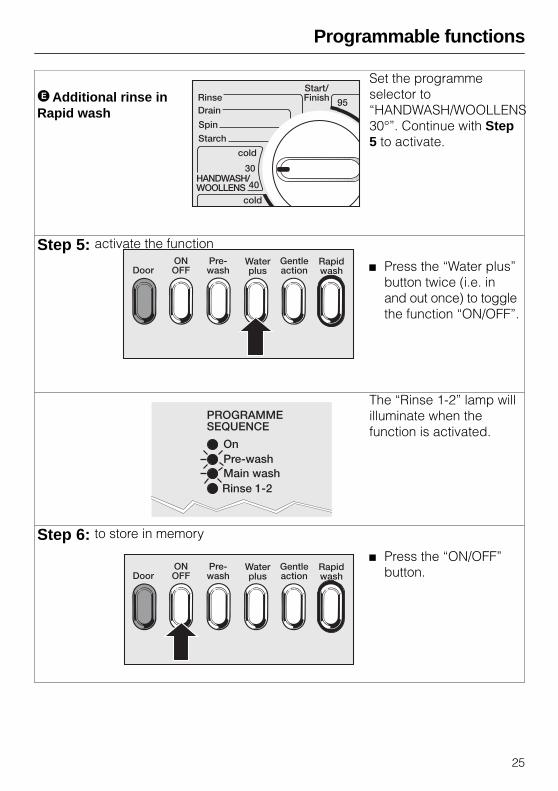
EAdditional rinse inRapid wash
Set the programmeselector to“HANDWASH/WOOLLENS30°”. Continue with Step5 to activate.
Step 5: activate the function
Press the “Water plus”button twice (i.e. inand out once) to togglethe function “ON/OFF”.
The “Rinse 1-2” lamp willilluminate when thefunction is activated.
Step 6: to store in memory
Press the “ON/OFF”button.
Programmable functions
25

To check if the function hasbeen stored:
Carry out Steps 1 to 4.
If the “Rinse 1-2” lamp lights up, theprogrammable function is activated.
Press the “ON/OFF” button. This fi-nishes the check of the program-mable function.
If, after Step 2, the selector switch isaccidentally turned to a settingother than one of the three shown:– If the “Rinse 1-2” indicator does
not light up - no function was acti-vated
– If the “Rinse 1-2” indicator lightsup - proceed as in “Deleting the additional functions”.
Exception: the “Rinse 1-2” indicatorwill light up if the switch is set to“COTTONS 95°C”.
Deleting the additional func-tions:Follow the same instructions givenunder “To activate the additional func-tions”, steps 1 to 4.
When the “Rinse 1-2” lamp goes out;
Press “ON/OFF”.
The additional function has now beendeleted.
Programmable functions
26
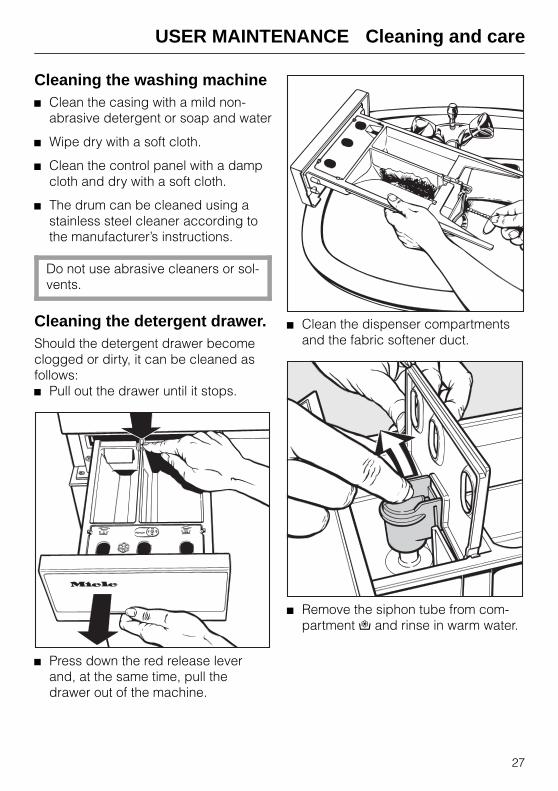
USER MAINTENANCE Cleaning and careCleaning the washing machine
Clean the casing with a mild non-abrasive detergent or soap and water
Wipe dry with a soft cloth.
Clean the control panel with a dampcloth and dry with a soft cloth.
The drum can be cleaned using astainless steel cleaner according tothe manufacturer’s instructions.
Do not use abrasive cleaners or sol-vents.
Cleaning the detergent drawer.Should the detergent drawer becomeclogged or dirty, it can be cleaned asfollows:
Pull out the drawer until it stops.
Press down the red release leverand, at the same time, pull thedrawer out of the machine.
Clean the dispenser compartmentsand the fabric softener duct.
Remove the siphon tube from com-partment p and rinse in warm water.
USER MAINTENANCE Cleaning and care
27

Cleaning the fluff (drain) filterand pumpCheck the fluff (drain) filter initially after3-4 washes to ascertain how often it islikely to require cleaning.
With normal cleaning approx. 2 litres ofwater run out.
If the drain outlet is clogged, morewater will be retained in the machine(up to 25 litres) .
Caution: If laundry has beenwashed at a high temperature,water draining out of the machinewill still be hot.
Take the (yellow) filter flap opener frombehind the detergent drawer faciapanel, (see illustration above).
Open the flap.
Place a dish under the drain fixture.
Turn the fluff filter lid round 2-3 times. Do not take it right out.
With large volumes of water, when thedish is full screw the fluff filter back intoposition, and empty the dish before re-peating the procedure.
USER MAINTENANCE Cleaning and care
28

Once the flow of water ceases,remove the fluff filter completely.
Clean the fluff filter thoroughly.
Remove any foreign objects (e.g.buttons, coins, etc.) and fluff.
Turn the impeller by hand to checkthat it is free to rotate. Any foreign ob-jects causing an obstruction shouldbe removed.
Clean the inside of the fluff filter hous-ing.
Remove any deposits of lime scale anddetergent or foreign objects from thethread of the filter housing and filter unit(as these objects can cause a leakageof water). Deposits of limescale areoften a sign of underdosage of powder.
Put the fluff filter back in place andsecure.
After performing this action gentlypour approx. 2 litres of water into thedetergent dispenser compartmentj to reactivate the ball valve whichkeeps detergent in circulation in thesuds.
USER MAINTENANCE Cleaning and care
29

Cleaning the water inlet filters.The washing machine has two waterinlet filters to protect each inlet valve.
To clean the filter in the inlet hose:
Turn off the valve.
Carefully unscrew the inlet hose fromthe valve by turning the connectorcounterclockwise using a wrench ifnecessary.
Remove the rubber seal from theconnector.
Using needle nose pliers, grasp theplastic filter and pull it out of thehose connector. Clean the filterunder running water and carefullyremove any large particles.
Replace the filter and seal and recon-nect the hose. Slowly turn on thevalve and check for leaks.
Inspect the inlet hose regularly. Thehose should be replaced if there aresmall cracks in the surface, or if it hasbeen otherwise damaged or cut.
If a replacement is necessary, use onlya genuine Miele inlet hose as otherhoses may burst under pressure.
To clean the filter in the inlet valve:
Using a wrench, carefully loosen andremove the plastic hose connectoron the inlet valve.
Using needle nose pliers, withdrawthe plastic filter by pulling on the bar(see illustration). Rinse under waterto clean, and then replace.
The two filters - one at the pressurehose/valve connection and one atthe inlet connection to the solenoidvalve - must not be removed.
USER MAINTENANCE Cleaning and care
30

Problem solving guideAny work done on the electrical components of this appliance shouldonly be performed by a qualified and trained person in accordance with alllocal and national codes and regulations. Unauthorized repairs may resultin personal injury and damage to the machine.
What to do if, . . . Cause . . . Remedy . . .
. . . The programme does notstart?
There is no power.The “ON” indicator lamp hasnot lit up.
Check that..:
– the door is properly closed.
– the machine is plugged in.
– the fuse or circuit breakerhas not tripped.
There is power and the “ON”indicator lamp is on, but theprogramme selector has notbeen turned to the “Start/Finish”position.
– Turn the programme selectorto the “Start/Finish” position.
– Select a programme.
. . . The “Check p / q”indicator lamps are flashing?
The “Check p” indicator lampis flashing, and the programmehas started.The water inlet is blocked.
– The inlet valve is not openedfar enough.
– The inlet hose is kinked.
– The water pressure is toolow. Call the Service Dept.
The “Check q” indicator lampis flashing.The drain is blocked.
– Clean the drain pump andlint trap.
– Has the drain hose beeninstalled too high? (max drainheight = 4 feet)
Problem solving guide
31

What to do if, . . . Cause . . . Remedy . . .
. . . the “Pre-wash”, “Mainwash” or “Rinse 1-2”indicator lamp is flashing?
There is an internal problem. Restart the programme. If theindicator lamp starts flashingagain, call the Service Dept.
. . . The “Rinse & hold”indicator lamp is flashing?
The spin speed setting hasbeen set to “Without final spin”.
Select a spin speed setting.
. . . The “Final spin”indicator lamp is flashing?
The final spin has not takenplace. The machine detectedan imbalance.
– Redistribute the laundry load.
– Select a spin speed.
– Turn the programme selectorto “Spin”.
. . . The “ON” indicator lampis flashing?
The child-safety feature isactivated, and the programmehas been changed.
Go back to the programmeoriginally selected.
. . . The wash is too wet afterthe final spin?
The spin speed selected wastoo low.
Select a higher spin speed nexttime.
The load was not evenlydistributed in the drum, and thelaundry was spun at a reducedspeed to protect the machine.
Mix large and small items in aload to avoid imbalance.
The drain pump or lint trap isclogged.
Clean the drain pump or linttrap.
. . . The machine shakesduring the spin cycle?
The four feet are not restingevenly on the floor.
Level the machine (seeInstallation Section).
The shipping struts have notbeen removed.
Remove the shipping struts.
Problem solving guide
32

What to do if, . . . Cause . . . Remedy . . .
. . . In spite of adequatewater supply, the water flowsslowly into the machine?
A filter in the water inlet systemis blocked.
Clean the water inlet filters.
. . . Large residues ofdetergent remain in thedispenser drawer?
The water pressure is too low. – Clean the filters in the waterinlet system.
– It may help to select “Waterplus”.
Detergent used with a watersoftener tends to become sticky.
Pour detergent into thedispenser before adding anywater softener.
. . Fabric softener is notcompletely dispensed orwater remains in the p
compartment?
The dispenser drawer was notpushed in when the fabricsoftener was being dispensed.
Make sure the drawer is all theway in.
The siphon tube is eitherincorrectly positioned orclogged.
Clean the siphon tube.
. . . There is an excessivebuild-up of foam?
Use only a low-sudsingdetergent at the appropriatetemperature.
– Follow recommendations onthe package.
– Take the water hardness intoaccount.
– Use less detergent for lightlysoiled or small loads.
. . . Lime deposits appear onthe drum surface?
Not enough detergent has beenused.
– Use a decalcifier suitable foruse in washing machines. Aproduct called “Quick” isavailable from the Miele PartsDepartment.
– Use the correct amount ofdetergent for the waterhardness in your area.
Problem solving guide
33

What to do if, . . . Cause . . . Remedy . . .
. . . Grey greasy particlescling to washed laundry?
Insufficient detergent was usedto break down the particles ofgrease in heavily soiled laundry.
– Add more detergent.
– Before washing the next loadrun a COTTONS 50°Cprogramme with detergentbut without a load to cleanthe machine.
. . . Liquid detergent doesnot give the required result?
Liquid detergents do notcontain bleaching agents. Theydo not remove stains as well aspowdered detergentscontaining non-chlorinatedbleaches.
– Use a general purposepowder detergent containinga bleaching agent.
– Pre-treat stains with a stainremover.
. . . After washing pillingappears on the fabric?
This is a normal occurance ofeveryday wear with somefabrics.
These fabrics must be handledwith care. Wash them using theDELICATES programme and/orselect “Gentle wash” in thefuture.
Problem solving guide
34

Opening the drum door in theevent of a power failure
To prevent water from spilling ontothe floor, make certain the machineis drained before opening the door.
Turn off the washing machine.
Open the lint trap door and drain offany water as described in the sec-tion on cleaning and care.
Pull down the ring in the upper rightcorner of the access area, and thedoor will open.
Always make sure the drum is sta-tionary before reaching in to removelaundry. Reaching into a movingdrum is extremely dangerous.
To check water pressurePlace a bucket under the water sup-ply valve.
Turn on the valve.
If 5 liters (1 gal.) of water flows into thebucket in 15 seconds the water press-ure is correct.
Problem solving guide
35

After sales serviceIf problems occur that cannot be easilyremedied, or if the appliance is underwarranty, please contact:
– Your Miele Dealer or
– The Miele Service Department (seeback cover).
When contacting the Service Depart-ment, please have the model and serialnumbers of your appliance available,both of which can be found on the data-plate visible above the front glass onthe inside of the door.
After sales service
36

INSTALLATION INSTRUCTIONSInstallation surfaceExperience has shown that a concretefloor is the most suitable surface for awashing machine. Concrete floors arefar less prone to vibration during thespin cycle than wooden floors.
Please note the following points:
The machine must be level and se-curely positioned.
To avoid vibrations during spinning,the machine should not be installedon soft floor coverings.
If installation must be on a woodenjoist floor, we recommend the use ofa plywood base at least 3 cm thickand 60 x 60 cm wide. Ideally thebase should be large enough tospan several joists and should be an-chored to the joists and not just thefloorboards.
As a general rule, we recommendthe installation of the machine (orwasher/dryer stack) in the corner ofa room where the stability of the flooris at its greatest.
InstallationLift the machine from its shipping palletand move it to the installation site.Please note:
Do not lift the machine by the drumdoor.
Ensure that the machine feet and thefloor are dry to prevent slippage dur-ing the spin cycle.
Removing the shipping struts
Turn the left-side shipping strut 90°counterclockwise.
Turn the right-side shipping strut 90°clockwise.
INSTALLATION INSTRUCTIONS
37

Withdraw the two struts together withthe support plate.
Plug the two holes with the plasticcaps supplied.
The machine should not be moved with-out the transit struts in place.
The transit fitting should be storedin a safe place for future use. Itmust be reinstalled before the ma-chine moved. Reinstallation can becarried out by reversing the proce-dure.
INSTALLATION INSTRUCTIONS
38

Levelling the machineTo ensure smooth operation, it is essen-tial that the machine is level.
Failure to level the machine can resultin the machine “banging” in the spincycle or “walking” across the floor dur-ing operaton. Energy and water use willalso increase.
Adjust the four leveling feet as fol-lows:
Loosen the conternuts (item #2) on allfour legs by moving the handle of thescrewdriver to the left (see illustration).Adjust the right rear leg to the properlength. Use the screwdriver to turnthe counternut up until it is tightagainst the bottom tray.Move the machine to its location.
BEWARE: The washing machine isheavier than it looks! When workingwith the machine, be careful that itdoes not slip or slide along the floor.Take care not to injure yourself ordamage any surrounding furniture.
Shorten the front left leg so the ma-chine is standing on the other threelegs only. Push the top front left cor-ner diagonally to ensure that theright rear leg is resting on the floor.
Check with a level in both planes asshown in the illustration.
To tilt the machine toward the back,extend the right front leg by turningthe leg to the left (see item #1).
To tilt sideways, shorten or extendthe left rear leg.
Check with a level again in bothplanes. If still not level, repeat the ad-justment.
When the position is correct, use thescrewdriver (move the handle to theright) to turn the counternuts up onthe right front and left rear legs untilthey are tight.
Extend the left front leg until it is incontact with the floor. Add 1/2 turn ro-tation.
INSTALLATION INSTRUCTIONS
39

Try to rock the machine diagonally tofind which diagonal is firmer. If the di-agonal from front left to rear right isless firm, extend the front left leg. Ad-just only the front left leg until both di-agonals have the same stiffness.When finished, turn and lock thecounternut on the front left leg.
All four counternuts must be tightagainst the bottom of the machine.In addition, check to see that thelegs were not inadvertently un-screwed while tightening thecounternuts. Running a machinethat is not level or whose legs arenot tight may cause damage to boththe machine and its surroundingarea.
If a countertop is placed over thewasher, at least a 6 mm (1/4")gapmust be left between the top of themachine and bottom of the counter-top; and nothing should be within12 mm (1/2") of any other side of thewashing machine.
Washer / Dryer Stack
This Miele washing machine can be in-stalled as part of a washer dryer stackin combination with a Miele tumbledryer. For this purpose, a stacking kit isavailable from the Miele parts depart-ment or your Miele dealer.
A washer and dryer should neverbe stacked without using the properstacking kit. Doing so is extremelydangerous, as the dryer may vi-brate off the washing machine dur-ing use.
INSTALLATION INSTRUCTIONS
40

Any residual water left in themachine from the factory test-ing process can be flushedout as follows:
Do not put any laundry in the ma-chine.
Add a small amount of detergent tocompartment j.
Turn on the machine.
Press the “Rapid wash” button.
Turn the programme selector to the“COTTONS 60°C” programme.
Any residual water will be flushedout during the programme.
Water hardness reminderThe amount of detergent needed towash clothes depends on various fac-tors, including the water hardness inyour area. You can set the water hard-ness dial in the detergent dispenser asa reminder.
Turn the dial to the desired setting.Use the tool supplied with the ma-chine. It is located behind the deter-gent drawer, on the left hand side(see Cleaning and Care) water.1 = soft, 4 = very hard
INSTALLATION INSTRUCTIONS
41

PlumbingConnect the cold water supply hose(marked blue) to the cold water tapand the warm water supply hose(marked red) to the warm water tap.
Turn on taps and check for leakage.The water pressure must be within the0.1-1 MPa (14 – 140 psi) range. If thewater pressure is greater than 1 Mpa(140 psi), a reducer valve must befitted. At pressures below 0.1 Mpa (14 psi), the standard inlet valve of themachine must be exchanged for a lowpressure version by an authorizedMiele Service Technician.
The water supply hoses are equippedwith a strainer filter; please do notremove this filter.
Special note
If the machine is not to be connectedto a hot water supply, it is essentialthat the hot water inlet hose is alsoconnected to the cold water supply,using a Y connector. Otherwise cor-rect functioning of the machinecould be impeded.
It is not allowed to connect the ma-chine to a hot water supply only, forfunctional and safety reasons.
Connection to the drainage system
The 1.5 m hooked drain hose may beconnected as follows:
1. Directly into a sink: hook the hose se-curely over the edge and secure,e.g. by tying the hose to the watertap.
2. Connection to a drain pipe: fit drainhose into a 38 mm ( 1 1/2") pipe andsecure firmly. (An antisiphoning de-vice is not required.)
3. Drainage into floor gully: if required,the drain hose may be extended to 5 m (15 ft.) maximum.
The machine drains via a pump with amaximum delivery head of 1.2 m (4 ft.).The hose must not be kinked as thisrestricts drainage.
Plumbing
42

Electrical connectionGROUNDING INSTRUCTIONS
This appliance must be grounded.
In the event of a malfunction or break-down, grounding will reduce the risk ofelectric shock by providing a path ofleast resistance for the electric current.This appliance is equipped with a cordhaving an equipment grounding con-ductor and plug. The plug must beplugged into an appropriate outlet thatis properly installed and grounded inaccordance with all local codes and or-dinances.
Warning
Improper connection of the equip-ment-grounding conductor can re-sult in the risk of electric shock.Check with a qualified electrician orserviceman if you are in doubt as towhether the appliance is properlygrounded.
Do not modify the plug provided withthe appliance; if it will not fit the outlet,have a proper outlet installed by a quali-fied electrician.
ELECTRICAL CONNECTIONThe washing machine comes suppliedwith a 1.5 m (5 ft.) long, 12/4 AWG cordwith a 4 wire, 3 pole grounding plug.(NEMA 14-30P regular Canadian dryerplug). It is ready for connection to a120V/240V (208V), two phase, 60Hzpower supply. The proper outlet can bepurchased from any electrical supplydealer. Ask for a NEMA 14-30R recep-tacle. (See Canadian Electrical Code,Part I, CSA Configurations for Non-Locking Receptacles.)
Electrical connection
43

“DOUBLE RECEPTACLE”Miele offers a “Double Receptacle”which will allow you to use a standarddryer, 4 wire, 30A outlet that mostlaundry rooms already have. Two 15AMiele appliances can be powered fromthis kit.
For more infomation on the “Double Receptacle”, please contact
– your Miele dealer or
– the Miele Service Department.
Electrical connection
44

Technical data1.1 Dimensions
Height
Width
Depth(including distance from wall)
Weight
Capacity
Rated load
Fuse rating
Water pressure
Maximum drain height
Drain hose diameter
Maximum drain length
Power supply
Max floor load
850 mm
595 mm
610 mm
99 kg
5 kg dry laundry
2.8 kW
15 Amp
14-140 psi (0.1-1 MPa)
1.25 m
25 mm
5.0 m
120 V/240 V ~2 phase 60 Hz (208V)
164 kg (360 lbs)
Technical data
45

1.2 Specifications
Hot and cold water connection via “Pipe to hose connector” (Female hose thread x 3/4" BSP male pipe thread).
Drainage is via 1.5m (5 ft) long, 1 1/4" OD hose (included).
Electrical: 1.5m (5 ft) long cable with plug for connection to a two phase 120/240 V(208 V) VAC 60 Hz power supply (3-pole-4 wire grounding).
Power consumption: (extendedcycles):
Cottons without prewash 95°C
Rapid wash - Cottons (3.2 kg) 60°C
Water consumption:
Cottons without prewash
Rapid wash - Cottons (3.2 kg)
Programme duration
Cottons without prewash 95°C
Rapid wash - Cottons (3.2 kg) 60°C
Spin speed
W 1918
Detergent dispenser:
Automatic for:
Temperature control variable:
1.30 kWh
0.25 kWh
65 l
55 l
108 minutes
38 minutes
from 400 to 1600 rpm
Prewash
Mainwash
Fabric softener or starch
from cold to 95°C
Technical data
46

47

Alteration rights reserved/000 0699
This paper is made from 100% chlorine-free bleached cellulose and therefore protects the environment.