waterproofing - dr. fixit institute · floors, internal wet areas, tile adhesive and grouts, roof...
TRANSCRIPT
Vo l . 8 No . 2 (Apr - Jun 2014 ) A Quar te r l y News le t te r
WATERPROOFING
PART – 9
WATERPROOFING OF EXTERNAL WALLS
OF BUILDINGS

As part of knowledge dissemination in the specialized area of waterproofing, we had started publishing a series of publications on various modern waterproofing systems. The present issue of our ReBuild is the concluding one of the series focusing on designing and waterproofing external walls. The detail of such publications is given in the table below, for the reference of our reader. All these publications can be viewed/downloaded on our Institute’s website: www.drfixitinstitute.com. Those who have missed any of the issues may visit our website.
Vol.6, No.2 Apr-Jun, 2012
Part 1 - Basement waterproofing
Vol.6, No.3 Jul-Sep, 2012
Part 2 - Remedial basement waterproofing
Vol.6, No.4 Oct-Dec, 2012
Part 3 - Waterproofing of water retaining structures
Vol.7, No.1 Jan-Mar, 2013
Part 4 - Waterproofing of Internal Wet Areas
Vol.7 ,No.2 Apr-Jun, 2013
Part 5 - Waterproofing of Roof & Terrace (i)
Vol.7, No.3 Jul-Sep, 2013
Part 6 - Waterproofing of Roof & Terrace (ii)
Vol.7, No.4 Oct-Dec, 2013
Part 7 - Waterproofing of Podium slabs, Planter box, Green roof system
Vol.8, No.1 Jan-Mar, 2014
Part 8 - Waterproofing & Low Energy consumption roofing system
Vol.8, No.2 Apr-Jun, 2014
Part 9 - Waterproofing of External Walls
Changing the specification of traditional waterproofing systems to modern waterproofing systems for basements, floors, internal wet areas, tile adhesive and grouts, roof slabs terrace, sunken slabs, external walls, etc. will increase the cost of the building only by three to five percent of the total cost. For a 2BHK flat of 1000 sqft the additional cost for all these waterproofing systems will be rupees two to three lakh only. Though the use of the construction chemicals increases the initial cost to the developers by certain percentage of the total cost, the value-adding inputs being achieved for long-term durability is very beneficial in terms of life-cycle cost and sustainability. However, a lot of money is being spent on protecting and maintaining new as well as existing concrete structures to enhance the durable lifespan. The result of the application of construction chemicals depends mainly on the way or
manner in which the application is being carried out. However, without any technical guidance to get the best results out of such expensive products may not be possible. There is also difficulty to get the skilled labour for the application. At the same time, around seventy five percent of the construction industry personnels are not aware of the concept of construction chemicals. They are even not aware of the productivity improvement and value addition of these construction chemicals. Hence, the structures that are being built brick-by-brick, get damaged by drop-by-drop seepage of water. This calls for knowledge and technology management for designing efficient waterproofing treatments, selection of site-specific materials and methodologies for execution.
A holistic approach consisting of various tasks such as inspection, assessment, condition survey, residual life analysis, specification, recommendation and implementation of the best possible remedial treatment will ensure durability of the structure. Many a times, there is a dilemma over whether damp proofing is to be adopted or waterproofing materials are to be used or both. However, as per ASTM D 1079, waterproofing is defined as “treatment of surface or structure to prevent the passage of water under hydrostatic pressure.” Whereas, Damp proofing is defined as “treatment of surface or structure to resist the passage of water in the absence of the hydrostatic pressure.” Hence, these are not only two different words with two different meanings, but altogether two different technologies for a similar purpose. The conventional waterproofing systems are slowly becoming outdated due to their inherent disadvantages and membrane waterproofing coatings, are gaining popularity.
The present issue of our ReBuild discusses the concept of ‘Building Envelope’, within the various issues of designing and waterproofing of external walls. The remedial waterproofing of external walls discusses all kinds of defects, their symptoms, possible causes and the remedial solutions. We will revisit the specialized issues of waterproofing on external walls in the future.
From theEditor’s Desk
2
Waterproofing - External Walls of Buildings[Excerpts from “Waterproofing – External Walls of Buildings” published in NBMCW, April 2014] by Sanjay Bahadur, CEO – Construction Chemicals & Paints, Pidilite Industries, Mumbai]
1.0 Significance of Waterproofing
Water leakage, or more categorically moisture ingress in buildings, results in damp, uncomfortable internal environments; deterioration of internal finishes (including mould growth); unsightly damp areas on wall and ceiling surfaces and increased concentrations of harmful pollutants affecting occupant’s health. The exclusion of moisture from buildings is therefore not only desirable but also of utmost concern to the residents of the buildings.
2.0 Water Seepage through External Walls in Mumbai
In Mumbai, due to heavy rainfall, water seepage through external walls is found to be a common defect faced by house owners. In one of the surveys conducted on about 10,000 private residential units, findings showed that the use of single layer (41/2)” brick wall was the most common cause of water seepage through external walls. Almost 90% of the water seepage occurred through cracks in the plastered brick walls.
In general, water seeps through external walls within the first five years of building completion. The problem is further compounded by Mumbai’s high humidity and higher rainfall levels. High wind speeds experienced by high-rise buildings also increases the likelihood of water seepage. Building envelopes must, therefore, be adequately designed and constructed to prevent ingress of water.
3.0 General Reasons of Water Seepage through External Walls• Joints and cracks in the walls
• Absorption and permeation of the materials
• Construction joints in the walls
• Penetrating dampness
• Rising dampness due to capillary action
• Poor construction practices
• Honeycomb structures in concrete or plaster
• Separation gaps
4.0 Waterproofing Systems and Materials
Water tightness of external walls is usually achieved by providing adequate wall thickness, proper designing at construction joints and surface rendering and finishes which serve as barrier against water ingress. But normally no attention is paid towards critical areas like separation
3
gaps, honeycomb areas, damp proof courses at plinth level, and so on. This results to serious leakages through external walls and damages to expensive internal paints and finishings.
5.0 Significance of External Wall Coating
Use of either cement or general exterior acrylic paint cannot create an impermeable envelope around a building. For effective waterproofing of external walls, the coating material used should function as more protective than decorative. Revolutionary products like Dr. Fixit Raincoat, an elastomeric exterior waterproofing coating composed of high quality acrylic emulsion polymer combined with weather durable pigments, graded fine fillers and additives, work as a barrier to liquid water and carbon dioxide gas; but permeable to water vapour (which makes it breathable). The special properties like accommodation of movement in substrate, bridging existing cracks, maintaining flexibility and strength over a broad temperature range, resisting dirt pick up and fungal/algal growth, and over and above, maintaining these properties for periods of up to 7-10 years, make them very suitable especially for environment like that in Mumbai.
Dr. Fixit Raincoat, an elastomeric exterior waterproofing coating can be applied on all types of exterior masonry surfaces, cement and renderings as well as on asbestos sheets. A list of various systems used to arrest water penetration in the external walls for specific reasons is given below:
Sr. No.
Reason Waterproofing system/ Materials
1 Cracks in the walls Polymer Modified Mortars / Pastes
2 Joints & Separation gaps Polymer Modified Mortar and sealants
3 Penetrating Dampness Impregnation system
4 Rising Dampness Injection system with siliconate materials
5 Honeycomb structures Flaring mortars / Crystalline system
6 Rain water penetration External Wall Coating
6.0 Conclusion
Considering the life cycle cost analysis, such acrylic elastomeric wall coating is a proven approach to long-term protection of exposed building walls as compared to normal acrylic decorative paints due to its dual properties of “Waterproofing & Crack Bridging”.

4
Designing and Waterproofing of External Walls[Excerpts from Healthy Construction Manual-2, “Protective Coatings (For Concrete & Masonry Surfaces” by Dr. Fixit Institute of Structural Protection & Rehabilitation and Singapore Standard CP82:1999, Code of Practice for “Waterproofing of Reinforced Concrete Buildings”]
1.0 Introduction
Exterior walls are subject to constant exposure to sun and rain, which impact their durability. Shrinkage and temperature movements result in cracks within the building walls, which result in water penetration. This leads to damp patches on walls which are common occurrence in most of the buildings. Damp walls are excellent breeding grounds for mildew and mold, which can damage the home and lead to health problems for occupants. Apart from the health issues, the water which enters or escapes from the buildings can cause serious damage to the building contents as well as structural damage. Water damage is second only to fire as a cause of building decay and deterioration. The combination of roofing, waterproofing, damp proofing, joint system and flashing system that act cohesively as a barrier, protecting interior areas from water and weather intrusion is known as Building-Envelope. These systems make an envelope of a building from top to bottom. However this principle of waterproofing to make a Building-Envelope is termed as the 90% / 1% principle. As much as 90 percent of all water intrusion problems occur within 1 percent of the total building or structure on exterior surface area. This 1% area is “Termination and Transition detailing”. However, the waterproofing system of external wall can be taken at 3 stages such as:
• Inherent/Built-in/Integral: Good quality construction, using integral waterproofing compound during construction for reducing permeability of concrete while admixtures imparting the property of water repellency are used for damp proofing.
• Ideally, total construction should be waterproof in itself, but this is a tall order to make a Building-Envelope. Expansion and contraction joints, construction joints etc are also part of total system of waterproofing.
• Post-construction: Maintenance of waterproofing system by periodic evaluation for individual members, their performance appraisal and finally providing a suitable protective coating.
1.1 Need for Waterproofing
The need for waterproofing is to satisfy the following:
• Prevents water intrusion
• Controls water vapour transmission
• Controls heat and air into and out of the existing surface
• Provides shield from UV rays
• Provides aesthetic value
1.2 Causes of Dampness in Walls
The principle of waterproofing failure is known as 99%/ 1% principle, where approximately 99% of waterproofing leaks are attributable to causes other than material or system failures. Therefore, about 1% of building area will typically involve any direct leakage and the cause for the same will have a 99% chance of being anything other than material failure. The various construction defects, waterproofing failure and subsequent dampness can be attributed to the following causes:
• Porous materials in construction (mortars, bricks, sandstones, etc.)
• Cracks in mortar joint plaster
• Cracks in plaster between walls and R.C.C members beam
• Column cracks and opening between walls and frames of door-window
• Exposed reinforcement for future expansion
• Vertical expansion joint fault
• Open joints in stone or tile cladding
• Faulty pointing in stone masonry
• Improper plaster behind drainage and water supply pipes and holes in walls
• Leaky pipe fittings of soil sullage and rain water pipes
2.0 Designing a Watertight System
The steps for designing a watertight system for external walls consists of identifying water ingress mechanism, collecting external environmental factors of the locality, choosing service life of the system, selecting and designing the materials for external walls, rendering materials and waterproofing materials to match the required service life, specifying the material properties for acceptance, quality control, acceptance criteria, maintenance of the coating system, warranty, life-cycle cost analysis for sustainability.
2.1 Mechanism of Water Ingress
To design a watertight system one has to understand the mechanism of water ingress and identify the sources of water ingress into structure. The water ingress takes place by various mechanisms such as natural gravity, surface tension, wind/air currents, capillary action and hydrostatic pressure. Moisture is transferred from the outside of the building to the interior by four primary mechanisms. First, water flows by gravity where it takes the path of least resistance. Thus by gravity the water flows very easily. Second, water moves by capillary action. Concrete is a porous material, it is very hard yet porous. As concrete sets in water, this water is absorbed by the concrete until it becomes completely saturated and then disperses moisture and water vapor to the inside of the home. Next water ingress takes place by
5
vapour diffusion. Vapor diffusion is much like capillary suction, except with water vapour. Water vapour only needs the smallest of openings to penetrate a structure and raise humidity levels. Lastly, by air movement the moisture ingress takes place through openings such as cracks, voids, joints, etc.
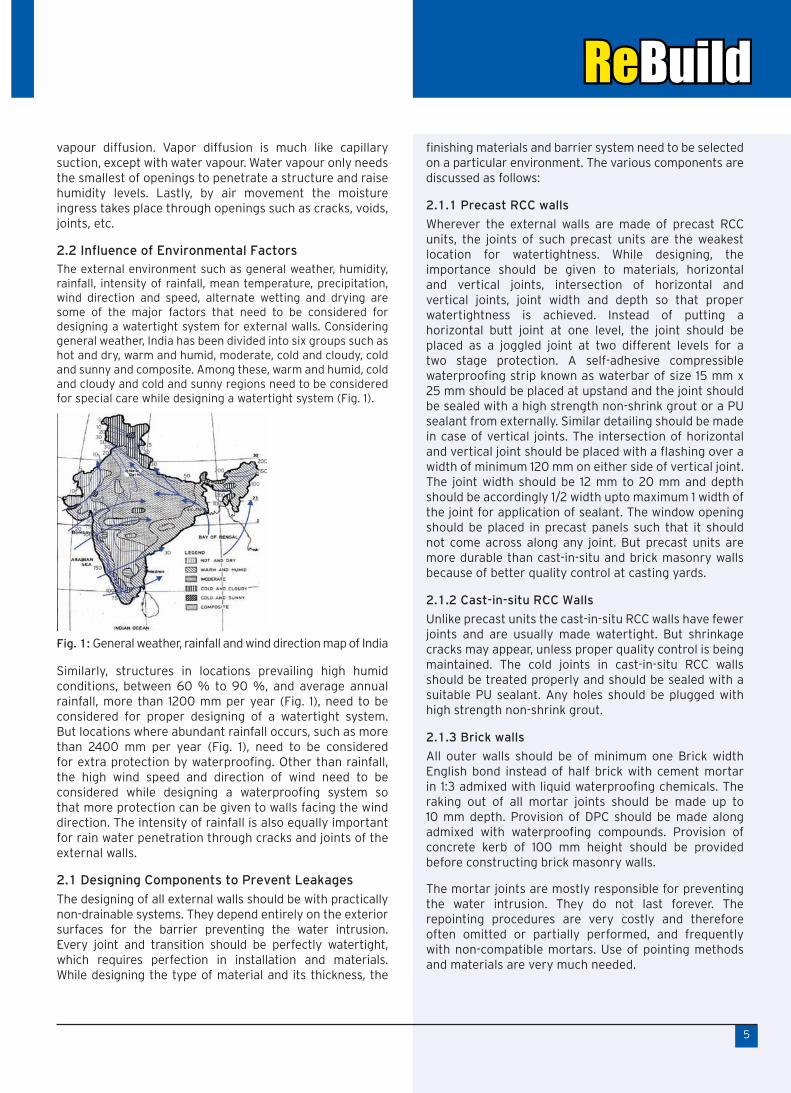
2.2 Influence of Environmental FactorsThe external environment such as general weather, humidity, rainfall, intensity of rainfall, mean temperature, precipitation, wind direction and speed, alternate wetting and drying are some of the major factors that need to be considered for designing a watertight system for external walls. Considering general weather, India has been divided into six groups such as hot and dry, warm and humid, moderate, cold and cloudy, cold and sunny and composite. Among these, warm and humid, cold and cloudy and cold and sunny regions need to be considered for special care while designing a watertight system (Fig. 1).
Similarly, structures in locations prevailing high humid conditions, between 60 % to 90 %, and average annual rainfall, more than 1200 mm per year (Fig. 1), need to be considered for proper designing of a watertight system. But locations where abundant rainfall occurs, such as more than 2400 mm per year (Fig. 1), need to be considered for extra protection by waterproofing. Other than rainfall, the high wind speed and direction of wind need to be considered while designing a waterproofing system so that more protection can be given to walls facing the wind direction. The intensity of rainfall is also equally important for rain water penetration through cracks and joints of the external walls.
2.1 Designing Components to Prevent Leakages
The designing of all external walls should be with practically non-drainable systems. They depend entirely on the exterior surfaces for the barrier preventing the water intrusion. Every joint and transition should be perfectly watertight, which requires perfection in installation and materials. While designing the type of material and its thickness, the
finishing materials and barrier system need to be selected on a particular environment. The various components are discussed as follows:
2.1.1 Precast RCC walls
Wherever the external walls are made of precast RCC units, the joints of such precast units are the weakest location for watertightness. While designing, the importance should be given to materials, horizontal and vertical joints, intersection of horizontal and vertical joints, joint width and depth so that proper watertightness is achieved. Instead of putting a horizontal butt joint at one level, the joint should be placed as a joggled joint at two different levels for a two stage protection. A self-adhesive compressible waterproofing strip known as waterbar of size 15 mm x 25 mm should be placed at upstand and the joint should be sealed with a high strength non-shrink grout or a PU sealant from externally. Similar detailing should be made in case of vertical joints. The intersection of horizontal and vertical joint should be placed with a flashing over a width of minimum 120 mm on either side of vertical joint. The joint width should be 12 mm to 20 mm and depth should be accordingly 1/2 width upto maximum 1 width of the joint for application of sealant. The window opening should be placed in precast panels such that it should not come across along any joint. But precast units are more durable than cast-in-situ and brick masonry walls because of better quality control at casting yards.
2.1.2 Cast-in-situ RCC Walls
Unlike precast units the cast-in-situ RCC walls have fewer joints and are usually made watertight. But shrinkage cracks may appear, unless proper quality control is being maintained. The cold joints in cast-in-situ RCC walls should be treated properly and should be sealed with a suitable PU sealant. Any holes should be plugged with high strength non-shrink grout.
2.1.3 Brick walls
All outer walls should be of minimum one Brick width English bond instead of half brick with cement mortar in 1:3 admixed with liquid waterproofing chemicals. The raking out of all mortar joints should be made up to 10 mm depth. Provision of DPC should be made along admixed with waterproofing compounds. Provision of concrete kerb of 100 mm height should be provided before constructing brick masonry walls.
The mortar joints are mostly responsible for preventing the water intrusion. They do not last forever. The repointing procedures are very costly and therefore often omitted or partially performed, and frequently with non-compatible mortars. Use of pointing methods and materials are very much needed.
Fig. 1: General weather, rainfall and wind direction map of India
6
2.1.4 Concrete Blocks
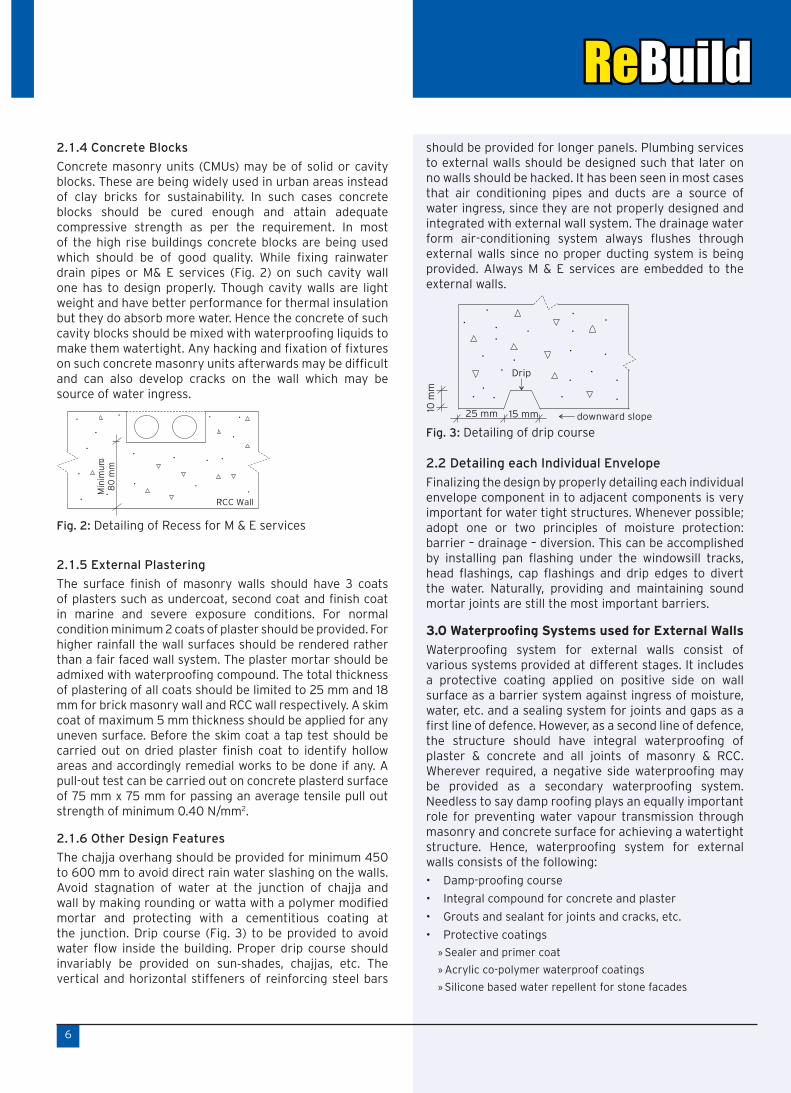
Concrete masonry units (CMUs) may be of solid or cavity blocks. These are being widely used in urban areas instead of clay bricks for sustainability. In such cases concrete blocks should be cured enough and attain adequate compressive strength as per the requirement. In most of the high rise buildings concrete blocks are being used which should be of good quality. While fixing rainwater drain pipes or M& E services (Fig. 2) on such cavity wall one has to design properly. Though cavity walls are light weight and have better performance for thermal insulation but they do absorb more water. Hence the concrete of such cavity blocks should be mixed with waterproofing liquids to make them watertight. Any hacking and fixation of fixtures on such concrete masonry units afterwards may be difficult and can also develop cracks on the wall which may be source of water ingress.
2.1.5 External Plastering
The surface finish of masonry walls should have 3 coats of plasters such as undercoat, second coat and finish coat in marine and severe exposure conditions. For normal condition minimum 2 coats of plaster should be provided. For higher rainfall the wall surfaces should be rendered rather than a fair faced wall system. The plaster mortar should be admixed with waterproofing compound. The total thickness of plastering of all coats should be limited to 25 mm and 18 mm for brick masonry wall and RCC wall respectively. A skim coat of maximum 5 mm thickness should be applied for any uneven surface. Before the skim coat a tap test should be carried out on dried plaster finish coat to identify hollow areas and accordingly remedial works to be done if any. A pull-out test can be carried out on concrete plasterd surface of 75 mm x 75 mm for passing an average tensile pull out strength of minimum 0.40 N/mm2.
2.1.6 Other Design Features
The chajja overhang should be provided for minimum 450 to 600 mm to avoid direct rain water slashing on the walls. Avoid stagnation of water at the junction of chajja and wall by making rounding or watta with a polymer modified mortar and protecting with a cementitious coating at the junction. Drip course (Fig. 3) to be provided to avoid water flow inside the building. Proper drip course should invariably be provided on sun-shades, chajjas, etc. The vertical and horizontal stiffeners of reinforcing steel bars
should be provided for longer panels. Plumbing services to external walls should be designed such that later on no walls should be hacked. It has been seen in most cases that air conditioning pipes and ducts are a source of water ingress, since they are not properly designed and integrated with external wall system. The drainage water form air-conditioning system always flushes through external walls since no proper ducting system is being provided. Always M & E services are embedded to the external walls.
2.2 Detailing each Individual Envelope
Finalizing the design by properly detailing each individual envelope component in to adjacent components is very important for water tight structures. Whenever possible; adopt one or two principles of moisture protection: barrier – drainage – diversion. This can be accomplished by installing pan flashing under the windowsill tracks, head flashings, cap flashings and drip edges to divert the water. Naturally, providing and maintaining sound mortar joints are still the most important barriers.
3.0 Waterproofing Systems used for External Walls
Waterproofing system for external walls consist of various systems provided at different stages. It includes a protective coating applied on positive side on wall surface as a barrier system against ingress of moisture, water, etc. and a sealing system for joints and gaps as a first line of defence. However, as a second line of defence, the structure should have integral waterproofing of plaster & concrete and all joints of masonry & RCC. Wherever required, a negative side waterproofing may be provided as a secondary waterproofing system. Needless to say damp roofing plays an equally important role for preventing water vapour transmission through masonry and concrete surface for achieving a watertight structure. Hence, waterproofing system for external walls consists of the following:
• Damp-proofing course
• Integral compound for concrete and plaster
• Grouts and sealant for joints and cracks, etc.
• Protective coatings
»Sealer and primer coat
»Acrylic co-polymer waterproof coatings
»Silicone based water repellent for stone facades
Fig. 2: Detailing of Recess for M & E services
. .
.
..
.
.
.
.. .
..
.
.
. .
.
.Min
imu
m
80
mm
RCC Wall
Fig. 3: Detailing of drip course
25 mm 15 mm
10 m
m
Drip
.. .
.
.
..
.
.
.
.. .
.. . .
..
.
.
downward slope
7
3.1 Damp-proofing Course
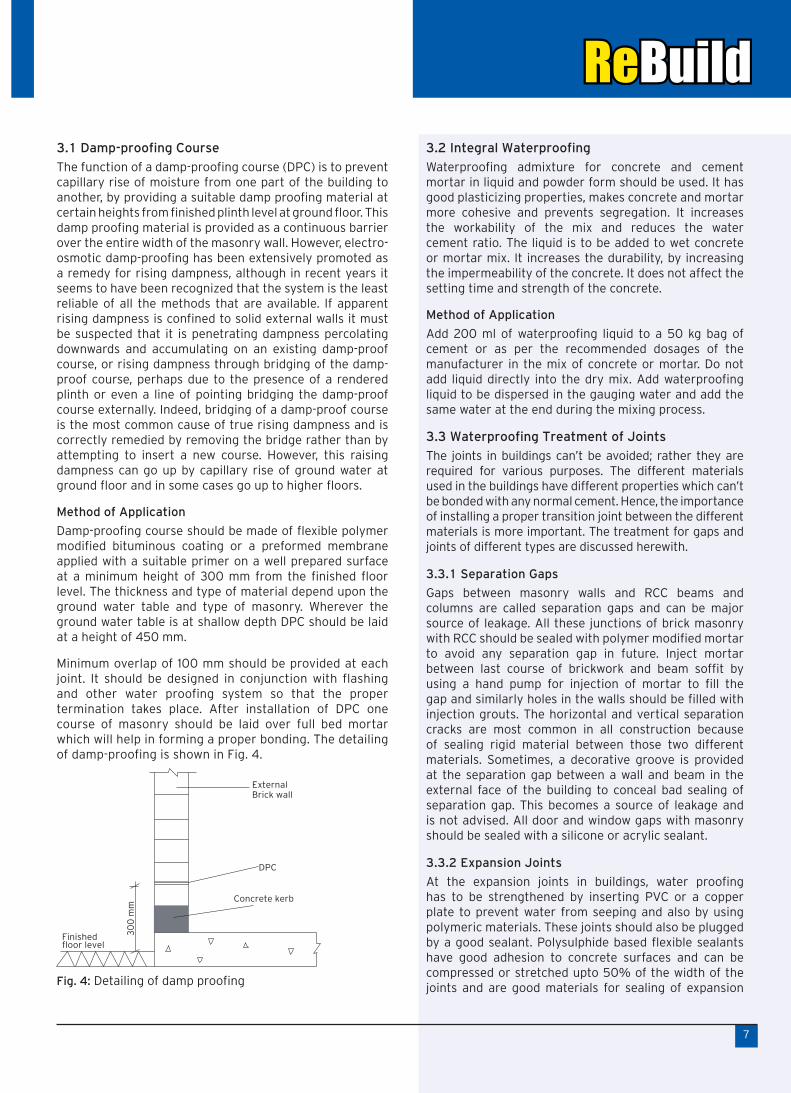
The function of a damp-proofing course (DPC) is to prevent capillary rise of moisture from one part of the building to another, by providing a suitable damp proofing material at certain heights from finished plinth level at ground floor. This damp proofing material is provided as a continuous barrier over the entire width of the masonry wall. However, electro-osmotic damp-proofing has been extensively promoted as a remedy for rising dampness, although in recent years it seems to have been recognized that the system is the least reliable of all the methods that are available. If apparent rising dampness is confined to solid external walls it must be suspected that it is penetrating dampness percolating downwards and accumulating on an existing damp-proof course, or rising dampness through bridging of the damp-proof course, perhaps due to the presence of a rendered plinth or even a line of pointing bridging the damp-proof course externally. Indeed, bridging of a damp-proof course is the most common cause of true rising dampness and is correctly remedied by removing the bridge rather than by attempting to insert a new course. However, this raising dampness can go up by capillary rise of ground water at ground floor and in some cases go up to higher floors.
Method of Application
Damp-proofing course should be made of flexible polymer modified bituminous coating or a preformed membrane applied with a suitable primer on a well prepared surface at a minimum height of 300 mm from the finished floor level. The thickness and type of material depend upon the ground water table and type of masonry. Wherever the ground water table is at shallow depth DPC should be laid at a height of 450 mm.
Minimum overlap of 100 mm should be provided at each joint. It should be designed in conjunction with flashing and other water proofing system so that the proper termination takes place. After installation of DPC one course of masonry should be laid over full bed mortar which will help in forming a proper bonding. The detailing of damp-proofing is shown in Fig. 4.
3.2 Integral Waterproofing
Waterproofing admixture for concrete and cement mortar in liquid and powder form should be used. It has good plasticizing properties, makes concrete and mortar more cohesive and prevents segregation. It increases the workability of the mix and reduces the water cement ratio. The liquid is to be added to wet concrete or mortar mix. It increases the durability, by increasing the impermeability of the concrete. It does not affect the setting time and strength of the concrete.
Method of Application
Add 200 ml of waterproofing liquid to a 50 kg bag of cement or as per the recommended dosages of the manufacturer in the mix of concrete or mortar. Do not add liquid directly into the dry mix. Add waterproofing liquid to be dispersed in the gauging water and add the same water at the end during the mixing process.
3.3 Waterproofing Treatment of Joints
The joints in buildings can’t be avoided; rather they are required for various purposes. The different materials used in the buildings have different properties which can’t be bonded with any normal cement. Hence, the importance of installing a proper transition joint between the different materials is more important. The treatment for gaps and joints of different types are discussed herewith.
3.3.1 Separation Gaps
Gaps between masonry walls and RCC beams and columns are called separation gaps and can be major source of leakage. All these junctions of brick masonry with RCC should be sealed with polymer modified mortar to avoid any separation gap in future. Inject mortar between last course of brickwork and beam soffit by using a hand pump for injection of mortar to fill the gap and similarly holes in the walls should be filled with injection grouts. The horizontal and vertical separation cracks are most common in all construction because of sealing rigid material between those two different materials. Sometimes, a decorative groove is provided at the separation gap between a wall and beam in the external face of the building to conceal bad sealing of separation gap. This becomes a source of leakage and is not advised. All door and window gaps with masonry should be sealed with a silicone or acrylic sealant.
3.3.2 Expansion Joints
At the expansion joints in buildings, water proofing has to be strengthened by inserting PVC or a copper plate to prevent water from seeping and also by using polymeric materials. These joints should also be plugged by a good sealant. Polysulphide based flexible sealants have good adhesion to concrete surfaces and can be compressed or stretched upto 50% of the width of the joints and are good materials for sealing of expansion
Fig. 4: Detailing of damp proofing
External
Brick wall
30
0 m
m
Finished�oor level
DPC
Concrete kerb
8
joints. Depth of the expansion joints above the copper/PVC plate should normally be kept half of the joint width and should not exceed 20 mm. Special precautions should be taken for sealing of area around the water spouts to make them water proof. Any type of impermeable layer/coating should never be applied on both faces of the wall as the wall must be allowed to “breathe”. A non permeable finish or waterproof finish should not be applied on a wet wall, as it takes a long time to loose water used during construction.
Proper distribution, design and installation of joints in the building e.g. expansion/contraction and construction joints and maintenance thereof can go a long way towards improving the water proofing of the building, since any crack may give rise to ingress of water. Thus it can accommodate movements in the structure.
Method of Application
Prepare the joint, prime with a suitable primer. After drying the primer use backer rod and fill the joint with polysulphide sealant of gun grade for vertical joints by application with a gun. The width to depth ratio should be 2:1. The recommended joint sizes are 40 mm x 20 mm or 25 mm x 12.5 mm. In any case, width of the joint shall not exceed 50 mm.
3.3.3 Cold Joints
During construction of RCC walls at site cold joints are being formed. Unless being treated properly leakages will appear from those cold joints. Hence, to have a leak free joint the following methods should be adopted.
Method of Application
In the case of cold joints highly flexible waterbar adhesive strip of 20 mm x 20 mm is to be placed between the two rows or columns of the reinforcing bars. It has to be placed vertically as well as horizontally while resuming concreting at cold construction joints. The waterbar swells while coming in contact with water and fully adhered to the
surface and completely providing a watertight cold joint.
3.4 Protective Coatings
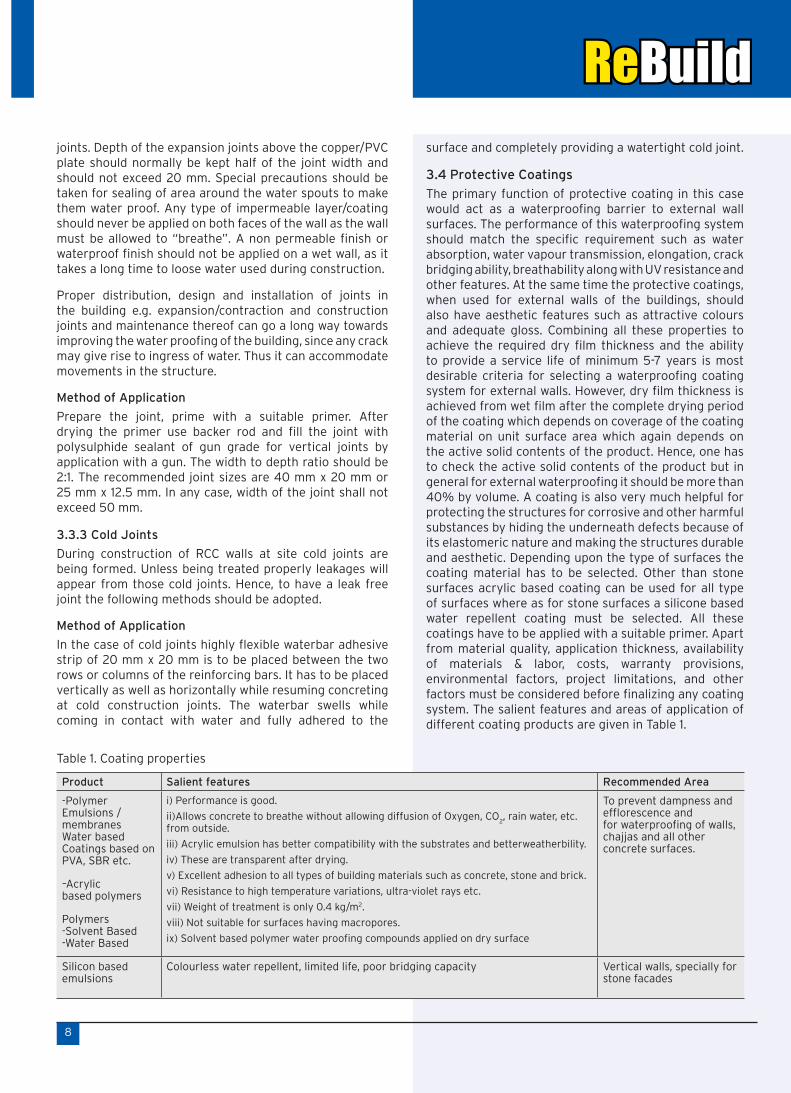
The primary function of protective coating in this case would act as a waterproofing barrier to external wall surfaces. The performance of this waterproofing system should match the specific requirement such as water absorption, water vapour transmission, elongation, crack bridging ability, breathability along with UV resistance and other features. At the same time the protective coatings, when used for external walls of the buildings, should also have aesthetic features such as attractive colours and adequate gloss. Combining all these properties to achieve the required dry film thickness and the ability to provide a service life of minimum 5-7 years is most desirable criteria for selecting a waterproofing coating system for external walls. However, dry film thickness is achieved from wet film after the complete drying period of the coating which depends on coverage of the coating material on unit surface area which again depends on the active solid contents of the product. Hence, one has to check the active solid contents of the product but in general for external waterproofing it should be more than 40% by volume. A coating is also very much helpful for protecting the structures for corrosive and other harmful substances by hiding the underneath defects because of its elastomeric nature and making the structures durable and aesthetic. Depending upon the type of surfaces the coating material has to be selected. Other than stone surfaces acrylic based coating can be used for all type of surfaces where as for stone surfaces a silicone based water repellent coating must be selected. All these coatings have to be applied with a suitable primer. Apart from material quality, application thickness, availability of materials & labor, costs, warranty provisions, environmental factors, project limitations, and other factors must be considered before finalizing any coating system. The salient features and areas of application of different coating products are given in Table 1.
Table 1. Coating properties
Product Salient features Recommended Area
-PolymerEmulsions /membranesWater basedCoatings based on PVA, SBR etc.
–Acrylicbased polymers
Polymers-Solvent Based-Water Based
i) Performance is good.
ii)Allows concrete to breathe without allowing diffusion of Oxygen, CO2, rain water, etc.
from outside.
iii) Acrylic emulsion has better compatibility with the substrates and betterweatherbility.
iv) These are transparent after drying.
v) Excellent adhesion to all types of building materials such as concrete, stone and brick.
vi) Resistance to high temperature variations, ultra-violet rays etc.
vii) Weight of treatment is only 0.4 kg/m2.
viii) Not suitable for surfaces having macropores.
ix) Solvent based polymer water proofing compounds applied on dry surface
To prevent dampness and efflorescence andfor waterproofing of walls, chajjas and all other concrete surfaces.
Silicon basedemulsions
Colourless water repellent, limited life, poor bridging capacity Vertical walls, specially for stone facades
9
3.4.1 Performance Requirement
The performance requirement for specifying a waterproofing system for external wall has to satisfy some of the minimum test properties in accordance to the specific standards as given in Table 2. The same values may change depending on environmental conditions which need to be designed to match the requirement. The coating should be water based and contain zero or low VOC contents.
Table 2. Test Standards and acceptance values
Sl Performance Specified standards
Values
1 Dry film thickness (DFT)
ASTM D 1212 110-120 micron
2 Water absorption ASTM D 5385 Max 170ml/m2/24h
3 Water vapour transmission
ASTM C642 Min 80 g/ m2/24h
4 Elongation ASTM D 412 Min 100%
5 Bond strength ASTM D 4541 Min 1 N/mm2
3.4.2 Surface Preparation
One of the most important criteria of durability of coating materials is surface preparation which is grossly neglected by applicator. Before application of the coating material a thorough inspection of the surface needs to be carried out. The surface has to be checked for any voids, cracks, moisture content and pH. A minimum 28 days curing period of fresh laid concrete is required before any coating can further be applied. Any excess moisture on the surface will lead to efflorescence of the coating. The following steps should be ensured for proper surface preparation:
• Surface for treatment must be thoroughly cleaned of all laitance, loose material, oil, grease, etc
• Mechanical means methods such as wire brushing, shot blasting can be used and finally vacuum cleaning of all loose solids and liquids, if required.
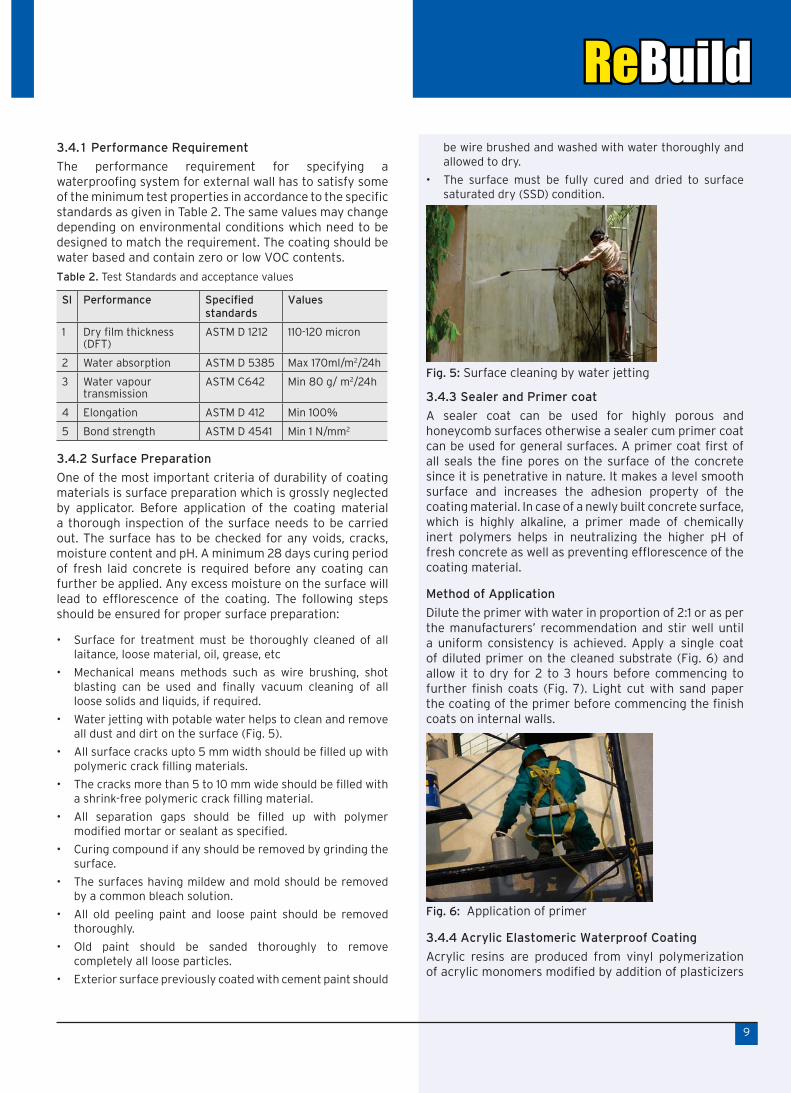
• Water jetting with potable water helps to clean and remove all dust and dirt on the surface (Fig. 5).
• All surface cracks upto 5 mm width should be filled up with polymeric crack filling materials.
• The cracks more than 5 to 10 mm wide should be filled with a shrink-free polymeric crack filling material.
• All separation gaps should be filled up with polymer modified mortar or sealant as specified.
• Curing compound if any should be removed by grinding the surface.
• The surfaces having mildew and mold should be removed by a common bleach solution.
• All old peeling paint and loose paint should be removed thoroughly.
• Old paint should be sanded thoroughly to remove completely all loose particles.
• Exterior surface previously coated with cement paint should
be wire brushed and washed with water thoroughly and allowed to dry.
• The surface must be fully cured and dried to surface saturated dry (SSD) condition.
3.4.3 Sealer and Primer coat
A sealer coat can be used for highly porous and honeycomb surfaces otherwise a sealer cum primer coat can be used for general surfaces. A primer coat first of all seals the fine pores on the surface of the concrete since it is penetrative in nature. It makes a level smooth surface and increases the adhesion property of the coating material. In case of a newly built concrete surface, which is highly alkaline, a primer made of chemically inert polymers helps in neutralizing the higher pH of fresh concrete as well as preventing efflorescence of the coating material.
Method of Application
Dilute the primer with water in proportion of 2:1 or as per the manufacturers’ recommendation and stir well until a uniform consistency is achieved. Apply a single coat of diluted primer on the cleaned substrate (Fig. 6) and allow it to dry for 2 to 3 hours before commencing to further finish coats (Fig. 7). Light cut with sand paper the coating of the primer before commencing the finish coats on internal walls.
3.4.4 Acrylic Elastomeric Waterproof Coating
Acrylic resins are produced from vinyl polymerization of acrylic monomers modified by addition of plasticizers
Fig. 5: Surface cleaning by water jetting
Fig. 6: Application of primer

10
and prepolymers. It is a water based, durable elastomeric coating that fills and covers hairline cracks and maintains a clean surface. The various features and benefits of this coating as follows:
• Impermeable to wind driven rain and thus waterproofs
• Is elastic in nature and covers hairline cracks
• Higher thickness and thus, longer life
• Algae and fungus resistant
• Decorative with low dirt pick up
• Applied along with a special primer to resist efflorescence
• Non toxic
During application of the coating system one has to give attention to the following :
• Pot life at application temperature
• Drying (tack free) time
• Number of coatings required
• Time between successive coatings
• Recommended application temperature
Method of Application
• Apply 2 neat coats on primed surface with an interval of 5 to 6 hrs
• Allow it to cure for 7 days
Precautions and Limitations
• Do not dilute the material by any means
• Application of a primer is must for all types of surfaces.
• Excess water on substrate prior to application must be removed by suitable means
• Do not apply below 100C or above 450C
• Do not apply during rains, or in direct sunlight
• The covering capacity of can vary as per the nature of the substrate
3.4.5 Water Repellent Coating on Stone Surfaces/Facades
Rendering and coating systems suffer from the disadvantage that they completely change the appearance of walls, but water repellent treatments provide an invisible method for reducing water penetration into porous walls without the condensation and spalling dangers associated with impermeable treatments. Water repellents act by lining the pores so that the angle of contact is reversed and the capillary forces them to repel rather than absorb the water. When first applied, water repellent treatments cause rain to globulate on the surface so that it falls away rather than being absorbed but, with most water repellents, this globulation or ‘duck’s back’ effect is soon lost and rain is able to wet the surface. However, this wetting is only superficial and, if the water repellent treatment has been applied sufficiently, the pores remain water repellent to an appreciable depth so that water absorption is still prevented. However, it must be firmly emphasized that only silicone resin (siloxane) water repellents should be used, as they are the only compounds that have sufficient durability when applied as the very thin pore linings than are necessary if permeability is to be maintained so that trapped moisture can disperse. Other water repellents are promoted for the treatment of external wall surfaces against penetrating dampness, particularly formulations based on wax, vinyl or aluminium compounds, however, if they are applied at sufficient concentrations to give resistance to water penetration and reasonable durability, they cause darkening of porous materials and they also restrict permeability and reduce water evaporation to a much greater extent than equivalent silicone resin treatments.
Problems with surface water repellent treatment are generally associated with errors in diagnosis of the dampness or carelessness in application of the treatment. All water repellents are sensitive to the moisture content and temperature of the surface; the surface must be ‘white’ dry, and extremely cold or hot surface conditions must be avoided. The organic solvent silicone resin treatments are usually extremely tolerant, but polyoxoaluminium stearate treatments are least tolerant as they gel by reaction with water and
Fig. 8: Application of Coating
Fig. 7: Primed exterior surface

11
application to a damp surface results in the formulation of an unsightly greasy coating.
Treatment for Porous Substrates
Most of the exterior components are very porous. Such substrates absorb moisture that eventually damage or destroy these components. The result is not only interior water damage but also biological growth and mildew. In such case there is a need for a water repellent coating. Water repellent coating should be a clear silicone based, which can penetrate in concrete / cementitious substrates pores, provide an effective water repellent protective coating. Its UV resistant properties make the film durable for outdoor use. It can be applied on cement painted surfaces, concrete, mortar, clay brick surfaces, natural and artificial stones etc.
Method of Application
• Surface should be dry and free from all debris, dirt, oil, grease, wax and all other contamination, which could prevent penetration.
• Apply one liberal coat of repellent coating by brushing evenly on the prepared surface. Allow the surface to dry for a minimum of 24 hrs for best results.
• Repellent coating can also be applied with an airless spray (0.07 - 0.1 N/mm2 pressure).
• Before taking up application on a large area, it is advisable to check the performance of the product on a relatively small area
Precautions and Limitations
• Do not dilute with water or by any other means.
• Close the container lid properly after use.
• Before applying over the natural stones like sand stone, slate sampling should be done on a small area to check its suitability.
4.0 Testing of Waterproofing System
The laboratory testing of a waterproofing material should match to the specific requirement such as water absorption, water vapour transmission, elongation, crack bridging ability, breathability along with UV resistance and other features. While all these tests are laboratory based but some of the properties can be tested on site such as wet film thickness by a thickness gauge, dry film thickness by non-destructive electronics thickness gauge and bonding by destructive pull-out adhesion test. The physical observation of the coating should be checked for uniformity, homogeneity, colour and gloss.
Unlike the ponding test of roof terrace the waterproofing test for external wall is being carried out by water spray test. The water is sprayed at a distance of 1.8 m to 2 m from the external wall on a test panel which should be minimum 10 % of total external surfaces and at all joints with certain pressure to simulate the actual rainfall of the locality for certain period. The pressure and duration has to be decided based on meteorological data of that locality. However
unless specified a minimum water spray of 300l/2 hours on a test panel may be adopted. The nozzle should be inclined at 300 to the wall. For watertightness of the joints, the intensity of water spray should be 1 l/min/m length of the joint with nozzle inclined at 900 to the wall at a distance of 200 mm. The length of test sample for joint should be 2 m long and duration of spray should be minimum 10 mins.
During the water spray test and within half an hour of the test the internal surfaces need to be checked for any dampness or seepages and if no dampness or seepages are found at internal or adjoining surfaces then the waterproofing system is tested to be satisfactory or else remedial action need to be taken.
5.0 Maintenance and Life Cycle Cost Analysis
Maintenance of a coating system involves periodical check up of the surface for defects, colour, gloss etc. Any dust accumulated on the surface should be cleaned by water jetting. Any localized defects can be patch repaired and recoated. For colour fading, the same spot or location may be top coated only. For excessive damage of coating like peeling, poor adhesion, chalking etc. the coating has to be removed completely and recoated along with suitable primer. Depending on the service life of the applied coating system the owner has to be informed when to recoat the surfaces. However, CPWD Maintenance Manual 2000 gives the periodicity of painting for different paints which is given in Table 3. It can be seen from the Table 3 that painting with an acrylic paint has a periodicity of 3 years but the latest elastomeric acrylic based waterproofing coating provides a service life of 5-7 years depending on the environment condition.
Table 3. Painting periodicity as per CPWD maintenance Manual 2000
Item Periodicity (Years)
Res Off Hospital Lab School
White washing/ colour washing
2 2 2 2 2
Applying dry distemper
2 2 2 2 2
Painting with plaster paint, synthetic enamel paint, bound distemper, acrylic paint, acrylic distemper
3 2 1-corriodor & OT 2-Other areas
2 3
Painting external surface with water proofing cement paint
3 3 3 3 3
Though the initial cost of elastomeric acrylic based waterproofing coating is higher than a normal
12
Remedial Water Proofing of External Walls[Excerpts from Dr. Fixit Healthy Construction Booklet, “Construct Your Ideas, 2012, pp.38]
1.0 Introduction
Walls are traditionally protected from rainfall by overhanging eaves fitted with gutters and downpipes. However, rain is often blown onto walls surfaces, the danger of penetrating dampness depending on the degree of exposure that is the total rainfall in relation to wind velocity. On a normal porous wall, the surface is wetted in this way during rainfall and the water is then absorbed by capillarity; the force drawing the water into the wall depends on the surface tension and the contact angle for water in relation to the pore size. With smaller pores the capillary force is greater, but in all normal porous walls the force is sufficient to ensure that water is absorbed into the wall rather than flowing down the external surface.
One method for reducing water penetration through walls is to increase their absorptive capacity, usually by the use of a thick porous render, a process that also significantly improves thermal insulation value. Unfortunately, this process is not generally understood; often thin dense or waterproof renderings are employed which are not usually sufficiently flexible to tolerate the seasonal thermal and moisture content changes in the structure so that eventually cracks develop. Water flowing down the wall is readily absorbed into these cracks, yet the remaining render obstructs evaporation so that the final result tends to be progressively accumulating moisture and the development of increasingly severe dampness internally.
Remedial treatment to reduce this dampness often includes the use of cement slurry or paint, or water-proof bitumen, oil paint or plastic coatings, but all these systems are unsuitable as they introduce severe interstitial condensation dangers; a permeable structure must never be sealed at the cold external surface as there is then a danger that interstitial humidity will condense immediately beneath the water-proof layer.
2.0 Remedial Solutions
Considering all the common defects their remedial solutions are provided along with symptoms and possible causes in Table 1.
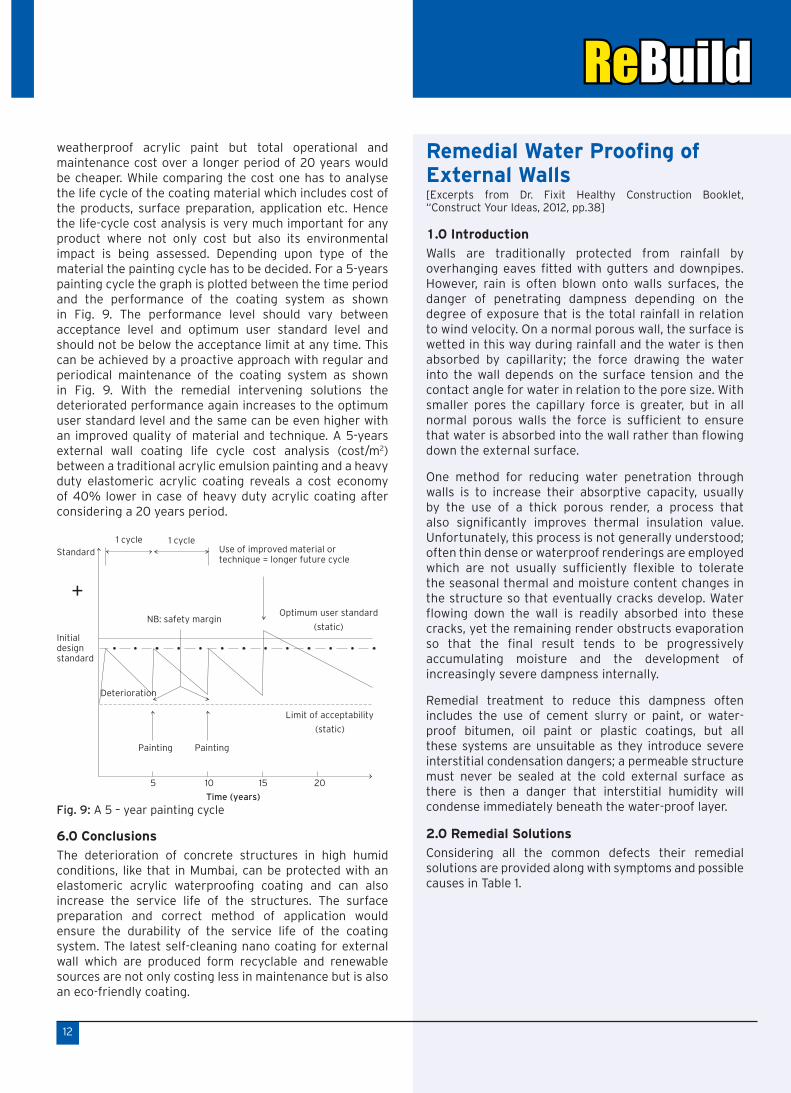
weatherproof acrylic paint but total operational and maintenance cost over a longer period of 20 years would be cheaper. While comparing the cost one has to analyse the life cycle of the coating material which includes cost of the products, surface preparation, application etc. Hence the life-cycle cost analysis is very much important for any product where not only cost but also its environmental impact is being assessed. Depending upon type of the material the painting cycle has to be decided. For a 5-years painting cycle the graph is plotted between the time period and the performance of the coating system as shown in Fig. 9. The performance level should vary between acceptance level and optimum user standard level and should not be below the acceptance limit at any time. This can be achieved by a proactive approach with regular and periodical maintenance of the coating system as shown in Fig. 9. With the remedial intervening solutions the deteriorated performance again increases to the optimum user standard level and the same can be even higher with an improved quality of material and technique. A 5-years external wall coating life cycle cost analysis (cost/m2) between a traditional acrylic emulsion painting and a heavy duty elastomeric acrylic coating reveals a cost economy of 40% lower in case of heavy duty acrylic coating after considering a 20 years period.
6.0 Conclusions
The deterioration of concrete structures in high humid conditions, like that in Mumbai, can be protected with an elastomeric acrylic waterproofing coating and can also increase the service life of the structures. The surface preparation and correct method of application would ensure the durability of the service life of the coating system. The latest self-cleaning nano coating for external wall which are produced form recyclable and renewable sources are not only costing less in maintenance but is also an eco-friendly coating.
Fig. 9: A 5 – year painting cycleTime (years)
Use of improved material or
technique = longer future cycle
1 cycle 1 cycle
Standard
+
Initial
design
standard
NB: safety marginOptimum user standard
(static)
Limit of acceptability
(static)
Painting Painting
5 10 15 20
Deterioration
13
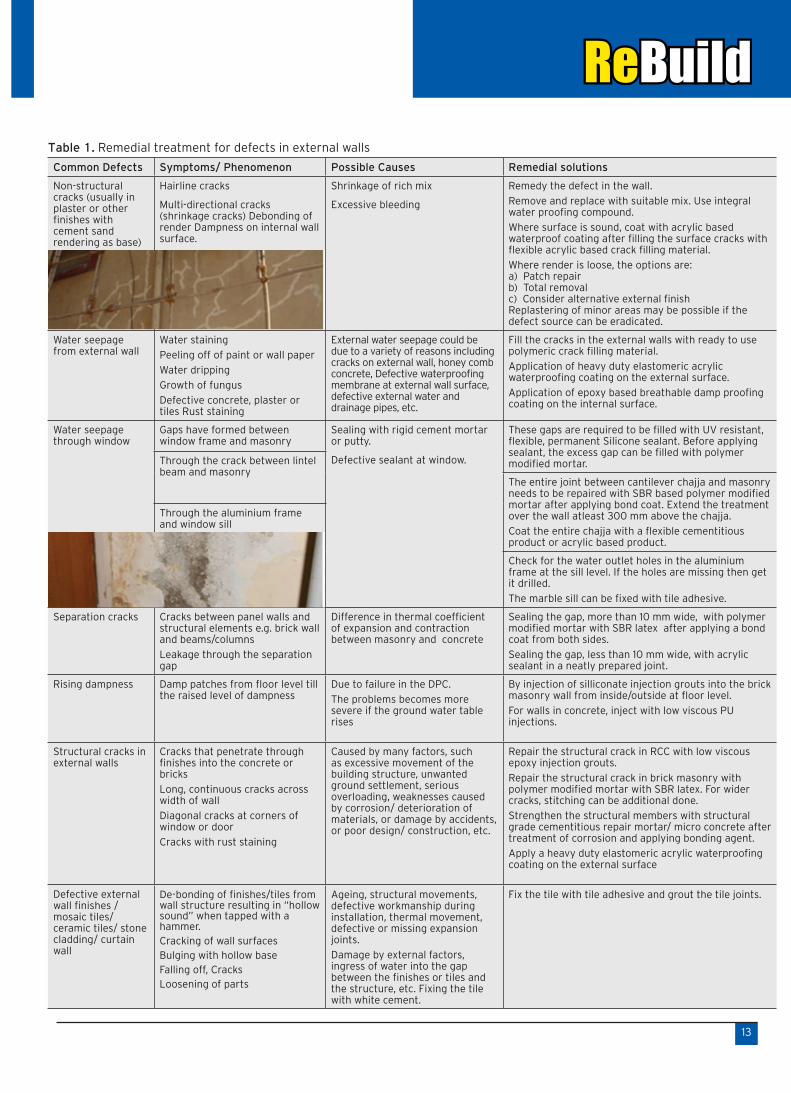
Table 1. Remedial treatment for defects in external walls
Common Defects Symptoms/ Phenomenon Possible Causes Remedial solutions
Non-structural cracks (usually in plaster or other finishes with cement sand rendering as base)
Hairline cracks
Multi-directional cracks (shrinkage cracks) Debonding of render Dampness on internal wall surface.
Shrinkage of rich mix
Excessive bleeding
Remedy the defect in the wall.
Remove and replace with suitable mix. Use integral water proofing compound.
Where surface is sound, coat with acrylic based waterproof coating after filling the surface cracks with flexible acrylic based crack filling material.
Where render is loose, the options are: a) Patch repair b) Total removalc) Consider alternative external finishReplastering of minor areas may be possible if the defect source can be eradicated.
Water seepage from external wall
Water staining
Peeling off of paint or wall paper
Water dripping
Growth of fungus
Defective concrete, plaster or tiles Rust staining
External water seepage could be due to a variety of reasons including cracks on external wall, honey comb concrete, Defective waterproofing membrane at external wall surface, defective external water and drainage pipes, etc.
Fill the cracks in the external walls with ready to use polymeric crack filling material.
Application of heavy duty elastomeric acrylic waterproofing coating on the external surface.
Application of epoxy based breathable damp proofing coating on the internal surface.
Water seepage through window
Gaps have formed between window frame and masonry
Sealing with rigid cement mortar or putty.
Defective sealant at window.
These gaps are required to be filled with UV resistant, flexible, permanent Silicone sealant. Before applying sealant, the excess gap can be filled with polymer modified mortar.Through the crack between lintel
beam and masonryThe entire joint between cantilever chajja and masonry needs to be repaired with SBR based polymer modified mortar after applying bond coat. Extend the treatment over the wall atleast 300 mm above the chajja.
Coat the entire chajja with a flexible cementitious product or acrylic based product.
Through the aluminium frame and window sill
Check for the water outlet holes in the aluminium frame at the sill level. If the holes are missing then get it drilled.
The marble sill can be fixed with tile adhesive.
Separation cracks Cracks between panel walls and structural elements e.g. brick wall and beams/columns
Leakage through the separation gap
Difference in thermal coefficient of expansion and contraction between masonry and concrete
Sealing the gap, more than 10 mm wide, with polymer modified mortar with SBR latex after applying a bond coat from both sides.
Sealing the gap, less than 10 mm wide, with acrylic sealant in a neatly prepared joint.
Rising dampness Damp patches from floor level till the raised level of dampness
Due to failure in the DPC.
The problems becomes more severe if the ground water table rises
By injection of silliconate injection grouts into the brick masonry wall from inside/outside at floor level.
For walls in concrete, inject with low viscous PU injections.
Structural cracks in external walls
Cracks that penetrate through finishes into the concrete or bricks
Long, continuous cracks across width of wall
Diagonal cracks at corners of window or door
Cracks with rust staining
Caused by many factors, such as excessive movement of the building structure, unwanted ground settlement, serious overloading, weaknesses caused by corrosion/ deterioration of materials, or damage by accidents, or poor design/ construction, etc.
Repair the structural crack in RCC with low viscous epoxy injection grouts.
Repair the structural crack in brick masonry with polymer modified mortar with SBR latex. For wider cracks, stitching can be additional done.
Strengthen the structural members with structural grade cementitious repair mortar/ micro concrete after treatment of corrosion and applying bonding agent.
Apply a heavy duty elastomeric acrylic waterproofing coating on the external surface
Defective external wall finishes / mosaic tiles/ ceramic tiles/ stone cladding/ curtain wall
De-bonding of finishes/tiles from wall structure resulting in “hollow sound” when tapped with a hammer.Cracking of wall surfacesBulging with hollow baseFalling off, CracksLoosening of parts
Ageing, structural movements, defective workmanship during installation, thermal movement, defective or missing expansion joints.
Damage by external factors, ingress of water into the gap between the finishes or tiles and the structure, etc. Fixing the tile with white cement.
Fix the tile with tile adhesive and grout the tile joints.
14
3.0 Remedial Treatment for Cracks in External Plaster
Cosmetic shrinkage, cracks in plaster or other forms of finishes will affect the appearance only and does not pose any safety concern. They are small hairline cracks developed within the finishes layer, not penetrating down to the reinforced concrete structure. Such shrinkage cracks develop in the cement mortar only and should be sealed with epoxy putty, which has good adhesion to ceramic surface and is not affected by acids and chemicals. The various types of cracks like plastic shrinkage, thermal shrinkage cracks occurs during pre-hardening stages of concrete which has to be filled in with suitable polymeric materials. A schematic diagram of remedial waterproofing system on external wall is given in Fig. 1.
3.1 By Polymeric Crack filling material For (cracks up to 5 mm width)
A single pack, ready to use flexible acrylic putty is very much suitable for filling the non-structural cracks in plastered surfaces.
Features & Benefits
• Paste form, easy to apply
• Flexible, therefore does not crack and accommodates minor movements in cracks
• Water based, hence eco-friendly
• Can be applied on damp surfaces but not on cracks with running water
• Over-coatable after 24 hours
• Non-staining
• Excellent adhesion with cementitious surface
• UV resistance
• It can be tinted using water-based stainers
Method of Application
• Surface must be free from dust, oil, grease, and loose particles etc. Moisten the surface before applying crack filling material
• Fine hair line cracks must be widened up to 1 mm minimum and then filled
• For porous surfaces, apply primer coat prepared with crack filling paste and water in 1:1 proportion over the crack
• Fill the cracks with the paste when the surface is tacky and not dried completely
• Press it firmly into the crack with a spatula or putty knifes and level with the surface.
• Care must be taken to avoid formation of cavities or bubbles during application
• Allow it set for 24 h and then apply another coat of crack filling material
• Further POP or painter’s putty application can be taken up once it is fully dry
• For best results allow it to cure for 7 days
Precautions & Limitations
• Should not be used for cracks more than 5 mm thick
• Not for application in cracks in structural members, expansion joints & separation gaps
• Not for cracks in POP or painter’s putty
• For application in temperatures below 100C, drying time will be delayed
3.2 By Flexible putty (For Cracks up to 10 mm width)
A single pack, ready to use, fast drying flexible putty used for filling the non-structural cracks in plastered surfaces in internal and external plastered brick masonry wall cracks of up to 10 mm width.
Features & Benefits
• Does not shrink after curing
• One time application
• Non-saging
• No sanding required
• Non-staining
• Excellent adhesion with cementitious surface
• UV resistance
Method of Application
Surface must be free from dust, oil, grease, and loose particles etc. Moisten the surface before applying flexible putty. Fine hair line cracks must be widened up to 10 mm minimum and then filled with flexible putty. The material should be pressed firmly into the crack one time only with a spatula or putty knifes and level with the surface. Care must be taken to avoid formation of cavities or bubbles during application. Allow it to dry in ambient conditions for 5-6 h. Further, POP or painter’s putty application can be taken up once it is fully dry. For best results allow it to cure for 7 days.
Precautions & Limitations
• Not for cracks in POP or painter’s putty
• External application must be over coated with coating
• Jet or power washing on walls not advisable prior to application
• For application in temperatures below 100C, drying time will be delayed
• Container to be tightly closed after application
• Incase the filler compound is too dry, add 1 teaspoon of potable water to 250 ml of flexible putty
• Clean tools and hands with soap and warm water
• Not to be used as a skim coat
• Cannot be tinted
15
3.3 Prevent leakage from separation gaps
Leakage arising between RCC members and masonry can be prevented by taking care following steps:
• Avoids dampness due to ingress of water.
• Crack–free by high flexibility of mortar.
Methodology
• Make a U groove, and blow off all laitance and loose material.
• Apply a polymer modified mortar in saturated surface dry condition, prepared with:
• Polymer modified mortar with SBR based, (10-12%) by weight of cement (cement: washed sand in 1:3) adjusting appropriate consistency as per water demand.
• Cure by sprinkling water 3-4 times a day for 2 days.
4.0 Damp-Proofing Treatment
The treatment against rising dampness involves pressure injection of non-aqueous water-repellent solutions into tubes sealed into holes in the masonry.
Surface Preparation
Remove paint up to bare masonry surface from affected area by wire-brushing or any other suitable means. Wipe surface with wet cloth to remove loose particles from cement plaster.
Fixing of nozzles
• Drill the holes with a 12 - 15 mm drill bit at 45° angle, penetrating ¾ width of the wall. Start from skirting level with 300 mm distance between each hole horizontally and 300 mm to 400 mm vertically from ground level, at centre to centre. A zigzag pattern needs to be formed to cover the entire area to be injected for effective result.
• Fix the perforated PVC nozzles and seal them secure with instant leak plug material and allow it to set for one day before starting next work.
• Use grouting pump with minimum 2 Bar (2 kg/ cm2) pressure capacity to pump the siliconate based grout.
Dilution of Grouts
Dilution of siliconate based injection grout depends upon the severity of problem, from 1 :1 to 1:5 with clean water.
Rising Dampness Injection
• Inject diluted siliconate based injection grout through the nozzles till the back pressure is felt. Move to next nozzle and complete the process by injecting through all fixed nozzles in the affected area. Then cut off the nozzles at the surface level and seal the holes using SBR based polymer modified mortar.
• Level the surface with plaster and allow the surface to dry completely before proceeding for painting.
Fig. 3: Drilling holes for fixing nozzles for grouting
Fig. 9: A 5 – year painting cycle
1
2
3
4
5
6
7
8
9
10
1 Spalled Plaster
2 Exposed Brick Masonry
3 Plaster Reinstated Using PMM Mixed with
Dr. Fixit Pidicrete URP
4 Column
5 Separation Joint Filled Using PMM Dr. Fixit Pidicrete URP
6 Plaster Cracks Filled with Dr. Fixit Crack-X Shrinkfree
7 Primer Coat of Dr. Fixit Primeseal
8 Separation Joint RCC-Masonry
9 2 Coats of Dr. Fixit Raincoat
10 Beam
16
5.0 Treatment for Internal Dampness
Two component epoxy based damp proofing material has to be used for remedial treatment. The detailed application is as given below:
• On the internal side of the wall, ensure complete surface preparation prior to application.
• Chip off the plaster in the affected area to expose the masonry.
• Wire brush the surface to remove all the loose laitance and wash with clean water.
• Blend a putty using epoxy based damp proofing material and cement in the ratio 1:1:2 (Base: Hardener: Cement) and apply the putty on the masonry surface to level out all the undulations.
• Allow the putty to dry for a period of 4-6 hrs.
• Now, blend a mixture of epoxy based damp proofing material and water in the ratio 1:1:1 (Base: Hardener: Water) and brush apply 2 coats over the leveled surface in a span of 4hrs.
• Air cure for 24 hrs prior to re-plastering mixed with SBR based polymer modified mortar.
6.0 Conclusion
After remedial treatment for cracks, voids, dampness and other defects the external waterproofing coating has to be provided on a properly prepared surface as discussed earlier.
Fig. 2: Injection grouting for raising dampness
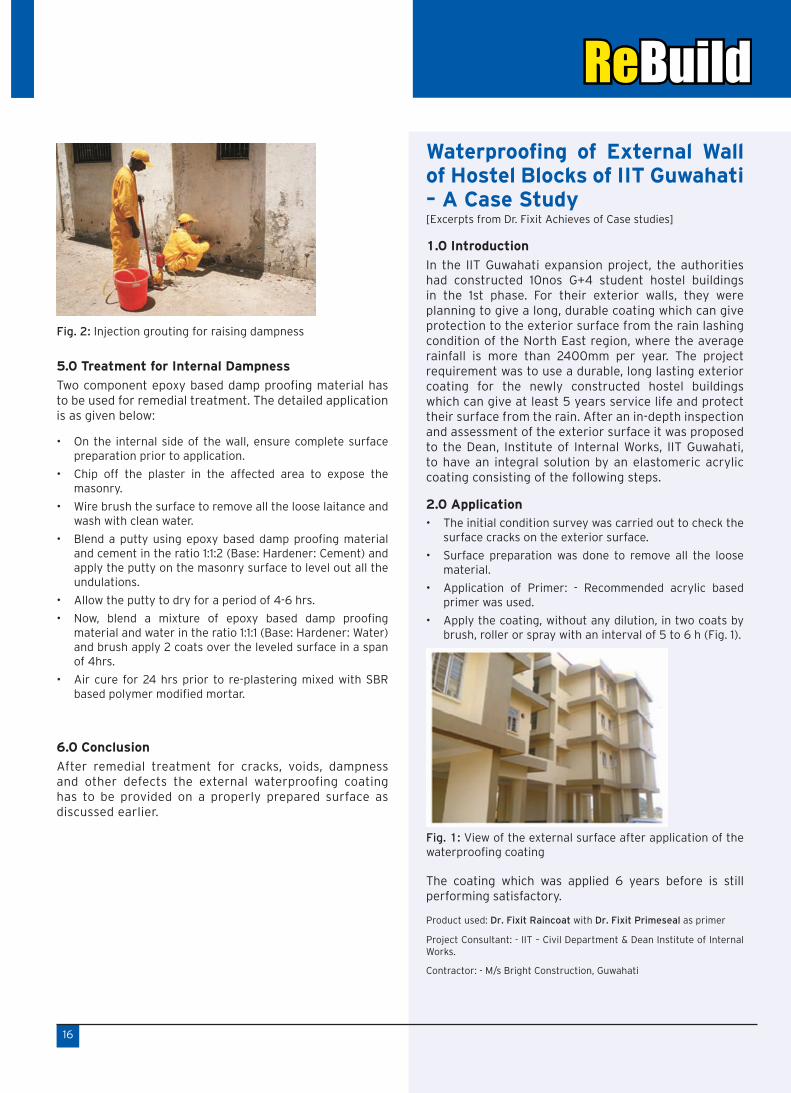
Waterproofing of External Wall of Hostel Blocks of IIT Guwahati – A Case Study[Excerpts from Dr. Fixit Achieves of Case studies]
1.0 Introduction
In the IIT Guwahati expansion project, the authorities had constructed 10nos G+4 student hostel buildings in the 1st phase. For their exterior walls, they were planning to give a long, durable coating which can give protection to the exterior surface from the rain lashing condition of the North East region, where the average rainfall is more than 2400mm per year. The project requirement was to use a durable, long lasting exterior coating for the newly constructed hostel buildings which can give at least 5 years service life and protect their surface from the rain. After an in-depth inspection and assessment of the exterior surface it was proposed to the Dean, Institute of Internal Works, IIT Guwahati, to have an integral solution by an elastomeric acrylic coating consisting of the following steps.
2.0 Application• The initial condition survey was carried out to check the
surface cracks on the exterior surface.
• Surface preparation was done to remove all the loose material.
• Application of Primer: - Recommended acrylic based primer was used.
• Apply the coating, without any dilution, in two coats by brush, roller or spray with an interval of 5 to 6 h (Fig. 1).
The coating which was applied 6 years before is still performing satisfactory.
Product used: Dr. Fixit Raincoat with Dr. Fixit Primeseal as primer
Project Consultant: - IIT – Civil Department & Dean Institute of Internal Works.
Contractor: - M/s Bright Construction, Guwahati
Fig. 1: View of the external surface after application of the waterproofing coating
CONSULTANCY SERVICES OFFERED• All type of Industries, Infrastructure, Marine
Structures & other Buildings
• Structural Audit
• Periodical health check up
• Diagnosis of structural defects and recommendation for suitable repair and rehabilitation
• Leakage Investigation of Buildings and recommendation for remedial water proofing
17
Advanced Diagnostic Laboratory & Consultancy ServicesNABL accredited laboratories for NDT and Chemical Testing in accordance with the standard ISO/IEC 17025:2005
TESTING FACILITIES• Quality of concrete by Ultrasonic Pulse Velocity
• Quality of concrete by Digital Schmidt Hammer
• Concrete cover mapping by Profometer
• In-situ strength of concrete by core extraction
• Rapid Chloride Penetration Test (RCPT)
• Corrosion analyser by Galvapulse
• Infra Red Thermography
• Microscopical analysis of thin concrete samples
• Chemical analysis of concrete related materials
For availing any of the above services, please contact:
Mr. E. Gopalkrishnan,
Phone : +91 22 2835 7822, Mobile : +91 9769222667
E-mail : [email protected]
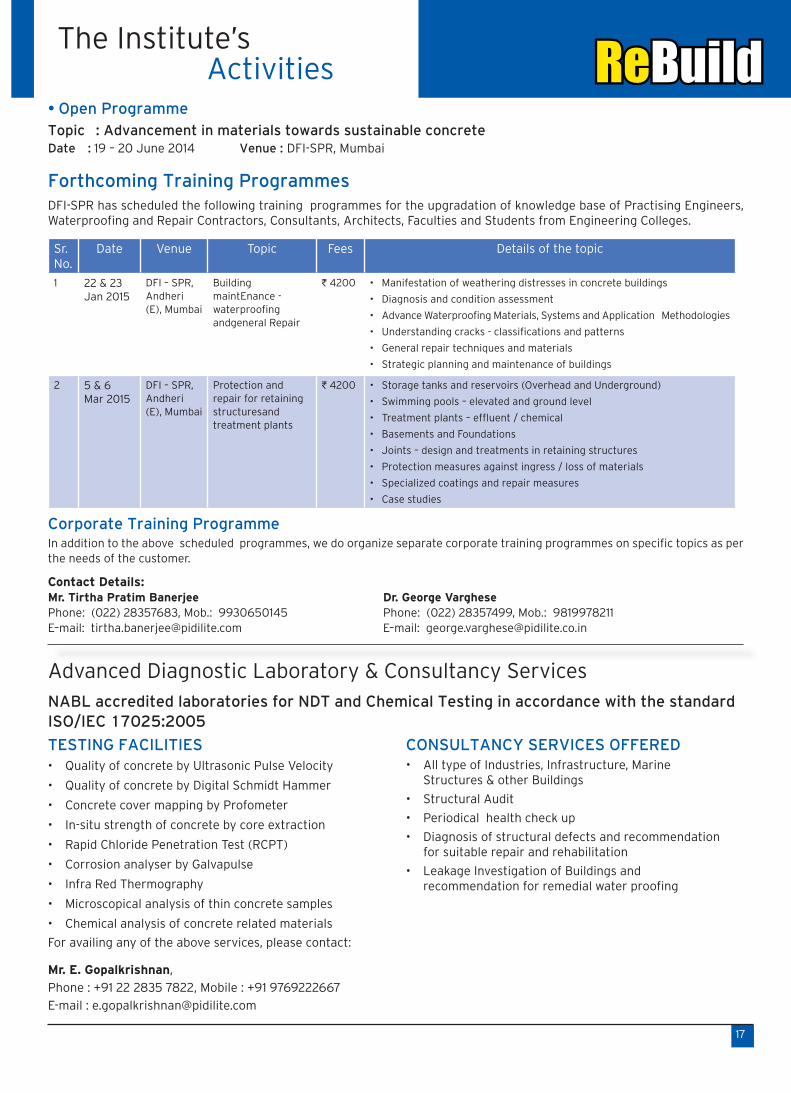
•Open ProgrammeTopic : Advancement in materials towards sustainable concreteDate : 19 – 20 June 2014 Venue : DFI-SPR, Mumbai
The Institute’sActivities
Forthcoming Training ProgrammesDFI-SPR has scheduled the following training programmes for the upgradation of knowledge base of Practising Engineers, Waterproofing and Repair Contractors, Consultants, Architects, Faculties and Students from Engineering Colleges.
Sr. No.
Date Venue Topic Fees Details of the topic
1 22 & 23 Jan 2015
DFI – SPR, Andheri (E), Mumbai
Building maintEnance - waterproofing and general Repair
` 4200 • Manifestation of weathering distresses in concrete buildings
• Diagnosis and condition assessment
• Advance Waterproofing Materials, Systems and Application Methodologies
• Understanding cracks - classifications and patterns
• General repair techniques and materials
• Strategic planning and maintenance of buildings
2 5 & 6Mar 2015
DFI – SPR, Andheri (E), Mumbai
Protection and repair for retaining structures and treatment plants
` 4200 • Storage tanks and reservoirs (Overhead and Underground)
• Swimming pools – elevated and ground level
• Treatment plants – effluent / chemical
• Basements and Foundations
• Joints – design and treatments in retaining structures
• Protection measures against ingress / loss of materials
• Specialized coatings and repair measures
• Case studies
Corporate Training Programme In addition to the above scheduled programmes, we do organize separate corporate training programmes on specific topics as per the needs of the customer.
Contact Details:Mr. Tirtha Pratim Banerjee Dr. George VarghesePhone: (022) 28357683, Mob.: 9930650145 Phone: (022) 28357499, Mob.: 9819978211E–mail: [email protected] E–mail: [email protected]
18
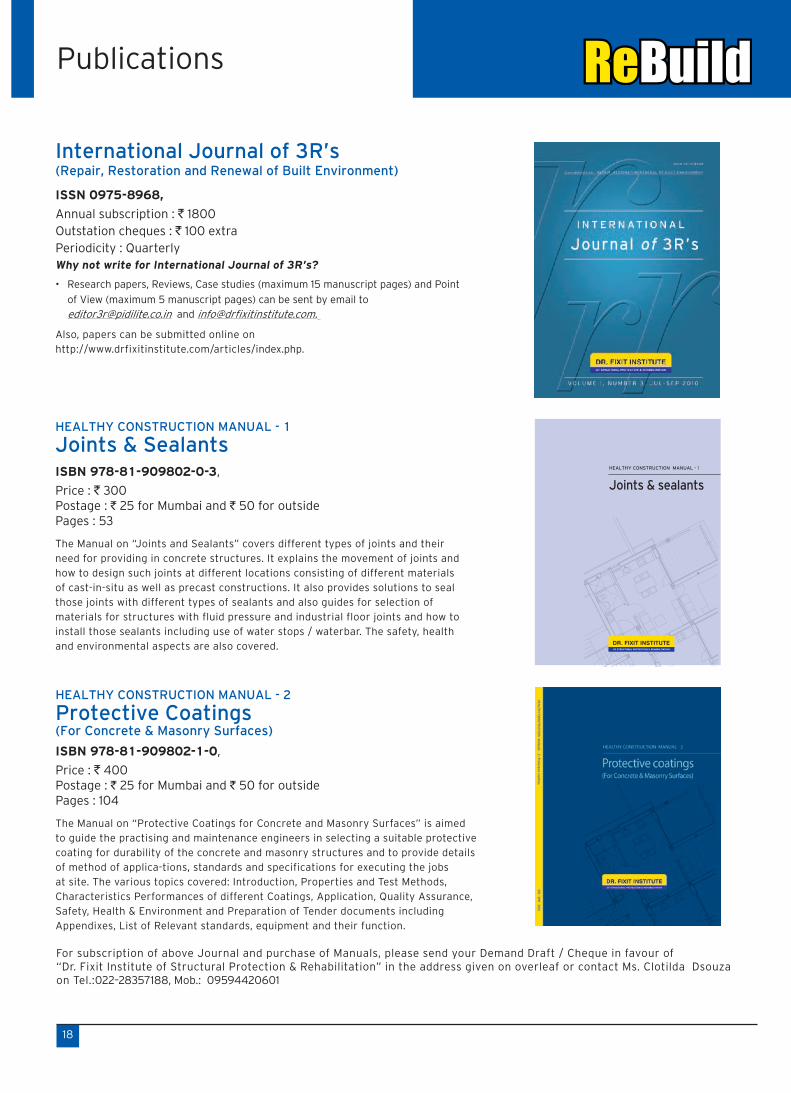
International Journal of 3R’s (Repair, Restoration and Renewal of Built Environment)
ISSN 0975-8968,
Annual subscription : ` 1800 Outstation cheques : ` 100 extraPeriodicity : QuarterlyWhy not write for International Journal of 3R’s?
• Research papers, Reviews, Case studies (maximum 15 manuscript pages) and Point
of View (maximum 5 manuscript pages) can be sent by email to [email protected] and [email protected].
Also, papers can be submitted online on http://www.drfixitinstitute.com/articles/index.php.
HEALTHY CONSTRUCTION MANUAL - 1
Joints & Sealants
ISBN 978-81-909802-0-3,
Price : ` 300 Postage : ` 25 for Mumbai and ` 50 for outsidePages : 53
The Manual on “Joints and Sealants” covers different types of joints and their need for providing in concrete structures. It explains the movement of joints and how to design such joints at different locations consisting of different materials of cast-in-situ as well as precast constructions. It also provides solutions to seal those joints with different types of sealants and also guides for selection of materials for structures with fluid pressure and industrial floor joints and how to install those sealants including use of water stops / waterbar. The safety, health and environmental aspects are also covered.
1
HEALTHY CONSTRUCTION MANUAL - 2
Protective Coatings (For Concrete & Masonry Surfaces)
ISBN 978-81-909802-1-0,
Price : ` 400 Postage : ` 25 for Mumbai and ` 50 for outsidePages : 104
The Manual on “Protective Coatings for Concrete and Masonry Surfaces” is aimed to guide the practising and maintenance engineers in selecting a suitable protective coating for durability of the concrete and masonry structures and to provide details of method of applica-tions, standards and specifications for executing the jobs at site. The various topics covered: Introduction, Properties and Test Methods, Characteristics Performances of different Coatings, Application, Quality Assurance, Safety, Health & Environment and Preparation of Tender documents including Appendixes, List of Relevant standards, equipment and their function.
Publications
For subscription of above Journal and purchase of Manuals, please send your Demand Draft / Cheque in favour of “Dr. Fixit Institute of Structural Protection & Rehabilitation” in the address given on overleaf or contact Ms. Clotilda Dsouza on Tel.:022–28357188, Mob.: 09594420601
19
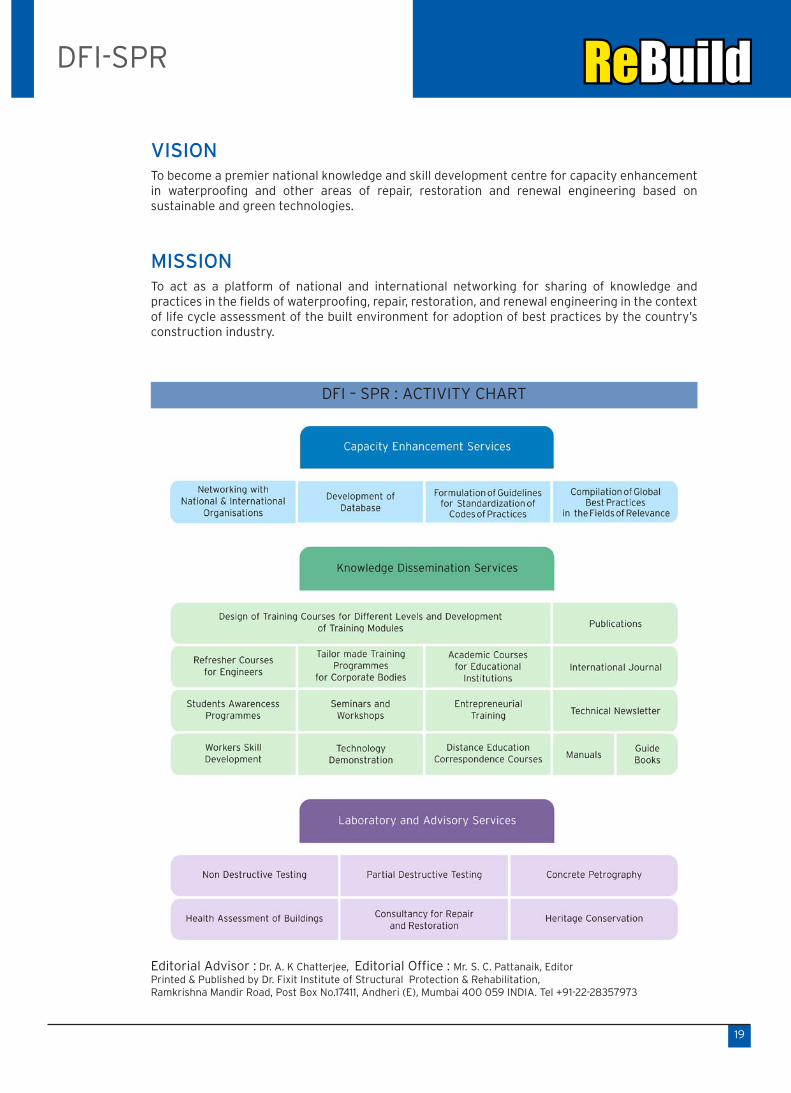
DFI-SPR
VISIONTo become a premier national knowledge and skill development centre for capacity enhancement in waterproofing and other areas of repair, restoration and renewal engineering based on sustainable and green technologies.
MISSIONTo act as a platform of national and international networking for sharing of knowledge and practices in the fields of waterproofing, repair, restoration, and renewal engineering in the context of life cycle assessment of the built environment for adoption of best practices by the country’s construction industry.
Editorial Advisor : Dr. A. K Chatterjee, Editorial Office : Mr. S. C. Pattanaik, Editor Printed & Published by Dr. Fixit Institute of Structural Protection & Rehabilitation, Ramkrishna Mandir Road, Post Box No.17411, Andheri (E), Mumbai 400 059 INDIA. Tel +91-22-28357973
DFI – SPR : ACTIVITY CHART

Reader’s Feedback & Interaction SolicitedOur Newsletter is focused on good concreting practices, waterproofing, repair, rehabilitation and maintenance of concrete structures and buildings. Any reader, who wishes to contribute his or her experience or achievements in this field to our Newsletter for wider dissemination, may send the details to:
The Editor – ’Rebuild’Dr. Fixit Institute of Structural Protection & Rehabilitation
C/o Pidilite Industries Limited Ramkrishna Mandir Road, Andheri (E), Mumbai 400 059Tel : 022 – 2835 7973E-mail : [email protected] [email protected] us at : www.drfixitinstitute.com