web publishing using t4 - university of glasgow
TRANSCRIPT
Web Publishing using T4
Table of Contents
Log in and Preview Content Module 1 .............................................................................. 2
Log in to t4 ........................................................................... 2 Preview an existing section .................................................. 3
Create Sections Module 2 .............................................................................. 4 Re-order sections ................................................................. 7
Edit, Create and Delete Content Module 3 .............................................................................. 9 Edit content .......................................................................... 9
Create content ................................................................... 12 Manual ordering of content items ..................................... 15
Automatic ordering of content items ................................ 17 Delete content ................................................................... 21
Creating a bin for deleted content ..................................... 23
Creating content and links Module 4 ............................................................................ 26 Format text ......................................................................... 30
Create an accordion and image ......................................... 32 Creating Navigation tiles and links ..................................... 35
Insert and format links ....................................................... 41 Insert an external link......................................................... 42
Insert a section link ............................................................ 43 Build the homepage ........................................................... 45
Save changes and logout .................................................... 45
Miscellaneous Module 5 ............................................................................ 46
Spellcheck ........................................................................... 46 Migrate content from Word or an existing web site ......... 46
t4 Moderators and Contributors ........................................ 46 Writing for the web ............................................................ 47
Register to use t4 and future support ................................ 47 Additional resources .......................................................... 47
Page 2
Log in and Preview Content Module 1
Log in to t4
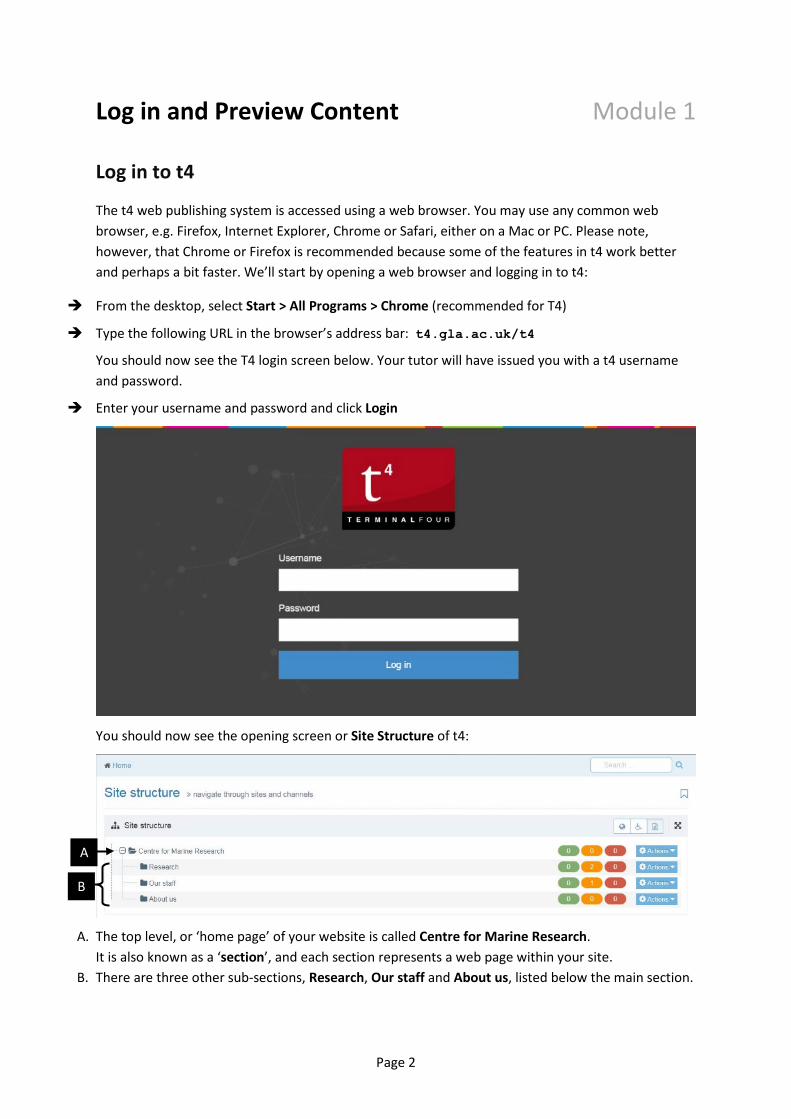
The t4 web publishing system is accessed using a web browser. You may use any common web browser, e.g. Firefox, Internet Explorer, Chrome or Safari, either on a Mac or PC. Please note, however, that Chrome or Firefox is recommended because some of the features in t4 work better and perhaps a bit faster. We’ll start by opening a web browser and logging in to t4:
From the desktop, select Start > All Programs > Chrome (recommended for T4)
Type the following URL in the browser’s address bar: t4.gla.ac.uk/t4
You should now see the T4 login screen below. Your tutor will have issued you with a t4 usernameand password.
Enter your username and password and click Login
You should now see the opening screen or Site Structure of t4:
A. The top level, or ‘home page’ of your website is called Centre for Marine Research.It is also known as a ‘section’, and each section represents a web page within your site.
B. There are three other sub-sections, Research, Our staff and About us, listed below the main section.
A
B
Page 3
Preview an existing section
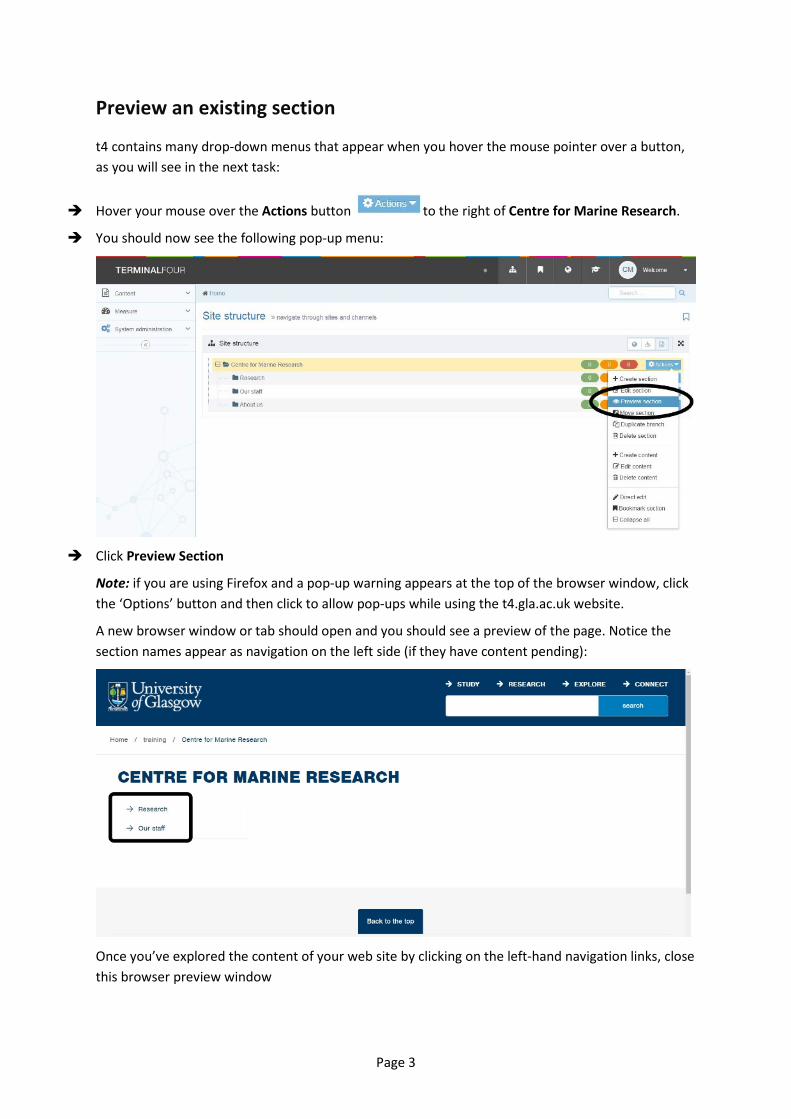
t4 contains many drop-down menus that appear when you hover the mouse pointer over a button, as you will see in the next task:
Hover your mouse over the Actions button to the right of Centre for Marine Research.
You should now see the following pop-up menu:
Click Preview Section
Note: if you are using Firefox and a pop-up warning appears at the top of the browser window, clickthe ‘Options’ button and then click to allow pop-ups while using the t4.gla.ac.uk website.
A new browser window or tab should open and you should see a preview of the page. Notice thesection names appear as navigation on the left side (if they have content pending):
Once you’ve explored the content of your web site by clicking on the left-hand navigation links, close this browser preview window

Page 4
Create Sections Module 2
As a t4 moderator, you may change the structure of a web site, i.e. add or delete sections and sub-sections to create new web pages and navigation options. In this module we will learn how to add a new ‘Contact us’ section. First, we’ll return to the Site Structure:
Select Content > Site Structure from the menu at the top of the window, as pictured below:
Hover your mouse over the Actions button to the right of Centre for Marine Research.
Click Create Section:
Page 5
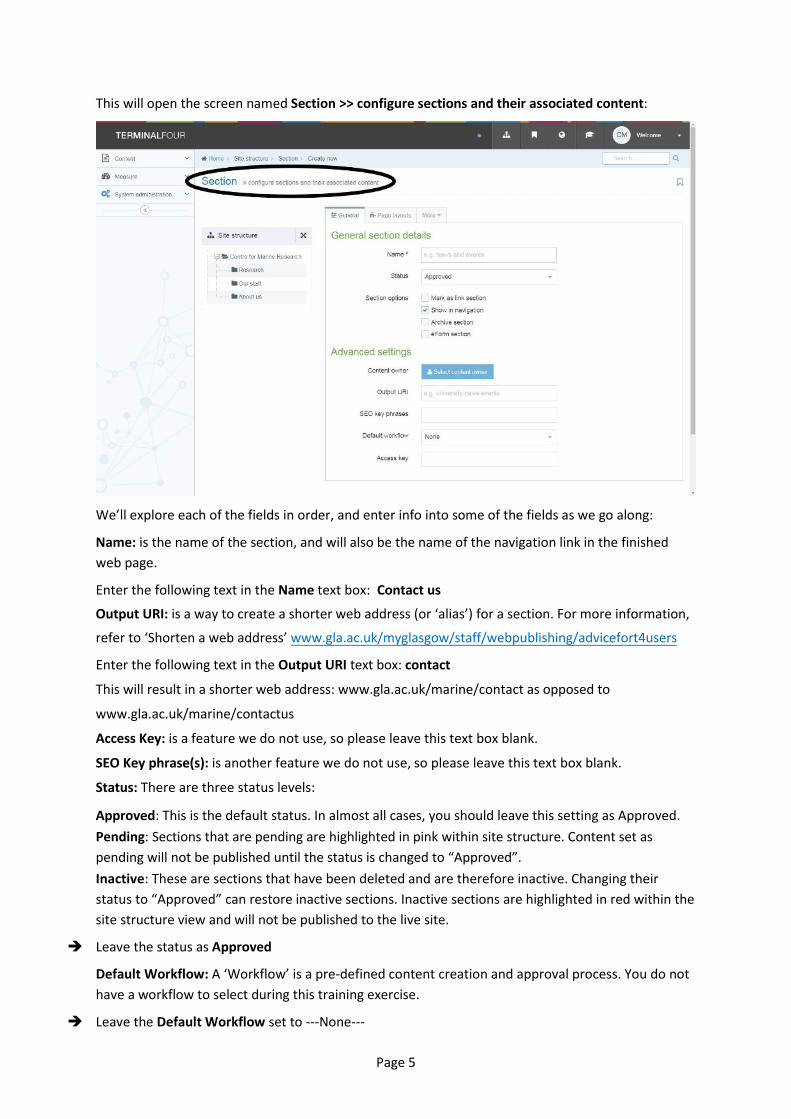
This will open the screen named Section >> configure sections and their associated content:
We’ll explore each of the fields in order, and enter info into some of the fields as we go along:
Name: is the name of the section, and will also be the name of the navigation link in the finished web page.
Enter the following text in the Name text box: Contact us
Output URI: is a way to create a shorter web address (or ‘alias’) for a section. For more information,
refer to ‘Shorten a web address’ www.gla.ac.uk/myglasgow/staff/webpublishing/advicefort4users
Enter the following text in the Output URI text box: contact
This will result in a shorter web address: www.gla.ac.uk/marine/contact as opposed to
www.gla.ac.uk/marine/contactus
Access Key: is a feature we do not use, so please leave this text box blank.
SEO Key phrase(s): is another feature we do not use, so please leave this text box blank.
Status: There are three status levels:
Approved: This is the default status. In almost all cases, you should leave this setting as Approved.Pending: Sections that are pending are highlighted in pink within site structure. Content set as pending will not be published until the status is changed to “Approved”.Inactive: These are sections that have been deleted and are therefore inactive. Changing their status to “Approved” can restore inactive sections. Inactive sections are highlighted in red within the site structure view and will not be published to the live site.
Leave the status as Approved
Default Workflow: A ‘Workflow’ is a pre-defined content creation and approval process. You do nothave a workflow to select during this training exercise.
Leave the Default Workflow set to ---None---

Page 6
Show in navigation: If this box is ticked, then the Name will appear in your web site navigation on the left-hand side. If this box is not ticked, then the name will not appear. This is useful for publishing and removing seasonal sections that you may not want to appear in your navigation all year round.
Ensure the box Show in navigation is checked
EForm Section: Eforms is another way of updating a webpage, but we do not support this method atthe moment, so please do not tick this box.
Archive Section: is another feature we do not use, so please do not tick.
Content Owner: is a feature we do not use, so please do not tick.
Make this a link section: A link section does not contain any content. This allows you to create anavigation option that links to a section belonging to another school within the t4 hierarchy, or to anexternal website. Since we’re creating our own section, do not tick.
At the bottom of the screen, click Save changes :
This will return you to the Show site structure screen. Notice your new section has been added:
Page 7
Re-order sections
We will learn how to re-order the presentation of your left-hand web site navigation by changing the order of the sections.
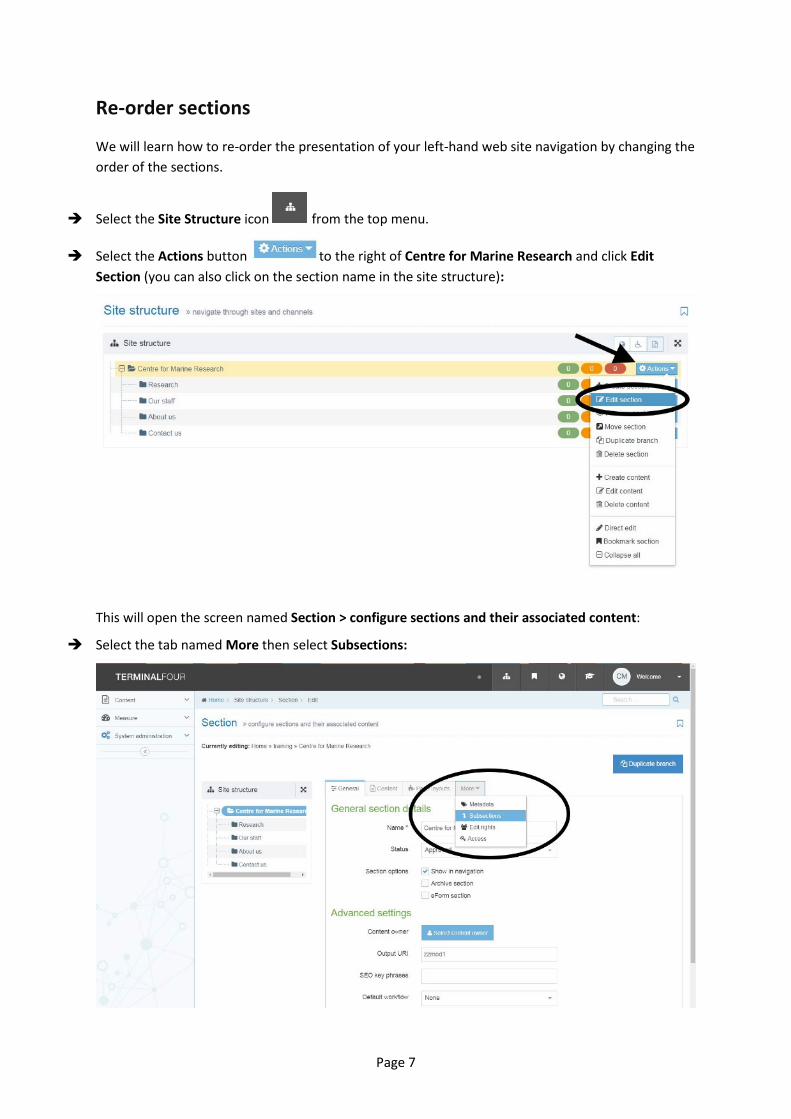
Select the Site Structure icon from the top menu.
Select the Actions button to the right of Centre for Marine Research and click Edit Section (you can also click on the section name in the site structure):
This will open the screen named Section > configure sections and their associated content:
Select the tab named More then select Subsections:
Page 8
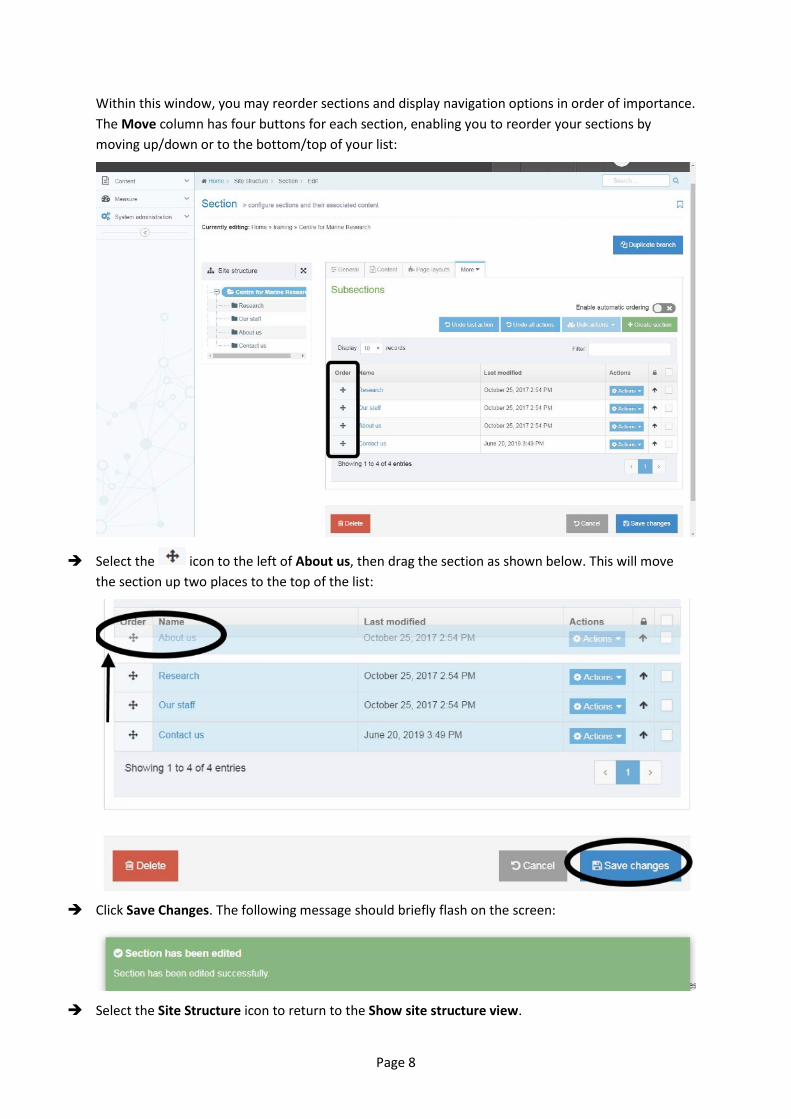
Within this window, you may reorder sections and display navigation options in order of importance. The Move column has four buttons for each section, enabling you to reorder your sections by moving up/down or to the bottom/top of your list:
Select the icon to the left of About us, then drag the section as shown below. This will move the section up two places to the top of the list:
Click Save Changes. The following message should briefly flash on the screen:
Select the Site Structure icon to return to the Show site structure view.

Page 9
Edit, Create and Delete Content Module 3
Edit content
Now we’ll learn how to open and modify some content of the Research web page:
Select Content > Edit Content from the top menu bar:
You should now see the screen below, which is very similar to the Site Structure screen. The difference is that the black bar now says Edit content, choose a section and the section names change into underlined clickable links.
Click on the link named Research:
The Edit content, choose a section to edit the content of screen will open as shown below.
Click on the content link named Research > Theme: Biodiversity & conservation:

Page 10
You should now see the t4 page editor for this section:
The t4 page editor allows you to edit text, using formatting buttons and other functions similar to those found in word processing programs. It also contains some web-specific features we will explore later.

Page 11
Now we’ll format a sub-heading:
Highlight the heading ‘Harmful algae’ using the mouse. From the Format drop-down menu, select Heading 3, as shown below:
Select to preview these changes. Add another sub-heading to the page if you wish.
Close the preview window.
Select the blue arrow next to the save changes button to reveal the update options. Select Save and Approve to save your changes.
Notice that you have three options within the Save changes button:
• Save changes: saves your work but does not publish it. The content item is placed into the approval area.
• Save and Approve: saves and publishes your work • Save as Draft: saves your work but does not publish it. The content item is not placed into the
approval area.
Select Site Structure to return to the Show site structure view
Page 12
Create content
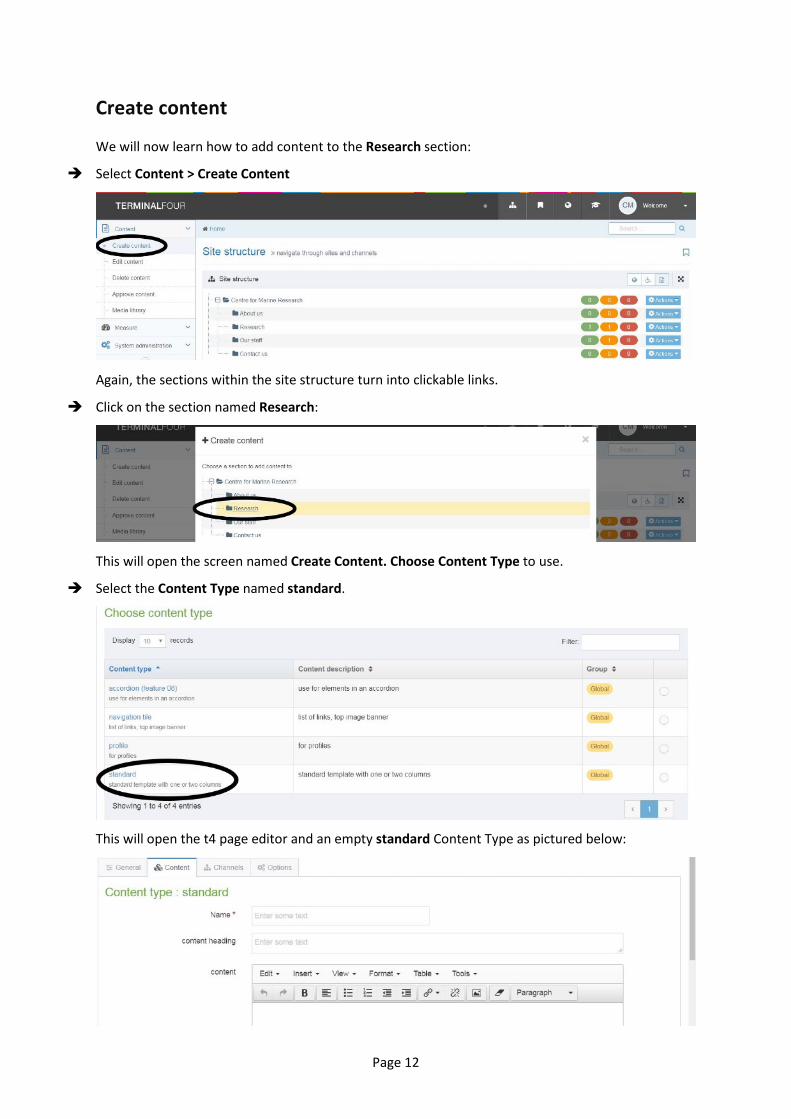
We will now learn how to add content to the Research section:
Select Content > Create Content
Again, the sections within the site structure turn into clickable links.
Click on the section named Research:
This will open the screen named Create Content. Choose Content Type to use.
Select the Content Type named standard.
This will open the t4 page editor and an empty standard Content Type as pictured below:
Page 13
The template has different input fields and text areas that you can type into. We’ll explore each of them in detail and will add some text into the fields we go along:
Name: Text entered into this area does not appear on the finished web page. This is a name that t4 uses to identify a piece of content. It is also a name that you will need to remember and recognize in order to edit or manage the piece of content in the future. Therefore, it is important that you choose a name that readily identifies the content.
Place the cursor into the Name area and enter the following text: Research > Theme: Climate proxies: Biology of calcifying organisms
Content heading: Text entered here appears on the finished web page as a heading above subsequent text. It is not uncommon for the Name and Content heading to be exactly the same.
Place the cursor into the content heading area and enter the following text: Research > Theme: Climate proxies: Biology of calcifying organisms
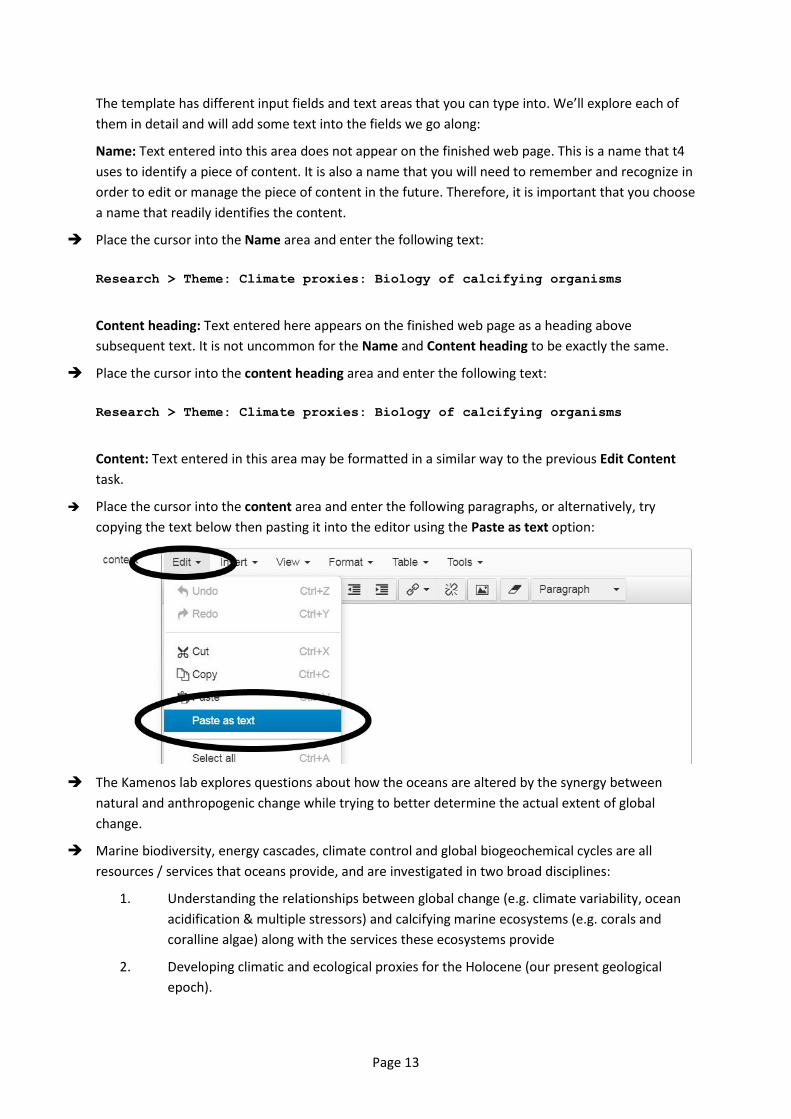
Content: Text entered in this area may be formatted in a similar way to the previous Edit Content task.
Place the cursor into the content area and enter the following paragraphs, or alternatively, try copying the text below then pasting it into the editor using the Paste as text option:
The Kamenos lab explores questions about how the oceans are altered by the synergy between natural and anthropogenic change while trying to better determine the actual extent of global change.
Marine biodiversity, energy cascades, climate control and global biogeochemical cycles are all resources / services that oceans provide, and are investigated in two broad disciplines:
1. Understanding the relationships between global change (e.g. climate variability, ocean acidification & multiple stressors) and calcifying marine ecosystems (e.g. corals and coralline algae) along with the services these ecosystems provide
2. Developing climatic and ecological proxies for the Holocene (our present geological epoch).

Page 14
These research areas are strongly interdisciplinary including many biological, geological and chemical techniques, with research in temperate, tropical and polar areas using SCUBA as well as in the Marine Mesocosm Facility.
Quick Links: This area is intended for an unordered bullet list of links. You may link to an external web site or to any part of your own site that you wish to feature. This link is displayed as a narrow column down the right-hand side of the published page. It is possible to populate this column with plain text and images also. If you do use images, it is important to make sure to use images that are no wider than 158 pixels. Leaving the quick links area blank means this narrow column does not appear.
Leave the quick links area blank.
Select the button to see how the page will look.
Close the preview window.
Select the blue arrow next to the Save button to reveal the update options. Select Save and Approve to save your changes:
This will open the screen named Content in this section. This window shows the three content items that make up the research web page, displaying a list of attributes for each content item. Have a look at the attributes for the content items:
• Order: Allows you to re-order the content items within this section • Version: The number of times this item has been edited, in this case, once. • Status: The workflow status of the piece of content, in this case ‘Approved’. This is because you
selected the ‘Save and Approve’ button when this content was created. If you had selected the ‘Save button, the status would display as ‘Pending’.

Page 15
• Last Modified: The date on which the piece of content was last modified, in this case, today’s date. • Publish date: The date the content has been published to the live website. • Actions: See below for more details • Lock: If the box has a tick next to it, then t4’s Automatic Ordering feature will not apply to the
content item. If the tick is removed, the content item may be automatically ordered alphabetically or by last modified date.
Hover your mouse over the Actions button to the right of Research > Theme: Climate proxies: Biology of calcifying organisms the following pop-up menu will appear:
• Edit: enables you to open a content item and then modify it. This has the same effect as clicking on the name of the content item.
• Preview: allows you to preview content. • Mirror: allows you to display a content item in another section. The mirrored content will
subsequently change when the original content is edited. • Duplicate: allows you to copy a content item into another section. The duplicated content will
subsequently not be associated with the original content. • Move: allows you to move content into another section. • History: allows you to see the previous versions of a content item. • Unlock: unlocks the content if it has been locked. • Lock to bottom: locks the content at the bottom of the content list. • Delete: allows you to delete a content item.
Manual ordering of content items
We will learn how to manually change the order that the content items of the Research section are presented. As with sections, each content item has an Order option.
The Order icon moves content to the order you wish for it to appear on the webpage.
In this case, we’ll move the content item named Research theme > Biodiversity & conservation to the bottom of the webpage.

Page 16
Click on the furthest left arrow, (Move to Bottom), that is listed to the right of Research theme > Biodiversity & conservation to move this content item to the bottom of the page.
Click Save Changes
t4 will briefly display this success message:
Now we’ll preview the change
Select the Site Structure icon from the top menu:
Page 17
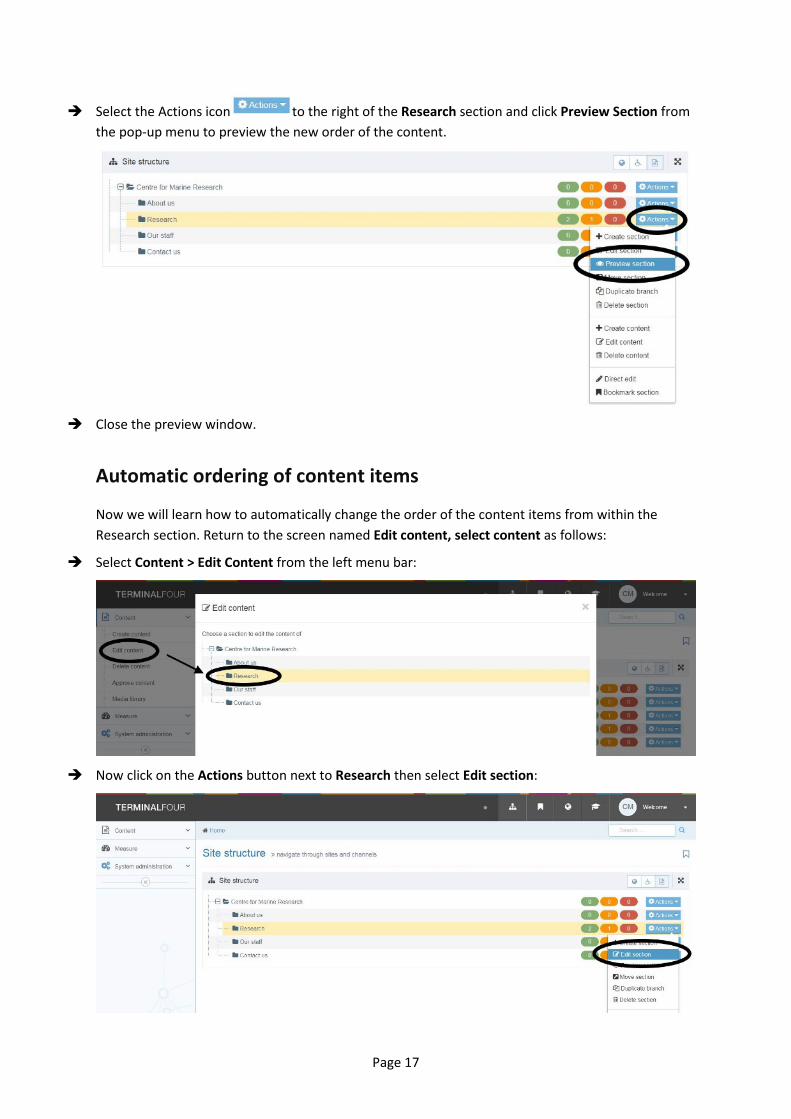
Select the Actions icon to the right of the Research section and click Preview Section from the pop-up menu to preview the new order of the content.
Close the preview window.
Automatic ordering of content items
Now we will learn how to automatically change the order of the content items from within the Research section. Return to the screen named Edit content, select content as follows:
Select Content > Edit Content from the left menu bar:
Now click on the Actions button next to Research then select Edit section:

Page 18
Select the Content tab. You may change the presentation order of the content items within the Research section alphabetically or by last update or publish date:
Within the area of the page named Enable automatic ordering, check the box named Enabled
Within the drop-down box of the Enable automatic ordering area, change the automatic order from
Alphabetical (A-Z) to Alphabetical (Z-A):
Notice that the order of the content items has changed. In a similar way, you may change the order by last update or publish date.
Please DO NOT save the changes you have made at this time. Select the Site Structure button to leave without saving.
Page 19
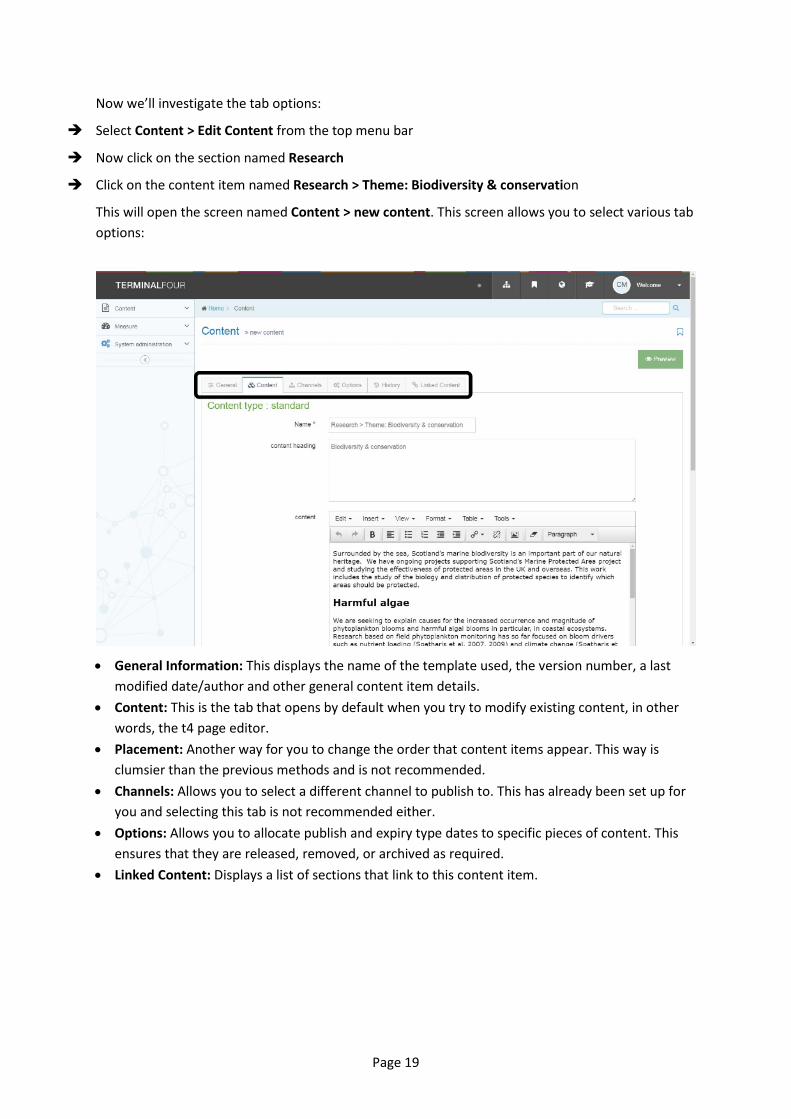
Now we’ll investigate the tab options:
Select Content > Edit Content from the top menu bar
Now click on the section named Research
Click on the content item named Research > Theme: Biodiversity & conservation
This will open the screen named Content > new content. This screen allows you to select various tab options:
• General Information: This displays the name of the template used, the version number, a last modified date/author and other general content item details.
• Content: This is the tab that opens by default when you try to modify existing content, in other words, the t4 page editor.
• Placement: Another way for you to change the order that content items appear. This way is clumsier than the previous methods and is not recommended.
• Channels: Allows you to select a different channel to publish to. This has already been set up for you and selecting this tab is not recommended either.
• Options: Allows you to allocate publish and expiry type dates to specific pieces of content. This ensures that they are released, removed, or archived as required.
• Linked Content: Displays a list of sections that link to this content item.

Page 20
Select the Options tab. You should see an area like this on the screen:
Within the Options tab, you can:
• Select a date and time for the Publish Date field to specify when a piece of content will be published. A date picker will display as shown below. In order for the piece of content to be released to the live site, it is necessary for it to have been approved prior to the published date specified:
• Select a date and time for the Expiry Date field to specify when a piece of content will be removed from the live site.
• Select a date and time for the Review Date field and an e-mail will be dispatched to the content owner on that date as a reminder to review for quality and accuracy.
• Archive Section allows you to select a t4 section that expired content is moved into when the expiry date is reached.
• We do not recommend using the Content Owner option.
Unfortunately, we do not have the time during this training course to fully demonstrate these features, but you may find them useful when publishing your own web pages. We do not want to update or approve any content at the moment
Click Cancel. This will return you to the content tab screen.
Select the Site Structure button:
Page 21
Delete content
In this exercise, we will learn how to Delete content by deleting something from the Research section:
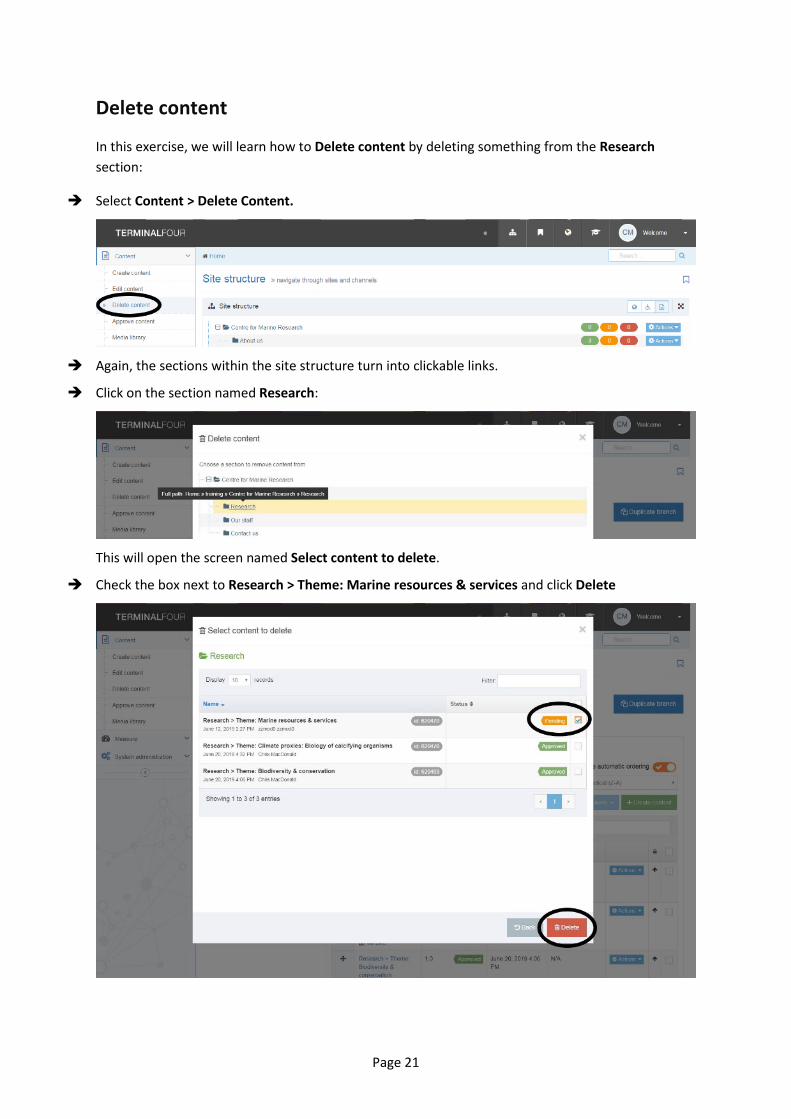
Select Content > Delete Content.
Again, the sections within the site structure turn into clickable links.
Click on the section named Research:
This will open the screen named Select content to delete.
Check the box next to Research > Theme: Marine resources & services and click Delete

Page 22
A brief confirmation message will display in green at the bottom of the screen.
You will notice that the status of the content item that you just deleted is now marked as Inactive
Select the Site structure button.
To the right of the page, you should see a ‘traffic light’ column display, with numbers under each of the three colours:
In the above example, there are four pieces of content within two sections.
• The green column shows that 2 content items have been Approved. • The yellow/amber column shows that 1 content item is Pending approval. • The red column shows that 1 content item is Inactive, which means it has either been deleted or
was never activated.
You should be able to see that your section Research has 2 approved and 1 inactive items of content.
Page 23
Creating a bin for deleted content
Next, we’ll create a section named Bin and learn how to move deleted content into it. This will keep your t4 interface tidy. We’ll start by creating a new Bin section:
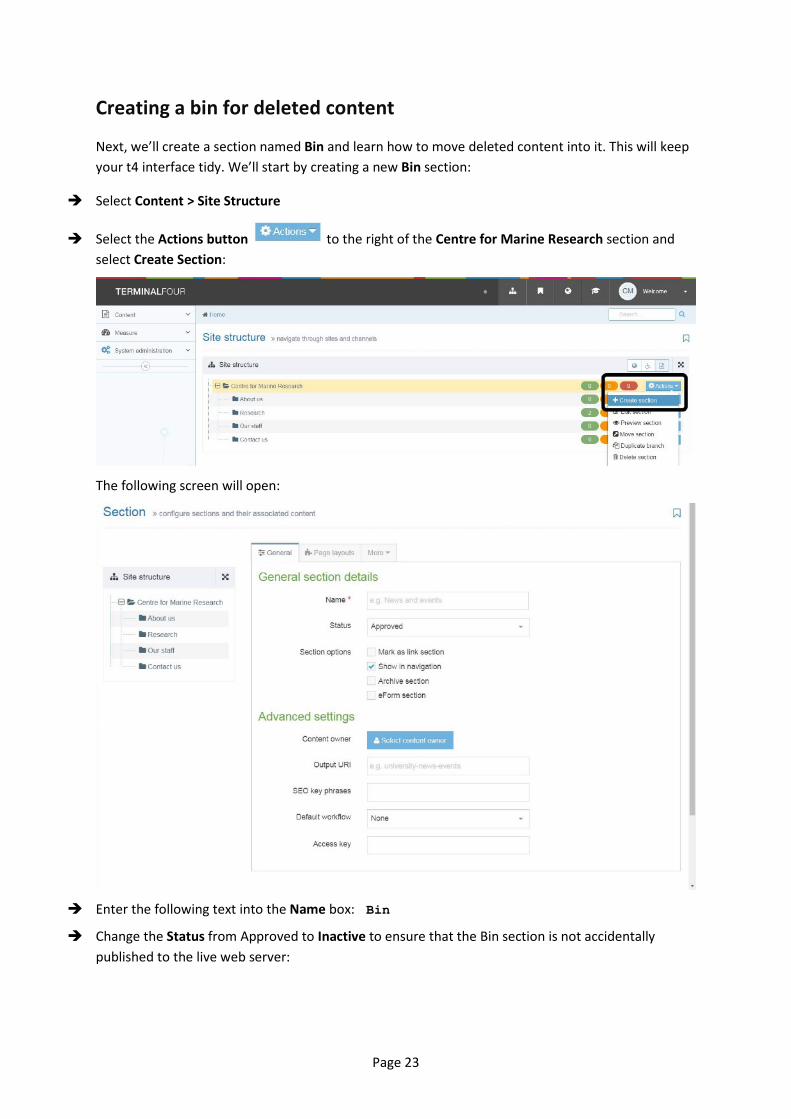
Select Content > Site Structure
Select the Actions button to the right of the Centre for Marine Research section and select Create Section:
The following screen will open:
Enter the following text into the Name box: Bin
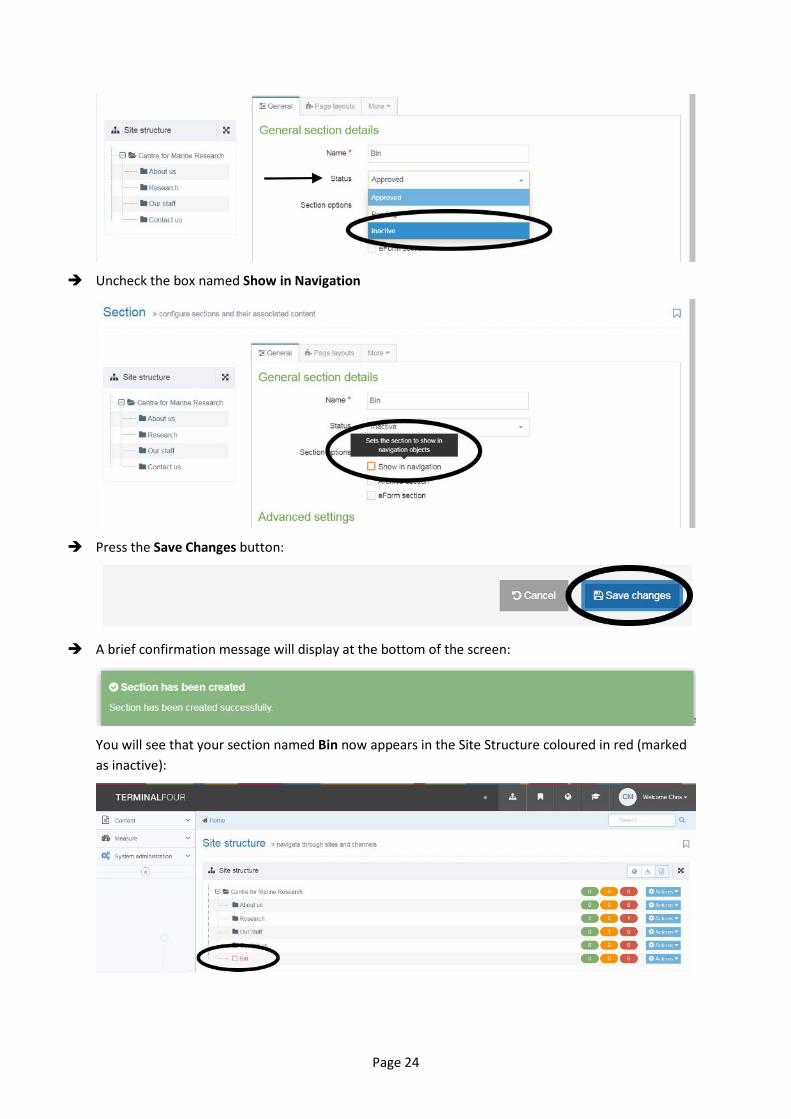
Change the Status from Approved to Inactive to ensure that the Bin section is not accidentally published to the live web server:
Page 24
Uncheck the box named Show in Navigation
Press the Save Changes button:
A brief confirmation message will display at the bottom of the screen:
You will see that your section named Bin now appears in the Site Structure coloured in red (marked as inactive):
Page 25
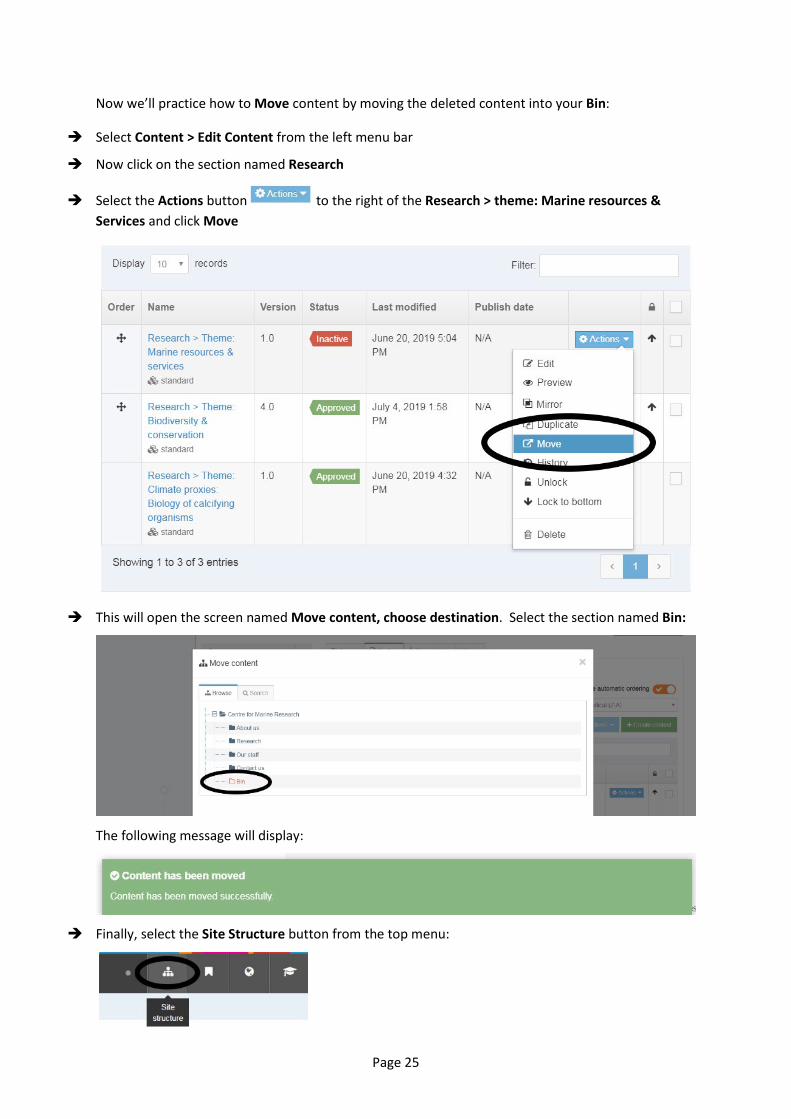
Now we’ll practice how to Move content by moving the deleted content into your Bin:
Select Content > Edit Content from the left menu bar
Now click on the section named Research
Select the Actions button to the right of the Research > theme: Marine resources & Services and click Move
This will open the screen named Move content, choose destination. Select the section named Bin:
The following message will display:
Finally, select the Site Structure button from the top menu:
Page 26
Creating content and links Module 4
The new University web style allows for greater flexibility, a clearer distinction between navigational and content pages, and displays more elegantly in mobile devices with small screens. On a small screen, content will flow into a single column.
You should always think about your users when publishing to the web. Many more are now accessing the site using devices with small screens: which makes it even more important that you say what you need to as concisely as possible. See Writing for the web for more.
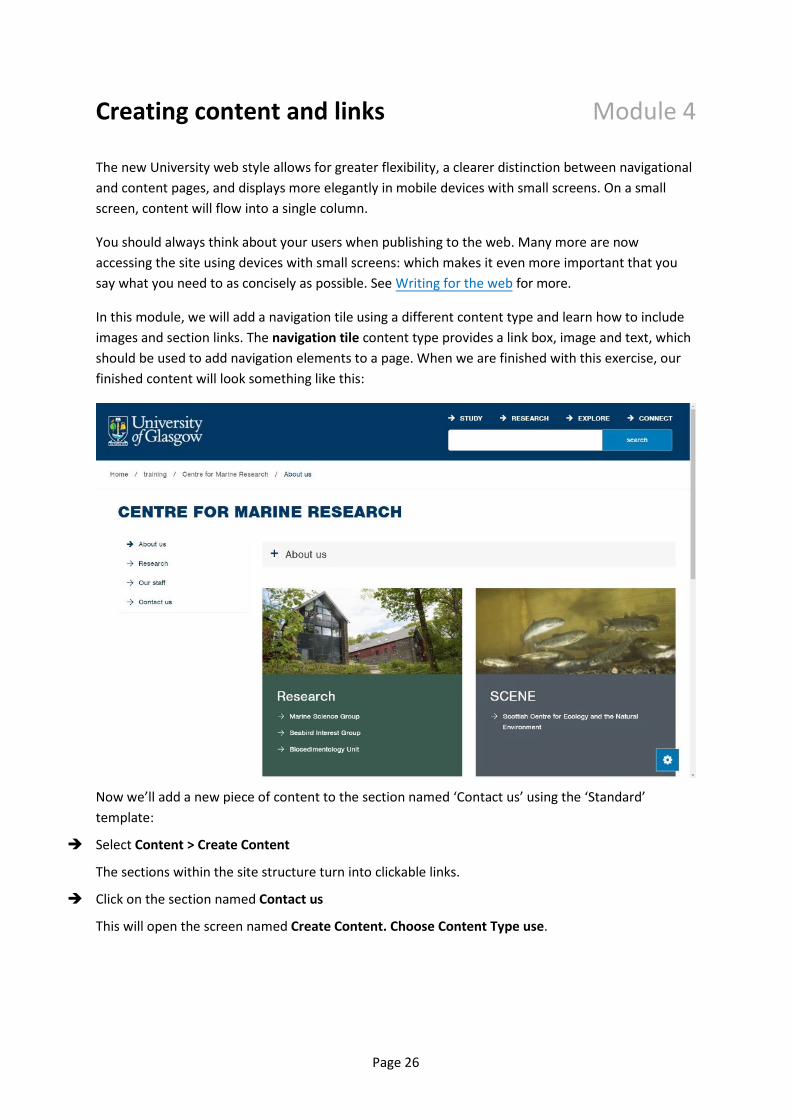
In this module, we will add a navigation tile using a different content type and learn how to include images and section links. The navigation tile content type provides a link box, image and text, which should be used to add navigation elements to a page. When we are finished with this exercise, our finished content will look something like this:
Now we’ll add a new piece of content to the section named ‘Contact us’ using the ‘Standard’ template:
Select Content > Create Content
The sections within the site structure turn into clickable links.
Click on the section named Contact us
This will open the screen named Create Content. Choose Content Type use.
Page 27
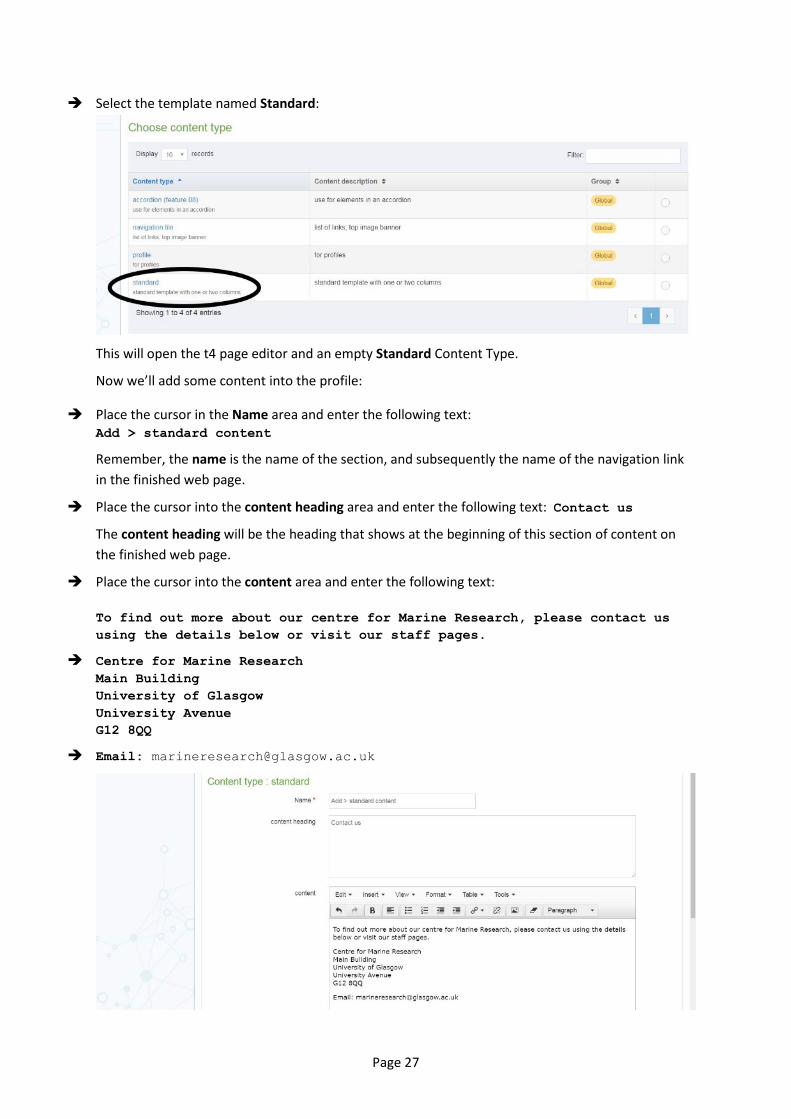
Select the template named Standard:
This will open the t4 page editor and an empty Standard Content Type.
Now we’ll add some content into the profile:
Place the cursor in the Name area and enter the following text:Add > standard content
Remember, the name is the name of the section, and subsequently the name of the navigation linkin the finished web page.
Place the cursor into the content heading area and enter the following text: Contact us
The content heading will be the heading that shows at the beginning of this section of content onthe finished web page.
Place the cursor into the content area and enter the following text:
To find out more about our centre for Marine Research, please contact ususing the details below or visit our staff pages.
Centre for Marine ResearchMain BuildingUniversity of GlasgowUniversity AvenueG12 8QQ
Email: [email protected]

Page 28
Highlight the text ‘visit our staff pages’ then select the Insert > Insert link > Insert link button in the editor:
A box will open displaying the t4 site structure, open the folders indicated below to find ‘Our Staff’.
Select this section to add the section link (always use section link when linking internally):
Home » Training » Centre for Marine Research » Contact us » Our staff
The two link icons in the editor will display highlighted, indicating that you have successfully added the section link. The text ‘visit our staff pages’ should now be underlined.
Highlight the text ‘[email protected]’ and then select the Insert/edit external link button:
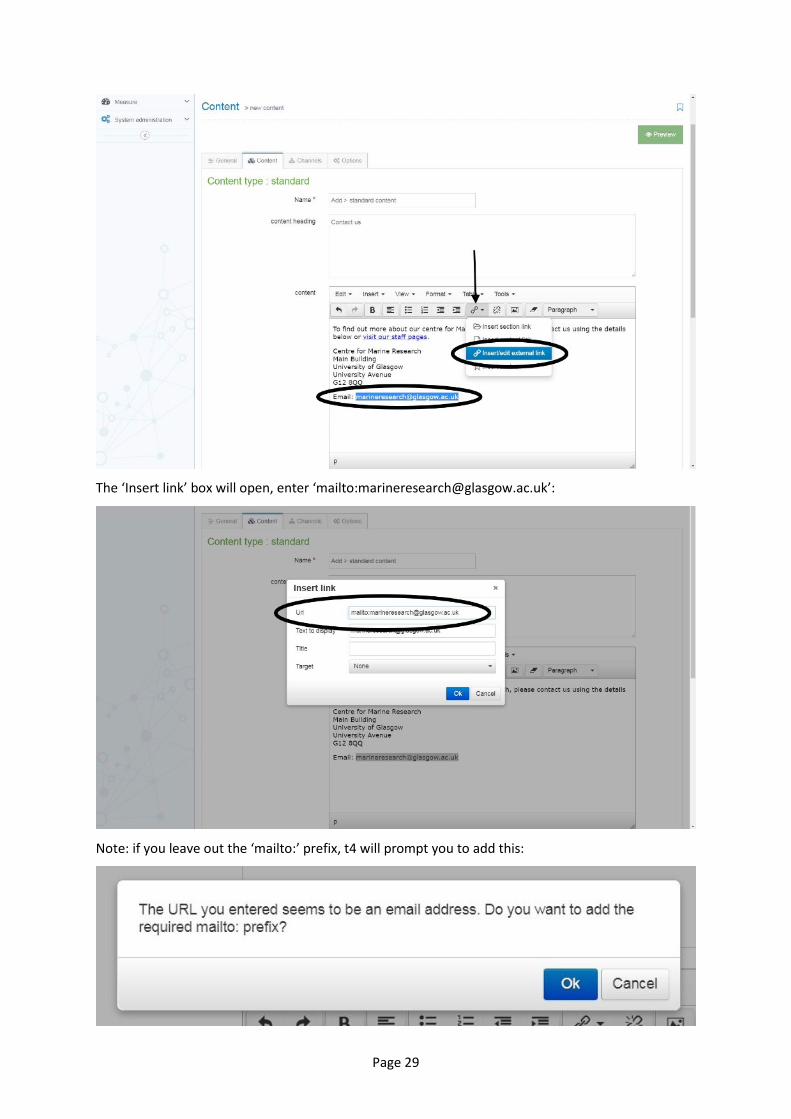
Page 29
The ‘Insert link’ box will open, enter ‘mailto:[email protected]’:
Note: if you leave out the ‘mailto:’ prefix, t4 will prompt you to add this:
Page 30
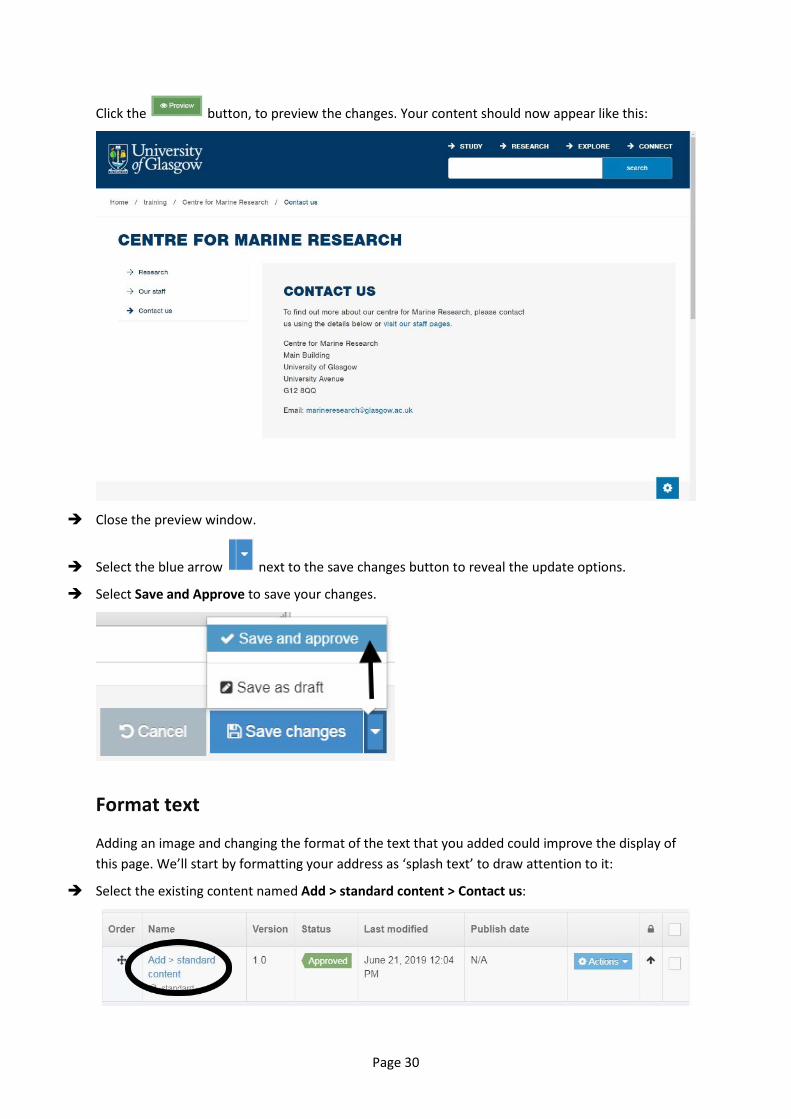
Click the button, to preview the changes. Your content should now appear like this:
Close the preview window.
Select the blue arrow next to the save changes button to reveal the update options.
Select Save and Approve to save your changes.
Format text
Adding an image and changing the format of the text that you added could improve the display of this page. We’ll start by formatting your address as ‘splash text’ to draw attention to it:
Select the existing content named Add > standard content > Contact us:
Page 31
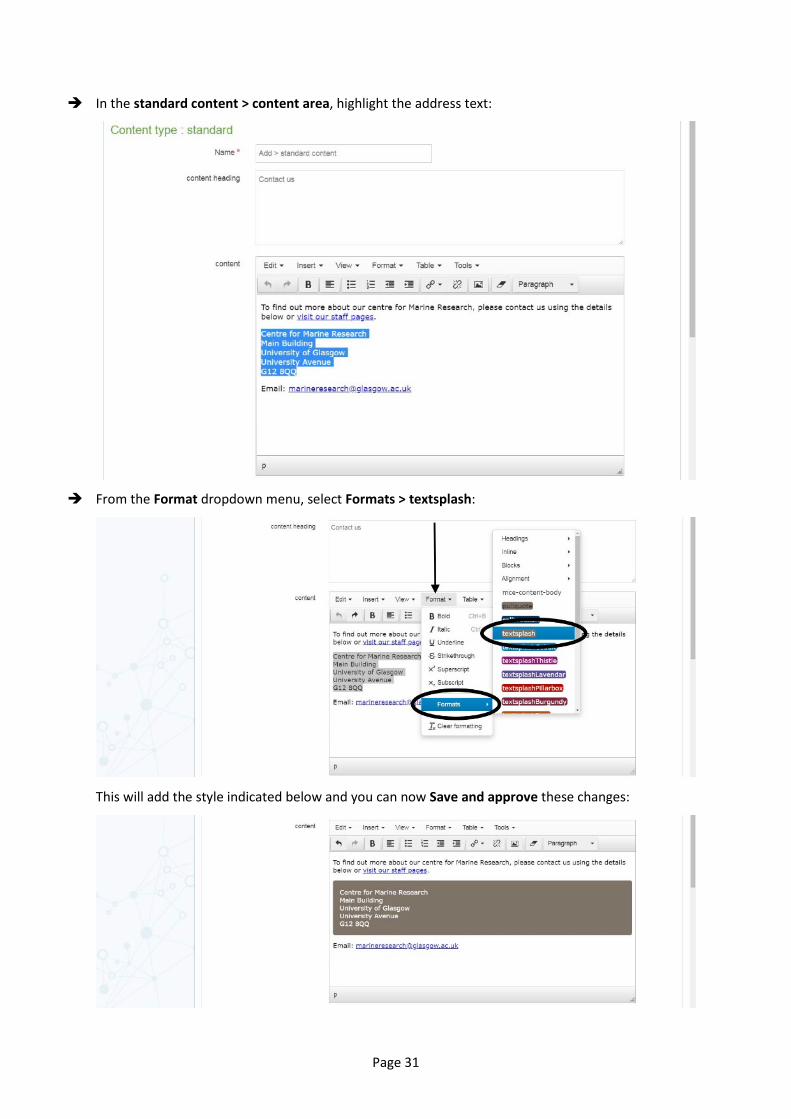
In the standard content > content area, highlight the address text:
From the Format dropdown menu, select Formats > textsplash:
This will add the style indicated below and you can now Save and approve these changes:
Page 32
Create an accordion and image
Next we will add another content type to a page. Select the ‘About us’ page, then the content tab.
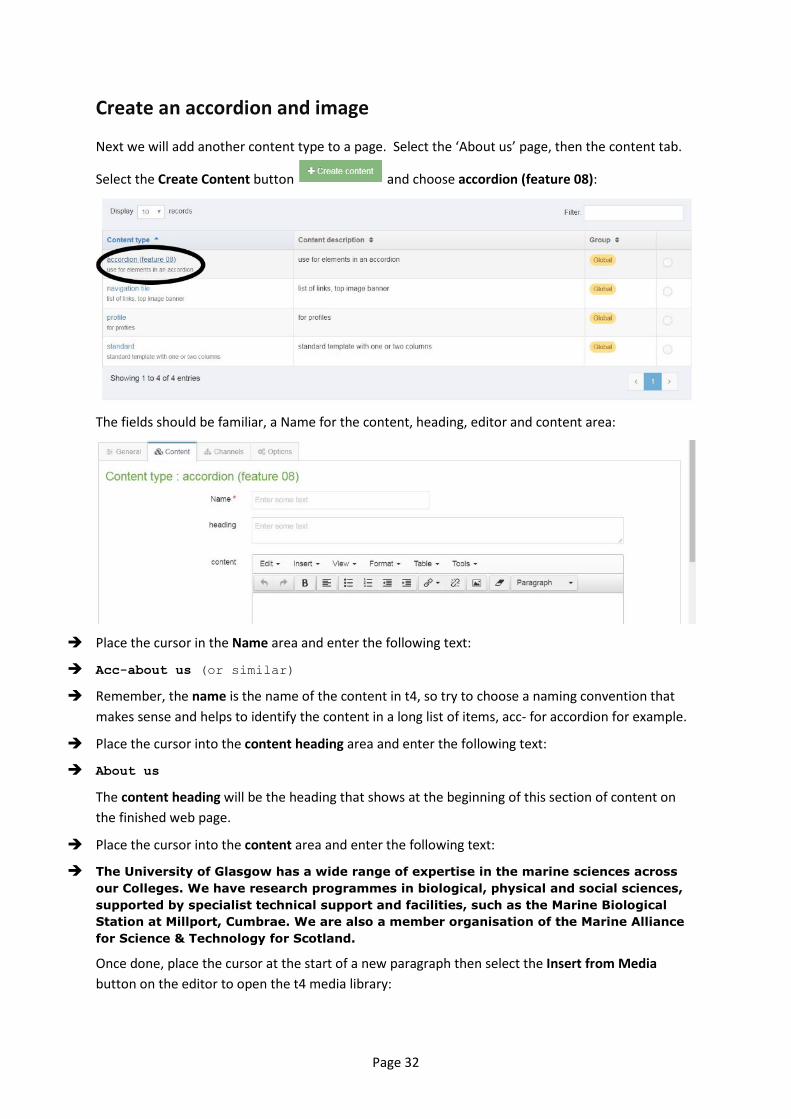
Select the Create Content button and choose accordion (feature 08):
The fields should be familiar, a Name for the content, heading, editor and content area:
Place the cursor in the Name area and enter the following text:
Acc-about us (or similar)
Remember, the name is the name of the content in t4, so try to choose a naming convention thatmakes sense and helps to identify the content in a long list of items, acc- for accordion for example.
Place the cursor into the content heading area and enter the following text:
About us
The content heading will be the heading that shows at the beginning of this section of content onthe finished web page.
Place the cursor into the content area and enter the following text:
The University of Glasgow has a wide range of expertise in the marine sciences acrossour Colleges. We have research programmes in biological, physical and social sciences,supported by specialist technical support and facilities, such as the Marine BiologicalStation at Millport, Cumbrae. We are also a member organisation of the Marine Alliancefor Science & Technology for Scotland.
Once done, place the cursor at the start of a new paragraph then select the Insert from Mediabutton on the editor to open the t4 media library:
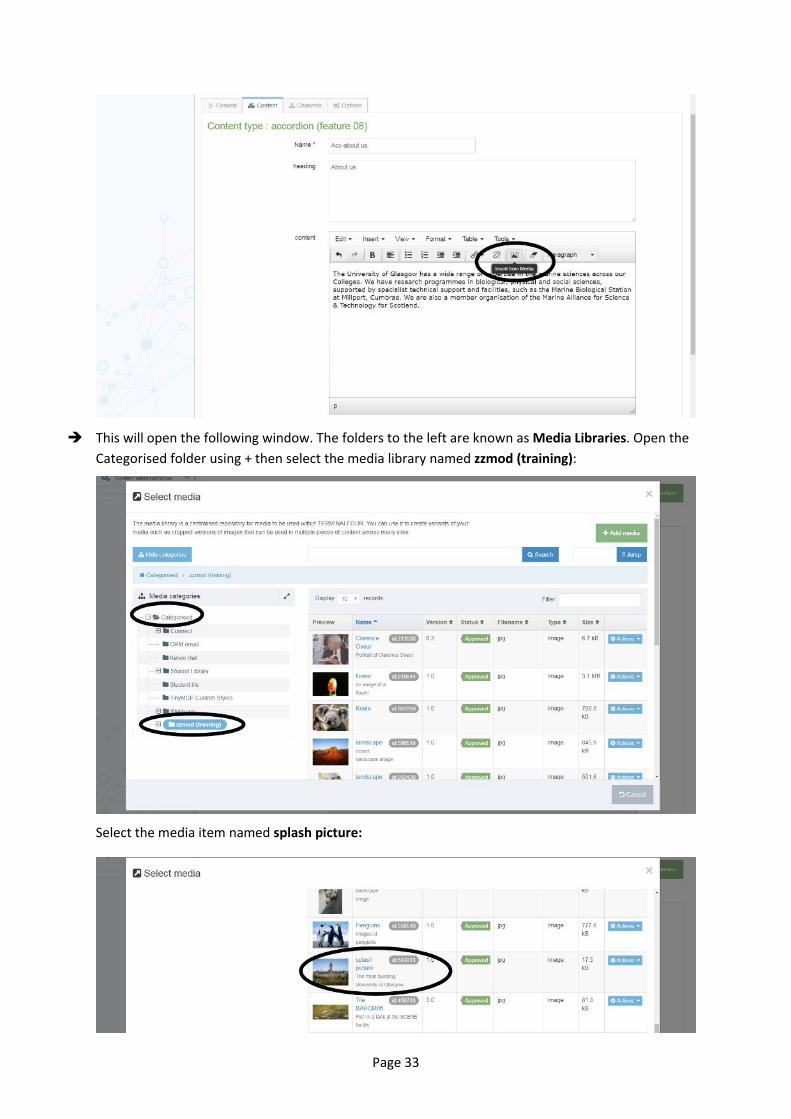
Page 33
This will open the following window. The folders to the left are known as Media Libraries. Open theCategorised folder using + then select the media library named zzmod (training):
Select the media item named splash picture:

Page 34
This will add the image from the media library. When adding media, always ensure that ‘alt text’has been added to the image. This descriptive text is essential for accessibility and screen readers.
Select a heading background colour that is different from the default.
Select Save and approve to create the new accordion. A confirmation message will display:
You can now preview the content in this section using the Actions button and should see the accordion added as follows:
Page 35
Creating Navigation tiles and links
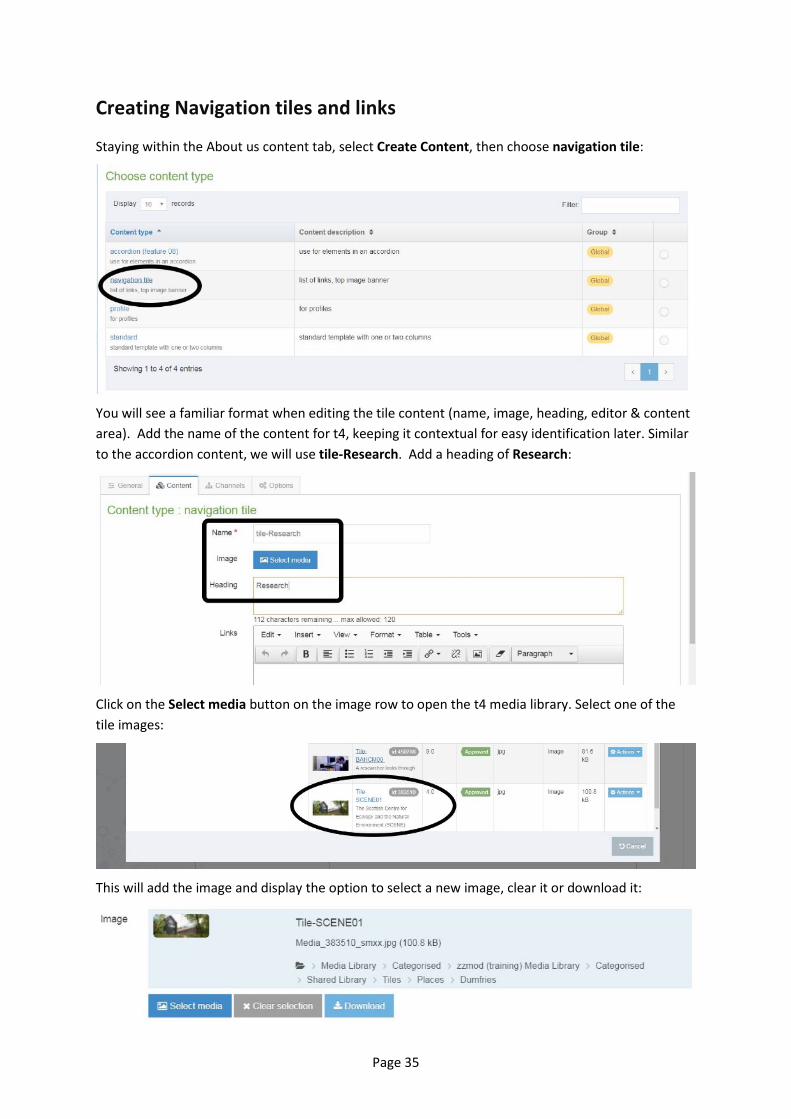
Staying within the About us content tab, select Create Content, then choose navigation tile:
You will see a familiar format when editing the tile content (name, image, heading, editor & content area). Add the name of the content for t4, keeping it contextual for easy identification later. Similar to the accordion content, we will use tile-Research. Add a heading of Research:
Click on the Select media button on the image row to open the t4 media library. Select one of the tile images:
This will add the image and display the option to select a new image, clear it or download it:
Page 36
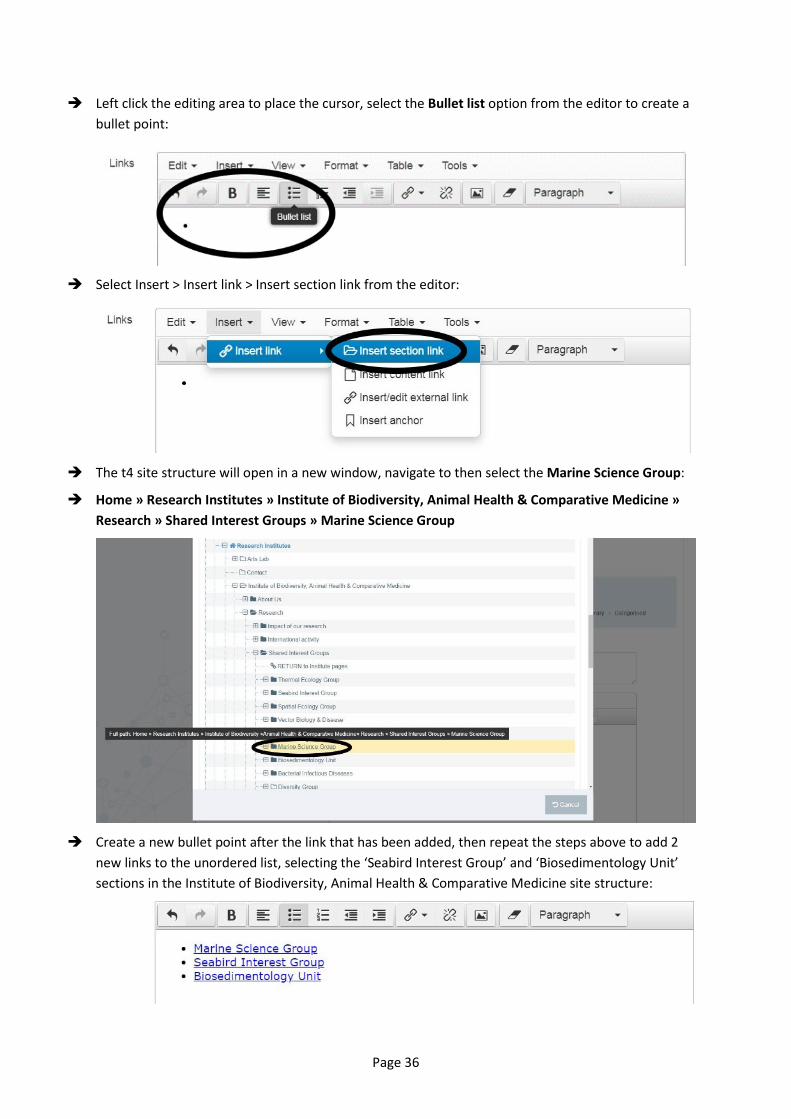
Left click the editing area to place the cursor, select the Bullet list option from the editor to create abullet point:
Select Insert > Insert link > Insert section link from the editor:
The t4 site structure will open in a new window, navigate to then select the Marine Science Group:
Home » Research Institutes » Institute of Biodiversity, Animal Health & Comparative Medicine »Research » Shared Interest Groups » Marine Science Group
Create a new bullet point after the link that has been added, then repeat the steps above to add 2new links to the unordered list, selecting the ‘Seabird Interest Group’ and ‘Biosedimentology Unit’sections in the Institute of Biodiversity, Animal Health & Comparative Medicine site structure:

Page 37
Select a background colour:
Then select span to set the tile with a width of 2/3:
Check to ensure that all of the fields are correctly completed, select Save and approve to createNavigation tile and see the confirmation message below:
Now we will add another tile to the About us page, this time selecting navigation tile 3, a simpler version of navigation tile 01 which allows an image, one link and some descriptive text.
Select Create content, choose navigation tile:

Page 38
If you add a single link to a navigation tile, once the tile is live on the webpage both the image and tile heading will link to the destination.
Add in a name for the tile content called ‘tile-facilities’:
Click the Select media button to open the media library and add an image to the tile. Choose one of the “tile-“ images as these are set to the recommended tile size 700x300px:
Repeat the steps for adding the previous navigation tile > Add a tile Heading “SCENE” > left click the editing area to place the cursor, select the Bullet list option from the editor to create a bullet point then select Insert > Insert link > Insert section link from the editor:
Page 39
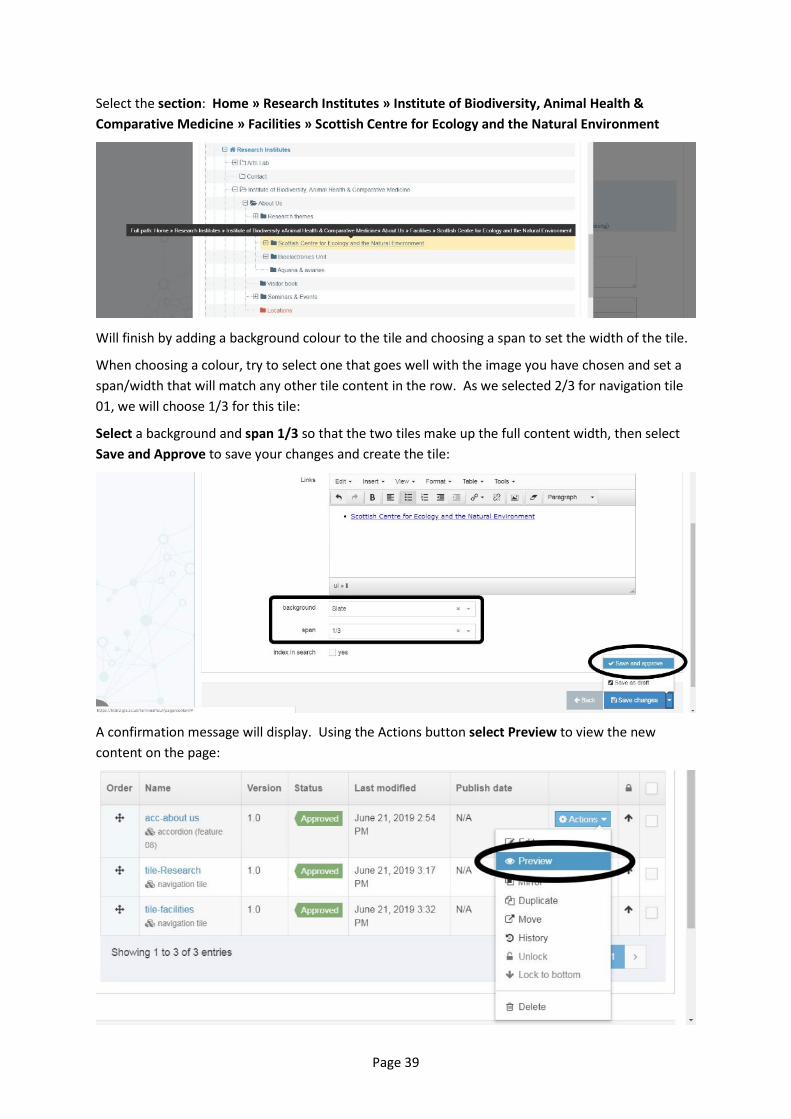
Select the section: Home » Research Institutes » Institute of Biodiversity, Animal Health & Comparative Medicine » Facilities » Scottish Centre for Ecology and the Natural Environment
Will finish by adding a background colour to the tile and choosing a span to set the width of the tile.
When choosing a colour, try to select one that goes well with the image you have chosen and set a span/width that will match any other tile content in the row. As we selected 2/3 for navigation tile 01, we will choose 1/3 for this tile:
Select a background and span 1/3 so that the two tiles make up the full content width, then select Save and Approve to save your changes and create the tile:
A confirmation message will display. Using the Actions button select Preview to view the new content on the page:
Page 40
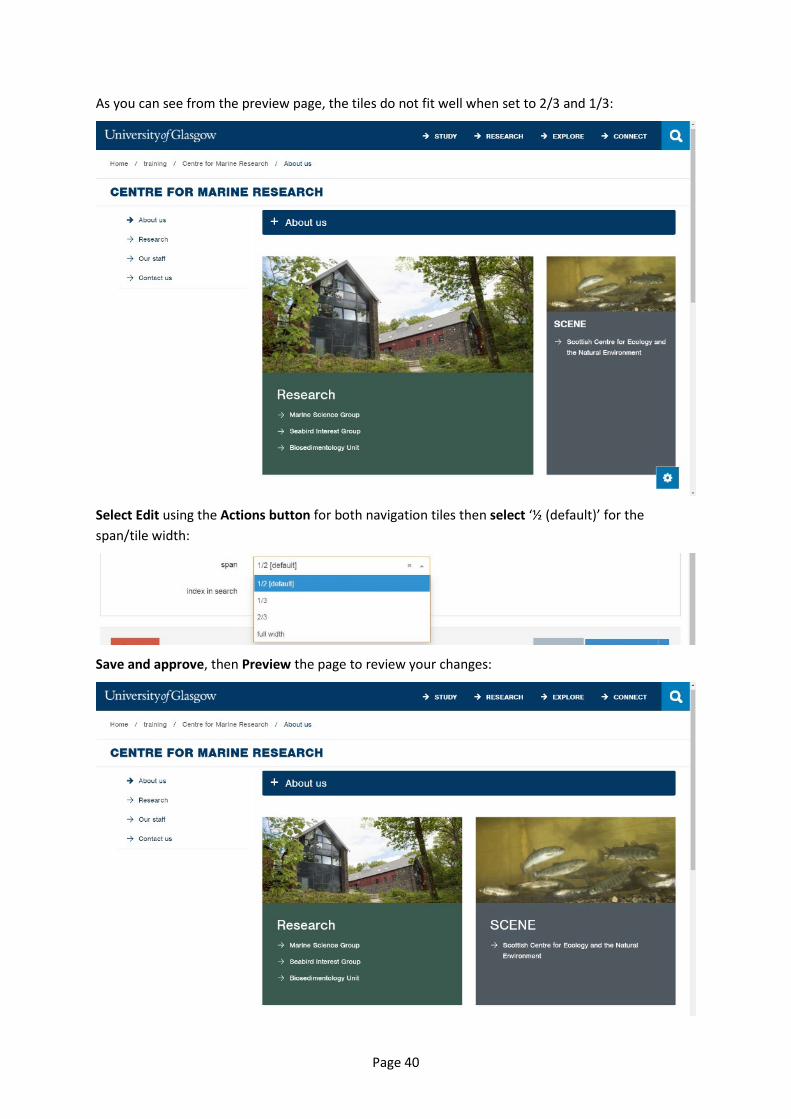
As you can see from the preview page, the tiles do not fit well when set to 2/3 and 1/3:
Select Edit using the Actions button for both navigation tiles then select ‘½ (default)’ for the span/tile width:
Save and approve, then Preview the page to review your changes:

Page 41
Both tiles now look much better on the page as there is now less grey or “negative” space. You should always consider the display of your content and try to achieve the best layout for the content you have on the page. The user journey on your webpages should take priority, with the most popular content being easy to find and logical steps taken to reach your content. Put yourself in the shoes of someone using your website and test what you are creating as much as possible, to ensure that you are making the most of the options you have.
Note: for an explanation of how to upload images into a media library, see www.gla.ac.uk/myglasgow/staff/webpublishing/advicefort4users/addingimages
Select the Site structure button from the top menu:
Insert and format links
Note: In the standard template, the narrow column down the right hand side of the page is for quick links. This column adds an unordered list of links as sticky navigation, meaning the content added will scroll down the page, depending on how long the rest of the content on the page is.
Click on the section named Research then select the content tab.
Select the existing content item named Research > Theme: Biodiversity & conservation:
Scroll down and place the cursor into the quick links area. Enter the text Related links and from thedrop-down menu of the editor, select Heading 3:

Page 42
Insert an external link
Press enter or place the cursor below the Related links text, add the text ‘Biogeosciences’, thenselect the Insert/edit external link button:
A pop-up window named Insert link will appear:
In the box named Link URL, enter the following text: www.biogeosciences.net
Page 43
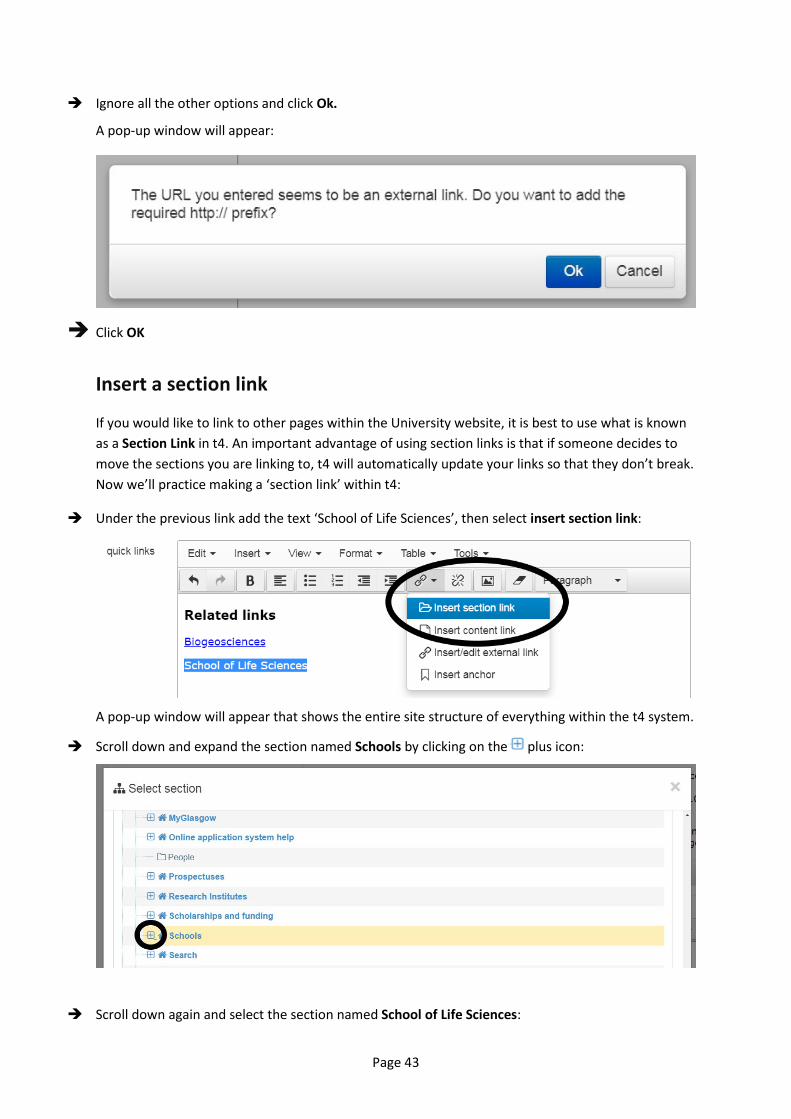
Ignore all the other options and click Ok.
A pop-up window will appear:
Click OK
Insert a section link
If you would like to link to other pages within the University website, it is best to use what is knownas a Section Link in t4. An important advantage of using section links is that if someone decides tomove the sections you are linking to, t4 will automatically update your links so that they don’t break.Now we’ll practice making a ‘section link’ within t4:
Under the previous link add the text ‘School of Life Sciences’, then select insert section link:
A pop-up window will appear that shows the entire site structure of everything within the t4 system.
Scroll down and expand the section named Schools by clicking on the plus icon:
Scroll down again and select the section named School of Life Sciences:
Page 44
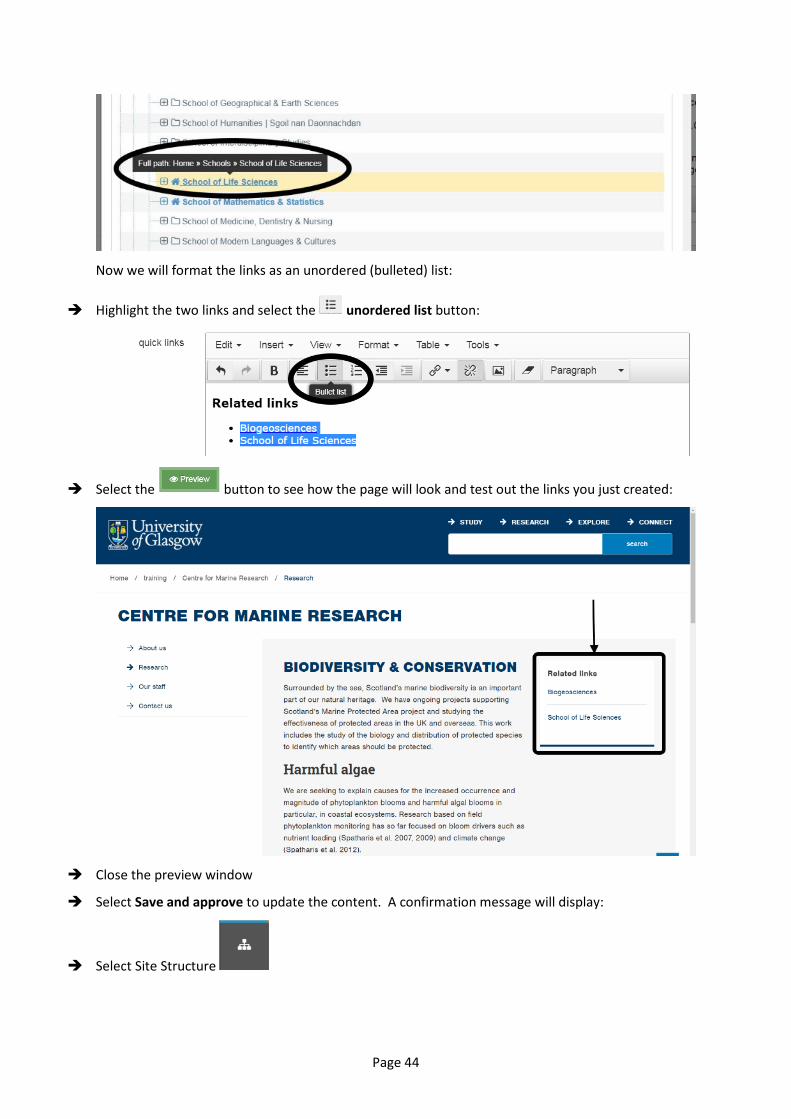
Now we will format the links as an unordered (bulleted) list:
Highlight the two links and select the unordered list button:
Select the button to see how the page will look and test out the links you just created:
Close the preview window
Select Save and approve to update the content. A confirmation message will display:
Select Site Structure
Page 45
Build the homepage
Now that you have some active subsections with approved content on them, it is time to revisit the homepage. Click on Centre for Marine Research in the site structure or select > Actions > Edit Section.
Click on the Content tab.
Good practice for a homepage is to identify the key user journeys that visitors to your website will want to take in order to find the information they are looking for. This could be to find information on Marine Research, see what your staff do or contact you.
Add content to your homepage in the form of navigation tiles on the grid that link to your subsections. You can mix these tile links with other t4 content types but it is important to remember that you should ensure your key user journeys are as quick to find and follow as possible.
Don’t add a giant splash image at the top of your page, or a large “welcome to our website” message at the top as this only gets in the way while pushing your important links further down the page, forcing users to scroll to try and find them which leads to a bad user experience and less traffic.
As you work on your homepage you will find other tips and useful info, such as tips on writing for the web, in our Guide to Web Publishing:
www.gla.ac.uk/myglasgow/staff/webpublishing
Our website also shows you how our various content types can be used to create different types of pages and should give you a few ideas on how best to organise your information.
Once you have finished adding navigation tiles pointing to your subsections and other homepage content, click on the Site Structure then click the Actions button and Preview the Centre for Marine Research section.
Navigate around your new website and test it from the perspective of visitor - check that all of your links work, make sure that your images all have alt text and are the correct size so that the page load time isn’t affected. Think about your website structure and how best to display your content using the options available. Keep things simple: a user friendly website is one that people will return to.
Save changes and logout
You should always click ‘Save changes’ on any content you have edited and click ‘logout’ as soon as you have finished a session, even if you plan to log in again 15 minutes later. t4 will automatically log out after 1 hour and you will lose any changes/edits that have not been saved.
Now we’ll log out of t4:
Click Welcome “your name” then Logout at the top right of the screen
Page 46
Miscellaneous Module 5
• Never resize images using the Set Media Attributes window. Images should be uploaded to your t4 media library and sized by graphics software such as Adobe Photoshop to the dimensions you wish to use. If you don’t have Photoshop, a free web-based image editor is available at: http://pixlr.com/editor
• We publish an ‘Images size chart’ at:www.gla.ac.uk/myglasgow/staff/webpublishing/advicefort4users/addingimages
• When using the ‘standard’ template, entering the text ‘right’ into the box named ‘class’ allows you to neatly flow text around an image inserted into a paragraph.
Spellcheck
We will open the content item named ‘Research’:
Select Content > Edit Content from the top menu bar
This will open the window named Edit content
Click on the section named Research
Select the existing content item named Research > Theme: Biodiversity & conservation
Within the content, highlight text, select the Spell Check button and explore this feature
Migrate content from Word or an existing web site
The course tutor will explain the best way to migrate content from Word or an existing web site, orany digital source for that matter. It is very important that you do not cut content from Word orInternet Explorer and paste directly into t4. This will also paste some ‘invisible’ formatting into t4and may mean that:
• your web page will not be accessible, i.e. useable by all regardless of ability• your web page may display incorrectly
t4 Moderators and Contributors
t4 has two types of user:
• Moderator: a moderator may create, edit, delete and approve content. You are all registered asModerators today.
• Contributor: a contributor may add, edit and delete content items within existing sections, butmay not create or delete sections and can therefore not alter web site navigation or structure. Inaddition, a contributor cannot approve content. All edits made by a contributor must beapproved by a moderator before going live.
Page 47
Writing for the web
Corporate Communications has created a short series of online audio training materials for anyone seeking extra advice on how to modify their writing style for an online audience. If you’d like to know more about how to:
• define website pages• structure copy effectively• use appropriate tone of voice; and• edit your material
then you can listen to and/or read the six short training sessions online at: www.gla.ac.uk/myglasgow/staff/webpublishing/advicefort4users/writingfortheweb
Register to use t4 and future support
Each school and research institute has a Principle Web Publisher or PWP.
https://www.gla.ac.uk/myglasgow/staff/webpublishing/registrationandtraining/pwp/#d.en.178438
Following this training please contact your PWP, who will be able to advise on:
• t4 registration• website migration• visual identity• database integration (e.g. how staff profiles draw in content from HR and enlighten)• information architecture (e.g. how Subjects A-Z works)
Visit www.gla.ac.uk/myglasgow/staff/webpublishing for t4 and general web publishing support. If you require additional support, e-mail [email protected]
Additional resources
• www.gla.ac.uk/myglasgow/staff/webpublishing/advicefort4users/• www.gla.ac.uk/myglasgow/staff/webpublishing/advicefort4users/contenttypest4webpagetemplates