webinar training manual - payroll setup - datatechag.com 2 - webinar... · sample template ... this...
TRANSCRIPT

Datatech Accounting Software
Webinar Training
Day 2 – Payroll Setup

2 | P a g e

3 | P a g e
Copyright 2002-2015 Davidian Business Services All Rights Reserved
Datatech 1911 North Fine Ave
Fresno, CA 93727
Toll free (888) 222-DATA Fax (559) 226-5418
www.DatatechAg.com
Revision Date: November 25, 2015
This manual was produced using ComponentOne Doc-To-Help.™

4 | P a g e
Contents Payroll Setup ................................................................................................................................................................. 5
Federal Tax Rate File ................................................................................................................................................ 6
G/L Accounts ......................................................................................................................................................... 6
State Tax Rate File .................................................................................................................................................... 8
Other Taxes............................................................................................................................................................ 8
G/L Numbers ....................................................................................................................................................... 10
Setup Wage Types ................................................................................................................................................... 11
Standard Wage Types .......................................................................................................................................... 11
Miscellaneous Payroll Deductions ........................................................................................................................... 13
Worker's Comp Table .............................................................................................................................................. 15
Worker's Comp Classes ....................................................................................................................................... 15
Copying G/L Expense Numbers .......................................................................................................................... 16
How the Worker's Comp Table is used ............................................................................................................... 16
Employee History Codes ......................................................................................................................................... 18
Overtime Rules ........................................................................................................................................................ 19
Sick Pay Plan Setup ................................................................................................................................................. 21
Assign Sick Pay Plan to Employees (Current) ........................................................................................................ 25
Employees ............................................................................................................................................................... 28
Deductions Page .................................................................................................................................................. 33
Employee Totals Page ......................................................................................................................................... 38
History/Benefits Page .......................................................................................................................................... 40
Employee Check Profile ...................................................................................................................................... 42
Archive ................................................................................................................................................................ 44
Direct Deposit ...................................................................................................................................................... 44
Deleting Employees ............................................................................................................................................. 47
Terminate Employee ............................................................................................................................................ 47
Rehire Employee ................................................................................................................................................. 48
Right-Click Menu ................................................................................................................................................ 48
Quick Employee Setup ........................................................................................................................................ 48
Crews ....................................................................................................................................................................... 50
Employee Job Titles/Pay Rates/Crew Settings .................................................................................................... 52
Crew Sheets ............................................................................................................................................................. 54
Crew Sheets Using an Excel Template .................................................................................................................... 56
Creating a Template ............................................................................................................................................. 58
Field Names ......................................................................................................................................................... 58
Sample Template ................................................................................................................................................. 60

5 | P a g e
HR Setup ..................................................................................................................................................................... 63
Category Setup ........................................................................................................................................................ 64
Health Insurance Plan Setup .................................................................................................................................... 68
Payroll Setup
This manuals covers the basics of setting up the payroll module for data entry. The information was compiled from our Help documentation, but some items have been simplified or edited for space reasons. If there are any questions on items not covered in this manual, please refer to the Help documentation (F1 in your Datatech software) for complete details.

6 | P a g e
Federal Tax Rate File The Federal Tax Rate Tables contain the annual table information for calculating federal income tax deductions.
At the end of each year, Datatech sends a year end update to all customers covered by a Software Support Agreement or under the initial warranty period. This update includes tax rates for the upcoming year, so normally you should not need to edit this information or manually enter it yourself. The following window will appear when you select the Federal Tax Rate Tables option on the Payroll Setup menu:
The tax tables contain the tax brackets for the annual wage totals. The program uses the Pay Cycle setting on the Employee file to convert the amounts on these tables for employees that are paid on a daily, weekly, biweekly, monthly, and semimonthly basis.
G/L Accounts
The third tab page has the settings used by the Payroll Journal for updating the general ledger, and the vendor account for writing federal tax deposit checks:

7 | P a g e
Enter the general ledger liability account used to accrue the taxes payable for each tax. Press [F4] or click on the lookup button to get the general ledger selection list.
If you have both ag and regular employees, be sure that the account numbers you use for both types are different. If the same account numbers are used for both, then the amounts will be combined and duplicated on the payroll tax deposit window.
If you have both ag and regular employees, be sure that the account numbers you use for both types are different. If the same account numbers are used for both, then the amounts will be combined and duplicated on the payroll tax deposit window.
Vendor For Tax Deposits
Name Key
Enter the name key of the vendor account for your federal tax deposits. Click on the lookup button or press {F4] to get a selection list of vendors.

8 | P a g e
State Tax Rate File The state tax rate file keeps track of state taxes for each year that you have payroll records for. In addition, if your company employs workers in multiple states, this file can keep track of different tax rates and tables for each state.
The State Tax Rate File option is found on the Payroll Setup sub-menu.
Other Taxes
The second tab page contains additional information needed to calculate state withholding as well as the State Unemployment, Disability, and local taxes (if applicable).

9 | P a g e
State Unemployment Insurance
SUI Rate
If your state taxes the employer for unemployment insurance, enter your rate here. Since this may varies from employer to employer, this rate is not included in Datatech's end-of-year tax updates. The rate should be entered as a decimal value, not a percentage. For instance, 5.4% would be entered as 0.054.
Training Tax
If there is an additional training tax besides the SUI rate, enter it here.
SUI Wage Limit
Enter the limit for unemployment wages for this state.
FUI Credit Reduction
When a FUI Credit Reduction rate is entered in the State Tax Rate Table, the 940 Form will automatically mark the Credit Reduction box, calculate the amount of credit reduction and fill out the Schedule A (Multi-State Employer and Credit Reduction Information).
You can also have the program accrue liability for the FUI credit reduction and if you are a labor contractor, include the FUI credit reduction rate in the FUI tax billed to growers. These behaviors are controlled by settings in the Program Setup window.
10 | P a g e
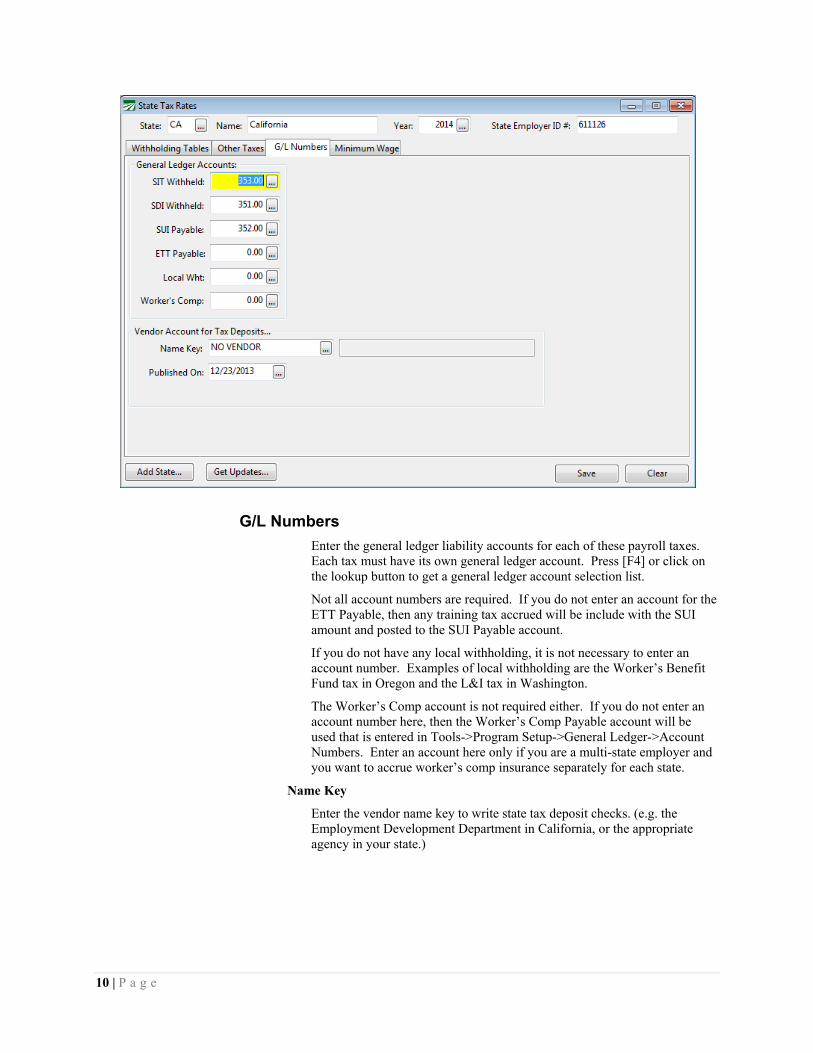
G/L Numbers
Enter the general ledger liability accounts for each of these payroll taxes. Each tax must have its own general ledger account. Press [F4] or click on the lookup button to get a general ledger account selection list.
Not all account numbers are required. If you do not enter an account for the ETT Payable, then any training tax accrued will be include with the SUI amount and posted to the SUI Payable account.
If you do not have any local withholding, it is not necessary to enter an account number. Examples of local withholding are the Worker’s Benefit Fund tax in Oregon and the L&I tax in Washington.
The Worker’s Comp account is not required either. If you do not enter an account number here, then the Worker’s Comp Payable account will be used that is entered in Tools->Program Setup->General Ledger->Account Numbers. Enter an account here only if you are a multi-state employer and you want to accrue worker’s comp insurance separately for each state.
Name Key
Enter the vendor name key to write state tax deposit checks. (e.g. the Employment Development Department in California, or the appropriate agency in your state.)

11 | P a g e
Setup Wage Types This window is used to define different how various pay types are taxed and handled by the program. Most users will not need to add any entries to this file. A standard set of wage types in included when the software is installed (see Standard Wage Type section below for a list).
Standard Wage Types
The following wage types are automatically set up for you. You should not modify or delete these entries, but you may set up new entries.
Code Description RH Regular Hours OT Overtime Hours DT Doubletime Hours SA Salary CO Commission BO Bonus PW Piecework MW Minimum Wage Payment PO Overtime Piecework GP Guaranteed Wage Piecework GW Guaranteed Wage Payment BH Base Hourly (Incentive Pay) IP Piecework (Incentive Pay) HO Paid Holiday SP Sick Pay VA Vacation Pay
RH, OT, and DT are used for hourly wages. When employees have overtime and/or doubletime wages, separate lines are entered with each wage type. The

12 | P a g e
program automatically multiplies the pay rate you enter by 1.5 or 2.0 respectively, for overtime and doubletime wages.
When entering piecework wages, use PW as the wage type and you will be enter both the number of house worked and the number of pieces. The program can then use this information in minimum wage verification calculations.
In cases where you have a base hourly pay rate plus a piecework incentive bonus, use the BH and IP wage types together (each wage type is entered on a separate line). By using these wage types, you can distinguish these wages from straight hourly wages or piece rate only wages. The minimum wage verification calculations are still done, but the wages entered under the base hourly pay type are combined with the incentive pay wages.
The salary, commission, bonus, and paid holiday wage types should be self-explanatory. These wage types are provided for other types of compensation that aren't covered by hourly or piecework wages.
The sick pay and vacation pay are treated differently by the program if you are accruing sick and/or vacation time/pay. By default the accrual is based on wages, but you can change this to accruing by hour in the Program Setup. When accruing wages, you should enter 1 for the Units and the amount to pay under Rate. When accruing by hour, enter the number of hours under Units and the employee's regular hourly pay rate in the Rate column.
When a regular check is printed for an employee, the wages or hours are added to the employee's accrued vacation and/or sick pay totals. When a check with the vacation and/or sick pay wages types is printed, the wages or hours are subtracted from the accrued totals.

13 | P a g e
Miscellaneous Payroll Deductions The payroll system allows you to deduct non-tax items from employee paychecks, such as deductions for tools, child support, garnishments, 401(k) plans, etc. A deduction type must be set up for each different kind of miscellaneous deduction you have.
The deduction type only needs to be set up once. For instance, you may have several employees with a child support deduction, but you only need to set up one entry in the Miscellaneous Deduction file. Then you can set up the child support deduction on each employee account where it is needed.
To open the Miscellaneous Payroll Deduction window, go to the Payroll option on the main menu, select Setup, then select Setup Misc Deductions:
Each deduction type is listed on a separate line.
Deduction #
In the first column enter a number from 1 to 99.
Description
Enter a description for the deduction. This description will appear on the payroll check entry and the employee's check stub.
If you have some employees set to print Spanish language check stubs, a second description column can be enabled where you can enter the description to use on Spanish language check stubs. To enable this column, right click on the grid and select the Enable Spanish Descriptions option.
G/L #
Enter the general ledger account number to use when updating the total deduction from employee checks. When you print the Payroll Journal and update it to the General Ledger, this general ledger account is used. The general ledger account may be an asset, liability, income or expense account, depending on the nature of the deduction.
An asset account is typically used for deductions for advances or similar situations where the employee owes the company money.
Liability accounts are normally used when the money that is withheld on behalf of the government or another company. Amounts withheld become a liability because you must pay them to someone else. For instance, child

14 | P a g e
support payments withheld must be remitted to the district attorney or state; back taxes must be paid to the state or federal governments; 401(k) deductions must be remitted to the company that administers your retirement plan.
If an amount withheld represents income to the employer, an income account would be used. For instance, if an employer provides housing for some employees, a rent deduction should be posted to an income account.
An expense account is normally used when the amounts withheld are offsetting an expense the company has incurred. For example, a company that pays for half of the health insurance premiums will expense the bill for health insurance to an expense account. Amounts that are withheld from employees paychecks are posted (as credits) to the same account, reducing the total expense for the company.
Wage Type
For some deductions, such as 401(k) or cafeteria plans, wages that are withheld are not subject to certain taxes. You can specify the wage type that corresponds with the deduction in this column. (The wage type is what tells the program which taxes the wages are not subject to.)
Active
This checkbox will determine whether or not this deduction type is calculated for all employees with this type. For instance, if you have a one-time deduction for tools, you can disable the deduction by unchecking this box after the deduction has been made. On the next checks, the Tools deduction will not be taken out.
Column
This specifies which column amounts for this deduction type will appear in on the Miscellaneous Deduction Report. This setting is not currently used.
Heading
This is the heading that will appear at the top of the Miscellaneous Deduction Report. This setting is not currently used.
Cost Center
When the Payroll Journal updates the general ledger, the credits amounts that are posted for miscellaneous deductions normally do not have a cost center. In some situations you may want these transactions to be assigned to a cost center, and you can enter the cost center to use in this column.

15 | P a g e
Worker's Comp Table The Worker's Comp table allows you to set up multiple workers’ comp rates for any combination of crop and job. Generally, for farming operations, each crop may have its own rate. However, if you are able to pay a lower rate for some jobs (for example, weeding in an orchard may have a lower rate than harvesting in an orchard) then you can set up different rates based on the job.
In addition to setting up rates by crop, you can also set up the worker's comp class codes and their rates, which allow the Worker's Comp Report to provide subtotals by the class code. So if for example you have six different vineyards, the Worker's Comp Report will not only give you a total for each vineyard, but it will also give you a single total for all vineyard work.
If you have a non-farming operation, then you can base the worker's comp rates only on the general ledger expense account for the employee's labor.
In addition to setting the worker's comp rates, this table is also used by the Payroll Journal to specify the general ledger accounts to update the employer's worker's comp expense and payroll tax expense amounts to. The Worker's Comp Table option is on the Payroll, Setup menu. When selected, the following window will appear:
If you are using the Farmer’s or Labor Contractor’s Office, the Workers Comp entries will be created when you set up your Cost Centers or Fields. Before you set those up, it is recommended that you set up the W/C Codes on the second tab. This way, you can assign the Code to each cost center/crop that is entered. See the Worker’s Comp Classes section below for more information on setting up your codes.
Worker's Comp Classes
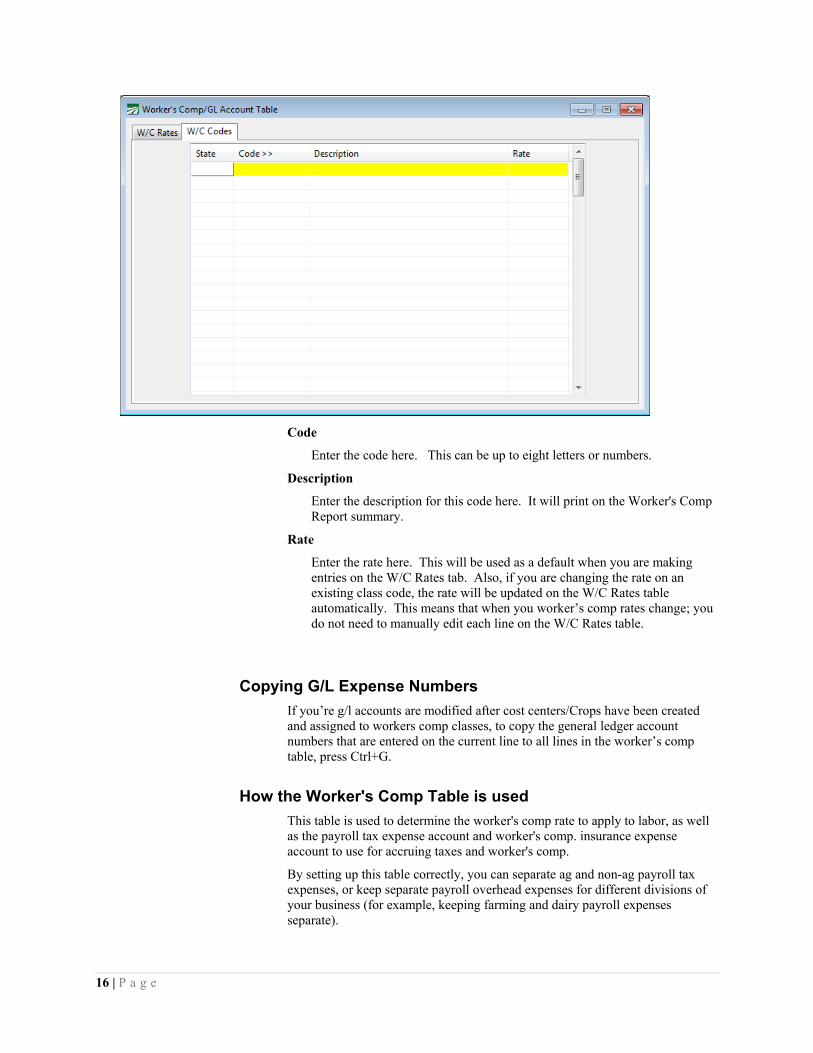
The second tab page on the Worker's Comp window allows you to enter the class codes, descriptions, and rates for your various workers’ comp rates.
16 | P a g e
Code
Enter the code here. This can be up to eight letters or numbers.
Description
Enter the description for this code here. It will print on the Worker's Comp Report summary.
Rate
Enter the rate here. This will be used as a default when you are making entries on the W/C Rates tab. Also, if you are changing the rate on an existing class code, the rate will be updated on the W/C Rates table automatically. This means that when you worker’s comp rates change; you do not need to manually edit each line on the W/C Rates table.
Copying G/L Expense Numbers
If you’re g/l accounts are modified after cost centers/Crops have been created and assigned to workers comp classes, to copy the general ledger account numbers that are entered on the current line to all lines in the worker’s comp table, press Ctrl+G.
How the Worker's Comp Table is used
This table is used to determine the worker's comp rate to apply to labor, as well as the payroll tax expense account and worker's comp. insurance expense account to use for accruing taxes and worker's comp.
By setting up this table correctly, you can separate ag and non-ag payroll tax expenses, or keep separate payroll overhead expenses for different divisions of your business (for example, keeping farming and dairy payroll expenses separate).

17 | P a g e
The key to doing this is to set up the information in the first three columns so that the program will use the entry that you want. In the simplest example, with farm-only payroll, you may leave the first two columns blank on each entry, and simply enter the cost center in the third column. The program will select a line to use based on the cost center entered on the payroll check.
To extend this example, suppose you have an office worker who has a different worker's comp rate (and you want to keep the payroll overhead for office wages separate from farm wages). In this case you should have a general ledger expense account for office wages, and you would enter this in the first column, and leave the job and cost center columns blank. The program will match the office wages general ledger account entered on the check to this entry, and thus will use it for the worker's comp rate and general ledger expense accounts.
When determine the entry in this table to use, there is a specific order that is used to search the table. The program will use an entry from the table based on the first entry that matches:
1. The general ledger account, job code, and cost center
2. The general ledger account and cost center
3. The job code and cost center
4. The general ledger account
5. The cost center

18 | P a g e
Employee History Codes The Employee History table allows you to record events for each employee account with a series of user-definable codes to define the event. The History table is located on the History/Benefit tab page of the Employee Setup window.
The Employee History Codes window allows you to set up the codes and descriptions that are used on the history table. A default set of pre-defined codes will be included on the initial installation, and you may edit, delete or add to this list.
When you select the Employee History Codes option on the Payroll->Setup menu, the following window will open.
Code
Enter a 1 or 2 character code for each entry. Codes must be unique.
Description
Enter a description for this code. The description will appear in the drop-down list on the Employee History grid.
Rehire
Check this box if this code will be used for a rehire event. Rehire record will result in the employee being reported on the New Hire report. In addition, the Rehire Employee dialog window will require you to select one of the codes marked as rehire events when recording a rehire record.
Term
Check this box if this code will be used for any type of termination (fired, laid off, end of season, etc.). When you use the Terminate button on the Employee Entry window, the Terminate Employee window will list only the codes that have the Term box checked to select the reason for termination.

19 | P a g e
Overtime Rules The Overtime Rules feature allows you to enter all hourly wages using the Regular Hours (RH) wage type, and then have the program determine which employees should be paid overtime and/or doubletime wages. Overtime and doubletime pay is based on limits defined for each day, the entire week or how many days the employee has worked.
On the Daily Payroll entry window, right click on a line to get the popup menu and select the Apply Overtime Rules… option. Then select which set of rules you want to use from the lookup.
Overtime rules can be applied to entries on the Daily Payroll window. After you enter the time for all employees on a crew for the entire week, you can apply the overtime rules to the daily payroll entries, print reports to verify totals are correct, and then create checks.
You can set up different sets of overtime rules to apply to different groups of employees. This is typically done when you have employees covered by different wage orders. For instance, the rules for field workers may be different than the rules for employees that work in a packing shed.
To use the Overtime Rules features properly, you must be familiar with the overtime requirements set by the state and/or federal governments. If you are not sure if your overtime rules are set up correctly, we suggest you enter test lines in the Daily Payroll window and apply your rules. Check the results to make sure the program has added the correct number of overtime and/or doubletime hours.
To set up overtime rules, go to the Payroll menu and select the Utilities option. On the Setup sub-menu, select Overtime Rules. The following window will open:
As you can see from the window, there are two types of rules that the program applies: rules applied to each day and rules that apply to the entire week. For the rules applied to the entire week, there are two types of rules: rules that are based on the number of hours that are worked, and rules for the number of days worked.

20 | P a g e
The rules are applied in a “bottom-up” order to each day in the pay period. If you specify the number of days an employee must work to receive either overtime or doubletime wages, those rules are applied first. Otherwise, the program will check the totals hours worked for the entire week to see if overtime or doubletime wages should be paid. If the limit for the week has not yet been reached, then the program checks the limits for the day to see if overtime or doubletime should be paid.
Note: If you do not need to pay overtime or doubletime over a certain number of hours worked in a single day, enter 99 for the number of hours for each day.

21 | P a g e
Sick Pay Plan Setup This screen is used to define the sick pay plan(s) that you will use. At the minimum, you will need to define one plan.
You will need to define more than one plan if:
1. Some employees will use the accrual method, while others will use the lump sum method.
2. You have different plans for different classes of employees.
3. You have different classes of employees that have different schedules. For instance, office employees that work 8 hours per day, and field workers that normally work 10 hours per day.
The setup screen is accessed from Payroll, Setup, sick Pay Plan Setup. The following screen will appear (but without any data):
The example entry you see above if for a standard 8 hour per day, 40 hour per week employee, using the accrual method. The entries are as follows:
Plan ID
This is a unique id for this plan. Once entered, it cannot be changed. You can use a maximum of 4 alphnumeric characters.

22 | P a g e
Plan Description
Enter a description of the plan, for your own use. As you can see from the example, in the description we have identified the type of plan (accrual) and hours worked per day.
State
Enter the two letter abbreviation for the state.
Method
Select Accrual or Lump Sum Pre-Funded for the method of determining sick pay hours.
Accrual Rate
If the method is accrual, enter the accrual rate as a decimal.
The minimum allowed accrual for California is one hour accrued for every 30 hours worked. This would translate into a decimal value of .033334. If you want to accrue at a higher rate, you can set this entry at the appropriate value.
Do not enter a rate if you are using the lump sum method.
Salary Hours/Week:
If this plan will be assigned to any salaried employees, enter the number hours they are credited for each week worked. Normally this would be 40 hours.
If you have salaried employees that regularly work more hours per week, you will need to set up a sick pay plan that defines their default hours per week.
The program will use these hours to determine the accrued sick pay for each week they work.
Waiting Period to Accrue (Days)
For California, there is currently no waiting period to start the accrual of sick pay, so this should be left blank (0).
Waiting Period to Pay (Days)
California law states that you may have a waiting period, from date that employment starts, before the employee may begin using the sick pay. The maximum waiting period by law is 90 days, but you may have a more liberal policy.
This entry allows the program to calculate the date on which the employee may begin using the accrued sick pay, and prevent the payment of sick pay before that date.
Discard Sick Pay Accrual (Days after Termination)
California law provides that an employee that is laid off, then returns within one year, must have any unused sick pay accrual reinstated. After one year, the accrual is discarded if the employee returns.
This entry is set to 365 days to implement the discarding of sick pay if the employee returns after 365 days. This is handled automatically during the check entry process.

23 | P a g e
Maximum Sick Pay Accrual (Hours)
California law provides that an employer may cap the number of sick pay hours accrued at a minimum of 48 hours, based on an 8 hour day (6 days). If you wish to provide a higher cap, you may.
If this sick pay plan is for 10 hour per day workers, your cap must be 60 hours (6 days @ 10 hours per day). See the sample screen that follows in this section.
Maximum Allowed Sick pay Per Year (Hours)
California law currently provides that an employer may cap the number of sick hours that are available for the employee to use at 24 hours, based on an 8 hour day (3 days). If you wish to provide a higher cap, you may.
If this sick pay plan is for 10 our per day workers, your cap must be a minimum of 30 hours (3 days @10 hours per day). See the sample screen that follows in this section.
Accrue Sick Pay on Out of State Wages
If an employee is set up with a California sick pay plan, and he will be paid sick pay on wages earned outside of California, check this box.
The determining factor for payment of sick pay by state is the state for “State Income Tax”, as entered on the employees check, where an employee is a multi-state employee.
This completes the entries needed for a sick pay plan, and the entry can be saved.
Following are sample screens that show how you would enter a plan for the lump sum method, and for 10 hour per day employees.

24 | P a g e
Lump Sum Method
Accrual Method, 10 hour per day employees

25 | P a g e
Assign Sick Pay Plan to Employees (Current) A sick pay plan must be assigned to each employee. Normally, this would be done when the employee is hired. For more information, see the section on enter sick pay for new employees.
This screen will allow you to assign a plan to a group of employees, or all employees, based on the selected options. This would be done one time only, in order to start the sick pay plans as of July 1, 2015.
To select this screen, go to Payroll, Setup, Assign Sick Pay Plan to Employees. This screen will appear:
Plan ID:
Select the company Plan ID that will be used.
The following selections determine which employees will be assigned this plan.
It is our recommendation that all employees, whether active or not, be assigned a sick pay plan, so that if and when they are rehired, this information will already be in place.
Any selections you make to limit the employees must all be met in order to apply to an employee. For instance, if you check the Active Only box and the Not Terminated box, an employee that is active, but has a date terminated in the file will not be selected.
Therefore, make your selections carefully.

26 | P a g e
Department
Select a department to apply the plan id to, or ALL if all employees will be assigned the same plan.
Active Only
Checking this box will select only employees that are active. We recommend leaving it unchecked.
Not Terminated
Checking this box will select only employees with no termination date. We recommend leaving it unchecked.
Current Wages
We recommend not basing the selection on current wages, but if you select Current Year wages, employees will be selected based on having wages in the current year.
Anniversary Date
Enter the starting date for the sick pay accrual. At the latest, this would be 7/1/2015, to conform to California law.
NOTE: July 1 may be in the middle of a pay period. If it is, the software WILL NOT divide up the hours in this first week. If the payroll ending date is on or after the anniversary date, all hours for that pay period will be used for the accrual.
Current Employees must work within (days)
A current employee is one that is currently working, for which the program will calculate a Date Available. Due to variations in schedules, possible temporary time off, or other factors, we have built in the ability to identify a current employee by checking for a date lasted worked within X days of your target date.
Enter number of days here.
Days of
Enter the date for determining a current employee here.
Review your selections, then if correct, click on the button labeled “Do It”.
Example of current employee calculation:
You are setting up sick pay plans in the employee file prior to 7/1/2015.
Your last payroll period ending date was 6/20/2015.
You want to make sure that any employee working with a date last worked within 14 days is considered a current employee,
You would enter 14 days, and 6/20/2015 for the date.
How is the current employee status used?
If the employee is considered current, the program will calculate a Sick Pay Date Available. This calculation will take into consideration whether or not the employee has fulfilled the 90 day waiting period within the last year. If so, the Date Available will be 07/01/2015.
If the employee is current, but has not fulfilled the 90 day waiting period, a Date Available will be calculated from 07/01/2015 based on the number of days remaining in the waiting period.

27 | P a g e
If the employee is not current, a Date Available will not be entered. The Date Available will be calculated if and when the employee returns to work.

28 | P a g e
Employees Before you can write payroll checks to a person, an employee account must be set up for them. Selecting the Employees option on the Payroll menu will open the following window where you can add new employees or edit the information on existing employee accounts:
Personal Information
Account #
If you are editing an existing account enter the account number, press [F4], or click on the look up button to get a look up list of employees.
When entering a new employee, the "Auto-Number Employees" option in the Program Setup determines whether or not you assign the employee account numbers yourself or whether the program will assign the next available number.
If the "Auto-Number Employees" box is checked, you can leave the Account # entry blank and the program will assign the next available number automatically for you. You may also assign the account number if desired. For example, you might want to reserve accounts 1-99 for your crew supervisors, and number employees that do field labor starting at 100. In this case, you would enter the first field labor employee with account # 100, and then every field labor employee after that will be automatically numbered from that point on. If you are entering a new crew supervisor, you can check to see what the next available account number is below 100, and assign his account number manually.

29 | P a g e
If the "Auto-Number Employees" box is not checked, the Account # is a required entry. You must enter a number for the new employee.
Name Key
The name key is used by the program to alphabetize employees. When entering checks, you can also use the name key instead of the account number to find employees. Because the name key can be used for finding employee accounts, each employee’s name key must be unique.
When entering a new employee, you can leave the name key entry blank and the program will create a name key automatically for you by taking the first six letters of the last and first names. If an employee already exists with the name key, the program will try using a different combination of letters and numbers from the employee's social security account until a unique name key is found.
You can of course enter the name key yourself. For instance, if you have few employees, you may wish to enter the employees with a shorter name key than the program would generate.
Social Security Number
The employee’s Social Security number must be unique. If you are entering a new employee, and after the social security number is entered, another employee’s name appears this number has already been entered under another name.
To find an employee by their Social Security number, enter the number and press [F9], press [F4], or click on the look up button to get a look up list of Social Security numbers.
To help you keep track of employees without
valid Social Security Numbers, the Employee Lists Report has an option to print a list of all employee accounts that have invalid social security numbers.
If an employee has not supplied you with a social security number, or has supplied an invalid number, click on the button with the question mark just to the right of the social security number entry. This will generate a unique, temporary social security number for the employee account. The temporary number will be 000-00-xxxx, where the "xxxx" is replaced with a unique number starting at "0001". You can quickly and easily see which employees have invalid social security numbers, since they will appear at the beginning of any report printed in social security number order.
Active
If you are entering a new employee the Active button should be checked.
When an employee is no longer working with the company, the employee should be set to inactive, so you can print reports and employee lists that have only active employees.
Last Name
The program will automatically capitalize names and addresses. Because of the requirements for electronic file reporting, leading letters (e.g. "O", "Mc", ect.) must not be separated from the rest of the surname by a blank space. For example: O’CONNELL should be entered OCONNELL, and MC DONALD should be entered as MCDONALD.
First & Middle Names
Enter the employee’s first and middle names.
Mailing Address
This field is for the address you intend to mail the employee’s check.

30 | P a g e
City/State/Zip
Enter the employee’s mailing, city, state and zip code. (The state should be the two letter postal abbreviation for the state.)
Phone #
Enter the employee’s telephone number. This field is an optional entry.
Street Address
If you need to keep track of a street address for the employee, click on this button or press [Enter] when it is selected. The following window will pop up for you to enter the street address:
If you don't need to enter a street address, simply press [Tab] when the street address button is selected.
Date of Birth
This is an optional entry. The date should be enter in MM/DD/YYYY format.
Gender
To choose the employee gender, click on the drop down menu button, and choose either Female or Male. You can also simply press “F” or “M” to select the gender.
Driver’s License # / Expiration Date
Enter the employee’s driver’s license number and expiration date, if available. This entry is not required.
I9 Alien Reg. # / Expiration Date
This field is used for recording alien registration numbers. Employees with a number will appear on the registered Alien Employee List, along with the expiration date that you enter. Leave this blank if the employee is not a registered alien.
Enter the date in which the employee’s registration number expires. Enter the date in MM/DD/YYYY format.
Need Alien I9 Reg #
Check this box next to the Alien Reg # entry if you need an I-9 number for this employee but you do not have it yet. An Employee List can be printed for all employees that do not have the Alien Registration # entered yet.
Need W-4
Check this box if you have not received a W-4 for this employee yet. When this box is checked, it will trigger the “Need W-4” message on the employee’s check stub (assuming you have enabled messages printing on payroll check stubs).

31 | P a g e
S.S. # Not Matched
Check this box if you receive a “no match” letter from the Social Security Administration for this employee.
On Pension Plan
Check this box if the employee is on a company pension plan.
ACA Seasonal
Passport # / Expiration Date
Enter the employee’s passport # and expiration date.
The following entries will only appear if you have the H-2A Payroll option enabled:
H-2A
Check this box if the employee is an H-2A worked.
Hours Offered
Enter the total number of hours offered this employee under his or her H-2A contract.
Visa # / Expiration Date
Enter the employee’s visa # and expiration date. These entries are only enabled for H-2A employees.
Employment Information
Crew #
This is a one to four digit user-defined number that will allow you to segregate employees into crews or locations.
This allows you to print lists of employees and crew sheets by crew.
Department
Position
Type of Employee
Pay Type/Rate
To select the pay type, click on the drop down menu button, and select, either hourly, piecework, or salary. This setting serves only as a default when entering payroll time, which you may override. An employee may have any combination of pay types on his or her check, for example, hourly wages and piecework wage types may be used together on the same check regardless of the pay type setting in the employee file.
Pay Rate
This is a numeric entry that sets the rate of pay for the employee. What you previously entered in the pay type determines what kind of rate this is.
If this is a salaried employee, the amount you enter here is the total amount to be paid on each paycheck.

32 | P a g e
If the employee is entered as hourly, the amount here will be multiplied by the number of hours worked for the gross check amount.
If you leave the rate of pay at zero, the program allows you to enter the rate of pay while entering the payroll check. This is necessary if you are paying an employee more than one rate on the same check
Date Hired
Enter the date the employee was originally hired in MM/DD/YYYY format.
When a new employee is entered the hire date should be entered, so that the employee appears on the DE-34 report. (New Hire report)
This field should not be edited for re-hires. The pay history file should be used to record re-hires, absences, terminations, etc.
Date/Reason Terminated
In the first field the date of termination can be recorded for a quick reference for unemployment requests. The date should be entered in the MM/DD/YYYY format. The second field can be used to record the reason for termination.
Not Rehireable
Check this box if the employee is not rehireable after termination.
Date of Last Raise
When an employee receives a raise in salary, you may put the date of the raise in the employee’s file for future reference. The date should be entered in MM/DD/YYYY format.
Note: This Information may be entered in the history file instead or in addition to the Employee Info File.
Last Check #/Date
Every time a check is printed through the system, the program will automatically record the check # and date here.
To see the date the employee last worked, place the mouse pointer over the last check date. A tooltip will appear showing the last date worked on that check. (This feature requires that the Day entry was filled in on the payroll check for the program to determine the last date worked.)
Default Labor G/L #
This is the default General Ledger Account number to which you wish to charge this employee’s wages on a regular basis. If you enter a number here, it will automatically appear when entering the employee’s checks.
If you do not enter a number, you can enter a general ledger account number while entering the employee’s checks. This item should be skipped if the general ledger account number will vary from week to week or if you’ll be expending this employee’s wages to more than one general ledger account number on one check.
To set the default account number enter the general ledger number, press [F4], or click on the look up button to get a look up menu of general ledger account numbers.

33 | P a g e
Advance G/L #
This entry is used when you set up a separate general ledger account for each employee. If you are using separate accounts, enter the general ledger account number to which any deductions or advances will be credited for this employee.
If you use one general ledger account number for all employees’ advances, leave this entry blank. The general account number you use for all employees is set up in the Program Setup.
Chk. Stub Language
You may select either English or Spanish to use for printing headings on the payroll check stubs. (The <Undefined> setting will default to English.)
The Miscellaneous Deduction window allows you to enter Spanish language descriptions in addition to English descriptions.
Note that this entry will not appear if you are printing checks on a dot matrix printer. Only laser check formats support printing the check stub in Spanish.
PIN/Badge #
If you use a data collection or a time clock system that uses a separate number to track employees, enter that number here. (If you are not using of these systems, this entry will not appear.)
W/C Class Code Deductions Page
This tab page contains the settings for calculating federal and state tax deductions as well as miscellaneous deductions (for advances, child support, health insurance, garnishments, etc.)
34 | P a g e
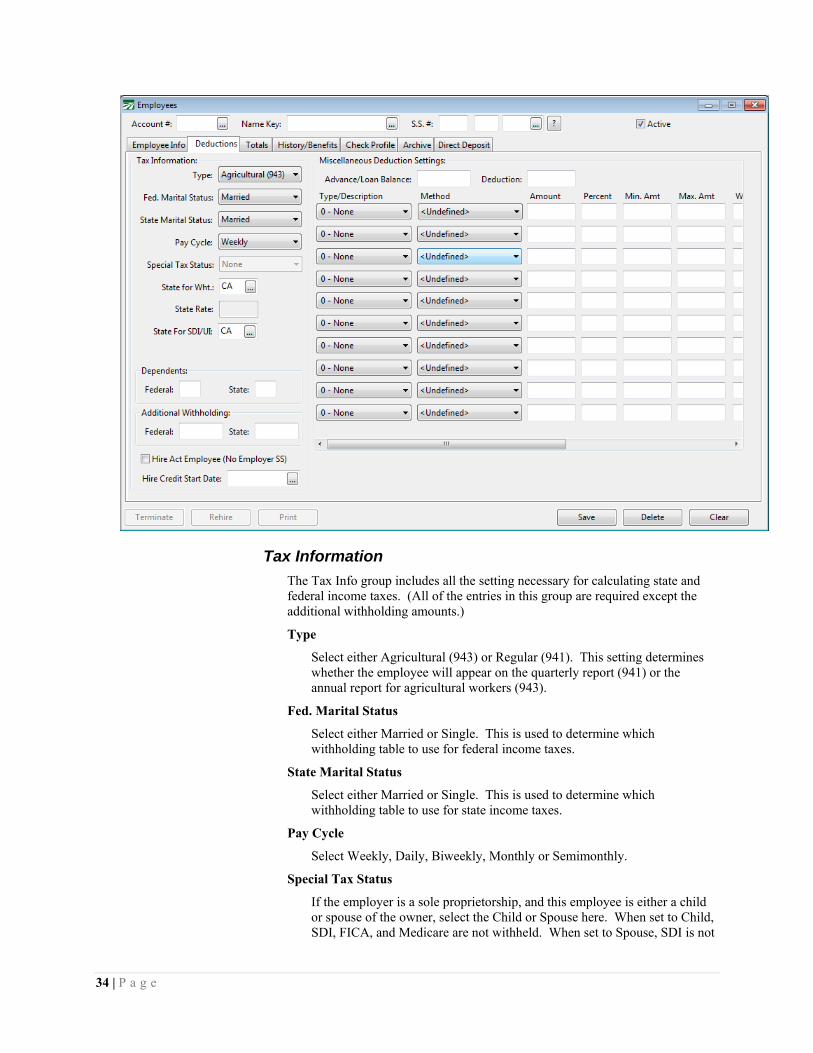
Tax Information
The Tax Info group includes all the setting necessary for calculating state and federal income taxes. (All of the entries in this group are required except the additional withholding amounts.)
Type
Select either Agricultural (943) or Regular (941). This setting determines whether the employee will appear on the quarterly report (941) or the annual report for agricultural workers (943).
Fed. Marital Status
Select either Married or Single. This is used to determine which withholding table to use for federal income taxes.
State Marital Status
Select either Married or Single. This is used to determine which withholding table to use for state income taxes.
Pay Cycle
Select Weekly, Daily, Biweekly, Monthly or Semimonthly.
Special Tax Status
If the employer is a sole proprietorship, and this employee is either a child or spouse of the owner, select the Child or Spouse here. When set to Child, SDI, FICA, and Medicare are not withheld. When set to Spouse, SDI is not

35 | P a g e
withheld. Also, the unemployment taxes (SUI and FUI for the employer) are not calculated for both the child and spouse settings.
The default for this setting is "None". Note: If you do not have your company type set to Sole Proprietorship in the Program Setup, this entry will be disabled.
EIC
If the employee is eligible for the Earned Income Credit, select one of the "Yes" options, either married or single. Otherwise, you should select "No". (The default setting is No.)
State for Withholding
Enter the state for calculating state income taxes.
State Rate
For Arizona, enter the withholding rate for this employee. (This is a percentage of the federal income tax withheld.) For other states, this entry is disabled (the regular tax tables will be used for other states).
State For SDI/UI
Allowances, Federal / State
Enter the number of allowances claimed for both federal and state income tax purposes from the W-4 and/or equivalent state form (e.g. the DE 4 for California).
To disable withholding of either federal or state income tax, enter 99 for the number of dependents. This would be used if the employee claims “Exempt” status on the W-4 or equivalent state form. Or if the employee wants a fixed amount withheld for federal or state income tax, you can enter 99 for the dependents and the amount to withhold in the Additional Withholding entries (see below).
An employee may want to claim more allowances for federal withholding than for state withholding, for instance to account for the federal child tax credit.
Additional Withholding, Federal / State
Enter dollar amounts for additional federal or state withholding tax.
Hire Act Employee
This checkbox was used for the New Hire Tax Credit available in 2010. It does not have any affect after 2010.
Hire Credit Start Date
Miscellaneous Deductions
In this section you can set up deductions for advances, loans, child support, withholding, health insurance, 125(c) and 401(k) plans, or any other non-tax deduction. The first two entries are used for advances/loans, then ten entries are provided for user defined miscellaneous deductions.
Advance/Loan Balance
This is the current balance of the employee's loan. Normally you don't need to edit this, but you can manually set up a balance (for instance, if you gave the employee cash).

36 | P a g e
Deduction
This amount will be taken out of each of the employee's checks until the current loan balance is zero. (The loan balance is updated each time a check for this employee is printed.)
You can override the deduction amount for advances on the check entry window.
User Defined Deductions
Up to ten different miscellaneous (non-tax) deductions may be set up for each employee. These deductions may include garnishments such as child support, health insurance, etc. Deduction types are set up under the Miscellaneous Deductions option.
As soon as a check is entered, the miscellaneous deduction information on the employee account is used to calculate the deductions for that check. Editing the information on the employee account after a check has been created will not change the deductions that have already been calculated for that check. For instance, if you notice a deduction on a check that should not be taken, deleting the deduction amount from the employee setup will not remove it from check as well. The check needs to be edited through the Batch Check Entry window. Likewise, it you add a deduction on an employee account, that deduction will not be added to a payroll check that has already been entered. It will be necessary to delete the check and reenter it.
Type/Description
Select the type of deduction. You can have up to 99 different deduction types. Deduction types are set up in the Miscellaneous Deduction window.
Method
Select the method to use for this deduction from one of the available options:

37 | P a g e
Flat Rate. A set amount is deducted on each check. You will enter the deduction amount in the Amount column. During check entry, you can override the amount you have entered here if needed.
Adjust Each Check. Similar to the Flat Rate option, but the program will remind you to adjust the amount of the deduction before you finish entering the check.
Percent of Gross. This setting will calculate the deduction as a percentage of the gross wages.
Percent of Net. This setting will calculate the deduction amount as a percentage of the net wages (gross wages less tax withholdings).
Percent of Net (-Misc). This setting will calculate the deduction amount as a percentage of the net wages less any previous miscellaneous deductions. This can be useful in a situation where you have two child support orders, and the second one must be calculated as a percentage of the net wages less the first order.
Per Hour. Enter the amount to deduct per hour worked in the Amount column.
Percent of IRA Wages. This option will calculate the deduction based on the total wages on the employee check that are used to calculate the employer’s contribution to an IRA/401(k) plan. If you have some wage types set up for mileage, meal(s) or other types of reimbursements, these wage types will not have this setting enabled so that the employee deduction amount calculation will not include these in the total wages.
Percent of Union Wages. This option may be used by labor contractors with employees that may or may not work under a union. This is normally determined by which grower(s) they are working for. A union checkbox on the grower setup window indicates the union status for each grower. The Calculate Union Deductions Report must be run to calculate the union deduction amounts before checks are printed.
Custom. This option is not used at this time.
Amount
If you specify a Flat Rate for the Method, enter the amount here. If the amount may vary from check to check, you can leave this blank, and manually enter the amount on each check.
Percent
If you specify either a percentage of the gross or net check amounts, enter the percentage here.
Min Amt / Max Amt
For deductions that are calculated based on a percentage, you can enter a minimum amount and/or a maximum amount to withhold.
Weeks
This entry can be used to control which weeks of the month each deduction is taken. The pay period ending date is used to determine which week a check falls in. An ending date from the 1st to the 7th is week one; from the 8th to the 14th is week two; from the 15th to the 21st is week three; from the 22nd to the 28th is week four, and from the 29th to the 31st is week five.

38 | P a g e
If this entry is blank, the deduction will be always be taken on the employee's checks.
If you have a deduction that you want to be taken out twice a month, you could enter "13" or "24" to take the deduction out just on those weeks. Or, if you have a total amount for the month that needs to be deducted and you have split it into four amounts, you can enter "1234" and the deduction will not be taken out on checks with an ending date from the 29th to the 31st (the fifth week).
Total to Deduct
The Total to Deduct allows you to enter the total that needs to be deducted. This would be used for a deduction like Income Tax Garnishment that has a total amount to be withheld.
Ded. to Date
This field will display the total amount that has been withheld for this deduction. The program uses this amount and the Total to Deduct amount to keep track of when to stop making deductions.
Note that this amount is not a year-to-date amount, but a total that has been deducted since the deduction was started. The program will only keep a total in this entry if you have entered an amount for the Total to Deduct.
Case #/Ref #
Enter the case number or reference number for a garnishment order (such as for child support or back taxes). This
Vend#
Enter the vendor account number that you need to remit withholding amounts to. You can press [F4] or click on the lookup button to select an account from the vendor lookup list.
Loan
If you advance wages to employees, the program can keep track of each employee's loan balance, and a current deduction per check. This deduction will be taken out of the employees check until the loan is paid off.
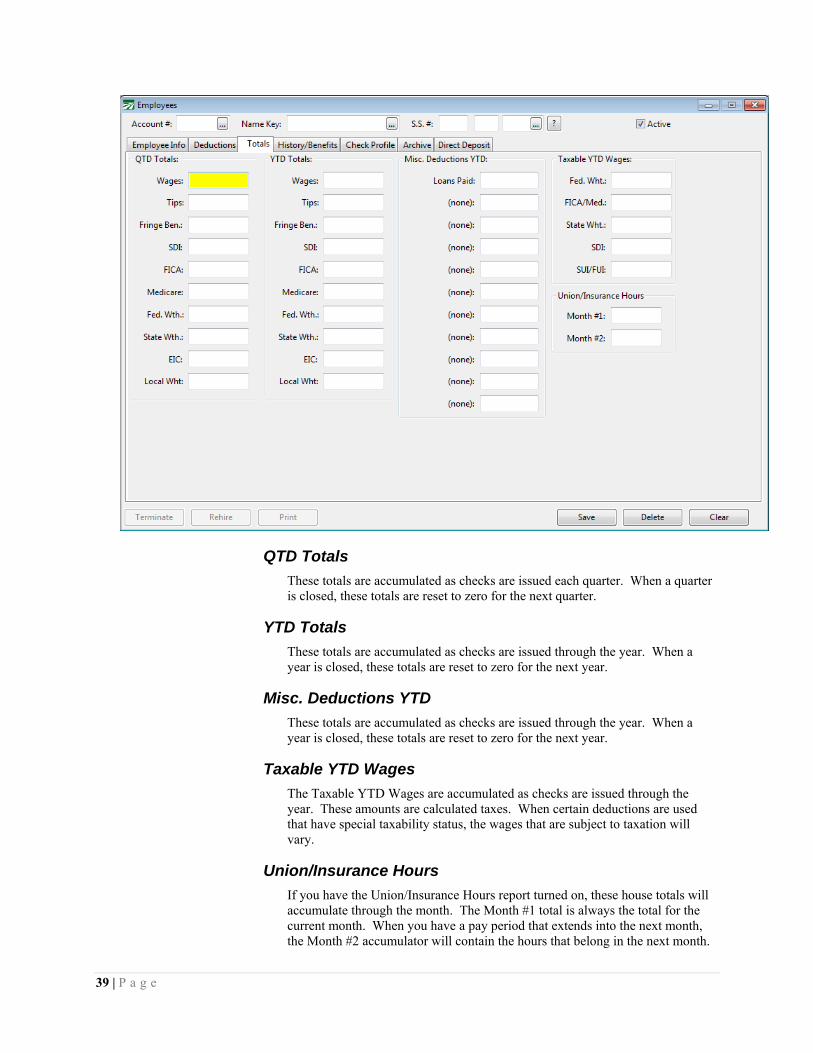
Employee Totals Page
The Totals page contains quarter to date and year to date employees for the employee. Normally you do not need to edit these amounts; they are displayed for your reference. In certain cases you may need to make adjustments or corrections to these numbers, so they can be edited.
39 | P a g e
QTD Totals
These totals are accumulated as checks are issued each quarter. When a quarter is closed, these totals are reset to zero for the next quarter.
YTD Totals
These totals are accumulated as checks are issued through the year. When a year is closed, these totals are reset to zero for the next year.
Misc. Deductions YTD
These totals are accumulated as checks are issued through the year. When a year is closed, these totals are reset to zero for the next year.
Taxable YTD Wages
The Taxable YTD Wages are accumulated as checks are issued through the year. These amounts are calculated taxes. When certain deductions are used that have special taxability status, the wages that are subject to taxation will vary.
Union/Insurance Hours
If you have the Union/Insurance Hours report turned on, these house totals will accumulate through the month. The Month #1 total is always the total for the current month. When you have a pay period that extends into the next month, the Month #2 accumulator will contain the hours that belong in the next month.

40 | P a g e
When the Union/Insurance Hours report is run after the last payroll of the month and you clear totals, the hours in the Month #2 accumulator will be moved to the Month #1 accumulator, and the Month #2 accumulator will be cleared.
History/Benefits Page
This tab page includes the history file and notes entry where you can record additional information about employees. The history file can be used for changes to the employee's account, such as pay rate changes, dates hired, rehired, or laid off, etc. This page also includes settings for the employee’s vacation/sick pay benefits and employer 401(k) contributions.
Date
Enter the date for this change.
Type
Enter a type code for this change. Press [F4] to get a list of codes to select from.
Notes/Descr/Job Title
Enter any notes for this change.
Pay Rate
If this is a pay rate change, you can enter the new rate here.
Per
Enter the unit type for the pay rate (hourly, week, month, etc.)

41 | P a g e
Vacation/Sick Pay
The payroll system can automatically accrue and keep track of vacation and sick pay amounts, controlled by these settings:
Vacation Rate / Sick Pay Rate
The rates are either a percentage of the wages (or hours) or the number of hours to accrue per week worked, depending on the settings you have made on the Program Setup. For instance, to accrue two weeks of vacation pay per year using a percentage method, you would use four percent. (4% of 50 weeks worked per year is 2 weeks of vacation pay.)
When accruing a fixed number of hours per week worked, enter the number of hours to accrue per week here. If the employee is paid on a weekly basis (as specified by the pay cycle) then the program will add this number to the accrued vacation/sick pay total. If the employee is paid on a biweekly basis, the program will multiply the number of hours by two and add that to the accrued vacation/sick pay total.
Accrued Vacation / Accrued Sick Pay
The amounts accrued for vacation and sick pay are displayed here. You can override these if you need to (for instance, to give employees more vacation pay). When you pay vacation or sick pay wages, the accrued amounts will be reduced by the wages paid.
Employee Notes
This is a notepad entry where you can type in any additional information that you want to record for this employee account. An option in the Program Setup window allows you to specify that the notes entry should be displayed when you enter a check for the employee.
Employer 401(k) Contributions
The payroll system can automatically keep track of the employer’s contributions to employee 401(k) or Simple IRA accounts. The 401(k) Report can be used to keep track of employer contributions.
Percentage
Employer contributions are based on a percentage of either the gross wages or the employee’s 401(k) deduction.
Max Contribution/Year
Enter the maximum dollar amount of the employer’s contribution. Once the maximum amount for the year is reached, the program will stop calculating the employer contribution.
YTD Contributions
This is the total of employer contributions for the current year. Each time a payroll check is printed, the program updates this amount.
Insurance Coverage Through
This date indicates how long the employee is covered by a health insurance program. Certain reports may update this date automatically. You can also enter a date manually here.

42 | P a g e
Emergency Contacts
Each employee may have its own set of emergency contact. Click on the Add button to open a window to enter the information for each contact:
If you need to edit or remove a contact, double click on the entry in the contact list and the information will be displayed in the Enter Emergency Contact window. To delete a contact, click on the Delete button at the bottom left corner of this window.
Check Stub Message
If you are using a custom check format for payroll checks and have set up a position for messages to print on the stub, you can enter a message that is specific to the employee here. This will be combined with any other messages that are set up to print automatically or based on certain conditions.
Clear Message After Printing on Check
Checking this box will cause the message that you enter to be printed on the employee’s check stub only once. It will be cleared after it is printed.
Employee Check Profile
The Check Profile page allows you to set up line items that will be added automatically to any check entered for this employee. For instance, you might have a salary employee whose wages need to expensed to the same cost center on each check. By entering a profile line with the cost accounting information, you won’t need to edit each check.
In the past, this was also used for employee deductions that have a special taxability (pre-tax) status. In most cases this is not necessary, as the program can automatically generate line items for pre-tax deductions.

43 | P a g e
Line
You can enter a line number to determine the order of multiple check profile lines.
You can use line numbers over 1000 to prevent these lines from being printed on the check stub. This is normally used for line items that are entered for pre-tax deductions.
G/L #
Enter the general ledger wage expense account here. Press [F4] or click on the column header to open the general ledger selection list.
Job ID
If you are using the Cost Accounting module, you can enter a Job ID to use on each line item. Press [F4] or click on the column header to select a Job ID from the lookup.
Crop ID
If applicable, you can select a cost center for each line. Press [F4] or click on the column header to open the cost center selection list.
Year
If you enter a cost center, enter the crop year here also.
Code
Enter the pay type code here. Press the [F4] key or click on the column header to open the pay type selection list.
44 | P a g e
PW Hours
Enter the piecework hours here, if applicable.
Units
Enter the units for this line item.
Rate
Enter the rate for this line item.
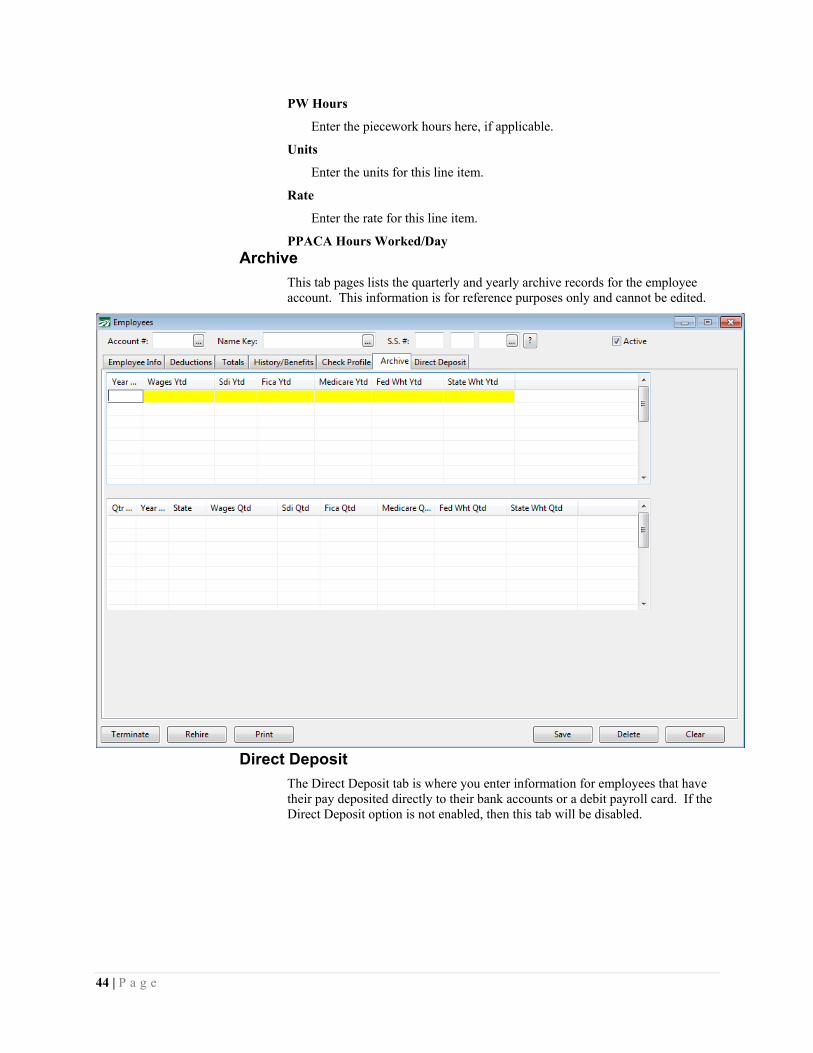
PPACA Hours Worked/Day Archive
This tab pages lists the quarterly and yearly archive records for the employee account. This information is for reference purposes only and cannot be edited.
Direct Deposit
The Direct Deposit tab is where you enter information for employees that have their pay deposited directly to their bank accounts or a debit payroll card. If the Direct Deposit option is not enabled, then this tab will be disabled.

45 | P a g e
The ACH Direct Deposit option is designed to be used with a 3rd party program such as Treasury Software to create and upload an ACH file to the bank. If you purchase the Direct Deposit option from Datatech, the Treasury Software program will be provided by Datatech.
If an employee account has anything entered for the Deposit Account #1 entry, the program considers that employee to be a direct deposit employee and will not print a payroll check for that employee. This means that you can still print checks for some employees while having other employees on the direct deposit system.
For each employee, enter the following information:
Deposit Account #1
Enter the account number to deposit this employee’s wages to.
Routing Number Account #1
Enter the nine digit bank routing number (if applicable) for the first bank account. If the direct deposit is to a payroll card, a routing number should not be necessary.
Type of Account
Select either Checking or Savings account.
Split Method
The Direct Deposit system can split the total wages for an employee between two different accounts. The Split Method determines how much is allocated to each account. Select all to deposit wages into account #1 only.

46 | P a g e
Select Flat Amount to deposit a specific amount into account #1 and the excess in account #2. Or select Percentage to deposit a specific percentage of wages into account #1.
Amount/Percentage
If you select either Flat Amount or Percentage for the Split Method, enter either the dollar amount or the percentage that the employee wants deposited in the first account number.
Minimum Amount, Acct #1 / Maximum Amount, Acct #1
When you select Percentage for the Split Method, you can also specify the minimum and maximum dollar amount that the employee wants to deposit to account #1.
Deposit Account #2
If splitting the employee’s wages between accounts, enter the second account number to deposit wages to.
Routing Number Account #2
Enter the bank routing number (if applicable) for the second bank account. If the direct deposit is to a payroll card, a routing number should not be necessary.
Type of Account
Select Checking or Savings account.
HSA Account #
Employees with a Health Savings Account (HSA) can have their contributions deposited directly to their individual HSA accounts. Enter the bank account number for the employees HAS account here.
For the HSA deduction amount to be included in the direct deposit entries that are generated by the program, you must enter the miscellaneous deduction number for the HSA deduction under Tools->Program Setup->Payroll->External Programs.
HSA Routing Number
Enter the bank routing number for the employee’s Health Savings Account.
HSA Type of Account
Select either Checking or Savings account.
ACH Test Generated
It is strongly recommended that you generate a test file for any new direct deposit accounts you set up. A test file will credit each new employee’s bank account with a penny (.01) transaction. The employee can then verify that the deposit appears in their account.
When you set up a new employee, leave this box unchecked so that a test will be generated. Once the test file has been generated, this box will be checked automatically to indicate such.
If the bank account needs to be corrected, uncheck the box to test again. If the employee changes banks, uncheck the box to test again.
NOTE: The test is not complete until an ACH file is generated and uploaded to the bank. See the instructions for “Create Direct Deposit File” to create a test file.

47 | P a g e
NOTE: The ACH test file option is only available if you are using the ACH Direct Deposit option with an ACH program such as Treasury Software. If so, the Direct Deposit option on the Program Setup screen will be set to “TS CSV File”.
Deleting Employees
An employee with wages or checks on file cannot be deleted form the program. If you have issued a check to an employee and then voided the check, the employee cannot be deleted because the checks are still on file.
If wages were paid to the wrong employee and the checks issued to this account need to be moved to a different account, use the Move Payroll Check option. Once all checks have been moved to another account, you may delete the account.
To delete an account without wages, first display the employee account information by entering the account number or using one of the selection lists to choose the employee. When the employee account is displayed click on the Delete button, or press [Shift]+[F2]. The program will then confirm that you want to delete this employee, to delete the account click on "Yes".
Terminate Employee
When an employee is terminated or laid off, there are several changes that are typically made to the employee’s account. The Terminate button at the bottom left corner of the Employees window provides a shortcut for handling this. When you click on the Terminate button on the Employee entry window, the following window will appear for you to enter the termination info:
Date Terminated
Enter the date the employee was terminated.
Type
Select from the available options: Fired, Medical Leave, Laid Off, or Quit.
Description
Enter the reason the employee was terminated here.
Inactive
Normally you will want to check this box so that the employee account will be set to inactive. If for some reason you want this account to remain active, uncheck this box.
Click on the Ok button to record the information. A record will be created in the Employee History file, and the date terminated and reason for termination fields will be updated on the employee account. Click on the Cancel button if you do not want to save this information.

48 | P a g e
Rehire Employee
When an employee comes back to work for your company, there are typically several changes that need to be made on the employee account. The Rehire button provides a shortcut for making these changes. The following window will open when you click on the Rehire button:
Date Rehired
Enter the date that the employee was rehired on. An entry will be made in the employee history file on this date showing the employee was rehired and the employee will appear on the next New Hire report that is printed.
Code
Description
Enter any additional notes here.
Crew #
Enter the crew number, if any, that the employee is assigned to.
Pay Rate
The employee’s previous rate of pay will be displayed here. You can update this if needed.
Request ID Badge
Click on the Ok button to finish the rehire process. If the employee was set to inactive, the employee’s account status will be changed to active. Click on the Cancel button to close the window without recording the rehire information.
Right-Click Menu
You can click with the right mouse button on a blank area of the window to get a menu with several shortcuts including options for printing reports, labels, and entering checks.
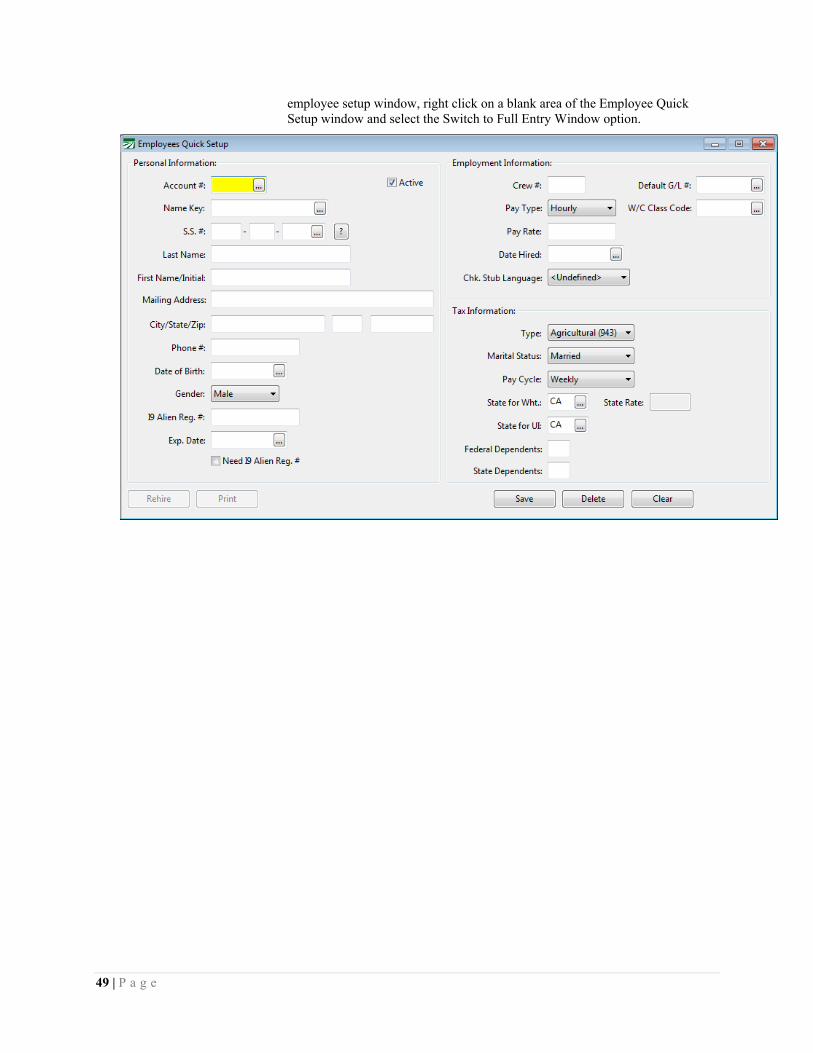
Quick Employee Setup
There is an employee setup window that has been streamlined for quick entry of new employees. It only includes a minimum set of entries for the required information for new employees. To access the Employee Quick Setup window, right click on a blank area and select the Switch to Quick Entry Window option. The program will remember which employee setup window you have selected until you exit the program. That window will appear when you select the Employees option on the main Payroll menu. To switch back the regular
49 | P a g e
employee setup window, right click on a blank area of the Employee Quick Setup window and select the Switch to Full Entry Window option.
50 | P a g e
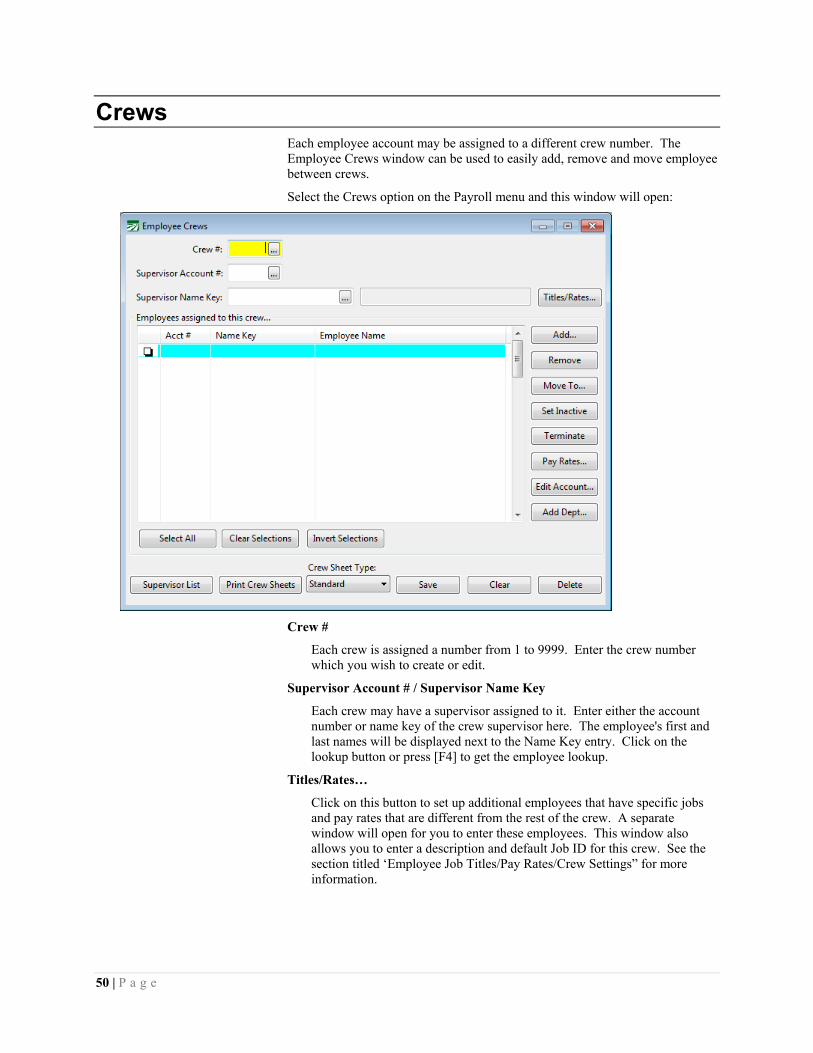
Crews Each employee account may be assigned to a different crew number. The Employee Crews window can be used to easily add, remove and move employee between crews.
Select the Crews option on the Payroll menu and this window will open:
Crew #
Each crew is assigned a number from 1 to 9999. Enter the crew number which you wish to create or edit.
Supervisor Account # / Supervisor Name Key
Each crew may have a supervisor assigned to it. Enter either the account number or name key of the crew supervisor here. The employee's first and last names will be displayed next to the Name Key entry. Click on the lookup button or press [F4] to get the employee lookup.
Titles/Rates…
Click on this button to set up additional employees that have specific jobs and pay rates that are different from the rest of the crew. A separate window will open for you to enter these employees. This window also allows you to enter a description and default Job ID for this crew. See the section titled ‘Employee Job Titles/Pay Rates/Crew Settings” for more information.

51 | P a g e
Add…
To add an employee to the crew, enter the name key or account number, or click on the lookup button to get a list of employees to select from. Once you have an employee account displayed, click on the Add button to add the employee to the list.
The following buttons will work on either a single employee account or multiple employee accounts:
Remove
This will set the crew number of the selected employee(s) to zero, removing them from this crew.
Move To…
Click on this button to move the employees that you have selected to a new crew number. A window will appear for you to enter the new crew number.
Set Inactive
This will set the account status of the selected employee(s) to inactive. They will disappear from the crew list, but they are still assigned to this crew. (Since the account status is inactive, they will not appear on the crew list or other reports that only list active employees.)
Terminate
Pay Rates…
Edit Account…
Add Dept…
How to select multiple employee accounts:
Click the mouse on the account number of each employee account you want to select. The box in the left hand column will be checked. Clicking a second time on an employee account will deselect it. Alternatively, you can press the space bar and use the arrow keys to select multiple employee accounts.
Once you have multiple accounts selected, the Remove, Set Inactive, and Move buttons will operate on the selected accounts. If you have not selected multiple accounts, this button will only operate on the highlighted account, whether it is selected or not.
The Invert Selections button will select the accounts that are not selected, and deselect the accounts that are selected. This is useful, for instance, if there are 30 employees on a crew, and you need to move 25 of them to another crew. Instead of selecting all 25 employees, you can select only the five that are staying on the crew, and then click on Invert Selections. The five will be deselected, and the other 25 will be selected. Then you can click on the Move button to move them to the other crew.
52 | P a g e
Supervisor List
This button will print a list of all employees that are assigned to be supervisors on crews.
Print Crew Sheets
This button will open the Crew Sheets report window. Click here for the help page for the Crew Sheets.
Crew Sheet Type Menu
Save
This button will save the crew to your files.
Clear
This button will clear the window of all information.
Delete
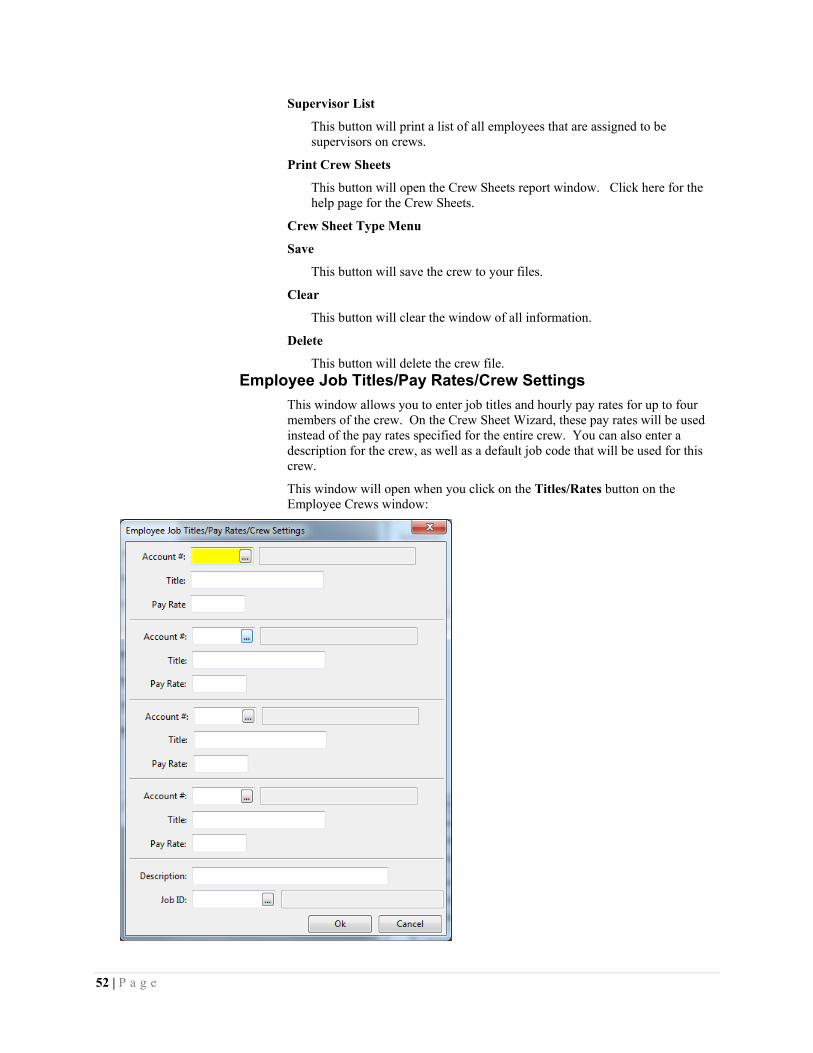
This button will delete the crew file. Employee Job Titles/Pay Rates/Crew Settings
This window allows you to enter job titles and hourly pay rates for up to four members of the crew. On the Crew Sheet Wizard, these pay rates will be used instead of the pay rates specified for the entire crew. You can also enter a description for the crew, as well as a default job code that will be used for this crew.
This window will open when you click on the Titles/Rates button on the Employee Crews window:

53 | P a g e
Enter the account number, title, and pay rate for up to four different employees.
The job title may appear next to the employee’s name on your crew sheet. Because there are several different crew sheet formats, some programmed for specific customers, the crew sheet you are using may not print the titles. Contact Datatech if you would like changes made to how your crew sheet is printed.
At the bottom of the window, you can enter a description for the crew (this is currently not used anywhere, so it can be entered solely for your reference) and a job code to use as a default when entering payroll for employees on this crew.

54 | P a g e
Crew Sheets Crew Sheets can be used for recording time and/or pieces worked each week. On the Payroll menu, go to the Employee Lists sub-menu, and select Crew Sheets. This window can also be opened from the Employee Crews window.
Note that these instructions are for the Standard Crew Sheet. Custom crew sheets may have additional options
Payroll Ending Date
Enter the ending date for the payroll period you are printing the crew sheet for. This will print at the top of the crew sheets.
First Day of Week
Select the first day of the payroll period here.
Print All Crews
Check this option to print Crew Sheets for all crews. If you uncheck it, you'll be able to select a single crew to print.
Crew # to Print
Enter the crew number you wish to print, or click on the lookup button to select a crew from the selection list.
Blank Extra Lines
The crew sheet can print extra lines for the crew supervisor to write in additional employees that are added to the crew in the field.
Next Crew Sheet #
If you use crew sheet numbers, the next available crew sheet # will appear here automatically. You may override it if you wish.

55 | P a g e
Print S.S. #
Be default, the crew sheet will print the social security number for each employee. Uncheck this box if you do not want the social security number to appear on the crew sheet.
The printing of the Social Security number on the crew sheet will be governed by the S.S. # Printing setting in the Program Setup window. The crew sheet will only print the last four digits of the social security number if you have selected that setting. If you have selected the “Do Not Print S.S #” setting, then the crew sheet will not print the Social Security number at all, regardless of whether this box is checked or not.
Print Hash Total
Check this box to print a hash total (the total of all employee account numbers) at the end of the report. This can be used during data entry to confirm that the correct employee account numbers have been entered.
If employees are added by hand to the crew sheet, the hash total needs to be updated with the handwritten employee account numbers before comparing to the hash totals that appear on the daily payroll reports.
Print Order
Select either Alphabetic or Account # order.
Orientation
Select the orientation the report here. Landscape mode provides more room to write in hours/units, but prints fewer employees on the page.
Preview
Click on this button to see a preview of the report on the screen.
Print Setup
Click on this button to select a printer to use for this report. If you do not select a printer, the report will automatically be printed to the current default printer. To see the current printer, you can move the mouse pointer over the button and a tool tip will appear showing the printer name and port.
Click on this button to print the report to the current printer. To see the current printer, you can move the mouse pointer over the button and a tool tip will appear showing the printer name and port.
Cancel
Click on this button to close the window.

56 | P a g e
Crew Sheets Using an Excel Template One of the custom Crew Sheet options allows you to create a spreadsheet in Excel for use as a template. The program fills in the employee, crew, and pay period information on this template and prints out the crew sheet through Excel. By using this setting, you can actually create several different crew sheet templates.
To use the Excel Template option for the Crew Sheet printing, go to the Program Setup option on the Tools menu, click on Payroll, then Settings. Under the Payroll Settings group, select “Excel Template” as the Crew Sheet Type.
When you select the Crew Sheet option from the Employee Lists menu or click on the Print Crew Sheets button on the Crews window, the following window will appear:
Payroll Ending Date
Enter the ending date for the payroll period you are printing the crew sheet for.
First Day of Week
Select the first day of the payroll period here.
Print All Crews
If you want to print crew sheets for all crews that are set up, check this box. Otherwise leave it unchecked and enter the Crew # to print in the next entry.
Crew # to Print
Enter the crew number you wish to print, or click on the lookup button to select a crew from the selection list.
57 | P a g e
Check Date
If you enter a check date, the crew sheet will list only the employees that received a check on that date under the crew # specified. If the check date is left blank, the crew sheet will print all employees that are assigned to the crew # specified.
(This option is only available if you are using a SQL database.)
Next Crew Sheet #
If you use crew sheet numbers, the next available crew sheet # will appear here automatically. You may override it if you wish.
Print Order
Select either Alphabetic or Account # order.
Activate/Inactivate # Days
This entry will be disabled unless you have enabled the Auto-Update Crew #’s option. If the option is enabled, you can enter the number of days since the last check date to inactivate an employee account. Once an employee account is inactivated, the employee will no longer appear on the crew sheet. (Note that the employee account will still be assigned to the crew number, but simply won’t print due to the inactive status.)
For instance, if you do not want employees who have not received a check in the last 10 days to appear on the crew sheet, enter 10 days.
Template File
Enter the full path and filename of the Excel spreadsheet to use as a template here. Click on the button to the right to select the file from an Open File dialog.
You can press [F12] while the cursor is in this entry to open the template file in Excel for editing.
Test Export
Click on this button and the program will fill in the template and display the results in Excel. If there are more employees than will fit on a single page, additional worksheets will be added to the spreadsheet and all employees will be listed.
# of Copies
By default, one copy of the crew sheet will be printed. You may change this if you want multiple copies to print.
Save As Excel Filename
Instead of printing the crew sheet, you can export the crew sheet to another Excel file. After exporting, you can make changes to the crew sheet before printing it. If multiple pages are required to list all of the employees, a separate worksheet will be created for each page. When printing the finished crew sheet, you will need to select the Print Entire Workbook option under Excel Print Settings to print all of the worksheets.
Export
Click on this button to Export the crew sheet to a new Excel spreadsheet.
Preview
Click on this button to see a preview of the crew sheet in Excel.

58 | P a g e
Print Setup
Click on this button to select a printer to use for this report. If you do not select a printer, the crew sheet will automatically be printed to the current default printer. To see the current printer, you can move the mouse pointer over the button and a tool tip will appear showing the printer name and port.
Click on this button to print the crew sheet to the current printer. To see the current printer, you can move the mouse pointer over the button and a tool tip will appear showing the printer name and port.
Cancel
Click on this button to close the window. Creating a Template
The template that you create in Excel should print on a single page. The program will look at each cell for specific field names enclosed in square brackets and replace those field names with data from the employee file, crew, or pay period. After replace all of the fields in the template, the program will instruct Excel to print the spreadsheet. If there are additional employees to print (i.e. a large crew doesn’t fit on one page) then the template will be cleared, the additional employees will be entered into the template, and additional page that is needed will be printed.
Any data, formatting, borders, etc. that you have set up on the template will be printed as-is. For instance, if you enter you company name in cell A1, then it will print in this position on all crew sheets pages. If you format a field to print bold, then it will be printed in bold on the crew sheet.
Keep in mind as you are designing the form that you can use the Print Preview option in Excel to preview the crew sheet to make sure it fits on a single page. You can also use the Preview button on the Print Crew Sheets window to do a test printout of the crew sheet. Remember though that the program will process and preview one page at a time, so the Preview window will appear for each page. When testing your template, it is best to use a crew with just a few employees.
Field Names
The following fields may be used to insert general information on the crew sheet:
[DATE_TIME_STAMP]
Inserts a date and time stamp for when the crew sheet was generated, similar to the date/time stamp that appears at the top of reports.
[COMPANY_NAME]
Inserts the company name (useful if you have multiple companies that use the same template files).
[COMPANY_ADDR]
[COMPANY_CITY]
[COMPANY_PHONE]
The following fields may be used to insert information from the employee file on the crew sheet:

59 | P a g e
[EMPL_NAME]
This will insert the employee last name followed by a comma and then the first name.
[LAST_NAME]
This will insert the employee last name.
[FIRST_NAME]
This will insert the employee first name.
[FIRST_LAST_NAME]
This will insert both the employee’s first and last name.
[ACCT_NUM]
This will insert the employee account number.
[ACCT_NUM39]
This will insert the employee account number with asterisks appearing before and after the account number and use the “Free 3 of 9” bar code font for this cell, resulting in a Code 3 of 9 barcode.
[TITLE]
This will insert the employee title that is set up on the crew record. For supervisors, the program will automatically insert “Supervisor”. If you set up other employees on the Titles/Rates window from the Crew setup, the titles that you entered on that window will be printed here. Any other employees that are assigned to the crew will not have a titled printed.
[SS4]
This will insert the last four digits of the employee social security number.
[PIN]
This will insert the employee’s PIN. The PIN is normally the unique numeric identifier/account # used by a third party data collection system.
[BADGE_NUM]
This will insert the employee’s badge #. The badge number is normally set by importing it from a payroll data import file. The badge # is a six character alpha-numeric ID.
[PHONE_NUM]
Inserts the employee’s phone number.
[CELL_PHONE]
Inserts the employee’s cell phone number.
[CELL_OR_PHONE_NUM]
Inserts the employee’s cell phone number if one has been entered, otherwise inserts the employee’s phone number.
[ALIEN_NUM]
This will insert the employee alien registration number.
[EXP_DATE]
This will insert the employee alien registration expiration date.

60 | P a g e
[PAY_RATE]
This will insert the employee’s pay rate.
[DEPARTMENT]
This will insert the employee’s department
The following fields may be used to insert information from the crew record. They would normally be used in the header section of the crew sheet.
[CREW_NUM]
This will insert the crew number/ID.
[SUPERVISOR]
This will insert the crew supervisor’s name.
[SHEET_NUM]
The program will insert the next available crew sheet number.
[HASH_TOTAL]
This will print the total of all of the employee account numbers that are printed on the time sheet. This total may be compared to the hash total on the Daily Payroll Entry window and Daily Payroll Reports (assuming that all of the employees on the crew sheet have time and no additional employees are manually added to the crew).
If some employees that are listed on the time sheet do not work, during data entry you can subtract their account numbers from the hash total. Likewise, if there are employees that are manually added to the crew sheet, you can add their account numbers to the hash total.
The following fields are related to the payroll period:
[PAY_PERIOD]
This will insert the payroll period starting and ending dates in the same cell, in the format “starting TO ending”.
[PAY_PERIOD_START]
This will insert the starting date for the pay period.
[PAY_PERIOD_END]
This will insert the ending date for the pay period.
[DAY1] … [DAY7]
This will insert the day of the week.
[DATE1] … [DATE7]
This will insert the date for each day in the pay period. Sample Template
The following screen shot from Excel shows a simple crew sheet template:

61 | P a g e

62 | P a g e
This template results in the following crew sheet printout:
Notice that the formatting for various cells, including colors, borders and text alignment, are preserved in the resulting crew sheet. The program simply replaces the field names that it finds in the spreadsheet with the appropriate text.

63 | P a g e
HR Setup
The following items are needed for the Human Resource Management Software Insurance/ACA setup.

64 | P a g e
Category Setup This window allows you to set up the rules that govern how full time employees are determined according to the regulations in Section 54.4980H-3.
For variable hour and seasonal employees, there are two methods allowed to determine whether these employees are full time (thus requiring you to make an offer for health insurance coverage) or part time (you are not required to offer coverage to part time employees).
These regulations specify that the criteria are applied to employees categorized as part time. This is likely to avoid the possibility that an employee is mis-categorized as part time but ends up working enough hours to qualify as a full time employee.
Employees must work 130 hours per calendar month or 30 hours per week to qualify as a full time employee.
You may have multiple categories defined, however the regulation specify what
When employees are hired/rehired, you must assign an ACA Category to the employee.
When you select the ACA Employee Category option from the Setup menu, the following window will open:

65 | P a g e
Category
Enter a description for this ACA category.
Locked
Once this box is checked, the settings cannot be modified. Once settings begin to be used you cannot change the eligibility criteria.
Method
Select either the Monthly measurement period 54.4980H-3(c) or the Look-back measurement period 54.4980H-3(d).
Date Period
Two methods are available for totaling hours of service to determine full or part time status. The Calendar month method requires employees to have 130 hours of service to be classified as full time, and thus get an offer of coverage.
The alternative is to use a Pay Period method. Because some months will have four weekly pay periods while others will have five, the hours of service is evaluated based on the average hours worked per week. The minimum hours worked must be 30 hours per week, so for a month that include four weeks, employees must work 120 hours to qualify for an offer of coverage. For a month that includes five weeks, employees must work 150 hours to qualify for an offer of coverage.
First Day
This setting is only enabled when the Calendar setting is selected for the Date Period entry and the Method setting is Monthly. While this setting is included, it’s use does not strictly follow the regulations published by the IRS. Therefore, use this setting at your own risk.
Since coverage must start on the first of each month, using a calendar month measurement period means that your carrier must either allow retroactive coverage (if you want employees to be covered each month based on the prior month’s hours of server) or you must have a waiting period of at least a month before employees are covered.
Example: Coverage for the month of January 2015 is based on hours of service in December 2014. Given a pay period that runs from Sunday to Monday, and checks are issued on the Friday following each pay period, the last check that includes December hours will be issued on the January 9th. This is the earliest that an Eligibility Report that includes all of December hours can be run.
The purpose of this setting is to begin your measurement period on a date other than the first of each month, and end the measurement period on the prior day of the next month. By doing this, you are retaining a calendar month period of 28/29/30/31 days. Since the measurement period ends before the end of the month, you would have more time for administrative tasks relating to determining eligibility and generating/transmitting enrollment data to your insurance carrier for those employees that will be covered on the first of the next month.
Example: Suppose you start the measurement period on the 15th of the month and ending it on the 14th of the next month. Depending on where the 15th of the month falls in your pay period, the final pay check for this measurement period will be issued between the 22st to 27th. After this check has been issued, the ACA Hour Eligibility Report can be run and the

66 | P a g e
enrollment file generated for employees who will be covered on the 1st of the next month.
Disclaimer: This method of measuring hours of service does not conform to the regulations published by the IRS. In some situations, it may produce prevent employees from qualifying for coverage. It is not clear however what penalties may result from using an alternate measurement period or whether the IRS intends to audit the measurement period methods employers use. As stated above, use this setting at your own risk.
Salary Employee Method
This setting controls how hours of service will be calculated for salaried employees. Three different options are available:
If you are recording the actual number of hours worked for salaried employees, you can use the “Actual hours of service” setting. To record the actual hours of service, you would normally use a wage type that has the Base Pay Type set to Piecework. This will allow you to enter the actual hours worked under the P/W Hrs column.
If you are not recording the actual hours worked, you can use one of the “equivalency” options. Employees can be credited with either eight hours per day worked or 40 hours per week worked.
When using the eight hours per day worked option, you will need to enable the Days Worked entry so that you can enter the actual number of days worked by the employee during the pay period.
When using the weeks worked method, the program will automatically credit the employee with 40 hours for a weekly pay period and 80 hours for a biweekly pay period.
Note that if you have an employee that is working part time hours, you must use the “Actual hours of service” method to avoid
See 4980H-3(3)(A)/(B)/(C).
Rehire Weeks
An employee that has not worked for 13 weeks can be considered a new employee for ACA purposes. When using the Look-back measurement method, this means that a new measurement period may be started for part time/variable hour/seasonal employees, and for full time employees an offer for coverage should be made based on the new rehire date.
When using the Monthly measurement method, the employee’s former status will not influence whether the employee is considered a full time or part time employee.
Full Time Employee Settings
# Days After Hire to Offer Coverage
Look-back Measurement Settings
If you are using the Monthly Measurement method, you do not need to enter anything in the Look-back Method Settings section.

67 | P a g e
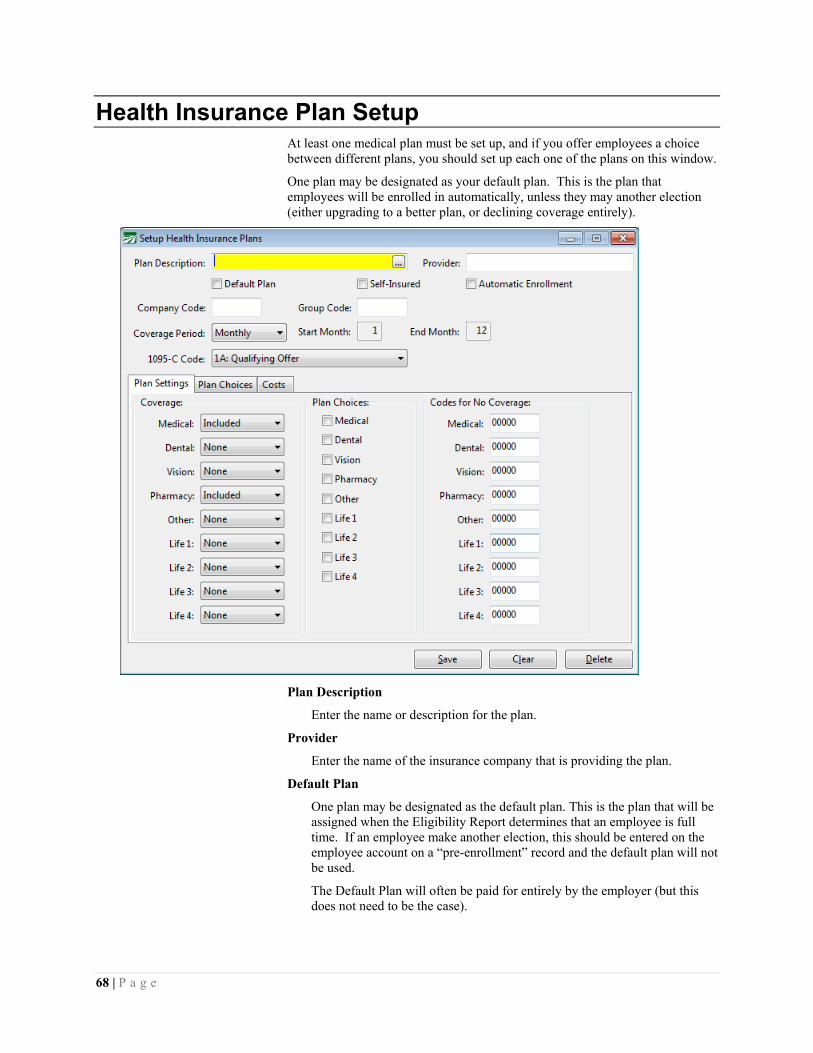
68 | P a g e
Health Insurance Plan Setup At least one medical plan must be set up, and if you offer employees a choice between different plans, you should set up each one of the plans on this window.
One plan may be designated as your default plan. This is the plan that employees will be enrolled in automatically, unless they may another election (either upgrading to a better plan, or declining coverage entirely).
Plan Description
Enter the name or description for the plan.
Provider
Enter the name of the insurance company that is providing the plan.
Default Plan
One plan may be designated as the default plan. This is the plan that will be assigned when the Eligibility Report determines that an employee is full time. If an employee make another election, this should be entered on the employee account on a “pre-enrollment” record and the default plan will not be used.
The Default Plan will often be paid for entirely by the employer (but this does not need to be the case).

69 | P a g e
Self-Insured
If this is a self-insured plan, check this box. This will tell the program that Part III of the 1095-C will need to be filled out.
Automatic Enrollment
Large employers may be required to automatically enroll employees in coverage, however the government (as of this writing) has not released the regulations covering auto-enrollment.
Check this box if employees will be automatically enrolled in this plan. At present, this box does not have any effect. It will be used to implement any rules or regulations related to auto-enrollment to be released in the future.
Company Code
Enter the code provided to you by the insurance company. This code will be used in the electronic enrollment file that will be generated by the program.
Group Code
Enter the code provided to you by the insurance company. This code will be used in the electronic enrollment file that will be generated by the program.
Coverage Period
Select either Monthly or Annual for this plan.
Start Month/End Month
Select the starting and ending month
1095-C Code
Indicate the code that should be reported on the 1095-C for this plan. (If you are not sure what code to use,
Plan Settings
This tab page allows you to define what coverage categories are included in the plan and which ones may be optional. This information is not used for ACA reporting purposes. It may be used to generate the electronic enrollment file. If employees have coverage choices that they opt for, you will need to select these options before generating and transmitting your enrollment file.
For each category, select either Included, None, or Optional. If a category has optional coverage, and there are different levels of coverage, then check the corresponding box in the Plan Choices group.
The Codes for No Coverage group allows you to define the codes that should be included in the electronic file for optional categories where no coverage is selected.
Keep in mind that not all plans have optional coverage, and not all electronic enrollment files may support including optional coverage information. Check with your provider if you are not sure.
If the electronic enrollment file does not support transmitting the coverage options selected, you may need to manually submit enrollment forms or use some other method of providing this information to the insurance provider/TPA.

70 | P a g e
Plan Choices
This tab page is used to define what options are available for different levels of coverage for each coverage category.
On the grid, first select the coverage category. Then enter the code that applies for this option (this code will be used in the electronic enrollment file) and the description for the option.
Costs
Enter the annual costs for adding spouse coverage, dependent coverage or family coverage on this tab page. When employees opt for additional coverage, the annual cost entered on this page will be converted to a monthly cost on the health insurance benefit record.
On the benefit record, you can then specify the employee’s share of the cost as a percentage, and the final number will be converted to a deduction amount that will be withheld on the employee’s paycheck based on the employee’s pay cycle.
834 Settings
This tab includes settings specific to the EDI 834 electronic enrollment file that is generated by the program and sent to your insurer or TPA (Third Party Administrator). These settings should be provided to you by your insurer/TPA.

71 | P a g e
Offered To
This tab page allows you to define which categories of employees this plan is offered to.
When multiple plans are offered to an employee, the program will select the “best” code to print on the 1095-C. For instance, if the default plan that employees are automatically enrolled in is a MEC plan for the employee only (code 1B), but employees are also offered coverage under a Qualifying Offer plan (code 1A), then the 1095-C will print the 1A code on Line 14 of the 1095-C.