week 7 - cloud object storage | store & retrieve data ...w7.pdfbringing the knees up towards the...
TRANSCRIPT

90 Day Challenge Transformation
Week 7

© The Betty Rocker™ Inc All Rights Reserved 2
#makefatcryfitness #noexcuses #rockyourbody
90 Day Challenge Transformation
Workout ProgramWeek 7
Bree Argetsingera.k.a The Betty Rocker

© The Betty Rocker™ Inc All Rights Reserved 3
HOW TO USE YOUR WORKOUT PLANThis program is PROGRESSIVE. The workouts get more challenging each week, allowing you to build your strength, endurance, confidence and see amazing results.
One of the best parts of this program is that you can be very flexible with the amount of time you are putting into the workout. Each workout can be made into a 15, 23, or 31 minute circuit, depending on how many rounds you do.
If you are a BEGINNER, focus on absolutely crushing 2 rounds*.
*The moves may be challenging to perform for a full minute, so take any of the modifications suggested in this document. Do as much as you can of each move - for example if holding plank for a minute is too much, hold it for 0:30 or as long as you can, then rest for the remainder of that move and continue to the next move with the video. You can also pause the video anytime and take more rest.
If you are INTERMEDIATE, go for 3 rounds*.
It’s absolutely fine to pause the video and take more rest between moves, or to stop after 0:30-0:45 of a move and rest until the next move starts. Remember that pushing yourself to your maximum is what helps you build strength - you are not doing it wrong by not doing the entire minute every time. You will get the opportunity to repeat the moves and you’ll see your body adapt and get stronger!
If you are ADVANCED go for 3-4 rounds*.
Rest as needed between moves and rounds.
Open the Challenge Calendar you are planning to follow. They are organized by Beginner, Intermediate and Advanced.
If you think you are a certain fitness level and start with that calendar, you can always dial it back down one level if you find that you are extremely sore, don’t have enough energy for the next workout, or need more rest.
Vice versa, if you start with a specific calendar and find you still have energy, are not really sore or just want to try more, go for the level above.
The main difference between these calendars is how many days you will be working out —and your fitness level (and time available) will dictate how many rounds you should do.

© The Betty Rocker™ Inc All Rights Reserved 4
#makefatcryfitness #noexcuses #rockyourbody
If you are short on time, it’s ALWAYS better to rock out an intense short circuit in the time you have (even one round giving max effort) than skipping your workout. Don’t fall victim to the trap of thinking “If I can’t do the full workout, I can’t work out.” That’s a great way to get way off track with your fitness.
You will have 2 foundational workouts each week, workout A and workout B. They are listed on your calendar where you should do them along with the rounds suggested.
Workout C is a unique specialty workout each week that compliments the plan—you will add in where listed on your calendar, usually added on to the end of either Workout A or B.
You have demonstration videos to follow, as well as the pictures and written form tips in this guide.
It’s absolutely fine to include other workouts with this program, swap your workout days and rest days around as long as you are fully resting and recovering. Here’s a great article to help you with figuring out the appropriate amount of rest you need.
One of the most important thing you will be doing in this program is COMBINING your fitness with the nutrients you’re putting in your body—so pay attention to eating balanced meals, staying hydrated and getting rest while you’re following the plan!

© The Betty Rocker™ Inc All Rights Reserved 5
WEEK 7 • WORKOUT A
Workout A
• Beginner: 2-3 rounds | Intermediate: 3 rounds | Advanced: 3-4 rounds
• The moves are all demonstrated for 1:00 in the videos. However, you may modify the time length—working to the best of your ability with
each move, each round:
Beginner: 0:30 each move | Intermediate: 0:45 each move Advanced: 1:00 each move
• Rest as needed between rounds.
• See Demo Pictures and form notes below.
Tuck Jumps
Narrow Push Ups
Triple Lunge
Down Dog with 3 Knee Hold
Switch Kicks
V-Ups
Rotating Planks
© The Betty Rocker™ Inc All Rights Reserved 6
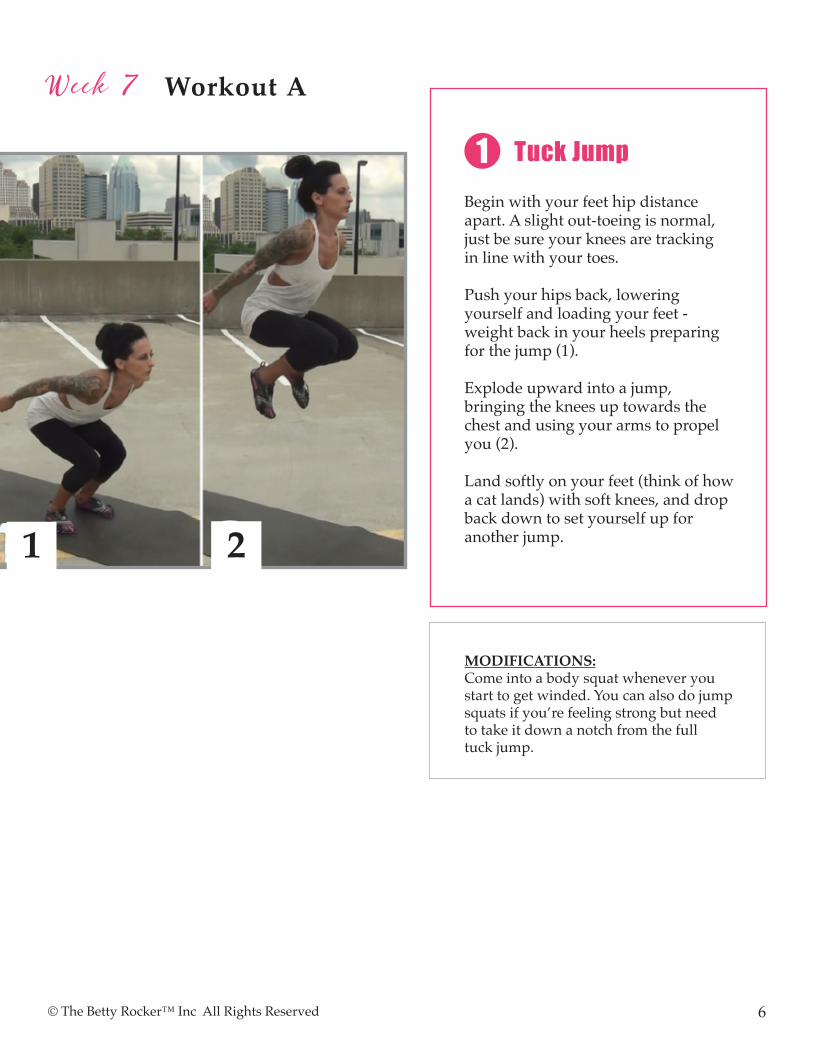
Tuck Jump Begin with your feet hip distanceapart. A slight out-toeing is normal,just be sure your knees are trackingin line with your toes.
Push your hips back, loweringyourself and loading your feet -weight back in your heels preparingfor the jump (1).
Explode upward into a jump,bringing the knees up towards thechest and using your arms to propelyou (2).
Land softly on your feet (think of howa cat lands) with soft knees, and dropback down to set yourself up foranother jump.
Week 7 Workout A
1
MODIFICATIONS:Come into a body squat whenever you start to get winded. You can also do jump squats if you’re feeling strong but need to take it down a notch from the full tuck jump.
1 2

© The Betty Rocker™ Inc All Rights Reserved 7
Week 7 Workout A
Narrow Push Ups Start in the Tall Plank position with the hands directly under your shoulders and elbows pointed backtowards your hips (1).
Keep the legs straight (for the advanced position) and the core tight, not letting the lower back arch.
Slowly lower down, keeping your elbows close to your body (2).
Don’t go all the way to the ground, keep yourself about 2-4 inches above it. Push back up using your chest and triceps.
You’ve already worked on push ups now for weeks, this is just another awesome variation to keep thatprogress going and add in a new challenge!
2
MODIFICATIONS: Drop to your knees, keeping your back straight and using the same good upper body form as described above. Kneeling push ups are still tough, and I will often come into a kneeling push up after a couple rounds of full pushups—so don’t ever feel like you’re not succeeding just because it’s a modification! The GOAL is always to keep moving to the best of your ability! Keep your elbows hugging in close to your body.
If you’re having any trouble with your wrists, you can form soft fists with your hands to align your wrists, or hold light dumbbells.
1
2

© The Betty Rocker™ Inc All Rights Reserved 8
#makefatcryfitness #noexcuses #rockyourbody
Week 7 Workout A Triple LungeStanding with feet hip width apart take a step forward with the left foot (1) Elevate the right/back heel. Find balance between the front foot toe andthe back foot toe and line your knees up with your toes.
Slowly lower your body till both knees are at 90 degree angles, and keep your chest up.
Squeeze your glutes as you press through your left foot, bringing it back behind you into the reverse lunge you already learned (2). Drop into a 90 degree bend (as close as you can).
Press through your front foot as you bring it back in front of you into another forward lunge (3).
Step the foot back to the starting position (4) and come into a forward lunge with your right foot first.Bring the right foot behind you to a reverse lunge, then bring it back in front of you for another forward lunge. Return to start and continue to alternate.
3
MODIFICATIONS: Take smaller steps, or go back to your basic stationary lunge from Week 1. Remember to pace yourself as you lift and lower.
1
3
2
4

© The Betty Rocker™ Inc All Rights Reserved 9
Down Dog with 3 Knee HoldsGet ready for a build on that 3 knee down dog you did in Week 4!
Start in a tall plank position, and press yourself back to a 3-legged downward dog yoga pose, extending your left leg high (1). Your arms stretch out, your fingertips spread wide. Your weight is back in your right foot, and you are light through your hands.
From this position, pull your left knee forward toward your left tricep as you come into a high plank position (2) with your shoulders stacked over your wrists and your arms straight. The difference this week is we’re going to hold it for a 2 second count, really focusing in on the squeeze through your side body.
Press back into your 3-leg downward dog, this time sweeping the leg right in to your midline as you come into plank, or knee to nose—again, pausing at the contraction and holding it for a 2 count (3).
Sweep the leg back up as you press back to 3 legged down dog and as you come back forward to high plank, bring that knee in and under your body, toward your right arm and pause at the contraction point holding a strong solid foundation (4).
Switch legs and perform the 3 knee and hold move with your right leg, and continue to alternate every time you complete all 3 positions until your time is up!
Week 7 Workout A4
MODIFICATIONS: If this gets tough, pause in downward dog. Then come forward to plank and hold.
You can also hold a kneeling plank, which is just like a kneeling push up without the press.
1
2
3
4
© The Betty Rocker™ Inc All Rights Reserved 10
#makefatcryfitness #noexcuses #rockyourbody
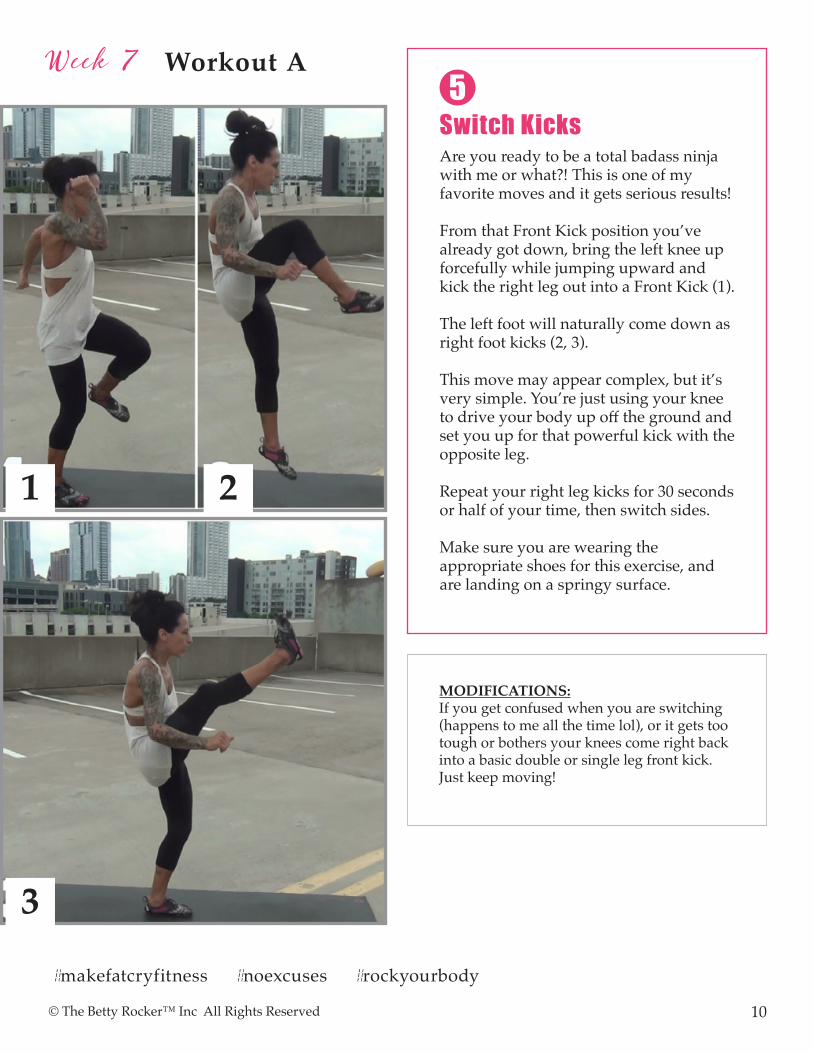
Week 7 Workout A Switch KicksAre you ready to be a total badass ninja with me or what?! This is one of my favorite moves and it gets serious results!
From that Front Kick position you’ve already got down, bring the left knee up forcefully while jumping upward and kick the right leg out into a Front Kick (1).
The left foot will naturally come down as right foot kicks (2, 3).
This move may appear complex, but it’s very simple. You’re just using your knee to drive your body up off the ground and set you up for that powerful kick with the opposite leg.
Repeat your right leg kicks for 30 seconds or half of your time, then switch sides.
Make sure you are wearing the appropriate shoes for this exercise, and are landing on a springy surface.
MODIFICATIONS:If you get confused when you are switching(happens to me all the time lol), or it gets tootough or bothers your knees come right backinto a basic double or single leg front kick. Just keep moving!
5
1
3
2

© The Betty Rocker™ Inc All Rights Reserved 11
V-UpsLay on the ground or on a mat, arms over head and legs extended (1).
Engage your core and bring yourself to an upright V-Sit position finding balance between your upper body and lower body with a straight back (2).
Do your best to keep your legs straight, but it’s super tough! Let the knees bend as needed as you get stronger.
Week 7 Workout A
6
MODIFICATIONS: If your back gets tired or you cannotcontinue in a smooth and controlledfashion, go back to the original V-Sitposition and hold it, or do the SingleLeg V-ups from Week 2!
Make sure to breathe—do not hold your breath. Focus on balance and control.
1
2

© The Betty Rocker™ Inc All Rights Reserved 12
Week 7 Workout A
THERE IS NO ELEVATOR TO SUCCESS. YOU HAVE TO TAKE THE STAIRS.
Rotating Planks Start in a plank position—either tall plank like Coach Erin or forearm plank like me (1).
Get that strong foundation set before you move, making sure your shoulders are stacked over your wrists/elbows and you legs are straight. Back is nice and flat.
Press into your right hand/elbow and rotate yourself to a side plank. You can stack your feet or let one come slightly in front of the other if it’s easier for you to balance (2).
Pause, then bring yourself back to front plank (3). Press through the left hand/elbow and rotate to the left, coming into a side plank again (4). Keep your hips lifted and square and really focus on maintaining a smooth rhythm and breathing as you rotate through these movements.
MODIFICATIONS:Hold a plank in place and focus on your form ifyou need to take a break.
If you’re up in tall plank remember you can comeonto soft fists if your wrists start to get tired, oryou can hold light dumbbells if you have some.
71
2
3
4
© The Betty Rocker™ Inc All Rights Reserved 13
WEEK 7 • WORKOUT B
Workout B
• Beginner: 2-3 rounds | Intermediate: 3 rounds | Advanced: 3-4 rounds
• The moves are all demonstrated for 1:00 in the videos. However, you may modify the time length—working to the best of your ability with
each move, each round:
Beginner: 0:30 each move | Intermediate: 0:45 each move Advanced: 1:00 each move
• Rest as needed between rounds.
• See Demo Pictures and form notes below.
Double Unders
Walking Plank
One Legged Burpees
Race Block Starters
Frog Jumps
Get Ups
Alternating V-Ups
Pike Push Ups

© The Betty Rocker™ Inc All Rights Reserved 14
Week 7 Workout B Double UndersStart this move in a slight squat to load your legs and jump up (1), bringing your knees up slightly—not as much as the tuck jump but high enough that you could swing a jump rope beneath your feet twice (2).
Good foot alignment has you with feet hip distance apart, weight evenly distributed and your chest up.
Imagine you’re holding a jump rope, and keep your shoulders loose and relaxed, focusing the rotation movement in your wrists.
Land softly and mostly on your toes (3). Load your entire foot to jump again. Make sure you’ve got something springy to land on as we want to be supporting our joints for any kind of impact move.
Keep soft knees throughout this movement.
The higher the jump , the better the result! Start slow and low and increase speed and the jump height as you get comfortable with the movement.
Pace yourself. A steady pace with great form and explosive power gets better results than going too fast, sacrificing form and burning out in 20 seconds.
MODIFICATIONS: If you start to get winded, slow down. Add in some regular jump ropes like we did in Week 1, You can alternate between the jump rope and double unders as much as you need, just keep moving.
1
1
3 2

© The Betty Rocker™ Inc All Rights Reserved 15
Week 7 Workout B
Walking PlankBegin in the Tall Plank position: Place your hands below your shoulders and make a straight line from your body up on your toes (1).
Press your lower back up to an invisible glass ceiling. DO NOT let it arch, and keep your gaze out in front of you like I’m doing.
Bring your right elbow down directly below your right shoulder, then your left elbow down to a forearm plank (2).
In one smooth motion, repeat this in reverse (3), walking yourself back up to a tall plank (4).
DO NOT LET YOUR HIPS ROLL from one side to the other. Keep them square to the ground and maintain strong plank alignment.
Lead with your right elbow for 30 seconds, then switch to the left side.
2
MODIFICATIONS: You can modify this move by staying intall plank for the full minute like Week 1,you can come onto soft fists or onto yourknees, or try the one-armed plank fromWeek 4.
1
2
3
4

© The Betty Rocker™ Inc All Rights Reserved 16
Week 7 Workout B 3
MODIFICATIONS: AT ANY TIME, put the foot down and go back to a regular burpee. Each time you do this, challenge yourself to do a few more with one or the other leg lifted.
To give yourself a break when doing burpees, as your shoulders begin to tire simply drop your chest straight to the ground and take out the push-up. Bring them back when you’re ready.
One Legged BurpeesAnd I thought REGULAR burpees were hard…
Begin standing. Squat down like I am and put your hands on the floor (1).
Shoot your feet out behind you, keeping your left foot off the ground, upper body in high plank—wrists below your shoulders, lower back pressing up, not arched, body straight and strong (2).
Keeping that leg lifted, drop down to a push up (3) and press back up. Keep your gaze out in front of you (4).
Jump your feet back to your hands to the original crouch position on one foot (4).
When your weight is back in your heel and your chest is lifted, jump up (5, 6)!
When you land from your jump, come right back down to crouch for speed and efficiency!
Remain on the left leg for 2 reps, then switch to the right leg.
1
2
3
4
5 6

© The Betty Rocker™ Inc All Rights Reserved 17
Week 7 Workout B
Race Block StartersStart in a 3 point position, hands stacked below your shoulders, your left leg between your hands. Your gaze should be in front of you, and your right leg straight behind you (1).
Keep your hips low as you bring your right foot in to touch the back of your right heel. Don’t let them raise up (2, 3).
As you tire, your hips will want to lift. Try to keep them down low.
After 30 seconds with the left leg forward, switch so that the right leg is between your hands, and bring your right foot in and back as quickly as you can (4-6).
Maintain a good quick pace throughout—go as fast as you can maintain for the full minute!
4
MODIFICATIONS:
You can go back to mountain climbers or stand and do the cross-cross squat from Week 1 if you need a break from being in this position.
1
2
3
4
5
6
© The Betty Rocker™ Inc All Rights Reserved 18
Week 7 Workout B
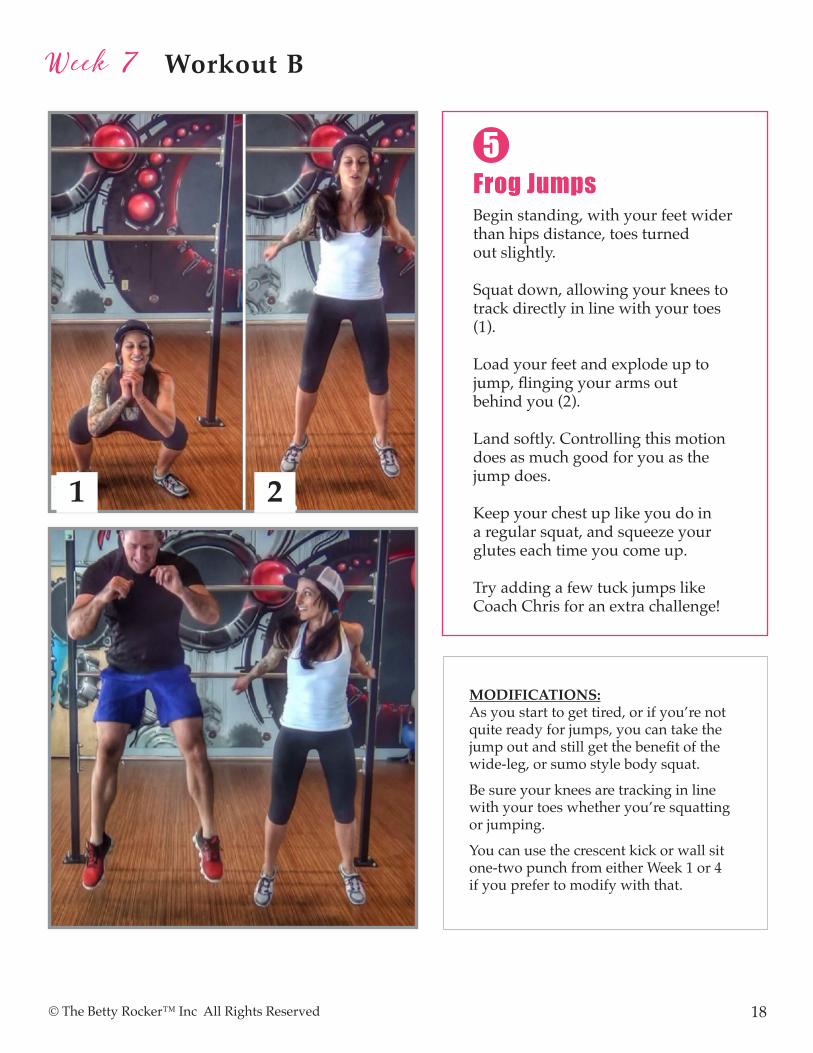
Frog JumpsBegin standing, with your feet wider than hips distance, toes turned out slightly.
Squat down, allowing your knees to track directly in line with your toes (1).
Load your feet and explode up to jump, flinging your arms out behind you (2).
Land softly. Controlling this motion does as much good for you as the jump does.
Keep your chest up like you do in a regular squat, and squeeze your glutes each time you come up.
Try adding a few tuck jumps like Coach Chris for an extra challenge!
5
MODIFICATIONS: As you start to get tired, or if you’re not quite ready for jumps, you can take the jump out and still get the benefit of the wide-leg, or sumo style body squat.
Be sure your knees are tracking in line with your toes whether you’re squatting or jumping.
You can use the crescent kick or wall sitone-two punch from either Week 1 or 4if you prefer to modify with that.
1 2

© The Betty Rocker™ Inc All Rights Reserved 19
Week 7 Workout B Get UpsFor this move, you can hold your water bottle (or a weight) straight up overhead In your right hand. The trick is to keep your eye on it throughout the entire movement (1).
This total body move is amazing for your core and works your whole body.
Begin standing. Lower yourself down to the floor, placing a hand behind you for balance. Keep the right knee bent as you straighten the left leg (2).
Lay all the way down, keeping the right knee bent (3, 4).
Sit back up (don’t forget to keep looking up at that water bottle) and draw your left foot back in to support you as you raise yourself back up to standing (5-8).
Squeeze your glutes on the way up.
When you hit the 30 second mark, switch hands and bend your left knee. Repeat everything above, just varying the leading leg and overhead arm.
MODIFICATIONS: I suggest that you try this move, and takeyour time with little to no weight.It is basically practicing laying down andgetting up while holding an object to keepyou aligned and focused. It works everymuscle in your body and is excellent foryour core, which is why it’s featured morethan once!
6
1
3
5
7
2
4
6
8

© The Betty Rocker™ Inc All Rights Reserved 20
Week 7 Workout B
Alternating V-Ups
Instead of triceps dips, this week you’re going to be adding an additional core move, that challenges your balance and your strength.
Lay on your back, arms and legs extended straight (1).
Sit up, and bring your left food to meet your right hand (2).
Keep your lifting leg as straight as you can. Always keep your chest lifted and your head up—this is not a crunch where you pull on your neck or tuck your chin.
This movement comes from your core. Feel it initiate the contraction as you exhale out to sit up. Inhale as you come down.
Alternate the lifting legs and reaching arm (3, 4).
7
MODIFICATIONS: Keep your knees bent and sit up to bentknee, alternating legs.
Another simple and effectivemodification is bicycle crunches.
1
2
3
4

© The Betty Rocker™ Inc All Rights Reserved 21
#makefatcryfitness #noexcuses #rockyourbody
Week 7 Workout B
WARNING: DAILY EXERCISE AND
HEALTHY EATING LEADS TO INCREASED AWESOMENESS.
Pike Push-UpsBegin in tall plank, hands below your shoulders (1).
Lift your hips, pressing back through your heels into downward facing dog, or pike position and spread your fingertips wide, distributing your weight evenly in your hands (2).
Once you are in your pike, maintain that nice flat back you have created and lower your forehead towards the floor, bending at the elbows only (3).
Your hips should not move, only your elbows as you push up and down (4).
When you feel yourself starting to lose your pike, simply readjust back into it. If you need a short break, come down into plank and then go back into it.
8
MODIFICATIONS: You can modify the pike push-up either by doing spiderman push-ups or by doing regular push-ups (and variation you like – knees, use soft fists, etc). Always keep your back straight and your upper body alignment in this exercise.
1
2
3
4

© The Betty Rocker™ Inc All Rights Reserved 22
WEEK 7 • WORKOUT C
C: Bonus Inner Thighs
Format: Prescribed reps or time below. 3 rounds.
Thigh Jacks
Single Leg Sumo Squat with Toe Up (left, then right)
Plie Squat Press
Sumo Lift to Cross Knee - Alternate Sides
Side Slides

© The Betty Rocker™ Inc All Rights Reserved 23
#makefatcryfitness #noexcuses #rockyourbody
Week 7 Workout C: Bonus Inner Thighs
Cross-In Jacks (1:00)This is a lot like a regular jumping jack, but keep your hands crossing in front of you (2) rather than going up overhead (you can try going overhead but I find I can keep the alternation with my feet better with my arms in front of me).
Stay light on your feet and jump your feet in and across one another, alternating the front foot as shown in the video (1-4).
If you lose your flow, just jump in place for a few beats and come back to it!
1
1
3
2
4

© The Betty Rocker™ Inc All Rights Reserved 24
#makefatcryfitness #noexcuses #rockyourbody
Week 7 Workout C: Bonus Inner Thighs
Single Leg Sumo Squat–toe up (0:30 each side)Come into a sumo squat position, feet wide and knees in line with your toes (1).
Keep your chest up and bend your right knee, keeping your left leg straight. Lift your left toe up to the sky, and begin to squat up and down on your right side (2).
Be mindful of your foot and knee alignment, you want them tracking together, and adjust your position as needed so your knee doesn’t go past your toe.
Do the same amount on each leg (3).
21
2
3

© The Betty Rocker™ Inc All Rights Reserved 25
Week 7 Workout C: Bonus Inner Thighs
Plie Squat Press (0:30)Use a wall for support. Bring your heels together, turning your toes out. Squat down and lift your heels. Adjust your feet so your heels touch, and toes are turned out (1).
Keep your back straight and your chest lifted and begin to bring your knees together and apart (2). Keep your weight back—don’t let your chest start to come toward the ground. Really focus on engaging your inner thighs with each press.
Challenge yourself if you want by taking your hands off the wall!
Sumo Lift to Cross Knee (0:30)I do variations of this move all the time—it’s super fun to kick and throw knees—and it’s amazing for the shape and tone of your legs!
Come into that sumo squat position again, and begin to do a quick paced sumo squat with a knee lift (1). When you bring your knee up, cross it over in front of your body and return to start (2). Repeat on the other leg (3 and 4).
Be sure to land softly on your feet, and use your hands for balance.
3
4
1
1
3
2
4
2

© The Betty Rocker™ Inc All Rights Reserved 26
#makefatcryfitness #noexcuses #rockyourbody
Week 7 Workout C: Bonus Inner Thighs
Side Glides (0:30)It’s time to get out your cardboard squares (or paper plates, or towels)!
Stand up and put them under your feet. Bring your hands up under your chin for balance, and remember to keep your chest lifting as much as you can.
Slide your right foot out to the side and at the same time, bend your left knee (1). Keep your left knee in line with your left toe, and keep your weight back in your heel to protect your knee.
Alternate sides, gliding back and forth (2). Adjust your position and check your form regularly, as this is a dynamic move and it’s easy to get out of balance.
The gliders really add an extra level of resistance that will totally burn that muscle!
51
2