welcome to booklink · web viewwelcome to booklink. the blind foundation library’s lending and...
TRANSCRIPT

Welcome to BookLinkThe Blind Foundation Library’s lending and reading app
Your BookLink loginThe first time you use BookLink, you’ll be prompted to log in. Your login details are:
Username:
Password:
Contact and helpIf you have any questions or need help with BookLink, contact us:
0800 24 33 33
Quick start guidesGet started with the iPad Mini.............................................1
iPad Mini guide............................................................1
Get started with VoiceOver.................................................9
Turn on VoiceOver......................................................9
VoiceOver gestures.....................................................9
VoiceOver practice area............................................11
VoiceOver rotor.........................................................11
Get started with BookLink.................................................13
Introduction to BookLink............................................13
BookLink: Audio Books.............................................15
BookLink: Audio Magazines......................................16
BookLink: Newspapers..............................................18
Additional BookLink features.....................................20

Get started with the iPad Mini
iPad Mini guideNote: Content adapted from Apple’s “iPad User Guide”, http://help.apple.com/ipad/11/
The Home buttonAt the bottom-centre of the device’s front, there is a physical button. This feels circular with a slight depression. This is the Home button.
Image source: Apple, “iPad User Guide”, http://help.apple.com/ipad/11/#/iPad997d9e62
The Home button takes you to the Home screen and provides other convenient shortcuts.
Go to the Home screen. Press the Home button. Accessibility Shortcut: VoiceOver. You can also
use the Home button to turn accessibility features on or off. With our Blind Foundation Library iPad Minis, we set the Accessibility shortcut to VoiceOver before we send them out. With this shortcut set, triple-
1

pressing the Home button will turn VoiceOver on or off. To change the shortcut, go to Settings > General > Accessibility, tap Accessibility Shortcut, then choose a shortcut.
Use Siri. Hold down the Home button until you hear two short tones. Then say what you need (for example “Open BookLink” or “Turn on/off VoiceOver”. Note: to enable Siri, go to Settings > General > Siri & Search and make sure that Siri is turned on. You need an Internet connection to use Siri.
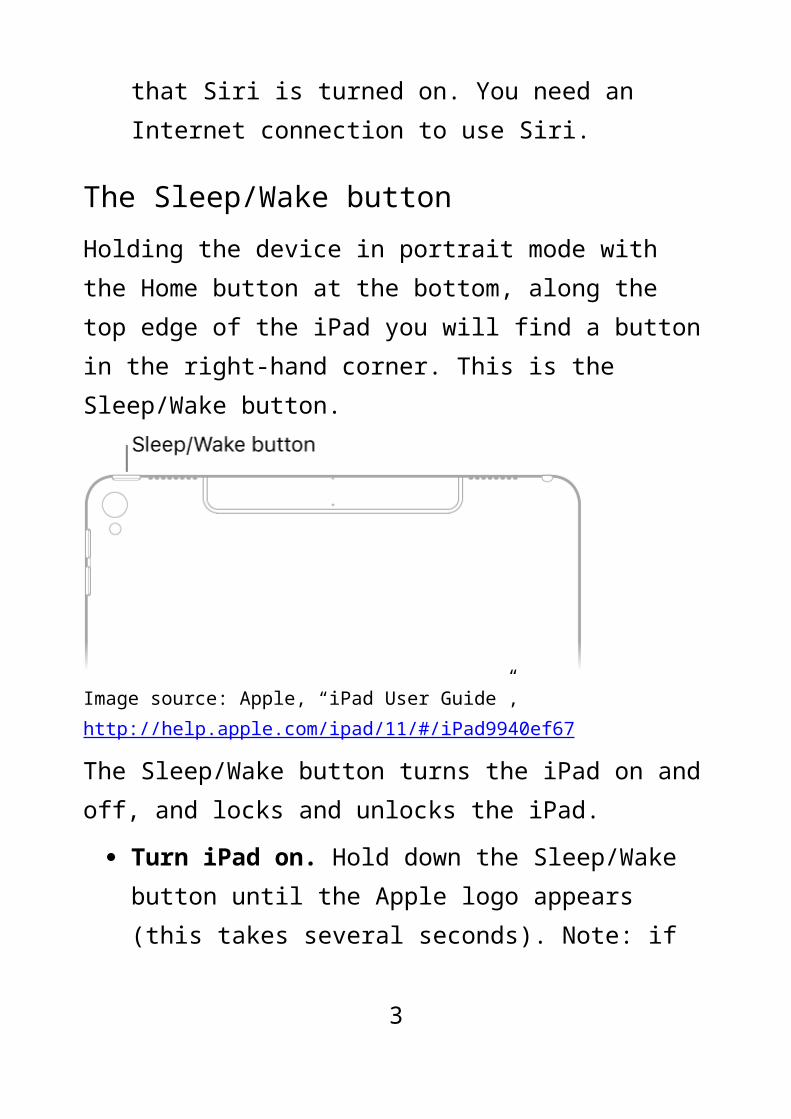
The Sleep/Wake buttonHolding the device in portrait mode with the Home button at the bottom, along the top edge of the iPad you will find a button in the right-hand corner. This is the Sleep/Wake button.
Image source: Apple, “iPad User Guide”, http://help.apple.com/ipad/11/#/iPad9940ef67
The Sleep/Wake button turns the iPad on and off, and locks and unlocks the iPad.
2
Turn iPad on. Hold down the Sleep/Wake button until the Apple logo appears (this takes several seconds). Note: if using VoiceOver, VoiceOver will not announce that the iPad is turning on.
Unlock iPad. Press the Home button or the Sleep/Wake button to reach the Lock screen. Press the Home button to unlock.
Lock iPad. Press the Sleep/Wake button. You should hear a click sound as the screen is locked.
Turn iPad off. Hold down the Sleep/Wake button for a few seconds until the slider appears onscreen, then drag the slider. Note: If using VoiceOver, rather than dragging the onscreen slider, you will need to select the Power Off button, to turn off the iPad. Once you’ve selected this button, VoiceOver will announce “iPad shutting down”.
Volume controlsHolding the device in portrait mode with the Home button at the bottom, you will find two long buttons in the upper right-hand edge of the iPad. These are the volume up (upper button) and volume down (lower button) buttons.
3
Image source: Apple, “iPad User Guide”, http://help.apple.com/ipad/11/#/iPad9940e758
Adjust volume. Use the Volume buttons on the side of iPad to adjust the audio volume.
Mute the sound. Press and hold the Volume Down button.
Open an app from the Home screenThe Home screen displays all the applications (apps) on your iPad/iPhone/iPod. If you have more apps than fit on the one screen, you will have multiple screens of apps.
4

Image source: Apple, “iPad User Guide”, http://help.apple.com/ipad/11/#/iPad997d9e62
When using your device, press the Home button any time to return to the Home screen. Swipe left or right to see other screens. Note: if using VoiceOver, the swipe left/right to move between screens becomes a three-finger swipe left/right.
Open an app. Tap an app to open it. Note: if using VoiceOver, navigate to the app first (for example by performing flick left/right to move through the apps), then double-tap to open the app.
5

Switch between apps using the App SwitcherYou can easily switch between the apps you’re using.
Image source: Apple, “iPad User Guide”, http://help.apple.com/ipad/11/#/iPad619935ea
View open apps. Double-click the Home button to reveal your open apps. Swipe sideways to see more. To switch to another app, tap it. Note: if using VoiceOver, the tap to open becomes a double-tap.
Close an app. If an app isn’t working properly, you can force it to quit. Swipe the app up from the app switcher display, then try opening the app again. Note: if using VoiceOver, the swipe up to close becomes a three-finger swipe up.
6

Charge the iPadHolding the device in portrait mode with the Home button at the bottom, if you trail your finger down to the bottom edge from the Home button, you will find a small slit – the Lightening Connector. This is where you plug in your charger to recharge the iPad.
To charge your iPad, connect the Lightening to USB Cable (this is included in the iPad box) to a USB port, or, connect it to a power socket using the 12W USB Power Adapter (this is included in the iPad box).
Note: The current level of battery is shown as a percentage in the upper right-hand corner of the screen.
Image source: Apple, “iPad User Guide”, http://help.apple.com/ipad/11/#/iPadaa25ff26
7

Connect to Wi-Fi
Image source: Apple, “Connect to Wi-Fi on your iPhone, iPad, or iPod touch”, https://support.apple.com/en-us/HT202639
8

Connect to an unsecure Wi-Fi network:1. From your Home screen, go to Settings > Wi-Fi.2. Turn on Wi-Fi. Your device will automatically search
for available Wi-Fi networks.3. Tap the name of the Wi-Fi network that you want to
join.
After you join the network, you'll see a check mark next to the network and the Wi-Fi icon in the upper-left corner of your display.
Connect to a secure Wi-Fi network:Secure Wi-Fi networks are password-protected and have a padlock icon by their names.
1. Go to Settings>Wi-Fi, and make sure Wi-Fi is turned on.
2. Tap the name of the secure Wi-Fi network you want to join.
3. Enter the password for the secure Wi-Fi network, then tap Join. If you can't tap Join, the password you've entered is incorrect.
After you join the network, you'll see a check mark next to the network and the Wi-Fi icon in the upper-left side of your display. If you don't know the password to the Wi-Fi network, contact your network provider.
9

Get started with VoiceOverVoiceOver is the built-in screen reader on all new Apple devices. It uses a gesture-based system to provide navigation and access to iPads, iPhones and iPods. VoiceOver has many gestures and commands.
Turn on VoiceOverIf you have a Blind Foundation Library iPad Mini, pressing the Home button three times quickly will turn VoiceOver on or off. This is because the Accessibility Shortcut has been set to VoiceOver. This is found at the bottom of the list in: Settings > General > Accessibility > Accessibility Shortcut. Additional VoiceOver settings can be found at the top of the list in: Settings > General > Accessibility > VoiceOver.
VoiceOver gestures
Basic Flick left: this gesture moves VoiceOver’s focus to the
previous item Flick right: this gesture moves VoiceOver’s focus to
the next item Touch: this gesture selects the item under your finger Double tap: this gesture activates the selected item
10

Two-finger double tap (when in an editable text field, such as the BookLink Basic Search): this gesture turns dictation on/off
Beyond the basic Two-finger flick up: this gesture reads the screen
starting at the top Two-finger flick down: this gesture reads the screen
starting at selected item Two-finger double tap: this gesture start/stops the
current action Three-finger flick right: this gesture scrolls left by one
page (for example scrolling through the pages of apps on the device Home screen)
Three-finger flick left: this gesture scrolls right by one page (for example scrolling through the pages of apps on the device Home screen)
Three-finger double tap: this gesture toggles VoiceOver speech on/off
Three-finger triple tap: this gesture toggles the screen curtain on/off
Four-finger tap near top of screen: this gesture moves VoiceOver’s focus to the first element on the screen
Four-finger tap near bottom of screen: this gesture moves VoiceOver’s focus to the last element on the screen
11
VoiceOver practice areaA VoiceOver practice area is available when VoiceOver is turned on. Once in the practice area, for any gesture you perform, VoiceOver will announce the result of that gesture. For example, when you perform a double tap, VoiceOver will say: “Double tap: Activates the selected item”.
With VoiceOver turned on, perform a four-finger double tap. VoiceOver will announce “starting help”. Once you’ve finished practicing, perform the four-finger double tap again to exit. VoiceOver will announce “Four-finger double tap: Start VoiceOver help. Stopping help”.
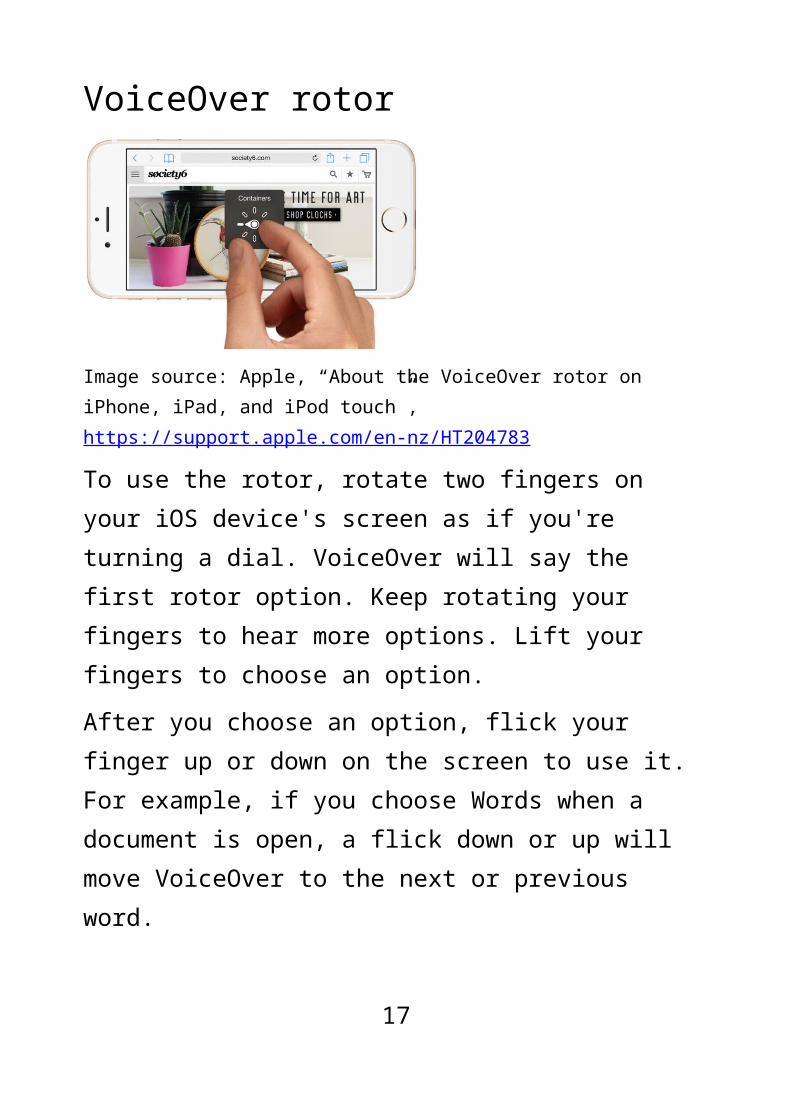
VoiceOver rotor
Image source: Apple, “About the VoiceOver rotor on iPhone, iPad, and iPod touch”, https://support.apple.com/en-nz/HT204783
12
To use the rotor, rotate two fingers on your iOS device's screen as if you're turning a dial. VoiceOver will say the first rotor option. Keep rotating your fingers to hear more options. Lift your fingers to choose an option.
After you choose an option, flick your finger up or down on the screen to use it. For example, if you choose Words when a document is open, a flick down or up will move VoiceOver to the next or previous word.
For a full list of what you can do with the rotor, visit: Apple, “About the VoiceOver rotor on iPhone, iPad, and iPod touch”, https://support.apple.com/en-nz/HT204783. Some examples are:
Navigate with headings: o Headings: Moves from one heading to the next.
Review text as you type with Characters, Words, and Lines:o Characters: Reads one character at a time.o Words: Reads one word at a time.o Lines: Reads one line at a time.
Adjust how VoiceOver speaks:o Speech Rate: Changes how fast VoiceOver
speaks. Flick up or down with one finger to speak faster or slower. Changes by five percent with each flick.
o Volume: Changes how loudly VoiceOver speaks. This is separate from the system volume. Flick up
13

or down with one finger to speak louder or quieter. Changes by five percent with each flick.
Get started with BookLink
Introduction to BookLink
Open BookLink1. From the iPad Home screen, navigate to the BookLink
icon. 2. Select the BookLink icon to open BookLink.3. If it’s your first time using BookLink, log in using the
BookLink username and password provided by the Blind Foundation Library. We recommend selecting “Remember me” so that you don’t have to log in every time you open BookLink.
Note: If you lose your BookLink username or password, please contact us on 0800 24 33 33 for assistance. If you have access to the e-mail address associated with your BookLink account, you can also use the “Forgot your password?” link underneath the Log In button in the app. This will take you to a screen where you can enter your e-mail address and have a new, randomly generated password sent to your e-mail account.
14
BookLink Home screenThe BookLink Home screen lists the available collections on BookLink. These are (as of BookLink Version 2.4):
Audio Books Youth Library (currently a subset of the Audio Books
collection) Audio Magazines Newspapers
There is also a More button (three dots icon) on the lower right of the Home screen, which takes you to the More section of BookLink. The More section includes the following four screens:
About
FAQ
Profile
Settings
You can navigate between these screens within the More section using the tabs along the bottom of the screen (present on all screens).
Wherever you are in BookLink, you can always navigate back to the Home screen using the Home button at the top left of the screen (house icon).
15

Collections on BookLinkWhen you select a collection from the Home screen (for example, Audio Books), you will be taken to that section of the app (in this case, the Audio Books section). Within each section, there are four screens: Search (in the case of Audio Books) or List (in the case of Newspapers and Audio Magazines); Downloads; Now Reading; My Library (Note: My Library is a Reading/Wish List). You can navigate between the screens within a section using the tabs along the bottom of the screen (present on all screens).
BookLink: Audio Books
Find an Audio Book1. From the Home screen, select Audio Books. If you are
not in the Search screen, select the Search tab at the bottom of the screen (magnifying glass icon).
2. Enter a search term into Basic Search and select the Search button. Alternatively, choose a book from the Recommended for You list below the search field (text box).
Note: We recommend books for you based on your user profile (you can update this in the More section of BookLink). See “Additional BookLink features:
16
Recommended for You” in this document for more information.
Download an Audio Book1. From the list of search results, or, alternatively from
the list of Recommended for You books, select a book title to reveal more information, and the Add to My Library, Download buttons.
2. Select the Download button to prepare the book for download. You will be taken to another screen while the book is downloaded to your device, and then returned to the Search screen.
Read an Audio Book1. Select the Downloads tab at the bottom of the screen
(downward-pointing arrow icon) to go to the Downloads screen.
2. Select a book title to reveal the Read Now and Return Book buttons.
3. Select the Read Now button to send the book to the Now Reading screen. You will be taken to the Now Reading screen automatically.
4. Select the Play/Pause button. If you navigate away from the Now Reading screen, you can return to it by selecting the Now Reading tab at the bottom of the screen (headphones icon).
17

BookLink: Audio Magazines
Find an Audio Magazine1. From the BookLink Home screen, select Audio
Magazines. If you are not in the Magazine List screen, select the Magazine List tab at the bottom left of the screen (boxed list icon).
2. Select a magazine category to reveal the list of magazines in that category.
3. Select a magazine title to reveal the information about the magazine, the Add to My Library button and the dates of the three latest issues.
Download an Audio Magazine 1. Select a magazine issue date to reveal the Download
button.2. Select the Download button to prepare the magazine
for download. You will be taken to another screen while the issue is downloaded to your device, and then returned to the Magazine List.
Read an Audio Magazine1. Select the Downloads tab at the bottom of the screen
(downward-pointing arrow icon) to go to the Downloads screen.
2. Select the magazine to reveal the information about the magazine and the magazine edition date.
18

3. Select the edition date to reveal the Read Now and Return buttons.
4. Select the Read Now button to send the magazine to Now Reading. You will be taken to the Now Reading screen automatically.
5. Select the Play/Pause button. If you navigate away from the Now Reading screen, you can return to it by selecting the Now Reading tab at the bottom of the screen (headphones icon).
BookLink: NewspapersThe Newspapers in BookLink are text format (not audio) and require the built-in screen reader VoiceOver to provide audio narration. You can use the accessibility shortcut (tap the Home button three times quickly) to turn VoiceOver on and off.
Find a Newspaper1. From the BookLink Home screen, select Newspapers.
If you are not in the Newspaper List screen, select the Newspaper List tab (boxed list icon) at the bottom of the screen.
2. Select a region to reveal a list of available newspapers in that region.
19

Download a Newspaper1. Select a newspaper to reveal the Add to My Library
and Download buttons.2. Select the Download button to move the latest edition
to Downloads.
Read a Newspaper1. Select the Downloads tab at the bottom of the screen
(downward-pointing arrow icon) to go to the Downloads screen.
2. Select the newspaper to reveal the Read Now and Remove buttons.
3. Select the Read Now button to send the newspaper to the Now Reading screen. You will be taken to the Now Reading screen automatically.
4. From the list of sections, select one to reveal the headlines in it.
5. From the list of headlines, select one to reveal an article. Select the article text to hear it narrated by VoiceOver.
20

Additional BookLink features
My LibraryMy Library is a feature in BookLink that you can use to save titles you might want to read, but don’t want to download straight away.
My Library [book icon] appears in the tab bar along the bottom of the screen in each of the sections of BookLink: Audio Books, Youth Library, Audio Magazines and Newspapers. You have a different Library for each section.
My Library behaviourWhen you save a serial title to My Library (a magazine or newspaper), it saves the serial title rather than a specific issue. As new issues become available, you can download them straight from My Library, rather than having to find the title every time from the Magazine/Newspaper List. When you download an edition of a serial title from My Library, the serial title will stay in My Library.
The same is not true for audio books (nor the Youth Library). When you download an audio book from My Library, it is automatically removed from My Library.
21

How to save a title to My LibraryFor an Audio Book:
1. Follow the steps in the Get Started with BookLink section to find an Audio Book.
2. From the list of search results, or, alternatively from the list of Recommended for You books, select a book title to reveal more information, and the Add to My Library, Download buttons.
3. Select the Add to My Library button to save the book to My Library.
For an Audio Magazine:
1. Follow the steps in the Get Started with BookLink section to find an Audio Magazine.
2. Select a magazine title to reveal the information about the magazine, the Add to My Library button and the dates of the three latest editions. Select the Add to My Library button to save the magazine title to My Library.
For a Newspaper:1. Follow the steps in the Get Started with BookLink
section to find a Newspaper.2. Select a newspaper title to reveal the Add to My
Library and Download buttons. Select the Add to My Library button to save the newspaper title to My Library.
22

Audio Books Search screen: search modesThe Audio Books Search screen has two modes: Basic and Advanced. The Recommended for You list will appear below the search field/s, in both search modes.
How to switch to advanced search mode1. From the BookLink Home screen, select Audio Books.
If you are not on the Search screen, select the Search tab at the bottom of the screen (magnifying glass icon).
2. To change the search mode to Advanced Search, select the Basic Search button. This acts as a toggle button between basic and advanced search modes.
How to perform an advanced search1. Set as many or few search criteria as you like. The
available search criteria available are described briefly in the next paragraph.
2. Select the Start Search button to begin the search.
Advanced search criteria: Keyword. Searches anywhere in the record for each
title, so you can combine names, titles, subjects, or places of publication.
Title. Only searches for book titles, or words from a book title.
Author. Searches on names in the catalogue, including book authors and narrators.
23
Subject. Searches on subject headings allocated to each book, so you can look for books by topic, for example “Dogs” or “History”.
Book No. Enter the unique Book Number assigned to the title, as listed in Bookmarks, Sound and Touch, or the Library catalogue.
Category and Interest. Use this to search by book genre. Select a Category, followed by an Interest within that category if desired.
Language. Use this to search for books in a specific language. Select from the available language options.
Once you’ve performed a search, up to 50 book results are displayed onscreen. If your search returned more than 50 results, you can select the Get Next 50 Books button to display more results onscreen.
Selecting the Refine Search button will return you to the search screen with your previous entries intact. Selecting the New Search button will take you back to the search screen with your previous entries deleted.
Now Reading screen: audio player modesEach of the three audio sections in BookLink (Books, Newspapers, and Magazines) has its own player in the Now Reading screen. These can be set to different modes, and will retain their settings between sessions.
24

The player on the Now Reading screen has three modes: simple, standard and advanced. Each mode offers a different level of functionality.
Regardless of which player mode you’re using, the audio title and the current section (chapter or article) title is displayed above the player.
How to change player modeSelect the Simple/Standard/Advanced button below the progress indicator bar to toggle between player modes.
Simple player mode controls Play/Pause. Use this control to play and pause the
audio. A circular progress bar around the play/pause icon indicates how far you are through the current chapter or article.
Progress Indicator. A thin black bar with a percentage reading tells you how you are through the whole audio file (all chapters or articles).
Standard player mode controls Skip Backward. Use this control to skip backward in
the audio file. The default setting is by section (previous chapter or article).
Skip Forward. Use this control to skip forward in the audio file. The default setting is by section (next chapter or article).
25
Sleep Timer. Use this control to set a timer on your player. When the specified time is up, the player will automatically pause the audio.
26

Advanced player mode controls Voice Speed. Use this control to change the speech
rate of the narrated audio. Skip Interval. Use this control to adjust the interval of
the Skip Backward and Skip Forward buttons. You can choose between chapters or time intervals between 5 seconds and 5 minutes.
Place Bookmark. Use this control to create a bookmark at your current location in the audio file. This will take you to another screen where you can name and save your new bookmark.
Chapters and Bookmarks. Use this control to bring up a list of sections in the audio file. Any saved bookmarks appear at the top of this list. Select a listed item to jump to that location.
Recommended for YouWe recommend books for you based on your BookLink user profile. A “Recommended for You” list of books will appear in the Audio Books Search screen, below the search field.
For each recommended book, you can choose to download it, add it to My Library, or, remove it from the Recommended for You list. Once you’ve selected one of these three options, the list will refresh and provide a new book recommendation.
27
Update your user profile1. To update your profile, go to the BookLink Home
screen and select the More button (three dots icon) at the bottom right of the screen.
2. Select the Profile button in the bottom toolbar, and set your profile options. The options include Reading Level, Subject, Language and Narrator.
3. The Subject categories will expand to show the available subject Interests underneath them. Reading Level includes options to exclude mature content, if set to Adult.
4. The Narrator category can be set to exclude books created with synthetic voice, or male or female narrators according to your preference.
5. You can also check all of your current profile settings in a single-page summary, by selecting the Profile Summary button underneath the Preferences categories.
6. Once you have made changes, two more buttons will appear at the bottom of the Profile screen, after Profile Summary. You can either Submit to save your changes, or select Undo Changes to clear them. Your changes will not be saved unless you select Submit.
Note: You can also update your user profile by calling us on 0800 24 33 33, or email to [email protected].
28
29