welcome to griz time online!
TRANSCRIPT
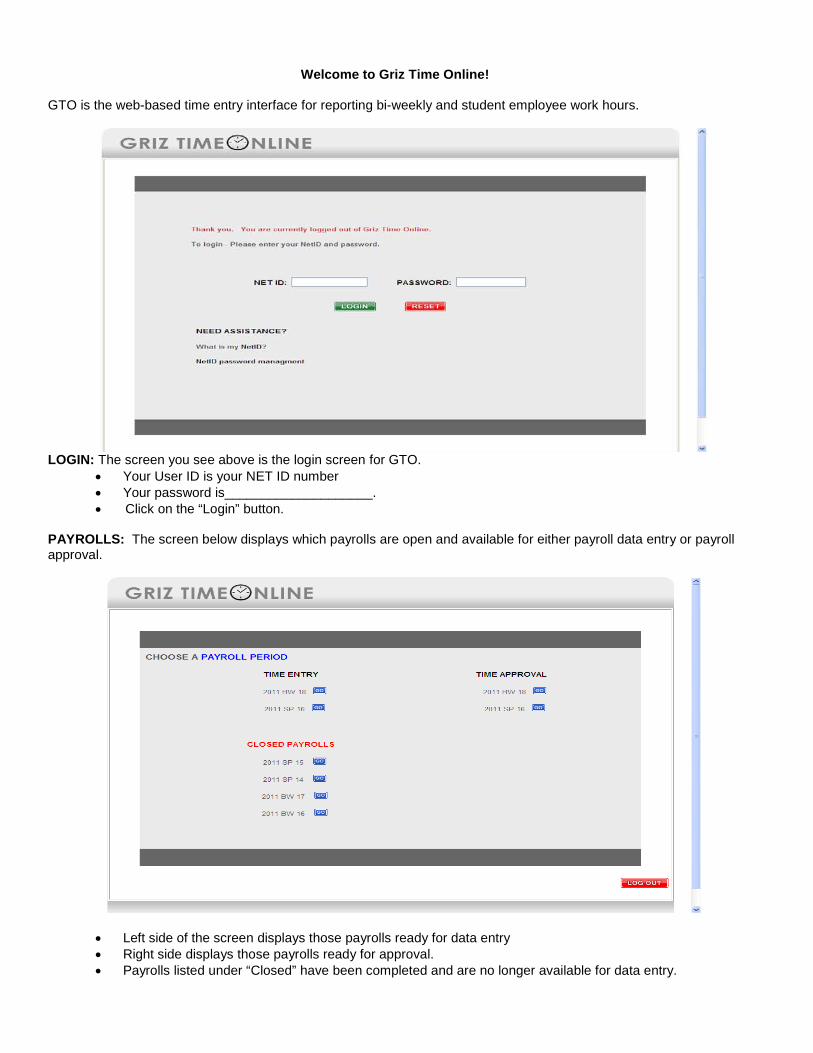
Welcome to Griz Time Online! GTO is the web-based time entry interface for reporting bi-weekly and student employee work hours.
LOGIN: The screen you see above is the login screen for GTO.
• Your User ID is your NET ID number • Your password is____________________. • Click on the “Login” button.
PAYROLLS: The screen below displays which payrolls are open and available for either payroll data entry or payroll approval.
• Left side of the screen displays those payrolls ready for data entry • Right side displays those payrolls ready for approval. • Payrolls listed under “Closed” have been completed and are no longer available for data entry.
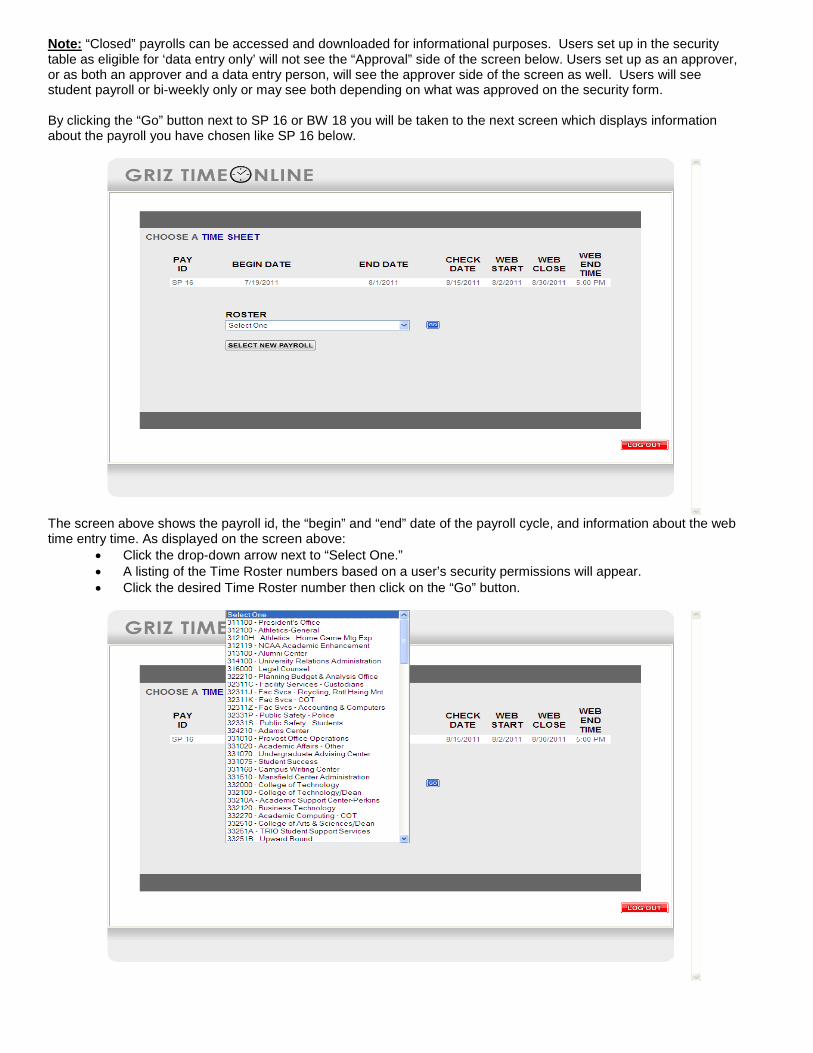
Note: “Closed” payrolls can be accessed and downloaded for informational purposes. Users set up in the security table as eligible for ‘data entry only’ will not see the “Approval” side of the screen below. Users set up as an approver, or as both an approver and a data entry person, will see the approver side of the screen as well. Users will see student payroll or bi-weekly only or may see both depending on what was approved on the security form. By clicking the “Go” button next to SP 16 or BW 18 you will be taken to the next screen which displays information about the payroll you have chosen like SP 16 below.
The screen above shows the payroll id, the “begin” and “end” date of the payroll cycle, and information about the web time entry time. As displayed on the screen above:
• Click the drop-down arrow next to “Select One.” • A listing of the Time Roster numbers based on a user’s security permissions will appear. • Click the desired Time Roster number then click on the “Go” button.
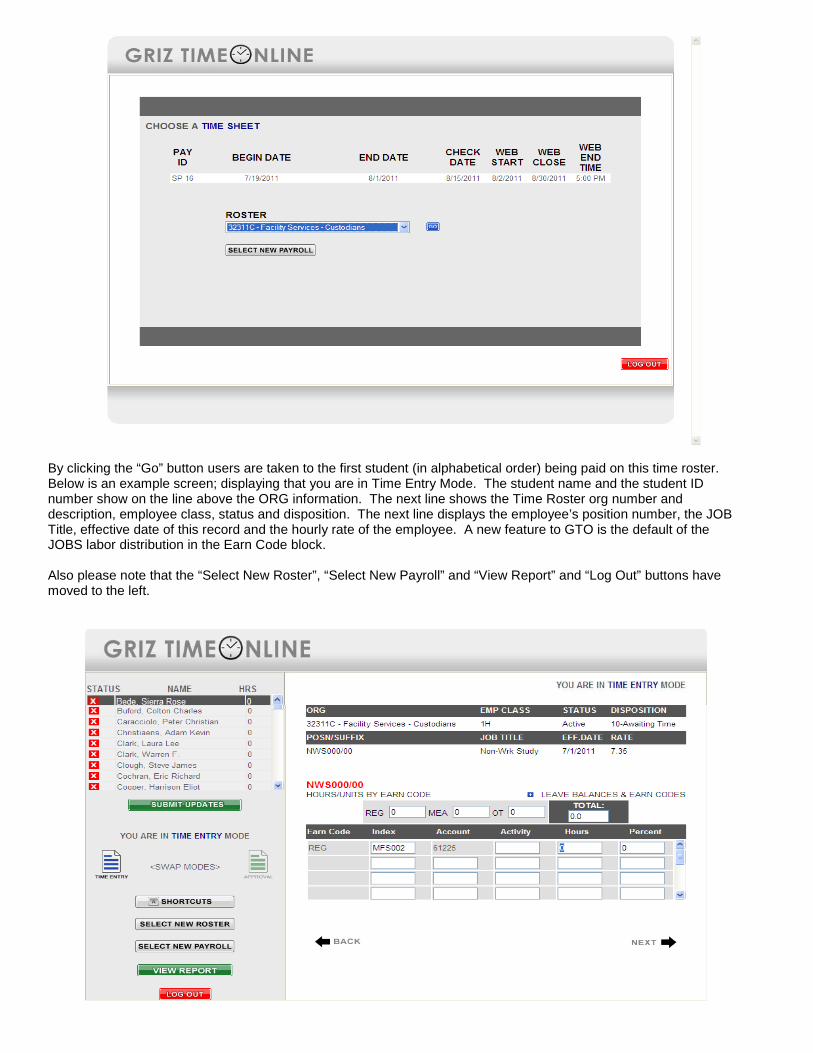
By clicking the “Go” button users are taken to the first student (in alphabetical order) being paid on this time roster. Below is an example screen; displaying that you are in Time Entry Mode. The student name and the student ID number show on the line above the ORG information. The next line shows the Time Roster org number and description, employee class, status and disposition. The next line displays the employee’s position number, the JOB Title, effective date of this record and the hourly rate of the employee. A new feature to GTO is the default of the JOBS labor distribution in the Earn Code block. Also please note that the “Select New Roster”, “Select New Payroll” and “View Report” and “Log Out” buttons have moved to the left.
• “Select New Roster” – This button will take you back to the “Choose a Time Sheet” screen to select a
new time roster. This is based on the security form and what time rosters you have access to for data entry or approval.
• “Select New Payroll” – This button will take you back to the “Choose a Payroll Period” screen to choose
another payroll to work on. Please Note: This feature will only be valid if you have security to enter or approve both bi-weekly and student payrolls. There will be only one SP payroll and one BW payroll open at a time.
• “View Report” – This button will show you a report listing the employees on your time roster. This report
has 3 buttons at the bottom of the report. The three choices are: view only those employees with hours, to export the file to Excel or to Close the report.
• “Log Out” – This button with log you out of the web data entry product from this screen.
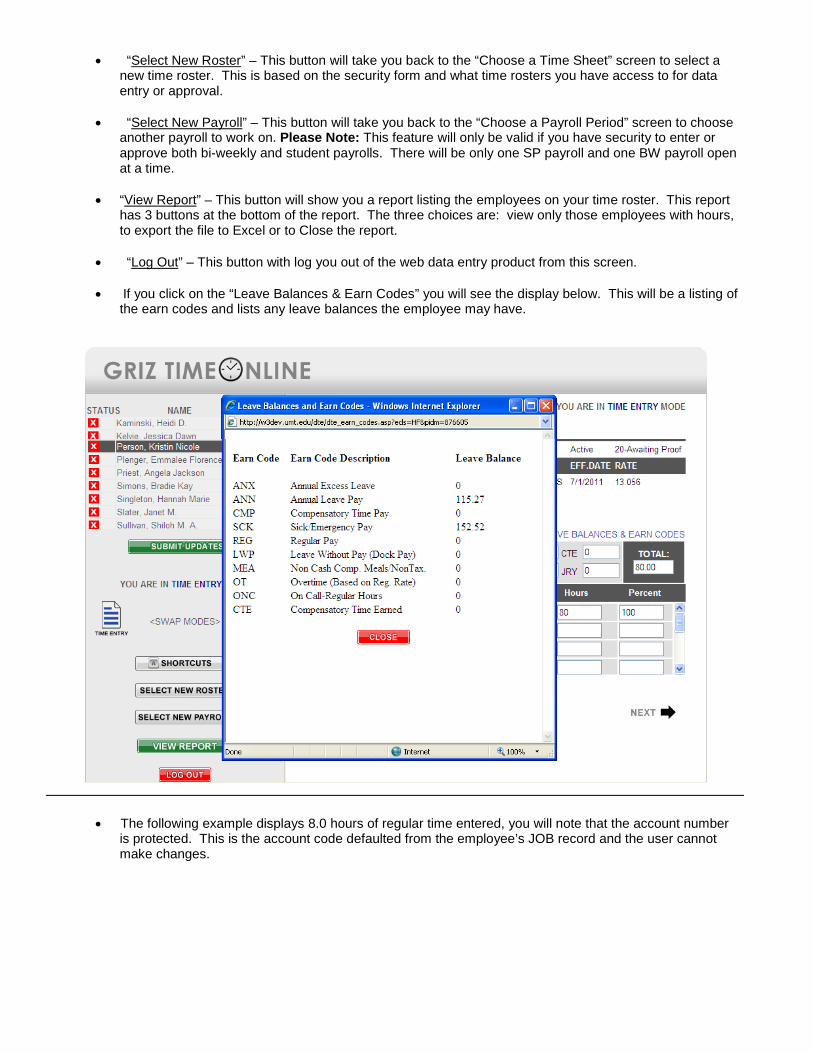
• If you click on the “Leave Balances & Earn Codes” you will see the display below. This will be a listing of
the earn codes and lists any leave balances the employee may have.
• The following example displays 8.0 hours of regular time entered, you will note that the account number is protected. This is the account code defaulted from the employee’s JOB record and the user cannot make changes.
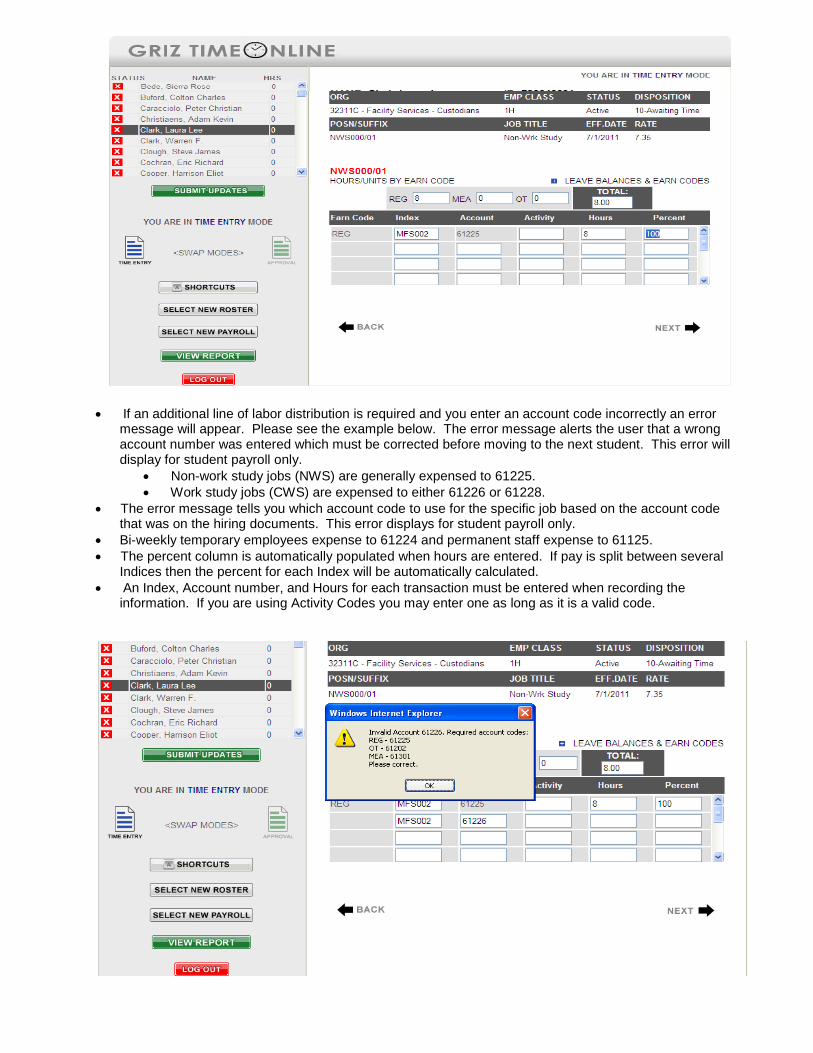
• If an additional line of labor distribution is required and you enter an account code incorrectly an error message will appear. Please see the example below. The error message alerts the user that a wrong account number was entered which must be corrected before moving to the next student. This error will display for student payroll only.
• Non-work study jobs (NWS) are generally expensed to 61225. • Work study jobs (CWS) are expensed to either 61226 or 61228. • The error message tells you which account code to use for the specific job based on the account code
that was on the hiring documents. This error displays for student payroll only. • Bi-weekly temporary employees expense to 61224 and permanent staff expense to 61125. • The percent column is automatically populated when hours are entered. If pay is split between several
Indices then the percent for each Index will be automatically calculated. • An Index, Account number, and Hours for each transaction must be entered when recording the
information. If you are using Activity Codes you may enter one as long as it is a valid code.
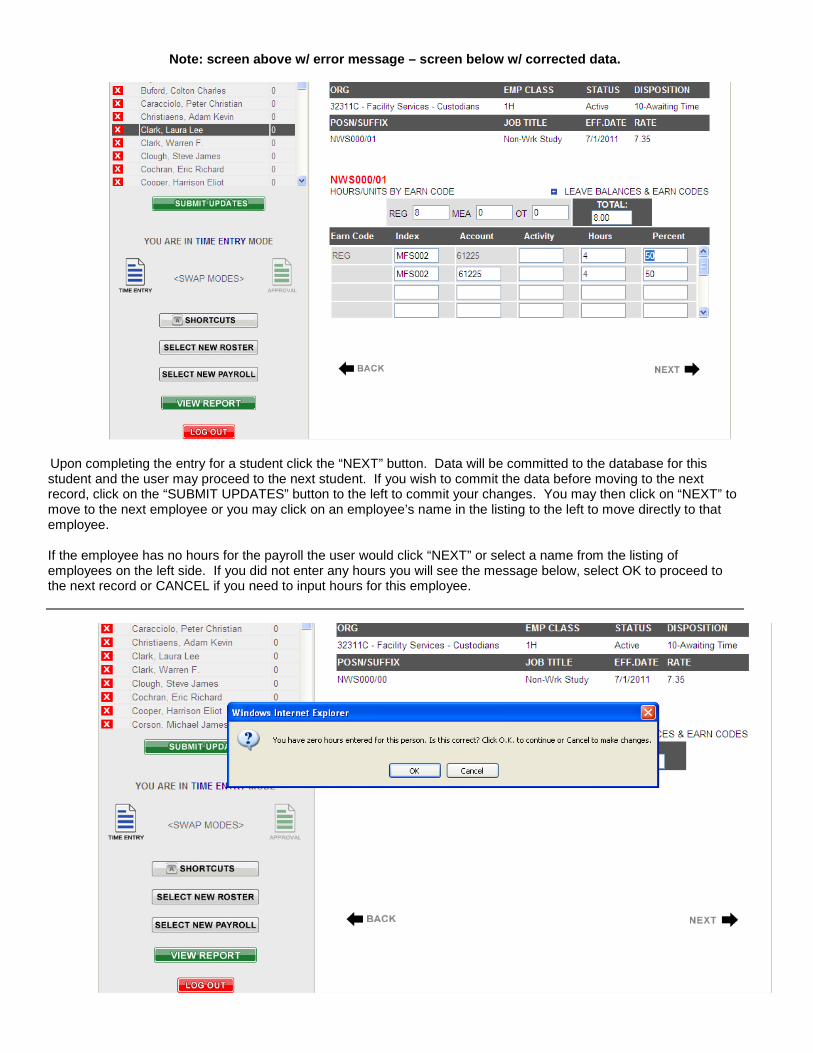
Note: screen above w/ error message – screen below w/ corrected data.
Upon completing the entry for a student click the “NEXT” button. Data will be committed to the database for this student and the user may proceed to the next student. If you wish to commit the data before moving to the next record, click on the “SUBMIT UPDATES” button to the left to commit your changes. You may then click on “NEXT” to move to the next employee or you may click on an employee’s name in the listing to the left to move directly to that employee. If the employee has no hours for the payroll the user would click “NEXT” or select a name from the listing of employees on the left side. If you did not enter any hours you will see the message below, select OK to proceed to the next record or CANCEL if you need to input hours for this employee.
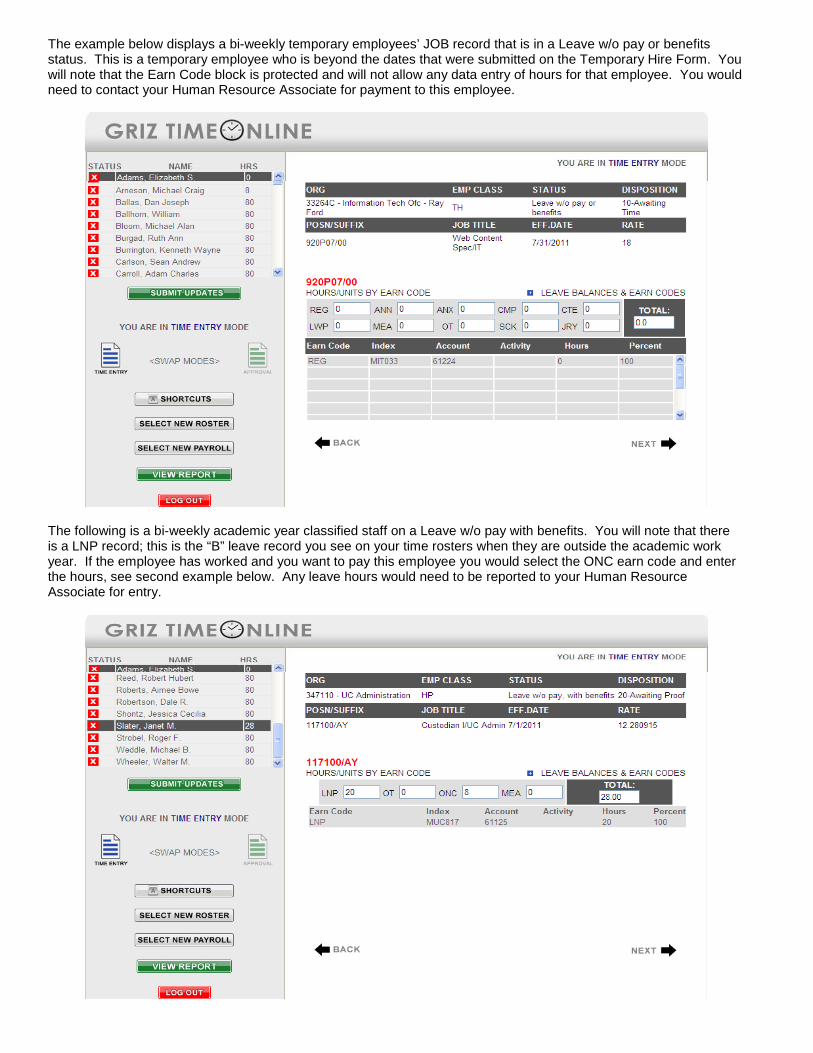
The example below displays a bi-weekly temporary employees’ JOB record that is in a Leave w/o pay or benefits status. This is a temporary employee who is beyond the dates that were submitted on the Temporary Hire Form. You will note that the Earn Code block is protected and will not allow any data entry of hours for that employee. You would need to contact your Human Resource Associate for payment to this employee.
The following is a bi-weekly academic year classified staff on a Leave w/o pay with benefits. You will note that there is a LNP record; this is the “B” leave record you see on your time rosters when they are outside the academic work year. If the employee has worked and you want to pay this employee you would select the ONC earn code and enter the hours, see second example below. Any leave hours would need to be reported to your Human Resource Associate for entry.
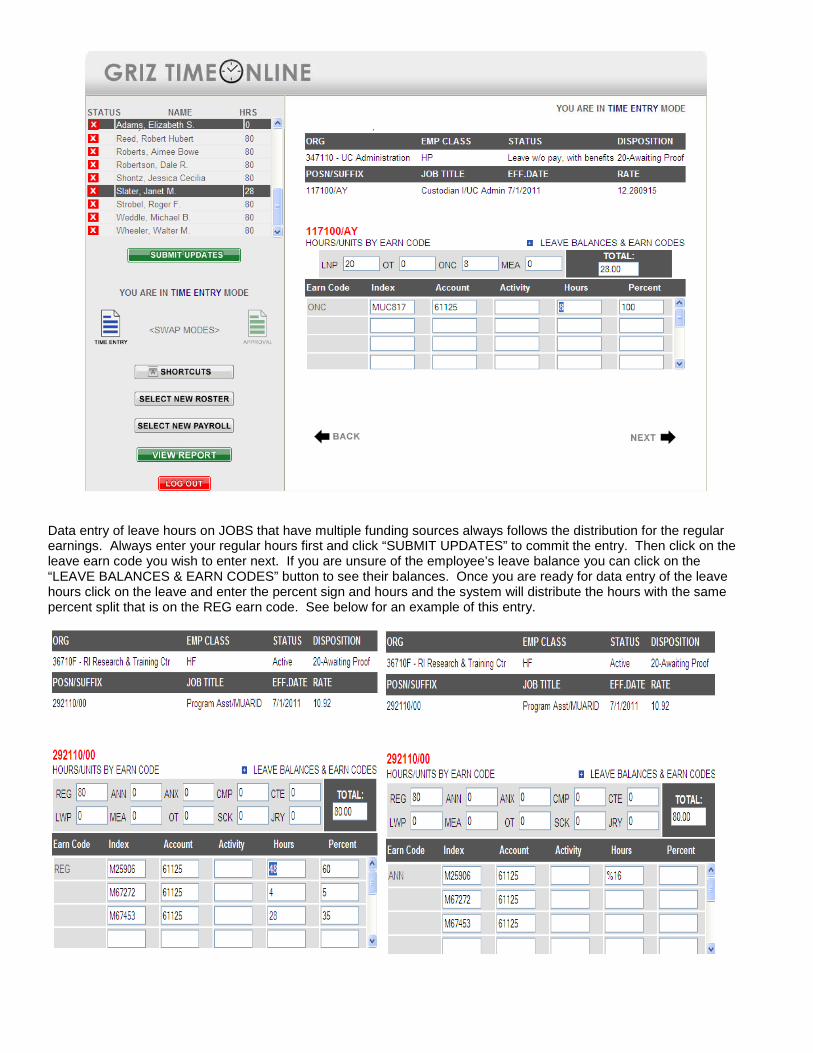
Data entry of leave hours on JOBS that have multiple funding sources always follows the distribution for the regular earnings. Always enter your regular hours first and click “SUBMIT UPDATES” to commit the entry. Then click on the leave earn code you wish to enter next. If you are unsure of the employee’s leave balance you can click on the “LEAVE BALANCES & EARN CODES” button to see their balances. Once you are ready for data entry of the leave hours click on the leave and enter the percent sign and hours and the system will distribute the hours with the same percent split that is on the REG earn code. See below for an example of this entry.

The Annual Leave hours have the same labor distribution split at the Regular earnings and the Regular hours have been reduced by the 16 annual leave hours. You are done with data entry and ready to go to the Approval Mode, if your security form gives you permission to do the Approval of Time entry, see the Approval Mode section below.
APPROVAL MODE Located on the left of the form there is the section to move to the Approval Mode by clicking on the “APPROVAL” icon. You will note that right above the icons the mode you are currently in is displayed. Below is a snap shot of the Approval Screen.

GTO Approver Screen Once data entry is completed for a roster the data must be approved. You may mark the records to be approved individually by clicking the “APPROVE” box before each name or you can click on the green “CHECK ALL RECORDS” to the left. This will put a check mark in the box of all the employees to the right. Then click the “SUBMIT UPDATES” button to commit the changes. On the first example you can see the two records were individually clicked to save and the changes submitted. It only approved two records and the other two have not been approved.
In this example the green “CHECK ALL RECORDS” was clicked so all 4 were checked and once the “SUBMIT UPDATES” was clicked all 4 records have been approved. Once Approval processing is finished the time roster is complete.
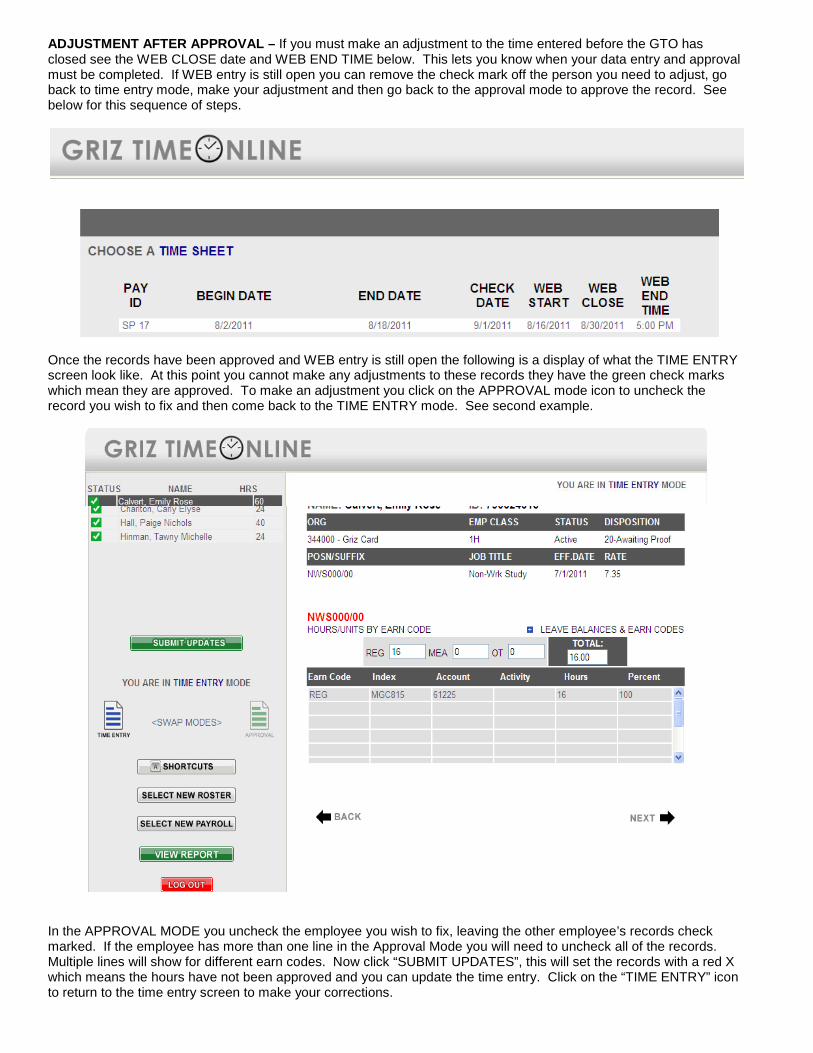
ADJUSTMENT AFTER APPROVAL – If you must make an adjustment to the time entered before the GTO has closed see the WEB CLOSE date and WEB END TIME below. This lets you know when your data entry and approval must be completed. If WEB entry is still open you can remove the check mark off the person you need to adjust, go back to time entry mode, make your adjustment and then go back to the approval mode to approve the record. See below for this sequence of steps.
Once the records have been approved and WEB entry is still open the following is a display of what the TIME ENTRY screen look like. At this point you cannot make any adjustments to these records they have the green check marks which mean they are approved. To make an adjustment you click on the APPROVAL mode icon to uncheck the record you wish to fix and then come back to the TIME ENTRY mode. See second example.
In the APPROVAL MODE you uncheck the employee you wish to fix, leaving the other employee’s records check marked. If the employee has more than one line in the Approval Mode you will need to uncheck all of the records. Multiple lines will show for different earn codes. Now click “SUBMIT UPDATES”, this will set the records with a red X which means the hours have not been approved and you can update the time entry. Click on the “TIME ENTRY” icon to return to the time entry screen to make your corrections.
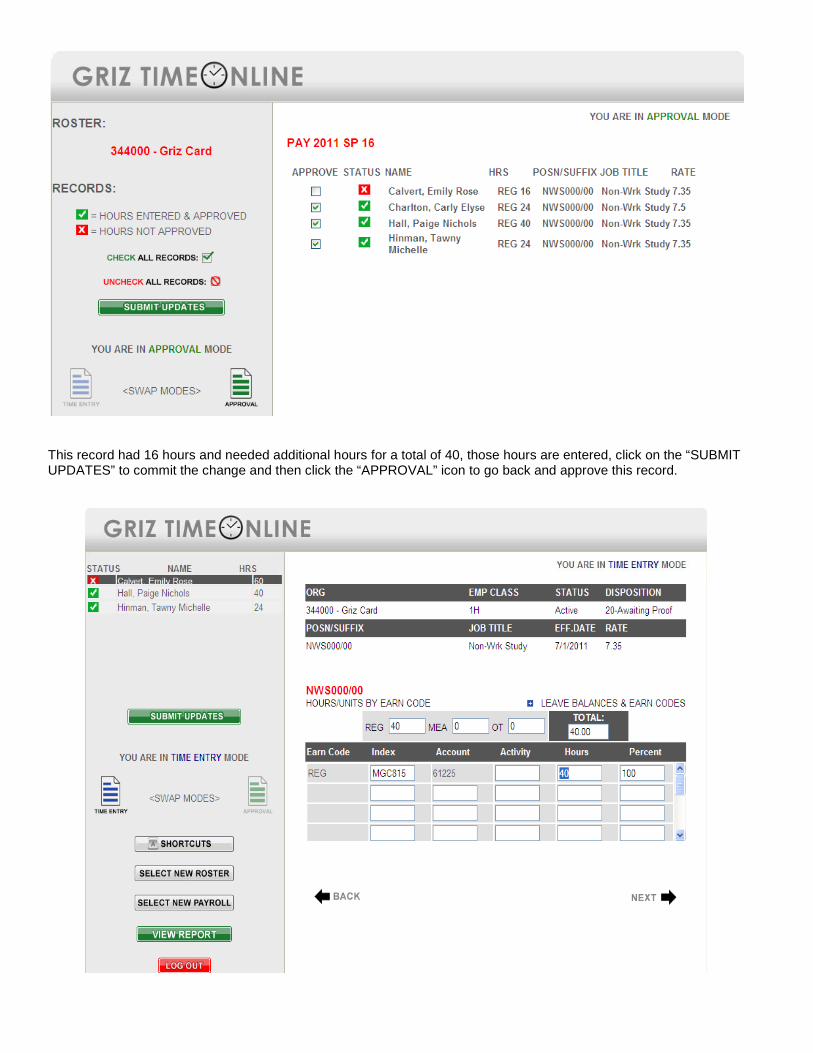
This record had 16 hours and needed additional hours for a total of 40, those hours are entered, click on the “SUBMIT UPDATES” to commit the change and then click the “APPROVAL” icon to go back and approve this record.
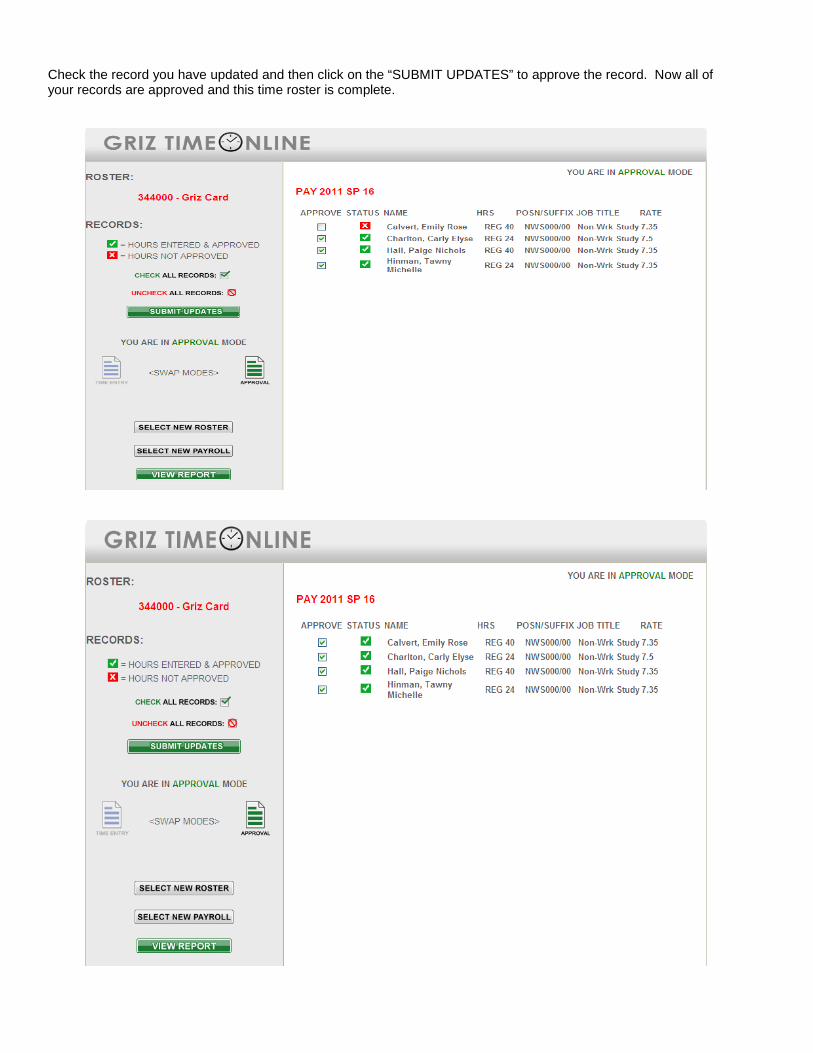
Check the record you have updated and then click on the “SUBMIT UPDATES” to approve the record. Now all of your records are approved and this time roster is complete.
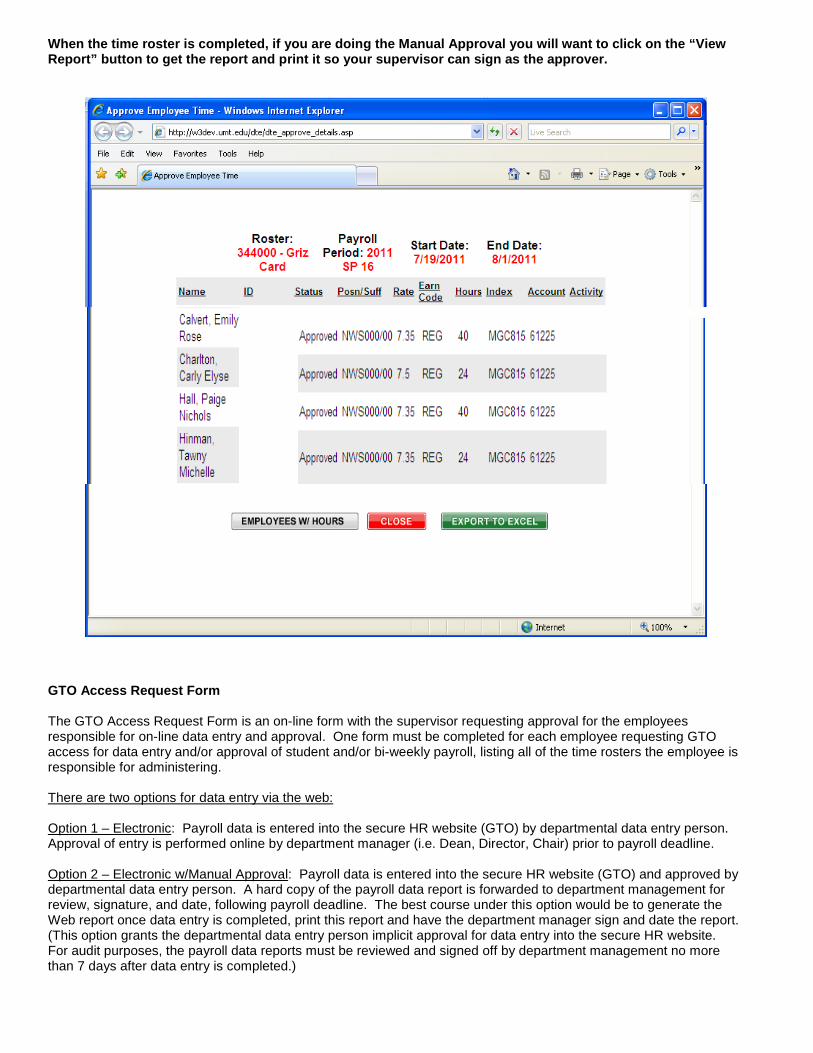
When the time roster is completed, if you are doing the Manual Approval you will want to click on the “View Report” button to get the report and print it so your supervisor can sign as the approver.
GTO Access Request Form The GTO Access Request Form is an on-line form with the supervisor requesting approval for the employees responsible for on-line data entry and approval. One form must be completed for each employee requesting GTO access for data entry and/or approval of student and/or bi-weekly payroll, listing all of the time rosters the employee is responsible for administering. There are two options for data entry via the web: Option 1 – Electronic: Payroll data is entered into the secure HR website (GTO) by departmental data entry person. Approval of entry is performed online by department manager (i.e. Dean, Director, Chair) prior to payroll deadline. Option 2 – Electronic w/Manual Approval: Payroll data is entered into the secure HR website (GTO) and approved by departmental data entry person. A hard copy of the payroll data report is forwarded to department management for review, signature, and date, following payroll deadline. The best course under this option would be to generate the Web report once data entry is completed, print this report and have the department manager sign and date the report. (This option grants the departmental data entry person implicit approval for data entry into the secure HR website. For audit purposes, the payroll data reports must be reviewed and signed off by department management no more than 7 days after data entry is completed.)

One of the options above must be selected when completing the Griz Time Online Access Request form. Complete the Web Time Entry Security Setup form for each employee who will perform web data entry and/or approval. Option 1 requires that the approver will be available each time payroll is completed in order to approve the data and have it submitted to the system for processing. Option 2 gives the individual who is completing actual data entry the ability to load the payroll data and approve it for submission. Under this option a signed and approved paper copy must be kept for audit purposes. In large departments it may be wise to have more than one employee approved and trained for on-line entry. Link to the Griz Time Online Access Request form: http://www.umt.edu/hrs/accessform/ Please visit HRS WEB page and click on Griz Time Online for all information about GTO.
Miscellaneous:
• Time records which serve as the original source document for data entry must be kept in the department for 5 calendar years.
• For GTO technical questions and procedural support: [email protected] • For questions regarding your bi-weekly payroll please contact your Human Resource Associate (HRA) if
you do not know who that is please use the following link. http://umt.edu/HRS/Payroll/Human%20Resource%20Associates.aspx
• For questions regarding your student payroll please contact Student Payroll at 243-6985 or email
[email protected] Please Note: The support email is received by several GTO trained individuals in HRS, and all emails will receive a response from this designated team.