weston schreiber & joshua gabrielse robotics summer training programming #1: easyc basics
TRANSCRIPT

Weston Schreiber & Joshua Gabrielse
Robotics Summer Training
Programming #1: EasyC Basics

Weston Schreiber & Joshua Gabrielse
Objectives: • Understand the 3 stages to programming
• Program a robot with custom controls• Build & Download program to a robot• Drive your robot!

Weston Schreiber & Joshua Gabrielse
1st Rule of Programming
Computers are stupid!!!!
They do EXACTLY what they are told,
nothing less, nothing more, and they never get the
idea.

Weston Schreiber & Joshua Gabrielse
Flowcharts(lists of instructions)
BEGIN
END
1. Put instructions on the flowchart.2. The computer (or robot) will start at
the beginning and move to the next instruction.
3. When that instruction is complete it moves to the next instruction.
4. When it gets to the end it keeps doing whatever it was last told to do.

Weston Schreiber & Joshua Gabrielse
• Break up into groups.
• Make a flowchart to make me walk out the door!
BEGIN
END
I will act like a computer (it comes naturally)
Computers do EXACTLY what they
are told, nothing less, nothing more, and they never get
the idea.

Weston Schreiber & Joshua Gabrielse
Stage 1: Planning(Algorithm, Flowchart, Pseudocode)
Stage 2: Coding(Variables, Functions, if statements, Loops)
Stage 3: Error Analysis(Syntax Errors, Logic Errors, Readdress Plan)
Stage 1: Planning(Algorithm, Flowchart, Pseudocode)

Weston Schreiber & Joshua Gabrielse
Flowcharts & Algorithm Planning• Two Types of Parts to a Programming Flowchart:
Actions Decisions
“Yes”
“No”
Robotics Examples“Turn on wheel motors” “Is the front bumper
pushed?”
“Lift Gripper Arm” “Has the robot turned 3 times?”
“Stop all motors” “Has the encoder registered over 1000 counts?”

Weston Schreiber & Joshua Gabrielse
Flowcharts & Algorithm PlanningPractice With Decision (Condition) Statements in Flowcharts:• Use a set of decision statements that allow the user to pick what movie they will go see:
• Prometheus (action, sci-fi)• Madagascar 3 (comedy, kids movie)

Weston Schreiber & Joshua Gabrielse
Writing Your 1st Program
1. Write a Plan for your Controller Setup
2. Start a New Program
3. Operator Control
4. Build & Download to Robot
5. Autonomous (next session)

Weston Schreiber & Joshua Gabrielse
Type in descriptions of what you’re
going to plug into each port.

Weston Schreiber & Joshua Gabrielse
Type in descriptions of what you’re
going to plug into each port.

Weston Schreiber & Joshua Gabrielse
8 channels:1. x-axis of right joystick
(-127 to +127)
2. y-axis of right joystick(-127 to +127)
3. y-axis of left joystick (-127 to +127)
4. x-axis of left joystick(-127 to +127)
5. left trigger buttons Up (0 or 1)Down (0 or 1)
6. right trigger buttons Up (0 or 1)Down (0 or 1)
7. left buttons Up (0 or 1)Down (0 or 1)Left (0 or 1)Right (0 or 1)
8. right buttons Up (0 or 1)Down (0 or 1)Left (0 or 1)Right (0 or 1)
VEXnet Joystick
↑ Top View ↑
↓ Front View ↓
↑ Front View ↑

Weston Schreiber & Joshua Gabrielse
Stage 1: Planning(Algorithm, Flowchart, Pseudocode)
Stage 2: Coding(Variables, Functions, if statements, Loops)
Stage 3: Error Analysis(Syntax Errors, Logic Errors, Readdress Plan)

Weston Schreiber & Joshua Gabrielse
EasyC Built-In Functions:
EasyC gives us functions to interact with the basic parts of the robot:
• Motor
• Servo
• Various Sensors (not this summer)

Weston Schreiber & Joshua Gabrielse
Anatomy of Functions• Name (case sensitive)
• Parameters (in order)
• Return Value (not necessary)
• Description (just for programmer)
FunctionName( param, param, param, etc. )
Examples:
RectangleArea( width, length )
DrawCircle( radius, centerX, centerY )

Weston Schreiber & Joshua Gabrielse
Anatomy of FunctionsRectangleArea( width, length )
• Name: RectangleArea• Parameters: width, length• Description: Calculates a rectangle’s area• Return Value? Area of the Rectangle
DrawCircle( radius, centerX, centerY )• Name: DrawCircle• Parameters: radius, centerX, centerY• Description: • Return Value? No return (void)

Weston Schreiber & Joshua Gabrielse
Writing Your 1st Program
1. Write a Plan for your Controller Setup
2. Start a New Program
3. Operator Control
4. Build & Download to Robot
5. Autonomous (next session)

Weston Schreiber & Joshua Gabrielse
Starting a New Program

Weston Schreiber & Joshua Gabrielse
Start a New Competition Project

Weston Schreiber & Joshua Gabrielse
Select Field Control Competition Project

Weston Schreiber & Joshua Gabrielse
Competition Projects
Initialize: This function runs when the robot is first turned on. All the motor outputs are disabled so the robot can’t move. Use to calibrate sensors.
Autonomous: This function runs after Initialize. This runs for fifteen seconds and input from joysticks is disabled.
Operator Control: This program runs after Autonomous. All inputs and outputs are enabled.
Click the tabs to access the functions.

Weston Schreiber & Joshua Gabrielse
Competition SwitchesEnable/Disable & Autonomous/Operator Control
Hardware: plug the ethernet cable into the competition port on the joystick
Software: the computer has to be connected directly to the robot controller or through VEXnet from the joystick (via the programming port)

Weston Schreiber & Joshua Gabrielse
Example Operator Control Code
Configuring the Controller

Weston Schreiber & Joshua Gabrielse
Select the Controller Configuration (F5)

Weston Schreiber & Joshua Gabrielse
Type in descriptions of what you’re going to plug into each port.

Weston Schreiber & Joshua Gabrielse
Type in descriptions of what you’re going to plug into each port.

Weston Schreiber & Joshua GabrielseSelect the OperatorControl tab.

Weston Schreiber & Joshua Gabrielse
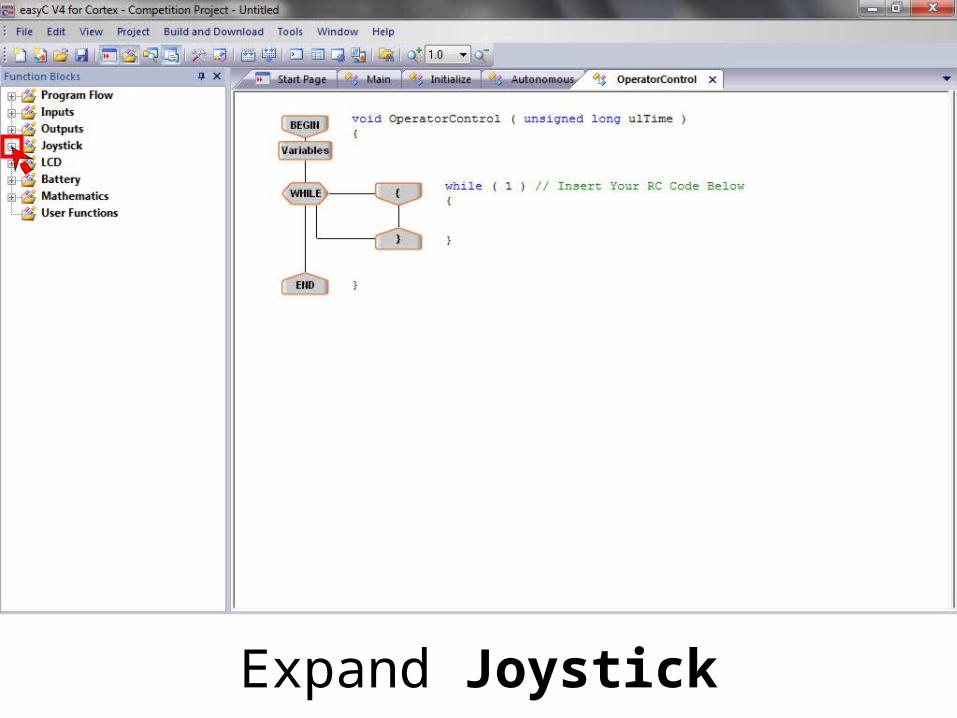
Put all control code inside the while loop.
Weston Schreiber & Joshua Gabrielse
Expand Joystick

Weston Schreiber & Joshua Gabrielse
Pick Tank or Arcade mode.
Modes
Arcade = 1 joystick drive (simpler)
Tank = 2 joystick drive (better control)
The number of motors should match your robot (2 for the CrabBot).

Weston Schreiber & Joshua Gabrielse
Drag Tank – 2 motor onto the flow chart.
Modes
I will use Tank – 2 motor since driving with two joysticks gives the driver more control.
You can use Arcade – 2 motor if you prefer to drive with one joystick.

Weston Schreiber & Joshua Gabrielse
Drag Tank – 2 motor into the WHILE loop.
WHILE Loops
Any statement placed in a while loop will execute over and over again (if the expression equals 1).
We drag the joystick block into the while loop so the program will get commands from the joystick over and over again.

Weston Schreiber & Joshua Gabrielse
For Tank drive set the Left Channel to 3 (the y-axis of your left joystick)
Tank Drive
The y-axis of the left joystick should control the left wheels and the y-axis of the right joystick should control the right wheels.

Weston Schreiber & Joshua Gabrielse
For Tank drive set the Right Channel to 2 (the y-axis of your right joystick)
Tank Drive
The y-axis of the left joystick should control the left wheels and the y-axis of the right joystick should control the right wheels.

Weston Schreiber & Joshua Gabrielse
For Arcade set the Forward/Reverse Channel to 2 (the y-axis of the right joystick).
Arcade Drive
The y-axis of your right joystick (if you’re right-handed) should control the speed (forward/reverse) of the robot.

Weston Schreiber & Joshua Gabrielse
For Arcade set the Rotate Channel to 1 (the x-axis of the right joystick).
Arcade Drive
The x-axis of your right joystick (if you’re right-handed) should control the rotation (turning) of the robot.

Weston Schreiber & Joshua Gabrielse
Select the motor number for your Left Motor.
Motor Numbers
The number of the slot/port on the robot controller that a motor is plugged into is its Motor Number.
Labels from the Controller Configuration automatically appear in green.
Weston Schreiber & Joshua Gabrielse
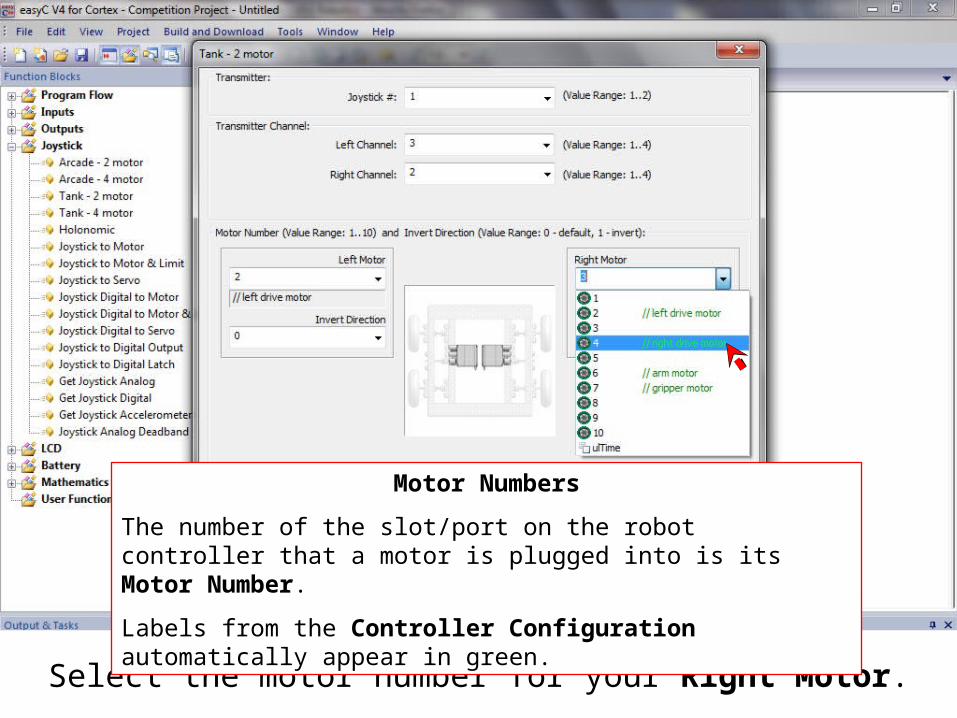
Select the motor number for your Right Motor.
Motor Numbers
The number of the slot/port on the robot controller that a motor is plugged into is its Motor Number.
Labels from the Controller Configuration automatically appear in green.

Weston Schreiber & Joshua Gabrielse
Arm
Arm

Weston Schreiber & Joshua Gabrielse
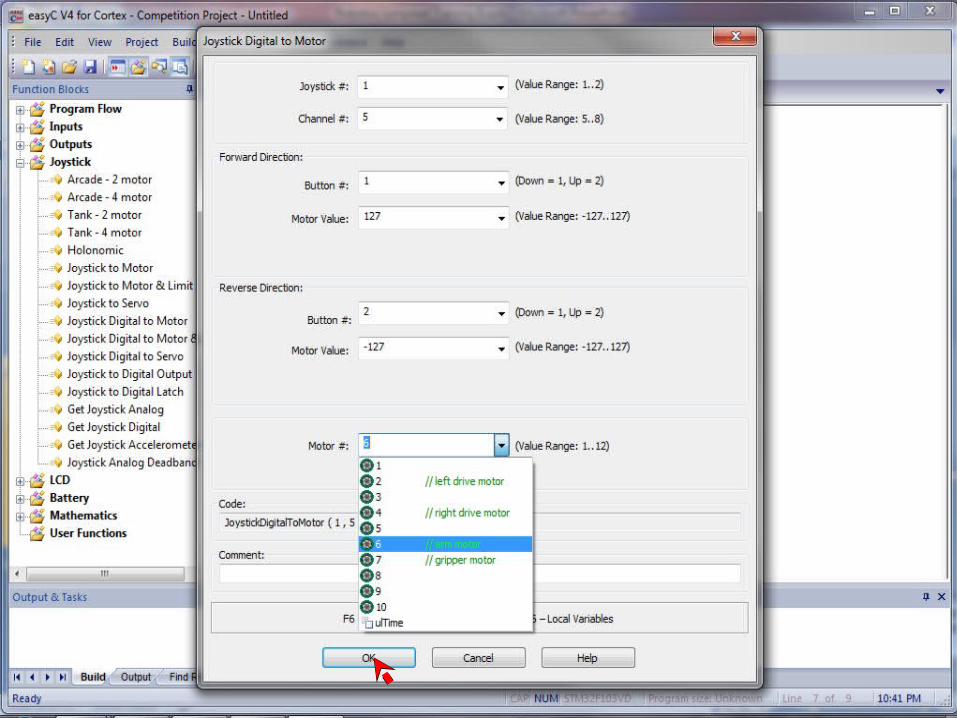
Arm Motor Selection
Change Joystick # to 2 for the
partner joystick.
Weston Schreiber & Joshua Gabrielse
Arm Motor Selection

Weston Schreiber & Joshua Gabrielse
Gripper
Gripper

Weston Schreiber & Joshua Gabrielse
Gripper

Weston Schreiber & Joshua Gabrielse
That’s it for Operator Control
Congratulations!

Weston Schreiber & Joshua Gabrielse
Stage 1: Planning(Algorithm, Flowchart, Pseudocode)
Stage 2: Coding(Variables, Functions, if statements, Loops)
Stage 3: Error Analysis(Syntax Errors, Logic Errors, Readdress Plan)

Weston Schreiber & Joshua Gabrielse
Build & Download
Build & Download your program.

Weston Schreiber & Joshua Gabrielse
Download Code to Robot
Build & Download your program.

Weston Schreiber & Joshua Gabrielse
Erasing & Writing New Code
Your program is finished downloading whenthe bar goes down (erases old code)
and goes back again (loads new code).

Weston Schreiber & Joshua Gabrielse
Save
Save your program even if it didn’t work.

Weston Schreiber & Joshua Gabrielse
The ROBOT light should be green (charged battery).The VEXnet light should be green (connected).
“My code won’t download!”(Is your robot on?)
Make sure to turn your joystick on too.
The POWER switch
should be ON.

Weston Schreiber & Joshua Gabrielse
What color is the ROBOT light on the controller?
“My code won’t download!”(Did you use a fresh battery?)
• green: okay battery • red: dead battery

Weston Schreiber & Joshua Gabrielse
• The USB A-A cable should be plugged into the robot controller in the USB port where the VEXnet key normally plugs in.
• The other end of the USB A-A cable should be plugged into a USB port on the computer.
“My code won’t download!”(Is the robot connected to the computer?)
USB A-A cable
computer
joystick
remove the VEXnet key robot controller

Weston Schreiber & Joshua Gabrielse
“My robot doesn’t drive right!”(Are the motors plugged in correctly?)
Everything should be plugged in according to the Controller Configuration

Weston Schreiber & Joshua Gabrielse
“My robot doesn’t drive right!”(Did you use servos instead of motors?)
• check the labels
• servos have two wire cords and motors have three wire codes
• motors need to be plugged into speed controllers
• motors spin continuously (360° of rotation)
• the controller sets the speed (-127 to +127)
• servos spin back and forth (120° of rotation)
• the controller sets the location (-127 to +127)
Servo(3-wire)
Motor(2-wire)

Weston Schreiber & Joshua Gabrielse
“My robot doesn’t drive right!”(Do you need to invert any of your motors?)
• Test drive your robot with all it’s wheels off the ground
• Look to see if any motors need to spin in the other direction
• Check Invert Direction to make a wheel spin in the other direction.
• Build & Download your modified code