wfg agent agency management system (ams2) · pdf file1.011 regenerate policy jacket document...
TRANSCRIPT

Revised 2/10/2017 Page 1 of 78
WFG Agent – Agency Management System (AMS2) User Job Aid
Version 1.0 Revised 4.12.2017
Table of Contents 1 AMS2 Introduction ..................................................................................................................................................................... 2
2 AMS2 General Information ........................................................................................................................................................ 3
1.01 Navigate to WFG Agent AMS2 .......................................................................................................................................... 3
1.02 Sign into AMS2 .................................................................................................................................................................. 3
1.03 Change Existing Password ................................................................................................................................................. 4
1.04 Forgot Password ................................................................................................................................................................ 5
1.05 Navigate to AMS Home Screen (WFG File Management) ................................................................................................. 7
1.06 Contact WFG for Assistance – After AMS2 Login .............................................................................................................. 8
1.07 Contact WFG for Assistance – Before AMS2 Login ........................................................................................................... 9
3 Closing Protection Letter Creation ........................................................................................................................................... 11
1.08 Create New Closing Protection Letter ............................................................................................................................. 11
1.09 Regenerate CPL Document in An Error Occurred Letter Status ...................................................................................... 19
4 Policy Jacket Creation .............................................................................................................................................................. 20
1.010 Create New Policy Jacket ................................................................................................................................................ 20
1.011 Regenerate Policy Jacket Document in An Error Occurred Policy Status ........................................................................ 34
5 Over the Limit (OTL) Request Creation .................................................................................................................................... 35
1.012 Create OTL Request at Time of Jacket Creation .............................................................................................................. 35
1.013 Create OTL Request Before Jacket Creation.................................................................................................................... 40
6 Closing Protection Letter Actions (Cancel, Edit, Send, View, Cancel All) ................................................................................. 45
1.014 Cancel Closing Protection Letter ..................................................................................................................................... 45
1.015 Edit Closing Protection Letter.......................................................................................................................................... 46
1.016 Send Closing Protection Letter ........................................................................................................................................ 48
1.017 View Closing Protection Letter ........................................................................................................................................ 49
1.018 Cancel All Closing Protection Letters ............................................................................................................................... 50
7 Policy Jacket Actions (Edit, View, Send, Void, Void All) ........................................................................................................... 51
1.019 Edit Policy Jacket ............................................................................................................................................................. 52
1.020 View Policy Jacket ........................................................................................................................................................... 54

Revised 2/10/2017 Page 2 of 78
1.021 Send Policy Jacket ........................................................................................................................................................... 54
1.022 Void Policy Jacket ............................................................................................................................................................ 55
1.023 Void All Policy Jackets...................................................................................................................................................... 56
8 OTL Request Actions (View/Edit) ............................................................................................................................................. 58
1.024 View (Edit) OTL Request .................................................................................................................................................. 58
9 Create a new File Record (No Existing Services) ...................................................................................................................... 64
10 File Record – Locate File/Locate Services/Update File ............................................................................................................ 67
1.025 Search for a File Record ................................................................................................................................................... 67
1.026 Locate Services for a File Record ..................................................................................................................................... 69
1.027 Update File Record Information ...................................................................................................................................... 71
11 WFG Remittance Report Creation............................................................................................................................................ 74
12 View Tab - Documents / Sent Items ......................................................................................................................................... 76
1.028 Documents Screen – View, Edit, Send, Void Actions ....................................................................................................... 76
1.029 Sent Items ....................................................................................................................................................................... 77
1 AMS2 Introduction WFG Agent AMS2 is the revamped, supercharged and flexible Agent Management System which provides you with three possibilities for creating your CPL and eJacket services.
1) You can create a CPL, eJacket or OTL Request as a stand-alone function in AMS2. Once the CPL, Jacket or OTL Request is generated, a new file record will be created, allowing you the option to create further services from the new file. [Refer to Section 3 for CPL, Section 4 for Policy Jacket (eJacket), Section 5 for OTL Request]
2) You can create a file record now and add services at a later time. [Refer to Section 9 for File Creation, Section 3 for CPL, Section 4 for Policy Jacket (eJacket), Section 5 for OTL Request for adding Services]
3) You can still utilize your production system to create eJackets and/or CPLs. The only time you would need to access AMS2 is to create an OTL Request or cancel the file record and the services that you created from your production system. [Refer to Section 5 for OTL Request, Section 11 for Update File Record]

Revised 2/10/2017 Page 3 of 78
2 AMS2 General Information
1.01 Navigate to WFG Agent AMS2
From the WFG Agent website https://wfgagent.com/ hover over Agent Services box and select a service option (e.g. Closing Protection Letters, Policy Jacket Generator, Remittance) or open an internet web browser tab and enter https://www.wfgsecure.com/AMS2/.
Internet Explorer 11 or higher and Google Chrome are the two recommended browsers
Navigation using either option will display the WFG AGENT Secure Account Sign In screen [Refer to Subsection 1.02 in Section 2]
Internet Explorer browser
Google Chrome browser
1.02 Sign into AMS2
After navigating to AMS2 you will be viewing the WFG AGENT Secure Account Sign In screen. Enter your login credentials
{User Name / Password} and click Sign In button to be navigated to the WFG File Management home screen
Figure 1 - WFG AGENT Secure Account Sign In Screen

Revised 2/10/2017 Page 4 of 78
Figure 2 - WFG File Management Screen
1.03 Change Existing Password
1. Click on your name hyperlink next to Welcome at any time to change your password. When directed to the
Change Password screen enter Existing Password, New Password and Confirm New Password, click Change
Password button
a. Click OK button on notificcation message indicating that your password was successfully changed. You
will remain logged in and will utilze the new password the next time you log in

Revised 2/10/2017 Page 5 of 78
1.04 Forgot Password
1. Click the Forgot Password? hyperlink on the WFG AGENT Secure Account Sign In screen at any time to request a
password reset, you will be navigated to the Forgot Password screen
2. On the Forgot Password screen
a. Click Back hyperlink to return to the WFG AGENT Secure Account Sign In screen
b. Click Reset Password button after entering User Name (login credentials) and primary Email address
associated to your log in credentials to submit the request
i. Click OK button on reset password notification message indicating that a reset password link has
been sent to your email address, you will automatically be returned to the WFG AGENT Secure
Account Sign In screen
2. Check the provided email box for an email with the subject of “Your password reset request” and click the
provided link. You will be navigated to the Change Password screen
Password reset link will expire in 24 hours or when the password is changed

Revised 2/10/2017 Page 6 of 78
3. On the Change Password screen
a. Enter the new password in New Password and enter same password in Confirm New Password, click
Change Password button
i. As soon as the Change Password button is clicked an email with the subject of “Password reset
request” will be sent indicating your email was used to reset the password, follow the
instructions provided (Figure 3)
b. Click OK button on notification message indicating that your password was successfully changed. You will
be navigated to the WFG AGENT Secure Account Sign In screen where you will use your new password to
log in
Figure 3
Revised 2/10/2017 Page 7 of 78
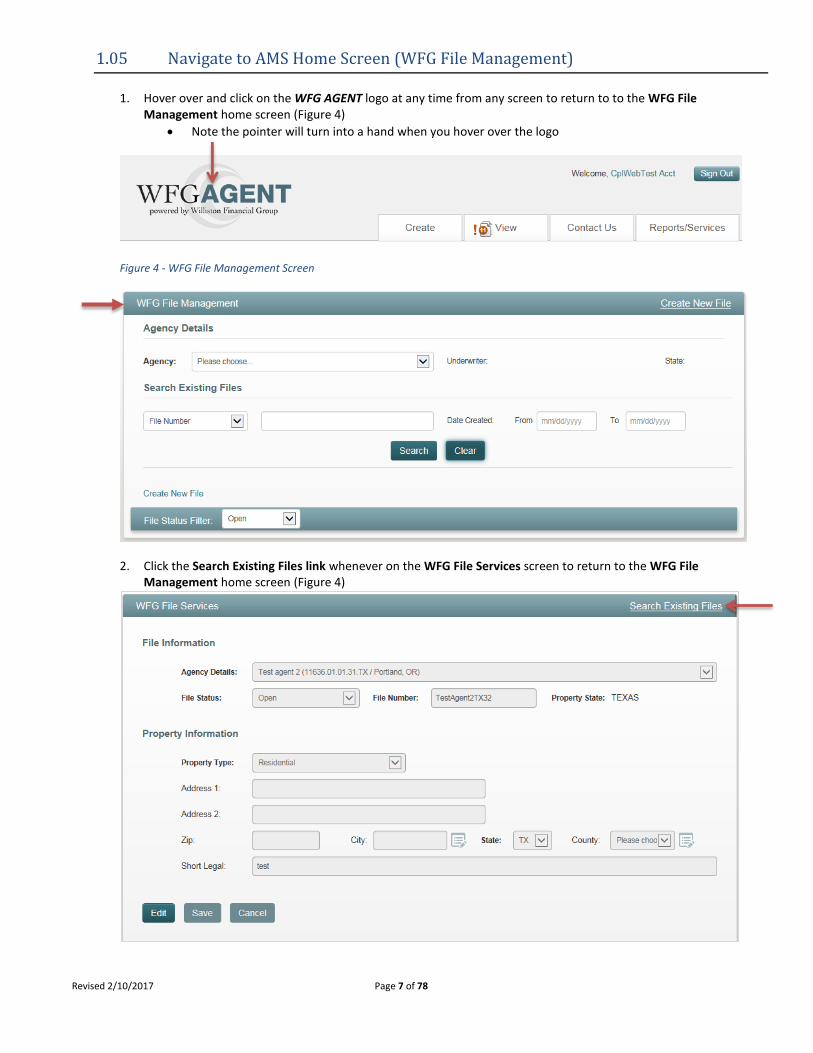
1.05 Navigate to AMS Home Screen (WFG File Management)
1. Hover over and click on the WFG AGENT logo at any time from any screen to return to to the WFG File
Management home screen (Figure 4)
Note the pointer will turn into a hand when you hover over the logo
Figure 4 - WFG File Management Screen
2. Click the Search Existing Files link whenever on the WFG File Services screen to return to the WFG File Management home screen (Figure 4)
Revised 2/10/2017 Page 8 of 78
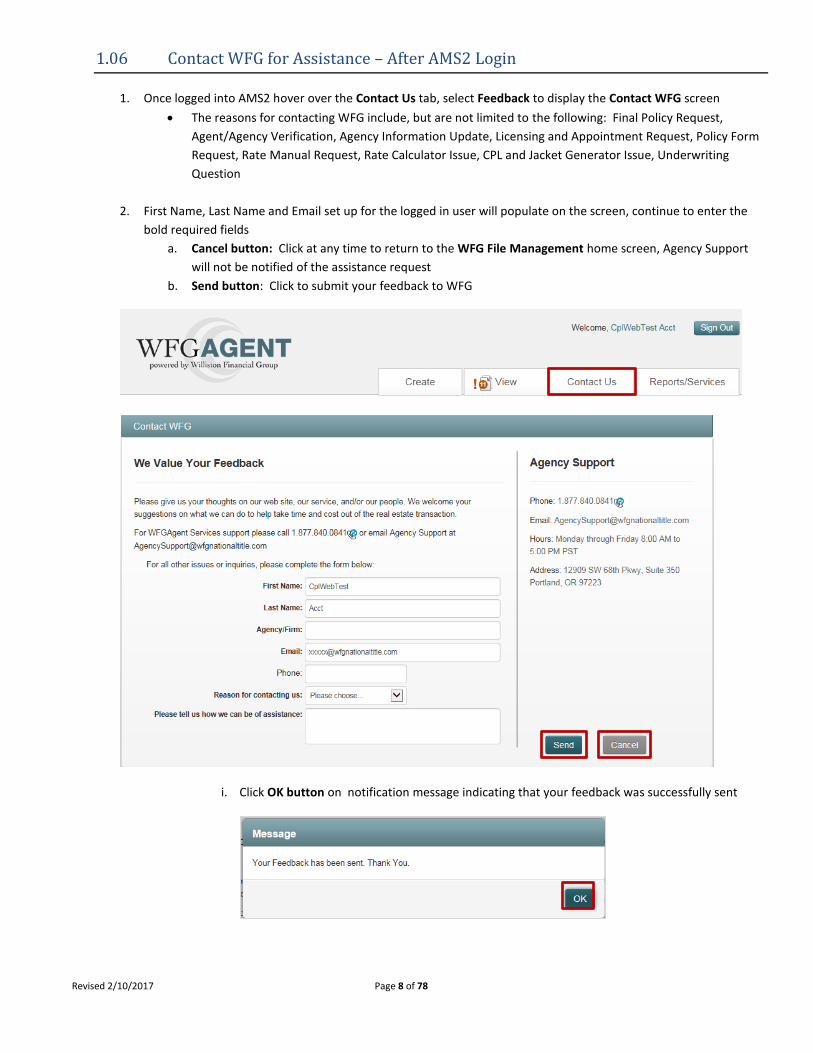
1.06 Contact WFG for Assistance – After AMS2 Login
1. Once logged into AMS2 hover over the Contact Us tab, select Feedback to display the Contact WFG screen
The reasons for contacting WFG include, but are not limited to the following: Final Policy Request,
Agent/Agency Verification, Agency Information Update, Licensing and Appointment Request, Policy Form
Request, Rate Manual Request, Rate Calculator Issue, CPL and Jacket Generator Issue, Underwriting
Question
2. First Name, Last Name and Email set up for the logged in user will populate on the screen, continue to enter the
bold required fields
a. Cancel button: Click at any time to return to the WFG File Management home screen, Agency Support
will not be notified of the assistance request
b. Send button: Click to submit your feedback to WFG
i. Click OK button on notification message indicating that your feedback was successfully sent

Revised 2/10/2017 Page 9 of 78
1.07 Contact WFG for Assistance – Before AMS2 Login
1. If you need assistance from WFG before you login to AMS2 navigate to the WFG AGENT Secure Account Sign In
screen [Refer to Subsection 1.01 and 1.02 in Section 2] and click Need Help? hyperlink to display the Feedback
screen
The reasons for contacting WFG include, but are not limited to the following: Password Reset/User
Unlock, Final Policy Request, Agent/Agency Verification, New User Access Request, Interested in
Becoming an Agent
2. On the Feedback screen enter all required fields indicated in Bold, click the I’m not a robot checkbox in the
reCaptcha box and follow the instructions provided
Once a green checkmark is displayed in the ReCaptcha box you can continue to the next step
3. Once all required fields are entered and ReCaptcha is approved on the Feedback screen
a. Cancel button: Click at any time to return to the WFG File Management home page, Agency Support will
not be notified of the assistance request
b. Send button: Click to submit your feedback to WFG

Revised 2/10/2017 Page 10 of 78

Revised 2/10/2017 Page 11 of 78
3 Closing Protection Letter Creation
1.08 Create New Closing Protection Letter
1. After you login in you will be viewing the WFG File Mangement home screen. You can select the desired agency from
the dropdown at this point or on the Generate Closing Protection Letter screen which appears next. Note an Agency
may default for you if your user login account was established with access to only a single account number
a. Hover over the Create tab, select CPL to display the Generate Closing Protection Letter screen
2. If an agency was not selected in the previous step on the WFG File Management screen, select one in the Agency
Details dropdown on the Generate Closing Protection Letter screen now to expand the screen; fields in bold are
required
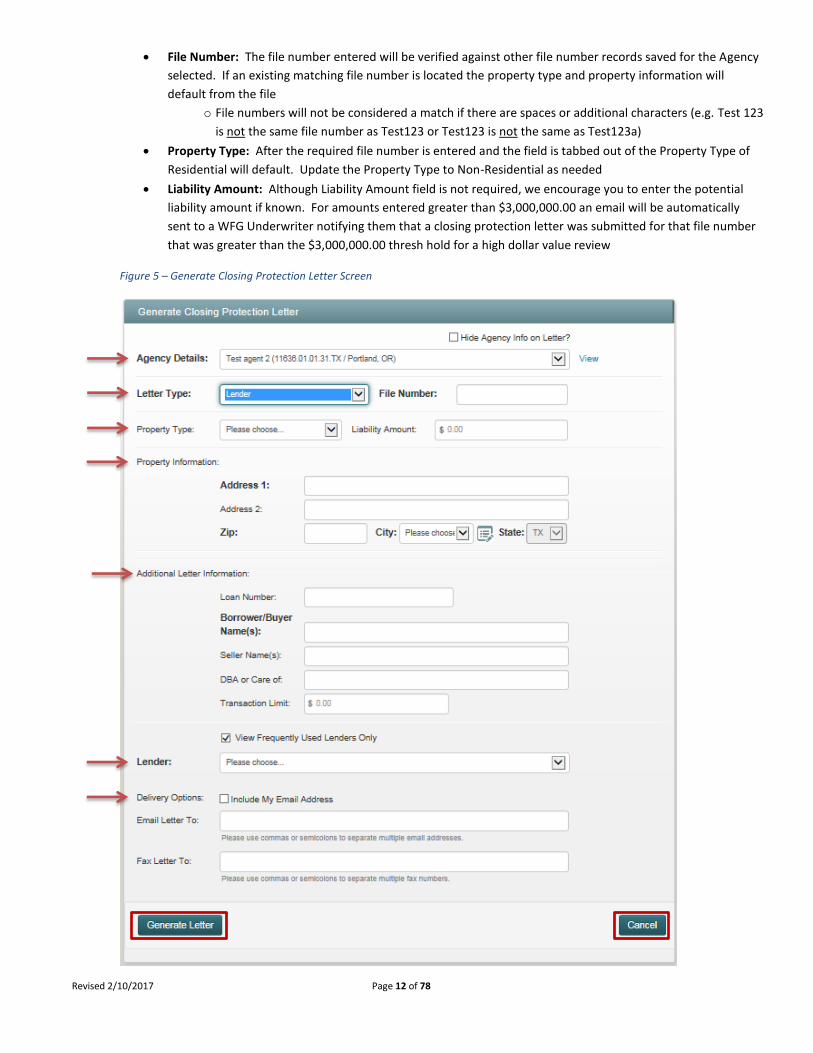
3. Once the Agency is selected and the screen expanded (Figure 5), a default type of closing protection letter (e.g.
Transaction, Lender, Seller, Buyer, etc.) will populate in the Letter Type dropdown based upon the property state and
the available data entry fields will be displayed for the selected letter type
Hide Agency Info on Letter? checkbox: When unchecked the name and address information of the agency
selected in Agency Details will display on the closing protection letter pdf generated. When checked the name
and address information of the agency selected in Agency Details will not display on the closing protection
letter pdf generated
View link: Click link as needed to expand the Agency Details contact information section for review
o Click Hide link to close the Agency Details contact information section (Figure 6)
Letter Type: After the default letter type is populated you can choose a new letter type if there are more than
one type available in the property state, click the dropdown arrow to review options. If letter type is updated
the available data entry fields will be displayed for the selected letter type
Revised 2/10/2017 Page 12 of 78
File Number: The file number entered will be verified against other file number records saved for the Agency
selected. If an existing matching file number is located the property type and property information will
default from the file
o File numbers will not be considered a match if there are spaces or additional characters (e.g. Test 123
is not the same file number as Test123 or Test123 is not the same as Test123a)
Property Type: After the required file number is entered and the field is tabbed out of the Property Type of
Residential will default. Update the Property Type to Non-Residential as needed
Liability Amount: Although Liability Amount field is not required, we encourage you to enter the potential
liability amount if known. For amounts entered greater than $3,000,000.00 an email will be automatically
sent to a WFG Underwriter notifying them that a closing protection letter was submitted for that file number
that was greater than the $3,000,000.00 thresh hold for a high dollar value review
Figure 5 – Generate Closing Protection Letter Screen

Revised 2/10/2017 Page 13 of 78
Figure 6 – Hide Link Displayed after View Link was Clicked
4. Enter Property Information, Additional Letter Information, Lender, Approved Attorney (if displayed), Covered Parties (if
displayed) and Delivery Options (Figure 5)
a. Property Information Section: Fields in bold are required
i. The city name will default after a valid zip code is entered when there is only one associated city
name. If there is more than one associated city name to the zip code entered Please Choose… will
display in the dropdown for selection (Figure 7)
1. If the city name needed is not available in the dropdown after a valid zip code is entered,
you can change the city name as needed
o Click the Edit icon next to the City field to remove the selected city (Figure 8) and
type in the new city name (Figure 9). To return the original city value selected click
the Edit icon again (Figure 10)
Figure 7 – City Field Not Prepopulated Due to Zip Code Associated to Multiple Cities
Figure 8 – Edit Icon for City
Figure 9 – City Field Turns to Text Box to Enter Preferred City Name

Revised 2/10/2017 Page 14 of 78
Figure 10 – Edit Icon for City Clicked to Populate Original City Name
b. Additional Letter Information Section: Fields in bold are required
c. Lender Section: Fields in bold are required
o Select or deselect the View Frequently Used Lenders Only checkbox to increase or decrease the list
of available lenders to select from
o If the needed lender is not visible in the Lender dropdown, select No Matching Lender to enter the
needed lender information; fields in bold are required
The new lender will be added and the closing protection letter can be processed
o Select Email checkbox to include the lender email address (if populated) in the Email Letter To field in
the Delivery Options section.
An email will automatically be sent to the lender recipient upon successful generation of the
closing protection letter which provides the closing protection letter pdf document
o Select Fax checkbox to include the lender fax number (if populated) in the Fax Letter To field in the
Delivery Options section
A fax will automatically be sent to the lender recipient upon successful generation of the
closing protection letter which provides a copy of the generated closing protection letter
o Select or deselect the Add Lender to Frequently Used List checkbox to add or remove a lender from
the list of available frequently used lenders
d. Approved Attorney Section: Fields in bold are required. Option only available in select states
o Select or deselect the View Frequently Used Attorneys Only checkbox to modify the list of available
attorneys to select from
o Click Request New button (if displayed) to request the addition of a new attorney; complete and
submit the Request New Attorney form
An email will be sent for review by WFG staff to approve the attorney before the closing
protection letter can be processed

Revised 2/10/2017 Page 15 of 78
o If Request New button is not displayed, select New Attorney Request in the Attorney dropdown;
complete and submit the Request New Attorney form
The new attorney will be added and the closing protection letter can be processed
o Select Email checkbox to include the attorney email address (if populated) in the Email Letter To field
in the Delivery Options section.
An email will automatically be sent to the attorney recipient upon successful generation of
the closing protection letter which provides the closing protection letter pdf document
o Select Fax checkbox to include the attorney fax number (if populated) in the Fax Letter To field in the
Delivery Options section
A fax will automatically be sent to the attorney recipient upon successful generation of the
closing protection letter which provides a copy of the generated closing protection letter
o Select or deselect the Add Attorney to Frequently Used List checkbox to add or remove the attorney
from the list of available frequently used attorneys
e. Covered Parties Section: Option only available in select states
o Click Seller Name checkbox and the seller name entered in the Additional Letter Information section
will automatically populate in the seller name field. You can edit the seller name here or if nothing is
populated enter the Seller Name information
Once the checkbox is clicked additional fields to enter the seller address will be displayed
(Optional) and will not print on the closing protection letter
The seller name(s) entered next to the checkbox is what will print on the closing protection
letter not the seller name entered in the Additional Letter Information section
o Click Buyer Name checkbox and enter the Buyer Name information here
Once the checkbox is clicked additional fields to enter the buyer address will be displayed
(Optional) and will not print on the closing protection letter
The buyer name(s) entered next to the checkbox is what will print on the closing protection
letter
o Click Borrower Name checkbox and the borrower/buyer name entered in the Additional Letter
Information section will automatically populate in the borrower name field. You can edit the
borrower name here or if nothing is populated enter the Borrower Name information here
Once the checkbox is clicked additional fields to enter the borrower address will be
displayed (Optional) and will not print on the closing protection letter

Revised 2/10/2017 Page 16 of 78
The borrower name(s) entered next to the checkbox is what will print on the closing
protection letter not the borrower/buyer name(s) entered in the Additional Letter
Information section
o Click Lender Name checkbox and the lender selected in the Lender section will automatically
populate in the lender field. If a lender was not selected in the Lender section first do not manually
enter a lender name here, select it in the Lender section so it will populate instead
When clicked the lender address will pull from the lender selected in the Lender section and
will print on the closing protection letter, therefore the additional fields for address entry
are not needed
The lender name populated next to the checkbox is what will print on the closing protection
letter
If the Lender Name checkbox is not checked and the Seller Name, Buyer Name
and/or Borrower Name checkboxes are also not checked, the lender name and
associated address selected in the Lender section will automatically print on the
closing protection letter by default
Lender name and address will not print at all on the closing protection letter if at least one of
the Seller Name, Buyer Name and/or Borrower Name checkboxes are checked
f. Delivery Options Section: Entering email(s) or fax number(s) for distribution of the closing protection letter is
optional
o Click Include My Email Address checkbox to default your primary email address in the Email Letter To
field
o When email and/or fax is entered, an email with pdf attachment of the closing protection letter
and/or fax with a copy of the closing protection letter will automatically be sent to the recipient(s)
upon successful generation of the closing protection letter document
o An email and/or fax can be sent at a later time after the closing protection letter has been
successfully generated [Refer to Subsection 1.016 in Section 6]
5. Click Cancel button at any time to close the Generate Closing Protection Letter screen and any data entered will not be
saved
6. Click Generate Letter button to process the closing protection letter pdf file and save the entered data
a. If there are any errors a validation flag will display next to or below the errored field(s) that briefly describe
the error; all errors must be fixed to continue
b. If there are no errors a generation message is displayed, click OK button

Revised 2/10/2017 Page 17 of 78
7. While the closing protection letter is processing, you will automatically be navigated to the WFG File Services screen,
CPL tab
The closing protection letter being generated will display on the CPL tab on the lower portion of the screen
and can be reviewed by clicking the View action [Refer to Subsection 1.017 in Section 6]
If the file record did not previously exist it will automatically be established on the top portion of the screen
using the information provided in the closing protection letter, including the Agency selected, file status, file
number, property type and property address
If the file record did previously exist the closing protection letter will be added to it as a new service and any
modifications to the property information will automatically be updated
When the closing protection letter is successfully generated the Actions [Cancel All, Cancel, Edit, Send, View]
are enabled
The closing protection letter is available for validation and/or remittance when the Letter Status is Assigned
The closing protection letter is not available for validation and/or remittance when the Letter Status is An
Error occurred [Refer to Subsection 1.09 in Section 3]
8. If an additional closing protection letter is needed on the current file, click Generate New Letter button on the lower
portion of the CPL tab to display the Generate Closing Protection Letter screen once again. Note if only changes need
to be made to the existing closing protection letter select the Edit action rather than creating a new one [Refer to
Subsection 1.015 in Section 6]
a. On the Generate Closing Protection Letter screen notice the Agency Details, File Number, Property Type and
Property Information entered previously and saved to the file record will prepopulate and a Letter Type will
default; fields in bold are required

Revised 2/10/2017 Page 18 of 78
i. Letter Type: Click the dropdown arrow to review available options. If letter type is updated the
available data entry fields will be displayed for the selected letter type
ii. Property Type: Verify the Property Type is correct for this file
1. Correct: Enter closing protection letter information, click Generate Letter button
2. Not Correct: Click Cancel button to return to the WFG File Services screen to update the
incorrect property type on the file record [Refer to Section 11]. Once the property type is
correct repeat the steps described in this section
9. If an additional closing protection letter is not needed on the current file, but you want to generate a closing protection
letter for a different file, hover over the Create tab, select CPL and a confirmation message is displayed asking if you
want to create a new closing protection letter for the current file
Revised 2/10/2017 Page 19 of 78
a. No button: Click to display the Generate Closing Protection Letter screen again and create a new closing
protection letter on a different file repeating the steps for creating a new closing protection letter
b. Yes button: Click to display the Generate Closing Protection Letter screen and create a new closing protection
letter on the current file repeating the steps for creating a new closing protection letter
1.09 Regenerate CPL Document in An Error Occurred Letter Status
1. If there was an issue generating the closing protection letter document on the file the Letter Status will display An Error
occurred and a Regenerate link will display in the Actions on the lower portion of the WFG File Services screen, CPL tab
(Figure 11)
a. Click Regenerate link to reprocess the closing protection letter document (Figure 11)
i. If the document failed to process again the Letter Status will remain An Error occurred and Error |
Regenerate link will display in the Actions (Figure 11)
1. Click Error link to display contact information for further assistance (Figure 12), click OK
button to close the informational message and return to the WFG File Services screen, CPL
tab
Figure 11 – WFG File Services Screen – CPL tab
Figure 12 - Issue with Regeneration of Closing Protection Letter Informational Message

Revised 2/10/2017 Page 20 of 78
4 Policy Jacket Creation
1.010 Create New Policy Jacket
1. After you login in you will be viewing the WFG File Mangement home screen. You can select the desired agency from
the dropdown at this point or on the Generate Policy Jacket screen which appears next. Note an Agency may default
for you if your user account was established with access to only a single account number
a. Hover over the Create tab, select Jacket to display the Generate Policy Jacket screen
2. If an agency was not selected in the previous step on the WFG File Management screen, select one in the Agency
Details dropdown now on the Generate Policy Jacket screen. Only after the bold and required Agency Details is
selected, File Number is entered and Property Type is selected the fields in the Property Information, Policy Jacket and
Delivery Options sections are enabled
Click the plus or minus sign on each section to expand or close that section for review as needed
Revised 2/10/2017 Page 21 of 78
File Number: The file number entered will be verified against other file number records saved for the Agency
selected. If an existing matching file number is located the property type and property information will
default from the file
o File numbers will not be considered a match if there are spaces or additional characters (e.g. Test 123
is not the same file number as Test123 or Test123 is not the same as Test123a)
Property Type: After the required file number is entered and the field is tabbed out of the Property Type of
Residential will default. Update the Property Type to Non-Residential as needed
Issue Simultaneous Policy checkbox: This checkbox will allow for the generation of more than one policy
jacket at a time for a single file (a.k.a. Simultaneous Policy)
o When only one policy is to be issued on a single file, the checkbox should be left unchecked as
defaulted on the Generate Policy Jacket screen (Figure 13)
If another policy needs to be added to the file at a later date it can be done at any time
o When more than one policy needs to be issued on a single file, click Issue Simultaneous Policy
checkbox so it is checked and 2 Policy Jacket sections for Residential property type or 3 Policy Jacket
sections for Non-Residential property type will automatically default on the Generate Policy Jacket
screen (Figure 14)
Issue up to 5 jackets on a Residential file and up to 8 on a Non-Residential file as needed by
clicking the Add Policy Jacket button
Figure 13 – Generate Policy Jacket Screen - Single Policy Jacket Creation

Revised 2/10/2017 Page 22 of 78
Figure 14 – Generate Policy Jacket Screen - Simultaneous Policy Jacket Creation
3. Enter the Property Information, Policy Jacket information and Deliver Options (Figure 13 or Figure 14)
a. Property Information Section: Fields in bold are required
i. The city name will default after a valid zip code is entered when there is only one associated city
name. If there is more than one associated city name to the zip code entered Please Choose… will
display in the dropdown for selection (Figure 15)
1. If the city name needed is not available in the dropdown after a valid zip code is entered,
you can change the city name as needed

Revised 2/10/2017 Page 23 of 78
o Click the Edit icon next to the City field to remove the selected city (Figure 16) and
type in the new city name (Figure 17). To return the original city value selected click
the Edit icon again (Figure 18)
ii. The county name will default after a valid city name is selected when there is only one associated
county name. If there is more than one associated county name to the city name selected Please
Choose… will display in the dropdown for selection (Figure 19)
1. If the county name needed is not available in the dropdown after a valid city name is
selected, you can change the county name as needed
o Click the Edit icon next to the County field to remove the defaulted or selected
county (Figure 18) and type in the new county name (Figure 20). To return the
original county value selected click the Edit icon again (Figure 18)
Figure 15 – City Field Not Prepopulated Due to Zip Code Associated to Multiple Cities
Figure 16 – Edit Icon for City
Figure 17 – City Field Turns to Text Box to Enter Preferred City Name
Figure 18 – Edit Icon for City and County Clicked to Populate Original City or County Name
Figure 19 – County Field Not Prepopulated Due to Zip Code/City Associated to Multiple Counties

Revised 2/10/2017 Page 24 of 78
Figure 20 – County Field Turns to Text Box to Enter Preferred County Name
b. Policy Jacket Section(s): Select a Jacket Type and the available data entry fields will be displayed for the
selected Jacket Type; fields in bold are required
o Include Owner’s Policy or Include Loan Policy checkboxes: If the Issue Simultaneous Policy
checkbox was checked, each Policy Jacket section will display an Include Owner’s Policy or Include
Loan Policy checkbox. The checkbox can be selected to add additional loan or owner policy jacket
selections in the Jacket Type dropdown (Figure 14)
Issue up to 2 Owner Policy jackets and 3 Loan Policy jackets on a Residential file or issue up
to 3 Owner Policy jackets and 5 Loan Policy jackets on a Non-Residential file as needed. At
any time the limit is exceeded for the type of policy (Owner, Loan) and property type
(Residential, Non-Residential) a notification message will display, follow the instructions
provided
Click OK button to close the message and return to the Generate Policy
Jacket screen
o SIMO Rate Applied: If the Issue Simultaneous Policy checkbox was checked select this checkbox to
indicate the simultaneous rate being charged for the loan policy. If a loan policy jacket is selected this
checkbox will default to checked, if an owner policy will default to unchecked. *There is no current
validation on this field so you may disregard this step (Figure 14)
o Clear icon : This icon is enabled when the jacket type is selected, click Clear icon to reset the
entire Policy Jacket section for which it was clicked only (Figure 13 or Figure 14) and a confirmation
message will display
Click Yes button to close the message to reset/clear the entire policy jacket section
Click No button to close the message and the policy jacket section will not be reset/cleared
o Liability Amount: The liability amount entered will be verified against the single risk limitation for a
transaction as set forth in your Agency Agreement and if the amount is greater than or equal to that
single risk limitation amount, a notification message indicating an over the limit (OTL) request is
necessary to proceed with generating the policy jacket will display after clicking the Generate Jacket
button. [Refer to Subsection 1.012 in Section 5]

Revised 2/10/2017 Page 25 of 78
i. Addendum button: Only available on Short Form Loan jacket types
1. After Addendum button is selected do the following:
a. Type and format, as necessary, the language to be printed on the Addendum for the
policy jacket
o Click Cancel button to close the Addendum window and any data entered will not
be saved
o Click Done button when finished typing the addendum language to return to the
Generate Policy Jacket screen
The check mark on the Addendum button indicates something was typed
in the Addendum window (Figure 13)
ii. Endorsements button:
1. Select endorsements as needed for the jacket type
a. Selection of endorsements is especially important for the Short Form Loan policy
jackets since they can be visible on the pdf file
b. All endorsements selected will display on the Policy Remittance report for the
policy jacket(s) generated
2. After Endorsements button is selected do the following:
a. Select needed endorsements by clicking in the checkbox next to the endorsement
code
i. If there is a default charge amount for the endorsement it will be
populated in the box next to the endorsement selected. You can edit the
amount in the text box as necessary
1. Click Calculate button to total all selected endorsement charges
b. Click Cancel button to close the Endorsements screen and any data entered will
not be saved
c. Click Done button when all endorsements are selected to return to the Generate
Policy Jacket screen
i. The count on the Endorsements button indicates the number of
endorsements selected (Figure 13 or Figure 14)
Revised 2/10/2017 Page 26 of 78
ii. The box next to the Endorsements button shows what endorsements were
selected and may be included on a short form loan policy and/or included
on the remittance report as indicated above (Figure 13 or Figure 14)
c. Delivery Options Section: Entering email(s) or fax number(s)) for distribution of the policy jacket is optional
o Click Include My Email Address checkbox to default your primary email address in the Email Letter To
field (Figure 13 or Figure 14)
o When email and/or fax is entered, an email with pdf attachment of the policy jacket and/or fax with a
copy of the policy jacket will automatically be sent to the recipient(s) upon successful generation of
the policy jacket document
o An email and/or fax can be sent at a later time after the policy jacket has been successfully generated
[Refer to Subsection 1.021 in Section 7]
4. Click Cancel button at any time to close the Generate Policy Jacket screen and any data entered will not be saved
5. Click Generate Jacket button to process the policy jacket pdf file(s) and save the entered data (Figure 13 or Figure 14)
a. If there are any errors a validation flag will display next to or below the errored field(s) that briefly describe
the error; all errors must be fixed to continue
b. If the liability amount entered exceeds the Single Risk Limitation for a transaction as set forth in your Agency
Agreement a notification message will display indicating an Over the Limit (OTL) authorization request must be
obtained to complete the generation of the policy jacket document. [Refer to Subsection 1.012 in Section 5]
o An automatic email notification will be sent to the assigned Agency Representative and WFG
Underwriting staff notifying them that an over the limit policy jacket was submitted on the file
c. If there are no errors a generation message is displayed, click OK button

Revised 2/10/2017 Page 27 of 78
Single Policy Jacket Simultaneous Policy Jacket
6. While the policy jacket is processing, you will be navigated to the WFG File Services screen, Jackets tab
The policy jacket(s) generated being generated will display on the Jackets tab on the lower portion of the
screen and can be reviewed by clicking the View action [Refer to Subsection 1.020 in Section 7]
If the file record did not previously exist it will automatically be established on the top portion of the screen
using the information provided in the policy jacket, including the Agency selected, file status, file number,
property type and property address
If the file record did previously exist the policy jacket will be added to it as a new service and any modifications
to the property information will automatically be updated
When the policy jacket(s) are successfully generated the Actions [Void All, Edit, Send, View, Void] will be
enabled
The policy number(s) are available for remittance when the Policy Status is Assigned
The policy number(s) are not available for remittance when the Policy Status is An Error occurred [Refer to
Subsection 1.011 in Section 4]
Revised 2/10/2017 Page 28 of 78
7. If an additional policy jacket is needed on the current file whether simultaneous or not, click the Generate New Jacket
button on the lower portion of the Jackets tab to display the Generate Policy Jacket screen once again. Note if only
changes need to be made to the existing policy jacket select the Edit action rather than create a new one [Refer to
Subsection 1.019 in Section 7]
a. On the Generate Policy Jacket screen notice the Agency Details, File Number, Property Type and Property
Information entered previously and saved to the file record will prepopulate
i. Property Type: Verify the Property Type is correct for this file
1. Correct: Skip to step 7aii below
2. Not Correct: Click Cancel button to return to the WFG File Services screen to update the
incorrect property type on the file record. [Refer to Section 11] Once the property type is
correct repeat the steps described in this item number (7)
ii. Issue Simultaneous Policy checkbox: Checkbox is enabled if there is not simultaneous policy jackets
existing on the file. Checkbox is disabled if there is simultaneous policy jackets existing on the file
1. Add policy jacket(s) to file - Non-Existing simultaneous group: Click checkbox so it is
checked and 2 Policy Jacket sections for Residential property type or 3 Policy Jacket sections
for Non-Residential property type will automatically default on the Generate Policy Jacket
screen (Figure 21) to add multiple additional policy jackets to the file in addition to any
policy jackets already existing on the file
a. Issue up to 5 jackets on a Residential file and up to 8 on a Non-Residential file as
needed by clicking on the Add Policy Jacket button. At any time the limit is
exceeded for the type of policy (Owner, Loan) and property type (Residential, Non-
Residential) a notification message will display, follow the instructions provided
i. Click OK button to return to the Generate Policy Jacket screen

Revised 2/10/2017 Page 29 of 78
ii. Use the Clear icon as needed in the policy jacket section(s) that exceed
the limit to remove all the data then proceed with generating the policy
jacket(s) that do not exceed the limit
2. Add policy jacket to file - Existing simultaneous group: Checkbox remains unchecked and
locked, continue to selecting a Jacket Type
b. Select a Jacket Type in the Policy Jacket section and a notification message will be displayed indicating there is
an existing policy jacket (e.g. Owner, Loan, Binder) on the file (Figure 22)
Figure 21 – Generate Policy Jacket Screen - Simultaneous Policy Jacket Creation
Figure 22 – Notification Message There is Policy Jacket(s) That Exist on the File
i. Cancel button: Click to exit the Generate Policy Jacket screen and return to the Jackets tab on the
WFG File Services screen
ii. Proceed button: Click to continue creating new jacket(s) and a confirmation message will display
asking if the new policy jacket(s) will be simultaneous with the existing loan or owner policy on the
file

Revised 2/10/2017 Page 30 of 78
1. No button: Click to continue creating policy jacket(s). The Generate Policy Jacket screen
will automatically refresh, the available data entry fields will be displayed for the selected
Jacket Type; fields in bold are required. Enter policy jacket information
o When Issue Simultaneous Policy checkbox is initially checked any policy jackets
generated now will become simultaneous, but any existing policy jacket on the file
will not become a part of the simultaneous group
Note the existing policy jacket information on the file did not prepopulate
on the Generate Policy Jacket screen for review
Click Add Policy Jacket button as needed to add additional Policy Jacket
sections to create the simultaneous group
o When Issue Simultaneous Policy checkbox is not initially checked the policy jacket
generated now will not become simultaneous with an existing policy jacket on the
file
Each jacket will be considered single issue from a system standpoint
Revised 2/10/2017 Page 31 of 78
2. Yes button: Click to continue creating simultaneous policy jacket(s)
o When Issue Simultaneous Policy checkbox is initially checked any policy jackets
generated now will become simultaneous with the existing policy jacket on the file
Note the existing policy jacket information prepopulated on the Generate
Policy Jacket screen for review. Click the plus sign to expand the Policy
Jacket section for review as needed
o When Issue Simultaneous Policy checkbox is not initially checked the policy jacket
generated now will become simultaneous with an existing policy jacket on the file
due to selecting Yes on the simultaneous message
Note the Issue Simultaneous Policy checkbox will automatically become
checked and locked
c. Click Cancel button at any time to close the Generate Policy Jacket screen and any data entered will not be
saved
d. When all information is entered click Generate Jacket button to process the policy jacket pdf file(s) and save
the entered data
i. If there are any errors a validation flag will display next to or below the errored field(s) that briefly
describe the error; all errors must be fixed to continue
ii. If the liability amount entered exceeds the Single Risk Limitation for a transaction as set forth in your
Agency Agreement a notification message will display indicating an Over the Limit (OTL) authorization
request must be obtained to complete the generation of the policy jacket document. [Refer to
Subsection 1.012 in Section 5]

Revised 2/10/2017 Page 32 of 78
1. An automatic email notification will be sent to the assigned Agency Representative and WFG
Underwriting staff notifying them that an over the limit policy jacket was submitted on the
file
iii. If there are no errors
1. And the liability amount entered is not over the limit, a generation message is displayed,
click OK button
2. And the liability amount entered is over the limit, an OTL Request is submitted but not yet
reviwed by WFG Underwriting, a generation message is displayed, follow the instructions
provided, click OK button
e. While the policy jacket is processing, you will automatically be navigated to the WFG File Services screen,
Jackets tab
The policy jacket(s) generated being generated will display on the Jackets tab on the lower portion of
the screen. Click the plus sign next to any policy jacket to review the Simultaneous With information
as needed
Since the file record did previously exist the policy jacket will be added to it as a new service and any
modifications to the property information will automatically be updated
When the policy jacket(s) are successfully generated the Actions [Void All, Edit, Send, View, Void] will
be enabled
The policy number(s) are available for remittance when the Policy Status is Assigned
The policy number(s) are not available for remittance when the Policy Status is An Error occurred
[Refer to Subsection 1.011 in Section 4]

Revised 2/10/2017 Page 33 of 78
8. If an additional policy jacket is not needed on the current file, but you want to generate a policy jacket for a different
file, hover over the Create Tab, select Jacket and a confirmation message is displayed asking if you want to create a
new policy jacket for the current file
a. No button: Click to display the Generate Policy Jacket screen again and create a new policy jacket on a
different file repeating the steps for creating a new policy jacket
b. Yes button: Click to display the Generate Policy Jacket screen and create a new policy jacket on the current
file repeating the steps for creating a new policy jacket

Revised 2/10/2017 Page 34 of 78
1.011 Regenerate Policy Jacket Document in An Error Occurred Policy Status
1. If there was an issue generating the policy jacket document on the file the Policy Status will display An Error occurred
and a Regenerate link will display in the Actions on the lower portion of the WFG File Services screen, Jackets tab
(Figure 23)
a. Click Regenerate link to reprocess the policy jacket document (Figure 23)
i. If the document failed to process again the Policy Status will remain An Error occurred and Error |
Regenerate link will display in the Actions (Figure 23)
1. Click Error link to display contact information for further assistance (Figure 24), click OK
button to close the informational message and return to the WFG File Services screen,
Jackets tab
Figure 23 – WFG File Services Screen – Jackets tab
Figure 24 – Issue with Regeneration of Policy Jacket Informational Message
Revised 2/10/2017 Page 35 of 78
5 Over the Limit (OTL) Request Creation
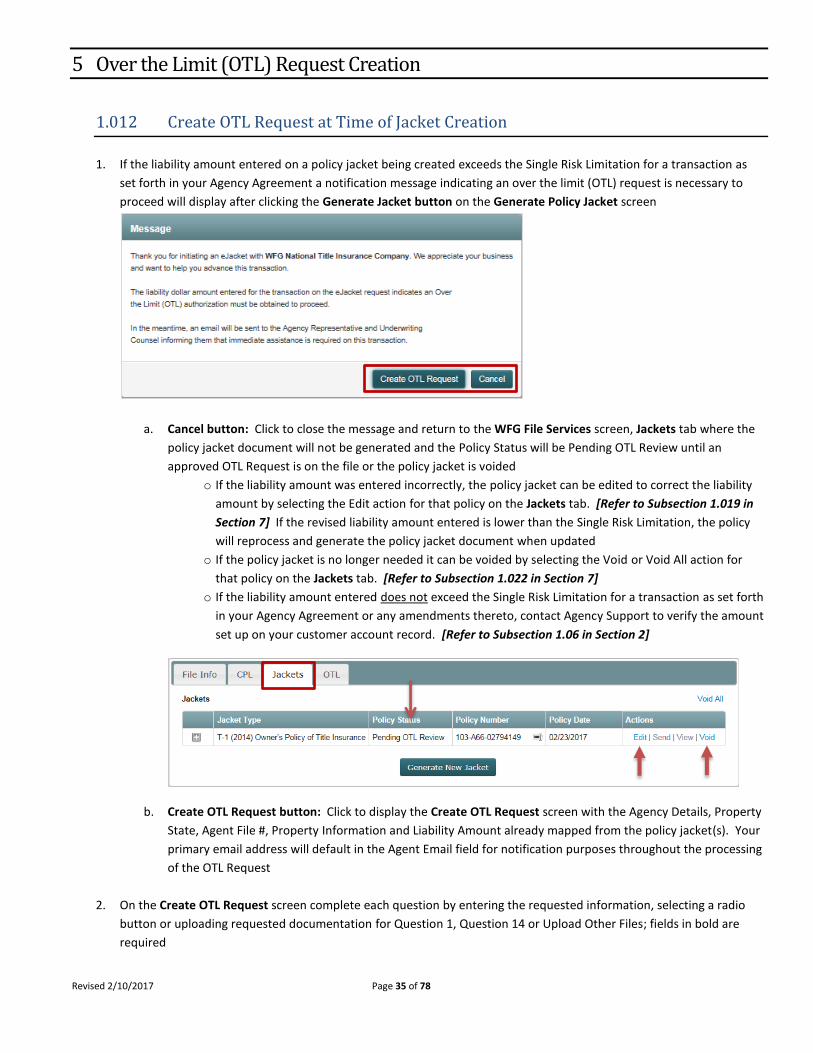
1.012 Create OTL Request at Time of Jacket Creation
1. If the liability amount entered on a policy jacket being created exceeds the Single Risk Limitation for a transaction as
set forth in your Agency Agreement a notification message indicating an over the limit (OTL) request is necessary to
proceed will display after clicking the Generate Jacket button on the Generate Policy Jacket screen
a. Cancel button: Click to close the message and return to the WFG File Services screen, Jackets tab where the
policy jacket document will not be generated and the Policy Status will be Pending OTL Review until an
approved OTL Request is on the file or the policy jacket is voided
o If the liability amount was entered incorrectly, the policy jacket can be edited to correct the liability
amount by selecting the Edit action for that policy on the Jackets tab. [Refer to Subsection 1.019 in
Section 7] If the revised liability amount entered is lower than the Single Risk Limitation, the policy
will reprocess and generate the policy jacket document when updated
o If the policy jacket is no longer needed it can be voided by selecting the Void or Void All action for
that policy on the Jackets tab. [Refer to Subsection 1.022 in Section 7]
o If the liability amount entered does not exceed the Single Risk Limitation for a transaction as set forth
in your Agency Agreement or any amendments thereto, contact Agency Support to verify the amount
set up on your customer account record. [Refer to Subsection 1.06 in Section 2]
b. Create OTL Request button: Click to display the Create OTL Request screen with the Agency Details, Property
State, Agent File #, Property Information and Liability Amount already mapped from the policy jacket(s). Your
primary email address will default in the Agent Email field for notification purposes throughout the processing
of the OTL Request
2. On the Create OTL Request screen complete each question by entering the requested information, selecting a radio
button or uploading requested documentation for Question 1, Question 14 or Upload Other Files; fields in bold are
required

Revised 2/10/2017 Page 36 of 78
Agent Email: Verify your defaulted email address is accurate for notifications on the OTL Request progress.
You can update the email on the screen if not correct, but also notify Agency Support to update your user
account for future notifications. [Refer to Subsection 1.06 in Section 2]
Property Information: If vacant land or no property address or zip code you can enter descriptive data in the
Short Legal field which will override the Address1, City and Zip from being required
Question 1: If the commitment/preliminary report is not yet issued, select No and a copy of the information
can be attached at a later date after the OTL Request has been submitted
Question 2: The liability amount entered on the policy jacket, policy jackets if simultaneous, will default in the
Lenders Amount of Policy and/or Owners Amount of Policy fields. If the amount entered is $3,000,001.00 or
greater the request will require Senior Underwriter Approval in addition to the first level Underwriter
Approval

Revised 2/10/2017 Page 37 of 78

Revised 2/10/2017 Page 38 of 78
3. Click Cancel button at any time to close the Create OTL Request screen and be navigated to the WFG File Services
screen, OTL tab; any data entered will not be saved
Click the Create OTL Request button as necessary to begin a new OTL Request on this file. Note the liability
amount will not be mapped from the policy jacket(s) initiated and will have to be entered manually along with
the remaining information
Click the Jackets tab as needed to review the policy jacket(s). The policy jacket document will not be
generated and the policy status will remain in Pending OTL Review until an approved OTL Request is on the file
o If the liability amount was entered incorrectly, the policy jacket can be edited to correct the liability
amount by selecting the Edit action for that policy. [Refer to Subsection 1.019 in Section 7] If the
revised liability amount entered is lower than the Single Risk Limitation, the policy will reprocess and
generate the policy jacket document when updated.
o If the policy jacket is no longer needed it can be voided by selecting the Void or Void All action for
that policy. [Refer to Subsection 1.022 in Section 7]
4. Click Clear Form button to reset/clear questions 1 through 15, including the mapped liability amount(s) from the policy
jacket(s) and any documents that were added
5. Click Save and Close button and if all required information in the top portion of the screen (above questions 1-15) is
entered a confirmation message will display confirming you want to save the OTL Request and return at a later time
a. Cancel button: Click to return to the Create OTL Request screen to continue with entering the OTL Request
data
b. Yes button: Click to close the Create OTL Request screen, save the entered data and attached documents in
the Incomplete OTL Status, and be navigated to the WFG File Services screen, OTL tab
i. The saved data can be accessed at a later time for completion by selecting the View action for that
OTL request on the file. [Refer to Section 10 and Subsection 1.024 in Section 8]
ii. The OTL Status will be Incomplete and may remain that way for 180 days or the OTL Status will be
systematically updated to Void. Notify Agency Support to have the OTL Request manually voided if
the transaction is not going to move forward. [Refer to Subsection 1.06 in Section 2]

Revised 2/10/2017 Page 39 of 78
iii. The policy jacket(s) for which the OTL Request is needed will remain in Pending OTL Review and the
policy jacket document(s) will not be generated until an approved OTL Request is on the file
1. If the liability amount was entered incorrectly, the policy jacket can be edited to correct the
liability amount by selecting the Edit action for that policy. [Refer to Subsection 1.019 in
Section 7] If the revised liability amount entered is lower than the Single Risk Limitation, the
policy will reprocess and generate the policy jacket document when updated.
2. If the policy jacket is no longer needed it can be voided by selecting the Void action for that
policy. [Refer to Subsection 1.022 in Section 7]
6. Click Submit OTL Request button and if all required information is entered a confirmation message will display
confirming you want to submit the OTL Request
a. Yes button: Click and a notification message indicating the over the limit request was submitted for review
will display
i. Click OK button to close the Create OTL Request screen, save the entered data, and be navigated to
the WFG File Services screen, OTL tab
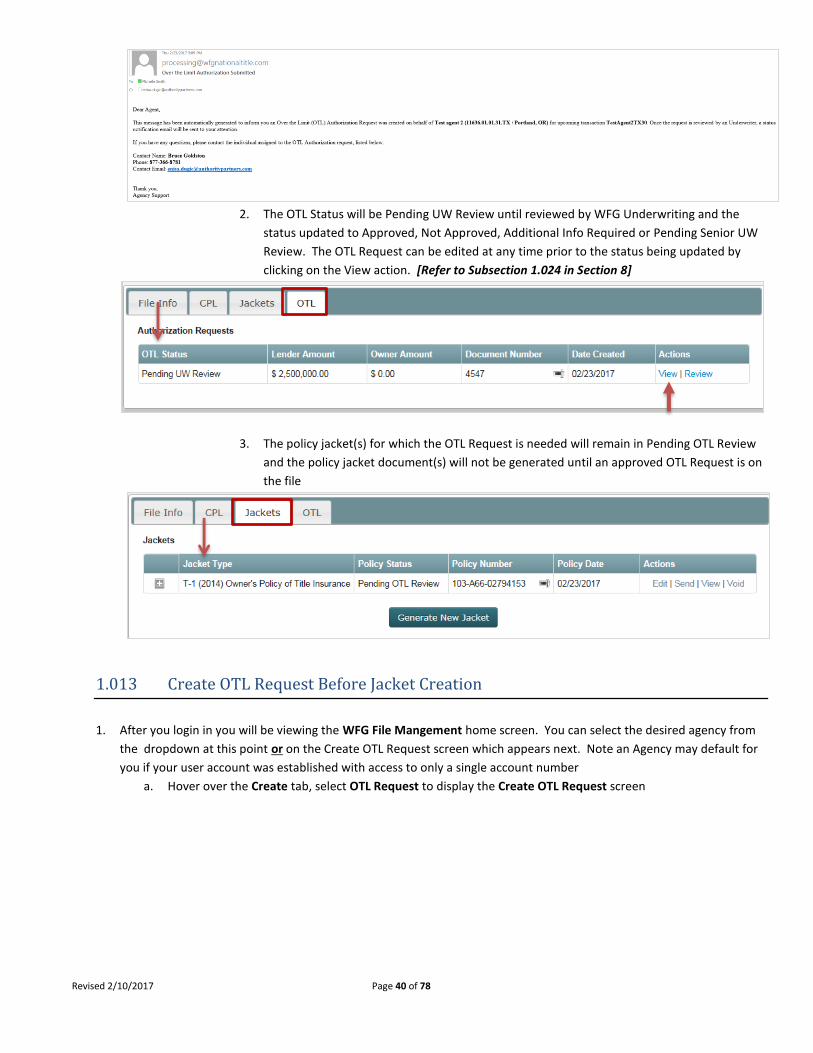
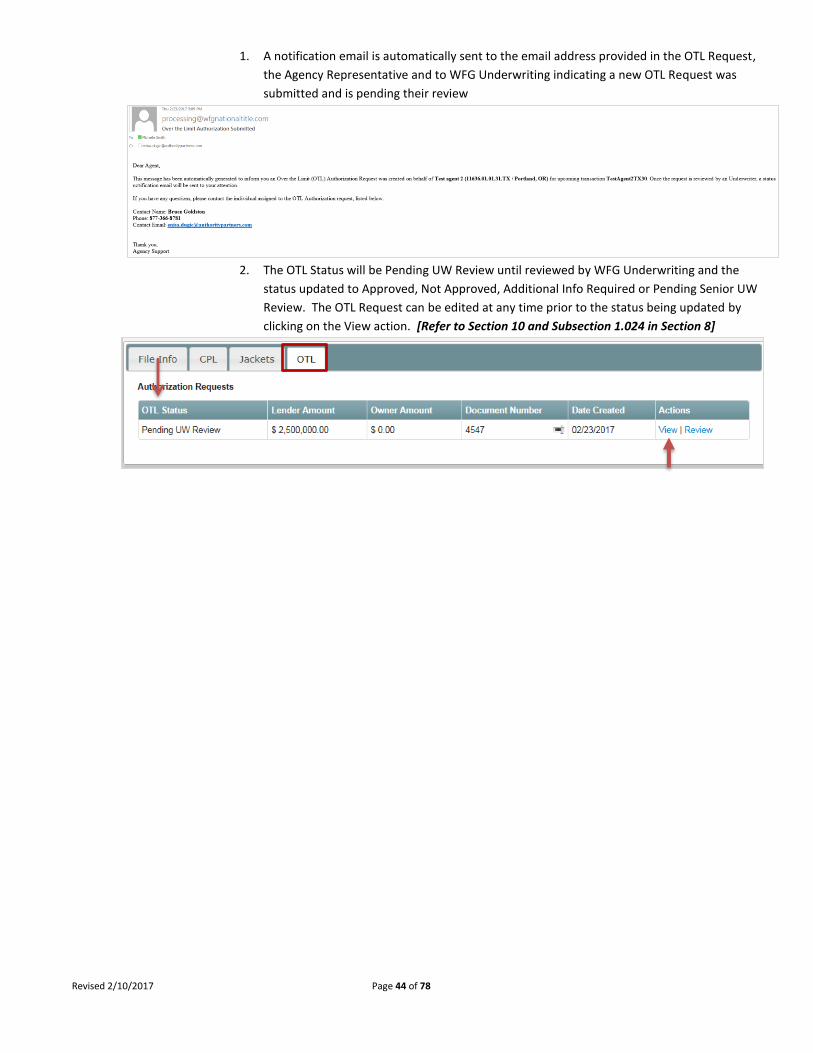
1. A notification email is automatically sent to the email address provided in the OTL Request,
the Agency Representative and to WFG Underwriting indicating a new OTL Request was
submitted and is pending their review
Revised 2/10/2017 Page 40 of 78
2. The OTL Status will be Pending UW Review until reviewed by WFG Underwriting and the
status updated to Approved, Not Approved, Additional Info Required or Pending Senior UW
Review. The OTL Request can be edited at any time prior to the status being updated by
clicking on the View action. [Refer to Subsection 1.024 in Section 8]
3. The policy jacket(s) for which the OTL Request is needed will remain in Pending OTL Review
and the policy jacket document(s) will not be generated until an approved OTL Request is on
the file
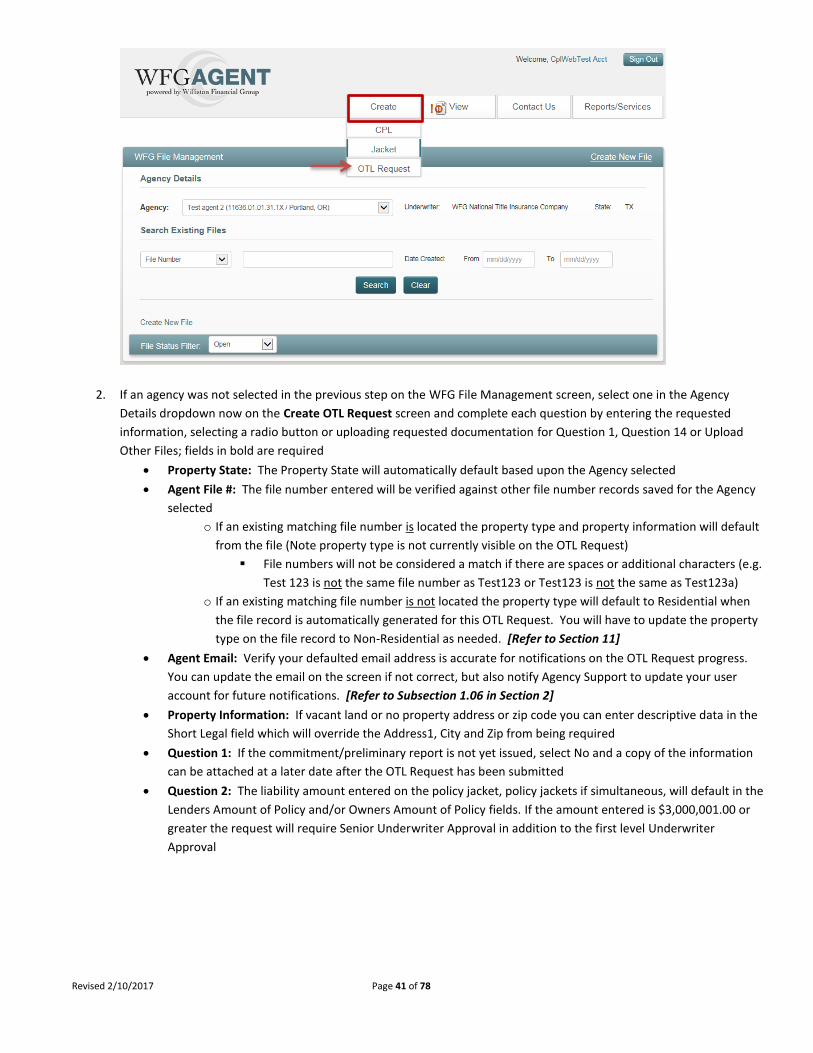
1.013 Create OTL Request Before Jacket Creation
1. After you login in you will be viewing the WFG File Mangement home screen. You can select the desired agency from
the dropdown at this point or on the Create OTL Request screen which appears next. Note an Agency may default for
you if your user account was established with access to only a single account number
a. Hover over the Create tab, select OTL Request to display the Create OTL Request screen
Revised 2/10/2017 Page 41 of 78
2. If an agency was not selected in the previous step on the WFG File Management screen, select one in the Agency
Details dropdown now on the Create OTL Request screen and complete each question by entering the requested
information, selecting a radio button or uploading requested documentation for Question 1, Question 14 or Upload
Other Files; fields in bold are required
Property State: The Property State will automatically default based upon the Agency selected
Agent File #: The file number entered will be verified against other file number records saved for the Agency
selected
o If an existing matching file number is located the property type and property information will default
from the file (Note property type is not currently visible on the OTL Request)
File numbers will not be considered a match if there are spaces or additional characters (e.g.
Test 123 is not the same file number as Test123 or Test123 is not the same as Test123a)
o If an existing matching file number is not located the property type will default to Residential when
the file record is automatically generated for this OTL Request. You will have to update the property
type on the file record to Non-Residential as needed. [Refer to Section 11]
Agent Email: Verify your defaulted email address is accurate for notifications on the OTL Request progress.
You can update the email on the screen if not correct, but also notify Agency Support to update your user
account for future notifications. [Refer to Subsection 1.06 in Section 2]
Property Information: If vacant land or no property address or zip code you can enter descriptive data in the
Short Legal field which will override the Address1, City and Zip from being required
Question 1: If the commitment/preliminary report is not yet issued, select No and a copy of the information
can be attached at a later date after the OTL Request has been submitted
Question 2: The liability amount entered on the policy jacket, policy jackets if simultaneous, will default in the
Lenders Amount of Policy and/or Owners Amount of Policy fields. If the amount entered is $3,000,001.00 or
greater the request will require Senior Underwriter Approval in addition to the first level Underwriter
Approval

Revised 2/10/2017 Page 42 of 78

Revised 2/10/2017 Page 43 of 78
3. Click Cancel button at any time to close the Create OTL Request screen and be navigated back to the WFG File
Management screen; any data entered will not be saved
4. Click Clear Form button to reset/clear questions 1 through 15, including the mapped liability amount(s) from the policy
jacket(s) and any documents that were added
5. Click Save and Close button and if all required information in the top portion of the screen (above questions 1-15) is
entered a confirmation message will display confirming you want to save the OTL Request and return at a later time
a. Cancel button: Click to return to the Create OTL Request screen to continue with entering the OTL Request
data
b. Yes button: Click to close the Create OTL Request screen, save the entered data and attached documents in
the Incomplete OTL Status, and be navigated to the WFG File Services screen, OTL tab
i. The saved data can be accessed at a later time for completion by selecting the View action for that
OTL request on the file. [Refer to Section 10 and Subsection 1.024 in Section 8]
ii. The OTL Status will be Incomplete and may remain that way for 180 days or the OTL Status will be
systematically updated to Void. Notify Agency Support to have the OTL Request manually voided if
the transaction is not going to move forward. [Refer to Subsection 1.06 in Section 2]
6. Click Submit OTL Request button and if all required information is entered a confirmation message will display
confirming you want to submit the OTL Request
a. Yes button: Click and a notification message indicating the over the limit request was submitted for review
will display
i. Click OK button to close the Create OTL Request screen, save the entered data, and be navigated to
the WFG File Services screen, OTL tab
Revised 2/10/2017 Page 44 of 78
1. A notification email is automatically sent to the email address provided in the OTL Request,
the Agency Representative and to WFG Underwriting indicating a new OTL Request was
submitted and is pending their review
2. The OTL Status will be Pending UW Review until reviewed by WFG Underwriting and the
status updated to Approved, Not Approved, Additional Info Required or Pending Senior UW
Review. The OTL Request can be edited at any time prior to the status being updated by
clicking on the View action. [Refer to Section 10 and Subsection 1.024 in Section 8]

Revised 2/10/2017 Page 45 of 78
6 Closing Protection Letter Actions (Cancel, Edit, Send, View, Cancel All)
1. After creating a closing protection letter you are automatically navigated to the WFG File Services screen, CPL tab
where various Actions will be enabled for a closing protection letter based upon the Letter Status a. To locate a file record when not already on the WFG File Services screen navigate to the WFG File
Management home screen [Refer to Subsection 1.05 in Section 2] and search for the file record to navigate
to the CPL tab. [Refer to Section 10]
Figure 25 – WFG File Services Screen – CPL tab
1.014 Cancel Closing Protection Letter
1. Click Cancel hyperlink (Figure 25) to update the selected closing protection letter Letter Status to Cancelled when the
closing protection letter is not needed and a confirmation message will display confirming you want to cancel the
selected closing protection letter
Hyperlink is only available on closing protection letters in the Assigned Letter Status

Revised 2/10/2017 Page 46 of 78
a. No button: Click to close the notification message and return to the CPL tab on the file
b. Yes button: Click to proceed to the CPL Maintenance screen to select a general cancel reason
2. On the CPL Maintenance screen select a general cancel reason in the Cancel Reason dropdown
a. Cancel button: Click to close the CPL Maintenance screen and return to the CPL tab on the file. The selected
cancel reason will not be saved and status of the closing protection letter will not be updated
b. Save button: Click to update the Letter Status of the closing protection letter. CPL Maintenance screen will
automatically close and return to the CPL tab on the file
o The Letter Status on the selected closing protection letter will be updated to Cancelled and all Actions
are disabled
o A closing protection letter cannot be reinstated once cancelled, a new closing protection letter must
be created. [Refer to Subsection 1.08 in Section 3]
1.015 Edit Closing Protection Letter
1. Click Edit hyperlink (Figure 25) for the closing protection letter to review or edit the current closing protection letter
information saved and the Edit Closing Protection Letter screen will display
Hyperlink is only available on closing protection letters in the Assigned Letter Status
2. On the Edit Closing Protection Letter screen you may get a confirmation message notifying you that the property
information on the file for which the closing protection letter was created has changed

Revised 2/10/2017 Page 47 of 78
a. Cancel button: Click to close the confirmation message, close out of Edit mode on the closing protection
letter and return to the WFG File Services screen, CPL tab
b. No button: Click to close the confirmation message and continue editing the closing protection letter without
the new property information (address) updates
c. Yes button: Click to close the confirmation message, update the property information (address); continue
editing the closing protection letter information as needed
3. On the Edit Closing Protection Letter screen update Letter Type, Liability Amount, Property Information, Additional
Letter Information, Lender, Approved Attorney (if displayed), Covered Parties (if displayed) and/or Delivery Options;
fields in bold are required

Revised 2/10/2017 Page 48 of 78
a. Cancel button: Click to close the Edit Closing Protection Letter screen and return to the CPL tab on the file;
any data entered will not be saved
b. Update Letter button: Click to generate a new closing protection letter pdf file with a new Letter Number
and save the updated data, a generation message is displayed
i. Click OK button to close the generation message
4. While the closing protection letter is processing, you will automatically be navigated back to the WFG File Services
screen, CPL tab (Figure 25)
The closing protection letter generated will display on the CPL tab on the lower portion of the screen in the
Assigned Letter Status and the original closing protection letter edited will automatically be updated to the
Cancelled Letter Status
When the closing protection letter is successfully generated the Actions [Cancel All, Cancel, Edit, Send, View]
are enabled
The closing protection letter is available for validation and/or remittance when the Letter Status is Assigned
The closing protection letter is not available for validation and/or remittance when the Letter Status is An
Error occurred [Refer to Subsection 1.09 in Section 3]
1.016 Send Closing Protection Letter
1. Click Send hyperlink (Figure 25) to forward a pdf copy of the closing protection letter via Fax and/or Email and the Send
Document screen will be displayed
Hyperlink is only available on closing protection letters in the Assigned Letter Status
2. On the Send Document screen enter fax and/or Email information to enable Send button
a. Select the Include My Email Address checkbox to automatically populate the your primary Email address in
the Email field
o Verify your defaulted email address is accurate. You can update the email on the screen if not correct,
but also notify Agency Support to update your user account for future notifications. [Refer to
Subsection 1.06 in Section 2]
Revised 2/10/2017 Page 49 of 78
i. Cancel button: Click to close the Send Document screen and return to the CPL tab on the file
ii. Send button: Click to send the closing protection letter pdf copy to the recipients. Send Document
screen will automatically close and return to the CPL tab on the file
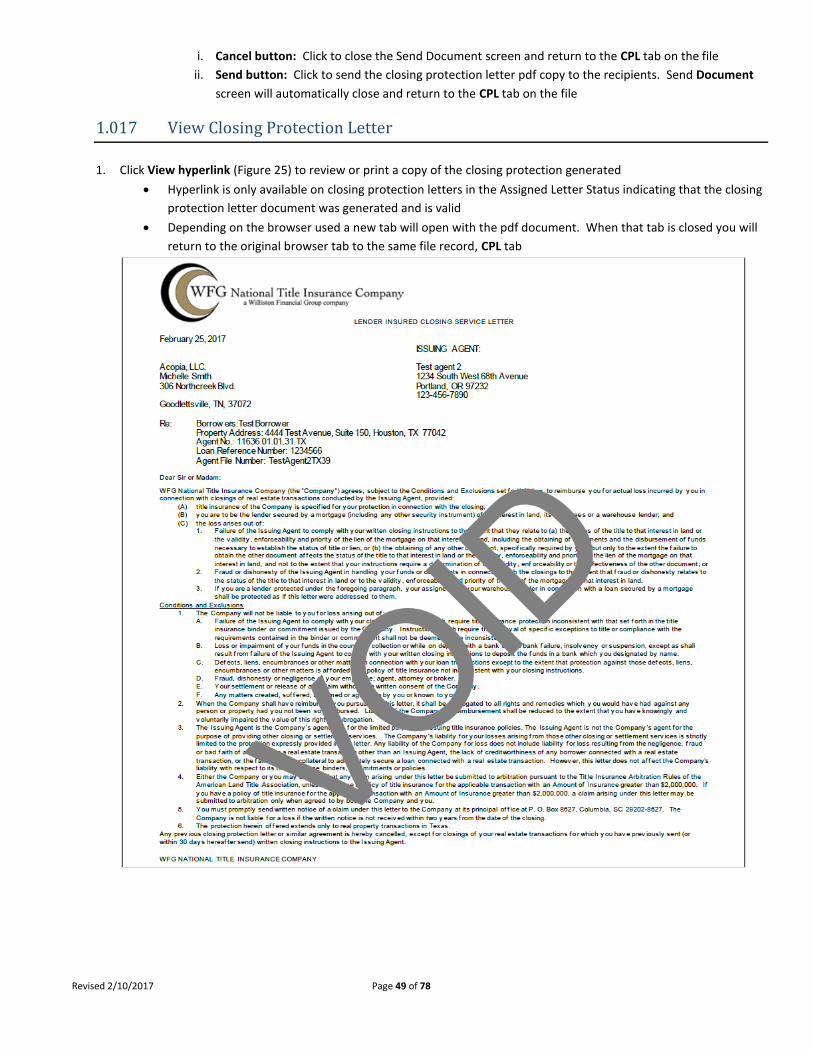
1.017 View Closing Protection Letter
1. Click View hyperlink (Figure 25) to review or print a copy of the closing protection generated
Hyperlink is only available on closing protection letters in the Assigned Letter Status indicating that the closing
protection letter document was generated and is valid
Depending on the browser used a new tab will open with the pdf document. When that tab is closed you will
return to the original browser tab to the same file record, CPL tab

Revised 2/10/2017 Page 50 of 78
1.018 Cancel All Closing Protection Letters
1. Click Cancel All hyperlink (Figure 25) to update all closing protection letters Letter Status to Cancelled when the closing
protection letters are not needed and a confirmation message will display confirming you want to cancel all closing
protection letters
Hyperlink is only available on closing protection letters in the Assigned Letter Status
a. No button: Click to close the notification message and return to the CPL tab on the file
b. Yes button: Click to proceed to the CPL Maintenance screen to select a general cancel reason for each closing
protection letter
2. On the CPL Maintenance screen select a general cancel reason in the Cancel Reason dropdown
a. Cancel button: Click to close the CPL Maintenance screen and return to the CPL tab on the file. The selected
cancel reason(s) will not be saved and status of the closing protection letters will not be updated
b. Next button: Click after a cancel reason is selected and until the Save button is enabled on the last closing
protection letter
c. Save button: Click to update the letter status of the closing protection letters. CPL Maintenance screen will
automatically close and return to the CPL tab on the file
o The Letter Status on all closing protection letters will be updated to Cancelled and all Actions are
disabled
o A closing protection letter cannot be reinstated once cancelled, a new closing protection letter must
be created. [Refer to Subsection 1.08 in Section 3]

Revised 2/10/2017 Page 51 of 78
7 Policy Jacket Actions (Edit, View, Send, Void, Void All)
1. After creating a policy jacket you are automatically navigated to the WFG File Services screen, Jackets tab where
various Actions will be enabled for a policy jacket based upon the Policy Status a. To locate a file record when not already on the WFG File Services screen navigate to the WFG File
Management home screen [Refer to Subsection 1.05 in Section 2] and search for the file record to navigate
to the Jackets tab. [Refer to Section 10]
Figure 26 – WFG File Services Screen – Jackets tab

Revised 2/10/2017 Page 52 of 78
1.019 Edit Policy Jacket
5. Click Edit hyperlink (Figure 26) for the policy jacket to review or edit the current policy information saved and the Edit
Policy Jacket / Edit Reason screen will display requesting a reason for the jacket revision on the selected policy jacket
Hyperlink is only available on policy jackets in the Assigned or Pending OTL Review* Policy Status
6. The Edit Policy Jacket / Edit Reason screen will be displayed, enter a brief edit reason for reviewing or editing the
policy jacket data
a. Cancel button: Click to exit the Edit Policy Jacket / Edit Reason screen and return to the Jackets tab on the
file; the Edit Reason entered will not be saved
b. Edit Jacket button: Click to display the Edit Policy Jacket screen
*The Edit Action for a Policy Jacket in Pending OTL Review Policy Status will only be enabled if the OTL Request was not
approved
7. On the Edit Policy Jacket screen you may get a confirmation message notifying you that the property information on
the file for which the policy jacket was created has changed
a. Cancel button: Click to close the confirmation message, close out of Edit mode on the policy jacket and return
to the WFG File Services screen, Jackets tab
b. No button: Click to close the confirmation message and continue editing the policy jacket without the new
property information (address) updates
c. Yes button: Click to close the confirmation message, update the property information (address); continue
editing the policy jacket information as needed
8. On the Edit Policy Jacket screen you may get a confirmation message notifying you that there are endorsements
selected for the policy jacket that are invalid due to a change in property type on the file record
a. Proceed button: Click to proceed to the Endorsements screen [Refer to Subsection 1.010 in Section 4] where
the invalid endorsements previously selected will automatically be removed. Select new endorsements that
are relevant for the policy jacket and property type as needed

Revised 2/10/2017 Page 53 of 78
b. Show Endorsements button: Click to proceed to the Endorsements screen [Refer to Subsection 1.010 in
Section 4] where the invalid endorsements previously selected will be present and still checked. Uncheck the
endorsements that are invalid or no longer relevant for the policy jacket and property type and reselect any
endorsements that are relevant
9. On the Edit Policy Jacket screen the policy jacket section for the policy number selected for Edit will be expanded for
review and any simultaneous Policy Jacket(s) generated on the file will display as read only on the screen, click the plus
sign to expand the simultaneous Policy Jacket section(s) to review as needed
a. Update Property Information section, Policy Jacket section and/or Delivery Options section; fields in bold are
required
i. Cancel button: Click to close the Edit Policy Jacket screen and return to the Jackets tab on the file;
any data entered will not be saved
ii. Update Jacket button: Click to regenerate a new policy jacket pdf file with the same policy number
and save the updated data, a generation message is displayed
1. Click OK button to close the generation message
10. While the policy jacket is processing, you will automatically be navigated back to the WFG File Services screen, Jackets
tab (Figure 26)
The policy jacket regenerated will display on the Jackets tab on the lower portion of the screen. Click the plus
sign next to any policy jacket to review the Simultaneous With information as needed
When the policy jacket is successfully regenerated the Actions [Void All, Edit, Send, View, Void] will be enabled
The policy number is available for remittance when the Policy Status is Assigned
The policy number is not available for remittance when the Policy Status is An Error occurred [Refer to
Subsection 1.011 in Section 4]

Revised 2/10/2017 Page 54 of 78
1.020 View Policy Jacket
1. Click View hyperlink (Figure 26) to review or print a copy of the policy jacket generated
Hyperlink is only available on policy jackets in the Assigned or Processed Policy Status indicating that the policy
jacket document was generated and is valid
Depending on the browser used a new tab will open with the pdf document. When that tab is closed you will
return to the original browser tab to the same file record, Jackets tab
1.021 Send Policy Jacket
1. Click Send hyperlink (Figure 26) to forward a pdf copy of the policy jacket via Fax and/or Email and the Send Document
screen will be displayed
Hyperlink is only available on policy jackets in the Assigned Policy Status

Revised 2/10/2017 Page 55 of 78
2. On the Send Document screen enter fax and/or Email information to enable Send button
a. Select the Include My Email Address checkbox to automatically populate the your primary Email address in
the Email field
o Verify your defaulted email address is accurate. You can update the email on the screen if not correct,
but also notify Agency Support to update your user account for future notifications. [Refer to
Subsection 1.06 in Section 2]
i. Cancel button: Click to close the Send Document screen and return to the Jackets tab on the file
ii. Send button: Click to send the policy jacket pdf copy to the recipients. Send Document screen will
automatically close and return to the Jackets tab on the file
1.022 Void Policy Jacket
1. Click Void hyperlink (Figure 26) to update the selected policy numbers Policy Status to Voided when the policy jacket is
not needed and a confirmation message will display confirming you want to void the selected policy jacket
Hyperlink is only available on policy jackets in the Assigned or Pending OTL Review* Policy Status
a. No button: Click to close the notification message and return to the Jackets tab on the file
b. Yes button: Click to proceed to the Policy Jacket Maintenance screen to select a general void reason
*The Void Action for a Policy Jacket in Pending OTL Review Policy Status will only be enabled if the OTL Request was
not approved
2. On the Policy Jacket Maintenance screen select a general void reason in the Void Reason dropdown
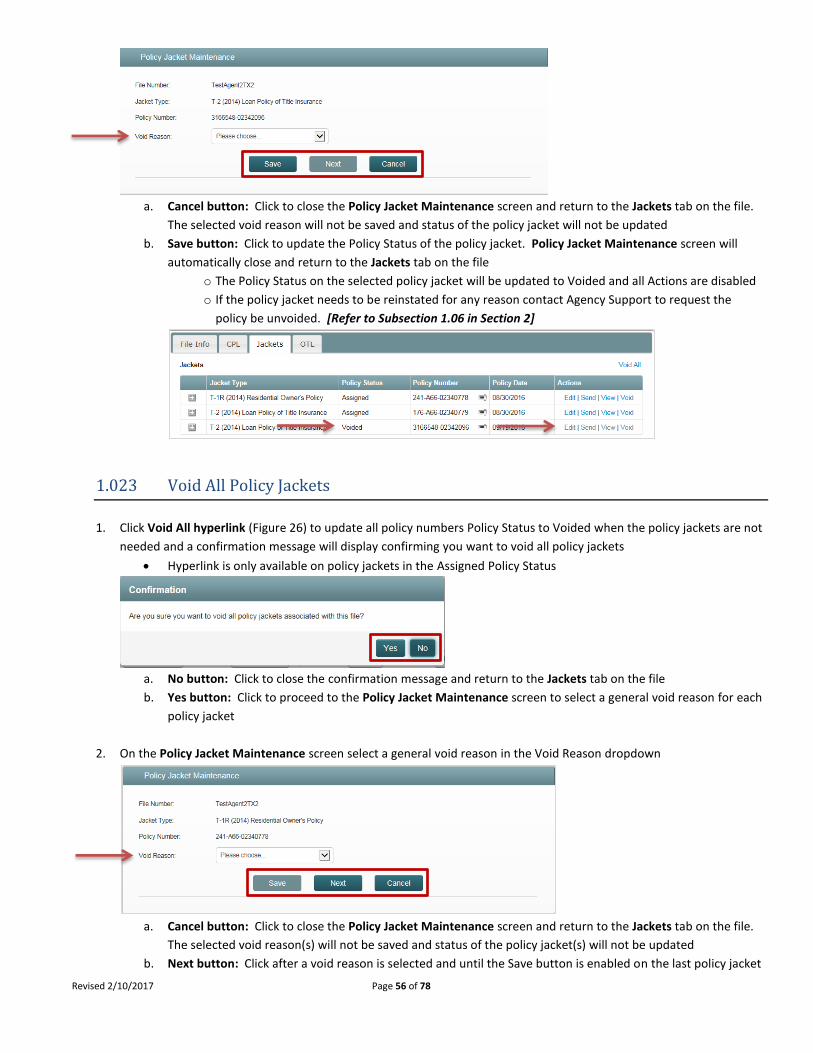
Revised 2/10/2017 Page 56 of 78
a. Cancel button: Click to close the Policy Jacket Maintenance screen and return to the Jackets tab on the file.
The selected void reason will not be saved and status of the policy jacket will not be updated
b. Save button: Click to update the Policy Status of the policy jacket. Policy Jacket Maintenance screen will
automatically close and return to the Jackets tab on the file
o The Policy Status on the selected policy jacket will be updated to Voided and all Actions are disabled
o If the policy jacket needs to be reinstated for any reason contact Agency Support to request the
policy be unvoided. [Refer to Subsection 1.06 in Section 2]
1.023 Void All Policy Jackets
1. Click Void All hyperlink (Figure 26) to update all policy numbers Policy Status to Voided when the policy jackets are not
needed and a confirmation message will display confirming you want to void all policy jackets
Hyperlink is only available on policy jackets in the Assigned Policy Status
a. No button: Click to close the confirmation message and return to the Jackets tab on the file
b. Yes button: Click to proceed to the Policy Jacket Maintenance screen to select a general void reason for each
policy jacket
2. On the Policy Jacket Maintenance screen select a general void reason in the Void Reason dropdown
a. Cancel button: Click to close the Policy Jacket Maintenance screen and return to the Jackets tab on the file.
The selected void reason(s) will not be saved and status of the policy jacket(s) will not be updated
b. Next button: Click after a void reason is selected and until the Save button is enabled on the last policy jacket

Revised 2/10/2017 Page 57 of 78
c. Save button: Click to update the policy status of the policy jacket(s). Policy Jacket Maintenance screen will
automatically close and return to the Jackets tab on the file
o The Policy Status on all policy jackets will be updated to Voided and all Actions are disabled
o If any one of the policy jackets need to be reinstated for any reason contact Agency Support to
request the policy be unvoided. [Refer to Subsection 1.06 in Section 2]

Revised 2/10/2017 Page 58 of 78
8 OTL Request Actions (View/Edit)
1. After creating an OTL Request you are automatically navigated to the WFG File Services screen, OTL tab where various
Actions will be enabled for an OTL Request based upon the OTL Status a. To locate a file record when not already on the WFG File Services screen navigate to the WFG File
Management home screen [Refer to Subsection 1.05 in Section 2] and search for the file record to navigate
to the OTL tab. [Refer to Section 10]
Figure 27 - WFG File Services Screen – OTL tab
1.024 View (Edit) OTL Request
1. Click View hyperlink (Figure 27) for the OTL Request to review or edit the current OTL Request information saved and
the View OTL Request screen will display (Figure 28)
2. Click Close button and be navigated to the WFG File Services screen, OTL tab when done reviewing information
3. Click Edit OTL Request button to enable the Update OTL Request screen to review and/or edit OTL Request
information

Revised 2/10/2017 Page 59 of 78
Figure 28 - View OTL Request Screen
Figure 29 - Update OTL Request Screen

Revised 2/10/2017 Page 60 of 78
4. On the Update OTL Request screen (Figure 29) you may get a confirmation message notifying you that the property
information on the file for which the OTL Request was created has changed

Revised 2/10/2017 Page 61 of 78
a. Cancel button: Click to close the confirmation message, close out of Edit mode on the OTL Request and return
to the WFG File Services screen, OTL tab
b. No button: Click to close the confirmation message and continue editing the OTL Request without the new
property information (address) updates
c. Yes button: Click to close the confirmation message, update the property information (address); continue
editing the OTL Request information as needed
5. On the Update OTL Request screen (Figure 29) update any questions by entering the requested information, selecting
a radio button or uploading any documentation for Question 1, Question 14 or Upload Other Files; fields in bold are
required
a. To upload documents only and not update any other OTL Request information, click Add files… button for the
question, select the document to upload, and once the File name is populated for the document(s) do the
following
i. Click Delete button to remove the individual document added and not save it to the OTL Request
ii. Click Delete All button to remove all unsaved documents added and not save them to the OTL
request
iii. Click Save Attachment button to attach and save the individual document added to the OTL Request
1. Click Cancel button to return to the WFG File Services screen, OTL tab when you are finished
adding documents
Once the document has been saved to the OTL Request it cannot be deleted
iv. Click Start Upload button to attach and save each of the added documents to the OTL Request
1. Click Cancel button to return to the WFG File Services screen, OTL tab when you are finished
adding documents
Once the documents have been saved to the OTL Request they cannot be deleted
b. If you want to save the attached documents and any updated OTL Request data as well, click the Update OTL
Request button [Refer to Step 7 below]

Revised 2/10/2017 Page 62 of 78
6. Click Cancel button at any time to close the Update OTL Request screen and be navigated to the WFG File Services
screen, OTL tab; any data edited will not be saved and the OTL Status will remain unchanged. Any documents that
were added and saved by clicking the Save Attachment button or Start Upload button will be saved
7. Incomplete OTL Status request only - Click Save and Close button and if all required information in the top portion of
the screen (above questions 1-15) is entered a confirmation message will display confirming you want to save the OTL
Request and return at a later time
a. Cancel button: Click to return to the Update OTL Request screen to continue with entering the OTL Request
data
b. Yes button: Click to close the Update OTL Request screen, save the entered data and attached documents in
the Incomplete OTL Status, and be navigated to the WFG File Services screen, OTL tab
i. The saved data can be accessed at a later time for completion by selecting the View action for that
OTL request on the file as indicated in this section
ii. The OTL Status will be Incomplete and may remain that way for 180 days or the OTL Status will be
systematically updated to Void. Notify Agency Support to have the OTL Request manually voided if
the transaction is not going to move forward. [Refer to Subsection 1.06 in Section 2]

Revised 2/10/2017 Page 63 of 78
8. Click Update OTL Request button and if all required information is entered a confirmation message will display
confirming you want to submit the updated OTL Request
a. Yes button: Click and a notification message indicating the over the limit request was submitted for review
will display {Message 1 displays for all OTL Requests in all OTL Statuses except Incomplete and Message 2 will
display for all OTL Requests in OTL Status Incomplete only}
Or
i. Click OK button to close the Update OTL Request screen, save the entered data, and be navigated to
the WFG File Services screen, OTL tab
1. A notification email is automatically sent to the Agency Representative and WFG
Underwriting indicating an updated OTL Request was submitted and is pending their review
2. The OTL Status will be Pending UW Review until reviewed by WFG Underwriting and the
status updated to Approved, Not Approved, Additional Info Required or Pending Senior UW
Review. The OTL Request can be edited at any time prior to the status being updated by
clicking on the View action. [Refer to Subsection 1.024 in Section 8]
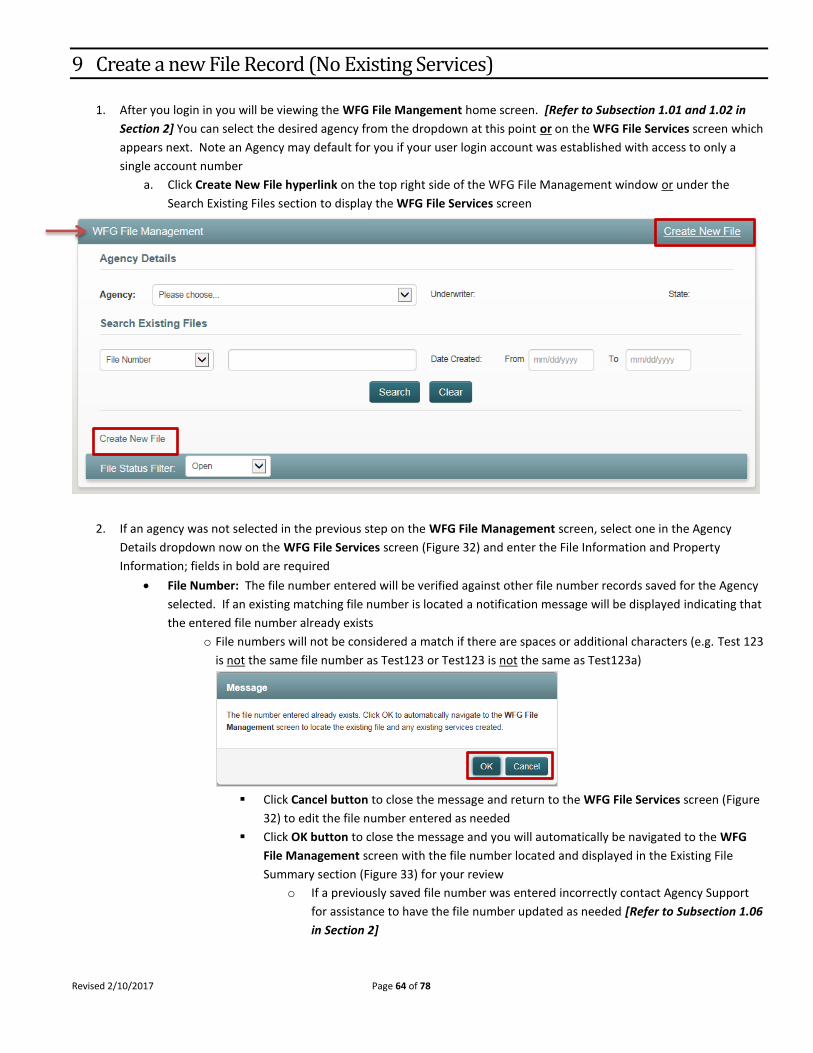
Revised 2/10/2017 Page 64 of 78
9 Create a new File Record (No Existing Services)
1. After you login in you will be viewing the WFG File Mangement home screen. [Refer to Subsection 1.01 and 1.02 in
Section 2] You can select the desired agency from the dropdown at this point or on the WFG File Services screen which
appears next. Note an Agency may default for you if your user login account was established with access to only a
single account number
a. Click Create New File hyperlink on the top right side of the WFG File Management window or under the
Search Existing Files section to display the WFG File Services screen
2. If an agency was not selected in the previous step on the WFG File Management screen, select one in the Agency
Details dropdown now on the WFG File Services screen (Figure 32) and enter the File Information and Property
Information; fields in bold are required File Number: The file number entered will be verified against other file number records saved for the Agency
selected. If an existing matching file number is located a notification message will be displayed indicating that
the entered file number already exists
o File numbers will not be considered a match if there are spaces or additional characters (e.g. Test 123
is not the same file number as Test123 or Test123 is not the same as Test123a)
Click Cancel button to close the message and return to the WFG File Services screen (Figure
32) to edit the file number entered as needed
Click OK button to close the message and you will automatically be navigated to the WFG
File Management screen with the file number located and displayed in the Existing File
Summary section (Figure 33) for your review o If a previously saved file number was entered incorrectly contact Agency Support
for assistance to have the file number updated as needed [Refer to Subsection 1.06
in Section 2]

Revised 2/10/2017 Page 65 of 78
3. Click Cancel button at any time to close the WFG File Services screen and be navigated back to the WFG File
Management screen; any data entered will not be saved
4. Click Create File button to save the entered data
If there are any errors a validation flag will display next to or below the errored field(s) that briefly describe
the error; all errors must be fixed to continue
a. If there were no errors a notification message will display indicating that the file record was successfully
created
i. Click OK button to be returned to the WFG File Services screen, File Info tab now displayed on the
lower portion of the screen
b. Click on the CPL tab, Jackets tab and/or OTL tab as needed to add a new service using the Generate New
Letter button, Generate New Jacket button or Create OTL Request button
c. To return to the WFG File Management home screen click the Search Existing Files hyperlink in the top right
corner of the WFG File Services screen or click the WFG Agent logo [Refer to Subsection 1.05 in Section 2]
Figure 30 - WFG File Services Screen

Revised 2/10/2017 Page 66 of 78
Figure 31 - WFG File Management Screen - Search Mode

Revised 2/10/2017 Page 67 of 78
10 File Record – Locate File/Locate Services/Update File
1.025 Search for a File Record
1. After you login in you will be viewing the WFG File Mangement home screen. [Refer to Subsection 1.01 and 1.02 in
Section 2] If your user login account was established with access to only a single account number the agency
dropdown will be prepopulated. If the agency dropdown is not prepopulated it is not necessary to select the desired
agency from the dropdown for search purposes
a. Search for All File Numbers
i. Select an agency in the agency dropdown, click Search button to display the Existing File Summary
grid with file number information populated
ii. To reduce the number of file records
1. Enter a partial file number in the Search Existing Files search field adjacent to File Number
value, click Search button again to repopulate the Exisiting File Summary grid
2. Choose a value other than Open in the File Status Filter

Revised 2/10/2017 Page 68 of 78
ii. To sort information in the Existing File Summary grid
1. Click on the following labels File Number, File Status or Date Created
a. Down arrow displayed will sort descending
b. Up arrow displayed will sort ascending
b. Search for a Single File Number
i. Select an agency (other than defaulted agency) in the agency dropdown (Optional)
o To conduct a wider search do not select an agency in the dropdown if you are unsure which
agency the file number belongs
ii. File Number is defaulted in the Search Existing Files dropdown, enter the file number value you wish
to search for in the adjacent field
o File numbers will not be considered a match if there are spaces or additional characters (e.g.
Test 123 is not the same file number as Test123 or Test123 is not the same as Test123a)
o Enter partial file number for a wider search and full file number for a smaller search
iii. Enter Date Created From and To (Optional)
o To conduct a wider search it is best to leave fields blank if unsure of the date range created
iv. Select File Status in the File Status Filter (Optional)
o To conduct a wider search leave the defaulted value Open, to conduct a smaller search
update the selection to an alternate file status v. Click Search button to display the Existing File Summary grid with file number information populated
vi. To reduce the number of file records
1. Enter a partial file number in the Search Existing Files search field adjacent to File Number
value, click Search button again to repopulate the Exisiting File Summary grid
2. Choose an agency in the Agent Filter if one is not defaulted
3. Choose a value other than Open in the File Status Filter
2. Click Clear button at any time to reset/clear the WFG File Management screen of any search criteria entered and close
the Existing File Summary grid if populated
3. Navigate through the Existing File Summary grid values by using the pagination arrows

Revised 2/10/2017 Page 69 of 78
1.026 Locate Services for a File Record
1. Locate the file record on the WFG File Management screen [Refer to Subsection 1.025 above] and choose a locate
service option below that best suits your needs (1a or 1b)
a. In the Existing File Summary section click the File Number hyperlink (Figure 32 – Orange Arrow) to
automatically navigate to the WFG File Services screen, File Info tab, then click the individual service tabs {File
Info, CPL, Jackets, OTL} to review the information generated for each service (Figure 33)
Figure 32 - WFG File Management Screen - Existing File Summary Grid
Figure 33 - WFG File Services Screen - With Services

Revised 2/10/2017 Page 70 of 78
b. In the Existing File Summary section click the plus sign next to the file number (Figure 32 – Blue Arrow) to
review which services have been created on the file record {File Information, Closing Protection Letter, Policy
Jacket, OTL Authorization Request} (Figure 34), click on a Service Name hyperlink to automatically navigate to
the WFG File Services screen tab for the service selected (Figure 35)
Figure 34 - WFG File Management Screen - Existing Services Grid
Figure 35 - WFG File Services Screen – Service Tabs

Revised 2/10/2017 Page 71 of 78
1.027 Update File Record Information
1. Locate the file record on the WFG File Management screen [Refer to Subsection 1.025 above], click the File Number
hyperlink in the Existing File Summary section (Figure 36) to automatically navigate to the WFG File Services screen,
File Info tab (Figure 37)
Figure 36 - WFG File Management Screen - Existing File Summary
Figure 37 - WFG File Services Screen - File Info

Revised 2/10/2017 Page 72 of 78
2. Click Edit button on the top portion of the screen to enable all fields where edits are allowed on the file record.
Update the Property Type and any other file information as needed; fields in bold are required
3. Click Cancel button to close the file record and any data edited will not be saved
4. When the file record information is updated, click Save button
a. If the property type was updated and there are no policy jackets generated on the file that are invalid for the
new property type, the file record will be saved and a notification message is displayed that the file was
successfully updated
i. Click OK button to close the notification message
1. Any existing closing protection letters, policy jackets or OTL Requests on the file will
automatically be updated to reflect the change in property type
b. If the property type was updated and there are policy jackets generated on the file that are invalid for the new
property type an action message will display asking if you want to have the invalid policy jacket(s) voided
i. No button: Click to close the action message and return to the file record in Edit mode, click Cancel
button as necessary to exit Edit mode
ii. Yes button: Click to close the action message and return to the file record in Edit mode, click Save
button and the file record will be saved and a notification message is displayed that the file was
successfully updated
ii. Click OK button to close the notification message
1. The system will automatically update the policy status on the invalid policy jacket(s) to
Voided, click on the Jackets tab as needed to review.
2. Any existing closing protection letters or OTL Requests on the file will automatically be
updated to reflect the change in property type
3. As needed, new Policy Jacket(s) will need to be generated under the new Property Type
c. If the File Status is updated to Opened In Error there were no services (CPL/Jacket/OTL) generated on the file.
The file record will be saved and a notification message is displayed that the file was successfully updated
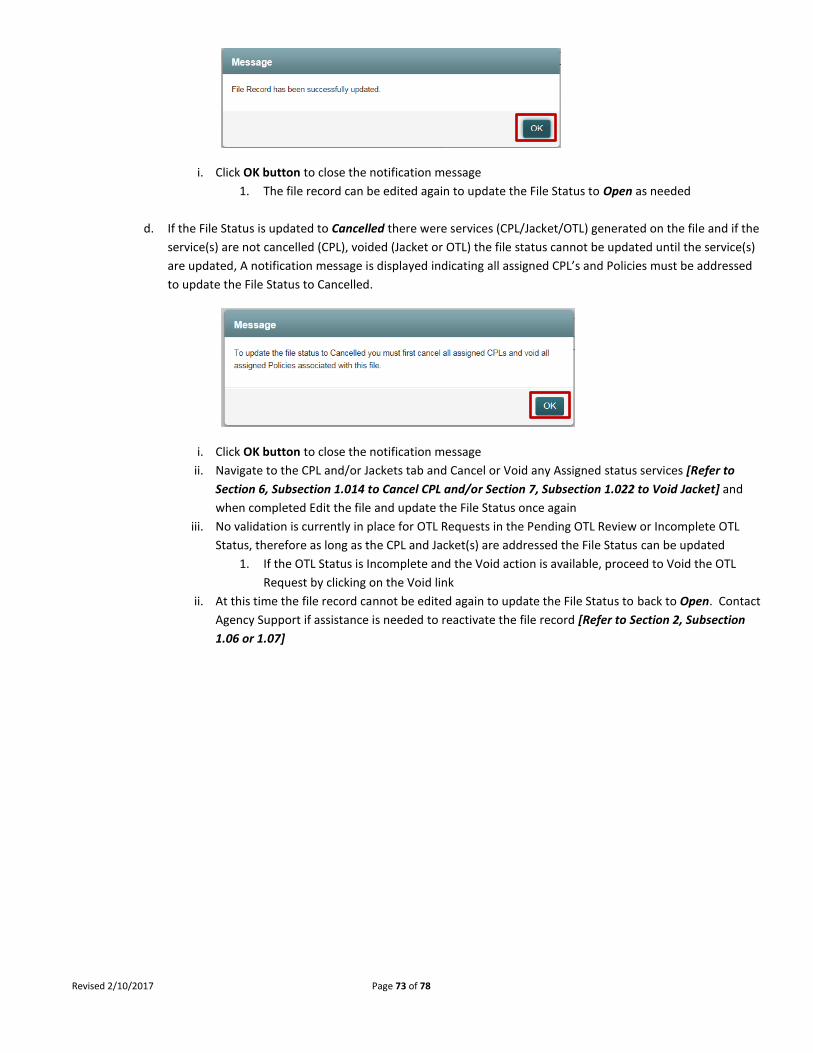
Revised 2/10/2017 Page 73 of 78
i. Click OK button to close the notification message
1. The file record can be edited again to update the File Status to Open as needed
d. If the File Status is updated to Cancelled there were services (CPL/Jacket/OTL) generated on the file and if the
service(s) are not cancelled (CPL), voided (Jacket or OTL) the file status cannot be updated until the service(s)
are updated, A notification message is displayed indicating all assigned CPL’s and Policies must be addressed
to update the File Status to Cancelled.
i. Click OK button to close the notification message
ii. Navigate to the CPL and/or Jackets tab and Cancel or Void any Assigned status services [Refer to
Section 6, Subsection 1.014 to Cancel CPL and/or Section 7, Subsection 1.022 to Void Jacket] and
when completed Edit the file and update the File Status once again
iii. No validation is currently in place for OTL Requests in the Pending OTL Review or Incomplete OTL
Status, therefore as long as the CPL and Jacket(s) are addressed the File Status can be updated
1. If the OTL Status is Incomplete and the Void action is available, proceed to Void the OTL
Request by clicking on the Void link
ii. At this time the file record cannot be edited again to update the File Status to back to Open. Contact
Agency Support if assistance is needed to reactivate the file record [Refer to Section 2, Subsection
1.06 or 1.07]

Revised 2/10/2017 Page 74 of 78
11 WFG Remittance Report Creation
1. After you login in you will be viewing the WFG File Mangement home screen [Refer to Subsection 1.025 above]. You
can select the desired agency from the dropdown at this point or on the Remittance Report screen which appears
next. Note an Agency may default for you if your user account was established with access to only a single account
number
a. Hover over the Reports/Services tab, select Remittance Report to display the Remittance Report screen
2. If an agency was not selected in the previous step on the WFG File Management screen, select one in the Agency
Details dropdown now on the Remittance Report screen; fields in bold are required
Select All Agencies value in the Agency Details dropdown to run the remittance report for all agencies for
which your user account has access and populate into one Excel file
a. Date Type: Select a date type
i. Policy Date: Effective date of the policy as entered in the Policy Date field for the policy jacket in
Policy Jacket Generator
ii. Generated Date: Actual date the policy(ies) were created in Policy Jacket Generator

Revised 2/10/2017 Page 75 of 78
b. State Date: Enter the earliest Policy date or Actual date of assigned policies to search for
c. End Date: Enter the latest Policy date or Actual date of assigned policies to search for
d. Include Remitted Policies: Check the box to include already remitted policies into the report (Optional). This
box is typically left unchecked
e. Exclude Endorsements: Check the box to exclude endorsements from the report (Optional). This box is
typically left unchecked
f. Exclude CPL: Check the box to exclude closing protection letters from the report (Optional). This box is
typically left unchecked
3. Click Clear button at any time to reset/clear the Remittance Report screen of any report criteria entered
4. Click Excel button to search for the assigned policies and related endorsements and/or CPL’s for all file numbers for the
report criteria entered
a. All policy information entered at the time of policy jacket generation necessary for policy remittance is
populated into an Excel spreadsheet named WFG_Remittance_Report (Figure 38)
o The information contained in the Excel spreadsheet (a.k.a WFG_Remittance_Report can be edited as
needed before submission to
b. The generated WFG_Remittance_Report file notification will display differently depending on the web
browser used
Internet Explorer – Displayed at the bottom middle of the screen, select Open or Save
Chrome - Displayed at the bottom left of the screen, click to Open
Figure 38 - WFG Remittance Report Example
5. The completed WFG_Remittance_Report should be submitted to the WFG Agency Services Department
Email Address: [email protected]
Mailing Address: 12909 SW 68th Parkway, Suite 350, Portland, OR 97223
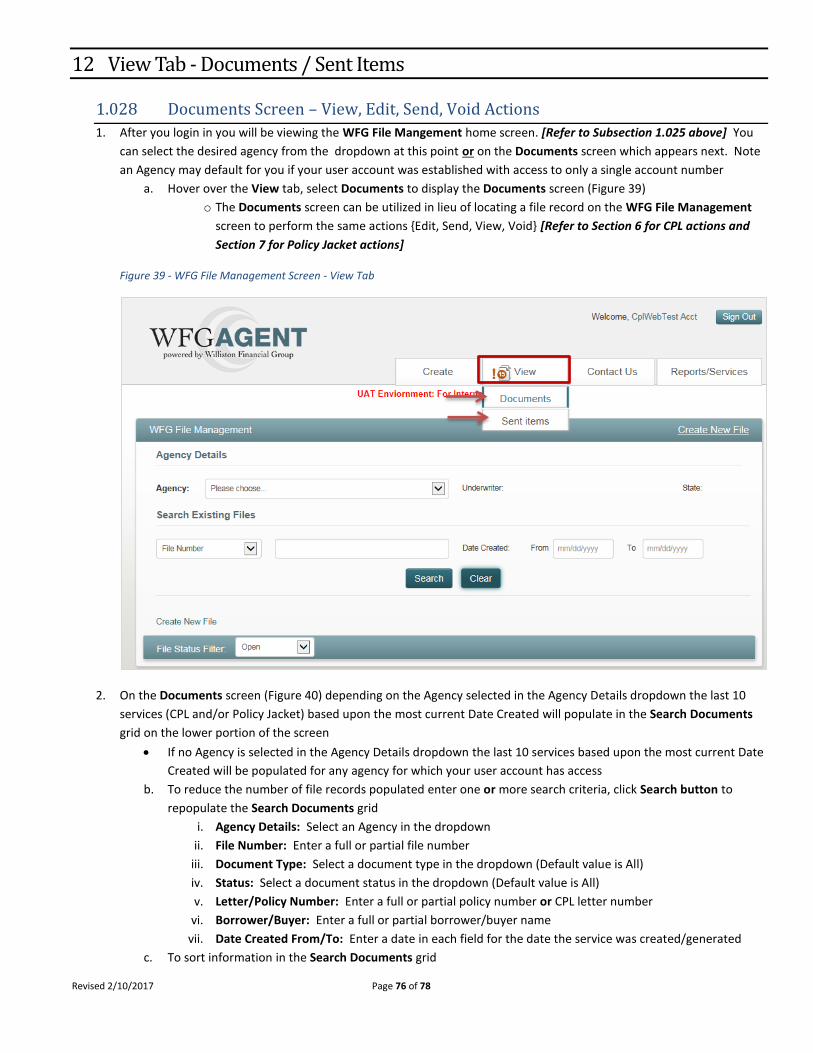
Revised 2/10/2017 Page 76 of 78
12 View Tab - Documents / Sent Items
1.028 Documents Screen – View, Edit, Send, Void Actions
1. After you login in you will be viewing the WFG File Mangement home screen. [Refer to Subsection 1.025 above] You
can select the desired agency from the dropdown at this point or on the Documents screen which appears next. Note
an Agency may default for you if your user account was established with access to only a single account number
a. Hover over the View tab, select Documents to display the Documents screen (Figure 39)
o The Documents screen can be utilized in lieu of locating a file record on the WFG File Management
screen to perform the same actions {Edit, Send, View, Void} [Refer to Section 6 for CPL actions and
Section 7 for Policy Jacket actions]
Figure 39 - WFG File Management Screen - View Tab
2. On the Documents screen (Figure 40) depending on the Agency selected in the Agency Details dropdown the last 10
services (CPL and/or Policy Jacket) based upon the most current Date Created will populate in the Search Documents
grid on the lower portion of the screen
If no Agency is selected in the Agency Details dropdown the last 10 services based upon the most current Date
Created will be populated for any agency for which your user account has access
b. To reduce the number of file records populated enter one or more search criteria, click Search button to
repopulate the Search Documents grid
i. Agency Details: Select an Agency in the dropdown
ii. File Number: Enter a full or partial file number
iii. Document Type: Select a document type in the dropdown (Default value is All)
iv. Status: Select a document status in the dropdown (Default value is All)
v. Letter/Policy Number: Enter a full or partial policy number or CPL letter number
vi. Borrower/Buyer: Enter a full or partial borrower/buyer name
vii. Date Created From/To: Enter a date in each field for the date the service was created/generated
c. To sort information in the Search Documents grid

Revised 2/10/2017 Page 77 of 78
i. Click on the following labels Status, Letter/Policy Number, File Number or Date Created
1. Down arrow displayed will sort descending
2. Up arrow displayed will sort ascending
d. Click on an available Action hyperlink {View, Edit, Void, Send} as needed to perform those actions [Refer to
Section 6 for CPL actions and Section 7 for Policy Jacket actions]
3. Click Clear button at any time to reset/clear the Documents screen of any search data entered
4. Navigate through the Search Documents grid values by using the pagination arrows
Figure 40 - Documents Screen
1.029 Sent Items
1. After you login in you will be viewing the WFG File Mangement home screen [Refer to Subsection 1.028 – Figure 39
above]
a. Hover over the View tab, select Sent items to display the Sent Items screen to preview a list of CPL and/or
Policy Jacket document emails sent via the Send action from the WFG File Services screen, CPL tab [Refer to
Subsection 1.016 in Section 6] and/or Jackets tab [Refer to Subsection 1.021 in Section 7] or from the
Documents screen [Refer to Subsection 1.028 – Figure 40 above]

Revised 2/10/2017 Page 78 of 78
2. Navigate through the Search Documents grid values by using the pagination arrows