what to do after transferring to the new eportfolio? dr sarah dix 2019... · what to do after...
TRANSCRIPT

What to do after transferring to the new ePortfolio?
Dr Sarah Dix
Summary 1. If you haven’t already done so, please look at the RCOG guidance on the new curriculum and
complete the e-learning package regarding the curriculum changes and ePortfolio: https://www.rcog.org.uk/en/careers-training/specialty-training-curriculum/curriculum-2019/. The ePortfolio quick start guides available here might be particularly helpful.
2. Login and edit your profile: a. Password b. Personal details c. Educational supervisor d. Current training post
3. Check your NES PDFs have transferred (may take 24hrs). These are located at the bottom of the “My Profile” page, and can be accessed by clicking on the edit button. Contact [email protected] if issues.
4. Make appointment with Educational supervisor to start process of baseline self-assessment against new CiP curriculum to enable creation of targeted PDP for the coming year.
5. We also suggest that you print/save/scan your ARCP record forms from each training year so far, either on your home computer or on the ePortfolio as “other evidence”. To apply for CCT you need to submit a copy of each outcome form, and this will save having to trawl back through the NES PDFs when you get to the end of ST7.
6. Feedback queries/constructive critique/unexpected items to either to RCOG ePortfolio helpdesk ([email protected]) or your ePortfolio champions. Details of the ePortfolio champions for each region are available here.
Additional “how-to” information
Edit your profile

Once you have adjusted anything, don’t forget to press SAVE at the bottom of the page! The red arrow also shows where your NES pdf’s can be found.
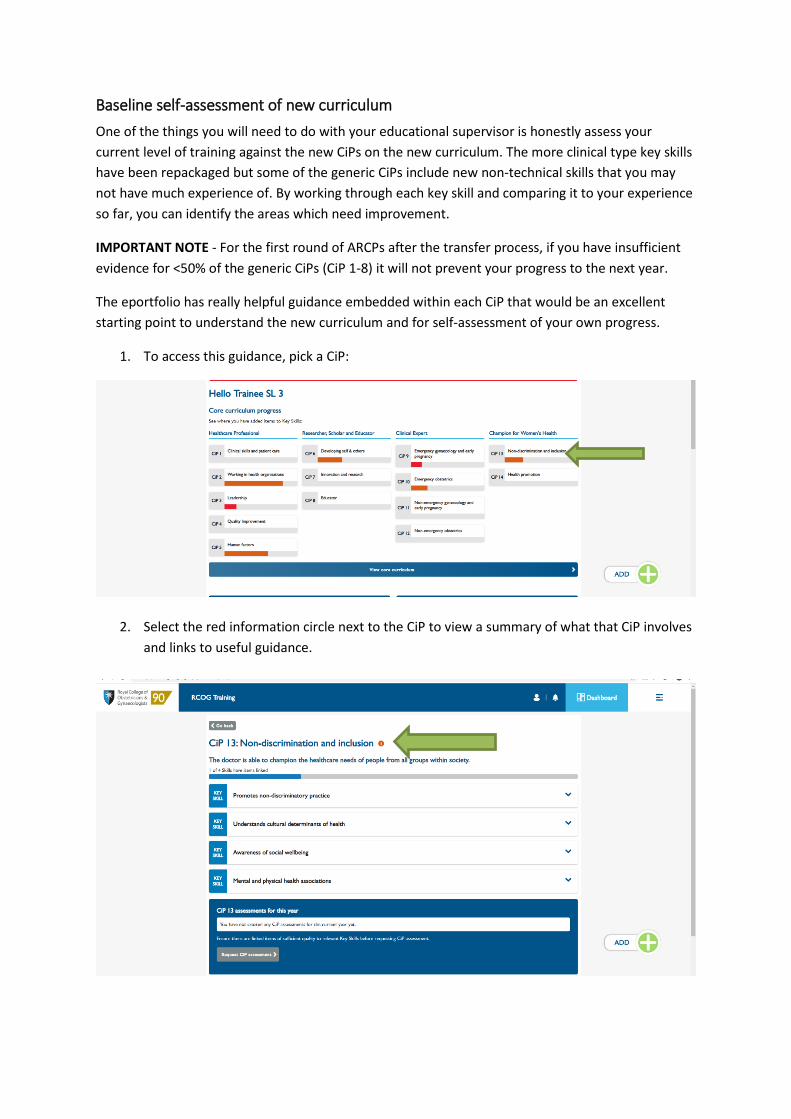
Baseline self-assessment of new curriculum One of the things you will need to do with your educational supervisor is honestly assess your current level of training against the new CiPs on the new curriculum. The more clinical type key skills have been repackaged but some of the generic CiPs include new non-technical skills that you may not have much experience of. By working through each key skill and comparing it to your experience so far, you can identify the areas which need improvement.
IMPORTANT NOTE - For the first round of ARCPs after the transfer process, if you have insufficient evidence for <50% of the generic CiPs (CiP 1-8) it will not prevent your progress to the next year.
The eportfolio has really helpful guidance embedded within each CiP that would be an excellent starting point to understand the new curriculum and for self-assessment of your own progress.
1. To access this guidance, pick a CiP:
2. Select the red information circle next to the CiP to view a summary of what that CiP involves and links to useful guidance.

3. These links are incredibly useful in understanding what makes up each key skill, what is expected from you at each stage of training, and how you might evidence the key skill.
4. See also the CiP guidance in the Curriculum 2019 eLearning package.
How can you record this self-assessment? The reason you have been transferred following an ARCP is to minimise the workload for you in the transfer process, as all of the NES evidence has already been assessed by your ES and by the ARCP process. The aim is for evidence linked to the new key skills to be prospective. However, there may well be some experiences/training courses/procedures that you wish to highlight for each key skill.
There is no prescriptive way to document this. Trainees and their educational supervisors may wish to approach this in different ways. The following is one suggested way of doing it.
1. Review the guidance for the key skill that you selected and consider your past experience to this point. You may wish to refer to your NES PDFs/curriculum module sign offs/etc.
2. Create a short summary using the “other evidence log”. First, select the ADD button:
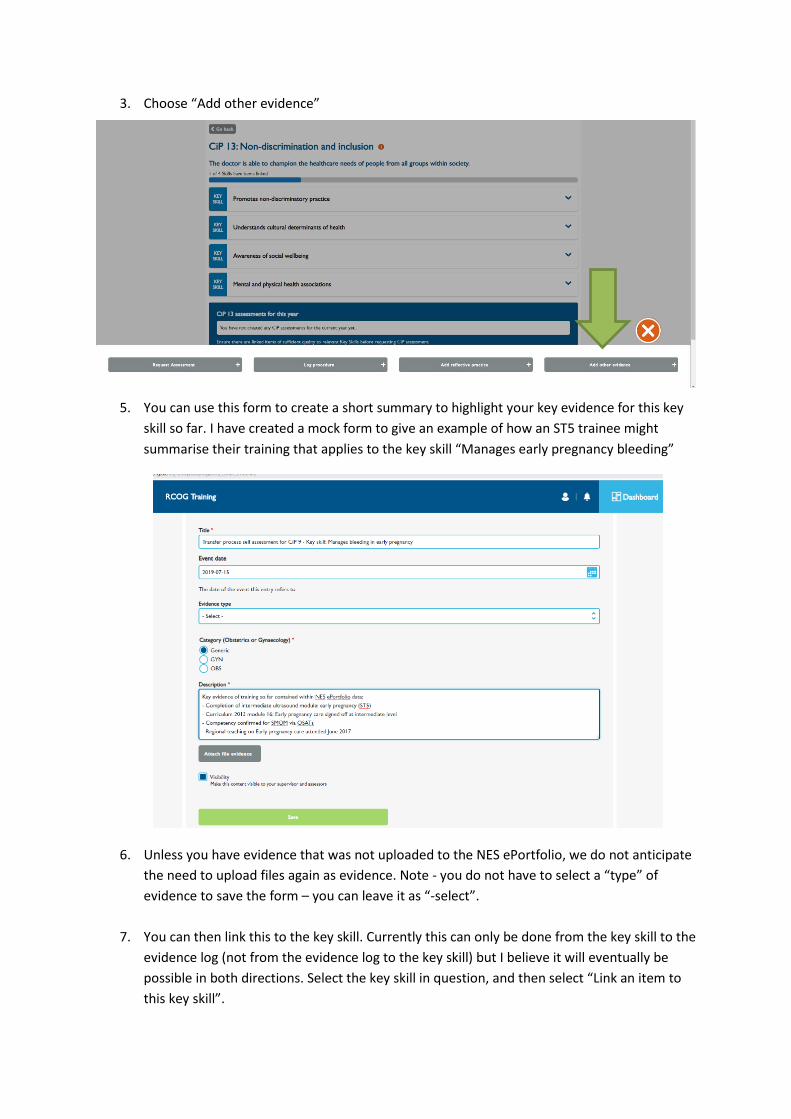
3. Choose “Add other evidence”
4. M
5. You can use this form to create a short summary to highlight your key evidence for this key skill so far. I have created a mock form to give an example of how an ST5 trainee might summarise their training that applies to the key skill “Manages early pregnancy bleeding”
6. Unless you have evidence that was not uploaded to the NES ePortfolio, we do not anticipate the need to upload files again as evidence. Note - you do not have to select a “type” of evidence to save the form – you can leave it as “-select”.
7. You can then link this to the key skill. Currently this can only be done from the key skill to the evidence log (not from the evidence log to the key skill) but I believe it will eventually be possible in both directions. Select the key skill in question, and then select “Link an item to this key skill”.

8. Select “Link log entry”
9. Select the box next to your evidence log, and then select “link”
Once you have completed this for each key skill in the CiP, you will want to review this with your educational supervisor to assist you with making a personal development plan for areas that you need to focus on. You may wish to complete the CiP self-assessment tool as a record of this.
Some trainees may choose to do a CiP self-assessment form in place of individual key skills summaries. Others may choose to only do key skill summaries or find other methods entirely.

Provided you and your supervisor are confident that you have understood your own progress in the relationship to the new curriculum and you feel happy that you can explain why you meet or don’t meet expectations for that CiP, the method that you use doesn’t matter.
CiP self-assessment tool This tool can be used at any time in the training year but definitely before each ARCP to assess your progress for each CiP for that training year. It could be used at the start to record your baseline self-assessments.
1. Select the CiP you want to assess. At the bottom of the page you can “Request CiP assessment”.
2. You can select whether you meet expectations for progression to the next stage of training or not, and then comment on this. Comments might include highlighting your key evidence.

3. At the bottom of the form, select your educational supervisor details and then click “Save and send form”. Your supervisor will then be able to agree or disagree with your assessment; they will have to comment if they disagree. It will be more meaningful to review your evidence together and complete this process within one of your educational meetings.