wi-fi docking station usb 3.0 single bay for...
TRANSCRIPT
WI-FI DOCKING STATION USB 3.0 Single Bay for 2.5"/3.5" SATA III Hard Disk
User Manual HXDDWIFI
www.hamletcom.com

Dear Customer, Thanks for choosing a Hamlet product. Please carefully follow the instructions for its use and maintenance and, once this item has run its life span, we kindly ask You to dispose of it in an environmentally friendly way, by putting it in the separate bins for electrical/electronic waste, or to bring it back to your retailer who will collect it for free. We inform You this product is manufactured with materials and components in compliance with RoHS Directive 2011/65/EU; with WEEE Directive 2002/96/CE, 2003/108/CE Italian Legislative Decree 2005/151 and R&TTE 1999/5/EC Directive for the following standards: EN 60950-1: 2006 + A11: 2009 + A1: 2010 + A12: 2011 + A2: 2013 ETSI EN 301 489-1 V1.9.2 (2011-09) ETSI EN 301 489-17 V2.1.1 (2009-05) ETSI EN 300 328-1 V1.8.1 (2012-06)
The complete CE declaration of conformity of the product can be obtained by contacting Hamlet at [email protected]. The information on the importer for your country can be found in the “About Us” section of the Hamlet website at www.hamletcom.com. CE Mark Warning This is a Class B product. In a domestic environment, this product may cause radio interference, in which case the user may be required to take adequate measures. Trademarks and changes All trademarks and company names mentioned in this manual are used for description purpose only and remain property of their respective owners. The material in this document is for information only. Contents, specifications and appearance of the product are indicative and may change without notice.
1 Description Hamlet Wi-Fi Docking Station offers a quick and easy way to access and share files stored in a 2.5" or 3.5" SATA hard disk over the Wi-Fi network from a Smartphone, Tablet PC, Computer or any other wireless device. The free App for iOS and Android is available from App Store and Google Play. In addition, the Wi-Fi Docking Station supports DLNA and UPnP for easy sharing of multimedia content. Thanks to Plug and Play and Hot-Swap functions, you only need to insert the hard drive into the docking station to quickly access your files. Direct computer connection via USB 3.0 cable allows maximum data transfer rate. 1.1 Features • Wi-Fi docking station for 2.5" or 3.5" SATA I/II/III Hard Disk Drive • IEEE 802.11b/g/n wireless interface up to 150Mbps • Supports SATA I/II/III HDD or SSD up to 4TB* • SATA III interface with data transfer rate up to 6 Gbps • Free App for iOS and Android • SuperSpeed USB 3.0 interface with data transfer rate up to 5 Gbps • Backward compatible with USB 2.0 and USB 1.1 • Built-in RJ45 10/100Mbps LAN port • Supports SAMBA/DLNA server and Universal Plug and Play (UPnP) • Supports WEP/WPA/WPA2 wireless encryption • Solid aluminum and plastic body • Activity LED indicators • Plug & Play and Hot-Swap support • USB 3.0 cable included • External power supply:
Input: AC 100~240V, 50~60Hz 0.8A Output: DC 12V, 2A
• Dimensions: 142 × 103 × 83 mm • Weight: 350 g • Compatible with Windows XP/Vista/7/8, Mac OS 10.4 or above, Linux,
Android and iOS 1.2 Package content • Wi-Fi Docking Station • USB 3.0 cable • Power supply • User’s manual * Only HDD up to 2TB are supported for access via Wi-Fi connection.

2 Product overview
1. Hard Disk slot 2. Antenna 3. Reset button 4. LED indicators 5. On/Off power button 6. USB 3.0 port 7. Power input 8. WAN/LAN port 2.1 LED description
Led Color Description READ/WRITE Blue HDD activity
ON Green Device powered ON
WAN White LAN connection
WLAN Red Wi-Fi activity

2.2 Default settings The default setting of the Wi-Fi Docking Station are as follows.
IP address 192.168.169.1
Subnet mask 255.255.255.0
DHCP Enabled
Username admin
Password admin
SSID Hamlet-WiFiDisk-XXXX
Wi-Fi Key az48486y Important Notes If the hard drive installed in the docking station is not formatted, you need to format it before use. Please refer to your operating system manual for the correct formatting procedure. Any loss, corruption or destruction of data while using a Hamlet drive is the sole responsibility of the user, and under no circumstances will Hamlet be held liable for the recovery or restoration of this data. To help prevent the loss of your data, it is highly recommended that you keep TWO copies of your data; one copy on your external hard drive, for instance, and a second copy either on your internal hard drive, another external hard drive or some other form of removable storage media.
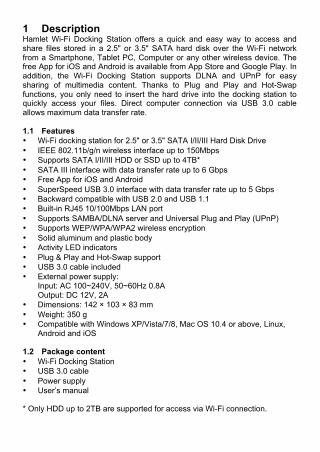
3 Operation modes of Wi-Fi Docking Station Hamlet Wi-Fi Docking Station can be used in different ways depending on the user needs. The different operation modes of the device are shown below. 3.1 USB Hard Drive The docking station is connected directly to the computer via the USB cable and the hard disk is used as a standard external drive. In this mode, the Wi-Fi interface is disabled.
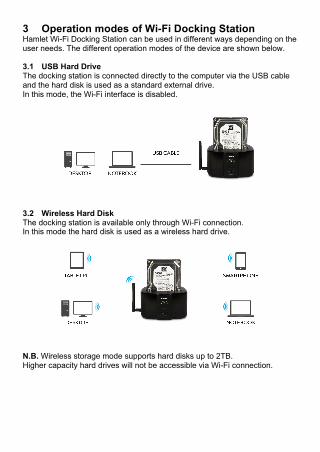
3.2 Wireless Hard Disk The docking station is available only through Wi-Fi connection. In this mode the hard disk is used as a wireless hard drive.
N.B. Wireless storage mode supports hard disks up to 2TB. Higher capacity hard drives will not be accessible via Wi-Fi connection.

3.3 Access Point The docking station is connected to an ADSL modem/router with a LAN cable and works as a wireless access point to the Internet. The hard disk installed in the docking station is available via Wi-Fi.
3.4 Wireless Repeater The docking station is connected to an existing Wi-Fi network to extend the coverage area of the wireless signal. The hard disk inserted in the docking station is available via Wi-Fi.
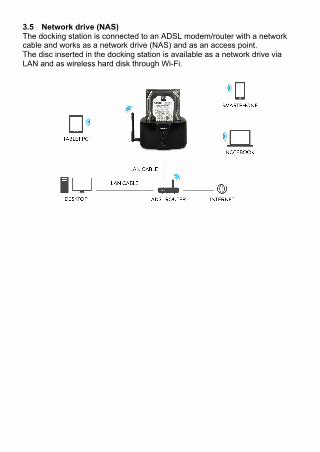
3.5 Network drive (NAS) The docking station is connected to an ADSL modem/router with a network cable and works as a network drive (NAS) and as an access point. The disc inserted in the docking station is available as a network drive via LAN and as wireless hard disk through Wi-Fi.

4 Installation of Wi-Fi Docking Station 4.1 USB Hard Disk mode The docking station can act as an external hard drive when it is connected to a computer through USB cable. 1. Insert the hard drive into the docking station, making sure to place it in
the correct direction. 2. Make sure the HDD is firmly connected to the SATA connector. 3. Connect the USB 3.0 cable to the docking station and to an available
USB port of your computer. 4. Connect the power cable to DC power input of the docking station and to
an electrical power outlet. 5. Turn on the docking station pressing the power button. 6. The computer will automatically detect the new hardware and the hard
disk will be visible and accessible by the operating system as a standard external drive.
Note: The Wi-Fi interface is automatically turned OFF when the docking station is connected via USB cable. 4.2 Wireless Hard Disk mode (Wi-Fi direct connection) Please follow the steps below to use the docking station as a wireless storage drive. 1. Insert the hard drive into the docking station, making sure to place it in
the correct direction. 2. Make sure the HDD is firmly connected to the SATA connector. 3. Connect the power cable to DC power input of the docking station and to
an electrical power outlet. 4. Turn on the docking station pressing the power button. 5. Please wait at least 40 seconds for the Wi-Fi signal to be ready. 6. Open the wireless utility of your operating system and connect to
“Hamlet-WiFiDisk-XXXX” wireless network. 7. When requested, input the Wi-Fi key. The default password is
“az48486y”. Your device is now connected to the docking station over a wireless connection. Please refer to chapter 5 of this manual to learn about the different ways to access the hard disk data.
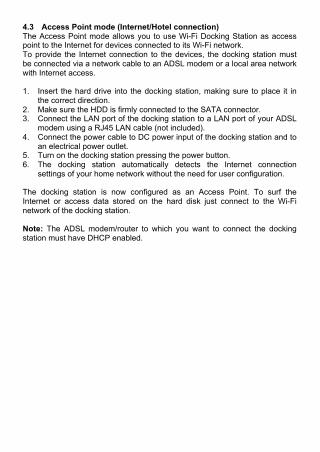
4.3 Access Point mode (Internet/Hotel connection) The Access Point mode allows you to use Wi-Fi Docking Station as access point to the Internet for devices connected to its Wi-Fi network. To provide the Internet connection to the devices, the docking station must be connected via a network cable to an ADSL modem or a local area network with Internet access. 1. Insert the hard drive into the docking station, making sure to place it in
the correct direction. 2. Make sure the HDD is firmly connected to the SATA connector. 3. Connect the LAN port of the docking station to a LAN port of your ADSL
modem using a RJ45 LAN cable (not included). 4. Connect the power cable to DC power input of the docking station and to
an electrical power outlet. 5. Turn on the docking station pressing the power button. 6. The docking station automatically detects the Internet connection
settings of your home network without the need for user configuration. The docking station is now configured as an Access Point. To surf the Internet or access data stored on the hard disk just connect to the Wi-Fi network of the docking station. Note: The ADSL modem/router to which you want to connect the docking station must have DHCP enabled.

4.4 Wireless Repeater mode (Wi-Fi network extension) The Wireless Repeater mode allows you to connect the Wi-Fi Docking Station to an existing Wi-Fi network to extend the coverage area of the wireless signal. To use the docking station as a Wireless Repeater, proceed as indicated in the following steps. 1. Insert the hard drive into the docking station, making sure to place it in
the correct direction. 2. Make sure the HDD is firmly connected to the SATA connector. 3. Connect the power cable to DC power input of the docking station and to
an electrical power outlet. 4. Turn on the docking station pressing the power button and wait at least
40 seconds for the Wi-Fi signal to be ready. 5. Connect to “Hamlet-WiFiDisk-XXXX” wireless network and input the Wi-
Fi key when requested (default password is “az48486y”). 6. Open the web browser, type in http://192.168.169.1 in the address bar
and press Enter. In the login screen type in user name (admin) and password (admin) and click OK to access the web interface of the docking station
7. Click on WiFi Repeater icon to access the configuration page.

8. Press the Search all APs button to view the available Wi-Fi networks. 9. Select the network you want to connect the docking station, if the
network is secured enter the Wi-Fi password, and press the Apply button to save the configuration.
10. Wait for the device to reboot and then reconnect to the Wi-Fi network of the docking station.
The docking station is so configured as Wireless Repeater. Note: In this mode, the LAN port on the docking station should be disconnected. Once you set up the docking station as a Repeater, the web interface is no longer accessible. To change the configuration of the docking station will be necessary to reset the device.

4.5 NAS mode (Network hard drive) This operation mode allows you to use the docking station as a network drive (NAS), thus making the data contained on the hard disk accessible to all users connected to the local network. 1. Insert the hard drive into the docking station, making sure to place it in
the correct direction. 2. Make sure the HDD is firmly connected to the SATA connector. 3. Connect the LAN port of the docking station to a LAN port of your ADSL
modem using a RJ45 LAN cable (not included). 4. Connect the power cable to DC power input of the docking station and to
an electrical power outlet. 5. Turn on the docking station pressing the power button and wait at least
40 seconds for the Wi-Fi signal to be ready. 6. Connect to “Hamlet-WiFiDisk-XXXX” wireless network and input the Wi-
Fi key when requested (default password is “az48486y”). 7. Open the web browser, type in http://192.168.169.1 in the address bar
and press Enter. In the login screen type in user name (admin) and password (admin) and click OK to access the web interface of the docking station.
8. Click on Router Settings then click on LAN to Router > DHCP.
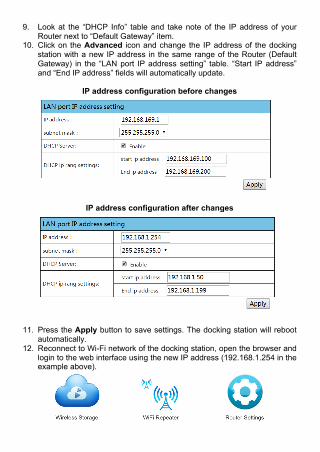
9. Look at the “DHCP Info” table and take note of the IP address of your Router next to “Default Gateway” item.
10. Click on the Advanced icon and change the IP address of the docking station with a new IP address in the same range of the Router (Default Gateway) in the “LAN port IP address setting” table. “Start IP address” and “End IP address” fields will automatically update.
IP address configuration before changes
IP address configuration after changes
11. Press the Apply button to save settings. The docking station will reboot
automatically. 12. Reconnect to Wi-Fi network of the docking station, open the browser and
login to the web interface using the new IP address (192.168.1.254 in the example above).
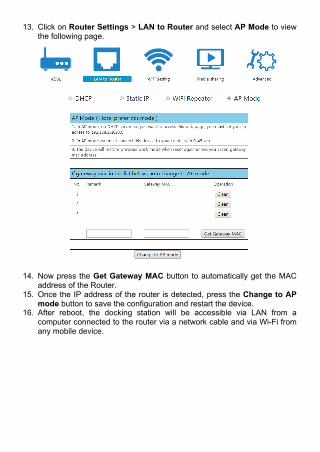
13. Click on Router Settings > LAN to Router and select AP Mode to view the following page.
14. Now press the Get Gateway MAC button to automatically get the MAC
address of the Router. 15. Once the IP address of the router is detected, press the Change to AP
mode button to save the configuration and restart the device. 16. After reboot, the docking station will be accessible via LAN from a
computer connected to the router via a network cable and via Wi-Fi from any mobile device.

5 Data access modes The data stored on the HDD installed in the docking station can be accessed in various ways as shown in the following sections. 5.1 Data access using browser You can access data on the HDD installed in the docking station using a common web browser as described below. 1. Open the web browser of your computer or mobile device. 2. Type in http://192.168.169.1 in the address bar and press Enter. In the
login screen type in user name (admin) and password (admin) and click OK to access the web interface of the docking station
3. Click on Wireless Storage icon to access the data on the hard disk.
4. The web application allows you to manage the files on the HDD by using
a common browser from any device. Use the button on the top of the page to navigate the HDD content and upload, download or delete files.

5.2 Data access using Android App The “ES File Explorer” app gives you access to the docking station as a wireless network drive from Android devices. To download the app, access to Google Play Store from your Android device and search for "ES File Explorer". Alternatively, you can scan the QR code shown below to go directly to the download page.
After installing the app, follow the steps below to access the disk installed on the docking station. 1. Open the app “ES File Explorer”. 2. In the application menu, press the New (+) button to add a new resource. 3. Tap the field next to the item “Type” to see the pull-down menu and
select the option “Samba (LAN)”. 4. Enter the IP address of the docking station (the default address is
192.168.169.1) in the “Path” field and press OK to confirm.
5. Then enter user name (admin) and password (admin) and press OK to
complete the configuration. 6. Tap on the “WiFiDisk” folder to acces the hard disk content. The hard disk installed in the docking station is now accessible as a network drive via wireless App.
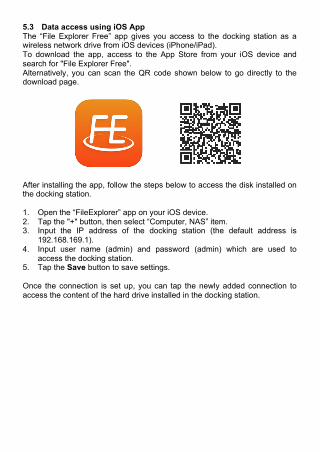
5.3 Data access using iOS App The “File Explorer Free” app gives you access to the docking station as a wireless network drive from iOS devices (iPhone/iPad). To download the app, access to the App Store from your iOS device and search for "File Explorer Free". Alternatively, you can scan the QR code shown below to go directly to the download page.
After installing the app, follow the steps below to access the disk installed on the docking station. 1. Open the “FileExplorer” app on your iOS device. 2. Tap the "+" button, then select “Computer, NAS” item. 3. Input the IP address of the docking station (the default address is
192.168.169.1). 4. Input user name (admin) and password (admin) which are used to
access the docking station. 5. Tap the Save button to save settings. Once the connection is set up, you can tap the newly added connection to access the content of the hard drive installed in the docking station.

5.4 Data access using SMB The configuration access via the SMB (Samba) protocol allows you to use the hard disk installed in the docking station as a network drive (NAS) from computers connected via LAN or Wi-Fi. Connecting using Windows 1. In Windows Explorer, click Map Network Drive. 2. In the “Drive” list select a drive letter. 3. In the “Folder” box, type the path \\192.168.169.1\wifidisk and press
Finish. 4. On the next screen, enter user name (admin) and password (admin)
used to access to the docking station then click OK to confirm. 5. Now the docking station is connected to the computer as a network drive. Connecting using Mac 1. Using the Finder, click on Go and Connect to Server. 2. In “Server Address” field, enter the path smb://192.168.169.1/wifidisk/
and click Connect. 3. When prompted, enter the user name (admin) and password (admin)
used to access to the docking station then click Connect. 4. The docking station is now mounted as a network drive on your Desktop.

6 Firmware upgrade You can update the firmware of Wi-Fi Docking Station through the web interface. 1. Connect to the Wi-Fi network of the docking station. 2. Open your web browser, type http://192.168.169.1 in the address bar
and press Enter to access the web interface. 3. When the login window appears, enter the user name (admin) and
password (admin) and press OK. 4. Click on Router Settings icon then go to the Advanced section. 5. Scroll down the page to see the “Update Firmware” section. 6. Press the Browse button to select the new firmware file. 7. Press the Apply button to start the firmware update and wait for the
restart of the docking station. 7 Reset To reset Wi-Fi Docking Station to factory default settings, proceed as follows. 1. Connect the power cable to the DC power input on the back of the
product and then to an electrical outlet. 2. Turn on the docking station by pressing the power button. 3. Using a pointed object, press the “Reset” button on the side of the device
for at least 8 seconds. 4. Release the “Reset” button and wait for the restart of the docking station. 5. The factory settings are restored and you can access your device again
using the default values. Warning! The reset procedure deletes all the configuration settings on the device.