windows autopilot
TRANSCRIPT
WINDOWS AUTOPILOT
Nick Ross | Microsoft Certified Expert Administrator
PAX8.COM
GUIDE DESCRIPTION
The purpose of this guide is to discuss Windows Autopilot and show you how to deploy it across your
clients. As we move into the modern desktop environment, we want to take advantage of the new features
introduced by Microsoft to enhance both the end user and admin experience. In this article, we will be
discussing the following topics:
• Overview of Windows Autopilot
• Licensing Requirements
• Creating a Deployment Profile
• Enrolling Existing Devices
• Enrolling New Devices
• End User Experience
• Hybrid Deployments
**Disclaimer**
This guide is meant to provide best practices for Windows Autopilot. It is meant to be used as a
template, but the policies defined will not be the same in all use cases. You must assess the policies
and configurations you will need for your clients’ environments and make changes as needed. Pax8
is not liable for any policies you create that do not meet the client’s standards. As a best practice,
test all configurations with a pilot group before moving to broad deployment across an entire
organization.
PAX8.COM
CONTENTS
Table of Contents .......................................................................................................................... 3
Overview .................................................................................................................................... 4
Requirements ............................................................................................................................. 7
Licensing Requirements ............................................................................................................ 7
Current OEM Providers and Resellers for Autopilot ................................................................ 8
Implementation Steps .................................................................................................................. 9
Licensing Users ........................................................................................................................... 9
Set the MDM Authority and Configure Auto-enrollment .................................................... 10
Configure Company Branding .............................................................................................. 12
Configure an Autopilot Profile................................................................................................ 14
Adding Existing Devices to Autopilot.................................................................................... 21
Adding New Devices .............................................................................................................. 26
Performing an Autopilot Reset .............................................................................................. 26
End User Experience ................................................................................................................... 28
Configuring MFA to Enroll a Device and at OOBE ............................................................... 30
Configuring Hybrid Azure AD Join ............................................................................................. 31
Increasing the Computer Account Limit in the OU ............................................................ 32
Install the Intune Connector ................................................................................................... 36
Configure the AD Connect Wizard ....................................................................................... 39
Configure the GPO.................................................................................................................. 43
Create the Domain Join Profile ............................................................................................. 45
Configure the Autopilot Profile .............................................................................................. 47
Conclusion ................................................................................................................................... 49
PAX8.COM
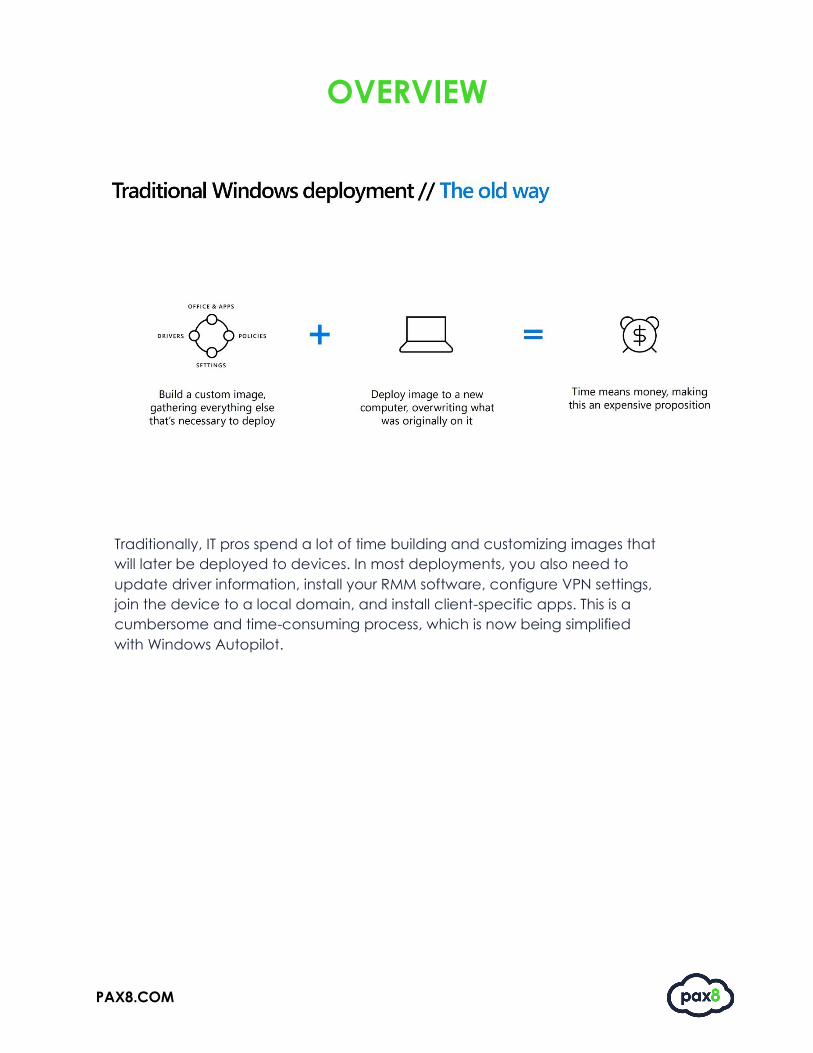
OVERVIEW
Traditionally, IT pros spend a lot of time building and customizing images that
will later be deployed to devices. In most deployments, you also need to
update driver information, install your RMM software, configure VPN settings,
join the device to a local domain, and install client-specific apps. This is a
cumbersome and time-consuming process, which is now being simplified
with Windows Autopilot.
PAX8.COM
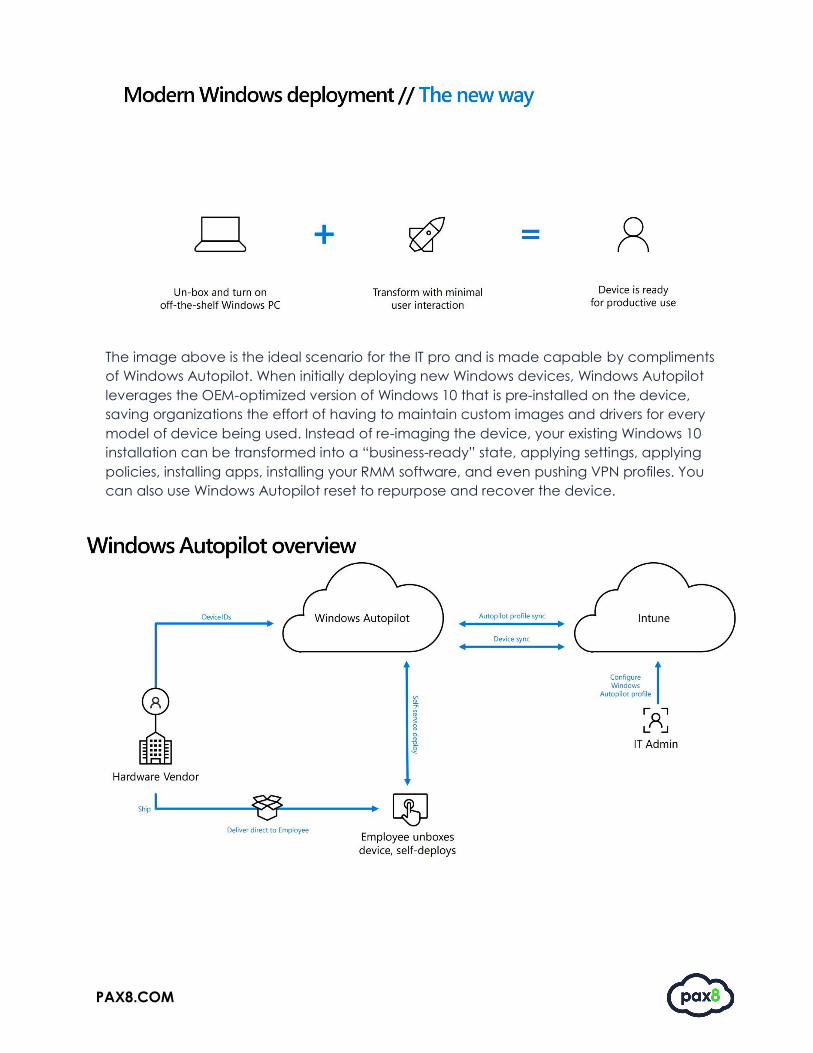
The image above is the ideal scenario for the IT pro and is made capable by compliments
of Windows Autopilot. When initially deploying new Windows devices, Windows Autopilot
leverages the OEM-optimized version of Windows 10 that is pre-installed on the device,
saving organizations the effort of having to maintain custom images and drivers for every
model of device being used. Instead of re-imaging the device, your existing Windows 10
installation can be transformed into a “business-ready” state, applying settings, applying
policies, installing apps, installing your RMM software, and even pushing VPN profiles. You
can also use Windows Autopilot reset to repurpose and recover the device.
PAX8.COM
WINDOWS AUTOPILOT ENABLES YOU TO:
• Automatically join devices to Azure Active Directory (Azure AD) or Active
Directory (via Hybrid Azure AD Join)
• Auto-enroll devices into Intune
• Restrict the Administrator account creation
• Create and auto-assign devices to configuration groups based on a device's profile
• Customize OOBE content specific to the organization
• Push custom apps, policies, and configuration settings to the device
MSP SCENARIO
I am an MSP and I use ConnectWise for my RMM software. I have a stack of
services that I offer which encompasses Microsoft 365 Business for Productivity,
Webroot Antivirus for Security, and custom apps that vary by client. Across my
client base, I average about 2-3% churn of employees per week. Most of my
clients have local Active Directory of which I am syncing to Office 365.
Utilizing Windows Autopilot, I can register new devices with the Autopilot
service when I contact my OEM provider, Dell. Dell ships the devices directly to
the client and gives me the list of hardware IDs that I can upload into Intune. I
have preconfigured Intune policies that make these devices compliant and I
have also added Labtech, Webroot, and my custom apps to this portal and
assigned them to the appropriate users. I have also preconfigured the settings
for Hybrid Azure AD Join.
The user receives the device, turns it on, and is prompted to enter in their
credentials for Azure AD. Once they type in their username, they are met with
their company branding. They enter their password and the device boots up,
telling them their device is being configured. The device installs your RMM
software, Webroot Antivirus, and your custom applications. The device
immediately connects to the user’s OneDrive account so that corporate data
can be protected. The device is also joined to the local Active Directory,
getting any legacy GPOs that you want to apply. The user is up and running,
fully compliant in a matter of minutes.
This is an oversimplified scenario, but it shows the power of Windows Autopilot!
PAX8.COM
REQUIREMENTS
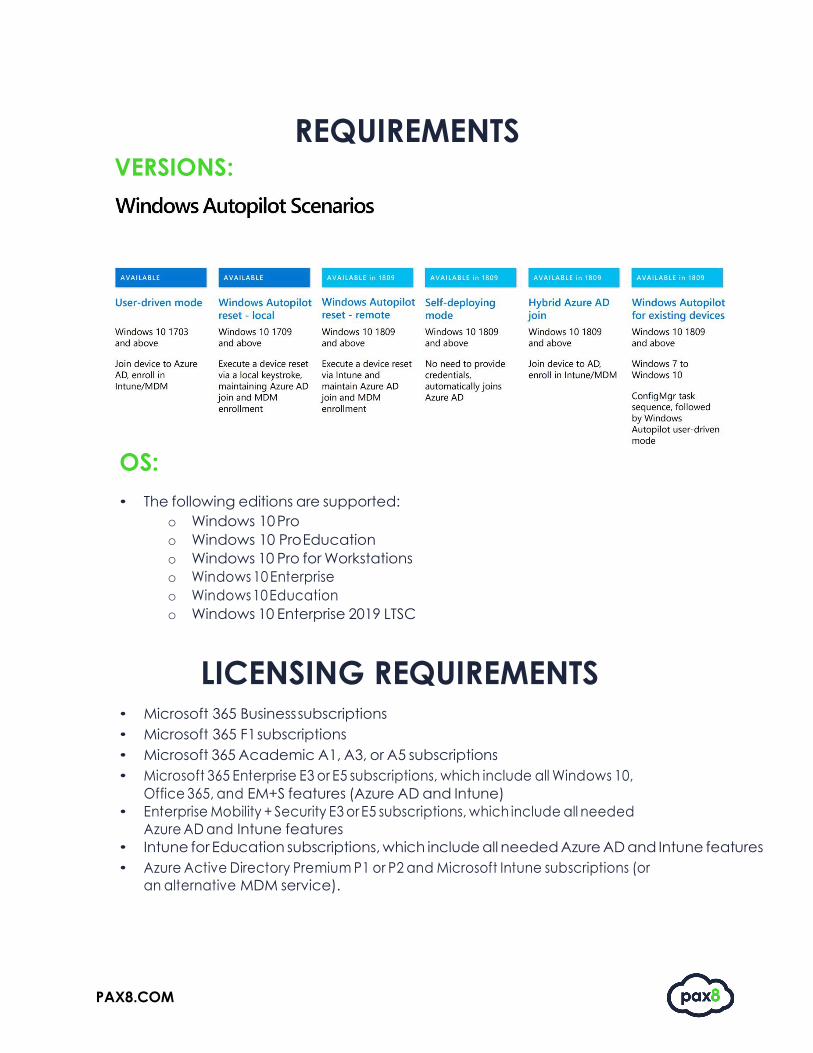
VERSIONS:
OS:
• The following editions are supported:
o Windows 10 Pro
o Windows 10 Pro Education
o Windows 10 Pro for Workstations
o Windows 10 Enterprise
o Windows 10 Education
o Windows 10 Enterprise 2019 LTSC
LICENSING REQUIREMENTS
• Microsoft 365 Business subscriptions
• Microsoft 365 F1 subscriptions
• Microsoft 365 Academic A1, A3, or A5 subscriptions
• Microsoft 365 Enterprise E3 or E5 subscriptions, which include all Windows 10,
Office 365, and EM+S features (Azure AD and Intune)
• Enterprise Mobility + Security E3 or E5 subscriptions, which include all needed
Azure AD and Intune features
• Intune for Education subscriptions, which include all needed Azure AD and Intune features
• Azure Active Directory Premium P1 or P2 and Microsoft Intune subscriptions (or
an alternative MDM service).
PAX8.COM
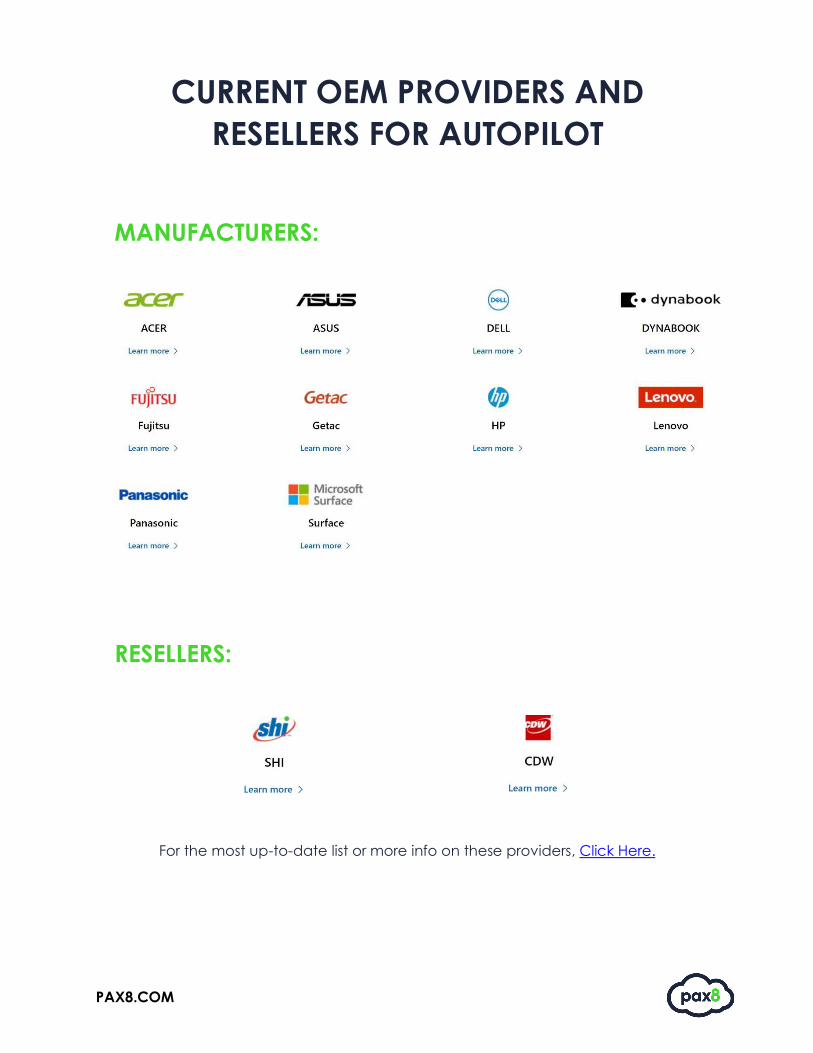
CURRENT OEM PROVIDERS AND
RESELLERS FOR AUTOPILOT
MANUFACTURERS:
RESELLERS:
For the most up-to-date list or more info on these providers, Click Here.
PAX8.COM
IMPLEMENTATION STEPS
Now we will go into the implementation steps for deploying Windows Autopilot. This
section will include prerequisite steps, such as licensing users and configuring company
branding. It also provides the deployment methods available, such as registering new
devices vs existing.
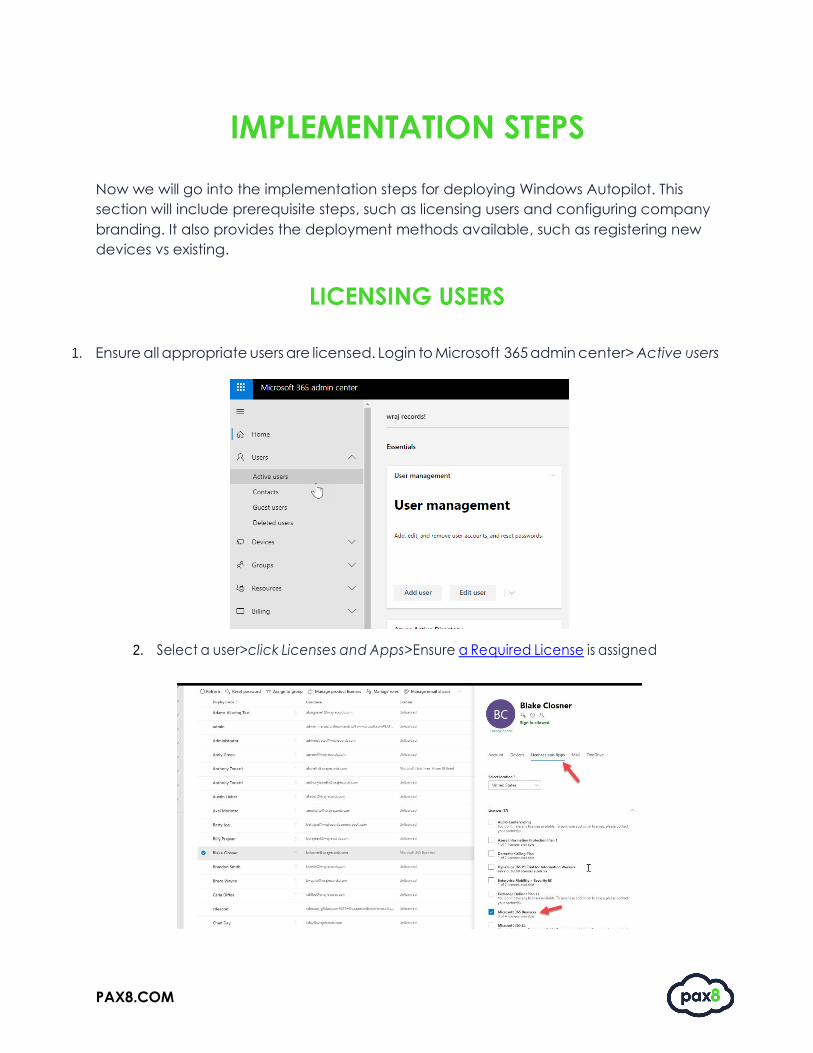
LICENSING USERS
1. Ensure all appropriate users are licensed. Login to Microsoft 365 admin center> Active users
.
2. Select a user>click Licenses and Apps>Ensure a Required License is assigned
PAX8.COM
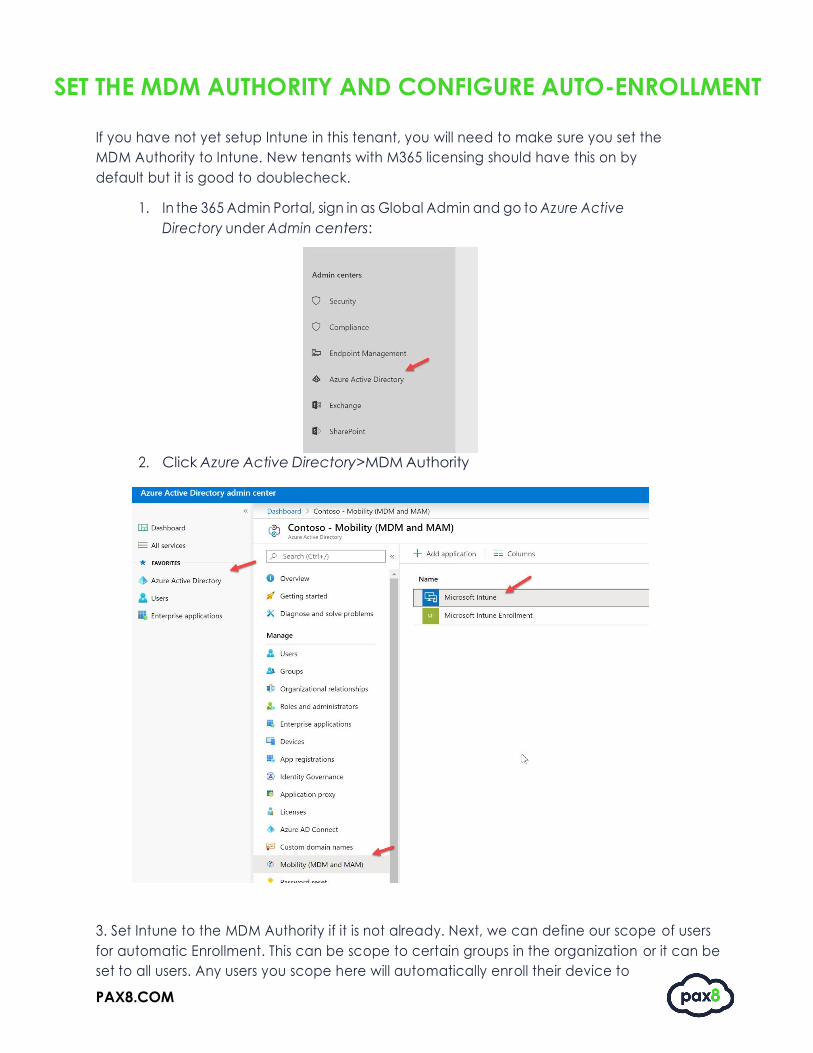
SET THE MDM AUTHORITY AND CONFIGURE AUTO-ENROLLMENT
If you have not yet setup Intune in this tenant, you will need to make sure you set the
MDM Authority to Intune. New tenants with M365 licensing should have this on by
default but it is good to doublecheck.
1. In the 365 Admin Portal, sign in as Global Admin and go to Azure Active
Directory under Admin centers:
2. Click Azure Active Directory>MDM Authority
3. Set Intune to the MDM Authority if it is not already. Next, we can define our scope of users
for automatic Enrollment. This can be scope to certain groups in the organization or it can be
set to all users. Any users you scope here will automatically enroll their device to
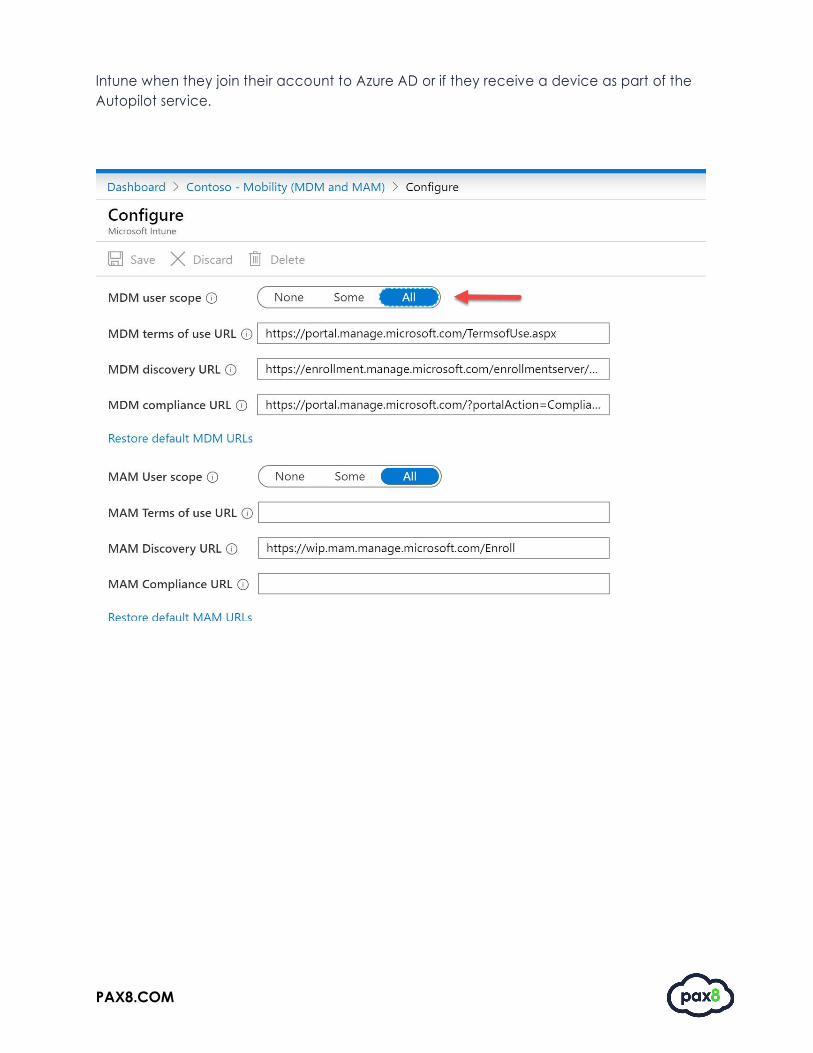
PAX8.COM
Intune when they join their account to Azure AD or if they receive a device as part of the
Autopilot service.
PAX8.COM
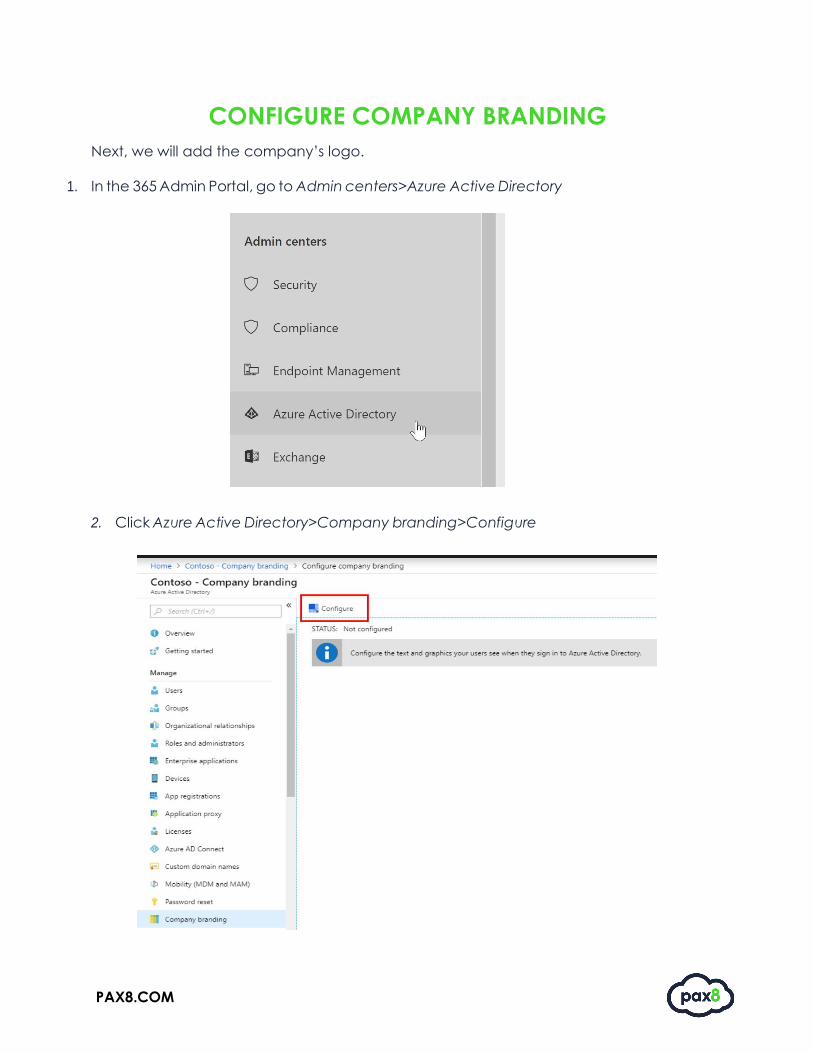
CONFIGURE COMPANY BRANDING
Next, we will add the company’s logo.
1. In the 365 Admin Portal, go to Admin centers>Azure Active Directory
2. Click Azure Active Directory>Company branding>Configure
PAX8.COM
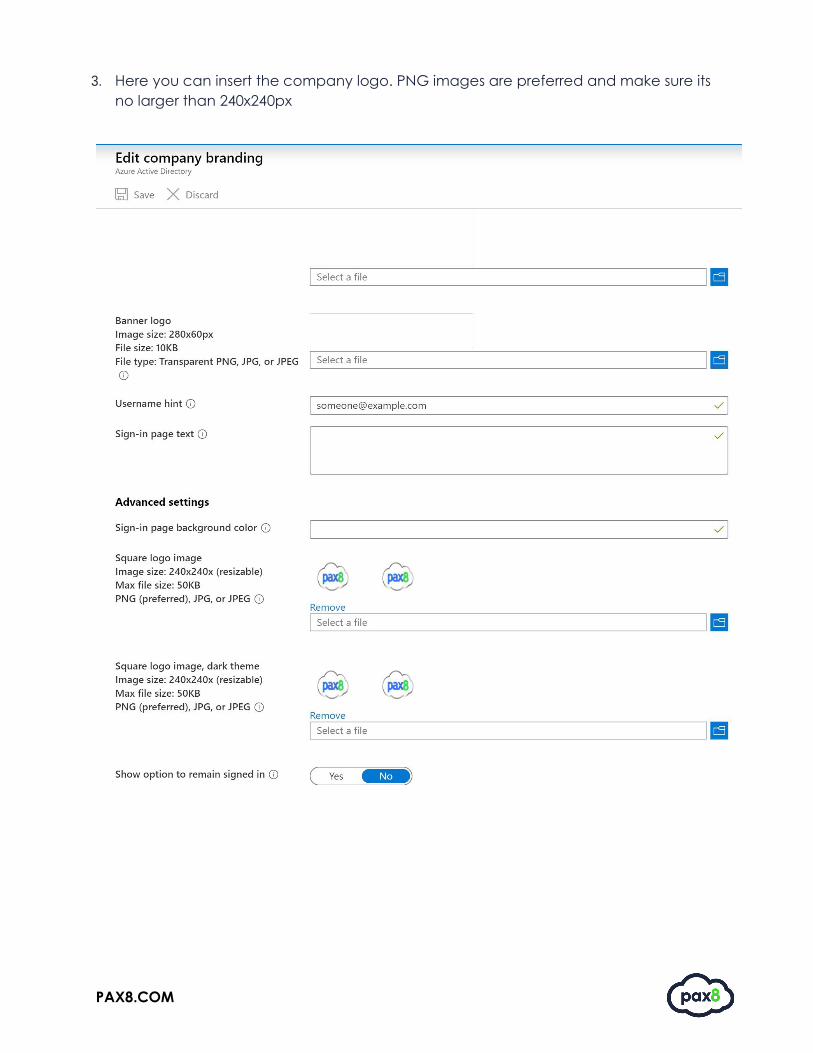
3. Here you can insert the company logo. PNG images are preferred and make sure its
no larger than 240x240px

PAX8.COM
4. This is what your end users will see when booting a device with the
Autopilot service
CONFIGURE AN AUTOPILOT PROFILE
Next, we will create an Autopilot profile that will define the out-of-the-box-
experience (OOBE) for the end user. *NOTE* I will be showing you how to create
this in Endpoint Manager but it can be done in the 365 admin portal, Windows
Store For Business, or in Partner Center.
1. In 365 Admin Portal, go to Admin centers>Endpoint Management
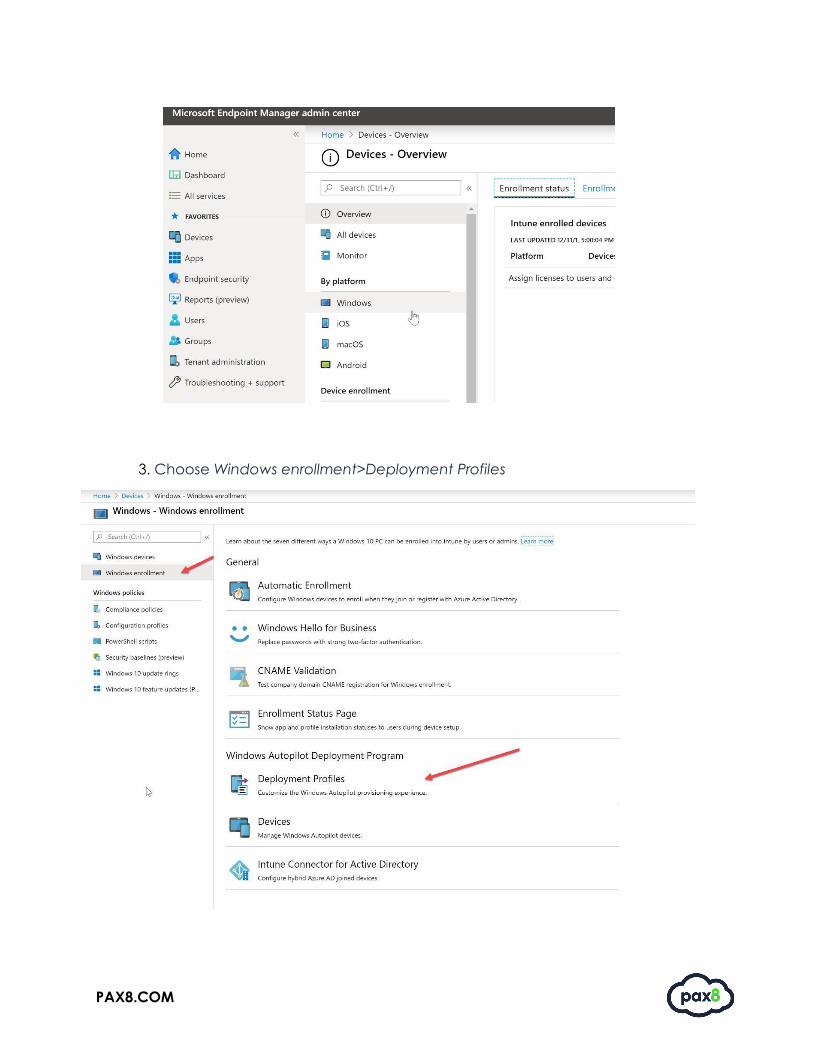
3. Click Devices > Windows
PAX8.COM
3. Choose Windows enrollment>Deployment Profiles

PAX8.COM
4. Click Create profile
5. Add a Name and Description If you want all devices in the assigned
groups to automatically convert to Autopilot, set Convert all
targeted devices to Autopilot to Yes.
Notes on this setting:
• You would need to have the devices registered in the Autopilot
service or enrolled into Intune which I will be showing you in a later
section.
• Allow 48 hours for the registration to be processed.
• When the device is unenrolled and reset, Autopilot will enroll it. After a
device is registered in this way, disabling this option or removing the
profile assignment won't remove the device from the Autopilot
deployment service. You must instead remove the device directly.
(remove from Autopilot devices)
PAX8.COM
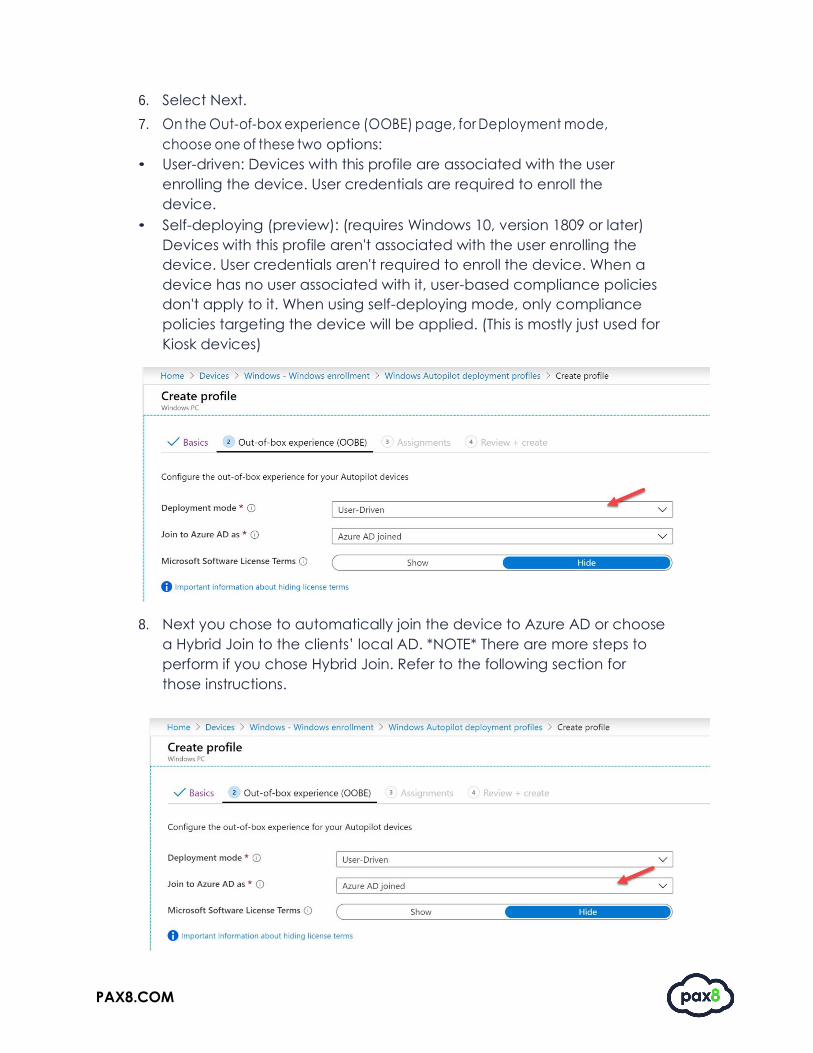
6. Select Next.
7. On the Out-of-box experience (OOBE) page, for Deployment mode,
choose one of these two options:
• User-driven: Devices with this profile are associated with the user
enrolling the device. User credentials are required to enroll the
device.
• Self-deploying (preview): (requires Windows 10, version 1809 or later)
Devices with this profile aren't associated with the user enrolling the
device. User credentials aren't required to enroll the device. When a
device has no user associated with it, user-based compliance policies
don't apply to it. When using self-deploying mode, only compliance
policies targeting the device will be applied. (This is mostly just used for
Kiosk devices)
8. Next you chose to automatically join the device to Azure AD or choose
a Hybrid Join to the clients’ local AD. *NOTE* There are more steps to
perform if you chose Hybrid Join. Refer to the following section for
those instructions.

PAX8.COM
9. Configure the following options:
• Microsoft Software License Terms (EULA): (Windows 10, version 1709 or later) Choose if you want
to show the EULA to users.
• Privacy settings: Choose if you want to show privacy settings to users.
• Hide change account options (requires Windows 10, version 1809 or later): Choose Hide to
prevent change account options from displaying on the company sign-in and domain error
pages. This option requires company branding to be configured in Azure Active Directory.
• User account type: Choose the user's account type (Administrator or Standard user). We allow
the user joining the device to be a local Administrator by adding them to the local Admin
group. We don't enable the user as the default administrator on the device.
• Allow White Glove OOBE (requires Windows 10, version 1903 or later; additional physical
requirements): Choose Yes to allow white glove support.
• Apply device name template (requires Windows 10, version 1809 or later, and Azure AD join
type): Choose Yes to create a template to use when naming a device during enrollment.
Names must be 15 characters or less, and can have letters, numbers, and hyphens. Names
can't be all numbers. Use the %SERIAL% macro to add a hardware-specific serial number.
Or, use the %RAND:x% macro to add a random string of numbers, where x equals the number
of digits to add. You can only provide a pre-fix for hybrid devices in a domain join profile.
• Language (Region)*: Choose the language to use for the device. This option is only available if
you chose Self-deploying for Deployment mode.
• Automatically configure keyboard*: If a Language (Region) is selected, choose Yes to skip the
keyboard selection page. This option is only available if you chose Self-deploying for
Deployment mode.
10. Click Next
**NOTE** I consider White Glove very valuable to the MSP. This allows your technician to preconfigure the device
before handing it off to the end user. This means you can allow the apps to fully install and configure any additional
settings before the user touches the device. Once completed the user will still go through the OOBE, but they will be
up and running immediately without having to wait for any apps to install. For more information, Click Here.

PAX8.COM
11. Now we can define our scope of users. You could set this to all devices or
define groups of users to apply this profile to. Most likely, you would assign to
different groups of users if you wanted to apply different settings to
different people.

PAX8.COM
12. Review Your Changes and Click Create

PAX8.COM
ADDING EXISTING DEVICES TO AUTOPILOT
To add existing devices, we need to harvest the Device ID from the computer so
that we can upload a CSV into the Autopilot service. A script has been created to
pull this information and export it in the correct format with Powershell. *NOTE* if you
have already enrolled devices to Intune, you can simply create an Autopilot profile
and chose the “Convert All Devices to Autopilot” on the first page of the wizard.
You would not need to perform these steps. These steps would be performed for a
device you do not want to enroll into Intune yet (because you have no user to join
to Azure AD) but want to enroll to the Autopilot service.
1. On the device, run Powershell as administrator and run the following:
md c:\HWID
Set-Location c:\HWID
Set-ExecutionPolicy -Scope Process -ExecutionPolicy Unrestricted -Force
Install-Script -Name Get-WindowsAutopilotInfo -Force
$env:Path += ";C:\Program Files\WindowsPowerShell\Scripts"
Get-WindowsAutopilotInfo.ps1 -OutputFile AutopilotHWID.csv
2. This will export a CSV to the HWID folder with the necessary information we
need to upload into the Endpoint Management Portal. First grab the CSV
from the Powershell export.
PAX8.COM
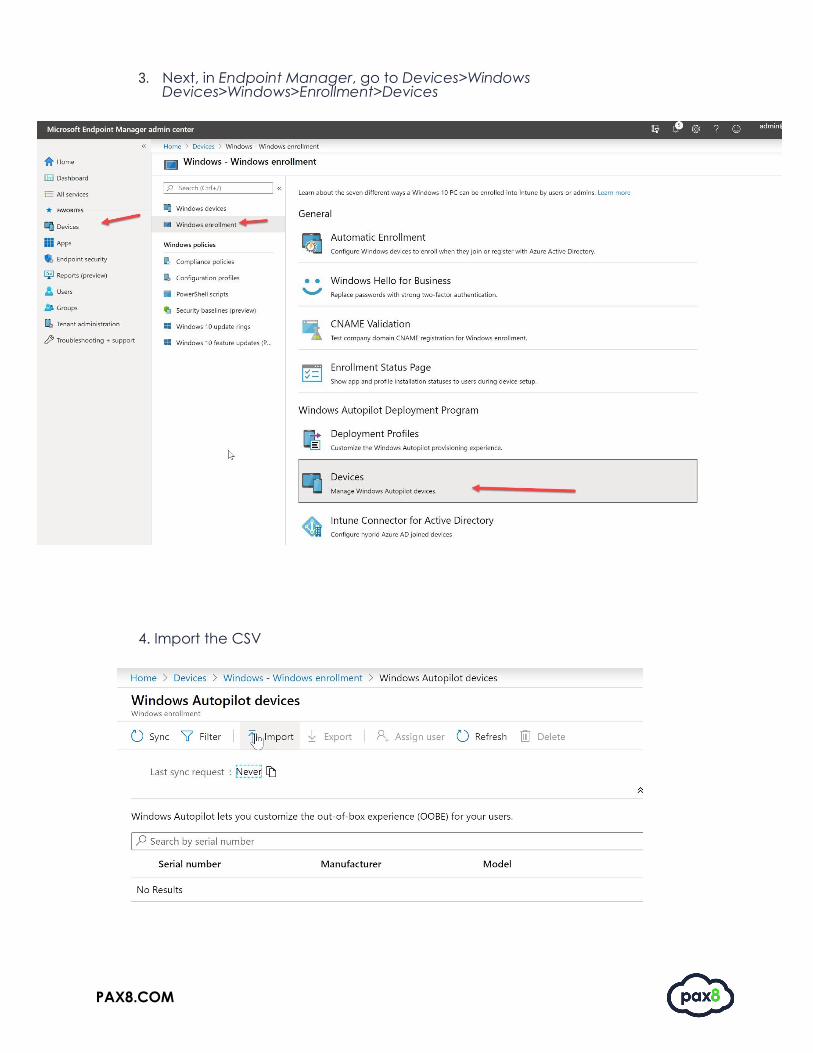
3. Next, in Endpoint Manager, go to Devices>Windows Devices>Windows>Enrollment>Devices
4. Import the CSV
PAX8.COM
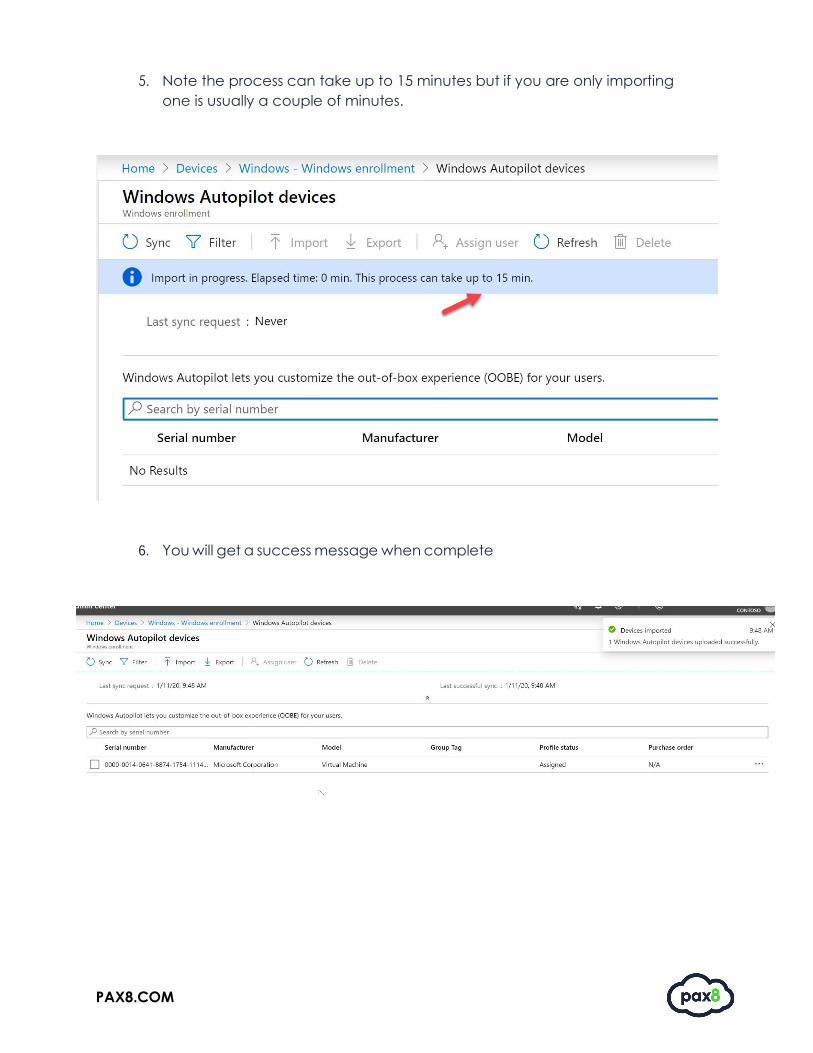
5. Note the process can take up to 15 minutes but if you are only importing
one is usually a couple of minutes.
6. You will get a success message when complete

PAX8.COM
7. From here, you can checkmark the device and assign it to a user:

PAX8.COM
8. Here you can assign a user-friendly name which is what the end user would see
from the OOBE. (Ex. Hi Megan Bowen, were getting things ready for you.)
Additionally, you can define a device name or group tag. You can use group tags in a variety of different ways to stay organized, but a good example would be
giving a group tag by department.
PAX8.COM
ADDING NEW DEVICES
New devices can be imported like we just showed in the existing devices section
and your OEM can supply you with the CSV file you need to upload at time of
purchase. Some OEM providers can even upload this for you. To review the list
of OEM providers again, click here.
PERFORMING AN AUTOPILOT RESET
After a device is enrolled in the Autopilot service, you can perform an Autopilot
reset to get the device back to a business-ready state after a user leaves the
organization. Windows Autopilot Reset removes personal files, apps, and settings
and reapplies a device’s original settings, maintaining its identity connection to
Azure AD and its management connection to Intune so that the device is once again
ready for use.
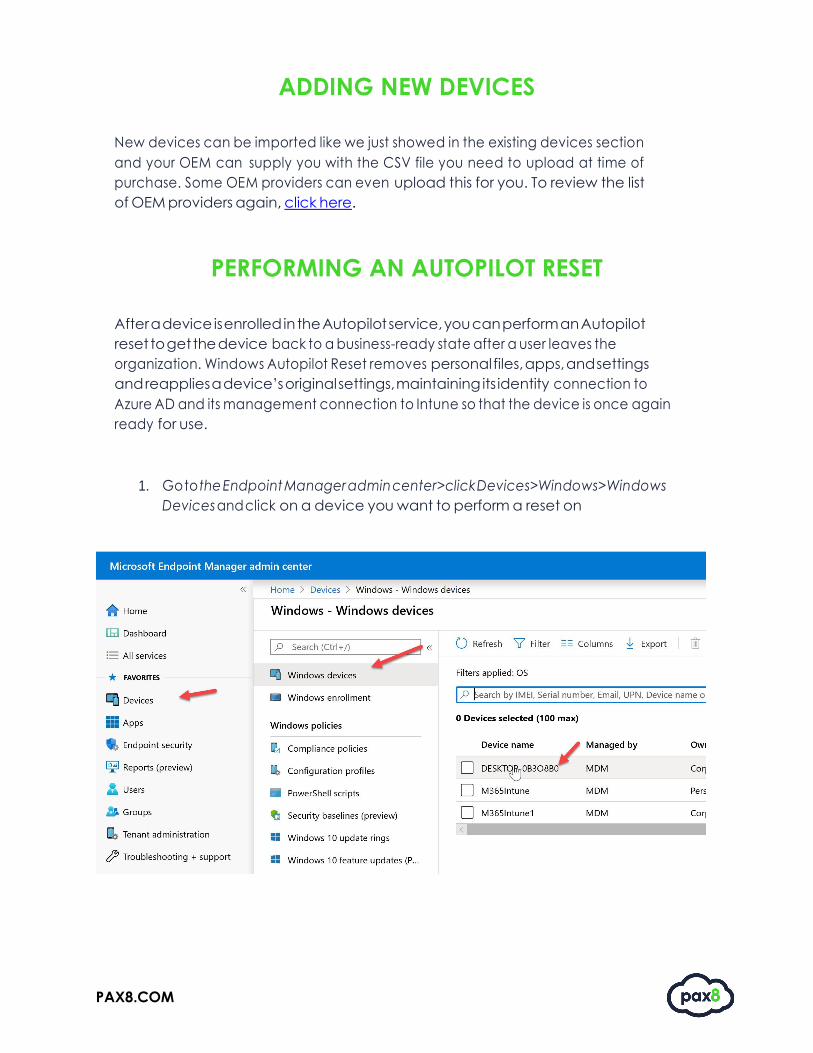
1. Go to the Endpoint Manager admin center>click Devices>Windows>Windows
Devices and click on a device you want to perform a reset on
PAX8.COM
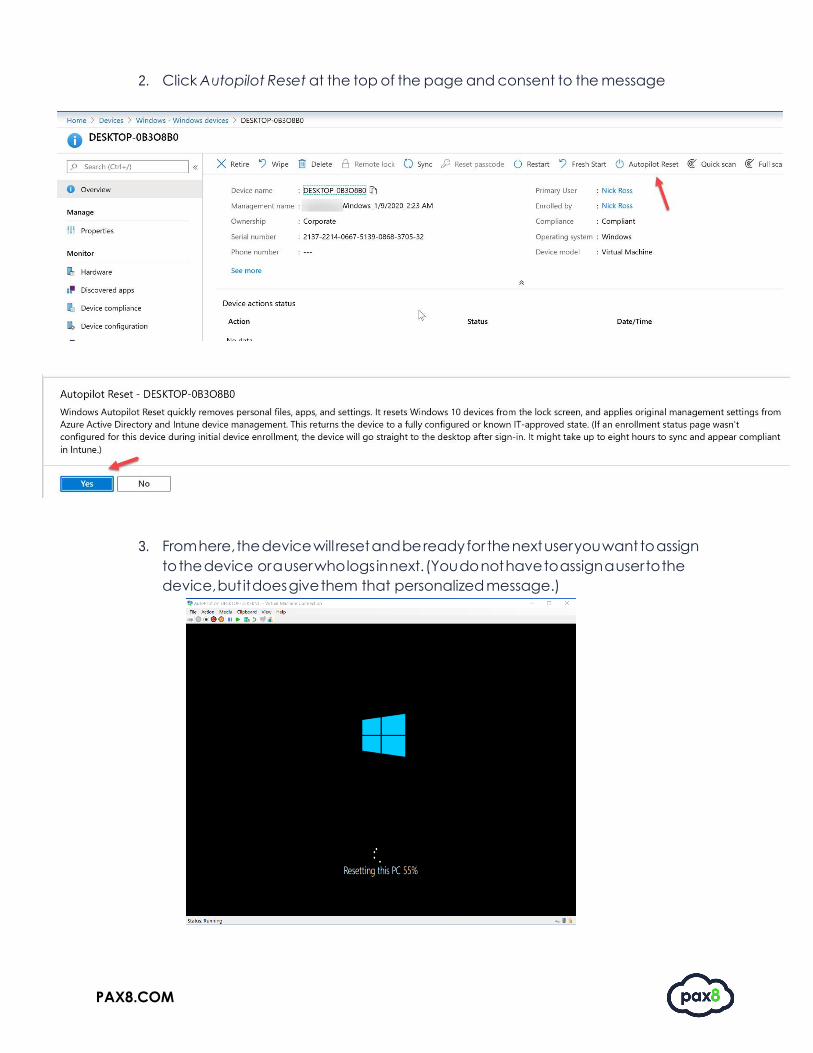
2. Click Autopilot Reset at the top of the page and consent to the message
3. From here, the device will reset and be ready for the next user you want to assign
to the device or a user who logs in next. (You do not have to assign a user to the
device, but it does give them that personalized message.)
PAX8.COM
END USER EXPERIENCE
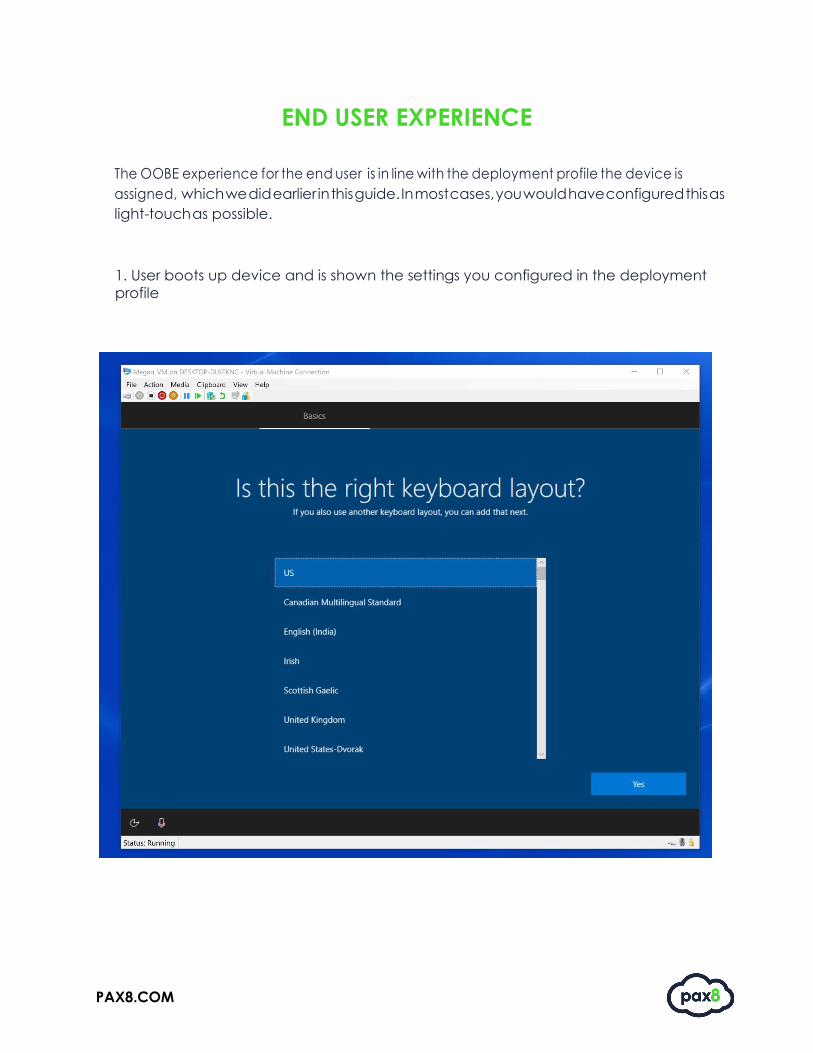
The OOBE experience for the end user is in line with the deployment profile the device is
assigned, which we did earlier in this guide. In most cases, you would have configured this as
light-touch as possible.
1. User boots up device and is shown the settings you configured in the deployment
profile

PAX8.COM
2. Once there is a network chosen, the Autopilot profile loads up, shows your
company branding (if added), and asks the user to authenticate
3. Once authenticated, the device will load up and push down all of your
settings, apps, and policies
PAX8.COM
CONFIGURING MFA TO ENROLL A DEVICE AND AT OOBE
In some cases, you may want to configure the user to be prompted to use
MFA when enrolling a device or during the OOBE. This is a security concern. If a
user is compromised and you have all of their corporate data and applications
syncing, anyone with their credentials could get access to that data on a new
device. To configure MFA to enroll a device, perform the following steps:
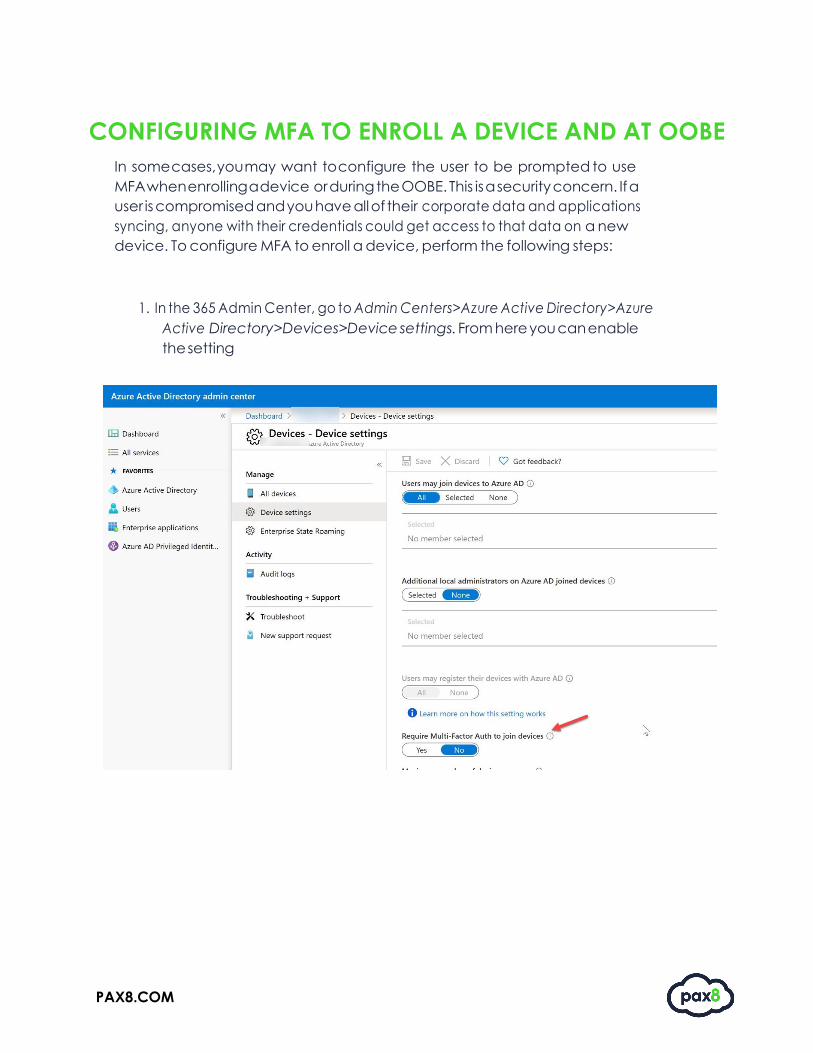
1. In the 365 Admin Center, go to Admin Centers>Azure Active Directory>Azure
Active Directory>Devices>Device settings. From here you can enable
the setting
PAX8.COM
CONFIGURING HYBRID AZURE AD JOIN
Many MSPs still have their clients’ local AD environment in place and in many cases, it
does not make sense to fully transition to the cloud. One great configuration to set
up to help you prepare to fully transition in the future is hybrid Azure AD Join. These
settings allow you to sync up your existing devices joined to the local domain into
Azure AD. They also allow you to use Autopilot to write these devices to your local
Active Directory. I propose the following as an ideal way to start to get users devices
managed by Intune and leverage the Autopilot service:
• Configure Hybrid Azure Join and sync existing devices to Azure AD
• Harvest these devices Hardware IDs as defined earlier in this guide
• Upload the hardware IDs into the Autopilot Devices section
• When you order new computers, ask the OEM to upload the hardware IDs to Autopilot
With this solution in place, you can begin to move away from using GPOs and fully
leverage the power of Intune for device management. This allows you to slowly
enroll existing devices into Intune when you issue the computer to a new user and
also automatically registers new devices to Intune straight out of the box. While you
do this, the new device writes down to the local AD to have current GPOs applied.
This will make things much easier when it is time to transition off the local AD environment
fully in the future. Let’s now get into this configuration.
Prerequisites for Hybrid Join:
• AD Connect is in place
• DC is Server 2016 or later
• Devices that write down from Autopilot have to be Windows 10 1809 or greater
Checklist that we’ll go through in this section:
• Delegate Active Directory Rights
• Install the Intune Connector
• Configure the AD Connect Wizard
• Configure the GPO
• Create the Domain Join Profile
• Create the Autopilot Profile
PAX8.COM
INCREASING THE COMPUTER ACCOUNT LIMIT IN THE OU
The Intune Connector for your Active Directory creates autopilot-enrolled computers
in the on-premises Active Directory domain. The computer that hosts the Intune
Connector must have the rights to create the computer objects within the
domain.
In some domains, computers are not granted the rights to create computers.
Additionally, domains have a built-in limit (default of 10) that applies to all users and
computers that aren't delegated rights to create computer objects. Therefore,
the rights need to be delegated to computers that host the Intune Connector on
the organizational unit where hybrid Azure AD-joined devices are created.
The organizational unit that's granted the rights to create computers must match:
• The organizational unit that's entered in the Domain Join profile
• If no profile is selected, the computer's domain name is used for your domain
**NOTE ** You may want to create a new OU specifically for Hybrid Devices for security
reasons, GPOs, etc.
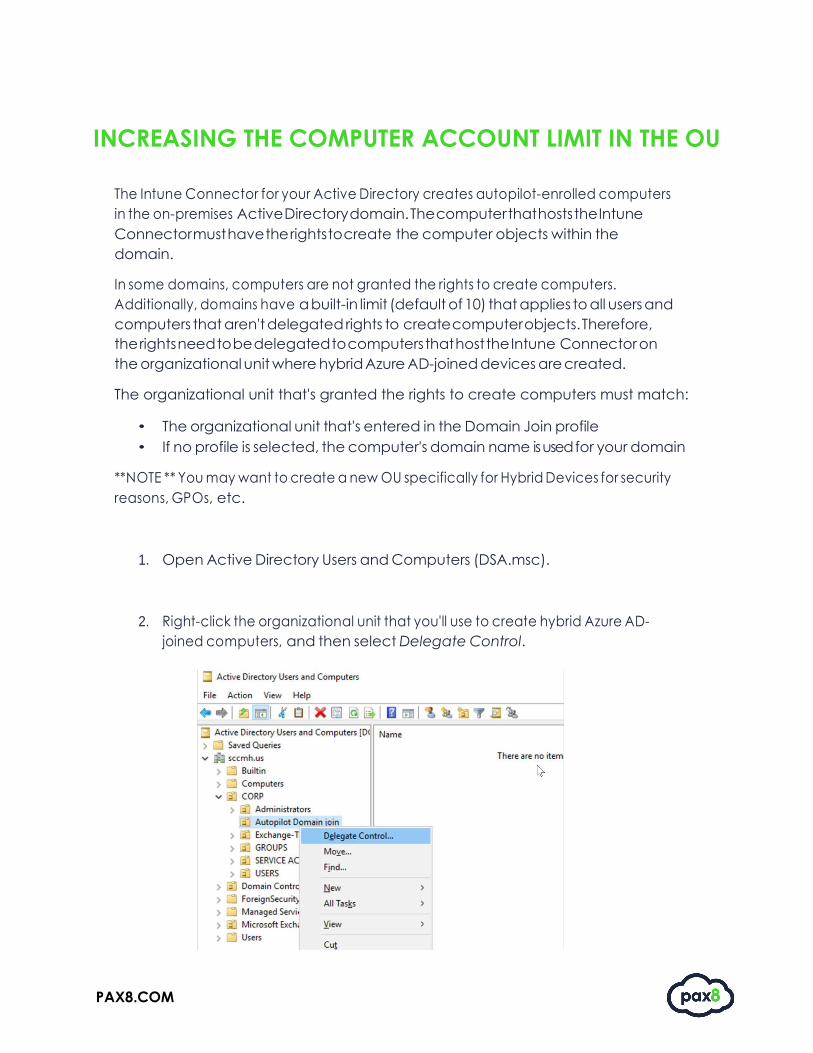
1. Open Active Directory Users and Computers (DSA.msc).
2. Right-click the organizational unit that you'll use to create hybrid Azure AD-
joined computers, and then select Delegate Control.
PAX8.COM
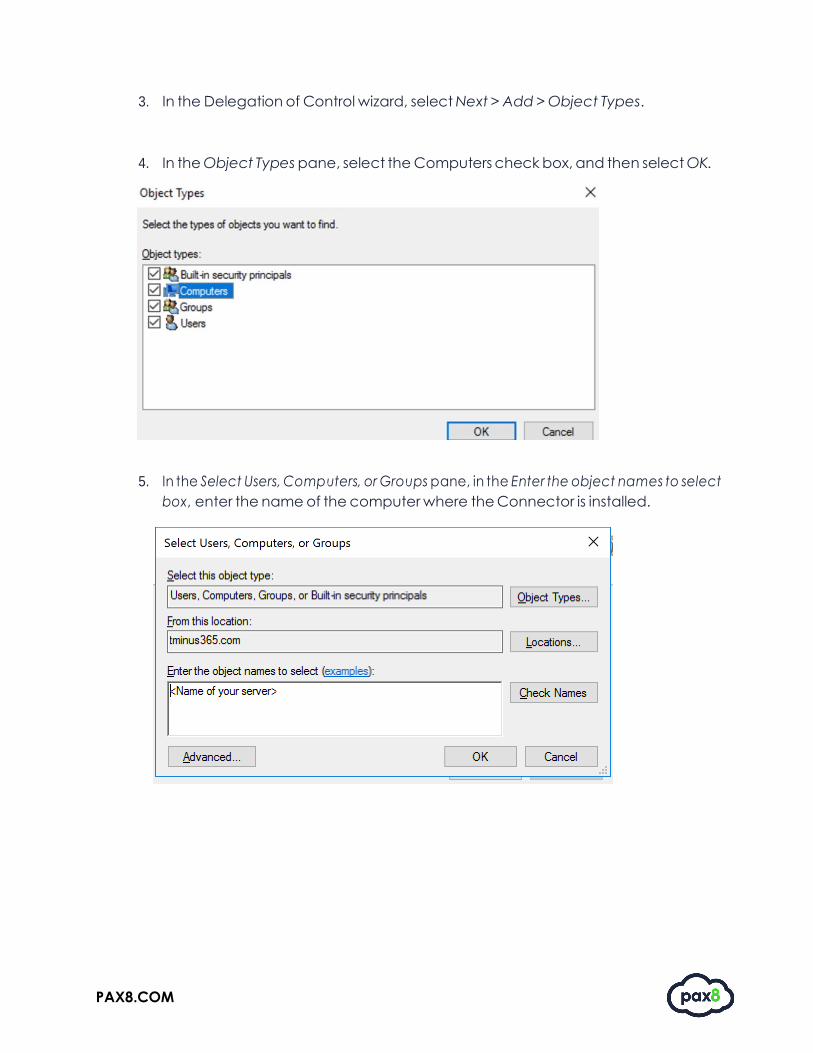
3. In the Delegation of Control wizard, select Next > Add > Object Types.
4. In the Object Types pane, select the Computers check box, and then select OK.
5. In the Select Users, Computers, or Groups pane, in the Enter the object names to select
box, enter the name of the computer where the Connector is installed.

PAX8.COM
6. Select Check Names to validate your entry, select OK, and then select Next.
7. Select Create a custom task to delegate > Next.
8. Select the Only the following objects in the folder check box, and then select the
Computer objects, Create selected objects in this folder, and Delete selected
objects in this folder check boxes.

PAX8.COM
9. Select Next.
10. Under Permissions, select the Full Control check box. This action selects all the other
options.
11. Select Next, and then select Finish.
PAX8.COM
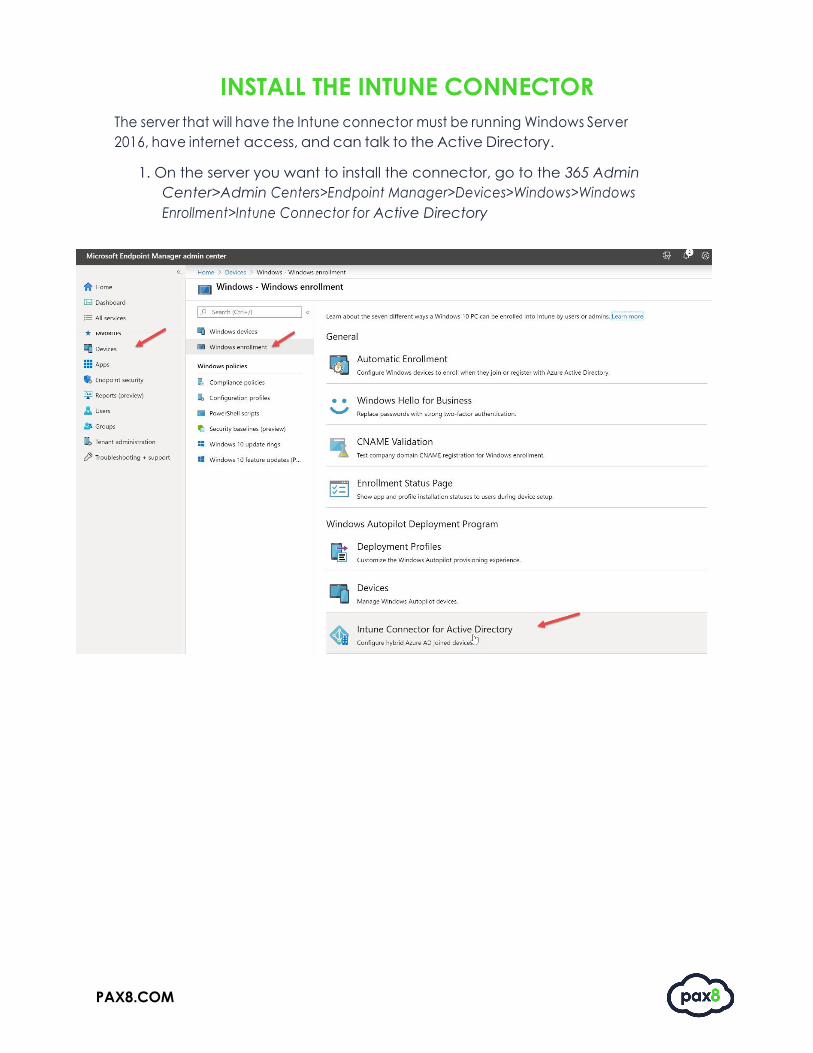
INSTALL THE INTUNE CONNECTOR
The server that will have the Intune connector must be running Windows Server
2016, have internet access, and can talk to the Active Directory.
1. On the server you want to install the connector, go to the 365 Admin
Center>Admin Centers>Endpoint Manager>Devices>Windows>Windows
Enrollment>Intune Connector for Active Directory
PAX8.COM
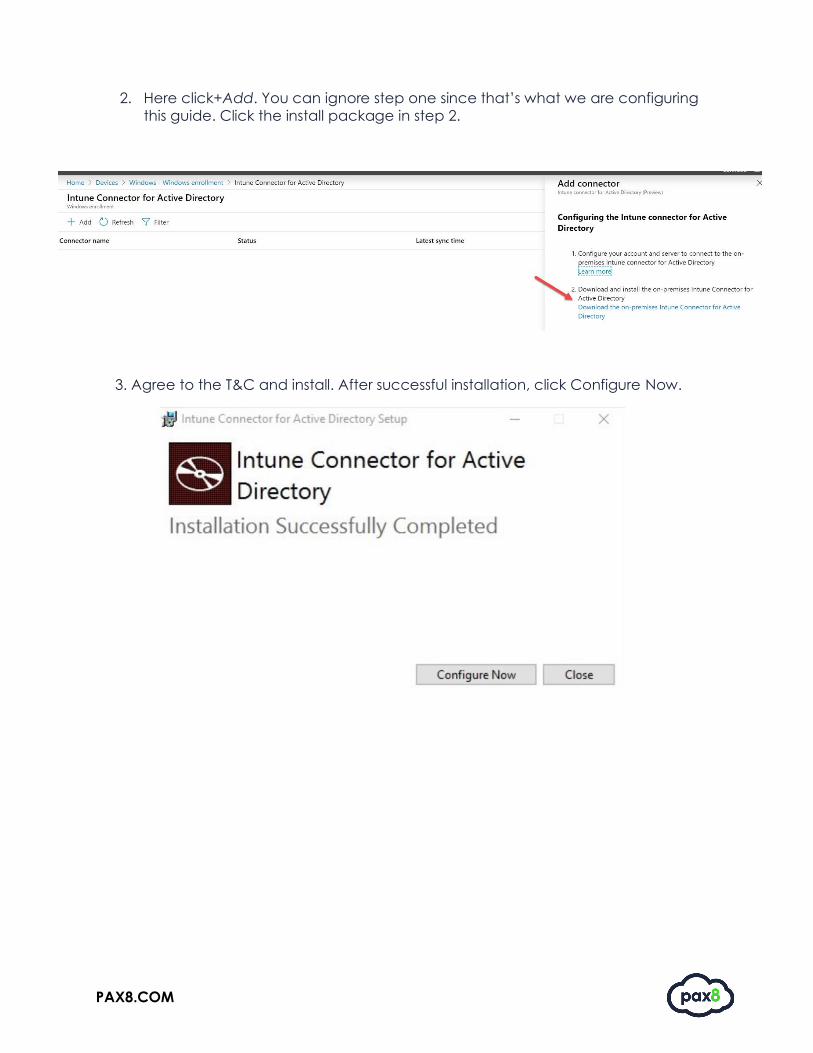
2. Here click+Add. You can ignore step one since that’s what we are configuring
this guide. Click the install package in step 2.
3. Agree to the T&C and install. After successful installation, click Configure Now.

PAX8.COM
4. Sign-In with Global Admin Creds:
5. You will get a success message and you can refresh the Endpoint Manager
Portal to see the successful connection.

PAX8.COM
CONFIGURE THE AD CONNECT WIZARD Next, we need to customize our settings for the AD Connect Wizard.
1. Run the Azure AD Connect service first.
2. Here we will select the Configure device options section and click Next.

PAX8.COM
3. Click Next as we will be configuring Hybrid Join
4. Enter your global admin creds:

PAX8.COM
5. Leave the default option of Configure Hybrid AzureAD Join.
6. Select Windows 10 or later domain-joined devices.

PAX8.COM
7. Click Add and enter your enterprise admin creds:
8. When complete, click Configure.
PAX8.COM
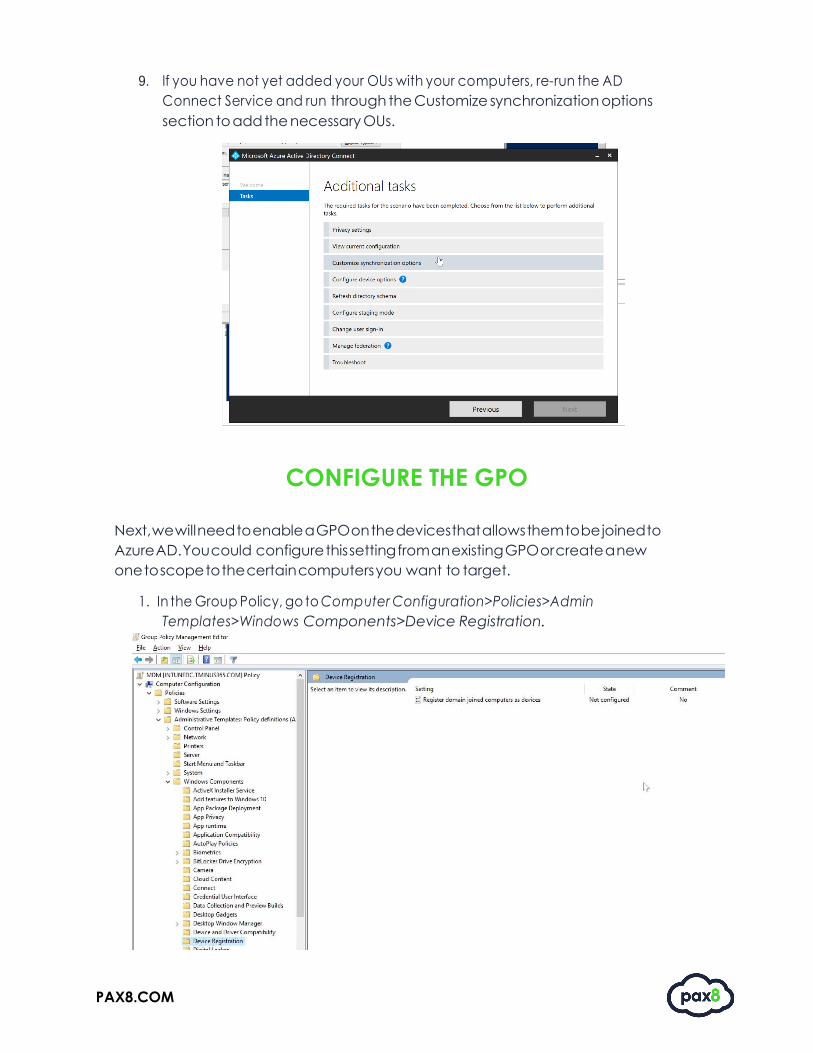
9. If you have not yet added your OUs with your computers, re-run the AD
Connect Service and run through the Customize synchronization options
section to add the necessary OUs.
CONFIGURE THE GPO
Next, we will need to enable a GPO on the devices that allows them to be joined to
Azure AD. You could configure this setting from an existing GPO or create a new
one to scope to the certain computers you want to target.
1. In the Group Policy, go to Computer Configuration>Policies>Admin
Templates>Windows Components>Device Registration.
PAX8.COM
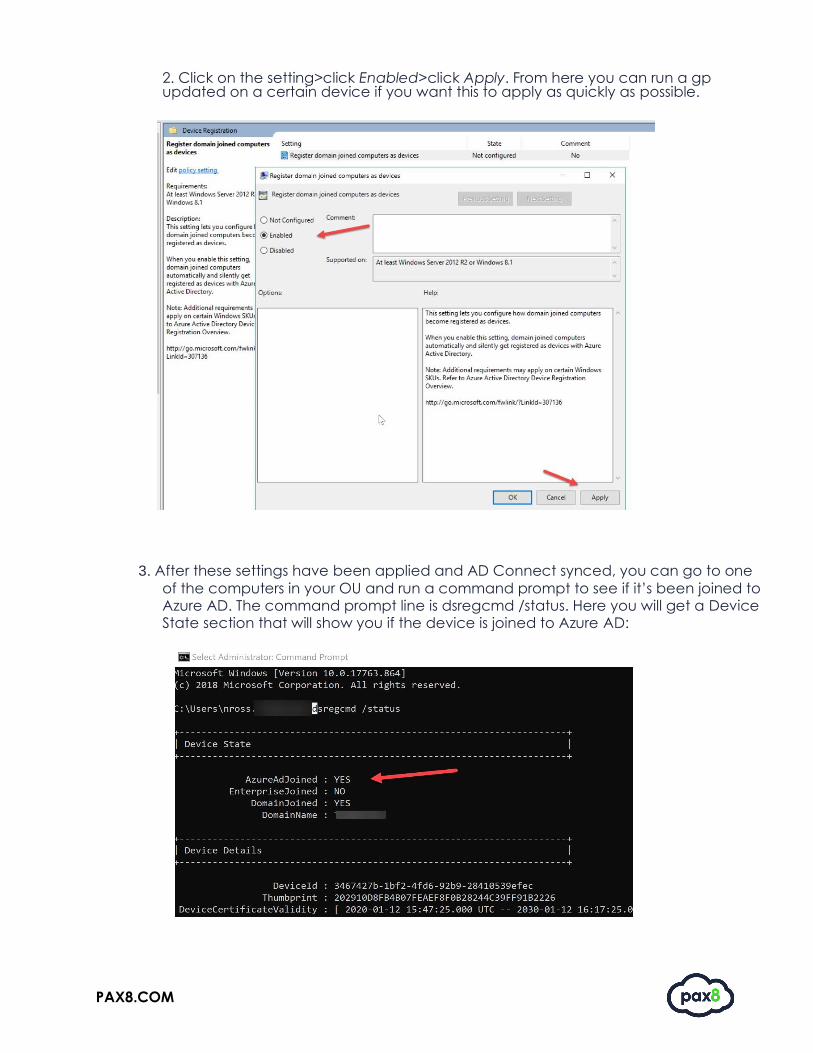
2. Click on the setting>click Enabled>click Apply. From here you can run a gp updated on a certain device if you want this to apply as quickly as possible.
3. After these settings have been applied and AD Connect synced, you can go to one
of the computers in your OU and run a command prompt to see if it’s been joined to Azure AD. The command prompt line is dsregcmd /status. Here you will get a Device State section that will show you if the device is joined to Azure AD:
PAX8.COM
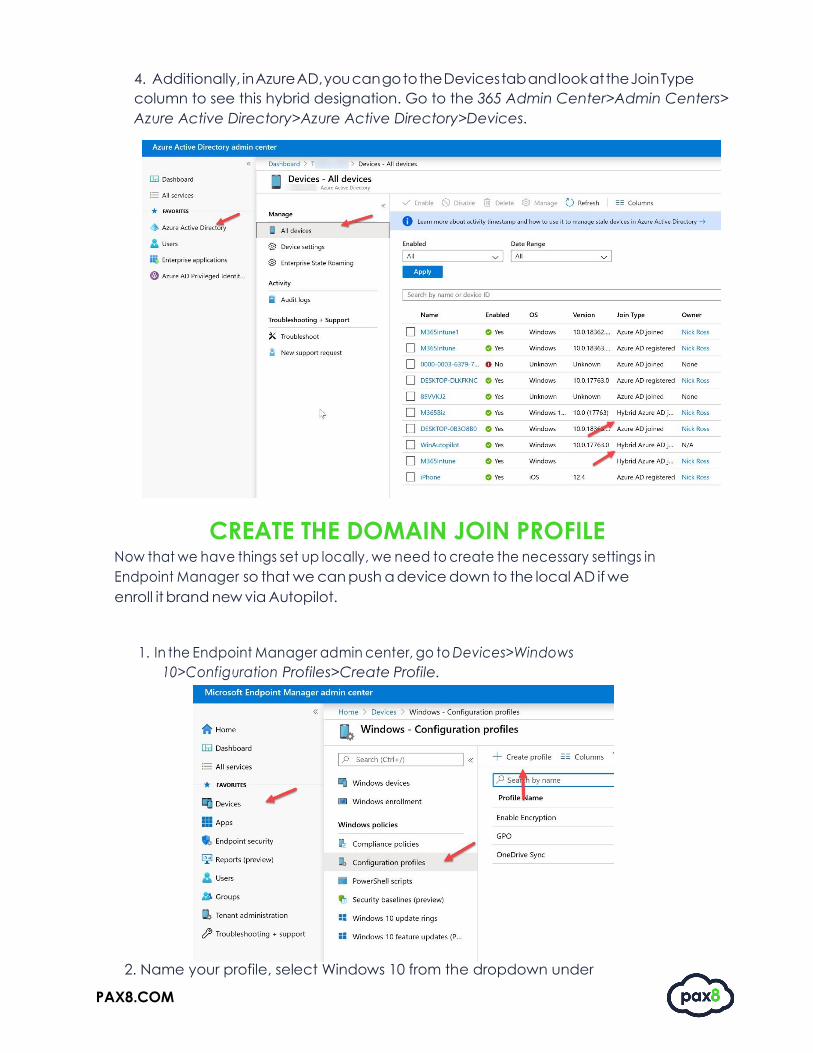
4. Additionally, in Azure AD, you can go to the Devices tab and look at the Join Type
column to see this hybrid designation. Go to the 365 Admin Center>Admin Centers>
Azure Active Directory>Azure Active Directory>Devices.
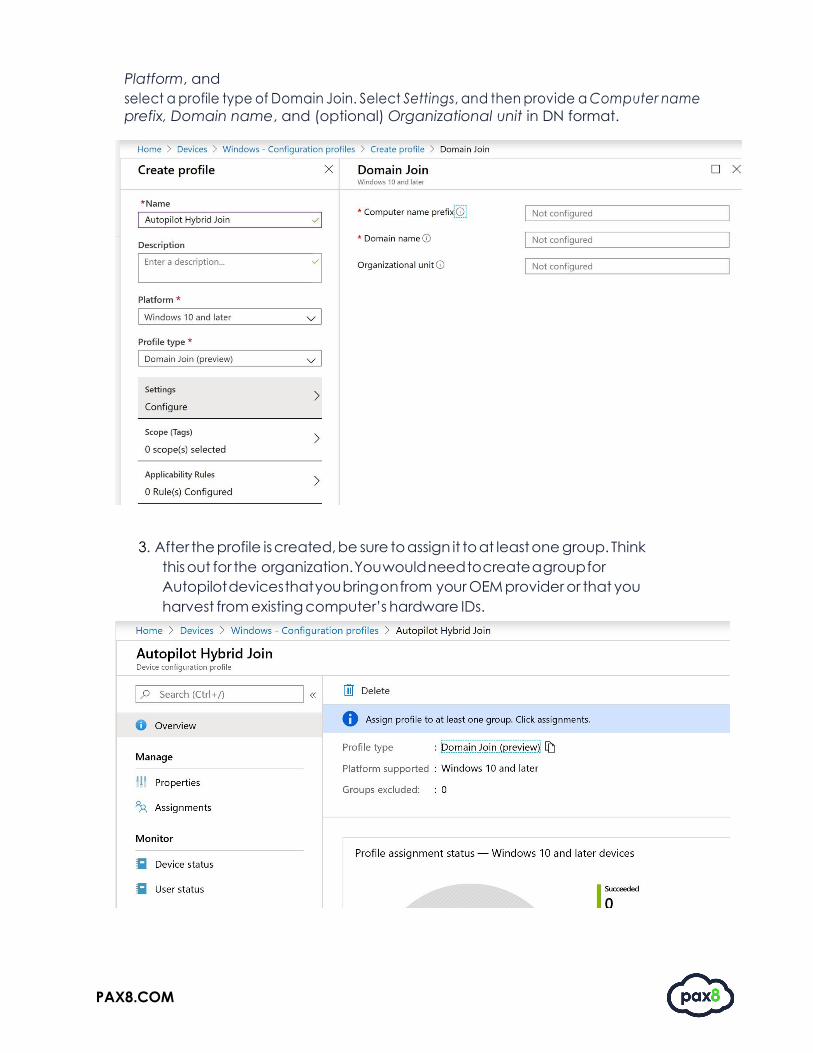
CREATE THE DOMAIN JOIN PROFILE Now that we have things set up locally, we need to create the necessary settings in
Endpoint Manager so that we can push a device down to the local AD if we
enroll it brand new via Autopilot.
1. In the Endpoint Manager admin center, go to Devices>Windows
10>Configuration Profiles>Create Profile.
2. Name your profile, select Windows 10 from the dropdown under
PAX8.COM
Platform, and
select a profile type of Domain Join. Select Settings, and then provide a Computer name
prefix, Domain name, and (optional) Organizational unit in DN format.
3. After the profile is created, be sure to assign it to at least one group. Think
this out for the organization. You would need to create a group for
Autopilot devices that you bring on from your OEM provider or that you
harvest from existing computer’s hardware IDs.
PAX8.COM
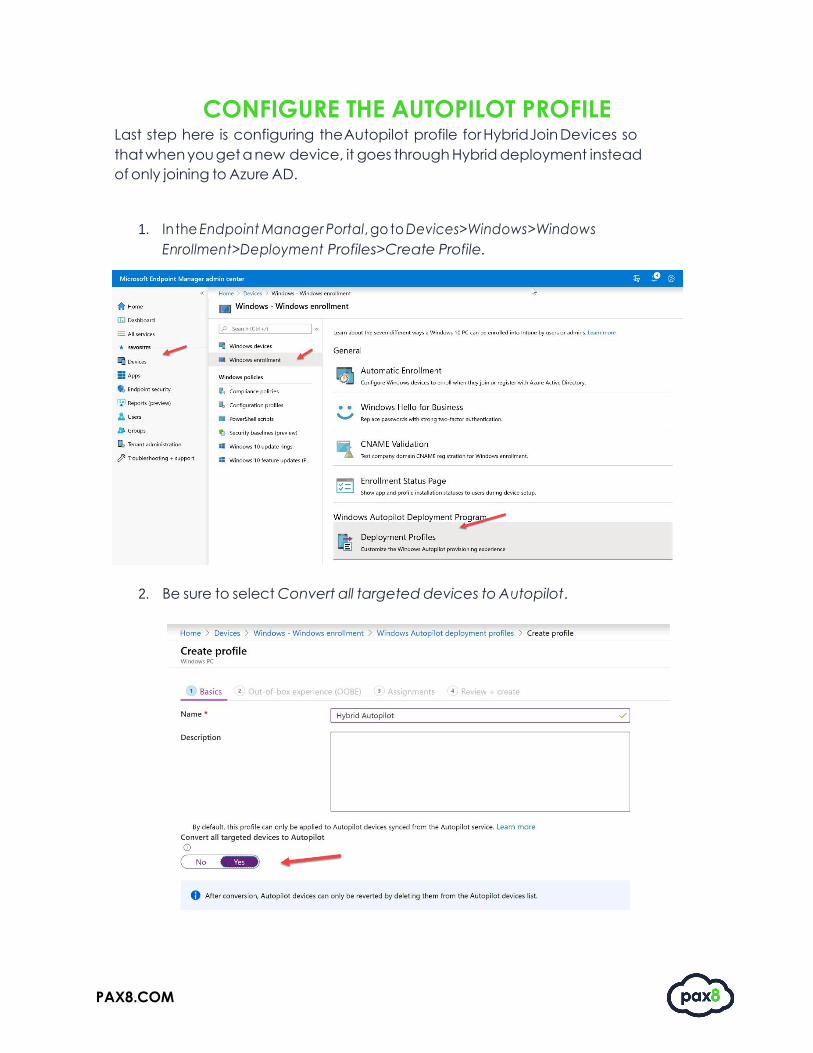
CONFIGURE THE AUTOPILOT PROFILE Last step here is configuring the Autopilot profile for Hybrid Join Devices so
that when you get a new device, it goes through Hybrid deployment instead
of only joining to Azure AD.
1. In the Endpoint Manager Portal, go to Devices>Windows>Windows
Enrollment>Deployment Profiles>Create Profile.
2. Be sure to select Convert all targeted devices to Autopilot.
PAX8.COM
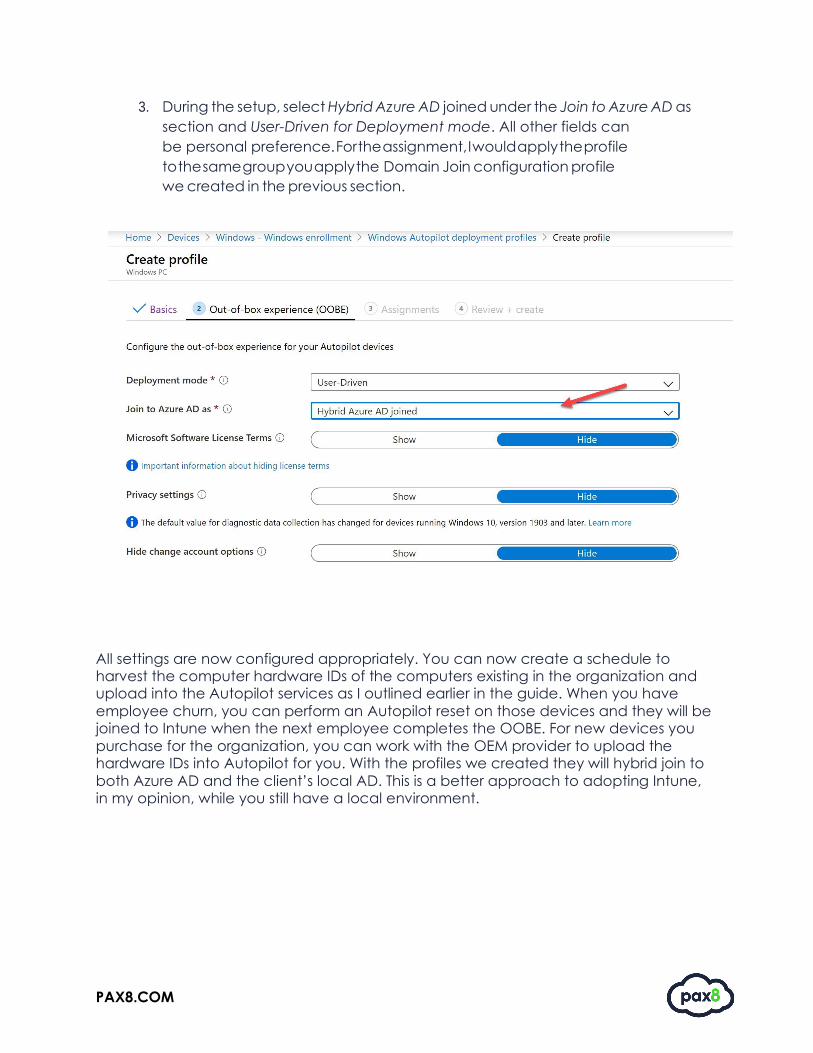
3. During the setup, select Hybrid Azure AD joined under the Join to Azure AD as
section and User-Driven for Deployment mode. All other fields can
be personal preference. For the assignment, I would apply the profile
to the same group you apply the Domain Join configuration profile
we created in the previous section.
All settings are now configured appropriately. You can now create a schedule to harvest the computer hardware IDs of the computers existing in the organization and upload into the Autopilot services as I outlined earlier in the guide. When you have
employee churn, you can perform an Autopilot reset on those devices and they will be joined to Intune when the next employee completes the OOBE. For new devices you
purchase for the organization, you can work with the OEM provider to upload the hardware IDs into Autopilot for you. With the profiles we created they will hybrid join to
both Azure AD and the client’s local AD. This is a better approach to adopting Intune, in my opinion, while you still have a local environment.

PAX8.COM
CONCLUSION
I hope this article provided you some targeted guidance on Windows Autopilot
with Microsoft Intune. I hope to get some feedback to improve this guide further.
Any feedback can be sent to the following email:
For all other questions or additional assistance, please reach out to your CSA or our support
team:
Support (Existing Partners Only)
• Support: 1-855-884-7298 Ext. 3
• Email: [email protected]
• Hours: 24/7