windows xp unwired provides a complete introduction to all...
TRANSCRIPT

[ Team LiB ]
• Table of Contents
• Index
• Reviews
• Reader Reviews
• Errata
• Academic
Windows XP Unwired
By Wei-Meng Lee
Publisher: O'Reilly
Pub Date: August 2003
ISBN: 0-596-00536-9
Pages: 278
Windows XP Unwired provides a complete introduction to all the wireless technologies supported byWindows XP, including Wi-Fi (802.11b, a, and g), infrared, Bluetooth, CDMA2000, and GPRS. It's aone-stop wireless information source for technically savvy Windows XP users. This book will show youthe full-spectrum view of wireless capabilities of Windows XP, and how to take advantage of them.
[ Team LiB ]

[ Team LiB ]
• Table of Contents
• Index
• Reviews
• Reader Reviews
• Errata
• Academic
Windows XP Unwired
By Wei-Meng Lee
Publisher: O'Reilly
Pub Date: August 2003
ISBN: 0-596-00536-9
Pages: 278
Copyright
Preface
What This Book Covers
Wireless Security
Conventions Used in This Book
Comments and Questions
Acknowledgments
Chapter 1. Wireless Networking Fundamentals
Section 1.1. TCP/IP
Section 1.2. Understanding Radio Waves
Section 1.3. Wireless Networks
Chapter 2. Wi-Fi on Your Notebook
Section 2.1. 802.11 Wireless Standards
Section 2.2. Understanding 802.11 Speak
Section 2.3. Connecting to a Wireless Network

Section 2.4. Taking It on the Road
Chapter 3. Wi-Fi on the Road
Section 3.1. Wireless Hotspots
Section 3.2. Finding Wireless Networks
Chapter 4. Communicating Securely
Section 4.1. Secure Wireless Computing
Section 4.2. Virtual Private Networks
Section 4.3. Secure Shell (SSH)
Section 4.4. Firewalls
Section 4.5. Wi-Fi Security
Section 4.6. Are 802.11 Networks Really Secure?
Chapter 5. Configuring Wireless Access Points
Section 5.1. Setting Up a Wireless Network
Section 5.2. Case Study: The Home Network
Section 5.3. Case Study: The Office Network
Section 5.4. Configuring an Access Point
Section 5.5. Ad-Hoc Wireless Networking
Section 5.6. Setting Up a Wireless Repeater
Section 5.7. Guidelines for Securing a Wireless Network
Section 5.8. Troubleshooting Wi-Fi
Chapter 6. Bluetooth
Section 6.1. Bluetooth Standards Today
Section 6.2. Bluetooth Devices
Section 6.3. Bluetooth Service Profiles
Section 6.4. Using Bluetooth in Windows XP
Section 6.5. Connecting to a Pocket PC
Section 6.6. Bluetooth LAN
Section 6.7. Bluetooth Security
Chapter 7. Infrared
Section 7.1. IrDA in More Detail
Section 7.2. IrDA Adapters
Section 7.3. Using IrDA in Windows XP
Section 7.4. Infrared File Transfer
Section 7.5. Infrared Security
Chapter 8. Cellular Networking
Section 8.1. Cellular Networking Price and Performance
Section 8.2. GPRS
Section 8.3. CDMA2000
Section 8.4. Compression
Chapter 9. Global Positioning System (GPS)

Section 9.1. How GPS Works
Section 9.2. GPS Devices
Section 9.3. GPS Software
Chapter 10. Microsoft Smart Display and Remote Desktop
Section 10.1. What Is the Microsoft Smart Display?
Section 10.2. Using the ViewSonic AirPanel V150
Section 10.3. Using Remote Desktop
Colophon
Index
[ Team LiB ]

[ Team LiB ]
Copyright
Copyright © 2003 O'Reilly & Associates, Inc.
Printed in the United States of America.
Published by O'Reilly & Associates, Inc., 1005 Gravenstein Highway North, Sebastopol, CA 95472.
O'Reilly & Associates books may be purchased for educational, business, or sales promotional use.Online editions are also available for most titles (http://safari.oreilly.com). For more information,contact our corporate/institutional sales department: (800) 998-9938 or [email protected].
Nutshell Handbook, the Nutshell Handbook logo, and the O'Reilly logo are registered trademarks ofO'Reilly & Associates, Inc. The Unwired series designations, Windows XP Unwired, the image of a birdcage, and related trade dress are trademarks of O'Reilly & Associates, Inc. Many of the designationsused by manufacturers and sellers to distinguish their products are claimed as trademarks. Wherethose designations appear in this book, and O'Reilly & Associates, Inc. was aware of a trademarkclaim, the designations have been printed in caps or initial caps.
While every precaution has been taken in the preparation of this book, the publisher and authorsassume no responsibility for errors or omissions, or for damages resulting from the use of theinformation contained herein.
[ Team LiB ]

[ Team LiB ]
PrefaceWith the explosive growth of the Internet, more and more people got connected. The world suddenlybecame much smaller, because the distance between people from different parts of the world nolonger prevented them from collaborating. In the 90s, there was a frenzied race to get people andcorporations connected. Today, Internet access is a necessity; even novice users have trouble findingvalue in a computer that doesn't have email, a web browser, or instant messenger (IM).
While Internet access becomes as important as telephone or cable service, even more demandingusers are appearing who are not satisfied in just getting connected. They want flexible ways to getconnected wherever they take their notebook computers.
When wireless networking became affordable, early adopters installed it in their homes and offices,and it also quickly became a part of life in other places: many Starbucks Coffee and Bordersbookstores now include wireless hotspots, mobile users are reading and sending email over cellularnetworks, and students are learning with notebook computers equipped with wireless network cards.
Today, wireless devices come in all shapes and sizes. In fact, wireless technology is not somethingnew: remote control cars and TV remote controls have been in use for some time. Wirelesstechnologies have penetrated our lives for so long that we take them for granted. In the case of a TVremote controller, infrared technology (which uses light) carries signals across the room. For theremote control car, radio waves transmit information from the controller to the car.
[ Team LiB ]

[ Team LiB ]
What This Book Covers
This book explains the following wireless technologies and how to use them with a Windows XPcomputer:
Wireless Fidelity (Wi-Fi)
Wi-Fi is sometimes called "wireless Ethernet." Using Wi-Fi, you can connect to the Internetwithout wires and roam from place to place (within range of the network) while maintainingyour connection. Wi-Fi uses radio waves to transmit information. Chapter 1, Chapter 2,Chapter 3, Chapter 4, and Chapter 5 discuss Wi-Fi.
Bluetooth
Bluetooth is often touted as a cable-replacement technology. Like Wi-Fi, Bluetooth also usesradio waves but operates within a shorter range. It is ideal for replacing cables that connecttwo devices. For example, your keyboard and mouse can use Bluetooth technology to transmitsignals to your computer, eliminating unsightly cables that often get hopelessly tangled. Youcan also wirelessly synchronize your PDA with your computer via Bluetooth. Chapter 6discusses Bluetooth.
Infrared
Infrared technology has been with us for a number of years. Infrared requires line of sight(LOS) to transmit data. Infrared is a short-range wireless technology like Bluetooth, but it useslight waves that are just outside the spectrum of visible light rather than radio waves. Chapter7 discusses Infrared.
General Packet Radio Services (GPRS) and Code Division Multiple Access 2000 (CDMA2000)
While Wi-Fi allows you to connect to the network wirelessly, it has limited coverage. Physicallymoving out of range of a wireless network breaks the connection. In highly mobile situations,GPRS and CDMA2000 may be the ideal solution (or a complement to Wi-Fi for networkconnectivity when you're away from a hotspot). CDMA2000 and GPRS are two leadingnetworking technologies used by high-speed (at the time of this writing, 50 to 70 Kbps;sometimes higher) cellular networking called 3G (which stands for third-generation, but it isusually called 2.5G because the current technology didn't quite live up to the high speedsoriginally promised). As long as you are within reach of a cell tower, either protocol will keepyou connected to the network (and Internet).

The choice of CDMA2000 or GPRS is generally dictated by your choice of wireless provider. Forexample, AT&T Wireless and T-Mobile both use GPRS for their 2.5G cellular networking, whileSprint and Verizon Wireless use CDMA2000. At the time of this writing, unlimited CDMA2000data plans are available for $80 a month in the United States, but only T-Mobile offers flat-rateGPRS pricing ($80 gets you around 60 MB with AT&T; T-Mobile offers unlimited GPRS for aslittle as $20 a month). Chapter 8 discusses cellular networking. (Chapter 6 shows how you canconnect to the Internet using a Bluetooth-enabled cell phone as a modem, and Chapter 7 doesthe same, but with Infrared).
Besides talking about the various wireless technologies, this book also covers some of their uses:
Emergence of wireless hotspots
A wireless hotspot is a specific location where you can connect to the Internet wirelessly usingWi-Fi. Some wireless hotspots include your favorite Starbucks Coffee, Burger King, McDonald's,and Delifrance outlets. With wireless hotspots, you can now work, sip some coffee, and engagein people-watching all at the same time. Chapter 3 discusses connecting to wireless hotspots.
Global Positioning System (GPS)
GPS is a technology that has many commercial and academic uses. Using a GPS receiver andrelevant mapping software, delivery personnel can quickly locate a destination with the aid ofthe navigational software. A GPS device works by reading the data emitted by satellitesorbiting around the earth and calculating the destination's precise location on earth. Chapter 9discusses GPS.
Microsoft Smart Display
One of the dream uses of wireless technology is the ability to work anywhere in the comfort ofyour home. Until Microsoft started shipping its Smart Display product, this was only available tolaptop users. With a Smart Display, you can detach your monitor from your desktop computerand work or play wirelessly in the comfort of your own home. Chapter 10 discusses MicrosoftSmart Display.
[ Team LiB ]

[ Team LiB ]
Wireless Security
With the convenience of wireless technologies comes a new host of security problems. Unlike wirednetworks where security involves limiting physical access to routers, hubs, and cables, wirelessnetworks' most vulnerable point (the radio waves floating through the air) has no physical substance,so securing wireless networks is a challenging task.
In this book, I take a look at the various ways to secure wireless networks, using standards such asWired Equivalent Privacy (WEP), Wireless Protected Access (WPA), 802.1X, and 802.11i.
In addition, I also look at the security features found in the Bluetooth and Infrared technologies.Chapter 4 discusses what you need to know to communicate securely.
[ Team LiB ]

[ Team LiB ]
Conventions Used in This Book
This book uses the following abbreviations:
Hz, kHz, MHz, and GHz
Hertz (cycles per second), KiloHertz (one thousand Hertz), MegaHertz (one million Hertz), andGigaHertz (one billion, or 109 Hertz).
bps, Kbps, Mbps
Bits per second, kilobits (1024 bits) per second, and megabits (1,048,576 bits) per second.
KB/s, MB/s
Kilobytes (1024 bytes) per second and megabytes (1,048,576 bytes) per second.
This book uses the following typographic conventions:
Constant width
Constant width is used for listing the output of command-line utilities and for command names.
Constant width italic
Constant width italic is used to show items that need to be replaced in commands.
Italic
Italic is used for emphasis, for first use of a technical term, and for example URLs.
...
Ellipses indicate text that has been omitted for clarity.

This icon indicates a tip, suggestion, or general note.
This icon indicates a warning or caution.
[ Team LiB ]

[ Team LiB ]
Comments and Questions
Please address any comments or questions concerning this book to the publisher:
O'Reilly & Associates1005 Gravenstein Highway NorthSebastopol, CA 95472800-998-9938 (in the U.S. or Canada)707-829-0515 (international or local)707-829-0104 (fax)
To ask technical questions or comment on the book, send email to:
We have a web site for this book where examples, errata, and any plans for future editions are listed.You can access this site at:
http://www.oreilly.com/catalog/winxpunwired
For more information about this book and others, see the O'Reilly web site:
http://www.oreilly.com
Readers who would like to contact the author to ask questions are welcome to do so [email protected]. You may also read the author's O'Reilly Network Articles athttp://www.oreillynet.com/pub/au/944.
[ Team LiB ]

[ Team LiB ]
Acknowledgments
The first section I turn to whenever I pick up a technical book is the Acknowledgments. This sectiontells you who the real heroes behind the scenes are. Though only my name appears on the cover, itis actually the collective efforts of many people that have made this book possible.
First and foremost, I want to express a heartfelt thank you to my editor, Brian Jepson. Brian hasbeen instrumental in designing the Unwired series and making sure that the book you are holding inyour hands is useful to you in your journey through the wireless world. Without Brian's help, thisbook would never have been possible. He has served both as an editor as well as an expert technicalreviewer, raising questions that made me think deeper. Brian also contributed several sections to thisbook, covering areas that were just too much for me. For these, I am forever indebted to you, Brian.Thanks!
I am also grateful to John Osborn, who had the faith to sign me up with O'Reilly. Thanks, John!Thanks also to the many wonderful folks that I met at the O'Reilly Cambridge office when I was in theStates in 2002.
This book covers a lot of products from many vendors. There is no way that I could own all theseproducts, and was lent several for review purposes. For this, I would like to express my gratitude tothe following people and companies for their generosity:
Mr. Goh Joon Tai from EastRep Pte Ltd, for loaning me the Bluetake Bluetooth equipment.
Mr. George Wong from D-Link International Pte Ltd, for loaning me the D-Link wireless accesspoints, cards, and adapters.
Ms. Jaylyn Tey and Ms. Janice Chew from ViewSonic Singapore Pte Ltd, for loaning me theViewSonic AirPanel V150.
Vera Lam and John Cheong of Space Machine, Inc., for loaning me the Pocket Map GPS.
J. Abra Degbor of Verizon Wireless, for loaning me the Sierra Wireless Aircard 555 1xRTTwireless card.
Suzanne Lammers and Amy Schiska of Sprint, for loaning me a PCS Vision card for their 1xRTTnetwork.
Ms. Jasmine Yong from Sony Ericsson Mobile Communications International AB, for loaning theT610 and the HBH-60 headset.
Thanks also to the various vendors who have kindly given me the permission to use the images oftheir products in this book.
Last, but not least, I would like to thank my family for their continuous support and understanding asI worked late into the nights.
[ Team LiB ]

[ Team LiB ]
Chapter 1. Wireless NetworkingFundamentalsTo understand Wireless Networking, there are two things that are fundamental: Transmission ControlProtocol/Internet Protocol (TCP/IP) and radio waves. TCP/IP governs how data flows across theInternet, whether it is over a dial-up modem, a cable modem, or a wireless network. Radio wavessurround us; some carry useful information, others are just noise. This book is more concerned withthe former, but the noise is of interest too, since it can drown out the useful signals. The first half ofthis chapter explains TCP/IP, and the second discusses radio waves. The rest of this book looks athow the two work together.
[ Team LiB ]

[ Team LiB ]
1.1 TCP/IP
Most of the concepts presented in this book require a basic understanding of TCP/IP, the networkingstandard used by the Internet as well as home or office connections. To understand TCP/IP, you'llneed to know how computers identify one another (IP addresses), talk to their immediate neighbors(subnet addressing), and talk to machines on the Internet or other networks (routing).
1.1.1 IP Address
TCP/IP stands for Transmission Control Protocol/Internet Protocol. It is a set of protocols that enablecomputers on the network to communicate with one another. (A protocol defines how data istransmitted between computers; if both computers adhere to the same protocol, they can exchangedata.)
On a TCP/IP network, each computer (also called a host) has an IP address. An IP address is muchlike a Social Security number: it uniquely identifies each computer on the network. An IP address hasfour numbers separated by periods and looks like this: 192.168.1.2. Each number occupies 8 bits (1byte) and thus can range from 0 to 255 (although there are some combinations that are reservedand have special meanings). Each IP address takes up 4 bytes.
By convention, an IP address contains two components, as shown in Figure 1-1.
Figure 1-1. Components of an IP address
The first is the network number, and the second is the host number. Hosts that are on the samephysical network normally share the same network number. There are five classes of IP address,indicated by the value of the first byte of the IP address:
Class A
0 to 127: Each Class A network supports a maximum of 16,777,214 hosts. Though there are atotal of 128 network numbers here, only 125 are usable.
Class B
128 to 191: Each Class B network supports a maximum of 65,534 hosts. A total of 16,382Class B networks are available.

Class C
192 to 223: Each Class C network supports 254 hosts. A total of 2,097,150 Class C hosts areavailable.
Class D
224 to 239: These networks are reserved for multicast addressing, which supportsbroadcasting the same data to multiple hosts.
Class E
240 to 254: These networks are reserved for experimental use.
The following IP address ranges are reserved for special purposes and hence are not used to assignto any host (for a complete list of special-use addresses, see http://www.ietf.org/rfc/rfc3330.txt?number=3330):
0.0.0.0 to 0.255.255.255
Broadcast addresses. These are used to send traffic to hosts on the current network.
127.0.0.0 to 127.255.255.255
Loopback addresses. 127.0.0.1 is used to loop back to the current host (so if you try to make anetwork connection to that address, you are talking to yourself).
169.254.0.0 to 169.254.255.255
Link local addresses. These are used for hosts that have to assign their own IP addresses.
The protocols used on the Internet are defined in a collection of notes calledRFCs (Requests for Comments). For more information, see http://www.rfc-editor.org/.
The following IP addresses are reserved for private networks (such as a home network). Theseprivate networks can be configured to see the outside world (see Section 1.1.4 later in this chapter,as well as DHCP and NAT in Chapter 5) without letting the outside world see them:

10.0.0.0 to 10.255.255.255
169.254.0.0 to 169.254.255.255
172.16.0.0 to 172.31.255.255
192.168.0.0 to 192.168.255.255
Figure 1-2 shows the Network number and Host number used in each class of IP addresses.
Figure 1-2. Network and Host numbers in each IP address class
1.1.2 IP Subnet Addressing
If you have ever manually configured a computer for TCP/IP networking, two of the configurationvalues are the IP address and a number called a subnet mask. If your network uses automaticconfiguration (see the sidebar DHCP and NAT in Chapter 5), then the IP address and subnet mask areautomatically assigned to your computer.
To calculate a network number from an IP address, you can apply the subnet mask to it usingBoolean arithmetic. For example, consider the IP address 192.168.1.2. This is a class C network andthus the first three numbers represent the network number. To derive the network number, we applya subnet mask of 255.255.255.0 (or 11111111.11111111.11111111.00000000 in binary).
Performing an AND operation between the IP address and the subnet mask gives:
11000000 10101000 00000001 00000010 AND 11111111.11111111.11111111.00000000= 11000000 10101000 00000001 00000000= 192. 168. 1. 0
The result (192.168.1.0) is the network number. Table 1-1 shows the default subnet mask for the
three classes of networks.
Table 1-1. The default subnet masks for the three classes of networks

Address class Subnet mask in bits Subnet mask value
Class A 11111111 00000000 00000000 00000000 255.0.0.0
Class B 11111111 11111111 00000000 00000000 255.255.0.0
Class C 11111111 11111111 11111111 00000000 255.255.255.0
Subnets are sometimes specified using the network number and number of bitsin the subnet mask. So, the Class C example in Table 1-1 with a networknumber of 192.168.1.0 would be written 192.168.1.0/24 because there are 24bits in the subnet mask.
1.1.3 Supernet Addressing
Subnetting can be a wasteful way to allocate IP addresses. Consider a company that has more than254 hosts: in theory, they would need a Class B IP address. But a Class B address can support65,534 hosts; any remaining IP addresses would go unused, wasting a limited resource.
Instead of using a Class B address, you can instead combine a few Class C addresses into a supernet.Suppose you have about 700 hosts. You would need to obtain three Class C addresses such as:
192.168.1.0
192.168.2.0
192.168.3.0
Obtaining IP Addresses
As an end user, you would most likely get an IP address from your ISP or your company.But who actually manages the allocation of IP addresses to ISPs and organizations? Theanswer is the Internet Corporation for Assigned Names and Numbers (ICANN). ICANNcoordinates the assignment of the following:
Internet domain names
IP address numbers
Protocol parameter and port numbers
Go to http://www.icann.org/ for more information on ICANN.
Each Class C address can support up to 254 hosts, so three Class C addresses are sufficient tosupport 700 hosts. But how do all the hosts know that they are in the same supernet? The answerlies in the subnet mask again. Let's examine the binary equivalent of the IP addresses just listed:

192.168.1.0 11000000 10101000 00000001 00000000192.168.2.0 11000000 10101000 00000010 00000000192.168.3.0 11000000 10101000 00000011 00000000
The binary patterns are all similar up to the first 22 bits.
So our subnet mask now becomes 11111111 11111111 11111100 00000000, or 255.255.252.0.
1.1.4 IP Routing
Let's now discuss how data packets (short blocks of data used to transfer information) aretransmitted between networks. Consider the first case where there are two computers on the samephysical network (see Figure 1-3).
Figure 1-3. Two computers in a physical network
When A wants to send a packet to B, it first must know B's IP address (see Figure 1-4). But toactually move data to B, A also needs to know the Ethernet address (also known as the MAC - MediaAccess Control - address) of B. (An Ethernet address looks like this: 05-EF-45-4D-2E-A5.)
To find out the Ethernet address of another computer, the Address Resolution Protocol (ARP) is used.ARP keeps a table containing a list of IP addresses and their corresponding Ethernet addresses (youcan list the contents of this table by running the command arp -a at the Windows XP Command
Prompt). If the table contains the Ethernet address of B, then A simply sends the packet over to B. Ifthe table does not have an entry, A broadcasts an ARP query ("Who has the IP address 192.168.1.2?") to all the computers in the network. B will respond with its Ethernet address, which is then storedin A's ARP table. A can now send the packet over to B.
What happens if A needs to send packets to another computer on another physical network? ARPcan't cross network boundaries, so a router takes care of moving data between networks (see Figure1-4).
Figure 1-4. Using a router in two physical networks

If A is sending packets to B, it does so using the method just described. If A needs to send packets toD, it uses the following steps:
A uses ARP to find R's Ethernet address.1.
A sends the packets to R, but specifies D as the final destination.2.
R uses ARP to find D's Ethernet address.3.
R passes the packet to D.4.
Note that a router has more than one IP address, since it is connected to multiple physical networks.So, A and B know R as 192.168.1.1, and C and D know it as 192.168.2.1.
If you want to watch ARP resolution in action, launch the Ethereal protocol analyzer (see Chapter 4)and do the following:
Select Capture Start.1.
Select the network adaptor that is connected to the network you want to monitor.2.
Set the filter to arp and click OK.3.
Open the Windows XP Command Prompt, and run the command arp -d ip-address (where ip-
address is the IP address of the computer you want to connect to) to remove if from your
computer's ARP cache; this forces it to broadcast the ARP request the next time you try toconnect.
4.
Ping the computer using ping ip-address at the Windows XP Command Prompt.5.
When the ping is complete, return to Ethereal, click Stop in the Capture window, and examine the logof ARP requests in Ethereal's main window. You should see the request and response, assuming thata computer with the ip-address exists on your local network and is currently up.
1.1.5 Domain Name System (DNS)
Identifying computers on the network (and on the Internet) by IP address is not particularly human-

friendly. Just as you are addressed by your name (rather than your Social Security number),computers on the Internet are commonly addressed using domain names. Some examples of domainnames are www.amazon.com, www.google.com, and www.oreilly.com.
Instead of using IP addresses, we use domain names that are meaningful and easy to remember. ADNS server is a database that contains the list of IP addresses and their corresponding domainnames. Because the database is huge, it is not practical for a single machine to host all the domainnames. Hence DNS is inherently distributed - there are many DNS servers on the Internet, and eachof them can turn some of the world's domain names into IP addresses.
When you type www.oreilly.com into your browser, your computer first obtains the IP address ofwww.oreilly.com by querying a DNS server (usually your ISP's or organization's DNS server). If thatDNS server does not contain an entry for the domain name, it then looks it up on other DNS serversthat may contain an entry for www.oreilly.com. Ultimately one of these servers will find the IPaddress; if not, you'll get an error message.
To find out the DNS server(s) that you use for your network, use the commandipconfig /all at the Windows XP Command Prompt. You can use thenslookup utility (which also displays your DNS server) to send queries to your
DNS server interactively.
1.1.6 Limitations of IP Addressing
The current version of IP addressing is Version 4, or IPv4. IPv4 uses 32 bits for addressing. If all thepossible addresses are allocated, there would be at most 232 hosts, which is about 4.3 billion(4,294,967,296) addresses (not forgetting that a portion of these addresses are reserved for specialpurposes). Even with 4.3 billion addresses, it was estimated that we would still run out of IPaddresses by the year 2008 (or the year 2028, depending on whose estimates you are looking at).
Though many schemes have been devised to prolong the "life" of IPv4, such as supernetting andNetwork Address Translation (NAT; see DHCP and NAT in Chapter 5), the industry is looking towardsusing IPv6, which supports 128-bit addressing (2128 different addresses).
Multihomed Hosts
A host that has two IP addresses is known as a multihomed host. A router that is attachedto two physical networks is an example of this.
[ Team LiB ]

[ Team LiB ]
1.2 Understanding Radio Waves
Most of the wireless technologies mentioned in the last section make use of radio waves. Wi-Fi,GPRS, GPS, and Bluetooth all utilize radio waves to transmit signals.
1.2.1 Radio Wave Basics
Put simply, a radio wave is an electromagnetic wave. It can propagate through a vacuum, air, liquid,or even solid objects. It can be depicted mathematically as a sinusoidal curve as shown in Figure 1-5.
Figure 1-5. A sine wave representing a radio wave
The distance covered by a complete sine wave (a cycle) is known as the wavelength. The height ofthe wave is called the amplitude . The number of cycles made in a second is known as the frequency.Frequency is measured in Hertz (Hz), also known as cycles per second. So, a 1 Hz signal makes a fullcycle once per second. You should be familiar with this unit of measurement: if your new computeroperates at 2 GHz, the internal clock of your CPU generates signals at roughly two billion cycles persecond.
Note that frequency is inversely proportional to the wavelength - the longerthe wavelength, the lower the frequency; the higher the frequency, the lowerthe wavelength. The wavelength of a 1 Hz signal is about 30 billioncentimeters, which is the distance that light travels in one second. A 1 MHzsignal has a wavelength of 300 meters.
1.2.2 Modulating Radio Waves
The sine wave carries data. To receive the transmission (such as audio or video), a radio wavereceiver needs to tune itself to the same frequency as the transmitter. The receiver examines theamplitude or the frequency of the received electromagnetic wave in order to get at the transmitteddata.

In the next section, I discuss three ways to carry data using radio waves.
1.2.2.1 Pulse Modulation
Pulse Modulation (PM) works by switching the radio signals ON and OFF (see Figure 1-6). This issimilar to sending information using Morse code. The atomic clock set up by the National Institute ofStandards and Technology in Fort Collins, Colorado uses PM to synchronize remote clocks andwatches.
Figure 1-6. Pulse Modulation (PM)
1.2.2.2 Amplitude Modulation
Amplitude Modulation (AM), as the name implies, works by varying the amplitude of the sine waves(see Figure 1-7). Different amplitudes represent different values. The most famous example use ofAM is in your radio.
Figure 1-7. Amplitude Modulation (AM)
1.2.2.3 Frequency Modulation
Frequency Modulation (FM) varies the frequency (the wavelength) of the sine waves (see Figure 1-8).The frequency of the sine waves changes slightly to represent different values. FM is commonly usedin radios as well as popular household items such as televisions and cordless phones. Your mobilephone also uses FM.
Figure 1-8. Frequency Modulation (FM)
1.2.3 Radio Frequency Spectrum

To regulate the use of the various radio frequencies, the Federal Communications Commission (FCC)in the United States determines the allocation of frequencies for various uses. Table 1-2 shows someof the bands defined by the FCC (see http://www.fcc.gov/oet/spectrum/table/fcctable.pdf).
Table 1-2. Range of frequencies defined for the various bands
Frequency Band
10 kHz to 30 kHz Very Low Frequency (VLF)
30 kHz to 300 kHz Low Frequency (LF)
300 kHz to 3 MHz Medium Frequency (MF)
3 MHz to 30 MHz High Frequency (HF)
30 MHz to 328.6 MHz Very High Frequency (VHF)
328.6 MHz to 2.9 GHz Ultra High Frequency (UHF)
2.9 GHz to 30 GHz Super High Frequency (SHF)
30 GHz and above Extremely High Frequency (EHF)
Table 1-3 shows some example of radio devices and their frequency ranges.
Table 1-3. Some common radio devices and their frequency ranges
Frequency range Device
535 kHz to 1.705 MHz AM radio
5.95 MHz to 26.1 MHz Short wave radio
54 to 88 MHz Television stations (channels 2 through 6)
88 MHz to 108 MHz FM radio
174 to 216 MHz Television stations (channels 7 through 13)
~ 900 MHz, ~ 2.4 GHz, ~ 5 GHz Cordless phones
1.2276 and 1.57542 GHz Global Positioning Systems (GPS)
You can get a more detailed frequency allocation chart fromhttp://www.ntia.doc.gov/osmhome/allochrt.pdf. The following is a conversion list that should helpyou understand this chart:
1 kiloHertz (kHz) = 1000 Hz
1 MegaHertz (MHz) = 1000 kHz

1 GigaHertz (GHz) = 1000 MHz
1.2.4 Radio Wave Behavior
Radio waves, like light waves, exhibit certain characteristics when coming into contact with objects.Here are some of the possible behaviors.
1.2.4.1 Reflection
Reflection occurs when a radio wave hits an object that is larger than the wavelength of the radiowave (see Figure 1-9). The radio wave is then reflected off the surface.
Figure 1-9. Reflection of a radio wave
1.2.4.2 Refraction
Refraction occurs when a radio wave hits an object of a higher density than its current medium (seeFigure 1-10). The radio wave now travels at a different angle. An example would be radio wavespropagating through clouds.
Figure 1-10. Refraction of a radio wave
1.2.4.3 Scattering
Scattering occurs when a radio wave hits an object of irregular shape, usually an object with a roughsurface area (see Figure 1-11), and the radio wave bounces off in multiple directions.
Figure 1-11. Scattering of a radio wave
1.2.4.4 Absorption

Absorption occurs when a radio wave hits an object that does not cause it to be reflected, refracted,or scattered, so it is absorbed by the object (see Figure 1-12). The radio wave is then lost.
Figure 1-12. Absorption of a radio wave
Radio Interference and Absorption
Radio waves are subject to interference caused by objects and obstacles in the air. Suchobstacles can be concrete walls, metal cabinets, or even raindrops. In general,transmissions made at higher frequencies are more subject to radio absorption (by theobstacles) and larger signal loss. Larger frequencies have smaller wavelengths, and hencesignals with smaller wavelengths tend to be absorbed by the obstacles that they collidewith. This causes high frequency devices to have a shorter operating range.
For devices that transmit data at high frequencies, much more power is needed in orderfor them to cover the same range as compared to lower frequency transmitting devices.
1.2.4.5 Diffraction
Sometimes a radio wave will be blocked by objects standing in its path. In this case, the radio waveis broken up and bends around the corners of the object (see Figure 1-13). It is this property thatallows radio waves to operate without a visual line of sight.
Figure 1-13. Diffraction of radio waves
[ Team LiB ]

[ Team LiB ]
1.3 Wireless Networks
In 1970, the University of Hawaii created a wireless network called ALOHANET. Since then, wirelessnetworking has come a long way. ALOHANET operated in the UHF range, and reached 4.8 Kbps, atwhich speed it could take half an hour to download a 1 MB file. Today, wireless LANs use frequenciesof 2.4 GHz and 5 GHz, and can reach speeds (after accounting for network overhead) of 20 Mbps,transferring that 1 MB file in a fraction of a second.
[ Team LiB ]

[ Team LiB ]
Chapter 2. Wi-Fi on Your NotebookComputer networks have traditionally been Ethernet networks, which use Unshielded Twisted Pair(UTP) cables to wire up all the computers participating in a network. However, as users carryportable computers around (or away from) the office and home, common applications such as email,web browsers, and instant messenger demand network access. Short-range wireless networks canmeet the demand for network access without the need for cabling in every place someone might usea computer.
Educational institutions are taking a lead in the adoption of wireless networks, particularly in theclassroom environment where students are equipped with a notebook computer and need to movefrom classroom to classroom while maintaining access to the network. Another area where wirelessnetworking is rapidly gaining ground is among home users. As computers get cheaper and morepowerful, it is not uncommon for people to have several computers at home. Wiring up the home isusually undesirable, since it involves costly cable-laying and often destroys the aesthetics of thehouse. With a wireless network, home users can link up all the computers in the house at anaffordable price and without laying a single cable.
Behind the conveniences of accessing the network wirelessly is the IEEE 802.11 standard, a physicallayer protocol and a data link layer protocol for wireless communication using radio waves. In thischapter, I lay the foundation for understanding and using a wireless network, so that you can learnhow to set up and configure your Windows XP computer for wireless access.
[ Team LiB ]

[ Team LiB ]
2.1 802.11 Wireless Standards
The 802.11 wireless standard is a family of specifications for wireless technology. It was (and is still)developed by the Institute of Electrical and Electronics Engineers (IEEE). 802.11 specifies a clientcommunicating over the air with another client (or through a base station). It comprises the followingspecifications:
802.11
This is the original specification for wireless networks. The 802.11 standard specifies atransmission rate of 1 or 2 Mbps, and it operates over the 2.4 GHz spectrum. It uses either aFrequency Hopping Spread Spectrum (FHSS) or a Direct Sequence Spread Spectrum (DSSS)modulation scheme.
802.11b
802.11b is more popularly known as Wi-Fi (Wireless Fidelity). This is an extension of theoriginal 802.11 specification. More significantly, 802.11b operates at a much higher data rate:11 Mbps. However, it can also fall back to a slower rate of 5.5, 2, or 1 Mbps. 802.11b uses onlyDSSS. Like the original 802.11 standard, 802.11b operates in the 2.4 GHz spectrum. Mostwireless networks deployed at the time of this writing are 802.11b networks.
The term Wi-Fi has now been extended to cover not only 802.11b, but theentire family of 802.11 specifications, such as 802.11a and 802.11g. The Wi-FiAlliance (http://www.wi-fi.org/), a nonprofit organization formed to promote802.11 wireless technologies, uses the term Wi-Fi to refer to 802.11a, 802.11b,and 802.11g wireless networks.
802.11a
The 802.11a is a relatively new extension to the 802.11 specification. It addresses the slowerdata rate of the 802.11 and 802.11b specifications by allowing data rates of up to 54 Mbps. Itdoes not use the FHSS or DSSS encoding scheme, but instead uses the Orthogonal FrequencyDivision Multiplexing (OFDM) modulation scheme. The most significant point about 802.11a isthat it is not compatible with the existing 802.11b networks because it operates in the 5 GHzspectrum.

Understanding DSSS and OFDM
DSSS is a transmission technology that transmits data in small pieces over a number ofdiscrete frequencies. Essentially it splits each byte into several bits and sends them ondifferent frequencies. (802.11 uses FHSS, which is similar, but hops across frequenciesmany times a second.)
OFDM, on the other hand, uses several overlapping frequencies to send packets of datasimultaneously. What's more, it splits the overlapping frequencies into smaller frequenciesfor its own data transmission. Hence, 802.11a and 802.11g can transmit at a higher datarate, since these two standards use OFDM.
802.11g
The latest addition to the 802.11 family is the 802.11g specification. 802.11g is a competingstandard to 802.11a. Similar to 802.11a, 802.11g uses OFDM, but it operates in the 2.4 Ghzspectrum, which is compatible with 802.11b. 802.11g supports up to a maximum of 54 Mbps.
The data rates specified for 802.11b (11 Mbps) and 802.11a/g (54 Mbps) areraw, and don't reflect what you'll actually experience in everyday use. Becauseof network overhead, 802.11b users will get between 4 and 5.5 Mbps;802.11a/g users can expect about 25 Mbps. Further, this is shared between allusers of a given base station.
The predominant 802.11 specification in use today is 802.11b. With the explosion of network-intensive applications such as streaming video between a computer and Personal Video Recorder(PVR), 802.11b networks are increasingly unable to meet the speed demands of users. Hencenetwork infrastructure designers are looking for faster standards available today and tomorrow. Theyhave to weigh the different criteria when deciding on the suitable specifications to follow. In the nextsection, you will see a more detailed comparison of the various 802.11 specifications, which will helpyou make an informed decision.
2.1.1 Comparing 802.11a, 802.11b, and 802.11g
To start off, let's compare 802.11a and the current 802.11b standard by looking at a few parameters.Table 2-1 lists the comparisons sorted according to basic characteristics.
Table 2-1. Comparing 802.11a and 802.11b

802.11b 802.11a
Modulation andpowerconsumption
802.11b uses the DSSSmodulation scheme.
In terms of power efficiency,DSSS is more efficient thanOFDM.
802.11a uses OFDM.
802.11a devices consume more power than802.11b devices.
Frequency
802.11b uses the 2.4 GHzspectrum, which isovercrowded with devices suchas cordless phones andmicrowave ovens. EvenBluetooth devices use the 2.4Ghz spectrum.
802.11a uses the 5 GHz spectrum. Though the 5GHz spectrum is less crowded, the signals have ahigher absorption rate and are easily blocked bywalls and objects.
Range
802.11b has a range of 300feet. But this is dependent onthe environment. Obstaclessuch as concrete walls andmetal cabinets can reduce theeffective range of 802.11bnetworks.
Due to the higher absorption rate at the 5 GHzspectrum, 802.11a devices have shorter operatingrange of about 150 feet, compared to the 300 feetachievable by 802.11b (optimally under idealconditions). As a result, more transmitters arerequired for 802.11a networks.
Data rate
802.11b supports raw speedsof up to 11 Mbps with a peakspeed of 4 to 5.5 Mbps afteraccounting for networkoverhead.
802.11a supports raw speeds up to 54 Mbps witha peak speed of approximately 25 Mbps afteraccounting for network overhead.
Cost
Cost of 802.11b devices havegone down due to thematurity of the 802.11btechnologies.
Components for 802.11a devices are moreexpensive to produce and hence their price tagsare higher than 802.11b devices. Also, theincreased number of transmitters required for the802.11a network will drive up the cost ofimplementing an 802.11a network.
Compatibility
802.11b wireless networks areprevalent, and most currentwireless networks use 802.11bdevices.
802.11a is not compatible with the 802.11bprotocol. Hence 802.11a devices cannot work withexisting 802.11b wireless access points (but seeDual Band and Compatibility later in this chapter).Note that if you plan on migrating to the newer802.11g standard, your 802.11b cards can stillaccess the "g" network. This will not be the casefor 802.11a radio cards.
Users
Supports between 30 and 60simultaneous wireless usersper base station, depending onthe device specifications andkind of user activities.
The 802.11a network can accommodate moreusers (compared to 802.11b) due to the increasein radio frequency channels and increasedoperating bandwidth.
The main draw of migrating to an 802.11a network is no doubt increased bandwidth. With the near

five-fold increase in data rate (54 Mbps), applications like streaming audio and video and networkedgames would now be possible (or at least more responsive).
Dual Band and Compatibility
The main drawback in adopting 802.11a networks is compatibility. Businesses andinstitutions that have invested in 802.11b networks are reluctant to migrate to a fasterbut incompatible 802.11a network. For these reasons, vendors are coming out with dual-band wireless access points and network adapters. These dual-band access points andnetwork adapters contain two sets of hardware, one for 802.11a and one for 802.11b,which let you deploy both 802.11a and 802.11b devices in the same environment. Best ofall, since these two protocols operate in different frequencies, interference is minimized.
How about the newer 802.11g standard? How does it compare to 802.11a? Table 2-2 is a comparisonof 802.11a and 802.11g standards.
Table 2-2. Comparing 802.11a and 802.11g
802.11a 802.11g
Modulation andpowerconsumption
Both 802.11a and 802.11gutilize OFDM.
Both 802.11a and 802.11g utilize OFDM, whichleads 802.11a and 802.11g to have similarpower consumption needs.
Frequency
Uses the 5 GHz spectrum.
The number of nonoverlappingchannels in 802.11a is eight.The eight nonoverlappingchannels in 802.11a make for anincrease in throughput (seeSection 2.2.3 later in thischapter).
Unlike 802.11a, 802.11g uses the same 2.4 GHzspectrum as 802.11b. The number ofnonoverlapping channels in 802.11g is three(see Section 2.2.3 later in this chapter),compared to eight in 802.11a networks. Thismakes channel assignment more difficult for802.11g networks and reduces the effectivethroughput in a given area.
Range
Both 802.11a and 802.11g havea shorter operating range than802.11b, due to the higherabsorption rate.
See 802.11a column.
Data rate
Both 802.11a and 802.11gsupport a maximum raw datarate of 54 Mbps, with a peakspeed of approximately 25 Mbpsafter accounting for networkoverhead.
See 802.11a column.

802.11a 802.11g
Cost802.11a and 802.11gnetworking equipment costabout the same.
802.11g can preserve the current investment inthe 802.11b network, allowing you to graduallyphase in 802.11g, replacing equipment atwhatever pace suits your budget.
Compatibility
802.11a is neither compatiblewith 802.11g nor 802.11b (seeDual Band and Compatibility forinformation about devices thatcan operate on 802.11b and802.11a networks).
802.11g allows both 802.11b and 802.11gdevices to coexist in the same network.
The question remains: which standard should you go for, 802.11a or 802.11g? The answer dependsvery much on your environment. Since each offers similar performance in terms of transfer rate, theother criteria that you should consider is your investment in current 802.11b technologies. Ifpreserving compatibility with older equipment is your priority, then 802.11g should be the clearchoice. If you are more concerned about pure performance and need to avoid interference with thealready crowded 2.4 GHz spectrum, 802.11a would be the recommended route. Another concern isinteroperability with equipment from other vendors. For example, Apple has decided not to invest in802.11a and instead supports 802.11g in its Airport Extreme line of wireless networking equipment.So, an Apple computer or access point would work with 802.11b or 802.11g equipment, but not802.11a.
At the time of this writing, D-Link has launched a tri-mode wireless accesspoint (the DI-774) that supports 802.11a, 802.11b, and 802.11g wirelessnetworks.
2.1.2 Wireless Cards and Adapters
Now that we have seen the various wireless standards available in the market, let's turn ourattention to the client side of things. Wireless cards and adapters come in the following flavors:
PCI adapters
USB adapters
PCMCIA cards
A PCI wireless adapter is useful for a desktop with an empty PCI slot. Figure 2-1 shows the D-LinkDWL-AB520 Multimode Wireless PCI Adapter. It supports both 802.11a and 802.11b wirelessstandards.
Figure 2-1. The D-Link AirPro DWL-AB520 Multimode Wireless PCIAdapter (802.11a and 802.11b)

If you do not want to open up your computer casing or you simply want to share a wireless adapteramong many computers, the Linksys WUSB11 (as shown in Figure 2-2) is a good choice. Simplyconnect the USB Wireless Adapter to the USB port on your computer and you can get on the wirelessnetwork. It supports the 802.11b standard.
Figure 2-2. The Linksys WUSB11 USB Wireless Adapter (802.11b)
Finally, for notebook users, the most popular choice is a PCMCIA card. Figure 2-3 shows the D-LinkDWL-G650 wireless card, which supports the 802.11b and 802.11g standards.
Figure 2-3. The D-Link DWL-G650 AirPlus wireless card (802.11b and802.11g)

2.1.3 Wireless Networking Modes
There are two modes in which your computer can participate in a wireless network. The first, ad-hocmode , is a wireless network where two or more computers communicate with one another directly.It is known as a Basic Service Set (BSS). An ad-hoc network is also known as an Independent BasicService Set (IBSS). An ad-hoc network does not involve the use of a wireless access point. Eachcomputer on the network communicates with each other in a peer-to-peer fashion. When two ormore BSSs operate within the same network, it is then called an Extended Service Set (ESS).
If you want your computer to participate in an ad-hoc network, each computeron the network must have a unique IP address. You can either assign a fixed IPaddress to your computer or rely on link-local addressing to have yourcomputer automatically assign itself an IP address. See Chapter 5 forinformation on how to set up an ad-hoc wireless network.
The second mode is infrastructure mode, in which a wireless access point is used. A wireless accesspoint routes the network traffic from one computer to another. It also moves data to the wirednetwork.
[ Team LiB ]

[ Team LiB ]
2.2 Understanding 802.11 Speak
In this section, I discuss some of the terminologies that you will often come across when you set upyour wireless network.
2.2.1 WEP
By default, encryption is not enabled for wireless networks. Encryption is important because malicioushackers equipped with the necessary software can sniff the packets transmitted by the wirelessnetwork, thereby compromising your data. Wired Equivalent Privacy (WEP) is a protocol used forencrypting packets on a wireless network. It uses a 64-bit (or 256-bit, depending on the equipment)shared key algorithm. Although it is far from perfect, WEP increases the protection of your data, butin doing so reduces your effective data rates.
Chapter 4 talks about WEP in more detail. More secure techniques used forsecuring wireless networks such as WPA (Wi-Fi Protected Access) and 802.1Xare discussed there.
2.2.2 SSID
The Service Set Identifier (SSID) acts as a name for a wireless network. All devices participating in aparticular wireless network must specify this SSID. The wireless devices will not be able to participatein this network if the SSID is not specified (or not stated correctly). For example, Linksys productsuse the default SSID "linksys" (D-Link products use "default"). If you are concerned aboutunauthorized users connecting to your access point, you should change this to something else anddisable SSID broadcast in the access point's configuration (see Chapter 4). This makes it harder forunauthorized users to find your access point. Use WEP, or if your hardware supports it, 802.1X toallow only authorized users to connect.
2.2.3 Channels
The 802.11b standard defines 14 channels. A channel is a particular frequency that is selected so thata Wi-Fi adapter and an access point can communicate at an agreed frequency. Table 2-3 list thefrequencies of the 14 channels.
Table 2-3. The frequencies for the 14 channels in 802.11b

Channels Frequency (GHz)
1 2.412
2 2.417
3 2.422
4 2.427
5 2.432
6 2.437
7 2.442
8 2.447
9 2.452
10 2.457
11 2.462
12 2.467
13 2.472
14 2.484
Not all channels are used universally. In the U.S., only channels 1 to 11 are allowed. In Europe, anadditional two channels are allowed, so channels 1 to 13 are usable. In Japan, all fourteen channelsare used.
A channel represents the center frequency used by both the radio card and the wireless access point.Each channel occupies 25 MHz of the spectrum (for example, channel 1 ranges from 2.3995 GHz to2.4245 GHz, a range of 0.025 GHz, or 25 MHz). But this range overlaps with other channels,particularly channels 2 and 3. If you use multiple access points within your network, you need to setthe channels of each access point so that they do not overlap, or else they will cause interferences.Figure 2-4 illustrates that the frequency difference between each channel is 5 MHz, but each channelwidth is 25 MHz. So effectively, to avoid interference, you should use channels 1, 6, and 11 if you areusing multiple access points that are within range of each other.
Figure 2-4. The nonoverlapping channels in 802.11b

In infrastructure mode, the access point determines the channel (the accesspoint will come preconfigured to use a particular channel, commonly channel6); clients are not required to configure the channel number, since they willautomatically select the correct channel needed to connect to the access point.For ad-hoc mode, the clients have to select the channel to be used.
In contrast with 802.11b and 802.11g (which has the same three nonoverlapping channelslimitation), 802.11a has a total of eight nonoverlapping channels that are 20 MHz wide. Each of thesechannels is subdivided into 52 subcarriers. And each channel is approximately 300 KHz wide.
2.2.4 Link Quality and Signal Strength
Most access points indicate the link quality and signal strength of a wireless network. Link quality is ameasure of the ability of the client to communicate with the access point. The signal strengthindicator indicates the signals of all received packets. In general, the higher the link quality and signalstrength, the better throughput you will get from the wireless network.
2.2.5 MAC Address
In order to uniquely identify each node on the network, every network adapter is assigned ahardware address known as the Media Access Control (MAC) address. This address is assigned by themanufacturer and stored in the card's firmware. A MAC address is a 48-bit number that uniquelyidentifies a network device. An Ethernet card has a MAC address, as does an 802.11 wireless card. Awireless access point also has a MAC address. For an explanation of how MAC addresses relate to IPaddresses, see Chapter 1.
Locking MAC Addresses
Some ISPs use a technique called MAC address locking to prevent unauthorized access tothe network. This is how it works: when you subscribe to a broadband service, the ISP willenter the MAC address of your modem into their database. When your modem requestsan IP address, the ISP's router checks the MAC address of your modem against itsdatabase. If it is not found, no IP address will be issued and you will not be able to getonto the network. Some ISPs also lock the MAC address of your network adapter.
A wireless router has two MAC addresses - one for the local network and one for the WAN(the ISP's network that is connected to the Internet). For those ISPs that lock yournetwork adapter's MAC address, you may have problems in using a wireless router toconnect to the Internet. In this case, you can try one of the following:
In some cases, the MAC address locking is done dynamically. The cable or DSLmodem remembers the first MAC address it encounters and won't let any moremachines connect unless you reboot it. So, try power-cycling the modem and thendoing the same with your access point.

Give your ISP a call and tell them the MAC address of your wireless access point.Most ISPs are friendly to home networking, but be sure to check the terms of yourservice agreement before you call.
Use the Clone MAC address feature, available in most wireless routers, to replace theMAC address of the wireless router with that of the network adapter (whose MACaddress is locked by the ISP). All devices connected to the wireless router will nowuse that particular MAC address to connect to the Internet.
In Windows XP, to find the MAC address of a network device, simply use the ipconfig command:
c:\> ipconfig /all
You should see something like the following:
Ethernet adapter Wireless Network Connection 9:
Connection-specific DNS Suffix . : ict.np.edu.sg Description . . . . . . . . . . . : Cisco Systems 350 Series Wireless LAN Adapter Physical Address. . . . . . . . . : 00-40-96-40-7E-F9 Dhcp Enabled. . . . . . . . . . . : Yes Autoconfiguration Enabled . . . . : Yes IP Address. . . . . . . . . . . . : 192.168.0.197 Subnet Mask . . . . . . . . . . . : 255.255.255.0 Default Gateway . . . . . . . . . : DHCP Server . . . . . . . . . . . : 192.168.0.1 DNS Servers . . . . . . . . . . . : 173.21.67.51 173.21.67.52 Lease Obtained. . . . . . . . . . : Wednesday, April 30, 2003 3:05:37 AM
Lease Expires . . . . . . . . . . : Wednesday, May 07, 2003 3:05:37 AM
Most wireless cards also have their MAC address printed on the card itself. A typical MAC addresslooks like this: 00-40-96-40-7E-F9.
[ Team LiB ]

[ Team LiB ]
2.3 Connecting to a Wireless Network
Up to this point, I have discussed the various standards in wireless networks, in particular the IEEE802.11 specifications. All the theoretical discussions are not very exciting unless you get your handsdirty and try to set up a wireless network yourself. In the following sections, I show you how toconnect to a wireless network using three different wireless cards and adapters.
Although I demonstrate each example using different hardware from Cisco, D-Link, and Linksys,wireless hardware vendors use the same or similar chipsets in their equipment. So, the installationand configuration procedures will be somewhat similar across different vendors and different productlines from the same vendor. You should still consult the documentation that comes with yourhardware before installing anything.
Most wireless cards in the market today use the following chipsets:
Atmel
Broadcom
Lucent Hermes
Intersil PRISM-II and Intersil PRISM-2.5
Symbol Spectrum24
TI wireless
Some newer 802.11g wireless products (such as those from Linksys) use the Broadcom chipset.
Centrino
Intel's Centrino technology initiative promises smaller laptops with extended battery lifeand mobile features such as 802.11b networking. For the most part, this means thatyou're buying a laptop with the Wi-Fi technology embedded deep inside the computer. Atthe time of this writing, Centrino is 802.11b only, and there is no indication that aCentrino laptop would be upgradeable to 802.11g or 802.11a. So, if you purchase aCentrino laptop, you need to obtain an 802.11a adapter to connect to an 802.11a-onlynetwork; you could connect to an 802.11g network, but only at 802.11b speeds. Despitethis limitation, a Centrino laptop may be right for you if you're only planning to use802.11b. For insight on what the bigger picture entails, see Glenn Fleishman's "Centrino:Trojan Horse for Future Cell Data" at http://wifinetnews.com/archives/001589.html.
Table 2-4 shows a list of common wireless cards available in the market (all are PC cards unlessstated otherwise).

Table 2-4. List of wireless cards and the chipsets used
Card Chipset
3Com AirConnect 3CRWE737A Spectrum24
3Com AirConnect 3CRWE777A (PCI) PRISM-II
Actiontec HWC01170 PRISM-2.5
Actiontec HWC01150 Atmel
Addtron AWP-100 PRISM-II
Agere Orinoco (Lucent) Hermes
Apple Airport Hermes
Buffalo AirStation PRISM-II
Buffalo AirStation (CF) PRISM-II
Cabletron RoamAbout Hermes
Compaq Agency NC5004 PRISM-II
Contec FLEXLAN/FX-DS110-PCC PRISM-II
Corega PCC-11 PRISM-II
Corega PCCA-11 PRISM-II
Corega PCCB-11 PRISM-II
Corega CGWLPCIA11 (PCI) PRISM-II
D-Link DWL-520 (PCI) PRISM-2.5
D-Link DWL-650 PRISM-2.5
D-Link DWL-650+ TI Chipset
D-Link DWL-660 TI Chipset
ELSA XI300 PRISM-II
ELSA XI325 PRISM-2.5
ELSA XI325H PRISM-2.5
ELSA XI800 (CF) PRISM-II
EMTAC A2424i PRISM-II
Ericsson Wireless LAN CARD C11 Spectrum24
Gemtek WL-311 PRISM-2.5
Hawking Technology WE110P PRISM-2.5

Card Chipset
I-O DATA WN-B11/PCM PRISM-II
Intel PRO/Wireless 2011 Spectrum24
Intersil PRISM-II PRISM-II
Intersil Mini (PCI) PRISM-2.5
Linksys Instant Wireless WPC11 PRISM-II
Linksys Instant Wireless WPC11 2.5 PRISM-2.5
Linksys Instant Wireless WPC11 3.0 PRISM-2.5
Lucent WaveLAN Hermes
Nanospeed ROOT-RZ2000 PRISM-II
NDC/Sohoware NCP130 (PCI) PRISM-II
NEC CMZ-RT-WP PRISM-II
Netgear MA401 PRISM-II
Netgear MA401RA PRISM-2.5
Nokia C020 Wireless LAN PRISM-I
Nokia C110/C111 Wireless LAN PRISM-II
NTT-ME 11Mbps Wireless LAN PRISM-II
Proxim Harmony PRISM-II
Proxim RangeLAN-DS PRISM-II
Samsung MagicLAN SWL-2000N PRISM-II
Symbol Spectrum24 Spectrum24
SMC 2632 EZ Connect PRISM-II
TDK LAK-CD011WL PRISM-II
US Robotics 2410 PRISM-II
US Robotics 2445 PRISM-II
I'll start by showing you how to connect to a wireless network. I will illustrate using two wirelesscards - the Cisco Aironet 350 and the D-Link DWL-650+, and one USB wireless adapter. I'll take alook at the Cisco Aironet 350 first.
2.3.1 Using a Plug-and-Play PCMCIA Wi-Fi Card
The Cisco Aironet 350 wireless card (see Figure 2-5) is an 802.11b card. This is my preferred card asit is truly plug-and-play - plug this into your PCMCIA slot and Windows XP will connect to thenetwork in seconds! Windows XP includes a driver for this card so there is no need for you to

manually install the drivers.
Figure 2-5. The Cisco Aironet 350 wireless card
For this section, you need the following:
A Windows XP notebook computer with a vacant PCMCIA slot
An existing wireless network (see Chapter 5 for information on setting up a wireless network)
The Cisco Aironet 350 wireless card
Take the following steps:
Insert the Cisco Aironet 350 into your computer's PCMCIA slot.1.
Windows XP will automatically detect the card and install the necessary drivers for it.2.
Windows XP will then automatically discover any available wireless networks. The WirelessNetwork Connection icon can be found in the system tray. This is shown in Figure 2-6.
3.
Click on the Wireless Network Connection icon in the tray to view all the available wirelessnetworks. Figure 2-7 shows the two available networks with the SSIDs: MyOffice and default.
4.
MyOffice has WEP enabled. When you select it, you have to enter a network key. default doesnot have WEP enabled, so when you select it, you have to turn on the "Allow me to connect tothe selected wireless network, even though it is not secure" option (see Figure 2-8).
5.
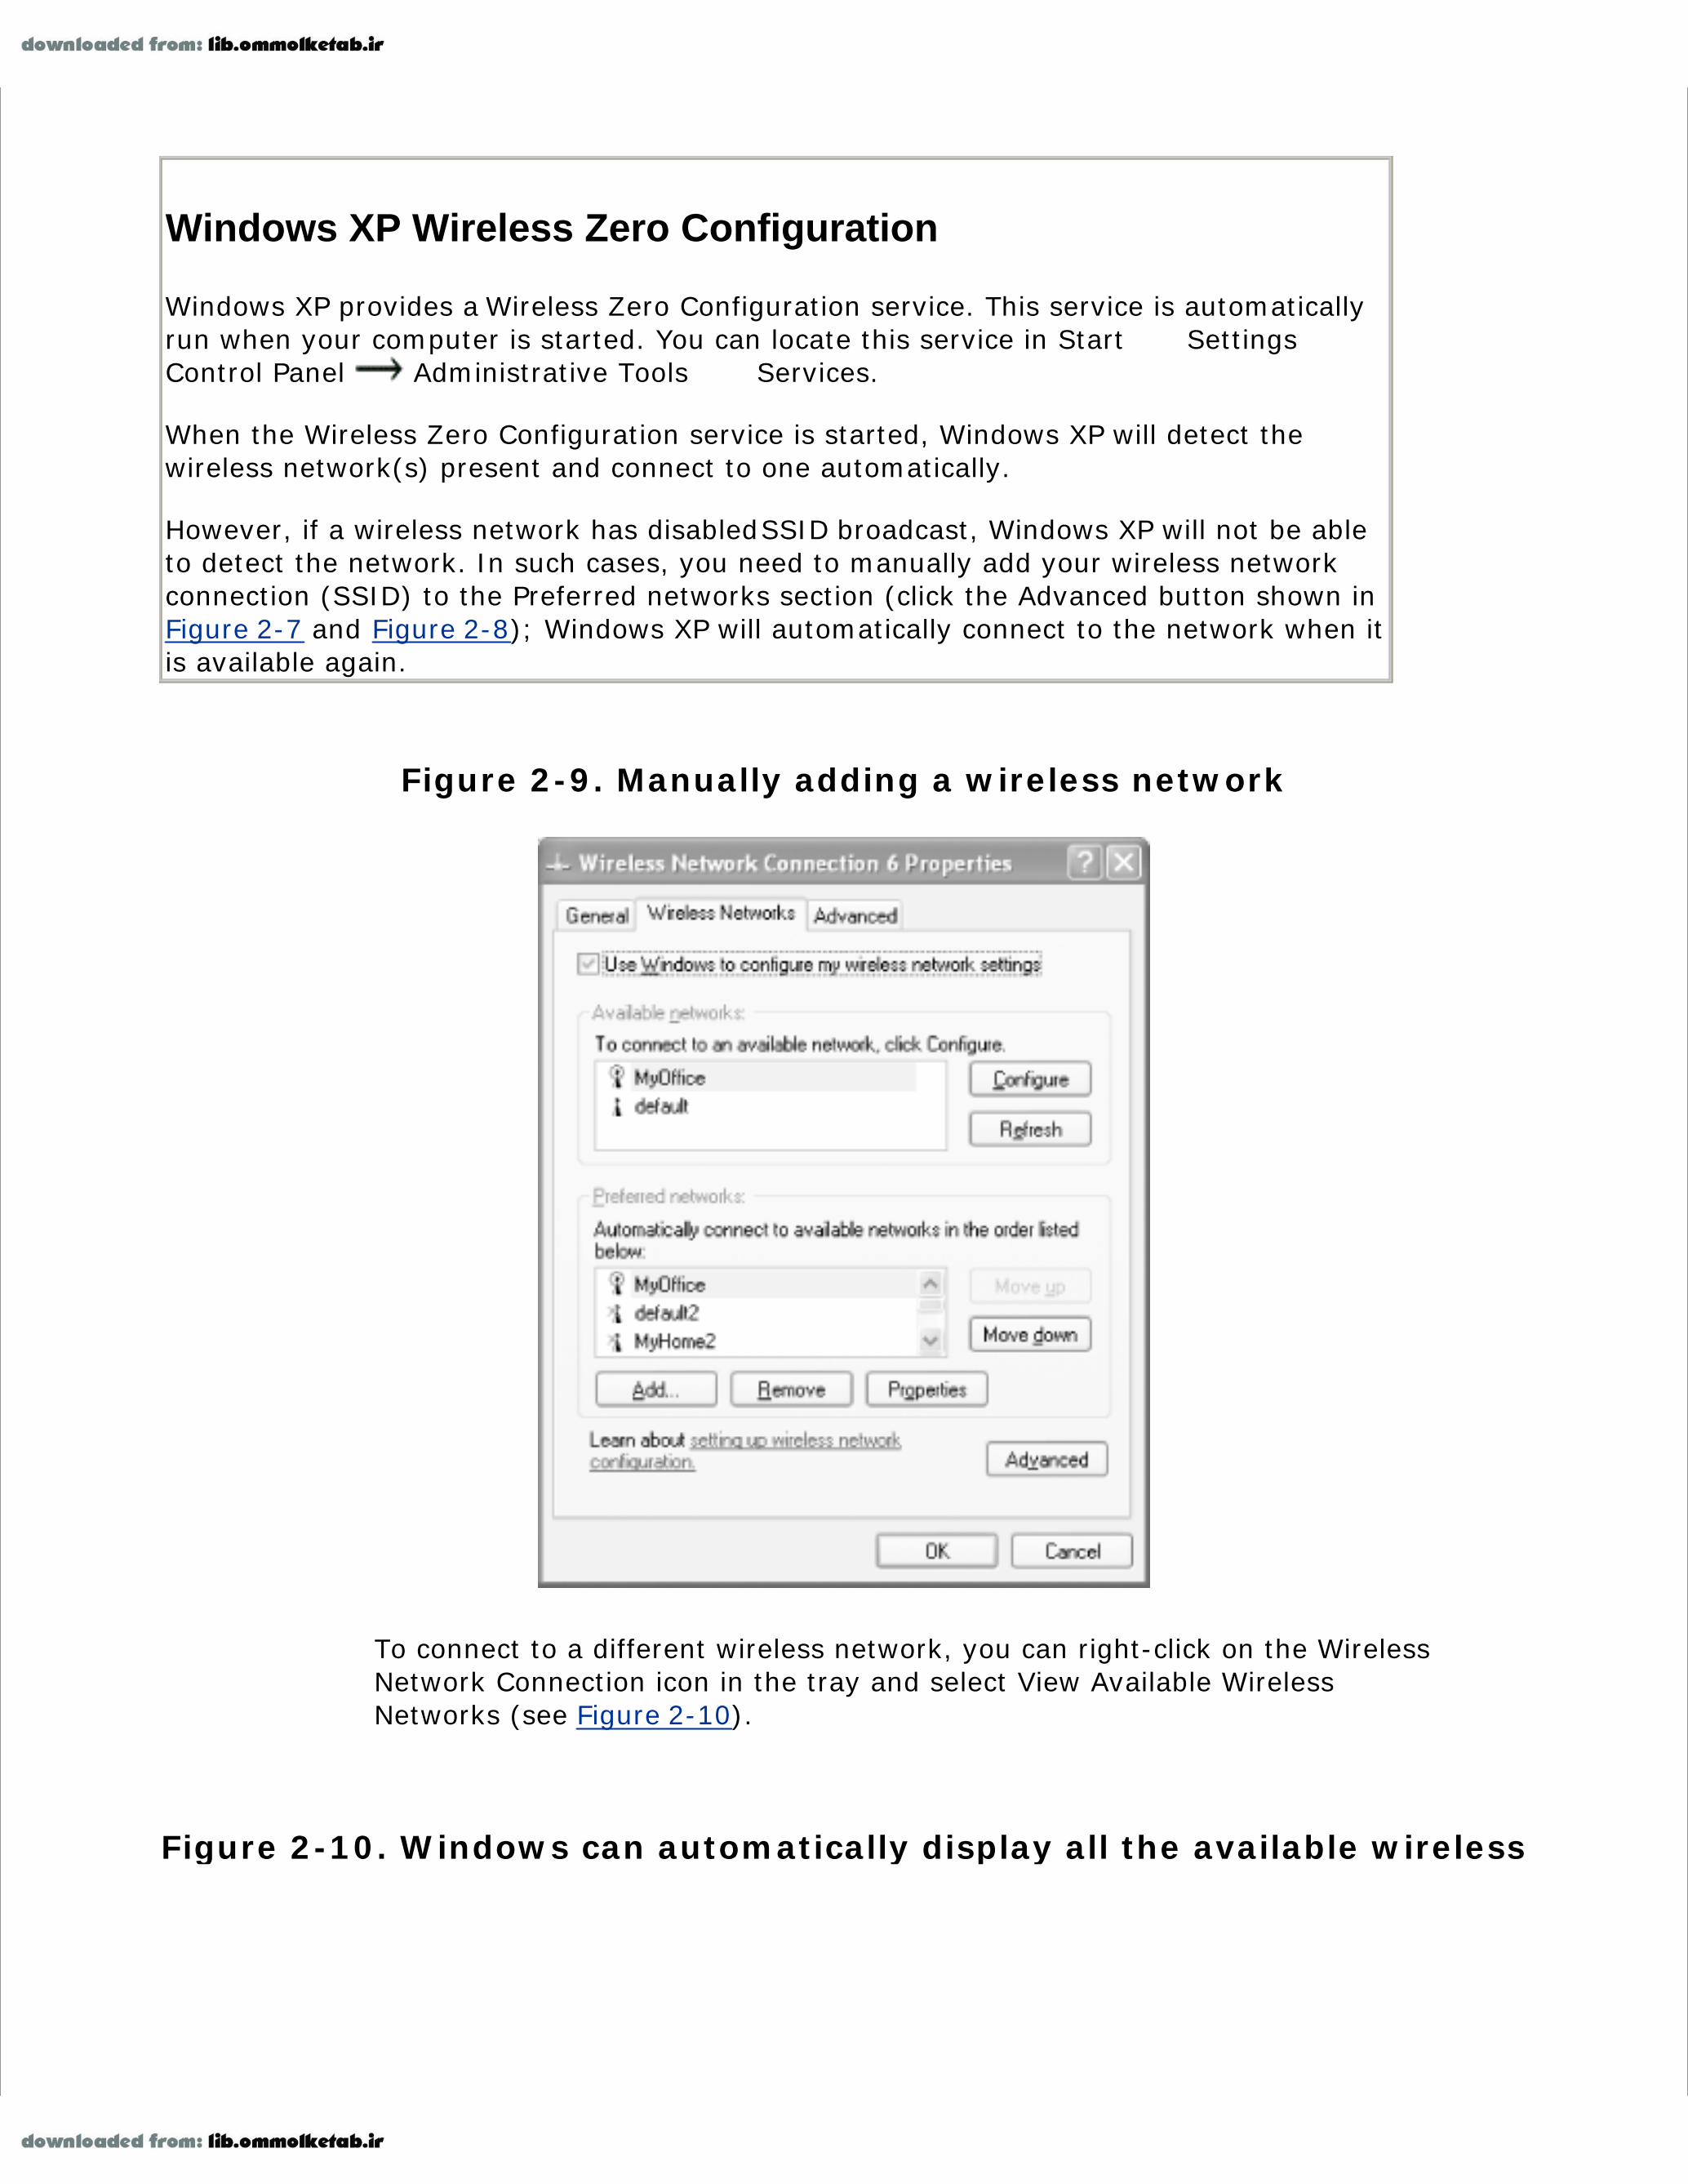
You can click on the Advanced button to add your own preferred wireless network (see Figure 2-9). This is useful when you use your computer in different places such as home and the office.In the Wireless Networks tab (see Figure 2-9), there are two sections: Available networks andPreferred networks. Available networks list the SSIDs of the all wireless networks in range.Preferred networks show all the SSIDs of wireless networks in range plus the networks that youused in the past. If your wireless network does not broadcast its SSID, you need to add itmanually using the Add button.
6.
Figure 2-6. The Wireless Network Connection icon in the Tray

Figure 2-7. Specifying a WEP key for a WEP-secure wireless network
Figure 2-8. Connecting to an unsecured wireless network
Windows XP Wireless Zero Configuration
Windows XP provides a Wireless Zero Configuration service. This service is automaticallyrun when your computer is started. You can locate this service in Start Settings Control Panel Administrative Tools Services.
When the Wireless Zero Configuration service is started, Windows XP will detect thewireless network(s) present and connect to one automatically.
However, if a wireless network has disabled SSID broadcast, Windows XP will not be ableto detect the network. In such cases, you need to manually add your wireless networkconnection (SSID) to the Preferred networks section (click the Advanced button shown inFigure 2-7 and Figure 2-8); Windows XP will automatically connect to the network when itis available again.
Figure 2-9. Manually adding a wireless network
To connect to a different wireless network, you can right-click on the WirelessNetwork Connection icon in the tray and select View Available WirelessNetworks (see Figure 2-10).
Figure 2-10. Windows can automatically display all the available wireless

networks
SSID Broadcast and MAC Address Filtering
You will not be able to see the SSID of the network available if the wireless access pointhas disabled SSID broadcast. To join the network, you need to manually add in the SSIDof the network under the Preferred networks section as shown in Figure 2-9.
If the access point uses MAC filtering (and enables SSID broadcast), you would be able tosee the SSID of the network but would not be able to connect to it unless your MACaddress is in the allow-access list. For information on configuring MAC address filtering,see Chapter 5.
2.3.1.1 Using the Cisco Aironet Client Utility (ACU)
The Cisco Aironet 350 comes with the Aironet Client Utility (ACU), as shown in Figure 2-11. Strictlyspeaking, you do not need this for the 350 to work, since Windows XP supports the card natively. Youcan also download the ACU from http://www.cisco.com/pcgi-bin/tablebuild.pl/aironet_utilities_windows.
Figure 2-11. The Cisco Aironet Client Utility

The ACU comes with an interesting Link Status function that displays the signal strength graphically(see Figure 2-12). This is useful when you need to know where to position yourself so that you getthe maximum signal strength for best throughput (see Section 3.2.1).
Figure 2-12. The ACU displays the signal strength graphically

2.3.2 Using a PCMCIA Wi-Fi Card
The D-Link AirPlus DWL-650+ (see Figure 2-13) is an 802.11b wireless card. When used with anotherAirPlus product (such as the D-Link AirPlus DI-714P+ wireless router), the maximum raw transferrate of 22 Mbps can be achieved. For this section, you need the following:
Figure 2-13. The D-Link DWL-650+ 802.11b wireless card
A Windows XP notebook computer with a vacant PCMCIA slot1.
An existing wireless network2.
The D-Link AirPlus DWL-650+ wireless card3.
2.3.2.1 Using the AirPlus utility
You should download and install the latest driver and utility from D-Link's web site at

http://www.dlink.com/.
Known Conflicts Between Windows XP and the D-Link DWL-650+
In my testing, the DWL-650+ sometimes conflicts with Windows XP. The AirPlus utilitymay connect you to a particular network, but after a while, Windows XP will automaticallyconnect to another network, or the network may simply be disconnected.
To solve this problem, disable the wireless zero configuration feature in Windows XP:
Go to Start Settings Control Panel.1.
Double-click on Administrative Tools Services.2.
Locate the item Wireless Zero Configuration and double-click on it.3.
Click the Stop button to stop the service (you should also change the Startup type toManual so that the service will not be started the next time your computer reboots).
4.
Once the Windows wireless zero configuration feature is turned off, the DWL-650+ shouldwork perfectly.
In general, if you encounter difficulties connecting to a wireless network, turn off Windowswireless zero configuration and use the utility provided by the wireless card vendor.
Note that when you disable the Windows XP Wireless Zero Configuration service, you losemany of the advanced wireless features found in Windows XP. These include:
Notification messages such as "One or more wireless networks are available" (Figure2-6)
The Wireless Network Connection dialog box (Figure 2-8)
The Wireless Networks tab of the network connection properties (Figure 2-9)
If you disable this service, you will need to use the configuration utility supplied by yourwireless card vendor to connect to a wireless network.
To install the DWL-650+, take the following steps:
Insert the DWL-650+ into the PCMCIA slot on your computer.1.
Windows XP will detect the presence of the card and search for a suitable driver.2.
If prompted for a driver, direct Windows XP to the drivers that you downloaded.3.
After the installation, the AirPlus utility icon should appear in the Tray, as shown in Figure 2-14 (theicon in the middle).

Figure 2-14. The AirPlus utility icon in the Tray
Double-click on the icon and the D-Link AirPlus utility window (see Figure 2-15) will appear.
Figure 2-15. Using the D-Link AirPlus utility
The AirPlus utility contains five main pages:
Link Info
Displays information about the current connection. Displays the link quality, signal strength,and data rate graphically.
Configuration
Allows configuration of the current wireless connection.
Encryption
Specifies whether encryption is used for the wireless network. Also allows you to enter thekey(s) used.

SiteSurvey
Displays the available wireless network as well as allows you to manually add networks (seeFigure 2-16).
About
Displays copyright information and the firmware and utility version numbers.
Figure 2-16. Performing a site survey using the D-Link AirPlus utility
Third-party tools like NetStumbler can also assist in doing a wireless sitesurvey. Chapter 3 and Chapter 9 discuss NetStumbler in more detail.
AirPlus Technology
The D-Link AirPlus product family uses the Texas Instruments' patented Digital SignalProcessing technology for enhanced performance. When two products from the AirPlusfamily are used, it results in improved performance. However, the AirPlus family is alsofully compatible with the 802.11b specification and thus will work with all other 802.11bproducts.
Figure 2-16 shows the result of a site survey. Two wireless networks are detected. When a wirelessnetwork with WEP enabled is selected, you are prompted to enter a key, as shown in Figure 2-17.

Figure 2-17. Entering a WEP key
2.3.3 Using a USB Wi-Fi Adapter
The USB wireless adapter that I use in this section is the Linksys WUSB11 wireless adapter (seeFigure 2-2, earlier in this chapter). The benefit of using a USB wireless adapter is that you can use iton your desktop PC as well as on a notebook. It is a useful alternative when you need to share anadapter among multiple computers.
To use the WUSB11, simply connect it to your USB port on your computer and Windows XP willprompt you for the drivers. You should use the drivers provided by Linksys or download them fromLinksys's web site at http://www.linksys.com/.
2.3.3.1 Using the Linksys wireless configuration utility
Linksys provides the WUSB11 with a configuration utility. (See Figure 2-18: the utility is representedby a little green icon on the lower right corner. When the network is not present, the icon turns red.)
Figure 2-18. The Linksys configuration utility

Using this configuration utility, you can perform a site survey and view the current link quality andsignal strength.
[ Team LiB ]

[ Team LiB ]
2.4 Taking It on the Road
Now that you have a better understanding of wireless networks and how you can connect to oneusing your wireless card or adapter, the following chapter discusses how you can find connectivitywhile on the road. For information on using Wi-Fi securely, see Chapter 4.
[ Team LiB ]

[ Team LiB ]
Chapter 3. Wi-Fi on the RoadIf you set up a wireless network in your home or office, you'll probably spend most of your time onthat network. However, when you wander away, your wireless adapter will let you access othernetworks, so why not take advantage of this? For example, you may be traveling and need to getonline at the airport or hotel. In this case, you could connect to a commercial or community wirelessnetwork (or a cellular network, as described in Chapter 8).
In this chapter, I discuss some of the commercial and community wireless access providers and howyou can use them while on the road. I also show you how to hunt for wireless networks using yourexisting hardware and some free software. This can come in handy when your travel involves aconference, since many conference organizers have begun to include free Wi-Fi as an added featurefor attendees.
[ Team LiB ]

[ Team LiB ]
3.1 Wireless Hotspots
As more users equip their portable computers with Wi-Fi, opportunities have emerged for anyonewho can bring a DSL line and access point into a public space such as a coffee shop, airport, or publiclibrary. Some people will set up an access point and charge by the hour; others will charge nothing,just to attract customers or keep them a little longer; some, such as a library, will set it up to makeinformation more accessible. A venue with this kind of public access point is known as a wirelesshotspot. The number of wireless hotspots is growing rapidly. Today, you can easily find wirelesshotspots in hotels, airports, coffee shops, and metropolitan areas.
In order to see striking views of wireless hotspots in New York City, see thePublic Internet Project's maps athttp://publicinternetproject.org/research/moremaps.html. Chapter 9 includesinstructions for generating your own such maps.
If you want to know out whether a particular area has a wireless hotspot, you can search for one atthe following web sites:
WiFinder
http://www.wifinder.com/search.php
HotSpotList
http://www.hotspotlist.com/
T-Mobile Hotspots
http://www.t-mobile.com/hotspot/
Wi-Fi Zone Finder
http://www.wi-fizone.org/zoneLocator.asp
In the following sections, I discuss some of the wireless hotspots provided by commercial serviceproviders as well as end users and community groups.

3.1.1 Wireless Internet Service Providers
Like the conventional Internet Service Provider (ISP), a Wireless Internet Service Provider (WISP)provides Internet access, albeit wirelessly (from the client to the access point). These providersranges from the big names, such as T-Mobile, WayPort, and Surf and Sip, to the independent wirelessoperators found in your neighborhood coffee houses and bars.
When you connect to a WISP's hotspot, the first thing you should do is open up a web browser andtry to visit a site outside the WISP's network, such as www.oreilly.com. This is because many WISPsdivert all web traffic to a sign-on page called a captive portal (see Figure 3-1). Until you sign up forthe service and pay with your credit card, your access is limited to the captive portal and possiblysome portions of the WISP's own web site.
Figure 3-1. T-Mobile's captive portal
3.1.1.1 T-Mobile HotSpot
T-Mobile HotSpot (http://www.t-mobile.com/hotspot/) is one of the wireless service providers in theU.S. It has coverage in over 2,000 locations such as airports, Starbucks Coffee, and Bordersbookstores.
Each location is equipped with a T1 line, providing speedy access to the Internet. The pricing plan isflexible - you can either sign up for an unlimited monthly subscription plan that starts at $29.95 orpay as you go for 10 cents per minute.
You can download a list of T-Mobile Hotspots at http://locations.hotspot.t-mobile.com/page6a.asp.

The SSID for the T-Mobile Hotspot is "tmobile."
3.1.1.2 Surf and Sip
Surf and Sip (http://www.surfandsip.com/) provides high-speed Internet access at locations such ascafes, hotels, restaurants, and other public places. Surf and Sip has flexible service plans rangingfrom monthly subscription to pay-as-you-go pricing.
The SSID for the Surf and Sip wireless network is "SurfandSip."
If you run a business, you can also collaborate with Surf and Sip to offer wireless Internet access atyour business location. Surf and Sip will provide all the technology and materials needed and best ofall, you get a cut of the revenue generated.
3.1.1.3 WayPort
WayPort has very good coverage in major hotels (such as the Four Seasons, Loews, Sheraton,Radisson, Hilton, Marriott, Embassy Suites, and Wyndham) and airports (including Dallas/Fort Worth,Atlanta Hartsfield, Chicago O'Hare, New York LaGuardia, Seattle-Tacoma, San Jose, and more) in theU.S. For a list of all WayPort wireless hotspot locations, visit http://www.wayport.com/locations.
With so many WISPs offering wireless Internet access, how do you identify one? The easiest way is tolook for a sign or logo in the coffee shop or airport. Figure 3-2 shows the signage of T-Mobile, Surfand Sip, and WayPort.
Figure 3-2. The signage of the various WISPs

Which WISP?
So with so many WISPs vying for your attention, which one should you sign up with? Hereare some suggestions:
If you are a frequent traveler, WayPort is a good choice. WayPort covers moreairports and hotels in the U.S. than any other WISP.
If you frequently hang out in places such as Borders or Starbucks Coffee, then T-Mobile is a great choice. T-Mobile has covered many Starbucks and Borders stores inthe U.S.
If T-Mobile is not available at your favorite coffee house, then Surf and Sip might beanother viable alternative.
Many WISPs offer short-term rates that you can sign up for from their captive portal.Since this doesn't involve a long-term commitment, you may find it more convenientto simply pay as you go.
Since Boingo Wireless partners with T-Mobile, WayPort, and Surf and Sip, as well as manyother hotspot operators, you can sign up for their service and get access to most, if notall, of the wireless networks you might encounter for a single price. (See Section 3.1.2 inthis chapter.)
3.1.2 Wireless Aggregators
With the proliferation of WISPs and hotspot operators, interoperability becomes crucial. You want tobe able to connect wirelessly whenever there is a wireless hotspot, regardless of the WISP that isproviding the network.
A wireless network aggregator provides uniform access to all the different operators that partner withthe aggregator. It is like roaming on your mobile phone, except without the exorbitant fees. Insteadof expecting you to sign up with all the phone companies in the countries that you visit, your localphone company works with operators from different countries to provide telephone service outside ofyour phone company's service areas.
Boingo.com is a wireless network aggregator. Boingo provides several price plans starting from $7.95for two Connect days (a Connect day is 24 hours of unlimited usage per location, starting from themoment you first connect) to $49.95 for monthly unlimited usage.
Using Boingo's software, you can configure your computer to wirelessly connect to the nearesthotspot. As a user, you are shielded from the intricacies of locating the right network andremembering various usernames and passwords.
You can search for over 1,300 hotspots covering 300 cities and 43 states athttp://www.boingo.com/search.html.
Figure 3-3 shows the Boingo software finding two wireless networks in your immediate vicinity.

Figure 3-3. Boingo's software locating two networks
3.1.3 Wireless Community Networks
When I first visited the U.S. many years ago, I came across one interesting fact. I realized that inmost places it is difficult to find a public washroom - you can usually find one in restaurants or bigshopping malls only. Back in Singapore, washrooms are easy to find, and access to most of them isfree. Think about it - you pay for water at home, but in public washrooms, it is free (at least toyou). If you apply this economic model to Internet access, why not have free Internet access inpublic places?
Wi-Fi Zone
With so many wireless operators rolling out wireless hotspots, how can you be assured ofquality? The Wi-Fi Zone attempts to address this concern.
The Wi-Fi Zone (http://www.wifizone.org/) is set up by the Wi-Fi Alliance, a nonprofitinternational association formed in 1999 to certify interoperability of wireless Local AreaNetwork products based on the IEEE 802.11 specification.
The aim of the Wi-Fi Zone is to establish guidelines for maintaining consistent anddependable wireless access services. Wireless operators who are awarded the Wi-Fi Zonelogo have demonstrated their adherence to minimum standards specified by the Wi-FiZone, assuring users a first-rate Wi-Fi connection to the Internet.
Visit the following URL for a list of Wi-Fi Zones:
http://www.wifizone.org/zoneLocator.asp

You can also locate a Wi-Fi Zone location by identifying the Wi-Fi Zone logo shown inFigure 3-4.
The idea that I have to pay for Internet access while I am on the road (or even sipping my coffee ata coffee house) still baffles me. The coffee house should provide free Internet access, just like usingthe water in the washroom is free. Commercial DSL can be had for well under $100 a month in manyparts of the United States, and an access point is a one-time expense of under $100. So why notsimply use free Wi-Fi as a way to lure customers? Fortunately, many people think likewise and set upfree hotspots in their businesses. Some grassroots groups take this a few steps further and formwireless community networks.
Figure 3-4. The Wi-Fi Zone logo
The concept of a wireless community network is simple. If you have a broadband connection to theInternet, why not share it? You can share the connection by connecting it to an access point andallowing your neighbors to connect to it as well. If many people do this, coordinate their efforts, andprovide a central location where users can learn about the service, it's a community network.
Refer to Building Wireless Community Networks , by Rob Flickenger (O'Reilly),for a more detailed discussion of community wireless networks.
You find the various wireless communities that are out there by visiting the WirelessCommunities siteat http://www.personaltelco.net/index.cgi/WirelessCommunities.
3.1.4 Sharing Bandwidth
If you often travel in groups and want to minimize the cost of getting online, bring a wireless accessrouter along with you the next time you travel. The NetGear MR814 802.11b Cable/DSL WirelessRouter is a good choice due to its slim design (see Figure 3-5).
Figure 3-5. The NetGear MR814 802.11b Cable/DSL Wireless Router

Instead of connecting your notebook computer directly to a hotel's broadband connection, connectyour wireless router to it and share it wirelessly with your colleagues. This way, all of your travelingcompanions can access the network at the same time.
If you don't feel like carrying a router with you when you travel, you can also share a connectionusing an ad-hoc network (see Chapter 5).
[ Team LiB ]

[ Team LiB ]
3.2 Finding Wireless Networks
Finding commercial wireless operators is easy - very often you can identify the signage hangingoutside a coffee house or on the walls of a hotel lobby. If not, when you power up your Windows XPcomputer equipped with a wireless card, it will display a list of wireless networks available. Examiningthe SSIDs (see Chapter 2 for more information on SSIDs) will often allow you to identify the networkoperator instantly.
This section focuses on how you can locate wireless networks when on the road. It is useful as aguide to help you look out for wireless networks in places such as hotels, coffee houses, or libraries.
3.2.1 Site Surveys
A simple way to discover wireless networks is to perform a site survey with your wireless networkcard. Doing a site survey is simple using either Windows XP's built-in capabilities or an advanced toolsuch as NetStumbler.
Check out the utility software bundled with your wireless card. Very often itcomes with an application that allows you to perform site surveys.
3.2.1.1 Windows XP
Windows XP's Wireless Zero Configuration feature automatically discovers the available wirelessnetworks in the vicinity (this feature was illustrated in Chapter 2). However, Windows XP does notallow you to see detailed information about the wireless networks, such as the number of accesspoints available or where they are located. If you need the additional information, you should use themore sophisticated (and free) NetStumbler program.
3.2.1.2 NetStumbler
NetStumbler is a free wireless network discovery tool (written by Marius Miner, a San Francisco Bayarea software developer) that runs on Windows-based computers. You can use NetStumbler for sitesurveys, and it is also a useful tool for detecting unauthorized (rogue) access points.

Check out NetStumbler's web site to see if your wireless card is supported.NetStumbler generally works with wireless cards using the Hermes chipset(refer to Chapter 2 for a list of wireless cards using the Hermes chipset).However, some cards that are not supported by NetStumbler (such as thosefrom Cisco and D-Link) work under Windows XP. My Cisco Aironet 350 workswell with NetStumbler.
You can download NetStumbler from http://www.netstumbler.com/. Running NetStumbler will displaya list of wireless access points detected.
As shown in Figure 3-6, NetStumbler groups the access points detected based on channels andSSIDs. In this case, several access points were found running on channel 6. The MAC addresses ofthe access point are also displayed, together with other information such as vendor of the accesspoint, whether WEP was used, signal-to-noise ratio, etc.
Figure 3-6. Using NetStumbler to detect wireless networks
If you do a site survey using NetStumbler and find a bunch of access points,you may be surprised to see the number of wireless networks that do not useany kind of security.
NetStumbler also includes GPS support so you can connect a GPS receiver to your notebook andcollect the location information for all the access points you find. Feeding the latitude and longitudeinformation to mapping software (such as Microsoft MapPoint) lets you plot a map showing thelocations of the access points. See Chapter 9 for more details on how to use NetStumbler with GPS.

Wardriving, Warwalking, and Warflying
A new term has been coined to describe the act of doing site surveys: Wardriving.Wardriving involves people using their notebook computers or Pocket PCs (equipped withwireless cards and GPS receivers) and driving around the city (or neighborhood) lookingfor the presence of wireless networks - just for the fun or it, or to assess the securityrisks of wireless networks. With a GPS receiver, wardrivers can catalog the exact locationof an access point. Besides Wardriving, people who performed site surveys via walking areWarwalking. Well, Warflying then seems obvious - you fly on an airplane doing sitesurveys (for a great Warflying story, see Philip Windley's weblog athttp://www.windley.com/2002/09/02.html).
To see the Wardriving efforts around the world, go to google.com and type in"Wardriving".
3.2.1.3 Determining wireless coverage with NetStumbler
You can use NetStumbler to display a graph depicting the signal-to-noise ratio of a given access point(see Figure 3-7). This is useful for helping network administrators select the best place to position anaccess point for maximum coverage.
Figure 3-7. NetStumbler can display the signal-to-noise ratio for anaccess point.

Is Wardriving Legal?
Before you do your own Wardriving, be sure to check with the local authorities to see if itis legal. As far as I know, Wardriving is not illegal in the U.S. However, in some countries,Wardriving may be an offense (in Singapore, it is classified under the Computer MisuseAct).
One way to protect yourself when doing a Wardrive is to disable DHCP on your computer.Set a static IP address for your computer so that when you are associated with an accesspoint, the network does not assign an IP address to you. Technically speaking, so long asyou have not been assigned an IP address by the wireless network (even though you havebeen associated with the access point), you have not joined the network, and so youcannot be held liable for trespassing into the network.
However, if you use DHCP for IP address, and an IP address is assigned to you, your MACaddress will be logged by the network. Depending on local law, this may make you liablefor your action.
NetStumbler displays the graph in two colors: green and red. If the graph displays in mostly green,then it means that the signal quality is good. In general, always aim for lots of green in your graph.
To aim for maximum coverage, once an access point is mounted, install NetStumbler on a notebookcomputer and call up the graph. (To view this graph, drill down into the list of channels or SSIDs onthe left and locate the access point you're interested in.) Watch the graph for a few seconds, andyou'll see that it is charting the signal-to-noise ratio over time. So, if you walk around the site youwish to survey, you'll see the values change as the quality of coverage increases or decreases.
3.2.2 Warchalking
Warchalking is the practice of drawing symbols on walls to indicate a nearby wireless network. Withthe symbols, wireless users can identify the areas in which they can connect wirelessly to theInternet. Figure 3-8 shows the symbols used for Warchalking. The web site for Warchalking can befound at http://www.warchalking.org/.
Figure 3-8. Symbols used for Warchalking (from left to right: an opennetwork, a closed network, and a network protected by WEP)
3.2.2.1 How Warchalking came about
In the 1930s during the Great Depression, many people left their homes to look elsewhere for jobs.Due to the poverty and scarcity of work, everywhere these people (often known as hobos) were often

unwelcome in the new cities. As the story goes, a group flocked to Texas because it was rumoredthat there was a town there called El Paso where people were generous to beggars. To avoid troublewith the locals, the hobos devised a set of symbols to communicate with each other, so that theyknew what to expect in the unfamiliar town. Figure 3-9 shows some original symbols devised by thehobos. Can you figure out what they mean?
Figure 3-9. Some symbols used by the hobos
Here are the answers:
You will be beaten1.
Man with gun2.
Safe camp3.
You can visit the following web sites for more symbols used by the hobos:
http://www.slackaction.com/signroll.htm
http://sedaliakatydepot.com/hobo.htm
Matt Jones, an Internet product designer, operates a web site (http://blackbeltjones.com) thatserves primarily as the Londoner's online resume and portfolio. In June 2002, Jones combined thepractice of using a sniffer tool to detect a wireless network (known as Wardriving or Warwalking) withthat of the hobos' symbol to come up with the symbols for wireless networks (see Figure 3-8). Usingthese symbols, wireless users can then know if there is an available wireless network for their use.He was inspired by architecture students "chalking up the pavement" on his way to lunch. During alunch, Jones and a friend, who had recently been discussing hobo signs with another friend, came upwith the notion of Warchalking.
So the next time you see such a symbol on a wall or a sidewalk, you know that there is probablywireless access in the vicinity. Once you know about it, what can you do with it? To answer thisquestion, you need to consider the legal and moral aspects of Warchalking.
3.2.3 Warchalking, Wardriving, and Legality
Warchalking or Wardriving for wireless networks are activities that are still legally debatable at themoment. First, drawing chalk marks on the wall may not constitute an offense (this depends onwhere you live: it is definitely considered an offense in Singapore if you do it without explicitpermission!). But the real concern is when you discover a wireless network in a nearby home orbusiness. Unlike wired networks, a wireless network has no clear boundary; hence, how does onedefine trespassing?
What happens if a wireless home network is not protected by any form of security (see Chapter 4) or

MAC address filtering (see Chapter 5)? In this case, the wireless network is deemed to be "open" andmay suggest that strangers are welcome to use the network. So, should you connect to the network?There is no clear answer.
At the time of this writing, a bill (House Bill 495) is moving through the New Hampshire statelegislature that defines explicit boundaries for this. Under this bill, users would effectively bepermitted to connect to open wireless networks. House Bill 495 recognizes that an open network isoften a welcome mat. After all, if you were sitting in a public place such as a hotel lobby, airport,coffee shop, library, or conference venue and found an open access point, what would your firstinstinct be? Would you connect to the wireless network or find someone in order to ask permission?Most users would assume that the network was put there for their use. If passed, House Bill 495would still protect wireless network operators by requiring them to take some steps to secure theirnetwork in order to be able to prosecute unauthorized users who connect to their network. If this sortof legislation becomes more common, then the legality of Warchalking and Wardriving will be easierto evaluate on a case-by-case basis.
[ Team LiB ]

[ Team LiB ]
Chapter 4. Communicating SecurelyWith no physical boundary, how can wireless networks be secure? Can they be locked downsufficiently to please security-conscious users? Because the initial wireless security standard wasfundamentally flawed, the answer is complicated. In this chapter, I explain the security issuesinherent in the 802.11 family and the various ways you can secure a wireless network.
[ Team LiB ]

[ Team LiB ]
4.1 Secure Wireless Computing
Before we start discussing the gory details of Wi-Fi LAN security, let me make one thing clear: WiredEquivalent Privacy (WEP), the security protocol used by most 802.11 networks at the time of thiswriting, is fundamentally flawed. Though I talk about WEP in much more detail later in this chapter,here is a quick rundown of WEP's flaws:
All users in a wireless network share the same secret key. (And a secret key is no longer asecret if more than one person knows it.)
The implementation of WEP makes it very susceptible to attacks by hackers. It is not a matterof whether it can be cracked, but a matter of how soon. The flaws in WEP have been provenboth in theory and practice.
Although WEP has its flaws, it's worth using to discourage unauthorized users from connecting toyour access point. If you need stronger security, you have to rely on other techniques to provide it.In the first part of this chapter, I assume that you are connected to a wireless network (with orwithout WEP), and that you want to securely access the network resources (including something assimple as surfing the Web or reading your email). I discuss three ways in which you can have moresecure wireless communications in the list shown next.
Virtual Private Networks (VPN)
A VPN allows you to remotely access a private network as though you were connected to itphysically. Moreover, the entire communication channel is protected by encryption. So if youare connected to a VPN server wirelessly, the packets transmitted between your computer andthe access point are encrypted by the VPN connection, which is much more secure than usingWEP.
Secure Shell (SSH)
SSH lets you initiate a shell session (similar to Telnet) or exchange files with a remote server,with the information exchanges all encrypted. When not using a VPN, SSH is an excellentoption for securely connecting to another computer.
Firewalls
If you connect to public networks where your fellow users are unknown and untrusted, a goodfirewall can provide some degree of security. Windows XP includes basic firewall capabilities;there are third-party firewall applications available that have more features.

After this, I go into the details of Wi-Fi security and the various technologies that are in use (or havebeen proposed) for securing wireless networks.
[ Team LiB ]
[ Team LiB ]
4.2 Virtual Private Networks
Imagine you are out of the office and need to access a printer or file server on the office network.Unless you dial in to the company's server, it is not possible for you to access the resources in theoffice. Moreover, using a dial-up line is not a cheap alternative (despite the slow speed), especially ifyou are overseas.
A Virtual Private Network (VPN) allows you to establish a secure, encrypted connection to the office'snetwork, all through a public network such as the Internet. Using a VPN, you can work as though youare connected to your company's network.
There are two main types of VPN:
User-to-Network
This type allows a client to use a VPN to connect to a secure network, such as a corporateintranet.
Network-to-Network
This type connects two networks via a VPN connection. This effectively combines two disparatenetworks into one, eliminating the need for a Wide Area Network (WAN).
4.2.1 Tunneling
Tunneling is the process of encapsulating packets within other packets to protect their integrity andprivacy during transit. A tunnel performs such tasks as encryption, authentication, packet forwarding,and masking of IP private addresses. Figure 4-1 shows a tunnel established between two computersthrough the Internet. Think of a tunnel as a private link between the two computers: whatever onesends to another is only visible to the other, even though it is sent through a public network like theInternet.
Figure 4-1. A tunnel established between two computers in a VPN
The following section discusses some tunneling protocols available for VPNs.

4.2.1.1 PPTP, L2TP, and IPSec
If you're curious about what goes on under the hood of a VPN, there are three protocols that youneed to know: PPTP, L2TP, and IPSec:
Point-to-Point Tunneling Protocol (PPTP)
This was designed by Microsoft (and other companies) to create a secure tunnel between twocomputers. PPTP provides authentication and encryption services, and encapsulates PPPpackets within IP packets. It supports multiple Microsoft networking protocols such as LAN toLAN and dial-up connections. However, it is proprietary and the encryption is weak.
Layer 2 Tunneling Protocol (L2TP)
This works like PPTP, except that it does not include encryption. L2TP was proposed by CiscoSystems, and like PPTP, supports multiple networking protocols.
IPSec
This addresses the shortcomings of L2TP by providing encryption and authentication of IPpackets. As such, L2TP is often used together with IPSec to provide a secure connection.
If possible, a VPN should be used together with 802.1X. 802.1X adds anadditional layer of protection that the VPN itself does not possess. For moreinformation on VPNs, see Virtual Private Networks (O'Reilly).
4.2.2 Setting Up a VPN Connection Between Two Computers
In the following sections, I illustrate how to set up a VPN host as well as a client using two WindowsXP Professional systems.
4.2.2.1 On the host computer
Let's start with setting up the VPN host:
On the desktop, right-click on Network Connections.1.
Select "Create a new connection".2.
In the New Connection Wizard window, select "Set up an advanced connection" (see Figure 4-3.

2.
2). Click Next.
Figure 4-2. Choosing the network connection type
3.
Select "Accept incoming connections". Click Next.4.
In the next window, you can select the other devices to accept the incoming connection. ClickNext.
5.
Select "Allow virtual private connections" and click Next (see Figure 4-3).
Figure 4-3. Allowing a VPN connection
6.
Select the users that you want to allow to connect to your computer using the VPN connection(see Figure 4-4). Click Next.
Figure 4-4. Granting access rights to users
7.

The next window allows you to install additional networking software for this connection (seeFigure 4-5). Click on Next to go to the next screen.
Figure 4-5. Installing the networking software for the VPNconnection
8.
Click on Next and then Finish to complete the process.9.
4.2.2.2 On the client

To configure Windows XP to connect to a VPN:
On the desktop, right-click on Network Connections.1.
Select "Create a new connection".2.
Select "Connect to the network at my workplace" (see Figure 4-6).
Figure 4-6. Selecting the network connection type
3.
Select "Virtual Private Network connection" (see Figure 4-7). Click Next.
Figure 4-7. Selecting the network connection
4.
Enter a name for the VPN connection (see Figure 4-8). Click Next.
Figure 4-8. Giving your VPN connection a name
5.

5.
Select "Do not dial the initial connection". Click Next.6.
Enter the IP address of the VPN server (see Figure 4-9). Click Next.
Figure 4-9. Specifying the IP address of the VPN host
7.
Select "My use only" (see Figure 4-10). Click Next.
Figure 4-10. Setting the connection availability
8.
9.

Turn on the "Add a shortcut to this connection to my desktop" checkbox. Click Finish.9.
That's it! When the process is completed, an icon is shown on the desktop (see Figure 4-11).
Figure 4-11. The icon for the VPN connection
To connect to the VPN server, double-click on the icon and log in with your username information(see Figure 4-12). You can now work as though you are working on a computer in your office: most(if not all) of your network resources, such as file and print servers, will be accessible.
Resist the temptation to check the box titled "Save this user name andpassword for the following users" (see Figure 4-12). If you enable this, yourpassword will be saved on your computer; if your computer is stolen orcompromised, an attacker will be able to connect to the VPN and accesseverything it protects.
Figure 4-12. Logging in to a VPN connection

One common error that you might encounter has to do with setting a proxyserver in Internet Explorer. For example, my ISP does not require me to use aproxy server when surfing the Web. But when I connected to the VPN server inmy workplace, I was suddenly unable to connect to the Web. As it turns out,my company requires me to use a proxy server to connect to the Web. Withthe proxy server configured in IE (Tools Internet Options Connections
Connection Name Settings), I am now able to connect to the Web
(see Figure 4-13).
Figure 4-13. Setting a proxy server for a VPN connection

IPSec and PPTP Pass Through
Most wireless routers support a feature known as "IPSec and PPTP pass through." Whatdoes it do?
IPSec and PPTP are security protocols that provide authentication and encryption over theInternet. The "pass through" feature of the wireless router allows secure packets to flowthrough the router, but the router itself does not perform any authentication andencryption operation.
IPSec works in two modes: transport and tunnel. Transport mode secures IP packets fromsource to destination, whereas tunnel mode puts an IP packet into another packet that issent to the tunnel's endpoint. Only tunnel mode (ESP) IPSec can be passed through.
[ Team LiB ]

[ Team LiB ]
4.3 Secure Shell (SSH)
If you need to connect to Unix or Linux servers, you may be familiar with utilities such as Telnet andFTP. Telnet lets you connect to a command prompt on a machine over the network. The FTP utilitytransfers files between your machine and a remote server.
If you are using either Telnet or FTP to connect to a sensitive server, but you're not also using a VPN,you are probably exposing your password to anyone who can access the network you're connected to(perhaps you're on a public network at a wireless hotspot?), the network where the remote serverresides, and any network in between. (Ever wonder what networks sit between you and a remotecomputer? Use the tracert command at the Windows XP Command Prompt to trace the routebetween your computer and a remote host, as in tracert www.oreilly.com).
Anonymous FTP, in which you use your email address as a password, is not aconcern. This is because, as the name implies, all remote users are treated asanonymous guests, and, if the remote FTP server is configured properly, areaccorded no privileges that could be abused.
If the remote server supports it, you can use the Secure Shell (SSH) protocol to work with a remotemachine's command prompt (replacing Telnet) or securely transfer files (replacing FTP). SSHCommunications Security offers SSH utilities for Windows and other platforms. Open source variantsinclude openssh (http://www.openssh.org), which is included with the Cygwin(http://www.cygwin.com) distribution, a Linux-like environment for Windows. However, since Cygwinhas a fairly big footprint, a popular open source alternative is PuTTY, a suite of SSH utilities that fit ona floppy disk.
PuTTY is available from http://www.chiark.greenend.org.uk/~sgtatham/putty/. At a minimum, youshould download and install (put the .exe somewhere in your Windows PATH) putty.exe. If you wantto perform secure file transfers, download pscp.exe and psftp.exe.
To connect to a remote host with PuTTY, launch the application, specify SSH as the protocol (thedefault is to use the insecure Telnet protocol), and supply the IP address or hostname of the machineto which you want to connect, as shown in Figure 4-14.
Figure 4-14. Connecting to a remote machine with PuTTY

The first time you connect to a remote server with PuTTY, it will advise you that the server isunknown to it (see Figure 4-15). Click Yes or No to continue connecting, and then type yourusername and password when prompted to do so.
Figure 4-15. PuTTY warns about unknown hosts
Once you are logged in, you can issue commands on the remote machine as shown in Figure 4-16.
Figure 4-16. Using a Unix shell over a PuTTY connection

You can use pscp (secure copy) and psftp (secure FTP) at the Windows XP Command Prompt. Tocopy a file with pscp, use pscp username@host:path, as in pscp [email protected]:MyDocuments/.
To use psftp, specify the hostname, and log in with your user ID and password. You can use ftpcommands such as put (to upload a file to the server) and get (to download a file from the server):
C:\Documents and Settings\bjepson\My Documents>psftp www.as220.orglogin as: bjepsonUsing username "bjepson"[email protected]'s password:********Remote working directory is /home/bjepsonpsftp> cd MyDocumentsRemote directory is now /home/bjepson/MyDocumentspsftp> put secret_document.doclocal:secret_document.doc => remote:/home/bjepson/MyDocuments/secret_document.docpsftp> get super_secret.docremote:/home/bjepson/MyDocuments/super_secret.doc => local:super_secret.doc
For more information, consult the PuTTY documentation and FAQ, located at the PuTTY home page.
[ Team LiB ]

[ Team LiB ]
4.4 Firewalls
A firewall keeps remote users from connecting to your computer, while letting you connect to remoteservers. A Windows XP system includes a number of services, such as file sharing, that a remoteattacker can use to access your system. In some cases, flaws in Windows can let a remote attackergain complete control over your system (this is why it's important to run Windows Update frequently,so that you have the latest security updates).
Most wireless access points that have router capabilities also have built-in firewalls (and the firewall istypically enabled by default). But when you are on the road, you should enable Windows XP's firewall,because other users on the wireless network will be able to access your computer if you don't.
To enable the firewall for your wireless connection:
Open the Network Connections folder (Control Panel Network and Internet Connections Network Connections).
1.
Right-click on your wireless connection and select Properties. When the connection Propertiesdialog appears, select the Advanced tab (Figure 4-17).
Figure 4-17. Enabling Windows XP's firewall
2.
3.
4.

Check the box labeled "Protect my computer and network by limiting or preventing access tothis computer from the Internet." This enables the basic firewall functionality.
3.
Click Settings. This brings up the Advanced Settings dialog (Figure 4-18). Use the Services tabto configure the inbound services (such as Remote Desktop) that you want other users to haveaccess to. Use the Security Logging tab to configure how connection attempts and failures arelogged. The ICMP tab allows you to enable Internet Control Message Protocol (ICMP) requests,which are employed when remote users apply diagnostic utilities such as ping to verify whetheryour computer is accessible. By leaving these disabled, you make it a little harder for attackersto find your computer or to determine potential vulnerabilities.
Figure 4-18. Configuring the firewall's advanced settings
4.
Click OK to dismiss the Advanced Settings dialog, then click OK to dismiss the connectionProperties dialog.
5.
To see a log of connection attempts, open the file C:\Windows\pfirewall.log in a text editor.
[ Team LiB ]

[ Team LiB ]
4.5 Wi-Fi Security
Now that I have discussed the three ways to secure your wireless connection, I'll dive deep into thedetails of Wi-Fi security. A secure network should (ideally) have the following:
Authentication
This is the process of verifying the identity of a user and making sure that she is who sheclaims. When you log in to your Windows computer, you are being authenticated via theusername and password. In a Wi-Fi network, authentication comes into play when the accesspoint has to determine whether a machine can connect to it.
Authorization
This is the process of allowing or denying access to a specific resource. You may beauthenticated as a user, but you may not be authorized to use certain feature perhaps due toyour user role (such as Guest, User, Power User, Administrator). For example, suppose you areat a wireless hotspot and have used up your allotted connection time: the network knows whoyou are, but won't authorize you to access the Internet until you pay for more minutes.
Confidentiality
This ensures the privacy of information that is being transmitted. Only an authorized party(such as the recipient of an email message) can see the information being transmitted. In aWi-Fi network, confidentiality is supported by protocols such as WEP, WPA, and 802.1X, whichencrypt the data that moves through the air.
Integrity
This ensures that the information that you have transmitted has not been tampered with enroute to its destination.
Authentication, authorization, confidentiality, and integrity are also addressed by other systems onyour network, just as they are on a wired network:
Passwords can be used to authenticate users when they log into a file server.
User roles control which files a given user has access to.

Web and email communications can be secured with SSL.
Network traffic can be tunneled through a VPN.
In Wi-Fi, there are two main authentication schemes (see Figure 4-19):
Noncryptographic
Cryptographic
Figure 4-19. Authentication schemes
Under the noncryptographic scheme, you can authenticate in two ways: one without an SSID andone with an SSID. If a wireless network allows clients to connect to it without specifying an SSID, it isknown as Open System Authentication.
For Closed System Authentication, two methods are possible: one using an SSID and one using acryptographic key.
In an Open System Authentication scheme, there is no encryption performed on the packetstransmitted between the client and the access point. The client does not need any SSID to join anetwork. This is the simplest mode as the configuration is straightforward and does not require anyadministration.
In the Closed System Authentication scheme, a client needs to specify an SSID that is identical tothat specified by the access point in order to join the network. In addition, a shared key may also beused to encrypt the data packets transmitted between the client and the access point. In 802.11, theencryption method is known as Wired Equivalent Privacy (WEP), which we discuss in greater length inSection 4.5.1, next.
To get connected to a network in a closed system, a client must fulfill one or several of the followingcriteria:
The SSID of the client must match that of the access point. If a wireless access point has SSIDbroadcast turned on, your Windows XP computer should be able to detect its presence and allowyou to connect to it. If the SSID broadcast is turned off, then the client must manually enter theSSID in order to associate with the access point. Getting associated with the access point is thefirst step in joining a network. Using an SSID to prevent people from accessing your network isnot effective, since the SSID is often guessable and can be "sniffed" by network tools such asAiroPeek (more on this later).
1.

There are actually two steps to gaining network access. The first isassociating with the access point , which means that the access point iswilling to talk to your machine. The second step is joining the network ,which usually means that your machine has been assigned an IP addressand can talk to other hosts on the network. Unless I need to specificallydiscuss one or the other of these steps, I'll say "connected to the wirelessnetwork," which means that the client has been associated to the accesspoint and joined the network.
Some access points use MAC address filtering to prevent clients from associating with them. Youcan enter a list of MAC addresses that you would allow (or deny) association with the accesspoint (this is usually done through a web-based configuration interface on the access point).Even if a client has the correct SSID, if its MAC address is not listed in the allow-list of theaccess point, it cannot be associated with the access point. Again, using MAC address filtering toprevent unauthorized access to the network is not foolproof - an unauthorized user can easilychange his network card's MAC address to that of an authorized client.
2.
If WEP encryption is used on a wireless network, the client must specify the same WEP key asentered in the access point. Using a WEP key protects the data that is exchanged between theclient and the access point. It also has the side effect of preventing unauthorized access to thenetwork since a client needs the WEP key to encrypt and decrypt the packets exchanged.However, it has been proven that WEP is not secure and the WEP key can easily be recoveredusing freely available tools.
3.
4.5.1 Wired Equivalent Privacy (WEP)
The main goal of WEP is to provide confidentiality of data packets. One secondary function of WEP isto provide authorization to a wireless network. This is, however, not the originally intended designgoal of WEP (but see the section on 802.1X later in this chapter). Although WEP was initially designedto safeguard the confidentiality of the data in a wireless network, it has been proven to be insecure.To understand how WEP compromises your data in a wireless network, let's first understand howWEP works.
WEP uses the RC4 stream cipher algorithm (search the FAQ athttp://www.rsasecurity.com/rsalabs/faq for "RC4"). It takes in a key and generates a largerpseudorandom bit sequence (the key stream) that serves as an encryption key. The key stream isthen XOR'ed (a logical operation that returns true if one, but not both, of two binary values are true)with the original message (the plaintext) to produce the ciphertext.
When the recipient receives the encrypted stream (the ciphertext), it uses the shared key (toproduce the same pseudorandom key stream) and performs an XOR function to derive the originalmessage.
Here is how WEP uses RC4 to encrypt network communications:
Before encryption, the packet is run through an integrity check algorithm to generate achecksum. This is to prevent the message from being tampered with.
1.
2.
3.

1.
The 40-bit WEP key is then combined with the 24-bit Initialization Vector (IV) to form a 64-bitkey.
2.
RC4 then uses the 64-bit key to generate a keystream equal to the length of the plaintext to beencrypted (including the checksum generated by the integrity check algorithm in step 1).
3.
The keystream is then XOR'ed with the plaintext to generate the encrypted packet. The IV isalso appended in the header of the encrypted packet to create the ciphertext.
4.
This encryption process is shown in Figure 4-20.
Figure 4-20. How WEP works
There are many security concerns that have been raised with respect to WEP. The first attack on WEPwas identified by researchers Scott Fluhrer, Itsik Mantin, and Adi Shamir.
Here are some of the more important security concerns regarding WEP:
The use of a shared static key is a major concern as everyone uses the same static key tosecure his communications. As soon as the key is made known, the network is no longer secure.Some access points use a passphrase to generate keys, which makes it easier to guess the key,since people tend to use familiar terms for passphrases.
Distributing WEP keys in a large network is not feasible. Imagine trying toobtain a WEP key at the airport, or hassling a busy barista at Starbucks forone.
The IV is only 24 bits in length, which means the same IV is reused many times over. This isespecially true in a busy access point. Most network cards reset the IV to 0 when it is initialized,and increment the IV by 1 for each subsequent packet. (Although there are over 16 milliondifferent IVs, in practice you should begin to see the IVs repeat after more than 5000 packetsare transmitted.) If an access point transmits packets of 1500 bytes in length, a 7 MB downloadwould cause the same IV to be used again. It has been shown that when two eavesdroppersintercept two ciphertexts encrypted with the same keystream, it is possible to obtain the XOR ofthe two plaintexts. Over time, when more ciphertexts encrypted with the same keystream arecollected, it is possible to recover the plaintext.
If the keystream is recovered by an eavesdropper, forging a packet is easy, since you now havethe keystream to generate the ciphertext. This can facilitate man-in-the-middle attacks, when ahacker may forge the identity of a legitimate user, and intercept and reroute the data

transmitted.
Due to the export regulations of the United States, the 802.11 standard called for 40-bit WEPonly. Most vendors introduced longer key length for their products, making their productsproprietary and often not interoperable. Even so, since WEP is not a well-designed cryptographicsystem, having extra key length does not make your communications more secure.
Many vendors have claimed that their products support longer encryption keyssuch as 128 or 256 bits (which promises to be more secure). This is nottechnically correct. Because the 128-bit or 256-bit designation is inclusive ofthe 24-bit IV, the effective key lengths are 104 and 232 bits, respectively.However, some vendors do have products that support 152 bits (128 bit keys+ 24-bit IV).
Figure 4-21 shows how you can enable WEP in a Linksys wireless router. For a 64-bit WEP key, only40 bits (or 5 bytes) are specified by the user (since 24 bits are used by the IV). So for a 64-bit key,you need to enter 10 hexadecimal characters (since 2 hexadecimal characters make up 1 byte). For a128-bit WEP key, 26 hexadecimal characters are needed.
Figure 4-21. Setting WEP keys in the Linksys access point
Figure 4-21 also shows the Linksys wireless access point using a passphrase to generate four WEPkeys. You can also manually set any of the four keys as your WEP key without using a passphrase.After you set the keys, click Apply.

Dynamic WEP Keys
Some vendors, like Cisco and 3COM, have implemented a dynamic WEP key in responseto WEP's weaknesses. Per user session, Cisco's software generates a dynamic WEP keythat is not shared with other users.
However, you must use access points, wireless cards, and adapters from the same vendorfor dynamic WEP keys to work. For more information on Cisco's Dynamic WEP keys, visithttp://www.cisco.com/warp/public/cc/pd/witc/ao350ap/prodlit/1281_pp.pdf.
The wireless client enters one of the four keys specified in the Linksys accesspoint and not the passphrase itself. The passphrase is used to simplify the taskof generating the WEP key.
4.5.2 802.11i
A longer-term solution to resolve WEP's inadequacies lies in the hands of the IEEE workgroup TGi(http://grouper.ieee.org/groups/802/11/Reports/tgi_update.htm) when they complete the 802.11ispecifications at the end of 2003.
The 802.11i specifications will address the items in the list shown next.
Use of 802.1X for authentication
The 802.1X specification is a framework for mutual authentication between a client and theaccess point. It may also use a RADIUS-based authentication server and one of the ExtensibleAuthentication Protocols (EAP) variations. 802.1X uses a new key for each session; hence itreplaces WEP's static key.
Use of the Temporal Key Integrity Protocol (TKIP)
TKIP will be used as a short-term solution to WEP's flaws. It uses 128-bit dynamic keys thatare utilized by different clients. Because of the changing keys, intruders would not have time tocollect enough packets to compromise the security scheme.
Use of Advanced Encryption Standard (AES)
The full implementation of 802.11i will utilize the AES encryption system for enhancedencryption in access points. However, use of AES requires changes in the chipsets used in

wireless devices; thus, at the time of this writing, no wireless device supports AES.
The 802.11i specification is tentatively called WPA2. See the next section for more details.
4.5.2.1 Wi-Fi Protected Access (WPA)
While the industry is waiting for the 802.11i specification to be ratified, the Wi-Fi Alliance hasaddressed the present need for secure wireless communication by coming out with the Wi-FiProtected Access (WPA).
The WPA is also known as WPA1, while 802.11i is known as WPA2.
WPA is a subset of the 802.11i standard and will be forward compatible with it. The key componentsof WPA are:
802.1X
802.1X is a port-based authentication mechanism. See the next section for a detaileddiscussion of 802.1X.
TKIP technologies
TKIP provides data encryption enhancements including a per-packet key mixing function, aMessage Integrity Check (MIC) called Michael, an extended Initialization Vector (IV) withsequencing rules, and a re-keying mechanism. In a nutshell, TKIP addresses WEP's limitationsby having dynamic keys coupled with a much longer IV (which means that the chances ofreusing the same IV within a period of time are reduced).
So how does WPA differ from WEP? Table 4-1 shows the quick comparison.
Table 4-1. Comparing WPA to WEP

WPA WEP
Key length 128-bit 40-bit to 232-bit
Key typeDynamic key; per-user, per-session,per-packet keys
Static shared key; used by everyone inthe network
Keydistribution
Automatic key distribution Each user must type in the key
Authentication Uses 802.1X and EAP Uses WEP key for authentication; flawed
WPA and Windows XP
Microsoft has recently released the WPA Wireless Security Update in Windows XP(http://support.microsoft.com/?kbid=815485).
The features of the security update are:
802.1X authentication
WPA key management
TKIP
Michael
AES support
However, before you start to use WPA, verify that your wireless card and access pointboth support it. Check with your vendor to see whether WPA can be supported viafirmware upgrades.
4.5.3 802.1X Authentication
The 802.1X specification is a port-based network access control mechanism: when a client isauthenticated, the port is granted access; if not, access to the port is denied. Although 802.1X wasoriginally designed for Ethernet networks, it can be applied to wireless networks as well.
In a wireless LAN, a port is simply the connection between a client and anaccess point.
This is how 802.1X works (see Figure 4-22):
The Supplicant (the client that wants to access a network resource) connects to the1.
2.

Authenticator (whose resource is needed).1.
The Authenticator asks for credentials from the Supplicant and passes the credentials to theAuthenticating Server.
2.
The Authenticating Server authenticates the Supplicant on behalf of the Authenticator.3.
If the Supplicant is authenticated, access is then granted.4.
Figure 4-22. Authenticating a Supplicant in 802.1X
Note that before the authentication is performed, all the communications go through an uncontrolledport . After authentication, the controlled port is used.
For the Authentication Server to authenticate the Supplicant, the Point-to-Point Protocol ExtensibleAuthentication Protocol (EAP) is used. EAP supports multiple authentication mechanisms and wasoriginally developed for PPP.
In a wireless network, a wireless client needs to connect to an access point; in this case, the wirelessaccess point is the Authenticator. The Authenticator can maintain a database of users and theirrespective passwords. However, this is a huge administrative task, especially in a large network. Soan access point can be connected to a RADIUS (Remote Authentication Dial-In User Service) server,which will maintain the database of users and perform authentication on behalf of the access point.This is as shown in Figure 4-23.
Figure 4-23. Using 802.1X authentication in a wireless network
Using a RADIUS server takes care of the authentication aspect of security only. What aboutconfidentiality? Packets traveling between the wireless clients and the access point must be encryptedto ensure confidentiality.
When a client is validated at the RADIUS server, an authentication key is transmitted to the accesspoint. (This key is encrypted; only the access point can decrypt it.) The access point then decrypts

the key and uses it to create a new key specific to that wireless client. That key is sent to the wirelessclient, where it's used to encrypt the master global authentication key to the wireless client. Toaddress WEP's shortcoming of a fixed key, the access point will generate a new master authenticationkey at regular intervals.
802.1X's Support in Access Points
At the time of this writing, support of 802.1X is mostly limited to enterprise-level accesspoints. However, if you are lucky, your access point vendor may have firmware that allowsyour access point to be upgraded to support 802.1X authentication. The D-Link 900AP+supports 802.1X after a firmware upgrade. Best of all, it is a consumer access point that isaffordable (under $100 in the U.S.).
4.5.3.1 Types of EAP
There are many variants of Extensible Authentication Protocol (EAP). Here are some that you maycome across in wireless security literature:
EAP-MD5
EAP-MD5 uses the challenge/response method to allow a server to authenticate a user using ausername and password. MD5 does not provide mutual authentication and is vulnerable to anoffline dictionary attack.
EAP-TLS (EAP-Transport Layer Security)
EAP-TLS is based on X.509 (an ITU standard specifying the contents of a digital certificate)certificates. It is currently the most commonly used EAP type for securing wireless networks.However, EAP-TLS requires the use of PKI (Public Key Infrastructure), which is not feasible tobe implemented on small networks.
PEAP (Protected EAP)
To counter the complexity of using EAP-TLS, PEAP was proposed as an alternative. PEAP uses aserver-side certificate to allow the authentication of the server. It creates an EAP-TLS tunneland then uses other authentication methods over the tunnel. EAP methods such as MD5, MS-CHAP, and MS-CHAP v2 are supported. PEAP was proposed as an IETF standard by Microsoft,Cisco, and RSA.
EAP-TTLS (EAP Tunneled TLS)

EAP-TTLS is similar to PEAP. It creates a tunnel between the user and the RADIUS server. Itsupports EAP methods such as MD5, MS-CHAP, and MS-CHAP v2.
LEAP (Lightweight EAP)
LEAP is Cisco's proprietary version of EAP, which works mostly with Cisco's wireless cards,RADIUS servers, and access points.
MS-CHAP v2 (Microsoft Challenge-Handshake Authentication Protocol Version 2)
Originally designed by Microsoft as a PPP authentication protocol, MS-CHAP v2 is a password-based, challenge-response, mutual authentication protocol that uses the Message Digest 4(MD4) and Data Encryption Standard (DES) algorithms to encrypt responses. MS-CHAP v2 isnow an EAP type in Windows XP.
Windows XP (Service Pack 1) supports PEAP and EAP-TLS. Prior to Service Pack 1, EAP-TLS and EAP-MD5 are supported. Figure 4-24 shows the various layers of EAP and their relationships to 802.1X.
Figure 4-24. The variants of EAP and their relationships to 802.1X and802.11
4.5.4 Using 802.1X in Windows XP
This section explains how to implement 802.1X authentication using PEAP and MS-CHAP v2authentication methods in Windows XP. Using PEAP with MS-CHAP v2 authentication allows users tobe authenticated using a username and password. This is much easier to administer than PEAP withEAP-TLS, which requires certificates to be installed on a user's computer. Also, PEAP with MS-CHAPv2 requires only a server certificate to be installed.
If you are only interested in knowing how to log in to an 802.1X protectedwireless network, you can skip to Section 4.5.4.4, later in this chapter.
4.5.4.1 Configuring the RADIUS server (IAS)
For this section, I assume you have the following:

Windows 2000 Server SP3 or greater acting as a Domain controller using Active Directory.
Microsoft 802.1X Authentication Client for Windows 2000(http://support.microsoft.com/default.aspx?scid=kb;en-us;313664) installed on your computer.Although the word "client" appears in the name, this is a required component for the server.
The Microsoft 802.1X Authentication Client for Windows 2000 contains supportfor PEAP, which is required if you specify the use of PEAP on the client side (thisis supported in Windows XP if you install the "Windows XP Support Patch forWireless Protected Access").
Also, PEAP requires Certificate Services to be installed on your Windows 2000.You can install Certificate Services by going to the Control Panel and usingAdd/Remove Programs, then selecting Add/Remove Windows Components.
First, you must configure the RADIUS server (Internet Authentication Server) on the Windows 2000Domain Controller:
Launch Internet Authentication Service (IAS) by clicking on Start Programs Administrative Tools Internet Authentication Service (see Figure 4-25).
Figure 4-25. Registering IAS with Active Directory
1.
Right-click on Internet Authentication Service (local) and select "Register Service in ActiveDirectory".
2.
Right-click on Clients and select "New Client".3.
Give a name to your client, say "AP" (which is your access point, the Authenticator).4.
Enter the IP address of the access point and check "Client must always send the signatureattribute in the request". Enter a secret key to be known by both the access point and IAS.
5.
Right-click on Remote Access Policies and select "New Remote Access Policy".6.
7.
8.

6.
Give a name to your new policy, such as "Wireless access". Click Next.7.
Add an attribute. Select the "Day-And-Time-Restriction" attribute and click Add.8.
Choose the time that you want the user to be allowed access to the network. Select all availabletime slots, click Permitted, and click OK. Click Next.
9.
Select the "Grant remote access permission" option to allow the remote user to log on if he isauthenticated. Click Next.
10.
Click on Edit Profile... to choose the authentication type.11.
Click the Authentication tab and select the options as shown in Figure 4-26. Click OK.
Figure 4-26. Selecting the EAP type to be used in IAS
12.
When prompted to read the help files on the EAP types checked, click No.13.
Click Finish to complete the setup.14.
4.5.4.2 Configuring Active Directory
Once the RADIUS server is configured, you need to give access permission to users in ActiveDirectory.
Click on Start Programs Administrative Tools Active Directory Users and1.
2.

Computers.1.
Click the Users item and double-click on the username that you want to grant wireless accessto.
2.
Select the Dial-in tab and select the Allow access option. Click OK.3.
4.5.4.3 Configuring the access point
Most consumer access points available today do not support 802.1X authentication. You would needto buy enterprise-level access points in order to use 802.1X authentication. Fortunately, a fewconsumer access points, such as the D-Link 900AP+, support 802.1X via a firmware download. If youown the D-Link 900AP+ access point, be sure to check out D-Link's web site to download the latestfirmware. (If you purchased your access point after mid-2003, it may already have the firmware with802.1X support).
You can administer the DWL-900AP+ access point using either a web-based utility or the providedAccess Point Manager (see Figure 4-27). You can access the Access Point Manager by clicking Start
Programs D-Link Airplus Access Point D-Link AirPlus Manager.
Figure 4-27. The Access Point Manager
To configure the DWL-900AP+ for 802.1X authentication, click on the 802.1X Setting link in the

Access Point Manager (see Figure 4-27).
Turn on the 802.1X Function checkbox.1.
Select the length of the key and enter the information for the RADIUS server that you set up inthe previous section.
2.
You need to enable WEP in order for 802.1X authentication to work.
The port number for the RADIUS server is 1812. You can specify up to two RADIUS servers.Also, enter the shared secret key that you entered in IAS.
3.
4.5.4.4 Configuring the client
The last stage is configuring the client. This is also the stage for readers who are trying to log on to anetwork that uses 802.1X authentication.
The test computer that I used for this book was updated with the Windows XPSupport Patch for Wireless Protected Access (seehttp://support.microsoft.com/?kbid=815485). If you have not installed thepatch, some of the screen elements may differ slightly.
Right-click on the Wireless Network Connection icon located in the Tray and select "ViewAvailable Wireless Networks" (see Figure 4-28).
Figure 4-28. Viewing the available wireless networks
1.
Select the SSID of the network that you wish to connect to. In my case, default is the networkthat implements 802.1X authentication. Select default and enter the network (WEP) key for thisnetwork. Turn on the checkbox "Enable IEEE 802.1X authentication for this network" (see Figure4-29).
Figure 4-29. Selecting the default wireless network
2.

Click on Advanced... to configure the settings for the selected network (see Figure 4-30).
Figure 4-30. Configuring the default wireless network for 802.1Xauthentication
3.
Under the Available networks section, select default and click Configure.4.
Click the Authentication tab (see Figure 4-31).5.

Figure 4-31. Choosing PEAP as the EAP type
5.
For EAP type, select Protected EAP (PEAP) and click Properties.6.
Select Secured password (EAP-MSCHAP v2) as the authentication method (see Figure 4-32).Click Configure....
7.
Figure 4-32. Choosing the authentication method

Fast Reconnect allows PEAP to quickly resume a TLS session. It minimizes theconnection delay in wireless networks when a wireless device roams from oneaccess point to another.
Turn off the checkbox "Automatically use my Windows logon name and password (and domain ifany)" (see Figure 4-33). Click OK three times to complete the settings.
Figure 4-33. Disabling automatic Windows logon
8.
Finally, double-click the Wireless Network Connection icon located in the Tray again and connectto the default network. You will be asked to supply your credentials to log on to the network(see Figure 4-34).
Figure 4-34. Prompting for the user credentials
9.
Enter your username and password; if you are a valid user (see Figure 4-35), you will beconnected to the network.
10.
Figure 4-35. Logging in to the RADIUS server

To confirm that you are connected to the network, launch your web browser and see if you canconnect to the Internet. You may also use the ipconfig /all command to see whether you are
assigned an IP address.
[ Team LiB ]

[ Team LiB ]
4.6 Are 802.11 Networks Really Secure?
One of the problems with wireless security is that you don't need expensive tools to break into awireless network. All you need in your toolbox is a computer, a wireless card, some suitable software,and perhaps a good antenna for receiving wireless signals.
The following is a list of software that you can use to detect wireless networks, sniff wireless packetsin transit, and much more. These tools have numerous legitimate uses, such as detectingunauthorized access points, intrusion detection, network traffic analysis, and debugging networkedapplications such as a web server.
NetStumbler (http://www.netstumbler.com/)
NetStumbler is a free application that allows you to detect the presence of wireless networks.Using NetStumbler, you can obtain information about a particular access point, the SSID used,whether WEP is enabled, and so on. Coupled with a GPS, you can even pinpoint the location ofan access point. NetStumbler is often used for Wardriving, site surveys, and detecting rogueaccess points.
AiroPeek NX (http://www.airopeek.com/)
AiroPeek is a wireless LAN analyzer from WildPackets. It is an extremely powerful wireless LANanalyzer that most security professionals use (be forewarned, this package costs $3499!).AiroPeek is able to sniff raw wireless packets transmitted through the air, which is whyprotecting your wireless network with 802.1X, a VPN, SSH, or even WEP is important. Datapackets that are not encrypted can easily be sniffed by AiroPeek.
Ethereal (http://www.ethereal.com/)
Ethereal is a free network protocol analyzer for Unix and Windows computers. It is similar toAiroPeek in that it allows you to sniff wireless (and wired) packets in transit. Many networkprotocols are susceptible to sniffing in this manner. For example, Telnet and FTP both sendpasswords as plaintext (for secure alternatives, see Section 4.3, earlier in this chapter). Figure4-36 shows an Ethereal session capturing an FTP password.
AirSnort (http://airsnort.shmoo.com/)
AirSnort is a wireless LAN analyzer with the capability of recovering WEP keys. It does so bypassively collecting packets that have been transmitted. After collecting enough packets,AirSnort is able to recover the WEP key.

All this software works in Windows XP, except for AirSnort, which runs on Linux. A Windows version isin the works, but for now, only Linux is supported.
Figure 4-36. Capturing a password with Ethereal
4.6.1 Common Security Features on Access Points
Most wireless access points provide some degree of protection against unauthorized access to thenetwork. Here are a few common features found in most consumer access points:
Disabling SSID broadcast
Disabling SSID broadcast causes the access point to suppress the broadcast of SSIDinformation to wireless clients. In order to join the wireless network, a wireless client needs tomanually specify the SSID that the network uses, or else it will not be able to associate withthe access point.
MAC address filtering
Most access points support MAC address filtering by allowing only network cards with thespecified MAC addresses to be associated with them. In a small network, this is feasible but itbecomes administratively prohibitive in a large network. Note that MAC address filteringauthenticates a device, not a user.
IP filtering
IP filtering works just like MAC address filtering, but instead filters computers based on IP

addresses.
Network Address Translation (NAT)
NAT allows multiple computers to connect to the Internet by sharing a single public IP address.One side effect of this is that computers within the internal network are shielded against theoutside parties, since the IP addresses used are only valid within the network.
802.1X
As 802.1X gains acceptance, expect to see support of 802.1X in consumer access points, notjust enterprise-level access points. Check with your vendor to see if your access point supports802.1X authentication (or can be upgraded to do so via a firmware upgrade).
In the following sections, I discuss some of the common techniques used for securing wirelessnetworks, and their effectiveness.
4.6.1.1 MAC address filtering
While MAC address filtering can prevent unauthorized network devices from gaining entry to anetwork, there are two problems with it:
It is the device that is authenticated in MAC address filtering, not the user. Hence if a user losesthe network card, another user who picks up the network card is able to gain access to thenetwork without any problem.
MAC addresses can easily be spoofed. Using AiroPeek, it is easy to impersonate the MACaddress of another device. Also, if you are a little adventurous, you can try changing the MACaddress of your wireless card manually in Windows XP. Visithttp://www.klcconsulting.net/Change_MAC_w2k.htm for more information.
4.6.1.2 Disabling SSID broadcast
Disabling SSID broadcast prevents uninvited users from accessing the network. However, there aretwo fundamental flaws with this approach:
It is not difficult to guess the SSID of a network. Most users deploy wireless networks using thedefault SSID that comes with the access point. It is too easy to guess the SSID of a wirelessnetwork based on hints like the brand of the access point, or from clues like the thrown-awaybox of the access point.
When you disable SSID broadcast, the access point does not broadcast the SSID information.However, as soon as one user connects to the access point using the known SSID, it is possibleto sniff the SSID that is transmitted in the network. Hence this method is only secure if there is

no user on the network; but as soon as one user is on the network, the SSID is no longer asecret.
4.6.1.3 Using WEP
As we have discussed, WEP has some fundamental flaws that make it prone to hackers. For example,AirSnort can recover the WEP key after collecting a sizeable number of packets from the wirelessnetwork.
4.6.1.4 Transferring in plaintext
Even though WEP is not secure, it is still advisable to use it to at least make it somewhat difficult tobreach your network. Site surveys will often show that the majority of wireless networks do not useWEP! Using AiroPeek or Ethereal, it is very easy to examine the data transmitted across the air.
[ Team LiB ]

[ Team LiB ]
Chapter 5. Configuring Wireless AccessPointsSo far you have been learning about how wireless networks work and how to connect to one. In thischapter, I show you how to deploy a wireless network yourself. I illustrate this using two differentwireless access points and considering how they might be used in two different environments-one athome and another in the office. Of course, many home users will have needs that are closer to thatof an office, and some small offices may have needs closer to that of a home user. For the purposesof these examples, the home environment is assumed to have consumer-level broadband access,while the office environment is assumed to have a more extensive wired network in place.
[ Team LiB ]

[ Team LiB ]
5.1 Setting Up a Wireless Network
The cost for setting up a wireless network has, over the years, been lowered substantially. Today,you can easily set up a wireless network at home for about $200. For that amount, you can get awireless access point, a wireless PC card (for your notebook), and a USB wireless adapter (for yourdesktop).
In this section, I am assuming you want your wireless users to access theInternet. If your aim is to simply connect two machines wirelessly, you do notneed a DSL/ADSL modem and wireless access point. All you need is a wirelessadapter or card for each computer. See Section 5.5 later in this chapter.
To set up your own wireless network, you need the following:
A DSL/ADSL or cable modem with an Ethernet connector (you may also have satellite Internetor a T1 line)
A wireless access point with router functionality
A wireless access card or adapter for each machine that wants to get on the wireless network
Some ISPs, in an attempt to discourage multiple computers from sharing theInternet connection, will bundle a USB-port modem when you sign up for thebroadband package. In order to connect a router to your ISP, you'll need topurchase a separate modem with an Ethernet port that is compatible with yourISP. Check with your ISP to obtain a list of compatible modems.
A typical wireless home/office setup is shown in Figure 5-1 (note that the PC with Ethernetconnection is optional).
Figure 5-1. Architecture for a wireless network

5.1.1 Wireless Access Points
A wireless access point is a wireless device that routes traffic in a wireless network. It is usuallyattached to an existing wired network, or to a Wide Area Network (WAN) connection such as a cableor DSL/ADSL modem. Basically, the purpose of the wireless access point is to provide a centralizedlocation for exchanging wireless traffic sent by wireless devices. Wireless access points generallycome in two flavors:
Pure wireless access point
Wireless access point with router functionality
5.1.1.1 Pure wireless access points
A pure wireless access point simply comes with an Ethernet connector for connecting to a wirednetwork. This is suitable for situations where you already have an established network and simplywant to enable wireless access to it. It relies on your network to provide DHCP (Dynamic HostConfiguration Protocol - a protocol that assigns IP addresses to clients) services, and hence is notsuitable in environments in which a single IP address is usually allocated, such as in a home network.A pure wireless access point is little more than a virtual wire that connects your unwired computersto whatever networking hardware you've plugged the access point into.
Figure 5-2 shows the Linksys WAP11 Wireless Access Point.
Figure 5-2. The Linksys WAP11 Wireless Access Point (802.11b) (photocourtesy of Linksys)

If you're connecting an access point to an ISP, you should check with your ISPto see if it will allocate more than one IP address. If only one IP address isallocated, you will need a router with DHCP services to allow multiplecomputers to connect to the Internet. In such a configuration, your router willgrab that one IP address and use Network Address Translation (NAT) to sharethat address with the rest of your network (see DHCP and NAT, later in thischapter). Even if your ISP offers more than one IP address, you should go witha wireless access point that has firewall capabilities, which nearly always gohand-in-hand with router capabilities. You will only pay a little bit more for arouter, but the peace of mind that comes with a firewall is well worth it.
Figure 5-3 shows the back of the Linksys WAP11.
Figure 5-3. The back of a wireless access point (photo courtesy ofLinksys)
At the moment, there are three prevailing wireless standards: 802.11b, 802.11a, and 802.11g (seeChapter 2). Figure 5-4 shows the D-Link DWL-6000AP Multimode Wireless Access Point that supportsboth the 802.11a and 802.11b wireless standards.
Figure 5-4. The D-Link AirPro DWL-6000AP Multimode Wireless AccessPoint (802.11a and 802.11b)

Besides the 802.11a wireless access points, vendors are also launching new 802.11g wireless accesspoints based on the 802.11g specifications. Figure 5-5 shows the Linksys WAP54G Wireless AccessPoint that supports both the 802.11b and 802.11g wireless standards.
Figure 5-5. The Linksys WAP54G Wireless Access Point (802.11b and802.11g) (photo courtesy of Linksys)
5.1.1.2 Wireless access points with router
A wireless access point with router functionality, on the other hand, provides routing services inaddition to being a wireless access point. It comes with a port for connecting to the WAN, and it alsousually comes with a multiport switch for wired connections (see Figure 5-6). Most routers supportDHCP and come with NAT services (see DHCP and NAT later in this chapter for more information). Assuch, a wireless access point with router functionality is useful in situations in which only a single IPaddress is allocated, or in which a router's firewall services are needed. Most DSL/ADSL and cableconnections are allocated a single IP address, effectively enabling only a single machine to connect atany one time. With a wireless router, multiple computers can connect to the Internet simultaneously.
Figure 5-6. The back of a wireless access point with router functionality

(photo courtesy of Linksys)
Figure 5-7 shows the Linksys BEFW11SE Wireless Access Point with a 4-port switch.
Figure 5-7. The Linksys BEFW11SE Wireless Access Point with 4-portswitch (802.11b) (photo courtesy of Linksys)
For 802.11g, D-Link has the DI-624, as shown in Figure 5-8.
Figure 5-8. The D-Link DI-624 AirPlus Extreme G Wireless Access Pointwith Router (802.11b and 802.11g)

DHCP and NAT
DHCP (Dynamic Host Configuration Protocol) automatically assigns an IP address tocomputers when they are logged on to the network. With DHCP, each machine is given anIP address (with an expiration date and time) during the time that they are on thenetwork. When they are logged off the network, the IP address is reused and reassignedto another computer.
Most home networks (DSL/ADSL or cable access) are usually given a single IP address,which means that only one machine is able to connect to the Internet at any one time.However, multiple machines can connect to the Internet using NAT (Network AddressTranslation). Most routers support NAT; the router is assigned that single IP address, andcomputers connected to the router are assigned IP addresses that are only valid within thelocal network (and are unusable on the Internet at large). For packets that are sent outinto the Internet, the router translates these local IP addresses into the real IP addressthat the router holds. The reverse happens when a packet from the Internet is sent to amachine on the local network. The NAT looks into its address translation table and maps itinto the local IP address used by the computer on the local network.
In summary, DHCP allocates dynamic IP addresses to computers connected to the routerwhile NAT allows all these computers with different IP addresses to communicate with theexternal network via a single IP address.
5.1.1.3 Setting up multiple access points
If you have a traditional wired network in your office or home environment, you can enable wirelessaccess by installing a wireless access point in your network. For a physically large access area, youcan use multiple access points. Figure 5-9 shows three wireless access points connected to a wirednetwork.
Figure 5-9. Adding wireless access points to your wired network

These wireless access points might all be configured with the same Service Set Identifier (SSID) orwith different SSIDs. If their ranges overlap with one another's, you may get a more reliable signalby assigning each one to a different channel (see Section 2.2.3 in Chapter 2 and Section 3.2.1.3 inChapter 3).
If users need to roam from one access point to another, it is recommendedthat all the access points be configured with the same SSID. If not, the usermay not be able to move from one access point to another unless theyconfigure their computers to accept different SSIDs. Windows XP Wireless ZeroConfiguration in Chapter 2 explains how to configure your computer to acceptdifferent SSIDs.
In general, Windows XP automatically detects the SSIDs of the wirelessnetworks, unless the access point turns off SSID broadcast. Please refer toChapter 4 for more information on turning off SSID broadcast.
The Vivato Switch
Instead of using multiple access points to wirelessly enable your office, you could just plugin a Vivato indoor wireless switch to your existing network. The Vivato switch is a flat-panel wireless switch that mounts on a wall. It contains a collection of antennas that shootnarrow, focused beams at wireless clients. Unlike other access points, Vivato claims to beable to give each wireless client maximum throughput, and a single Vivato switch cancover the entire office floor, penetrating glass buildings and obstacles. But all these neatfeatures come with a hefty price tag: U.S. $8995.
Visit http://www.vivato.net/ for more information.
5.1.1.4 Using the wireless access point as a repeater
Every wireless access point has a limited operating range. To extend the effective range of a wirelessnetwork, you can use a wireless repeater. There aren't many standalone wireless repeaters in themarket, but some wireless access points double as a repeater. Figure 5-10 show how a wirelessrepeater can extend the effective range of a wireless network.
Figure 5-10. Using a wireless repeater to extend the range of a wirelessnetwork

You need to use compatible wireless access points with the repeater you areusing. In other words, you would most likely buy the equipment from the samevendors.
A wireless repeater does not need to connect to any part of the wired network. Basically it receives asignal from a wireless access point and retransmits it, essentially extending the range of the wirelessnetwork.
The D-Link AirPlus DWL-900AP+ Wireless Access Point is one such access point that includes arepeating function (see Figure 5-11).
Figure 5-11. The D-Link AirPlus DWL-900AP+ Wireless Access Point withrepeating function

5.1.1.5 Using the wireless access point as a bridge
Another use of wireless access points is to bridge devices to connect two wired networks. Figure 5-12shows this scenario.
Figure 5-12. Using access points as wireless bridging devices
Two wired networks may be physically separated but can be linked using two wireless access pointsoperating in bridge mode. The D-Link DWL-900AP+ supports this bridge mode.
[ Team LiB ]

[ Team LiB ]
5.2 Case Study: The Home Network
Figure 5-13 shows the Motorola SB4200 cable modem popularly used to connect to residentialbroadband services. Many users have ADSL/DSL modems instead of cable; some users even havesatellite Internet access. Regardless of whether you use cable, ADSL/DSL, or satellite, you shouldhave a device (such as the cable modem shown in Figure 5-13) with flashing lights and an Ethernetport that provides you with Internet access. You may have bought this device in a computer store ordirectly from your ISP, or perhaps you rent it from your ISP.
Figure 5-13. The Motorola SB4200 cable modem
Some ISPs may have supplied you with a device that uses a USB connection toyour computer instead of Ethernet, or even a card that was installed insideyour computer. To connect your broadband service to a wireless network, you'llneed an external device with an Ethernet port. You may need to contact yourISP's technical support, explain what you are trying to do (give them thesimplest version of the story: you're trying to connect a wireless access pointto your broadband service), and request the correct device. If your ISP refusesto help or doesn't understand your request, it is time to find a new ISP.
A common limit of broadband connections is that only one computer can be connected to the Internetat any one time. As discussed in Chapter 2, there are many ways the ISP can impose the restriction,such as MAC address locking, or issuing a single IP address to the cable modem. So to enablemultiple computers to wirelessly access the Internet, you could use a wireless router. (See DHCP andNAT earlier in this chapter for information on how DHCP and NAT features found in wireless routerswork around this limitation.) One such wireless router is the Linksys BEFW11S4 802.11b WirelessAccess Point with 4-port switch (see Figure 5-14).

Figure 5-14. The Linksys BEFW11SE Wireless Access Point with 4-portswitch (802.11b)
In most cases, this limit is a practical limitation dictated by the scarcity of IPaddresses. Most ISPs permit you to use a router to get around this restriction,and some will happily sell you a router and may also send a technician to yourhome to set it up (often for an extra fee, but this is sometimes included withthe purchase of a router). However, in some cases, your ISP's Terms of Service(TOS) may contractually limit you to one computer, in which case they willtypically charge you a nominal fee for each additional computer to which youconnect. If so, then using a router is a violation of the TOS. This was morecommon during the early days of broadband; nowadays, most ISPs don't carehow many computers you connect, as long as they are your computers andyou aren't sharing your connection with the rest of your neighborhood.
Figure 5-15 shows one possible configuration for a home network.
Figure 5-15. The configuration of a home network
See Section 5.4, later in this chapter, for information on setting up and configuring the BEFW11S4.


[ Team LiB ]
5.3 Case Study: The Office Network
Your office might have a router that allows your computers to access the network and Internet. Youwould most likely be using DHCP to obtain IP addresses for all the computers. (If your office doesn'thave any of this, perhaps you are starting from scratch - in that case, your office will resemble ahome network in that your wireless access point is your first foray into networking.) In this section, Idiscuss the issues involved with adding a wireless network to an office environment using the D-LinkDI-714P+ Wireless Access Point as an example.
Rogue Access Points
Be sure to check with your administrator before you connect your access point to yournetwork switch. End users who deploy wireless networks without the permission of theadministrator pose a security risk, since wireless networks are generally not adequatelyprotected. These unauthorized access points are known as rogue access points.
Also, do not connect an access point to a hub; connect it to a switch instead. Hubs arebroadcast devices, and so all the packets received by a port in a hub will be broadcast tothe wireless segment if an access point is connected to a hub.
The D-Link DI-714P+ (see Figure 5-16) is an enhanced 802.11b wireless access point with routerfunctionality. It comes with AirPlus technology that allows up to 22 Mbps of data transfer rate if usedtogether with D-Link's AirPlus wireless card (such as the D-Link DWL-650+). Besides this, it alsoincludes a printer port for connecting a printer, so the access point can also act as a print server.
Figure 5-16. The D-Link DI-714P+ Wireless Router

Figure 5-17 shows the network configuration.
Figure 5-17. The configuration of an office network
As shown in Figure 5-17, the DI-714P+'s WAN port is plugged into the switch. Your desktop systemscan be connected either to the switch or the LAN ports of the DI-714P+ (see Figure 5-18).
Figure 5-18. The back panel of the DI-714P+
[ Team LiB ]

[ Team LiB ]
5.4 Configuring an Access Point
To connect your access point to the Internet, use a straight-through Ethernet cable to plug theaccess point's WAN port into your cable modem, DSL modem, router, or whatever piece of equipmentin your home or office that is responsible for providing Internet access. After you plug it in, turn onthe access point's switch (assuming it has one - some access points can only be powered down byunplugging them), and it will power up, perform its initialization, and then request a DHCP addressfrom the cable or DSL modem or router.
You may need to reboot your cable or ADSL/DSL modem in order for theaccess point to obtain an IP address. This is especially important in caseswhere the modem was initially connected directly to the PC and may havelocked itself to the MAC address of the PC (see Locking MAC Addresses inChapter 2).
5.4.1 Web-Based Configuration
To configure the wireless router, connect your computer to one of the wireless router's LAN portsusing a straight-through Ethernet cable (if your computer has an autosensing Ethernet port, you canuse either a straight-through or crossover cable). For the Linksys BEFW11S4, load the following URLin your web browser: http://192.168.1.1/. For the D-Link DI-714P+, use http://192.168.0.1/. Whenprompted for a username and password, use "admin" as your username and leave the password fieldempty.
The default IP address, username, and password may be different for differentaccess point models and manufacturers. Check your access point manual forthe correct defaults.
Bypassing a Proxy Server
If you use a proxy server to connect to the Web, ensure that you bypass the router's IPaddress or you may not be able to connect to the web-based configuration utility.
To do so, go to Internet Explorer and follow these steps:
Click on Tools Internet Options...1.
Select the Connection tab and click on LAN settings...2.
Check the option "Bypass proxy server for local addresses"3.

Figure 5-19 shows the web-based configuration utility of the BEFW11S4.
Figure 5-19. The BEFW11S4 configuration utility
Figure 5-20 shows the web-based configuration utility of the DI-714P+. There are several tabsdisplayed horizontally: Home, Advanced, Tools, Status, and Help. Corresponding to each tab arevarious functions displayed vertically. For example, in the Home tab there are five functions: Wizard,Wireless, WAN, LAN, and DHCP.
Figure 5-20. The configuration utility of the DI-714P+

5.4.1.1 DI-714P+ setup wizard
To quickly set up the DI-714P+, I suggest you run the wizard. Click on the Run Wizard button andtake the following steps:
Change the password of the DI-714P+ (see Figure 5-21). Failing to change the default emptypassword will allow unauthorized users to access the router and make modifications thatcompromise the security of the network.
Figure 5-21. Changing the password of the DI-714P+
1.
Choose the time zone settings for your router.2.
Select the Internet connection type (see Figure 5-22). Choose Dynamic IP Address if your wirednetwork supports DHCP. In a case where you are allocated a fixed IP address, choose Static IP
3.

2.
Address. Most ADSL/DSL users will choose "PPP over Ethernet".
Figure 5-22. Selecting the Internet connection type
3.
Depending on the connection type you have selected in Step 3, you will be asked to enterinformation pertaining to the selected connection type. Figure 5-23 shows the window displayedif you select Dynamic IP Address in Step 3. You can clone your network card's MAC addresshere.
4.
Figure 5-23. Setting the MAC address of the DI-714P+

Please refer to Chapter 2 for an explanation of MAC address cloning.
Enter an SSID for your network. You can also set a channel to use here (see Figure 5-24). Ifyou have multiple access points in a network, set them to use nonoverlapping channels (seeChapter 2 for more information on nonoverlapping channels). For WEP encryption, you havethree choices: 64 bits, 128 bits, or 256 bits. Depending on the strength of the encryption, youwould need to enter 10, 26, or 58 hexadecimal (0 to 9, A to F, or a to f) characters.
5.
Figure 5-24. Using WEP encryption
Chapter 4 discusses WEP keys in more detail.
That's it! Restart (switch off and switch on the router) the DI-714P+ for the new settings to takeeffect. Now, use an Ethernet cable and connect the WAN port of the DI-714P+ to the switch (ordirectly to the customer premise equipment supplied by your ISP, in case the DI-714P+ is the onlyswitch you plan to use). You should now be able to use your computer with a wireless card (seeChapter 2) to connect to the Internet through the DI-714P+.
The configuration screen for different access point models, as well as access points from othermanufacturers, will vary somewhat. The remaining sections explain how to accomplish common taskswith the web-based configuration.

5.4.2 Setting the SSID
The SSID (Service Set Identifier) gives your access point a name (see Section 2.2.2 in Chapter 2). Ifyou intend to let strangers connect to your access point, I suggest you give your SSID a friendlyname such as "welcome." (If you don't, be sure to see Section 5.4.4 and Section 5.4.11 in thischapter).
To change the SSID of the BEFW11S4, click on the Setup tab, enter the new SSID, and select theappropriate channel number. To change the SSID of the DI-714P+, click on the Home tab and selectthe Wireless option.
5.4.3 Setting the Channel Number
If you have multiple access points in close proximity to one another, you should set them tobroadcast on different channels. To change the channel number of the BEFW11S4, click on the Setuptab, enter the new SSID, and select the appropriate channel number. To change the SSID of the DI-714P+, click on the Home tab and select the Wireless option.
5.4.4 Enabling WEP
You can also enable WEP encryption to secure your wireless network. If you use WEP, users will notbe able to connect to your network unless they know (or can obtain) the WEP key. Chapter 4 goesinto more detail about using WEP (and stronger systems) to secure your wireless network.
To enable WEP on the BEFW11S4 (64- and 128-bit keys are supported), click on the WEP Key Settingbutton. You can specify up to four keys for WEP. You can also enter a passphrase to get the router togenerate the four keys required. To enable WEP on the DI-714P+ (64-, 128-, and 256-bit WEP keysare supported), click the Home tab and select the Wireless option. As with the BEFW11S4, you canspecify up to four keys.
The DI-714P+ does not support generating WEP keys using a passphrase.
5.4.5 Changing the Access Point's Default IP Address
By default, when a wireless client connects to the access point, it is assigned an IP address by theaccess point. The default LAN IP address for the BEFW11S4 itself is 192.168.1.1. The default IPaddress for the DI-714P+ is 192.168.0.1.

A wireless router has two IP addresses - one for LAN (Local Area Network)access and one for WAN (Wide Area Network) access. The LAN IP address (forexample, 192.168.1.1) is used internally within your home or office wirelessnetwork. The WAN address (for example, 202.156.1.35) is for communicatingwith the outside world (in this case, assigned by your ISP).
You can modify the default LAN IP address of the BEFW11S4 by clicking the Setup tab and selectingthe LAN IP Address option. You can modify the default IP address of the DI-714P+ by clicking on theHome tab and selecting the LAN option.
When the default IP address is changed, the range of allocatable IP addresses also changes. To learnhow to change the range, see Section 5.4.7.
Be sure to enable the DHCP server on the wireless router if your ISP allocatesonly a single IP address to you. This allows multiple wireless users to connectto the Internet.
Forgotten the IP Address of Your Wireless Router?
Suppose you have changed the LAN IP address of your wireless router and a month lateryou need to configure the router again. But, what is the IP address of the router? If you'veforgotten, there are two ways to solve this problem:
Most wireless routers come with a reset button to restore the router back to itsdefault factory settings. Doing so resets the router back to its original default IPaddress (which you can look up in the manual). But doing so also erases all the othersettings. This is especially painful if you have entered the MAC addresses of all thenetwork cards used for MAC address filtering. Note that some routers do have abackup utility to allow you to back up your settings.
1.
Use the ipconfig /all command to see the default gateway IP address (wireless
router). You will see something like the following. The Default Gateway is then yourwireless router.
2.
Ethernet adapter Wireless Network Connection: Connection-specific DNS Suffix . : Description . . . . . . . . . . . : Cisco Systems 350 Series Wireless LAN Adapter Physical Address. . . . . . . . . : 00-40-96-40-7E-F9 Dhcp Enabled. . . . . . . . . . . : Yes Autoconfiguration Enabled . . . . : Yes IP Address. . . . . . . . . . . . : 192.168.2.101 Subnet Mask . . . . . . . . . . . : 255.255.255.0 Default Gateway . . . . . . . . . : 192.168.2.1 DHCP Server . . . . . . . . . . . : 192.168.2.1

DNS Servers . . . . . . . . . . . : 202.156.1.58 202.156.1.48 Lease Obtained. . . . . . . . . . : Tuesday, May 06, 2003 7:23:33 PM Lease Expires . . . . . . . . . . : Wednesday, May 07, 2003 7:23:33 PM
But what if you have forgotten your password to the router? Well, then the first option isthe only solution!
5.4.6 Setting the WAN IP Address
The BEFW11S4 supports five ways to obtain a WAN IP address:
Obtain an IP address automatically
Under this configuration, your ISP assigns you a different IP address periodically using DHCP.
Static IP
With this configuration, your ISP gives you a static IP address. This is often found withcommercial and hobbyist accounts where there's a need to run servers (such as a web orgaming server).
PPPoE (PPP over Ethernet)
This is a protocol used by many ADSL providers to encapsulate the Point-to-Point Protocol(PPP) within Ethernet. Among other things, it allows multiple users to be serviced through asingle DSL modem.
RAS (Remote Access Service)
This is a protocol used by Windows for remote access. SingTel, a large ISP in Singapore, usesthis.
PPTP (Point-to-Point Tunneling Protocol)
This is a protocol used for Virtual Private Networks (VPN), and is commonly used to establish asecure connection to a corporate network.
If your ISP allocates an IP address to you automatically, choose "Obtain an IP address

automatically". If you use a static IP address, choose "Static IP". For most ADSL/DSL modem users,choose "PPPoE".
The DI-714P+ also supports Dynamic IP Address, Static IP Address, PPPoE, and PPTP.
5.4.7 Configuring DHCP
DHCP automatically assigns IP addresses to machines that connect to your access point (for moreinformation, see the earlier DHCP and NAT).
To enable or disable the DHCP server on the BEFW11S4, click on the DHCP tab. For the DI-714P+,click on the Home tab and then click on the DHCP option.
The BEFW11S4 assigns IP addresses (if the DHCP server is enabled on the router) to all its wirelessclients from a default range of 192.168.1.100 to 192.168.1.149 (50 users). The DI-714P+ assigns IPaddresses to its clients from a default range of 192.168.0.100 to 192.168.0.199 (customizable).
Disabling the DHCP server on the access point requires all clients that connect to the router to havetheir own static IP addresses. This makes it slightly harder for unwanted users to connect to yournetwork.
5.4.8 Changing the Administrator Password
A hacker who knows the default password on your access point and who can manage to connect toyour network will have full control over your network, and all the other security precautions that youhave taken (such as using WEP and disabling DHCP) could come to naught.
To change the Administrator password on the BEFW11S4, click the Password tab. To change it on theDI-714P+, click the Tools tab. I suggest you change the Administrator password frequently.
5.4.9 Disabling SSID Broadcast
By default, the access point will broadcast its SSID to all wireless clients. Anyone in the vicinity with awireless-enabled computer now knows that you have a wireless network. In order to minimize thechances of allowing uninvited people to connect to your wireless network, it is advisable that youdisable the SSID broadcast feature.
To disable the SSID broadcast on the BEFW11S4, select the Setup tab and choose "No" in the "Allow`Broadcast' SSID to associate?" option.
As of this writing, the DI-714P+ does not have the option to turn off the SSID broadcast.
5.4.10 Viewing the Status of the Access Point
If you need to check on the status of the BEFW11S4, click the Status tab. The Status tab will displayinformation on the following options: LAN and WAN Information such as IP addresses and subnet

mask will also be displayed. This is a useful option to troubleshoot network problems that maysometimes occur when you connect the BEFW11S4 to the network.
You can also renew your IP address and see the IP addresses in use by computers on your network(these are assigned by the BEFW11S4's built-in DHCP server) in the Status tab.
If you need to check on the status of the DI-714P+, click the Status tab. The Status tab will displayinformation on the following options: LAN, WAN, Wireless, and Peripheral. Information such as IPaddresses and subnet mask will be displayed. This is a useful option to troubleshoot networkproblems that may sometimes occur when you connect the DI-714P+ to the network.
5.4.10.1 SNMP monitoring
SNMP (Simple Network Management Protocol) is a protocol used to monitor network devices. Someaccess points, such as the DI-714P+, will send SNMP messages (known as traps) across the network.You can configure the DI-714P+ to send SNMP messages by clicking Tools and then clicking SNMP.
To receive SNMP messages, you'll need an SNMP monitoring program such as SNMP Trap Watcher (afreeware SNMP trap receiver available from http://www.bttsoftware.co.uk/snmptrap.html). For acomprehensive list of SNMP tools as well as more information about SNMP, seehttp://www.snmplink.org/.
5.4.11 MAC Address Filtering
One of the security measures you can take for your wireless network is to enable MAC addressfiltering. MAC address filtering ensures that only computers with the specified MAC addresses areallowed (or denied) access to the network. This can prevent wandering users from accessing thenetwork.
MAC address filtering is not foolproof: using the appropriate utility, a wirelesscard can assume any MAC address. However, MAC address filtering will preventusers from casually connecting to your access point.
You can use the ipconfig /all command to check for the MAC address of your wireless card. Most
wireless cards have the MAC address directly printed on it. Figure 5-25 shows the MAC addressprinted on my Cisco Aironet 350.
Figure 5-25. The MAC address printed on the Cisco Aironet 350

To enable MAC address filtering on the BEFW11S4:
Click on the Advanced tab and then the Wireless tab.1.
Choose the Enable option in the Station Mac Filter section.2.
Click on Edit MAC Filter Setting.3.
Enter the MAC addresses of the wireless card/adapter to which you would like to grant access. Ifyou want to prevent a particular device from connecting, check the Filter checkbox (see Figure5-26). You can enter up to 32 MAC addresses. (Other routers from Linksys and other vendorsmay have a different limit.)
4.
Figure 5-26. Specifying the MAC addresses for enabling wireless access(BEFW11S4)
To enable MAC address filtering on the DI-714P+ (see Figure 5-27):
1.
2.

Click on the Advanced tab and then the Filter tab.1.
Choose the MAC Filter option.2.
Choose "Only allow computers with MAC address listed below to access the network".3.
Enter the MAC address of each computer to which you want to allow access and turn on theEnable checkbox.
4.
Click the Apply button.5.
Figure 5-27. Specifying the MAC addresses for enabling wireless access(DI-714P+)
5.4.12 Opening a Port
In some cases, you may want to punch a hole in your firewall to let users on the Internet access aservice on one of your computers. For example, you may want to run a public web server on yournetwork. However, when a remote user tries to connect to your public IP address, she'll be stoppeddead in her tracks by your access point's firewall.

Be careful using this option. Even if you only tell a few friends about your webserver (or FTP, game, or some other kind of server), malicious hackers willscan your computer on a regular basis (they choose ranges of IP addresses andscan them constantly with automated tools looking for victims), and will be ableto tell if the port is open. As soon as they find it, they will begin probing it forvulnerabilities using kits put together by experienced hackers. Unless you areprepared to make daily visits to http://www.microsoft.com/security/ to checkfor and act upon security bulletins, you should think twice before punching ahole in your firewall. It's not a matter of whether the hackers will go after you,it's a matter of when.
You can configure the access point to accept connections on a particular port and let one of yourcomputers inside your network handle it. For this to be effective, you should configure that computerwith a fixed IP address (otherwise, the access point's DHCP server may assign a different IP addresseach time). If you do this, make sure the fixed IP address is outside the range of DHCP addressesused by your router (see Section 5.4.7 earlier in this chapter), or you could end up with twocomputers on your LAN with the same IP address.
To open a port on the BEFW11S4:
Click the Advanced tab and select Forwarding.1.
Specify the port or port range, IP address, and whether the port should be open for TCP, UDP,or Both. If in doubt, select Both.
2.
Click the Apply button.3.
To open a port on the DI-714P+:
Click the Advanced tab and select Virtual Server.1.
Specify the port or port range (for example, 80-81) and the IP address of the machine runningthe service, and turn on the Enable checkbox.
2.
Click the Apply button.3.
[ Team LiB ]

[ Team LiB ]
5.5 Ad-Hoc Wireless Networking
So far, we have been talking about wireless networks that involve an access point. While this isprimarily the way most wireless networks are constructed and used, there are times where you donot have access to an access point and need to simply connect to another computer wirelessly. Thismode of wireless connectivity is known as ad-hoc mode.
To enable two computers to connect wirelessly without using an access point, you would just need awireless card/adapter on each computer. Then, take the following steps:
Right-click on the Wireless Network connection icon located in the tray and select View AvailableWireless Networks. Click on Advanced.
1.
The Wireless Network Connection Properties window will appear (see Figure 5-28).
Figure 5-28. Adding a new wireless network
2.
Click on Advanced. Select the option "Computer-to-computer (ad hoc) networks only" (seeFigure 5-29). (To connect to either an access point or another computer directly, select theoption "Any available network (access point preferred)".) Click Close.
3.
Figure 5-29. Choosing the type of network access

The change in Step 3 will prevent you from connecting to an access point.When you want to go back to connecting to an access point, return to thisdialog and reset it to its original value - the default is "Any available network(access point preferred)"
Click on Add... and give the ad-hoc wireless network an SSID (see Figure 5-30). Check theoption "This is a computer-to-computer (ad hoc) network; wireless access points are not used".Click OK. Click OK again to dismiss the Connection Properties dialog.
Figure 5-30. Specifying the SSID of the new wireless network
4.
On the other computer, right-click on the Wireless Network Connection icon located in the5.
6.

system tray and select View Available Wireless Networks.5.
You should now see the SSID of the ad-hoc network. Select the SSID and enter the key forencryption. (If WEP is enabled, see Figure 5-31. The initiating computer will supply the WEPkey.) Both computers should share the same key. Click Connect.
6.
Figure 5-31. Connecting to another computer using ad-hoc mode
If you don't see the SSID of the ad-hoc network on the second computer, gointo the Advanced settings (as in Figure 5-29) and make sure you have notselected "Access point (infrastructure) networks only." This will prevent all ad-hoc networks from appearing in the list.
You should now see that the connection is established (hover the mouse over the WirelessNetwork Connection icon in the tray). This is shown in Figure 5-32.
7.
Figure 5-32. Confirming the connection
When you set up an ad-hoc network this way, there is no DHCP server to hand out addresses, butthe computers select temporary addresses called link local addresses. These are chosen from theClass B subnet (see Chapter 1 for more information on IP addressing) 169.254.0.0/16. To determinethe temporary IP addresses, use the ipconfig command at the Windows XP Command Prompt.
Note that if you choose to use your own IP address, it will work as well. Also, if you want to share aconnection (suppose the first computer is plugged into a broadband connection), you can do so by

opening Control Panel Network and Internet Connections Network Connections on the firstcomputer, and then:
Right-click on the connection that you want to share and select Properties from the contextmenu. This brings up the Connection Properties dialog.
1.
Select the Advanced tab (see Figure 5-33). Check the box labeled Allow other network users toconnect through this computer's Internet connection. (If it is already checked, uncheck it, clickOK to dismiss the Connection Properties dialog, and start over at step 1.)
Figure 5-33. Sharing an Internet connection over an ad-hoc wirelessnetwork
2.
To allow other computers to access the Internet connection through the ad-hoc network createdon the first computer, select the wireless connection from the Home Networking Connection listand click OK.
3.
Now, when another computer connects to the first computer's ad-hoc network, the first computer willact as a DHCP server and assign it a private network address (if you run into problems, see Section6.5.5.3 in Chapter 6). The first computer will also perform NAT services to permit the other computerto access the Internet (assuming the shared connection is an Internet connection). In effect, thistrick turns a Windows XP machine into an expensive wireless access point!
[ Team LiB ]

[ Team LiB ]
5.6 Setting Up a Wireless Repeater
There are two ways in which you can extend the effective range of a wireless network: put in morewireless access points or use a wireless repeater. The former method requires that a wired networkconnection be available in the location where you want to put the access point. However, if yourwired network does not extend to that location, the best solution would be to use a wireless repeater.
At the time of this writing, there aren't many (if any) dedicated wireless repeaters in the market.However, some wireless access points come with a repeating function. The D-Link DWL-900AP+ (seeFigure 5-11) is one such model. It supports five modes: Access point, Wireless client, Wireless bridge,Multiple-point bridge, and Repeater.
In this section, I show how to configure the DWL-900AP+ to be used as a wireless repeater. I use ittogether with the D-Link DI-714P+ (see Figure 5-34).
Figure 5-34. Extending the range of a wireless network using a wirelessrepeater
The repeating mode of the DWL-900AP+ works only with another D-Linkproduct such as the DI-714P+.
5.6.1 Configuring the DWL-900AP+
First, connect the DWL-900AP+'s LAN port to the LAN port of the DI-714P+. Using a wireless cardsuch as the DWL-650+, connect your Windows XP computer to the DI-714P+.
You can also use a crossover cable to connect your computer directly to theDWL-900AP+ for configuration.

If you do a site survey, you should be able to see the two SSIDs broadcast by the DI-714P+(assuming you did not turn off SSID broadcast) and the DWL-900AP+. Connect to the DI-714P+ (orthe DWL-900AP+) and use a web browser to invoke the web-based utility of the DWL-900AP+. Thedefault IP address of the DWL-900AP+ is 192.168.0.50.
When prompted for username and password, use "admin" for your username and leave the passwordfield empty.
To configure the DWL-900AP+ to act as a repeater, click on the Advanced tab (see Figure 5-35).Check the Repeater option and enter the MAC address of the access point to repeat. Click Apply andthe DWL-900AP+ will reboot. You can now disconnect the cable connecting the DWL-900AP+ to theDI-714P+.
Figure 5-35. The configuration utility of the DWL-900AP+
Perform a site survey again and you should now see only one SSID.
[ Team LiB ]

[ Team LiB ]
5.7 Guidelines for Securing a Wireless Network
Though your new wireless network allows you to have the freedom to surf the Internet anywhere inyour house, it also is good news to your neighbors. With your newly set up wireless network, yourneighbor can now surf the Internet for free!
Sharing Your Internet Connection with Your Neighbors
Many ISPs prohibit this, and there have been cases of ISPs sending cease-and-desistorders to customers who shared their network access in a large metro area. Anotherconcern is liability: if a malicious hacker uses your Internet connection to attack anothersite, you'll be among the first people who have to answer questions about the attack. Onthe other hand, if you want to leave your access point open (such as in a coffee shop), Isuggest you give your wireless network a nice friendly SSID and perhaps even put theappropriate Warchalking (http://www.warchalking.org/) symbol outside your house!
Unlike a wired network, where you need to have physical access to a network access point, wirelessnetworks extend beyond the four walls of your house.
Most wireless access points and routers provide a web-based configuration program for configuringthe wireless access point. The following are some guidelines for securing your wireless network:
Disable SSID broadcast
By default, most wireless access points will broadcast the SSID to all wireless devices. Anyonewith a wireless network card can detect the SSID you use and gain access to your network.This brings us to the next point.
Change the default SSID
Most people don't even bother to change the default SSID provided by a wireless access point.If your neighbor knows that you are using a Linksys wireless access point (say, by seeing theboxes you throw away), they could easily try the default SSID. Change it to something lessobvious. Note that with some patience and the right tools, discovering an SSID is not difficult.However, changing the default SSID is one step forward in securing your wireless network.
Use MAC address filtering

If you have a small number of users in your wireless network (which is usually the case), youcan use MAC address filtering. With MAC address filtering, you find the MAC address of yournetwork card and manually enter this number into your wireless access point. Only MACaddresses that have been registered with the wireless access point are able to gain access toyour network. You can usually locate the MAC address of your network card on the deviceitself.
Change the username and password for the access point's web interface
It is too easy for people to find the default username and password used in wireless accesspoints by consulting a user manual or manufacturer's web site.
Turn off DHCP
If the number of users on the network is small, it is good to turn off DHCP (use static IPaddresses instead). Turning off DHCP prevents uninvited users from getting an automatic IPaddress when they connect to your wireless network. You could instead use static DHCPassignments, where you map an IP address to a specific MAC address. This eliminates the needto do client configuration (giving you all the benefits of the static IP address with configurationcentralized on the access point).
Refrain from using the default IP subnet
Most wireless routers use the default 192.168.1.0 network. It is easy for people to guess the IPaddresses used and illegally gain access to the network. Also, refrain from using the192.168.0.0 network address range, since Windows uses this for the private networks itcreates with Internet Connection Sharing (ICS).
Use WEP for encryption of packets
If you are concerned about the confidentiality of information transmitted by your wirelessnetwork, you may wish to enable WEP encryption. Though WEP has been proven to benonsecure, it still acts as a deterrent against packet sniffing.
Use something better than WEP
Use a wireless access point that supports something stronger than WEP, such as 802.1X orWPA.
Chapter 4 discusses Wi-Fi security, including 802.1X, in more detail.


[ Team LiB ]
5.8 Troubleshooting Wi-Fi
Here are some tips to help you if you have problems in getting your USB adapters/cards to work:
If Windows XP does not automatically install the drivers for your card/adapter, use the driversprovided by the vendor.
If you did not install the drivers correctly the first time you connected the card to yourcomputer, subsequent connections may cause the card to be unusable. In such situations, go toControl Panel and select Add Hardware. Select "Yes, I have already connected the hardware"and choose the device that is not working. You will then need to update the driver for your card.Be sure to use the driver from the vendor or download its latest driver from the vendor's website.
If you still have trouble in getting a connection to the wireless network, ensure that the wirelesscard/adapter is enabled. To verify this, right-click on My Network Places and select Properties.Check that the wireless connection is enabled.
If the wireless network uses WEP for encryption, be sure to enter the WEP key when connectingto the network. If you are using your own wireless network, you can check the WEP key byusing the access point's configuration utility (more on this in Section 5.4 earlier in this chapter);otherwise, you need to check with the system administrator for the WEP key.
If you have a wired connection to the Internet as well as a wireless card/adapter, you candisable the wireless card/adapter by right-clicking on My Network Places and selectingProperties. Right-click on the wireless connection and select Disable. This forces Windows XP touse the wired connection exclusively.
If you are having trouble with a USB adapter, power down the computer and the USB hub (ifyou are using one), restore power, and then restart. This can eliminate certain operatingconditions that are preventing the adapter from functioning properly by forcing it to completelyreinitialize itself when you reapply power.
If everything appears to be set up correctly, but your network connection frequently drops orslows to a crawl, look for sources of interference. Common sources include microwave ovensand cordless telephones that operate in the 2.4 Ghz range. In general, these will not interfereunless they are very close to your computer or access point, or if they are situated in a directline of sight (remember that wireless adapters can "see" through walls) between your computerand access point. Also, if you have a whole lot of wireless equipment set up for testing, such asseveral access points in close proximity, consider relocating them or powering them down whenthey are not in use. See section 3.2.1.3 in Chapter 3 for an easy way to survey your site forsignal strength and quality.
[ Team LiB ]

[ Team LiB ]
Chapter 6. BluetoothNamed after the Danish King Harald Bluetooth (who ruled approximately from A.D. 940 to 985, andwho is reported to have united Denmark and Norway), Bluetooth is a short-range wireless technologywith an operating range of 30 feet (10 meters) and a maximum transmission rate of a mere 1 Mbps.Bluetooth is widely touted as a "cable replacement" solution. In the near future, you may not needany cables to connect your keyboard and mouse to the PC, and you may even download your favoritemusic to your MP3 player wirelessly. In fact, such things are possible today.
Behind the Bluetooth technology is a set of specifications, now under the purview of the BluetoothSpecial Interest Group (SIG). The Bluetooth SIG (http://www.bluetooth.com/) was spearheaded byEricsson (the inventor of Bluetooth) and formed in February 2001. The Bluetooth SIG has sincegrown to have more than 2000 members, comprised of companies such as Ericsson, Nokia, 3Com,Intel, Motorola, Microsoft, and many more.
[ Team LiB ]

[ Team LiB ]
6.1 Bluetooth Standards Today
Bluetooth is a wireless communication technology that is designed for short-range, point-to-pointdata transfer. Like infrared, Bluetooth is well suited for ad-hoc applications where the presence of anetwork infrastructure is not available. However, unlike infrared, Bluetooth does not have thelimitation of requiring line of sight for communication. Bluetooth uses radio waves in the 2.4 GHzband. Coincidentally, this is also the band used by 802.11b and 802.11g devices. Unfortunately, a lotof domestic appliances also use this 2.4 GHz band, most notably cordless phones and microwaveovens. This means that this 2.4 GHz frequency band (also known as Industrial, Scientific, andMedical, or ISM) is crowded (see Interference Between Bluetooth and Other Devices in this chapter).
Interference Between Bluetooth and Other Devices
If you are operating an 802.11b (or 802.11g) network together with Bluetooth, Bluetoothperformance will take a minor, generally unnoticeable hit. Since both operate in the 2.4GHz band, interference will cause Bluetooth devices to resend their data. Well, if yourfather is operating his microwave in the kitchen, that is also going to interfere with yourwireless network, whether it is Bluetooth or 802.11. When you are deciding where to putyour computers and access points, you need to take this into consideration.
To minimize the impact of interference, Bluetooth uses a technique called Spread SpectrumFrequency Hopping . The actual frequency range used by a Bluetooth device is from 2.402-2.480GHz. Within this range, Bluetooth devices "hop" between the different frequencies with a 1 MHzinterval. This essentially gives Bluetooth devices 79 different frequencies to choose from. During adata transfer, the data is divided into packets. Each packet can be sent or received using any of the79 different frequencies. Per the Bluetooth specification, Bluetooth devices can make up to 1600 hopsper second. This essentially reduces the chance that a device will be "jammed" in a fixed frequency.(If the device is experiencing too much interference on the current frequency, you can be sure that itwill look for a less busy one in a fraction of a second.)
6.1.1 Piconet
When two Bluetooth devices connect to each other, they create a network called a piconet. A piconetcontains a master and one or more slaves. Any device can take the role of a master. The device thatinitiates the connection (the one that found the other device) is the master. Figure 6-1 shows apiconet containing eight devices (the maximum number allowed in a piconet) with one master andseven slaves.
Figure 6-1. A piconet with one master and seven slaves

I mentioned frequency hopping in the previous section. So how do all thedevices in the piconet know which frequency to hop to? The master willestablish a frequency-hopping scheme and communicate it to all the slaves. Allslaves will then follow the frequency sequence set by the master.
6.1.2 Scatternet
When you have more than eight devices to connect, you can form piconets and join them into alarger network called the scatternet. A scatternet is made up of up to 10 piconets, giving a total of 80devices. Figure 6-2 shows a scatternet comprising of two piconets. The individual master in thescatternet serves as a communication bridge between devices in each piconet.
Figure 6-2. A scatternet with two piconets
A device can belong to more than one piconet at any one time. It can also be a master in one piconetas well as a slave in another piconet. But a device cannot be a master of more than one piconet.
When a master is initiating a connection with a slave, it is known as paging.The master selects a new frequency for paging every 312.5 seconds, while theslave(s) selects a frequency to listen at every 1.28 seconds. Eventually, themaster and slave devices will encounter a common frequency on whichcommunication can take place.
The frequency hopping nature of Bluetooth devices also helps to enhance thesecure communication path between two devices. See Section 6.7 in the laterpart of this chapter for more information.
6.1.3 Bluetooth Device Classes
Bluetooth devices fall into three categories: Class 1, 2, and 3. Most devices in the market today areClass 3. Due to their low power consumption, they operate with a radius of 30 feet (10 meters). Forlong-range applications, Class 1 devices allow up to 300 feet (100 meters) in operating radius. Table6-1 shows the range and output of each class.

Table 6-1. Bluetooth device classes
Power class Range/operating radius Output power (dBm)
1 300 feet (100m) 20
2 30 feet (10m) 4
3 10cm to 10m 0
What Is dBm?
The unit for output power is dBm, a measure of signal strength in wires and cables at RFand AF frequencies. dBm means "decibels relative to one milliwatt." The output power, S,is defined to be:
SdBm = 10 log10 P
where P is the power level in milliwatts (mW). By definition, a 1 mW signal has a level of 0dBm.
You can freely mix devices of different classes in a piconet or scatternet. However, note the range ofeach device. For example, Figure 6-3 shows a Class 1 Bluetooth access point with an operating radiusof 300 feet. The Class 2 (or 3) Bluetooth adapter is within the access point's range. However, theClass 2 (or 3) device does not have an operating range to reach the access point. Hence the twodevices are not able to communicate with each other.
Figure 6-3. Mixing Class 1 and 2 devices
[ Team LiB ]

[ Team LiB ]
6.2 Bluetooth Devices
Just a year ago, Bluetooth devices were a rare species. It was difficult to find Bluetooth add-ons, notto mention Bluetooth-enabled devices. Today, you can find Bluetooth adapters of all shapes andsizes, and with different kinds of interfaces for the various devices. Bluetooth adapters come in thefollowing types of interfaces:
USB
Suitable for desktops and notebooks that have a USB port
Compact Flash (CF)
For use with handheld devices equipped with a CF slot, especially Pocket PCs
PCMCIA
Suitable for notebooks with PCMCIA slots
Secure Digital (SD)
For use with handheld devices equipped with SD slots, such as Pocket PCs and Palm devices
The following sections show some of the Bluetooth devices available in the market today.
6.2.1 USB Adapters and Dongles
The easiest way to add Bluetooth capability to your system is to insert a USB Bluetooth adapter intoyour USB port. Today, USB Bluetooth adapters come in all shapes and sizes. For as little as $40 youcan a get Class 2/3 Bluetooth adapter. For slightly more, you can get a Class 1 adapter that extendsthe effective communication radius. Figure 6-4 shows the Billionton USB Bluetooth adapter connectedto my notebook computer.
Figure 6-4. The Billionton USB Bluetooth adapter connected to mynotebook

6.2.2 Compact Flash
For Personal Digital Assistants (PDAs), a popular format is CF. Many PDAs contain a CF slot forexpansion purposes. You can also use the CF Bluetooth cards together with a PCMCIA sleeve andconnect it to your notebook computer. CF Bluetooth cards have the advantage of low powerconsumption, which is useful for battery-powered devices such as PDAs. Figure 6-5 shows the SocketCF Bluetooth adapter.
Figure 6-5. Compact Flash Bluetooth Card from Socket
6.2.3 PC Card
Notebook users generally have two choices for Bluetooth capability: a USB Bluetooth adapter or aPCMCIA Bluetooth card. You can also reuse the PCMCIA Bluetooth card on your PDA, if it includes aPCMCIA slot (normally achieved by adding an expansion jacket to the PDA). Figure 6-6 shows theBelkin Bluetooth PC card.
Figure 6-6. A PCMCIA Bluetooth card

6.2.4 Secure Digital
Toshiba seems to be the only vendor producing the Bluetooth SD (Secure Digital) card (the one usedby Palm devices are manufactured by Toshiba). Figure 6-7 shows the Toshiba Bluetooth SD card.
Figure 6-7. Bluetooth SD card
6.2.5 Bluetooth Access Points
Besides 802.11 wireless access points, Bluetooth access points are also becoming common. Figure 6-8 shows the Bluetake BT300 Bluetooth Access Point (AP), which is Bluetooth 1.1 compliant andsupports an operating range of 100 meters (300 feet). The AP comes with two interfaces: RS232(standard PC serial adapter) and a 10/100 Base-T Ethernet port. It supports the Bluetooth LANAccess profile (more on this later), operates at a maximum data rate of 1 Mbps, and supports up toseven simultaneous users. I look at how to use a Bluetooth access point for network access later, inSection 6.6.1.
Figure 6-8. The Bluetake BT300 Bluetooth Access Point

6.2.6 Personal Digital Assistants
One of the earliest PDAs to support Bluetooth is HP's (formerly Compaq) iPaq series of Pocket PCs.Starting from the iPaq 3800 series, HP has been building Pocket PCs with the Bluetooth capabilitybuilt in. Palm has since also built devices that come with the Bluetooth capability built in. The PalmTungsten T is one such model. Figure 6-9 shows the Palm Tungsten T.
Figure 6-9. The Palm Tungsten T
6.2.7 Cell Phones
Sony Ericsson has been taking the lead in launching Bluetooth-capable mobile phones, which is notsurprising since Bluetooth was invented by Ericsson. Starting from the Ericsson T68 to the latestP800, Bluetooth-equipped mobile phones allow you to wirelessly synchronize your calendar andcontact database with your Windows XP PC and other devices. Figure 6-10 shows the Sony EricssonT68i and P800.
Figure 6-10. The Sony Ericsson T68i and the Sony Ericsson P800 (shownwith the kind permission of Sony Ericsson; copyright Sony Ericsson 2003)

Ericsson and Sony Ericsson
The original T68 was marketed under the Ericsson brand. It was then that Ericsson andSony started a joint venture in mobile phone development. Subsequent phones weremarketed under the Sony Ericsson label. The Sony Ericsson T68i was an improved versionof the T68. In some places, you can convert your T68 to T68i via a firmware upgrade.
[ Team LiB ]

[ Team LiB ]
6.3 Bluetooth Service Profiles
As a consumer technology, Bluetooth needs to be widely supported by vendors to be successful.Interoperability, the ability for different devices (from different manufacturers) to work with oneanother, is the key factor in securing this broad support (many a technology has been stalledbecause users were frustrated by incompatibilities and finger-pointing among vendors). In Version1.1 of the Bluetooth specification (the latest at the time of this writing), there are 13 profiles. Aprofile is a description of a particular functionality and how to implement it based on the specification.Bluetooth device manufacturers use these profiles as a guide to implement specific functionality. Withthis approach, vendors can be sure that their devices will work with current and future Bluetoothproducts. Let's take a closer look at the 13 profiles defined in Bluetooth 1.1:
Generic Access Profile
The Generic Access Profile (GAP) defines how two Bluetooth devices discover and establishcommunications between each other. The GAP is the "mother" of all profiles, as it definesmodes and procedures used by all the other profiles.
Service Discovery Application Profile
The Service Discovery Application Profile (SDAP) allows Bluetooth devices to query the servicesavailable on other Bluetooth devices.
Cordless Telephony Profile
The Cordless Telephony Profile (CTP) defines how a Bluetooth device can be used as a cordlessphone.
Intercom Profile
The Intercom Profile defines how two Bluetooth-enabled phones can connect with each otherdirectly without the use of the public telephone network.
Serial Port Profile
The Serial Port Profile defines how two Bluetooth devices can communicate with each other byusing virtual serial ports. Using this profile, Bluetooth communication can be treated as justanother serial communication.

Headset Profile
The Headset Profile defines how a headset can communicate with a Bluetooth device.
Dial-up Networking Profile
The Dial-up Networking Profile defines how a Bluetooth device can connect to a Bluetooth-enabled modem or mobile phone.
Fax Profile
The Fax Profile defines how a Bluetooth device can connect to a Bluetooth-enabled fax device,such as a fax machine or a fax-enabled mobile phone like the Sony Ericsson T68i.
LAN Access Profile
The LAN Access Profile defines how a Bluetooth-enabled device can connect to a network usingPPP (Point-to-Point Protocol).
Generic Object Exchange Profile
The Generic Object Exchange Profile (GOEP) defines a set of protocols used by applications forexchanging objects.
Object Push Profile
The Object Push Profile is used together with the GOEP to send and receive objects, primarilyfor exchanging electronic business cards.
File Transfer Profile
The File Transfer Profile is used together with the GOEP to transfer files between two Bluetoothdevices.
Synchronization Profile
The Synchronization Profile is used together with GOEP to synchronize calendar and addressinformation between two Bluetooth devices, such as a laptop and cell phone.

In this chapter, we will make use of several of the 13 profiles for file transfer, Internet connectivity,etc.
Using a Bluetooth Headset
You can connect a Bluetooth headset to any Bluetooth-enabled device as long as thedevice supports the Headset profile. For example, I am able to use my Sony Ericsson T610to connect to the HBH-60 Bluetooth headset (see Figure 6-11).
You can now talk freely without any wires connecting between your headset and yourphone. But you have to get used to the occasional stare that passer-bys will give you (theheadset looks futuristic and ahead of its time)!
Figure 6-11. The Sony Ericsson T610 and the Bluetooth Headset HBH-30(shown with the kind permission of Sony Ericsson; copyright Sony
Ericsson 2003)
[ Team LiB ]

[ Team LiB ]
6.4 Using Bluetooth in Windows XP
Let's now equip a Windows XP computer with a USB Bluetooth adapter. In this chapter, I illustrateusing the Billionton USB Bluetooth adapter (see Figure 6-12).
Figure 6-12. The Billionton USB Bluetooth adapter
When you first connect the Bluetooth adapter to your computer, Windows XP detects the new deviceand prompts for the installation CD. Insert the CD (included with the adapter) and follow theinstructions on the screen.
With other manufacturers' devices, you may need to install the drivers first,and then insert the Bluetooth adapter. Please see the documentation that camewith your device for more details. Also, the procedures shown in the followingmay differ from what you will experience during your own setup. However, thegeneral steps still apply.
During the installation stage, you can choose the services that you want your Bluetooth adapterto provide (see Figure 6-13).
Figure 6-13. Installing the services that Bluetooth provides
1.

Once the driver is installed, you should see the Bluetooth icon located in the tray (see Figure 6-14).
Figure 6-14. Locating the Bluetooth icon in the tray
2.
Right-click on the Bluetooth icon and you will see a series of options that you can use (seeFigure 6-15).
Figure 6-15. The Bluetooth utility
3.
When you double-click on the Bluetooth icon in the tray, a window appears, displaying theoptions as shown in Figure 6-16. We make use of these options in the rest of this chapter.
Figure 6-16. Bluetooth options in My Bluetooth Places
4.

Select "View My Bluetooth services" to view the Bluetooth services that your adapter provides(see Figure 6-17)
5.
Figure 6-17. Bluetooth services that the adapter offers
These services correspond to the Bluetooth profiles that we discussed earlier.
Who's WIDCOMM and Why Did I Install Their Drivers?
When you installed the Bluetooth software on your PC, you may have noticed the nameWIDCOMM at least once, perhaps in the license agreement.
Most Bluetooth adapters use the WIDCOMM Bluetooth Stack driver. WIDCOMM(http://www.widcomm.com) licenses its software to most Bluetooth manufacturers.Consequently, the installation, configuration, and use of different Bluetooth devices onWindows have a nearly identical look and feel even though Microsoft has not yet (at thetime of this writing) released an update to Windows XP to provide native support forBluetooth. However, Microsoft has released a patch to Original Equipment Manufacturers(OEMs) that supports Bluetooth. This patch is known as QFE (Quick Fix Engineering)313183. There is a good chance you will find native support for Bluetooth in a futureWindows XP service pack. Until then, you will probably use the WIDCOMM drivers suppliedby your adapter vendor.
You can download the latest drivers and support software from the adapter vendor's website. Because each vendor customizes the WIDCOMM software slightly, you should not usedrivers from a vendor other than the one who manufactured your Bluetooth adapters.


[ Team LiB ]
6.5 Connecting to a Pocket PC
You can use Bluetooth to synchronize your Bluetooth-equipped Pocket PC with your computer. If youhave a Bluetooth-equipped Pocket PC, you can use the Bluetooth connection as an ActiveSyncconnection. You can then synchronize your Pocket PC with your computer wirelessly.
Even if your Pocket PC does not have built-in Bluetooth, you should be able tofind a Bluetooth adapter for little more than $100 if your Pocket PC has aCompact Flash slot.
To connect to a Pocket PC, take the following steps:
First, you must establish a partnership with your computer through ActiveSync. You need to usea USB sync cable or the cradle that comes with your Pocket PC.
1.
If you are using a third-party Bluetooth adapter, you may need to install Bluetooth supportsoftware on your Pocket PC. Follow the instructions that came with your Bluetooth adapter toinstall the Bluetooth software.
2.
Next, invoke the Bluetooth Manager on your Pocket PC and search for the host computerrunning Microsoft ActiveSync. (Some Pocket PC Bluetooth adapters, such as the SocketBluetooth Connection Kit, do not require this step). Tap on the host computer (LWM-1, in mycase) icon and check the ActiveSync Partner checkbox to establish the host computer as anActiveSync partner (see Figure 6-18).
Figure 6-18. Configuring a Bluetooth device as an ActiveSync partner
3.
4.

On the host computer running Microsoft ActiveSync, right-click on the Bluetooth icon in the trayand select Setup Configuration. Select the Local Services tab and double-click on theBluetooth Serial Port item (see Figure 6-19). Verify the virtual COM port number used by theBluetooth serial port. In my case, it is using COM port 4.
Figure 6-19. Using a virtual COM port for Bluetooth communication
4.
Next, launch Microsoft ActiveSync and select File Connection Settings.... Turn on the "Allowserial cable or infrared connection to the COM port" checkbox and select the COM port numberthat you used for the Bluetooth serial port. In this case, it is COM port 4 (see Figure 6-20). ClickOK.
Figure 6-20. Setting a COM port for ActiveSync operation
5.

To activate ActiveSync, go to the Today screen of the Pocket PC and tap on the Bluetooth icon(located at the bottom right) and select Start ActiveSync (see Figure 6-21). (Some Bluetoothadapters, such as the Socket Bluetooth Connection Kit, use a menu option titled BluetoothActiveSync.)
6.
Figure 6-21. Starting ActiveSync on the Pocket PC
Your Pocket PC and host computer should start synchronizing now.
6.5.1 Troubleshooting ActiveSync

If you have trouble making the connection, try the following:
Try it with a cable
Be sure that you can use ActiveSync with a USB or serial port connection (whichever thePocket PC's cradle supports). You must first establish a Standard or Guest partnership betweenthe PC and Pocket PC before you can perform a Bluetooth ActiveSync.
Reset your Pocket PC
Many times resetting the Pocket PC will solve the connection problem.
Pair (or bond) your PC and Pocket PC
This ensures that the two can see one another, and avoids the need to search for one anothereach time you perform an ActiveSync.
Check the ActiveSync Partner box
Ensure that you have turned on the ActiveSync Partner checkbox, as shown in Figure 6-18.Some Bluetooth adapters, such as the Socket Bluetooth Connection Kit, do not require this.
Verify your COM port
Double-check that the COM port used by ActiveSync (right-click on the ActiveSync tray iconand choose Connection Settings) is the same as the one used by your Bluetooth serial port(right-click on the Bluetooth tray icon, choose Setup Configuration, and then double-clickBluetooth Serial Port in the Local Services tab).
Make sure ActiveSync can see the COM port
If the ActiveSync Connection Settings dialog's Status field (see Figure 6-20) claims that theBluetooth Serial Port is not available, ActiveSync may not know the serial port exists. If this isthe case, click Get Connected in the Connection Settings dialog, and allow ActiveSync to lookfor your Pocket PC. Make sure that your Bluetooth adapter is connected and active and thatyour Pocket PC is cradled before you perform this step. This won't cause ActiveSync to locateyour Pocket PC over the Bluetooth serial port, but it will let ActiveSync know about all theBluetooth serial ports available on your PC.
In my testing, I had occasional problems in getting ActiveSync to use the Bluetooth serial port. My

best advice is to restart both the computer and the Pocket PC if such a connection problem arises,and try these steps again.
6.5.2 Connecting to a Palm
You can use Bluetooth with Palm Handhelds that have an SDIO slot (such as the Palm m500, m505,m130, or m125 Handhelds) or built-in Bluetooth (such as the Tungsten T). To connect to a Palm,follow these steps:
Before you try to connect your Palm and computer over Bluetooth, be sure to get the latestPalm Desktop and Palm Bluetooth software from http://www.palm.com/software and install itaccording to the instructions.
1.
Verify that you can perform a HotSync using the Palm cradle or cable before trying to make aBluetooth connection. (You'll need to do this to install all the Palm Bluetooth software, anyhow.)
2.
Remove the Palm from the cradle and, if you are using a Palm with a Bluetooth SDIO adapter,insert the adapter. You should hear a beep when the card is inserted properly.
3.
Configure your Palm to use Bluetooth for HotSync:
Tap the Home icon on your Palm to bring up the list of Applications.a.
Tap the Prefs icon. This brings up the Preferences application.b.
Tap the menu in the upper-right corner and select Connection. This brings up the AvailableConnections dialog, shown in Figure 6-22.
Figure 6-22. Viewing the Palm Connection Preferences
c.
Tap the New button to bring up the Edit Connection dialog. Specify a name, select PC fromthe Connect To drop-down menu, and choose Bluetooth in the Via drop-down menu (seeFigure 6-23).
Figure 6-23. Editing the Bluetooth Connection in Preferences
d.
4.

Tap the button labeled Tap to Find. This begins the Bluetooth discovery process (seeFigure 6-24).
Figure 6-24. Discovering Bluetooth devices
e.
After a few seconds, the Discovery Results appear. Select your computer from the list.Figure 6-25 shows the discovery results with a Windows XP notebook (CAM-FRANCIUM)and a Mac OS X PowerBook (Brian Jepson's computer). Select your Windows XP computerand tap OK. If the computer is not already paired with the Palm, you'll be asked if youwant to add it to your trusted device list. Tap Yes to continue. You'll be asked to enter apasskey on both the Palm and Windows XP computer.
Figure 6-25. Viewing the list of Bluetooth devices
f.
When you have selected the Windows XP PC and paired successfully, you'll be back at theEdit Connection dialog. Click OK to dismiss this dialog.
g.
Configure your PC to use Bluetooth for HotSync:
Click the HotSync icon in the system tray and select Local Serial (see Figure 6-26).
Figure 6-26. Clicking the HotSync system tray icon
a.
5.

Click the HotSync icon in the system tray and select Setup, then select the Local tab (seeFigure 6-27).
Figure 6-27. Selecting a COM port in Palm Desktop setup
b.
Select the same COM port used for the Bluetooth Serial Port (right-click on the Bluetoothtray icon, choose Setup Configuration, and double-click Bluetooth Serial Port in theLocal Services tab), and click OK.
c.
Next time you perform a HotSync from your Palm Handheld, choose Bluetooth from the drop-down menu (see Figure 6-28).
6.
Figure 6-28. Performing a Bluetooth HotSync operation

6.5.3 Connecting to the Internet Through a Mobile Phone
If you have a Bluetooth-equipped mobile phone, such as the Sony Ericsson T68i, you can use it as amodem to connect to the Internet (see Section 8.1 in Chapter 8 for more information on pricing).Best of all, with Bluetooth, you can simply leave the phone in your pocket or briefcase and still beable to connect to the Internet (as long as the phone is powered up and your briefcase is withinrange). In this section, I show you how to connect to the Internet using the Sony Ericsson T68i.
First, turn on the Sony Ericsson T68i's Bluetooth radio (press the joystick button and selectConnect Bluetooth Options Operation Mode On) and make the phonediscoverable (press the joystick button and select Connect Bluetooth Discoverable).
1.
Turning on the Bluetooth radio on your phone will drain its battery. If you arenot using the Bluetooth connection, it is advisable to turn off the Bluetoothradio.
In Windows XP, go to My Bluetooth Places and select "View devices in range" (you may alsoclick the Bluetooth menu and select "Search for devices" or open the Entire BluetoothNeighborhood and press F5). After the discovery process, you should be able to see the SonyEricsson T68i icon. Right-click on the icon and select Discover Available Services (see Figure 6-29).
Figure 6-29. Discovering the services offered by the T68i
2.
The Sony Ericsson T68i supports the services shown in Figure 6-30.
Figure 6-30. Services offered by the T68i
3.
To connect to the T68i, right-click on the Dial-up Networking on T68 service and select ConnectDial-up Networking (see Figure 6-31).
4.

Figure 6-31. Using the Dial-up Networking service on the T68i
4.
The phone asks you whether you want to accept the connection request, decline it, or "add topaired." This last step pairs the phone and the PC and performs the connection request. Pairingthe phone and the computer ensures that the connection can be established whenever you needit (even though you have not used the connection for some time). If your phone is not paired,you need to make it discoverable every time you need to use the connection. See Pairing, laterin this chapter, for more details.
5.
You will be prompted to supply a PIN code to pair up the phone with your computer (see Figure6-32). You need to enter the same PIN code on your phone.
Figure 6-32. Supplying a PIN code for pairing
6.
Next, a dialog box will be displayed, prompting you to enter the username, password, andphone number to dial (see Figure 6-33). You can get all this information from your ISP.
7.
Some ISPs do not require a username or password, just the dialing sequencefor the T68i. For example, AT&T Wireless's dial string is *99*CID#, where CID isyour connection ID (typically 1, as in *99*1#). This uses the connections
defined on your phone (#1 is usually configured by AT&T for your GPRS dataconnection).
Click on the Dial button to complete the connection process (see Figure 6-33).8.

8.
Figure 6-33. Dialing using the T68i
Pairing
In Bluetooth, you have the option to pair two devices. When you pair with a Bluetoothdevice, this device will be remembered and trusted. The next time you need to use thedevice, you need not search for it again.
When pairing with a device, the device requesting the pairing will need to supply a PINcode to establish the link. The other device needs the same PIN to complete the pairingprocess.
You can still use a Bluetooth device without pairing, but you need to search for the deviceevery time you need to use it.
Note that some devices use the word "bonding" to mean pairing.
To pair your computer with a phone (such as the T68):
Turn on the Bluetooth radio on T68 and assign a name to it, such as T68.1.
On your Windows XP computer, go to My Bluetooth Places and click on "View devicesin range".
2.
Right-click on the T68 icon and select Pair Device (see Figure 6-34).3.
Key in the PIN code to be used for pairing on the computer.4.
5.
3.
4.
On the T68, you have three choices: Accept, Add to Paired, or Decline. Select Acceptto allow the computer to pair with the phone. Select Add to Paired if you want thephone to add the computer to its paired collection. Select Decline if you do not wishto pair.
5.
If you are pairing your computer with a phone, take care to use numbers only, or else youmay have problems keying in alphabetic characters using your phone's PIN code dialog!
Figure 6-34. Pairing with the T68
6.5.4 File Transfers Between Computers
Bluetooth was popularly touted as a cable replacement technology. File transfers are a commonchore that typically depends on a network cable. (Wi-Fi networking also allows you to create ad-hocnetworks for file transfers. See Section 5.5 in Chapter 5 for more details.) Bluetooth can be useful insituations when there are no cables or networks available, and you need to transfer files betweencomputers and/or other Bluetooth-enabled devices.
For Bluetooth file transfer, you can typically expect transfer rates ranging from 100 Kbps to amaximum of 750 Kbps. File transfers between computers are generally much faster than betweenPocket PCs.
To transfer files between computers, follow these steps:
Open up My Bluetooth Places and click on "View devices in range".1.
Figure 6-35 shows that two devices have been found: a Bluetooth access point and anothercomputer (equipped with Bluetooth capability) named Jupiter. Right-click on Jupiter and selectDiscover Available Services to list the various services that the computer Jupiter provides (seeFigure 6-36).
2.
Figure 6-35. Finding the Bluetooth devices nearby
Figure 6-36. Discovering the services offered by another computer

Figure 6-37 shows the services that Jupiter provides.
Figure 6-37. Services that Jupiter offers
3.
To initiate a file transfer between Jupiter and your computer, double-click on the File Transferon Jupiter icon (this may also appear as an icon called Public Folder). Depending on the securitysettings of the remote machine (Jupiter), you may be prompted to enter a PIN code (see Figure6-38). Once this PIN code is entered, you will also need to enter the same code on Jupiter.
4.
Figure 6-38. Connecting to Jupiter
In some releases of the Bluetooth software, you may need to click on theBluetooth tray icon to bring up dialogs for PIN codes (clicking the bubble shownin Figure 6-38 will only make it disappear).
When connected, you will see Jupiter in My Bluetooth Places as shown in Figure 6-39.
Figure 6-39. You can copy files to Jupiter after connecting
5.

You can treat this as just a normal folder. However, when you try to copy files or create a folderon Jupiter, the dialog box shown in Figure 6-40 may appear on Jupiter's screen.
6.
Not Seeing an Authorization Prompt?
Whether you are prompted for authorization depends on the security settings on theremote machine (Jupiter), which you can adjust by right-clicking the Bluetooth tray icon,selecting Setup Configuration, and then double-clicking the File Transfer in the LocalServices tab of the Bluetooth Configuration dialog (check the Authorization box to requireAuthorization before a transfer).
Figure 6-40. Giving the rights for the remote computer
There are three permission settings that Jupiter can grant:
For the current task
You allow the operation to be performed once only. Subsequent operations require yourexplicit consent.
7.

For the next...x minutes
You allow operations to be performed within the specified amount of time. After the timelimit, all operations require your explicit consent.
Always allow this device to access to my computer's File Transfer service
You allow all operations to be performed. Subsequent operations do not require yourexplicit consent.
The files transferred using Bluetooth are stored in the Bluetooth ExchangeFolder. To locate this folder, go to My Bluetooth Places in Jupiter and selectView My Bluetooth Services. Right-click on My File Transfer and selectBluetooth Exchange Folder (see Figure 6-41).
If this option is not available, go to the Bluetooth configuration, right-click theBluetooth tray icon, select Setup Configuration, and go to the InformationExchange tab. The folder listed as My Shared Directory (see Figure 6-42)contains files transferred to your computer.
Figure 6-41. Viewing the Bluetooth Exchange Folder
Figure 6-42. Viewing the location of the Bluetooth exchange folder

6.5.5 Sharing an Internet Connection Using Bluetooth
Using Bluetooth, two computers can share an Internet connection (see Figure 6-43). Assuming thatone computer (equipped with Bluetooth) is connected to the Internet via an Ethernet (or Wi-Fi)connection, another computer that is also equipped with Bluetooth can establish a Bluetoothconnection with it and share the connection to the Internet.
Figure 6-43. Sharing an Internet connection

6.5.5.1 On the computer providing the Internet connection
To share an Internet connection and set it up on the computer that is providing the connection, followthe steps described in the list shown next.
Go to My Bluetooth Places and select View My Bluetooth Services (or navigate to My BluetoothPlaces My Device in Windows Explorer). Right-click on Network Access and selectProperties.
1.
Change the type of service to offer remote devices to "Allow other devices to access theInternet/LAN via this computer" (see Figure 6-43). If your Bluetooth software does not offer thisoption, you may proceed to the next step without changing this setting.
2.
Click on the Configure Connection Sharing button. The Network connections window will bedisplayed. (If your Bluetooth software does not support this option, you can also bring up thiswindow by opening Windows Explorer My Computer Control Panel Network andInternet Connections Network Connections.) Select the network connection that you wantto share with other computers that connect to you via Bluetooth. For example, you may havean Ethernet connection for Internet access, or you may have a wireless connection. Right-clickon the connection of your choice and select Properties.
3.
To enable Internet connection sharing, click on the Advanced tab (see Figure 6-44). Turn on the4.

"Allow other network users to connect through this computer's Internet connection" checkbox (ifit is already checked, uncheck it, click OK to dismiss the Connection Properties dialog, and startover at step 3). In the drop-down list box, select Bluetooth Network. (If this connection is notavailable, look for the network connection listed as Bluetooth LAN Access Server in Networkconnections, which may be named something cryptic such as Local Area Connection 7.) Clickthe OK button.
4.
Figure 6-44. Configuring the connection to be used for Internetconnection sharing
6.5.5.2 On the computer using the shared Internet connection
To share an Internet connection and set it up on the computer that is using the connection, follow thesteps described in the list shown next.
On the computer using the shared Internet connection, go to My Bluetooth Places and select"View devices in range". Select the computer providing the Internet connection and right-clickon the Network Access Service. Select Connect to Network Access Point, as shown in Figure 6-45. You may be prompted for a user ID and password, in which case you must use a user IDand password that are valid on the remote computer.
Figure 6-45. Connecting to the shared Internet connection
1.

On the host computer providing the Internet connection, a dialog box may prompt forpermission to share the network (see Figure 6-46), depending on that computer's securitysettings.
Figure 6-46. Giving permission to the remote computer for Internetsharing
2.
Click on the OK button to complete the connection.3.
That's it! Both computers should now be able to connect to the Internet by using the host's Internetconnection.
6.5.5.3 Troubleshooting connection sharing
One common problem in sharing an Internet computer on a host computer is IP address conflict. Oneeasy way to prevent this error is to use DHCP to assign IP addresses. On the computer using theshared Internet connection, ensure that you obtain an IP address dynamically using DHCP. This canbe done by right-clicking on My Network Places and selecting Properties. Choose the BluetoothNetwork icon and configure the property of Internet Protocol (TCP/IP) to obtain an IP addressautomatically.
Here are some troubleshooting tips:
Make sure you have an IP address
Use ipconfig to check whether an IP address has been allocated to your computer. If you do
not have an IP address, then the connection has not been established correctly.

Check your connection
Use ping to verify that you can reach other computers. Open a Windows XP Command Prompt,
and type ping computername, as in ping jupiter (always try the computer that's sharing the
Internet connection first). Then you might want to try to ping a remote host, such aswww.oreilly.com.
Check your name servers
Use nslookup to resolve the hostname of a remote computer, such as www.oreilly.com. This
can help you to verify whether you are able to connect to the Internet.
Make sure the host computer is still connected
Go to the computer that's sharing its Internet connection, and check to see whether it's lost itsconnection to the Internet.
6.5.6 Bluetooth Printing
Printing wirelessly is another popular use of Bluetooth technology. This is especially useful in a smalloffice environment where many coworkers need to share a single printer. Instead of buying a moreexpensive network printer, you can purchase a Bluetooth printer adapter and connect it to yourprinter. Users can then print wirelessly using Bluetooth.
Figure 6-47 shows the Bluetake BT200 Bluetooth printer adapter (other vendors offering Bluetoothprinter adapters include MPI Tech and Anycom), which connects to the parallel port on your printer.It is a Class 2 Bluetooth device and supports the Serial Port Profile.
Figure 6-47. The Bluetake BT200 Bluetooth Printer Adapter
In the following, I show you how I use the BT200 to connect to my HP 5L laser printer.
First, establish a connection between your computer and the printer using a parallel cable. Onceyou can print correctly using the parallel cable, power down the computer and printer,
1.

disconnect the parallel cable, and connect the Bluetooth printer adapter to the printer.
1.
The Bluetake Bluetooth printer adapter that I used in this chapter connectsonly to a parallel port printer. But if you have a USB printer, you can get theBluetooth printer adapter for it from MPI Tech at http://www.mpitech.com/.
Right-click on the Bluetooth icon in the System Tray and select Advanced Configuration. Click onthe Client Applications tab (see Figure 6-48).
Figure 6-48. Verifying the COM port used as a serial port
2.
Confirm the COM port used for the Bluetooth Serial Port. In my case, the port number is COM3.We will use COM3 to connect to the printer using Bluetooth. Also, double-click on BluetoothSerial Port to ensure that the Secure Connection checkbox is unchecked.
3.
Since our printer is going to connect to this virtual COM3, we need to configure our printer toconnect to this COM port, not the parallel port. Go to Start Settings Printers and Faxes.Locate your printer and right-click on it. Select Properties. Turn off the LPT port checkbox andturn on the COM3 checkbox. Click OK (see Figure 6-49).
Figure 6-49. Configuring the printer to print to a virtual COM port
4.

Next, go to My Bluetooth Places and select Bluetooth Setup Wizard.5.
In the Bluetooth Setup window, select "I know the service I want to use and I want to find aBluetooth device that provides that service" (see Figure 6-50). Click Next.
Figure 6-50. Using the Bluetooth setup wizard to set up the printer
6.
7.

In the next window, select Bluetooth Serial Port (see Figure 6-51) and click Next.
Figure 6-51. Using the Bluetooth serial port to connect to the printer
7.
Bluetooth will now search for other Bluetooth devices. Select "Show printers, cameras andscanners" from the drop-down list (see Figure 6-52). You should be able to find a device callBT200. Select it and click Next.
Figure 6-52. Locating the printer
8.
Finally, a Cable Replacement icon will be created in My Bluetooth Places. Click Configure toconfirm the settings for this connection (see Figure 6-53).
9.
Figure 6-53. A Cable Replacement icon to link to the printer

That's it! You can now print normally to your printer, and Bluetooth will perform its magic wirelesslyin the background.
6.5.6.1 Troubleshooting Bluetooth printing
Here are two solutions to common problems in getting your printer to print wirelessly:
Ensure that your printer is configured to print to the Bluetooth Serial Port.
Because different vendors have different setup instructions, follow the installation instructionsprovided by the vendor.
[ Team LiB ]

[ Team LiB ]
6.6 Bluetooth LAN
Like Wi-Fi access points, Bluetooth access points are increasingly popular. Using a Bluetooth accesspoint is similar to using a Wi-Fi access point - connect the access point to a wired network and youcan wirelessly connect your Bluetooth devices to the Internet.
6.6.1 Using a Bluetooth Access Point
In following steps, I illustrate the use of a Bluetooth access point by using the Bluetake BT300Bluetooth Access Point (AP).
6.6.1.1 Connecting to the Bluetooth access point
To connect to the access point, follow these steps:
First, connect your Bluetooth access point to your router/hub (you can also connect it directly toyour ADSL/DSL/cable modem). Power up your Bluetooth access point, go to My BluetoothPlaces, and search for the Bluetooth access point.
1.
When the access point is found, right-click on the icon and select Discover Available Services, asshown in Figure 6-54.
Figure 6-54. Discovering the services that the Bluetooth access pointprovides
2.
The Bluetooth access point supports the LAN access using PPP service. Right-click on the LANAccess icon and select Connect to Network Access Point, as shown in Figure 6-55.
3.
Figure 6-55. Connecting to the Bluetooth access point

By default, the Bluetooth access point has a static IP address of 1.1.1.1. Youcan configure it to obtain its address from a DHCP server. I discuss this in moredetail in Section 6.6.1.2.
You should then see a dialog prompting you to enter your username and password. Simplyleave these boxes empty and click on Connect, as shown in Figure 6-56.
4.
Figure 6-56. Click on Connect to log on to the Bluetooth access point
You should now be able to connect to the Internet.
6.6.1.2 Configuring the Bluetooth access point
By default, the connection to the Bluetooth access point is set at 115200 bps. You should set it to themaximum of 921600 bps. To do so, right-click on My Network Places and select Properties. Then,right-click on BluetoothNullConnection and select Properties. Under the General tab, click on theConfigure... button. This is shown in Figure 6-57.
Figure 6-57. Changing the maximum transfer speed of the Bluetooth

access point
One problem that you need to look out for is when you connect the Bluetooth access point to arouter. You need to assign an IP address to the access point before you can connect to it using theInternet. To do so, once you are connected to the access point, use a web browser and configure theaccess point (see Figure 6-58) using the URL http://1.1.1.1:5000. The default username andpassword for the Bluetake access point are BT and access_point, respectively. Check the
documentation that comes with your Bluetooth access point.
Figure 6-58. Configuring the Bluetake access point
Click on the Configuration link to configure the access point.
For those using an ADSL/DSL modem, choose the PPPoE option (see Figure 6-59). For cable modemusers, choose DHCP. (If you are not sure whether your Internet connection uses DHCP or PPPoE,contact your ISP.) There are also three security options available - levels 1 to 3. For security level 3,you need to supply a PIN code. You can also optionally enable data encryption. But doing so willeffectively reduce the data transfer rate.

Figure 6-59. Configuring the network type and security for the accesspoint
If you use security level 3, you will be prompted to enter the PIN code when your computer connectsto the access point (shown in Figure 6-60).
Figure 6-60. Prompt from the access point when security level 3 isselected
Click on the prompt and enter the PIN code, as shown in Figure 6-61.
Figure 6-61. Entering a PIN code to connect to the Bluetooth access point
You can now test your connection by using a web browser and see whether it can connect to a website.

Testing the Connection
I tested the connection using my two USB Bluetooth adapters - a Class 1 Bluetake USBadapter and a Class 3 Billionton USB adapter. Performance was comparable between thetwo except that the Class 1 Bluetake Bluetooth adapter is able to operate at a longerdistance. I was able to surf the Web comfortably without any noticeable difference. Onething I gathered is that Bluetooth works best if there is a lot of free space for the radiowaves to reach you. I tried locating the AP in a closed room (with concrete walls) andaccessing the network two rooms away, and the signal dropped to a rather weak level. Idid, however, maintain the connection, although it was slow. With Bluetooth, you canconnect up to seven devices to the AP, a number that should be sufficient for most homeuse. Using Bluetooth for LAN communications is useful for small devices (such as Palm andPocket PC) because Bluetooth generally uses less power than 802.11b.
[ Team LiB ]

[ Team LiB ]
6.7 Bluetooth Security
You saw in Chapter 4 that wireless security is always a concern to administrators. You have also seenthe flaws inherent in 802.11's WEP security. What about Bluetooth? Is it any more secure than802.11?
The short and quick answer is no, Bluetooth is no more secure than 802.11. Because Bluetooth isoften used in short-distance communications, its security aspects aren't well publicized, but it hascertainly had its share of security woes.
In Windows XP, to enable secure Bluetooth communication using encryption, right-click on theBluetooth icon located in the Tray and select Advanced Configuration. Click on the Local Services tab,and select the services that you want to enable encryption.
For example, you can select the Bluetooth Serial Port service and click on Properties. Check theSecure Connection checkbox to enable encryption (see Figure 6-62).
Figure 6-62. Enabling encryption for the Bluetooth serial port
In this and following sections, I explain how security is implemented in Bluetooth and some of thesecurity concerns of which you need to be aware.
As shown in Figure 6-63, Bluetooth has three security modes:
1.

Security Mode 1 doesn't provide security. A Bluetooth device in this mode allows any device toconnect to it. This is useful for applications that don't explicitly require security, such as theexchange of business cards.
1.
Security Mode 2 works at the service level. It is secured at the application layer (in other words,it is secured after a connection has been established). An application can be written to allowaccess to certain services (by another device) while restricting certain services.
2.
Security Mode 3 works at the link level. It is secured before a connection is established betweentwo devices. The use of a link key (or PIN code, as seen in earlier sections) is used toauthenticate the identity of another device.
3.
Figure 6-63. Security modes in Bluetooth
6.7.1 Authentication
Authentication verifies the identity of a device. First, some definitions are in order: a claimant is thedevice that needs to be authenticated, and a verifier is one that verifies the identity of the claimant.
Here is the sequence of the authentication process:
The user enters a PIN code (on both the claimant and the verifier).1.
The two devices use the PIN code to generate a 128-bit link key.2.
The claimant transmits its address (a 48-bit address, similar to the MAC address of a wirelesscard) to the verifier.
3.
The verifier transmits a 128-bit random challenge to the claimant.4.
Both the claimant and the verifier use the SAFER+ algorithm (Secure and Fast EncryptionRoutine) to generate a 32-bit authentication response. The SAFER+ algorithm takes in as inputthe link key, claimant's address, and the 128-bit random challenge.
5.
The claimant transmits the 32-bit authentication response to the verifier, which then comparesit with its own. If the two authentication responses are identical, the authentication issuccessful; otherwise, it fails.
6.
When an authentication fails, a Bluetooth device has to wait for an interval of time before it can beauthenticated again. This is a security measure against hackers using a rapid trial-and-errorapproach.

Figure 6-64 shows the authentication process.
Figure 6-64. Bluetooth authentication process
6.7.2 Encryption
Encryption protects the confidentiality of data transmitted between two Bluetooth devices. TheBluetooth specification supports three modes of encryption:
Encryption Mode 1
No packets are encrypted in this mode.
Encryption Mode 2
Data transmitted to a specific device is encrypted, but data broadcast to multiple devices isnot.
Encryption Mode 3
All the data transmitted is encrypted.
Here is the sequence for the encryption:
A Key Generator generates an encryption key using as input the 96-bit Authenticated CipherOffset (a result returned by the earlier authentication process), the Link key, and the 32-bit
1.

random challenge. The size of the encryption key ranges from 8 to 128 bits, and is negotiatedbetween the master and the slave.
1.
A key stream is produced using a cryptographic algorithm based on LFSR (Linear Feedback ShiftRegisters). The LFSR takes in as input the encryption key generated, the master's address, the32-bit random challenge, and the slot number to be used for the current packet.
2.
The key stream produced for each packet is different, since the slot numbervaries with each packet (due to frequency hopping). In a way, this is a securityfeature of Bluetooth.
The key stream produced is then XOR'ed with the plaintext, which is then transmitted to themaster.
3.
Figure 6-65 illustrates the process of encryption.
Figure 6-65. Bluetooth encryption process
6.7.3 Bluetooth Security Concerns
A detailed survey of Bluetooth security issues is beyond the scope of this book. However, based onwhat I have discussed, the following are some of the concerns with regards to Bluetooth security:
The PIN code used for establishing a link is usually short and thus easy to guess. Longer PINcodes could be used. However, users normally prefer a shorter PIN code for convenience.
Distribution of PIN codes in a large network is difficult. Fortunately, this is not a major concern,as Bluetooth is commonly used for ad-hoc networking.
The 32-bit random challenge may generate numbers that follow a certain pattern. This reduces

the effectiveness of the encryption.
Authentication is only at the device level; user-level authentication must be explicitlyimplemented.
As Bluetooth is a relatively new standard, the Bluetooth specifications are still undergoing changes.Over time, you can expect to see more security measures being put in place. At the moment, it isappropriate to apply some of the techniques used for securing network communications on sometypes of Bluetooth connections. For example, you could use a VPN or SSH (see Chapter 4) inconjunction with a Bluetooth network connection.
[ Team LiB ]

[ Team LiB ]
Chapter 7. InfraredIf you have ever used a remote control, you have used infrared technology. Infrared is a wirelesscommunication technology that makes use of the invisible spectrum of light that is just beyond red inthe visible spectrum. It's suitable for applications that require short-range, point-to-point datatransfer. Because it uses light, line of sight is a prerequisite for using infrared. Despite this limitation,infrared is widely used in household equipment and is increasingly popular in devices such as digitalcameras, PDAs, and notebook computers.
Founded in 1993 as a nonprofit organization, the Infrared Data Association (IrDA) is an internationalorganization that creates and promotes interoperable, low-cost infrared data interconnectionstandards that allow users to point one device at another and have it just work. The Infrared DataAssociation standards support a broad range of appliances, computing, and communications devices.
The term IrDA is typically used to refer to the protocols for infraredcommunications, not exclusively to the nonprofit body.
In this chapter, I take a look at Windows XP's support for infrared and show how you can make useof it for your daily tasks.
[ Team LiB ]

[ Team LiB ]
7.1 IrDA in More Detail
There are currently four versions of IrDA; their differences are mainly in the transfer speed. Theyare:
Serial Infrared (SIR)
This is the original standard with a transfer speed of up to 115 Kbps.
Medium Infrared (MIR)
Improved transfer speed of 1.152 Mbps. Not widely implemented.
Fast Infrared (FIR)
Speed of up to 4 Mbps. Most new computers implement this standard. Windows 2000 and XPsupport this implementation.
Very Fast Infrared (VFIR)
Speed of up to 16 Mbps. Not widely implemented yet.
Future versions of the IrDA will boost speed up to 50 Mbps.
When two devices with two different IrDA implementations communicate with each other, they willboth step down to the lower transfer speed.
In terms of operating range, infrared devices can communicate up to one or two meters. Dependingon the implementation, if a device uses a lower power version, the range can be stepped down to amere 20 to 30 cm. This is crucial for low-power devices.
All data packets exchanged are protected using a Cyclic Redundancy Check (CRC), which uses anumber derived from the transmitted data to verify its integrity. CRC-16 is used for speeds up to1.152 Mbs and CRC-32 is used for speeds up to 4 Mbs. The IrDA also defines a bi-directionalcommunication for infrared communications.
[ Team LiB ]

[ Team LiB ]
7.2 IrDA Adapters
If you use a notebook computer, you most likely have an infrared port. Most notebook computerscome with an infrared port built in; look at the back of your notebook and you should be able to findit. The port is usually a dark red color. Figure 7-1 shows the infrared port at the back of an HPnotebook.
Figure 7-1. An infrared port at the back of a notebook computer
7.2.1 USB Infrared Adapter
It is rare to find an infrared port on a desktop computer. Most desktop manufacturers have notincorporated infrared functionality into their design, mainly because of the lack of demand for it.However, you can add infrared functionality into your desktop by purchasing a relatively cheap(under $50) infrared adapter. Figure 7-2 shows a USB infrared adapter. To use it, simply plug theadapter into the USB port and Windows XP will automatically recognize and install the driver for thedevice.
Figure 7-2. A USB infrared adapter

You can verify that your Windows XP computer supports infrared functionalityby going to Start Settings Control Panel System. Go to theHardware tab and click on Device Manager. If you can locate the icon namedInfrared devices (see Figure 7-3), then your computer is capable of infraredfunctionality. If you cannot locate this icon, ensure that you really have aninfrared port or connect your infrared adapter again.
Figure 7-3. Infrared support in Windows XP
[ Team LiB ]

[ Team LiB ]
7.3 Using IrDA in Windows XP
Windows XP supports the IrDA protocols, providing connectivity to the Internet and to othernetworks. Using Windows XP support for infrared communication, you can connect to the Internetusing a dial-up infrared modem or connect to another computer through point-to-point connection.You can also connect to the Internet through a computer and a network access point.
The advantage of using Windows XP for infrared communication is transparency to the end user.
For dial-up networking, when an infrared device is within range of anotherdevice, Windows XP will automatically install the necessary device (such as aninfrared modem). Two kernel-mode drivers (IrCOMM and IrEnum) and an .inffile (Mdmirmdm.inf) provide this functionality.
For LAN access networking, Windows XP uses the IrNET protocol, which uses the Point-To-Point (PPP)protocol over the infrared link for network access.
[ Team LiB ]

[ Team LiB ]
7.4 Infrared File Transfer
Imagine that you are at a conference and would like to send a couple of files to someone that youhave just met. There might not be a network available, and it is unlikely that you lug a serial cablewith you when you travel. If both of you are using notebook computers, the best solution is to useinfrared to send the files.
When two computers are within communicating range of each other (with the infrared port of eachcomputer pointing at each other), Windows XP will automatically activate the irFTP application, whichis found in the C:\Windows\system32 directory. The irFTP application allows two computers toexchange files using infrared. You can use this utility at the command prompt. To see a list ofoptions, enter the command irftp /h.
Exchanging files between computers using infrared is similar to doing so with aPocket PC; this is demonstrated in the following section.
7.4.1 Computer to Pocket PC
Most Pocket PCs contain a built-in infrared port for communicating with the outside world. Using theinfrared port, you can transfer files from the Pocket PC to the computer (and vice versa) withoutusing a cable. Figure 7-4 shows the iPaq 3870 with the infrared port located at the top.
Figure 7-4. The infrared port located at the top of the iPaq 3870
When you align the infrared ports of both the Pocket PC and your computer, Windows XP will informyou that a Pocket PC is nearby (see Figure 7-5).
Figure 7-5. Discovering a nearby computer using infrared

The Send files to another computer icon (a shortcut to the irFTP application) also appear on yourdesktop (see Figure 7-6).
Figure 7-6. The shortcut to the irFTP application
You can double-click on the icon shown in Figure 7-6 to send files to your Pocket PC (see Figure 7-7).
Figure 7-7. Sending files using infrared
Select the file that you want to send and click on the Send button.
7.4.2 Pocket PC to Computer
To send files from the Pocket PC to the computer, go to File Explorer on the Pocket PC, then tap andhold on to the file that you want to send, to bring up the context menu. Select Beam File... as shownin Figure 7-8.
Figure 7-8. Sending a file on a Pocket PC using infrared

On your computer, you will receive a prompt seeking your permission to accept the file. Click on Yesto receive the file, or click Cancel to reject it (see Figure 7-9).
Figure 7-9. Requesting permission to accept or reject a file
On the receiving computer's end, you need to click on the infrared icon locatedin the tray to accept the incoming file. Windows XP does not alwaysautomatically display a window for that. If you do not click on the iconmanually, the sending computer continues to wait for a reply.
You can configure the default directory for file transfer by right-clicking on the infrared icon in thetray (shown in Figure 7-10) and selecting Properties from the pop-up menu.
Figure 7-10. The infrared icon in the Tray

This brings up the Wireless Link dialog, shown in Figure 7-11.
Figure 7-11. Configuring the properties for infrared communication
If you did not configure a default location for received files, the incoming file(s) will be saved on thedesktop.
7.4.3 ActiveSync
Another use of infrared is synchronizing your Pocket PC with your computer. With ActiveSync, youcan use infrared to connect to your Pocket PC without a syncing cradle or cable.
To use infrared for ActiveSync, launch Microsoft ActiveSync on your computer and click File Connection Settings.... Turn on the "Allow serial cable or infrared connection to this COM port"checkbox (see Figure 7-12) and click OK.
Figure 7-12. Configuring Microsoft ActiveSync for infraredcommunication

Align the infrared port of the Pocket PC to that of the computer and on the Pocket PC, launchActiveSync and select Tools Connect via IR... (see Figure 7-13).
Figure 7-13. Invoking Microsoft ActiveSync using infrared
Microsoft ActiveSync should now start connecting to the Pocket PC.
7.4.4 Connecting to the Internet Via Infrared

In this section, I illustrate how you can connect to the Internet using a mobile phone. The phoneused in this example is the Nokia 6610 (see Figure 7-14), which supports GPRS data access.
Figure 7-14. The Nokia 6610
For more information on GPRS, please refer to Chapter 8.
Invoke the Infrared option (go to Menu Connectivity Infrared) on your mobile phone.
Align the phone's infrared port (see Figure 7-15) to that of your computer's.
Figure 7-15. The infrared port for the Nokia 6610
Windows XP will automatically detect the Nokia 6610 (see Figure 7-16).
Figure 7-16. Detecting the Nokia 6610

Windows XP will also query the device for the services that it provides. In the case of the Nokia 6610,a classic phone (with modem capability) is detected, and Windows XP automatically installs astandard modem over the IR link (see Figure 7-17).
Figure 7-17. Installing a standard modem over the IR link for the Nokia6610
You are now ready to set up your computer to use the Nokia 6610 as a modem:
Right-click on My Network Places and select Properties.1.
Select Create a New Connection.2.
A wizard will appear to help you set up the connection. Choose the following options in eachdialog:
Connect to the Internet
Set up My Connection manually
Connect using a dial-up modem
3.
A list of available modems will be displayed (see Figure 7-18). Choose the standard modem over theIR link.
Figure 7-18. Selecting the IR modem for dial-up access
You will be prompted to enter the ISP name, username, and password. You need to obtain all thisinformation from your ISP.

Finally, turn on the "Add a shortcut to this connection to my desktop" checkbox. Double-click on theconnection icon, and a connection window appears as shown in Figure 7-19.
Figure 7-19. Dial-up access using the Nokia 6610
7.4.5 Sharing Internet Connection Using Infrared
Using an infrared connection, two computers can share an Internet connection. Assuming that onecomputer with an infrared port is connected to the Internet via an Ethernet connection, anothercomputer that is also equipped with an infrared port can establish a connection with it and share theconnection to the Internet.
On the computer that is connected to the Internet:
Right-click on My Network Places and select Properties.1.
Select Create a New Connection.2.
Select Set up an Advanced Connection and click Next. The Advanced Connection Options dialogappears.
3.
Select Accept Incoming Connections and click Next. The Devices for Incoming Connectionsdialog appears.
4.
Choose the devices for the connection. In this case, you should choose the Infrared Port(IRDA3-0); see Figure 7-20. Click Next. The Incoming Virtual Private Network (VPN) Connectiondialog appears.
5.

Figure 7-20. Selecting the infrared port for Internet sharing
5.
Select Do Not Allow Virtual Private Connections and click Next. The User Permissions dialogappears.
6.
Select the user accounts that should be allowed to connect to this computer (see Figure 7-21).
Figure 7-21. Selecting the accounts for sharing the Internetconnection
7.
8.

Finally, select the protocols to be installed for the connection. Accept the default settings (seeFigure 7-22).
8.
Figure 7-22. Installing the protocols for the shared connection
That's it! Your computer is now ready to accept incoming connections.
On the computer that is going to use the shared Internet connection, you need to perform thesesame steps. However, in step 4, instead of configuring an incoming connection, select the option"Connect directly to another computer" (see Figure 7-23). Click Next. The "Host or Guest?" dialogappears. Do the following:
Figure 7-23. Creating a connection to the host computer
1.
2.

Select Guest and click Next. The Connection Name dialog appears.1.
Give the host computer a name and click Next. The Select a Device dialog appears.2.
Select the device to be used for the connection. In this case, use the Infrared port (IRDA3-0);see Figure 7-24. Click on Next to complete the installation.
Figure 7-24. Selecting an infrared port to be used for connection
3.
You now see the connection window (see Figure 7-25). Enter the username and password thatcorresponds to the account name that you selected for access in the last section.
4.
Figure 7-25. Connecting to the host computer
You can now connect to the Internet using the infrared port. Subsequently, you can connect to theInternet by aligning the infrared ports of the two computers and double-clicking on the icon bearingthe remote host computer's name (located in the Network Connections window).

You may need to configure your web browser for Internet access. For example,if the host computer requires you to specify a proxy server for Internet access,you also need to specify it in your web browser settings.
[ Team LiB ]

[ Team LiB ]
7.5 Infrared Security
Unlike Bluetooth and 802.11, Infrared requires an unobstructed line of sight in order for two devicesto communicate with each other. It also has a much smaller operating range, compared to the othertwo. For these reasons, Infrared does not provide any security mechanism at the link level; instead,applications must implement their own security measures at a higher protocol level.
To better understand the security risk of Infrared, let's look at some characteristics of it. An infraredconnection operates at a range of 0 to 1 meter, with peak intensity within a 30 degree cone (seeFigure 7-26). With more power, a longer operating range is possible with a reduction in transferspeed. In addition, an infrared connection requires a visual line of sight (LOS) in order to work. Inother words, there must be no direct obstruction between the two communicating devices.
Figure 7-26. The 30 degree cone for peak power intensity of an infraredport
Considering that infrared communications operate at such a short range, it is quite difficult for anattacker to eavesdrop without being noticed (or completely breaking the connection).
[ Team LiB ]

[ Team LiB ]
Chapter 8. Cellular NetworkingIn theory, cellular networking offers the ultimate unwired experience: network connectivity as long asyou are in range of a cell tower. In practice, it's much less than its promise, but it's still getting betterevery day. Most unwired power users employ a combination of Wi-Fi hotspots and cellular networkingto satisfy their lust for bandwidth.
[ Team LiB ]

[ Team LiB ]
8.1 Cellular Networking Price and Performance
Cellular networking offers the following downstream speeds (for activities such as receiving email,downloading files via FTP, and surfing the Web):
19.2 Kbps on first generation (1G) networks. CDPD (Cellular Digital Packet Data) is a once-popular 1G service that cellular providers are hoping to phase out.
50-70 Kbps on early third-generation (3G) networks (often referred to as 2.5G), sometimespeaking to 144 Kbps. General Packet Radio Services (GPRS) is the leading 2.5G service. AT&TWireless uses GPRS for its mMode consumer-oriented data plans and its Mobile Internetbusiness-oriented data plans. T-Mobile uses GPRS for its T-Mobile Internet data plans.
144 Kbps and higher on 3G networks. CDMA2000, Enhanced Data GSM Environment (EDGE),and Wideband CDMA (WCDMA) are emerging 3G technologies. The first phase of CDMA2000 is1x Radio Transmission Technology (1xRTT); it is used by Verizon's Express Network andSprint's PCS Vision. At the time of this writing, EDGE is not widely available, but is reported tohave been quietly deployed by AT&T Wireless and Cingular.
Upstream speeds (for activities such as sending email, using FTP to upload files, and uploadingdocuments to web sites) are generally less than the download speeds, anywhere from 9.6 Kbps toabout one-half the downstream speed.
One of the fundamental limits on cellular networking is the price of data. Typical packages offer abucket of data with coverage charged per kilobyte over the limit. Table 8-1 shows some examplesbased on current U.S. pricing.
Table 8-1. 1G, 2G, and 3G pricing
Quantity 1G 2.5G and 3G
Unlimited$40-$60/month
$80 or more per month for 1xRTT service. At the time of this writing, T-Mobile is the only GPRS provider advertising unlimited data plans($29.99/month).
5 Mb n/a $15-$20 per month
20 Mb n/a $35-$55 per month
A busy user can blow through 20 megabytes in a couple hours of web surfing and email. So heavyusers should opt for an unlimited pricing plan, or carefully plan out their usage to take advantage of(free, if possible) Wi-Fi hotspots and use the cellular service only when absolutely necessary (such assending out an urgent email while sitting on a runway).
Even with a data allotment that you're comfortable with, service can be spotty, though coverage is

most comprehensive in densely populated areas (especially Europe and Asia). However, in a denselypopulated area such as New York City, buildings can interfere with the signals, and manysimultaneous users can limit the performance of the network in a given area.
As tempting as it is to chalk up performance problems to early adoption doldrums, the old maxim stillstands: let the buyer beware. If you knowingly purchase poor service in the hopes that it will improveover time, keep in mind that there is no guarantee that it will. When in doubt, seek the opinions ofothers; the Usenet hierarchy alt.cellular.* has many newsgroups devoted to specific carriers whereyou can read about peoples' experiences (you can read and post to these newsgroups throughGoogle Groups at http://groups.google.com). Be sure to get service from a provider who offers acomplete refund, no questions asked, within a reasonable trial time (some providers offer 15 days,which is too little, so try pressuring the sales person for a 30-day trial).
[ Team LiB ]

[ Team LiB ]
8.2 GPRS
General Packet Radio Service (GPRS) is a data service that supplements other data services such asCircuit Switched Data (CSD, used for data and fax calls on GSM networks) and Short MessageService (SMS). The design of GPRS was informed by the fact that wireless data communications arebursty in nature. That is, the data is not sent in one long stream, but rather in short bursts.Traditional use of CSD such as the Wireless Application Protocol (WAP) for data transfer requiresestablishing connections between two communicating parties, which occupies bandwidth even whennot transmitting data. With GPRS, data is sent as packets as and when required. This feature allowsdevices to stay connected all the time, and eliminates the need to establish a connection and stayconnected within the entire duration. This allows service providers to bill customers based on the datatransferred and not the connection time.
In this section, I take a closer look at how GPRS works, as well as some of the devices that you canuse on the road.
8.2.1 GSM Networks and GPRS
GPRS is a packet-switched service built on the existing Global System for Mobile (GSM)communication voice network. GSM was primarily designed for voice services.
A GSM channel contains eight timeslots (a portion of time allocated to transmit data), with eachtimeslot dedicated to each circuit-switched call. Traditionally, when using Circuit Switched Data (CSD)- which is explained in more detail in What Is CSD/HSCSD? later in this chapter - you can only usea maximum of one timeslot. With GPRS, timeslots can be assigned dynamically, and you can usemore than one single timeslot. This results in increased throughput, which was was previously notpossible with CSD. Also, because timeslots are only allocated when required, more users can besupported at any one time.
GSM networks have more worldwide coverage than any other cellular technologies, such as CDMAand PDC (Personal Digital Cellular) used in Japan. In Asia and Europe, the frequencies used for GSMare 900 and 1800 MHz. In North America, it is 1900 MHz. Phones that support these threefrequencies are known as tri-band phones. Examples of tri-band phones are the Sony Ericsson T68iand the Nokia 6610.

GPRS and 3G
3G wireless (or Third-Generation wireless) is an initiative to provide enhanced voice, text,and data services. The main draw of 3G networks is the vastly increased data transferrate of between 384 Kbps and 2 Mbps. With these speed improvements, applications thatsupport real-time video and high-quality multimedia elements can be deployed.
However, deploying 3G networks is not an overnight affair. This requires heavyinvestment from wireless carriers as well as from telephone and modem manufacturers.In the midst of waiting for the next generation wireless networks, GPRS bridges the gapbetween the current 2G networks (such as GSM or TDMA) and the forthcoming 3Gnetworks. As such, GPRS is commonly known as 2.5G.
3G networks will likely be using W-CDMA (Wideband Code Division Multiple Access)technology, which is backed by industry giants like Nokia and Ericsson. In Europe, UMTS(Universal Mobile Telephone Service) has been adopted as a 3G network.
8.2.2 How GPRS Works
GPRS uses multiple timeslots for sending data. In theory, GPRS can use up to eight timeslots, butphysical constraints (such as the number of users currently on the network as well as the coveragequality) have placed the number to a maximum of five, with one or two timeslots reserved forupstream communications (leaving three or four for downloads).
There are altogether four encoding schemes used in a GPRS network. Table 8-2 shows these andtheir data rate per timeslot as well as their maximum data speed for eight timeslots. The encodingscheme to be used is determined by the service provider and depends on factors such as the qualityof the channel (the radio link between the GPRS device and the base station). CS-1 has the highestreliability (but the lowest data rate) and CS-4 has the least reliability (but the highest data rate).
Table 8-2. Coding schemes used in GPRS
Channel codingscheme
Data rate pertimeslot
Maximum data speed with eighttimeslots
CS-1 9.05 Kbps 72.4 Kbps
CS-2 13.4 Kbps 107.2 Kbps
CS-3 15.6 Kbps 124.8 Kbps
CS-4 21.4 Kbps 171.2 Kbps
Each GPRS device also belongs to a particular class. A class determines the number of timeslots usedfor downloading and uploading. The manufacturer of the GPRS device determines the class of adevice.

Table 8-3 shows the 29 classes for GPRS devices. Each class has a designated number of timeslotsused for downloading and uploading. The maximum slots column lists the maximum number oftimeslots that a device can use simultaneously for downloads and uploads.
Table 8-3. GPRS device classes
Class Download Upload Maximum slots
1 1 1 2
2 2 1 3
3 2 2 3
4 3 1 4
5 2 2 4
6 3 2 4
7 3 3 5
8 4 1 5
9 3 2 5
10 4 2 5
11 4 3 5
12 4 4 5
13 3 3 unlimited
14 4 4 unlimited
15 5 5 unlimited
16 6 6 unlimited
17 7 7 unlimited
18 8 8 unlimited
19 6 2 unlimited
20 6 3 unlimited
21 6 4 unlimited
22 6 4 unlimited
23 6 6 unlimited
24 8 2 unlimited
25 8 3 unlimited

Class Download Upload Maximum slots
26 8 4 unlimited
27 8 4 unlimited
28 8 6 unlimited
29 8 8 unlimited
To put these numbers into perspective, let's take an example and illustrate how all these numbersdetermine the throughput of a GPRS device.
The Nokia D211 GPRS PC card is a Class 6 device (I talk more about this card in the next section).This means that it has 3 timeslots allocated for downloads (sometimes referred as 3+2, for 3timeslots for downloads and 2 timeslots for uploads). If I use the Nokia D211 in Singapore and myISPsupports the CS-2 coding scheme, then the maximum downstream speedof the D211 is (13.4 Kbps x3), giving a maximum download speed of 40.2 Kbps.
In practice, the theoretical data rate of 40.2 Kbps is not achievable due to real-world conditions such as signal interference and protocol overhead.
GPRS devices fall into three categories:
Class A
Class A devices can connect to GSM and GPRS services simultaneously, and both can work atthe same time. This is the ideal communication device.
Class B
Class B devices can connect to either GSM or GPRS services (or both at the same time). Butonly one can work at a time. An example of Class B device is a GPRS-enabled mobile phonesuch as the Ericsson T68i. You may be using the GPRS service and suddenly a voice call comesin. You can use either the voice service or the GPRS service, but not the two simultaneously.Most mobile phones today are Class B devices.
Class C
Class C devices can connect to GSM or GPRS services (but not both at the same time). Theuser must manually switch between the two services. An example of Class C device is theNokia D211 GPRS card. You need to manually switch between GSM and GPRS services.

8.2.3 GPRS Devices
GPRS devices are commonly called " GPRS terminals." These come in different shapes and sizes, butcan be grouped into the following categories:
GPRS phones
GPRS modems
GPRS modules
A constantly updated list of GPRS terminals can be found athttp://www.gsmworld.com/technology/gprs/terminals.shtml.
8.2.3.1 GPRS phones
Many new mobile phones support GPRS for data access. Two such phones are the Sony Ericsson T68iand the Nokia 6610 (see Figure 8-1).
Figure 8-1. The Sony Ericsson T68i and the Nokia 6610 (shown with thekind permission of Sony Ericsson; copyright Sony Ericsson 2003)
Using a GPRS-enabled phone, you can access WAP applications on your mobile phone. You can alsoconnect your Windows XP computer to your mobile phone (through Bluetooth or infrared) and use itas a GPRS modem. You can then access the Internet.

What Is a SIM Card?
A SIM is a smart card placed inside a GSM phone that identifies the user account to thenetwork. It handles tasks such as authentication and acts as data storage for user datasuch as phone numbers, Short Message Service (SMS) messages, and networkinformation. Figure 8-2 shows a SIM card inserted into a mobile phone.
A SIM card may also contain applications that run on the phone.
Chapter 6 and Chapter 7 discuss how you can use Bluetooth and infraredconnections to connect to your GPRS-enabled phone for Internet access.
8.2.3.2 GPRS modem
For dedicated data access, you can use a GPRS modem. This is usually a PC card that allows you tomake data calls. To use a GPRS modem, you need to insert your Subscriber Identity Module (SIM)card into your phone or PCMCIA card; it also requires a subscription to the data service provided byyour ISP. The Sierra Wireless Aircard® 750 (see Figure 8-3) is a GPRS modem card that supportsGPRS data access in addition to GSM voice calls and SMS messages.
Figure 8-2. A SIM card inserted into a mobile phone
Figure 8-3. The Sierra Wireless Aircard 750

8.2.3.3 GPRS modules
GPRS modules are commonly used by vertical application developers such as value-added serviceproviders and equipment manufacturers.
The Sony Ericsson GM47/GM48 (see Figure 8-4) is a radio device that can be incorporated into otherdevices such as a vending machine, an alarm monitoring system, etc. It allows systems developers tobuild GPRS (and GSM) functionality into their systems.
Figure 8-4. The Sony Ericsson GM47/GM48 GSM module (shown with thekind permission of Sony Ericsson; copyright Sony Ericsson 2003)
The Sony Ericsson GM29 (see Figure 8-5) uses the GM47/GM48 hardware module. The GM29 ismarketed as a GSM/GPRS modem. It is a Class B (4+1) device with an RS232 connection.
Figure 8-5. The Sony Ericsson GM29 GSM/GPRS modem (shown with thekind permission of Sony Ericsson; copyright Sony Ericsson 2003)

8.2.4 Using a GPRS/GSM PCMCIA Card
The Nokia D211 (see Figure 8-6) and D311 are multimode radio cards (PCMCIA cards) that supportGPRS, CSD (Circuit Switched Data), HSCSD (High Speed Circuit Switched Data; D211 only), and802.11b networks. It is slightly longer than a conventional wireless card and combines the best ofboth worlds: allowing you to access a wireless network as well as connect to the Internet throughGPRS when a wireless network is not available. The beauty of the D211 is that all these functionalitiesare integrated in one card, which makes it ideal for road warriors. The only downside is that youcannot make voice calls using the D211; otherwise, the card would be perfect.
Figure 8-6. The Nokia D211
Both T-Mobile and AT&T Wireless offer the Sierra Wireless AirCard 750;although it does not support Wi-Fi, it is voice capable.

What Is CSD/HSCSD?
Circuit Switched Data (CSD) is the regular way to transfer data using a circuit switchingtechnique. It is like making a voice call between two parties - you have to establish aconnection first. Once you are connected, you can then start talking. With CSD, chargesare based on the time you spend connected with the other party. CSD allows data rate of9.6 Kbps to 14.4 Kbps.
High Speed Circuit Switched Data (HSCSD) is the same as CSD except that its data rate ismuch higher - up to 43.2 Kbps is possible.
Compared to CSD, GPRS charges are usually billed based on the data actually transferred,not by connection time. However, GPRS service is generally quite limited in comparison tocompanion voice plans. For example, it would not be unusual to get 500 voice minutes permonth (if you pick the right promotion, you could double that) for $40 but to get only 20megabytes of data for another $40. So, when you run out of megabytes at GPRS speeds(40 Kbps or more), you can switch over to dialing into a dial-up ISP at your workplace atCSD speeds, at which point you start using up your voice minutes (and whatever feesyour ISP charges). Note that some U.S. providers do not permit CSD calls. For example,as of this writing, it is impossible to initiate a CSD call with AT&T Wireless's 2.5G service.
8.2.4.1 Installing the drivers and support software
Installing the Nokia D211 is a straightforward procedure:
Install the provided software using the installation CD.1.
Insert the card into a PCMCIA slot on your notebook.2.
Windows XP will search for the appropriate drivers using wizards. Select the option "Install thesoftware automatically," and then select "Continue Anyway" to continue with the installation.
3.
When the software is installed, you should be able to see the icon of the Nokia software locatedin the Tray (see Figure 8-7).
Figure 8-7. The Nokia software icon located in the Tray
4.
Double-click on the icon in the Tray to invoke the Nokia D211 Manager (see Figure 8-8).
Figure 8-8. The Nokia D211 Manager
5.

The Nokia D211 Manager contains three main functions: Profiles, Settings, and Tools. TheProfiles function allows you to configure the various settings for Wi-Fi, GSM and GPRS access.The Settings function allows you to fine-tune the various settings for GSM, WLAN, and Security.The Tools function contains a diagnostics utility as well as log information, etc.
6.
In this chapter, I use the D211 to illustrate the configuration process. Youshould substitute the D211 with the D311 if you reside in the U.S.
D211 Versus D311
Nokia has two GPRS radio cards: D211 and D311. These two models are almost similar,except that the D211 is sold (and usable) in Europe and Asia, whereas the D311 is sold inthe U.S.
The D211 supports dual band EGSM (Enhanced GSM) and operates at frequencies of900/1800 MHz. The D311 supports dual band GSM and operates at frequencies of850/1900 MHz. The D211 supports CSD and HSCSD while the D311 supports only CSD.
The most significant difference between the D211 and the D311 is in the data rate. D211supports up to 43.2 Kbps (using HSCSD; a maximum 40.2 Kbps. when using GPRS) whilethe D311 only supports up to 14.4 Kbps (using CSD; a maximum 40.2 Kbps using GPRS).Do note that data rates are dependent on service providers.
For more information on the two cards, point your browser athttp://www.nokia.com/cda10/0,1119,2004,00.html.

8.2.4.2 Configuring WLAN access
The Nokia D211 and D311 support 802.11b wireless network access. Let's configure the card forwireless access now. Here are the steps:
Ensure that you have selected the Profiles function from the Nokia D211 Manager.1.
Click on the Modify tab.2.
Click on New....3.
Give your profile a name, e.g., Home Network (see Figure 8-9). Also check the connectiontype(s) to be used for this profile. In other words, you can use this profile to connect to a WLANconnection, GSM connection, or GPRS connection (for our example here, let's just turn on theWLAN connection checkbox). Click Next.
4.
Figure 8-9. Creating a new profile

SMS Craze in Asia
SMS messaging is very popular in Asia. In Singapore, teenagers can often input text faster(using numeric keypads on the phones) than you can type on a computer keyboard!
The following is an explanation of how to type messages on your mobile phone.
Each numeric key on your phone is assigned three to four alphabetic characters:
2 - a, b, c3 - d, e, f4 - g, h, i5 - j, k, l6 - m, n, o7 - p, q, r, s8 - t, u, v9 - w, x, y, z
To form a word, you need to press the corresponding digits that make up the letters of aword. For example, to form the word "is," you would press "4" three times ("i" is the thirdalphabet in this assignment) and then press "7" four times. This input method iscommonly known as the "multitap" method.
But most mobile phones sold today support the T9 input method. T9 stands for "Text on 9keys." Here is how T9 works. Look for the letters that you want and press the assigneddigit once. Using the same example, to form the word "is," press "4," followed by "7." Aphone utilizing the T9 technology has a compressed database of all the commonly usedwords. In this case, the database returns "is" as a likely word.
There are many cases when a particular key sequence may generate multiple words, suchas the sequence "4663." Two possible words are "good" and "home." So, as a user youjust need to select the word that you want. If a desired word cannot be found in thedatabase, you have the option to add it in.
Try it on your mobile phone and see if you can type faster than on a keyboard!
For more information on T9 input, go to http://www.t9.com/.
TDMA
The predecessor of CDMA is Time Division Multiple Access (TDMA). TDMA operatessimilarly to network packet switching - it divides the signal into multiple segments,thereby allowing multiple calls to take place. Unlike CDMA, TDMA does not utilize SpreadSpectrum Technology and hence the available spectrum must be divided into channels,which means fewer users are supported simultaneously than with CDMA.
5.

You will be prompted to select the wireless mode (Infrastructure or ad-hoc). The SSID(s) of theavailable wireless networks will also be displayed (see Figure 8-10). Select the SSID of thewireless network to which you want to connect. Click Next.
Figure 8-10. Selecting the wireless mode
5.
On the next screen, you have the option to specify your IP address manually. We will use the IPaddress allocated by the wireless network. Click Next.
6.
The main screen of the Nokia D211 Manager will be displayed again (see Figure 8-8). ClickSelect... to choose the profile to use. Select the WLAN connection type under the Home Networkitem (see Figure 8-11).
Figure 8-11. Selecting the wireless connection
7.
You should now be able to connect to the wireless network. Information about the connection,such as the connection quality and data flow, is displayed (see Figure 8-12).
8.

8.
Figure 8-12. Viewing the wireless connection information
8.2.4.3 Configuring GPRS access
Let's now configure the Nokia D211 for GPRS access. For this, you need to insert your SIM card intothe D211 before you can connect to the GPRS network. If you purchased the D211 or D311 alongwith a wireless plan from a cellular provider, the SIM card may have been installed for you.Otherwise, you will have to use a SIM card from another phone.
In the D211 Manager, click on Profiles, then click the Modify tab.1.
Select the profile to which you want to add GPRS access.2.
Click on GPRS (see Figure 8-13). Turn on the "Use GPRS connection with this profile" and"Specify access point name manually" options. Enter the GPRS access point name provided byyour ISP.
Figure 8-13. Using a GPRS connection
3.

Click OK and return to the main screen by clicking on the General tab.4.
Click Select... and choose the GPRS item (see Figure 8-14).
Figure 8-14. Selecting the GPRS connection
5.
Click the Activate button (see Figure 8-15).
Figure 8-15. Activating GPRS access
6.
A Dial-up Connection window appears (see Figure 8-16). Enter your username and password(provided by your ISP).
Figure 8-16. Dialing up GPRS
7.

When authenticated, you should now see the operational information (see Figure 8-17).8.
Figure 8-17. Viewing the GPRS connection information
8.2.4.4 Messaging using SMS on the Nokia D211

One interesting feature of the Nokia D211 is the ability to send and receive SMS (Short MessageService) messages. In the Nokia D211 Manager window (see Figure 8-18), click SMS Inbox (orany other items within the SMS menu to launch the Nokia Short Messaging window).
Figure 8-18. Invoking the SMS functionality
This window contains five main tabs: Inbox, Outbox, Sent messages, Delivery reports and Contacts(see Figure 8-19). To send a message, simply click the Send message icon and type your text.
Figure 8-19. The Nokia Short Messaging window
[ Team LiB ]

[ Team LiB ]
8.3 CDMA2000
Besides GSM, Code Division Multiple Access (CDMA) is also a popular cellular technology used in theU.S. CDMA uses Spread Spectrum Technology (SST), which allows a unique code to be attached toeach conversation and to spread conversations across wide segments of the cellular broadcastspectrum. Each receiver decodes on the same frequency segment as the sender. Because multiplesignals can be transmitted over the same spectrum, CDMA allows many more conversations to bepossible compared to other cellular technologies.
CDMA is used by Sprint PCS, Verizon Wireless, and AT&T. CDMA2000 is the latest generation ofCDMA technology and is used on Sprint's PCS Vision network and Verizon Wireless's ExpressNetwork.
8.3.1 Using the AirPrime PC3200 CDMA2000 PC Card
Sprint's AirPrime PC3200 PCMCIA card operates on the CDMA2000 network. This card dances on theedge of 2.5G and 3G, boasting typical data speeds of between 50 and 70 Kbps. It is capable of apeak speed of 144 Kbps.
8.3.1.1 Installing the AirPrime PC3200
Take the following steps to install the AirPrime PC3200:
Install the provided software using the installation CD.1.
Tips for Road Warriors
Here are some tips for road warriors:
Use a wireless network whenever one is around. When you are traveling, such as on atrain, you can manually switch to GPRS access. The downside is that GPRS access isslower and much more costly than wireless access. The theoretical speed of 40.2 Kbps isnot achievable in practice. Expect performance of about 20+ Kbps.
Since GPRS is much slower and costs more, turn off image loading in your web browserwhen surfing the Web. This causes the web pages to load faster and save you money.
If your cellular provider supports a compressing proxy (See Section 8.4, later in thischapter), be sure to install and configure the software according to the instructions. Sucha proxy server can increase speed and reduce your bandwidth consumption.
Speed for checking emails is acceptable when using GPRS. However, it is advisable to

configure your email client to download message headers only; if someone sends you amulti-megabyte attachment or even a long message, it could take a long time todownload and use up your bandwidth allotment. You can then decide on a message-by-message basis whether to view the message body and/or download attachments. Youshould also install a spam filter in your email application so as to avoid downloading hugejunk emails just to delete them. Many email clients include some spam-blocking features,and typically analyze the email headers (rather than the body of the message) todetermine whether a message is spam.
Make full use of the SMS feature. Sending SMS messages may be cheaper than making avoice call. Use SMS instead of voice calls: you can type them with the keyboard on yournotebook and they will be delivered quickly.
Insert the card into a PCMCIA slot on your notebook.2.
Windows XP will search for the appropriate drivers using wizards. Select the option "Install thesoftware automatically", and then select Continue Anyway to continue with the installation.
3.
When the software installation is complete, you need to activate the card (see the followingsection).
4.
8.3.1.2 Activating the AirPrime PC3200
Before you can use the card, you need to activate it, which connects your account to the card andallows it to get on the Sprint PCS Vision network. Unlike with GSM/GPRS adapters and phones, CDMAdoes not use a SIM card, so your identity is connected with the account information you supplyduring this procedure.
After the software installation is complete, the Activation Wizard appears and provides you with thefollowing sequence:
The first screen (Figure 8-20) provides you with basic information about the activationsequence. If you don't already have an activation code and phone number, follow theinstructions on this screen to obtain them.
Figure 8-20. Sprint PCS Vision Activation Wizard
1.

In the following screens, supply your activation code, phone number, and MSID (this may bethe same as the phone number). When this sequence is complete, the final screen of theActivation Wizard appears (Figure 8-21).
Figure 8-21. The final step of the Activation Wizard
2.

After the Activation Wizard is complete, the PCS Connection Manager appears and begins theprocess of provisioning (Figure 8-22), which supplies your adapter with a valid IP address andwhatever credentials are necessary to make future connections to the network. This is a one-time operation, and may take 15 minutes or more.
3.
Figure 8-22. The PCS Connection Manager during provisioning
8.3.1.3 Making the connection
After you've activated the card and gone through the provisioning process, the PCS ConnectionManager will prompt you to "Click `GO' to connect...". (If you get an error message, contact Sprinttechnical support.) To connect to the network, take the steps described next.
Click GO in the PCS Connection Manager window.1.
After the connection is made, you will see a splash screen, which you can disable in futuresessions by deselecting "Show welcome screen".
2.
Dismiss the splash screen by clicking OK, and you will return to the PCS Connection Manager,3.

2.
which now shows some basic network statistics (Figure 8-23).
Figure 8-23. PCS Connection Manager showing network usagestatistics
3.
Click Stop to disconnect from the network (you can now unplug the card until you need to use itagain).
4.
Each time you log in, the PCS Connection Manager is started automatically. You can close the windowand minimize it to the system tray by clicking the "x" in the lower-right corner. Click the tray icon(see Figure 8-24) to restore the PCS Connection Manager window.
Figure 8-24. PCS Connection Manager system tray icon
The PCS Connection Manager displays precious little information. To see extended information, suchas signal strength, click MENU and select Device Info & Diagnostics. (This option is only availablewhile you are disconnected from the network; see Figure 8-25.)
Figure 8-25. Device Info & Diagnostics showing device information andnetwork signal status

8.3.2 Using the AirCard 555 CDMA2000 PC Card
Verizon offers the Sierra Wireless (http://www.sierrawireless.com/) AirCard 555 for notebookcomputer users of its Express Network service. As with the offerings from Sprint, you can expectbetween 50 and 70 Kbps with this card and Verizon's service, with a peak speed of144 Kbps.
8.3.2.1 Installing the AirCard 555
Follow these steps to install the AirCard 555:
Install the provided software using the installation CD.1.
Insert the card into a PCMCIA slot on your notebook.2.
Windows XP will search for the appropriate drivers using wizards. Select the option "Install thesoftware automatically", and then select Continue Anyway to continue with the installation.
3.
When the software installation is complete, you need to activate the card (see the followingsection).
4.
8.3.2.2 Making the connection
After you've installed the software, insert the AirCard into your PCMCIA slot. Windows XP detects thecard and installs the drivers (you may need to click through some confirmation dialogs). When that isfinished, your system tray will indicate that a new network device has been detected (see Figure 8-

26). You can ignore this.
Figure 8-26. Windows XP detecting the AirCard
After a few seconds, things settle down, and the AirCard 555 Watcher icon appears in the tray (theleft-most icon shown in Figure 8-27). This icon is only available when the AirCard is plugged into yourcomputer. Click it to bring the Watcher window to the front (Figure 8-28).
Figure 8-27. The AirCard 555 Watcher icon appearing in the system tray
Figure 8-28. The AirCard 555 Watcher waiting for you to connect
The AirCard 555 Watcher (Figure 8-28) shows the signal strength (one out of five bars in this figure).To connect to the network, click Connect. Within a few seconds, you should be able to access theInternet. You can also send and receive SMSs using the Watcher. Click Tools Mobile Messengerto access this feature (you do not need to be connected to send or receive an SMS, but you must bein the service area).
[ Team LiB ]

[ Team LiB ]
8.4 Compression
Although GPRS and CDMA2000 can reach speeds faster than a regular dial-up Internet connection,they can't compete with a good solid Wi-Fi connection. But, they can get slightly closer by putting alittle intelligence between your notebook and the Internet.
Verizon and AT&T Wireless support a compressing proxy server . This involves two pieces ofmiddleware that sit between your web browser and the Internet, which are described next.
The compressing proxy server
This is a proxy server that sits in your cellular carrier's "cloud" (somewhere on their network).When a request comes in for a web document, such as an HTML file, graphic, or text file, thisproxy server downloads the content, compresses it, and sends it back to whoever requested it(you).
The client
Because your web browser doesn't understand the compression scheme used by the proxyserver up in the cloud, there is a second piece of software that runs on your computer. This isoften referred to as a client and is generally invisible to you. This client is actually a mini proxyserver that accepts requests from your web browser, forwards them to the compressing serverin the cloud, and decompresses the responses before sending them back to your browser.
The upshot of this arrangement is that you can expect load times to be significantly reduced in manycircumstances. For example, under poor network connections (with the signal meter reading one outof five bars), Verizon's compressing proxy was able to transfer an 814-kilobyte text file in 98 seconds- a speed of 8.3K per second. Compare this to a transfer under the same network conditions butwithout the compressing proxy, which took 15 minutes and 5 seconds!
The compressing proxies can also compress images. Figure 8-29, Figure 8-30, and Figure 8-31 showdetail from an image that was compressed using three different compression settings (lowest quality,highest compression, 6155 bytes; medium quality, medium compression, 10419 bytes; and nocompression at all, 16918 bytes).
Figure 8-29. Photograph showing maximum compression

Figure 8-30. Photograph showing a medium level compression
Figure 8-31. Photograph showing no compression

In Figure 8-30, artifacts are barely visible; even though the file size is roughly 60 percent of theuncompressed version, it is hard to tell the difference between the two.
You should ask your wireless carrier about this capability because they may not call attention to itwhen you subscribe for service. At the time of this writing, the following offerings are available frommajor providers in the United States:
AT&T Wireless
AT&T provides an Optimization Manager as part of their Communication Manager. To downloadthe Communication Manager, visit http://support.attws.com, and click the link for downloads.
Verizon Wireless
Verizon includes Venturi (http://www.venturiwireless.com/) compression software with theSierra Wireless AirCard 555.
T-Mobile
T-Mobile uses a service called T-Mobile Internet Accelerator. Unlike the solutions described inthis section, this is completely clientless; it transparently intercepts and compresses networktraffic so that images and documents that your web browser receives are as small as possible.
Sprint
As with T-Mobile, Sprint's PCS Vision network uses transparent compression built into theirnetwork infrastructure. Sprint's compression capabilities are provided by Bytemobile(http://www.bytemobile.com/).
[ Team LiB ]

[ Team LiB ]
Chapter 9. Global Positioning System(GPS)Have you ever lost your way when you were in a foreign country, state, or even your neighborhood?You could use a map to help orient yourself. But if you are in a foreign land, this is not always aneasy task.
This is where the Global Positioning System (GPS) comes in. Using GPS, you can find out preciselywhere you are on earth, and, when equipped with the appropriate mapping software, you can getdriving instructions to bring you to your destination.
In this chapter, I explain how GPS works and how you can equip your Windows XP notebook with aGPS receiver and mapping software. We will go driving with our GPS and even have a little Wi-Fi fun!!
[ Team LiB ]

[ Team LiB ]
9.1 How GPS Works
The Global Positioning System consists of 27 earth-orbiting satellites (of which 24 are operational and3 are backups) circling the earth twice each day. These satellites are arranged in six orbital paths, asshown in Figure 9-1.
Figure 9-1. Satellites circling the earth in six orbital paths
These satellites continuously emit coded positional and timing information using low-power radiowaves at frequencies in the 1500 MHz range. GPS receivers on earth then pick up the signals andcalculate the exact[1] positioning on earth. The orbits of the satellites are arranged in such a mannerthat at any one time, four satellites are visible. Thus, a GPS receiver is able to receive signals fromthese four satellites and, based on the various signals transmitted by them, derive positionalinformation on earth.
[1] Exact positioning is dependent on many factors, such as the type of receiver used and whether SelectiveAvailability (see the sidebar Accuracy of GPS, later in this chapter, for more information) is turned on. Ingeneral, the precision of positioning can be anywhere from 5 meters to 100 meters.
So how does the GPS receiver calculate its position? It does so by measuring the distance betweenitself and the satellites. Signals emitted by the satellites will be received by the GPS receiver after atime lag, and based on the speed of light, the GPS receiver can calculate the distance from itself tothe satellite. But getting the distance away from one satellite is not enough, since it tells you onlythat you are anywhere on the surface of the sphere (think in terms of three-dimensional space).Figure 9-2 shows that you can be anywhere on the sphere surrounding the satellite.
Figure 9-2. A sphere containing all the possible positions
To pinpoint your exact location, GPS uses a technique call triangulation. It uses at least three

satellites to pinpoint an exact location on earth. Figure 9-3 shows that if you have two satellites, thenyou can narrow down your location to the intersection of the two spheres. In this case, you can beanywhere on the dotted line (which is a circle).
Figure 9-3. Intersection of two spheres forming a circle
This is not precise enough. With a third satellite, you can reduce the possibilities to two (see Figure 9-4). But one of these two points is in space, which is not likely the position you are in. Hence you caneffectively derive your position from three satellites.
Figure 9-4. Intersections of the circle (formed by the two intersectingspheres) with a third sphere
Most GPS receivers use information from three or more satellites to increasethe accuracy of the positional information.

Accuracy of GPS
GPS was originally developed in the 1980s by the U.S. Department of Defense for militaryuse. Because it was designed primarily for the military, the U.S. Department of Defenseintroduced Selective Availability (SA) to degrade the signal accuracy and to encryptsensitive information, so that civilian usage could be restricted. The satellites woulddeliberately broadcast wrong and randomly inaccurate signals, which would cause theprecision of the GPS data to be within 100 meters. The accurate information could only bedecoded by the military.
Because of the great commercial potential of GPS, in May 2000, President Clintonannounced that the U.S. would no longer degrade the accuracy of GPS. With SA turnedoff, the accuracy of the GPS data could be within 5 meters.
In the second Gulf war against Iraq in 2003, the United States reportedly degraded theGPS system so that Iraq could not make use of GPS against U.S. forces. While this is goodnews for the military, it certainly affected all those who rely on GPS for their dailyactivities. So, if you arrived at the wrong destination using a GPS navigational system,now you know why!
9.1.1 Uses of GPS
The function of GPS is fairly straightforward - with a GPS receiver, you can obtain your positionalinformation in the form of longitude, latitude, and altitude. What is important is the way you use thisinformation. Some useful applications of GPS are described next.
Military use
As GPS was originally developed for military use, the U.S. Department of Defense is the mainuser of the technology. The use of GPS for guiding "smart" bombs has played an important rolein recent wars, especially in the Persian Gulf.
Location Based Services (LBS)
GPS has been increasingly deployed in the commercial scene. Location Based Services makeuse of the knowledge of your precise location to provide location-sensitive services. Forexample, you can use location-based services to give you a list of restaurants near yourcurrent location.
Navigation services
GPS is popularly used for navigational purposes, such as driving and flying. A GPS-enabled PDA

can help a driver to navigate unfamiliar cities. GPS is also widely used in the shipping industryas well as in airplane navigational systems. Courier companies such as UPS and FedEx makeextensive use of GPS in their delivery infrastructures.
Tracking
Using GPS to track the whereabouts of people or objects is rapidly gaining acceptance. This isuseful in the medical sector where patients suffering from diseases such as Alzheimer's canwear a GPS watch, and when needed, press a panic button to reveal their exact location totheir family members.
Mapping
GPS is also popularly used in mapping software, allowing you to combine a GPS receiver withmapping software to display your current location. This is useful for travelers or explorers whoneed navigational aids.
9.1.2 A GPS Glossary
Here are some GPS terms that you will encounter when you use GPS and GPS software:
Waypoint
A location that you store in your GPS system (as coordinates). Examples of waypoints are ahiking location, camping ground, church, or any places of interest to a GPS user. You normallyadd a waypoint to your GPS before you start your traveling. You can also add one during yourtravel when you locate a place of interest.
Route
A collection of waypoints representing the path that you would like to take.
Latitude, Longitude, and Altitude
The coordinates of a specific location on earth. These three pieces of information togetherdefine a point in the three-dimensional space.
Bearing
The direction you are aiming for.

Heading
The actual direction you are traveling towards. It is not the same as bearing. Bearing is yourdesired direction, but you may not be heading towards the desired direction due to factors suchas obstacles (e.g., water, fences, and mountains). Therefore, you have to momentarily head inanother direction in a bid to get to your destination.
Fix
A location returned by the GPS receiver after processing the readings of at least threesatellites.
TTFF (Time to First Fix)
The least amount of time required to get a fix by the minimum number of satellites required fortriangulation. Normally it takes a few minutes before you can get a fix.
NMEA (National Marine Electronics Association)
The NMEA-0183 standard has been universally adopted by GPS manufacturers and virtuallyevery GPS product for exchanging navigational information between devices. NMEA-0183defines a "sentence" format (using printable ASCII text) describing navigational information.
8/12 channels receiver
An 8-channel receiver uses 8 channels to access 8 different satellites at any one time. A 12-channel receiver can access 12 satellites at once.
Selective Availability (SA)
The degrading of GPS signals and the encryption of GPS data for non-military use. SeeAccuracy of GPS earlier in this chapter for more information on SA.
CEP, RMS, and 2D RMS
Circular Error Probable (CEP), RMS (Root Mean Square), and 2D RMS are all measures of theaccuracy of a GPS receiver. CEP represents the radius of a circle containing 50 percent of theGPS readings. RMS represents the radius of a circle containing 68 percent of the GPS readings.2D RMS represents the radius of a circle containing 98 percent of the GPS readings. If 3 GPS

receivers each claims to have 2m CEP, 2m RMS and 2m 2D RMS respectively, then the thirdone is the most accurate, since it has readings accurate to within a 2-meter radius 98 percentof the time.
[ Team LiB ]

[ Team LiB ]
9.2 GPS Devices
There are two main types of GPS receivers available in the market at the moment:
Plain GPS receivers
GPS receivers with maps
A plain GPS receiver simply interprets the readings from the satellite and returns the result inlatitude, longitude, and altitude. Figure 9-5 shows the PocketMap (http://www.pocketmap.com) PMG-220 CF GPS receiver. You can use the PMG-220 on your Pocket PC or your Windows XP notebook(which requires a PCMCIA sleeve for the CF card). Plain GPS receivers are useful in cases where youwant to use the receiver interchangeably on your Pocket PC or Windows XP notebook computer. Youalso have the flexibility to use them with any other mapping software.
Figure 9-6 shows the Emtac Bluetooth GPS receiver. The nice feature of this receiver is that it doesnot occupy a Compact Flash slot on your Pocket PC for GPS functionality. You can connect to itwirelessly using Bluetooth and position it at a location where you can get a good signal.
Figure 9-5. The PocketMap PMG-220 Compact Flash GPS receiver with aCompactFlash to PCMCIA sleeve
Figure 9-6. The Emtac Bluetooth GPS receiver

Figure 9-7 shows two standalone GPS receivers equipped with their own mapping software. TheMagellan Meridian Gold and the Garmin StreetPilot III contain built-in screens to display maps. Thereis no need to connect the receivers to any device for them to work. Standalone GPS receivers areuseful for travelers who need a lightweight GPS solution.
Figure 9-7. The Magellan Meridian Gold GPS (left) and the GarminStreetPilot III (Magellen used by permission, Thales Navigation, Inc.
2003; Garmin courtesy of Garmin Ltd.)
9.2.1 Installing a GPS
There's generally not much to installing a GPS device. To Windows XP, most GPS devices look like aCOM port (also known as a serial port, best known for connecting modems to your computer). Mostconsumer GPS devices use serial port settings of 4800,N,8,1, which is serial port shorthand for theunderwhelming speed of 4800 bps, no parity, 8 data bits, and 1 stop bit. The GPS spews informationto that COM port.

If you're interested in seeing what the GPS has to say, do the following:
Launch HyperTerminal (Start All Programs Accessories Communications HyperTerminal).
1.
When prompted, supply a description for the connection (such as GPS, as shown in Figure 9-8).Click OK. This brings up the Connect To dialog.
Figure 9-8. Creating a new connection with HyperTerminal
2.
Next, select the COM port that your GPS uses (see the documentation that came with your GPSfor this information), as shown in Figure 9-9. Click OK. This brings up the COM port Propertiesdialog.
Figure 9-9. Connecting to the GPS COM port
3.
Set the properties to 4800, 8, None, 1, and None, as shown in Figure 9-10. Click OK.4.

4.
Figure 9-10. Setting COM port properties in HyperTerminal
If all went well, you should start seeing all kinds of nonsense appear on your screen, as shown inFigure 9-11.
Figure 9-11. Viewing raw GPS data from the COM port
[ Team LiB ]

[ Team LiB ]
9.3 GPS Software
A GPS receiver receives coordinate information about its location and that's it. To put the locationinformation to good use, you need mapping software that is able to take in the location informationand return something, perhaps a map showing you where you are. Some mapping software goes theextra mile in helping you to navigate routes based on the end point that you have defined.
Here is a list mapping software that is worth exploring:
Microsoft Streets and Trips (http://www.microsoft.com/streets/)
MapPoint (http://www.microsoft.com/mappoint/)
MapPoint Web Service (http://www.microsoft.com/mappoint/net/)
EarthViewer3D (http://www.earthviewer.com)
GPS3D (http://www.mgix.com/gps3d/)
VisualGPS (http://www.visualgps.net/VisualGPS/)
GPS Trackmaker (http://www.gpstm.com/)
USAPhotoMaps (http://jdmcox.com/)
In the next section, I show you how you can use the Microsoft Streets and Trips together with yourGPS receiver to display a map showing your current location.
9.3.1 Microsoft Streets and Trips
Microsoft Streets and Trips is an affordable (less than $40) mapping package based on MapPointtechnology. It has comprehensive maps of the U.S. and Canada, and lets you locate addresses, planroutes, and export maps to a Pocket PC. It also can use a GPS receiver to keep track of your locationat all times.
To configure Streets and Trips to use a GPS:
Select Tools GPS Configure GPS Receiver. The GPS Receiver settings dialog appears(Figure 9-12).
Figure 9-12. Configuring Microsoft Streets and Trips for a GPSreceiver
1.

Select the COM port your GPS is installed on and click OK.2.
Next, select Tools GPS Track Position. The GPS Sensor window appears (Figure 9-13).(If you close this window, you can bring it back up with Tools GPS GPS Sensor.)
3.
Figure 9-13. Microsoft Streets and Trips waiting for data from the GPSreceiver
After some time (a few seconds to several minutes), Streets and Trips will begin getting positionaldata from the GPS, and it will show your location as you can see in Figure 9-14.
Figure 9-14. Pinpointing a location with GPS

9.3.2 NetStumbler and GPS
Chapter 3 introduced NetStumbler (http://www.netstumbler.com), a free application for discoveringwireless networks. If you attach a compatible GPS to your computer, you can configure NetStumblerto read data from the GPS. Then, you can drive around while it's scanning and generate maps ofwireless access points.
To configure NetStumbler for GPS, make sure that it is installed and working, and that you'veinstalled your GPS device according to the GPS vendor's instructions. You'll need to know the COMport that your GPS uses (see your GPS documentation). To get NetStumbler to read data from theGPS, follow these steps:
In NetStumbler, select View Options. This brings up the Network Stumbler Options dialog.1.
Click the GPS tab (Figure 9-15). Set the protocol, COM port, and communications settings tomatch your GPS device. Click OK.
Figure 9-15. Configuring the communication settings to match yourGPS device
2.

Examine the lower-right corner of the NetStumbler window. You will probably see the message"No position fix" for anywhere from a few seconds to 15 minutes. After a while, it should bereplaced by your longitude and latitude. If it does not display this information, your GPS maynot be able to get a fix. Orient the antenna so that it has a clear view of the sky, and run anydiagnostic software that came with your GPS or a free utility such as VisualGPS (exitNetStumbler first, since only one program can access the GPS at a time) to see if you can get asignal.
3.
You can also configure NetStumbler's scan speed (click the General tab in Network Stumbler Options;see Figure 9-16). Fast will scan every 0.5 seconds and slow will scan every 1.5 seconds. If you select"Auto Adjust using GPS", NetStumbler will adjust its scan rate based on how fast you are traveling.
Figure 9-16. Setting the NetStumbler scan speed
9.3.2.1 COM port hell
At the time of this writing, NetStumbler supports COM ports between 1 and 8. If your GPS wasassigned a higher COM port, you can adjust serial port allocations as follows:
Bring up the Device Manager (right-click My Computer, choose Properties, then chooseHardware Device Manager).
1.
Expand the node marked Ports (COM & LPT) and examine the current COM port assignments(see Figure 9-17). You will need to find the one that corresponds to your GPS device.
2.

Figure 9-17. Viewing COM port assignments in the Device Manager
2.
Double-click the port you want to change. This brings up the Properties dialog.3.
Click Port Settings Advanced. This brings up the Advanced Settings dialog (see Figure 9-18). Set the COM Port Number to the desired setting (If the port is marked as In Use, you mustfree that port; check the settings of other ports, as well as modems in the device manager tosee if you can reassign them.)
4.
Figure 9-18. Reassigning COM20 to COM3

One common source of in-use ports is Bluetooth. Use the Bluetooth setup(right-click the Bluetooth icon in the system tray and click Setup Configuration) to alter the port settings. Better yet, install your Bluetoothdrivers after you've installed your GPS. (If you're so inclined, you can uninstallboth the GPS and Bluetooth drivers and repeat the installation.)
9.3.2.2 Safety
If you plan to do some Wardriving (see Chapter 3) with NetStumbler, keep the following in mind:
Put the computer somewhere safe and out of the way. Don't put it someplace where a suddenstop will send it into your lap or through a window.
Forget that the computer is there while you are driving. If you have to fiddle with it, pull overfirst. If you can have a friend driving with you who can operate the computer, all the better. Donot let the computer distract you while you are driving.
Make sure that the GPS gets a fix before you start driving. It's a lot harder for it to get a fixwhile you are in motion.
Put the GPS somewhere where it can easily pick up the satellite signals. Your best bet is to get amagnetized external antenna that can attach to your roof. Be sure that there are no loose wiressticking out of your window. Don't slam the wires in the door!
When you are driving a car, your first responsibility is to drive safely. Payattention to the road and drive carefully.
9.3.2.3 Generating maps
After you've finished doing a scan with NetStumbler, you should be sure to save the file (File Save) so that you can access it later or generate maps with it. WiFiMaps.com (http://wifimaps.com/)lets you upload scan files, then it stores the information, making detailed maps of Wi-Fi access pointsto anyone who visits their site. (If this prospect troubles you, you can check their site to see if youraccess point is listed; their FAQ includes instructions for having your access point removed from theirdatabase.)
This book's editor, Brian Jepson, got so excited about this that he wrote a simple web application togenerate a map using the summary format that NetStumbler exports (File Export Summary). This program uses the 1990 U.S. Census map server (http://tiger.census.gov/cgi-bin/mapsurfer). To generate your own maps, all you need to do is visithttp://www.jepstone.net/stumbler with a web browser, use the web page to upload yourNetStumbler summary file, and wait for it to render the map. Figure 9-19 shows a sample map fromsouthern Rhode Island.

Figure 9-19. Mapping access points in southern Rhode Island
This program does not store the maps for very long-just a couple of days so you can revisit the mapa few times if you'd like-and does not publish the information you upload publicly. It's just there forone-offs.
[ Team LiB ]

[ Team LiB ]
Chapter 10. Microsoft Smart Display andRemote DesktopMany people have cordless phones at home and in the office. Instead of using a tethered phone, acordless phone allows you the freedom to use the phone anywhere in the house, without theconstraints of wires. The same concept applies to computing. How often have you dreamed of usingyour computers anywhere in your home? A notebook computer is one such solution. However, if yourprimary computer is a desktop system, synchronizing documents created or modified on thenotebook with your desktop is always a chore. It would be better to use the same desktop computerbut with the mobility to use it anywhere at home-in the garden, garage, or even the washroom!
Microsoft thought of this concept and calls it the Microsoft Smart Display (previously code-named"Mira"). In this chapter, I explain what a Smart Display is and how you can use it together with yourWindows XP computer. I also explain Remote Desktop, the underlying service behind the SmartDisplay, and how you can use it to connect from one computer to another.
[ Team LiB ]

[ Team LiB ]
10.1 What Is the Microsoft Smart Display?
Microsoft defines the Smart Display as a wireless touch-screen monitor that allow you to access yourcomputer from anywhere in your home. Think of it as just your conventional LCD monitor, but withWi-Fi built in and the ability to write on the screen directly.
On the technical side, a Smart Display uses the Windows CE for Smart Display operating system, aversion based on Windows CE .NET 4.1. On the host computer, you need Windows XP ProfessionalEdition (Service Pack 1). This is because the Smart Display makes use of Remote Desktop fordisplaying the output remotely, which is available in the Windows XP Professional edition but not inthe Home edition. This is shown in Figure 10-1.
Figure 10-1. How Smart Display works
When you use the Smart Display to connect to the host computer, the host computer will be not beusable; only one user is allowed to use the computer at any one time. This is a limitation thatMicrosoft says it will resolve in the next version of the Smart Display.
[ Team LiB ]

[ Team LiB ]
10.2 Using the ViewSonic AirPanel V150
The ViewSonic AirPanel V150 (see Figure 10-2) is a 15" Smart Display utilizing the Intel's XScalePX250 processor running at 400 MHz. It comes with 32 MB of ROM and 64 MB of SDRAM. Weighing amere six pounds, it is quite easy to lug around the house. A fully charged battery allows the AirPanelto last for four hours (a decent duration - just remember to charge it every alternate night if youuse it on a regular basis).
Figure 10-2. The ViewSonic AirPanel V150
The AirPanel screen can support a maximum resolution of 1024 by 768. With an optional dockingstation (see Figure 10-3), you can use the AirPanel as your primary monitor.
Figure 10-3. The optional AirPanel dock

The AirPanel comes with the following features (see Figure 10-4):
Directional pad with left and right button functionality
Handwriting recognition
On-screen keyboard
Two USB ports and one PC card slot
Microphone and speaker jacks
Figure 10-4. Expansion slots on the AirPanel V150
The AirPanel V150 also includes the 802.11b AirSync USB wireless adapter (see Figure 10-5). Youneed to connect this to your host computer so that the AirPanel can connect to it wirelessly (this isnot needed if you already have a Wi-Fi adapter).

Figure 10-5. The AirSync USB Wireless adapter
10.2.1 Connecting the AirPanel to Your Host Computer
There are a few ways to connect the AirPanel to your desktop:
The simplest way is to use the included AirSync USB Wireless adapter. Connect the AirSyncadapter and your AirPanel to your desktop using the included USB cable. Install the includedsetup application. Your available user accounts on the desktop will be copied to the AirPanel.This method is the most straightforward. It uses the wireless ad-hoc mode and does not requirethe use of access points.
If you have an existing wireless card in your computer (common for notebook users), you caneither use the included AirSync USB adapter or the existing wireless card to communicate withthe AirPanel. However, if you use your existing wireless card to connect to the AirPanel, you willnot be able to connect to your network (and Internet). The best option would be to use theAirSync for connecting to the AirPanel and to use your existing wireless card for Internet ornetwork access. This approach still uses the ad-hoc mode for connecting to the AirPanel.
If your desktop is connected to a wireless access point (through a wired connection), you neednot use the AirSync for ad-hoc networking. You can connect the AirPanel through the accesspoint. This mode uses the infrastructure mode.
10.2.1.1 Connecting via ad-hoc mode
By default, the Smart Display connects to your computer using ad-hoc mode. Using the installationCD, install the Microsoft Smart Display services by following the instructions on the screen. Prior tothis, you also need to connect your Smart Display to your computer using the provided USB cable.The Smart Display services will automatically copy the account(s) on your host computer to theSmart Display.
When you insert the supplied CD, the window in Figure 10-6 will be displayed. Select the desiredlanguage.
Figure 10-6. Installing the Smart Display services for the ViewSonicAirPanel

You will need to connect the AirSync USB Adapter to your computer (see Figure 10-7). You can alsoreuse your existing wireless adapter.
Figure 10-7. Connecting the AirSync wireless adapter
The accounts used to log in to your host computer must have a password, or else you will beprompted to supply a password for accounts that are used to log in to the host computer (see Figure10-8).
Figure 10-8. Requirements for using the AirPanel

If you have an existing wireless adapter, you can choose to use it (see Figure 10-9). Otherwise, youcan leave it alone and use the provided AirSync to connect to the AirPanel.
Figure 10-9. You can reuse your existing wireless adapter
If you have more than one wireless adapter, you will be prompted to select the adapter to configurefor connecting to the AirPanel (see Figure 10-10).
Figure 10-10. Selecting the wireless adapter to configure

Once the configuration is done, you will be shown the configuration information (Figure 10-11). Isuggest you print out this window (press the Print button) so that you can use it to check on yourAirPanel if you have a connection problem later on.
Figure 10-11. Displaying the configuration information
Finally, you will be prompted to select the account(s) that will be copied to the AirPanel (see Figure10-12).
Figure 10-12. Copying the accounts to the AirPanel

That's it! On the AirPanel, use the stylus to tap on the user account to log in to the host computer.
10.2.1.2 Connecting via infrastructure mode
Using infrastructure mode is straightforward: you just need to install the Microsoft Smart Displayservices on the target machine and configure your Smart Display to connect to it. There is no need touse the included AirSync wireless adapter. This configuration is suitable for office environments whereyour computer is connected to a network and you want to use the AirPanel in a meeting room withwireless access. On the AirPanel:
Click on the Settings icon and select the General tab.1.
Under the New connection group, click on the New... button.2.
Supply the username and computer name of the computer that you want to connect to (withthe Microsoft Smart Display services installed).
3.
You may optionally supply the password now so that when you connect to the computer in thefuture you will not need to supply the password again. But if you lose the AirPanel, yourcomputer will not be secure anymore!
4.
Under the Advanced tab, ensure that you check the option to obtain an IP address using DHCP.5.
10.2.2 Some Tips for Connecting Your AirPanel V150
If you encounter problems in connecting your AirPanel to your computer, try the following:

If you are accessing through an access point, ensure that you add the MAC address of yourAirPanel to your access point (if you enable MAC address filtering, see Section 5.4.11 in Chapter5). The MAC address of the AirPanel can be obtained via Settings System Info (on theAirPanel itself).
If your AirPanel connects to your desktop via ad-hoc mode, the AirPanel uses a fixed IP address.If you are using infrastructure mode, ensure that you use DHCP to obtain an IP address for theAirPanel. You can go to the Settings button on the AirPanel to configure the IP address.
The best way to solve a connection problem would be to use the Connection Troubleshooterlocated in Programs Microsoft Smart Display Services. Simply use the included USB cable toconnect the AirPanel to your computer and click on "Scan your Smart Display connections" (seeFigure 10-13).
Figure 10-13. Using the Connection Troubleshooter to solve commonconnection problems
Use the Connection Troubleshooter to see the WEP key generated (it is automatically generatedby the Connection Troubleshooter). You need to enter this key into your AirPanel. WEP is usedin ad-hoc mode when you use the Connection Troubleshooter to establish a connection betweenyour computer and the AirPanel. If you are using infrastructure mode, WEP is optional.
10.2.3 Connecting Peripherals to the AirPanel
In most cases, the AirPanel is useful for tasks that do not require much input. Reading email andsurfing the Web using the AirPanel is quite neat, considering that you can bring the monitor aroundthe house and find a comfortable position to do so.

However, when it comes to input-intensive tasks such writing emails and using instant messaging,the shortcomings of the AirPanel become apparent. The onscreen keyboard is too slow and thehandwriting recognition is not accurate enough. This is due to the touch screen technology used. TheAirPanel is still using the older pressure-sensitive technology found in Pocket PCs, unlike the newTablet PC's magnetic pen technology. And so, resting your hand on the screen would often cause youto click on items unintentionally. Writing on the screen is not natural and requires you to writelegibly.
For typing, you can attach a USB keyboard to the AirPanel (see Figure 10-14). You can also attach aUSB mouse to help in the navigation. One challenge in using the AirPanel for web surfing is thatwithout using a mouse, it is difficult to identify hyperlinks - there is no mouse cursor to indicatewhen you are hovering over a hyperlink. If the AirPanel were to use the magnetic pen technology,then the hovering cursor would be visible to give visual cues.
Figure 10-14. Attaching a USB keyboard to the AirPanel
[ Team LiB ]

[ Team LiB ]
10.3 Using Remote Desktop
One of the tools shipped with Windows XP Professional is Remote Desktop. Remote Desktop allowsyou to connect to a remote computer (see Figure 10-15) as if you were sitting right in front of it. Thisis useful in situations where you need to access the network resource in your office while you are onthe road (in which case Remote Desktop should be used through a VPN; see Section 4.2 in Chapter4).
Figure 10-15. How Remote Desktop works
Remote Desktop uses the Remote Desktop Protocol (RDP), the same protocol used by TerminalServer (also known as Terminal Services in Windows 2000). Remote Desktop works on low-bandwidth connections, since it transmits only keystrokes and mouse events to the host, which thensends back screen information for the client to display.
Remote Desktop is only available in Windows XP Professional. It is not includedin Windows XP Home Edition.
10.3.1 Setting Up Remote Desktop
To allow remote users to connect to your computer:
Click Start Settings Control Panel System and select the Remote tab (see Figure10-16).
1.
Figure 10-16. Allowing remote access to the computer

If your machine is located behind a firewall, you need to open up port 3389.See Section 5.4.12 in Chapter 5.
Turn on the "Allow users to connect remotely to this computer" checkbox.2.
Remote Desktop Clients for Other Operating Systems
You can download Remote Desktop clients for operating systems other than Windows XPat the Microsoft web site, athttp://www.microsoft.com/windowsxp/pro/downloads/rdclientdl.asp.
This download installs the remote desktop client for Windows 95, Windows 98 SecondEdition, Windows ME, Windows NT 4, or Windows 2000.
If you are using Mac OS X, you can download the Remote Desktop Client (RDC) fromhttp://www.microsoft.com/mac/DOWNLOAD/MISC/RDC.asp. Figure 10-19 shows the RDCconnected to Windows 2000 Advanced Server.
For Unix users, you can download rdesktop, an open source client for Windows NTTerminal Server and Windows 2000 Terminal Services, from http://www.rdesktop.org.
3.

By default, administrators are given access. Click on the Select Remote Users... button to giveaccess rights to other nonadministrator users (see Figure 10-17).
3.
Figure 10-17. Giving access rights to users
10.3.2 Using Remote Desktop
To use Remote Desktop to connect to the remote host:
Go to Start Programs Accessories Communications Remote DesktopConnection (see Figure 10-18).
1.
Figure 10-18. Using the Remote Desktop to log in to another XPcomputer

Enter the IP address of the remote host and enter the username, password, and domain name(if required). You can click on the various tabs (Display, Local Resources, Programs, andExperience) to customize the options available (such as screen size, audio output, etc.).
2.
You can now view the remote display either in a window or full screen.3.
Figure 10-19. Using RDC (on a Mac) to connect to Windows 2000Advanced Server

Using Remote Desktop, you can:
Enable the local filesystem to be made available to the remote host.
Redirect print jobs from the remote host to the local printer.
Allow local serial and parallel ports to be accessed by the applications running on the remotehost.
Share the clipboard between the local and remote host.
[ Team LiB ]

[ Team LiB ]
Colophon
Our look is the result of reader comments, our own experimentation, and feedback from distributionchannels. Distinctive covers complement our distinctive approach to technical topics, breathingpersonality and life into potentially dry subjects.
The item on the cover of Windows XP Unwired is a bird cage. When a pet owner invests in a birdcage, he needs to consider certain factors, such as safety and size. A bird pecks at the bars of itscage, so the materials that the cage is made of are important because certain metals are poisonousto birds. Stainless steel is the best type of metal to use; however, if this is not available, there arecages that have a "bird-safe" powder baked on to the metal. This coating protects the bird from anytoxins. In terms of the size of a cage, it should be large enough to offer at least double the bird'swing span, from the top to the bottom of the cage as well as from side to side. Ideally, a bird shouldhave even more room than that. In addition, it is sometimes suggested that it is a good idea toprovide your pet bird with a large cage for the day and a smaller one for sleep, in order to offer thebird a change of scenery.
Mary Brady was the production editor and the copyeditor for Windows XP Unwired. Sada Preisch wasthe proofreader. Emily Quill, Phil Dangler, and Mary Anne Weeks Mayo provided quality control. JudyHoer wrote the index.
Edie Freedman designed the cover of this book. The cover image is an original photograph by EdieFreedman. Emma Colby produced the cover layout with QuarkXPress 4.1 using Adobe's HelveticaNeue and ITC Garamond fonts.
David Futato designed the interior layout. This book was converted to FrameMaker 5.5.6 by AndrewSavikas with a format conversion tool created by Erik Ray, Jason McIntosh, Neil Walls, and MikeSierra that uses Perl and XML technologies. The text font is Linotype Birka; the heading font is AdobeHelvetica Neue Condensed; and the code font is LucasFont's TheSans Mono Condensed. Theillustrations that appear in the book were produced by Robert Romano and Jessamyn Read usingMacromedia FreeHand 9 and Adobe Photoshop 6. This colophon was compiled by Mary Brady.
The online edition of this book was created by the Safari production group (John Chodacki, BeckiMaisch, and Madeleine Newell) using a set of Frame-to-XML conversion and cleanup tools written andmaintained by Erik Ray, Benn Salter, John Chodacki, and Jeff Liggett.
[ Team LiB ]

[ Team LiB ]
[SYMBOL] [A] [B] [C] [D] [E] [F] [G] [H] [I] [J] [K] [L] [M] [N] [O] [P] [Q] [R] [S] [T] [U] [V] [W] [X]
[ Team LiB ]

[ Team LiB ]
[SYMBOL] [A] [B] [C] [D] [E] [F] [G] [H] [I] [J] [K] [L] [M] [N] [O] [P] [Q] [R] [S] [T] [U] [V] [W] [X]
1G cellular networking
1x Radio Transmission Technology (1xRTT)
2.5G cellular networking 2nd 3rd
2D RMS, measuring accuracy of GPS receivers
3G cellular networking 2nd
GPRS and
8- or 12-channel receivers
802.11 wireless standards
security issues with
terminology of
802.11a standard
pure wireless access points
vs. 802.11b standard
vs. 802.11g standard
802.11b standard
configuring PCMCIA cards for
D-Link DI-714P+ wireless router
frequencies for channels in
included with AirPanel V150
interference between Bluetooth and
pure wireless access points
vs. 802.11a standard
802.11g standard
D-Link DI-624 Extreme G Wireless Access Point
interference between Bluetooth and
pure wireless access points
vs. 802.11a standard
802.11i standard 2nd
802.1X standard
authentication 2nd
implementing in Windows XP
as security feature
support of, by access points
Virtual Private Networks (VPNs) and
[ Team LiB ]

[ Team LiB ]
[SYMBOL] [A] [B] [C] [D] [E] [F] [G] [H] [I] [J] [K] [L] [M] [N] [O] [P] [Q] [R] [S] [T] [U] [V] [W] [X]
absorption of radio waves
Access Point Manager
access points
Bluetooth 2nd
configuring
connecting to
testing the connection
bridging devices between networks
communicating using channels
configuring 2nd
default IP addresses, changing
displaying signal-to-noise ratio for
dual-band
generating Wi-Fi maps
getting associated with
infrastructure mode and 2nd 3rd
link quality and signal strength
multiple, setting up
plotting map of 2nd
pure wireless access points
repeaters, using as
security features in
sharing Internet connections with neighbors
SSID broadcast and MAC address filtering
status of, viewing
support of 802.1X
unauthorized
detected by NetStumbler 2nd
web-based configuration
wireless access points with routers
accuracy of GPS
activating AirPrime PC3200
Active Directory, configuring
ActiveSync
troubleshooting
using infrared to connect to Pocket PCs
ACU (Aironet Client Utility)
ad-hoc networks 2nd 3rd
configuring WLAN access
connecting AirPanel to host computers
adapters, wireless [See wireless adapters]
Address Resolution Protocol (ARP), locating Ethernet addresses
addresses, IP [See IP addresses]
Administrator password, changing
ADSL/DSL modems
access points with routers
home network setup

obtaining IP addresses
PPPoE protocol
Advanced Encryption Standard (AES)
AES (Advanced Encryption Standard)
AirCard 555 (Sierra Wireless)
Venturi compression software included with
AirCard 750 (Sierra Wireless)
Aironet 350 wireless card (Cisco)
connecting to wireless networks with
Aironet Client Utility (ACU)
AiroPeek NX tool and security issues 2nd
AirPanel V150 (ViewSonic)
connecting
peripherals to
to host computers
docking station for
expansion slots on
AirPlus utility [See entries under D-Link]
AirPrime PC3200 card (Sprint)
activating
installing
PCS Connection Manager and
AirSnort tool and security issues
AirSync USB wireless adapters
allow-access lists and MAC address filtering
ALOHANET wireless network
altitude, latitude, and longitude of locations 2nd
AM (Amplitude Modulation)
Amplitude Modulation (AM)
amplitude of radio waves
anonymous FTP
antennae
configuring NetStumbler
safety issues with
ARP (Address Resolution Protocol), locating Ethernet addresses
associating with access points
AT&T Wireless
CDMA and
compressing proxy servers and
Sierra Wireless AirCard 750 and
Atmel chipset
attacks (hacker), susceptibility of WEP to
Authenticated Cipher Offset
Authenticating Servers
authentication
802.1X standard 2nd
implementing in Windows XP
for Bluetooth
IPSec and PPTP pass-through feature
tunneling and
authorization
requiring, before file transfers

security features on access points
WEP (Wired Equivalent Privacy) and
automatic configuration
Available networks section
[ Team LiB ]

[ Team LiB ]
[SYMBOL] [A] [B] [C] [D] [E] [F] [G] [H] [I] [J] [K] [L] [M] [N] [O] [P] [Q] [R] [S] [T] [U] [V] [W] [X]
bandwidth, sharing with wireless routers
Basic Service Set (BSS)
bearing (desired direction)
BEFW11S4 wireless router [See Linksys BEFW11S4 wireless router]
Belkin Bluetooth PC cards
Billionton USB Bluetooth adapters
blackbeltjones.com
Bluetake BT200 Bluetooth printer adapter
Bluetake BT300 Bluetooth Access Point (AP)
Bluetooth Exchange Folder
Bluetooth for HotSync
configuring Palm to use
configuring PC to use
Bluetooth SD (Secure Digital) cards
Bluetooth SIG (Special Interest Group)
Bluetooth technology 2nd 3rd
access points 2nd
configuring
connecting to
testing the connection
Compact Flash and
connecting headsets to devices
connecting to
Palm Handhelds
Pocket PCs
current standards
device classes
devices
pairing
dongles
Emtac GPS receiver
file transfers
interference between other devices and
pairing devices
piconets
printing wirelessly
troubleshooting
scatternets
security issues
security modes for devices
service profiles
sharing Internet connections
troubleshooting
USB adapters
Windows XP and
Boingo.com
bonding devices

bridging devices between networks
broadband services
broadcast addresses
Broadcom chipset
BSS (Basic Service Set)
Building Wireless Community Networks
bypassing proxy servers
[ Team LiB ]

[ Team LiB ]
[SYMBOL] [A] [B] [C] [D] [E] [F] [G] [H] [I] [J] [K] [L] [M] [N] [O] [P] [Q] [R] [S] [T] [U] [V] [W] [X]
cable-replacement technology [See entries under Bluetooth]
cards, wireless [See wireless cards]
CDMA2000 technology 2nd 3rd
cell phones as modems
cellular networking 2nd
CDMA2000 technology
compressing proxy servers
GPRS (General Packet Radio Service)
price/performance 2nd
Centrino
CEP (Circular Error Probable), measuring accuracy of GPS receivers
CF (Compact Flash) Bluetooth cards
channel coding schemes used in GPRS networks
channel numbers, setting
channels in 802.11b standard
chipsets in wireless cards
ciphertext
Circuit Switched Data (CSD) 2nd
Nokia D211 vs. Nokia D311
Circular Error Probable (CEP), measuring accuracy of GPS receivers
Cisco
Aironet 350 wireless card
connecting to wireless networks with
dynamic WEP keys
Class 1/Class 2/Class 3 (Bluetooth devices)
Class A/Class B/Class C (GPRS devices)
Class A/Class B/Class C/Class D/Class E (IP addresses)
classes of Bluetooth devices
classes of GPRS devices
classes of networks
supernet addressing and
clients
8021X authentication and
configuring
setting up VPNs on
Clone MAC address feature
Closed System Authentication scheme
Code Division Multiple Access (CDMA) technology 2nd 3rd
coding schemes used in GPRS networks
COM ports
installing GPS devices
supported by NetStumbler
Communication Manager (AT&T Wireless)
community networks, wireless
Compact Flash Bluetooth cards
compressing proxy servers
confidentiality 2nd

802.1X standard and
Configuration page in AirPlus utility
configuration utility (Linksys)
connecting to
Bluetooth access points
Internet
using infrared technology
using mobile phones
wireless networks
in closed systems
Connection Manager, PCS
connection sharing
using Bluetooth
troubleshooting
using infrared technology
with neighbors
Connection Troubleshooter service
controlled ports
Cordless Telephony Profile (CTP)
CRC (Cyclic Redundancy Check), used for infrared data
cryptographic authentication scheme
CSD (Circuit Switched Data) 2nd
Nokia D211 vs. Nokia D311
CTP (Cordless Telephony Profile)
cycles per second (frequencies)
Cyclic Redundancy Check (CRC), used for infrared data
Cygwin distribution
[ Team LiB ]

[ Team LiB ]
[SYMBOL] [A] [B] [C] [D] [E] [F] [G] [H] [I] [J] [K] [L] [M] [N] [O] [P] [Q] [R] [S] [T] [U] [V] [W] [X]
D-Link AirPlus 900AP+ wireless card 2nd
setting up wireless repeaters 2nd
D-Link AirPlus DI-714P+ wireless router
adding wireless network to office environment
Administrator password, changing
channel numbers, changing
default IP address, changing
DHCP, configuring
MAC address filtering, enabling
ports, opening
reviewing status of access points
setup wizard for
SNMP monitoring
SSID (Service Set Identifier)
changing
disabling broadcast of
WAN IP address, setting
web-based configuration
WEP, enabling
wireless repeaters, setting up
D-Link AirPlus DWL-650+ wireless card
conflicts between Windows XP and
setting up wireless repeaters
D-Link AirPlus DWL-G650 wireless card
D-Link AirPlus utility
connecting to wireless networks with
improving performance with
office network setup and
D-Link AirPro DWL-AB520 multimode wireless PCI adapter
data packets [See packets]
data rates for 802.11 standards
dBm (decibels relative to one milliwatt)
degrading GPS signals 2nd
devices
Bluetooth
pairing
finding MAC addresses of
GPRS
DHCP (Dynamic Host Configuration Protocol)
configuring
NAT (Network Address Translation) and
turning off, as security measure
Dial-up Networking Profile
diffraction of radio waves
Direct Sequence Spread Spectrum (DSSS) modulation scheme
DNS (Domain Name System)
docking station for ViewSonic AirPanel V150

Domain Name System (DNS)
domain names
assigned by ICANN
driving vehicles and using GPS
DSL/ADSL modems
access points with routers
home network setup
obtaining IP addresses
PPPoE protocol
DSSS (Direct Sequence Spread Spectrum) modulation scheme
dual-band access points/network adapters
dynamic WEP keys
[ Team LiB ]

[ Team LiB ]
[SYMBOL] [A] [B] [C] [D] [E] [F] [G] [H] [I] [J] [K] [L] [M] [N] [O] [P] [Q] [R] [S] [T] [U] [V] [W] [X]
EAP (Extensible Authentication Protocol)
types of
EAP-MD5
EAP-TLS (EAP-Transport Layer Security)
EAP-TTLS (EAP Tunneled TLS)
earth-orbiting satellites for GPS
EarthViewer3D mapping software
EDGE (Enhanced Data GSM Environment) technology
EGSM (Enhanced GSM) networks
EHF (Extremely High Frequency) band
Emtac Bluetooth GPS receiver
encapsulating packets, using tunneling
encoding schemes used in GPRS networks
encrypting [See also WEP standard]
ad-hoc networks and
between Bluetooth devices
GPS data 2nd
packets on wireless networks 2nd
tunneling protocols and
Encryption page in AirPlus utility
Enhanced GSM (EGSM) networks
Ericsson
Bluetooth SIG and
Sony Ericsson and
ESS (Extended Service Set)
Ethereal protocol analyzer
security issues and
Ethernet addresses
Ethernet connections
configuring access points
PPPoE (PPP over Ethernet) protocol
setting up wireless networks
Exchange Folder, Bluetooth
expansion slots on ViewSonic AirPanel V150
Extended Service Set (ESS)
Extensible Authentication Protocol (EAP)
types of
Extremely High Frequency (EHF) band
[ Team LiB ]

[ Team LiB ]
[SYMBOL] [A] [B] [C] [D] [E] [F] [G] [H] [I] [J] [K] [L] [M] [N] [O] [P] [Q] [R] [S] [T] [U] [V] [W] [X]
Fast Infrared (FIR)
Fax Profile
FHSS (Frequency Hopping Spread Spectrum) modulation scheme
File Transfer Profile
file transfers
with Bluetooth
with infrared
FIR (Fast Infrared)
firewalls 2nd
punching holes in
setting up Remote Desktop
fix (location)
Flickenger, Rob
Fluhrer, Scott
flying airplanes and using GPS
FM (Frequency Modulation)
frequencies
for channels in 802.11b standard
spectrum of 2nd
frequency allocation chart
Frequency Hopping Spread Spectrum (FHSS) modulation scheme
Frequency Modulation (FM)
frequency-hopping technique (Bluetooth)
FTP utility vs. SSH
[ Team LiB ]

[ Team LiB ]
[SYMBOL] [A] [B] [C] [D] [E] [F] [G] [H] [I] [J] [K] [L] [M] [N] [O] [P] [Q] [R] [S] [T] [U] [V] [W] [X]
GAP (Generic Access Profile)
Garmin StreetPilot III GPS receiver
General Packet Radio Services [See GPRS]2nd [See GPRS]
generating Wi-Fi maps
Generic Access Profile (GAP)
Generic Object Exchange Profile (GOEP)
Global Positioning System [See GPS]
Global System for Mobile networks [See GSM networks]
glossary of GPS terms
GOEP (Generic Object Exchange Profile)
GPRS (General Packet Radio Service) 2nd 3rd
classes of GPRS devices
devices
encoding schemes used in
GSM networks and
how it works
mobile phones
modems
modules
PCMCIA cards and
terminals
GPS (Global Positioning System) 2nd
accuracy of
applications of
calculating positions on earth
glossary of terms
installing
Microsoft Streets and Tips
NetStumbler tool and
receivers
calculating positional information
measuring accuracy of
types of
software for
GPS Trackmaker mapping software
GPS3D mapping software
GSM (Global System for Mobile) networks
GPRS devices and
Nokia D211 vs. Nokia D311
PCMCIA cards and
[ Team LiB ]

[ Team LiB ]
[SYMBOL] [A] [B] [C] [D] [E] [F] [G] [H] [I] [J] [K] [L] [M] [N] [O] [P] [Q] [R] [S] [T] [U] [V] [W] [X]
hacker attacks, susceptibility of WEP to
handhelds, connecting to with Bluetooth
HBH-60 Bluetooth headset
heading (actual direction)
Headset Profile
headsets, Bluetooth, connecting to devices
High Frequency (HF) band
High Speed Circuit Switched Data (HSCSD)
Nokia D211 vs. Nokia D311
home network setup
host computers
connecting ViewSonic AirPanel V150 to
using Remote Desktop with
setting up VPNs on
host numbers
HotSpotList web site
hotspots [See wireless hotspots]
HotSync, Bluetooth for
HSCSD (High Speed Circuit Switched Data)
Nokia D211 vs. Nokia D311
HyperTerminal, creating new connection with
[ Team LiB ]

[ Team LiB ]
[SYMBOL] [A] [B] [C] [D] [E] [F] [G] [H] [I] [J] [K] [L] [M] [N] [O] [P] [Q] [R] [S] [T] [U] [V] [W] [X]
IBSS (Independent Basic Service Set)
ICANN (Internet Corporation for Assigned Names and Numbers)
ICMP (Internet Control Message Protocol) requests, enabling
IEEE 802.11 standard [See 802.11 wireless standards]
IEEE TGi workgroup
images
compressing
turn off loading
Independent Basic Service Set (IBSS)
Infrared Data Association [See IrDA]
infrared technology 2nd
connecting to
Internet
Pocket PCs with ActiveSync
file transfers
security issues
sharing Internet connections
infrastructure networks 2nd
configuring WLAN access
connecting AirPanel to host computers
Initialization Vector (IV)
integrity
checking for, before encryption
tunneling and
Intel XScale PX250 processor
Intercom Profile
interference (radio) and absorption
interference between Bluetooth and other devices
Internet
connecting to
using infrared technology
using mobile phones
connection sharing
troubleshooting
using Bluetooth
using infrared technology
with neighbors
Internet Accelerator by T-Mobile
Internet Authentication Server, configuring
Internet Control Message Protocol (ICMP) requests, enabling
Internet Corporation for Assigned Names and Numbers (ICANN)
Intersil PRISM-II/Intersil PRISM-2.5 chipsets
IP addresses
ad-hoc networks and
assigned by ICANN
bypassing
calculating network numbers from

classes of
default of access points, changing
DHCP and NAT 2nd 3rd 4th
Domain Name System (DNS) and
filtering, as security measure
limitations of
obtaining 2nd 3rd
automatically
opening ports and
ranges of
reserved
resetting
scarcity of
static
transmitting packets between networks
turning off DHCP, as security measure
IP routing
IP subnet addressing
iPaq series of Pocket PCs
ipconfig command 2nd 3rd 4th 5th
finding MAC addresses
IPSec
pass-through feature
IPv4/IPv6 and limitations of IP addressing
IrCOMM kernel-mode driver
IrDA (Infrared Data Association)
adapters
versions of
Windows XP and
IrEnum kernel-mode driver
irFTP application
ISPs and locking MAC addresses
IV (Initialization Vector)
[ Team LiB ]

[ Team LiB ]
[SYMBOL] [A] [B] [C] [D] [E] [F] [G] [H] [I] [J] [K] [L] [M] [N] [O] [P] [Q] [R] [S] [T] [U] [V] [W] [X]
joining the network
Jones, Matt
[ Team LiB ]

[ Team LiB ]
[SYMBOL] [A] [B] [C] [D] [E] [F] [G] [H] [I] [J] [K] [L] [M] [N] [O] [P] [Q] [R] [S] [T] [U] [V] [W] [X]
key streams
keyboards, connecting to AirPanel
keys, WEP
King Harald Bluetooth
[ Team LiB ]

[ Team LiB ]
[SYMBOL] [A] [B] [C] [D] [E] [F] [G] [H] [I] [J] [K] [L] [M] [N] [O] [P] [Q] [R] [S] [T] [U] [V] [W] [X]
L2TP Tunneling Protocol
LAN Access Profile 2nd
LAN, Bluetooth
latitude, longitude, and altitude of locations 2nd
Layer 2 Tunneling Protocol (L2TP)
LBS (Location-Based Services), used by GPS
LEAP (Lightweight EAP)
legal issues for warchalking and wardriving
LF (Low Frequency) band
LFSR (Linear Feedback Shift Registers)
limitations of broadband connections
line of sight (LOS) 2nd
security issues for infrared
Linear Feedback Shift Registers (LFSR)
Link Info page in AirPlus utility
link local addresses 2nd
link quality and signal strength
Link Status function (ACU)
Linksys BEFW11S4 wireless router
Administrator password, changing
channel numbers, changing
default IP address, changing
DHCP, configuring
MAC address filtering, enabling
ports, opening
reviewing status of access points
SSID (Service Set Identifier)
changing
disabling broadcast of
WAN IP address, setting
web-based configuration
WEP, enabling
Linksys BEFW11SE Wireless Access Point 2nd
Linksys WAP11 Wireless Access Point
Linksys WAP54G Wireless Access Point
Linksys WUSB11 wireless adapter
connecting to wireless networks with
Location-Based Services (LBS), used by GPS
locking MAC addresses
longitude, latitude, and altitude of locations 2nd
loopback addresses
LOS (line of sight) 2nd
security issues for infrared
Low Frequency (LF) band
Lucent Hermes chipset
[ Team LiB ]

[ Team LiB ]
[SYMBOL] [A] [B] [C] [D] [E] [F] [G] [H] [I] [J] [K] [L] [M] [N] [O] [P] [Q] [R] [S] [T] [U] [V] [W] [X]
MAC (Media Access Control) addresses 2nd
configuring filtering for
connecting AirPanel V150 to computers
filtering, as security measure 2nd 3rd 4th
problems with
locking by ISPs
resetting IP addresses
Mac OS X systems
downloading Remote Desktop clients for
Magellan Meridian Gold GPS receiver
Mantin, Itsik
manually adding wireless networks
mapping software and GPS 2nd
Microsoft Streets and Tips
NetStumbler tool
MapPoint mapping software
MapPoint Web Service
maps of access points, generating
master/slave relationships
Media Access Control addresses [See MAC addresses]
Medium Frequency (MF) band
Medium Infrared (MIR)
Message Integrity Check (MIC)
MF (Medium Frequency) band
MIC (Message Integrity Check)
Microsoft Smart Display 2nd
Microsoft Streets and Trips package
military use of GPS
MIR (Medium Infrared)
mobile phones
Bluetooth devices
connecting to Internet through
GPRS
pairing computers with
T9 technology for inputting text
tri-band phones
modems
cell phones as
GPRS
modes for wireless networking
modulating radio waves
modulation schemes
modules, GPRS
MS-CHAP v2 (Microsoft Challenge-Handshake Authentication Protocol Version 2)
multitap method on mobile phones
[ Team LiB ]

[ Team LiB ]
[SYMBOL] [A] [B] [C] [D] [E] [F] [G] [H] [I] [J] [K] [L] [M] [N] [O] [P] [Q] [R] [S] [T] [U] [V] [W] [X]
NAT (Network Address Translation)
DHCP (Dynamic Host Configuration Protocol) and
IPv4/IPv6
as security feature
navigational uses of GPS
NMEA-0183 standard and
NetGear MR814 802.11b Cable/DSL Wireless Router
NetStumbler tool
configuring scan speed
using with GPS
security issues and
network adapters, dual-band
Network Address Translation (NAT)
IPv4/IPv6
as security feature
network aggregators, wireless
network devices, finding MAC addresses of
network numbers
calculating from IP addresses
network-to-network VPN
networks
classes of
transmitting packets between
wireless [See wireless networks]
newsgroups about cellular issues
NMEA (National Marine Electronics Association)
NMEA-0183 standard
"No position fix" message
Nokia 6610 mobile phones
connecting to Internet via infrared
Nokia D211 GPRS cards 2nd
configuring for
GPRS access
WLAN access
installing
messaging using SMS
vs. Nokia D311
Nokia D311 GPRS cards
configuring for
GPRS access
WLAN access
noncryptographic authentication scheme
nonoverlapping channels in 802.11b
notebook computers, putting Wi-Fi on
nslookup utility
[ Team LiB ]

[ Team LiB ]
[SYMBOL] [A] [B] [C] [D] [E] [F] [G] [H] [I] [J] [K] [L] [M] [N] [O] [P] [Q] [R] [S] [T] [U] [V] [W] [X]
Object Push Profile
OFDM (Orthogonal Frequency Division Multiplexing) modulation scheme
office network setup
Open System Authentication scheme
openssh utility
Optimization Manager provided by AT&T Wireless
Orthogonal Frequency Division Multiplexing (OFDM) modulation scheme
[ Team LiB ]

[ Team LiB ]
[SYMBOL] [A] [B] [C] [D] [E] [F] [G] [H] [I] [J] [K] [L] [M] [N] [O] [P] [Q] [R] [S] [T] [U] [V] [W] [X]
packets
encapsulating, via tunneling
encrypting on wireless networks
transmitting between networks
paging (initiating a connection)
pairing devices
Palm Handhelds, connecting to, using Bluetooth
Palm Tungsten T Personal Digital Assistant
passwords
802.1X authentication and
Administrator, changing
capturing, using Ethereal
EAP-MD5 protocol and
PEAP and MS-CHAP v2 authentication methods
tracert command and
VPNs and
Wi-Fi security and
PCI adapters
PCMCIA wireless cards
Bluetooth and
connecting to networks using
Cisco Aironet 350 card
D-Link AirPlus DWL-650+ card
Sprint AirPrime PC3200 card
GPRS/GSM networks and
PCS Connection Manager
PCS Vision network [See Sprint PCS Vision network]
PDAs (Personal Digital Assistants)
Compact Flash Bluetooth cards and
PEAP (Protected EAP)
performance issues for cellular networking 2nd
peripherals, connecting to ViewSonic AirPanel V150
Personal Digital Assistants (PDAs)
Compact Flash Bluetooth cards and
pfirewall.log file
phones [See mobile phones]
piconets
ping command
plain GPS receivers
plaintext
transferring in
PM (Pulse Modulation)
Pocket PCs
connecting to, using Bluetooth
file transfers between computers and
PocketMap PMG-220 CF GPS receiver
Point-to-Point Tunneling Protocol (PPTP)

pass-through feature
setting WAN IP address
port 3389
setting up Remote Desktop
port-based authentication mechanism [See 802.1X standard]
ports
controlled/uncontrolled
infrared
numbers of, assigned by ICANN
opening, to provide access
positional information on earth
calculating with GPS 2nd
Microsoft Streets and Tips
NetStumbler and
PPPoE (PPP over Ethernet) protocol, setting WAN IP address
PPTP (Point-to-Point Tunneling Protocol)
pass-through feature
setting WAN IP address
Preferred networks section
manually adding SSID to
price issues for cellular networking 2nd
pricing plans for cellular networking
printing wirelessly with Bluetooth
troubleshooting
private networks, reserved IP addresses for
profiles, Bluetooth
protocols
parameters for, assigned by ICANN
tunneling
provisioning process done by PCS Connection Manager
proxy servers
bypassing
compressing
issues with VPNs and
pscp (secure copy) utility
psftp (secure FTP) utility
Pulse Modulation (PM)
pure wireless access points
PuTTY utility
[ Team LiB ]

[ Team LiB ]
[SYMBOL] [A] [B] [C] [D] [E] [F] [G] [H] [I] [J] [K] [L] [M] [N] [O] [P] [Q] [R] [S] [T] [U] [V] [W] [X]
QFE (Quick Fix Engineering) 313183 patch
[ Team LiB ]

[ Team LiB ]
[SYMBOL] [A] [B] [C] [D] [E] [F] [G] [H] [I] [J] [K] [L] [M] [N] [O] [P] [Q] [R] [S] [T] [U] [V] [W] [X]
radio devices, frequency range of
radio frequency spectrum 2nd
radio interference and absorption
radio waves
absorption of
amplitude of
basics of
behavior of
Bluetooth and
diffraction of
GPS (Global Positioning System) satellites and
modulating
reflection of
refraction of
scattering
security issues with
Wi-Fi and
RADIUS (Remote Authentication Dial-In User Service) server
configuring
ranges of IP addresses
RAS (Remote Access Service) protocol, setting WAN IP address
RC4 stream cipher algorithm
RDC (Remote Desktop Client), downloading
rdesktop (open source client)
RDP (Remote Desktop Protocol)
reflection of radio waves
refraction of radio waves
Remote Access Service (RAS) protocol, setting WAN IP address
Remote Authentication Dial-In User Service (RADISU) server
configuring
Remote Desktop
connecting to remote hosts with
downloading clients for Mac OS X/Unix users
setting up
Remote Desktop Client (RDC), downloading
Remote Desktop Protocol (RDP)
repeaters, wireless
setting up
using access points as
Requests for Comments (RFCs)
reserved IP addresses
RFCs (Requests for Comments)
RMS (Root Mean Square), measuring accuracy of GPS receivers
road warriors, tips for
rogue access points
Root Mean Square (RMS), measuring accuracy of GPS receivers
routers, wireless [See wireless routers]

routes (collection of waypoints)
routing, IP
[ Team LiB ]

[ Team LiB ]
[SYMBOL] [A] [B] [C] [D] [E] [F] [G] [H] [I] [J] [K] [L] [M] [N] [O] [P] [Q] [R] [S] [T] [U] [V] [W] [X]
SA (Selective Availability), turning on/off 2nd
SAFER+ algorithm (Secure and Fast Encryption Routine)
safety issues when Wardriving
satellites, earth-orbiting
scan speed of NetStumbler, configuring
scattering radio waves
scatternets
SD (Secure Digital) cards for Bluetooth
SDAP (Service Discovery Application Profile)
Secure Digital cards for Bluetooth
Secure Shell (SSH) protocol 2nd
security
of access points
Bluetooth technology and
firewalls and 2nd
infrared technology and
SSH (Secure Shell) protocol 2nd
VPNs (Virtual Private Networks)
wireless networks 2nd
security modes for Bluetooth devices
Selective Availability (SA), turning on/off 2nd
Serial Infrared (SIR)
Serial Port Profile 2nd
serial ports
adjusting allocations for
installing GPS devices
Service Discovery Application Profile (SDAP)
service profiles, Bluetooth
Service Set Identifier [See SSID]
setup wizard for D-Link DI-714P+
Shamir, Adi
shared static keys, security problems with
SHF (Super High Frequency) band
Short Message Service messages [See SMS messages]
Sierra Wireless AirCard 555
Venturi compression software included with
Sierra Wireless Aircard 750
signal strength
displaying graphically
link quality and
signal-to-noise ratio for access points, displaying
signs/logos of WISPs
SIM (Subscriber Identity Module) cards
configuring GPRS access
GPRS modems and
sine waves representing radio waves
SIR (Serial Infrared)

Site Survey page in AirPlus utility
site surveys, finding wireless networks using
Smart Display (Microsoft) 2nd
SMS (Short Message Service) messages
increasing performance with
inputting text on mobile phones
messaging on Nokia D211
SNMP (Simple Network Management Protocol) monitoring
Socket CF Bluetooth adapters
software for GPS
Sony Ericsson
Bluetooth-capable phones
Ericsson and
GM29 devices
GM47/GM48 devices
P800 mobile phones
T68i mobile phones
connecting to Internet using
dialing
pairing with computers
supporting GPRS for data access
spam filters, increasing performance with
special-use IP addresses
spectrum of radio frequencies 2nd
Spread Spectrum Frequency Hopping technique (Bluetooth)
Spread Spectrum Technology (SST)
Sprint AirPrime PC3200 card
activating
installing
PCS Connection Manager and
Sprint PCS Vision network
activating AirPrime PC3200
CDMA2000 used on
compression capabilities of
SSH (Secure Shell) protocol 2nd
SSID (Service Set Identifier)
ad-hoc networks and
changing default
disabling broadcast of 2nd
disabling broadcast of, as security feature
problems with
MAC address filtering and
multiple access points, setting up
noncryptographic authentication scheme and
setting
Wireless Zero Configuration and
SST (Spread Spectrum Technology)
standalone GPS receivers
static IP addresses
static keys, security problems with sharing
Streets and Trips package (Microsoft)
subnet masks

Subscriber Identity Module (SIM) cards
configuring GPRS access
GPRS modems and
Super High Frequency (SHF) band
supernet addressing
supplicants (clients using 802.1X)
Surf and Sip hotspots
Symbol Spectrum24 chipset
Synchronization Profile
[ Team LiB ]

[ Team LiB ]
[SYMBOL] [A] [B] [C] [D] [E] [F] [G] [H] [I] [J] [K] [L] [M] [N] [O] [P] [Q] [R] [S] [T] [U] [V] [W] [X]
T-Mobile
compressing proxy servers and
Sierra Wireless AirCard 750 and
T-Mobile HotSpot (WISP)
T68i mobile phones [See Sony Ericsson, T68i mobile phones]
T9 input method on mobile phones
TCP/IP
TDMA (Time Division Multiple Access)
Telnet utility vs. SSH
Temporal Key Integrity Protocol (TKIP)
terminals, GPRS
testing Bluetooth connections
text files, compressing
TGi workgroup (IEEE)
TI wireless chipset
Time Division Multiple Access (TDMA)
Time to First Fix (TTFF)
timeslots and GPRS/GSM
tips for road warriors
TKIP (Temporal Key Integrity Protocol)
Toshiba Bluetooth SD (Secure Digital) card
tracert command
tracking people/objects with GPS
transfer speeds of IrDA
transferring files
with Bluetooth
with infrared
transport mode of IPSec protocol
tri-band phones, supporting different frequencies
triangulation, pinpointing exact locations using 2nd
troubleshooting
ActiveSync connection
Bluetooth printing
connecting AirPanel V150
Internet connection sharing
Wi-Fi
TTFF (Time to First Fix)
tunnel mode of IPSec protocol
tunneling process
[ Team LiB ]

[ Team LiB ]
[SYMBOL] [A] [B] [C] [D] [E] [F] [G] [H] [I] [J] [K] [L] [M] [N] [O] [P] [Q] [R] [S] [T] [U] [V] [W] [X]
UHF (Ultra High Frequency) band
Ultra High Frequency (UHF) band
UMTS (Universal Mobile Telephone Service)
unauthorized access points
detected by NetStumbler 2nd
uncontrolled ports
Universal Mobile Telephone Service (UMTS)
Unix systems, downloading Remote Desktop clients for
unsecured wireless servers, connecting to
USAPhotoMaps mapping software
USB adapters
for AirPanel V150
for Bluetooth
connecting to wireless networks with
for infrared
troubleshooting
Usenet newsgroups about cellular issues
user-to-network VPN
[ Team LiB ]

[ Team LiB ]
[SYMBOL] [A] [B] [C] [D] [E] [F] [G] [H] [I] [J] [K] [L] [M] [N] [O] [P] [Q] [R] [S] [T] [U] [V] [W] [X]
Venturi compression software
Verizon Wireless and compressing proxy servers
Very Fast Infrared (VFIR)
Very High Frequency (VHF) band
Very Low Frequency (VLF) band
VFIR (Very Fast Infrared)
VHF (Very High Frequency) band
ViewSonic AirPanel V150
connecting
peripherals to
to host computers
docking station for
expansion slots on
Virtual Private Networks (VPNs)
VisualGPS software
Vivato indoor wireless switches
VLF (Very Low Frequency) band
voice services
3G networks and
GSM networks and
Sierra Wireless AirCard 750
VPNs (Virtual Private Networks)
[ Team LiB ]

[ Team LiB ]
[SYMBOL] [A] [B] [C] [D] [E] [F] [G] [H] [I] [J] [K] [L] [M] [N] [O] [P] [Q] [R] [S] [T] [U] [V] [W] [X]
WAN IP address, setting
WAP (Wireless Application Protocol) 2nd
Warchalking
Wardriving
legality of
with NetStumbler, safety issues for
Warflying
Warwalking
Watcher icon for AirCard 555
wavelength of radio waves
waypoints (GPS locations)
WayPort hotspots
WCDMA (Wideband CDMA) 2nd
web-based configuration for access points
WEP (Wired Equivalent Privacy) standard 2nd 3rd
configuring wireless networks
dynamic WEP keys
enabling for wireless networks 2nd
problems with 2nd 3rd
specifying WEP keys
vs. WPA
Wi-Fi Alliance
Wi-Fi Zone and
Wi-Fi Protected Access standard [See WPA standard]
Wi-Fi technology
generating maps
putting on notebook computers
security issues and
troubleshooting
Wi-Fi Zone
web site for
WIDCOMM Bluetooth Stack driver
Wideband CDMA (WCDMA) 2nd
WiFinder web site
WildPackets Inc.
Windows XP
Bluetooth technology and
conflicts between D-Link DWL-650+ and
implementing 802.1X authentication in
IrDA protocols supported by
using encryption with Bluetooth devices
WPA and
Windows XP Professional Edition
Remote Desktop and
setting up VPN connection between two computers
Smart Display and
Wired Equivalent Privacy standard [See WEP standard]

wireless access points [See access points]
wireless access points with routers
wireless adapters
for AirPanel V150
for Bluetooth
connecting to wireless networks with
infrared
troubleshooting
Wireless Application Protocol (WAP) 2nd
wireless cards
chipsets in
connecting AirPanel to host computers
wireless community networks
Wireless Fidelity technology [See Wi-Fi technology]
wireless hotspots 2nd
Wireless Internet Service Providers (WISPs)
wireless LAN access, configuring PCMCIA cards for
wireless LAN analyzers
wireless network aggregators
Wireless Network Connection icon
wireless networks
802.11 standards
terminology of
ad-hoc mode 2nd 3rd
connecting to
in closed systems
firewalls and
fundamentals of
gaining access to
home network setup
infrastructure mode 2nd
locating, when on the road
manually adding
office network setup
security issues 2nd
setting up
sharing Internet connections with neighbors
technologies used by
web-based configuration
wireless repeaters
setting up
using access points as
wireless routers
enabling WEP using Linksys
"IPSec and PPTP pass-through" feature and
MAC addresses, locking
sharing bandwidth on the road
wireless access points and
wireless security [See security]
wireless standards [See 802.11 wireless standards]
Wireless Zero Configuration service
disabling

finding wireless networks
WirelessCommunities web site
WISPs (Wireless Internet Service Providers)
WLAN access, configuring PCMCIA cards for
WLAN analyzers
WPA (Wi-Fi Protected Access) standard 2nd
vs. WEP
Windows XP and
WPA2 standard (802.11i)
[ Team LiB ]

[ Team LiB ]
[SYMBOL] [A] [B] [C] [D] [E] [F] [G] [H] [I] [J] [K] [L] [M] [N] [O] [P] [Q] [R] [S] [T] [U] [V] [W] [X]
XScale PX250 processor (Intel)
[ Team LiB ]