wood harvesting with hand tools - an illustrated training
TRANSCRIPT

Home"" """"> ar.cn.de.en.es.fr.id.it.ph.po.ru.sw
Wood Harvesting with Hand Tools - An Illustrated Training
Manual (ILO, 1989, 128 p.)
(introduction...)
INTRODUCTION
BASIC WORK AND MAINTENANCE TOOLS
HAND TOOLS FOR WOOD HARVESTING
FILES
GRINDSTONES AND WHETSTONES
SPLITTING HAMMER AND WEDGES
MAKING TOOL HANDLES
AXES
USE AND TYPES OF AXES
MAINTAINING AN AXE
MAKING AN AXE HANDLE
SHAFTING AN AXE
BOW SAWS
USE AND TYPES OF BOW SAWS
CROSS-CUT SAWS
TYPES OF CROSS-CUT SAWS
MAINTENANCE TOOLS FOR CROSS-CUT SAWS
FILING VICES, SELF-MADE
21/10/2011 Wood Harvesting with Hand Tools - An Illustrated Training…
D:/cd3wddvd/NoExe/Master/dvd001/…/meister10.htm 1/186

FILING VICES, COMMERCIALLY-MADEMAINTAINING A PEG-TOOTH CROSS-CUT SAW
TYPES OF RAKER-TOOTH CROSS-CUT SAWS
MAINTAINING A RAKER-TOOTH CROSS-CUT SAW
MAJOR OVERHAUL OF CROSS-CUT SAWS
THE WORKER
CLOTHING, PERSONAL PROTECTIVE EQUIPMENT,
FIRST-AID EQUIPMENT
FOOD, NUTRITION AND REST
WORKING POSTURES AND MOVEMENTS
WORK PLANNING AND ORGANISATION
ACCIDENT PREVENTION
TREE FELLING
PREPARATION FOR TREE FELLING
TREE FELLING WITH AXE AND BOW SAW
TREE FELLING WITH AXE AND CROSS-CUT SAW
PRECAUTIONS WHEN MAKING THE UNDERCUT AND
THE BACK CUT
FELLING TREES LEANING INTO THE PLANNED
FELLING DIRECTION
FELLING TREES LEANING TO THE SIDE
TREE FELLING IN DENSE TROPICAL FORESTS
FELLING OF TREES WITH PLANK BUTTRESSES
21/10/2011 Wood Harvesting with Hand Tools - An Illustrated Training…
D:/cd3wddvd/NoExe/Master/dvd001/…/meister10.htm 2/186

WOOD WASTAGE DUE TO POOR WORKING
TECHNIQUES IN FELLINGRELEASING LODGED TREES
RELEASING LODGED TREES WITH SIMPLE TOOLS
RELEASING LODGED TREES WITH SPECIAL
EQUIPMENT AND MACHINES
DEBRANCHING AND DEBARKING
DEBRANCHING
DEBARKING
CROSS-CUTTING
GENERAL RULES FOR CROSS-CUTTING
TOOLS FOR CROSS-CUTTING
SUPPORTS AND TRESTLES
CROSS-CUTTING OF TREES UNDER TENSION
WOOD WASTAGE IN CROSS-CUTTING
CUTTING WINDFALLS
WOOD SPLITTING
WOOD HANDLING AND TRANSPORT
HANDLING BILLETS AND LOGS
MANUAL TRANSPORT OF SMALLER-SIZED WOOD
USE OF SKIDDING SULKIES
SLIDING WOOD DOWNHILL
STACKING AND STORING OF WOOD
PIT-SAWING
21/10/2011 Wood Harvesting with Hand Tools - An Illustrated Training…
D:/cd3wddvd/NoExe/Master/dvd001/…/meister10.htm 3/186

TRAINING IN WOOD HARVESTING
OTHER ILO PUBLICATIONS
BACK COVER
Home"" """"> ar.cn.de.en.es.fr.id.it.ph.po.ru.sw
Wood Harvesting with Hand Tools - An Illustrated Training
Manual (ILO, 1989, 128 p.)
(introduction...)
INTRODUCTION
BASIC WORK AND MAINTENANCE TOOLS
AXES
BOW SAWS
CROSS-CUT SAWS
THE WORKER
TREE FELLING
RELEASING LODGED TREES
DEBRANCHING AND DEBARKING
CROSS-CUTTING
CUTTING WINDFALLS
WOOD SPLITTING
WOOD HANDLING AND TRANSPORT
STACKING AND STORING OF WOOD
21/10/2011 Wood Harvesting with Hand Tools - An Illustrated Training…
D:/cd3wddvd/NoExe/Master/dvd001/…/meister10.htm 4/186

PIT-SAWINGTRAINING IN WOOD HARVESTING
OTHER ILO PUBLICATIONS
BACK COVER
International Labour Office
Geneva
Copyright © International Labour Organisation 1987
Publications of the International Labour Office enjoy copyright under Protocol 2 of
the Universal Copyright Convention. Nevertheless, short excerpts from them may
be reproduced without authorisation, on condition that the source is indicated. For
rights of reproduction or translation, application should be made to the
Publications Branch (Rights and Permissions), International Labour Office, CH-
1211 Geneva 22, Switzerland. The International Labour Office welcomes such
applications.
ISBN 92-2-106217-1
First published 1987
The designations employed in ILO publications, which are in conformity with
United Nations practice, and the presentation of material therein do not imply the
expression of any opinion whatsoever on the part of the International Labour
21/10/2011 Wood Harvesting with Hand Tools - An Illustrated Training…
D:/cd3wddvd/NoExe/Master/dvd001/…/meister10.htm 5/186

Office concerning the legal status of any country, area or territory or of its
authorities, or concerning the delimitation of its frontiers.
The responsibility for opinions expressed in signed articles, studies and other
contributions rests solely with their authors, and publication does not constitute
an endorsement by the International Labour Office of the opinions expressed in
them.
Reference to names of firms and commercial products and processes does not
imply their endorsement by the International Labour Office, and any failure to
mention a particular firm, commercial product or process is not a sign of
disapproval.
ILO publications can be obtained through major booksellers or ILO local offices in
many countries, or direct from ILO Publications, International Labour Office, CH-
1211 Geneva 22, Switzerland. A catalogue or list of new publications will be sent
free of charge from the above address.
Printed in France
SAD
Home"" """"> ar.cn.de.en.es.fr.id.it.ph.po.ru.sw
Wood Harvesting with Hand Tools - An Illustrated Training
Manual (ILO, 1989, 128 p.)
21/10/2011 Wood Harvesting with Hand Tools - An Illustrated Training…
D:/cd3wddvd/NoExe/Master/dvd001/…/meister10.htm 6/186
DEBRANCHING AND DEBARKINGDEBRANCHING
DEBARKING
Wood Harvesting with Hand Tools - An Illustrated Training Manual (ILO, 1989,
128 p.)
DEBRANCHING AND DEBARKING
DEBRANCHING
Debranching may be a rather time-consuming job, especially in coniferous trees.
It is done with an axe. For small poles with thin branches, a matchet can also be
used.
Debranching is a dangerous job and easily causes accidents which may be quite
severe, especially if a powerful stroke misses the branch and hits the leg. This may
happen especially to young, inexperienced workers.
21/10/2011 Wood Harvesting with Hand Tools - An Illustrated Training…
D:/cd3wddvd/NoExe/Master/dvd001/…/meister10.htm 7/186

It is therefore essential never to cut towards the legs, to stand as far as possible
on the side of the tree opposite the branch that is cut (1) and always to direct the
stroke away from the body.
Debranching usually proceeds towards the top of the tree. If branches are thick
and under tension, it may be preferable first to cut them off some distance from
their base and subsequently cut the remaining part flush with the stem.
If trees are heavily branched, care must be taken to remove cut branches from the
tree and to keep the working space clear.
After debranching the upper side, a turning hook (2) is needed to turn trees or
logs (2a).
21/10/2011 Wood Harvesting with Hand Tools - An Illustrated Training…
D:/cd3wddvd/NoExe/Master/dvd001/…/meister10.htm 8/186

Figure
21/10/2011 Wood Harvesting with Hand Tools - An Illustrated Training…
D:/cd3wddvd/NoExe/Master/dvd001/…/meister10.htm 9/186

Figure
DEBARKING
Debarking of wood may be required for a variety of reasons such as control of
insects, acceleration of wood seasoning, reduction of weight in transport or
simply the demand for wood without bark, for instance pulp wood, or the demand
for the bark itself if it is used for tanning.
Large industries requiring debarked wood are usually equipped with debarking
machines installed in the plant.
21/10/2011 Wood Harvesting with Hand Tools - An Illustrated Training…
D:/cd3wddvd/NoExe/Master/dvd001/…/meister10.htm 10/186

If manual debarking is required, a variety of different tools can be used. As
debarking demands much time and effort, the tools should be suitable for the job
and be handled efficiently.
Debarking of small- to medium-sized logs is usually done with debarking spades,
of which different models exist. A short-handled debarking spade is used for
harder bark (1a), a long-handled one for softer bark, to permit working in longer
strokes (1b).
Axes may be used to debark trees or their butt ends if the bark is too thick and
tough for the debarking spade.
It may be necessary to debark large logs of broad-leaved tropical trees which
have very thick and strong bark. In such cases, an iron spoon should be used
which permits, if necessary, beating the bark loose and peeling it off with the
spoon (2).
Machetes are sometimes used for peeling off the thin bark of smaller trees, such
as eucalyptus. They are less efficient and less convenient than debarking spades
and should therefore be restricted to occasional work on a small scale.
As in debranching, a turning hook may be needed to turn logs during debarking.
21/10/2011 Wood Harvesting with Hand Tools - An Illustrated Training…
D:/cd3wddvd/NoExe/Master/dvd001/…/meister10.htm 11/186

Figure
21/10/2011 Wood Harvesting with Hand Tools - An Illustrated Training…
D:/cd3wddvd/NoExe/Master/dvd001/…/meister10.htm 12/186

Figure
Home"" """"> ar.cn.de.en.es.fr.id.it.ph.po.ru.sw
Wood Harvesting with Hand Tools - An Illustrated Training
Manual (ILO, 1989, 128 p.)
CROSS-CUTTING
GENERAL RULES FOR CROSS-CUTTING
TOOLS FOR CROSS-CUTTING
SUPPORTS AND TRESTLES
21/10/2011 Wood Harvesting with Hand Tools - An Illustrated Training…
D:/cd3wddvd/NoExe/Master/dvd001/…/meister10.htm 13/186

CROSS-CUTTING OF TREES UNDER TENSIONWOOD WASTAGE IN CROSS-CUTTING
Wood Harvesting with Hand Tools - An Illustrated Training Manual (ILO, 1989,
128 p.)
CROSS-CUTTING
GENERAL RULES FOR CROSS-CUTTING
If the tree is not skidded to a landing for cross-cutting, this operation should be
done in the forest by the same team which does the felling and debranching to
avoid delays and additional time spent on getting to the tree. However, this
process requires the presence of qualified supervisors or availability of workers
having basic knowledge in timber grading unless only fuelwood is to be produced.
The greatest care is required to avoid losses in cross-cutting valuable trees. They
should be thoroughly inspected for proper grading before cross-cutting begins.
21/10/2011 Wood Harvesting with Hand Tools - An Illustrated Training…
D:/cd3wddvd/NoExe/Master/dvd001/…/meister10.htm 14/186

Clear instructions should be given for the grading of different logs. Simply cutting
trees from the bottom into uniform log lengths may result in much wastage during
utilisation.
A single tree may be cut into different assortments: for instance, higher-quality
logs for the sawmill (1a), lower-quality logs for a chipboard plant (1b), and
fuelwood (1c). Skilled grading can considerably increase the economic returns of
the operation.
In many sawmills, it is common for saw logs to go straight from the forest without
further cross-cutting into conversion. In such cases, tree shape and quality must
be carefully assessed to allow a reasonable degree of recovery in the mill. Heavily
tapering trees should therefore be cut into shorter lengths than straight trees with
little taper (2). Minimum and maximum log length and size, however, will depend
on transport facilities.
Crooked logs should normally be cross-cut in the bend and not between the bends
(3).
Figure
21/10/2011 Wood Harvesting with Hand Tools - An Illustrated Training…
D:/cd3wddvd/NoExe/Master/dvd001/…/meister10.htm 15/186

Figure
Figure
TOOLS FOR CROSS-CUTTING
For cross-cutting small-sized trees, e.g. for fuelwood, a portable support should
be used (1). This facilitates the job and avoids contact of the sharp cutting tool
with the ground. This type of support can easily be made on the spot and
transported within the forest (see page 92).
Bow saws are handy for cross-cutting up to a diameter of 20 cm (2).
Above diameters of 20 cm, the bow saw should be replaced by the cross-cut saw
(3).
To avoid pinching of the saw, wedging is required (4).
21/10/2011 Wood Harvesting with Hand Tools - An Illustrated Training…
D:/cd3wddvd/NoExe/Master/dvd001/…/meister10.htm 16/186

Furthermore, tools for correct measuring are needed, such as measuring sticks,
tapes or calipers.
Figure
Figure
Figure
21/10/2011 Wood Harvesting with Hand Tools - An Illustrated Training…
D:/cd3wddvd/NoExe/Master/dvd001/…/meister10.htm 17/186

Figure
SUPPORTS AND TRESTLES
These are made locally and used as an aid for work such as debarking and cross-
cutting in the stand, at the roadside, landing or timber yard. In many cases, work
is done more easily and quickly when using supports and trestles. Moreover, tool
edges remain sharp for a longer time if work is not done close to the ground.
A forked branch is the easiest means of supporting a pole if rested against a
standing tree in the forest (1).
Dovetail trestles consist of a wooden post and two legs. They can easily be made
in the forest with no other tools than an axe and a bow saw. Dry and light wood is
used. Two dovetail cuts are made on one end of the post (2). The top ends of the
legs are square on three sides (3) and fitted into the dovetail cuts.
The low dovetail trestle (4) consists of a post 200 cm long and 12 cm thick (4a).
The dovetail cuts 25 mm deep are made about 20 cm and 40 cm from the end. The
legs are 70 cm and 80 cm long and about 7.5 cm thick. They are inserted into the
dovetail cuts from below. Their feet should be about 65 cm apart. The top of the
longer leg must be so fitted into the dovetail that it is 10 cm higher than the post.
21/10/2011 Wood Harvesting with Hand Tools - An Illustrated Training…
D:/cd3wddvd/NoExe/Master/dvd001/…/meister10.htm 18/186
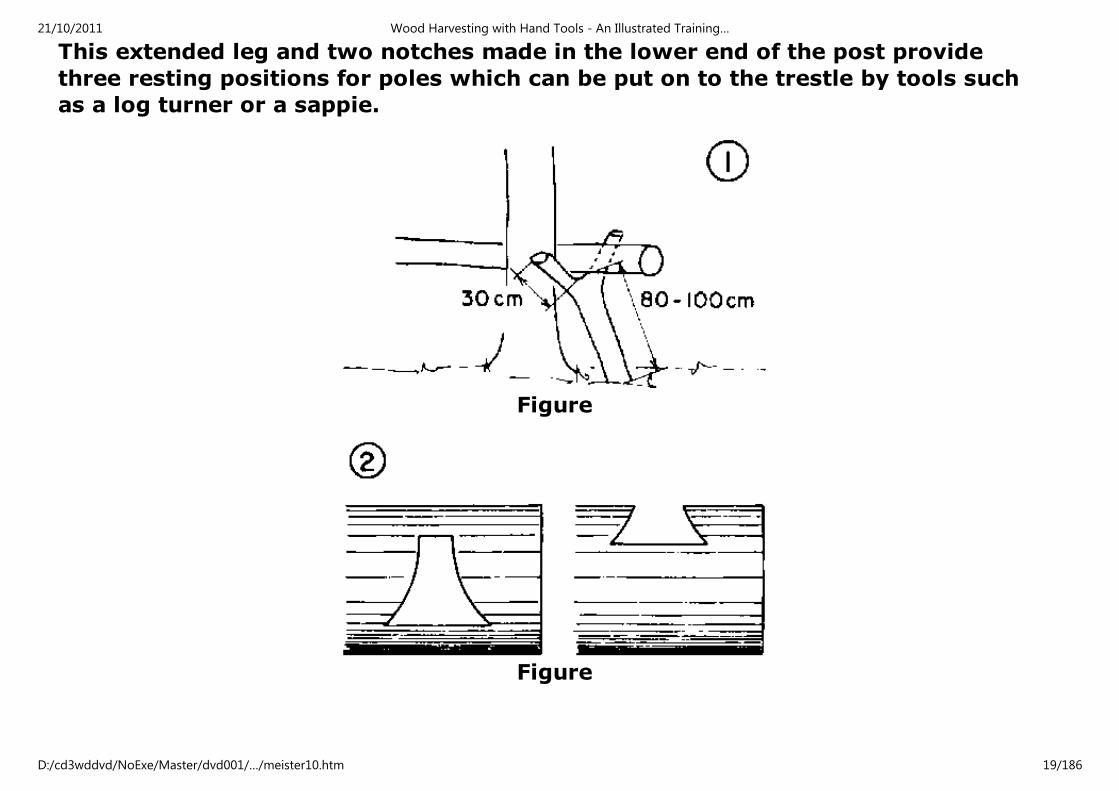
This extended leg and two notches made in the lower end of the post provide
three resting positions for poles which can be put on to the trestle by tools such
as a log turner or a sappie.
Figure
Figure
21/10/2011 Wood Harvesting with Hand Tools - An Illustrated Training…
D:/cd3wddvd/NoExe/Master/dvd001/…/meister10.htm 19/186

Figure
21/10/2011 Wood Harvesting with Hand Tools - An Illustrated Training…
D:/cd3wddvd/NoExe/Master/dvd001/…/meister10.htm 20/186

Figure
CROSS-CUTTING OF TREES UNDER TENSION
Cross-cutting of trees under tension may cause loss of wood and may also pinch
the saw. This should be avoided as much as possible through special techniques.
Tension can often be reduced by putting supports under the tree (1a). If this is not
possible, e.g. in a tree where the upper side is under tension and the lower side is
21/10/2011 Wood Harvesting with Hand Tools - An Illustrated Training…
D:/cd3wddvd/NoExe/Master/dvd001/…/meister10.htm 21/186

accessible, then cross-cutting should be done from below (1b) until the saw starts
jamming and then continued from above (1c).
If the lower side of the tree is under tension, an effort should be made to place a
support under the tree (2a). In this case, sawing should start from above until the
saw starts jamming (2b) and be continued from below (2c) unless wedging is
feasible and sufficient.
In windfalls, cross-cutting under tension is very common. As shown on pages 98
and 99, a pressure rope or cable can be used in such cases to avoid cracking. Such
equipment may in special cases also be useful in other harvesting operations.
21/10/2011 Wood Harvesting with Hand Tools - An Illustrated Training…
D:/cd3wddvd/NoExe/Master/dvd001/…/meister10.htm 22/186

Figure
21/10/2011 Wood Harvesting with Hand Tools - An Illustrated Training…
D:/cd3wddvd/NoExe/Master/dvd001/…/meister10.htm 23/186

Figure
WOOD WASTAGE IN CROSS-CUTTING
Cross-cutting with axes should be avoided (1a). In large-sized wood, losses of 30
per cent of the total volume may occur if wood is cut into lengths of 1 m or less.
The saw cut wastes only a minimal amount of wood and requires less effort than
21/10/2011 Wood Harvesting with Hand Tools - An Illustrated Training…
D:/cd3wddvd/NoExe/Master/dvd001/…/meister10.htm 24/186

axe work (1b). Furthermore, a clean saw cut allows more precise measurement
and stacking as well as denser loading in transport.
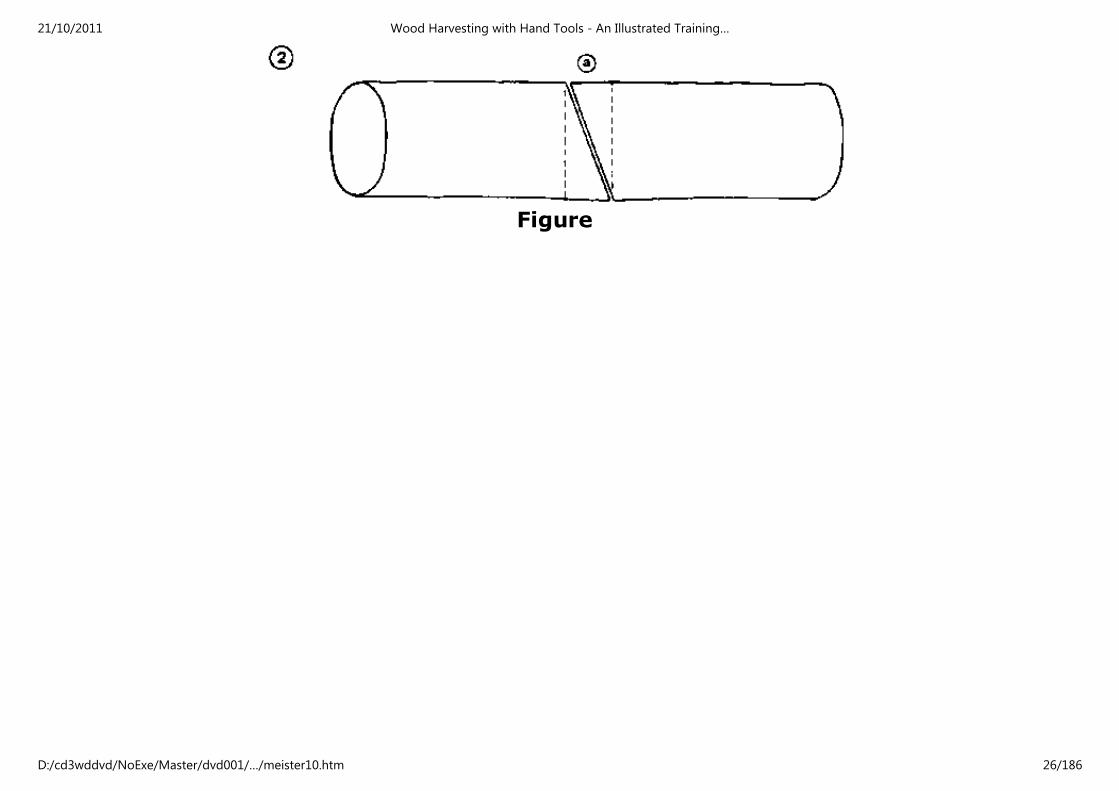
If cross-cuts on logs are not made at an angle of 90 (2a), wood is usually lost
during utilisation since logs may require corrective cross-cutting.
Cutting from the side which is under tension causes the log to crack. This may be
an advantage in special circumstances when the log would have to be split anyway
into fuelwood or pulpwood. However, valuable logs should never be reduced by
careless cutting to fuelwood quality (3a, 3b).
Figure
21/10/2011 Wood Harvesting with Hand Tools - An Illustrated Training…
D:/cd3wddvd/NoExe/Master/dvd001/…/meister10.htm 25/186
Figure
21/10/2011 Wood Harvesting with Hand Tools - An Illustrated Training…
D:/cd3wddvd/NoExe/Master/dvd001/…/meister10.htm 26/186

Figure
Home"" """"> ar.cn.de.en.es.fr.id.it.ph.po.ru.sw
21/10/2011 Wood Harvesting with Hand Tools - An Illustrated Training…
D:/cd3wddvd/NoExe/Master/dvd001/…/meister10.htm 27/186

Wood Harvesting with Hand Tools - An Illustrated Training
Manual (ILO, 1989, 128 p.)
(introduction...)
INTRODUCTION
BASIC WORK AND MAINTENANCE TOOLS
AXES
BOW SAWS
CROSS-CUT SAWS
THE WORKER
TREE FELLING
RELEASING LODGED TREES
DEBRANCHING AND DEBARKING
CROSS-CUTTING
CUTTING WINDFALLS
WOOD SPLITTING
WOOD HANDLING AND TRANSPORT
STACKING AND STORING OF WOOD
PIT-SAWING
TRAINING IN WOOD HARVESTING
OTHER ILO PUBLICATIONS
BACK COVER
CUTTING WINDFALLS
21/10/2011 Wood Harvesting with Hand Tools - An Illustrated Training…
D:/cd3wddvd/NoExe/Master/dvd001/…/meister10.htm 28/186

Windfalls are dangerous to cut: the wood is often under high tension; the working
place is sometimes restricted and the tree difficult to get at. Stumps may tip
forward or backward when cut loose from the trunk. Therefore, the worker must
be well trained and experienced in order to avoid accidents and to reduce the loss
of wood.
Chain saws have a definite advantage over hand saws in clearing windfalls as they
can be more easily handled in restricted space and, compared to a cross-cut saw,
only one man is exposed to danger. They permit special techniques for cutting
wood under tension without cracking. Furthermore, in extensive windfalls where
there is a danger of wood deterioration through insects and fungi, chain saws help
to speed up the operation.
Wind-fallen areas are attacked from the side where the wind has entered. When
working with hand tools, trees are worked up from the top end by debranching
and cross-cutting to release tension.
When cutting the tree from the stump, special care must be taken if there is a
danger of the stump turning over. To avoid the stump moving towards the
sawyers, different means of support can be used, e.g. a piece of wood or a stone
(1a), a pole (1b), or a cable (1c).
After cutting off the tree, stumps may fall back. The sawyers must therefore make
sure that nobody is standing behind the stump whilst they are sawing.
In loose soil, the base of the tree may be pressed on the ground. In this case, it is
necessary to dig a trench to allow salvage of the valuable butt end (2a).
21/10/2011 Wood Harvesting with Hand Tools - An Illustrated Training…
D:/cd3wddvd/NoExe/Master/dvd001/…/meister10.htm 29/186

Cutting of tensioned trees in windfalls may easily result in wood losses through
cracking (2b). This risk can be reduced through pressure ropes or chains (3).
Work in windfalls is greatly facilitated if the wood is skidded after cross-cutting to
storage places which are easy of access.
Figure
Figure
21/10/2011 Wood Harvesting with Hand Tools - An Illustrated Training…
D:/cd3wddvd/NoExe/Master/dvd001/…/meister10.htm 30/186

Figure
Home"" """"> ar.cn.de.en.es.fr.id.it.ph.po.ru.sw
Wood Harvesting with Hand Tools - An Illustrated Training
Manual (ILO, 1989, 128 p.)
(introduction...)
INTRODUCTION
BASIC WORK AND MAINTENANCE TOOLS
AXES
BOW SAWS
CROSS-CUT SAWS
21/10/2011 Wood Harvesting with Hand Tools - An Illustrated Training…
D:/cd3wddvd/NoExe/Master/dvd001/…/meister10.htm 31/186

THE WORKERTREE FELLING
RELEASING LODGED TREES
DEBRANCHING AND DEBARKING
CROSS-CUTTING
CUTTING WINDFALLS
WOOD SPLITTING
WOOD HANDLING AND TRANSPORT
STACKING AND STORING OF WOOD
PIT-SAWING
TRAINING IN WOOD HARVESTING
OTHER ILO PUBLICATIONS
BACK COVER
WOOD SPLITTING
To make handling and transport of short pieces of wood easier and to reduce the
time required for seasoning, wood of a diameter exceeding 20 cm is often split
after cross-cutting. In the absence of splitting tools, bigger wood pieces of
fuelwood quality often remain unutilised.
It may also be necessary to split wood to be used as fence posts.
Splitting requires good quality splitting hammers and wedges. The hammer should
weigh about 2.5 kg and have a straight handle, about 90 cm long, with a knob (1).
Steel wedges with a mushroom head should not be used (2). The safest wedge is a
21/10/2011 Wood Harvesting with Hand Tools - An Illustrated Training…
D:/cd3wddvd/NoExe/Master/dvd001/…/meister10.htm 32/186

steel socket wedge with a wooden head and a steel ring (3).
Since the way wood splits differs a lot depending on the tree species, splitting
techniques must be modified accordingly. For wood which splits easily, a few
blows with the cutting side of the splitting hammer on the end of the billet will
suffice. For wood which is more difficult to split, a wedge is inserted near the end
of the billet and further wedges may be needed as the crack opens (3).
21/10/2011 Wood Harvesting with Hand Tools - An Illustrated Training…
D:/cd3wddvd/NoExe/Master/dvd001/…/meister10.htm 33/186

Figure
Figure
Figure
Home"" """"> ar.cn.de.en.es.fr.id.it.ph.po.ru.sw
Wood Harvesting with Hand Tools - An Illustrated Training
21/10/2011 Wood Harvesting with Hand Tools - An Illustrated Training…
D:/cd3wddvd/NoExe/Master/dvd001/…/meister10.htm 34/186
Manual (ILO, 1989, 128 p.)
WOOD HANDLING AND TRANSPORT
HANDLING BILLETS AND LOGS
MANUAL TRANSPORT OF SMALLER-SIZED WOOD
USE OF SKIDDING SULKIES
SLIDING WOOD DOWNHILL
Wood Harvesting with Hand Tools - An Illustrated Training Manual (ILO, 1989,
128 p.)
WOOD HANDLING AND TRANSPORT
HANDLING BILLETS AND LOGS
Loading and stacking of billets and moving of logs is easier if simple helping tools
are used.
In the absence of such helping tools, the worker has to bend down and pick up the
wood from the ground, which may be muddy (1a).
A timber pick makes it much easier to pick up and handle small pieces of wood
(1b).
21/10/2011 Wood Harvesting with Hand Tools - An Illustrated Training…
D:/cd3wddvd/NoExe/Master/dvd001/…/meister10.htm 35/186

Different types of handling tools are available, such as metal hooks (2), timber
picks with a short wooden handle, fitting the hand of the worker (3) and small
timber tongs (4). The latter tool is particularly handy but the former ones can be
locally made more easily.
The sappie is used for lifting or for short-distance skidding of logs (5). A model for
heavier logs has a handle 190 cm long and a hook 42 cm long. A lighter model has
a handle 110 cm long and a hook 28 cm long.
Sappies are typically used for pulling logs (6) and for turning them (7). In the
Alpine countries they were widely used for gravity skidding of logs and continue
to be indispensable in handling logs during tree felling and transport.
Figure
21/10/2011 Wood Harvesting with Hand Tools - An Illustrated Training…
D:/cd3wddvd/NoExe/Master/dvd001/…/meister10.htm 36/186

Figure
Figure
21/10/2011 Wood Harvesting with Hand Tools - An Illustrated Training…
D:/cd3wddvd/NoExe/Master/dvd001/…/meister10.htm 37/186

Figure
Figure
21/10/2011 Wood Harvesting with Hand Tools - An Illustrated Training…
D:/cd3wddvd/NoExe/Master/dvd001/…/meister10.htm 38/186

Figure
Figure
MANUAL TRANSPORT OF SMALLER-SIZED WOOD
21/10/2011 Wood Harvesting with Hand Tools - An Illustrated Training…
D:/cd3wddvd/NoExe/Master/dvd001/…/meister10.htm 39/186

Carrying wood manually should be avoided as much as possible. It is a heavy and
inefficient job which is only permissible over short distances of just a few metres
(1).
Small logs can be pulled more easily to the stacking or loading place using
skidding tongs (2). The tong should be attached close to the end of the log to
achieve a lifting effect and thus facilitate pulling.
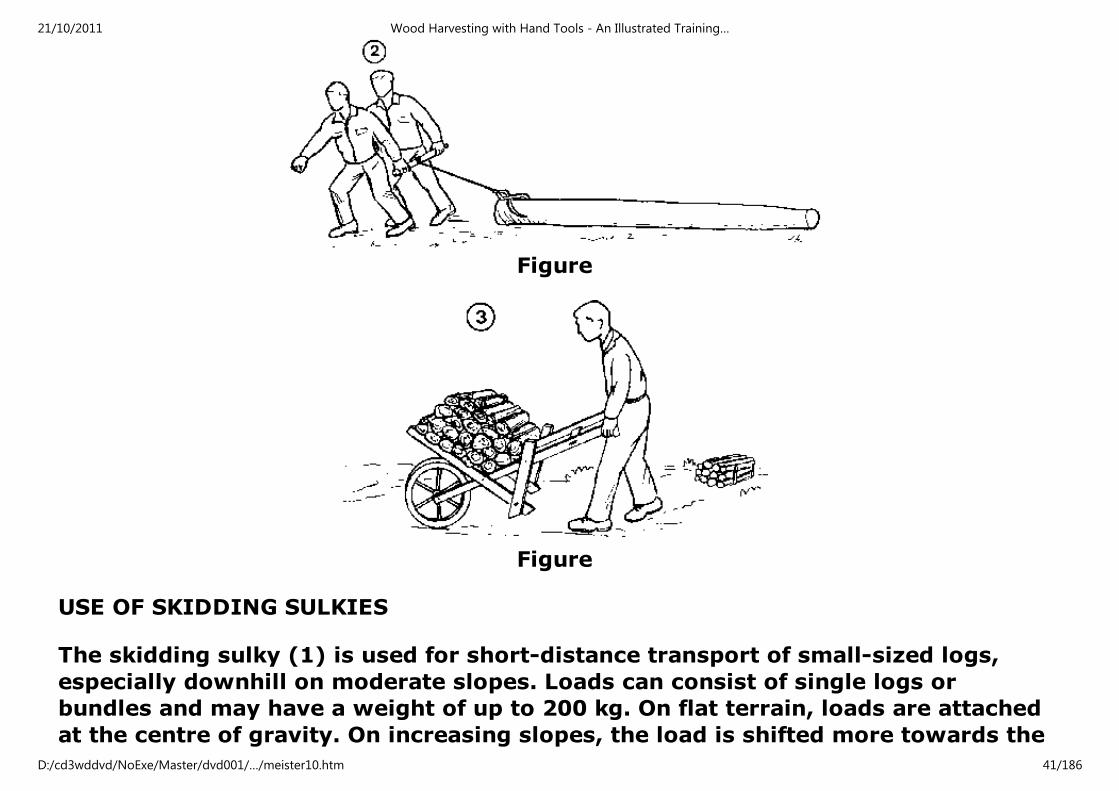
If the terrain and ground cover permit, the wheelbarrow is an excellent means of
assembling loads of short pieces of wood for transport over short distances, e.g.
for taking wood to a site for a charcoal kiln (3).
Figure
21/10/2011 Wood Harvesting with Hand Tools - An Illustrated Training…
D:/cd3wddvd/NoExe/Master/dvd001/…/meister10.htm 40/186
Figure
Figure
USE OF SKIDDING SULKIES
The skidding sulky (1) is used for short-distance transport of small-sized logs,
especially downhill on moderate slopes. Loads can consist of single logs or
bundles and may have a weight of up to 200 kg. On flat terrain, loads are attached
at the centre of gravity. On increasing slopes, the load is shifted more towards the
21/10/2011 Wood Harvesting with Hand Tools - An Illustrated Training…
D:/cd3wddvd/NoExe/Master/dvd001/…/meister10.htm 41/186

back to serve as a brake. Skidding sulkies can be built with 2 wheels (1a) or with
4 wheels fixed to bogie axles (1b). The latter type is more sophisticated but
permits the handling of larger loads and negotiating rougher surface conditions.
Two sulkies can also be connected to skid bigger logs (2). In this case, the load is
guided by one handle in the front and one in the rear. On slopes, the rear part of
the log should hang close to the ground to facilitate rapid braking when required.
On steep terrain, two sulkies may be operated together (3). They can be
connected by a cable which is guided by two pulleys attached to trees (3a). The
loaded sulky (3b) can thus be used to pull up the empty one (3c), together with
the worker, who guides it by the handle.
Figure
21/10/2011 Wood Harvesting with Hand Tools - An Illustrated Training…
D:/cd3wddvd/NoExe/Master/dvd001/…/meister10.htm 42/186

Figure
21/10/2011 Wood Harvesting with Hand Tools - An Illustrated Training…
D:/cd3wddvd/NoExe/Master/dvd001/…/meister10.htm 43/186

Figure
SLIDING WOOD DOWNHILL
Timber chutes are used for sliding small logs or short pieces of wood downhill on
slopes with a gradient of 25% or more (1).
Plastic chutes are commercially available in sections of 5 m and with a diameter of
35-50 cm. At a diameter of 40 cm, the chutes can take logs up to a length of 5 m
and short pieces to a diameter of 30 cm.
Chutes may be used over distances of up to 150 m. Under favourable conditions, 2
21/10/2011 Wood Harvesting with Hand Tools - An Illustrated Training…
D:/cd3wddvd/NoExe/Master/dvd001/…/meister10.htm 44/186

m stacked may be transported per hour over that distance.
Commercially-available chutes are easily assembled thanks to different connecting
systems. Chutes may be made locally from plastic tubes cut lengthwise or from
other materials, e.g. wooden boards, although these are heavier and more difficult
to handle.
In clearfelling areas on moderate slopes, logs may be rolled down to the roadside
across trees which have been felled up the slope (2). They can subsequently be
cut into shorter assortments, if necessary, at the foot of the slope. This technique,
if applied properly, can save considerable expense in skidding.
21/10/2011 Wood Harvesting with Hand Tools - An Illustrated Training…
D:/cd3wddvd/NoExe/Master/dvd001/…/meister10.htm 45/186

Figure
21/10/2011 Wood Harvesting with Hand Tools - An Illustrated Training…
D:/cd3wddvd/NoExe/Master/dvd001/…/meister10.htm 46/186

Figure
Home"" """"> ar.cn.de.en.es.fr.id.it.ph.po.ru.sw
Wood Harvesting with Hand Tools - An Illustrated Training
Manual (ILO, 1989, 128 p.)
(introduction...)
INTRODUCTION
BASIC WORK AND MAINTENANCE TOOLS
21/10/2011 Wood Harvesting with Hand Tools - An Illustrated Training…
D:/cd3wddvd/NoExe/Master/dvd001/…/meister10.htm 47/186

AXES
BOW SAWS
CROSS-CUT SAWS
THE WORKER
TREE FELLING
RELEASING LODGED TREES
DEBRANCHING AND DEBARKING
CROSS-CUTTING
CUTTING WINDFALLS
WOOD SPLITTING
WOOD HANDLING AND TRANSPORT
STACKING AND STORING OF WOOD
PIT-SAWING
TRAINING IN WOOD HARVESTING
OTHER ILO PUBLICATIONS
BACK COVER
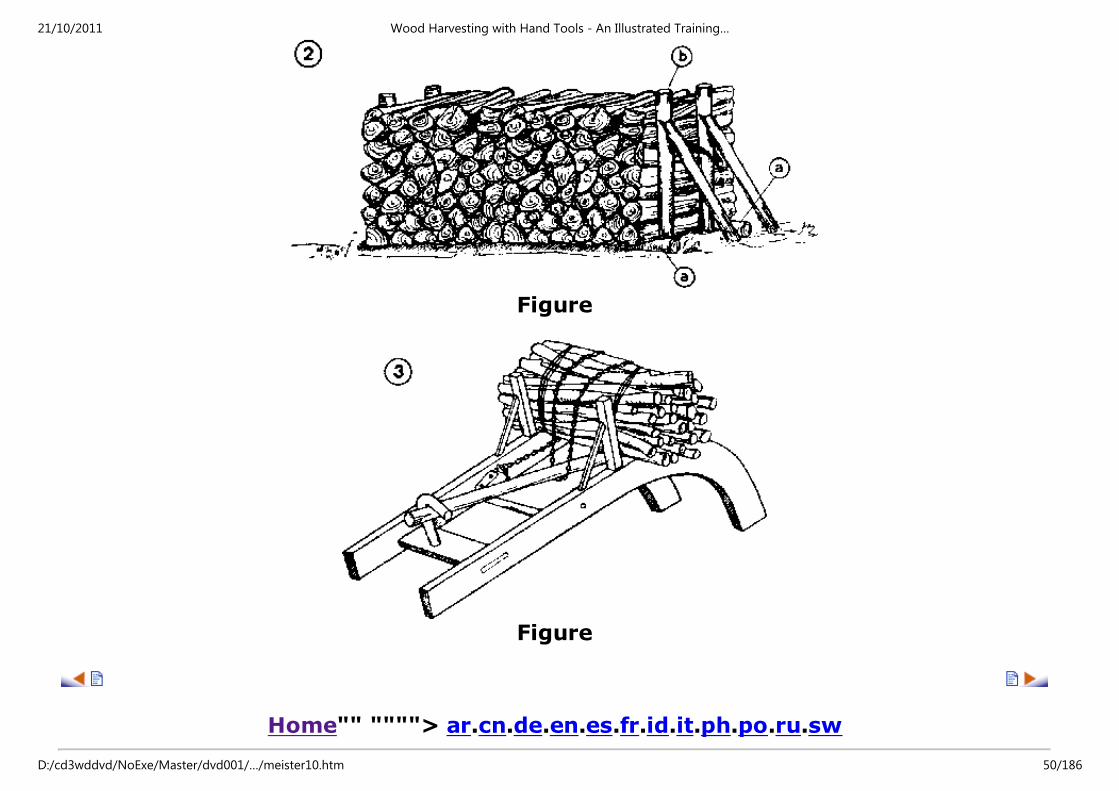
STACKING AND STORING OF WOOD
Proper stacking of wood at the roadside prior to transport aids seasoning, reduces
weight and provides protection against deterioration. Stacking should if possible
be done on the higher side of the road embankment if this facilitates loading (1).
Logs and poles should be placed on supports (1a) and be easily accessible for
21/10/2011 Wood Harvesting with Hand Tools - An Illustrated Training…
D:/cd3wddvd/NoExe/Master/dvd001/…/meister10.htm 48/186

loading.
Short wood is usually piled in stacks which also require supports (2a). The stacks
should be firmly secured by one or more stakes (2b).
Small-sized material used for fuel can be bundled prior to stacking and is thus
more easily handled and marketed (3).
Figure
21/10/2011 Wood Harvesting with Hand Tools - An Illustrated Training…
D:/cd3wddvd/NoExe/Master/dvd001/…/meister10.htm 49/186
Figure
Figure
Home"" """"> ar.cn.de.en.es.fr.id.it.ph.po.ru.sw
21/10/2011 Wood Harvesting with Hand Tools - An Illustrated Training…
D:/cd3wddvd/NoExe/Master/dvd001/…/meister10.htm 50/186

Wood Harvesting with Hand Tools - An Illustrated Training
Manual (ILO, 1989, 128 p.)
(introduction...)
INTRODUCTION
BASIC WORK AND MAINTENANCE TOOLS
AXES
BOW SAWS
CROSS-CUT SAWS
THE WORKER
TREE FELLING
RELEASING LODGED TREES
DEBRANCHING AND DEBARKING
CROSS-CUTTING
CUTTING WINDFALLS
WOOD SPLITTING
WOOD HANDLING AND TRANSPORT
STACKING AND STORING OF WOOD
PIT-SAWING
TRAINING IN WOOD HARVESTING
OTHER ILO PUBLICATIONS
BACK COVER
PIT-SAWING
21/10/2011 Wood Harvesting with Hand Tools - An Illustrated Training…
D:/cd3wddvd/NoExe/Master/dvd001/…/meister10.htm 51/186

Pit-sawing continues to be widespread in rural areas of developing countries. It is
used for cutting boards and planks at the felling site without transporting the logs.
The sawnwood is mainly used locally as building material but sometimes it
reaches distant markets. Pit-sawing provides jobs for many thousands of workers.
Pits are dug and large logs are easily rolled across for sawing. However, it is more
convenient to set up a stand on which the log is placed (1). The saw cut is marked
with a string soaked in moist charcoal dust (fines). A plumb line is fixed to the end
of the cut to guide the worker standing on the ground. This worker should wear a
wide-brimmed hat as a protection against sawdust. The saw cuts only on the way
down but the worker standing on the log has the heavier job because he has to lift
the saw up to shoulder height. Therefore, both workers should change places
regularly.
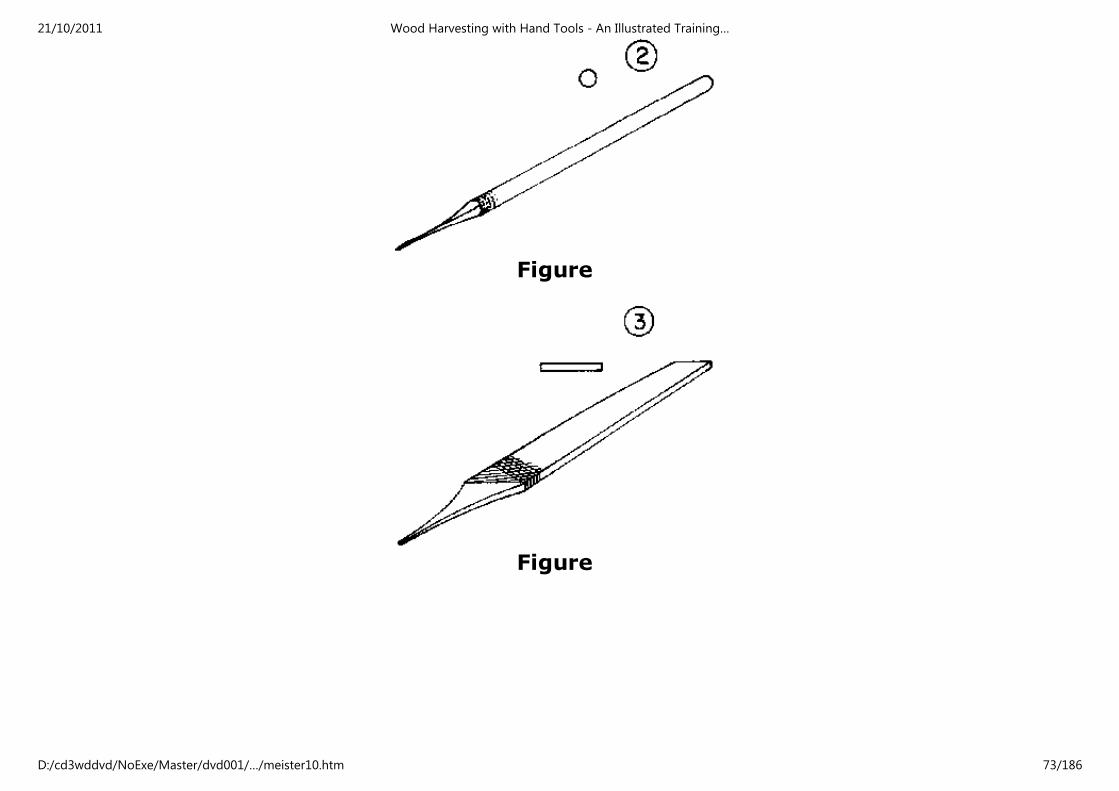
The pit saw is tapering in shape (2). Depending on log size, pit saws may vary in
length from 150 to 300 cm. Different types of handles are used. An example is
given of a lower handle (3a) and an upper handle (3b), both of which must be
easily removable.
The shape and size of the teeth is indicated in illustration 4. The height of teeth is
from 15 to 20 mm, the distance from tooth to tooth from 20 to 25 mm, the front
edge angle varies from 100 to 105° and the near edge angle from 20 to 25 mm.
Maintenance includes the following operations:
- jointing (as for cross-cut saws);
- gulleting (with round-edge millsaw file);
21/10/2011 Wood Harvesting with Hand Tools - An Illustrated Training…
D:/cd3wddvd/NoExe/Master/dvd001/…/meister10.htm 52/186

- sharpening of teeth (with millsaw at an angle of 90° with the saw);
- setting of saw (as for triangular cross-cut saws, saw set 0. 8 mm);
- bevelling (teeth pointing away are given a slight bevel of about 5°).
The measures given must be adapted to size of log and hardness of wood.
Figure
21/10/2011 Wood Harvesting with Hand Tools - An Illustrated Training…
D:/cd3wddvd/NoExe/Master/dvd001/…/meister10.htm 53/186

Figure
21/10/2011 Wood Harvesting with Hand Tools - An Illustrated Training…
D:/cd3wddvd/NoExe/Master/dvd001/…/meister10.htm 54/186

Figure
Figure
Home"" """"> ar.cn.de.en.es.fr.id.it.ph.po.ru.sw
Wood Harvesting with Hand Tools - An Illustrated Training
Manual (ILO, 1989, 128 p.)
(introduction...)
INTRODUCTION
BASIC WORK AND MAINTENANCE TOOLS
AXES
21/10/2011 Wood Harvesting with Hand Tools - An Illustrated Training…
D:/cd3wddvd/NoExe/Master/dvd001/…/meister10.htm 55/186

BOW SAWSCROSS-CUT SAWS
THE WORKER
TREE FELLING
RELEASING LODGED TREES
DEBRANCHING AND DEBARKING
CROSS-CUTTING
CUTTING WINDFALLS
WOOD SPLITTING
WOOD HANDLING AND TRANSPORT
STACKING AND STORING OF WOOD
PIT-SAWING
TRAINING IN WOOD HARVESTING
OTHER ILO PUBLICATIONS
BACK COVER
TRAINING IN WOOD HARVESTING
Wood harvesting, whether done with hand tools or with machines, can be a heavy
and dangerous job. If it is done by unskilled persons with poor tools and
inadequate working techniques, it generally results in excessive effort, numerous
accidents, low productivity and also in wood waste. For this reason, training is
indispensable not only for professional forest workers but also for occasional
wood cutters such as rural people harvesting fuelwood or construction poles.
21/10/2011 Wood Harvesting with Hand Tools - An Illustrated Training…
D:/cd3wddvd/NoExe/Master/dvd001/…/meister10.htm 56/186
Obviously, such training must be adapted to the special conditions of wood
harvesting. It must be done on the job, as much as possible in a practical way and
on a short-term basis with follow-up visits. It should always be based on locally-
available tools and equipment. The benefits of training may be lost if tools are
brought just for the sake of training which cannot be bought locally or which are
too expensive for village people. Under such conditions, it is important for the
trainer to ensure that tools and tool handles made by rural artisans or sold by
local hardware shops meet the requirements as much as possible.
Traditionally, skills are passed on from one generation to the next. Where the axe
is the only wood harvesting tool, this transfer of skills normally produces quite
experienced axe workers. However, the use of saws, saw maintenance tools and
helping tools requires additional knowledge and skill for which training is needed.
Training of professional forest workers may last several weeks in order to reach
acceptable levels of productivity with new tools and working methods. For the
occasional wood cutter, the minimum would be a one-to-two day demonstration,
but a one-week period including demonstrations and on-the-job practice would be
preferable. This type of training should concentrate on safe working habits,
reduction of physical effort and optimal wood utilisation more than on high
productivity.
The trainee is provided with information, demonstrations and practice regarding
tools and tool maintenance, safety rules, directional tree felling, debranching,
cross-cutting, splitting, stacking and transport as required for his job. For the
maintenance of tools, especially saws and wooden handles, it may be necessary to
train specially selected persons who take care of this aspect for a group of
21/10/2011 Wood Harvesting with Hand Tools - An Illustrated Training…
D:/cd3wddvd/NoExe/Master/dvd001/…/meister10.htm 57/186
workers.
Training will be readily accepted if it brings obvious benefits to the trainee.
Follow-up visits are needed to further improve and correct the work.
The instructor plays a crucial role in training. He will only be accepted if he is
perfectly skilled himself and if he is able to communicate in the language spoken
locally. Ideally, instructors should themselves have extensive experience in wood
harvesting and should undergo special training as instructors for several months.
Training of instructors for wood harvesting is included in ILO technical co-
operation activities. Further information on this subject may be requested from:
Forestry and Wood Industries Specialist,
International Labour Office,
CH-1211 GENEVA 22,
Switzerland.
Please send any comments which you might wish to make on the contents of this
training manual and suggestions for its improvement to the same address.
Home"" """"> ar.cn.de.en.es.fr.id.it.ph.po.ru.sw
Wood Harvesting with Hand Tools - An Illustrated Training
Manual (ILO, 1989, 128 p.)
(introduction...)
21/10/2011 Wood Harvesting with Hand Tools - An Illustrated Training…
D:/cd3wddvd/NoExe/Master/dvd001/…/meister10.htm 58/186
INTRODUCTION
BASIC WORK AND MAINTENANCE TOOLS
AXES
BOW SAWS
CROSS-CUT SAWS
THE WORKER
TREE FELLING
RELEASING LODGED TREES
DEBRANCHING AND DEBARKING
CROSS-CUTTING
CUTTING WINDFALLS
WOOD SPLITTING
WOOD HANDLING AND TRANSPORT
STACKING AND STORING OF WOOD
PIT-SAWING
TRAINING IN WOOD HARVESTING
OTHER ILO PUBLICATIONS
BACK COVER
OTHER ILO PUBLICATIONS
Fuelwood and charcoal preparation
An illustrated training manual on simple tools and techniques for small-scale
enterprises.
21/10/2011 Wood Harvesting with Hand Tools - An Illustrated Training…
D:/cd3wddvd/NoExe/Master/dvd001/…/meister10.htm 59/186

Fuelwood and charcoal are major sources of energy in many developing countries.
In those countries which face an acute shortage of energy, efficient methods of
production are of vital importance. If the greatest possible use is to be made of
natural resources, and if fuel shortages are to be eased and eventually overcome,
wasteful production methods must be avoided.
This training manual is a completely revised and enlarged version of an earlier
manual on charcoal preparation. The various methods for preparing fuelwood are
presented step by step, and are supplemented by numerous illustrations which
make the manual ideal for a wide market.
ISBN 92-2-100540-2
15 Swiss francs
Equipment planning guides for vocational and technical training and education
programmes
No. 17: Forestry, by S.M. Saarilahti
For a number of years there has been an increasing need in both developing and
industrialised countries for guides on planning and ordering equipment for
vocational and technical training and education programmes. The ILO therefore
publishes a series of equipment planning guides in respect of various occupations.
The guides contain illustrated lists of equipment, model workshop layouts,
common conversion factors, price lists and alphabetical indexes of item captions
in English, French and Spanish. The information contained in these guides should
prove invaluable to: government departments and national institutions in the
developing countries; national project directors, teachers, instructors, chief
21/10/2011 Wood Harvesting with Hand Tools - An Illustrated Training…
D:/cd3wddvd/NoExe/Master/dvd001/…/meister10.htm 60/186

technical advisers, experts, consultants, etc.; purchasers in developing and
industrialised countries; firms in developing and industrialised countries; and
teachers and instructors everywhere.
ISBN 92-2-102603-5
40 Swiss francs
Safe design and use of chain saws
An ILO code of practice
This code of practice offers practical advice for the use of all persons who are
responsible for safety and health in the safe design and use of chain saws and who
may be framing provisions on the subject. Its value lies in the fact that, like all ILO
codes of practice, it embodies the knowledge and experience of many countries.
ISBN 92-2-101927-6
15 Swiss francs
ILO Technical Meeting reports
Occupational safety and health problems in the timber industry, Report II, Third
Tripartite Meeting for the Timber Industry, Geneva, 1981.
ISBN 92-2-102765-1
12.50 Swiss francs
Employment promotion and vocational training in the timber industry, with
particular reference to developing countries, Report III, Third Tripartite Technical
21/10/2011 Wood Harvesting with Hand Tools - An Illustrated Training…
D:/cd3wddvd/NoExe/Master/dvd001/…/meister10.htm 61/186

Meeting for the Timber Industry, Geneva, 1981.
ISBN 92-2-102766-X
12.50 Swiss francs
Prices subject to change without notice.
Home"" """"> ar.cn.de.en.es.fr.id.it.ph.po.ru.sw
Wood Harvesting with Hand Tools - An Illustrated Training
Manual (ILO, 1989, 128 p.)
(introduction...)
INTRODUCTION
BASIC WORK AND MAINTENANCE TOOLS
AXES
BOW SAWS
CROSS-CUT SAWS
THE WORKER
TREE FELLING
RELEASING LODGED TREES
DEBRANCHING AND DEBARKING
CROSS-CUTTING
21/10/2011 Wood Harvesting with Hand Tools - An Illustrated Training…
D:/cd3wddvd/NoExe/Master/dvd001/…/meister10.htm 62/186

CUTTING WINDFALLSWOOD SPLITTING
WOOD HANDLING AND TRANSPORT
STACKING AND STORING OF WOOD
PIT-SAWING
TRAINING IN WOOD HARVESTING
OTHER ILO PUBLICATIONS
BACK COVER
BACK COVER
In many developing countries wood harvesting with hand tools continues on a
large scale. With the shift of emphasis towards trees grown by rural people rather
than forestry enterprises, it will gain in importance in the years to come. This
training manual provides basic information on efficient and safe equipment and
methods for manual wood harvesting. At the same time, the information helps to
ensure the fullest utilisation of the available wood raw material.
The manual updates previous ILO publications on the same subject, while taking
into account progress and new developments observed in recent years. It is richly
illustrated to make it easily accessible and will be ideal for forestry training and
rural extension work.
ISBN 92-2-106217-1
Price: 15 Swiss francs
21/10/2011 Wood Harvesting with Hand Tools - An Illustrated Training…
D:/cd3wddvd/NoExe/Master/dvd001/…/meister10.htm 63/186

Home"" """"> ar.cn.de.en.es.fr.id.it.ph.po.ru.sw
Wood Harvesting with Hand Tools - An Illustrated Training
Manual (ILO, 1989, 128 p.)
(introduction...)
INTRODUCTION
BASIC WORK AND MAINTENANCE TOOLS
AXES
BOW SAWS
CROSS-CUT SAWS
THE WORKER
TREE FELLING
RELEASING LODGED TREES
DEBRANCHING AND DEBARKING
CROSS-CUTTING
CUTTING WINDFALLS
WOOD SPLITTING
WOOD HANDLING AND TRANSPORT
STACKING AND STORING OF WOOD
PIT-SAWING
TRAINING IN WOOD HARVESTING
OTHER ILO PUBLICATIONS
21/10/2011 Wood Harvesting with Hand Tools - An Illustrated Training…
D:/cd3wddvd/NoExe/Master/dvd001/…/meister10.htm 64/186

BACK COVER
INTRODUCTION
This training manual updates and amalgamates the following previous ILO
publications:
- Felling and cross-cutting of tropical trees in natural forests (1969); and
- Selection and maintenance of logging hand tools (1970).
These publications were prepared by B. Strehlke, on the basis of substantial inputs
from H. Glser and R. Wettstein and with illustrations by B. Schmidle. The first of
these two publications dealt with axes, hand saws and chain saws. Its English
version has been out of print for several years. In 1980, in collaboration with the
FAO, the section dealing with chain saws was expanded to include work in man-
made forests and chain-saw maintenance and this was published separately under
the title:
- Chainsaws in tropical forests (Rome, FAO/ILO, 1980).
During the last decade, the use of chain saws has spread increasingly to the
developing countries where they are found in commercial logging operations,
especially in countries with higher wage levels. However, wood harvesting with
manual tools continues on a large scale and, with the shift of emphasis to trees
grown by rural people, it will gain more importance in the years to come.
It is for this reason that a need was felt to compile information on basic wood
harvesting, excluding machines and techniques which in many developing
21/10/2011 Wood Harvesting with Hand Tools - An Illustrated Training…
D:/cd3wddvd/NoExe/Master/dvd001/…/meister10.htm 65/186

countries are out of reach of the rural population. This view was fully supported
by the participants in an FAO/ECE/ILO Workshop on the Transfer of Basic
Technology, held in 1986.
For several years it looked as if experience in efficient basic logging and supplies
of hand tools of adequate quality would become less and less available. This trend
has changed thanks to the manufacture of improved forestry tools in several
developing countries and the reappearance of logging hand tools in the catalogues
of some of the major dealers in forestry tools and equipment.
Attempts have also been made in Central Europe and Scandinavia to keep alive
experience in manual logging accumulated in previous periods and to encourage
further improvement of manual tools and techniques. An example of this is the
logging sulky of which a bogie type has been developed only recently.
This manual is addressed primarily to trainers, extension workers, work
supervisors and foremen.
As in the three publications mentioned above, an attempt has been made to use
simple terms and to describe as much as possible by means of drawings. Users are
encouraged to translate the text into other languages and to copy illustrations in
any way they might find useful for training purposes.
The reader interested in supplementary information is referred to the following
publications:
- Equipment planning guides for vocational and technical training and
education programmes: No. 17 - Forestry (Geneva, ILO, 1981);
21/10/2011 Wood Harvesting with Hand Tools - An Illustrated Training…
D:/cd3wddvd/NoExe/Master/dvd001/…/meister10.htm 66/186

- Basic technology in forest operations (Rome, FAO, 1982);
- Swedish forestry techniques with possible applications in the Third World
(Spnga, SIDA, 1983);
- Handbook on appropriate technology for forestry operations in
developing countries (Helsinki, FINNIDA, 1986).
The present publication was compiled by B. Strehlke in collaboration with E.
Fosser. Hazel Cecconi edited and typed the text and Michel Bags amended and
supplemented the drawings. DANIDA provided the finance.
Home"" """"> ar.cn.de.en.es.fr.id.it.ph.po.ru.sw
Wood Harvesting with Hand Tools - An Illustrated Training
Manual (ILO, 1989, 128 p.)
BASIC WORK AND MAINTENANCE TOOLS
HAND TOOLS FOR WOOD HARVESTING
FILES
GRINDSTONES AND WHETSTONES
SPLITTING HAMMER AND WEDGES
MAKING TOOL HANDLES
21/10/2011 Wood Harvesting with Hand Tools - An Illustrated Training…
D:/cd3wddvd/NoExe/Master/dvd001/…/meister10.htm 67/186

Wood Harvesting with Hand Tools - An Illustrated Training Manual (ILO, 1989,
128 p.)
BASIC WORK AND MAINTENANCE TOOLS
HAND TOOLS FOR WOOD HARVESTING
The following tools are needed for efficient manual wood harvesting:
(1) Axe (weight between 0.8 and 1.5 kg)
(2) One-man bow saw (length approx. 1 m)
(3) Cross-cut saw (length usually 1.20-1.60 m)
(4) Machete
(5) Splitting hammer (weight about 2.5 kg)
(6) Wedges (for felling, cross-cutting and splitting)
(7) Turning hook
(8) Timber tong and timber pick
(9) Measuring stick or tape measure
(10) Caliper (to measure diameter)
(11) Debarking spade
More detailed information is given in: Equipment planning guide for vocational and
technical training and education programmes: No. 17 - Forestry (Geneva, ILO,
1981).
21/10/2011 Wood Harvesting with Hand Tools - An Illustrated Training…
D:/cd3wddvd/NoExe/Master/dvd001/…/meister10.htm 68/186

Figure
Figure
Figure
Figure
Figure
21/10/2011 Wood Harvesting with Hand Tools - An Illustrated Training…
D:/cd3wddvd/NoExe/Master/dvd001/…/meister10.htm 69/186

Figure
Figure
Figure
Figure
Figure
21/10/2011 Wood Harvesting with Hand Tools - An Illustrated Training…
D:/cd3wddvd/NoExe/Master/dvd001/…/meister10.htm 70/186

Figure
FILES
The following types of file will commonly be used for maintaining forest tools. An
effort has been made to keep these to the minimum to simplify stocking and
distribution.
For cross-cut saws
Millsaw file, 20 cm, single cut, smooth (22.4 cuts per cm), flat with two round
edges for sharpening cutter and raker teeth and for deepening small gullets (1).
A worn file of this sort can be used for jointing the saw and for lowering the raker.
Round file, 25 cm, constant diameter of 12.5 mm for deepening the big gullets
between rakers (2).
For axes and other edged tools
Millsaw file, 25 cm, single cut, tapered or blunt for reshaping (3).
For tool handles
Wood rasps are used for shaping wooden handles (4). They must never be used on
metal.
21/10/2011 Wood Harvesting with Hand Tools - An Illustrated Training…
D:/cd3wddvd/NoExe/Master/dvd001/…/meister10.htm 71/186

File handles
A file or rasp must never be used without a handle (5). The handle should have a
length of 12 cm.
Care of files
When file or rasp teeth become clogged, they must be cleaned with a wire brush
(file card) which must be kept clean and dry (6).
Files must never be allowed to become rusty, knocked or dropped and are best
kept in a canvas holder when not in use.
Figure
21/10/2011 Wood Harvesting with Hand Tools - An Illustrated Training…
D:/cd3wddvd/NoExe/Master/dvd001/…/meister10.htm 72/186
Figure
Figure
21/10/2011 Wood Harvesting with Hand Tools - An Illustrated Training…
D:/cd3wddvd/NoExe/Master/dvd001/…/meister10.htm 73/186

Figure
Figure
21/10/2011 Wood Harvesting with Hand Tools - An Illustrated Training…
D:/cd3wddvd/NoExe/Master/dvd001/…/meister10.htm 74/186

Figure
GRINDSTONES AND WHETSTONES
For sharpening axes, debarking spades and other cutting tools, revolving
grindstones operated by hand or foot are used for regular overhauls (1). They
should have a minimum diameter of 50 cm and a minimum width of 10 cm, be
made of sandstone or appropriate artificial material and be used with water. When
not in use, the stone must be kept dry to prevent moisture softening the part of
the stone under water. From time to time, the stone must be "dressed", that is,
restored to its original circular shape.
Grindstones can easily be made locally from 20 litres of good quality cement and
50 litres of quartzitic sand with 1 mm or smaller particle size. The sand must be
sieved (e.g. with mosquito netting), be washed and clean from clay or salt. In
addition, an iron tube or rod is needed, about 60 cm length and 2 cm diameter
with a nail welded to its middle.
The grindstone is made in a wooden mould (2) which is set up in a shady place.
21/10/2011 Wood Harvesting with Hand Tools - An Illustrated Training…
D:/cd3wddvd/NoExe/Master/dvd001/…/meister10.htm 75/186

The mould is approximately 50 by 50 cm in size and 15 cm high. It consists of two
parts (2a) which are placed on a board (2b) resting on two supports (2c).
Exactly in the centre of the mould the iron rod is placed, forming a perfect right
angle with the mould and securely held in position by small boards nailed on the
mould (3a).
After filling the mould with mortar and compacting it carefully, the grindstone is
left to dry for about three days. Some sprinkling with water may be required to
avoid too rapid drying.
After removing the grindstone from the mould, the stone is placed in a trestle with
a piece of an old tyre fitted underneath as a water container (4a).
This type of grindstone is also handy for sharpening agricultural tools such as
hoes and spades and should be available in any village.
In addition to grindstones, whetstones are necessary where edged tools are in use
for frequently touching them up during the day. They are also used for finishing
axes after grindstone work and saws and axes after filing. Whetstones with a
coarse and a fine side, of pocket size (5 by 10 cm), are required (5).
21/10/2011 Wood Harvesting with Hand Tools - An Illustrated Training…
D:/cd3wddvd/NoExe/Master/dvd001/…/meister10.htm 76/186

Figure
21/10/2011 Wood Harvesting with Hand Tools - An Illustrated Training…
D:/cd3wddvd/NoExe/Master/dvd001/…/meister10.htm 77/186

Figure
Figure
21/10/2011 Wood Harvesting with Hand Tools - An Illustrated Training…
D:/cd3wddvd/NoExe/Master/dvd001/…/meister10.htm 78/186

Figure
Figure
SPLITTING HAMMER AND WEDGES
21/10/2011 Wood Harvesting with Hand Tools - An Illustrated Training…
D:/cd3wddvd/NoExe/Master/dvd001/…/meister10.htm 79/186

To avoid the saw blade getting caught in the saw cut (pinching), and to lift the
tree into the intended direction of fall and for splitting wood, a splitting hammer
(1) and wedges (2) are needed.
The splitting hammer should have a weight of about 2.5 kg and a straight handle
about 90 cm long. For splitting, the edge should be kept sharp.
Wedges should preferably be made from aluminium alloys. They can also be made
from hard wood. Steel wedges have the disadvantage of being very heavy and
dangerous if splinters break off.
Three types of wedges are suggested for use:
Type
2a
is a wedge commonly used for tree felling with a rather large surface and a narrow
angle, opening up closed saw cuts even under very high pressure.
Type
2b
consists of a metal shoe and a wooden head which can be replaced after wear.
Additionally, the wooden head is secured with a metal ring. This type of wedge has a
wider angle and therefore opens the saw cut farther up than type 2a. In the absence
of a metal shoe, the head of a wooden wedge may be fitted with an iron ring to
reduce wear.
Type
2c
made from metal, is very convenient for cross-cutting and felling. It can be carried in
the pocket and should be inserted in the saw cut as a measure of precaution before
the saw cut closes.
21/10/2011 Wood Harvesting with Hand Tools - An Illustrated Training…
D:/cd3wddvd/NoExe/Master/dvd001/…/meister10.htm 80/186

Figure
Figure
MAKING TOOL HANDLES
21/10/2011 Wood Harvesting with Hand Tools - An Illustrated Training…
D:/cd3wddvd/NoExe/Master/dvd001/…/meister10.htm 81/186

This simple construction made from wood and two pieces of an old tyre (1a) is
very practical for holding a piece of wood when making a handle.
The vice is closed when the platform is down (1b). It opens when the platform is
lifted (2a). The tool is firmly held between the two rubber pieces when the worker
is standing on the platform. His elbow height should then correspond to the height
of the opening of the vice.
Good tool handles, for instance of axes, hooks and hoes, are extremely important
to ensure that work can be done conveniently and efficiently. The handle should fit
the worker (size of hand, length of arm, height) and the size and weight of the
tool. It should be made from suitable wood in order to last for a long time,
The vice can be used for other purposes as well, such as holding an axe during
sharpening.
21/10/2011 Wood Harvesting with Hand Tools - An Illustrated Training…
D:/cd3wddvd/NoExe/Master/dvd001/…/meister10.htm 82/186

Figure
21/10/2011 Wood Harvesting with Hand Tools - An Illustrated Training…
D:/cd3wddvd/NoExe/Master/dvd001/…/meister10.htm 83/186

Figure
Home"" """"> ar.cn.de.en.es.fr.id.it.ph.po.ru.sw
Wood Harvesting with Hand Tools - An Illustrated Training
Manual (ILO, 1989, 128 p.)
AXES
21/10/2011 Wood Harvesting with Hand Tools - An Illustrated Training…
D:/cd3wddvd/NoExe/Master/dvd001/…/meister10.htm 84/186

USE AND TYPES OF AXES
MAINTAINING AN AXE
MAKING AN AXE HANDLE
SHAFTING AN AXE
Wood Harvesting with Hand Tools - An Illustrated Training Manual (ILO, 1989,
128 p.)
AXES
USE AND TYPES OF AXES
In traditional wood harvesting, the axe is used as a universal tool for felling,
debranching, cross-cutting, splitting and debarking.
The main advantages of axe work are the simple tool outfit and easy maintenance.
However, it is heavy work and may waste a lot of wood and cause many accidents,
including very serious ones.
Axe work should be restricted to the felling of very small trees, to preparation for
21/10/2011 Wood Harvesting with Hand Tools - An Illustrated Training…
D:/cd3wddvd/NoExe/Master/dvd001/…/meister10.htm 85/186

the felling of larger ones and to debranching,
Axes made by local blacksmiths may be quite good for traditional use if they are
properly hardened and well shafted.
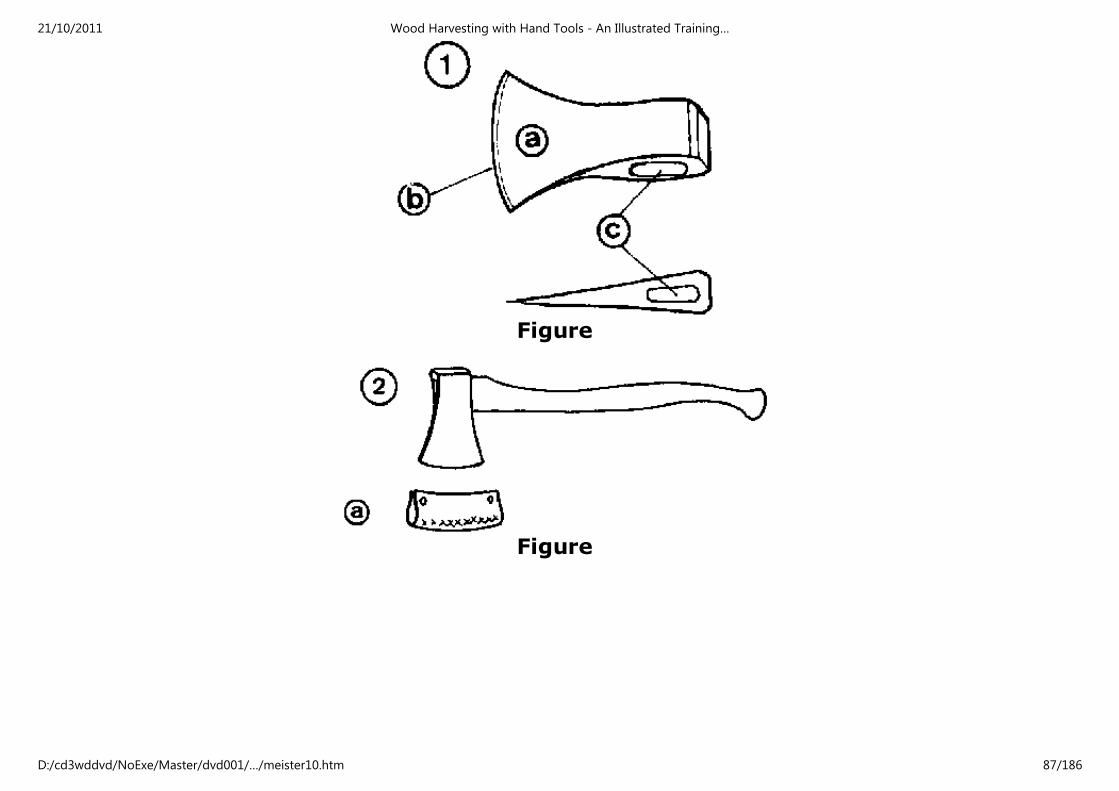
The axe consists of a steel head fitted to a wooden handle. The most important
part of the head (1) is the blade (1a), ending in the edge (1b). The wooden handle
is fitted into the eye (1c). Modern axes are shaped like a wedge and have an oval
eye which prevents the handle from turning in the eye.
Special types of axes can be used for felling and debranching. However, in most
cases a universal axe is used for both jobs.
For professional work, the type of axe shown in the picture is recommended (2).
The weight should be from 0.8 to 1.5 kg, the length of the handle from 60-80 cm,
depending on the length of the worker's arms (3). The handle should have
fawnfoot shape (2) and be made of strong wood. Workers should be able to make
handles and to replace broken handles themselves. During transport, the axe blade
should be secured with a protective cover which can be made easily, e.g. from a
worn bicycle tyre (2a).
To keep the axe sharp, repeated maintenance is needed during the course of the
day using a whetstone (see page 8).
21/10/2011 Wood Harvesting with Hand Tools - An Illustrated Training…
D:/cd3wddvd/NoExe/Master/dvd001/…/meister10.htm 86/186
Figure
Figure
21/10/2011 Wood Harvesting with Hand Tools - An Illustrated Training…
D:/cd3wddvd/NoExe/Master/dvd001/…/meister10.htm 87/186

Figure
MAINTAINING AN AXE
Taper
The axe blade has a curved taper towards the edge. During sharpening it is
important that the correct taper is maintained.
Heavy axes and axes used to cut hard wood and frozen wood require a stronger
blade close to the cutting edge (1a).
Lighter axes and axes used for soft wood should be thinner close to the cutting
edge (1b).
Although wood of coniferous trees is usually soft, branches may be very hard and
axes may require the same taper as for hard wood.
21/10/2011 Wood Harvesting with Hand Tools - An Illustrated Training…
D:/cd3wddvd/NoExe/Master/dvd001/…/meister10.htm 88/186

Taper gauge
The taper of new axes is usually suitable for average conditions. A gauge can be
made from a piece of metal sheet corresponding to the taper of the new axe (2a).
This gauge can be used during maintenance. If the axe "bites", the taper is too
small and if the axe does not penetrate enough into the wood, the taper is too big.
Adjustments are made during maintenance and when the taper corresponds to the
requirements, the taper gauge can be adjusted accordingly.
Daily maintenance
Hone the axe several times daily with a whetstone (3). Use water or spit on the
whetstone to keep it moist. Honing is done downwards on one side with the
handle down (3a) and on the other side with the handle up (3b).
21/10/2011 Wood Harvesting with Hand Tools - An Illustrated Training…
D:/cd3wddvd/NoExe/Master/dvd001/…/meister10.htm 89/186

Figure
21/10/2011 Wood Harvesting with Hand Tools - An Illustrated Training…
D:/cd3wddvd/NoExe/Master/dvd001/…/meister10.htm 90/186

Figure
Figure
Major overhaul
This is done at intervals of about a week or longer depending on the use of the
axe. Major overhaul is done by the following steps:
21/10/2011 Wood Harvesting with Hand Tools - An Illustrated Training…
D:/cd3wddvd/NoExe/Master/dvd001/…/meister10.htm 91/186

- Check curve of edge with a new axe or a curve gauge (1). A curve gauge
can be made locally from a metal sheet (1a), using a new axe to copy the
correct curve.
- If necessary, correct curve with millsaw file (page 6), holding the axe in a
vice (2).
- Grind axe blade on grindstone in zone 3a, by moving the axe from right to
left (4) and at the same time up and down (5). Grind zone 3b only at longer
intervals, if necessary, by moving the axe from left to right (4).
- Final honing is done as for daily maintenance with a whetstone to remove
burrs and to polish the surface of the axe (see 3, previous page).
If a grindstone is not available, a millsaw file can be used for sharpening. Care
must be taken to file a correct taper. Always move file away from the cutting edge.
Figure
21/10/2011 Wood Harvesting with Hand Tools - An Illustrated Training…
D:/cd3wddvd/NoExe/Master/dvd001/…/meister10.htm 92/186

Figure
Figure
21/10/2011 Wood Harvesting with Hand Tools - An Illustrated Training…
D:/cd3wddvd/NoExe/Master/dvd001/…/meister10.htm 93/186

Figure
Figure
MAKING AN AXE HANDLE
To make an axe handle, hardwood of high elasticity and strength is taken from the
butt end of a young tree or from the outer zones of an old one. The wood must be
well seasoned. It should have straight fibres and be free of knots and bends.
A scantling is sawn or squared with an axe out of a suitable piece of wood (1).
21/10/2011 Wood Harvesting with Hand Tools - An Illustrated Training…
D:/cd3wddvd/NoExe/Master/dvd001/…/meister10.htm 94/186

Annual rings should run through the scantling as indicated in the drawing (2a).
The scantling must be well seasoned before the handle is made.
A model of a fawnfoot handle is used for drawing the outline of the handle on the
scantling (2b). The model can be copied from a new handle on a piece of
cardboard.
A bow saw is used for making cuts into the wood to be taken off from the
scantling (2c).
An axe can be used for shaping the outline of the handle.
Final shaping is done with a spokeshave (3), if available, and a wood rasp (see
page 6).
The handle is finished by polishing with sandpaper (4), a piece of glass (for
instance, window glass), or a knife.
Making an axe handle is easier if a vice can be used (see page 12)
21/10/2011 Wood Harvesting with Hand Tools - An Illustrated Training…
D:/cd3wddvd/NoExe/Master/dvd001/…/meister10.htm 95/186

Figure
Figure
Figure
21/10/2011 Wood Harvesting with Hand Tools - An Illustrated Training…
D:/cd3wddvd/NoExe/Master/dvd001/…/meister10.htm 96/186

Figure
SHAFTING AN AXE
When shafting an axe, care must be taken to ensure:
- that the blade and the handle are in exactly the same plane (1);
- that the centre of the blade touches the surface if the axe is placed with
the blade and the end of the handle on a level surface (2).
Shafting is done by the following steps:
- Fit the handle exactly to the eye of the axe, preferably with a wood rasp
(3).
- Put handle into the eye (4) and test for correct alignment (1, 2).
21/10/2011 Wood Harvesting with Hand Tools - An Illustrated Training…
D:/cd3wddvd/NoExe/Master/dvd001/…/meister10.htm 97/186
- Take the handle out and cut with a knife or axe to the depth of the eye
(5).
- Put the handle into the eye again and drive a small hardwood wedge into
the saw cut (6).
- Test for correct alignment (1, 2). If necessary, adjust alignment with the
wood rasp after having taken off the head of the axe once more.
- If the alignment is correct, put 2 small nails across the handle, and wedge
it above the head of the axe (6a), saw off the protruding part of the handle
and wedge about 1 cm above nails.
Note: If an axe is reshafted, drive the remaining wood out of the eye either from
the unwedged side or from the wedged side once nails and wedge have been
removed. Never burn wood still remaining in the eye: by doing this, the axe's
temper would be lost and it would become useless.
21/10/2011 Wood Harvesting with Hand Tools - An Illustrated Training…
D:/cd3wddvd/NoExe/Master/dvd001/…/meister10.htm 98/186

Figure
Figure
21/10/2011 Wood Harvesting with Hand Tools - An Illustrated Training…
D:/cd3wddvd/NoExe/Master/dvd001/…/meister10.htm 99/186

Figure
Figure
21/10/2011 Wood Harvesting with Hand Tools - An Illustrated Training…
D:/cd3wddvd/NoExe/Master/dvd001/…/meister10.htm 100/186

Figure
Figure
Home"" """"> ar.cn.de.en.es.fr.id.it.ph.po.ru.sw
Wood Harvesting with Hand Tools - An Illustrated Training
Manual (ILO, 1989, 128 p.)
BOW SAWS
21/10/2011 Wood Harvesting with Hand Tools - An Illustrated Training…
D:/cd3wddvd/NoExe/Master/dvd001/…/meister10.htm 101/186

USE AND TYPES OF BOW SAWS
Wood Harvesting with Hand Tools - An Illustrated Training Manual (ILO, 1989,
128 p.)
BOW SAWS
USE AND TYPES OF BOW SAWS
Bow saws are handy for felling and cross-cutting small trees provided the wood is
not too hard.
For professional use, the bow saw should consist of a high-quality oval steel frame
holding a thin blade under high tension (1). A protective cover is needed to guard
the blade during transport (1a).
A one-man bow saw with an asymmetric frame of approx. 100 cm length is
21/10/2011 Wood Harvesting with Hand Tools - An Illustrated Training…
D:/cd3wddvd/NoExe/Master/dvd001/…/meister10.htm 102/186

recommended (1). There are also models with a symmetric frame and one side of
the bow extended into a handle which allows more force in cutting but restricts
movement if space is narrow (1b).
For a frame of 100 cm length, the corresponding saw blades (2) are 91.5 cm long
and usually have hard-pointed peg teeth (2a) or raker teeth (2b).
When a hard-pointed blade loses its set and starts pinching, it should be re-set
with setting pliers (3).
When the blade becomes dull, it can be re-sharpened with a whetstone (4). If the
saw runs to one side, the whetstone should be used on the side to which it is
running (5).
Hard-pointed blades wear out after some time and must then be discarded. Great
care must be taken during cutting to avoid contact with soil, sand and stones.
Figure
21/10/2011 Wood Harvesting with Hand Tools - An Illustrated Training…
D:/cd3wddvd/NoExe/Master/dvd001/…/meister10.htm 103/186

Figure
Figure
21/10/2011 Wood Harvesting with Hand Tools - An Illustrated Training…
D:/cd3wddvd/NoExe/Master/dvd001/…/meister10.htm 104/186
Figure
Figure
Home"" """"> ar.cn.de.en.es.fr.id.it.ph.po.ru.sw
Wood Harvesting with Hand Tools - An Illustrated Training
Manual (ILO, 1989, 128 p.)
CROSS-CUT SAWS
TYPES OF CROSS-CUT SAWS
MAINTENANCE TOOLS FOR CROSS-CUT SAWS
FILING VICES, SELF-MADE
FILING VICES, COMMERCIALLY-MADE
MAINTAINING A PEG-TOOTH CROSS-CUT SAW
TYPES OF RAKER-TOOTH CROSS-CUT SAWS
MAINTAINING A RAKER-TOOTH CROSS-CUT SAW
MAJOR OVERHAUL OF CROSS-CUT SAWS
21/10/2011 Wood Harvesting with Hand Tools - An Illustrated Training…
D:/cd3wddvd/NoExe/Master/dvd001/…/meister10.htm 105/186

Wood Harvesting with Hand Tools - An Illustrated Training Manual (ILO, 1989,
128 p.)
CROSS-CUT SAWS
TYPES OF CROSS-CUT SAWS
If cross-cut saws are used, a comprehensive tool outfit is required. The saw must
be well maintained in order to make the job easy and efficient. Properly
maintained saws require less energy in use and increase production.
The saw should be made of high-quality steel. For large trees, a straight-back type
of saw is preferable (1a) and for small to medium trees a hollow-back type. The
cutting edge should be thicker than the back in order to reduce friction and the
risk of "binding". The length of the saw should be 100 cm plus the diameter of the
tree. The saw should be fitted with detachable handles (1b) which can easily be
screwed on and off. A protective cover (1c) is needed to guard the cutting edge
during transport.
Peg-tooth type saws are common because they are easy to maintain (2a).
Raker-tooth type saws are preferred by professional workers. They cut faster but
require more skill in maintenance (2b).
Saw teeth must do three things:
- cut through the fibres;
- break loose the cut fibres;
21/10/2011 Wood Harvesting with Hand Tools - An Illustrated Training…
D:/cd3wddvd/NoExe/Master/dvd001/…/meister10.htm 106/186
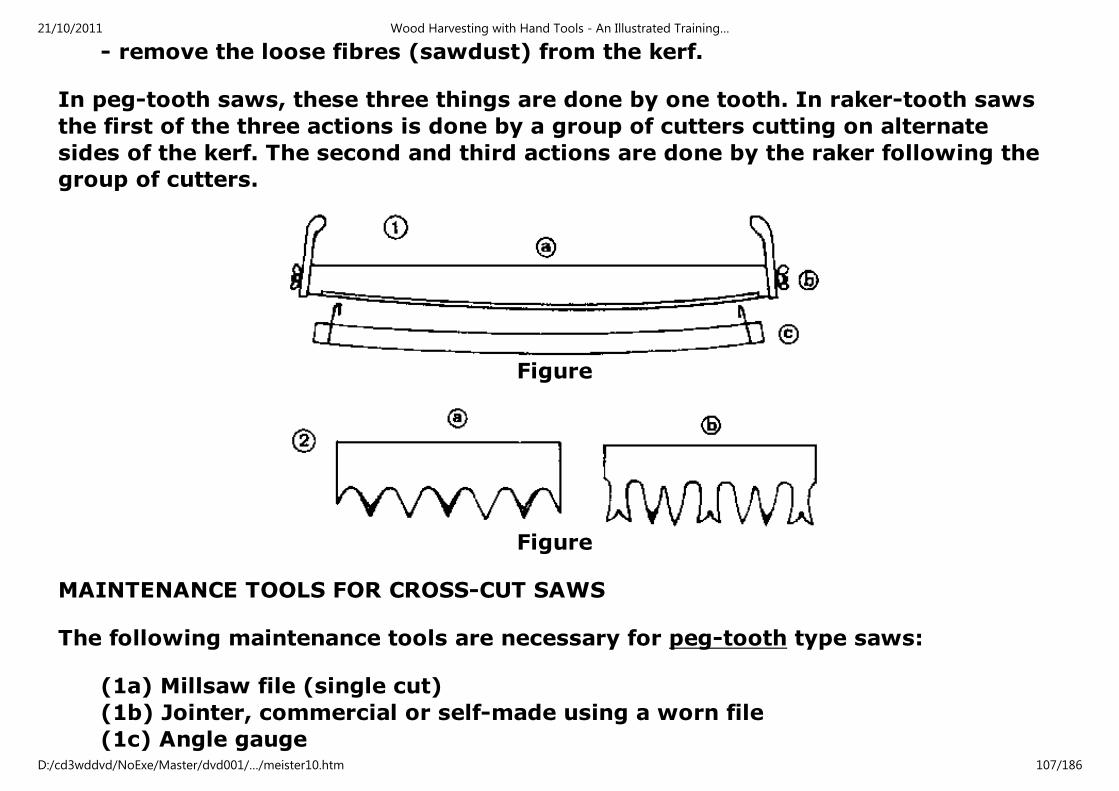
- remove the loose fibres (sawdust) from the kerf.
In peg-tooth saws, these three things are done by one tooth. In raker-tooth saws
the first of the three actions is done by a group of cutters cutting on alternate
sides of the kerf. The second and third actions are done by the raker following the
group of cutters.
Figure
Figure
MAINTENANCE TOOLS FOR CROSS-CUT SAWS
The following maintenance tools are necessary for peg-tooth type saws:
(1a) Millsaw file (single cut)
(1b) Jointer, commercial or self-made using a worn file
(1c) Angle gauge
21/10/2011 Wood Harvesting with Hand Tools - An Illustrated Training…
D:/cd3wddvd/NoExe/Master/dvd001/…/meister10.htm 107/186

(1d) Filing grid
(1e) Setting iron
(1f) Setting indicator, commercial or self-made
(1g) Whetstone
(1h) Filing vice
(The self-made setting indicator consists of a piece of wood with three metal pins
of the same length in a fixed position and an adjustable screw-type pin.)
For raker-tooth type saws, the same maintenance tools are needed, except for the
following differences:
- a raker adjuster (or a combined raker adjuster and shaper) (2a) is
necessary; and
- a setting hammer (2b) and a setting anvil (2c) replace the setting iron.
21/10/2011 Wood Harvesting with Hand Tools - An Illustrated Training…
D:/cd3wddvd/NoExe/Master/dvd001/…/meister10.htm 108/186

Figure
21/10/2011 Wood Harvesting with Hand Tools - An Illustrated Training…
D:/cd3wddvd/NoExe/Master/dvd001/…/meister10.htm 109/186
Figure
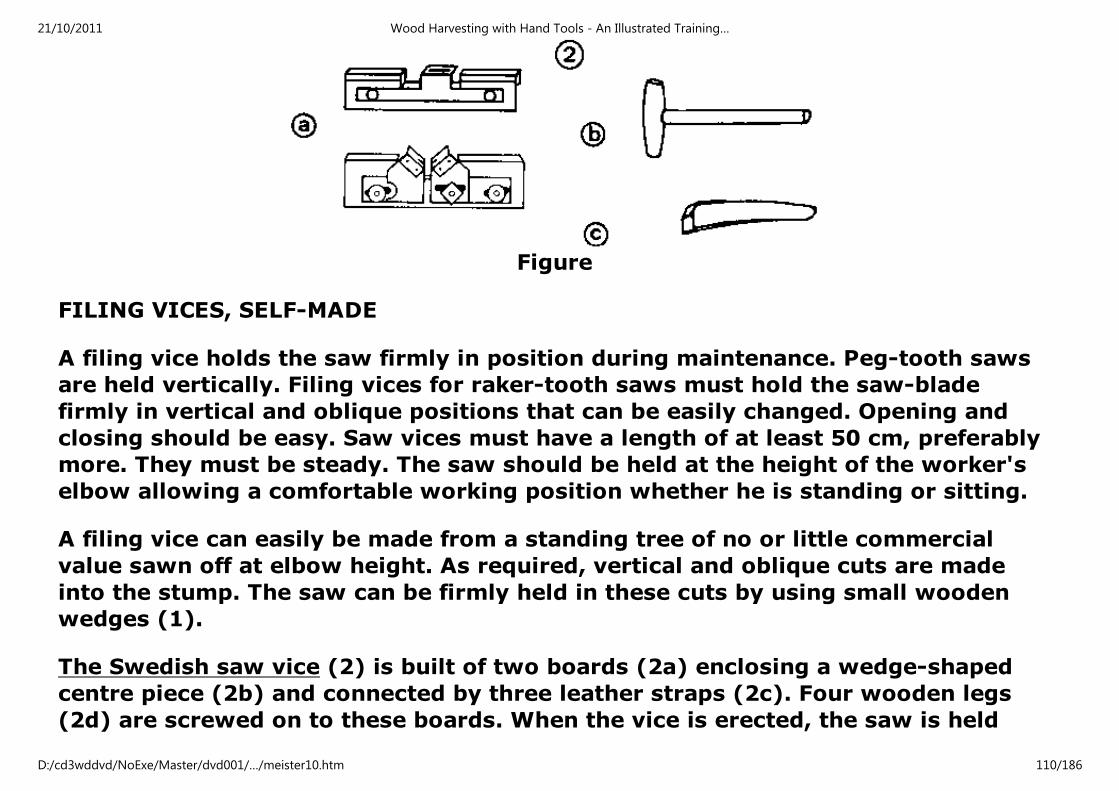
FILING VICES, SELF-MADE
A filing vice holds the saw firmly in position during maintenance. Peg-tooth saws
are held vertically. Filing vices for raker-tooth saws must hold the saw-blade
firmly in vertical and oblique positions that can be easily changed. Opening and
closing should be easy. Saw vices must have a length of at least 50 cm, preferably
more. They must be steady. The saw should be held at the height of the worker's
elbow allowing a comfortable working position whether he is standing or sitting.
A filing vice can easily be made from a standing tree of no or little commercial
value sawn off at elbow height. As required, vertical and oblique cuts are made
into the stump. The saw can be firmly held in these cuts by using small wooden
wedges (1).
The Swedish saw vice (2) is built of two boards (2a) enclosing a wedge-shaped
centre piece (2b) and connected by three leather straps (2c). Four wooden legs
(2d) are screwed on to these boards. When the vice is erected, the saw is held
21/10/2011 Wood Harvesting with Hand Tools - An Illustrated Training…
D:/cd3wddvd/NoExe/Master/dvd001/…/meister10.htm 110/186

between one of the two boards and the centre piece in a vertical or oblique
position.
The Swedish saw vice can be made easily from locally-available materials and is
easily transportable.
Figure
21/10/2011 Wood Harvesting with Hand Tools - An Illustrated Training…
D:/cd3wddvd/NoExe/Master/dvd001/…/meister10.htm 111/186

Figure
FILING VICES, COMMERCIALLY-MADE
Commercially-made filing vices are available in various types. Two handy
examples are given:
21/10/2011 Wood Harvesting with Hand Tools - An Illustrated Training…
D:/cd3wddvd/NoExe/Master/dvd001/…/meister10.htm 112/186

The Swiss filing bench has the advantage of enabling the worker to sit during
filing (1).
An engineer's vice can be used as a filing vice by inserting two pieces of wood in a
vertical position connected with flap hinges between the vice jaws. An oblique
position of the saw can be arranged using two wedges (2).
Figure
21/10/2011 Wood Harvesting with Hand Tools - An Illustrated Training…
D:/cd3wddvd/NoExe/Master/dvd001/…/meister10.htm 113/186

Figure
MAINTAINING A PEG-TOOTH CROSS-CUT SAW
The following measures are recommended for triangular teeth:
Hardness of
wood
Distance between points of two
teeth
Height of
tooth
Width of gullet between two
teeth
Hard 17 mm 16 mm 6.0 mm
Soft 9 mm 12 mm 0.5 mm
Mixed hard and
soft
14 mm 15 mm 3.7 mm
Maintenance starts with jointing while the saw is firmly held in a vertical position
by the filing vice. The jointer is run along the saw teeth using very little pressure
21/10/2011 Wood Harvesting with Hand Tools - An Illustrated Training…
D:/cd3wddvd/NoExe/Master/dvd001/…/meister10.htm 114/186

(1). In normal use, the teeth in the middle of the saw will wear more quickly than
those at the end. This is adjusted by increased pressure at the beginning and the
end of the jointing stroke.
The jointing is continued until all cutter teeth show a small "flat" and jointing
should stop when this happens. One or a few (if evenly distributed) badly worn or
broken teeth are not considered. Further jointings will bring them back into the
tooth line.
Cutter teeth filing is done with a 20 cm millsaw file using horizontal strokes
parallel to the lines of a grid attached to the vice (2). The sharpening angle
marked on the grid (2a) is 70° for hard wood and 60° for soft wood. These angles
may be copied from figure 3. The top angle (2b) is 38° for hard and soft wood. A
gauge is needed to check the sharpening angle and the top angle (4). During filing,
the gullet should be lowered at the same time (5). First file one side of the saw,
tooth by tooth, and then turn the saw and file the other side. Care must be taken
to stop filing when the flat is about to disappear.
Deburring is done with the whetstone, the fine side of which is run lightly along
both sides (as for raker-tooth saws, see page 38).
Setting is carried out with a setting indicator (6a) and a special saw set (6b). The
correct set is 0.3-0.4 mm for hard wood and 0.5-0.6 mm for soft wood.
Note: Badly worn saws may need gulleting before sharpening begins. This is best
done after having marked the gullet depth and position (7a). The round edge of
the millsaw file is used for gulleting (7b).
21/10/2011 Wood Harvesting with Hand Tools - An Illustrated Training…
D:/cd3wddvd/NoExe/Master/dvd001/…/meister10.htm 115/186

Figure
Figure
21/10/2011 Wood Harvesting with Hand Tools - An Illustrated Training…
D:/cd3wddvd/NoExe/Master/dvd001/…/meister10.htm 116/186

Figure
Figure
21/10/2011 Wood Harvesting with Hand Tools - An Illustrated Training…
D:/cd3wddvd/NoExe/Master/dvd001/…/meister10.htm 117/186

Figure
Figure
21/10/2011 Wood Harvesting with Hand Tools - An Illustrated Training…
D:/cd3wddvd/NoExe/Master/dvd001/…/meister10.htm 118/186

Figure
TYPES OF RAKER-TOOTH CROSS-CUT SAWS
The raker-tooth cross-cut saw is the most efficient type of saw for felling and
cross-cutting. This type of saw is recommended for professional use.
There are two types: one raker followed by two cutters (Champion teeth BM1) for
harder wood (1) and one raker followed by four cutters (Lance teeth, 4 YM1) for
softer wood (2).
1 According to International Organisation for Standardisation.
The raker's work can be compared with that of a plane. It removes the fibres (3b)
which are cut on both sides of the kerf by the cutters (3a). The raker must be
slightly shorter than the cutters so that it will not break off uncut fibres. However,
21/10/2011 Wood Harvesting with Hand Tools - An Illustrated Training…
D:/cd3wddvd/NoExe/Master/dvd001/…/meister10.htm 119/186

if too short, it will not sufficiently break loose the cut fibres and the cutters will
jam in the kerf. A gullet of sufficient depth is needed to hold and transport the
sawdust (3c).
Correct raker depth produces long chips with clean edges (4); if the raker depth is
too long, chips tend to have whiskers (5); if too short, fine sawdust is produced.
Figure
Figure
21/10/2011 Wood Harvesting with Hand Tools - An Illustrated Training…
D:/cd3wddvd/NoExe/Master/dvd001/…/meister10.htm 120/186

Figure
Figure
21/10/2011 Wood Harvesting with Hand Tools - An Illustrated Training…
D:/cd3wddvd/NoExe/Master/dvd001/…/meister10.htm 121/186

Figure
MAINTAINING A RAKER-TOOTH CROSS-CUT SAW
Maintenance work follows the same pattern as for peg-tooth saws except that,
additionally, raker adjustment is needed. The saw is held at all times in a vertical
position during maintenance work.
Jointing is done in exactly the same way as for peg-tooth saws (1).
Raker adjustment. The raker adjuster, correctly set, is placed over a raker (2).
Holding the tool firmly against the saw, the raker is filed flush with the tool guide
plate (2a). The raker depth should be 0.2-0.5 mm for hard wood and 0.6-1.0 mm
for soft wood (2b). The correct depth must be found under working conditions and
will be indicated by properly-shaped saw chips.
Raker filing is done after adjusting the raker height (3). It is continued until the
flat is as small as possible. Horizontal file strokes are used (3a). The raker angle
should be 90°. It can be checked easily during filing with the top end of the mill-
21/10/2011 Wood Harvesting with Hand Tools - An Illustrated Training…
D:/cd3wddvd/NoExe/Master/dvd001/…/meister10.htm 122/186

saw file (3b).
Cutter teeth filing is done with the saw in the oblique position (4). A top angle of
70 and a side angle of 35 must be produced. Filing strokes should not exceed 60
per minute. The full length of the file is used and an even pressure put on the file.
Check the angles with the gauge frequently and when the flat almost disappears,
tap the top of the tooth with the file handle or small piece of wood. This gives a
true picture of how much flat is left. The last strokes with the file must be very
gentle. Sharpening is finished when the flat is just about to disappear.
Figure
21/10/2011 Wood Harvesting with Hand Tools - An Illustrated Training…
D:/cd3wddvd/NoExe/Master/dvd001/…/meister10.htm 123/186

Figure
Figure
21/10/2011 Wood Harvesting with Hand Tools - An Illustrated Training…
D:/cd3wddvd/NoExe/Master/dvd001/…/meister10.htm 124/186

Figure
Deburring. Put the saw in a vertical position. The fine side of the whetstone is run
along both sides of the saw to remove burrs (1). Be careful not to touch the sharp
teeth with the fingers.
Setting (2). Check that the saw is held very firmly in the vice. For a right-handed
man, the left arm is put over the saw, taking care not to catch the saw with the
arm or body, and the anvil held in the left hand. Those teeth with the bevels
towards the body are set first. The anvil is placed against the back of the cutter.
The cutter is set with short and firm strokes of the setting hammer held in the
right hand (2a, 2b).
The setting indicator is used to check the set of each tooth (3). The correct saw
set for hard wood is 0.1-0.2 mm, for soft wood 0.2-0.4 mm (4). Insufficient set is
21/10/2011 Wood Harvesting with Hand Tools - An Illustrated Training…
D:/cd3wddvd/NoExe/Master/dvd001/…/meister10.htm 125/186

corrected at once by further hammer strokes. If the set is too great it is removed
with the setting hammer after the position of the anvil has been changed (5). After
setting one side, the saw is turned round and the other side is set.
Note: The first six teeth on either end of the saw need no setting.
Setting normally follows cutter teeth filing but the order can also be reversed.
Deepening of gullets. At intervals of about four weeks, it is necessary to deepen
the gullets on the cutters (6a) and the gullets between the rakers (6b) with the
millsaw file and the big gullets between the rakers and the cutters (6c) with the
round file.
Figure
21/10/2011 Wood Harvesting with Hand Tools - An Illustrated Training…
D:/cd3wddvd/NoExe/Master/dvd001/…/meister10.htm 126/186

Figure
21/10/2011 Wood Harvesting with Hand Tools - An Illustrated Training…
D:/cd3wddvd/NoExe/Master/dvd001/…/meister10.htm 127/186

Figure
21/10/2011 Wood Harvesting with Hand Tools - An Illustrated Training…
D:/cd3wddvd/NoExe/Master/dvd001/…/meister10.htm 128/186

Figure
Figure
21/10/2011 Wood Harvesting with Hand Tools - An Illustrated Training…
D:/cd3wddvd/NoExe/Master/dvd001/…/meister10.htm 129/186

Figure
MAJOR OVERHAUL OF CROSS-CUT SAWS
If saws become badly out of tooth line, it is necessary to adjust the tooth line.
This can best be done by using a new saw which is properly shaped as a model.
Its tooth line is marked with a scribe on the old saw (1). A second line is drawn
underneath at the correct gullet depth. This can also be done after jointing with a
scribe attached to the jointer (2). The position of tooth points is also marked on
the old saw to avoid incorrect spacing.
If a new saw is not available, a thin flexible board (or a straight-back saw) can be
used to draw the desired curve (3). It is fixed on both ends and bent in the middle
to the correct tooth line shape. If a straight line (3a) is drawn between the two
ends of the board, the correct curve is obtained if the middle of the board is bent
outward (3b) by 7 cm for 1.5 m saw length, by 8 cm for 2.0 m saw length and 9
cm for 2.5 m saw length.
21/10/2011 Wood Harvesting with Hand Tools - An Illustrated Training…
D:/cd3wddvd/NoExe/Master/dvd001/…/meister10.htm 130/186

Reshaping the curve according to the new tooth line marked on the saw is
facilitated if shears can be used instead of files. Shears may be found in central
workshops.
Use of a press
In central workshops, it may also be useful to provide a press for deepening
gullets and reshaping worn saws (4). This saves files and time.
Figure
Figure
21/10/2011 Wood Harvesting with Hand Tools - An Illustrated Training…
D:/cd3wddvd/NoExe/Master/dvd001/…/meister10.htm 131/186

Figure
Figure
Home"" """"> ar.cn.de.en.es.fr.id.it.ph.po.ru.sw
Wood Harvesting with Hand Tools - An Illustrated Training
Manual (ILO, 1989, 128 p.)
THE WORKER
CLOTHING, PERSONAL PROTECTIVE EQUIPMENT,
FIRST-AID EQUIPMENT
21/10/2011 Wood Harvesting with Hand Tools - An Illustrated Training…
D:/cd3wddvd/NoExe/Master/dvd001/…/meister10.htm 132/186

FOOD, NUTRITION AND RESTWORKING POSTURES AND MOVEMENTS
WORK PLANNING AND ORGANISATION
ACCIDENT PREVENTION
Wood Harvesting with Hand Tools - An Illustrated Training Manual (ILO, 1989,
128 p.)
THE WORKER
CLOTHING, PERSONAL PROTECTIVE EQUIPMENT, FIRST-AID EQUIPMENT
Workers should wear:
(1) Long-sleeved shirt or jacket, preferably in a warning colour, fitting
neither too loosely nor too tightly.
(2) Long trousers.
(3) Boots with non-slip soles.
21/10/2011 Wood Harvesting with Hand Tools - An Illustrated Training…
D:/cd3wddvd/NoExe/Master/dvd001/…/meister10.htm 133/186

In felling operations, the worker must wear:
(4) Safety helmet with ventilation holes.
During the felling of large-sized trees, it may be advisable to use:
(5) Knee protectors.
The following first-aid equipment must be available:
(6) A pocket first-aid kit containing roller bandages and standard dressing
for open wounds, carried by the worker.
(7) A full first-aid kit for treating serious accidents, to be kept at the work
site for a group of workers.
During rainy periods, workers should have:
(8) Rubber boots.
(9) Raincoats.
Simple shelters should be available for use during breaks as a protection against
rain or sun (10).
21/10/2011 Wood Harvesting with Hand Tools - An Illustrated Training…
D:/cd3wddvd/NoExe/Master/dvd001/…/meister10.htm 134/186

Figure
21/10/2011 Wood Harvesting with Hand Tools - An Illustrated Training…
D:/cd3wddvd/NoExe/Master/dvd001/…/meister10.htm 135/186
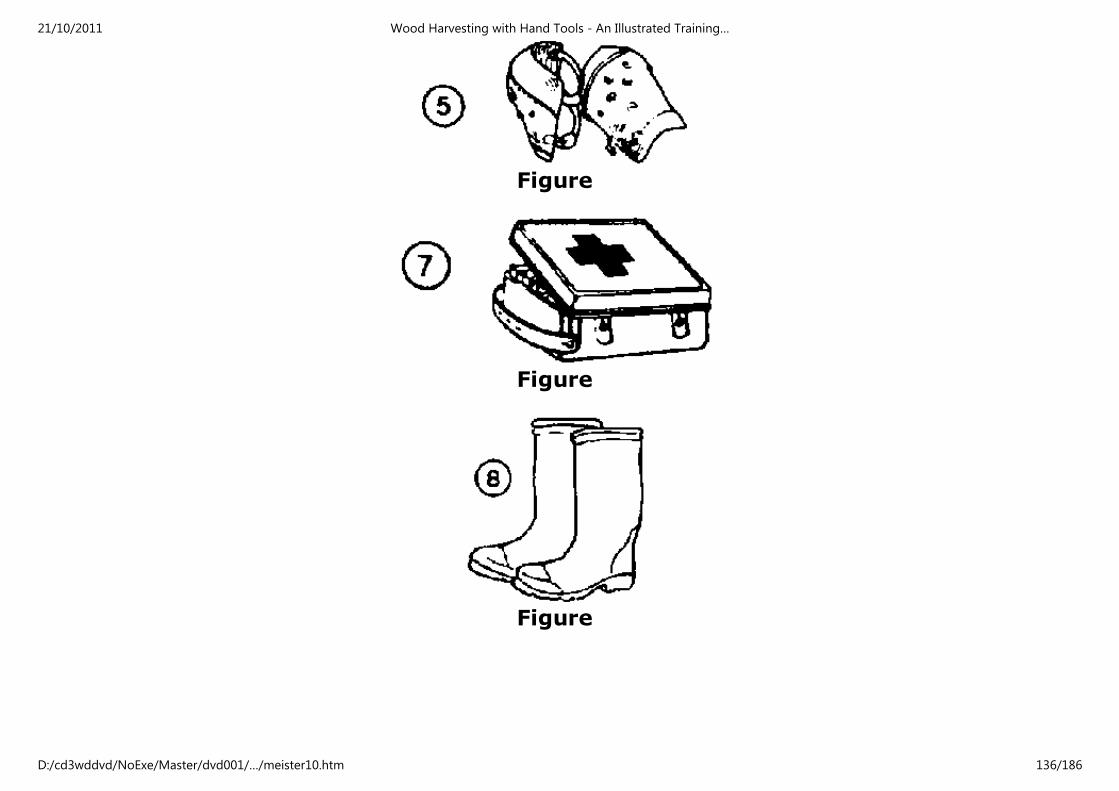
Figure
Figure
Figure
21/10/2011 Wood Harvesting with Hand Tools - An Illustrated Training…
D:/cd3wddvd/NoExe/Master/dvd001/…/meister10.htm 136/186

Figure
21/10/2011 Wood Harvesting with Hand Tools - An Illustrated Training…
D:/cd3wddvd/NoExe/Master/dvd001/…/meister10.htm 137/186

Figure
FOOD, NUTRITION AND REST
Wood harvesting is heavy work and over a period of time is tiring. The worker
must therefore be in a good state of health and be well fed.
He should have a meal before starting work and eat during breaks.
Under severe climatic conditions (very hot weather or humid, tropical climate),
not more than six hours of productive work can be expected. During a six-hour
working day, two meal breaks of at least 30 minutes each should be taken (after
the first two hours of work and again two hours later).
Food should be sufficiently rich in starches (rice, maize, wheat, millet, bananas,
21/10/2011 Wood Harvesting with Hand Tools - An Illustrated Training…
D:/cd3wddvd/NoExe/Master/dvd001/…/meister10.htm 138/186

cassava); in proteins (beans, eggs, meat, fish); in fats (olive oil, coconut oil,
cheese, butter); and in vitamins (fruit, vegetables).
During hard work and in hot weather, the body can lose 3 to 6 litres of liquid per
day. This must be replaced. Workers should carry a container with boiled water,
tea or other beverages and drink not only when thirsty but also at regular
intervals during the day. Care must be taken to replace the salt lost through
sweating.
21/10/2011 Wood Harvesting with Hand Tools - An Illustrated Training…
D:/cd3wddvd/NoExe/Master/dvd001/…/meister10.htm 139/186

Figure
WORKING POSTURES AND MOVEMENTS
Heavy physical work can be made easier by proper working postures and working
21/10/2011 Wood Harvesting with Hand Tools - An Illustrated Training…
D:/cd3wddvd/NoExe/Master/dvd001/…/meister10.htm 140/186

movements.
Sawing can become very tiring and quite inefficient if the saw is pulled by the
arms towards the body, if the body remains stiff and upright and consequently
only short strokes can be made.
To make the job less tiring and more efficient, the saw should work along its full
length and the load should be carried not only by the arm muscles but by the
whole body swinging backwards and forwards and supporting the movement of
the saw.
Efficient working techniques in the use of bow saws (1) and crosscut saws (2) are
indicated in the illustration, showing the change in working position. The same
principles apply to other jobs, such as debarking (3).
Manual wood harvesting often involves heavy lifting and carrying of loads. In such
work, the back should be kept straight to avoid excessive strain and the strong
muscles of the legs should be used for lifting (4).
Figure
21/10/2011 Wood Harvesting with Hand Tools - An Illustrated Training…
D:/cd3wddvd/NoExe/Master/dvd001/…/meister10.htm 141/186

Figure
Figure
Figure
In axe work, the whole body moves and supports the stroke by changing the
weight from the leg away from the cut to the leg near the cut while the upper hand
slides down the handle. If the worker masters the left-hand grip (1), (2) and the
21/10/2011 Wood Harvesting with Hand Tools - An Illustrated Training…
D:/cd3wddvd/NoExe/Master/dvd001/…/meister10.htm 142/186

right-hand grip (3), work is safer and less strenuous.
Figure
21/10/2011 Wood Harvesting with Hand Tools - An Illustrated Training…
D:/cd3wddvd/NoExe/Master/dvd001/…/meister10.htm 143/186

Figure
Figure
WORK PLANNING AND ORGANISATION
21/10/2011 Wood Harvesting with Hand Tools - An Illustrated Training…
D:/cd3wddvd/NoExe/Master/dvd001/…/meister10.htm 144/186

Wood harvesting must be well planned and organised in order to make the best
use of the raw material while keeping labour input and production cost low and
minimising damage to the environment.
A variety of different harvesting systems can be applied depending on the wood
species, size and assortment (fuelwood, poles or logs), type of forest (man-made
or natural), type of cut (thinning or clear cut), kind of regeneration (artificial,
coppice, natural), terrain (flat, steep, swampy), accessibility (roads, waterways)
and means of transport (manual, animal, motorised).
In all these cases, good planning and organisation of work depends on:
- the assessment of the volume to be harvested;
- the determination of the assortments to be produced;
- the determination of wood storing places, skidding lines and felling
direction;
- clearly-instructed and skilled supervisors and workers;
- availability of the necessary hand tools and maintenance and other
equipment;
- clear separation of working areas for individual work teams and different
operations (felling and transport).
The illustration shows an example of a harvesting map indicating the forest road
21/10/2011 Wood Harvesting with Hand Tools - An Illustrated Training…
D:/cd3wddvd/NoExe/Master/dvd001/…/meister10.htm 145/186

network (1), the transport direction (2), the skidding lines (3), the felling
direction (4) and the storage places for logs (5) and short wood (6).
Figure
21/10/2011 Wood Harvesting with Hand Tools - An Illustrated Training…
D:/cd3wddvd/NoExe/Master/dvd001/…/meister10.htm 146/186

ACCIDENT PREVENTION
Wood harvesting is extremely dangerous. Many workers are killed or severely
injured in tree felling and transport. Cutting tools may lead to serious open
wounds. Many accidents occur when workers slip, stumble and fall in difficult
terrain or on slippery surfaces.
Adequate accident prevention is therefore a basic requirement of any type of wood
harvesting.
Workers need to be healthy and in good physical condition. They must be well
trained for their jobs. They must strictly observe a definite set of safety rules.
The most important safety rules are the following:
- In tree felling, workers must use safety helmets, wear good shoes with
non-slip soles and carry first aid equipment.
- Axes, saws and helping tools should be available in sufficient number and
be adequate as regards type and maintenance.
- The felling team must keep a minimum distance of two tree lengths from
other workers (1). This distance may be increased to four tree lengths
when visibility in the forest is poor. A warning should be given before a
tree is about to fall.
- Greatest care is required in controlling trees during felling by an adequate
undercut and back cut, leaving a sufficiently strong hinge.
21/10/2011 Wood Harvesting with Hand Tools - An Illustrated Training…
D:/cd3wddvd/NoExe/Master/dvd001/…/meister10.htm 147/186

- When the tree falls, the worker must retreat to a safe position and watch
out for falling branches (2).
Figure
21/10/2011 Wood Harvesting with Hand Tools - An Illustrated Training…
D:/cd3wddvd/NoExe/Master/dvd001/…/meister10.htm 148/186
Figure
- Particular care is needed to bring lodged trees down safely (1).
- No tree felling should be done in stormy weather.
- During debranching, debarking and cross-cutting, workers must watch
out that they are not caught by falling, sliding or turning trees or parts of
trees, especially on slopes.
- When axes, debarking spades or splitting hammers are being used, other
people must keep clear of the working range.
- Accidents are more frequent towards the end of the day when workers
are tired. During this period, harvesting should preferably concentrate on
the less dangerous jobs.
21/10/2011 Wood Harvesting with Hand Tools - An Illustrated Training…
D:/cd3wddvd/NoExe/Master/dvd001/…/meister10.htm 149/186

Figure
The working techniques described in this manual are specifically designed with a
view to reducing hazards.
Home"" """"> ar.cn.de.en.es.fr.id.it.ph.po.ru.sw
Wood Harvesting with Hand Tools - An Illustrated Training
Manual (ILO, 1989, 128 p.)
TREE FELLING
21/10/2011 Wood Harvesting with Hand Tools - An Illustrated Training…
D:/cd3wddvd/NoExe/Master/dvd001/…/meister10.htm 150/186

PREPARATION FOR TREE FELLING
TREE FELLING WITH AXE AND BOW SAW
TREE FELLING WITH AXE AND CROSS-CUT SAW
PRECAUTIONS WHEN MAKING THE UNDERCUT AND
THE BACK CUT
FELLING TREES LEANING INTO THE PLANNED
FELLING DIRECTION
FELLING TREES LEANING TO THE SIDE
TREE FELLING IN DENSE TROPICAL FORESTS
FELLING OF TREES WITH PLANK BUTTRESSES
WOOD WASTAGE DUE TO POOR WORKING
TECHNIQUES IN FELLING
Wood Harvesting with Hand Tools - An Illustrated Training Manual (ILO, 1989,
128 p.)
TREE FELLING
PREPARATION FOR TREE FELLING
The felling direction must be carefully determined (1). This will depend on the
skidding direction, the lean of the tree, the shape of the crown, the wind, and on
obstacles in the way of the tree's fall, obstacles on the ground and also on the
possibility of retreating safely.
When the felling direction (1a) is determined, the tools are placed opposite to the
21/10/2011 Wood Harvesting with Hand Tools - An Illustrated Training…
D:/cd3wddvd/NoExe/Master/dvd001/…/meister10.htm 151/186

felling direction, behind the tree (1b). The working area around the tree is cleared
(1c). Two escape routes are cleared, as far as is necessary to allow easy retreat,
placed sideways at about 45 angles to the rear (1d).
The base of the tree must be well cleared, using the axe or a matchet in order to
prevent the saw from blunting too quickly (2).
Figure
21/10/2011 Wood Harvesting with Hand Tools - An Illustrated Training…
D:/cd3wddvd/NoExe/Master/dvd001/…/meister10.htm 152/186

Figure
TREE FELLING WITH AXE AND BOW SAW
Small trees are felled with an axe, cutting from both sides (1).
For slightly larger trees, axes are used for making the undercut. In this case, the
horizontal cut can be done with the bow saw (2). The back cut should not be made
with the axe because too much wood is wasted and it is more difficult to maintain
the desired direction of fall (3).
Axe felling of larger trees is allowed only in exceptional cases.
21/10/2011 Wood Harvesting with Hand Tools - An Illustrated Training…
D:/cd3wddvd/NoExe/Master/dvd001/…/meister10.htm 153/186

Figure
21/10/2011 Wood Harvesting with Hand Tools - An Illustrated Training…
D:/cd3wddvd/NoExe/Master/dvd001/…/meister10.htm 154/186

Figure
21/10/2011 Wood Harvesting with Hand Tools - An Illustrated Training…
D:/cd3wddvd/NoExe/Master/dvd001/…/meister10.htm 155/186

Figure
TREE FELLING WITH AXE AND CROSS-CUT SAW
Felling of medium- and large-sized trees is done with the axe and the cross-cut
saw. This process requires special skills and experience.
A proper undercut (1a) and back cut (1b) are necessary, leaving a hinge (2a) to
guide the tree into the desired direction of fall. Small lateral cuts (1c) and (2b)
avoid tearing of fibres from the tree during felling. The depth of the undercut
should be about 1/5 to 1/4 of the diameter; it should open at an angle of about
60. The back cut should be about 2-5 cm higher than the undercut. In very large
trees, the undercut may penetrate up to 1/3 of the diameter, depending on shape,
21/10/2011 Wood Harvesting with Hand Tools - An Illustrated Training…
D:/cd3wddvd/NoExe/Master/dvd001/…/meister10.htm 156/186

and the back cut may be 10-20 cm higher.
Wedging will be necessary to avoid pinching of the saw (3). If necessary, wedging
will also force the tree to fall.
Figure
21/10/2011 Wood Harvesting with Hand Tools - An Illustrated Training…
D:/cd3wddvd/NoExe/Master/dvd001/…/meister10.htm 157/186

Figure
21/10/2011 Wood Harvesting with Hand Tools - An Illustrated Training…
D:/cd3wddvd/NoExe/Master/dvd001/…/meister10.htm 158/186

Figure
PRECAUTIONS WHEN MAKING THE UNDERCUT AND THE BACK CUT
Accurate felling makes the job safer, facilitates subsequent operations and
reduces timber wastage. Felling should therefore be done with the greatest care
and precision. By looking at the stump, it can easily be seen whether a poor or a
good felling job has been done.
When making the undercut, care must be taken that it points precisely into the
felling direction. This can be checked by standing in front of the undercut (1). If
necessary, the undercut should be corrected.
Sufficient holding wood which acts as a hinge must always remain in order to
maintain control of the tree so that it does not fall in any direction other than that
21/10/2011 Wood Harvesting with Hand Tools - An Illustrated Training…
D:/cd3wddvd/NoExe/Master/dvd001/…/meister10.htm 159/186
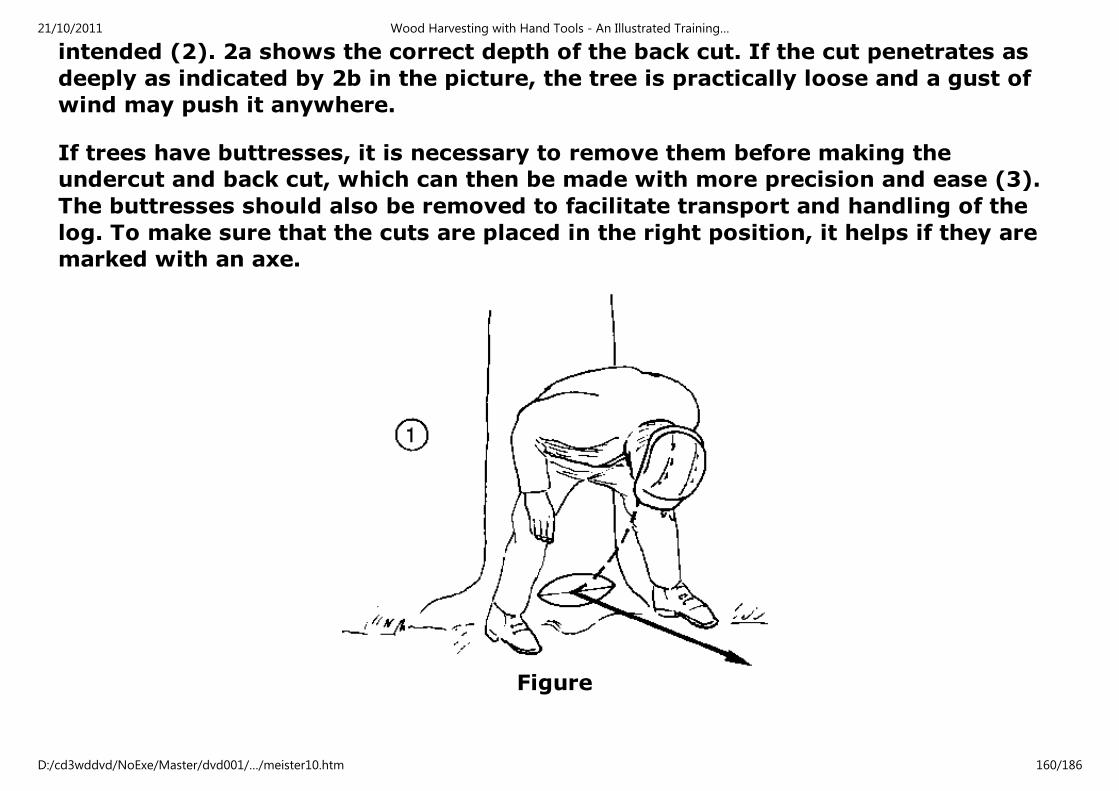
intended (2). 2a shows the correct depth of the back cut. If the cut penetrates as
deeply as indicated by 2b in the picture, the tree is practically loose and a gust of
wind may push it anywhere.
If trees have buttresses, it is necessary to remove them before making the
undercut and back cut, which can then be made with more precision and ease (3).
The buttresses should also be removed to facilitate transport and handling of the
log. To make sure that the cuts are placed in the right position, it helps if they are
marked with an axe.
Figure
21/10/2011 Wood Harvesting with Hand Tools - An Illustrated Training…
D:/cd3wddvd/NoExe/Master/dvd001/…/meister10.htm 160/186

Figure
Figure
FELLING TREES LEANING INTO THE PLANNED FELLING DIRECTION
21/10/2011 Wood Harvesting with Hand Tools - An Illustrated Training…
D:/cd3wddvd/NoExe/Master/dvd001/…/meister10.htm 161/186

Trees leaning into the planned felling direction (1) have to be felled particularly
carefully in order to avoid danger to the workers, damage to the saw and wastage
of timber.
In such a case, the undercut (2) must penetrate more deeply into the tree. This
may entail preparing the undercut in two steps (3) and (4). When the saw starts
pinching, work should continue with the axe.
The back cut (5) must be done from both sides and only the remaining wood (6)
be sawn parallel with the hinge.
21/10/2011 Wood Harvesting with Hand Tools - An Illustrated Training…
D:/cd3wddvd/NoExe/Master/dvd001/…/meister10.htm 162/186

Figure
FELLING TREES LEANING TO THE SIDE
A tree can also be felled at an angle of about 30 from the lean. In this case, the
undercut (a) should face the intended felling direction (b). The hinge (c) should be
kept smaller on the side of the lean (d) and larger on the side to which the tree is
to be felled. In addition, a wedge (e) placed on the side of the lean will help to
direct the fall of the tree.
21/10/2011 Wood Harvesting with Hand Tools - An Illustrated Training…
D:/cd3wddvd/NoExe/Master/dvd001/…/meister10.htm 163/186

Felling larger trees against the lean is only justified in exceptional cases (e.g. to
save young tree growth or near buildings) and requires special skills, techniques
and equipment (e.g. winches).
Figure
21/10/2011 Wood Harvesting with Hand Tools - An Illustrated Training…
D:/cd3wddvd/NoExe/Master/dvd001/…/meister10.htm 164/186

Figure
TREE FELLING IN DENSE TROPICAL FORESTS
Felling in dense tropical forests can be particularly dangerous. Dense undergrowth
makes it difficult to retreat from the tree during its fall. Dead branches may be
hidden in the crown, which is often not visible. For the same reason, it may be
difficult to assess the lean of the tree.
21/10/2011 Wood Harvesting with Hand Tools - An Illustrated Training…
D:/cd3wddvd/NoExe/Master/dvd001/…/meister10.htm 165/186

Trees may be over-mature and may therefore have hollow or rotten centres.
Trees are often connected to each other with climbers. When the trees fall, they
frequently pull down other trees (1). Branches from the falling tree or from
neighbouring trees (2, 3) are broken off and may swing backwards (4). Climbers
are torn off or may break and snap back (5).
The accident risk when felling trees in dense tropical forests is considerably
reduced if the area around the base of the tree and the escape routes are well
cleared.
Two paths are cleared to a length of 20-30 m beyond the reach of the crown
opposite the felling direction. The angle between them should be about 45.
Climbers attached to the tree must also be cut before sawing begins,
It will often be necessary to clean the base of the tree to remove bark and dirt
deposited by termites.
Tree harvesting in natural tropical forests still continues to some extent with hand
saws although in the large commercial operations chain saws have taken over.
21/10/2011 Wood Harvesting with Hand Tools - An Illustrated Training…
D:/cd3wddvd/NoExe/Master/dvd001/…/meister10.htm 166/186

21/10/2011 Wood Harvesting with Hand Tools - An Illustrated Training…
D:/cd3wddvd/NoExe/Master/dvd001/…/meister10.htm 167/186

Figure
FELLING OF TREES WITH PLANK BUTTRESSES
Plank buttresses are common in tropical trees. They occur in many tree species
once they have grown large.
Large trees with plank buttresses often attain a cylindrical shape only at a height
of 3-5 m above ground level (1). At ground level the cross-section becomes larger
and more irregular (2), (3).
Trees with large plank buttresses may be felled at a convenient working height
while the workers are standing at ground level.
If felling from the ground is not possible, it may be necessary to build a platform
(4), especially in steep terrain. Experienced workers will be able to do this quite
quickly with material available locally. The platform should permit a sufficiently
comfortable and safe working position.
21/10/2011 Wood Harvesting with Hand Tools - An Illustrated Training…
D:/cd3wddvd/NoExe/Master/dvd001/…/meister10.htm 168/186

Figure
21/10/2011 Wood Harvesting with Hand Tools - An Illustrated Training…
D:/cd3wddvd/NoExe/Master/dvd001/…/meister10.htm 169/186

Figure
If felling is done through the buttresses, the tree is usually felled into the direction
of lean.
The undercut is made to a depth of about one-third of the diameter (1a). First the
horizontal cut is made and then the oblique cut. The back cut is made about 20 cm
higher (or more) than the horizontal cut of the undercut. The cut begins on the
side buttresses (1b) and is finished on the rear buttress (1c). Wedging may be
21/10/2011 Wood Harvesting with Hand Tools - An Illustrated Training…
D:/cd3wddvd/NoExe/Master/dvd001/…/meister10.htm 170/186

necessary on the lateral buttress in order to stabilise the tree and on the rear
buttress to push the tree into the direction of fall (1d).
This technique must be adapted to the particular shape of the tree. The undercut
may, for instance, have to be made in two buttresses (2a). If there are also two
buttresses opposite the felling direction which have to cut one after the other, the
smaller one should be cut first (2b) and then the larger one (2c). To assist felling,
it is again advisable to insert wedges (2d).
Figure
21/10/2011 Wood Harvesting with Hand Tools - An Illustrated Training…
D:/cd3wddvd/NoExe/Master/dvd001/…/meister10.htm 171/186

Figure
WOOD WASTAGE DUE TO POOR WORKING TECHNIQUES IN FELLING
High stumps are an indication of poor workmanship and insufficient supervision.
21/10/2011 Wood Harvesting with Hand Tools - An Illustrated Training…
D:/cd3wddvd/NoExe/Master/dvd001/…/meister10.htm 172/186

Often they are the result of putting felling marks, which are to be left on the stump
for control purposes, too high. Sometimes workers find it more comfortable to cut
about 1 m above ground level (1a). Except in special cases (e.g. hollow or heavily
buttressed trees), the stump should be as low as possible (1b). This helps to avoid
wastage of wood and because lower stumps make skidding easier.
Where the wage level is low and the timber price high, the value of wood left in
one stump (1c) may correspond to a week's wages or more of the operator.
The following table gives information on volume loss:
Stump recoverable height Diameter cm
40 60 80
20 0.025 0.057 0.100
40 0.050 0.113 0.200
60 0.075 0.171 0.300
Considerable wood losses in felling can also occur if the tree is felled without an
undercut or with an insufficient undercut (2). If the undercut is at the same level
as, or higher than, the back cut, there is a risk that wood fibre will be pulled out of
the butt end, reducing the value of the log.
If the undercut is too small (3a), this can be most dangerous because the tree's
fall is no longer properly guided. The tree may split and this results in
considerable wastage on the valuable bull end.
21/10/2011 Wood Harvesting with Hand Tools - An Illustrated Training…
D:/cd3wddvd/NoExe/Master/dvd001/…/meister10.htm 173/186

Figure
21/10/2011 Wood Harvesting with Hand Tools - An Illustrated Training…
D:/cd3wddvd/NoExe/Master/dvd001/…/meister10.htm 174/186

Figure
21/10/2011 Wood Harvesting with Hand Tools - An Illustrated Training…
D:/cd3wddvd/NoExe/Master/dvd001/…/meister10.htm 175/186

Figure
A considerable amount of valuable wood is lost when large trees are felled across
obstacles on the ground such as hollows (1), ridges (2), logs or rocks (3). Most
species break if they hit such obstacles. Although the broken part may be small,
21/10/2011 Wood Harvesting with Hand Tools - An Illustrated Training…
D:/cd3wddvd/NoExe/Master/dvd001/…/meister10.htm 176/186

the loss caused by cutting out the break can be considerable.
The experienced worker will look carefully for obstacles and, when determining
the felling direction, he will try to avoid them. This will be possible in many cases.
Remember that even heavily leaning trees can be felled to a point about 30 on
either side of the lean.
Efforts to avoid obstructions not only reduce waste but also facilitate work
because unnecessary cross-cutting is avoided.
The breaking of a tree can cause serious losses, especially for valuable hardwood
species.
Figure
21/10/2011 Wood Harvesting with Hand Tools - An Illustrated Training…
D:/cd3wddvd/NoExe/Master/dvd001/…/meister10.htm 177/186

Figure
Figure
Home"" """"> ar.cn.de.en.es.fr.id.it.ph.po.ru.sw
Wood Harvesting with Hand Tools - An Illustrated Training
Manual (ILO, 1989, 128 p.)
RELEASING LODGED TREES
RELEASING LODGED TREES WITH SIMPLE TOOLS
RELEASING LODGED TREES WITH SPECIAL
EQUIPMENT AND MACHINES
21/10/2011 Wood Harvesting with Hand Tools - An Illustrated Training…
D:/cd3wddvd/NoExe/Master/dvd001/…/meister10.htm 178/186

Wood Harvesting with Hand Tools - An Illustrated Training Manual (ILO, 1989,
128 p.)
RELEASING LODGED TREES
RELEASING LODGED TREES WITH SIMPLE TOOLS
When thinning man-made forests, falling trees are frequently stopped by other
trees. The tree is then said to be lodged and this is called a hang-up.
Skilled operators will try to avoid this by felling the tree into open spaces. A
proper undercut, an adequate hinge and wedging will help to reduce lodging, but
this cannot always be avoided.
BEWARE - dislodging hung-up trees is very dangerous. Think first before deciding
21/10/2011 Wood Harvesting with Hand Tools - An Illustrated Training…
D:/cd3wddvd/NoExe/Master/dvd001/…/meister10.htm 179/186

how to take the tree down.
Do not walk or work below a hang-up.
Do not try to fell the tree which is holding the lodged tree.
Do not fell another tree on to the hang-up.
Do not climb the lodged tree to loosen its crown.
Recommended techniques for small trees
- Place suitable material (e.g. poles, split wood) on the ground on to which
the tree might slide backwards (1a), (2a), (3a).
- Cut the remaining wood which may still connect the tree with the stump,
preferably with an axe (1). If a saw is used, it might easily get pinched.
- Use the turning hook to roll the tree to one side (2).
- Use a pole to push the butt end backwards (3).
- Use a manual winch to pull the tree backwards (4). A pulley may help to
increase the pull or to place the winch in a safe position, if necessary.
21/10/2011 Wood Harvesting with Hand Tools - An Illustrated Training…
D:/cd3wddvd/NoExe/Master/dvd001/…/meister10.htm 180/186

Figure
21/10/2011 Wood Harvesting with Hand Tools - An Illustrated Training…
D:/cd3wddvd/NoExe/Master/dvd001/…/meister10.htm 181/186

Figure
21/10/2011 Wood Harvesting with Hand Tools - An Illustrated Training…
D:/cd3wddvd/NoExe/Master/dvd001/…/meister10.htm 182/186

Figure
Figure
RELEASING LODGED TREES WITH SPECIAL EQUIPMENT AND MACHINES
If lodging occurs frequently, a sulky may be a convenient aid for lifting the tree up
from the stump and to pull it down (1). The sulky may also be used to skid it to
21/10/2011 Wood Harvesting with Hand Tools - An Illustrated Training…
D:/cd3wddvd/NoExe/Master/dvd001/…/meister10.htm 183/186

the skidding line. Sulkies are an excellent means of facilitating this heavy and
dangerous job. Their use is restricted to trees up to a volume of about 0.5 cubic
metres. Sulkies can be made in local workshops.
BEWARE - if the terrain slopes, the tree may push the sulky suddenly forward
when it is lifted from the stump. In such cases, it is advisable to move the butt end
to the ground before attaching the sulky. For braking, the handle of the sulky is
lifted up.
Heavy trees which cannot be dislodged by manual work should be pulled down
with draught animals or a skidding tractor (2). The tractor or animals must be
placed at a safe distance from the lodged tree and the cable winch used.
21/10/2011 Wood Harvesting with Hand Tools - An Illustrated Training…
D:/cd3wddvd/NoExe/Master/dvd001/…/meister10.htm 184/186

Figure
21/10/2011 Wood Harvesting with Hand Tools - An Illustrated Training…
D:/cd3wddvd/NoExe/Master/dvd001/…/meister10.htm 185/186

Figure
21/10/2011 Wood Harvesting with Hand Tools - An Illustrated Training…
D:/cd3wddvd/NoExe/Master/dvd001/…/meister10.htm 186/186