word 2016 styles and structure - university of queensland · document structure ... notes 7 of 20...
TRANSCRIPT
Reproduced or adapted from original content provided under Creative Commons license by The University of Queensland Library
Word 2016 Styles and Structure
Course objectives:
• Customise the Ribbon and toolbars • Simplify document formatting using styles • Insert sections and manage document structure
Student Training and Support
Phone (07) 334 64312 Email [email protected] Web http://www.library.uq.edu.au/library-services/training
Service Points St Lucia: Main desk of the SSAH, ARMUS and DHESL libraries Hospitals: Main desk of the PACE, Herston and Mater libraries Gatton: Level 2, UQ Gatton Library
Staff Training and Support Phone (07) 3365 2666 Email [email protected] Web http://www.uq.edu.au/staffdevelopment Staff may contact their trainer with enquiries and feedback related to training content. Please contact Staff Development for booking enquiries or your local I.T. support for general technical enquiries.
UQ Library Staff and Student I.T. Training
Download the exercise files on the Ask I.T. website: 2 of 20 Microsoft Word 2016: Styles and Structure https://www.library.uq.edu.au/library-services/training-resources
Table of Contents Interface Overview .......................................................................................................................... 3
Prepare your interface .................................................................................................................... 4
Exercise 1. Display formatting symbols ..................................................................................... 4
Exercise 2. Add quick access tools ........................................................................................... 4
Exercise 3. Modify the Status Bar ............................................................................................. 4
Exercise 4. Enable the Navigation Pane ................................................................................... 4
Styles .............................................................................................................................................. 5
Exercise 5. Apply quick styles ................................................................................................... 5
Exercise 6. Locate and add styles to the Style Gallery .............................................................. 5
Modify styles ................................................................................................................................... 6
Exercise 7. Modify the Normal style .......................................................................................... 6
Exercise 8. Modify heading styles ............................................................................................. 7
Exercise 9. Modify paragraph styles ......................................................................................... 8
Themes and style sets .................................................................................................................... 9
Exercise 10. Save a style set/design theme ............................................................................ 9
Exercise 11. Change the design theme ................................................................................... 9
Character styles ............................................................................................................................ 11
Exercise 12. Apply character styles ....................................................................................... 11
Exercise 13. Modify character styles ..................................................................................... 11
Exercise 14. Inspect styles .................................................................................................... 12
Exercise 15. Remove/clear styles ......................................................................................... 12
New styles .................................................................................................................................... 13
Exercise 16. Create a style ................................................................................................... 13
Document structure ....................................................................................................................... 14
Exercise 17. Insert page and section breaks ......................................................................... 14
Exercise 18. Remove page or section breaks ....................................................................... 14
Headers and footers ..................................................................................................................... 15
Exercise 19. Add header or footer text .................................................................................. 15
Exercise 20. Add page numbers ........................................................................................... 16
Keyboard Shortcuts ...................................................................................................................... 17
Notes
3 of 20 Microsoft Word 2016: Styles and Structure
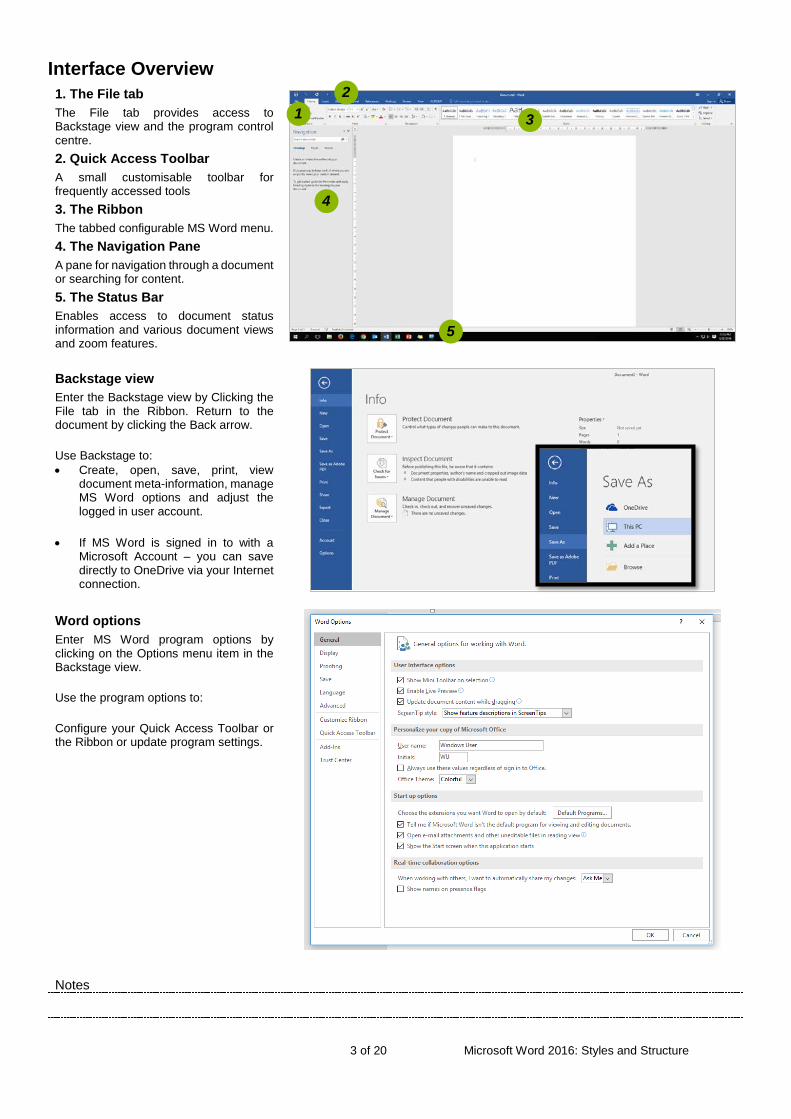
Interface Overview 1. The File tab The File tab provides access to Backstage view and the program control centre. 2. Quick Access Toolbar A small customisable toolbar for frequently accessed tools 3. The Ribbon The tabbed configurable MS Word menu. 4. The Navigation Pane A pane for navigation through a document or searching for content. 5. The Status Bar Enables access to document status information and various document views and zoom features. Backstage view Enter the Backstage view by Clicking the File tab in the Ribbon. Return to the document by clicking the Back arrow. Use Backstage to: • Create, open, save, print, view
document meta-information, manage MS Word options and adjust the logged in user account.
• If MS Word is signed in to with a
Microsoft Account – you can save directly to OneDrive via your Internet connection.
Word options Enter MS Word program options by clicking on the Options menu item in the Backstage view. Use the program options to: Configure your Quick Access Toolbar or the Ribbon or update program settings.
1 2
3
4
5
Notes
4 of 20 Microsoft Word 2016: Styles and Structure
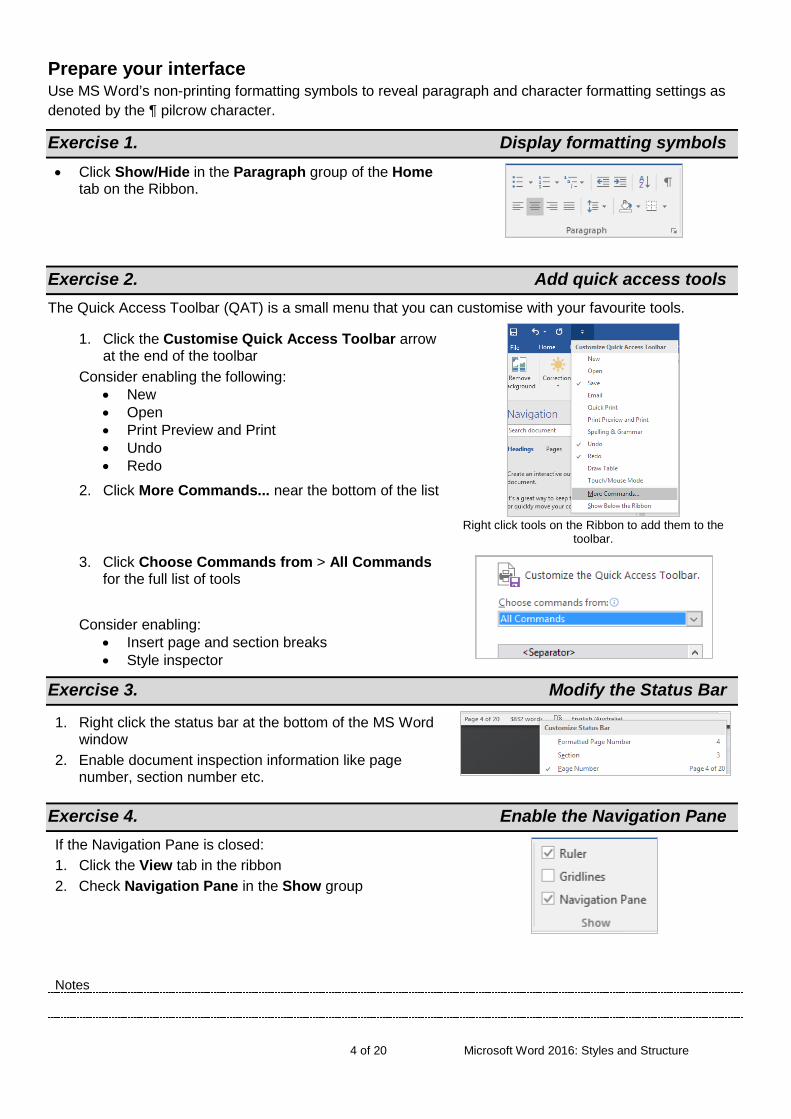
Prepare your interface Use MS Word’s non-printing formatting symbols to reveal paragraph and character formatting settings as denoted by the ¶ pilcrow character.
Exercise 1. Display formatting symbols • Click Show/Hide in the Paragraph group of the Home
tab on the Ribbon.
Exercise 2. Add quick access tools The Quick Access Toolbar (QAT) is a small menu that you can customise with your favourite tools.
1. Click the Customise Quick Access Toolbar arrow at the end of the toolbar
Consider enabling the following: • New • Open • Print Preview and Print • Undo • Redo
2. Click More Commands... near the bottom of the list
Right click tools on the Ribbon to add them to the toolbar.
3. Click Choose Commands from > All Commands for the full list of tools
Consider enabling: • Insert page and section breaks • Style inspector
Exercise 3. Modify the Status Bar
1. Right click the status bar at the bottom of the MS Word window
2. Enable document inspection information like page number, section number etc.
Exercise 4. Enable the Navigation Pane If the Navigation Pane is closed: 1. Click the View tab in the ribbon 2. Check Navigation Pane in the Show group
Notes
5 of 20 Microsoft Word 2016: Styles and Structure
Styles Styles are named collections for formatting choices that can be used instead of manual formatting. Applying a style gives a text element a specific formatting definition that can be consistently applied and easily updated. New documents automatically use the Normal style.
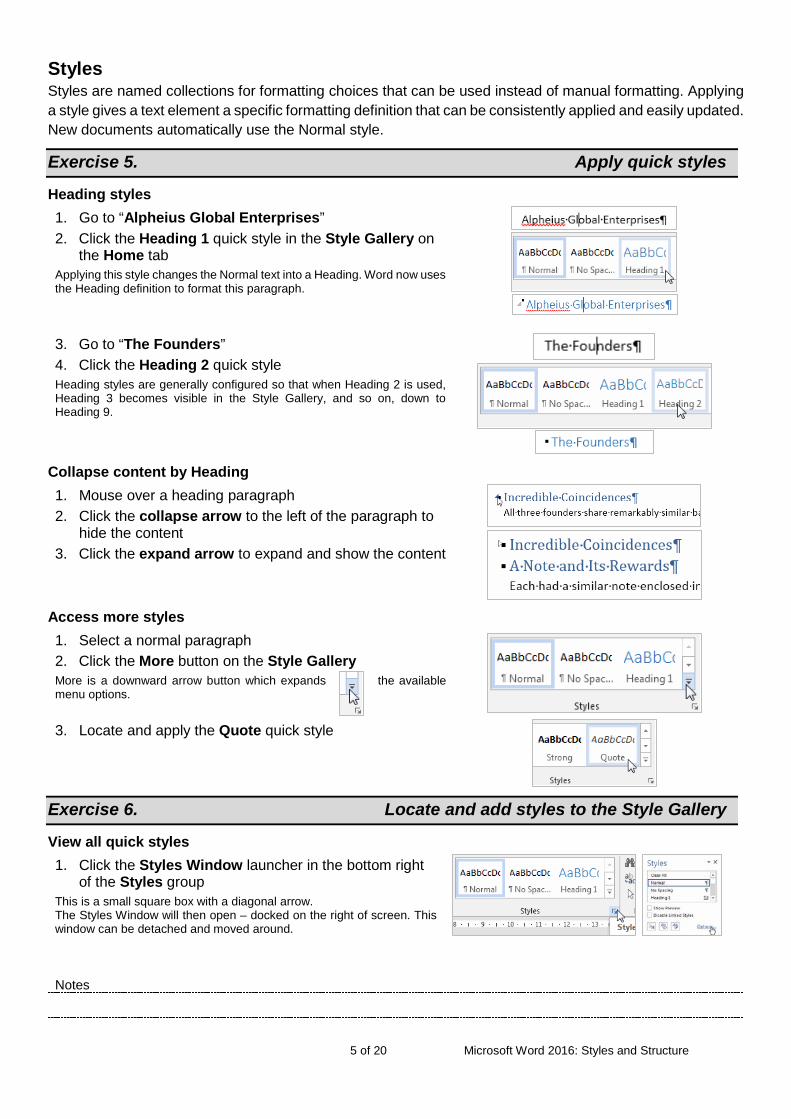
Exercise 5. Apply quick styles
Heading styles 1. Go to “Alpheius Global Enterprises” 2. Click the Heading 1 quick style in the Style Gallery on
the Home tab Applying this style changes the Normal text into a Heading. Word now uses the Heading definition to format this paragraph.
3. Go to “The Founders” 4. Click the Heading 2 quick style Heading styles are generally configured so that when Heading 2 is used, Heading 3 becomes visible in the Style Gallery, and so on, down to Heading 9.
Collapse content by Heading 1. Mouse over a heading paragraph 2. Click the collapse arrow to the left of the paragraph to
hide the content 3. Click the expand arrow to expand and show the content
Access more styles 1. Select a normal paragraph 2. Click the More button on the Style Gallery More is a downward arrow button which expands the available menu options. 3. Locate and apply the Quote quick style
Exercise 6. Locate and add styles to the Style Gallery
View all quick styles 1. Click the Styles Window launcher in the bottom right
of the Styles group This is a small square box with a diagonal arrow. The Styles Window will then open – docked on the right of screen. This window can be detached and moved around.
Notes
6 of 20 Microsoft Word 2016: Styles and Structure
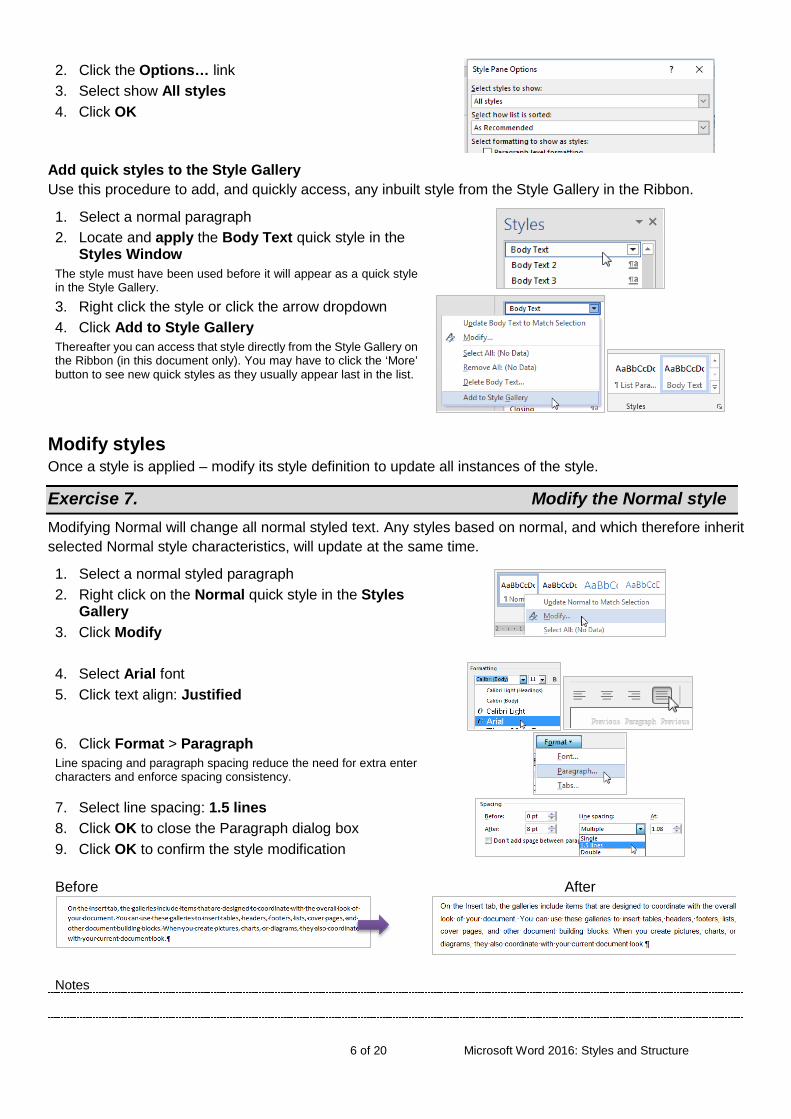
2. Click the Options… link 3. Select show All styles 4. Click OK
Add quick styles to the Style Gallery Use this procedure to add, and quickly access, any inbuilt style from the Style Gallery in the Ribbon.
1. Select a normal paragraph 2. Locate and apply the Body Text quick style in the
Styles Window The style must have been used before it will appear as a quick style in the Style Gallery. 3. Right click the style or click the arrow dropdown 4. Click Add to Style Gallery Thereafter you can access that style directly from the Style Gallery on the Ribbon (in this document only). You may have to click the ‘More’ button to see new quick styles as they usually appear last in the list.
Modify styles Once a style is applied – modify its style definition to update all instances of the style.
Exercise 7. Modify the Normal style Modifying Normal will change all normal styled text. Any styles based on normal, and which therefore inherit selected Normal style characteristics, will update at the same time.
1. Select a normal styled paragraph 2. Right click on the Normal quick style in the Styles
Gallery 3. Click Modify 4. Select Arial font 5. Click text align: Justified
6. Click Format > Paragraph Line spacing and paragraph spacing reduce the need for extra enter characters and enforce spacing consistency.
7. Select line spacing: 1.5 lines 8. Click OK to close the Paragraph dialog box 9. Click OK to confirm the style modification Before After
Notes
7 of 20 Microsoft Word 2016: Styles and Structure
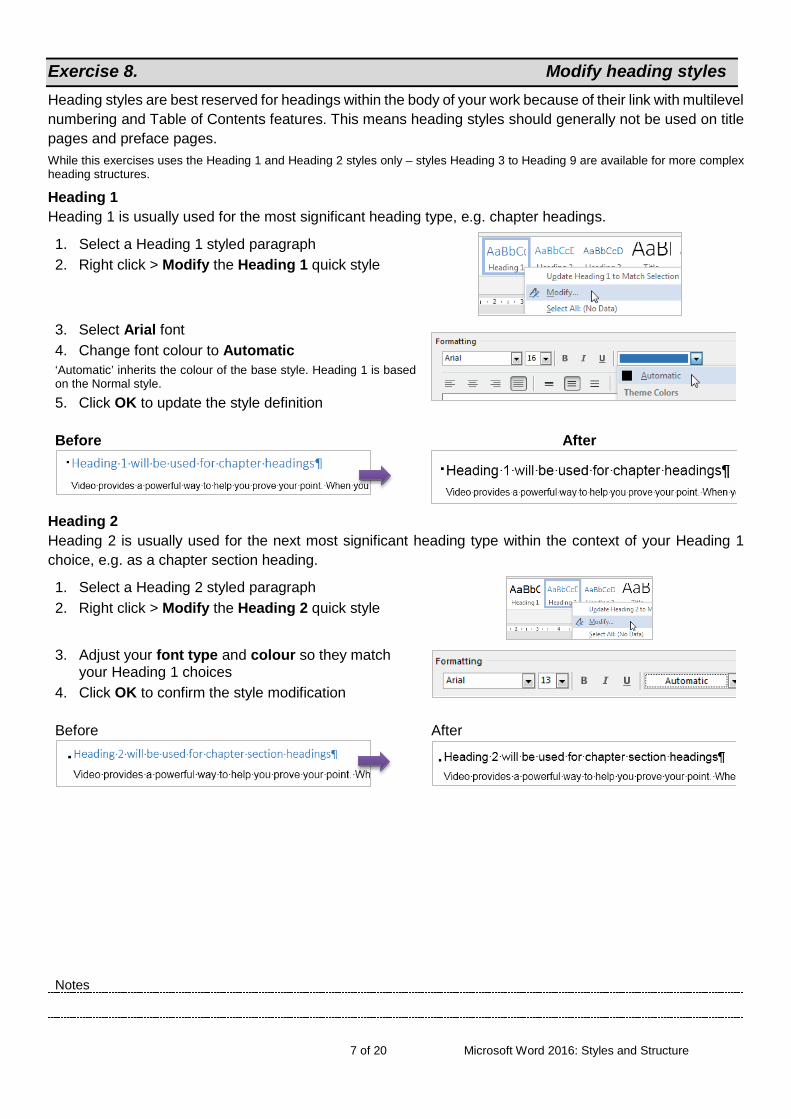
Exercise 8. Modify heading styles Heading styles are best reserved for headings within the body of your work because of their link with multilevel numbering and Table of Contents features. This means heading styles should generally not be used on title pages and preface pages. While this exercises uses the Heading 1 and Heading 2 styles only – styles Heading 3 to Heading 9 are available for more complex heading structures.
Heading 1 Heading 1 is usually used for the most significant heading type, e.g. chapter headings.
1. Select a Heading 1 styled paragraph 2. Right click > Modify the Heading 1 quick style
3. Select Arial font 4. Change font colour to Automatic ‘Automatic’ inherits the colour of the base style. Heading 1 is based on the Normal style. 5. Click OK to update the style definition
Before After
Heading 2 Heading 2 is usually used for the next most significant heading type within the context of your Heading 1 choice, e.g. as a chapter section heading.
1. Select a Heading 2 styled paragraph 2. Right click > Modify the Heading 2 quick style
3. Adjust your font type and colour so they match
your Heading 1 choices 4. Click OK to confirm the style modification Before After

Notes
8 of 20 Microsoft Word 2016: Styles and Structure
Exercise 9. Modify paragraph styles
Quote style 1. Select a Quote styled paragraph 2. Right click > Modify the quick style 3. Click Justified text alignment
4. Click Format > Paragraph 5. Update paragraph indentation from the left and right
margin to 1cm each 6. Select First line for Special indentation 7. Click OK to close the Paragraph dialogue 8. Click OK to update the style definition
Before After
Body text style 1. Select a Body Text styled paragraph This references Add quick styles to the Style Gallery on page 6. 2. Right click > Modify the quick style
3. Click Format > Paragraph
4. Apply Single line spacing 5. Adjust spacing after to 8pt 6. Click OK to close the Paragraph dialogue 7. Click OK to confirm the style modification Before After
Body Text with single line spacing could be useful when using Tables. Alternatively the No Spacing quick style could be used for this purpose.
Notes
9 of 20 Microsoft Word 2016: Styles and Structure
Themes and style sets Microsoft has introduced the Design tab to the Word 2013 Ribbon and used it to more closely integrate style sets into theme tools of the Office Suite.
• Style sets are collections of complementary styles in the same way a style is a collection of formatting choices.
• Themes are a wider concept which incorporates style sets, colours and effects to theme a document or a series of documents consistently.
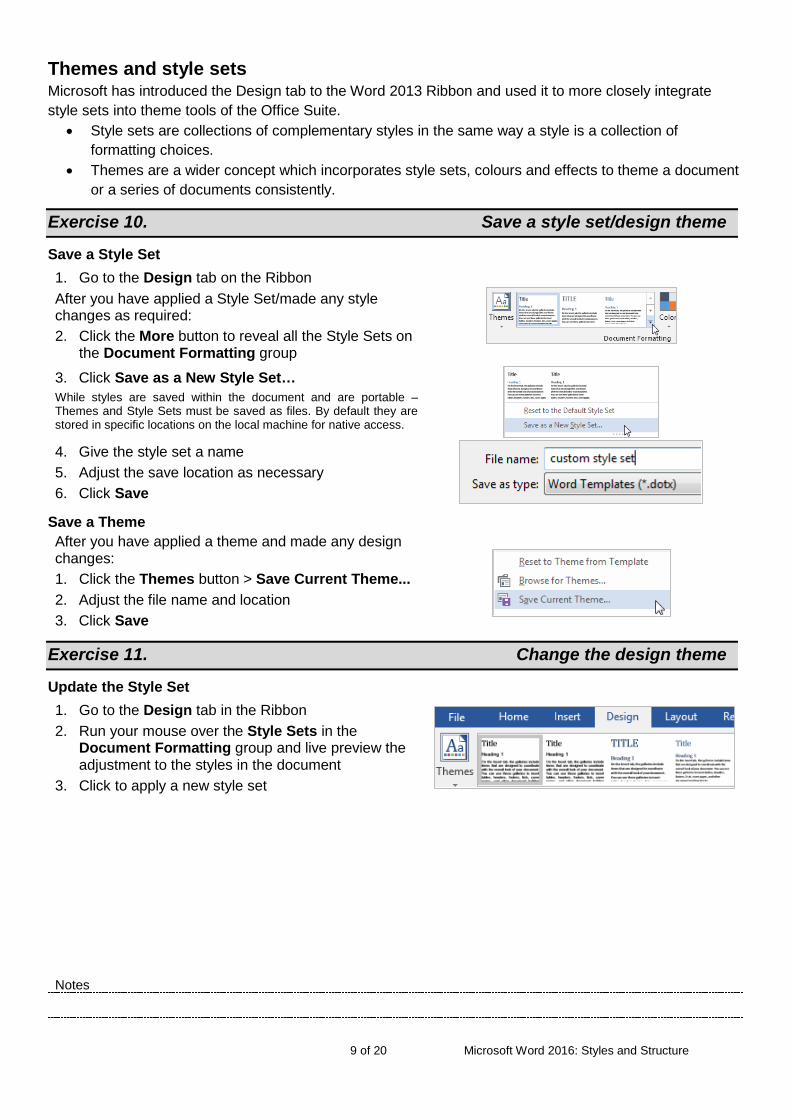
Exercise 10. Save a style set/design theme
Save a Style Set 1. Go to the Design tab on the Ribbon After you have applied a Style Set/made any style changes as required: 2. Click the More button to reveal all the Style Sets on
the Document Formatting group
3. Click Save as a New Style Set… While styles are saved within the document and are portable – Themes and Style Sets must be saved as files. By default they are stored in specific locations on the local machine for native access.
4. Give the style set a name 5. Adjust the save location as necessary 6. Click Save
Save a Theme After you have applied a theme and made any design changes: 1. Click the Themes button > Save Current Theme... 2. Adjust the file name and location 3. Click Save
Exercise 11. Change the design theme
Update the Style Set 1. Go to the Design tab in the Ribbon 2. Run your mouse over the Style Sets in the
Document Formatting group and live preview the adjustment to the styles in the document
3. Click to apply a new style set
Notes
10 of 20 Microsoft Word 2016: Styles and Structure
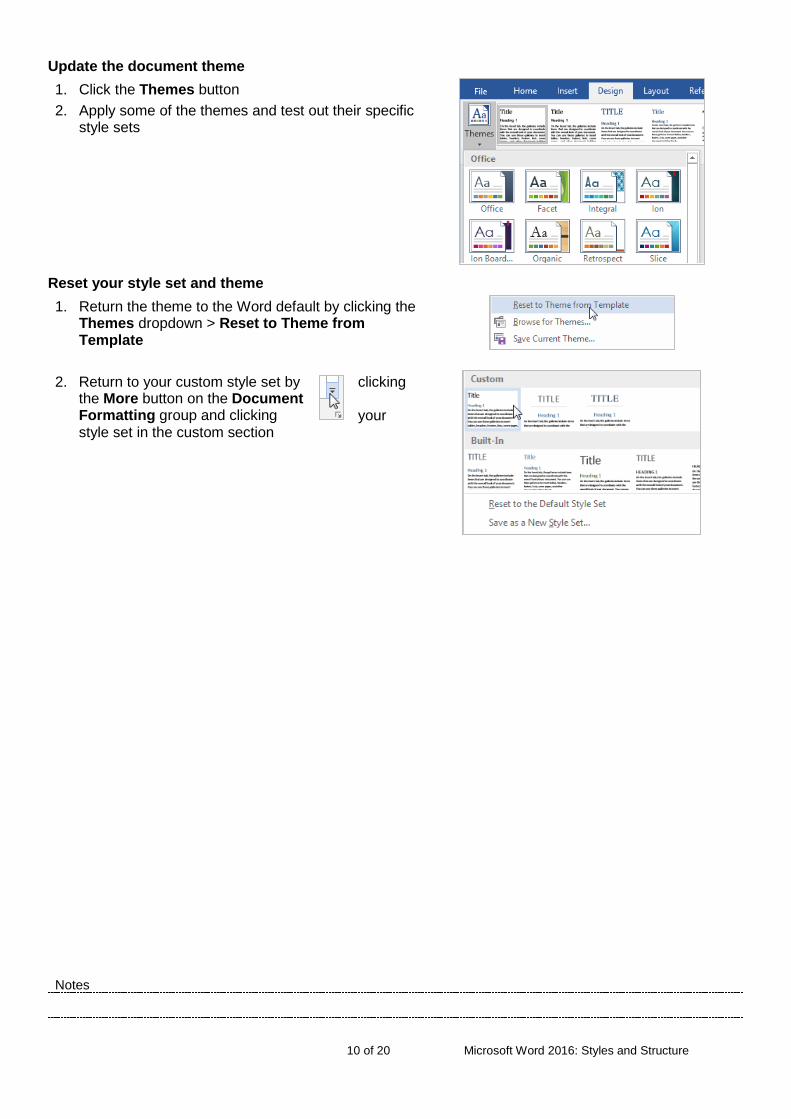
Update the document theme 1. Click the Themes button 2. Apply some of the themes and test out their specific
style sets
Reset your style set and theme 1. Return the theme to the Word default by clicking the
Themes dropdown > Reset to Theme from Template
2. Return to your custom style set by clicking
the More button on the Document Formatting group and clicking your style set in the custom section
Notes
11 of 20 Microsoft Word 2016: Styles and Structure
Character styles Character styles overlay paragraph styles and allow the user to emphasise text elements. Useful character styles include: Strong, Subtle Emphasis, Emphasis and Intense Emphasis. These quick styles resemble bold, italic etc. but can be modified for any type of emphasis.
Exercise 12. Apply character styles
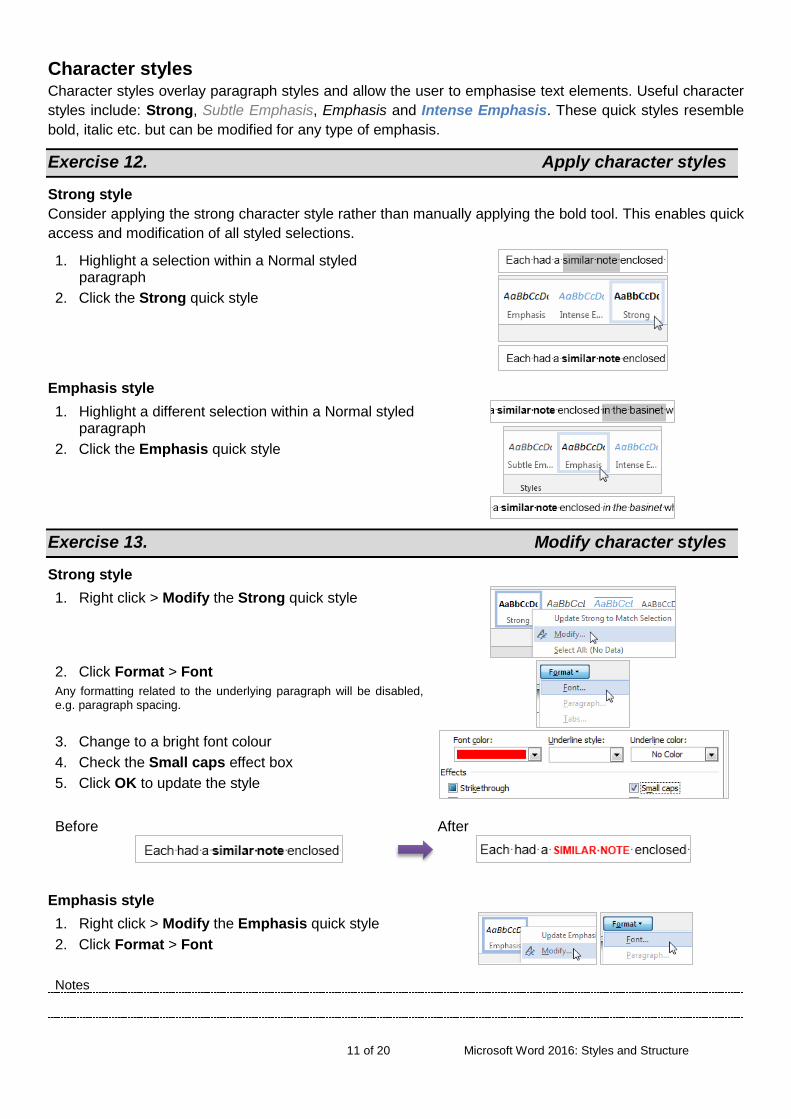
Strong style Consider applying the strong character style rather than manually applying the bold tool. This enables quick access and modification of all styled selections.
1. Highlight a selection within a Normal styled paragraph
2. Click the Strong quick style
Emphasis style 1. Highlight a different selection within a Normal styled
paragraph 2. Click the Emphasis quick style
Exercise 13. Modify character styles
Strong style 1. Right click > Modify the Strong quick style
2. Click Format > Font Any formatting related to the underlying paragraph will be disabled, e.g. paragraph spacing.
3. Change to a bright font colour 4. Check the Small caps effect box 5. Click OK to update the style
Before After
Emphasis style 1. Right click > Modify the Emphasis quick style 2. Click Format > Font
Notes
12 of 20 Microsoft Word 2016: Styles and Structure
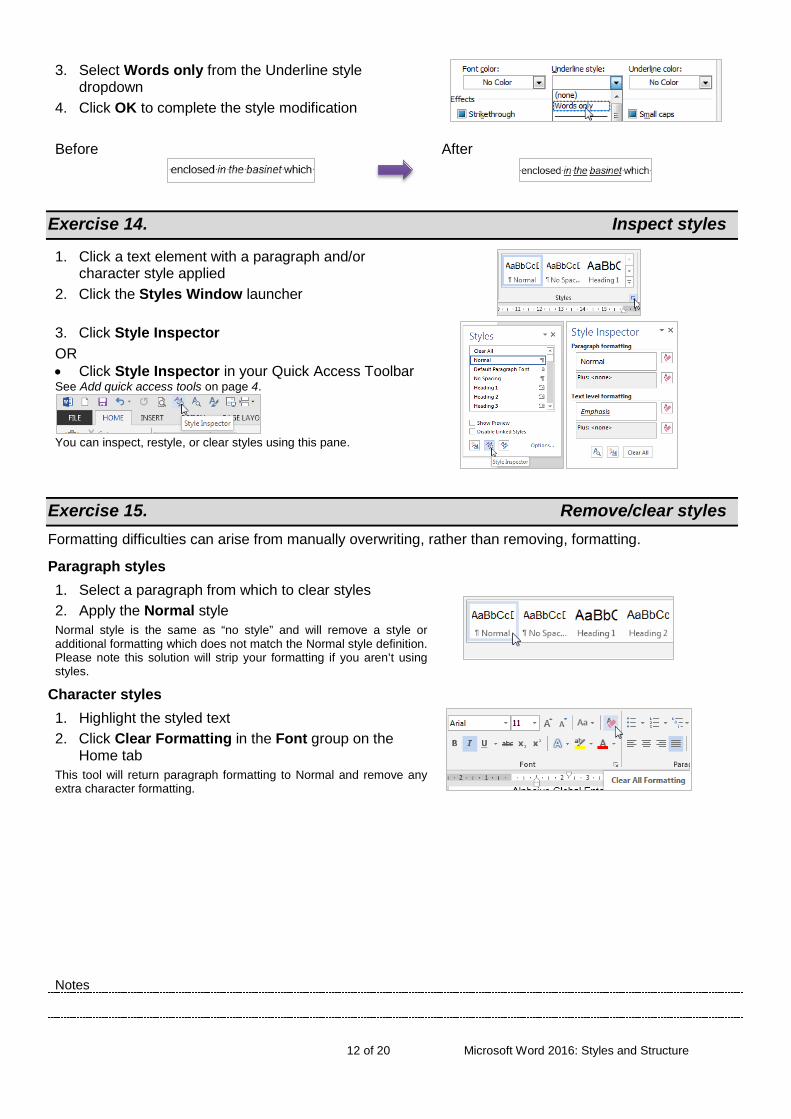
3. Select Words only from the Underline style dropdown
4. Click OK to complete the style modification
Before After
Exercise 14. Inspect styles
1. Click a text element with a paragraph and/or character style applied
2. Click the Styles Window launcher 3. Click Style Inspector OR • Click Style Inspector in your Quick Access Toolbar See Add quick access tools on page 4.
You can inspect, restyle, or clear styles using this pane.
Exercise 15. Remove/clear styles Formatting difficulties can arise from manually overwriting, rather than removing, formatting.
Paragraph styles 1. Select a paragraph from which to clear styles 2. Apply the Normal style Normal style is the same as “no style” and will remove a style or additional formatting which does not match the Normal style definition. Please note this solution will strip your formatting if you aren’t using styles.
Character styles 1. Highlight the styled text 2. Click Clear Formatting in the Font group on the
Home tab This tool will return paragraph formatting to Normal and remove any extra character formatting.
Notes
13 of 20 Microsoft Word 2016: Styles and Structure
New styles
Exercise 16. Create a style
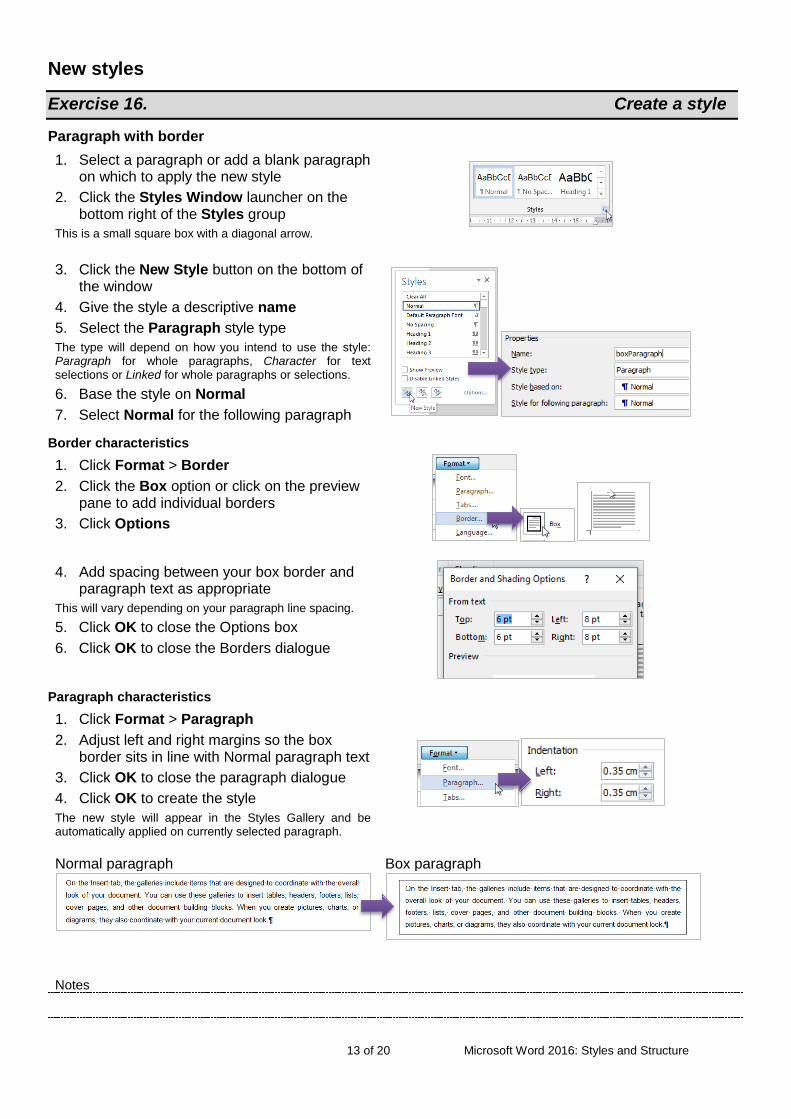
Paragraph with border 1. Select a paragraph or add a blank paragraph
on which to apply the new style 2. Click the Styles Window launcher on the
bottom right of the Styles group This is a small square box with a diagonal arrow.
3. Click the New Style button on the bottom of
the window 4. Give the style a descriptive name 5. Select the Paragraph style type The type will depend on how you intend to use the style: Paragraph for whole paragraphs, Character for text selections or Linked for whole paragraphs or selections. 6. Base the style on Normal 7. Select Normal for the following paragraph
Border characteristics 1. Click Format > Border 2. Click the Box option or click on the preview
pane to add individual borders 3. Click Options
4. Add spacing between your box border and
paragraph text as appropriate This will vary depending on your paragraph line spacing. 5. Click OK to close the Options box 6. Click OK to close the Borders dialogue
Paragraph characteristics 1. Click Format > Paragraph 2. Adjust left and right margins so the box
border sits in line with Normal paragraph text 3. Click OK to close the paragraph dialogue 4. Click OK to create the style The new style will appear in the Styles Gallery and be automatically applied on currently selected paragraph.
Normal paragraph Box paragraph
Notes
14 of 20 Microsoft Word 2016: Styles and Structure
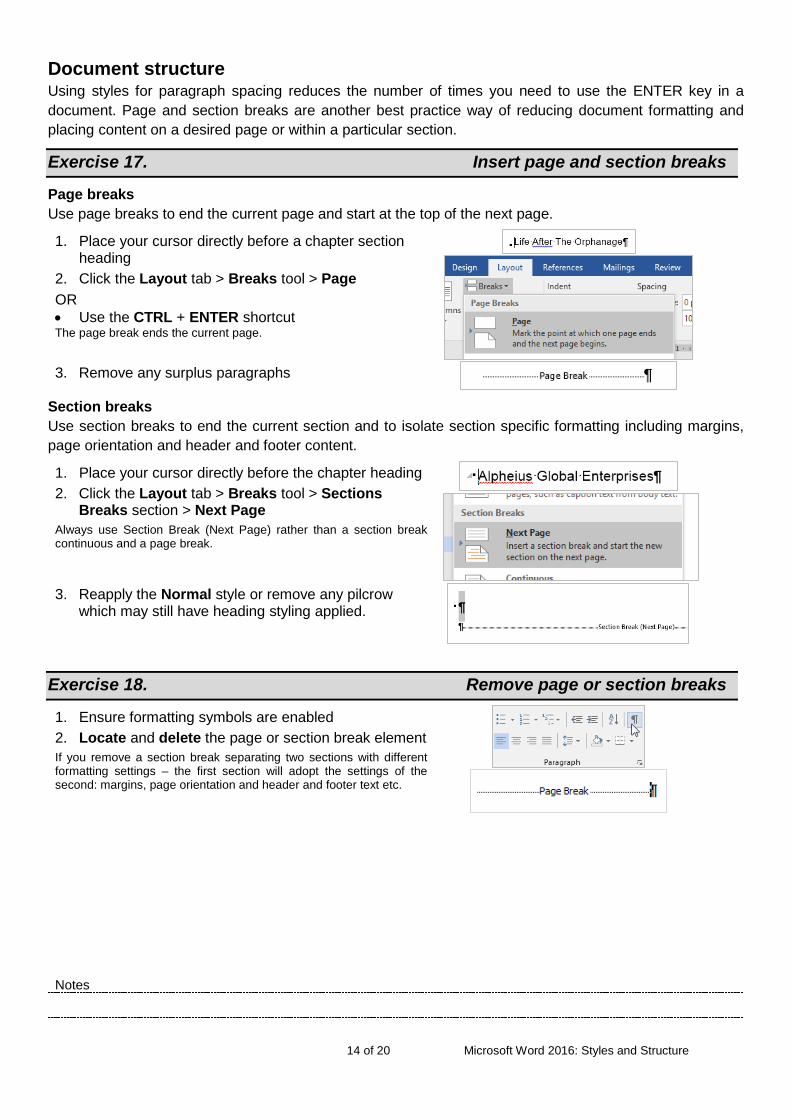
Document structure Using styles for paragraph spacing reduces the number of times you need to use the ENTER key in a document. Page and section breaks are another best practice way of reducing document formatting and placing content on a desired page or within a particular section.
Exercise 17. Insert page and section breaks
Page breaks Use page breaks to end the current page and start at the top of the next page.
1. Place your cursor directly before a chapter section heading
2. Click the Layout tab > Breaks tool > Page OR • Use the CTRL + ENTER shortcut The page break ends the current page.
3. Remove any surplus paragraphs
Section breaks Use section breaks to end the current section and to isolate section specific formatting including margins, page orientation and header and footer content.
1. Place your cursor directly before the chapter heading 2. Click the Layout tab > Breaks tool > Sections
Breaks section > Next Page Always use Section Break (Next Page) rather than a section break continuous and a page break.
3. Reapply the Normal style or remove any pilcrow
which may still have heading styling applied.
Exercise 18. Remove page or section breaks
1. Ensure formatting symbols are enabled 2. Locate and delete the page or section break element If you remove a section break separating two sections with different formatting settings – the first section will adopt the settings of the second: margins, page orientation and header and footer text etc.
Notes
15 of 20 Microsoft Word 2016: Styles and Structure
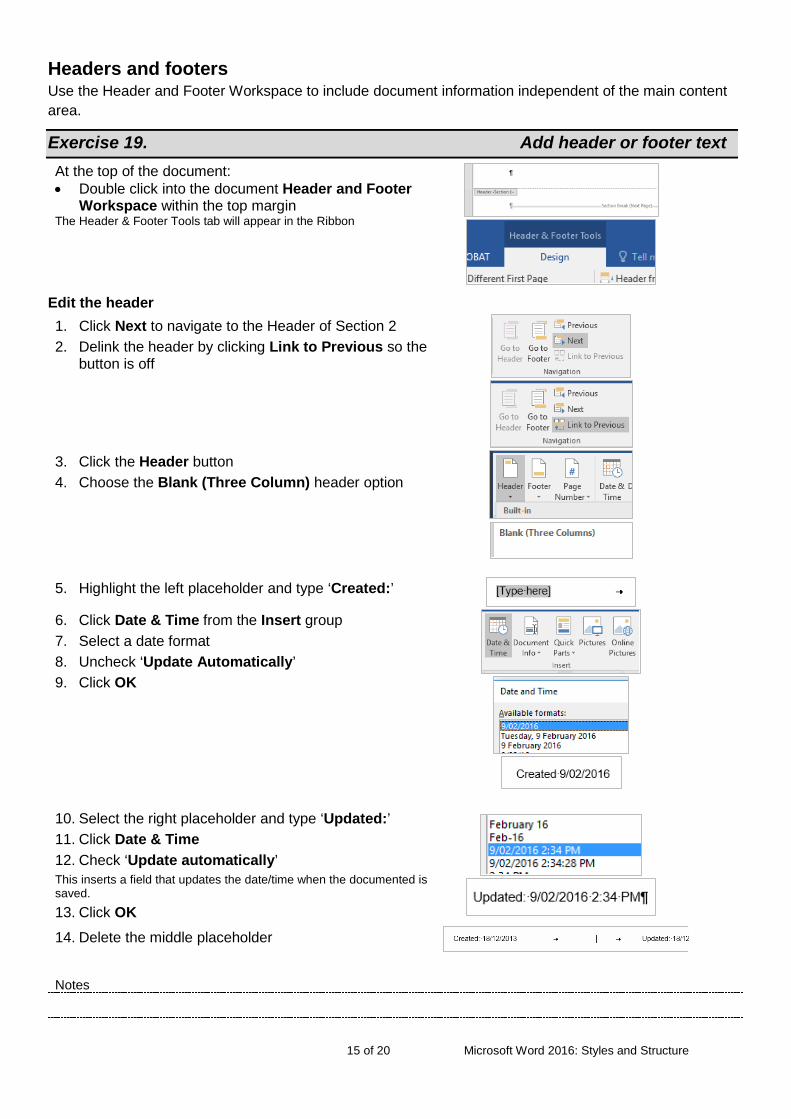
Headers and footers Use the Header and Footer Workspace to include document information independent of the main content area.
Exercise 19. Add header or footer text At the top of the document: • Double click into the document Header and Footer
Workspace within the top margin The Header & Footer Tools tab will appear in the Ribbon
Edit the header 1. Click Next to navigate to the Header of Section 2 2. Delink the header by clicking Link to Previous so the
button is off
3. Click the Header button 4. Choose the Blank (Three Column) header option
5. Highlight the left placeholder and type ‘Created:’
6. Click Date & Time from the Insert group 7. Select a date format 8. Uncheck ‘Update Automatically’ 9. Click OK
10. Select the right placeholder and type ‘Updated:’ 11. Click Date & Time 12. Check ‘Update automatically’ This inserts a field that updates the date/time when the documented is saved. 13. Click OK
14. Delete the middle placeholder

Notes
16 of 20 Microsoft Word 2016: Styles and Structure
Exercise 20. Add page numbers Within the Header and Footer Workspace: 1. Click Go to Footer 2. Delink the footer by clicking Link to Previous so the
button is off
3. Press the TAB key twice 4. Click Page Number > Current Position > Plain
Number Using ‘Current Position’ retains any current Header or Footer text. The other options (Top/Bottom) will overwrite any current formatting – even if it looks like parts of the building block are blank.
5. Click Page Number > Format Page Numbers… 6. Click the Start at: button and ensure the count is 1 7. Click OK
Notes
17 of 20 Microsoft Word 2016: Styles and Structure
Keyboard Shortcuts Working with Office Applications
Display and use windows To do this Press
Switch to the next window. ALT+TAB
Switch to the previous window. ALT+SHIFT+TAB
Close the active window. CTRL+W or CTRL+F4
Restore the size of the active window after you maximize it. ALT+F5
Move to a task pane from another pane in the program window F6
Switch to the previous window. CTRL+SHIFT+F6
Maximize or restore a selected window. CTRL+F10
Copy a picture of the screen to the Clipboard. PRINT SCREEN
Copy a picture of the selected window to the Clipboard. ALT+PRINT SCREEN
Undo and redo actions To do this Press
Cancel an action. ESC
Undo an action. CTRL+Z
Redo or repeat an action. CTRL+Y
Access and use task panes and galleries To do this Press
Move to a task pane from another pane in the program window. F6
Display the full set of commands on the task pane menu. CTRL+SPACEBAR
Perform the action assigned to the selected button. SPACEBAR or ENTER
Open a drop-down menu for the selected gallery item. SHIFT+F10
Select the first or last item in a gallery. HOME or END
Scroll up or down in the selected gallery list. PAGE UP or PAGE DOWN
Access and use smart tags To do this Press
Display the shortcut menu for the selected item. SHIFT+F10
Display the menu or message for a smart tag. If more than one smart tag is present, switch to the next smart tag and display its menu or message.
ALT+SHIFT+F10
Select the next item on a smart tag menu. DOWN ARROW
Select the previous item on a smart tag menu. UP ARROW
Perform the action for the selected item on a smart tag menu. ENTER
Close the smart tag menu or message. ESC
Notes
18 of 20 Microsoft Word 2016: Styles and Structure
Working with documents and web pages Create, view, and save documents
To do this Press Create a new document of the same type as the current or most recent document. CTRL+N
Open a document. CTRL+O
Close a document. CTRL+W
Split the document window. ALT+CTRL+S
Remove the document window split. ALT+SHIFT+C
Save a document. CTRL+S
Switch to another view To do this Press
Switch to Print Layout view. ALT+CTRL+P
Switch to Outline view. ALT+CTRL+O
Switch to Draft view. ALT+CTRL+N
Print and preview documents To do this Press
Print a document. CTRL+P
Switch in or out of print preview. ALT+CTRL+I
Move around the preview page when zoomed in. Arrow keys
Move by one preview page when zoomed out. PAGE UP or PAGE DOWN
Move to the first preview page when zoomed out. CTRL+HOME
Move to the last preview page when zoomed out. CTRL+END
Full Screen Reading view To do this Press
Go to beginning of document. HOME
Go to end of document. END
Go to page n. n, ENTER Exit reading layout view. ESC
Work with Web pages To do this Press
Insert a hyperlink. CTRL+K
Go back one page. ALT+LEFT ARROW
Go forward one page. ALT+RIGHT ARROW
Refresh. F9
Notes
19 of 20 Microsoft Word 2016: Styles and Structure
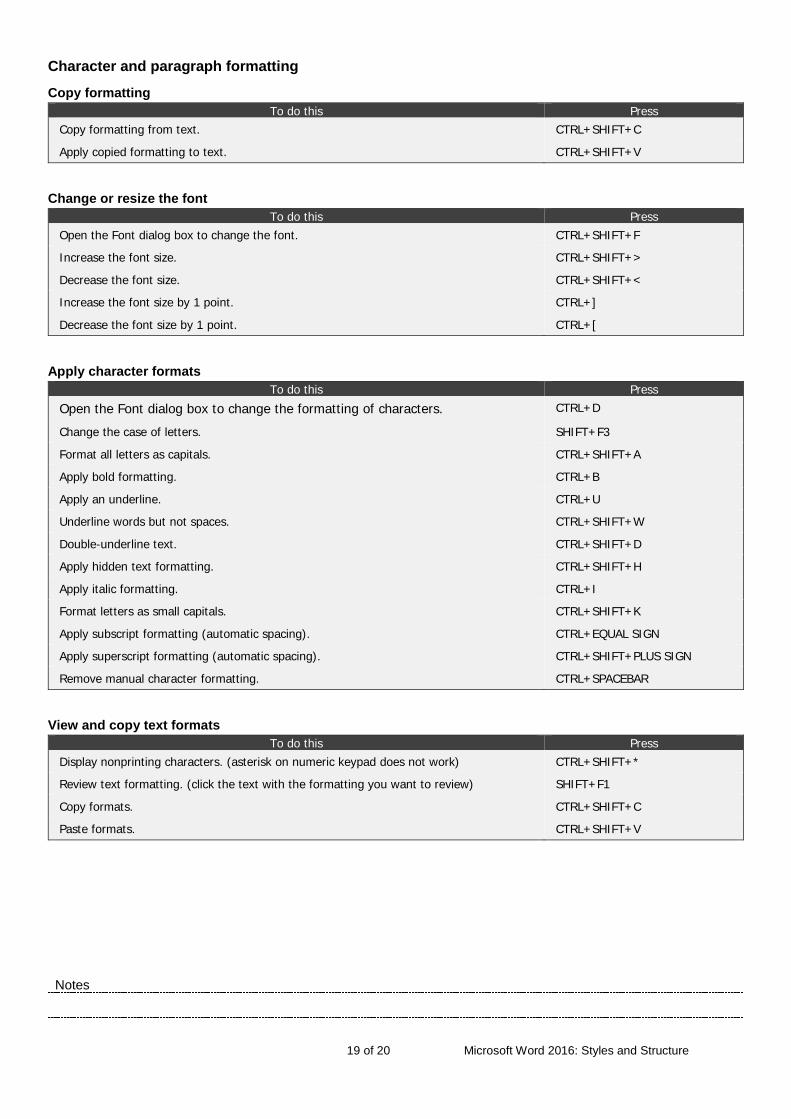
Character and paragraph formatting Copy formatting
To do this Press Copy formatting from text. CTRL+SHIFT+C
Apply copied formatting to text. CTRL+SHIFT+V
Change or resize the font To do this Press
Open the Font dialog box to change the font. CTRL+SHIFT+F
Increase the font size. CTRL+SHIFT+>
Decrease the font size. CTRL+SHIFT+<
Increase the font size by 1 point. CTRL+]
Decrease the font size by 1 point. CTRL+[
Apply character formats To do this Press
Open the Font dialog box to change the formatting of characters. CTRL+D
Change the case of letters. SHIFT+F3
Format all letters as capitals. CTRL+SHIFT+A
Apply bold formatting. CTRL+B
Apply an underline. CTRL+U
Underline words but not spaces. CTRL+SHIFT+W
Double-underline text. CTRL+SHIFT+D
Apply hidden text formatting. CTRL+SHIFT+H
Apply italic formatting. CTRL+I
Format letters as small capitals. CTRL+SHIFT+K
Apply subscript formatting (automatic spacing). CTRL+EQUAL SIGN
Apply superscript formatting (automatic spacing). CTRL+SHIFT+PLUS SIGN
Remove manual character formatting. CTRL+SPACEBAR
View and copy text formats To do this Press
Display nonprinting characters. (asterisk on numeric keypad does not work) CTRL+SHIFT+*
Review text formatting. (click the text with the formatting you want to review) SHIFT+F1
Copy formats. CTRL+SHIFT+C
Paste formats. CTRL+SHIFT+V
Notes
20 of 20 Microsoft Word 2016: Styles and Structure
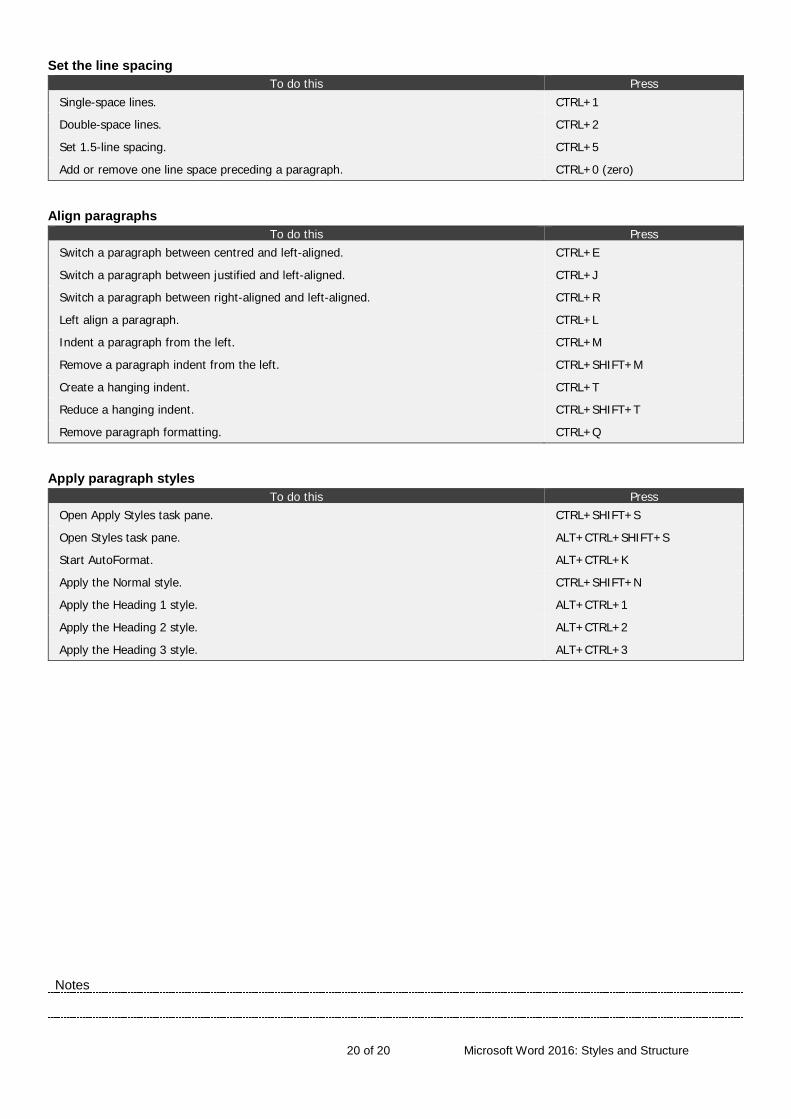
Set the line spacing To do this Press
Single-space lines. CTRL+1
Double-space lines. CTRL+2
Set 1.5-line spacing. CTRL+5
Add or remove one line space preceding a paragraph. CTRL+0 (zero)
Align paragraphs To do this Press
Switch a paragraph between centred and left-aligned. CTRL+E
Switch a paragraph between justified and left-aligned. CTRL+J
Switch a paragraph between right-aligned and left-aligned. CTRL+R
Left align a paragraph. CTRL+L
Indent a paragraph from the left. CTRL+M
Remove a paragraph indent from the left. CTRL+SHIFT+M
Create a hanging indent. CTRL+T
Reduce a hanging indent. CTRL+SHIFT+T
Remove paragraph formatting. CTRL+Q
Apply paragraph styles To do this Press
Open Apply Styles task pane. CTRL+SHIFT+S
Open Styles task pane. ALT+CTRL+SHIFT+S
Start AutoFormat. ALT+CTRL+K
Apply the Normal style. CTRL+SHIFT+N
Apply the Heading 1 style. ALT+CTRL+1
Apply the Heading 2 style. ALT+CTRL+2
Apply the Heading 3 style. ALT+CTRL+3