word skills for students writing theses
TRANSCRIPT
Word Skills for
Students Writing
Theses
Prepared for The Commons
by Rick Kelly
Fall 2016

i
Contents
1. Formatting the Document .................................................................................................................... 1 2. Using Styles and Headings .................................................................................................................... 3
2.1. Styles ............................................................................................................................................. 3 2.2. Updating Styles ............................................................................................................................. 3 2.3. Using Styles ................................................................................................................................... 5 2.4. Headings ........................................................................................................................................ 5 2.5. Automatic Table of Contents ........................................................................................................ 7
3. Formatting a Paragraph ........................................................................................................................ 9 3.1. Font Options ................................................................................................................................. 9 3.2. Paragraph Options ...................................................................................................................... 10
4. Breaks .................................................................................................................................................. 13 4.1. Page Breaks ................................................................................................................................. 13 4.2. Section Breaks ............................................................................................................................. 13 4.3. Columns ...................................................................................................................................... 15
5. Headers, Footers, and Page numbers ................................................................................................. 17 5.1. Header & Footer Tools ................................................................................................................ 17 5.2. Page Numbers ............................................................................................................................. 18 5.3. Page Numbers for a MUN Thesis ................................................................................................ 20
6. Positioning Images, Charts, and Shapes ............................................................................................. 21 7. Captions & Automatic Tables of Figures ............................................................................................. 23
7.1. Multilevel Lists ............................................................................................................................ 23 7.2. Captions ...................................................................................................................................... 25 7.3. Tables of Figures ......................................................................................................................... 28
8. Track Changes & Comments ............................................................................................................... 30 9. Endnotes & Footnotes ........................................................................................................................ 32 10. Useful tools ..................................................................................................................................... 34
10.1. Show/Hide ............................................................................................................................... 34 10.2. Cut, Copy, Paste, and the Clipboard ....................................................................................... 35 10.3. Format Painter ........................................................................................................................ 36 10.4. Tab stops ................................................................................................................................. 37
11. Saving to PDF .................................................................................................................................. 40
Note: throughout this document “click” or “clicking” refers to a LEFT mouse click. “Right-click” refers to a RIGHT mouse click.
This guide is written for Word for Windows using versions ranging from 2010 – 2016. Some screenshots may show buttons in a different place or with slightly different names from your copy of Word, but most features are largely unchanged between these versions of Word on Windows.
If you are using a Mac, in some cases Word functions differently than stated here, and many tools and features are located in completely different areas of the program.

1
1. Formatting the Document
There are several options for setting the look of an entire document in the “Page Layout” tab, under the “Page Setup” section.
To set the margins of your thesis, use the “Custom Margins…” option and set the margins according to MUN’s guidelines:
A thesis at MUN must have margins of at least 3cm on the top and bottom, exactly 2.5cm on the right, and 3.8cm on the left (the left margin is lager for binding).

2
The MUN guidelines also specify portrait format (orientation) for the main text, but do not specify a page size for a thesis.
Note that the page size used in Canada for a standard document is “Letter”, not A4. They are not the same size of paper.

3
2. Using Styles and Headings
You need to use Word’s Styles feature to have an automatic table of contents and automatic chapter numbering of figure captions. Headings are also easy to work with and make navigation of your document easier.
2.1. Styles
Look for the style section in the Home tab:
In the above image, the highlighting around the “Normal” style means that the cursor is currently on a “Normal” paragraph in the document text. The sample text (AaBb…) in each style shows what text of that style looks like.
2.2. Updating Styles
There are two ways to change what a style (and all paragraphs associated with that style) looks like. You can right click on a style and click “modify”:
That opens another window where you can make many adjustments to a style’s appearance:

4
[Click the “Format” button for many more options.]
You can also change a style’s appearance by choosing a paragraph in your document, modifying it to have the properties you want, and then updating the style to match the paragraph. With your cursor on the desired paragraph, right click on a style and choose “Update [Style-name] to Match Selection”:

5
2.3. Using Styles
Every paragraph has some style attached to it. If you change the styling of your text using the normal font tools (changing the font size, changing the colour, etc.) or paragraph tools (justification, bullets, line spacing, paragraph spacing, etc.), your paragraph may not match the style it’s associated with. However, if you update a style that’s in use in your document, all paragraphs of that style will be updated to match it.
This can cause problems. For example, you could occasionally alter the formatting of a paragraph… say making it all italics, or bold, etc. but leave it as a “Normal” paragraph. Later on, if you decide that you want to update all your normal paragraphs to have a different font, font size, etc. you might also reset all the paragraphs you had changed to the new “Normal” styling, undoing your custom styling work.
Set the styles you’ll be using early and use them so that your document is formatted properly right from the beginning.
Set a paragraph’s style by placing your text cursor on a paragraph and then clicking on a style in the style section of the Home Tab. When you hover the mouse cursor over a style, your selected paragraph will change to look like that style, as a preview.
To view more styles, click on the “More” button in the bottom right corner of the styles box. After clicking “more” you can also find options for saving a new custom style.
Word comes with a number of built-in styles that can be modified to suit your needs.
2.4. Headings
The styles “Heading 1”, “Heading 2”, etc. are meant for headings in your document and are used to generate automatic tables of contents.

6
Headings are used to organize your document. Each level of a heading should represent another level of organization underneath the higher ones. For example, a common way to organize a thesis or paper is to have each chapter title set to Heading 1, and then subsections within a chapter are Heading 2, and possibly sub-sub sections set to Heading 3, and so on.
Headings allow you to easily move through your document and look at its structure using the Navigation Pane, which can be enabled from the View tab.
A common mistake is to press return/enter at the beginning of a heading to get new lines, which Word interprets as adding new paragraphs of the heading style. These can show up as blank lines in your table of contents. The Navigation pane makes it easy to identify these problem areas.
You can use the Show/Hide tool to confirm that your blank lines are the wrong type, and then convert them to “Normal” style.
NOTE: With a brand new document, you will only see Headings 1-3 in the list of available styles. Once you use a Heading 3 somewhere in your document, Heading 4 will appear in the list.

7
2.5. Automatic Table of Contents
Once you have some of your headings in place, you can create an automatic table of contents by clicking on Table of Contents in the References tab. Place the cursor wherever in the document you would like the table of contents to appear before clicking on the button.
You can use one of the two built-in automatic table styles (the only difference between them is their titles) or choose “Insert Table of Contents…” to make adjustments to the style and contents of the table. Manual Table just creates a template to fill out with any content you want, and would usually only be used if you needed to create a table of contents for a pre-existing document that wasn’t in Word format.
The built-in automatic tables are fine for most uses. They display up to Heading 3. If you need to show more than 3 levels of headings in the table of contents, you need to use “Insert Table of Contents…”.

8
The Insert menu allows you to change the number of levels to display with Show levels. The Tab leader option affects the character used to connect headings to page numbers. In “Options…” you can add other styles to the table of contents, rather than just using the heading styles. With “Modify…” you can set the style for each individual level of the TOC, using all the options that exist for modifying styles.
A table of contents can be updated by right clicking on it and selecting Update Field, or by Clicking on Update Table in the References tab. Depending on what has changed in your document Word may offer just to update the page numbers, or to update the entire table. Updating the entire table means adding new headings that have been added to the document and updating the names of any headings whose content has changed.
It is possible to edit the text in a table of contents, if for some reason you want the headings to be a bit shorter or longer than in your document body, for example, or if there’s something you want to omit from the table of contents. If you do edit the table of contents, be careful to only update page numbers afterwards. If you “Update entire fields” then the changes you made will be lost.
Sometimes it is useful to break a heading across two lines but still have it as one item in the table of contents. This can be achieved by using a line break to break the heading across the lines instead of a paragraph break. A line break is added by holding the shift key while pressing Enter, whereas a paragraph break is what you get when you normally press the Enter key.

9
3. Formatting a Paragraph
The text of an individual paragraph can be formatted using the Font and Paragraph options on the Home tab, as well as the additional Paragraph options on the Page Layout tab:
It is a very good idea to decide on the settings you need for the main text of your document and apply them to the Normal style before you start writing. You can also specify the styles of other sections of text according to the rules of your style guide (e.g. APA, MLA, etc.). For instance, long quotations are often indented and/or italicized. Those settings can be saved to a custom style or the built-in “Quote” style in Word.
3.1. Font Options
Font options that you will likely use are the font itself (set to Calibri in the example above) and font size. MUN’s thesis guidelines say “Times New Roman or similar font of at least size 12 is recommended for text. Smaller fonts may be used for footnotes, graphs, etc. but must be sufficiently clear to permit microfilming.”
Additional font options are accessible by clicking on the arrow in the lower-right corner of the font option area:

10
3.2. Paragraph Options
A common task in the paragraph settings is to set the justification of your paragraphs. “Align Text Left” or “Justify” are common options.

11
The indent buttons on the Home tab will increase or decrease the left-indentation of a paragraph by a certain amount (usually 1.27 cm), while the indent controls on the Page Layout tab allow you to specify the exact indentation (from the left and right sides). Those indents can even be negative, causing your paragraph to go outside the bounds of the page margins.
People often have confusion about the difference between line spacing and paragraph spacing. Line spacing is the space between lines of a paragraph. For a MUN thesis normal paragraphs should be double (or 2.0) spaced, while footnotes and lengthy quotations should be single spaced.
Paragraph spacing is the space between paragraphs, which you can control independently for the space before and after a paragraph. In the image above the paragraph has a 12pt space before and after it. If all paragraphs have the same spacing, it isn’t necessary to specify both before and after spacing, since Word just uses the maximum of the two spacings for each between-paragraph space. i.e. in this case the space between two paragraphs with the same settings as pictured above would be 12 points, not 24.
For a thesis, the paragraph spacing for the main text is usually set to 0 for before and after the paragraph. The double line spacing ensures that paragraphs have a space between them. Headings, subheadings, and images or figures are allowed to have larger spacing around them, which can easily be achieved by adding paragraph spacing to those paragraphs (ideally to your Heading 1, Heading 2, etc. styles).
More paragraph options are accessible by clicking on the arrow in the lower-right corner of the paragraph options area:

12
Most of the options here are the same ones accessible from the top (Ribbon) of Word. The main option on this screen you will want to use is Special indentation. “First line” indentation indents only the first line of a paragraph (by an amount that you can specify), which is a common requirement by style guides for main text paragraphs. “Hanging” indentation indents every line except the first line, which is a common way to present references in a bibliography.
The second tab of the Paragraph options window also has some useful features:
Window/Orphan control makes paragraphs break before they have to, so that the last line is not left (orphaned) by itself at the top of the next page.
Keep with next specifies that a paragraph will stay on the same page as the next paragraph. This is useful if you want to make sure a paragraph explaining a figure or image is on the same page as the figure or image.
Keep lines together stops a paragraph from breaking across two pages, if possible.
Page break before causes a paragraph to start at the top of a page. This can be used on a heading style to make all instances of that heading appear at the top of a page (i.e. Heading 1, which would likely be chapter titles in a thesis).

13
4. Breaks
4.1. Page Breaks
Page breaks start the content following them on a new page. They should be used any time you know you have content that needs to be at the top of a page. They’re useful because they keep that content at the top of the page even when you add more text to the previous section.
If you don’t use page breaks and instead use many paragraph breaks (typing “Enter” multiple times) to position text on the next page, then when some text is added to the document later on it can push the extra empty lines into the new page.
To insert a page break, click on the Page Break button on the Insert tab, or click on Page in the Breaks dropdown menu in the Page Layout tab.
The page break is inserted wherever your curser is placed, and the new page will begin at that position.
4.2. Section Breaks
Section breaks divide the document into sections, which control the behaviour of several properties that would otherwise apply to the whole document. Different sections can have different orientations, different number of columns, different headers and footers (and thus different page number formats), and more.
To insert a section break, place your cursor where you want the break to be inserted, and click on Breaks in the Page Layout tab. The Breaks menu has four different kinds of section breaks that can be added.

14
A Next Page Section Break is mostly equivalent to using a Continuous Section Break along with a regular Page Break. Even and Odd Page section breaks won’t be covered in this document.
When you insert the section break you may not see its effects at all, and the section break itself is normally invisible. Depending on where it’s placed, it might result in a new blank line being added to the document. Use the Show/Hide tool to see the section break and make sure you don’t accidentally delete it when working around it.
Sections are numbered. To see which section you are working in, and to easily differentiate between sections, go to the Header/Footer area.
Note, however, that the Section number displayed in the Header/Footer section is the section at the beginning of the given page. For example, if page 3 starts on section 1 and there is a section break on page 3, then page 4 will display section 2 in the header/footer area, regardless of whether the section break is a continuous or next page section break. If there are two section breaks on page 3, then the header/footer area of page 4 will show section 3.

15
One use of section breaks is to change the orientation of pages for only one section of the document. To do so you need to add in at least two section breaks (unless you want to change orientation only at the beginning or end of the document). Then you simply place the cursor (click somewhere) on a page within the section you want to convert, and change the orientation using Orientation in the Page Layout tab. Only the current section will change orientation. This is useful if you have a table that would be better presented in landscape than portrait mode.
The section in the middle could of course be more than one page if desired.
4.3. Columns
Text in Word can be arranged in multiple columns, like a newspaper or magazine article. Papers written to the IEEE standard have two columns throughout the entire document. Sometimes it is useful to have parts of a document with multiple columns within a document that is mostly one column.
To change the number of columns, use the Column drop down menu in the Page Layout tab.

16
The options are straightforward, and More Columns gives you control over the spacing between columns.
Using section breaks, you can have a part of one page with multiple columns and keep the rest of the document single columned. The process is the same as for the orientation example above, but you should use continuous section breaks if you don’t want a full page section with a different number of columns.
In the following example, using the Show/Hide tool to illustrate the section breaks, a small section of text is converted to two columns using sections.
It’s also possible to control where the text moves to the next column using a Column Break (found in the Breaks drop-down menu). Simply place it like any other break at the point where you want the text the start on the next column.

17
5. Headers, Footers, and Page numbers
5.1. Header & Footer Tools
Any content that needs to be on every page (or a section of pages) in your document is usually placed in the header or footer areas. Those are strips at the top and bottom, respectively, of the page.
You can edit the Header/Footer areas by double clicking on them (Word doesn’t give you any indication that you have the mouse in the right place – if you work with headers and footers often you’ll get used to finding the right place). You can then double click on the main area of any page to return to the normal view. You can also access the header/footer by going to the Insert tab, clicking on either Header or Footer, and then the Edit option.
Headers and footers can contain most of the same types of content you would normally put in the main part of your document, but they normally contain some information about the document that you want on every page, page numbers, the date, etc.
When you are editing the header and footer, a new tab called Header and Footer Tools appears in Word. In it are the same Header, Footer, and Page Number buttons from the Insert tab, as well as some options for the Header/Footer. The Header and Footer buttons have Header and Footer templates you can use. Page numbers will be covered in the next section.

18
The Position section allows you to make the header or footer bigger or smaller, but normally doesn’t need to be modified at all. The interesting options here are Different First Page, Different Odd & Even Pages, and Link to Previous.
If section breaks are present in the document, then headers and footers can be different between sections. By default if you have a document with only one section and start adding section breaks, each new section will be “linked” to the previous one and will have the same headers/footers. When two adjacent sections have a linked header or footer, the Link to Previous button will be highlighted in gold when you look at the second section. To unlink two sections, click on the Link to Previous button while the cursor is in the second section. Unlinked sections are completely independent. Headers and Footers can be linked/unlinked independently of each other!
Without section breaks, the only differences you can have in headers/footers is through the two “Different…” options.
Different First Page applies to both the header and footer, but if a section has different first page enabled, the Link to Previous setting is independent for the first page and the main pages of that section. So if your previous section has all pages the same (Different First Page is turned off), and in the current section Different First Page is turned on and you make the first page Link to Previous, it will have a blank header because there is no first-page header in the previous section.
Different Odd & Even Pages is a document-wide setting that makes each header and footer specified as either odd or even. If Different First Page is also enabled for a particular section, you can see that all 3 header/footer types are clearly labeled in Word: First page header, even page header, odd page header. Even, Odd, and First Page headers/footers can each independently be linked/not-linked from section to section.
Deleting or adding section breaks sometimes causes unwanted header/footer linkage, so always check your headers and footers to make sure everything is linked/not linked as desired after adding or removing sections. If you have unlinked sections that you are going to link together, the first section header/footer will replace the second section.
5.2. Page Numbers
Page numbering is one of the most common things to place in the header or footer of a document. The format of a page number can change from section to section or in any independent header/footer (i.e. by using Different First Page).
Page numbers are added and formatted using the Page Numbers button in either the Insert or Header and Footer Tools tabs.
19
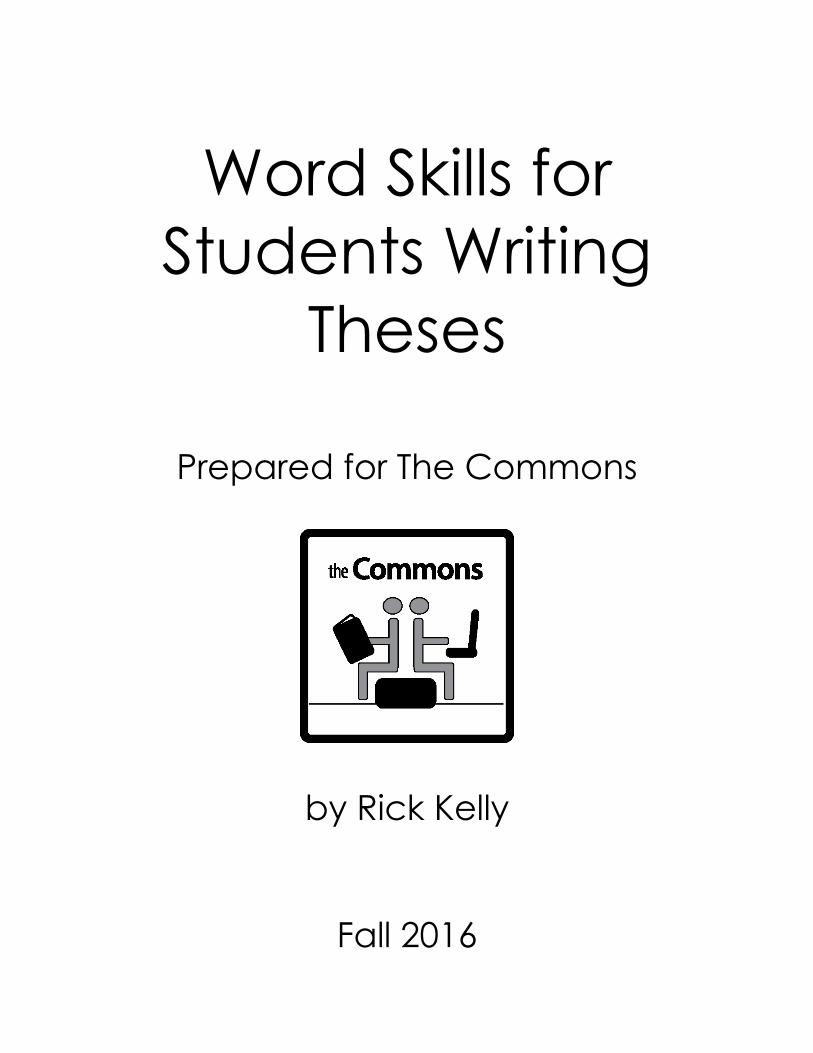
Page numbers can be created with one of the templates Word offers, which formats your header or footer in a certain way, plus adding a page number, or you can just select Current Position to place a plain number wherever your cursor is.
To change the format of existing page numbers, you can click on “Format Page Numbers…” in the Page Number menu pictured above, or click on an existing page number until it highlights the entire number, then right click and chose “Format Page Numbers…” from the menu.
Number format lets you change the characters that represent the numbers. Options include letters, Arabic numbers, and Roman numerals. These can vary between unlinked sections.

20
Chapter numbering is not often used for page numbers, and to use it you need your chapters to be automatically numbered. See the section on multilevel lists for more information.
The “Continue from previous section” and “Start at” options are two different ways to control where your page numbers in this section start. With the Continue option you can have page numbering continue unchanged through sections where the headers and footers are not linked. The “Start at” option is usually used to control whether your cover page is counted as page 1 or page 0, which would be used in cases where the header/footer is set to different first page and you don’t want a page number displayed on the cover page.
5.3. Page Numbers for a MUN Thesis
A thesis in traditional format should have no page number on the cover page, followed by Roman numerals starting at 2 (ii, iii, iv, etc.) on the subsequent pages (acknowledgements, table of contents, etc.), and finally Arabic numerals (1, 2, 3, etc.) on all pages including and following the first page of chapter 1.
To achieve this, you need a section break on the last page before chapter 1, so that chapter 1 starts in a new section. The section with chapter 1 in it should be unlinked form the previous section. The page numbers in chapter 1 and beyond should be formatted to Arabic numerals, and the numbering should “Start at” 1, rather than be “Continued” from the previous section.
You can use the same method to separate the cover page (which should have no page number) from the rest of the document. You could also use Different First Page to have no page number on the cover page, but Roman numerals on the rest of the first section. (Note that this is only possible to do if you are starting at page ‘ii’ on the first page after the cover page. If you start at page ‘i’ after the cover page, you can’t use “Different First Page” because the number counting starts from the beginning of the section, and the cover page would have to be page zero. Roman numeral page numbers can’t start from zero in Word.)
21
6. Positioning Images, Charts, and Shapes
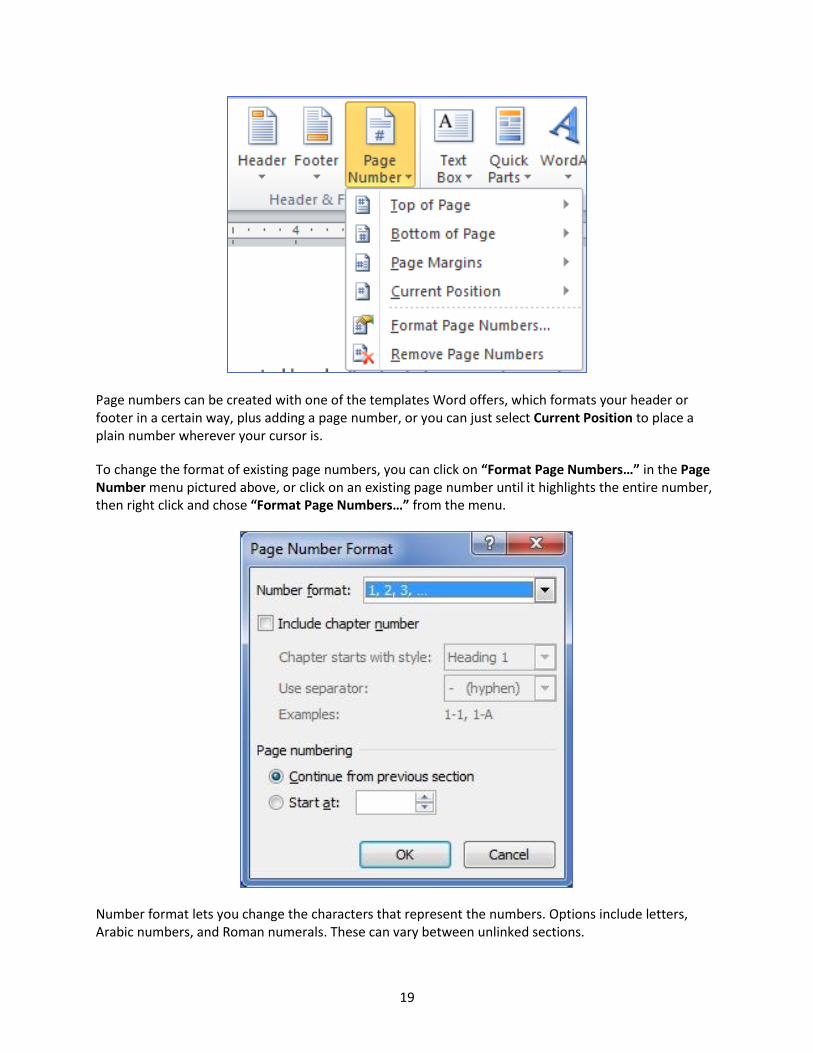
Anything you can insert in the Illustrations section of the Insert tab has a set of common controls for positioning, which will be covered in this section. This includes images, charts, shapes and smart art.
Inserting an image or shape, etc. is easy. Once you’ve placed an image, for example, in your document, click on the image to gain access to the Picture Tools Format tab. If you insert a shape, clicking on it will give you access to the Drawing Tools Format tab. Pictures, shapes, and smart art all give the same basic controls for positioning the object (image tab displayed):
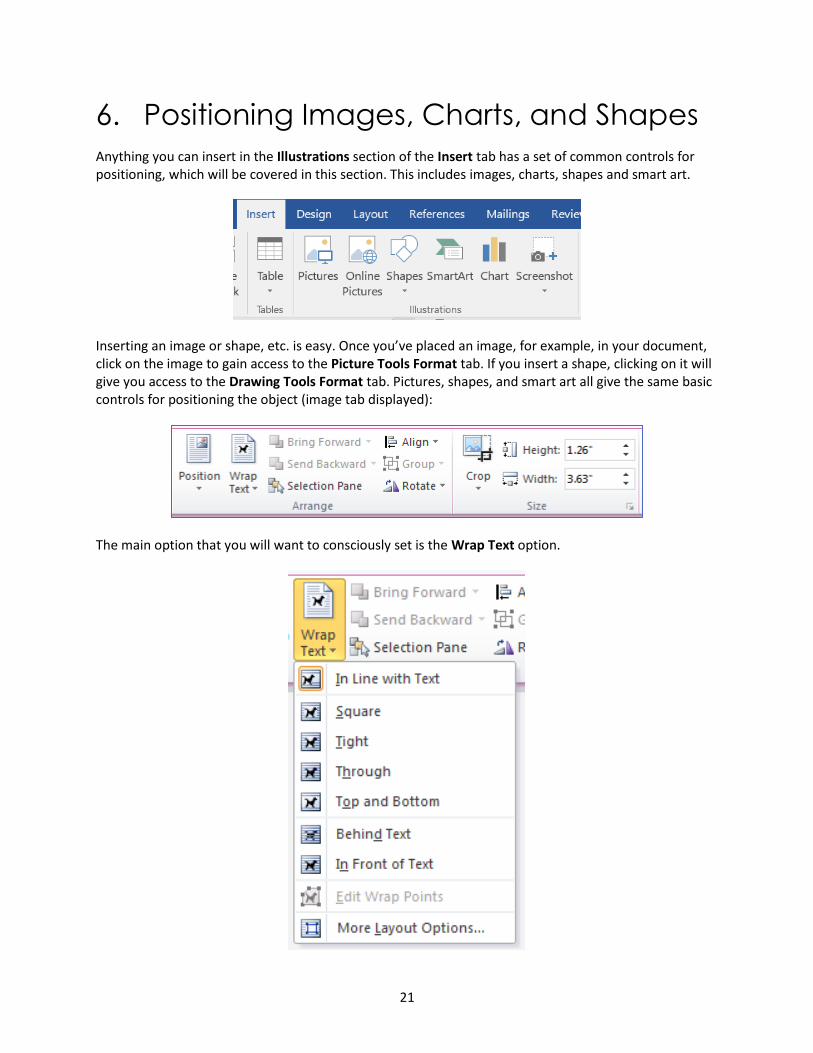
The main option that you will want to consciously set is the Wrap Text option.

22
Here the first option is actually to not wrap the text. Having an image “In Line with Text” makes it behave like any other character you type in a paragraph. If the image is small enough, it could share part of a line with some text. In Line with Text lets you control the position of an image using the Paragraph formatting available on the Home tab (e.g. to center an image). You can also use options like Keep with Next from the Paragraph options window to make sure that an image is always on the same page a title, caption, or other explanatory text. Another great advantage of In Line with Text is that images positioned in this way never “jump around” as more content is added to the document. They will always be in the same space relative to the flow of the text.
Square, Tight, and Top and Bottom allow you to place the image somewhere on a page and have the text wrap around it in some way. Square creates a box around the image where the text wraps around. Tight simply creates a tighter box around the image. Here is an example of text wrapping around an image with Square:
Top and Bottom forces text to go either above or below the image only.
With either of these three wrapping options, or when using Behind Text or In Front of Text, you have the option of placing the image anywhere on the page by clicking and dragging the image. You can also more explicitly place an image in certain positions by using the Position drop-down menu in the Format tab, or by choosing an alignment from the Align drop-down menu.
Neither Position nor Align are available when In Line with Text is selected. When using that option images and other objects must be moved by placing them somewhere in the flow of text (with cut and paste or by dragging and dropping with the mouse).
An issue you are likely to encounter if you are using one of the wrapping options is that images will move around in unpredictable ways as you add content to the document. If an image is positioned to be at the top of a particular page, and text is added on the previous page that bumps a paragraph into the page with the image, the image might jump to the next page, or the previous page. Be careful and know that you may have to reposition items such as images as you change other content.

23
7. Captions & Automatic Tables of Figures
7.1. Multilevel Lists
Multilevel lists are not required in order to have captions, but they allow you to have both automatically numbered headings and figure captions that are numbered using the chapter number. For example, with multilevel lists you can have figures numbered 1-1, 1-2, 2-1, 2-2, 2-3, etc. Without multilevel lists you can only have figures numbered like 1, 2, 3, etc.
Here is an example of what headings with a multilevel list can look like:
Other numbering formats (e.g. roman numerals, letters, etc.) are possible.
To make a multilevel list, click on Multilevel List in the Home tab, right next to the other list types, and
select Define New Multilevel List.
Chapter 1
1.1. Some heading level 2
Lorem ipsum dolor sit amet, consectetur ut labore et dolore magna aliqua.
1.2. Some other heading which is level 2
Duis aute irure dolor in reprehenderit in voluptate velit eu fugiat nulla pariatur.
1.2.1. Some smaller heading of the third level
Excepteur sint occaecat cupidatat non proident, deserunt mollit anim id est laborum.
1.2.2. Some other smaller heading level 3
Ut enim ad minim veniam, quis nostrud exercitation ullamco commodo consequat.
Chapter 2
etc.

24
Click on the More tab to get all the options. You can edit the list for every level all at once using this
menu. The list of levels on the left tells you which one you are working on.

25
“Enter formatting for number” is where you define what the numbering should look like. Here you can
add other characters that aren’t the number to your number formatting. e.g. 1., 1), a), a., (a), and
Chapter 1 are all possible formats for a first level. If this level is attached to the Heading 1 style, then
every Heading 1 will have the same formatting (but with a different number… i.e. Chapter 1, Chapter 2,
etc.)
“Number style for this level”, let’s you choose from numbers, roman numerals, letters, etc. The options
under “Position” allow you to change how the numbering looks in relation to the margin of the page
and the text in the rest of the heading.
In order to attach a level of numbering to a heading use the “Link level to style” option to select a
heading style. Other styles can be used as well.
Use “Include level number from” To have your sublevels use numbers from lower numbered levels.
Place your cursor in “enter formatting for number” where you want to include the lower numbered level
number, then pick the level from the drop-down list. It will place a sample number where your cursor is.
So if you want to have 1.1. for your second level, place the cursor before the “1.” you have originally,
then select the level to include from the dropdown box, and type another ‘.’. You can include multiple
lower-numbered levels in a given level, to have something like 1.1.1. for your third level, for example.
Select “OK” when you’re finished and the list should apply to all of the headings you selected. If you
want to change the multi-level list settings later, repeat the steps above. When you click on Define New
Multilevel List the settings for the current list will appear, and you can modify them rather than create
them again from scratch.
7.2. Captions
To add a caption, select the image/graph/table you want to caption and click on Insert Caption in the
References tab.
Word automatically places a label and number at the beginning of the caption in the “Caption” field.
The “Label” is the type of object you’re captioning (defaults to Figure), and you can create new labels
with the “New Label…” button. By default the caption numbering is sequential from the beginning of
the document, and independent for each type of label. So if you have Figure 1, Figure 2, etc. that
numbering system is separate from Table 1, Table 2, etc.

26
To name the caption, place text after the number in the “Caption” field. Usually, table captions are
placed above the table, and all other types of figures have their captions below, but you can choose
where the caption goes using the “Position” option.
The “Numbering…” menu allows you to choose the numbering style and whether you want single
numbers, or a two-part number (what we want), where the first part of the two-part number is tied to
the multilevel list numbering that a particular heading has. Turn on the two-part numbering by selecting
“Include chapter number”. The heading you choose (default “Heading 1”) must have a multilevel list
associated with it.
You can also choose the separator that goes between the ‘chapter’ number and the figure number.

27
Note: A multilevel list is the only way to have caption numbers that restart with every chapter. You can’t use section breaks or any other method to get them to restart numbering from 1 at any part of the document.
Once you create a caption, it will either be placed as text in the body of the document, with the
“Caption” style applied to it, or as text inside a text box. If the figure is formatted to be “In Line With
Text”, then the caption will be just a normal text on a new line beneath or above the figure. If the figure
is using any other Wrap Text option, such as Square or Top and Bottom, then the caption will be placed
inside a text box.

28
In the following two images, both figures are captioned, but the caption on the left is in a text box because the image is in the Top and Bottom format (the text box is visible because the cursor is placed inside it). The caption on the right is just text on its own line.
Caption numbering can be updated if the order of the captions changes. To update all caption numbers (and tables of contents) all at once:
Select all text in the document with ctrl-a
Press F9
Follow the prompt(s).
7.3. Tables of Figures
To make a table of figures/tables/etc., place your curser where you want the table to go, and navigate to the References tab and chose Insert Table of Figures from the Captions section.

29
Choose the type of table you want to make (in the “Caption Label” drop down box), and modify any paragraph formatting settings you want using the “Modify…” option. The options work just like those for Tables of Contents.
You can make a table for each kind of thing (different label) that you have captions for.

30
8. Track Changes & Comments
Track Changes saves a record of every change you make to a document, allowing other users, or yourself, see the edits that have been made and choose which ones to accept. The edits of multiple users can be tracked at the same time.
To turn on Track Changes, click on the Track Changes button in the Review tab.
While in this mode, every edit to content or formatting of the document is tracked. You can turn Track Changes off and on at any time to make changes that are untracked or tracked, respectively. Tracked changes will look like this, by default:
Changes to the text are shown with strikethrough and underline effects, while formatting changes are displayed in a new area on the right-hand side of the document.
Use the Previous and Next buttons in the Changes section of the Review tab to cycle through all the tracked changes in a document. You can “accept” or “reject” an individual change that your cursor is on by clicking the corresponding buttons in the Changes section. If you click on the small arrow beneath Accept or Reject, you have the option to accept or reject all changes in the document.

31
Comments can also be made on a selection of text by selecting the text and clicking on New Comment in the Review tab. Comments are also visible in the right-hand side area. In Word 2013 or newer, you can reply to comments with more comments.
You can cycle through all comments on a document using the Previous and Next buttons in the Comment section of the Review tab. Comments can be deleted using the Delete button in that same section, or by right-clicking on a comment.
Turn on the Reviewing Pane to see a list of all tracked changes. Click on an item in the Reviewing Pane to travel to that part of the document.
It is possible to see tracked changes when not currently tracking your changes, as well as to turn off the display of tracked changes while still tracking your current changes. In the Tracking section of the Review tab, the drop-down box will usually be set to “Final: Show Markup” by default. This means you are seeing the final version of the document, including all tracked changes, but with the deletions and insertions visible. Switching to “Original” or “Final” will display either the before-tracked-changes version of the document or the ‘after’ version. In “Original: Show Markup”, text changes will look the same as in “Final: Show Markup”, but formatting changes will not be shown.
The colours used to represent the changes made by different users, as well as which types of changes are tracked, can be modified in the menus accessible by clicking on the arrow beneath the Track Changes button.

32
9. Endnotes & Footnotes
Footnotes and endnotes can both be inserted using the buttons in the Footnotes section of the References tab. Endnotes generally appear at the end of the document and footnotes appear at the bottom of each page they’re used in. Once one is inserted in the text, the cursor jumps to the appropriate section so you can type the content of the note.
The interesting options for footnotes and endnotes are in the Footnote and Endnote dialog box, opened by clicking the small arrow in the corner of the Footnotes section.
The Convert option can be used to change endnotes into footnotes and vice versa.
Selecting Footnotes or Endnotes in the Location section affects the entire set of options, so you can format the numbers independently for each type of note. Select Apply to save any changes you make.

33
With the Location options, footnotes can be set to either the bottom of the page, or the bottom of the text (i.e. for pages where the text ends part-way down the page, the footnotes will be just below the text). Endnotes can be set to be at the end of the document, or at the end of each section. Putting them at the end of each section can be useful for some types of documents where you want each chapter to have its own endnotes. Remember that different sections are created using Section Breaks.
You might need to have endnotes that are at the end of the main text of the document (i.e. after the last chapter), but before the references/bibliography (and possibly appendices). To do that, use the “End of section” option for endnotes, and then place a section break between the last chapter and the references section. If you have any section breaks in your main text already, which you could be using for various reasons (e.g. changes in number of columns, changes in orientation, etc.), then you need to “suppress endnotes” for all the sections other than the last section in which you want the endnotes to appear. “Suppress endnotes” is found in the Page Layout tab, in the Page Setup section dialog box (click on the small arrow in the corner). Once the dialog box is open click on the Layout tab.
The Supress endnotes option will force the endnotes for a section into the next section. The option applies to the section your cursor is in when you access the Layout menu.

34
10. Useful tools
10.1. Show/Hide
Show/Hide is a feature that displays symbols representing all the normally hidden formatting of a Word document. You can find it in the Paragraph section of the Home tab:
This tool is very useful for finding the causes of formatting problems when you can’t see them.
Paragraphs of all types have a symbol that resembles a backwards P, the Pilcrow, following them. That represents the end of a paragraph. Every space is represented by a small dot about half-way up the height of the letters. These make the text look pretty messy while in this view.
Line breaks (produced by pressing shift-enter), have their own sign.
Tabs are represented by arrows, but note that indentation (through the paragraph formatting) is not. When you add a tab at the beginning of a paragraph Word usually automatically changes that into first-line indentation.
Page Breaks and all Section Breaks are also represented by a dotted line and the name of the type of break in the centre of the line. A break can share a line with the end of a paragraph (it will be at the right-hand side), or can be on its own line. If you want to fix a problem where the beginning of a chapter is jumping around, use the Show/Hide tool to check whether there is a page or section break, or just a bunch of new paragraphs to achieve a new page.
Because page or section breaks can be at the end of a paragraph, on the same line as the last line of the paragraph, they can sometimes be hard to find, even while using the show/hide tool (i.e. if the last line of the paragraph goes all the way to the margin).

35
10.2. Cut, Copy, Paste, and the Clipboard
Cutting, copying, and pasting are essential to working efficiently with your document. Copying and pasting means to copy some text, or any other element in your document (including images and tables) to another part of the document. If you cut instead of copy, the text moves to the new position, instead of being copied.
You can cut, copy and paste using the buttons in the “Clipboard” section of the Home tab, or by using keyboard shortcuts. In order to copy or cut you have to select some text. Select text by clicking and holding the left mouse button, or by holding down the shift key while single-clicking or using the arrow keys to move the cursor. Next press the button or use the shortcut for either copy or cut. Finally move the cursor to where you want the text to go, and paste.
The very convenient keyboard shortcuts for copying, cutting, and pasting are Ctrl-c, Ctrl-x, and Ctrl-v, respectively. That means to hold down the control key while tapping c, x, or v.
If pasting, you can choose some paste options based on what kind of content it is. After you paste, there will be a menu in the bottom right corner of the pasted material where you can choose paste options. For example, for text you can choose to use the paragraph and font formatting of the source of the text, or instead the destination to which you are pasting.
Normally paste only pastes the most recently copied item, but you can see a record of all the recently copied items and paste them using the Clipboard. Click on the small arrow in the corner of the Clipboard area on the Home tab to open the Clipboard pane.

36
Click on any item in the Clipboard to paste it in your document where your cursor is.
10.3. Format Painter
The Format Painter tool, located in the Clipboard section of the Home tab, works similarly to the copy and paste commands, except it copies formatting rather than content. Like copy and paste, it can be used by clicking on the button, or by using keyboard shortcuts.
By copying formatting, you can quickly format parts of your document that need specific formatting that isn’t used often enough to have its own Style (or formatting for a part of a paragraph rather than the entire paragraph).
To use the Format Painter, place the cursor on the text whose formatting you want to copy, then click on the Format Painter button, and then click on or highlight the text you want to copy formatting to. It will take on the properties (font style, font size, bold, paragraph settings, etc.) of the copied text. If you click on a paragraph it should format the entire paragraph, whereas if you highlight some text, it should format only the highlighted text (which could be part of a paragraph or multiple paragraphs).
Using the above method, you would have to click on the Format Painter tool each time you want to apply the same formatting to a new section. To go faster, you can double-click on the Format Painter

37
button and then continue clicking on new paragraphs or selections to continually paste the same formatting. Click on the Format Painter button again to stop.
Another way to quickly use this tool is by using keyboard shortcuts. Copy a format by placing your cursor on the text whose formatting you want to copy, and then press Ctrl-Shift-c to copy formatting, and ctrl-shift-v to paste formatting. That means to hold down Ctrl and Shift, and then tap c or v. You can use this method to paste the same formatting multiple times.
10.4. Tab stops
Tab stops are a handy way to position text on a line. They can allow you to format a form or other types of text where you want things to line up vertically on the page. They are used by default in Word document headers and footers. Tables could be used in some of these situations, but tab stops are often more convenient.
To work with tab stops, first make sure that the Ruler is turned on in the View tab.
The top ruler displays the margins and shows the width of the page in the units set in Word preferences. On the left-hand side of the ruler is a small symbol representing the currently selected type of tab stop. The one pictured above is a “left tab stop”. Tab stops determine the behaviour of text that is ‘tabbed’ in a line of text. If a left tab stop is placed somewhere on a line, then inserting a tab character once on that line will cause the next characters to be left-aligned at the position of the tab stop. Don’t worry, some real examples are coming! To insert tab stops, click on the tab stop selector repeatedly to cycle through the different types of tab stops until you find the one you want. Then click on the ruler in the position you would like the tab stop to be.

38
Available tab stops:
Left tab left aligns text
Center tab center aligns text
Right tab right aligns text
Decimal tab aligns numbers on the decimal point
Bar tab inserts a vertical bar on the line
First Line Indent changes the first line indent amount for a paragraph
Hanging Indent changes the hanging indent amount for a paragraph
In this document we will focus on the first three: left, center, and right. Once you have selected a type of tab stop, click on the ruler to insert the selected tab stop anywhere on the ruler. Multiple instances of the same type of tab stops can be on the same line, and different types can be on the same line. Here is an example of a ruler with multiple tab stops:
Here is an example of some text on a line with those same tab stops:
this is centered left-aligned right-aligned
And, finally, here is an image of the same line with Show/Hide enabled:
The tabs are visible as right-arrow symbols. Notice how the text is positioned relative to each tab stop.
By positioning a right tab at the right margin you can have text left aligned on the left hand side, then a tab character, and then some more text right-aligned at the right side of the page, which is a common application of tab stops (e.g. resume formatting).
Unfortunately, it’s impossible to directly place a tab stop at the margin by clicking on the ruler, since the mouse cursor turns to a double arrow indicating the ability to move the right indent marker when you hover it over the margin. To get a tab stop at the margin, create one somewhere else and then click, hold, and drag it over to the margin and release. You can move any tab stops around by clicking on them and dragging in the ruler. You can also double click on a tab stop to open a Tabs menu.

39
In the Tabs menu you can change the type of a tab stop by selecting it form the list and then selecting the desired Alignment. You can also set a Leader, which is a character that is repeated from the beginning of the tab character until the tab stop. You can also create new tabs with Set, or Clear (delete) a single tab or all tabs at once. This is the only way to remove tab stops.
Tab stops are independent by paragraph. Every paragraph can have a different set of tab stops. However, if you have tab stops set up on one paragraph, and then press ‘enter’ to move to the next paragraph, it will have copied the tab stops, just like for all other paragraph formatting.

40
11. Saving to PDF
Your thesis needs to be saved as a PDF/A in order to be submitted to the School of Graduate Studies at MUN. PDF/A is a kind of PDF file that is optimized for archiving, but the filename extension of a PDF/A is still .pdf or .PDF. To save your file as a PDF in Word, use the Save As option in the File tab/menu.
Choose PDF from the Save as Type dropdown menu.
Once PDF is selected as the file type, an “Options…” button appears. Open the Options menu and make sure the checkbox for: “ISO 19005-1 compliant (PDF/A)” is checked and select OK:

41
Before saving your file, click on the Tools button, and select Save options. Check the box that says “Embed fonts in the file” and select OK. Now you can save your document as a PDF/A.