x.509 certi cates: a tutorial for ios · 2015-09-30 · jorn lapon msec x.509 tutorial 1...
TRANSCRIPT

SecureApps
X.509 Certificates:
A Tutorial for iOS
Jorn Lapon
MSEC Research Group
Dept. of Computer Science
KU Leuven, TCG

Jorn Lapon MSEC X.509 Tutorial
Contents
1 Introduction 4
2 Theory on Public Key Infrastructures 5
2.1 Building-Blocks . . . . . . . . . . . . . . . . . . . . . . . . . . . . . . . . . . . . . . . . . . . . 5
2.1.1 Symmetric-Key Cryptography . . . . . . . . . . . . . . . . . . . . . . . . . . . . . . . . 5
2.1.2 Public-Key Cryptography . . . . . . . . . . . . . . . . . . . . . . . . . . . . . . . . . . 5
2.2 The PKI ecoSystem . . . . . . . . . . . . . . . . . . . . . . . . . . . . . . . . . . . . . . . . . 7
2.2.1 Parties . . . . . . . . . . . . . . . . . . . . . . . . . . . . . . . . . . . . . . . . . . . . . 7
2.2.2 Actions . . . . . . . . . . . . . . . . . . . . . . . . . . . . . . . . . . . . . . . . . . . . 7
2.3 Public-Key Certificates . . . . . . . . . . . . . . . . . . . . . . . . . . . . . . . . . . . . . . . . 8
2.3.1 General . . . . . . . . . . . . . . . . . . . . . . . . . . . . . . . . . . . . . . . . . . . . 8
2.3.2 Creating Certificates . . . . . . . . . . . . . . . . . . . . . . . . . . . . . . . . . . . . . 12
2.3.3 Certificate Revocation . . . . . . . . . . . . . . . . . . . . . . . . . . . . . . . . . . . . 12
2.3.4 Certificate Validation . . . . . . . . . . . . . . . . . . . . . . . . . . . . . . . . . . . . 13
2.3.5 File Formats . . . . . . . . . . . . . . . . . . . . . . . . . . . . . . . . . . . . . . . . . 14
3 General approach and Set-up 15
3.1 Prerequisites & Tutorial approach . . . . . . . . . . . . . . . . . . . . . . . . . . . . . . . . . 15
3.2 A Custom PKI Infrastructure . . . . . . . . . . . . . . . . . . . . . . . . . . . . . . . . . . . . 16
3.3 Setup a Standard Web Server . . . . . . . . . . . . . . . . . . . . . . . . . . . . . . . . . . . . 17
3.4 The iOS Project. . . . . . . . . . . . . . . . . . . . . . . . . . . . . . . . . . . . . . . . . . . . 19
4 Server authentication 22
4.1 Setup CA hierarchy and generate client certificates . . . . . . . . . . . . . . . . . . . . . . . . 22
4.1.1 Setup folders. . . . . . . . . . . . . . . . . . . . . . . . . . . . . . . . . . . . . . . . . . 22
4.1.2 Create CA certificates. . . . . . . . . . . . . . . . . . . . . . . . . . . . . . . . . . . . . 22
4.1.3 Create SSL Server Certificate . . . . . . . . . . . . . . . . . . . . . . . . . . . . . . . . 25
4.2 Setup a Secure Site on Apache . . . . . . . . . . . . . . . . . . . . . . . . . . . . . . . . . . . 26
Page 2 of 41

Jorn Lapon MSEC X.509 Tutorial
4.3 Server Authentication on iOS . . . . . . . . . . . . . . . . . . . . . . . . . . . . . . . . . . . . 28
4.3.1 Built-in Applications . . . . . . . . . . . . . . . . . . . . . . . . . . . . . . . . . . . . . 29
4.3.2 Accessing the server from a custom app . . . . . . . . . . . . . . . . . . . . . . . . . . 30
5 Client/Mutual Authentication 34
5.1 Creating Client Certificates . . . . . . . . . . . . . . . . . . . . . . . . . . . . . . . . . . . . . 34
5.2 Enabling Client Authentication on the web server . . . . . . . . . . . . . . . . . . . . . . . . . 34
5.3 Client Authentication on iOS . . . . . . . . . . . . . . . . . . . . . . . . . . . . . . . . . . . . 35
5.3.1 Built-in Applications . . . . . . . . . . . . . . . . . . . . . . . . . . . . . . . . . . . . . 35
5.3.2 Enabling Client Authentication in a Custom App . . . . . . . . . . . . . . . . . . . . . 36
A Build & Setup Environments 40
A.1 Server Environment . . . . . . . . . . . . . . . . . . . . . . . . . . . . . . . . . . . . . . . . . 40
A.2 Mobile Environment . . . . . . . . . . . . . . . . . . . . . . . . . . . . . . . . . . . . . . . . . 41
B Sources 41
C FAQ 41
Page 3 of 41

Jorn Lapon MSEC X.509 Tutorial
1 Introduction
This tutorial covers the basic steps towards the use of X.509 certificates for strong authentication in Mobile
Environments (Android and iOS). Knowledge on the use of X.509 certificates in general and platform specific,
is presented for application developers.
In short this tutorial learns the reader the following:
• Setup a custom X.509 PKI using OpenSSL.
• Setup an Apache 2 Web Server
• Configure the web server to support SSL server authentication (i.e., Https) using a custom server
certificate.
• Configure the web server to support SSL client authentication.
• Import root and identity certificates in the device Keychain of the mobile device for use in standard
applications (e.g., the browser).
• Setup an Https connection with the server from within a custom app on the mobile with server au-
thentication.
• Setup an Https connection with the server from within a custom app on the mobile with client authen-
tication.
The files accompanying this tutorial can be downloaded from https://www.msec.be/secureapps/
X509_Tutorial.
First, we start with some theory on X.509 and PKI in Section 2, in which the main concepts and building
blocks are discussed.
In Section 3, we demonstrate step-by-step, how to setup and implement X.509 certificates. We, therefore,
show how to generate a custom PKI, initialize a web server that uses this PKI and show how to support
both server and client authentication on iOS.
Page 4 of 41

Jorn Lapon MSEC X.509 Tutorial
2 Theory on Public Key Infrastructures
In this section, cryptographic building blocks are introduced that are important when applying X.509 cer-
tificates. We start with symmetric and public-key cryptography, followed by its use in certificates and the
PKI eco-system.
2.1 Building-Blocks
2.1.1 Symmetric-Key Cryptography
Symmetric-Key cryptography, also called conventional or secret-key cryptography, is based on a secret key
(Key) that is shared among the parties that want to exchange confidential data. The same key is used both
for encryption and decryption.
• Ciphertext← encrypt(Key, P laintext)
The encrypt-operation converts Plaintext into Ciphertext using the secret key Key.
• Plaintext ← decrypt(Key, Ciphertext)
The decrypt-operation converts Ciphertext into Plaintext using the secret key Key.
m mccDear Bob, Dear Bob,Xqs987f2sdlkc2 Xqs987f2sdlkc2
encrypt decrypt
Key Key
Figure 1: Alice sending a message to Bob using symmetric cryptography
Examples of symmetric-key encryption schemes are: Twofish, Serpent, AES (Rijndael) and Blowfish.
Every encryption scheme can be turned into a probabilistic encryption scheme by adding random data to the
plain text. This way, different encryptions of the same plain text (with the same key) will yield a different
cipher text. Hence, a passive attacker cannot link both cipher texts. When the cipher text is decrypted, the
random value is discarded.
• Ciphertext← encrypt(Key, {Random⊕
Plaintext})Before encrypting the plain text, a random value is generated and concatenated with the plain text.
• (Random⊕
Plaintext)← decrypt(Key,Ciphertext)
The decryption of the cipher text yields both a random value and the plain text; the random value is
discarded.
2.1.2 Public-Key Cryptography
Before symmetric encryption can take place, the secret must be shared securely, which is not evident when
the corresponding parties never met before. Public-Key cryptography tackles this problem:
Page 5 of 41

Jorn Lapon MSEC X.509 Tutorial
In public-key encryption schemes, each entity has a Public Key (pk) and a corresponding Private Key (sk).
The Public Key is public and can be shared with anyone. A message encrypted with this Public Key can
only be decrypted by the owner of the corresponding Private Key.
Two operations are defined:
• Ciphertext← encrypt(pk, P laintext)
The encrypt-operation converts Plaintext into Ciphertext using the public key pk.
• Plaintext← decrypt(sk, Ciphertext)
The decrypt-operation converts Ciphertext into Plaintext using the private key sk.
m mccDear Bob, Dear Bob,Xqs987f2sdlkc2 Xqs987f2sdlkc2
encrypt decrypt
pk skBobBob
Figure 2: Alice sending a message to Bob using asymmetric cryptography
Examples of public-key encryption schemes are: RSA, Rabin and ElGamal.
As shown in Fig. 2, Alice wishing to send a message m to Bob, first obtains an authentic copy of Bob’s public
key (pkBob), uses the encryption algorithm to compute the cipher text c = encrypt(pkBob,m) and transmits
c to Bob. To decrypt c, Bob takes his private key skBob and applies the decryption algorithm to obtain the
original message m = decrypt(skBob, c).
The public key need not to be kept secret and, in fact, should be made public. Only its authenticity is required
to guarantee that Bob is the only party who knows the corresponding private key. A primary advantage of
such systems is that providing authentic public keys is in general easier to realize than distributing secret keys
securely (as required in symmetric-key systems). In a large-scale networked environment, it is impossible to
guarantee that prior relationships between communicating entities have been established or that a trusted
repository exists with all used public keys. Therefore, certificates [4] will establish the authentic binding
between public key and owner of the corresponding private key (cfr. Sect. 2.3).
Digital Signature. Some public-key encryption schemes also allow for digitally signing data. Similar to
public-key encryption, only the owner of the private key is able to create a genuine signature, and everyone
may verify the correctness using the public key. In this case, two more operations are defined:
• Sig← sign(PrivateKey,Data)
The sign-operation generates a signature Sig on message Data using the private key PrivateKey.
• SigOK← verify(PublicKey, Sig,Data)
The verify-operation verifies whether the signature Sig on Data is genuine. The verification uses the
public key PublicKey that corresponds to the private key with which the signature was generated.
Page 6 of 41

Jorn Lapon MSEC X.509 Tutorial
2.2 The PKI ecoSystem
2.2.1 Parties
In the PKI ecosystem, we can distinguish 4 different types of actors.
Certificate Authority. The entities issuing certificates are called Certificate Authorities (CAs) or simply
issuers. A CA that issued a certificate to itself (self-signed) is called a Root CA. It can issue certificates to
end entities (e.g., client certificates or server certificates) or to other CAs called Intermediate CAs.
Certificate Holder. A Certificate Holder or Subscriber may be any party that holds the private key
corresponding to the public key certified by a CA. In fact, a root authority that issues a self-signed certificate,
is also a Certificate Holder.
Relying Party or Verifier. When the certificate is used to authenticate, the party to whom the certificate
holder is authenticating is called the Relaying Party. This party verifies that the authentication is performed
correctly, and that the certificate is still valid.
Revocation Authority. When, for instance, a private key got compromised or the certificate content is
no longer valid, it is important to have a way to make the public aware that a certificate is no longer valid.
This is called certificate revocation. The entity that handles the certificate revocation is called the Revocation
Authority.
2.2.2 Actions
Certificates are most commonly used in applications either for encryption, for digital signatures, or secure
communication.
Encryption. Any party that received the public certificate can encrypt data. Only the certificate holder,
holding the corresponding private key is able to decrypt the data.
Digital Signatures and Authentication. Digital signatures are used for two reasons.
The first is the digital version of the physical signing of documents. Only the certificate holder can make a
valid signature that can be verified with the corresponding certificate.
The second reason is for authentication. In fact, authentication consists of making a digital signature on
a challenge received from a relying party. If the entity that wants to authenticate, is able to make a valid
signature on that challenge, this means that this party is indeed the entity specified in the certificate (unless
the private key or CA was compromised).
Secure Communication. Setting up a secure communication channel using certificates is standardized
in the SSL/TLS protocol In SSL/TLS, the certificates are used both for authentication and for encryption.
Page 7 of 41

Jorn Lapon MSEC X.509 Tutorial
To secure communication with web sites and services, the Http protocol is replaced by the Https protocol.
Https is a combination of the standard Http protocol and SSL/TLS In this case, there are two options:
−Server Authentication in which the server authenticates towards the client.
−Client Authentication in which the client authenticates towards the server.
However, in Https client authentication is only used in combination with server authentication. This is also
called mutual authentication.
2.3 Public-Key Certificates
2.3.1 General
Although public key cryptography solves the problem of sharing a secret (now, only the public part must
be shared), a relying party does not know to whom the public key belongs. One solution is to use digital
certificates. In short, a certificate is a statement of a third party, claiming that the owner of the private
key corresponding the public key in the certificate holds the attributes in the certificate. It is up to the
relying party to trust if the third party verified this correctly. The trusted third party, called a Certification
Authority (CA), vouches for the correctness of the information in the certificate.
A digital certificate is a digitally signed statement that binds a public key held by an entity (such
as a person, an organization, an account, a device, or a site) to a set of information (e.g., name,
address, account number, web address) that identifies the holder of the corresponding private key.
Figure 3 shows a user (Bob) authenticating using his certificate, issued by CA, towards a relying party. In
order to authenticate, the relying party sends a random challenge which Bob signs using his private key. The
resulting signature is sent to the relying party which can now verify that the signature indeed corresponds to
the public key contained in the certificate. In addition, the relying party must verify the certificate. Among
others, it checks that the certificate is not expired (i.e., dateFrom < NOW < dateUntil) and that the
certificate was created by trusted CA. The relying party, therefore, fetches the public key of the issuing CA
from his list of trusted CA’s and verifies that the signature of the issuer is valid. If this signature is invalid, or
the public key was not found in the list of trusted CA’s, the relying party does not trust the authentication.
BobBob
CA
Relying Party
trusts
Bob
+ sign(challenge, )
issues
challenge
Figure 3: Bob holds a certificate issued by CA and used to authenticate to a relying party.
Page 8 of 41

Jorn Lapon MSEC X.509 Tutorial
In practice, the most commonly used CA certificates are included (built-in) in operating systems and browsers
as trusted root certificates. Some examples of CA’s are the public Certification Authorities, such as Global-
Sign, VeriSign, Thawte, Entrust and Diginotar1. Note that organizations can also create their own Certificate
Authority. To list the public keys of trusted parties, each CA publishes a ’self-signed’ certificate (i.e., subject
and issuer are the same), containing the public key that can be used to verify the certificates it issued.
X.509 Certificates. The most well-known public-key certificates are X.509 certificates [4, 3]. The standard
was defined in 1988, modified in 1993 (Version 2) and extended in 1995 (Version 3). Standard extensions for
Version 3 certificates appear in an amendment to X.509. These certificates accommodate information related
to key identifiers, key usage, certificate policy, alternate names (versus X.500 names) and name attributes,
certification path constraints, and enhancements for certificate revocation including revocation reasons and
CRL partitioning. A typical X.509 certificate has the following structure:
Version
Serial Number
Algorithm ID
Issuer
Validity
− Not Before
− Not After
Subject
Subject Public Key Info
Public Key Algorithm
Subject Public Key
Issuer Unique Identifier
(Optional)
Subject Unique Identifier
(Optional)
Extensions (Optional)
...
Certificate Signature Algorithm
Certificate Signature
Table 1: Structure of a typical X.509 Certificate
An example X.509 certificate is shown in figure 4.
1Diginotar is no longer trusted after it was hacked: http://nl.wikipedia.org/wiki/Hack_bij_DigiNotar
Page 9 of 41

Jorn Lapon MSEC X.509 Tutorial
Data:
Version: 3 (0x2)
Serial Number: 1 (0x1)
Signature Algorithm: sha256WithRSAEncryption
Issuer: C=BE, ST=East Flanders, L=Ghent, O=KU Leuven - Campus Ghent,
O=Computer Science Department, OU=MSEC, CN=MSEC Tutorial Client CA
Validity
Not Before: May 12 13:38:13 2014 GMT
Not After : May 12 13:38:13 2015 GMT
Subject: C=BE, ST=East Flanders, L=Ghent, O=KU Leuven - Campus Ghent,
O=Computer Science Department, OU=MSEC, CN=Alice in Wonderland
Subject Public Key Info:
Public Key Algorithm: rsaEncryption
Public-Key: (2048 bit)
Modulus:
00:be:2e:3d:32:72:4a:92:ff:67:7b:df:7c:89:83:
...
72:91
Exponent: 65537 (0x10001)
X509v3 extensions:
X509v3 Basic Constraints:
CA:FALSE
X509v3 Subject Key Identifier:
5D:1D:32:41:95:72:C6:CA:9C:E6:91:4B:32:50:C7:6E:14:68:F9:CA
X509v3 Authority Key Identifier:
keyid:8B:D5:5E:F2:84:62:04:E4:91:25:78:74:87:14:5F:F2:F0:20:AC:2E
DirName:/CN=MSEC Tutorial Root CA/OU=MSEC/O=KU Leuven - Campus Ghent/
O=Computer Science Department/L=Ghent/ST=East Flanders/C=BE
serial:02
X509v3 Key Usage:
Digital Signature, Non Repudiation, Key Encipherment
X509v3 Extended Key Usage:
TLS Web Client Authentication
Signature Algorithm: sha256WithRSAEncryption
3e:be:89:73:ed:92:ff:f2:89:2b:98:0a:46:e8:26:b7:af:53:
...
a7:4a:ec:89
Figure 4: Example of an X.509 certificate
CA hierarchy. The example above presents a single CA issuing certificates to users. But other more
complex settings are also possible. For instance, a root certificate authority can delegate the issuance of
certificates to Intermediate Authorities. Resulting in, for instance, a two level hierarchical CA, in which the
root is a company wide CA, and the second level contains departmental CA’s issuing certificates to users.
Note that the more levels in the CA structure, the more trust is needed in the authorities. For instance,
Page 10 of 41

Jorn Lapon MSEC X.509 Tutorial
Diginotar, a public CA, went bankrupt after it was discovered that their private key got compromised.
The degree to which a relying party can trust the binding embodied in a certificate depends on several
factors. These factors can include:
• the practices followed by the certification authority (CA) in verifying the subject;
• the CA’s operating policy, procedures, and security controls;
• the scope of the subscriber’s responsibilities (for example, in protecting the private key);
• the stated responsibilities and liability terms and conditions of the CA (for example, warranties, dis-
claimers of warranties, and limitations of liability).
The certificate may contain a field declaring that one or more specific certificate policies [5] apply to that
certificate. The policy may be used by a relying party to help in deciding whether a certificate, and the
binding therein, are sufficiently trustworthy and otherwise appropriate for a particular application.
Use of Digital Certificates. Examples of use cases in which digital certificates are used, are digitally
signed email or electronic documents, and Secure Web sites (Https). Note that in the case of Secure Web
Sites, the website is the certificate holder and the browser/user is the relying party. Secure websites use digital
certificates to authenticate towards the user, and encrypt the communication with the site. The browser,
therefore, verifies that the web address contained in the certificate used to setup a secure communication,
corresponds to the address (e.g., URL) of the website being accessed. In other words, (as shown in Fig. 5)
the browser verifies that the certificate was issued by a certificate authority listed in the trusted certificate
authorities (1) and the certificate contains the web address specified in the browser (2).
Figure 5: SSL Server Certificate
Page 11 of 41

Jorn Lapon MSEC X.509 Tutorial
2.3.2 Creating Certificates
In order to obtain a certificate, a user first creates a certificate signing request (CSR) and sends it to the
CA and finally retrieves the signed certificate from the authority.
Creating a Certificate Signing Request. A certificate signing request [7] is a digitally signed request
to obtain a certificate containing specific attributes. Therefore, the applicant typically generates a key
pair of which the private key is kept secret and used to sign (identifying) information including the newly
generated public key. Information typically included in the request are the distinguished name, Organization,
Department, City, Region, Country and/or Email Address. Finally, this request is submitted to the certificate
authority.
Signing a Certificate Signing Request. The certificate authority verifies the CSR. The signature is
verified, ensuring that the applicant holds the private key corresponding to the public key in the CSR.
The authority is also trusted to verify that the attributes to be included in the certificate are genuine. It
can do so by verifying other credentials or proofs of identity sent with the request, or by contacting the
applicant for further information. Finally, if all information is valid, this information (possibly joined with
information included by the authority) is certified by by the authority. The resulting certificate is returned
to the applicant.
Self-signed Certificate. Instead of including the public keys of root authorities in the list of trusted
parties (e.g. in the browser), root authorities create a self-signed certificate. In this case, the creator is
also the holder of the certificate. The issuer and subject of such certificates are the same. The signature is
created using the private key corresponding to the public key contained in the certificate, hence, self-signed.
2.3.3 Certificate Revocation
The validity dates (i.e., valid from, valid until) contained in the certificate are not sufficient to verify that a
certificate is still valid. Next to this time limitation, other reasons may require to revoke a certificate. The
revocation reasons defined in RFC 3280 are:
revoked: A certificate is irreversibly revoked (and entered on a CRL) if, for instance, it is discovered that
the certificate authority (CA) had improperly issued a certificate or a privatekey is thought to have
been compromised. Certificates may also be revoked for failure of the identified entity to adhere to
policy requirements such as publication of false documents, misrepresentation of software behaviour, or
violation of any other policy specified by the CA operator or its customer. The most common reason
for revocation is the user’s not being in sole possession of the private key (e.g token containing the
private key has been lost or stolen).
hold/supended: This reversible status can be used to notice the temporary invalidity of the certificate, for
instance when the user is not sure if the private key has been lost. If, in this example, the private key
was found again and nobody had access to it, the status can be reinstated, and the certificate is valid
again, thus removing the certificate from further CRLs.
Certificates in the Belgian e-ID card are initially set to the suspended-status, until the card has been
issued to and activated by the card holder.
Page 12 of 41

Jorn Lapon MSEC X.509 Tutorial
One solution is to (white)list the serials of valid certificates, and check this upon authentication. This
solution is, for instance, used in Microsoft IIS7 when mapping certificates to users in an LDAP database.
Another solution is slightly more complex and uses certificate revocation lists (CRL) [3]. A CRL is a
(black)list of certificates (more accurately: their serial numbers) which are currently not valid (revoked or
suspended), and should not be relied on by any system entity.
Usually, a CRL is generated after a clearly defined time frame and (optionally) immediately after a certificate
has been revoked. The CRL is always issued by the CA that issued the corresponding certificates. All CRLs
have a (often short) lifetime in which they are valid and in which they may be consulted by a PKI-enabled
application to verify a counterpart’s certificate prior to its use. To prevent spoofing or denial-of-service
attacks, CRLs are usually signed by the issuing CA.
Best practices require that a certificate’s validity must be checked whenever one wants to rely on that
certificate. Otherwise, a revoked certificate may be incorrectly accepted as valid. This means that to use a
PKI effectively one must have access to current CRLs (i.e. Internet access in the case of a PKI).
An alternative to using CRLs, which is especially useful for software clients, is the on-line certificate validation
protocol Online Certificate Status Protocol (OCSP) [2]. OCSP has the primary benefit of requiring
less network bandwidth and thus enabling real-time and near real-time status checks for high volume or
high value operations. It is an Internet protocol used for obtaining the revocation status of an X.509 digital
certificate. It is described in RFC 2560. Compared to CRLs, OCSP has the following advantages and
disadvantages:
• Since an OCSP response contains less information than a typical CRL, OCSP can feasibly provide
more timely information regarding the revocation status of a certificate without burdening the network.
However, the greater number of requests and connection overhead may overwhelm this benefit if the
client does not cache responses.
• Using OCSP, clients do not need to parse CRLs themselves, saving client-side complexity. However,
this is balanced by the practical need to maintain a cache. In practice, such considerations are of little
consequence, since most applications rely on third-party libraries for all X.509 functions.
• CRLs may be seen as analogous to a credit card company’s ”bad customer list” – an unnecessary public
exposure.
• OCSP discloses to the responder that a particular network host used a particular certificate at a
particular time. OCSP does not mandate encryption, so this information may also be intercepted by
other parties.
2.3.4 Certificate Validation
When verifying a digital signature, not only the validity of the signature is important, but also the validity
of the corresponding certificate and its entire certificate chain.
The steps to verify a digital signature (both for signing documents or during authentication) can be sum-
marized as follows:
1. Verify the signature with the public key in the certificate
2. Verify the issuer signature of the certificate.
Page 13 of 41

Jorn Lapon MSEC X.509 Tutorial
3. Verify the validity date of the certificate.
4. Check that the certificate was not revoked.
5. Verify the validity of the issuing certificates in the certificate chain (i.e., check issuer signature, validity
date and revocation status).
6. Verify that the root CA or an intermediate CA is trusted.
2.3.5 File Formats
Certificate Format. The most common formats of certificate are the following:
• ASN.1 DER-encoded format (binary BER-encoded)
• PEM (BASE64 encoded)
Listing 1: Excerpt of a PEM encoded certificate
1 -----BEGIN CERTIFICATE-----
2 MIIFJDCCBAygAwIBAgIBATANBgkqhkiG9w0BAQsFADCBrzELMAkGA1UEBhMCQkUx
3 FjAUBgNVBAgTDUVhc3QgRmxhbmRlcnMxDjAMBgNVBAcTBUdoZW50MSEwHwYDVQQK
4 ExhLVSBMZXV2ZW4gLSBDYW1wdXMgR2hlbnQxJDAiBgNVBAoTG0NvbXB1dGVyIFNj
5 ......
6 uwNsnqe2d2qKB0FETa2Csvojojg7n0WZkOKgFIeRz9L1ZaBnjg51VDwRPsFIkXNd
7 +1KlTjs++EvvKZsVgogLjcP/m5rRHqnwnxhzJTQeUXvq2oCQXUHzkoRnxAibT1w3
8 shr72Y7RXvKGmtJLuQRygdCIjcFeUKMG
9 -----END CERTIFICATE-----
• XML
Key Store File Formats The most common key store file formats are the following:
• PEM (*.pem, *.crt, *.cer)
Governed by RFCs, it’s used preferentially by open-source software. Next to storing certificates (see
above), this format also allows to store private keys and entire certificate chains.
• PKCS12 (*.pkcs12, *.pfx, *.p12)
A private standard that provides enhanced security versus the plain-text PEM format. Unlike the
PEM format, the content is fully encrypted. It’s used preferentially by Windows systems, and can be
freely converted to PEM format through use of OpenSSL.
• Jave Key Store (*.jks)
When using Key Stores in Java, the Java Key Store is used in general. In other environemnts, JKS
files are often not supported.
• Bouncy Castle Key Store (*.bks)
This format is the main format to be used in Android. For instance, although other formats are
supported, it is the only format that can be used to import certificates in the Android KeyChain.
For converting key stores from one format to another, Protecle can be used.
Page 14 of 41

Jorn Lapon MSEC X.509 Tutorial
3 General approach and Set-up
3.1 Prerequisites & Tutorial approach
Environments. The systems used to run the tutorial are as follows:
• Web Server
The server will be deployed on Linux Mint 16 Petra Cinnamon. See Appendix A.1 contains the steps
to prepare the Linux environment for this tutorial.
• iOS App
The iOS App is built using XCode on a MacBook running XCode (Version 5.1.1). The target platform
of the project is iPhone 7.1.
The tutorial files. All tutorial files are packed together and can be downloaded from:
https://www.msec.be/secureapps/X509_Tutorial.
The package contains 2 folders and the tutorial text.
• Tutorial X509 iOS contains the XCode tutorial project for the iOS App.
• Tutorial X509 Server contains the files to setup the server. It consists of seven scripts (.sh files) and a
config folder containing additional configuration and build files.
For the seminar the server files are already pre-installed on a workstation and can be
found on the Desktop.
For the iOS app, donwload and unzip the Tutorial X509 iOS.zip file and open the
project in XCode. The tutorial was tested with an emulator for iPhone 7.1.
Notes about the Tutorial Scripts:
• Not all commands in the scripts are described in this tutorial. Comments are
added to the scripts and additional checks are used to ensure the correct working
of the tutorial.
• To make sure the tutorial runs correctly, configuration files and commands are
specified such that the user has to enter as little as possible. For instance,
passwords are fixed in the scripts (i.e., passed by passout= pass:mypassword)
and users are not prompted (i.e., prompt = no in the OpenSSL config file) to
change the value of the attributes in certificates.
The Tutorial outline. To lead the reader through the tutorial, special information and instructions are
marked as follows:
Page 15 of 41

Jorn Lapon MSEC X.509 Tutorial
Viewing or analyzing a file or content goes here.
Actions that need to be performed on the device (mobile or desktop) are presented
here.
Commands that need to be run in a console are presented here.
Remarks are shown here.
Additional information is shown here.
Running scripts on the server. To run a script on Linux Mint, open a terminal (click in the menu
bar) and type the following to run the file script.sh
1 $ ./script.sh
Some scripts require higher privileges and require commands to be run as root. On Linux Mint2 you can do
this using the sudo command. In this case, during the execution of the script, you will be requested to enter
the password for the root user.
The root password used on the workstation for this tutorial is: msec
Important:
· During this tutorial except for running the scripts, no
commands have to be entered in the console.
· All instructions are given in the Action, View and
Console boxes. Other code and commands in the
text are purely for your information.
3.2 A Custom PKI Infrastructure
This tutorial learns the reader, step-by-step, how to create a custom PKI infrastructure and use it in mobile
environments (iOS and Android) A simple web server (i.e., Apache 2) is installed and configured to support
2Note that Linux Mint is based on Ubuntu, and the scripts used in this tutorial work for both
Page 16 of 41

Jorn Lapon MSEC X.509 Tutorial
both server and client authentication. In order to take advantage of both mechanisms in mobile environments,
this tutorial shows how to add support in both iOS and Android when using the built-in browser and also
when writing a custom App.
The tutorial starts from a clean standard Linux Mint Desktop installation and uses scripts to create the PKI
and install the web server. Nevertheless, some pointers will be given to enable the same on Microsoft IIS.
For both iOS and Android, a project has been created (with XCode and Eclipse, resp.) that shows the user
how to enable certificate support in their custom Apps.
A certificate issued by a public certificate authority such as GlobalSign or Verisign, is required when used
in a public website or other applications that use the built-in trust store. This prevents the user having to
install your root certificate manually. Nevertheless, in many applications it is sufficient to set-up a custom
PKI. This tutorial learns the reader step-by-step how to create such a custom infrastructure and how to
implement it on both server and client side.
For this tutorial, a two level hierarchical CA structure is generated as shown in Figure 6. The root authority
(MSEC Tutorial Root CA) issues a certificate to a CA (MSEC Tutorial Server CA) that issues server
certificates and a certificate to a CA (MSEC Tutorial Client CA) that issues client certificates. To request,
issue and manage certificates the command-line tools provided by the OpenSSL [6] package are used.
MSEC Tutorial Root CA
MSEC Tutorial Server CA
MSEC Tutorial SSL Server
MSEC Tutorial Client CA
Alice in Wonderland Bob The Builder
Figure 6: A Custom X.509 PKI
3.3 Setup a Standard Web Server
For this tutorial, the scripts to setup the web server are placed on the desktop in the folder Tutorial X509 Server.
Page 17 of 41

Jorn Lapon MSEC X.509 Tutorial
• Open a terminal (i.e., Click in the menu bar at the bottom of your screen).
• Go to the folder containing the tutorial files:
1 $ cd Desktop/Tutorial_X509_Server
To ease the typing of commands in the terminal, you can start
typing the first letters of a file or folder and press TAB to get the
full list of possible files and folders in the folder specified.
From now on, all folders are specified relative to this Tutorial X509 Server folder unless specified differ-
ently.
The scripts in this tutorial assume a fresh install of Linux Mint. Do not use these
scripts on an existing system as files may be deleted from your system!
Setup Apache and PHP5 on Linux Mint The Apache HTTP Server Project ?? is an effort to develop
and maintain an open-source HTTP server for modern operating systems. The goal of this project is to
provide a secure, efficient and extensible server that provides HTTP services in sync with the current HTTP
standards. PHP is a server-side scripting language that will be used to present a web page with some
information about the connection. For details on both Apache and PHP we refer to the original websites
and many tutorials available. In this tutorial we focus on the configuration of Apache to enable HTTPS
with server and client authentication.
In order to install Apache and PHP5 the package management tool APT is used. This is an efficient way
to install packages and dependencies automatically and take care of their configuration. To enable php5 in
apache2 the a2enmod command is used.
1 $ sudo apt-get install apache2 php5
2 $ a2enmod php5
Apache is able to serve multiple sites, called Virtual Hosts. A default Virtual Host (located at /etc/apache2/sites-
enabled/000-default.conf) is configured to handle Http requests on port 80, the standard Http port, and serves
web pages from the directory /var/www. For more in-depth documentation on configuring the Apache Http
Server we refer to http://httpd.apache.org/docs/.
By default, a file index.html is generated in the /var/www folder. The tutorial script will remove this file and
replace it with index.php which will be automatically assigned as the default web page.
Page 18 of 41

Jorn Lapon MSEC X.509 Tutorial
Run the first script of the tutorial, enter the root password when needed and confirm
installation (i.e., ’Y’).
1 $ ./Tutorial_0_Apache_Install_Apache.sh
Write down the IP Address that is returned after running the
script.
Open a browser and go to http://localhost. You should see something like this:
3.4 The iOS Project.
In order to develop an iOS application, an XCode project has been created (it is part of the tutorial
package, available for download).
Page 19 of 41

Jorn Lapon MSEC X.509 Tutorial
· Open XCode and explore the X509 Tutorial iOS project. In the X509 Tutorial iOS
sub-folder, you will find the source code for the project. The most important files
that will be used in this tutorial are the MainUIViewController.h header and MainUIV-
iewController.m class file. Open both classes and have a look inside.
· Run the project by clicking the arrow button ( ). This will build the iOS app,
launch the emulator (if not launched before) and run the application.
The emulator will start and show you the start screen of the Android App.
Do not close the emulator ! Starting the emulator takes a long
time. However, this is required only once. The emulator can be kept
running and when starting the app again from the XCode environ-
ment, XCode detects that the emulator is running and automatically
closes the app inside the emulator (if it is still running), deploys the
new version of the app and starts it for you.
Page 20 of 41

Jorn Lapon MSEC X.509 Tutorial
The emulator shows the MainUIViewController. There is only one UIViewController in the project. For
this tutorial, the MainUIViewController was prepared with a number of controls. It contains a switch that
allows the user to select Insecure and Secure. In the white area, a UIWebView control is included that will
show the results of the HTML pages fetched from the server. Depending on the switch, the button makes
a connection with the server either securely over Https or insecurely over Http. However, before doing
this, we have to let the app know the IP address of our web server.
In Xcode, open the MainUIViewController.m file and locate the following line of code
40 @serverIP=@"www.kuleuven.be";
Replace www.kuleuven.be by the IP address that you got previouslya.
You should get something like this, with your IP Address instead:
40 @serverIP=@"192.168.101.110";
aYou can fetch the IP address with the config/get IPAddress.sh script
Setting up a connection in XCode is simple. During this tutorial, we will use the NSURLConnection to
make connections to our web server.
Using the NSURLConnection class, setting up a connection can be achieved as follows:
1 NSString *url = [NSURL URLWithString: @"http://www.kuleuven.be"];
2
3 NSURLRequest *request = [NSURLRequest requestWithURL:url];
4
5 NSURLConnection *conn = [[NSURLConnection alloc]initWithRequest:request delegate:
self];
This can be found in the -(IBAction)btnConnect:(id)sender method, in the MainUIViewController.m class
file. As can be seen in this listing, in the tutorial app, we pass self (in other words the MainUIView-
Controller) as a delegate to the NSURLConnection. Therefore, we add ¡NSURLConnectionDelegate¿ in the
MainUIViewController.h header file to indicate that this class implements this delegate.
Page 21 of 41

Jorn Lapon MSEC X.509 Tutorial
Start the iOS Application, and click the search button. The app will connect to your
server and you should see the following:
4 Server authentication
4.1 Setup CA hierarchy and generate client certificates
4.1.1 Setup folders.
During this step, several certificates, keys, etc., will be created for different entities. To organize things, we
start with creating a number of folders and files required to request and issue certificates.
1 $ ./Tutorial_1_PKI_setupDirectories.sh
This script creates a directory build, containing five subdirectories: three for each CA, one for the clients
(clientCert) and one for the server (serverCert). For each CA, a subdirectory ca.db.certs is generated where
all issued certificates will be stored, an empty index file ca.db.index, a serial file ca.db.serial containing 01 as
the initial serial number and a seed for the randomness is stored in ca.db.rand.
Open the build folder (Double-Click the folder on the Desktop) and view its contents.
4.1.2 Create CA certificates.
The next step in creating the CA Structure is to setup the CA’s.
To create the certificates for the root CA and both the Server and Client CA, the commands are all contained
in the Tutorial 2 PKI Create CAs.sh script.
Page 22 of 41

Jorn Lapon MSEC X.509 Tutorial
Open and analyze the script Tutorial 2 PKI Create CAs.sh.
In this script, a number of configuration files (*.cnf) located in the config folder, is used by OpenSSL. The
files starting with req are configuration files used by applicants to create a certificate request. The files
starting with issue are used by the respective CAs to generate a certificate. Finally, the file self rootCA.cnf
configures both request and issuance of a self-signed certificate for the root authority.
Note that for this tutorial, all commands are included in the same script, but in
practice they will be performed by each entity and the requests and certificates will
be communicated between the applicant and the issuing authority.
We will now go over the most important commands in the script.
MSEC Tutorial Root CA. To create a self-signed CA certificate the following command is used:
1 $ openssl req -x509 -config config/self\_rootCA.cnf -newkey rsa -keyout build/rootCA/
rootCA.key -out build/rootCA/rootCA.pem -passout pass:rootCA
This command internally creates a certificate signing request containing the values specified in the req
section of the config file (-config config/self rootCA.cnf). It, therefore, generates a new rsa keypair (-newkey
rsa -keyout build/rootCA/rootCA.key) protected with the password ‘rootCA’ and outputs the certificate in
PEM format(-out build/rootCA/rootCA.pem) containing the public key.
Open and analyze the root authority configuration file config/self rootCA.cnf (Double-
Click the file in the file explorer).
The configuration file contains multiple sections. [ca] is simply a section that refers to the default ca section,
namely [CA default]. In this section, the location of the files created previously for the root authority are
specified, together with some defaults, for instance, for the name of the certificate and key of the root CA,
and the hashing algorithm used. The section [req] defines the content of the attributes that must be specified
in the request. Amongst others, it refers to the value of the subject’s name ([req distinguished name]),
but also the extensions of the certificate.
In order to allow a certificate to be used by a Certificate Authority, the following
(Version 3) extension must be part of the certificate:
1 basicConstraints = CA:true
MSEC Tutorial Server and Client CA. The remaining certificates in the hierarchy are not self-signed,
but are generated in three steps:
1. The applicant generates a certificate signing request (CSR) and sends it to the signing authority.
Page 23 of 41

Jorn Lapon MSEC X.509 Tutorial
2. This authority verifies and validates the request, issues a certificate based on the request and returns
it to the applicant.
3. The applicant verifies and stores the returned certificate.
In order for the Server CA to generate a CSR, the following command is executed; doing this for the Client
CA is analogous.
1 $ openssl req -config config/req_serverCA.cnf -newkey rsa -keyout build/serverCA/
serverCA.key -out build/serverCA/serverCA.req -passout pass:serverCA
The main difference with the command to issue a self-signed certificate is the -x509 argument which is now
omitted. This tells OpenSSL to generate a CSR instead of a self-signed certificate.
Open and analyze the configuration file of the Server CA to request a certificate
config/req serverCA.cnf (Double-Click the file in the file explorer).
In contrast to the previous configuration file, this file does not contain a [ca] section. Now, the [req] section
specifies the content of the CSR to be created. Note that the basicConstraints extension specified in the
config file adds an additional parameter, pathlen:0. This indicates that the intermediate authorities cannot
issue sub-CA certificates.
Except for the name of the subject in the request, the configuration file of the Client CA is the same as the
one of the Server CA. In practice, one may add additional attributes, such as a policy that specifies the CA’s
practices or other information.
After generating the request, the requesting CA sends it to the issuing CA to obtain a certificate. The
following listing shows the command that the root authority performs to issue a certificate to the Server CA.
1 $ openssl ca -notext -batch -passin pass:rootCA -config config/issue_by_rootCA.cnf -
out build/serverCA/serverCA.pem -infiles build/serverCA/serverCA.req
This command generates a certificate and specifies the configuration file, the output file, the request file and
the password of the root CA. (The -batch argument is passed for this tutorial, preventing the user to have
to confirm each transaction during the generation of the certificate.)
The -notext argument is passed to ensure that the PEM file does not include a textual
representation of the certificate, since some platforms have difficulties reading the file
in that case.
Note that the private key used for signing the certificate is specified in the configuration file (issue by rootCA.cnf).
Key Stores. To import the certificate of the root authority into Android, one solution is to use a Bouncy
Castle KeyStore. The certificate is imported using the keytool into a Bouncy Castle KeyStore:
1 $ keytool -importcert -alias ssl_ca -trustcacerts -keystore build/serverCert/
SSL_Server_chain.bks -storetype bks -storepass userpwd -file build/rootCA/rootCA.
pem -noprompt -provider org.bouncycastle.jce.provider.BouncyCastleProvider -
providerpath config/bcprov-jdk15on-146.jar
Page 24 of 41

Jorn Lapon MSEC X.509 Tutorial
This command generates a BKS keystore file (SSL Server chain.bks) and imports the rootCA.pem file as a
trusted CA certificate with alias ssl ca. To generate BKS files, the keytool requires BouncyCastleProvider to
be specified explicitly.
Likewise, a certificate chain is required to be used by the SSL enabled web server. Generating a certificate
chain in PEM format is straightforward and is simply a concatenation of the certificate files:
1 $ cat build/serverCA/serverCA.pem build/rootCA/rootCA.pem > build/serverCert/
SSL_Server_chain.pem
Time for Action.
Create the CA certificates by running the following script:
1 $ ./Tutorial_2_PKI_Create_CAs.sh
Have a look at the files created in the sub folders of the build folder.
To read out the contents of a PEM file, the following command can be used:
1 $ openssl x509 -in cert.pem -text
Analyze and compare the contents of the PEM certificate of the root and server CA:
1 $ openssl x509 -in build/rootCA/rootCA.pem -text
2 $ openssl x509 -in build/serverCA/serverCA.pem -text
Notice that for the former, issuer and subject are equal, while in the latter, the issuer
is the root CA.
Also the basicConstraints extension is different.
4.1.3 Create SSL Server Certificate
To obtain an SSL Server Certificate, a CSR is generated on the web server and the Server CA generates a
certificate that is returned to the server. The Tutorial 3 PKI Create SSL ServerCert.sh script generates the
CSR, and issues a certificate based on this CSR.
Page 25 of 41

Jorn Lapon MSEC X.509 Tutorial
Open the Tutorial 3 PKI Create SSL ServerCert.sh script.
• Notice that instead of passing a password, the -nodes parameter is specified.
This specifies that the private key generated during the request is not encrypted
with a password. This is done such that the web server does not need a password
to use the key for SSL Server authentication in Apache.
• The script also contains code (in comments) to export the private key and
certificate to a PKCS#12 keystore file. This can, for instance, be used to install
the key on a Microsoft IIS web server.
Open the config/req serverCert.cnf.
Notice that the extendedKeyUsage field is set to serverAuth to allow
the certificate to be used for SSL server authentication
Also, an extra field is added to the request, namely the subjec-
tAltName. For this tutorial, it contains an IP sub-field with the
IP address, and a DNS sub-field also containing the DNS address.
Among others, this is required by the mobile to allow a correct
host name verification.
In practice, the actual DNS domain name should be included in
this field (e.g., www.msec.be).
Create the SSL server certificate by running the following script:
1 $ ./Tutorial_3_PKI_Create_SSL_ServerCert.sh
4.2 Setup a Secure Site on Apache
Configure SSL Virtual Host. In this tutorial, an additional Virtual Host will be created that serves
SSL Secured pages (Https). By default, during installation of Apache a default SSL Virtual Host is created
(i.e., /etc/apache2/sites-available/default-ssl.conf) but not activated.
The file defines access to the web server through Https at default Https port 443. It serves pages from the
same DocumentRoot /var/www as the insecure site serves at port 80.
Have a look at the configuration file
/etc/apache2/sites-available/default-ssl.conf
Notice that by default the configuration file already specifies a certificate and key file
(ssl-cert-snakeoil.pem and ssl-cert-snakeoil.key) that can be generated automatically
for demonstration purposes($ make-ssl-cert generate-default-snakeoil) to setup a simple
SSL server using self-signed certificates.
In order to configure the Secure site to use our custom PKI, the configuration file must point to the files, we
created for our secure web server. We, therefore, need to replace the following files with our own:
Page 26 of 41

Jorn Lapon MSEC X.509 Tutorial
1 SSLCertificateFile /etc/ssl/certs/ssl-cert-snakeoil.pem
2 SSLCertificateKeyFile /etc/ssl/private/ssl-cert-snakeoil.key
In addition, since the server certificate is issued by a root authority (not self-signed), we must point the
configuration file to the correct server certificate chain. The following line is uncommented (i.e., remove #)
and the server certificate chain is copied to the file specified:
1 #SSLCertificateChainFile /etc/apache2/ssl.crt/server-ca.crt
This certificate chain will be sent to the client while the connection is made. This allows the client to verify
that the root of the chain is part of the trusted root authorities maintained by the client.
Enable the new Virtual Host. Before we can activate a Virtual Host that uses SSL on the web server,
the SSL module must be activated once:
1 a2enmod ssl // activate SSL Module
Enabling the newly configured Virtual Host (defined by /etc/apache2/sites-available/default-ssl.conf) is sim-
ple and can be performed as follows:
1 sudo a2ensite default-ssl // activate SSL Site
2 sudo service apache2 restart
First, the site is added to the configuration of Apache, followed by a restart of Apache’s web server making
the changes effective.
Apache makes use of two folders to activate and deactivate websites:
/etc/apache2/sites-available contains the configuration files of sites that can be set
active.
/etc/apache2/sites-enabled contains the configuration files of sites that are active.
The a2ensite command makes a logical link from the former to the latter when enabling
the site. To deactivate the site a2dissite removes this link and the site is no longer
active.
Configure the site, enable SSL and activate the secure site by executing the Tuto-
rial 4 Apache Setup Server Authentication.sh script:
1 $ ./Tutorial_4_Apache_Setup_Server_Authentication.sh
In addition, a number of files (certificates, chains, keystores, ...) are copied to the
website, that will be fetched by the mobile in later steps.
Notice that the extension of the rootCA.pem file is changed into
.crt. This will allow the android built-in browser to import the
certificate when downloading it through the browser.
Page 27 of 41

Jorn Lapon MSEC X.509 Tutorial
Open a browser and go to https://localhost. (Note the ’s’ of https) Since the
rootCA is not trusted, it will notify you and ask for confirmation (i.e., I understand
the risks). You should see something like this, after adding an exception:
Another way to prevent this message from happening is to add the root authority to
Firefox as a trusted authority:
In Firefox goto: Preferences→ Advanced→ Certificates→ View Certificates, and im-
port the rootCA.pem in the tab of authorities.
For this tutorial, the web server is accessible both over Http and Https. To prevent
this the default Http Virtual Host can be disabled as follows:
1 $ sudo a2dissite 000-default
4.3 Server Authentication on iOS
To access public websites, supporting Https with Server Authentication only, doesn’t require the user
anything to do except for changing http:// into https:// in the URL pointing to the server. However, in
the case of a custom PKI, iOS does not trust the certificate of the root CA.
Page 28 of 41

Jorn Lapon MSEC X.509 Tutorial
Go back to the Tutorial App on the emulator. Select Secure and click the search
button. You will get an error stating that a trust anchor for the certification path
was not found.
This means that the server certificate is not trusted.
In order to have iOS accept the server certificate as trusted, there are a number of solutions, which we
will now cover:
4.3.1 Built-in Applications
iOS contains a built-in Keychain. Applications such as the built-in browser and email apps use this when
accessing remote services. Users can manually add trusted certificates to the Keychain as follows:
Page 29 of 41

Jorn Lapon MSEC X.509 Tutorial
· Open the browser in the emulator (click the Hardware ← Home ( H) in the emu-
lator menu and open Safari in the emulator).
· Browse to your web server by entering the url https://your ip here. Since the server
certificate is not trusted, you will get a security warning.
· Click continue.
· To import the certificate, you can click on the link in the web page pointing to the
rootCA.crt file.
· You will be asked to install the certificate that will be imported. Click Install.
· A warning about the server’s authenticity is presented. Accept the warning, and
click Done to finish the installation.
When browsing to the web server again, it will no longer show you the security
warning.
4.3.2 Accessing the server from a custom app
After the trusted certificate was added to the iOS Keychain, connecting to the web server will no longer
fail, since the trust store of iOS is used by default for any app.
Page 30 of 41
Jorn Lapon MSEC X.509 Tutorial
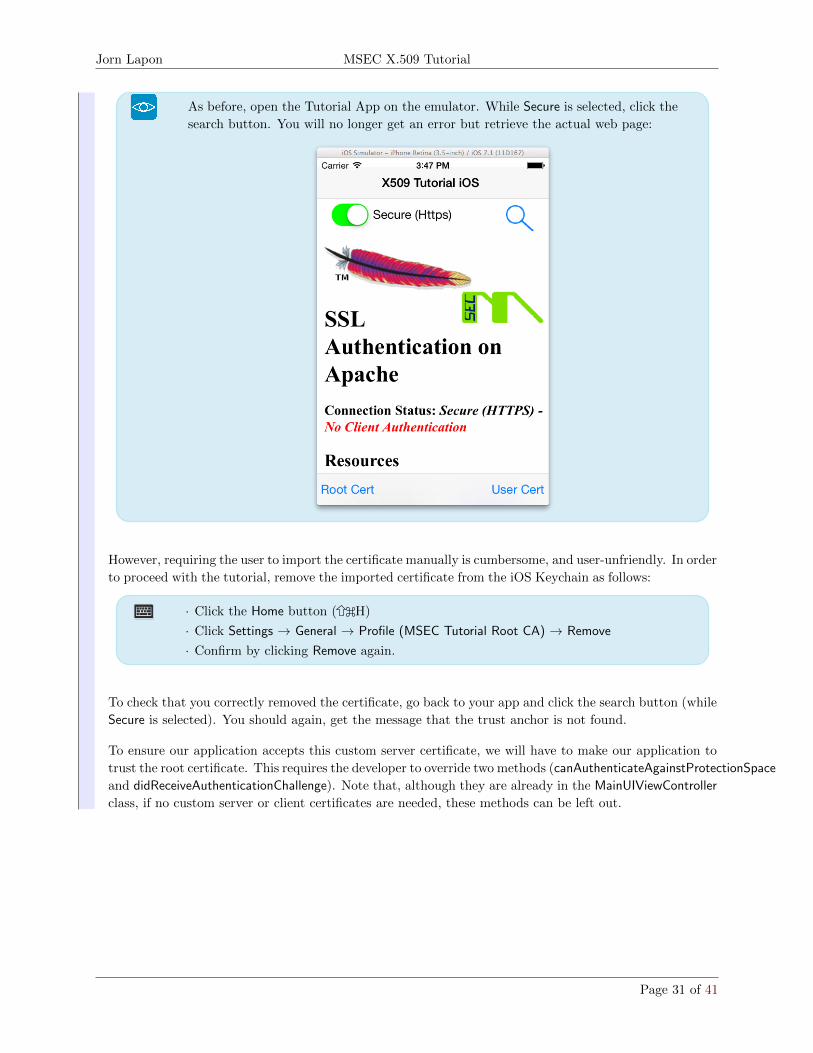
As before, open the Tutorial App on the emulator. While Secure is selected, click the
search button. You will no longer get an error but retrieve the actual web page:
However, requiring the user to import the certificate manually is cumbersome, and user-unfriendly. In order
to proceed with the tutorial, remove the imported certificate from the iOS Keychain as follows:
· Click the Home button ( H)
· Click Settings → General → Profile (MSEC Tutorial Root CA) → Remove
· Confirm by clicking Remove again.
To check that you correctly removed the certificate, go back to your app and click the search button (while
Secure is selected). You should again, get the message that the trust anchor is not found.
To ensure our application accepts this custom server certificate, we will have to make our application to
trust the root certificate. This requires the developer to override two methods (canAuthenticateAgainstProtectionSpace
and didReceiveAuthenticationChallenge). Note that, although they are already in the MainUIViewController
class, if no custom server or client certificates are needed, these methods can be left out.
Page 31 of 41

Jorn Lapon MSEC X.509 Tutorial
connection:canAuthenticateAgainstProtectionSpace: is called before connec-
tion:didReceiveAuthenticationChallenge:, allowing the delegate to inspect a protection
space before attempting to authenticate against it. By returning YES, the delegate
indicates that it can handle the form of authentication, which it does in the subse-
quent call to connection:didReceiveAuthenticationChallenge:. If the delegate returns
NO, the system attempts to use the iOS Keychain to authenticate. More information
can be found in the official developer documentation of iOS[1].
In the tutorial, the following indicates that in case of the authentication method NSURLAuthentication-
MethodServerTrust, the delegate will handle the authentication.
100 - (BOOL)connection:(NSURLConnection *)connection
canAuthenticateAgainstProtectionSpace:(NSURLProtectionSpace *)protectionSpace {
101 NSString *method = [protectionSpace authenticationMethod];
102 /* Request to Add Custom Anchor */
103 if (method == NSURLAuthenticationMethodServerTrust)
104 return YES;
105 ...
106 else /* No handling by the delegate */
107 return NO;
108 }
connection:didReceiveAuthenticationChallenge: allows the developer to pass credentials
when appropriate.
The following snippet checks the authentication method, and in the case of server trust, we add our custom
trust anchor. When the verification success, a credential for trust is set.
111 -(void)connection:(NSURLConnection *)connection didReceiveAuthenticationChallenge:(
NSURLAuthenticationChallenge *)challenge
112 {
113 NSURLProtectionSpace *protectionSpace = [challenge protectionSpace];
114 if ([protectionSpace authenticationMethod] ==
NSURLAuthenticationMethodServerTrust) {
115 /* Add Trust Anchor */
116
117 SecTrustRef trust = [protectionSpace serverTrust];
118 SecTrustRef customTrust = [self addTrustAnchor:trust];
119
120 /* Re-evaluate the trust policy. */
121 SecTrustResultType secresult = kSecTrustResultInvalid;
122 if (SecTrustEvaluate(customTrust, &secresult) != errSecSuccess) {
123 /* Trust evaluation failed. */
124 [connection cancel];
125 return;126 }
127
128 switch (secresult) {
Page 32 of 41

Jorn Lapon MSEC X.509 Tutorial
129 case kSecTrustResultUnspecified: // The OS trusts this certificate
implicitly.
130 case kSecTrustResultProceed: // The user explicitly told the OS to trust
it.
131 {
132
133 NSURLCredential *credential = [NSURLCredential credentialForTrust:
challenge.protectionSpace.serverTrust];
134 [challenge.sender useCredential:credential forAuthenticationChallenge
:challenge];
135 return;136
137 }
138 }
139 [connection cancel];
140 ...
141 } else142 [challenge.sender performDefaultHandlingForAuthenticationChallenge:challenge
];
143 }
Locate the -(SecTrustRef)addTrustAnchor:(SecTrustRef)trust method used in previous
listing to add our custom certificate to the trust store.
This custom method loads the der-encoded root certificate from a file that was pre-
viously stored locally, and adds it to the trust store.
As indicated above, for this tutorial, the root certificate of our custom PKI must be downloaded and
added to the trust managers.
To simplify the tutorial, we already provide code to download the root certificate to the device and store
it as a file, in the context of the app. Download the DER file (i.e., rootCA.der) from the web server as
follows:
In the Tutorial App on the emulator, click the Root Cert button, and the download
will take place.
To enable the custom trust certificate, we need to uncomment some parts of the code. Code that will be
uncommented in this tutorial uses the // prefix. To ’uncomment’ simply means removing the this prefix.
Uncomment the following code, to enable a custom authentication:
103 if (method == NSURLAuthenticationMethodServerTrust)
104 return YES;
If YES is returned, the didReceiveAuthenticationChallenge will be called and load our
custom certificate.
Have a look at the first part of the didReceiveAuthenticationChallenge, in which the
custom certificate is loaded and returned by the delegate.
Page 33 of 41

Jorn Lapon MSEC X.509 Tutorial
As from iOS, these two methods are replaced by the willSendRequestForAuthentica-
tionChallenge method.
5 Client/Mutual Authentication
5.1 Creating Client Certificates
Finally, we create 2 client certificates. One for Alice, and one for Bob. Again both have to create a certificate
request, in which their attributes are specified, and each gets a private key. The Client CA, then, issues the
certificates. In addition, the client certificate and private key are contained in a PKCS#12 keystore, that
will be used by the mobile application.
Open the Tutorial 5 PKI Create ClientCerts.sh script. The script shows that two
certificates are generated and imported in a PKCS#12 keystore. The request makes
use of the config/req clientCert.cnf. Have a look at this file and notice the keyusage
and extendKeyUsage.
clientAuth must be specified in the extendedKeyUsage field to allow the certificate to
be used for client authentication.
Create the client certificates by running the following script:
1 $ ./Tutorial_5_PKI_Create_ClientCerts.sh
5.2 Enabling Client Authentication on the web server
The default-ssl.conf file that we edited before, also contains a number of parameters that are marked as
comments in the file. To support client authentication, we copy the client certificate chain to the ca-bundle.crt
file and uncomment the following values in the configuration file:
1 #SSLCACertificateFile /etc/apache2/ssl.crt/ca-bundle.crt
2 #SSLVerifyClient require
3 #SSLVerifyDepth 10
Have a look at the script file Tutorial 6 Apache Setup Client Authentication.sh
Notice that instead of require, we specify optional for demonstration purposes, allowing
client authentication to be optional.
Enable client authentication on the server by running the following script:
1 $ ./Tutorial_6_Apache_Setup_Client_Authentication.sh
Page 34 of 41

Jorn Lapon MSEC X.509 Tutorial
5.3 Client Authentication on iOS
5.3.1 Built-in Applications
Similar to importing a server certificate, it is possible to import client certificates into the Default iOS
KeyChain. We will now show how to import the client certificate in the browser and access our server
with the client certificate.
· Open the browser on the emulator, and reload the web page. You should now get a
link to the client key store. (SSL Client A.p12).
· Click the link, and you will be asked to import the identity certificate.
· Click Install and confirm the changes to the settings of the mobile (click Install Now)
· Enter ’user’ for the password and click Next.
This will import the identity certificate.
However, as shown below, you may notice on the device that this
certificate is not trusted.
Although the client certificate chain is part of the PKCS#12 key-
store file, it is not imported into iOS. We can do this manually by
opening the browser again and importing the certificate by click-
ing the link to the client certificate chain. Nevertheless, the client
certificate is accepted by the server.
Page 35 of 41

Jorn Lapon MSEC X.509 Tutorial
Now return to the browser application and browse back to the secure web server url
(or simply refresh):
https://your ip here
You should get the following result:
5.3.2 Enabling Client Authentication in a Custom App
Although the user’s identity was installed in the Keychain, it is not accessible to the custom app. Only
the app installing the certificate or apps created by the same developer can access the items installed in
the Keychain.
Instead, it we provide the identity in code as follows:
In the app, click the Client Cert button to download the PKCS#12 file. The client
(Bob) keystore will be downloaded to the device and stored in the context of the app.
In XCode, uncomment the following lines:
215 else if (method == NSURLAuthenticationMethodClientCertificate)
216 return YES;
This will indicate the delegate to also call the didReceiveAuthenticationChallenge when
authenticating the client.
Page 36 of 41

Jorn Lapon MSEC X.509 Tutorial
Have a look at the second part of the didReceiveAuthenticationChallenge, in which the
client certificate/Identity is loaded and returned by the delegate.
143 SecIdentityRef myIdentity;
144 CFMutableArrayRef certs = CFArrayCreateMutable (
kCFAllocatorDefault, 0, &kCFTypeArrayCallBacks);
145 OSStatus status = loadUserCertificates(&certs,&myIdentity);
146 if (status == 0){
147 NSURLCredential *credential = [NSURLCredential
credentialWithIdentity:myIdentity certificates:(__bridge
NSArray *)(certs) persistence:
NSURLCredentialPersistenceNone];
148 [[challenge sender] useCredential:credential
forAuthenticationChallenge:challenge];
149 CFRelease(myIdentity);
150 CFRelease(certs);
151 }
The loadUserCertificates method loads the client key store from the PKCS#12 file
stored in the app context.
Launch the app from within SCode environment.
After connecting to the secure site, you should see the following result:
Note that this time, we used Bob’s certificate instead of the one of Alice.
Page 37 of 41

Jorn Lapon MSEC X.509 Tutorial
Currently, in the case of custom files, the tutorial does not use the iOS KeyChain.
To get a higher level of security (as from iOS 4, with a hardware backed KeyChain),
it is recommended to use the iOS KeyChain.
Although you can import client certificates through the browser or the settings app
of Android, it may be better to have your app add the certificates to the KeyChain.
In this case, the client certificate will only be accessible to your own app, in contrast
to the device wide availability of client certificates installed through the browser.
Page 38 of 41

Jorn Lapon MSEC X.509 Tutorial
References
[1] ios developer library.
[2] M. Myers, R. Ankney, A. Malpani, S. Galperin, and C. Adams. X.509 Internet Public Key Infrastructure
Online Certificate Status Protocol - OCSP. RFC 2560 (Proposed Standard), June 1999. Obsoleted by
RFC 6960, updated by RFC 6277.
[3] W. Ford D.Solo R. Housley, W. Polk. Rfc3280: Internet x.509 public key infrastructure, certificate and
certificate revocation list (crl) profile. http://tools.ietf.org/html/rfc3280, April 2002.
[4] W. Polk D.Solo R. Housley, W. Ford. Rfc2459: Internet x.509 public key infrastructure, certificate and
crl profile (obsolete). http://tools.ietf.org/html/rfc2459, January 1999.
[5] R. Sabett C. Merrill S. Wu S. Chokhani, W. Ford. Rfc3647: Internet x.509 public key infrastructure,
certificate policy and certification practices framework. http://tools.ietf.org/html/rfc3647,
November 2003.
[6] The OpenSSL Project. OpenSSL: The open source toolkit for SSL/TLS. www.openssl.org, April
2003.
[7] S. Turner. The application/pkcs10 Media Type. RFC 5967 (Informational), August 2010.
Page 39 of 41

Jorn Lapon MSEC X.509 Tutorial
A Build & Setup Environments
A.1 Server Environment
• Linux Mint 16 Petra
(kernel: 3.11.0-12-generic)
• Setup
#i n s t a l l update mint
sudo apt−get update
sudo apt−get upgrade
#i n s t a l l adt bund le
cd ˜/Downloads
wget http :// d l . goog l e . com/ android / adt / 2 2 . 6 . 2
/adt−bundle−l inux−x86 64 −20140321. z ip
mkdir ˜/ Development
unzip adt−bundle−l inux−x86 64 −20140321. z ip −d ˜/ Development
#c r e a t e s h o r t c u t on desk top & launcher
# manually . . .
mv ˜/adt−bundle−l i nux /sdk/ t o o l s / l i b / libOpenGlRender . so
˜adt−bundle−l i nux /sdk/ t o o l s / l i b / libOpenGlRender . so . bak
sudo apt−get i n s t a l l ia32− l i b s # to suppor t the l i n u x 64 b i t v e r s i o n
sudo apt−get i n s t a l l android−t oo l s−adb # in sdk / p lat form−t o o l s ?
# Launch E c l i p s e
# ∗ workspace : ˜/ Desktop / workspace Android
# Android SDK Manager :
# ∗ i n s t a l l Android 4 . 0 . 3 SDK
# − SDK Platform
# − I n t e l x96 Atom System Image
# Android AVD Manager :
# ∗ c r e a t e AVD
# HostGPU
# no s o f t keys . . .
• Server version: Apache/2.4.6 (Ubuntu)
Server built: Mar 19 2014 20:56:01
Page 40 of 41

Jorn Lapon MSEC X.509 Tutorial
A.2 Mobile Environment
B Sources
• Setting up an Apache Web Server: https://www.digitalocean.com/community/articles/
how-to-configure-the-apache-web-server-on-an-ubuntu-or-debian-vps
• Setting up SSL on an Apache Web Server http://www.techrepublic.com/article/solutionbase-setting-up-an-ssl-enabled-web-site-with-apache-224
C FAQ
• Scripts:
failed to update database
TXT DB error number 2
Solution: You may see this when trying to generate a new SSL certificate, but the same DN (the
common name, etc.) was used before (and recorded in index.txt). Re-run the scripts as from Tuto-
rial 0...sh.
• Firefox:
Serial already used
Solution: remove from certificates in Firefox
• ADT Bundle:
AVD fails to run on Linux 64 bit with the Android ADT Bundle
Solution: move sdk/tools/lib/libOpenGlRender.so to sdk/tools/lib/libOpenGlRender.so.bak
• In the emulator of Android, the content of a web page is too small to read.
To enlarge the content of the website, double click the page.
• The Android project shows errors and cannot be build.
Close the project and open it again.
Page 41 of 41