xactimate 28 network installation guide - xactware · xactware recommends that a certified network...
TRANSCRIPT

Network Installation Guide

© 2011-2013 by Xactware . All rights reserved.
Xactware, Xactimate, Xactimate Online, XactNet, and/or other Xactware products referenced herein are either trademarks or registered trademarks of Xactware Solutions, Inc. Other product and company names
mentioned herein may be the trademarks of their respective owners. (031213)
www.xactware.com

Xactimate version 28 Network Installation Guide
INTRODUCTION
Like all networked software applications, Xactimate must be installed on a workstation connected to a network that has been properly set up and mapped to a shared drive (this document uses the X drive as an example). Xactware recommends that a certified network technician set up and administer the network. It is recommended for a network installation of Xactimate to use the physical disc. For instructions about how to set up a network installation of Xactimate via the downloadable version, visit the eService Center at https:/ / eservice.xactware.com/apps/esc/
Xactimate v28.0 Network Installation Guide Page 1

Introduction
SYSTEM REQUIREMENTS - XACTIMATE V28.0 NETWORK INSTALLATION
Specifications Minimum Requirements Recommended Requirements
Processor Single Core Processor 1.5GHz Dual Core Processors
Operating System Windows 8 (32 bit, 64 bit) Windows 7 (32 bit, 64 bit)
Windows Vista (32 bit, 64 bit Business, 64 bit Ultimate) Windows XP Service Pack 3
*Windows RT is not Supported
Video Card Open GL 2.0 Compatible with 128 MB of VRAM and Latest Drivers
Open GL 2.0 Compatible with 512 MB of VRAM and Latest Drivers
Memory 2 GB of RAM 4 GB of RAM or More
Hard Drive Space 5 GB of Continual Free Space 30 GB of Continual Free Space
Hard Drive Speed 5400 PRM Drive 7200 RPM Driver of Faster
Resolution 1024 x 768 1280 x 900 or Higher
Internet One Workstation must have Internet Access
Internet Connection A Broadband Internet Connection is Recommended (or required if using Xactimate Online)
Internet Browser Internet Explorer 8.0 or Above
Optical Drive A DVD Drive is Required to Install Xactimate from a Disk
Network Hardware 100Base-T Category 5 Unshielded Twisted-Pair (UTP) Cable throughout all Network Connections
*VPN/WLAN/WAN not Supported
Prerequisites
Microsoft.Net Framework 4.0 or Higher Version 4.0 Packaged with Xactimate 28
Microsoft SQL Server or Express Edition 2008 or 2012 *2008 Required for Windows XP
*2012 Required for Windows 7 or 8
Microsoft SQL Server Express 2008 and 2012 are packaged with Xactimate 28.
Microsoft Silverlight 5.0 or Higher (Only Needed if Using Xactimate Online)
Xactimate v28.0 Network Installation Guide Page 2

Installing Xactimate on the Server
INSTALLING XACTIMATE ON THE SERVER
Before installing Xactimate on a workstation, the server must first be prepared. If the network meets all the minimum system requirements, then follow the steps below to install SQL Server Express on the server.
Note: If there is not a dedicated server, use a workstation that meets the minimum system requirements as
the SQL Server Express server (that workstation is now referred to as the “server” for purposes of installing Xactimate).
This “server” computer can still be used as a workstation with minimal impact for the user. If Xactimate needs to be installed on the server (as when using a peer-to-peer network), Xactware recommends installing the workstation version of Xactimate on the server after the other workstations have been properly installed and configured. If there is a dedicated server, it is possible to install just SQL Server or SQL Server Express, and not Xactimate. Dedicated server networks do not need the Xactimate workstation install performed on the server.
Note: An install of SQL Server Express is available on the Xactimate DVD and should allow up to ten users
to access the network with minimal effect to network performance. For networks with more than ten users, Xactware recommends that a full version of SQL Server be installed on the server.
INSTALLING SQL SERVER EXPRESS
1. On the server, insert the Xactimate DVD.
Note: If the Xactimate install begins, cancel the install.
2. Open Windows Explorer (i.e. Computer).
3. Right-click on the DVD-ROM drive, and select Open.
4. Locate and double-click on the SQL Express folder.
A list of files appear.
Note: If your Operating System is XP or Vista, click the 2008 folder, and then proceed to step 5.
5. Locate and double-click on the Setup_Network batch (i.e. Setup_Network.bat) file.
The batch file automatically performs the SQL Server Express Install.
Xactimate v28.0 Network Installation Guide Page 1
Installing Xactimate on the Server
Several windows may appear and then close automatically during the setup. When the install is complete, the install window closes.
ENABLING NETWORK PROTOCOLS
If using the SQL Server 2008 or SQL Server 2008 Express, perform the following steps on the server to enable the network protocols.
If the SQL Server is already installed, depending on the configuration, network protocols may need to be enabled on the server in order for the workstations on the network to communicate.
Note: If the Setup_Network batch file was used to install SQL Server Express, skip this section and move
on to “Open the Windows Firewall” on page 6.
To enable network protocols,
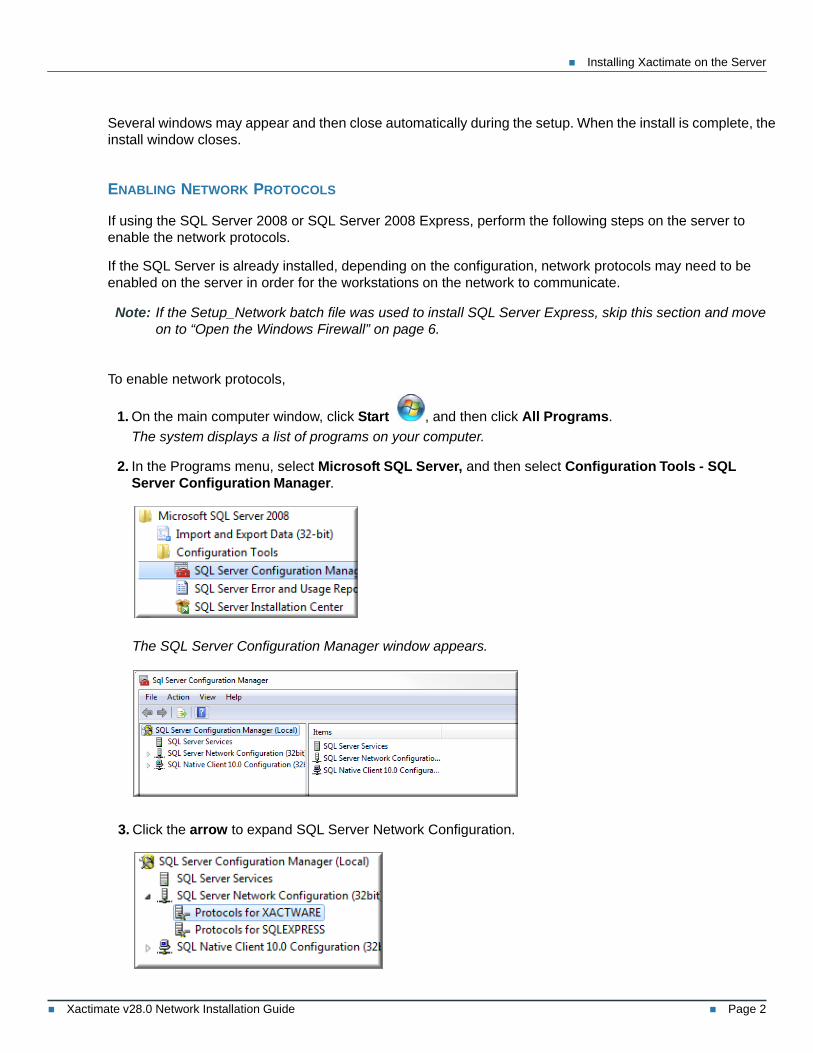
1. On the main computer window, click Start , and then click All Programs. The system displays a list of programs on your computer.
2. In the Programs menu, select Microsoft SQL Server, and then select Configuration Tools - SQL
Server Configuration Manager.
The SQL Server Configuration Manager window appears.
3. Click the arrow to expand SQL Server Network Configuration.
Xactimate v28.0 Network Installation Guide Page 2

Installing Xactimate on the Server
4. Click Protocols for XACTWARE.
The Protocol Name/Status area appears to the right of the Configuration Manager window.
5. In right side of the Configuration Manager, right-click on Named Pipes, and then select Enable.
A message indicates the change does not take effect until the service is stopped and restarted.
‘
6. Click OK.
7. Repeat Steps 5-6 for TCP/IP.
8. Click OK, and then close the Sql Server Configuration Manager.
STARTING AND STOPPING SERVICES
1. Click Start , select Computer, and then right-click. The system displays the Computer drop-down menu.
Xactimate v28.0 Network Installation Guide Page 3

Installing Xactimate on the Server
2. In the Computer menu, select Manage.
The Computer Management window appears.
3. In the Computer Management window, click the arrow to expand Services and Applications.
Xactimate v28.0 Network Installation Guide Page 4

Installing Xactimate on the Server
4. Under Services and Applications, click Services.
The Services window displays items and their descriptions. You can view the Services in the Extended or Standard tabs. (The Standard tab is illustrated below.)
5. In the Services window, scroll down to the SQL Server (XACTWARE).
6. Right-click SQL Server (XACTWARE), and then select Stop.
7. Verify that nothing appears under the SQL Server (XACTWARE) Status column.
8. Right-click the SQL Server (XACTWARE), and then select Start.
9. If the SQL Server Browser service hasn’t started, right-click the Service, and then select Start.
10. Close the Computer Management window.
Xactimate v28.0 Network Installation Guide Page 5

Installing Xactimate on the Server
OPEN THE WINDOWS FIREWALL
When setting up a peer-to-peer network it may be necessary to open the Windows Firewall to allow SQL access.
1. To open the Control Panel, click Start , and then click Control Panel.
2. Click System and Security.
The Windows Firewall options are displayed in the System and Security window.
Xactimate v28.0 Network Installation Guide Page 6

Installing Xactimate on the Server
3. Select Allow a program through Windows Firewall.
A window opens displaying the programs and features allowed through the firewall.
4. Click Allow another program. . .
The Add a Program window is displayed.
Note: Depending on the Operating System, some of the wording may be slightly different. (i.e. “Add program” on XP, “Allow another program” on Windows 7.)
Xactimate v28.0 Network Installation Guide Page 7

Installing Xactimate on the Server
5. On the Add a Program window, select Browse.
6. In the Browse window, navigate to:
C:\Program Files (x86)\Microsoft SQL Server\MSSQL10.XACTWARE\MSSQL\Binn
7. Double-click sqlservr.
The Add a Program window appears.
Note: The sqlservr.exe pathway has been added to the Path field.
8. Click Add.
SQL Server is added to the list of programs allowed past the firewall.
9. To close the Allowed Programs window, click OK.
Xactimate v28.0 Network Installation Guide Page 8

Xactimate Network Installation
XACTIMATE NETWORK INSTALLATION
SETUP MAPPED NETWORK DATA LOCATION
Prior to setup, a network share must be mounted on the local machine with full permissions for all workstations running Xactimate. This drive must be mounted with the exact same context and drive letter (i.e. Z:\server\share). The network folder, where the Xactimate data resides, needs full permissions set for user accounts running Xactimate.
To mapped network drive,
1. On the main computer window, click Start , and then click Computer. 2. Click on Map network drive.
3. In the Drive list, select the Drive letter for your network connection.
The Map Network Drive window appears.
4. In the Folder field, type the Folder Location and Name.
5. Click Finish.
The system displays the new network drive.
Xactimate v28.0 Network Installation Guide Page 9

Xactimate Network Installation
PRE-CONFIGURE THE WORKSTATION
Follow the steps below to install Xactimate to your server from a workstation.
Note: No part of this installation is done on a dedicated server.
To begin the Installation,
1. Establish an Internet Connection.
2. On your workstations, insert your Xactimate DVD.
The installation procedure should begin automatically. If the Xactimate setup does not begin immediately, follow these steps:
For Windows XP
a. Click the Windows Start button. b. Click Run. c. Type D:\setup.exe in the Open field.
If your DVD-ROM drive is not D, type the letter for your DVD drive instead. d. Click OK.
For Windows Vista
a. Click the Windows Start button. b. Type D:\setup.exe from the Start Search text box. c. If the DVD-ROM drive is not D, type the letter for the DVD drive instead. d. Press Enter on the keyboard.
For Windows 7
a. Click the Windows Start button. b. Type D:\setup.exe from the Start Search text box. c. If the DVD-ROM drive is not D, type the letter for the DVD drive instead. d. Press Enter on the keyboard.
For Windows 8
a. Type D:\setup.exe. If your DVD-ROM drive is not D, type the letter for your DVD drive instead.
b. Press Enter.
3. Select Yes.
The Xactimate Install Wrapper—InstallShield Wizard appears.
Xactimate v28.0 Network Installation Guide Page 10

Xactimate Network Installation
4. Select the Language, and then click OK.
Note: In Windows Vista and Windows 7, you may be prompted to allow the setup.
5. Click Install.
Note: An InstallShield Wizard may inform you that Xactimate requires certain programs to run correctly. If your computer already has the Microsoft applications installed, the InstallShield Wizard is not displayed, nor are you be required to restart your computer.
6. If required, click Yes to restart the computer.
Xactimate v28.0 Network Installation Guide Page 11

Xactimate Network Installation
7. Once the computer has restarted, click the Install button.
The installation procedure begins automatically and the License Agreement appears.
Note: If the Xactimate installation does not begin immediately, go back to step 1 to start the install.
8. After reviewing the License Agreement, click I accept the terms of the license agreement, and then click Next.
In Xactimate, there are three Install Type options that apply to a network setup:
Network -
– Choose this option to configure a network for the first time from the first workstation.
– This sets up a network on the server and sets the current machine as a workstation.
Xactimate v28.0 Network Installation Guide Page 12

Xactimate Network Installation
– The network option needs to be selected only once on the first workstation being installed.
– Each additional workstation requires the Workstation option.
Workstation -
– For each additional workstation being added to the network, select this option.
– This is only to be selected if the network has already been configured on another workstation using the Network option.
Local and Workstation -
– Select this option if there is a pre-existing local install that also needs to connect to a pre-existing
network.
Note: Both the local and workstation must be configured before proceeding with this option.
Continue on to the next procedure to configure the network and the first workstation.
Xactimate v28.0 Network Installation Guide Page 13

Configure the Initial Workstation and Network
CONFIGURE THE INITIAL WORKSTATION AND NETWORK
These steps are only to be followed for the first workstation to be added to the network. If the network has already been set up, please skip these steps and continue to the next section “Add an Additional Xactimate Workstation to an Existing Network” on page 17.
1. On the Install Type options, select Network.
The Data Path field appears in the installation window.
2. In the Data Path field, browse to the Drive mapped as your network data location (see “Setup Mapped Network Data Location” on page 9 for more details).
3. To locate the drive mapped as your network data location, click Browse next to the Data Path field.
The Browse For Folder window appears.
4. On the Browse For Folder window, select the mapped network drive, and then click OK.
5. Click Next.
6. On the back of your product packaging, locate and type the 20-character Product Key Code.
7. Select one of the following:
If you need a new XactNet Address, choose I don’t have an existing XactNet address.
If you have an existing XactNet address, choose I already have an XactNet address and want to recover it, and then follow the steps below:
i. Type the e-mail address that was used previously to register with XactAnalysis.
ii. Select Request an e-mail with Security Codes. Within a few minutes, Xactware sends a
message to the e-mail address you entered. This e-mail message contains a security code.
iii. Type (or paste) the security code into the appropriate field.
8. Click Next.
Xactimate v28.0 Network Installation Guide Page 14

Configure the Initial Workstation and Network
9. Select one of the following:
Express to install using the same settings chosen with the configuration of your network.
Advanced to install additional versions and profiles that are available on your key code.
Note: If you are installing a Multi-Version Install, you must have the standard version of Xactimate version 28 installed in order for the multi-license versions to work.
10. Click Next.
The Server Configuration window appears.
11. Enter the number of Licenses you would like to assign to your current network.
Xactimate v28.0 Network Installation Guide Page 15

Configure the Initial Workstation and Network
12. In the SQL Server field, type the name of the machine configured as your SQL server for your network, followed by “\xactware” (For example, if your server’s name is server001, type server001\xactware into this field).
Note: If you created your own named instance of SQL, enter the name of that instance instead of ‘xactware’ at the end.
13. The SQL User and SQL Password fields are set as by default. Unless you have created your own named instance of SQL, leave these as they are; otherwise populate the fields as you have set them up with your instance.
14. If you plan on setting up more than one network using this SQL server, select the Modify Database
Names check box and change the Database Prefix to something unique to identify this network setup.
15. Click Next.
The install configures the network.
16. Once complete, click Finished.
You may now use this workstation and/or begin adding additional workstations to the network.
Xactimate v28.0 Network Installation Guide Page 16

Configure the Initial Workstation and Network
ADD AN ADDITIONAL XACTIMATE WORKSTATION TO AN EXISTING NETWORK
These steps are to be followed only after the network you are adding the workstation to has been setup and configured. If you have not completed those steps, please return to the previous section and complete the steps to set up an Xactimate network.
Important: Map a drive on your current machine to the shared network data location (see “Setup Mapped Network Data Location” on page 9).
To begin the installation process,
1. From the Install Type options, select Workstation.
2. To locate the mapped network data location, click the Browse button next to the Data Path field. The Browse For Folder window appears.
3. In the Browse For Folder window, select your mapped data location, and then click OK.
The system enters the selected location into the Data Path field.
Xactimate v28.0 Network Installation Guide Page 17

Configure the Initial Workstation and Network
4. Click Next.
The workstation connects to the existing network and applies the settings that have already been configured with the initial workstation.
5. Select one of the following:
Express to install using the same settings chosen with the configuration of your network.
Advanced to install additional versions and profiles that are available on your key code.
If needed, click the Show versions for all profiles link.
6. To complete the workstation configuration, click Next.
7. Once configuration is complete, click Finished to launch Xactimate on this workstation.
Xactimate v28.0 Network Installation Guide Page 18

Upgrading Xactimate from v27.5UC to v28.0
UPGRADING XACTIMATE FROM V27.5UC TO V28.0
1. On one of your workstations, insert your Xactimate DVD.
The installation procedure begins automatically.
If the Xactimate setup does not begin immediately, follow these steps:
For Windows XP
a. Click the Windows Start button. b. Click Run. c. Type D:\setup.exe in the Open field.
If your DVD-ROM drive is not D, type the letter for your DVD drive instead. d. Click OK.
For Windows Vista
a. Click the Windows Start button. b. In the Start Search field, type D:\setup.exe.
If your DVD-ROM drive is not D, type the letter for your DVD drive instead. c. Press Enter on your keyboard.
For Windows 7
a. Click the Windows Start button. b. In the Search programs and files field, type D:\setup.exe.
If your DVD-ROM drive is not D, type the letter for your DVD drive instead. c. Press Enter on your keyboard.
For Windows 8
a. Type D:\setup.exe. If your DVD-ROM drive is not D, type the letter for your DVD drive instead.
b. Press Enter.
2. Continue to “Run the Install” on page 21.
Xactimate v28.0 Network Installation Guide Page 19
Upgrading Xactimate from v27.5UC to v28.0
DOWNLOAD INSTALLATION
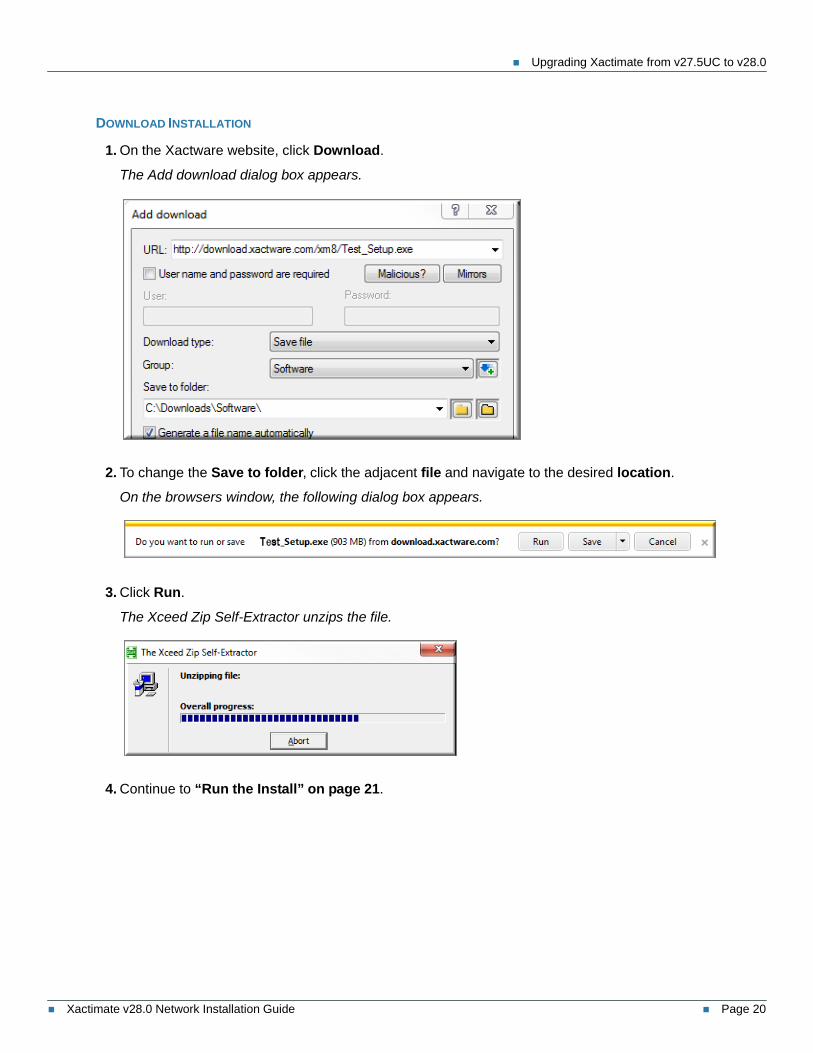
1. On the Xactware website, click Download.
The Add download dialog box appears.
2. To change the Save to folder, click the adjacent file and navigate to the desired location.
On the browsers window, the following dialog box appears.
3. Click Run.
The Xceed Zip Self-Extractor unzips the file.
4. Continue to “Run the Install” on page 21.
Xactimate v28.0 Network Installation Guide Page 20
Upgrading Xactimate from v27.5UC to v28.0
RUN THE INSTALL
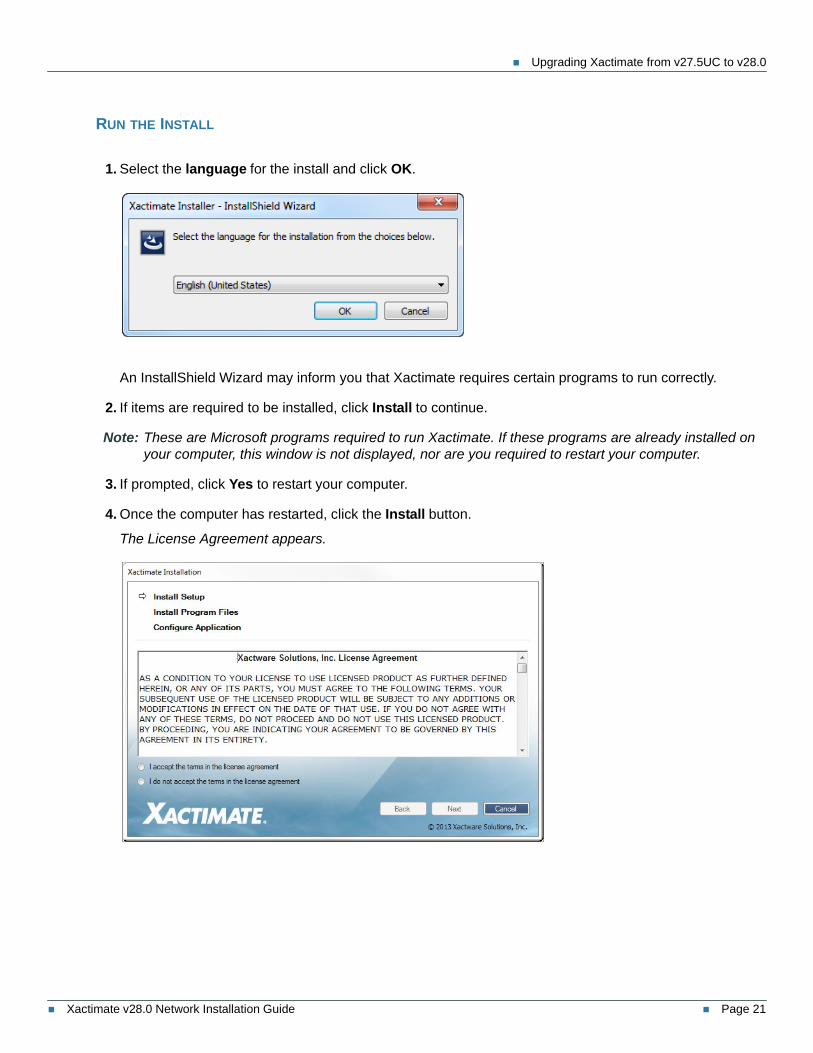
1. Select the language for the install and click OK.
An InstallShield Wizard may inform you that Xactimate requires certain programs to run correctly.
2. If items are required to be installed, click Install to continue.
Note: These are Microsoft programs required to run Xactimate. If these programs are already installed on your computer, this window is not displayed, nor are you required to restart your computer.
3. If prompted, click Yes to restart your computer.
4. Once the computer has restarted, click the Install button.
The License Agreement appears.
Xactimate v28.0 Network Installation Guide Page 21

Upgrading Xactimate from v27.5UC to v28.0
5. After reviewing the License Agreement, click I accept the terms in the license agreement, and then click Next.
The Xactimate Install Setup appears.
6. In the Xactimate Installation screen, select one of the following:
Express to install all versions of Xactimate needed to work with the profiles on your Key Code
Advanced to manually select the versions of Xactimate to install
7. Click Next. The upgrading process begins.
A progress bar shows you the progress of the upgrade. This may take several minutes; do not cancel the installation while the configuration is running.
Xactimate v28.0 Network Installation Guide Page 22

Upgrading Xactimate from v27.5UC to v28.0
8. Once the configuration is complete, click Finished to launch Xactimate version 28.
The Xactimate Login dialog box appears.
Congratulations! You have successfully upgraded to Xactimate version 28.
You’re now ready to begin using Xactimate.
Note: Your login and password for version 27.5UC will not work for v28.0. To create a User Name and Password for v28.0, follow the steps outlined in this section: “Get an Xactware ID” on page 26.
Xactimate v28.0 Network Installation Guide Page 23

Installing Xactimate to a Networked Workstation
INSTALLING XACTIMATE TO A NETWORKED WORKSTATION
Note: No part of this installation is done on a dedicated server.
1. To begin setting up a new workstation, perform steps 1-6 from “Upgrading Xactimate from v27.5UC to v28.0” on page 19.
The system displays the Install Type window.
2. On the list of Install Type options, select Workstation.
3. In The Data Path field, browse to the drive you have mapped as your network data location.
Note: If this is a new machine being added to the network, please follow the steps from “Setup Mapped Network Data Location” on page 9 for more details on how to configure your mapped drive.
4. In the Browse For Folder window, select the Drive where your network data is installed, and then click
OK.
5. Click Next.
The workstation connects to the existing network and applies the settings that have already been configured with the initial workstation.
6. Select one of the following:
Express button to install using the same settings chosen with the configuration of your network.
Advanced button to install additional versions and profiles that are available on your key code
7. Click Next to complete the workstation configuration.
8. Once the configuration is completed, clicked the Finished button to launch Xactimate on this workstation.
Xactimate v28.0 Network Installation Guide Page 24

Add an Additional Xactimate Workstation using the Native Client
ADD AN ADDITIONAL XACTIMATE WORKSTATION USING THE NATIVE CLIENT
Note: Follow these steps after the network you are adding the workstation to has been set up and configured. If you have not completed those steps, please return to the previous section “Xactimate Network Installation” on page 9.
1. On the workstation, insert the Xactimate DVD.
Note: Stop the installation process if it starts automatically.
2. Click on the Drive that contains the Xactimate DVD, and then open the DVD folder.
The system displays the contents of the DVD folder.
3. Once inside the DVD folder, double-click the SQLExpress folder.
4. Inside the SQLExpress folder, double-click the Setup_Workstation.bat file to run the workstation setup.
Windows configures Microsoft SQL Server Native Client for this machine.
5. Once the Setup_Workstation.bat file has finished the configuration, open the CD folder from the main menu of the disc.
The system displays a list of folders and files in the CD folder.
6. In the CD folder, double-click the XM8.msi file.
7. Once the configuration is complete, click the Finished button to launch Xactimate on this workstation.
Xactimate v28.0 Network Installation Guide Page 25

Get an Xactware ID
GET AN XACTWARE ID
1. On the Xactimate login page, click Get an Xactware ID.
A browser window opens to the Xactware ID Management page.
2. Type in the required information.
Xactware ID must be a valid email address.
Password requirements:
Xactimate v28.0 Network Installation Guide Page 26

Get an Xactware ID
– Must be at least eight characters long.
– Must have at least one letter upper or lower case.
– Must have at least one number.
– Must be different than the Xactware ID.
Type in your first and last name.
Alternate email address and security question is optional.
3. Click Create Xactware ID.
The following message appears.
4. Go to your email and open the XID email.
5. To verify your account, click the provided link in the email message.
6. On the Xactimate login dialog box, type in your Xactware ID and Password.
Xactimate v28.0 Network Installation Guide Page 27
Get an Xactware ID
7. Click OK.
Xactimate version 28.0 opens to the Control Center Dashboard.
FORGOT YOUR XACTWARE PASSWORD
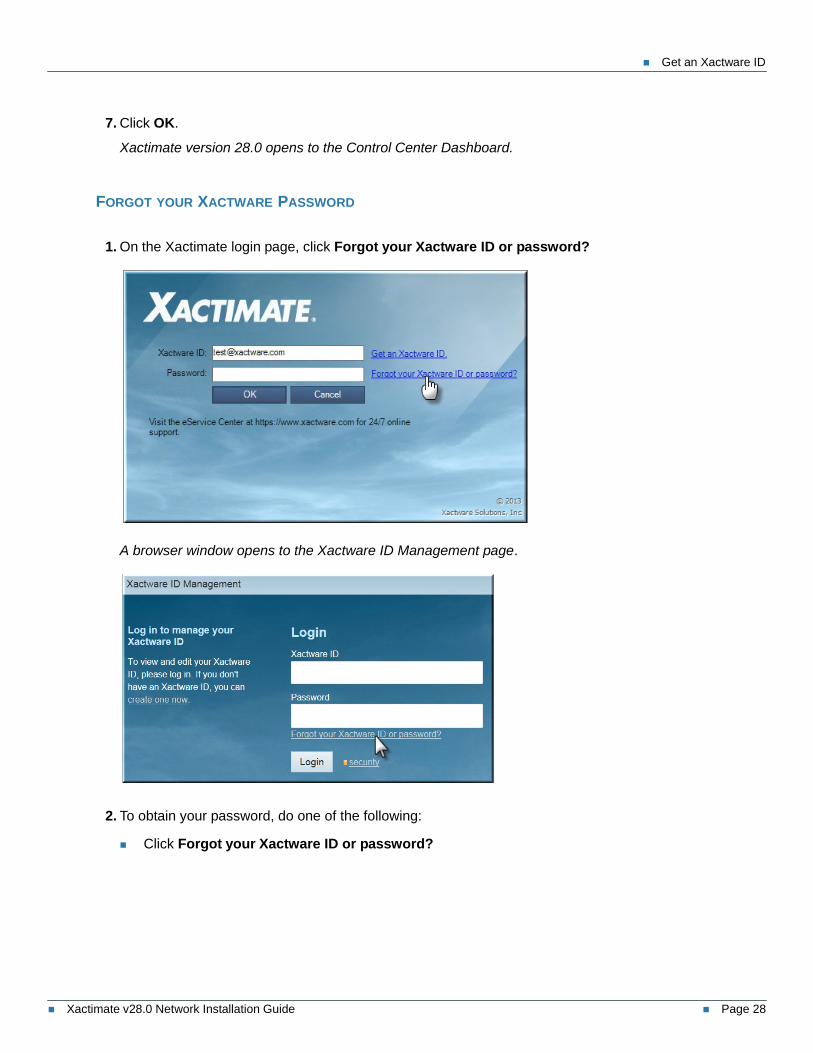
1. On the Xactimate login page, click Forgot your Xactware ID or password?
A browser window opens to the Xactware ID Management page.
2. To obtain your password, do one of the following:
Click Forgot your Xactware ID or password?
Xactimate v28.0 Network Installation Guide Page 28

Get an Xactware ID
i. Type your Xactware ID (i.e. your email address), and then click Next.
ii. Click My Xactware ID email address, and then click Reset Password.
An email is sent to your Xactware ID email address.
iii. Open the email and click the provided link to reset your password.
iv. On the Create a new password form, type in your new password and retype to confirm.
v. Click Reset Password.
3. Go to the Xactimate login screen and enter in your user name and new password.
Xactimate v28.0 Network Installation Guide Page 29

Get an Xactware ID
FORGOT YOUR XACTWARE ID
1. On the Xactimate login page, click Forgot your Xactware ID or password?
A browser window opens to the Xactware ID Management page.
2. Click Forgot your Xactware ID or password?
Xactimate v28.0 Network Installation Guide Page 30

Get an Xactware ID
3. On the Xactware ID Management page, to find your Xactware ID, type in the required information.
4. Click Recover ID.
If the information entered matches our records, the Xactware ID is returned and appears on the screen.
If the information entered does not match our records, contact support (1-800-710-9228) for further assistance.
Xactimate v28.0 Network Installation Guide Page 31