xspider 2.13 en reference manual
TRANSCRIPT

8/17/2019 XSpider 2.13 en Reference Manual
http://slidepdf.com/reader/full/xspider-213-en-reference-manual 1/236
The xSpider software system is a graphically oriented designsystem for dimensioning of low-voltage networks fitted withprotective devices of Eaton brands.
xSpider 2.13 REFERENCE MANUAL

8/17/2019 XSpider 2.13 en Reference Manual
http://slidepdf.com/reader/full/xspider-213-en-reference-manual 2/236
_______________________________________________________________________________
_______________________________________________________________________________________________________________________
_____________________________________________________________________________
xSpider Version 2.13, Reference Manual
© Ing. Petr Slavata, Doc. Ing. Jiří Rez, CSc., Ing. Michal Kříž, Ing. František Štěpán© 2001 - 2015
Exclusive rights: Eaton Industries (Austria) GmbH Scheydgasse 42, A-1215 Wien, Austria
Technical assistance (Austria): Technical assistance (Germany):Eaton Industries (Austria) GmbHScheydgasse 42, A-1215 Wien
AustriaTel.: +43 (0) 5 08 68 - 0
e-mail: [email protected] http://xspider.moeller.net www.moeller.net
Eaton Electric GmbHHein-Moeller-Str. 7-11, 53115 Bonn
GermanyTel: +49 (02 28) 602 - 5600
e-mail: [email protected] http://xspider.moeller.net www.moeller.net
This documentation is an integral part of the xSpider (Spider) software system and may bedistributed only in connection with this system.
The authors provide the software system and its documentation on an „As-is“ basiswithout warranties of any kind and with the potential occurrence of faults. Theauthors shall not be held liable for any deliberate, indirect, incidental or subsequentdamage arising in connection with the use of these materials.
This manual describes the status of the software system at the time upon completion of itsdevelopment and does not concern any potential changes in the future.
All registered trademarks or other trademarks used in this documentation are the propertyof their respective owners. No ownership rights arising therefrom are questioned by their
reference in the documentation.Files: xSpider_mTI.DOC, xSpider_mOB.DOC, xSpider_m**.DOC, where ** means 00 - 09
xSpider_t**.DOC, where ** means 01 - 03

8/17/2019 XSpider 2.13 en Reference Manual
http://slidepdf.com/reader/full/xspider-213-en-reference-manual 3/236
_______________________________________________________________________________
_______________________________________________________________________________________________________________________
xSpider, Reference Manual I
CONTENTS _______________________________________________
xSpider_mOB.DOC
Contents .................................................................................................................................... I
PART I: DIMENSIONING OF LOW-VOLTAGE NETWORKS
THEORETICAL INTRODUCTION Prepared by: Ing. Michal K ř íž, Doc. Ing. Jiř í Rez, CSc., Ing. František Št ě pán xSpider_m00.DOC
1. Introduction ............................................................................................................................. 1
1.1 Why is good to use computer for dimensioning conductors and designing of
circuit protection? ......................................................................................................... 1
1.2 xSpider software - what is it intended for? .................................................................... 2
1.3 How to proceed when designing a low-voltage network ............................................... 3
2. Network Behavior in Operating State and under Overload .................................................... 4
2.1 Line current I B, nominal current of the protective device I n .......................................... 42.2 Line dimensioning ......................................................................................................... 5
2.2.1 Heat generation in the conductor ....................................................................... 5
2.2.2 Steady conductor temperature - maximum temperatures allowed… ................ 6
2.2.3 Maximum currents allowed - what do they depend on ..................................... 6
2.2.4 Comments on entering values into the xSpider software .................................. 8
2.3 Determination and verification of protective devices .................................................... 8
3. Network Behavior at Short Circuits ...................................................................................... 15
3.1 Types of short-circuit faults ......................................................................................... 15
3.2 Short-circuit current flow ............................................................................................. 15
3.3 Network configuration ................................................................................................. 173.4 Short-circuit current calculation .................................................................................. 17
3.5 Calculation procedures ................................................................................................ 19
3.6 Line dimensioning from the short-circuit point of view .............................................. 20
3.7 Dimensioning of protective devices from the short-circuit point of view ................... 21
4. Voltage Drops, Load Distribution, Selectivity ..................................................................... 27
4.1 Allowed voltage drops ................................................................................................. 27
4.2 Comments on the voltage drop calculation .................................................................. 28
4.3 Load calculation for the particular network branches ................................................. 28
4.4 Coordination between protective devices .................................................................... 29
4.5 Cascading of protective devices .................................................................................. 314.6 Reactive power compensation ..................................................................................... 33
5. Properties of Protective Devices ........................................................................................... 36
5.1 Fuses ............................................................................................................................ 36
5.2 Circuit breakers ............................................................................................................ 37
6. Bibliographic Reference ....................................................................................................... 41
PART II: XSPIDER - PROGRAM OPERATION Prepared by: Ing. Petr Slavata xSpider_m01.DOC
7. Introduction ........................................................................................................................... 43
8. Installation ............................................................................................................................. 46
8.1 Installation from CD-ROM .......................................................................................... 46

8/17/2019 XSpider 2.13 en Reference Manual
http://slidepdf.com/reader/full/xspider-213-en-reference-manual 4/236
_______________________________________________________________________________
_______________________________________________________________________________________________________________________
II xSpider, Reference Manual
8.2 “Manual” customer installation in case of SETUP failure .......................................... 48
8.3 Installation backup ....................................................................................................... 49
8.4 Software update from website .................................................................................... 50
8.5 Software update from directory ................................................................................... 50
9. Launching xSpider ................................................................................................................ 51
9.1 First launching ............................................................................................................. 519.2 Second and any other launching .................................................................................. 52
xSpider_m02.DOC
10. Introduction to the xSpider system ..................................................................................... 54
10.1 Main screen and program operation .......................................................................... 54
10.2 Running program functions ....................................................................................... 56
10.3 Undo, Redo ................................................................................................................ 57
10.4 Method of program application ................................................................................. 57 xSpider_m03.DOC
11. Network wiring diagram (topology) ................................................................................... 60
11.1 Network type and voltage system .............................................................................. 61
11.2 Supply network .......................................................................................................... 6211.3 Generator ................................................................................................................... 64
11.4 Transformer................................................................................................................ 65
11.5 Switchboard trunk ...................................................................................................... 67
11.6 Line - enclosed busbar distribution system................................................................ 69
11.7 Line - cable ................................................................................................................ 72
11.8 Switch-disconnector ................................................................................................... 77
11.9 Circuit breaker ........................................................................................................... 78
11.10 Fuse .......................................................................................................................... 81
11.11 Motor ....................................................................................................................... 83
11.12 Load ......................................................................................................................... 84
11.13 Compensation .......................................................................................................... 8611.14 Group ....................................................................................................................... 87
11.15 Free graphics ............................................................................................................ 89
11.15.1 Line .............................................................................................................. 89
11.15.2 Rectangle ..................................................................................................... 89
11.15.3 Circle ........................................................................................................... 89
11.15.4 Text .............................................................................................................. 90
11.16 Drawing tools ........................................................................................................... 90 xSpider_m04.DOC
12. Editing the Network Wiring Diagram ................................................................................. 91
12.1 Properties editing ....................................................................................................... 91
12.1.1 Editing the properties of network components .............................................. 9212.1.2 Editing the properties of free graphics components ...................................... 94
12.1.3 Batch properties editing - limit voltage drops and limit discon. time ........... 95
12.1.4 Batch properties editing - tags ...................................................................... 96
12.2 Changing component position ................................................................................... 97
12.3 Copying components ................................................................................................. 98
12.4 Modifying the component geometry - stretch ............................................................ 99
12.5 Erasing components ................................................................................................... 99
12.6 Using the clipboard .................................................................................................. 100
12.6.1 Cut objects to the clipboard ......................................................................... 100
12.6.2 Copy objects to the clipboard ...................................................................... 10112.6.3 Paste objects from the clipboard ................................................................ 101
12.7 Searching item in wiring diagram according to tag ................................................. 101

8/17/2019 XSpider 2.13 en Reference Manual
http://slidepdf.com/reader/full/xspider-213-en-reference-manual 5/236
_______________________________________________________________________________
_______________________________________________________________________________________________________________________
xSpider, Reference Manual III
13. View control (Zoom) ........................................................................................................ 102
13.1 Regenerating images ................................................................................................ 102
13.2 Pan............................................................................................................................ 102
13.3 Zoom in / zoom out .................................................................................................. 103
13.4 Zooming in a part of the design (Zoom Window) ................................................... 104
13.5 Return to the previous image (Zoom Previous) ....................................................... 105
13.6 Viewing the drawing area image (Zoom All) .......................................................... 105
13.7 Hide calculation results ............................................................................................ 105 xSpider_m05.DOC
14. Network Parameter Calculations ...................................................................................... 106
14.1 Dimensioning of cables and protective devices ....................................................... 106
14.2 Network connection logic check .............................................................................. 109
14.3 Voltage drops and load distribution ......................................................................... 109
14.4 Short-circuit currents ............................................................................................... 114
14.4.1 Cascades ...................................................................................................... 119
14.4.2 Selectivity .................................................................................................... 124
14.5 Displaying impedances in network nodes ............................................................... 125
14.6 Displaying the values of limit voltage drops, discon. times and conn. phases ........ 127
14.7 Summary of variables related to the calculations .................................................... 129 xSpider_m06.DOC
15. Tripping Characteristics .................................................................................................... 133
15.1 Plotting the characteristics of circuit breakers from the database ........................... 134
15.2 Plotting the characteristics of fuses from the database ............................................ 136
15.3 Plotting the characteristics of cables from the database .......................................... 136
15.4 Plotting the characteristics of circuit breakers/fuses/cables
taken over from the network project ........................................................................ 138
15.5 Editing the properties of an already plotted characteristic ...................................... 139
15.6 Erasing an already plotted characteristic from the chart ......................................... 140
15.7 Printing the sets of characteristics to printer ............................................................ 140
15.8 Working with files ................................................................................................... 141
15.8.1 Saving a set of characteristics to file ........................................................... 141
15.8.2 Loading (opening) files with the set of characteristics ............................... 142
15.8.3 Starting to create a new set of characteristics ............................................. 143
15.8.4 Exporting the sets of characteristics to BMP format ................................... 143
15.8.5 Exporting the sets of characteristics to DXF format ................................... 144
15.8.6 Terminating the work with the Tripping Characteristics module ............... 145 xSpider_m07.DOC
16. Component Databases ....................................................................................................... 146
16.1 Database operation - component selection .............................................................. 14616.2 Database modifications by the user ......................................................................... 148
16.3 Structure of data tables for the individual component types ................................... 152 xSpider_m08.DOC
17. Information about Project, Title Block ............................................................................. 156
18. Printing the Results to Printer ........................................................................................... 157
18.1 Print preview ............................................................................................................ 157
18.2 Printing the results to printer ................................................................................... 159
18.3 Printing wiring diagrams ......................................................................................... 159
18.4 Page Setup ................................................................................................................ 163
19. Data Export ....................................................................................................................... 16519.1 Exporting component lists ....................................................................................... 165
19.2 Exporting the network wiring diagram to BMP file format .................................... 166

8/17/2019 XSpider 2.13 en Reference Manual
http://slidepdf.com/reader/full/xspider-213-en-reference-manual 6/236
_______________________________________________________________________________
_______________________________________________________________________________________________________________________
IV xSpider, Reference Manual
19.3 Exporting the network wiring diagram to DXF file format ..................................... 168
20. Working with Files ........................................................................................................... 169
20.1 Saving your project to a file on the disk .................................................................. 169
20.2 Loading (opening) files with projects ...................................................................... 170
20.2.1 Loading (opening) demo files ..................................................................... 170
20.3 Editing a new project ............................................................................................... 171
20.4 Ending the project editing operation ........................................................................ 171
20.5 Ending the program session ..................................................................................... 172
21. Options .............................................................................................................................. 173
21.1 Graphics environment .............................................................................................. 173
21.2 Wiring diagram ........................................................................................................ 175
21.3 Free graphics ............................................................................................................ 176
21.4 Calculation ............................................................................................................... 176
21.5 Automatic dimensioning .......................................................................................... 177
21.6 Changing the licence data ........................................................................................ 179
22. Help .. ................................................................................................................................ 180
22.1 Tip of the Day .......................................................................................................... 180
23. About xSpider ................................................................................................................... 181 xSpider_m09.DOC
24. History of Versions ........................................................................................................... 182
PART III: XSPIDER - SOLVED EXAMPLES Prepared by: Ing. Petr Slavata xSpider_t01.DOC
25. xSpider - Solved Examples ............................................................................................... 194
25.1 Wiring diagram - creation, editing ........................................................................... 194 xSpider_t02.DOC
25.2 Wiring diagram editing and basic calculations - radial network ............................. 106 xSpider_t03.DOC
25.3 Overview of demo examples provided with the program ........................................ 218
25.3.1 DEMO-RadialNetwork (radial network) ..................................................... 218
25.3.2 DEMO-MeshedNetwork (meshed network) ............................................... 219
25.3.3 DEMO-Simultaneous-and-Utilization-Factors ........................................... 220
25.3.4 DEMO-Busbar (busbar distribution) ........................................................... 221
25.3.5 DEMO-LoadLooping (load looping) .......................................................... 222
25.3.6 DEMO-Cascade (circuit-breaker/fuse cascading) ....................................... 223
25.3.7 DEMO-Network (radial network) ............................................................... 22525.3.8 DEMO-Network-1F (radial network with 1-phase consumptions) ............. 226
25.3.9 DEMO-Sit-TN690 (meshed TN network 690/400 V)................................. 226
25.3.10 DEMO-Network-IT (radial IT network) ................................................... 227
25.3.11 DEMO-ParallelCables (parallel cables) .................................................... 227

8/17/2019 XSpider 2.13 en Reference Manual
http://slidepdf.com/reader/full/xspider-213-en-reference-manual 7/236
_______________________________________________________________________________
_______________________________________________________________________________________________________________________
xSpider, Reference Manual V
PART I: Dimensioning of Low-Voltage Networks -Theoretical Introduction

8/17/2019 XSpider 2.13 en Reference Manual
http://slidepdf.com/reader/full/xspider-213-en-reference-manual 8/236
_______________________________________________________________________________
_______________________________________________________________________________________________________________________
VI xSpider, Reference Manual

8/17/2019 XSpider 2.13 en Reference Manual
http://slidepdf.com/reader/full/xspider-213-en-reference-manual 9/236
_______________________________________________________________________________
_______________________________________________________________________________________________________________________
xSpider, Reference manual 1
1. Introduction _______________________________________________
It is not easy to dimension and protect electrical equipment in a correct and at the same time
optimum way. Because every time it is necessary to harmonize a number of requirements, lead inthe first place by need to secure safety of the operated equipment in the best manner possible and
simultaneously ensure the overall efficiency of its design. Both of these points of view are on
principle contradictory. The aim is always the same - the equipment and the supply lines should
never threaten its neighborhood, even under the most unfavorable operating or fault conditions. On
the other hand, the financial affordability always forces us not to oversize the entire system and to
keep it within reasonable costs and spatial requirements.
Safety of electrical equipment is governed by electrical regulations. They specify that the
equipment may not run excessively hot when being overloaded, the voltage drops on the supply
side may not, under any operating conditions, exceed the maximum limit allowed, the protection
through automatic disconnection from the power source must respond in sufficiently short time incase of fault etc. From the list specified above it may appear that the safety requirements will be
met provided the equipment and the supply lines are dimensioned sufficiently. However, we should
also not forget the fact that excessively high short-circuit currents may arise in case of fault and the
equipment must comply, with all of its components, precisely to such possible short-circuit
currents. Incorrect selection of any installation component can seriously threaten the safety of the
equipment itself as well as the safety of the neighborhood.
In addition to the necessary safety points of view, we should not forget the operating reliability
aspect either. A fault caused by one part of the equipment may not lead to the entire facility being
out of operation. Instead, the protective device should disconnect the respective failed part only.Even though the aspect of selective rating as described above is mentioned right in several
standards, in practice this issue is, unfortunately, not given adequate attention most of the times.
Various requirements, which are indicated here, can be met through the right selection of
equipment, lines and protective devices. Nowadays there is a fairly wide range of these components
available, but when selecting them, it is necessary to take into account that each type has slightly
different characteristics and, thus, is suitable for a different purpose.
1.1 Why is good to use computer for dimensioning of conductors and designing ofcircuit protection?
First of all, the primary aim should not be to fully mechanize and automate the designer’s work
with electrical equipment, circuits and installations. Designing cannot and may not be distorted
simply to some series production of designs. Prior to starting to process a project itself at all, the
designer must determine a number of figures, values and parameters. He/she must know what must
be supplied with what power, under what conditions, what are all the situations that certain
electrical equipment must withstand during operation etc. On the other hand, there is a range of
routine and sometimes even quite tedious tasks included in or associated with designing. These
tasks include both the correct dimensioning of line and the correct selection of the protective device
when the line as well as the protective device must be verified from many different aspects. In some
cases, the designer should repeat a number of operations several times to follow the correct
procedure. For instance, if he/she receives an incorrect cross-section due to voltage drop, which is averification that should be done as one of the very last checks, he/she should review the previous
design verifications from all aspects once again.

8/17/2019 XSpider 2.13 en Reference Manual
http://slidepdf.com/reader/full/xspider-213-en-reference-manual 10/236
_______________________________________________________________________________
_______________________________________________________________________________________________________________________
2 xSpider, Reference manual
At the same time, everyone would probably admit that it is even needless to repeat all the steps
many times. Whether this is the case or not must be decided by the designer alone again based on a
proper consideration. However, if he/she uses a computer, many of these concerns and
considerations are not present anymore because the computer processes these tasks alone.
Therefore, it is good to use the computer also because we do not want to leave anything up to the
coincidence, we do not want to omit certain steps because of their labor intensity as well as because
we want to get a fast and accurate calculation result. However, the designer must know what the
computer is doing in fact and why it is doing it. He must be aware of the fact that a computer can be
a useful aid, however, all important decisions must be made by the designer himself/herself.
1.2 xSpider sof tware - what is it intended for?
The xSpider software is intended for the design of low-voltage installations and their protection in
TN, TT and IT systems, the rated voltage of which can be selected from the range of typical
voltages or entered manually for any different voltage up to 1,000 V. Work in TT and IT systems
extends the software's range of application nearly to all cases required by the designers.
The network configuration itself depends on where the power source is located and how the loads
are distributed. According to these factors, the designer decides on what the network should look
like, whether there should be just a single backbone line with branches leading to the individual
electricity consumers or whether the network should be designed as a radial network with branching
directly at the transformer or as a combination of both previous options, as the case may be.
Another advantageous feature of the xSpider software is the possibility of designing circular and
meshed networks. The program will allow a fast verification of the proposed network arrangement
and optimization of various network configurations.
When solving the issues of low-voltage network dimensioning with the aid of computer technology,we work with two types of components in general:
Inserted components, i.e. such components, the parameters of which are preset and cannot be
configured within the program (power sources, transformers, loads, motors, compensation
condensers),
User-defined components, i.e. such components, the parameters of which are subject to
investigation and optimization (lines - cables, busbar systems; protective devices - circuit
breakers, fuses).
The text below deals with the issues related to the dimensioning of user-defined components.
The xSpider software allows working in the following basic modes:
Design mode, i.e. the parameters of the user-defined components, where required so by the
user, will be automatically determined and set in such manner as to ensure compliance with
the safety requirements; however, the proposed design solution must not be fully optimal;
Control mode, i.e. parameters of all components (user-defined as well as inserted) are set by
the user based on his/her experience; the calculation is followed by a check of the criteria for
safe operation of the network. The user will evaluate the results and may subsequently carry
out some optimization adjustments to the design.

8/17/2019 XSpider 2.13 en Reference Manual
http://slidepdf.com/reader/full/xspider-213-en-reference-manual 11/236
_______________________________________________________________________________
_______________________________________________________________________________________________________________________
xSpider, Reference manual 3
1.3 How to proceed when designing a low-voltage network
The process of designing a low-voltage network in particular steps as described in the following
chapters is only a recommended procedure and the designer can select the sequence of the
individual steps according to his/her needs. Typically, he/she designs the distribution as a whole
and then at a later point in time it is found out that something must be added yet. Whereas what has
once been designed or already installed, cannot be changed anymore. As a matter of fact, it should
be counted with the option of including additional electrical equipment during the facility’s service
life according to the electrical regulations, and it is also quite common in the practice. Another
situation, which is similar in principle, occurs when changing the power supply for a certain
equipment part. Part of the equipment is disconnected in the emergency mode, for instance, and the
remaining parts of the installation are supplied from a standby supply. In such case, the designer
works with already preset line parameters and carries out only the appropriate checks and possible
adjustments. Ideal case occurs when the entire electric distribution is designed at once, which is
exactly the case described in the following text of this user manual.

8/17/2019 XSpider 2.13 en Reference Manual
http://slidepdf.com/reader/full/xspider-213-en-reference-manual 12/236
_______________________________________________________________________________
_______________________________________________________________________________________________________________________
4 xSpider, Reference manual
2. Network Behavior in Operating State andunder Overload
_______________________________________________
2.1 Line current IB, nominal current of the protective device In
First of all, the designer determines the highest current in the line to the known equipment of the
consumption point (building, facility, workshop, plant), which must be supplied to this point in
order to ensure standard expected operation of the electrical equipment. However, it is not a simple
sum of the rated currents of all devices, but the maximum current required to supply all devices,
which are expected to be possibly in simultaneous operation at the power usually used instead of
the maximum power. When supplying devices of identical character, the sum of the rated currents is
multiplied by the simultaneous factor and the utilization factor. (The simultaneous factor is a ratio
of the power input of devices in operation to the power input of all devices; the utilization factor
expresses the extent of use of the respective equipment in percentage rate). xSpider allows the user
to enter both factors. The utilization factor is always taken into account; the simultaneous factor is
taken into account in radial networks. In addition, xSpider also offers the possibility to trip the
particular loads, thus allowing the user to simulate real situations in the operation of electrical
devices and take into account mainly heavier loads.
Here it is necessary to point out certain pitfalls present when assessing the used (actual) and
installed power since a prudent procedure is required. For instance, when the user enters the
currents of all powered loads, we will use the sum of these currents for calculations. This method,
however, is incorrect. If someone entered one socket outlet as one load, he would obtain the design
current of I B = 10×16 = 160 A for one socket circuit with ten sockets, which is false of course. Inthe real case, the user must therefore specify the limitation described above right into its task
definition.
Based on the information about the loads, the designer will obtain the highest current in the line,
which is called the design current I B. For this current, the designer selects the rated current of the
protective device I n. Its value must always be higher than the design current I B. Thus, it must be true
that:
I B I n
whereas: I B ...... design current (current for which the circuit is designed) [A] I n ...... nominal current of the protective device [A]
The condition stipulated above results from the requirement to avoid switching off by the protective
device at normal functioning of the equipment.
At this moment, the designer will not meditate too much on other features of the protective device.
He/she will only determine its rated size. Nowadays, the size is identical for both circuit breakers
and fuses. It can be selected from the series of 2; 4; 6; 10; 16; 20; 25; 32; 40; 50; 63; 80; 100; 125;
160; 200; 225; 250; 315; 400; 630 A etc. Only the rated values of 12 A or 35 A, as the case may be,
of fuses and 13 A for circuit breakers are different.

8/17/2019 XSpider 2.13 en Reference Manual
http://slidepdf.com/reader/full/xspider-213-en-reference-manual 13/236
_______________________________________________________________________________
_______________________________________________________________________________________________________________________
xSpider, Reference manual 5
2.2 Line dimensioning
The magnitude of the design current I B and subsequently the magnitude of the rated current I n for
the protective device imply also the admissible current load I z. The following condition must be
met:
I n I
z
whereas: I n ..... nominal current of the protective device [A]
I z ...... admissible line current load (continuous current carrying capacity) [A]
The condition stipulated above is based on the requirement that the line may not be overloaded
under either an abnormal equipment operation or its overloading; otherwise the line must be
disconnected from power supply. Therefore, the admissible current load must be higher than the
nominal current of the protective device. At the same time it is required from the protective device
not to switch off in case of overcurrents, which may occur on a short-term basis during the
operation. This implies also the assignment of line characteristics (the maximum admissible load),
protection and equipment (load required for equipment functioning) as shown in the picture below.
Similarly to the case of protection assigned to the design current, the idea of allocating the same or
higher value for the conductor or cable rated current to the nominal current of the protective device
suggests itself here. The IEC 60364 5-523 standard specifies in fact the terms of “rated current-
carrying capacity - rated current“. So why cannot we simply take a conductor or a cable with themost favorable price for us, the rated current (admissible line current load I z ) of which is
immediately next higher to the nominal current of the protective device I n? The manufacturers even
specify the rated currents of their cables and the rated values of a number of those are specified in
the Annex to IEC 60364 5-523. The text below explains why it is not so simple.
2.2.1 Heat generation in the conductor
Heat is generated when electric current passes through the conductor. Unless such generated heat
was carried away to the ambient environment, the conductor would be heated up until melting
down. Only then the passage of the current would be interrupted. After the passage of any currentlower than the one leading to conductor melting down, the temperature settles down at a certain
value at last. Nevertheless, the higher the conductor temperature, the more heat is transmitted by the
Magnitude of current I
Time/current characteristic of the maximum
admissible load of the protected equipment
(current carrying capacity of a conductor).
Time/current characteristic
of the protective device.
Time/current characteristic of the
minimum load required for properunction of the equipment.
tPassagetime of Icurrent I

8/17/2019 XSpider 2.13 en Reference Manual
http://slidepdf.com/reader/full/xspider-213-en-reference-manual 14/236
_______________________________________________________________________________
_______________________________________________________________________________________________________________________
6 xSpider, Reference manual
conductor to its ambient environment (see the following picture). The heat generated by the current
passage in the conductor is proportional to the conductor resistance and increases with the square of
the current. In addition to that, it must be kept in mind that the conductor resistance increases with
rising temperature, which leads to even higher heat output exceeding the value corresponding to its
square (2.492 precisely).
2.2.2 Steady conductor temperature - maximum temperatures allowed:operating and overload temperature
When a steady temperature is reached, there is a balance between the heat generated in the
conductor by the passing current and the heat transmitted by this conductor into its ambient
environment. The more obstacles there are for the heat to be transmitted into the ambient
environment (insulation, installation method, …), the less current is needed for its heating up to the
steady temperature. The highest core temperature allowed is thus determined by the insulation used
for cable sheathing. A slightly higher temperature of the conductor core is allowed for overloadingand short circuit since these overcurrents are presumed to be interrupted by the protective device in
a sufficiently short period of time. The maximum allowed temperatures for standard operation and
overload situation are different for various insulation types. Different insulation materials are able
to withstand different temperatures. For the common PVC insulation, the maximum temperature
allowed is 70 °C during standard operation, 120 °C in case of overload and 160 °C in case of short
circuit. For bare aluminium and copper conductor (Al, Cu), these temperatures are 80 °C, 180 °C
and 300 °C, respectively.
2.2.3 Maximum currents allowed - what do they depend on
The magnitude of the currents allowed is determined by the maximum temperature of the conductor
on one hand, and by the ambient temperature of the environment, to which the heat is transmitted,
on the other hand. The crucial factor is the difference between the maximum temperature allowed
for the conductor (whether the operating or the overload temperature) and the ambient temperature.
Therefore, the lines can be stressed more at lower ambient temperatures than at its basic
temperature and, conversely, less stressed at higher ambient temperatures.
Another important property, which has an influence on the conductor current load, is going to be
shown in example. The rated current of a CY single-core cable with the cross-section of 0.35 mm2
is 10.5 A. We would expect the rated current of the same CY conductor having the cross-section of
35 mm2, i.e. a hundred times larger, to be also a hundred times higher, i.e. approximately 1,000 A.However, it is by far not the case. The rated current of a CY conductor with the cross-section of
35mm2 is only 181 A. Why only so little? The load can rise only up to such extent how the heat
Current carrying
core of the conductor .
Conductor insulation
Distance, in which the ambient
temperature is not
significantly increased due to
the current influence
Power loss flowing from the
conductor core to the
ambient environment
Tempe-rature
rise
u
Distance fromthe cable center

8/17/2019 XSpider 2.13 en Reference Manual
http://slidepdf.com/reader/full/xspider-213-en-reference-manual 15/236
_______________________________________________________________________________
_______________________________________________________________________________________________________________________
xSpider, Reference manual 7
transmission is increased from the conductor into the ambient environment. However, the heat
transmitted to the ambient environment did not increase proportionately to the cross-section, but
proportionately to the conductor surface. Thus, if we take into account the core cross-sections, the
surface did not increase 100 times as the cross-section did, but only 10 times. This implies that the
allowed current should be 105 A. The fact that the actual rated current is higher results from several
other factors, which were not taken into account in our estimate (insulation thickness etc.). In this
case we have shown that the better heat transmission of the conductor into its ambient environment,
the higher possible load of the conductor. Therefore it is possible, in general, to apply a higher load
per cross-section unit on conductors with small cross-section than on large-cross-section
conductors. The load-carrying capacity decreases in a similar manner for bundled conductors. In
simple words, the load-carrying capacity will not increase proportionately to the number of
conductors in the bundle, but proportionately to the square root of this number.
During the designing work, it must be constantly kept in mind that the current loads of lines cannot
be generally compared to the rated current-carrying capacity - rated current. This is because the
rated current-carrying capacity of a conductor or cable is determined by its manufacturer for
nominal (standard) conditions, which include:
for installation in air (basic installation method) - the nominal air temperature (30 °C) and
installation in horizontal position in still air,
for installation in ground - nominal ground temperature (20 °C) and the determined thermal
resistance of ambient ground.
However, these nominal conditions are met only rarely in practice. The actual conditions usually
differ from the nominal ones. In addition to the basic installation, conductors and cables can be (and
typically are) designed for various other methods of installation and a recalculation must be carried
out depending on the actual situation.
The following basic methods of installation are distinguished according to IEC 60364 5-523:
A Insulated conductors or multi-core cables in
conduit placed in a thermally insulated wall, or
multi-core cables directly in a thermally
insulated wall
B Insulated conductors or multi-core cables in
conduit on a wooden wall
C Cable on a wall
D Cable either directly in the soil or in ducts in
the ground
E Two-core or three-core cables in air

8/17/2019 XSpider 2.13 en Reference Manual
http://slidepdf.com/reader/full/xspider-213-en-reference-manual 16/236
_______________________________________________________________________________
_______________________________________________________________________________________________________________________
8 xSpider, Reference manual
F Single-core cables grouped tightly in air
G Single-core cables in air, spaced, cable to cable
clearance equal at least to the cable diameter
The standard distinguishes also modifications of these methods of installation of cables. The
difference between installation method A1 and A2 and between B1 and B2 lies in the fact that A1
and B1 concern insulated conductors or single-core cables in pipe, while A2 and B2 concern multi-
core cables in pipe. The previously used installation methods H, J, K, L etc., which distinguished
between perforated and unperforated cable trays, installation on hooks, ladders or racks, are now
included under the E, F or G methods of installation.
Besides that the ambient temperature does not always have to comply with values taken into
account according to the standard. In most cases, the 30 °C ambient air temperature and 20 °C
ambient ground temperature are usually sufficient. The ambient temperature typically ranges belowthese values. If, for instance, the ambient air temperature does not exceed e.g. 25 °C and you
calculate with the temperature of 30 °C, it means you have a certain reserve in the line loading. At
the same time, it is not presumed that anyone would apply a load the line depending on changes in
the ambient temperatures (such as day - night, or summer - winter). The maximum ambient
temperature is counted upon. Line load is calculated for these maximum temperatures, whereas
small short-time temperature fluctuations are not taken into account. If the maximum temperatures
differ from the specified temperatures in the long term, whether in the upward or downward
direction, these different temperatures must be entered in the program.
Line loading also depends on the grouping of conductors and cables. Several conductors in the
bundle reduce the allowed load. Cables can be grouped together in different ways. Therefore, a
number of various alternatives arise in connection with the installation possibilities. For practical
reasons, the program allows you to solve only basic situations described in IEC and European
standards. However, it is a very useful tool also in those cases which are not specifically stated in
the standard, because it is possible to find a close alternative and, on its basis, estimate the situation
we need to solve (see also Chap. 2.2.4).
2.2.4 Comments on entering values into the xSpider software
The programs solves only situations described in IEC 60364 5-523. It is not anticipated, for
instance, that lines with cross-section exceeding 120 mm2 would be placed in conduits and cable
trunkings. Most of the time, however, it pays off to lay two or even more cables parallel for such
high currents than just one cable with an enormous cross-section, which is allowed in xSpider.
Cables with cross-section greater than 300 mm2 cannot be designed either. All other effects that are
not described can be taken into account by means of the user coefficient, through which it is
possible to reduce or increase the final cable current-carrying capacity in any way. The use of this
coefficient is in the sole responsibility of the user.
2.3 Determination and verification of protective devices
Both circuit breakers and fuses can be used to protect electric lines. At present, circuit breakers are
used to protect line with small cross-section up to 10 mm2, namely circuit breakers with types B, C

8/17/2019 XSpider 2.13 en Reference Manual
http://slidepdf.com/reader/full/xspider-213-en-reference-manual 17/236
_______________________________________________________________________________
_______________________________________________________________________________________________________________________
xSpider, Reference manual 9
or D line characteristics (see Chapter 5), as the case may be, due to the possibility of easy
reconnection. Fuses are typically used at the line entry into a building. Circuit breakers as well as
fuses are used for cross-sections of 16 mm2 and 25 mm2, and fuses with gG characteristics usually
protect larger cross-section lines. Those circuit breakers can be used for high admissible currents,
for which it is possible to set the nominal current as well as the release currents and disconnection
times in the particular characteristic sections. In this manner it is possible to adjust the circuit
breakers so that their characteristics correspond optimally to the characteristics of the protected
line.
At this point it is useful to mention the principle for correct assignment of the protective device to
the line. As already mentioned above, the line should be loaded with its design current IB. The
nominal current In of the protective device must be greater than or at least equal to the design
current IB, i.e. IB In. Satisfaction of this inequality, however, is not yet a full guarantee for the
correct assignment of the protective device to the line. Not even satisfaction of the condition In Iz
can guarantee that. This is because the nominal current of the protective device, without knowing
the tripping characteristics, does not tell us anything about its capability to protect the line properly.
The current, which ensures that the protective device is disconnected, can be 20 percent higher thanits nominal current, but it might as well (in case of older types of circuit breakers) be 80 percent
higher. In the former case, it is quite certain that the line will not be heated over the admissible
overload temperature while in the latter case, this inadmissible line heating will occur for sure one
day (cables with PVC insulation can be heated up to 200 °C). The damage to the insulation is then
so strong that - if no other severe consequences occur (such as fire) - the line must be replaced
together with the wiring components (boxes, terminals etc.).
0.0005
1
B C D
2 3 4 5 6 7 8 9 10
xIn
15 20 30 40 50
0.001
0.002
0.005
0.01
0.02
0.05
0.1
0.2
0.5
1
2
5
10
30
60
120
300
600
1200
3600
7200
1.13 1.45
t [s]
_________________________________1) These circuit breakers, sometimes also called miniature circuit breakers (MCB, according to EN 60 898, see Chap.
5.2) or installation circuit breakers, are equipped with identical thermal release which causes disconnection of small
overcurrents in case of overload. They differ in setting of the instantaneous (short-circuit, electromagnetic) release,
which ensures disconnection of high overcurrents - short circuits. This release operates only forcurrents above a certain
size. For circuit breakers with characteristics:- type B - for currents exceeding the nominal current more than 3 to 5 times,
- type C - for currents exceeding the nominal current more than 5 to 10 times,
- type D - for currents exceeding the nominal current more than 10 to 20 times.
Tripping characteristics of gG fuses with
indication of tolerance fields
Tripping characteristics of circuit breakers;
B, C, D type1 )
Int = 1.13 InIt = 1.45 In
o = 30°C

8/17/2019 XSpider 2.13 en Reference Manual
http://slidepdf.com/reader/full/xspider-213-en-reference-manual 18/236
_______________________________________________________________________________
_______________________________________________________________________________________________________________________
10 xSpider, Reference manual
Apart from this information as to whether the protective device disconnects at all, we also need to
know when it actually disconnects. There is a maximum admissible operating temperature and a
maximum admissible overload temperature for every conductor. However, the protective device
must disconnect the overcurrent in advance in order to prevent the conductor from reaching such
temperature. xSpider allows you to check whether this is achieved. This is indeed also apparent
from the following figures.
The first figure shows the line heating characteristics (i.e. the time-temperature dependencies) at the
overcurrents of 1.4, 1.5, 1.6, 1.7 and 1.8 fold of the rated current. The times, during which the
disconnection should occur under the respective overcurrent values without exceeding the
temperature of 100 °C under overload, were deducted from these characteristics. The dependency
of these times on the cable current (indicated in multiples of its rated current) is plotted below (on
the second figure). Under the specified currents, the protective device should disconnect no later
than within these periods of time.
Line heating characteristics
0
50
100
150
200
250
0 , 1
0 , 3
0 , 5
0 , 7
0 , 9
1 , 1
1 , 3
1 , 5
1 , 7
1 , 9
2 , 1
2 , 3
2 , 5
2 , 7
2 , 9
time in relation to the time heating temperature of th e cable
t e m p e r a t u r e i n ° C 1,4
1,5
1,6
1,7
1,8
Tripping characteristics of circuit breakers for high currents allowing the releases to be
adjusted (see Moeller catalogue for "Power circuit breakers" line characteristics).

8/17/2019 XSpider 2.13 en Reference Manual
http://slidepdf.com/reader/full/xspider-213-en-reference-manual 19/236
_______________________________________________________________________________
_______________________________________________________________________________________________________________________
xSpider, Reference manual 11
Required characteristics
0
0,2
0,4
0,6
0,8
1
1,2
1,4
1,6
1,4 1,5 1,6 1,7 1,8
Multiple of the nominal current
D i s c o n n e c t i o n t i m e ( r e l a t i o n t o
t h e t i m
h e a t i n g c o n s t a n t )
1
Some examples of graphical outputs from xSpider (module of Tripping Characteristics) follow: The
thin line in the time - current characteristics indicates the threshold, at which the conductor core or
cable core will be heated to the admissible overload temperature. A point having the coordinates of
40 A and 715 s is marked in the first one of those figures. What meaning does this point have? It
simply means that if a current of 40 A flows through the conductor or cable for the period of 715
seconds, its core is heated to the admissible overload temperature. The same applies for the current
of 60 A in the second figure. This current may flow through the given cable for the period of 715
seconds before its core is heated to the operating temperature. In this manner, every point of thethin curve determines the overcurrent and the period required for the core to reach the maximum
overload temperature allowed at this overcurrent.
How can we then verify if the correct protection has been assigned to the respective conductor or
cable? Simply from the condition that - for any overcurrent - the protective device must disconnect
before the limit overload temperature is reached. This means that every point of the circuit breaker
characteristics - represented as the thick line in the graphs - must lie under the thin curve. This
requirement is met in the case illustrated on the second one of the provided figures. For the
overcurrent of 60 A, for instance, disconnection will occur approximately after 150 s, while the
conductor core reaches the maximum temperature allowed not sooner than after 715 s. You can see
that the condition is amply met in this case. That is, however, not the case in the situation shown onthe previous figure. Both curves intersect there. In this figure you can see that the admissible
overload temperature is reached within 715 seconds at the overcurrent of 40 A. The circuit breaker
characteristic shows very obviously that the circuit breaker disconnects no sooner than after
approximately 10,000 s, if it disconnects at all because the ordinate (a line perpendicular to the
current axis) only touches the circuit breaker characteristic at this point for 40 A.
Course of the ideal line
characteristics (relative
values used for general
representation).

8/17/2019 XSpider 2.13 en Reference Manual
http://slidepdf.com/reader/full/xspider-213-en-reference-manual 20/236
_______________________________________________________________________________
_______________________________________________________________________________________________________________________
12 xSpider, Reference manual
Cable overload protection is not
secured for these currents (the cable
will be overheated before the circuitbreaker disconnection).
Time/current characteristics
of the cable.
Tripping characteristics of
the circuit breaker.
Cable overload protection IS ensured
or all currents (the circuit breaker
will disconnect before the cable can
be overheated).
Time/current characteristics
of the cable.
Tripping characteristics ofthe circuit breaker.

8/17/2019 XSpider 2.13 en Reference Manual
http://slidepdf.com/reader/full/xspider-213-en-reference-manual 21/236
_______________________________________________________________________________
_______________________________________________________________________________________________________________________
xSpider, Reference manual 13
Some people could possibly object that the procedure described above is more complicated than the
one indicated in the technical standard, namely in IEC 60364-4-43. This standard provides that the
current load allowed for a protected line must be 1.45 times higher than the current that secures
effective operation of the protective device within the agreed time. The standard does not explain
further what is to be understood under this agreed time. However, we can state here for our
purposes that as far as the miniature circuit breakers are concerned, this time means either one hour
for lower nominal currents (up to 63 A) or two hours for higher nominal currents. Within this
period of time (i.e. within one hour or within two hours), the miniature circuit breakers must
disconnect the multiple of 1.45 of their nominal current. Consequently, the assignment itself of
these miniature circuit breakers to lines is very easy. The allowed load of the line must be higher
than the nominal current of the circuit breakers. In case of fuses, this assignment is less
unambiguous. For common fuse cartridges, the blowing current within the agreed time (typically
one hour, but also 2, 3 and 4 hours) corresponds to the multiple of 1.6 of its nominal current. The
assignment of a line (its cross-section) to the nominal current of the fuse is then carried out in such
a manner that the current-carrying capacity (current load allowed) of the line must be higher than
approximately 110 % of the fuse cartridge nominal current (1.6/1.45 = 1.103). In a mathematical
expression:
I 2 1.45 I z
whereas: I 2 ..... current ensuring effective operation of the protective device within the agreed
period of time [A]
I z ..... current load allowed for the protected line [A]
The following applies for miniature circuit breakers:
I 2 = 1.45 I n
whereas: I n ..... nominal current of the circuit breakers [A], then:
1.45 I n 1.45 I z
this implies that I n I z and, thus, that the allowed cable load must be HIGHER than the
nominal current of the circuit breakers.
The following applies for fuses:
I 2 = 1.6 I n
whereas: I n ..... fuse nominal current [A], then:
1.6 I n 1.45 I z
this implies that 1.1 I n I z and, thus, that the allowed cable load must be HIGHER than
110% of the fuse nominal current.
Coordination between protective devices and cables is always checked according to formulas
described above in xSpider software. It applies only to a certain, though the largest group of cases
that come into consideration. But the standard IEC is based on some simplifications. The first of
them is the anticipated ambient temperature, at which the line is loaded with its maximum operating
current; the second one is the maximum allowed insulation temperature at overload, and the third
one is the anticipated course of line heating that should correspond approximately to thecharacteristic of the protective device (see the previous figures). Therefore, the standard itself states
that the protection pursuant to the standard does not ensure perfect protection under all

8/17/2019 XSpider 2.13 en Reference Manual
http://slidepdf.com/reader/full/xspider-213-en-reference-manual 22/236
_______________________________________________________________________________
_______________________________________________________________________________________________________________________
14 xSpider, Reference manual
circumstances and does not have to be the most cost-efficient one in every case. Although the
protection pursuant to the xSpider software system does not provide absolutely accurate results
either, its final assignment of protective devices (checked by comparing cable heating characteristic
and protective device tripping characteristic) is not only more accurate, but it also allows you to
assign the protective devices for significantly different initial conditions than those considered in
the standard (different ambient temperatures, different maximum insulation temperature allowed).
Software xSpider from version 2.5 enables to switch off procedure of comparing cable heating
characteristic and protective device tripping characteristic and to consider obligatory terms from
IEC 60364-4-43 only.

8/17/2019 XSpider 2.13 en Reference Manual
http://slidepdf.com/reader/full/xspider-213-en-reference-manual 23/236
_______________________________________________________________________________
_______________________________________________________________________________________________________________________
xSpider, Reference manual 15
3. Network Behavior at Short Circuits _______________________________________________
3.1 Types of short-circuit faults
If two conductors with different voltage are connected, we call it short circuit. Therefore, a network
short circuit means a transient electromagnetic process, which is caused by a sudden decrease in
impedance between phase conductors, or between the phase and the neutral or the protective
conductor, as the case may be. The faulty conductive connection can be caused by improper
handling, mechanical damage to the insulation, damage to the cable during earth work etc., its
natural deterioration e.g. due to humidity, or it can be the result of increased stress to which it is
exposed during switching processes. A short circuit causing a decrease of impedance leads
immediately to an increase of the current to multiple of the usual operating current, the value of
which depends on voltage and impedance. The values of the short-circuit current range within
thousands and tens of thousands of amperes and its dynamic (power) and thermal impacts jeopardize all wiring components and components in the electrification network, through which it
flows.
Depending on the mode of loading of particular conductors of the three-phase system at short
circuits (or its supply, as the case may be), we distinguish between symmetric or balanced short
circuits (three-phase, or three-phase short circuit to earth), and asymmetric short circuits (two-
phase, two-phase short circuit to earth, single-phase), as indicated in the figures.
The 3-phase symmetric short circuit leading to the highest short-circuit current is of a great
importance from the point of view of electric network dimensioning according to IEC. The 1-phase
short circuit to earth is the opposite example. It has large impedance in the fault current loop where
the fault disconnection time can be considerably long due to the small short-circuit current anddangerous voltage is found on the exposed conductive parts throughout this time.
3.2 Short-circui t current flow
A sudden impedance change in the event of a short circuit leads to a transient process. Due to the
high current, the balance between the magnetic and the electric field is disrupted in the
electrification system area and the system comes to a new balanced state through transient current
and voltage components. The short-circuit waveform depends on the moment when the short-circuit
fault occurs. This flow curve can show a certain asymmetry in relation to the time axis with the
presence of direct-current component. The short-circuit current is shown in the following figure.
1-phase short circuit
to earth
2-phase short circuit
to earth
2-phase symmetric
short circuit 3-phase symmetric
short circuit

8/17/2019 XSpider 2.13 en Reference Manual
http://slidepdf.com/reader/full/xspider-213-en-reference-manual 24/236
_______________________________________________________________________________
_______________________________________________________________________________________________________________________
16 xSpider, Reference manual
The following characteristic values marked with the symbols below are used with short-circuit
current for dimensioning of electrical equipment and settings of protective devices.
Ik ’’ Initial impulse short-circuit current: i.e. the r.m.s. value of symmetrical short-circuit
current without the direct-current component at the time of the short-circuit formation.
Ikm
(i p)
Peak short-circuit current: i.e. the first amplitude (peak value) of the asymmetric short-
circuit current with the direct-current component. It is the crucial criterion monitored when
checking the dynamic stress of network equipment. Note: the i p symbol (taken over from
IEC) is also used in later regulations for Ikm.
Itr Tripping short-circuit current (symmetrical) and its direct-current component ia tr . It is
applied as a criterion to check the dimensioning of circuit breakers.
Ike Thermal equivalent short-circuit current: i.e. the r.m.s. value equivalent or imaginary
symmetric (balanced) short-circuit current value, which results in the same heat effects after
the tk period of the short-circuit duration as the actual asymmetric short-circuit current with
the direct-current component. It serves as a criterion to assess the thermal load of the
electrification network equipment.
Ik Steady-state short-circuit current i.e. the effective (symmetric) short-circuit current value
after all the transient components disappear. With electrically remote short-circuits (the
majority of cases in practice), it equals to the initial impulse short-circuit current I k ’’. Withelectrically near short circuits, i.e. in circuits near the power supplies with large
synchronous generators, it applies that Ik < Ik ’’ due to the increasing internal reactance of the
synchronous machine throughout the short-circuit duration.
Short-circuit current waveform:
I k – effective short-circuit current value,
ik – instantaneous short-circuit current value,
i ss (ia ) – direct-current component of the short-
circuit current,
I km – surge short-circuit current.
(ia)

8/17/2019 XSpider 2.13 en Reference Manual
http://slidepdf.com/reader/full/xspider-213-en-reference-manual 25/236
_______________________________________________________________________________
_______________________________________________________________________________________________________________________
xSpider, Reference manual 17
3.3 Network configuration
In practice we encounter various network configurations, which place various demands on the
computational methods. In general we distinguish between the following network types:
Whereas more simple computational methods and computational means (such as nomograms) are
sufficient for the networks supplied from one side or for radial networks, we must use a computer to
solve the meshed network efficiently. The advantage of xSpider consists in the possibility to
perform calculations in the meshed networks with general (virtually arbitrary) definition of powersupplies, lines and loads.
3.4 Short-circuit current calculation
The calculation of conditions prevailing at short circuits in three-phase systems are regulated by the
standard IEC 60909. The calculation can be done with relative (percentage) impedance values or
with the actual values. The calculation using the actual impedance values proceeds as follows:
1. At first you depict the network, in which the short-circuit conditions are to be determined,
through the so-called initial diagram showing all operating states.2. Mark the locations, in which the short-circuit conditions are to be calculated.
3. Determine (calculate) the impedances for the individual system components. Then relate the
impedances of the individual system components to the reference voltage, typically
corresponding to the rated voltage at the short-circuit point. A uniform reference voltage is
selected for the entire system.
4. The positive-phase sequence impedance must be determined in order to be able to calculate
the symmetric (three-phase) short circuits. In order to calculate the asymmetric (two-phase,
single phase) short circuits you also need to know the negative-phase sequence impedance
and the zero-phase sequence impedance for the electrification system components.
5. Set up a substitution diagram for the positive-phase, negative-phase and zero-phase sequencesystems.
Line with supply from one side
Radial network Meshed network (with a
higher number of nodes)
Radial network

8/17/2019 XSpider 2.13 en Reference Manual
http://slidepdf.com/reader/full/xspider-213-en-reference-manual 26/236
_______________________________________________________________________________
_______________________________________________________________________________________________________________________
18 xSpider, Reference manual
6. Determine the final short-circuit impedance in the given short-circuit point - by the
application of computational methods for more simple network configurations through
gradual simplification, and by means of a computer in case of more complex network with a
higher number of nodes.
7. Calculate the short-circuit current, being the current of the equivalent voltage supply and
short-circuit impedance.
For users who are interested to know more details about the computational methods applied in the
xSpider software algorithms, we specify the following relations:
Design (calculation) impedance for the:
supply part (hatched rectangle): Qt Qt Qt jX R Z is calculated from the short-circuit
power at the supply node
Transformer: T T T jX R Z is calculated from the short-circuit
voltage and from the transformer
short-circuit losses Cable line: L L L jX R Z
is calculated from catalogue values
for cable resistance and inductance
Short-circuit impedance: k k k jX R Z whereas: LT Qt k R R R R
LT Qt k X X X X
The design impedances are of a complex nature (they include both real and imaginary component)
and we apply the same calculation rules for them as for complex numbers.
Absolute value of short-circuit impedance: 22
k k k X R Z
Initial impulse short-circuit current under a three-phase short circuit:k
n
k Z
U c
I 3
.''
whereas3
. nU c is the phase voltage of the equivalent power supply; c is the voltage coefficient
determined according to IEC 60909 (its value depends on the voltage of the applied LV, HV or
EHV systems).
In case of 1-phase and 2-phase short circuits, the situation is rather more complicated because you
must calculate the positive-phase sequence Z(1), negative-phase sequence Z(2) and zero-phase
sequence Z(0) impedance.
Fault point F

8/17/2019 XSpider 2.13 en Reference Manual
http://slidepdf.com/reader/full/xspider-213-en-reference-manual 27/236
_______________________________________________________________________________
_______________________________________________________________________________________________________________________
xSpider, Reference manual 19
In practice it applies that Z(1) = Z(2) and, therefore, the initial impulse short-circuit current under a 1-
phase short circuit (relevant for calculation of the fault disconnection time from source) is then
defined by the relation:
I c U
Z Z
k
n''
( ) ( )
3
2 1 0
The fault loop impedance (for the needs of IEC 60364-4-41) can be determined as follows:
Zsv = (2 Z(1) + Z(0)) / 3
Since xSpider calculates the fault disconnection time from source directly, the user does not have to
deal with the impedance calculation. The calculated impedances Z(0), Z(1) a Zsv can be displayed
either as absolute values or as complex numbers.
Note: Inspection technicians often require the Z s impedance (or the Z sv impedance according to
IEC 60364-4-41, as the case may be) to be shown in the form of a single number. In spite of acertain inconsistency in the interpretation of measurements obtained by means of inspection
measuring devices, it is possible to compare such results with the calculated Z sv values obtained
from xSpider (typically, the inspection measuring devices do not measure impedance, but the active
loop resistance - see R schl , which is an acceptable simplification with respect to the measurement
error).
3.5 Calculation procedures
xSpider was developed for calculations of concerning generally defined networks, including
complexly configured power networks with high number of nodes. The network can be analyzedunder normal operating states as well as under short-circuit faults. The calculation is solved by
matrix methods, i.e. by creating an admittance matrix for the drawn network configuration and
inverting it to the impedance matrix. The impedances obtained in this manner are then used in the
computational methods specified in IEC 60909 to determine the characteristic values of short-
circuit currents, i.e. the initial impulse current I k ’’, the surge short-circuit current I km (i p), the
breaking current I tr and the equivalent heating current I ke. The short-circuit current flow is displayed
as calculated by the differential equation method. Throughout the calculations, you still work with
the fully designed power network diagram, in which you can - at any moment during the
calculations - build various network configuration modes in the graphical form, such as changes in
the power sources and loads by connecting or disconnecting certain branches etc.
Definition of the zero-phase
sequence component of short-
circuit impedance:
Z (0) = U (0) / I (0)
Definition of the negative-phase
sequence component of short-
circuit impedance:
Z (2) = U (2) / I (2)
Definition of the positive-phase
sequence component of short-
circuit impedance:
Z (1) = U (1) / I (1)

8/17/2019 XSpider 2.13 en Reference Manual
http://slidepdf.com/reader/full/xspider-213-en-reference-manual 28/236
_______________________________________________________________________________
_______________________________________________________________________________________________________________________
20 xSpider, Reference manual
3.6 Line dimensioning from the short-circuit point of view
Lines (conductors and cables) as well as devices included in the circuit must withstand the
maximum short-circuit current, which may occur in the lines. This is the current developed due to a
short circuit in the beginning of the line, which was not loaded before and, therefore, its minimum
electric resistance should be taken into account. Both the lines as well as the devices must be
checked for these maximum possible short-circuit currents, which vary depending on the place
within the network where you calculate them. In addition, it must be verified whether the protective
devices are capable of operating even at the smallest short-circuit currents arising in the circuit.
Here you should realize that:
the function of the protective devices is activated by the short-circuit current and if the short
circuit-current is too small, it will not cause the protective device to release, and
these “small“ short-circuit currents can - in case of its longer duration - also cause a damage
to the devices, conductors, cables and electrical equipment integrated in the short-circuited
circuit.
The lines are checked in view of the maximum short-circuit currents. The value of the short-time
withstand current for the period of 0.1 s, i.e. I cw(0,1 s), is specified for every cable in the xSpider
database. It represents the size of the short-circuit current, which can pass through the cable for the
period of 0.1 s without causing the cable to heat to a temperature higher than the maximum allowed
temperature at short circuit. And why is this value indicated for the short-circuit duration of 0.1 s?
Because this is the longest period specified in the product regulations for circuit breakers (such as
EN 60 947-2), during which the circuit breakers must disconnect any short circuits and, thus, it is
longest period possible for the passage of the anticipated short-circuit current through the cable.
However, the short-circuit duration periods are usually shorter. Common circuit breakers
disconnect the short circuit significantly earlier than in 0.1 s (the miniature circuit breakers withinthe order of few milliseconds, the power circuit breakers within tens of milliseconds). The aforesaid
variable is derived from the assumption that all heat developed due to the passage of the short-
circuit current is also absorbed by the given conductor, which is then warmed up. This assumption
is justified because no substantial heat transfer into the ambient environment can occur during such
short period of short-circuit current passage. But in any case, the error arising due to negligence of
the heat transfer into the environment lies on part of safety. Therefore, the actual current could be
even slightly higher than the current calculated based on the aforesaid assumption. The program
recalculates the actual short-circuit current I k ’’ (initial) to the equivalent heating current flowing
through the conductor for 0.1 s with I ke(0.1s). This is the current, which would pass through the
conductor for the period of 0.1 s and would have identical effects as the real short-circuit current
passing through the conductor for the period of T tr (from the beginning of the short circuit untildisconnection). This current is compared with I cw(0,1s) and must be lower than I cw(0,1s), i.e. I ke(0.1s)
I cw(0,1s). The important aspect is that the I cw value for the time of 0.1 s can be easily calculated from
the conductor material and cross-section.
Note: The sub-clause 434.3.2 of IEC 60364-4-43 implies the relation: I 2 × t = k 2 × S 2 , whereas I is
the effective short-circuit current value (i.e. I k ), S is the cable core cross-section in [mm2 ] and k is
the constant dependant on the conductor material and its insulation. If you substitute the value of
0.1 s for the t time in this relation, you obtain I cw(0,1 s). Consequently, this implies the inequality:
I k 2 × T tr I cw
2 × 0.1.

8/17/2019 XSpider 2.13 en Reference Manual
http://slidepdf.com/reader/full/xspider-213-en-reference-manual 29/236
_______________________________________________________________________________
_______________________________________________________________________________________________________________________
xSpider, Reference manual 21
3.7 Dimensioning of protective devices from the short-circuit point o f view
In this field, verification is required from the point of view of the maximum short-circuit currents
on one hand, i.e. whether the protective devices are able to withstand them, and also from the point
of view of the minimum short-circuit currents on the other hand, i.e. whether these devices
disconnect them. More detailed information about the devices are provided in chapter “Properties of
protective devices“ (Part I. Chap. 5).
Verification in view of the maximum short-circuit currents
Devices, which are included in the circuit where the short circuit occurred, must be able to
withstand this short circuit. As for circuit breakers, it is important on one hand that they respond to
the short-circuit current, and on the other hand it is also essential for them to be able to disconnect
this short circuit. Therefore, the devices are checked for the passage of the short-circuit current.
One parameter is indicated for MCBs (miniature circuit breakers) - the nominal breaking capacity
I cn; two breaking capacities are indicated for power circuit breakers, namely the nominal limit
breaking capacity I cu and the nominal operating breaking capacity I cs. It is guaranteed that the circuit breaker will withstand the I cu current passage and that it will also disconnect However, afterwards it
is not guaranteed anymore that the circuit breaker meets all requirements as it should. In other
words - it is not guaranteed anymore that it will disconnect such current the second time. As far as
the I cs current is concerned, it is guaranteed that the circuit breaker will not only disconnect the
current equivalent to I cs, but it will also remain functional in the future and meet the appropriate
parameters even after this disconnection. Therefore, it is not necessary to replace it after the short
circuit.
The tripping short-circuit current I tr , i.e. the short-circuit current at the moment of disconnection,
which comprises both its alternating-current component I k and its direct-current component I a ( I ss),
is compared with the circuit breaker values I cu and I cs or with the fuse value I cn (its nominal breaking capacity). The short-circuit current I tr must be lower than I cu. But if it is essential that the
circuit breaker remains functional even after the short circuit, the short-circuit current I tr must be
lower than I cs.
Verification in view of the minimum short-circuit currents - protection against indirect contact
(fault protection)
One of the most frequently used methods of protection against indirect contact with exposed
conductive parts (or - more correctly – fault protection) is the protection by automatic
disconnection of supply. In case of a fault (insulation breakdown between the live and the exposedconductive part), the disconnection of the fault is effected by a suitable protective device.
xSpider allows solving the protection by automatic disconnection in all typical low-voltage
alternating current networks i.e. in TN, TT and IT systems. Conditions for protection in TN, TT and
IT systems are specified in IEC 60364-4-41 (HD 60364-4-41:2007) - Protection against electric
shock, and we will mention only the most important information here because these facts are
generally known.
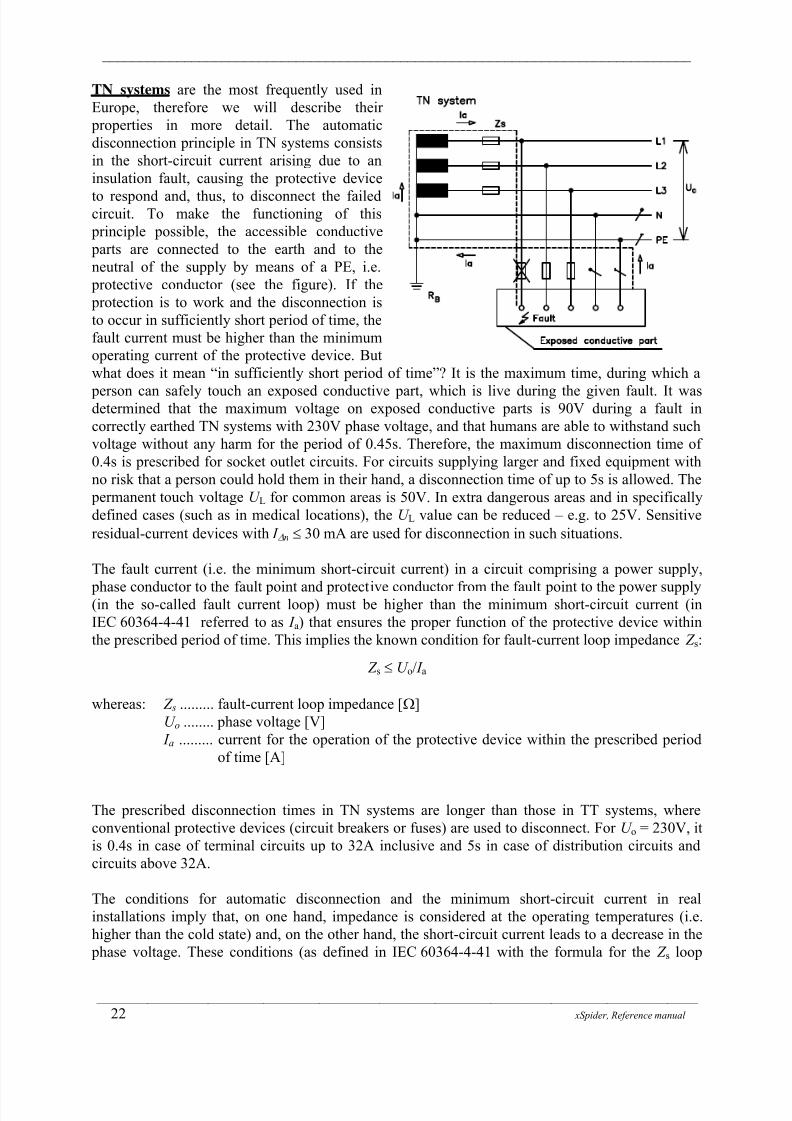
8/17/2019 XSpider 2.13 en Reference Manual
http://slidepdf.com/reader/full/xspider-213-en-reference-manual 30/236
_______________________________________________________________________________
_______________________________________________________________________________________________________________________
22 xSpider, Reference manual
TN systems are the most frequently used in
Europe, therefore we will describe their
properties in more detail. The automatic
disconnection principle in TN systems consists
in the short-circuit current arising due to an
insulation fault, causing the protective device
to respond and, thus, to disconnect the failed
circuit. To make the functioning of this
principle possible, the accessible conductive
parts are connected to the earth and to the
neutral of the supply by means of a PE, i.e.
protective conductor (see the figure). If the
protection is to work and the disconnection is
to occur in sufficiently short period of time, the
fault current must be higher than the minimum
operating current of the protective device. But
what does it mean “in sufficiently short period of time”? It is the maximum time, during which a person can safely touch an exposed conductive part, which is live during the given fault. It was
determined that the maximum voltage on exposed conductive parts is 90V during a fault in
correctly earthed TN systems with 230V phase voltage, and that humans are able to withstand such
voltage without any harm for the period of 0.45s. Therefore, the maximum disconnection time of
0.4s is prescribed for socket outlet circuits. For circuits supplying larger and fixed equipment with
no risk that a person could hold them in their hand, a disconnection time of up to 5s is allowed. The
permanent touch voltage U L for common areas is 50V. In extra dangerous areas and in specifically
defined cases (such as in medical locations), the U L value can be reduced – e.g. to 25V. Sensitive
residual-current devices with I n 30 mA are used for disconnection in such situations.
The fault current (i.e. the minimum short-circuit current) in a circuit comprising a power supply, phase conductor to the fault point and protective conductor from the fault point to the power supply
(in the so-called fault current loop) must be higher than the minimum short-circuit current (in
IEC 60364-4-41 referred to as I a) that ensures the proper function of the protective device within
the prescribed period of time. This implies the known condition for fault-current loop impedance Z s:
Z s U o/ I a
whereas: Z s ......... fault-current loop impedance []
U o ........ phase voltage [V]
I a ......... current for the operation of the protective device within the prescribed period
of time [A]
The prescribed disconnection times in TN systems are longer than those in TT systems, where
conventional protective devices (circuit breakers or fuses) are used to disconnect. For U o = 230V, it
is 0.4s in case of terminal circuits up to 32A inclusive and 5s in case of distribution circuits and
circuits above 32A.
The conditions for automatic disconnection and the minimum short-circuit current in real
installations imply that, on one hand, impedance is considered at the operating temperatures (i.e.
higher than the cold state) and, on the other hand, the short-circuit current leads to a decrease in the phase voltage. These conditions (as defined in IEC 60364-4-41 with the formula for the Z s loop

8/17/2019 XSpider 2.13 en Reference Manual
http://slidepdf.com/reader/full/xspider-213-en-reference-manual 31/236
_______________________________________________________________________________
_______________________________________________________________________________________________________________________
xSpider, Reference manual 23
impedance calculated or measured at the temperature of 20°C, adjusted to take into account the
expected temperature rise in the conductors due to a fault:
a
o s
I
U Z
3
2
are included in the program so that when you substitute the appropriate data, the result truly
indicates whether the circuit complies even under the most unfavourable fault conditions. Since the
program calculates the disconnection time directly, it is not necessary to deal with the impedance
calculation (for more details see also Part I Chap. 3.4, Part II Chap. 14.5). The figures show that the
point determined by the coordinates of the calculated short-circuit current and the prescribed
disconnection times must lie – in relation to the fuse or the circuit breaker characteristics – to the
right of the right boundary line for the tripping characteristics (or above this characteristic, as the
case may be).
A TT system is characterized by line conductors
(L1, L2, L3, N) being led from the earthed power
supply to the appliance (load), but the protection
against indirect contact is ensured by connecting theexposed conductive parts of appliance to the
installation earth electrode. If a fault earth current
occurs (short-circuit between the phase and the
appliance’s frame), the fault current I F flows
through the ground to the power source and its
strength is determined by the high earth resistance
of the load ( R A) and of the earthed power supply
( R B). Touch voltage is present on the exposed
conductive parts throughout the duration of the
fault, i.e. until the moment of disconnection, but it –
in case of a longer duration – may not exceed the permanent touch voltage value U L (50, 25 V).
Current Current Im Ip
A
B
A
B
Ip
t1
t0
t1
t0
Time Circuit breaker Fuse
Time
Reliable
disconnection
zone
Reliable
disconnection
zone
Protection with fuses Protection with circuit breakers

8/17/2019 XSpider 2.13 en Reference Manual
http://slidepdf.com/reader/full/xspider-213-en-reference-manual 32/236
_______________________________________________________________________________
_______________________________________________________________________________________________________________________
24 xSpider, Reference manual
This requirement implies the condition for ensuring such protection, if the device responsible for
the automatic disconnection in a TT system is a residual-current device. At present, residual-current
devices are practically the only devices that are able to disconnect the fault – insulation breakdown
to the exposed conductive part – in powerful installations in TT systems. Accordingly, if a residual-
current device is used in a TT system for automatic disconnection, the following condition must be
met for the earth resistance of the load:
R A U L /I n
whereas: R A ........ earthing resistance of the protected load’s earth electrode [],
U L ........ permanent touch voltage limit of 50 V,
I n ....... rated residual current of the residual-current device [A].
In order to achieve disconnection within a sufficiently short period of time, it is required that a
significantly higher current is taken into account in the above-specified condition instead of I n. The
value of 5 I n is indicated as a typical value, so that the earthing resistance of the load should
certainly meet the condition of R A U L / (5 I n) when calculating with this safety increase. In some situations, particularly in case of small equipment with small consumption currents, it is
possible to continue using the conventional protective devices, i.e. fuses or circuit breakers. Fuses
and circuit breakers are subject to a different condition that residual-current devices. Similarly to
the condition for automatic disconnection in a TN system, this condition is based on the concept of
a current loop, which is closed by the fault current when a fault occurs (short-circuit between the
phase and the appliance’s frame). This fault current must be disconnected in time so that the voltage
at the exposed conductive parts upon fault, which can be as high as the phase voltage in the TT
system, is disconnected in time. This condition can be formulated in a similar manner as the known
condition for automatic disconnection in TN systems:
Z s U o/ I a
whereas: Z s ......... fault-current loop impedance []
U o ........ phase voltage [V]
I a ......... current for the operation of the protective device within the prescribed period of
time [A]
Apart from the power supply, the conductor up to the fault point, the protective conductor to the
exposed conductive parts and the earthing lead, the fault current loop includes particularly the earth
conductor for the electrical installation and the supply earth conductor. In a simplified calculation,
it is sufficient to take into account the resistance of these earth connections, with a certain reserve.However, the operating current of the protective device in a TT system, is in principle not the same
as the operating current in a TN system. In view of the fact that a fault at the exposed conductive
parts results in a higher touch voltage than a fault in a TN system, the disconnection times
prescribed for a TT system are shorter than those for a TN system. For U o = 230V, it is 0.2s in case
of terminal circuits up to 32 A inclusive and 1s in case of distribution circuits and circuits
above 32A. Unlike with the TN systems, on the other hand, the increase in the loop impedance due
to the temperature increase in the wires (occurring in TN systems) is not taken into account here
because the electrical resistance of the wires accounts only for a fundamentally negligible part of
the resistance in the loop impedance.

8/17/2019 XSpider 2.13 en Reference Manual
http://slidepdf.com/reader/full/xspider-213-en-reference-manual 33/236
_______________________________________________________________________________
_______________________________________________________________________________________________________________________
xSpider, Reference manual 25
IT systems are used in situations where the
maximum safety for the operator and high
reliability in power supply are required even in
case of a fault, which would lead to the release of
the protective device in earthed TN and TT
systems. Protection of exposed conductive parts is
– similarly to TT systems – protected by
connecting the exposed conductive parts of the
loads to the earth. A typical feature of an IT system
is that the protective device is not released at the
moment of the fault (first fault) to earth because
the fault current is limited only to leakage and
capacity currents of the installation. Under these
circumstances, the system with the first fault can
be seen as a TN or TT system (depending on the
extent and design of the earthing of the loads –
whether the exposed conductive parts of all appliances in the system are connected to a common protective conductor, or whether they are connected to earth in groups or individually per
appliance). If the exposed conductive parts are properly connected to earth, no danger of electrical
accident arises during the first fault yet and, therefore, the faulted circuit is not disconnected upon
this first fault; however, a check of the insulation condition is prescribed by means of insulation
monitoring devices or other devices.
A release of the protective device due to high overcurrent can take place only upon a second fault,
which occurred in another phase and usually in a different electrical device. If the exposed
conductive parts of loads in the system are connected to a common protective conductor, a short-
circuit current determined by the fault loop impedance flows through the conductors during the
second fault.
The aforesaid situation can be seen as a certain analogy to the TN system; however, the difference
is that the first and the second fault can be – in the most unfavourable case – located at the
farthermost, opposite ends of the installation. Thus, it is necessary to reckon a double length of the
line (see the cipher 2 in the denominator).
The following condition must be met for an IT system where the neutral is not distributed:
Z s U / 2 I a
The following condition must be met for an IT system where the neutral is distributed: Z ́ s U 0 / 2 I a
whereas: Z s ......... fault loop impedance consisting of the phase conductor and the protective
conductor,
Z´ s ........ fault loop impedance consisting of the neutral conductor and the protective
conductor,
U 0 ........ nominal voltage between the phase and the neutral conductor,
U ......... nominal voltage between phases,
I a .......... breaking current of the protective device, which disconnects within the specified
period of time (for 230/400V, the disconnection time is 0.4s for a system where
neutral is not distributed and 0.8s for a system where neutral is distributed. Thedisconnection times are shorter for extra dangerous areas.

8/17/2019 XSpider 2.13 en Reference Manual
http://slidepdf.com/reader/full/xspider-213-en-reference-manual 34/236
_______________________________________________________________________________
_______________________________________________________________________________________________________________________
26 xSpider, Reference manual
If the exposed conductive parts of loads in an IT system are connected to earth individually or in
groups, the following condition applies for automatic disconnection regardless of whether residual-
current devices or overcurrent protective devices are used for the automatic disconnection:
R A U L / I a
whereas: R A ........ earthing resistance of the protected load’s earth electrode, including the
resistance of the protective conductor to exposed conductive parts [],
U L ........ permanent touch voltage limit [V],
I a .......... operating current of the overcurrent protective device of the protected equipment
[A].
Because of their properties, IT systems are used in heavy-duty facilities requiring non-stop
operation (mines, metallurgical works, special plants, etc.) where they usually work with 500V
voltage at present. A special type of IT systems used in hospitals and medical locations is the
isolated medical system (IMS), which you can find in particular in operating rooms (voltage 230V).
The requirements for IMS are specified in a separate standard IEC 60364-7-710 – Electricalinstallation in medical locations. IMS is quite unique from a certain point of view because special
isolation transformers are used in order to create the isolated system. These transformers must meet,
inter alia, the requirements of VDE 0107 applicable to electrical devices in medical locations (their
types offered by Moeller are included in the database) and are connected to a TN system by primary
winding. The input impedance components for the isolating transformer (typical transformation
ratio 230V / 230V) can easily be obtained directly from the TN system in the given connection
point.

8/17/2019 XSpider 2.13 en Reference Manual
http://slidepdf.com/reader/full/xspider-213-en-reference-manual 35/236
_______________________________________________________________________________
_______________________________________________________________________________________________________________________
xSpider, Reference manual 27
4. Voltage Drops, Load Distribution, Selectivity _______________________________________________
4.1 Allowed voltage drops
Electric current is formed during any consumption from the electric network. The passage of this
current leads to voltage drops in the respective lines and, thus, the voltage supplied all the way to
the load is not equal to the voltage on the power source terminals, it is rather lower. Indeed, various
voltage drops are prescribed for the particular parts of an electrical circuit.
As for the voltage drop from the power supply to the consumption point, the considerations can be
based on the prescribed voltage deviations (IEC 60038), which are to range between + 6 percent
and -10 percent from their nominal value. (Starting from 2003 year, this range should be 10
percent.) This means that the total voltage drop from the power supply to the consumption point can
be up to 16 percent.
Within the electrical installation itself in a building (i.e. inside the facility), it is recommended
according to IEC 60364-5-52 that the voltage drop between the beginning of the installation and the
user’s operating equipment should not exceed 4 percent of the installation rated voltage. This
recommendation collides somewhat with the requirements of other national standards (e.g.
CSN 33 2130 in Czech Republic), which lays down the following maximum voltage drops for the
particular installation parts:
1. From the distribution board behind the electric meter (indoor distribution box) to appliances:
for lighting outlets 2 %,
for boiler and heater outlets (include washing machines) 3 %
for sockets and other outlets 5 %
2. Lines between the electric meter distribution box and compact indoor distribution box
for lighting and composite consumption 2 %
for consumption other than concerning lighting 3 %
We can admit that higher drops than those specified above may occur in a certain segments whendimensioning the lines with respect to compliance with other requirements provided the following
drops will not be exceeded in the lines leading from the service connection point to the appliance:
for lighting outlets 4 %,
for boiler and heater outlets (include washing machines) 6 %,
for sockets and other outlets 8 %.
As you can see, you can get up to the actual functional limit of some devices and equipment when
you add all the allowed voltage drops (in the distribution network and the electrical installation)
together. (In case of relays and contactors, for instance, their function is guaranteed from 85 percentof their rated voltage and above, in case of electric motors it is guaranteed from 90 percent of their

8/17/2019 XSpider 2.13 en Reference Manual
http://slidepdf.com/reader/full/xspider-213-en-reference-manual 36/236
_______________________________________________________________________________
_______________________________________________________________________________________________________________________
28 xSpider, Reference manual
rated voltage). Therefore, it is essential to follow the aforesaid recommendation (drop up to 4
percent) as stipulated in IEC 60364-5-52.
More stringent requirements for voltage drops in industrial distributions are laid down in national
standard (e.g. CSN 34 1610 in Czech Republic). This standard stipulates that:
the voltage drop at the motor load terminals caused by its rated current shall not exceed 5
percent of the nominal voltage of the installation (i.e. the voltage shall not drop below 95
percent of the nominal voltage),
the voltage drop at the light source point caused by the design load shall not exceed 3 percent
of the nominal voltage of the installation (i.e. the voltage shall not drop below 97 percent of
the nominal voltage),
the voltage drop at the heating appliance point caused by the design load shall not exceed 5
percent of the nominal voltage of the installation (i.e. the voltage shall not drop below 95
percent of the nominal voltage).
We point out that the requirements of national standards do not concern voltage drops in a certain
part of the line. The regulation concerns the requirement on the possible voltage drop allowed in
relation to the nominal voltage. For instance, the transformer terminals may have a voltage
equivalent to 110 percent of the nominal voltage, from which the voltage drops may then be 15
percent and 13 percent, respectively. Thus, the designer has a certain “elbow room“ in how the
voltage drops from the power supply to the load should be designed in such cases. xSpider provides
a new useful function, which gives you the option of setting the limit drops locally for the particular
nodes and network branches.
4.2 Comments on the voltage drop calculation
It must be also explained how the voltage drops are calculated or how they are added together, as
the case may be. As far as purely active consumptions such as electrical heating appliances and
small cross-section lines are concerned, the situation is quite simple. Voltage drops are products of
line currents and resistances, which can be easily added together. As far as loads such as motors are
concerned, the nature of consumption of which is active and inductive, and as far as impedances of
the line Z composed of the real component R (resistance) and the imaginary component X
(inductance), these complex variables are multiplied. The result of this multiplication is a complex
variable again, i.e. a complex voltage drop. This variable describes the voltage drops in the real and
the imaginary axis of the coordinates. Therefore, the absolute values of these drops in the particular
line segments from the power source to the load may not be added together in the ordinary manner,instead they must be added together only as complex numbers again (i.e. the real and the imaginary
components separately). The program user should thus not be surprised that the sums of absolute
values of the voltage drops are often not an accurate sum of their absolute values in the particular
lines linked to each other. The same situation applies to the sum of impedances and currents.
According to the Kirchhoff’s law, the sum of currents in the nodes must be equal to zero whereas
for the sum of absolute values, however, this is may not be the case.
4.3 Load calculation for the particular network branches
xSpider allows you to calculate also the load in the particular network branches (represented bycables and conductors) under various load distribution within the network. In this case, the program
calculates with complex values of currents and impedances again. Therefore it is not possible - just

8/17/2019 XSpider 2.13 en Reference Manual
http://slidepdf.com/reader/full/xspider-213-en-reference-manual 37/236
_______________________________________________________________________________
_______________________________________________________________________________________________________________________
xSpider, Reference manual 29
like in the previous case - to add the current loads in the particular branches together simply as an
arithmetical sum of all absolute current values, but separately for the real and the imaginary
components. Provided these rules are observed, you can determine the respective load with any
network configuration. Similar rules should also be followed when calculating the short-circuit
currents, since the network impedance used for the short-circuit calculation is expressed in the
complex form as well.
4.4 Coord ination between protective devices
The aim of the coordination is to ensure that only the one protective device is going to disconnect
the fault or the overload, which is the closest one to the fault point or the location where the
overload occurs. Therefore, if you want to maintain coordination (discrimination) between two
protective devices arranged after each other, their characteristics may not intersect in any point and
if the characteristics are defined by zones instead of one unambiguous line, these zones may not
intersect either. The characteristics may not intersect and their zones may not overlap either for the
overcurrents corresponding to the overloads or for the short-circuit currents. The figures below
show different situations of ensuring the discrimination, either for all overcurrents (Fig. a, b) or
only in a certain range of overcurrents (Fig. c).
a) Protection by two fuses: discrimination
ensured for all currents
b) Protection by two circuit breakers,
discrimination ensured for all currents.
c) Protection by two circuit breakers and a fuse: discrimination of circuit breakers
ensured in full the range of currents lower than I 1 , discrimination between the
circuit breakers cannot be ensured for the range of currents between I 1 and I 2; the fuse with the characteristics 3 will disconnect for currents exceeding I 2.

8/17/2019 XSpider 2.13 en Reference Manual
http://slidepdf.com/reader/full/xspider-213-en-reference-manual 38/236
_______________________________________________________________________________
_______________________________________________________________________________________________________________________
30 xSpider, Reference manual
An example of graphical outputs from xSpider (the module of Tripping Characteristics) follows:
The figure illustrates a practical situation of how selectivity between the FA1 and FA8 circuit
breakers can be ensured. The FA1 circuit breaker is located closer to the component or circuit with
overcurrent protection, and the FA8 circuit breaker is located farther from this component or circuit.
Thus, the FA8 circuit breaker is upstream in relation to the FA1 circuit breaker. A typical example
of such wiring configuration is that the FA1 circuit breaker protects a 63 A outlet, for instance, and
the FA8 circuit breaker protects four such outlets, for which the simultaneous design current of 125
A is anticipated. It is naturally desirable that solely the FA1 circuit breaker disconnects when a
single 63 A outlet only is overloaded. This ensures that the supply for other outlets continues
without interruption in such case. With any potential overcurrent (whether under overload or at
short circuit), the FA1 circuit breaker will respond earlier than the FA 8 circuit breaker would. You
can satisfy yourself of that from the figure. Subtract the disconnection time, for instance, for 200 A.
The FA1 circuit breaker will disconnect at first - within the period of approximately 17 s, and the
FA8 circuit breaker would disconnect only much later - within about 200 s. Similarly you can also
trace that the FA8 circuit breaker would disconnect later than the FA1 circuit breaker for every
overcurrent, which can be assumed to occur in the given circuit. In such case, the FA8 circuit
breaker acts as a standby device if the FA1 circuit breaker failed or if the sum of currents of allcircuits supplied by the lines protected by the FA8 circuit breaker reaches up to the overcurrent
range. This could happen in fact if the anticipated coincidental simultaneousness was exceeded that
is when the aforesaid circuits were used and all four circuits protected by the FA1 circuit breakers
would withdraw their full design current at the same time. More detailed information about the
protective devices are provided in chapter “Properties of protective devices“ (see Part I. Chap. 5).

8/17/2019 XSpider 2.13 en Reference Manual
http://slidepdf.com/reader/full/xspider-213-en-reference-manual 39/236
_______________________________________________________________________________
_______________________________________________________________________________________________________________________
xSpider, Reference manual 31
A special xSpider function gives you the possibility to evaluate the
selectivity of two circuit-breakers also based on selectivity tables specified
in the power circuit-breaker catalogue. These tables were compiled on the
basis of short-circuit test results and, for standard cases, they offer more
precise, verified results. The following basic situations can occur:
Full selectivity (T): the outgoing circuit-breaker (2) will trip, whilethe incoming circuit-breaker (1) remains on.
Partial selectivity: selectivity between the relevant circuit-breakers is secured, if the short-
circuit current Ik ’’ is lower than a specified value. In such case, the outgoing circuit-breaker
(2) will trip, while the incoming circuit-breaker (1) remains on.
No selectivity: both circuit-breakers, the outgoing (2) as well as the incoming (1) will trip.
Cannot be evaluated: the pair under examination was not found in the selectivity table;
selectivity must be evaluated through a comparison of their tripping characteristics, as
specified above.
4.5 Cascading of protective devices
Cascading of protective devices means their arrangement with respect to the impacts of the short-
circuit currents. Probably all of us roughly understand the principle of correct ordination of
protective devices, which must be ranged in a way to ensure that the short-circuit current be
disconnected before any of the devices could be damaged. Nevertheless, we provide several
explanatory comments to be on the safe side.
The previous paragraphs told us that the protective device should disconnect such overcurrent,
which would endanger the protected line. If we summarize it and simplify it, it is true that the
higher the current is, the earlier the protective device should disconnected. But can the protectivedevice disconnect any current? This would naturally be the ideal situation. However, it is not the
case in reality. We did not deal with the question of what happens if the overcurrent is too high. In
such case, the protective device might not disconnect the overcurrent and it will be damaged. This
situation is undesirable of course. Relevant checks and verifications must be carried out in order to
avoid such situation,. On one hand, the protective devices are checked for the maximum current
they are in fact able to withstand. On the other hand, the designer calculates the maximum
overcurrent (i.e. typically the short-circuit current), which may possibly occur in the place where
the protective device is located. The former case concerns the design issue of the protective device,
the latter concerns the layout and configuration of the circuits, in which the protective devices are
employed.
But there is also another option. The protective device located farther will not withstand the
anticipated short-circuit current in the short-circuit point, however, this short-circuit current will be
limited by the upstream protective device. The limitation consists in disconnecting the short-circuit
current before the first half-wave of the anticipated short-circuit current reaches its maximum point
(i.e. the current, which would flow through circuit if the protective device was not included). This is
shown in the figure below where the waveform of the anticipated short-circuit current ik and the
waveform of the limited current io. The maximum values of this limited short-circuit current I o
depend on the magnitude of the anticipated short-circuit current ik . Even if the short-circuit current
is limited by the protective device during its first half- period, this limited current is the higher the
faster is the short-circuit current increase. Therefore, the higher the anticipated short-circuit current
is, the higher also the limited short-circuit current I o is (duration of one half- period is always 10ms). However, the waveform of the anticipated short-circuit current does not describe its immediate
values, but its r.m.s. value in steady state. This value is marked as I k . The maximum value of the

8/17/2019 XSpider 2.13 en Reference Manual
http://slidepdf.com/reader/full/xspider-213-en-reference-manual 40/236
_______________________________________________________________________________
_______________________________________________________________________________________________________________________
32 xSpider, Reference manual
short-circuit current (at the sinusoid
peak) is I km = I k ×2. I k represents the
short-circuit current, i.e. its effective
value in steady state. When showing the
graphical dependence of the maximum
value of the limited current I o on the
anticipated short-circuit current I k , this
short-circuit current is typically labeled
I p (the p-index can be remembered to
represent the fault current). An example
of such dependence is shown in the
figure below. In this case a fuse with the
nominal current of 63 A or 100 A, as the
case may be, acts as the limiting
component. You can see that the short-
circuit current, the r.m.s. value of which
is 10 kA (i.e. its maximum value isapproximately 14 kA), is limited to 4 kA
with the 63 A fuse and to 7 kA with a
100 A fuse. These so-called limiting
characteristics are supplied by the device
manufacturers and are included in
xSpider in digital form.
In order to ensure that the protective
device arranged behind the component
designed to limit the short-circuit current
is suitable for this limited short-circuitcurrent, the maximum value of the short-
circuit current that the second
component can withstand must exceed
the maximum value of the limited short-
circuit current I o. This second protective
device is usually a circuit breaker. Such values of the short-circuit current are indicated for the
circuit breakers, which the respective circuit breaker is able to disconnect. These are the so-called
short-circuit breaking capacities of the circuit breaker (namely the limit breaking capacity I cu and
the operating breaking capacity I cs - see below). And precisely these values must be compared with
the value of the limited short-circuit current I o. However, there is one more detail that must be keptin mind when doing so. The breaking capacities of circuit breakers are specified in r.m.s. values,
whereas the value of the limited short-circuit current I o is the actual maximum value of the limited
current. In order to be able to compare both numbers, we must recalculate the r.m.s. value of the
short-circuit breaking capacity I c to the maximum value I cmax. The relation equals to I cmax = Ic ×2.
It must be true that I c × 2 I o. For I c you substitute either the limit short-circuit breaking capacity
I cu or the operating short-circuit breaking capacity I cs of the circuit breaker. This selection depends
on if you need the circuit breaker to be still functioning after the short circuit - in that case you
substitute I cs, or if it is sufficient for you that the circuit breaker is able to withstand the short-circuit
current safely - you substitute I cu.
Conventional components used to limit high short-circuit currents are fuses. This capacity was not
previously presumed for circuit breakers at all. It was counted on the situation that - even with the
short-circuit current - there will be several periods of the short-circuit current passing through and
Waveform of limitation of the anticipated short-circuit current ik
Limiting characteristics of fuses

8/17/2019 XSpider 2.13 en Reference Manual
http://slidepdf.com/reader/full/xspider-213-en-reference-manual 41/236
_______________________________________________________________________________
_______________________________________________________________________________________________________________________
xSpider, Reference manual 33
only then the circuit breaker will disconnect. However, the nowadays manufactured installation
circuit breakers (MCB) do have a limiting capacity and break the short-circuit current before its
first half-wave reaches its peak.
To summarize the findings mentioned above, we can recommend the following procedure to check
the protective devices from the point of view of their short-circuit resistance:
1. Calculate the maximum short-circuit current I k , which can pass through the protective device.
It is usually the current arising with a three-phase short circuit at the protective device
location.
2. Check whether the protective device is able to withstand the given short-circuit current. If the
protective device is to comply, its breaking capacity must be higher than the short-circuit
current. If you want to be really sure, consider the surge short-circuit current I km, the value of
which is I k m = K × I k , whereas K usually does not exceed the value of 1.6. Therefore, if you
want to be sure, the breaking capacity (i.e. either I cs or I cu for power circuit breakers) must be
greater than 1.6 I k . If the selected protective device does not meet this condition, you can
select a protective device with a higher short-circuit resistance.
3. Check whether the upstream protective device is able to limit the short-circuit current to theextent that the value of the limited short-circuit current I o (i.e. its maximum value) is lower
than the maximum value of the short-circuit current corresponding to the breaking capacity of
the given protective device, i.e. is lower than I c × 2 I o (when you substitute either the limit
short-circuit breaking capacity I cs or the operating short-circuit breaking capacity I cu of the
circuit breaker for I c).
If the above-mentioned condition is not met, you can select either a protective device with a higher
breaking capacity or you can connect an upstream protective device that will secure a greater
limitation the short-circuit current more (fuses can be used nearly in all cases).
4.6 Reactive power compensation
Electrical equipment, such as electric motors, transformers, fluorescent tube chokes and many
other, do not consume only active energy from the network, but also the reactive (idle) energy
which is required to ensure their proper functions. The problem is that the transmission network is
loaded with the sum of both these energies. In order to reduce the reactive energy transmitted by the
system, a compensation condenser is connected to the appliance or to its neighborhood, which
supplies the reactive energy directly to the appliance, thus reducing the volume of the reactive
energy transmitted in the network. The quality of the reactive energy compensation is determined
by the cos power factor, which is the ratio of the active power P and the apparent power S . Thefollowing relation applies with a certain simplification:
cos = P / S
The apparent power S consists of the active and the reactive power components:
S P Q 2 2
whereas: cos ........ power factor (cosine of the phase shift angle between the voltage and the
current - for 50 Hz)
P .............. active power [W]S ............... apparent power [VA]
Q .............. reactive power [var]

8/17/2019 XSpider 2.13 en Reference Manual
http://slidepdf.com/reader/full/xspider-213-en-reference-manual 42/236
_______________________________________________________________________________
_______________________________________________________________________________________________________________________
34 xSpider, Reference manual
The ideal situation is to reach the power factor as close to one as possible. If the power factor is too
low, then the consumer is penalized for drawing reactive energy.
Depending on the extent and stability of consumption, various types of compensation are used:
individual, group or central compensation. As for individual compensation, the condenser is
switched on directly with the load, while the group and the central compensation is suitable for
larger electric systems with variable load. Here the condenser switching is controlled by an
automatic controller, which ensures that the required power factor is reached. In all cases referred to
above it applies, however, that the compensation located in any network point influences the entire
system.
The picture on the right shows a simplified diagram
of a parallel connected compensation condenser.
The current phasor is changed due to that, from I´ to
I K . Following the compensation, the net line current
is going to change to I K = I´+I C .
With the C capacitor (condenser) you achieve the
compensation power of:
Q I
C C
2
whereas: QC ... capacitor output [var]
I ...... effective current value [A]
..... angular frequency
( = 2 f ; for 50 Hz it is 314)
C ..... condenser capacity [F]
Solely delta connection (CD) is used in fact for condensers in three-phase network. xSpider allows
using condensers also in star connection, however, these can be employed only for one-phase loads.
After connecting a condenser, you can deduct the current flowing through the condenser and use it
to select the condenser contactors (Moeller offer full series of them). The required power factor can
be obtained by selecting a suitable condenser. However, it is necessary to point out that the program
does not perform any automatic check of the original to the final power factor, but calculates the
state with a specific selected condenser. During the aforesaid check, you can try the maximum
output of the compensation batteries for instance, which will be needed in the given network in
order not to over-compensate the network or not to use compensation batteries with unnecessarily
high power (up to now usually by estimate) in the design. The reduction of power of the connectedcondensers is then carried out through an automatic mechanism, which is a standard component of
compensation distribution boards.
xSpider allows you also to compare the voltage drop before and after the compensation because the
reduction in the apparent output leads to a decrease in the current as well. It is demonstrable that
reduction of losses occurring during the transmission of electric energy is a very beneficial measure
since other methods, such as increased cross-section, increased rated voltage etc., are not
economical and, from the technical point of view, often feasible only with difficulties. Through
calculations you can also check that it is even possible to reduce the cross-section of the lines used
in some cases.

8/17/2019 XSpider 2.13 en Reference Manual
http://slidepdf.com/reader/full/xspider-213-en-reference-manual 43/236
_______________________________________________________________________________
_______________________________________________________________________________________________________________________
xSpider, Reference manual 35
Note (taken over from: “Reactive power compensation in practice“):
„Countless range of articles and many post-graduate theses were written during the last hundred
years about what reactive power is and what it is not. A series of professional conferences has
naturally also dealt with the reactive power mysteries. And the result of the entire research and
investigation on the physical substance of the reactive power has been more or less also idle and
fruitless so far. The only thesis, on which the top world experts agree unanimously, doesn’t say
anything more than that the reactive power is something different from the active power and,
therefore, everyone must also pay for it separately….“

8/17/2019 XSpider 2.13 en Reference Manual
http://slidepdf.com/reader/full/xspider-213-en-reference-manual 44/236
_______________________________________________________________________________
_______________________________________________________________________________________________________________________
36 xSpider, Reference manual
5. Properties of Protective Devices _______________________________________________
In order to ensure that a protective device is used properly in electric circuits, it is necessary to
know both the basic parameters of the circuit (short-circuit conditions, load type etc.) as well as the properties of the protective device (type of the tripping characteristic, breaking capacity etc.).
Parameters of the protective device, which are guaranteed by the manufacturer in the catalogue
documentation, determine whether the respective device is suitable for use in the given circuit. At
the same time you need to know which parameter of the protective device (such as I cn, I cu, I cs, I cw)
can be assigned to which parameter of the short-circuit current (such as I k ’’, I km) in the given circuit.
Note: all currents exceeding the rated current in the circuit are called “overcurrent“. The term
“overcurrent“ includes the “overload“ situations (low overcurrents, several folds of I n ) and
“short-circuit“ situations (large overcurrents).
5.1 Fuses
Fuses are currently regulated by the set of standards IEC/EN 60269. Fuses can be classified
according to different aspects such as the design (power fuses - fuse links with blade contact , plug,
cylindrical etc. type), type of the tripping characteristic ((gG/gL: for general use - for predominant
part of applications; aM: for motor circuit protection - only for short-circuit protection; gR, aR: for
semiconductor protection et al.), according to the current type (AC, DC), nominal voltage etc. The
types and designs vary also depending on the national practice.
Overload: In the overload field, i.e. at low overcurrents, it is necessary to take into account that the
disconnection times of fuses will be relatively longer than those of circuit breakers. The definitionof the fuse tripping characteristics implies for instance that the fuse can disconnect not sooner than
after 1 hour when the current of 1.6 I n passes through, while the agreed breaking currents for circuit
breakers are lower.
Short-circuit currents: The most important feature of fuses is the high breaking capacity at short
circuit, which predetermines the fuses - considering their very small size - to be used for the main
or the backup protection of circuits and devices against short circuits. The nominal breaking
capacity of fuses is specified as a single number I cn and ranges usually from 50 kA up to 120 kA
(depending on the fuse type, power factor, voltage etc.). For overcurrents starting from ca. 20 I n
above, you can expect the fuses to show their limiting characteristics when the short-circuit currentis limited before it reaches its maximum value (thus, disconnection must take place within 5 ms, at
the latest, with the frequency of 50 Hz). The limited current (commonly marked I o) is expressed in
the maximum value. A typical course of the limiting characteristics is obvious from the figure
provided in Chapter 4.5. Two parallel lines are shown in this figure:
the bottom line expresses the peak (limited) value of the symmetric short-circuit current
(anticipated),
the top line expresses the peak (limited) value of the asymmetric short-circuit current, i.e. the
most unfavorable state.
The decision on which one of the lines should be used, depends on the state of the circuit, which we
examine for the short circuit.

8/17/2019 XSpider 2.13 en Reference Manual
http://slidepdf.com/reader/full/xspider-213-en-reference-manual 45/236
_______________________________________________________________________________
_______________________________________________________________________________________________________________________
xSpider, Reference manual 37
Another option of describing the properties of fuses is quantification of the energy allowed to pass
through the fuses into the circuit (i.e. the energy resulting in a rise of the line temperature), which is
expressed by the I 2t parameter (the Joule integral). It is deducted from the limiting characteristics
provided in the catalogue documentation. Limitation of the short-circuit current has a positive
impact on the line temperature rise and on the reduction of the dynamic load of conductors and
distribution boards.
Fuse selection criterion in a circuit with known short-circuit conditions:
I cn I k “
whereas: I cn .... nominal short-circuit breaking capacity of the fuse
I k “ ..... initial impulse short-circuit current
Discrimination of fuses: Discrimination of two fuses in series connection is generally guaranteed
for the ratio of nominal currents being 1: 1.6, unless stipulated otherwise by the manufacturer. As a
precondition, however, the tripping characteristics must be of the same type (see Chap. 4.4, Fig. a).
5.2 Circuit breakers
Depending on the purpose of use, we must take into account right two basic regulations for circuit
breakers which are specified the most frequently in the catalogues, EN 60898 and EN 60947-2.
EN 60898 Electrical accessories - Circuit breakers for overcurrent protection for household
and similar installations (2003)
EN 60898 is intended for circuit breakers used for building installations (also called installationcircuit breakers) where you can expect their operation by laymen. Nominal currents nowadays
range up to 125 A. The tripping characteristic is shown in the figure in Chapter 2.3.
Overload due to low overcurrents: Specific limits are determined for low overcurrents, in which the
release may not respond or must respond to the overload. The agreed non-breaking current ( I nt)
applies for 1.13 I n, the agreed breaking current ( I t ) is 1.45 I n . This means that the circuit breaker
may not disconnect in the agreed period of time if a current under the value of 1.13 I n is passing
through, and the circuit breaker must disconnect in the agreed period of time if the current exceeds
1.45 I n. The agreed period time is either 1 hour (for I n 63 A) or 2 hours (for I n > 63 A). These
limits are prescribed in general regardless of the type of the tripping characteristic. The data
specified above apply for the reference ambient temperature of 30 °C, with the circuit breakers
having no temperature compensation.
Short-circuit currents: In the area of short-circuit release response, the standard EN 60898
prescribes altogether three types of tripping characteristics with different setting limits - from 3 to 5
I n for B type, from 5 to 10 I n for C type and from 10 to 20 I n for D type, respectively. The area of
short-circuit release action has a direct impact on the correct circuit breaker selection in the circuit
in those cases when we want to meet the conditions for fault disconnection within the prescribed
time. It is also directly related with meeting the condition of the maximum loop impedance value in
TN system. Thus, in this connection we are solving the problem of ensuring such loop impedance,
which would guarantee at least the minimum short-circuit current being formed in a fault circuitthat ensures the respond of the short circuit release. Every higher current would then guarantee a
fast disconnection of the fault circuit within milliseconds. The nominal short-circuit breaking

8/17/2019 XSpider 2.13 en Reference Manual
http://slidepdf.com/reader/full/xspider-213-en-reference-manual 46/236
_______________________________________________________________________________
_______________________________________________________________________________________________________________________
38 xSpider, Reference manual
capacity ( I cn) of the circuit breaker must be taken in account in the area of high short-circuit
currents. This circuit breaker capacity reaches the values of 6, 10, 15, 20 and 25 kA. If the short-
circuit current exceeds the nominal breaking capacity of the circuit breaker, the circuit breaker will
be damaged. One of the options to prevent such situation is to use an upstream fuse (the fuse value
is 100 A for FAZ circuit breakers or 200 A for AZ circuit breakers). In this case we talk about the
circuit breaker backup protection. The limiting factor present when using an upstream fuse in front
of the circuit breaker in order to secure a backup protection is a certain constraint of the
discrimination. Specific values of the maximum selectivity current, for which the circuit
breaker/fuse combination is still selective, are specified by the circuit breaker manufacturers in their
catalogues in the form of tables (the table data are verified by measurements).
Selection criterion for installation circuit breakers (MCB) in a circuit with known short-circuit
conditions:
I cn I k “
whereas: I cn ..... nominal short-circuit breaking capacity of the circuit breaker
I k “
..... initial impulse short-circuit current
Note: For simplification, the I cn value is used in the I cs column for miniature circuit breakers in the
xSpider database.
Selectivity (discrimination) of installation circuit breakers: In addition, EN 60898 defines three
classes of energy limitation at short circuit for circuit breakers up to 32 A. Most of the circuit
breakers belong to the third class (limitation class 3, class of discrimination 3 as well) and, in fact,
circuit breakers for higher currents fall under this category, too (such as PLHT and AZ circuit
breakers up to 125 A). The advantage of these limiting circuit breakers is the high limitation of the
passed energy comparable with fuses and thus also a very low temperature rise in the line at short
circuits (only several degrees °C or tens of degrees °C in extraordinary cases). Their disadvantage isthe impossibility of selective grading of two circuit breakers in the same, i.e. the third selectivity
class, arranged after each other because limiting circuit breakers arranged after each other
disconnect virtually with the same speed. Selectivity in full range of the operating currents could be
theoretically possible only for large intervals between the nominal currents (ca. tenfold I n by
estimate), which is not applicable in practice. But beware of the commonly spread mistake that the
selectivity of two installation circuit breakers can be solved by sole grading of the B, C and D type
characteristics! Both limiting circuit breakers (such as a 32 A circuit breaker with C characteristic
and a 10 A circuit breaker with B characteristic) disconnect approximately with the same speed at a
short circuit and their passed energy is comparable. The selectivity problem can be solved only by
using two circuit breakers with very different values of the energy passed through, i.e. withdifferent disconnection speed at short circuit), such as by using a power circuit breaker with higher
current (according to EN 60 947-2) as the first one and then, arranged behind it, an installation
circuit breaker with B, C or D characteristics (according to EN 60898). The graphical illustration of
this situation is shown in Fig. b) in Chapter 4.4.
Note: residual current devices with inbuilt overcurrent protection (according to EN 61009) are
sometimes used for overcurrent protection by means of combined residual current devices with
circuit breakers. The conditions for circuit breakers as laid down in EN 60898 can be applied to
those without changes.

8/17/2019 XSpider 2.13 en Reference Manual
http://slidepdf.com/reader/full/xspider-213-en-reference-manual 47/236
_______________________________________________________________________________
_______________________________________________________________________________________________________________________
xSpider, Reference manual 39
EN 60947 Low voltage switchgear and conrolgear. Part 2: Circuit breakers (1997)
Circuit breakers assessed according to EN 60947-2 are designed in particular for industrial use and
it is presumed that these devices will always be operated only persons with electrical qualification
(qualified operator). The standard applies both to line circuit breakers as well as to motor circuit
breakers for any currents and design methods and for any recommended application, and it applies
also to circuit breakers with adjustable releases.
Overload due to low overcurrents: the tripping characteristics is determined by two binding values
only, namely the value of the conventional non tripping current of 1.05 I n and the conventional
tripping current of 1.3 I n. The agreed period of time is 1 hour for I n 63 A and then 2 hours for I n >
63 A). Unless provided otherwise, the reference ambient temperature is preferably 30 °C.
Short-circuit currents: the standard does not stipulate any limits for adjustment of the short-circuit
releases and their labeling of tripping characteristics. Therefore, the manufacturer itself can define
the labeling and setting for its circuit breakers (such the R, S characteristics, etc.). One of the most
important properties of circuit breakers is their ability to safely disconnect short circuit currents at
repeated occasions. Circuit breakers considered according to EN 60947-2 are mostly called “powercircuit breakers“ and are characterized by several values of breaking capacities:
nominal ultimate short-circuit breaking capacity ( I cu) – value of the short-circuit current
specified on the circuit breaker for the respective nominal voltage, which the circuit breaker
must disconnect safely. After such disconnection, however, its characteristics may change. In
other words, disconnection of the short-circuit current with the value of I = I cu is guaranteed
for one single time only. Although it may seem like a technical nonsense at the first sight to
dimension the circuit breakers for the I cu value (one-time disposable circuit breaker?), it has
been proven in practice that faults do not occur immediately on the output terminals of the
circuit breakers and that even a relatively small line impedance behind the circuit breaker is
sufficient to reduce the short-circuit current efficiently under I cu..
nominal service short-circuit breaking capacity ( I cs) – value of the short-circuit current
specified on the circuit breaker for the respective nominal voltage. It is expressed by the
prospective breaking current (in kA) corresponding to one of the values laid down by the
standard. It is most frequently expressed in percentage rate (25, 50, 75 and 100% I cu) relative
to the I cu value, i.e. for a circuit breaker with I cs = 75% I cu and I cu = 100 kA, for instance, I cs =
75 kA. I cs must be disconnected by the circuit breakers repeatedly and, therefore, it is only up
to the designer what extent of long-term operating reliability he/she wants to use for the
calculations - whether the circuit breakers will be designed with respect to I cs, or to I cu. It also
relates to the price of the circuit breakers.
nominal service short-circuit making capacity ( I cm) – value of the short-circuit current
specified on the circuit breaker for the respective nominal voltage, nominal frequency and thegiven power factor. It is expressed as the maximum anticipated dynamic current (the
maximum value of the first half- period with the direct-current component of the short-circuit
current being included). The nominal short-circuit making capacity ( I cm) is always higher
than the nominal short-circuit breaking capacity (Icu or Ics, as the case may be) and their
minimum ratio is prescribed by the regulations to range from 1.5 up to 2.2.
Note: The aspect of the short-circuit currents comes to the forefront of the designer's interest in
particular in the vicinity of the power source where the direct-current component of the short-
circuit current I a also has its effect in addition to the alternating component of the current I k . You
should not forget the dynamic effects I dyn of the short circuits, which are important in particularwhen assessing the short-circuit resistance of distribution boards (I dyn assessment is carried out
according to the I km parameter).

8/17/2019 XSpider 2.13 en Reference Manual
http://slidepdf.com/reader/full/xspider-213-en-reference-manual 48/236
_______________________________________________________________________________
_______________________________________________________________________________________________________________________
40 xSpider, Reference manual
Selection criteria for power circuit breakers in a circuit with known short-circuit conditions:
a) according to the nominal short-circuit breaking capacity of the circuit breaker
I cu I k ’’
whereas: I cu ..... nominal short-circuit breaking capacity of the circuit breaker
I k “ ..... initial impulse short-circuit current
*) In case of more demanding operating requirements where you need to work with a sufficient
reserve of parameters, it is possible to dimension the circuit breakers for the I cs parameter, which is
supported by xSpider.
b) according to the nominal short-circuit switching capacity of the circuit breaker:
I cm km
whereas: I cm .... nominal short-circuit switching capacity of the fuse
I km .... peak short-circuit current (also labeled i p)
Selectivity (discrimination) of power circuit breakers: The issue of selectivity of two and more
power circuit breakers arranged in series is solved in following manner. EN 60974-2 defines two
groups of circuit breakers. The so-called A category of use (common, non-selective circuit
breakers) and then the B category of use for selective circuit breakers with adjustable delay (at least
50 ms; preferable values are 0.05 - 0.1 - 0.25 - 0.5 - 1s).
A certain parameter similar to the one for cables is introduced for the B-category circuit breakers,
i.e. in the selective design, namely the nominal short-time withstand current I cw, which describes the
circuit breaker’s ability to transmit the short-circuit current equivalent precisely to I cw throughoutthe duration of the forced delay. Manufacturers of power circuit breakers specify the most frequent
periods for short-time delay. They are 0.1 s, 0.3 s, 1 s or 3 s. The circuit breaker located closer to
the fault point typically is not of a selective design (A category of use) and will disconnect the fault
within a short time - in tens of milliseconds as the maximum. – Than the I cw parameter of the
selective circuit breaker usually does not need to be used in full.
EN 60947 Low voltage switchgear and control gear.
Part 4: Contactors and motor starters - Section One - Electromechanical Contactors and
Motor Starters (1992)
The group of circuit breakers, which is regulated by EN 60947-1, includes also motor starters which
can be, in other words, described as a special design of motor-protective circuit breakers. They are
characterized by the possibility to adjust the overcurrent releases and the thermal release must be
set to the rated current of the motor, i.e. the release must be set to the “adjustment current“ in order
to ensure their correct function. A similar procedure is applied when using thermal overcurrent
relays which, however, require a short-circuit protection of the switching device to be used (such as
a fuse, preferably in aM characteristic).

8/17/2019 XSpider 2.13 en Reference Manual
http://slidepdf.com/reader/full/xspider-213-en-reference-manual 49/236
_______________________________________________________________________________
_______________________________________________________________________________________________________________________
xSpider, Reference manual 41
6. Bibliographic Reference _______________________________________________
1. K ř íž M.: Dimensioning and Protection of Electrical Equipment - Tables and Examples.
Volume 56, IN-EL, Prague 2001, second updated edition 2008 2. Rudolph W.: Safety of Electrical Installations up to 1000 Volts, VDE Verlag GmbH - Berlin -
Offenbach 1990
3. IEC 60364-4-41 (HD 60364-4-41:2007) Electrical Equipment Part 4: Safety. Chapter 41:
Protection against Electrical Accident.
4. IEC 60364-4-43 Electrical equipment Part 4: Safety. Chapter 43: Overcurrent protection.
5. IEC 60364-5-523 Electrical Equipment Part 5: Selecting and Building Electrical Equipment.
Chapter 52: Selecting Systems and Building Lines. Section 523: Allowed Currents.
6. IEC 1200-53 Guideline for Electrical Installations. Part 53: Selecting and Building Electrical
Equipment. Switching and Controlling Devices.
7. EN 60947 Switching and Controlling Devices (1994), a set of regulations.
8. EN 60898 Circuit Breakers for Overload Protection of House and Similar Installations (mod
IEC 898:1987)
9. IEC 60909 Calculation of Conditions at Short Circuits in a Three-Phase Electrification
Network
10. IEC 60909 Short-circuit current calculation in three-phase a.c. systems (mod IEC 909:1988)
11. Prof. Dr. Roland Zeise: The Computer-Aided Dimensioning of Low-Voltage networks,
Moeller GmbH, Bonn TB 0820-031 GB
12. Korenc V., Holoubek J.: Reactive power compensation in practice. Volume 39, IN-EL,
Prague 1999

8/17/2019 XSpider 2.13 en Reference Manual
http://slidepdf.com/reader/full/xspider-213-en-reference-manual 50/236
_______________________________________________________________________________
_______________________________________________________________________________________________________________________
42 xSpider, Reference manual
PART II: xSpider - Program Operation

8/17/2019 XSpider 2.13 en Reference Manual
http://slidepdf.com/reader/full/xspider-213-en-reference-manual 51/236
_______________________________________________________________________________
_______________________________________________________________________________________________________________________
xSpider, Reference manual 43
7. Introduction
_______________________________________________
The xSpider software system is a graphically oriented design system for dimensioning of low-
voltage networks fitted with circuit protection equipment of Eaton brand. It calculates voltagedrops, load distributions and short-circuit currents for radial as well as meshed networks and carries
out a subsequent check of suitability of the cables and protection equipment used. The calculation
methods are based on IEC standards. It is an independent program requiring only the operating
system of Windows. The software is intended primarily for designers and computational engineers.
General:
Design of TN/TT/IT systems of various voltage systems up to 1000 V (400/230V, 690/400V, …).
Design of radial as well as meshed networks.
Design of networks supplied from one or more different power supplies (supergrid,
transformer, generator), design of networks supplied concurrently from different powersources.
Possibility to simulate various operating states of the network by disconnecting power sources
and loads.
Possibility to define simultaneous and utilization factors.
Database of components with transparent tree structure allowing user-defined additions.
All calculations (voltage drops, load distribution, impedance, short circuits) are based on IEC
standards.
User-friendly interface allowing easy and fast entry of simple cases while maintaining the
maximum variability and open-end character. User operation similar to standard CAD
systems (AutoCAD).
Program core using the options of Windows XP / Windows Vista / Windows 7 / Windows 8.
Network topology:
Use of MDI interface - possibility for parallel processing of several projects.
The network wiring diagram (topology) is defined by combining the particular components
(power sources, transformers, circuit lines, circuit protection equipment, loads) in the
graphics. A function is available to insert standard component groups with a single click
(power supply group, couplings, outlets, …).
Standard functions used for graphics editing are available (copy, move, erase, stretch).
Standard functions for display control (zoom, pan).
Network nodes are created automatically on a continuous basis. Connection logic check.
Option to transfer objects among projects by means of the clipboard.
Possibility to add free graphics (line, circle, rectangle, text).
Parameters of network components, database of components
Parameters of the inserted components (i.e. those components, which cannot be dimensioned
within the program - power sources, loads, transformers) must be entered immediately after
inserting the respective component into the network wiring diagram.
Parameters of other components (circuit protection equipment, cables) can be also entered orthey will be dimensioned by the program automatically.

8/17/2019 XSpider 2.13 en Reference Manual
http://slidepdf.com/reader/full/xspider-213-en-reference-manual 52/236
_______________________________________________________________________________
_______________________________________________________________________________________________________________________
44 xSpider, Reference manual
A database of standard components is available (Generators, Transformers, Cables, Circuit-
breakers, Fuses, Switch-disconnectors, Motors, Compensation units).
The database is built as open-ended and the user can add any components into the database
that he uses in his projects. It is possible to create a database tree as well as data tables.
The option of adding items to the databases by the user is important in particular with
components not supplied by Eaton (Generators, Transformers, Cables, Motors, Compensationunits).
Parameters of components taken from the database can be edited locally after being inserted
into the network.
Calculations
The calculations are based on IEC standards. A TN, IT or TT systems considered
alternatively, depending on the user’s selection, for the selected voltage system up to 1,000 V,
and the short circuits are electrically remote.
Voltage drops in nodal points of the network (a check whether the drop does not exceed the
user-defined maximum value set locally for every network component). The utilization factoris always taken into account. For radial networks, the simultaneous factor is also taken into
account.
Load distribution in the network lines (check of correct dimensioning of the circuit protection
equipment and conductors according to IEC 60364-5-523), check of line protection for
overload and short circuit according to IEC 60364-4-43. Calculation of power factor for
meshed networks.
Three-phase symmetric short circuit, calculation according to IEC 60909 - calculation of the
short-circuit current in the selected network point, distribution of short-circuit current flows in
the network (check of correct dimensioning of the circuit protection equipment and
conductors). Contribution from motors is taken into account. Solving of cascades – checking the breaking capacities of the outgoing protective components
at the outgoers with respect to the incoming protective components at the incomers.
A function to evaluate circuit-breaker selectivity based on circuit-breaker/circuit-breaker
selectivity tables as specified in the catalogue.
Two-phase asymmetric short circuit, calculation according to IEC 60909 - calculation of the
short-circuit current between phases, the current into the ground at the short-circuit point and
the short-circuit current flow in the network (check of correct dimensioning of the circuit
protection equipment and conductors).
One-phase asymmetric short circuit against the ground, calculation according to IEC 60909 -
calculation of the short-circuit current at the selected network point and of the short-circuitcurrent flow in the network, calculation of impedance in the short-circuit point and of contact
voltage in non-conductive parts. Calculation of the disconnection time for the short-circuit
point and check of compliance with the requirements of IEC 60364-4-41 (HD 60364-4-
41:2007).
Calculation of the positive and zero sequence components of impedance at the network node
(which can be used for the subsequent design of the connected IT network, for instance), the
calculation of impedance for the fault loop Zsv according to IEC 60364-4-41 (HD 60364-4-
41:2007). The calculation results can be displayed either as absolute values or as complex
numbers; the calculated impedances are not corrected with any coefficient.

8/17/2019 XSpider 2.13 en Reference Manual
http://slidepdf.com/reader/full/xspider-213-en-reference-manual 53/236
_______________________________________________________________________________
_______________________________________________________________________________________________________________________
xSpider, Reference manual 45
Results display
A list of unsuitable components is displayed immediately after performing the calculation.
The list can be printed out.
After the calculation has been performed, the calculated values will be displayed for the
individual components in the network wiring diagram. The diagram showing the results can
be printed out. It can be printed on any output device, for which a driver is available inWindows (printer, plotter).
Possibility to print tables - the list of network components with specification of the
calculation results.
Option to print tables – the list of cables.
Export of graphics into DXF data format (for their subsequent import to CAD systems).
Export of data tables into TXT, TAB, XLS (Microsoft Excel) data formats.
Working with the tripping characteristics
Selection of circuit protection equipment from the database and drawing of their tripping
characteristics.
Selection of equipment from the network wiring diagram and drawing of their tripping
characteristics - selectivity assessment possible.
Possibility to set the tag assigned to the respective characteristics, curve color setting.
Gauging in the chart possible.
In case a circuit protection device is equipped with adjustable releases, it is possible to modify
all parameters available. If this was a device from the wiring diagram, the change of the
release parameter setting is transferred back into the wiring diagram.
Chart print on the output device (black-and-white or color print).
Archiving of the set of characteristics in a data file (an arbitrary number of such sets ofcharacteristics can be created for one project).
Hardware and software requirements (the minimum configuration is as follows):
PC, Pentium III and higher, 64 MB and more RAM, graphics with the minimum resolution of
1,024x768, 15“ screen, mouse, output printing device (laser printer, plotter etc.).
At least 20 MB free hard-disk space,
Operating system installed: Windows XP, Windows Vista, Windows 7, Windows 8.
Notes:
The xSpider software is not a network program. It must always be installed on the local diskof every user.
The licence to use the program system is provided for a limited period of time. The licence is
provided by Eaton GmbH, Scheydgasse 42, A-1215 Wien, Austria, the exclusive holder of
rights to the program.

8/17/2019 XSpider 2.13 en Reference Manual
http://slidepdf.com/reader/full/xspider-213-en-reference-manual 54/236
_______________________________________________________________________________
_______________________________________________________________________________________________________________________
46 xSpider, Reference manual
8. Installation
_______________________________________________
8.1 Installation from CD-ROM
1. Insert the installation CD-ROM in the drive (e.g. the D: drive).
2. Run the program \ xSpi der _SETUP\ SETUP. EXE from the CD-ROM. Click on the Start
button and select Run. A dialogue panel will open, in which you type the following text in the
Open field: D: \ xSpi der _SETUP\ SETUP. EXE (where D means the CD drive). Click OK.
3.
Select the language version of the installation from the list of the options being offered.
4. Now, you are prompted to close all the running applications (programs). It is also
recommended that the network drivers and antivirus programs running in the background
should be disconnected. Click Next to continue the installation.
5.
Read the Licence Agreement in the dialogue panel that opens up subsequently. If you agree
with the conditions, select the option ‘I agree’. Then click Next.

8/17/2019 XSpider 2.13 en Reference Manual
http://slidepdf.com/reader/full/xspider-213-en-reference-manual 55/236
_______________________________________________________________________________
_______________________________________________________________________________________________________________________
xSpider, Reference manual 47
6. Now, specify the directory INTO which the program is to be installed. The xSpider program
is not a network program. It must always be installed on each user’s local disc. If the preset
directory does not conform, click on the Browse button and specify a different directory in
the dialogue panel that opens up subsequently. Click Next to continue the installation.
7.
If there is already an older installation of the xSpider program in the specified destination
directory, the system asks whether the files that have been modified by the user are to be
transferred from the previous installation. Click Next to continue the installation.
The default directory that the
program is to be installed into; this
directory can be changed by
editing the text, or the directory
can be selected after clicking on
the Browse button. If the directory
already exists, you will be
prompted to confirm the rightselection. The program cannot be
installed directly into the root
directory of the hard drive or
directly into the system folder.
After selecting the directory,
continue the installation by
clicking on the Next button.
If you agree with the terms of
the Licence Agreement, click on
‘I accept’ to accept the terms of
the Licence Agreement. Then
continue the installation by
clicking on the Next button.
If the user-defined database of
components (generators, motors,
transformers, etc.) has been
modified in the previous
installation, click on this button.
If you are not sure, use this
button as well.
The original installation will be
deleted; the user-defined
database of components will notbe transferred.

8/17/2019 XSpider 2.13 en Reference Manual
http://slidepdf.com/reader/full/xspider-213-en-reference-manual 56/236
_______________________________________________________________________________
_______________________________________________________________________________________________________________________
48 xSpider, Reference manual
Please, pay attention to the following warning:
8. Specify the name of the group of programs where the program’s ‘run’ icon will be located
(the name of a new item of the Start – Programs menu). It is recommended that the pre-
selected (default) name should be kept. Click Next to continue the installation.
9. The setting carried out in the previous steps is summarized at the sheet that is displayed
subsequently. Please, check whether the setting complies with your requirements. By means
of the Back button, you can revert the necessary number of steps and modify the individual
parameters. The actual installation is to be launched by clicking on the Install button.
10. Now, the files will be copied to the hard drive of the computer, and the installation will be
expanded.
11. A final report will be displayed by the installation program. This means that the installation
has been completed in a correct way and that the xSpider program is ready for use. Close this
dialogue panel by clicking on the Finish button. The installation program will automatically
create the ‘run’ icon on the desktop, and it will carry out the association of the .SPI extensionfiles (projects of networks) with the xSpider program (the program is activated automatically
by double clicking on the file with the SPI extension in the Windows Explorer). Run the
program and enter the licence (see Chap. 9.1).
12. The installed program can be removed by means of the uninstall program. Click on the Start
button. Then subsequently select the items Programs - xSpider - Uninstall. The uninstall
program will start, and the installation will be removed from your computer.
8.2 “ Manual” customer installation in case of SETUP failure
A problem may occur on some computers when installing the software from the installation CD-ROM through the standard procedure with SETUP. EXE. As an alternative solution, it is possible to
install the software “manually” without using the installation program.
The list of the existing program
groups (items of the ‘Start –
Programs’ menu).
The name of the newly created
program group (an item of the
‘Start – Programs’ menu) in
which the program’s ‘run’ icon
will be located.

8/17/2019 XSpider 2.13 en Reference Manual
http://slidepdf.com/reader/full/xspider-213-en-reference-manual 57/236
_______________________________________________________________________________
_______________________________________________________________________________________________________________________
xSpider, Reference manual 49
Caution: performance of the manual installation requires certain knowledge and skills in computer
operations. Should some steps from the procedure specified below be not completely clear or
comprehensible to you, please leave the installation up to your system administrator or up to an
expert in this field.
1.
Create the directory C: \ xSpi der on your hard disk (using the operating system tools, suchas the Windows Explorer, WindowsCommander etc.).
2. Copy all files from the directory \ xSpi der _SETUP\ CUSTOM located on the installation
CD-ROM into this newly created directory.
3. Run the program UnPack. BAT in the directory on your hard disk - the customer installation
of the xSpider program will be unpacked.
4. Create a shortcut icon for the xSpider software on the desktop and a new item in the section
Start-Programs. Create a shortcut icon for the program on the desktop (using the operating
system tools).
5. Run the program by double-clicking the icon created in the previous step. If it is not possible
to start the program, copy the files from the directory \ xSpi der _SETUP\ Wi nSys on theinstallation CD-ROM to your Windows system directory, usually located at
C: \ Wi ndows\ Syst em32 (Attention - newer versions of these libraries, which can already
exist there in Windows, may not be overwritten !!).
6. Run the program and enter the licence data (see Chap. 9.1).
8.3 Installation backup
Some files can be modified from time to time when using the program. This concerns files with the
program configuration, user databases etc. It is desirable to back up these files:
File Comment From
versionxSpi der \ Spi der . I NI Program configuration 1.0xSpi der \ DATA\ . . . User-defined databases of components (motors, generators,
transformers, cables, …)
1.0
Full installation backup:
A precondition allowing you to perform the backup of the existing installation is the presence of the
RAR.EXE packing program in the program root directory. RAR is not included in the standardinstallation, however, it is a shareware which can be downloaded from the Internet (e.g. at
WWW. RAR. CZ) and used further on payment of the copyright fee.
1.
Copy RAR. EXE to the superstructure root directory (typically C: \ xSpi der ).
2. Run PACK. BAT from the program root directory (typically C: \ xSpi der ). Click on the
Start button and select Run. A dialogue panel will open, in which you type the following text
in the Open field: C: \ xSpi der \ PACK. BAT (where C: \ xSpi der is the path to the
program root directory). Click OK.
3. The program will be packed. Archive file Spi der . RAR will be created in the program root
directory. Backup this file together with UNRAR. EXE and UnPack. BAT to CD.4. By using UnPack. BAT, you can unpack the archive file again.

8/17/2019 XSpider 2.13 en Reference Manual
http://slidepdf.com/reader/full/xspider-213-en-reference-manual 58/236
_______________________________________________________________________________
_______________________________________________________________________________________________________________________
50 xSpider, Reference manual
8.4 Software update from website
As an integral part, xSpider includes the so-called Updater, a software to check the availability of
new versions on the Eaton website. Its launch is offered automatically at regular intervals when you
start up xSpider.
When the user agrees to launch the Updater, the software will automatically connect to the Eatonwebsite and check the availability of a new xSpider version. If a new version is available, it will be
downloaded and installed automatically. An Internet connection is a pre-condition for this function.
Notes:
The check interval for availability of new versions on the Eaton website can be defined in the
Options function under the System tab (see Chap. 21.1).
The date of the last check for availability of new versions on the
Eaton website can be determined in Options under the Licence
tab (see Chap. 21.6).
The Updater application to check the availability of newversions on the Eaton website can be launched at any time by
using the Software Update from Website function from the
Help drop-down menu.
8.5 Software update from directory
If no Internet connection is available, it is possible to ask the software provider to have the update
files sent in another way, and subsequently to update the software from directory.
1.
Ask the software provider to have the update files sent to you, e.g. on a CD-ROM by postalservice (there are two files for every update: control file *. XML and data file *. ZI P).
2. Load your update files to an auxiliary directory on the hard disk. All update files issued for
the given software version must be present in the directory (it is not sufficient to have only the
last issued update).
3. Launch xSpider.
4.
Select Software Update from Directory from the Help drop-
down menu.
5. A dialogue panel will subsequently open (similar to the Open
function – see Chap. 20.2), in which you select the update
control file (with extension *. XML) and click Open.6. xSpider will be closed and Updater will be launched to update
your installation.

8/17/2019 XSpider 2.13 en Reference Manual
http://slidepdf.com/reader/full/xspider-213-en-reference-manual 59/236
_______________________________________________________________________________
_______________________________________________________________________________________________________________________
xSpider, Reference manual 51
9. Launching xSpider _______________________________________________
If you have installed xSpider on your computer successfully in accordance with the procedure
described in chapter 8, you can proceed with the program running.
9.1 First launching
1. Click on the Start button and follow the menu according to the items Programs -
xSpider - xSpider. It is also possible to start the program simply by double
clicking on the program’s icon on the desktop.
1. A dialogue panel with the Licence Agreement text will be displayed.
If you agree with the text shown above, click on the I Agree button. By doing so, you undertake
to respect all provisions of the Licence Agreement. If you do not agree with the Licence
Agreement, the program cannot be run. The wording of the Licence Agreement can be also
viewed at any later point in time by using the function About xSpider (see Chap. 23).

8/17/2019 XSpider 2.13 en Reference Manual
http://slidepdf.com/reader/full/xspider-213-en-reference-manual 60/236
_______________________________________________________________________________
_______________________________________________________________________________________________________________________
52 xSpider, Reference manual
2. As the next step, a dialogue panel will open requesting the entry of licence data:
Enter the required data specified in your licence or contact your software provider and ask
him to provide you with the required licence data. Please pay special attention to filling out
all items carefully, in particular the correct entry of licence expiration date and the licence
number. The program will not be launched when incorrect values have been entered.
4. In case all data were filled in properly, the program will now be launched. The system
remembers the licence conditions and does not request their entry with another start of the
program. The licence data can be changed additionally at a later point in time by using the
Options function (see Chap. 21.6). You can also view the licence data by using the function
About xSpider (see Chap. 23).
5.
After the program startup, the Tip of the Day window is displayed automatically, providingyou with suggestions for working with the program. Please read the Tip for this startup and
close the dialogue panel by clicking Close. The program is ready for use.
9.2 Second and any other launching
1. Click on the Start button and follow the menu according to the items Programs -
xSpider - xSpider. If you have created a shortcut icon for the program at the desktop,
you can simply run the program by double-clicking this icon.
2. The system checks the licence validity and, provided everything is correct, launches
the program.3. After the program startup, the Tip of the Day window is displayed automatically, providing you
with suggestions for working with the program. Please read the Tip for this startup and close the
dialogue panel by clicking Close. The program is ready for use.
Notes:
If you want to open a new project now, click on the icon New Project (see Chap. 20.3).
If you want to open one of the demonstrational examples, click on the icon Open Demo
(see Chap. 20.2.1). Demos can be used as an initial point to solve a specific problem.
If you want to continue in editing a network project you have already created and saved
previously, open this file now by clicking the icon Open Project (see Chap. 20.2). Showing of the Tip of the Day window at program startup can be overridden. It is also
possible to look through all the tips one by one (for more details see Chap. 22.1).
The specific provider address depends
on the national version of your software.
Customer identification data. At least onecharacter must be entered in every field.
Licence expiration date. It must be filled
in very carefully according to the data
provided by the software provider.
Licence number. It must be filled in very
carefully according to the data provided
by your software provider.

8/17/2019 XSpider 2.13 en Reference Manual
http://slidepdf.com/reader/full/xspider-213-en-reference-manual 61/236
_______________________________________________________________________________
_______________________________________________________________________________________________________________________
xSpider, Reference manual 53
If the following message appears after the program startup:
it means that your software lifetime has expired. Please contact your xSpider system provider to
obtain new version of the software (or you can visit the website of the program provider, where you
can download new version of the software).
If the following message appears after the program startup:
it means that your licence has expired. Please contact your xSpider system provider if he can give
you a new licence number (or possibly visit the website of the program provider where you can re-
register your software online together with obtaining a new licence number, or download an update
for the program, as the case may be). Then click Yes and enter the new licence data in the dialogue
panel identical to the one used during the first initialization (see Chap. 9.1).
If the following message appears after the program startup:
it means that the file Spi der . I NI containing the licence data has been corrupted. Click Yes and
enter the new licence data in the dialogue panel identical to the one used during the first
initialization (see Chap. 9.1). If difficulties persist, contact your xSpider system provider.

8/17/2019 XSpider 2.13 en Reference Manual
http://slidepdf.com/reader/full/xspider-213-en-reference-manual 62/236
_______________________________________________________________________________
_______________________________________________________________________________________________________________________
54 xSpider, Reference manual
10. Introduct ion to the xSpider software _______________________________________________
10.1 Main screen and program operation
After launching the program (see Chap. 9.1, 9.2), the main screen is activated. The program uses
the MDI user interface (Multiple Display Interface) allowing parallel processing of several network
projects (similarly to the MS Word text editor, for instance, allowing parallel editing of several
documents). A new project is activated automatically upon the program startup. You can commence
to work with the program in one of the following ways:
Start creating the topology of a new network or set up another new network project by
clicking the icon New Project (see Chap. 20.3),
Open one of the demonstrational examples by clicking the icon Open Demo (see Chap.
20.2.1),
Open an already existing network project and continue in its editing after clicking the
icon Open Project (see Chap. 20.2),
Use some of the independent modules for working with the tripping characteristics (see
Chap. 15) or for administration of user databases (see Chap. 16).
Main screen of the program - no project is activated:
Tools for handling the main
rogram window (minimize,
maximize, close window).
Status bar, information about
the currently performed
operation
Current date and time NumLock key state
Activation of the user database administration module
CapsLock key state
Activation of the tripping characteristics module
Opening an existing network project for further editing
Creating a new network project
Window area for network projects
By dragging the edges,
you can modify the
dimensions of the main
program window
Opening a demo example for further editing

8/17/2019 XSpider 2.13 en Reference Manual
http://slidepdf.com/reader/full/xspider-213-en-reference-manual 63/236
_______________________________________________________________________________
_______________________________________________________________________________________________________________________
xSpider, Reference manual 55
Main screen of the program - the window with the network project is maximized:
Main screen of the program - two parallel opened projects:
Tools for handling the
main program window
(minimize, maximize,
close window).
Tools for arranging the
articular project windows on
the main screen.
File name for the
currently edited
roject.
Currently edited project
(active project) – the top
blue band. All functions
relate to this project.
Non-active project –
the top grey band.
The project window
dimensions can be
changed by dragging
its edges
Tools for handling the
roject window (minimize,
maximize, close window).
You can change the
roject window position
within the main screen by
dragging the top band.
File name for
the currently
edited project.

8/17/2019 XSpider 2.13 en Reference Manual
http://slidepdf.com/reader/full/xspider-213-en-reference-manual 64/236
_______________________________________________________________________________
_______________________________________________________________________________________________________________________
56 xSpider, Reference manual
The functions controlling the arrangement of the individual windows with projects in the main
screen are located in the Window drop-down menu (the maximum of 10 windows with different
projects can be opened simultaneously):
10.2 Running program functions
The individual program functions can be launched either by selecting the appropriate item from the
drop-down menu (includes all program functions) or by clicking on the icon in the tool bar
(includes only the most important functions). Launching of functions by means of the icons is
preferred in this manual.
The last called function and the frequently used functions for Zoom view control can be launched
from the context menu (pop-up menu), which is displayed after clicking your right mouse button in
the graphics area of the window showing the project.
Keyboard shortcuts:
F1 Help (see Chap. 22) Ct r l +N New project (see Chap. 20.3)F3 Group (see Chap. 11.14) Ct r l +O Open project (see Chap. 20.2)F4 Calculation (see Chap. 14) Ct r l +S Save project (see Chap. 20.1)F5 Tripping characteristics (see Chap. 15) Ct r l +E Export (see Chap. 19)F6 Database (see Chap. 16) Ct r l +P Print (see Chap. 18)F7 Grid (see Chap. 11.16) Ct r l +Z Undo (see Chap. 10.3)F8 Ortho (see Chap. 11.16) Ct r l +Y Redo (see Chap. 10.3)F9
Step (see Chap. 11.16)Ct r l +F
Find (see Chap. 12.7)Ct r l +X Cut to clipboard (see Chap. 12.6.1)Ct r l +C Copy to clipboard (see Chap. 12.6.2)Ct r l +V Paste from clipboard (see Chap. 12.6.3)
Arrange windows as a cascade:
Tile windows horizontally:
Tile windows vertically:
List of all open windows with network projects. By clicking on
an item, the respective window becomes current.
Identification of the current window.
Arrange icons of the minimized windows in
the bottom part of the basic screen.
Close windows with the currently edited project (similarly to
clicking on the X in the upper right corner of the window).
Close all open project windows – setting the default state just
like at the program startup.
Name of the last called function (here insertion of the Generator component). By
selecting this item, the last called function will be activated again.
Functions for view control (zoom) (see Chap. 13).
Regenerate graphics display (see Chap. 13.1).
Context menu activated by the right mouse button.

8/17/2019 XSpider 2.13 en Reference Manual
http://slidepdf.com/reader/full/xspider-213-en-reference-manual 65/236
_______________________________________________________________________________
_______________________________________________________________________________________________________________________
xSpider, Reference manual 57
10.3 Undo, Redo
The effect of all program functions (with the exception of image change carried out by the
Zoom functions) can be cancelled (undone) one by one as they have been called by clicking
the Undo icon. The program remembers all steps carried out from the beginning of the network
project editing. Use the Undo function carefully since some operations do not have any direct visual
implications for the wiring diagram (e.g. a change in the line parameters).
The effect of the last performed Undo function can be restored by clicking the Redo icon.
Only one single Undo step can be restored.
10.4 Method of program application
When designing a network, the first step consists in drawing the wiring diagram (topology). The
network wiring diagram is defined by combining the particular components (power sources,
transformers, circuit lines, switching devices, protective devices, loads, compensation units)
together in the graphics. Free graphics (lines, circles, text, …) can be added into the drawing. Thesoftware is intended for design of networks, which are operated as TN/IT/TT networks of various
voltage systems. Thus the first step, prior to commencing the design of a new network, is selection
of the network type and the voltage system (see Chap. 11.1).
There are 2 types of components available in general when designing the wiring diagram:
Inserted components, i.e. introduced components, the parameters of which are preset and
cannot be configured within the program (power sources, transformers, loads, motors,
compensation units),
User-defined components, i.e. such components, the parameters of which are subject to
investigation and optimization (lines - cables, busbar systems; protective devices - circuit
breakers, fuses, switching components - disconnectors).
The entry of parameters for the user-defined components depends on the mode in which the
program is operating. The following basic modes are available:
Design mode, i.e. the parameters of the user-defined components, where required so by the
user, will be automatically determined and set in such manner as to ensure compliance with
the safety requirements; however, the proposed design solution must not be optimal;
Control mode, i.e. parameters of all components (user-defined as well as inserted) are set by
the user based on his/her previous experience; the calculation is followed by a check of thecriteria for safe operation of the network. The user will evaluate the results and may
subsequently carry out some optimization adjustments to the design.
Recommended work flow in the design mode:
1. Drawing of the network wiring diagram (topology) by combining the particular components
in the graphics together.
Precise parameters of the inserted components must be entered (possibility of selecting
the components from databases). Parameters of the user-defined components must not be entered, but the Dimension
automatically switch must be activated for every component. Using the Options

8/17/2019 XSpider 2.13 en Reference Manual
http://slidepdf.com/reader/full/xspider-213-en-reference-manual 66/236
_______________________________________________________________________________
_______________________________________________________________________________________________________________________
58 xSpider, Reference manual
function under the Diagram tab, it is possible to define that the AutoDimension switch
be automatically enabled by default when a component is inserted in the wiring diagram;
for more details see Chap. 21.2.
Such user-defined components can also exist within the network, which have already
been determined (by their selection from the database) and their dimensioning is not
required - the Dimension automatically switch must be disabled for these components. For more details see Chap. 11.2 - 11.14, 12.1.1.
2. Setting the automatic dimensioning parameters by using the Options function: to determine
the default standard for conductors (material, insulation), determine the preferences for
circuit-breaker product series, etc. For more details see Chap. 21.5.
3. Launching the calculation of the automatic dimensioning by using the Calculation function.
A complex check of the entire network is carried out after performing the calculation and the
results are displayed (see Chap. 14.1).
4. Design editing or optimization, as the case may be, handling of collisions and error states (the
automatic dimensioning mode solves standard cases so that they are in compliance from the
safety point of view; however, it performs no optimization and does not take the technicalfeasibility of the design into account). For more details see Chap. 11, 12.
5. Print of the design results - the functions Print (see Chap. 18), or Export (see Chap. 19).
Recommended work flow in the control mode:
1.
Drawing of the network wiring diagram (topology) by combining the particular components
in the graphics together (some of the demos supplied with the program can be used as an
initial point).
Precise parameters of the inserted components must be entered. Precise parameters of the user-defined components must be entered; the Dimension
automatically switch must be disabled.
For more details see Chap. 11.2 - 11.14, 12.1.1.
2. Design of network behavior in operating state and in case of overload: calculation of Voltage
drops and load distribution by using the Calculation function. This step is followed by
checks of the calculated parameters - whether the requirements of applicable standards are
met. For more details see Chap. 14.3.
3. Design editing and repeating step 2 so long until all components comply. It is suitable to use
the module for Tripping characteristics to assess the overload protection of cables (for more
details see Chap. 15).4. Design of network behavior at the maximum short circuit (resistance of network components
to short-circuit currents): execution of the Check the entire network calculation: 3-phase
symmetric short circuit by using the Calculation function. This step is followed by checks
of the calculated parameters - whether the requirements of applicable standards are met. For
more details see Chap. 14.4.
5. Design editing and repeating step 4 so long until all components comply. When designing
only a part of the network, it is possible to use the calculation of Short-circuit currents: 3-
phase symmetric short circuit - short circuit only in a single selected network node. For
more details see Chap. 14.4.
6.
Design of network behavior at the minimum short circuit (check for the fault disconnection
time from the power source): execution of the Check the entire network calculation: 1-
phase asymmetric short circuit by using the Calculation function. This step is followed by

8/17/2019 XSpider 2.13 en Reference Manual
http://slidepdf.com/reader/full/xspider-213-en-reference-manual 67/236
_______________________________________________________________________________
_______________________________________________________________________________________________________________________
xSpider, Reference manual 59
checks of the calculated parameters - whether the requirements of applicable standards are
met. For more details see Chap. 14.4.
7. Design editing and repeating step 6 so long until all components comply. When designing
only a part of the network, it is possible to use the calculation of Short-circuit currents: 1-
phase asymmetric short circuit - short circuit only in a single selected network node. For
more details see Chap. 14.4.8. Selectivity assessment by means of the module for Tripping characteristics (for more details
see Chap. 15), or by means of a special Selectivity function (selectivity comparison between
two circuit-breakers based on selectivity tables specified in the catalogue, for more details see
Chap. 14.4.2).
9. Assessment of network behavior in various operating states - possibility of disconnecting
individual lines (required in case of meshed networks supplied from several power sources,
such as networks within the health care sector).
10. Print of the design results - the functions Print (see Chap. 18), or Export (see Chap. 19).
Note: the sequence of the particular steps in the control mode can be modified as desired; the
process specified above is only the recommended procedure. For details regarding the theory of
designing and dimensioning of low-voltage networks see Chap. 1 - 4.

8/17/2019 XSpider 2.13 en Reference Manual
http://slidepdf.com/reader/full/xspider-213-en-reference-manual 68/236
_______________________________________________________________________________
_______________________________________________________________________________________________________________________
60 xSpider, Reference manual
11. Network Wiring Diagram (Topology) _______________________________________________
When designing a network, the first step consists in drawing the wiring diagram (topology). The
network wiring diagram is defined by combining the particular components in the graphicstogether. Free graphics can be added into the drawing. The following components can be used
within the program:
Supply network Inserted
component, see
Chap. 11.2
Generator Inserted
component, see
Chap. 11.3
TransformerInserted
component, see
Chap. 11.4
Switchboard trunk - logical network branching (busbars,
terminal blocks etc.), component with negligible impedance
Inserted
component, see
Chap. 11.5
Line - enclosed busbar distribution system User-defined
component, see
Chap. 11.6
Line - cable User-defined
component, see
Chap. 11.7
Switch disconnector (the operating state of the switching
component can be set to: on/off, thus allowing disconnection
of the particular network lines)
User-defined
component, see
Chap. 11.8
Circuit-breaker (the operating state of the circuit-protection
component can be set to: on/off, thus allowing disconnection
of the particular network lines)
User-defined
component, see
Chap. 11.9
Fuse (the operating state of the circuit-protection component
can be set to: on/off, thus allowing disconnection of the
particular network lines)
User-defined
component, see
Chap. 11.10
Motor Inserted
component, see
Chap. 11.11
Load Inserted
component, see
Chap. 11.12
Compensation unit Inserted
component, see
Chap. 11.13
Group (insertion of typical component groups - supply, motor
outlet with circuit breaker, general outlet with circuit breakerand fuse, …)
Group of user-
defined andinserted comps,
see Chap. 11.14

8/17/2019 XSpider 2.13 en Reference Manual
http://slidepdf.com/reader/full/xspider-213-en-reference-manual 69/236
_______________________________________________________________________________
_______________________________________________________________________________________________________________________
xSpider, Reference manual 61
Free graphics - basic geometric figures (line, circle, rectangle,
text)
Inserted
component, see
Chap. 11.15
11.1 Network type and vol tage system
Prior to beginning to draw the wiring diagram, it is necessary to set the
network type (TN, IT, or TT) and the voltage system. The network type
has an influence on the calculation of asymmetric short circuits, while
the voltage system influences currents in the network and the breaking
capacities of circuit-protection components. When inserting a
component into the wiring diagram, a check is carried out as to whether
the component is suitable for the selected network voltage. The network
type and voltage system can be changed at any later point in time by the
same function, however, such change usually gives rise the need to
modify a number of components in the wiring diagram. The initial
network type and voltage system for a new project can be set in the Options under the Calculation
tab (see Chap. 21.4).
1. In the Tools drop-down menu, select the item Network: type, voltage system.
2. A dialogue panel will open, in which you select the network type and the voltage system as
necessary:
3.
Close the dialogue panel by clicking OK. The new values set will be saved in the network
project and can be changed any time by using the same function again. The currently set
values are shown under the description field (title block) in the network project:
Set the network type by selecting
one of the offered options.
Set the voltage system by selecting one of the standard
voltage systems defined in the regulations. If you select
„Other“, you can specify any other system by defining
the delta voltage and the phase voltage.
Please pay attention to this information.

8/17/2019 XSpider 2.13 en Reference Manual
http://slidepdf.com/reader/full/xspider-213-en-reference-manual 70/236
_______________________________________________________________________________
_______________________________________________________________________________________________________________________
62 xSpider, Reference manual
11.2 Supply network
This component represents supergrid network supplying power into the designed circuit. It can be a
high-voltage network feeding the transformer, or a low-voltage network. Every network mustinclude at least one power supply unit. The program allows designing of networks supplied from
one or more power sources. In addition to the supply network, power supply can be also provided
from a generator (see Chap. 11.3).
1. Click on the Supply network icon. The mouse pointer will change. The pointer form
determines the position of the symbol with respect to the insertion point (the symbol is
directed upwards above the insertion point).
2. Click the symbol position in the graphics area of the project window. The insertion
point will be automatically captured in the grid (colored dots in the graphics area).
3.
A dialogue panel will be subsequently opened, in which you enter all parametersdefining the component (it is an inserted component, the precise parameters of which must
always be entered):
Network type.
The tag identifying the component in the
roject, it must be unique within the entire
roject; the number in the tag automatically
increases when inserting a new component.
Voltage system:
hase/delta voltage.
Graphics tab – modification of the symbol
osition in the project, see Chap. 12.1.1.
Short-circuit power and short-circuit current
are interconnected values, it is sufficient to
enter one of them and the other one will be
calculated automatically. Click on the
question-mark icon to view a table of typical
values for different cases of power supply
networks. If you lack other data, you can usesome of the values offered. Exact data can be
requested from the power distribution
company.
For filling of the particular items
in the title block see Chap. 17.
The supply network voltage must correspond
to the selected voltage system (see Chap.
11.1) (will be pre-filled automatically) and to
the connected phases (delta voltage for 3-hase connections, phase voltage for 1-phase
connections).
Specification of the connected phase: either a
3-phase connection or one specific phase.

8/17/2019 XSpider 2.13 en Reference Manual
http://slidepdf.com/reader/full/xspider-213-en-reference-manual 71/236
_______________________________________________________________________________
_______________________________________________________________________________________________________________________
xSpider, Reference manual 63
4.
Close the dialogue panel by clicking OK. The component will be inserted in the network
design.
Notes: Supply network can be connected directly to a transformer or to switchboard trunks.
Supply network can be connected by cable (the ratios between the supply network and the
first switchboard must be taken into account).
In case of parallel feed from several power supply units into one switchboard, all supply
networks must be connected by cable.
The short-circuit power values indicated for the different cases of power supply networks are
indicative only. Please contact the local power distribution company to obtain exact values.
The short-circuit power for 1-phase short-circuit in a 3-phase network does not have to be
entered, in particular, for high-voltage networks. It should always be entered for 3-phase low-
voltage networks. If it is not entered, the calculation of asymmetric short-circuits will be less precise.
Short-circuit power for 1-phase short-circuit does not have to be entered
(primarily with high-voltage networks); if it
is not entered, the calculation of asymmetric
short-circuits will be less accurate. Click on
the question-mark icon to view information
text with user recommendation.
Instead of the short-circuit power, you can
enter the equivalent impedance
components directly (will be used e.g. in
case of IT networks supplied from a TN
supply network). After enabling the switch,the respective items will become
accessible.

8/17/2019 XSpider 2.13 en Reference Manual
http://slidepdf.com/reader/full/xspider-213-en-reference-manual 72/236
_______________________________________________________________________________
_______________________________________________________________________________________________________________________
64 xSpider, Reference manual
Effective impedance components obtained through measurement or through independent
calculation for the supply network can be entered instead of the short-circuit power. This can
become useful, for instance, in case of IT networks (such as health-care installations) powered
from a TN supply network – the effective impedance components can be obtained through
independent calculation for the TN supply network.
11.3 Generator
This component represents a generator (typically a standby power source) supplying power into the
designed circuit. The program allows designing of networks supplied from one or more power
sources. In addition to the generator, power supply can be also provided from supply networks (see
Chap. 11.2).
1. Click on the Generator icon. The mouse pointer will change. The pointer form
determines the position of the symbol with respect to the insertion point (the symbol is
directed upwards above the insertion point).
2. Click the symbol position in the graphic area of the project window. The insertion point
will be automatically captured in the grid (colored dots in the graphics area).
3. A dialogue panel will be subsequently opened, in which you enter all parameters defining the
component (it is an inserted component, the precise parameters of which must always be
entered). As an integral part, the program includes a database of standard generators with the
option of adding user-defined types. The database is activated by clicking the Database
button. For description of the database explorer see Chap. 16.1.
Correct Incorrect
HV side conditions immediately in front of
the transformer can be taken into account.
(high-voltage cables and protective devices
are not included in the software databases).Connection of two parallel
supply networks into a single
distribution board:
Supply from HV networks:
Supply from LV networks:

8/17/2019 XSpider 2.13 en Reference Manual
http://slidepdf.com/reader/full/xspider-213-en-reference-manual 73/236
_______________________________________________________________________________
_______________________________________________________________________________________________________________________
xSpider, Reference manual 65
4.
Close the dialogue panel by clicking OK. The component will be inserted in the network
design.
Notes:
It is suitable to connect the generator by line with a circuit breaker. The program enables the
user to change the operating state of the circuit breaker between ON-OFF, therefore it is
possible to analyze various network situations (with supply from a generator or with supply
from a supply network).
The program allows calculation of electrically remote short circuits only - it is not possible to
calculate the short circuit directly on the generator terminals.
11.4 Transformer
This component represents either a distribution transformer dividing the high-voltage supply
network and the designed low-voltage network, or a protective isolation transformer used to build
IT networks (e.g. for medical isolated system).
The tag identifying the component in the
roject, it must be unique within the
entire project; the number in the tag
automatically increases when inserting a
new component.
Graphics tab – modification of the symbol
osition in the project, see Chap. 12.1.1.
Component parameter setting by selection
rom the database; for database operation
see 16.1.
„Manual“ entry of component
arameters, or local editing of the
articular values taken over from the
database, as the case may be (without
reverse impact on the database).
Supply from generator:Generator
disconnected:
Correct Incorrect
Incorrect connection of generator
and network directly to thedistribution board.
Specification of the connected phase.
The supply network voltage must correspond
to the selected voltage system (see Chap.
11.1) (will be pre-filled automatically) and to
the connected phases (delta voltage for 3-
hase connections, phase voltage for 1-phase
connections).

8/17/2019 XSpider 2.13 en Reference Manual
http://slidepdf.com/reader/full/xspider-213-en-reference-manual 74/236
_______________________________________________________________________________
_______________________________________________________________________________________________________________________
66 xSpider, Reference manual
1.
Click on the Transformer icon. The mouse pointer will change. The pointer form
determines the position of the symbol with respect to the insertion point (the symbol is
directed downwards under the insertion point).
2.
Click the symbol position in the graphic area of the project window. The insertion point
will be automatically captured in the grid (colored dots in the graphics area).
3.
A dialogue panel will be subsequently opened, in which you enter all parameters defining thecomponent (it is an inserted component, the precise parameters of which must always be
entered). As an integral part, the program includes a database of standard transformers with
the option of adding user-defined types. The database is activated by clicking the Database
button. For description of the database explorer see Chap. 16.1.
4. Close the dialogue panel by clicking OK. The component will be inserted in the network
design.
Notes:
With its high-voltage end, the transformer can be connected either to a supply network or to a
cable. With its low-voltage end, the transformer can be connected only to a cable or a busbar
system. The transformer cannot be connected directly to a „Switchboard trunk“ or a "Circuit
breaker“ type component.
The computational node is always located on the transformer’s low-voltage side; calculation
results shown for the transformer always relate to the low-voltage side.
Primary voltage Ur1 must match the voltage of the supergrid supply network precisely.
Secondary voltage Ur2 must correspond to the selected voltage system (see Chap. 11.1) and
the connected phases (delta voltage for 3-phase connection; phase voltage for 1-phase
connection).
The tag identifying the component in the
roject, it must be unique within the entireroject; the number in the tag automatically
increases when inserting a new component.
Graphics tab – modification of the symbol
osition in the project, see Chap. 12.1.1.
Component parameter setting by
selection from the database; for
database operation see 16.1.
„Manual“ entry of componentarameters, or local editing of the
articular values taken over from the
database, as the case may be (without
reverse impact on the database).
Specification of the connected phase.
Calculation of the transformer
nominal current

8/17/2019 XSpider 2.13 en Reference Manual
http://slidepdf.com/reader/full/xspider-213-en-reference-manual 75/236
_______________________________________________________________________________
_______________________________________________________________________________________________________________________
xSpider, Reference manual 67
11.5 Switchboard trunk
Switchboard trunks represent arbitrary logical network branching implemented, for instance, as a
busbar or terminal block, interconnecting bar etc. It is a component having a negligible impedance.
Network branching is possible only at this component. The component may not be an end-
component in the network - at least two additional components must be connected to it.
1. Click on the Switchboard trunk icon. The mouse pointer will change to a cross-hair.
2. Click the first point of the line representing the trunk component in the diagram. The
clicked point will be automatically captured in the grid (colored dots in the graphics area).
3. Now drag the radius vector - the line representing the switchboard trunk component in the
diagram. The line can be horizontal only. Drawing from the left to the right is presumed.
Click the end point of the line representing the trunk component in the diagram. The clicked
point will be automatically captured in the grid (colored dots in the graphics area) in such a
way to ensure that the line is parallel to the X axis.
4.
A dialogue panel will be subsequently opened, in which you enter all parameters defining thecomponent (it is an inserted component, the precise parameters of which must always be
entered).
CorrectCorrect Correct Incorrect Incorrect
The tag identifying the component in the
roject, it must be unique within the
entire project; the number in the tag
automatically increases when inserting anew component.
Graphics tab – modification of the
osition and size of the line
representing switchboard trunk
component in the project, see
Chap. 12.1.1.
Calculation results relate to the
LV side of the transformer.
The HV side conditions immediately in front of
the transformer can be taken into account.
(high-voltage cables and protective devices are
not included in the software databases)

8/17/2019 XSpider 2.13 en Reference Manual
http://slidepdf.com/reader/full/xspider-213-en-reference-manual 76/236
_______________________________________________________________________________
_______________________________________________________________________________________________________________________
68 xSpider, Reference manual
5. Close the dialogue panel by clicking OK. The component will be inserted in the network
design.
Notes:
Simultaneous factor – defines the simultaneousness of consumptions from the node.
Example: there are 3 outlets connected to a node = 3 loads with a nominal current of 100A,
500A, 1000A, and a simultaneous factor was defined as Ks=0.5; the current flowing to the
node is 0.5x(100+500+1000) = 800A.
The simultaneous factor is taken into account only with radial networks. The simultaneous factor is ignored with meshed networks.
Blue line representing the switchboard trunk component in the
diagram. The line position and length can be changed at a later point in
time – see Chap. 12.5. The line can be horizontal only.
2nd click the end point (drawing from the left to the right is anticipated). The
line length must exceed the distance between two adjacent dots in the grid.
1st click the initial point.
Switchboard trunk tag. Placed automatically near the first clicked point, its
osition can changed at a later point in time – see Chap 12.5.
The supply network voltage must
correspond to the selected voltage system
(see Chap. 11.1) (will be pre-filled
automatically) and to the connected phases
(delta voltage for 3-phase connections,
hase voltage for 1-phase connections).
Specification of the connected phase.
The maximum voltage drop allowed in this
network node in relation to the power
source voltage; you can select from values
rescribed by the standard (see Chap. 4.1),
or enter any arbitrary value.
Simultaneous factor – defines the
simultaneousness of consumptions from
the node (ratio between the number of
devices in operation and the total
number of devices).

8/17/2019 XSpider 2.13 en Reference Manual
http://slidepdf.com/reader/full/xspider-213-en-reference-manual 77/236
_______________________________________________________________________________
_______________________________________________________________________________________________________________________
xSpider, Reference manual 69
11.6 Line - enclosed busbar distribution system
This component represents a line executed as an enclosed busbar distribution system. Power is
transferred from the initial point to the end point. Taps or network branching are not possible along
the component (the „Switchboard trunk“ component is to be used for network branching - see Chap.
11.5). Note: The function is not available from the 2.2 version.
1. Click on the Line - Busbar Systems icon. The mouse pointer will change to a cross-hair.
2. Click the first point of the line representing the line component in the diagram. The
clicked point will be automatically captured in the grid (colored dots in the graphics area).
3. Now drag the radius vector - the line representing the line component in the diagram. The line
can be horizontal or vertical only. Drawing from the left to the right and from the top to the
bottom is presumed. Click the line breakpoint. The clicked point will be automatically
captured in the grid (colored dots in the graphics area) in such a way to ensure that the line is
parallel to the X axis or to the Y axis.
4.
Repeat step 3 until you draw the entire line shape (the line shape can include up to 5 breakpoints). Every line section must exceed the distance between two adjacent grid dots. The
line must include at least two points (the beginning and the end) clicked by the left mouse
button.
5. Click the right mouse button to complete the definition of the line shape.
6. A dialogue panel will open subsequently, in which you enter all parameters defining the
component. It is a user-defined component, the parameters of which can be, but do not have
to be entered.
If you are using the program in the design mode, enter only the line length and the
method of installation (or, where relevant, also the conductor material and design under
the Details tab), and activate the Dimension automatically switch. Other parameters do
not have to be entered, they will be added automatically after running the calculation for
Cable and circuit-protection dimensioning (see Chap. 14.1).
Correct branching on
the switchboard trunk:
Inadmissible branching
outside of the
switchboard trunk:
component
Inadmissible network
branching on the HV side:
Correct Incorrect Incorrect
At least 2 additional
components must be
connected to every
switchboard trunk.

8/17/2019 XSpider 2.13 en Reference Manual
http://slidepdf.com/reader/full/xspider-213-en-reference-manual 78/236
_______________________________________________________________________________
_______________________________________________________________________________________________________________________
70 xSpider, Reference manual
Note: Using the Digram tab under the Options function, it is possible to define that the
switch be automatically enabled by default when a component is inserted in the wiring
diagram (see Chap. 21.2).
If you are using the program in the control mode, enter only the line length, the method
of installation and the number of parallel lines. Then click on the Database button and
select the desired busbar system (for database explorer operation see Chap. 16.1.). TheDimension automatically switch must be disabled.
The tag identifying the component in the
roject, it must be unique within the entire
roject; the number in the tag automatically
increases when inserting a new component.
Graphics tab – modification of the position
and size of the line representing line
component in the project, see Chap. 12.1.1.
Cable length and the method of installation
must be always specified regardless of the
status of the „Dimension automatically“
switch; the method of installation limits the
current-carrying capacity of the line , it has
no effect on some types of busbar systems.
The ambient temperature cannot be
changed; operation under higher
temperatures is not expected.
Setting of component parameters by
selection from the database; for database
control see Chap. 16.1.
Automatic dimensioning – when it is
enabled, the component parameters will
be set automatically after running thecalculation called Cable and protective
device dimensioning (see Chap. 14.1);
otherwise the values specified here shall
apply.
Number of parallel lines must be set if the
rogram is used in the control mode.
Will be determined automatically in case of
automatic dimensioning.
Specification of the connected phase.
The maximum allowed voltage drop in this
line; it is possible to select from values
rescribed by the standard (see Chap. 4.1), or
to enter any arbitrary value.

8/17/2019 XSpider 2.13 en Reference Manual
http://slidepdf.com/reader/full/xspider-213-en-reference-manual 79/236
_______________________________________________________________________________
_______________________________________________________________________________________________________________________
xSpider, Reference manual 71
7. Close the dialogue panel by clicking OK. The component will be inserted in the network
design.
Notes:
The line may not be an end-component in the network - at least one additional component
must be connected to every end of the line. Taps or network branching are not possible along
the component (the „Switchboard trunk“ component is to be used for network branching - see
Chap. 11.5).
1st point – beginning of the line (left-button click).
4th point – end of the line – right-click after clicking this
oint to end the line drawing mode.
The particular parameters of the busbar
distribution system are taken over from the
database and cannot be edited locally.
2nd
point – breakpoint in the line (left-button click).
3rd point - breakpoint in the line (left-button click).
The line tag is placed automatically at the first clicked point (beginning of the
line), its position can be changed at a later point in time – see Chap 12.5.
A protective device is at the beginning of the line (a circuit breaker in this case).
A motor is connected to the end of the line in this case.
Line route – enclosed busbar distribution system –
marked with dark green color in the diagram.
Rated voltage indicates the maximum
ossible voltage for which the
component can be used.
The conductor material and design can be
defined – only the values set here will, insuch case, be respected in automatic
dimensioning (see Chap. 14.1). If nothing
is defined here, the default values from the
Options – AutoDimensioning tab will be
used in automatic dimensioning.

8/17/2019 XSpider 2.13 en Reference Manual
http://slidepdf.com/reader/full/xspider-213-en-reference-manual 80/236
_______________________________________________________________________________
_______________________________________________________________________________________________________________________
72 xSpider, Reference manual
11.7 Line - cable
This component represents a line executed as a cable, a group of single-core cables or an overhead
line. Power is transferred from the initial point to the end point. Taps or network branching are not
possible along the component (the „Switchboard trunk“ component is to be used for network
branching - see Chap. 11.5).
1. Click on the Line - Cable icon. The mouse pointer will change to a cross-hair.
2. Click the first point of the line representing the line component in the diagram. The
clicked point will be automatically captured in the grid (colored dots in the graphics area).
3. Now drag the radius vector - the line representing the line component in the diagram. The line
can be horizontal or vertical only. Drawing from the left to the right and from the top to the
bottom is presumed. Click the line breakpoint. The clicked point will be automatically
captured in the grid (colored dots in the graphics area) in such a way to ensure that the line is
parallel to the X axis or to the Y axis.
4. Repeat step 3 until you draw the entire line shape (the line shape can include up to 5
breakpoints). Every line section must exceed the distance between two adjacent grid dots. The
line must include at least two points (the beginning and the end) clicked by the left mouse
button.
5. Click the right mouse button to complete the definition of the line shape.
6. A dialogue panel will open subsequently, in which you enter all parameters defining the
component. It is a user-defined component, the parameters of which can be, but do not have
to be entered.
If you are using the program in the design mode, enter only the line length, the method of
installation and the ambient temperature (after clicking on Define installation); and
activate the Dimension automatically switch. Other parameters do not have to be
entered, they will be added automatically after running the calculation for Cable and
circuit-protection dimensioning (see Chap. 14.1).
If you are using the program in the control mode, enter only the line length, the method
of installation and the ambient temperature (after clicking on Define installation) as well
as the number of parallel lines. Then click on the Database button and select the desired
cable (for database explorer operation see Chap. 16.1.). The Dimension automatically
switch must be disabled.
Line is not protected.
Nothing is connected to the end of the line.
Inadmissible network branching
outside of the switchboard trunk.
Incorrect Incorrect

8/17/2019 XSpider 2.13 en Reference Manual
http://slidepdf.com/reader/full/xspider-213-en-reference-manual 81/236
_______________________________________________________________________________
_______________________________________________________________________________________________________________________
xSpider, Reference manual 73
The tag identifying the component in the
roject, it must be unique within the
entire project.
Graphics tab – modification of the position
and size of the line representing cable
component in the project, see Chap. 12.1.1.
Cable length and the method of
installation must be always specified
regardless of the status of the
„Dimension automatically“ switch; the
method of installation limits the cable
current-carrying capacity.
Setting of component parameters by
selection from the database; for databasecontrol see Chap. 16.1.
Automatic dimensioning – when it is
enabled, the component parameters will be
set automatically after running the
calculation called Cable and protective
device dimensioning (see Chap. 14.1);
otherwise the values specified here shall
apply.
The number of parallel lines must
be set if the program is used in
the control mode.
Calculation and display of the cable current-
carrying capacity with respect to the specifiedinstallation, cable grouping and ambient
Specification of the connected phase.
The maximum voltage drop allowed in
this line - it is possible to select one ofthe values prescribed by the standard
(see Chap. 4.1), or to enter any desired
value.
See text below.

8/17/2019 XSpider 2.13 en Reference Manual
http://slidepdf.com/reader/full/xspider-213-en-reference-manual 82/236
_______________________________________________________________________________
_______________________________________________________________________________________________________________________
74 xSpider, Reference manual
The method of installation and the ambient temperature limit the cable current-carrying
capacity. Precise setting is possible after clicking on Define installation:
Select the basic installation method to be applied for the cable according to IEC 60364-5-
523 and the arrangement in case of cable grouping (various grouping arrangements are
available for different installation; the impact of the grouping will appear in case of more
parallel lines or in case the number of other circuits within the grouping is higher than
zero).
The number of other circuits within the grouping is the number of other cables located inthe grouping together with the designed circuit. The total number of circuits within the
grouping is determined by the number of parallel lines in the designed circuit + the
number of other circuits. In case the cable is lead separately, leave the value 0.
As for the ambient temperature, the maximum temperature of ambient air or of the
surrounding soil must be entered, which can reasonably occur during the operation of the
equipment. For more details see the theoretical introduction - Chap. 2.2. The specific
thermal resistance of ground can be also set for the D-type installation.
The user coefficient allows you to take other factors into account or to solve situations
not described in the IEC standards. By means of this coefficient, it is possible to increase
or reduce the cable current-carrying capacity in any way. The use of this coefficient is in
the sole responsibility of the user.
Selection of the basic method of installation according
to IEC 60364-5-523 (the description column can be
extended by dragging the edges of the dialogue panel,
thus extending it). The figure on the right represents theselected basic method of installation.
Depiction of the
selected basic
method of
installation.
Depiction of the
grouping in case
of several circuits
being groupedtogether.
Selection of the grouping
method in case of several
circuits grouped together.
The dialogue panel dimensions can
be changed by dragging its edges.
Calculation of the coefficient
taking into account the grouping,
ambient temperature and the user
coefficient; calculation of the
cable current-carrying capacity.
The calculation is performed only
when the cable has already been
defined.
Information message in
case the cable current-
carrying capacity cannot
be determined with respect
to the method of
installation.

8/17/2019 XSpider 2.13 en Reference Manual
http://slidepdf.com/reader/full/xspider-213-en-reference-manual 83/236
_______________________________________________________________________________
_______________________________________________________________________________________________________________________
xSpider, Reference manual 75
The programs solves only situations described in IEC 60364-5-523. However, it can be a
very useful tool also in those cases which are not specifically stated in the standard,
because it is possible to find a close alternative and, on its basis, estimate the situation we
need to solve or to correct it with the user coefficient, as the case may be.
If a cable has already been selected, a continuous coefficient calculation is being carried
out taking into account the grouping, ambient temperature and the user coefficient, aswell as calculation of the cable current-carrying capacity.
In case you select a combination of installation/temperature/cross-section/material, which
is not included in IEC 60364-5-523, the program will alert you on this fact. The solution
typically consists in using a higher number of parallel lines with smaller cross-section or
in using the user coefficient. For more details see the theoretical intro - chap. 2.2.
After closing the dialogue panel by clicking OK, the values set will be displayed within
the Method of installation section. The actual current-carrying capacity of the cable can
be subsequently viewed after clicking the Current-carrying capacity button.
The number of wires must correspond to the number of connected phases (3-phase
connection: 4 and more wires, 1-phase connection: 2 or 3 wires).
The maximum voltage drop allowed in this line - it is possible to select one of the values
prescribed by the standard (see Chap. 4.1), or to enter any desired value. The calculation of
voltage drops is followed by a check whether the calculated drop does not exceed the limit
value set here. As standard, the value determined by the function in the Options under the
Calculation tab is offered as the default value for a new inserted component.
Rated voltage indicates the maximum voltage possible, for which the component can be used.
User coefficient. It is specified only if it doesn’t equal one.
Ambient temperature.
The selected basic method of installation
(marking + description). Specified always.
Total number of circuits in the grouping
(number of parallel lines of the designed
circuit + number of additional circuits),
description of the grouping arrangement.
Specified, if the total number of circuits in
the grouping exceeds one.
The text does not have to be shown in full, you can move throughthe text by means of the scroll bar in the right part of the window.

8/17/2019 XSpider 2.13 en Reference Manual
http://slidepdf.com/reader/full/xspider-213-en-reference-manual 84/236
_______________________________________________________________________________
_______________________________________________________________________________________________________________________
76 xSpider, Reference manual
7. Close the dialogue panel by clicking OK. The component will be inserted in the network
design.
Notes: The line may not be an end-component in the network - at least one additional component
must be connected to every end of the line. Taps or network branching are not possible along
the component (the „Switchboard trunk“ component is to be used for network branching - see
Chap. 11.5).
Item concerning Nominal current of cable to be installed in air, which is entered under the
Details tab. The value entered here will be used in case of any changes to the data in this item
as well as for user-defined cables. The user is responsible for the correctness of the entered
value. In other cases (for cables from the master database), the nominal current of the cable
will be calculated from tables defined by the relevant standard, based on the conductor
material and insulation. Using the Digram tab under the Options function, it is possible to define that the Dimension
automatically switch be automatically enabled by default when a component is inserted in
the wiring diagram (see Chap. 21.2).
If the items for Conductor material and Core insulation are defined under the Details tab,
the values entered here will be respected during automatic dimensioning (see Chap. 14.1). If
nothing is entered here, the default values from the Options – AutoDimensioning tab will be
used in automatic dimensioning (see Chap. 25.1). Both aluminium and copper cables can be
automatically dimensioned simultaneously within a single project if these items are set
appropriately.
The particular cable parameters are usually
taken over from the database; their local
editing is possible here (without the
retrospective effect on the database).
The number of conductors must correspond
to the number of the connected phases (3-
hase connection: 4 and more conductors;
1-phase connection: 2 or 3 conductors).
Rated voltage indicates the maximum
ossible voltage for which the
component can be used.
Nominal current of the cable to be installed in
air. For cables from the parent database, the
value is calculated from the tables defined by the
standard, based on the conductor material and
the insulation. In case of user-defined cables or
in case of any changes made to the data in this
field, the value entered here will be used. This
gives the possibility to define cables with a
higher current-carrying capacity than that
indicated by the standard. The user is
responsible for the correctness of the entered
value.

8/17/2019 XSpider 2.13 en Reference Manual
http://slidepdf.com/reader/full/xspider-213-en-reference-manual 85/236
_______________________________________________________________________________
_______________________________________________________________________________________________________________________
xSpider, Reference manual 77
11.8 Switch-disconnector
The switch-disconnecting component is designed for disconnection of the individual network lines
and monitoring of the network behavior under various operating states. It is used in situations where
the use of a circuit-protection component is unnecessary. The switch-disconnector will not switch
off the short circuit, but it must withstand the short-circuit current until the moment it is switched
off. The rated current In and the short-time one-second withstand current Icw are checked during the
calculations.
1. Click on the Switch-disconnector icon. The mouse pointer will change. The pointer
form determines the position of the symbol with respect to the insertion point (the
symbol is directed downwards under the insertion point).
2. Click the symbol position in the graphic area of the project window. The insertion
point will be automatically captured in the grid (colored dots in the graphics area).
3. A dialogue panel will open subsequently, in which you enter all parameters defining
the component. It is a user-defined component, the parameters of which can be, but do
not have to be entered.
If you are using the program in the design mode, activate the Dimension
automatically switch. Other parameters do not have to be entered, they will be added
automatically after running the calculation for Cable and circuit-protection
dimensioning (see Chap. 14.1).
Line is not protected.
Nothing is connected to
the end of the line.
Inadmissible network branching
outside of the switchboard trunk.
Incorrect Incorrect
1st point – beginning of the line (left-button click).
4th point – end of the line – right-click after clicking this
oint to end the line drawing mode.
2nd point – breakpoint in the line (left-button click).
3rd point - breakpoint in the line (left-button click).
The line tag is placed automatically at the first clicked point (beginning of the
line), its position can be changed at a later point in time – see Chap 12.5.
A protective device is at the beginning of the line.
A motor is connected to the end of the line in this case.

8/17/2019 XSpider 2.13 en Reference Manual
http://slidepdf.com/reader/full/xspider-213-en-reference-manual 86/236
_______________________________________________________________________________
_______________________________________________________________________________________________________________________
78 xSpider, Reference manual
Using the Digram tab under the Options function, it is possible to define that the
Dimension automatically switch be automatically enabled by default when a component
is inserted in the wiring diagram (see Chap. 21.2).
If you are using the program in the control mode, click on the Database button and select
the desired switch-disconnector (for database explorer operation see Chap. 16.1). The
Dimension automatically switch must be disabled.
The number of poles of the equipment must correspond to the number of connected phases.
Rated voltage indicates the maximum voltage possible, for which the component can be used.
4. Close the dialogue panel by clicking OK. The component will be inserted in the network
design.
Notes:
A line must always be connected to one side of the switch-disconnector (as with a circuit
breaker, see Chap. 11.9).
11.9 Circuit breaker
The circuit-breaker type protection component is used to protect lines. A circuit-protection
component should be connected to one of the ends of every line. The operating state of the circuit-
The tag identifying the component in the
roject, it must be unique within the
entire project.
Graphics tab – modification of the symbol
osition in the project, see Chap. 12.1.1.
Setting of component parameters by selection
rom the database; for database control seeChap. 16.1.
„Manual“ entry of component parameters,
or local editing of the particular values
taken over from the database, as the case
may be (without reverse impact on thedatabase).
Automatic dimensioning – when it is enabled,
the component parameters will be set
automatically after running the calculation
called Cable and protective device
dimensioning (see Chap. 14.1); otherwise
the values specified here shall apply.
Setting of the protective-device operating state to on/off; possibility to
disconnect lines and monitor various operating states of the networks.
Specification of the connected phase: either 3-
hase connection or a single specific phase.

8/17/2019 XSpider 2.13 en Reference Manual
http://slidepdf.com/reader/full/xspider-213-en-reference-manual 87/236
_______________________________________________________________________________
_______________________________________________________________________________________________________________________
xSpider, Reference manual 79
protection component can be set to: on/off, thus allowing disconnection of the particular network
lines and monitoring of network behavior in different operating states.
1.
Click on the Circuit breaker icon. The mouse pointer will change. The pointer form
determines the position of the symbol with respect to the insertion point (the symbol is
directed downwards under the insertion point).2. Click the symbol position in the graphic area of the project window. The insertion point
will be automatically captured in the grid (colored dots in the graphics area).
3. A dialogue panel will open subsequently, in which you enter all parameters defining the
component. It is a user-defined component, the parameters of which can be, but do not
have to be entered.
If you are using the program in the design mode, activate the Dimension
automatically switch. Other parameters do not have to be entered, they will be added
automatically after running the calculation for Cable and circuit-protection
dimensioning (see Chap. 14.1).
Note: Using the Digram tab under the Options function, it is possible to define that theDimension automatically switch be automatically enabled by default when a component
is inserted in the wiring diagram (see Chap. 21.2).
If you are using the program in the control mode, click on the Database button and select
the desired circuit breaker (for database explorer operation see Chap. 16.1). The
Dimension automatically switch must be disabled.
The tag identifying the component in the
roject, it must be unique within the
entire project.
Graphics tab, see Chap. 12.1.1.
Setting of component parameters by selection
rom the database; for database control see
Chap. 16.1.
„Manual“ entry of component parameters, or
local editing of the particular values takenover from the database, as the case may be
(without reverse impact on the database).
Automatic dimensioning – when it is enabled,
the component parameters will be set
automatically after running the calculation
called Cable and protective device
dimensioning (see Chap. 14.1); otherwise the
values specified here shall apply.
Specification, which of the parameters will
be taken into account when checking the
short-circuit current load: Operating
breaking capacity Ics – the circuit breaker is
able to disconnect this short-circuit current
without damage repeatedly. Limit breaking
capacity Icu – the circuit breaker is able to
disconnect this short-circuit current, but can
be damaged.
Setting of the protective-device operating
state to on/off; possibility to disconnect
lines and monitor various operating states
of the networks.
The tripping characteristic can be viewed by means of
the Tripping Characteristics module (see Chap. 15).
Specification of the connected phase: either 3-hase connection or a single specific phase.
The maximum disconnection time of the circuit
breaker from the point of view of protection against
indirect contact with exposed conductive parts.

8/17/2019 XSpider 2.13 en Reference Manual
http://slidepdf.com/reader/full/xspider-213-en-reference-manual 88/236
_______________________________________________________________________________
_______________________________________________________________________________________________________________________
80 xSpider, Reference manual
The number of poles of the equipment must correspond to the number of connected phases.
Rated voltage indicates the maximum voltage possible, for which the component can be used.
The switching capacity of some circuit-breaker types depends on the voltage of the network,
in which the component is connected. When selecting the component from the database, the
system will automatically select the switching capacity corresponding to the selected voltage
system (see Chap. 11.1). Other values can be viewed after opening the full drop-down list (thevoltage, to which the given value relates, is specified in the brackets). In case this value list is
empty, the respective number applies for the full voltage range up to Un. As for local editing,
any desired value can be entered. In such case, the entered value relates to the current Un
value.
The maximum disconnection time of the circuit breaker from the point of view of protection
against dangerous voltage in dead parts - pursuant to IEC 60364-4-4 (see Chap. 3.7). From
the list, select one of the values provided for by the standard or enter any number. Following
the 1-phase short circuit calculation, a check is carried out as to whether the circuit breaker
will switch off the failure faster, i.e. before the limit time set here. As standard, the value
determined by the function in the Options under the Calculation tab is offered as the default
value for a new inserted component.
In case the circuit breaker is equipped with adjustable releases, a modification of their settings
is possible under the Releases tab. All control features of the releases are set to the maximum
value by default.
With the module for Tripping characteristics (see Chap. 15), it is possible to view the
tripping characteristics including the impact of the release settings (to assess the selectivity or
overload protection).
Evaluation of selectivity can also be carried out using the special Selectivity function
(selectivity comparison of two circuit-breakers based on selectivity tables specified in the
catalogue, for more details see Chap. 14.4.2).
4.
Close the dialogue panel by clicking OK. The component will be inserted in the network design.
Release parameter setting. Only
adjustable parameters are accessible
depending on the circuit breaker type.
Specific value, for which the release is
set.
The tripping characteristic (takinginto account the release settings) can
be viewed by means of the Tripping
Characteristics module (see Chap.
15).

8/17/2019 XSpider 2.13 en Reference Manual
http://slidepdf.com/reader/full/xspider-213-en-reference-manual 89/236
_______________________________________________________________________________
_______________________________________________________________________________________________________________________
xSpider, Reference manual 81
Notes:
A line must always be connected to one side of every circuit breaker.
Circuit breaker/fuse cascading is solved (the fuse serves as back-up protection for the circuit-
breaker).
Circuit-breaker/circuit-breaker cascading is addressed – see Chap. 14.4.1.
11.10 Fuse
The fuse type circuit-protection component is used to protect lines. A circuit-protection component
should be connected to one of the ends of every line. The operating state of the circuit-protection
component can be set to: on/off, thus allowing disconnection of the particular network lines and
monitoring of network behavior in different operating states.
1. Click on the Fuse icon. The mouse pointer will change. The pointer form determines
the position of the symbol with respect to the insertion point (the symbol is directed
downwards under the insertion point).
2. Click the symbol position in the graphic area of the project window. The insertion
point will be automatically captured in the grid (colored dots in the graphics area).
3. A dialogue panel will open subsequently, in which you enter all parameters defining
the component. It is a user-defined component, the parameters of which can be, but do
not have to be entered.
If you are using the program in the design mode, activate the Dimension
automatically switch. Other parameters do not have to be entered, they will be addedautomatically after running the calculation for Cable and circuit-protection
dimensioning (see Chap. 14.1).
Correct Incorrect
Correct design of
bus connection:
Inadmissible connection of
circuit breaker between buses:
Circuit breaker/fuse cascade:
A cable must be
always present,
even if with large
cross-section and
minimum length.
Circuit breaker on.
Circuit breaker off.

8/17/2019 XSpider 2.13 en Reference Manual
http://slidepdf.com/reader/full/xspider-213-en-reference-manual 90/236
_______________________________________________________________________________
_______________________________________________________________________________________________________________________
82 xSpider, Reference manual
Note: Using the Digram tab under the Options function, it is possible to define that the
Dimension automatically switch be automatically enabled by default when a component
is inserted in the wiring diagram (see Chap. 21.2).
If you are using the program in the control mode, click on the Database button and select
the desired fuse (for database explorer operation see Chap. 16.1). The Dimension
automatically switch must be disabled.
The number of poles of the equipment must correspond to the number of connected phases. Rated voltage indicates the maximum voltage possible, for which the component can be used.
The breaking capacity applies for the full voltage range up to Un.
The maximum disconnection time of the fuse from the point of view of protection against
indirect contact with exposed conductive parts - pursuant to IEC 60364-4-41 (see Chap. 3.7).
From the list, select one of the values provided for by the standard or enter any number.
Following the 1-phase short circuit calculation, a check is carried out as to whether the fuse
will switch off the failure faster, i.e. before the limit time set here. As standard, the value
determined by the function in the Options under the Calculation tab is offered as the default
value for a new inserted component.
4. Close the dialogue panel by clicking OK. The component will be inserted in the network
design.
The tag identifying the component in the
roject, it must be unique within the
entire project.
Graphics tab – modification of the symbol
osition in the project, see Chap. 12.1.1.
Setting of component parameters by
selection from the database; for database
control see Chap. 16.1
„Manual“ entry of component parameters,
or local editing of the particular values
taken over from the database, as the case
may be (without reverse impact on the
database).
Automatic dimensioning – when it isenabled, the component parameters will be
set automatically after running the
calculation called Cable and protective
device dimensioning (see Chap. 14.1);
otherwise the values specified here shall
apply.
The tripping characteristic can be viewed by means of the
Tripping Characteristics module (see Chap. 15)
Specification of the connected phase: either
3-phase connection or a single specific phase.
Limiting characteristic will be applied when
calculating 3-phase short circuits –
determination of the limited short-circuit current
behind the fuse.
Setting of the protective-device operatingstate to on/off; possibility to disconnect
lines and monitor various operating
states of the networks.The maximum disconnection time of the
circuit breaker from the point of view of
rotection against indirect contact with
exposed conductive parts.

8/17/2019 XSpider 2.13 en Reference Manual
http://slidepdf.com/reader/full/xspider-213-en-reference-manual 91/236
_______________________________________________________________________________
_______________________________________________________________________________________________________________________
xSpider, Reference manual 83
Notes:
A line must always be connected to one side of the fuse (similarly to circuit breakers, see
Chap. 11.9).
Circuit breaker/fuse cascading is solved (the fuse serves as back-up protection for the circuit-
breaker).
11.11 Motor
This component represents a rotary (motor) load consuming power from the designed circuit
(typically an asynchronous motor). A typical feature of this load type appearing during short-
circuits consists in supplying power into the short-circuited circuit, thus contributing to increase in
the short-circuit current. It is an end-type network component, which must always be connected at
the end of the line.
1. Click on the Motor icon. The mouse pointer will change. The pointer form determines
the position of the symbol with respect to the insertion point (the symbol is directed
downwards under the insertion point).
2. Click the symbol position in the graphic area of the project window. The insertion point
will be automatically captured in the grid (colored dots in the graphics area).
3. A dialogue panel will be subsequently opened, in which you enter all parameters defining the
component (it is an inserted component, the precise parameters of which must always be
entered). As an integral part, the program includes a database of standard motors with the
option of adding user-defined types. The database is activated by clicking the Database
button. For description of the database explorer see Chap. 16.1.
Rated voltage of the component must correspond to the number of connected phases (3-phase
connection - delta voltage; 1-phase connection - phase voltage) and to the selected voltagesystem (see Chap. 11.1).
The tag identifying the component in the
roject, it must be unique within the
entire project.
Graphics tab – modification of the symbolosition in the project, see Chap. 12.1.1.
Setting of component parameters by
selection from the database; for
database control see Chap. 16.1.
„Manual“ entry of component
arameters, or local editing of the
articular values taken over from the
database, as the case may be (without
reverse impact on the database).
Specification of the connected phase: either 3-
hase connection or a single specific phase.
The utilization coefficient defines to what
extent the motor is loaded during
ordinary operation..

8/17/2019 XSpider 2.13 en Reference Manual
http://slidepdf.com/reader/full/xspider-213-en-reference-manual 92/236
_______________________________________________________________________________
_______________________________________________________________________________________________________________________
84 xSpider, Reference manual
The maximum voltage drop - the highest voltage drop allowed in this network node with
respect to the power supply voltage; it is possible to select one of the values prescribed by the
standard (see Chap. 4.1), or to enter any desired value. The calculation of voltage drops is
followed by a check whether the calculated drop does not exceed the limit value set here. As
standard, the value determined by the function in the Options under the Calculation tab is
offered as the default value for a new inserted component.
The entered current and output values are checked for consistence. An error message is
generated in case of any inconsistency. This message can be ignored if we need to design the
network state at the moment of motor startup and if we temporarily increase the rated current
up to the value of the starting current, or it can be ignored in case of a minor inconsistence
caused by rounding.
4. Close the dialogue panel by clicking OK. The component will be inserted in the network
design.
Notes:
Motor is an end-type network component, which must always be connected at the end of the
line.
Only one line can be connected to a motor (the „Switchboard trunk“ component is to be used
for network branching - see Chap. 11.5).
The utilization factor defines to what extent the motor is loaded during ordinary operation
(the default value is 1 – the motor is loaded to 100%). Example: 7.5kW motor fitted in the
project, with maximum 80% load during ordinary operation – utilization factor Ku=0.8. The
utilization factor is taken into account in both radial and meshed networks.
11.12 Load
This component represents a general stationary (non-motor) load consuming power from the
designed circuit (typically lighting, heaters, socket circuits etc.). It is an end-type networkcomponent, which can always be connected at the end of the line or directly to switchboard trunks.
Incorrect connection ofmotors without any line used:Correct connection of motorsat the end of the line:
Correct Incorrect Incorrect Incorrect
Inadmissible networkbranching outside of the
switchboard trunk:

8/17/2019 XSpider 2.13 en Reference Manual
http://slidepdf.com/reader/full/xspider-213-en-reference-manual 93/236
_______________________________________________________________________________
_______________________________________________________________________________________________________________________
xSpider, Reference manual 85
1.
Click on the Load icon. The mouse pointer will change. The pointer form determines
the position of the symbol with respect to the insertion point (the symbol is directed
downwards under the insertion point).
2.
Click the symbol position in the graphic area of the project window. The insertion point
will be automatically captured in the grid (colored dots in the graphics area).
3.
A dialogue panel will be subsequently opened, in which you enter all parameters defining thecomponent (it is an inserted component, the precise parameters of which must always be
entered).
Rated voltage of the component must correspond to the number of connected phases (3-phase
connection - delta voltage; 1-phase connection - phase voltage) and to the selected voltage
system (see Chap. 11.1).
The maximum voltage drop - the highest voltage drop allowed in this network node with
respect to the power supply voltage; it is possible to select one of the values prescribed by the
standard (see Chap. 4.1), or to enter any desired value. The calculation of voltage drops isfollowed by a check whether the calculated drop does not exceed the limit value set here. As
standard, the value determined by the function in the Options under the Calculation tab is
offered as the default value for a new inserted component.
The utilization factor defines to what extent a load is loaded during ordinary operation (the
default value is 1 – the load is loaded to 100%). Example: a general load is constituted by a
socket circuit composed of 10 sockets with 16A each. The nominal current of such load is
In=10x16=160A; however, the simultaneous consumption is max. 10%. This means the
utilization factor is Ku=0.1. The utilization factor is taken into account in both radial and
meshed networks.
4.
Close the dialogue panel by clicking OK. The component will be inserted in the network
design.
The tag identifying the component in the
roject, it must be unique within the
entire project.
Graphics tab – modification of the symbol
osition in the project, see Chap. 12.1.1.
Component parameter entry.
A load can be defined by means of the
rated current or the rated input power.
First of all the switch must be set
depending on which of the parameters is
known, and then specify the value in the
ield next to it. The other parameter will
be calculated automatically.
Specification of the connected phase:
either 3-phase connection or a singlespecific phase.
The utilization coefficient defines to what
extent the motor is loaded during
ordinary operation.

8/17/2019 XSpider 2.13 en Reference Manual
http://slidepdf.com/reader/full/xspider-213-en-reference-manual 94/236
_______________________________________________________________________________
_______________________________________________________________________________________________________________________
86 xSpider, Reference manual
Notes:
Load is an end-type network component, which can always be connected at the end of the line
or directly to switchboard trunks.
Only one line can be connected to a load (the „Switchboard trunk“ component is to be used
for network branching - see Chap. 11.5).
11.13 Compensation
This component represents a load constituted by compensation condenser. It is an end-type network
component, which can always be connected at the end of the line or directly to switchboard trunks.
1. Click on the Compensation icon. The mouse pointer will change. The pointer form
determines the position of the symbol with respect to the insertion point (the symbol is
directed downwards under the insertion point).
2. Click the symbol position in the graphic area of the project window. The insertion point
will be automatically captured in the grid (colored dots in the graphics area).
3.
A dialogue panel will be subsequently opened, in which you enter all parameters
defining the component (it is an inserted component, the precise parameters of which must
always be entered).
Incorrect load
connection directly to
protective devices:
Correct load connection
directly to busbars:
Correct load connection
at the end of the line:
Correct Correct Incorrect Incorrect
Inadmissible network
branching outside of the
switchboard trunk:
The tag identifying the component in the
roject, it must be unique within the
entire project.
Graphics tab – modification of the symbol
osition in the project, see Chap. 12.1.1.

8/17/2019 XSpider 2.13 en Reference Manual
http://slidepdf.com/reader/full/xspider-213-en-reference-manual 95/236
_______________________________________________________________________________
_______________________________________________________________________________________________________________________
xSpider, Reference manual 87
Rated voltage of the component must correspond to the number of connected phases (3-phase
connection - delta voltage; 1-phase connection - phase voltage) and to the selected voltage
system.
The connection of condensers must correspond to the number of connected phases (3-phase
connection - star or delta connection; 1-phase connection - star connection).
The entered output and capacity values are checked for consistence. In case of minor
inconsistence caused by rounding, it is possible to ignore the warning message.
4.
Close the dialogue panel by clicking OK. The component will be inserted in the network
design.
Notes:
Compensation is an end-type network component, which can always be connected at the end
of the line or directly to switchboard trunks (similarly to loads, see Chap. 11.12).
Only one line can be connected to a compensation (the „Switchboard trunk“ component is to
be used for network branching - see Chap. 11.5). A line must be always present between a
circuit-protection component and a compensation (similarly to loads, see Chap. 11.12).
After the calculation of the voltage drop and the load distribution, the power factor in the 3-
phase network nodes formed by the „Switchboard trunk“ component. The program does not
allow the user to enter the target power factor; the required compensation volume must bedetermined by trial and error through successive insertion of various-sized condensers. The
possibility of changing the operating state of switching and circuit-protecting components can
be used as an advantage for successive connection of the individual condensers.
11.14 Group
The Group function allows insertion of typical groups of components forming a part of the wiring
diagram. Therefore, a group of components comprising the power supply (network, transformer,
cable, protection) or an outlet to the load (protection, cable, load) etc. can be created with a singlemouse click.
Setting of component parameters by
selection from the database; for
database control see Chap. 16.1.
„Manual“ entry of component
arameters, or local editing of the
articular values taken over from the
database, as the case may be (without
reverse impact on the database).
Specification of the connected phase:
either 3-phase connection or a single
specific phase.

8/17/2019 XSpider 2.13 en Reference Manual
http://slidepdf.com/reader/full/xspider-213-en-reference-manual 96/236
_______________________________________________________________________________
_______________________________________________________________________________________________________________________
88 xSpider, Reference manual
1.
Click on the Group icon.
2.
In the subsequently opened dialogue panel, select the group of components to be
inserted (click on the image) and click Insert.
3.
The mouse pointer will change. The pointer form determines the position of the symbol withrespect to the insertion point (the symbol is directed downwards under the insertion point).
4.
Click the position of the group insertion point in the graphics area of the project window. The
insertion point was indicated with violet cross in the dialogue panel image. The insertion
point will be automatically captured in the grid (colored dots in the graphics area). The group
of components will be inserted.
5. Repeat the previous step until you insert the required number of groups.
6. Click the right mouse button to exit the group insertion.
7. Now set the properties of the individual component groups. To go to the properties editing
mode as fast as possible, double-click on the respective component (see Chap. 12.1).
Note:
The Group function allows you to insert only typical combinations of components. Any other
combinations must be composed by separate insertion of the particular components (see
Chap. 11.2-11.13).
In case of repeated occurrence of component groups, the parameters of which differ only very
slightly (such as several motor outlets differing only in the cable length), it is more suitable to
insert only one group, set the parameters of all its components and then copy this group (see
Chap. 12.3).
Insertion of any arbitrary number of the selected group into
the wiring diagram. Right click to exit the insertion mode.
Figure identifying the components
included in the group and their
connection.
The cross indicates the position of the group
insertion point. The position of this point
must be clicked in the graphic area of theroject window.

8/17/2019 XSpider 2.13 en Reference Manual
http://slidepdf.com/reader/full/xspider-213-en-reference-manual 97/236
_______________________________________________________________________________
_______________________________________________________________________________________________________________________
xSpider, Reference manual 89
11.15 Free graphics
The term „free graphics“ includes a group of functions allowing the user to add the basic graphical
entities into the network wiring diagram, such as a line, rectangle, circle and text. In this manner it
is possible, for instance, to add comments to the network wiring, separate the particular
switchboards, indicate the power flow in different network operating states etc. The default
properties of the free graphics (color, line thickness and type) are given by the program setting (see
Chap. 21.3) and can be modified at a later point in time (see Chap. 12.1.2), just like the
component’s position and dimensions. The functions for free graphics insertion are located in the
Draw drop-down menu, or as icons in the tool bar.
11.15.1 Line
1. Click on the Line icon.
2. Click the initial point of the line (point B1). The clicked point will be
automatically captured in the grid (colored dots in the graphics area).3.
Now drag the radius vector - a curve representing the future line. Click the end point of the
line (point B2). The clicked point will be automatically captured in the grid (colored dots in
the graphics area).
4. The line is now inserted in the diagram. The default properties (color, line thickness and type)
are given by the program setting (see Chap. 21.3) and can be modified at a later point in time
(see Chap. 12.1.2), just like the component’s position and dimensions.
11.15.2 Rectangle
1.
Click on the Rectangle icon.
2. Click one corner of the rectangle (point B1). The clicked point will be
automatically captured in the grid (colored dots in the graphics area).
3. Now drag the shape representing the future rectangle. Click the opposite
corner of the rectangle (point B2). The clicked point will be automatically captured in the grid
(colored dots in the graphics area).
4. The rectangle is now inserted in the diagram. The default properties (color, line thickness and
type) are given by the program setting (see Chap. 21.3) and can be modified at a later point in
time (see Chap. 12.1.2), just like the component’s position and dimensions.
11.15.3 Circle
1.
Click on the Circle icon.
2. Click the center of the circle (point B1). The clicked point will be
automatically captured in the grid (colored dots in the graphics area).
3. Now drag the shape representing the future circle. Click the point representing the radius of
the circle (point B2). The clicked point will be automatically captured in the grid (colored
dots in the graphics area).
4. The circle is now inserted in the diagram. The default properties (color, line thickness and
type) are given by the program setting (see Chap. 21.3) and can be modified at a later point intime (see Chap. 12.1.2), just like the component’s position and dimensions.

8/17/2019 XSpider 2.13 en Reference Manual
http://slidepdf.com/reader/full/xspider-213-en-reference-manual 98/236
_______________________________________________________________________________
_______________________________________________________________________________________________________________________
90 xSpider, Reference manual
Note:
When inserting a circle, the image of the surrounding graphics may be damaged
(disappearance of the grid, irregular display of geometry). These image faults can be
remedied by using the function Regen function from the View drop-down menu (see Chap.
13.1).
11.15.4 Text
1. Click on the Text icon.
2. Click the bottom left corner of the text (point B1). The clicked
point will be automatically captured in the grid (colored dots in the graphics area).
3. A dialogue panel will open, in which you enter the text string and the font height:
4. The text is now inserted in the diagram. The default properties (color) are given by the
program setting (see Chap. 21.3) and can be modified at a later point in time (see Chap.
12.1.2), jus like the position, font height and the text itself. The text font cannot be modified
in this version.
11.16 Drawing tools
The following drawing tools are applied when creating a wiring
diagram and inserting free graphics:
Grid - a mesh of dots filling the drawing area and allowing easier
orientation. The grid display can be turned on/off by using the
Grid function in the Tools menu, or by pressing F7. The grid
density (distance between the dots) can be set in the Options
menu under the Page tab (see Chap. 21.1). Tip: It is suitable to
turn off the grid when working with large formats (where it slowsdown the Zoom function) or when exporting graphics into BMP format (raster image suitable
for insertion into text editors).
Ortho - locking the pointer movement within the direction of the coordinate axes. With Ortho
turned on, only horizontal or vertical lines can be drawn for instance. When cable lines are
drawn (see Chap. 11.6, 11.7), it is turned on automatically. In other cases, it can be turned off
by using the Ortho function in the Tools menu, or by pressing F8.
Snap - automatic capturing of the clicked point to the tops of the invisible grid with the given
spacing. The snap cannot be turned off and its spacing cannot be modified (it corresponds to
the size of wiring diagram tags). By default, the snap spacing is identical to the distance
between the grid dots.
Field for the text string entry. Only one line
of text can be entered per one activation of
the function.
Font height in points.

8/17/2019 XSpider 2.13 en Reference Manual
http://slidepdf.com/reader/full/xspider-213-en-reference-manual 99/236
_______________________________________________________________________________
_______________________________________________________________________________________________________________________
xSpider, Reference manual 91
12. Edit ing the Network Wiring Diagram _______________________________________________
12.1 Properties editing
The term of properties editing shall be understood as modification of all geometric properties
(position, dimensions) as well as non-geometric properties (color, line thickness and type, electrical
parameters) of the component forming part of the network wiring diagram. There are two ways of
selecting the component to be edited:
By using the Properties icon:
1. Click on the Properties icon in the tool bar.
2. The mouse pointer will change to the form of the selection square. Now you will be requested
to select the component to be edited (the request to do so is displayed in the status bar in the
bottom part of the main program window, see Chap. 10.1).
3. Click on any line constituting the component, the properties of which you want to modify (so
that such line lies within the selection square). A dialogue panel will appear allowing to edit
all properties of the selected component. The appearance of the dialogue panel depends on the
type of the edited component.
By double-clicking the component:
1. Make sure that no other command is active (the status bar in the bottom part of the main
program window is empty and the mouse pointer has the shape of an arrow).
2. Double-click on any line constituting the component, the properties of which you want to
modify. A dialogue panel will appear allowing to edit all properties of the selectedcomponent. The appearance of the dialogue panel depends on the type of the edited
component.
Dialogue panel allowing
you to edit all properties o
the selected component.
The appearance of the
dialogue panel depends onthe type of the edited
component (here a general
load component).
Component selected to be edited
Point of clicking on the component (any line constituting the component).
Status bar
Properties icon.

8/17/2019 XSpider 2.13 en Reference Manual
http://slidepdf.com/reader/full/xspider-213-en-reference-manual 100/236
_______________________________________________________________________________
_______________________________________________________________________________________________________________________
92 xSpider, Reference manual
12.1.1 Editing the properties of network components
1. Select the component from the network wiring diagram, the properties of which you want to
edit (see Chap. 12.1).
2. A dialogue panel will open in the form identical to the one shown when inserting the
component into the network (see Chap. 11.1-11.10). In this dialogue panel, you can modifyall electrical properties of the component depending on its type.
3. Every dialogue panel, regardless of the component type, includes the Graphics tab allowing
you to edit the position or dimensions, as the case may be, of the symbol representing the
component in the network wiring diagram. (Note: graphics editing can be carried out with
higher comfort by using the Stretch function - see Chap. 12.4):
The Graphics tab for components formed only by a symbol (network, generator,
transformer, motor, circuit breaker, …):
The Graphics tab for components of electric line type (busbar systems, cables, trunks):
Coordinates of the component insertion
oint. The coordinate system origin is
located in the upper left corner of theimage; positive direction of the Y axis is
downwards.
Distance between the tag and the
component insertion point.
Coordinates of the initial (first clicked)
oint of the line. The coordinate system
origin is located in the upper left corner of
the image; positive direction of the Y axis isdownwards.
Coordinates of the individual
breakpoints in the line. The last point in
the table is end point of the line.
Distance between the tag and the
component insertion point, i.e. the
initial line point.
Specification of new coordinates for the
selected line breakpoint (from the table
above the item).
Registration of the new coordinates
specified for the selected line breakpoint
into the list.
Symbol dimensions and angle
cannot be changed.

8/17/2019 XSpider 2.13 en Reference Manual
http://slidepdf.com/reader/full/xspider-213-en-reference-manual 101/236
_______________________________________________________________________________
_______________________________________________________________________________________________________________________
xSpider, Reference manual 93
When editing the breakpoints of a line, first of all select the breakpoint to be edited in the
table, then adjust the X and Y coordinates in the fields below the table and at last click on
the Record… button. Please keep in mind that the Trunk component can be placed only
parallel to the X axis and that the particular line sections should be parallel to the X and
Y axes.
The origin of the coordinate system is located in the upper left corner of the drawing, the positive direction of the X axis is to the right and the positive direction of the Y axis is
downwards (!!).
All entered coordinates are automatically rounded up to multiples of 5 (grid snap).
The color of the diagram components is given by the settings in the Options (see Chap.
21.2). The line thickness for diagram components as well as the font height for symbol
cannot be adjusted.
4. Close the dialogue panel by clicking OK. The performed changes will be registered in the
system. In case of changes in the Graphics tab, the wiring diagram will be redrawn. If the
results of any calculation were shown in the diagram prior to calling this function, such results
will disappear after the performed editing since they would no longer correspond to the new
network configuration. A new calculation must be performed - see Chap. 14.
Insertion point - initial (first clicked) point of the line.
Tag position in relation to the insertion point.
The crosses represent the breakpoints in the line.
Line path.
Positive direction of the Y axis is downwards!!
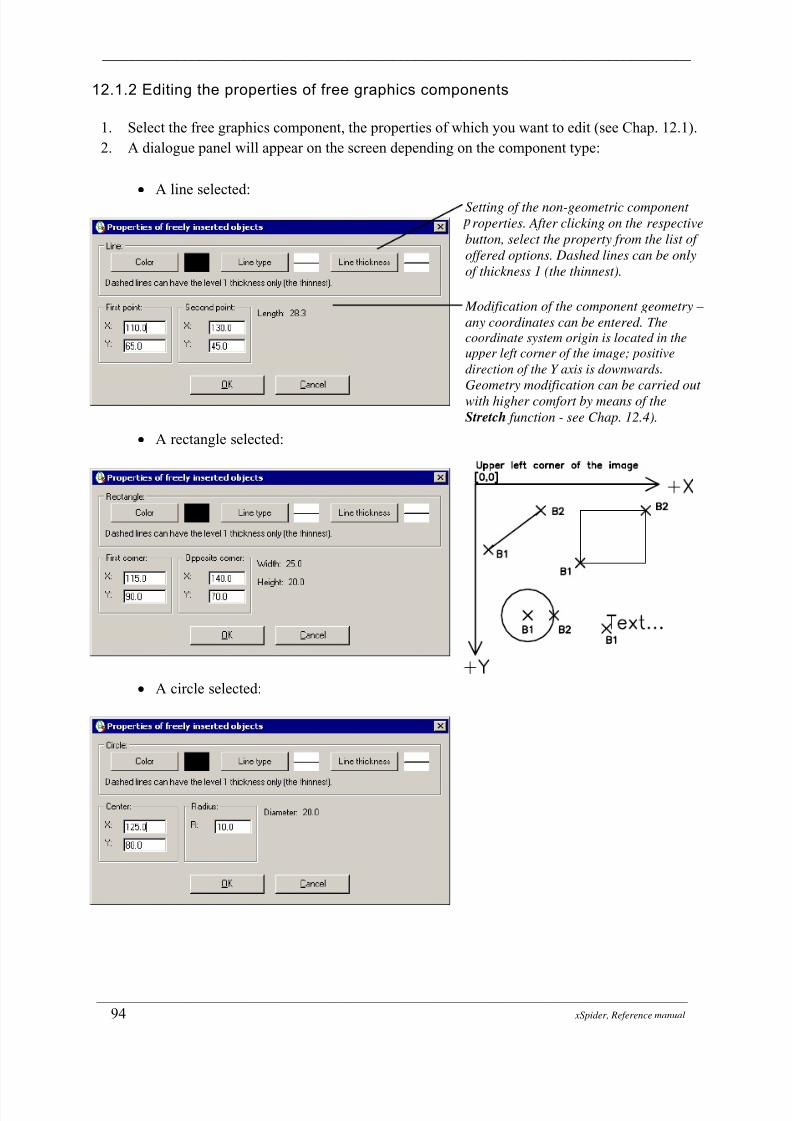
8/17/2019 XSpider 2.13 en Reference Manual
http://slidepdf.com/reader/full/xspider-213-en-reference-manual 102/236
_______________________________________________________________________________
_______________________________________________________________________________________________________________________
94 xSpider, Reference manual
12.1.2 Editing the properties of free graphics components
1. Select the free graphics component, the properties of which you want to edit (see Chap. 12.1).
2. A dialogue panel will appear on the screen depending on the component type:
A line selected:
A rectangle selected:
A circle selected:
Setting of the non-geometric component
roperties. After clicking on the respective
button, select the property from the list of
offered options. Dashed lines can be only
of thickness 1 (the thinnest).
Modification of the component geometry –
any coordinates can be entered. The
coordinate system origin is located in the
upper left corner of the image; positive
direction of the Y axis is downwards.
Geometry modification can be carried out
with higher comfort by means of the
Stretch function - see Chap. 12.4).

8/17/2019 XSpider 2.13 en Reference Manual
http://slidepdf.com/reader/full/xspider-213-en-reference-manual 103/236
_______________________________________________________________________________
_______________________________________________________________________________________________________________________
xSpider, Reference manual 95
A text selected:
3. Close the dialogue panel by clicking OK. The component will be redrawn to the new position.
12.1.3 Batch properties editing - limit voltage drops and limit disconnection time
The properties of maximum voltage drop in the network node with respect to the power supply
voltage, the maximum voltage drop on the network line and the maximum disconnection time of the
protective device are set locally for every component. Their editing is possible either within the
editing of every particular component (see Chap. 12.1) or by batches. That way it is possible to
easily set a uniform maximum disconnection time, for instance, for a group of 10 circuit breakers
protecting the outlets in one space.
1. Select the item Properties dUmax, TtrMax from the Modify drop-
down menu (the function cannot be accessed through icons).2. The mouse pointer will change to the form of the selection square.
Now you are requested to select the components, for which you want
to edit the property dUmax (limit voltage drop in the node or in the
line) and TtrMax (maximum disconnection time of the protective
device).
3. Select all components, the properties of which you want to edit. You can either click on any
line constituting the component or - which is more suitable - you can use the cross selection
window):
Click to a place where no component is located (point B1) - thus activating the selection
window. If you move the mouse to the left from the first clicked point, the selection window is
dragged crosswise (all components lying within the window or partially reaching into the
window will be selected).
Click the opposite window corner (point B3). The selected components will be
highlighted.
Tip: by using the Options function, it is possible to modify the control over the selection
windows (either identical to AutoCAD with click-click - default setting, or identical to
Windows with click-hold).

8/17/2019 XSpider 2.13 en Reference Manual
http://slidepdf.com/reader/full/xspider-213-en-reference-manual 104/236
_______________________________________________________________________________
_______________________________________________________________________________________________________________________
96 xSpider, Reference manual
4. Click the right mouse button to exit the selection set. A dialogue panel will open, in which you
set the required values (the accessibility of the items depends on the type of the selected
components; e.g. if you select only circuit breakers, the setting of the maximum disconnectiontime of the protective device only will be accessible):
5. Close the dialogue panel by clicking OK. The new entered values will be recorded in the
selected components. After calculation completion, it will be checked whether the calculated
voltage drop and disconnection time values do not exceed the limit set in here (for moredetails see Chap. 14.3 and 14.4). To view the set values in the wiring diagram with the print
option see Chap. 14.6.
12.1.4 Batch properties editing – tags
The ‘tag’ attribute is set locally for each component when the component is
being inserted in the wiring diagram. This attribute can be edited either
within the framework of editing each individual component (see Chap.
12.1) or ‘in bulk’ – in this case, the end-position number is changed
automatically. This way, for example, it is possible to easily renumber agroup of circuit-breakers that has been transferred by means of the
clipboard from another project (see Chap. 12.6).
Selection of a group of circuit
breakers, for which we require an
identical maximum disconnection time
to be set by means of the cross-wise
selection window.
The first corner of the selection window;
it must lie to the right from the selectedobjects.
Move the mouse to the right from the first
clicked point to drag the selection
window crosswise (all components lying
inside the window or at least partially
reaching into it will be selected).
Opposite corner of the selection window.
Setting of limit drops and disconnection
time for the selected components.
Accessibility of the items depends on the
type of the selected components.
Roll the list down and select one of
the values required by the regulation
(for a theoretic analysis of what value
and when can be used see Chap. 3.7,
4.1); any arbitrary value can also be
entered manually.

8/17/2019 XSpider 2.13 en Reference Manual
http://slidepdf.com/reader/full/xspider-213-en-reference-manual 105/236
_______________________________________________________________________________
_______________________________________________________________________________________________________________________
xSpider, Reference manual 97
1.
Choose the item ‘Tags’ from the ‘Modification’ drop-down menu (this function can not be
accessed through the icons).
2.
The cursor’s form will change to the selection square. Now, you are prompted to select the
components for bulk editing of tags.
3.
Select all the components whose attributes should be changed (the components will be
numbered in the order in which they have been selected). Click any line that forms thecomponent, or use the selection window (for more details, see the ‘Move’ function, Chap.
12.2, item 3 of the instruction). In the event that the selection window is used, the order of the
components in the selection set can not be influenced. Also, different types of components
can be selected (e.g. circuit-breakers and cables); the items selected can be filtered
subsequently.
4. The selection set is to be closed by right-clicking. Set the required values in the dialogue
panel that is displayed subsequently:
5. Close the dialogue panel by clicking on the OK button. The newly specified values will be
recorded into the components selected. This function does not carry out the check for
unwanted duplicities. This check is carried out automatically, before any computation is
performed.
12.2 Changing component position
1. Click on the Move icon in the tool bar.
2. The mouse pointer will change to the form of the selection square. Now you will be
requested to select the components to be moved (the request to do so is displayed in the status
bar in the bottom part of the main program window, see Chap. 10.1).3. Select all components that you want to move. Now click on any line constituting the
component (point B1) or use the selection windows:
Click to a place where no component is located (point B2) - thus activating the selection
window.
If you move the mouse to the left from the first clicked point, the selection window is
dragged crosswise (all components lying within the window or partially reaching into the
window will be selected).
If you move the mouse to the right from the first clicked point, the selection window of
window type is dragged (only components lying fully within the window will be
selected).
Filter of the component type. In this
case, tags will be changed only for the
circuit-breakers selected, without regard
to the other components that may be
included in the selection set.
The text in front of the number, the
number of the first component selected,
and the numbering step; the tags of the
components selected (in this case, the
tags of the circuit-breakers selected) will
be changed to FA12.1, FA12.2, FA12.3,
FA12.4, etc.

8/17/2019 XSpider 2.13 en Reference Manual
http://slidepdf.com/reader/full/xspider-213-en-reference-manual 106/236
_______________________________________________________________________________
_______________________________________________________________________________________________________________________
98 xSpider, Reference manual
Click the opposite window corner (point B3). The selected components will be
highlighted.
Tip: by using the Options function, it is possible to modify the control over the selection
windows (either identical to AutoCAD with click-click - default setting, or identical to
Windows with click-hold).
4.
Click the right mouse button to exit the selection set.
5. Click two points defining the displacement vector - B4, B5 in the figure. The clicked points
will be automatically captured in the grid (colored dots in the graphics area). The selected
components will be moved to the new position.
12.3 Copying components
1.
Click on the Copy icon in the tool bar.
2.
The mouse pointer will change to the form of the selection square. Now you will be
requested to select the components to be copied (the request to do so is displayed in the status
bar in the bottom part of the main program window, see Chap. 10.1).
3. Select all components that you want to copy (click on any line constituting the component -
points B1, B2, B3 in the figure. The selected component will be highlighted. You can also use
the selection windows (for more details see the Move function, Chap. 12.2, step 3).
4. Click the right mouse button to exit the selection set.
5.
Click two points defining the displacement vector - B4, B5 in the figure. The clicked points
will be automatically captured in the grid (colored dots in the graphics area). The selected
components will be copied to a new position. When copying components constituting one
wiring diagram, the tags of the copied components will be changed in order to avoid any
undesired duplicities (the tags can be adjusted additionally, either by editing the individual
components – see Chap. 12.1, or in bulk, by means of the Tags function – see Chap. 12.1.4).
6.
Click another point determining the position of the next copy - point B6.
7.
Repeat step 5 until you create the required number of copies. Click the right mouse button to
exit the copying mode.
After editing: Before editing:

8/17/2019 XSpider 2.13 en Reference Manual
http://slidepdf.com/reader/full/xspider-213-en-reference-manual 107/236
_______________________________________________________________________________
_______________________________________________________________________________________________________________________
xSpider, Reference manual 99
12.4 Modifying the component geometry - stretch
1. Click on the Stretch icon in the tool bar.
2. The mouse pointer will change to the form of the selection square. Now you will be
requested to select the component to be stretched (the request to do so is displayed in the
status bar in the bottom part of the main program window, see Chap. 10.1).
3. Select a component lying near the point you want to stretch (end point of a line; corner of a
rectangle; initial, end or breakpoint of a cable line; tag etc.), point B1 in the figure. Now drag
the radius vector from the selected definition point, you will be requested to specify its new
position.
4. Click the new position of the selected point - point B2. The clicked point will be
automatically captured in the grid (colored dots in the graphics area). The object shape will beadjusted accordingly.
12.5 Erasing components
1. Click on the Erase icon in the tool bar.
2.
The mouse pointer will change to the form of the selection square. Now you will be requestedto select the component to be erased (the request to do so is displayed in the status bar in the
bottom part of the main program window, see Chap. 10.1).
After editing: Before editing:
After editing: Before editing:

8/17/2019 XSpider 2.13 en Reference Manual
http://slidepdf.com/reader/full/xspider-213-en-reference-manual 108/236
_______________________________________________________________________________
_______________________________________________________________________________________________________________________
100 xSpider, Reference manual
3. Select all components that you want to erase (click on any line constituting the component).
The selected component will be highlighted. You can also use the selection windows (for
more details see the Move function, Chap. 12.2, item 3 in the Manual).
4.
Click the right mouse button to exit the selection set. The selected components will be erased.
12.6 Using the clipboard
The xSpider program’s clipboard serves for transferring and copying of
objects either among simultaneously opened projects or within the
framework of the currently opened project. Objects are either free
graphics or components that form a wiring diagram. The utilization
method is similar to the utilization method for the Windows clipboard in
other programs. The necessary functions can be found in the Edit drop-down menu. The standard
icons and the Ctrl+X, Ctrl+C and Ctrl+V keyboard shortcuts are available.
Notes: The clipboard can not be used to transfer objects into other programs (e.g. for transferring of
graphics into CAD systems, such as AutoCAD, or into Word). To transfer graphics into other
programs, you can use the Export function (see. Chap. 19.2 and 19.3).
The clipboard can not be used to transfer objects from other programs. Objects (graphics) can
not be imported from other programs.
12.6.1 Cut objects to the clipboard
1. Click on the icon Cut Objects to Clipboard at the toolbar, or use the Ctrl+X
keyboard shortcut.
2.
The cursor’s form will change to the selection square. Now, you are prompted to select the
component that is to be cut to the clipboard (the prompt is displayed at the status line).
3.
Select all the components that should be cut to the clipboard (click any line that forms a
component). The component selected will be highlighted. The selection windows can be used
as well (for more details, see the Move function, Chap. 12.2, item 3 of the instruction).
4. Right-click to close the selection set. The components that have been selected will be
removed from the project and cut to the xSpider program’s clipboard. For ‘Paste the objects
from the clipboard’, refer to Chap. 12.6.3.
12.6.2 Copy objects to the clipboard
1. Click on the icon Copy Objects to Clipboard at the toolbar, or use the Ctrl+C
keyboard shortcut.
2.
The cursor’s form will change to the selection square. Now, you are prompted to select the
component that is to be copied to the clipboard (the prompt is displayed at the status line).
3.
Select all the components that should be copied to the clipboard (click any line that forms a
component). The component selected will be highlighted. The selection windows can be used
as well (for more details, see the Move function, Chap. 12.2, item 3 of the instruction).
4.
Close the selection set by right-clicking. The components that have been selected will becopied to the xSpider program’s clipboard (they remain in the project). For ‘Paste the objects
from the clipboard into the project’, refer to Chap. 12.6.3.

8/17/2019 XSpider 2.13 en Reference Manual
http://slidepdf.com/reader/full/xspider-213-en-reference-manual 109/236
_______________________________________________________________________________
_______________________________________________________________________________________________________________________
xSpider, Reference manual 101
12.6.3 Paste objects from the clipboard
1. Click on the icon Paste from the Clipboard at the toolbar, or use the Ctrl+V keyboard shortcut.
2.
If the clipboard does not contain any objects of the xSpider program, an information message
will be displayed (the clipboard can not be used to transfer objects from other programs;
objects (graphics) from other programs can not be imported). For ‘Cut or Copy the objects to
the clipboard’, refer to Chap. 12.6.1, 12.6.2.
3.
If the clipboard contains at least one object of the xSpider program, the mouse cursor will change in a
way similar to the operation of inserting the symbol of a wiring diagram. Determination is requested of
the positions of the objects within the graphical area (the prompt is displayed at the status line).
4. Click a point – the top left corner of the imaginary rectangle that would enclose the objects in the
clipboard. The objects from the clipboard will be pasted into the project. The exact positions of the
objects can be subsequently adjusted by means of the Move function (see Chap. 12.2). For elements
that form a wiring diagram, the tags of the components being copied will be changed so as to prevent
unwanted duplicities from occurring (the tags can be modified additionally either by editing the
individual components – see Chap. 12.1, or in bulk, by means of the Tags function – see Chap.
12.1.4).
12.7 Searching item in wiring diagram according to tag
Any item from wiring diagram can be looked up by function Find (Ctrl+F) from the Edit drop-down menu.
Item is searched according to its tag (designation like FA1, WL1, LOAD1, …). The tag can be set exactly orwildcard characters can be used (? substitutes one character, * substitutes a group of characters). Looked up
item is pointed by cyan rectangle an can be zoomed by clicking Zoom to button.
Copy the objects to the clipboard:
1.
Press Ctrl+C.
2.
Select the objects by means of the
crossing window (click points B1
and B2).
3.
Right-click to close the selection set.
B1
B2
Source ro ect Tar et ro ect
B3
Paste the objects from the clipboard:
1.
Switch to the target project (by clicking
inside the window or by pressing
Ctrl+F6).
2.
Press Ctrl+V.
3.
Click the insertion point (point B3).
The imaginary rectangle
that would enclose the
objects in the clipboard.
The insertion point – the top
left corner of the rectangle that
would enclose the objects in
the clipboard.

8/17/2019 XSpider 2.13 en Reference Manual
http://slidepdf.com/reader/full/xspider-213-en-reference-manual 110/236
_______________________________________________________________________________
_______________________________________________________________________________________________________________________
102 xSpider, Reference manual
13. View Control (Zoom) _______________________________________________
The view control (zooming in and out in the design sections) is based on the
method of operation applied in CAD systems (such as AutoCAD). The program makes drawings in area having the dimensions of infinity x infinity.
The screen of your monitor is only like a zooming glass, a „peep-hole“
through which you look at a part of the infinite drawing area. Depending on if
the zooming glass is further from or closer to the area, you see a larger or
smaller part of the design in it, with smaller or larger details. The individual
functions can be activated from the View drop-down menu, or by clicking on
the appropriate icon in the tool bar or from the pop-up context menu, which is
displayed after clicking the right mouse button inside the graphics area.
13.1 Regenerating images
1. Select the Regen item from the View drop-down menu.
2. The image will be regenerated - image faults will be eliminated. It is recommended to be used
e.g. after changing the main program window dimensions by dragging its edge or in case of
faulty diagram representation after a non-standard termination of some editing operation.
13.2 Pan
1. Select the Pan item from the View drop-down menu or click on the corresponding icon
in the tool bar.
2. The pan mode is activated. The standard mouse pointer (usually an arrow) is changed to the
pan pointer (arrows up/down, left/right). Click to the image with your mouse, hold the left
button down and move the mouse slowly. The graphics is dragged simultaneously with the
mouse move. Some texts are not drawn during the move. Note: on slower computers and with
complicated and large diagrams, the movement can be jerky or the graphics might not move
at all. In such case use the scroll bars at the side of the graphics area.
3. Release the left mouse button - the graphics will be redrawn in the new position.
4. Press Esc to exit the pan mode (or click with the right mouse button and select Exit
Zoom/Pan mode from the pop-up context menu).
Tip: the pan function can be also activated by pressing the middle mouse button (wheel) even if
parallel to another performed command (such as when inserting a component in the wiring diagram
or when selecting objects for some editing operation, e.g. their move):
1.
Click the middle mouse button, hold it down and move the mouse slowly. The standard
mouse pointer (usually an arrow) is changed to the pan pointer (arrows up/down, left/right).
The pan mode is activated - the graphics is dragged simultaneously with the mouse move.
Note: on slower computers and with complicated and large diagrams, the movement can be
jerky or the graphics might not move at all. In such case use the scroll bars at the side of the
graphics area.

8/17/2019 XSpider 2.13 en Reference Manual
http://slidepdf.com/reader/full/xspider-213-en-reference-manual 111/236
_______________________________________________________________________________
_______________________________________________________________________________________________________________________
xSpider, Reference manual 103
2. Release the middle mouse button - the graphics will be redrawn in the new position. In case
the operation was called parallel to another function, it is now possible to continue in this
function.
13.3 Zoom in / zoom out
1. Select the Zoom realtime item from the View drop-down menu or click on the
corresponding icon in the tool bar.
2. The Zoom Realtime mode is activated. The standard mouse pointer (usually an arrow) is
changed to the Zoom Realtime pointer (arrow up/down). Click to the image with your mouse,
hold the left button down and move the mouse slowly. When moving upwards, the image is
enlarged (zoomed in); when moving downwards it is reduced (zoomed out). Some texts are
not drawn during the move. Note: the movement can be jerky on slower computers or the
graphics might not move at all. In such case use the Zoom Window function to enlarge the
image (see Chap. 13.4) and the Zoom All function to reduce the image (see Chap. 13.6). The
function sensitivity (ratio between the distance dragged by the mouse and the image size) can
be modified by using the Options function under the System tab (see Chap. 21.1).
3. Release the left mouse button - the graphics will be redrawn in the new position.
4.
Press Esc to exit the Zoom Realtime mode (or click with the right mouse button and select
Exit Zoom/Pan mode from the pop-up context menu).
After editing: Before editing:
The mouse-pointer form in the Pan mode. Scroll bars to move
through the diagram view. Drag the mouse with the left (or the middle)
mouse button being pressed down.

8/17/2019 XSpider 2.13 en Reference Manual
http://slidepdf.com/reader/full/xspider-213-en-reference-manual 112/236
_______________________________________________________________________________
_______________________________________________________________________________________________________________________
104 xSpider, Reference manual
Tip: the Zoom function can be also activated by scrolling the mouse wheel of the IntelliMouse
type. However, this feature must be first activated and its sensitivity must be set in the Options
function under the System tab (see Chap. 21.1). Attention: only some drivers for some mouse types
are supported.
13.4 Zooming in a part of the design (Zoom Window)
1.
Select the Zoom Window item from the View drop-down menu or click on the
corresponding icon in the tool bar.
2. The Zoom Window mode is activated. The standard mouse pointer (usually an arrow) is
changed to the Zoom Window pointer (crosshair). Specify the area you want to be zoomed-in:
click the first corner of the rectangle and move the mouse - a rectangle is dragged defining the
area to be zoomed-in. Click the opposite corner of the rectangle.
3. The specified area will be zoomed-in. You can return to the previous image by using the
Zoom Previous function (see Chap. 13.5).
The mouse-pointer form
in the Quick Zoom mode.
Drag the mouse with the left
button being pressed down.
Moving diagram in the
window is possible by
means of the Pan
unction, see Chap. 13.2.
After editing: Before editing:
The mouse-pointer form
in the Zoom Window
mode (crosshair).
Two clicked points – opposite
corners of the selection rectangle
specifying the area to be zoomed in.
After editing: Before editing:

8/17/2019 XSpider 2.13 en Reference Manual
http://slidepdf.com/reader/full/xspider-213-en-reference-manual 113/236
_______________________________________________________________________________
_______________________________________________________________________________________________________________________
xSpider, Reference manual 105
Tip: by using the Options function (see Chap. 21.1), it is possible to modify the Zoom Window
control (either identical to AutoCAD: click-click - default setting, or identical to Windows: click-
hold).
13.5 Return to the previous image (Zoom Previous)
1. Select the Zoom Previous item from the View drop-down menu or click on the
corresponding icon in the tool bar.
2.
The previous image will (if any) will be restored. Only one single step can be restored.
13.6 Viewing the drawing area image (Zoom All )
1. Select the Zoom All item from the View drop-down menu or click on the
corresponding icon in the tool bar.
2.
The entire drawing area will be displayed. The image will be zoomed in or out in order toshow the entire network drawing in the current graphical window.
13.7 Hide calculation results
1. Select the Hide Calculation Results item from the View drop-down menu or click on
the corresponding icon in the tool bar.
2. Results of the last performed calculation, which are shown in the network wiring diagram
with the particular components, will be erased. A new calculation must be performed if you
want them to be shown in the drawing again (for more details see Chap. 14).
After editing: Before editing:
Results of the last performed
calculation are shown (here the
voltage drop and load
distribution calculation).
Calculation results were hidden. A new
calculation must be performed to show
them again (see Chap. 14).

8/17/2019 XSpider 2.13 en Reference Manual
http://slidepdf.com/reader/full/xspider-213-en-reference-manual 114/236
_______________________________________________________________________________
_______________________________________________________________________________________________________________________
106 xSpider, Reference manual
14. Network Parameter Calculations _______________________________________________
Once the network wiring diagram (topology) has been designed, it is possible to proceed with
network parameter calculations. There is a number of computational algorithms available, bothcomplex (related to the network as a whole) and local, being focused only on a certain network
segment (such as short circuit in one selected node).
The particular computational algorithms are launched through the Calculation function from
the Tools drop-down menu, or by clicking on the Calculation icon in the tool bar. A
dialogue panel will open, showing a list of calculation methods grouped as follows:
Basic calculations – includes only the most important calculations required by the standard.
This group will be the only one used by the most common users.
All calculations – includes completely all calculation procedures that are available in
xSpider. The functions from this group are intended, in particular, for advanced users. Set parameters for calculations – includes functions to modify the software behaviour. The
functions from this group are intended, in particular, for advanced users.
Double click on the selected line to start the respective calculation.
14.1 Dimensioning of cables and protective devices
If you are using xSpider in the design mode, this function will perform automatic dimensioning for
those protective devices and lines, for which the Dimension automatically switch was enabled.
Parameters of other components, for which the Dimension automatically switch is disabled, must
be already defined and will not be modified by this function.
The automatic dimensioning algorithm will assign the types of conductors and protective devices
from the database tables. The assignment process is controlled by the Options function (can be
See Chap. 14.4
See Chap. 14.3
See Chap. 14.1
See Chap. 14.2
Complex network check, the following
calculations are carried out step by step:
voltage drops and load distribution (see
Chap. 14.3), 3-phase symmetric short-circuit
and 1-phase short-circuit (see Chap. 14.4).
Drag the edges to adjust the
dialogue panel size.

8/17/2019 XSpider 2.13 en Reference Manual
http://slidepdf.com/reader/full/xspider-213-en-reference-manual 115/236
_______________________________________________________________________________
_______________________________________________________________________________________________________________________
xSpider, Reference manual 107
activated from the Tools drop-down menu), AutoDimensioning tab (for more details see also
Chap. 21.5):
For cables: If the conductor material and the insulation were defined by the user when the
cable was inserted in the wiring diagram (under the Details tab – see Chap.11.7), the values
set here will be applied; if nothing was defined, the default values specified in Options under
the AutoDimensioning tab will be applied. The number of wires will be determinedautomatically based on the number of phases connected.
For enclosed busbar distribution: If the conductor material and the design were defined by
the user when the component was inserted in the wiring diagram (under the Details tab – see
Chap.11.6), the values set here will be applied; if nothing was defined, the default values
specified in Options under the AutoDimensioning tab will be applied. The number of wires
will be determined automatically based on the number of phases connected.
For circuit-breakers: All circuit-breaker types (modular as well as power circuit-breakers)
are dimensioned. The characteristics and type of the tripping release is defined automatically
based on the nature of the load. The number of poles is determined based on the number of
phases connected and based on the settings specified in Options under the AutoDimensioning
tab. The product series preferences are defined in Options. In case of equivalence of
parameters, the higher ranking type series circuit-breaker is used. Example:
The product-series sequence is set as follows: PL6, PL7, PLHT … By preference, PL6
type-series circuit-breakers (Icn=6kA) will be used wherever possible; only in case of
unsuitable breaking capacity, PL7 (Icn=10kA), or PLHT (Icn=25kA) circuit-breakers will
be used.
The product-series sequence is set as follows: PL7, PLHT, PL6 … By preference, PL7
type-series circuit-breakers (Icn=10kA) will be used even if the expected short-circuit
current is lower than 6kA; only in case of unsuitable breaking capacity, PLHT (Icn=25kA)
circuit-breakers will be used.
For fuses: The number of poles is determined based on the number of phases connected. The
product series preferences are defined in the same manner as with circuit-breakers based on
the settings specified in Options under the AutoDimensioning tab.
For switch-disconnectors: All switch-disconnector types (modular as well as power switch-
disconnectors) are dimensioned. The number of poles and the product series preferences are
defined in the same manner as with circuit-breakers.
Dialogue panel can be
activated by using the
Options function from the
Tools drop-down menu.
Specification of some conductor
parameters that will be assigned
by the Dimension Automatically
unction to the components, for
which the Dimension
automatically switch was
enabled and for which these
parameters were not set when
the component was inserted in
the wiring diagram .

8/17/2019 XSpider 2.13 en Reference Manual
http://slidepdf.com/reader/full/xspider-213-en-reference-manual 116/236
_______________________________________________________________________________
_______________________________________________________________________________________________________________________
108 xSpider, Reference manual
The components are dimensioned so that they meet the checks required by the relevant standard
(see Chap.1 - 4). The proposed design can certainly not be considered as ideal, and its technical
feasibility must always be assessed.
1. Create the network wiring diagram (topology).
Precise parameters of the inserted components (power sources, loads) must be entered.
Parameters of the user-defined components (lines, protective devices) must not be
entered, but the Dimension automatically switch must be activated for every
component.
Such user-defined components can also exist within the network, which have already
been determined (by their selection from the database) and their dimensioning is not
required - the Dimension automatically switch must be disabled for these components.
2. Set the automatic dimensioning parameters by using the Options function. For more details
see Chap. 21.5.3. Click on the Calculation icon in the tool bar. In the list of computational algorithms
under the Basic calculations group, double click on the line called Cable and
protective device dimensioning.
4. The calculation will now be performed. If it is not possible to find a suitable component in the
data table defined in the Options, the algorithm will fail. In such case it is necessary to
dimension the component automatically, disable the Dimension automatically switch and
repeat step 3.
5. A complex check of the entire network will be carried out at the end of the calculation for all
components regardless of whether or not they have been dimensioned. Results of the
particular checks are displayed in dialogue panels (every panel can be closed by clicking onthe X in the upper right corner or by pressing Esc):
Required number of poles for
protective and switching
devices..
Preference settings for
product series – determines
the sequence, in which the
individual types will be
assigned during
AutoDimensioning.

8/17/2019 XSpider 2.13 en Reference Manual
http://slidepdf.com/reader/full/xspider-213-en-reference-manual 117/236
_______________________________________________________________________________
_______________________________________________________________________________________________________________________
xSpider, Reference manual 109
6. Based on the checking results, the network design can be modified with the application of
algorithms described below with the aim to achieve maximum optimization.
Notes:
Before you start with the calculation, check the correctness of the fault tripping time from
power source for all protective devices. Technically unjustified, too low values can result in
algorithm failure.
It is not recommended to automatically dimension couplings in meshed networks.
Simultaneous factors will be ignored in case of meshed networks.
14.2 Network connection logic check
This function checks the logical links between the network components. In case of any problem, an
error message appears indicating the fault description and instructions for its remedy. The function
is activated automatically prior to every calculation. It is recommended to launch it separately after
completing the layout of a new diagram in order to eliminate mistakes made during the drawing
process.
Examples of the most frequent logic errors together with instructions for their remedy are specified
at the end of chapters defining the insertion of the particular network components - see Chap. 11.1 -
11.10.
14.3 Voltage drops and load distr ibution
The function calculates network behavior at the rated operating state and under overload. The
function can be applied if you are using xSpider in the control mode. There are algorithms
available:
Algorithm omitting the impact of the voltage drop: due to the impedance of conductors located
between the power supply source and the load, the voltage in load terminals is lower than the
supply unit voltage. However, the current consumed by the load will not be affected by this drop. In
other words, the load currents are constant. It is a conventional calculation; the obtained results are
comparable with outputs of common methods. This algorithm is available in the following versions:
Printing the list of error
components as a basis for
urther editing.
Description of the
erformed check.
List of error components
including specification of
the problem.
Drag the corners or the
artition to change the
dialogue panel size.

8/17/2019 XSpider 2.13 en Reference Manual
http://slidepdf.com/reader/full/xspider-213-en-reference-manual 118/236
_______________________________________________________________________________
_______________________________________________________________________________________________________________________
110 xSpider, Reference manual
For radial networks – taking the simultaneous factors into account (available in the Basic
calculations group in the Calculation dialogue panel).
For general networks, both radial and meshed networks, using the admittance matrix method
– the simultaneous coefficients are ignored (available in the All calculations group in the
Calculation dialogue panel).
Algorithm taking into account the impact of the voltage drop: due to the impedance of conductors
located between the power supply source and the load, the voltage in load terminals is lower than
the supply unit voltage. However, since loads work with constant output, the voltage drop results in
increase in the consumed current. The increase in the consumed current leads to increase in voltage
drops. In other words, the load outputs are constant. The network balance state is found through
iteration method. Though this calculation is more precise, it is also more time-consuming and its
results may be slightly different from those obtained by common methods. The function is available
in the All calculations group in the Calculation dialogue panel.
1. We assume that the network wiring diagram (topology) has been defined and all network
components have been dimensioned.
2.
Click on the Calculation icon in the tool bar. In the list of computational algorithms
under the Basic calculations group, double click on the line called Voltage drops and
load distribution.
3.
The network type is detected automatically. The algorithm that takes simultaneous factors
into account is applied automatically for radial networks. For meshed networks, information
about the ignored simultaneous factors is indicated to the user. When the calculation
continues, the algorithm working with the admittance matrices will be used. Alternatively, the
calculation can be terminated and the meshed network can be transformed to a radial one
through an appropriate modification of the operating status / switching off of some switching
devices.4. Calculation will be performed, followed by the individual checks:
Check of voltage drops in the nodes with respect to power source voltage. Such nodes are
not compliant where the voltage drop exceeds the limit set when inserting the component.
Check of voltage drops in branches. Such branches are not compliant where the voltage
drop exceeds the limit set when inserting the component.
Check of circuit breakers and fuses for nominal current. Such devices are not compliant
where the current in the branch exceeds the nominal current of the device (switching off
takes place at the nominal state already).
Check of switch-disconnectors for nominal current. Check of switch-disconnector pre-
protection.
Check of busbars for rated current load. Such components are not compliant where the
current in the branch exceeds the rated current of the component. The component’s rated
current is determined with respect to its installation.
Check of cables for rated current load. Such components are not compliant where the
current in the branch exceeds the rated current of the component (determined with
respect to its installation, ambient temperature, cable grouping etc).
Check of cable overload protection. The nominal current of the protective device must be
smaller than the cable current-carrying capacity determined with respect to its installation
and ambient temperature (first term from article 433.2 from IEC 60364-4-43). Second
term I2≤1.45*Iz from article 433.2 from IEC 60364-4-43 must be completed also. Theampere-second heating characteristics of the cable must lie above the tripping
characteristics of the circuit breaker (this test is not required by IEC 60364-4-43 and can

8/17/2019 XSpider 2.13 en Reference Manual
http://slidepdf.com/reader/full/xspider-213-en-reference-manual 119/236
_______________________________________________________________________________
_______________________________________________________________________________________________________________________
xSpider, Reference manual 111
switched off - see Chap. 21.4). For more details see the theoretical introduction, Chap.
2.3. The ampere-second characteristics of the cable in relation to the respective protective
device can be viewed by means of the Tripping Characteristics module (see Chap. 15).
Check of transformer and generator for load and protection.
Components on the transformer line are checked for the transformer nominal current
regardless of the current load.
The check results are displayed in a dialogue panel (close the panel by clicking on the “x” in the
top right corner or by pressing Esc):
4.
Based on the checking results, the network design can be modified and this function can be repeated.
The calculation results are displayed in the network wiring diagram. This diagram can be printed out
(see Chap. 18), or it is possible to draw a list of components with the calculation results and print it outthen (see Chap. 18), or to export it in a data file (see Chap. 19).
Notes:
In case there is at least one 1-phase consumption in the network, the calculation is carried out
separately for every phase. Voltage drops and currents are showed for every phase separately
in L1, L2, L3 and N sequence. This allows you to verify the load distribution to the particular
phases. All checks are carried out with respect to the most loaded phase.
For display of the connected phases of the individual components - see Chap. 14.6.
The cosPhi power factor is determined automatically in 3-phase network nodes formed by
the switchboard trunk component (when the general-network algorithm working with theadmittance matrix method is applied). The program does not allow the user to enter the target
power factor; the required compensation volume must be determined by trial and error
through successive insertion of various-size condensers. The possibility of changing the
operating state of switching and protective devices can be used as an advantage for successive
connection of the individual condensers. For insertion of the Compensation component see
Chap. 11.13.
The simultaneous factor is taken into account in radial networks only. In meshed networks,
the operating state of circuit-breakers can be modified (on/off) to test the network behavior in
different operating conditions.
In case of unbalanced networks with 1-phase loads, the voltage on the low-load or tripped phase can be higher than the power source voltage; in such case, different computational
algorithms can deliver slightly different results.
Print the list of error components as a
basis for further editing.
Description of the
erformed check.
List of error components
including specification of
the problem.
Drag the corners or
the partition to change
the dialogue panel size.
Closing the dialogue panel
and moving to the next
check (pressing the Esc
has the same function).
Closing the dialogue panel and moving to the next check (the same effect can
be achieved by clicking on the X in the upper right corner of by pressing Esc).

8/17/2019 XSpider 2.13 en Reference Manual
http://slidepdf.com/reader/full/xspider-213-en-reference-manual 120/236
_______________________________________________________________________________
_______________________________________________________________________________________________________________________
112 xSpider, Reference manual
By using the Options function (see Chap. 21.4) it is possible to:
Activate the display of the real and the imaginary components of currents (show currents
as complex numbers),
Override the feature of highlighting error components in the diagram,
Activate the display of admittance matrices and other intermediate results of the calculation.
Only 3-phase meshed network (simultaneous coefficients are ignored; the power factor in network
nodes is calculated); there is no 1-phase load present:
Voltage of the power source
(sources) is fixed (delta voltage)
dUwl is voltage drop on
the given line (identical
in all phases)
Iwl is the current flowing
through the given line (the
percentage line load is
indicated in the brackets .
Unode is voltage in
the node (delta
voltage); dUnode is
the voltage drop inthe node in relation
to the power source
voltage; cosPhi is
the power factor.
Inode is the current taken by the load (with
respect to the utilization factor Ku).
Unode is the voltage in the node –
here on the load terminals.
dUnode is the voltage drop in
relation to the power source voltage.
Indication of the error componentthat failed to comply during one of
the checks (in this case, the current
on line Iwl is higher than the
current of the thermal release of
circuit-breaker Ir).
Tag
Type
Transformer voltage is fixed (the
transformer is running as an ideal
device).

8/17/2019 XSpider 2.13 en Reference Manual
http://slidepdf.com/reader/full/xspider-213-en-reference-manual 121/236
_______________________________________________________________________________
_______________________________________________________________________________________________________________________
xSpider, Reference manual 113
Only 3-phase radial network (simultaneousness taken into account); there is no 1-phase load present:
Network containing at least one 1-phase load:
The voltage of the power
source (sources) is fixed.
Inode - current taken by the load in the
particular phases (absolute value) with respectto the utilization actor Ks.
dUnode - voltage drop in the node in relation to the
power source voltage for the particular phases.
Iwl is the current flowing through the given line inthe particular phases and N-conductors (absolute
dUwl is the voltage drop on the given line in the
particular phases (= in this case, voltage drop on
cable CAB8).
Indication of the error component
that failed to comply during one
of the checks (in this case, thecurrent on line Iwl is higher than
the nominal current of circuit-
breaker In).
Ks - simultaneous factor;
dUnode - voltage drop in
relation to the power source
voltage.
1-phase branch line.
3-phase branch line.
Inode is the current taken by the
load (with respect to the utilizationactor Ku).
dUnode is the voltage drop in
relation to the power source
voltage.
dUwl is the voltage drop on the
given line (identical in all
phases)
Iwl is the current flowing through
the given line (the percentage line
load is indicated in the brackets).
The power source and transformer
voltages are fixed; the voltage drop
is always zero.
Current taken from the transformer (the
percentage load of the transformer is
indicated in the brackets)
Ks - simultaneous factorin the given node;
dUnode - voltage drop in
the node in relation to the
power source voltage. Iwl is the current flowing through the given line,
taking into account the simultaneous factor in
the node:
Iwl(W1)=Ks*(Iwl(W2)+ Iwl(W3)+Iwl(W4)
Note: currents are summarized as vectors.

8/17/2019 XSpider 2.13 en Reference Manual
http://slidepdf.com/reader/full/xspider-213-en-reference-manual 122/236
_______________________________________________________________________________
_______________________________________________________________________________________________________________________
114 xSpider, Reference manual
14.4 Short-circui t currents
There are several algorithms available in the program to calculate short-circuit
currents. The first group of algorithms is based on the assumption that the short
circuit will occur only in one selected network node - this is useful when we are
solving one specific outlet for instance. The other group carries out a complex check
of the entire network - the short circuit occurs in all nodes one by one. The
calculation of asymmetric short circuits against ground depends on the selected
network type (see Chap. 11.1)
Short-circuit currents: 3-phase symmetric short circuit Ik3p - analysis of
network behavior under a short circuit in a single selected network node, check
for the load applied on network components due to the short-circuit current
(maximum short circuit).
Short-circuit currents: 2-phase asymmetric short circuit Ik2p - school-
level problem, this calculation is usually not required.
Short-circuit currents: 2-phase asymmetric short circuit against ground
Ik2PE - school-level problem, this calculation is usually not required.
Short-circuit currents: 1-phase asymmetric short circuit Ik1p - analysis of
network behavior under a short circuit in a single selected network node, check
for the load applied on network components due to the short-circuit current and check for the
fault point disconnection from source (minimum short circuit).
Entire network check: 3-phase symmetric short circuit Ik3p - the short circuit will occur
in all network nodes one by one, check for the load applied on network components due to the
short-circuit current (maximum short circuit).
Entire network check: 1-phase asymmetric short circuit Ik1p - the short circuit will occur
in all network nodes one by one, check for the load applied on network components due to the
short-circuit current and check for the fault point disconnection from source (minimum short
circuit).
1.
We assume that the network wiring diagram (topology) has been defined and all network
components have been dimensioned.
2. Click on the Calculation icon in the tool bar. In the list of computational algorithms
under the Basic calculations group, double click on the line corresponding to the
required short-circuit type (see the list above).
3.
A dialogue panel with the definition of cascades is displayed (see Chap. 14.4.1); this panel is
to be closed by pressing Esc.
4. If you select an algorithm calculating the short circuit only in a single node, in the next step
you must select the node where the short circuit occurs. Double click on the component tag
forming the short-circuited node.
5. The calculation will be performed. In case of a 3-phase symmetric short circuit in the selected
network node, the waveform of the short-circuit current is displayed (the panel can be closed
by clicking on the X in the upper right corner or by pressing Esc which will move you to the
next check); the graph display function can be disabled in the Options - see Chap. 21.4):

8/17/2019 XSpider 2.13 en Reference Manual
http://slidepdf.com/reader/full/xspider-213-en-reference-manual 123/236
_______________________________________________________________________________
_______________________________________________________________________________________________________________________
xSpider, Reference manual 115
6.
The individual checks now follow:
Check of circuit breakers and fuses for breaking capacity. Such devices are not compliant
for which the breaking short-circuit current in the branch exceeds the breaking capacity
of the component. The breaking capacity of the device is determined by the or value in
case of circuit breakers - depending on the setting of the „Dimension for …“ switch (see
Chap. 11.7), or by the Icn value in case of fuses.
If a cascade has been defined (that is, the incoming protective components (at the
incomers) and the outgoing protective components (at the outgoers) have been
determined for each node formed by the ‘Switchboard Trunk’ component – see Chap.
14.4.1), the breaking capacities of the outgoing protective components are assessed with
respect to the incoming components (both the limitation of the short-circuit current bymeans of a fuse and the interoperation of the circuit-breakers are taken into account).
Check of switch-disconnectors for nominal current load. The switch disconnector will not
disconnect the short circuit, but must be able to withstand the short-circuit current in the
short term. Such devices are not compliant, for which the effective heating current in the
branch per 1 s exceeds the short-time withstand current Icw(1s) of the component.
Protection against dangerous voltage in non-conductive parts (check for the fault
disconnection time from source). It is carried out only for 1-phase short circuits. Such
component, located closest to the short-circuit point, is not compliant for which the
disconnection time exceeds the limit set when inserting the component.
Check of cables/busbars for short-circuit current load. Such devices are not compliantwhere the effective heating current in the branch per 0.1 s exceeds the short-time
withstand current Icw(0.1s) of the component. For more details see the theoretical
introduction, Chap. 3.6.
Check of the PEN conductor for short-circuit current load. It is carried out only for 1-
phase short circuits in case the PEN conductor cross-section is smaller than the phase-
conductor cross-section. Such devices are not compliant where the effective heating
current in the branch per 0.1 s exceeds the short-time withstand current Icw(0.1s) of the
PEN cable conductor.
Results of each one of the checks are displayed in dialogue panel (the panel can be closed
by clicking on the X in the upper right corner or by pressing Esc which will move you tothe next check). For panel control description see Chap. 14.3 item 3 in the Manual.
Values of time or current, as the case
may be, corresponding to the current
osition of the mouse pointer.
Dialogue panel dimensions can be
changed by dragging the corners.
Surge short-circuit current – amplitude
of the first half-wave of the short-
circuit current after the short-circuitoccurrence (value I km).
Closing the dialogue panel and
moving to the next check (same
unction achieved by pressing Esc).
Steady short-circuit current, its effective
value is usually labeled marked I k ’’.

8/17/2019 XSpider 2.13 en Reference Manual
http://slidepdf.com/reader/full/xspider-213-en-reference-manual 124/236
_______________________________________________________________________________
_______________________________________________________________________________________________________________________
116 xSpider, Reference manual
7. Based on the checking results, the network design can be modified and this function can be
repeated. The calculation results are displayed in the network wiring diagram. This diagram
can be printed out (see Chap. 18), or it is possible to draw a list of components with the
calculation results and print it out then (see Chap. 18), or to export it in a data file (see Chap.
19).
Notes:
In case of IT networks, asymmetric short circuit against ground is calculated at the moment of
a second fault.
In case of TT networks, it is necessary to enter the ground resistance R t of the transformer
node and the ground resistance R a in the network node where the short circuit occurred.
The safety coefficient of 1.25, which is defined by the regulation and which increases the
impedance of the short-circuit loop, is applied when calculating the disconnection time of the
fault point from supply (for 1-phase short circuit)
If the fault point disconnection time from source is not compliant, it is possible to adjust the
settings of the protective device releases (if possible for such device), otherwise it isnecessary to increase the cross-section of the line in the branch.
Assessment of the short-circuit current strength of the protective devices that are connected to
the ‘Switchboard Trunk’ component: It is assumed that the short circuit, which the protective
component at the outgoer has to withstand, may occur not only at the end of the line protected
by this protective component, but also immediately behind the circuit-breaker. So, the
breaking capacity of the component is assessed with respect to the short-circuit current of the
node to which the protective component is connected (the ‘Switchboard Trunk’ component).
This solution improves the margin of safety.
In order to assess the selectivity, the ampere-second characteristics of the protective devices
can be viewed by means of the Tripping Characteristics module (see Chap. 15).
By using the Options function (see Chap. 21.4) it is possible to:
Override the feature of highlighting error components in the diagram,
Activate the display of admittance matrices and other intermediate results of the
calculation.

8/17/2019 XSpider 2.13 en Reference Manual
http://slidepdf.com/reader/full/xspider-213-en-reference-manual 125/236
_______________________________________________________________________________
_______________________________________________________________________________________________________________________
xSpider, Reference manual 117
The calculation results shown in the network wiring diagram: the calculation of „Entire network
check: 3-phase symmetric short circuit Ik3p“ performed (the short circuit is induced in the
particular network nodes one by one, the calculated values are displayed for the particular nodes):
I km is the peak short-circuit current – the height of the first half-
wave of the short-circuit current after the short circuit started;
this is the current that causes dynamic effects. It is given only for
the node where the short circuit is to occur.
I k3p’’ is the initial impulse short-circuit current for a 3-phase short
circuit (the effective value of the alternating symmetrical
component at the moment when the short circuit started; for remote
short circuits, the initial impulse short-circuit current is identical
with the effective value of the steady short-circuit current).
If the component has not been adequately defined, the check can not be
carried out and the component is marked as a non-conforming component. In
the event of this switch disconnector, the one-second short-time withstand
current has not been specified and so the short-circuit current strength of the
switch disconnector can not be checked.
Tag
Type identification
Setting of the
parameters of therelease (displayed
only if the component
is fitted with an
adjustable release).
Identification of the
cascade; the
breaking capacity of
the component is
assessed with respect
to the given incoming
component.
The cascade has not been determined, or the
incoming protective component does not influence
the breaking capacity of this component.
Indication for the error component that did not
comply with some of the checks (here the switchingcurrent I trip is higher than breaking capacity of the
circuit breaker I cs).

8/17/2019 XSpider 2.13 en Reference Manual
http://slidepdf.com/reader/full/xspider-213-en-reference-manual 126/236
_______________________________________________________________________________
_______________________________________________________________________________________________________________________
118 xSpider, Reference manual
Representation of the computation results at the wiring diagram: The computation ‘Short-circuit
currents: 1-phase asymmetrical short-circuit Ik1p’ at node M3 has been carried out:
The values of the short-circuit
currents are displayed only for
the node where the short circuit
has occurred.
I km is the peak short-circuit current.
I k1p’’ is the initial impulse short-circuit
current for the 1-phase short circuit.
I k 1p’’ is the initial impulse short-
circuit current flowing trough the
branch; it is distributed across
the whole network, up to the
power sources.
No short-circuit current is flowing
through the branch (no motive-powerload is connected; the branch does not
contribute to the short circuit).
The protective component which is at the closest
distance from the failure area; the Ttr time of
failure disconnection from the power source has
been determined.
Identification of the faulty component,
which has not conformed to the conditions
of some of the checks (in this case, the time
of failure disconnection from the power
source has not fulfilled the condition).
The safety coefficient of 1.25, which is
stipulated by the standard in order to
increase the impedance of the short-circuit
loop, has been applied in the computation
of the time of disconnection of the area of
the failure from the power source.
I o – the fuse let-through short-circuit current; the peak value of the
short-circuit current, which will be let through by the fuse. If there
were no fuse there, the peak short-circuit current in this case would
be I km=27 kA. Owing to the limiting capabilities of the fuse, this
current will be limited to no more than 6.49 kA. In order that the
circuit-breaker may be adequately protected, Io must be less than
the breaking capacity of the circuit-breaker, that is, I o<I cs(I cu)* 2 ;see Chap. 4.5 as well.
The node where the short circuit is to occur; theshort-circuit currents have been computed as if
there were no fuse there.
The selectivity of the circuit-breaker/fuse cascade according to the
selectivity tables for the given types of devices; if the short-circuit
current is less than the value given here (here, for example, the
value is 4.2 kA), the circuit-breaker will switch off. In the other
cases, the fuse will switch off.

8/17/2019 XSpider 2.13 en Reference Manual
http://slidepdf.com/reader/full/xspider-213-en-reference-manual 127/236
_______________________________________________________________________________
_______________________________________________________________________________________________________________________
xSpider, Reference manual 119
14.4.1 Cascades
Creating of cascades is a concept in which an incoming circuit-breaker or a fuse are used to restrict
the short-circuit current to a value which can be safely switched off by the outgoing circuit-breaker.
If a prescribed combination of circuit-breakers and of the nominal currents of these circuit-breakers
is used, it is guaranteed that the outgoing circuit-breaker can be used even in circuits with short-
circuit conditions exceeding the breaking capacity of this circuit-breaker – for more details, see
Chap. 4.5.
The function ‘Cascades’ makes it possible to define the incoming protective components (at the
incomers) and the outgoing protective components (at the outgoers) for each node formed by the
‘Switchboard Trunk’ component. The breaking capacities of the outgoing protective components
are assessed with respect to the incoming components (both the limitation of the short-circuit
current by means of a fuse and the interoperation of the circuit-breakers are taken into account).
Cascades can be defined by means of the separate function Cascades of the Tools pull-down
menu. This function is called automatically before any short circuit computation, with the exception
of a 1-phase short-circuit check of the whole network. Defining of cascades is not obligatory (forcomplex, ‘knotted’ networks, defining of cascades is sometimes not possible); if there is no cascade
defined, the protective components do not influence one another . Cascades are pre-defined
automatically for radial networks.
Warning: Please, pay close attention to the defining of cascades. Incorrect determination of the
incoming components may result in wrong conclusions. If you are not sure, do not set any incoming
component.
1. We assume that the network wiring diagram (the topology) has
been drawn correctly.
2.
Select the item ‘Defining of Cascades’ from the ‘Tools’ drop-
down menu (this function can not be accessed through the icons).
3. A dialogue panel will be displayed, which is similar to the panel
with computation results (Chap. 14.3). In this panel, the incoming
and outgoing protective components are represented for each
‘Switchboard Trunk’ component. In the default setting, there is no
component defined as an incoming component (the protective
components do not influence one another).
Editing the cascade for the node selected
(changing the settings of the incoming and
outgoing protective components).
Closing the dialogue panel and quitting the function (or continuing the computation); the panel can
also be closed by pressing the Esc key or by clicking on the small cross at the right-hand top corner.
The changes that have been made are always saved (the Cancel option is not available).
Please, pay attention to
these comments.

8/17/2019 XSpider 2.13 en Reference Manual
http://slidepdf.com/reader/full/xspider-213-en-reference-manual 128/236
_______________________________________________________________________________
_______________________________________________________________________________________________________________________
120 xSpider, Reference manual
4. Select the line (that is, the node formed by the ‘Switchboard Trunk’ component) for which a
cascade should be defined (that is, the setting of the incoming and of the outgoing protective
components should be changed).
5. Click on the icon Editing the Cascade (or double-click the line selected). Define the
incoming and outgoing protective components in the dialogue panel that opens up
subsequently:
6.
Repeat items 4 and 5 for all the nodes (the ‘Switchboard Trunk’ components).7. Close the ‘Cascades’ dialogue panel by clicking on the Continue icon (or by pressing
the Esc key). The changes that have been made are always saved (the Cancel option is
not available in this case).
The dimensions of
the dialogue panel
can be adjusted by
dragging the edges.
List of the tags of the nodes in
a project (the nodes are the
‘Switchboard Trunk’
components), which have at
least one protective
component connected to them.
The outgoing protective components
(the tags); the breaking capacities of
these components are assessed with
respect to the incoming components.
The incoming protective components; the
function of these components influences
the outgoing components assigned to them.
Tag of the node (the node is the‘Switchboard Trunk’ component) for
which a cascade is being defined.
Transferring the circuit-breaker selected
back to the outgoing circuit-breakers (or,
double click the line selected).
Transferring the protective component
selected to the incoming protective components
(or, double click the line selected).

8/17/2019 XSpider 2.13 en Reference Manual
http://slidepdf.com/reader/full/xspider-213-en-reference-manual 129/236
_______________________________________________________________________________
_______________________________________________________________________________________________________________________
xSpider, Reference manual 121
Examples (1 = incoming component, 2 = outgoing component):
A fuse used as a backup protection of circuit-breakers:
Circuit-breaker / circuit-breaker cascade:
If the protection at the incomer is formed by a
series connection of a circuit-breaker and fuse,
only the fuse is to be defined as an incomingcomponent.
1
2 2
1
2
1
2 2
The FA3 incoming circuit-breaker serves as a backup
protection of the FA4, FA5 and FA6 outgoing circuit-
breakers if the short-circuit current does not exceed 30kA
(the limiting value given by the manufacturer for this
pair; in this case, the condition has been fulfilled:
I k3p''=27kA at NOD1).
During a short circuit, the FA3 and FA4 circuit-
breakers may be subject to the short-circuit
current stress Ik3p’’=14.6kA (this is more than
their I cs=6kA); the incoming fuse will limit this
current to the peak value of about 6.5kA, which
is less than I cs* 2

8/17/2019 XSpider 2.13 en Reference Manual
http://slidepdf.com/reader/full/xspider-213-en-reference-manual 130/236
_______________________________________________________________________________
_______________________________________________________________________________________________________________________
122 xSpider, Reference manual
The incoming component is not a circuit-breaker – there is no cascade defined:
2
No cascade can be defined for
node Rv2 (a switch disconnector isat the incomer); no circuit-breaker
may be defined as an incoming
circuit-breaker, each protective
component must be assessed
separately, without regard to the
other protective components. It is
not possible to take into account
the influence of the protective
components of other nodes.
All the components connected to this node must
withstand this short-circuit current (that is, the
short circuit immediately behind the component,
not only the short circuit at the end of the line).
The FA8 incoming circuit-breaker
serves as a backup protection of the
outgoing circuit-breakers at node Rv1.
1
2
If the outgoing protectivecomponent might interoperate with
the incoming protective
component, a check is carried out
to establish whether the
anticipated cut-off short-circuit
current is not greater than the limit
specified by the manufacturer for
the given pair. The fact that the
circuit-breaker is assessed as a
cascade is indicated by an
information message.
2 2
If it is not possible that the outgoing
protective component may
interoperate with the incoming one, it
is always assessed separately,
without regard to the setting of the
cascades (in this case, the FA2 and
FA3 motor starters).

8/17/2019 XSpider 2.13 en Reference Manual
http://slidepdf.com/reader/full/xspider-213-en-reference-manual 131/236
_______________________________________________________________________________
_______________________________________________________________________________________________________________________
xSpider, Reference manual 123
‘Meshed’ network:
Evaluation of cascades:
The incoming protective components are either fuses or fuses and circuit-breakers: The
limited short circuit current is computed for the incomers with fuses, and we add to this
current the unlimited short-circuit current of the incomers with the circuit-breakers. The
current computed in this way is causing stress to the outgoing component. The interoperation
of the circuit-breakers is not assumed.
The incoming protective components are circuit-breakers (two or more): The interoperation of
the circuit-breakers can not be assessed, each protective component is evaluated separately,
without regard to the setting of the cascade.
The incoming protective component is a circuit-breaker: A test is carried out to establish
whether it is possible that the incoming component and the outgoing component may
interoperate. If it is possible that they may interoperate, the assessment is carried out to
establish whether the assumed cut-off short-circuit current is not greater than the limit
specified by the manufacturer for the given pair. If it is not possible that they may
interoperate, each of the circuit-breakers is assessed separately – they do not influence one another.
Warning: Please, pay close attention to the defining of cascades, in particular in ‘knotted’networks. Incorrect determination of the incoming components may result in wrong
conclusions. If you are not sure, do not set any incoming component.
1
2
1 2 2
2 2 2 2 2
1 1
Node Rv1a: It is not
possible to determine
generally what an
incomer is and what an
outgoer is – no
incoming component
has been set, each
component is assessedseparately.
Node Rv1: In this
configuration, it is
possible to assume: two
incomers = two incoming
components. However,
other alternatives arealso possible. Proceed
with heightened caution!
Node Rv2: two incomers
= two incoming
components

8/17/2019 XSpider 2.13 en Reference Manual
http://slidepdf.com/reader/full/xspider-213-en-reference-manual 132/236
_______________________________________________________________________________
_______________________________________________________________________________________________________________________
124 xSpider, Reference manual
14.4.2 Selectivity
The aim of securing selectivity is to ensure that, in case of short-circuit or
overload, only the protective device closest to the fault point will trip and the
rest of the installation will remain operational (for more details see Chap.4.4).
Selectivity of two protective devices - incoming (1) and outgoing (2) can be
evaluated, on one hand, by comparing their tripping characteristics (see
Chap.15) and, on the other hand, with a special function that evaluates selectivity based on
selectivity tables specified in the power circuit-breaker catalogue. The latter option is addressed in
this Chapter.
Selectivity – comparing two circuit-breakers selected from the database
This function allows you to evaluate selectivity of two circuit-breakers on the basis of selectivity
tables independently on the wiring diagram edited. There is no need to make drawings, you can just
select two devices from the database and the selectivity is then showed, accompanied by the
relevant comments.
1. Click on the Calculation icon in the tool bar. In the list of computational algorithms
under the All calculations group, double click on the line called Selectivity
(comparison of two circuit-breakers selected from the database).
2. A dialogue panel will open, in which you click on the Database button to select an incoming
circuit-breaker.
3.
Click on the Database button to select an outgoing circuit-breaker.
4.
The combination of the selected circuit-breakers will be searched in the selectivity tables, and
the result will be displayed, accompanied by the relevant comments (limiting conditions, where
relevant).
5. Click Close to close the dialogue panel.
Selectivity – comparing circuit-breakers in a project
This function allows you to evaluate selectivity of circuit-breakers connected to a single node
constituted by the “Switchboard trunk” component.
1.
Click on the Calculation icon in the tool bar. In the list of computational algorithms
under the All calculations group, double click on the line called Selectivity
(comparison of circuit-breakers in the project).
Selection of the incoming
circuit-breaker from the
database.
Selection of the outgoing
circuit-breaker from the
database.
Result – selectivity evaluation
based on the selectivity tables
specified in the power circuit-
breaker catalogue.

8/17/2019 XSpider 2.13 en Reference Manual
http://slidepdf.com/reader/full/xspider-213-en-reference-manual 133/236
_______________________________________________________________________________
_______________________________________________________________________________________________________________________
xSpider, Reference manual 125
2. If no cascades were defined for the project, a dialogue panel will open requesting the user to
specify their definition (see Chap.14.4.1). An incoming circuit-breaker must be defined for
every node where the line splits (a node constituted by the “Switchboard trunk” component).
For radial networks, cascades are defined automatically.
3. Where the cascades have already been defined, a dialogue panel with the results is displayed.
All incoming circuit-breaker – outgoing-circuit breaker pairs are examined for every nodewhere the line splits (a node constituted by the “Switchboard trunk” component):
4.
Click on the Close icon or press Esc to close the dialogue panel.
Close the dialogue panel.
Print the list with results.
Interchange cascade settings
(determination of the incoming
circuit-breaker .
Comments on the results (limiting
conditions, where relevant ).
Drag the corners or the partition to change
the dialogue panel size.

8/17/2019 XSpider 2.13 en Reference Manual
http://slidepdf.com/reader/full/xspider-213-en-reference-manual 134/236
_______________________________________________________________________________
_______________________________________________________________________________________________________________________
126 xSpider, Reference manual
14.5 Displaying impedances in network nodes
The function allows you to view impedances in the particular network nodes, namely the positive-
sequence and zero-sequence components, and the impedance of the short-circuit loop Z sv for one-
phase short circuit. They can be shown optionally either in the form of absolute values or complex
numbers, depending on the set Options (see Chap. 21.4). The displayed impedances are not
corrected by any coefficients and can be used as input data to solve the connected IT networks.
1. We assume that the network wiring diagram (topology) has been defined and all network
components have been dimensioned.
2. Click on the Calculation icon in the tool bar. Double click on the line called Show
impedance in network nodes in the list of computational algorithms under the All
calculations group.
3.
The calculation will be performed and the impedance values will be displayed in the wiring
diagram. This diagram can be printed out (see Chap. 18), or it is possible to draw a list of
components with the calculation results and print it out then (see Chap. 18), or to export it in a
data file (see Chap. 19).
Z1 - impedance in the given network node, positive-phasesequence component (absolute value).
Z0 - impedance in the given network node, zero-phase sequence
component (absolute value). For definition of the positive and
zero-phase sequence component of impedance see Chap. 3.4.
Zsv - impedance of the fault loop for a 1-phase short circuit as
defined by IEC 60364-4-41 (no coefficient applied).

8/17/2019 XSpider 2.13 en Reference Manual
http://slidepdf.com/reader/full/xspider-213-en-reference-manual 135/236
_______________________________________________________________________________
_______________________________________________________________________________________________________________________
xSpider, Reference manual 127
Display of the real and the imaginary impedance components activated (see Chap. 21.4):
Notes: The specified impedance values apply for the conductor temperature equivalent to the
ambient temperature.
The shown impedances represent values determined by calculation, which are not adjusted by
any coefficients.
The specified impedance values of Z(1) and Z(0) can be used for further calculations (such as in
the linked IT networks, isolated medical system, etc.)
By using the Options function (see Chap. 21.4) it is possible to:
Activate the display of the real and the imaginary components of impedances (show
impedances as complex numbers),
Activate the display of admittance matrices and other intermediate results of thecalculation.
14.6 Displaying the values of limit vo ltage drops, disconnection times andconnected phases
The properties of maximum voltage drop in the network node with respect to the power supply
voltage, the maximum voltage drop in the network branch and the maximum disconnection time of
the protective device are set locally for every component. Their editing is possible either within the
editing of every particular component (see Chap. 12.1) in batch (see Chap. 12.1.3). The entered
values can be displayed to ensure a better orientation and transparency.
1. Click on the Calculation icon in the tool bar. Double click on the line called Show
values of dUmax max. drops, … in the list of computational algorithms under the All
calculations group.
2.
The required values will be displayed in the wiring diagram. This diagram can be printed out
(see Chap. 18), or it is possible to draw a list of components with the calculation results and
print it out then (see Chap. 18), or to export it in a data file (see Chap. 19).
Positive-phase sequence component: real part,
imaginary part, absolute value.
Zero-phase sequence component: real part,
imaginary part, absolute value.
Fault loop for 1-phase short circuit:
real part, imaginary part, absolute value

8/17/2019 XSpider 2.13 en Reference Manual
http://slidepdf.com/reader/full/xspider-213-en-reference-manual 136/236
_______________________________________________________________________________
_______________________________________________________________________________________________________________________
128 xSpider, Reference manual
Cable tag.
Cable type, number of conductors, phase cross-section
(possibly + PEN cross-section if it is different from the
hase cross-section).
Cable length.
Method of cable installation, code laid down by
regulations (see Chap. 2.2.3-2.2.4).
Labeling of the connected phases in the branch:
3-phase connection: 4 dashes; 1-phase connection 2 dashes.
Maximum voltage dropin the network node.
The maximum voltage
drop in this line.
The maximum
disconnection time of the
rotective device.
Exact determination of
the connected phase.
If the load is connected
through one-phase, the
connected phase is shown,
as standard, as part of the
type designation.

8/17/2019 XSpider 2.13 en Reference Manual
http://slidepdf.com/reader/full/xspider-213-en-reference-manual 137/236
_______________________________________________________________________________
_______________________________________________________________________________________________________________________
xSpider, Reference manual 129
14.7 Summary of variables related to the calculations
Device parameters and general network parameters
Ur V Generator: Nominal voltage
Sr kVAGenerator: Nominal power
Xd' ' % Generator: Subtransient reactance
Un V Circuit-breaker: Nominal voltage
I u V Circuit-breaker: Nominal constant current
I cs kA Circuit-breaker: Operating breaking capacity
I cu kA Circuit-breaker: Limited breaking capacity
I r A Circuit-breaker: Overload release (see also Chap. 15.1)
t r s Circuit-breaker: Tripping time expressed as X-times Ir (see also Chap. 15.1)
I sd A Circuit-breaker: Delayed short-circuit release (see also Chap. 15.1)
t sd s Circuit-breaker: Delay time of delayed short-circuit release (see also Chap. 15.1)
I i A Circuit-breaker: Instantaneous short-circuit release (see also Chap. 15.1)
L M Cable: Length
Un V Cable: Nominal voltage
I n A Cable: Nominal current (in air, 30°C)
Tau s Cable: Heating time constant
I cw( 0. 1s) kA Cable: Short-time withstand current 0.1 s
R1 mW/ m Cable: Active resistance, positive-sequence network
X1 mW/ m Cable: Inductive reactance, positive-sequence network
R0 mW/ m Cable: Active resistance, zero-sequence network
X0 mW/ m Cable: Inductive reactance, zero-sequence network Ta °C Cable: Ambient temperature
- K. m/ W Cable: Specific thermal resistance of earth
k - Cable: User coefficient
Un V Compensation: Nominal voltage
Qn kVA Compensation: Capacitance reactive power
Qcal kVA Compensation: Calculated capacitance reactive power
Cn mF Compensation: Capacity (per 1 phase)
Un V Motor: Nominal voltage
Pn kWMotor: Nominal power
et a - Motor: Efficiency
I n A Motor: Motor nominal current
I s/ I n - Motor: Starting/nominal current ratio
cosPhi - Motor: Power factor
Ku - Motor: Utilization factor
dUmax % Motor: Maximum voltage drop (in node constituted by a motor)
Un V Fuse: Nominal voltage
I n A Fuse: Nominal current
I cn kA Fuse: Breaking capacity
L m Line – busbar system: Length
Ta °C Line – busbar system: Ambient temperature

8/17/2019 XSpider 2.13 en Reference Manual
http://slidepdf.com/reader/full/xspider-213-en-reference-manual 138/236
_______________________________________________________________________________
_______________________________________________________________________________________________________________________
130 xSpider, Reference manual
Un V Line – busbar system: Nominal voltage
I n A Line – busbar system: Nominal current (in air, 30°C)
Tau S Line – busbar system: Heating time constant
I cw( 0. 1s) kA Line – busbar system: Short-time withstand current 0.1s
R1 mW/ m Line – busbar system: Active resistance, positive-sequence network
X1 mW/ m Line – busbar system: Inductive reactance, positive-sequence network
R0 mW/ m Line – busbar system: Active resistance, zero-sequence network
X0 mW/ m Line – busbar system: Inductive reactance, zero-sequence network
Un V Supply network: Nominal voltage
Sk' ' MVA Supply network: Short-circuit power (3-phase short-circuit)
I k' ' kA Supply network: Impulse short-circuit current (3-phase short-circuit)
Sk1' ' MVA Supply network: Short-circuit power (1-phase short-circuit)
R1 W Supply network: Active resistance, positive-sequence network
X1 W Supply network: Inductive reactance, positive-sequence network
R0 W Supply network: Active resistance, zero-sequence network
X0 W Supply network: Inductive reactance, zero-sequence network
Un V Load: Nominal voltage
I n A Load: Nominal current
Pn kW Load: Nominal power
cosPhi - Load: Power factor
Ku - Load: Utilization factor
dUmax % Load: Maximum voltage drop (in node constituted by a load)
Ur 1 V Transformer: Nominal primary voltage
Ur 2 V Transformer: Nominal secondary voltageSr kVA Transformer: Nominal power
I nt r A Transformer: Nominal current
Pk kW Transformer: Short-circuit losses
uk % Transformer: Short-circuit voltage
Un V Switch-disconnector: Nominal voltage
I n A Switch-disconnector: Nominal current
I cw( 1s) kA Switch-disconnector: Short-time withstand current 1s
Uph/ Ud V/ V Network: Voltage system (phase voltage / delta voltage)
Uph V Network: Phase voltage
UphCal V Network: Calculated phase voltage
Ud V Network: Delta voltage
RA W TT network: Total resistance of the earth wire and guard wire of exposed
conductive parts in the node where the short circuit occurred
RB W TT network: Earth resistance of the source (node) centre
Voltage drops and load distribution calculation
Unode Voltage in the network node (absolute value)
dUnode Voltage drop in the network node in [%] relative to the power source voltage
dUnodeMax Maximum voltage drop in the network node in [%] relative to the power source voltage (limit
value defined by the user)

8/17/2019 XSpider 2.13 en Reference Manual
http://slidepdf.com/reader/full/xspider-213-en-reference-manual 139/236
_______________________________________________________________________________
_______________________________________________________________________________________________________________________
xSpider, Reference manual 131
dUwl Voltage drop in [%] in the network branch, i.e. voltage drop in the respective wiring line
dUwl Max Maximum voltage drop in [%] in the network branch, i.e. voltage drop in the respective wiring
line (limit value defined by the user)
I node Current consumed in the network node (absolute value)
I noder Active current consumed in the network node *)
I nodex Idle current consumed in the network node *)I wl Current flowing through the network branch (absolute value)
I wl r Active current flowing through the network branch *)
I wl x Idle current flowing through the network branch *)
I n Rated current of a network element in general
I nf Nominal current of a protective device (circuit breakers, fuses)
I 2, I 2f Conventional breaking current of circuit-breaker / fuse
I nc Rated current of a line (cable, busbar system)
I nI nst Cable nominal current with respect to the installation
cosPhi Power factor in the network node
Tet aA Ambient temperature (with definition of cable installation)
Tet aOp Maximum operating ambient temperature (with definition of cable installation)
Short-circuit calculation
I k3p’ ’ Initial impulse short-circuit current for 3-phase short circuit (effective value of the symmetric
alternating component at the moment of short-circuit occurrence, for remote short circuits
identical with the effective value of the steady short-circuit current)
I k2p’ ’ Initial impulse short-circuit current for 2-phase short circuit
I k2PE’ ’Initial impulse short-circuit current for 2-phase short circuit against ground, current flowing intothe ground
I k2L’ ’ Initial impulse short-circuit current for 2-phase short circuit against ground, current flowing
between phases
I k1p’ ’ Initial impulse short-circuit current for 1-phase short circuit against ground
I k Initial impulse short-circuit current (in general)
I km Surge short-circuit current (maximum instantaneous short-circuit current value allowed - height
of the first short-circuit current half-wave)
I t r Tripping short-circuit current
I ke1 Short-time withstand current 1s
I ke01 Short-time withstand current 0.1s Tt r Disconnection time of the protective device (disconnection of the fault point from the power
supply)
Tt r Max Maximum disconnection time of the protective device (disconnection of the fault point from the
power supply; limit value defined by the user)
I cu Nominal breaking capacity of the protective device (the device can disconnect this current
repeatedly without damage)
I cs Limit breaking capacity of the protective device (the device disconnects the specified current,
however, it may be damaged).
I cn Fuse breaking capacity
I kcas Breaking capacity of cascade circuit-breaker/circuit-breakerI cw01s Rated short-time withstand current, i.e. the current, which the equipment can transmit for the
period of 0.1 second without damage

8/17/2019 XSpider 2.13 en Reference Manual
http://slidepdf.com/reader/full/xspider-213-en-reference-manual 140/236
_______________________________________________________________________________
_______________________________________________________________________________________________________________________
132 xSpider, Reference manual
I cw1s Rated short-time withstand current, i.e. the current, which the equipment can transmit for the
period of 1 second without damage
I o Limited short-circuit current behind fuse. Peak value of the short-circuit current, which is let
through by the fuse
Impedances
R1 Resistance of positive-phase sequence component system as viewed from the short-circuit point *)
X1 Reactance of positive-phase sequence component system as viewed from the short-circuit point *)
Z1 Impedance of positive-phase sequence component system as viewed from the short-circuit point *)
R0 Resistance of zero-phase sequence component system as viewed from the short-circuit point *)
X0 Reactance of zero-phase sequence component system as viewed from the short-circuit point *)
Z0 Impedance of zero-phase sequence component system as viewed from the short-circuit point *)
Rsv Fault loop resistance for one-phase short circuit *)
Xsv Fault loop reactance for one-phase short circuit *)
Zsv Fault loop impedance for one-phase short circuit *)
*) In order to view the active and idle components of currents and impedances, you need to enable
this function in the Options (see Chap. 21.4).

8/17/2019 XSpider 2.13 en Reference Manual
http://slidepdf.com/reader/full/xspider-213-en-reference-manual 141/236
_______________________________________________________________________________
_______________________________________________________________________________________________________________________
xSpider, Reference manual 133
15. Tripping Characteristics _______________________________________________
The module designed for working with the tripping characteristics is a module associated with the
xSpider software. It can be used both on a fully separate basis independently of the network projectas well as in combination with the currently edited project. The module allows you to:
Select devices from the database, display tripping characteristics of protective devices with
respect to release setting, read the disconnection time and assess selectivity;
Display the ampere-second heating characteristics of cables with a view to the cable
installation method and the ambient temperature; assign a protective device to the cable in
order to ensure cable protection in the rated operating state as well as under overload;
Display the tripping characteristics of protective devices and cables from the currently edited
project; option to adjust the setting of releases – changes are transferred back into the project;
Save sets of characteristics independently of the network project, print to printer.
Module launch: select the Tripping Characteristics item from the Tools drop-down menu
or click on the Tripping Characteristics icon in the tool bar. The module can be launched
also in a situation when no network project is activated. The basic module screen:
Values of current or time, as
the case may be,
corresponding to the currentosition of the mouse pointer.
Window size can be changed bydragging the corners.
Tools for window handling
(maximize, close).
Values
corresponding
to the clicked
oints in the
chart and
difference
between points
(right click to
delete the
oints).
Tool bar – set of functions
or module operation.
Tripping char.
of the protective
device
Ampere-second
char. of the
cable
3 lines above the chart are
available for tags.
Points clicked
by the left
button todetermine the
values.

8/17/2019 XSpider 2.13 en Reference Manual
http://slidepdf.com/reader/full/xspider-213-en-reference-manual 142/236
_______________________________________________________________________________
_______________________________________________________________________________________________________________________
134 xSpider, Reference manual
15.1 Plotting the characteristics of circuit breakers from the database
The module of tripping characteristics enables the user to select a protective device from the
database independently of the currently edited network project and to plot its tripping characteristic
with respect to release settings.
1. We assume that the module of tripping characteristics has already been activated (see Chap. 15).
2.
Click on the Insert Circuit Breaker… icon in the tool bar.
3.
The circuit-breaker database explorer is activated. For description of the database
explorer see Chap. 16.1. Select the device, the characteristic of which you would like to be
plotted and click Insert.
4. A dialogue panel will open, in which you enter the tag, curve color and release settings:
5.
Close the dialogue panel by clicking OK. The tripping characteristic is plotted in a chart. The
curve color, tag and release settings can be modified at a later point in time (see Chap. 15.5).
Notes:
Line characteristics are given for all the circuit-breakers.
For large circuit-breakers, the behaviour of the characteristics, after the Isd release, possibly Ii
release has acted, is somewhat simplified and is replaced with polylines.
Identification of the parameters of releases:
Parameter Previous identification
(NZM 7,10)
New identification
(NZM 1-4, IZM, etc.)
Overload release (thermal, overcurrent release), L-curve I I
Tripping time, as an X-multiple of I t t
Short-circuit release, delayed, S-curve I rmv I sd
Short-circuit release delay t v t sd
Short-circuit release, non-delayed I rm I i
Setting of releases, only those
arameters can be set, which are
allowed to be changed for the given
type of the release.
Concrete value, to which the
respective release is set.
Curve color setting.
The currently set curve color.
Tag identifying the curve in the chart.
Any text can be specified.
Tag position; number of the line above
the chart, where the tag will be placed.
A component inserted directly from
the database has no linkage to the
wiring diagram.

8/17/2019 XSpider 2.13 en Reference Manual
http://slidepdf.com/reader/full/xspider-213-en-reference-manual 143/236
_______________________________________________________________________________
_______________________________________________________________________________________________________________________
xSpider, Reference manual 135
Selections of the tr switch disconnector and of the I2t function:
Selection Meaning
L: tr=ON
tr = according to
the selection
L-curve – the overload release (thermal, overcurrent release) switched on;
the tr value (tripping time as an X-multiple of Ir ) set according to the selection
L: tr=OFF
tr = infinite value
L-curve – the overload release switched off (thermal, overcurrent release);
the t setting (tripping time as an X-multiple of I ) ignored (tr = ∞)
L: I2t L-curve – the overload release switched on (thermal, overcurrent release);
the tr value (tripping time as an X-multiple of Ir ) set according to the selection, inclination of the
curve according to the I2t function
L: I4t L-curve – the overload release switched on (thermal, overcurrent release);
the tr value (tripping time as an X-multiple of Ir ) set according to the selection, inclination of the
curve according to the I4t function
S: I2t=OFF S-curve – short-circuit release, the I2t function switched off
S: I2t=ON S-curve – short-circuit release, the I2t function switched on
L: tr=OFF; S: I2t=OFF
L: I4t; S: I2t=OFF
L: I2t; S: I2t=OFF
L: I2t; S: I2t=ON
L: I2t; S: I2t= OFF
S-curve
(short-circuit
release)
L-curve
Overload release
(thermal,
overcurrent release)
L: tr=OFF; S: I2t=OFF
L: tr=ON; S: I2t=OFF
L: tr=ON; S: I2t=ON
IZM circuit breakers, -U, -D releases NZM circuit-breakers, -VE release

8/17/2019 XSpider 2.13 en Reference Manual
http://slidepdf.com/reader/full/xspider-213-en-reference-manual 144/236
_______________________________________________________________________________
_______________________________________________________________________________________________________________________
136 xSpider, Reference manual
15.2 Plotting the characteristics of fuses from the database
1. We assume that the module of tripping characteristics has already been activated (see Chap. 15).
2.
Click on the Insert Fuse… icon in the tool bar.
3.
The fuse database explorer is activated. For description of the database explorer see
Chap. 16.1. Select the device, the characteristic of which you would like to be plotted andclick Insert.
4. A dialogue panel will open, in which you enter the tag and the curve color:
5.
Close the dialogue panel by clicking OK. The tripping characteristic is plotted in a chart. The
curve color and the tag can be modified at a later point in time (see Chap. 15.5).
15.3 Plotting the characteristics of cables from the database
The module of tripping characteristics enables the user to select a cable from the database
independently of the currently edited network project and to plot its ampere-second heatingcharacteristic with respect to its installation method and the ambient temperature. In combination
with the tripping characteristics of protective devices, it is then possible to assess the cable overload
protection.
1. We assume that the module of tripping characteristics has already been activated (see Chap. 15).
2.
Click on the Insert Cable… icon in the tool bar.
3.
The cable database explorer is activated. For description of the database explorer see
Chap. 16.1. Select the cable, the characteristic of which you would like to be plotted and click
Insert.
4.
A dialogue panel will open, in which you enter the tag, curve color and cable installationmethod (the installation method limits the current-carrying capacity of the cable; only the
typical and most frequently used installation methods are available):
Curve color setting.
The currently set curve color.
Tag identifying the curve in the chart.
Any text can be specified.
Tag position; number of the line above
the chart, where the tag will be placed.
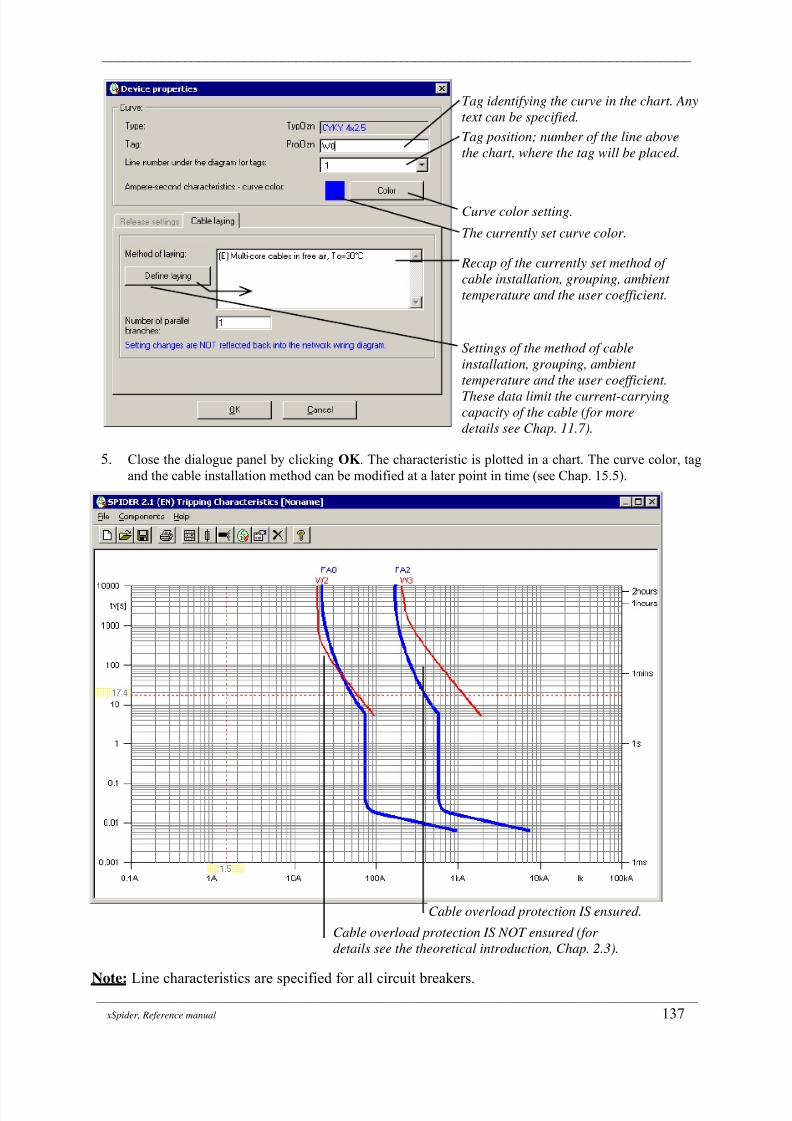
8/17/2019 XSpider 2.13 en Reference Manual
http://slidepdf.com/reader/full/xspider-213-en-reference-manual 145/236
_______________________________________________________________________________
_______________________________________________________________________________________________________________________
xSpider, Reference manual 137
5. Close the dialogue panel by clicking OK. The characteristic is plotted in a chart. The curve color, tag
and the cable installation method can be modified at a later point in time (see Chap. 15.5).
Note: Line characteristics are specified for all circuit breakers.
Settings of the method of cable
installation, grouping, ambient
temperature and the user coefficient.These data limit the current-carrying
capacity of the cable (for more
details see Chap. 11.7).
Curve color setting.
The currently set curve color.
Tag identifying the curve in the chart. Any
text can be specified.
Tag position; number of the line above
the chart, where the tag will be placed.
Cable overload protection IS ensured.
Cable overload protection IS NOT ensured (for
details see the theoretical introduction, Chap. 2.3).
Recap of the currently set method of
cable installation, grouping, ambient
temperature and the user coefficient.

8/17/2019 XSpider 2.13 en Reference Manual
http://slidepdf.com/reader/full/xspider-213-en-reference-manual 146/236
_______________________________________________________________________________
_______________________________________________________________________________________________________________________
138 xSpider, Reference manual
15.4 Plott ing the characteristics of circuit breakers/fuses/cables taken over from thenetwork project
The module for working with the tripping characteristics allows you to take over information about
the diagram components from the currently edited network project and to display any combination
of the tripping characteristics. Thus it is possible to assess the selectivity and cable overload
protection or to fine tune the required settings, as the case may be.
1. We assume that the network, from which we want to take over the characteristics, is open and
set as the currently active project (see Chap. 20.2 and 10.1).
2. We assume that the module of tripping characteristics has already been activated (see Chap. 15).
3. Click on the Insert Device/Cable from Network Project… icon in the tool bar.
4.
A list of protective device / cable pairs will be displayed, which are available in the
current network project. Double click on the line with the device, the characteristic of which
you want to see.
5.
A dialogue panel will open, in which you enter the curve color and the tag position first for
the protective device and then for the cable. It is also possible to edit the settings of the
circuit-breaker releases and the cable installation method.
Type and tag identifying the curve in the chart.
Taken over from the network project; changes
are not recommended.
Cable type.
Circuit-breaker or fuse type.
Cable tag.
Circuit-breaker or fuse tag
Curve color setting.
Not a cable, but a busbar system is connected
behind this circuit breaker; the ampere-second
heating characteristic cannot be displayed for
busbar systems, therefore, only the circuit breaker
is specified.
The currently set curve color.
Tag position; number of the line above thechart, where the tag will be placed.
Settings of the releases of the protective
component, which have been taken over from
the network project; it is possible to carry out
correction of the settings, the changes will be
transferred back into the network wiring
diagram. See the notes at the end of Chapter
15.1 as well.
Cancel means that the circuit-breaker
characteristic will not be inserted (but the
cable characteristic set in the following step
can be inserted).
Dialogue for protective device
(circuit breaker or fuse).

8/17/2019 XSpider 2.13 en Reference Manual
http://slidepdf.com/reader/full/xspider-213-en-reference-manual 147/236
_______________________________________________________________________________
_______________________________________________________________________________________________________________________
xSpider, Reference manual 139
6. The curves will be plotted in a chart. Once again, the list of protective device / cable pairs will
be displayed, which are available in the current network project.
7.
Repeat steps 4 and 5 until you enter all required characteristics. In order to maintain
transparency, it is not recommended to insert a higher number of curves into one chart.
8. Click on the Close button to exit the list of protective device / cable pairs.
Notes:
The curve color and the tag can be modified at a later point in time (see Chap. 15.5).
The settings of circuit-breaker releases or cable installation methods, as the case may be, can
be modified at a later point in time (see Chap. 15.5).
A curve can be erased from the chart (see Chap. 15.6).
The set of curves can be saved completely independently of the network project (see Chap.
15.8.1). Any arbitrary number of characteristics sets can be created for one network.
A set of characteristics created by its transfer from a network project can be supplemented
with characteristics of protective devices and cables inserted freely from the database (see
Chap. 15.1-15.3).
15.5 Editing the properties of an already plotted characteristic
1. We assume that the module of tripping characteristics has already been activated (see Chap.
15) and that at least one curve is plotted in the chart.
2. Select the Properties item from the Components drop-down menu or click on the
corresponding icon in the tool bar.
3.
A list of components will be displayed, the characteristics of which are shown in the chart.
Double click on the line with the component, the characteristic of which you want to edit(select the characteristic based on the tag or type of the pertinent component or according to
the curve color - the colored square in the right column next to the type designation).
Dialogue for cable.
Type and tag identifying the curve in the chart.
Taken over from the network project; changes
are not recommended.
Curve color setting.
The currently set curve color. The program
automatically offers the same color as for the
rotective device. A change is recommended.
Tag position; number of the line above the chart,
where the tag will be placed. It is automatically
increased with respect to the protective device.
Settings of the cable installation, which have
been taken over from the network project;
correction of the settings can be carried out
(see Chap. 11.7), the changes will be
Cancel means that the cablecharacteristic will not be inserted (but
the circuit-breaker characteristic as set
in the previous step will be inserted). Information about the linkage to the wiring diagram
(saying whether the changes carried out will or will not
be transferred back into the network wiring diagram).

8/17/2019 XSpider 2.13 en Reference Manual
http://slidepdf.com/reader/full/xspider-213-en-reference-manual 148/236
_______________________________________________________________________________
_______________________________________________________________________________________________________________________
140 xSpider, Reference manual
4.
A dialogue panel will open in the form identical to the one shown when inserting a
component from the database (see Chap. 15.1 - 15.3). The appearance of the dialogue panel
depends on the component type. The tag, tag position and curve color can be edited for all
components. For protective devices, the release settings can be modified (where possible in
view of the respective component). In addition, an Apply button is available to view the
impact of the parameter change on the curve, without having to leave the dialogue panel. For
cables, the method of installation, grouping, ambient temperature and the user coefficient can
be modified. Attention: In case of cables, where a component was taken over from a network
project, these modifications will not be reflected back in the wiring diagram.
5.
Close the dialogue panel by clicking OK. The performed changes will be reflected in the
chart immediately. Now go back to the list of components.
6.
Repeat steps 3-5 until you edit all desired characteristics.
7. Click Close to exit the list of components, the characteristics of which are shown in the chart.
15.6 Erasing an already plot ted characterist ic from the chart
1.
We assume that the module of tripping characteristics has already been activated (see Chap.
15) and that at least one curve is plotted in the chart.
2. Select the Erase item from the Components drop-down menu or click on the
corresponding icon in the tool bar.
3. A list of components will be displayed, the characteristics of which are shown in the chart.
Double click on the line with the component, the characteristic of which you want to erase
(select the characteristic based on the tag or type of the pertinent component or according to
the curve color - the colored square in the right column next to the type designation).
4. The characteristic will be erased from the chart. Now go back to the list of components.
5.
Repeat steps 3-4 until you erase all desired characteristics.6. Click Close to exit the list of components, the characteristics of which are shown in the chart.
15.7 Printing the sets of characteristics to pr inter
1. We assume that the module of tripping characteristics has already been activated (see Chap.
15) and that at least one curve is plotted in the chart.
2. We assume that information has been entered in the description field (title block) by using the
Information about Project function (see Chap. 17).
3.
Select the Print item from the File drop-down menu or click on the corresponding iconin the tool bar.
Colored square, its color corresponds to the
curve color.
Exit the properties editing mode.
Editing of properties of the selected component in thesame dialogue panel as when inserting components
rom the database (see Chap. 15.1-15.3).
Component selected for further editing. Tip:
Double click on the selected line = start editing.

8/17/2019 XSpider 2.13 en Reference Manual
http://slidepdf.com/reader/full/xspider-213-en-reference-manual 149/236
_______________________________________________________________________________
_______________________________________________________________________________________________________________________
xSpider, Reference manual 141
4. A dialogue panel will open, in which you set the required number of copies. You can also
modify the print parameters (such as select color print):
5. A dialogue panel will open, in which you select the printer type and paper format (standard
A4 format is set as default). The dialogue panel appearance depends on the version of the
Windows operating system used (for more details see the Windows operating system
manual).
15.8 Working with files
A set of characteristics can be continuously saved to a data file on your hard disk in order to keep
the data for future editing. The created files are fully independent on the currently edited network
project. All information is in a single file with the standard *. SPC extension and the name of the
file is determined by the user All operations with the files can be carried out by using the functions
from the File drop-down menu or by means of the icons in the tool bar.
15.8.1 Saving a set of characterist ics to f ile
The current state of a set of characteristics can be saved to a file
located on the hard disk by means of the Save and Save As…
functions from the File drop-down menu.
When calling the Save function for the first time with no file
name specified before, the user is required to enter the file name
and directory (folder), where the file is to be saved. During the second
and next calls of this function, all changes to the design are automatically saved to the data file, thename of which was entered during the first function activation. The current name of the edited file
is shown in the top part of the Tripping Characteristics dialogue panel.
Setting the parameters for list generation and print (such as
enabling the color print), for more details see Chap. 21.1.
Information about the currently set output devicetype, to which the characteristics will be printed.
Setting the number of copies. The number of copies
specified here is never recorded in the print driver and,
therefore, does not affect printing from other programs.
Changing the properties of the currently set
output device type, to which the characteristics
will be printed (changing the type, port, paper
size, paper orientation, ...).
Always leave the value 1 here (the required number of
copies was already set in the previous step).
Execution of the print to the currently set
output device type.
Forced interruption of the function without
rint execution.

8/17/2019 XSpider 2.13 en Reference Manual
http://slidepdf.com/reader/full/xspider-213-en-reference-manual 150/236
_______________________________________________________________________________
_______________________________________________________________________________________________________________________
142 xSpider, Reference manual
When using the Save As … function, the user is always required to enter the file name and
directory (folder), where the file is to be saved with every call of this function. In this manner it is
possible, for instance, to save the current design to a file with different name, thus, copying the
original design to be used for further editing. The name of the currently edited file is shown in the
top part of the Tripping Characteristics dialogue panel.
The name of the edited file is shown in the top part of the Tripping Characteristics dialogue panel.
15.8.2 Loading (opening) files with sets of characteristics
A previously created data file, which includes a set of characteristics, can be loaded by
means of the Open function from the File drop-down menu. First of all, the system performs
the default state settings - checks whether the currently opened design was saved. If this is
not the case, it will generate a message asking about its saving (see Chap. 15.8.3). In the next step,
the user is asked for the directory (folder) and the file name:
Setting the structure – format
of the output file.
Name of the edited file
Files of the same type in the
current directory (folder).
Setting the directory (folder), into
which the file is to be saved.
Name of the file, to which the project isto be saved. The .SPC extension will be
added automatically.
Moving one level higher in the
directory (folder) tree.
Creating a new directory (folder).
Setting the method of representation of
iles in the currently open directory
(folder) – either as icons or as a list.
Setting the structure – format
of the opened file.
Files with the existing projects in the
current directory (folder). Click on the
ile name you want to open.
Setting the directory (folder), from
which the file is to be loaded.
Name of the file you want to open, the .SPC
extension does not have to be specified.
Moving one level higher in the
directory (folder) tree.
Setting the method of representation of
iles in the currently open directory
(folder) – either as icons or as a list.

8/17/2019 XSpider 2.13 en Reference Manual
http://slidepdf.com/reader/full/xspider-213-en-reference-manual 151/236
_______________________________________________________________________________
_______________________________________________________________________________________________________________________
xSpider, Reference manual 143
The loaded file can be edited in any manner by using the tools of the Tripping Characteristics
module associated with xSpider.
15.8.3 Creating a new set of characterist ics
If you would like to start editing a new set of characteristics = set the Tripping
Characteristics module to its default state, use the New command from the File drop-down
menu. First of all, the system checks whether the currently opened design was saved. If this is not
the case, it will generate a message asking about its saving:
Depending on the user’s response, it will set the default state of the program (identical situation as
if you exit the Tripping Characteristics module - see Chap. 15.8.6 and launch it again - see Chap.
15).
15.8.4 Export ing the sets of characterist ics to BMP file format
The image depicting the current state of the tripping characteristics set can be exported to a file in
BMP format (bitmap, raster image). The image in this universal format can be then imported e.g. in
the Microsoft Word text editor and alike.
1. We assume that the module of tripping characteristics has already
been activated (see Chap. 15) and that at least one curve is plotted
in the chart.
2. By dragging its edges, set the dimensions of the chart window to
obtain a suitable size. The image in the BMP file will have the
same size as the chart window at the moment of its export.
3. Select the Export item from the File drop-down menu.
4. A dialogue panel will open (similar to that opening with the Save
function, see Chap. 15.8.1), in which you select the “Raster image (*.BMP)” as the format of
the output file by choosing the respective option from the list of formats available.
5.
Enter the file name and the directory (folder), into which the exported image is to be saved.
Calls the Save function automatically (see Chap. 20.1) in
order to save the current state of the design to your hard
disk. Afterwards it continues in the New function.
Does not save the current state of the design anywhere
and continues directly in the New function.
Forced interruption of the function, nothing happens
and it is possible to continue in further editing of the
current ro ect.

8/17/2019 XSpider 2.13 en Reference Manual
http://slidepdf.com/reader/full/xspider-213-en-reference-manual 152/236
_______________________________________________________________________________
_______________________________________________________________________________________________________________________
144 xSpider, Reference manual
6. Click Save to close the dialogue panel. The image with the set of characteristics will be
exported to the data file.
15.8.5 Export ing a set of characterist ics to DXF file format
xSpider allows you to export graphics to DXF (universal exchangeable format for CAD systems).
This also makes possible the subsequent import of charts to CAD systems supporting DXF format
(such as AutoCAD). Graphics breakdown to levels, colors and line types is supported. Basic
information about the project is attached. Alternatively, the possibility of exporting the graphics to
BMP (raster format) remains – see Chap. 15.8.4.
1.
We assume that the module of tripping characteristics hasalready been activated (see Chap. 15) and that at least one curve
is plotted in the chart.
2. Select the Export item from the File drop-down menu (or press
keyboard shortcut Ctrl+E).
3. A dialogue panel will open (similar to that opening with the
Save function, see Chap. 15.8.1), in which you select the “DXF
file (*.DXF)” as the format of the output file by choosing the
respective option from the list of formats available. DXF is
offered as default in standard.
4. Enter the file name and the directory (folder), into which the exported image is to be saved.
5.
Click Save to close the dialogue panel. The chart will be exported to the data file. Provided
the export was completed successfully, the final message appears as follows:
Notes:
In Settings under the System tab, it is possible to define the DXF file compatibility with
various AutoCAD versions (see Chap. 21.1). It is advisable to change the setting if you have
difficulties with loading the created DXF file.
Output file format. Select the
„Raster image (*.BMP)“ to
export to BMP.
Name of the file, to which the
image is to be saved. The file
name with the set ofcharacteristics is offered as
default.

8/17/2019 XSpider 2.13 en Reference Manual
http://slidepdf.com/reader/full/xspider-213-en-reference-manual 153/236
_______________________________________________________________________________
_______________________________________________________________________________________________________________________
xSpider, Reference manual 145
The full RGB system color range can be used in xSpider. When exporting to DXF, the colors
are converted into ACI system. After loading the DXF file into the target program, the colors
might not correspond precisely to the xSpider settings.
15.8.6 Ending the Tripping Characteristics module session
If you would like to terminate your work with the Tripping Characteristics module, use the Exit
command from the File drop-down menu or close the main module window by clicking on the X in
the upper right corner. First of all, the system checks whether the currently opened design was
saved. If this is not the case, it will generate a message asking about its saving (see Chap. 15.8.3).
Afterwards it will terminate the Tripping Characteristics module and return you to the xSpider
environment.

8/17/2019 XSpider 2.13 en Reference Manual
http://slidepdf.com/reader/full/xspider-213-en-reference-manual 154/236

8/17/2019 XSpider 2.13 en Reference Manual
http://slidepdf.com/reader/full/xspider-213-en-reference-manual 155/236
_______________________________________________________________________________
_______________________________________________________________________________________________________________________
xSpider, Reference manual 147
3. Find the desired device type in the database tree structure. Search in the tree is identical to
that in the tree of directories in the Windows Explorer:
An item beginning with the „+“ sign is rolled up (it includes additional sub-branches,
which are not shown). To roll down the item menu (and to view its sub-branches) double
click the respective item (or click on the „+“ sign).
An item beginning with the „-“ sign is rolled down (all its sub-branches are shown on the screen).To roll up the item menu double click the respective item (or click on the „-“ sign).
Click on any branch once to view more detailed information about the branch in the
items on the right side from the tree.
Now you want to find your device - circuit breaker (B char., 16 A, 3-pole, 6 kA breaking
capacity):
Double click on the „Modular circuit breakers, PL type“- the tree covered within this branch
will roll down.
Double click on the „Circuit breakers, breaking capacity 6 kA, PL6 type“.
Double click on the „B characteristics“ branch Click once on the „3-pole“ branch - now you are already located on the end sub-branch of
the tree and the table of the available devices is shown on the right.
Select the suitable type (16 A) from the table - by means of the horizontal and vertical
scroll bars it is possible to view the hidden parts of the table.
Click with your right mouse button on the data table. Select the Abbreviation Legend
item from the pop-up context menu - a dialogue panel will open which contains
explanations of meaning for the variable abbreviations used in the data table head.
By dragging the edge and the partition, it is possible to modify the size of the dialogue
panel and its columns.
Selection of the komponent type from the tree
of options. Tree control:
double click on a branch = roll down/up
single click on a branch = select the branch
Data table with specific
types of components in
the given branch.
The selected component,
actions of other buttons
relate to this component.
Insertion of the selected component in the network project.
End of work with the database
without inserting anycomponent in the project.
The dialogue panel size can be
changed by dragging its edges.
User modifications of
the data table, see
Chap. 16.2.
User modifications of
the database tree, see
Chap. 16.2.
Scroll bar to view the
hidden parts of the
data table.
Double click on the
selected line = Insert.
The window size can be changed
by dragging the partition.

8/17/2019 XSpider 2.13 en Reference Manual
http://slidepdf.com/reader/full/xspider-213-en-reference-manual 156/236
_______________________________________________________________________________
_______________________________________________________________________________________________________________________
148 xSpider, Reference manual
Right click on the database tree or the data table to activate the context menu, which
includes the Abbreviation Legend for explanation of meaning of the variable
abbreviations used in the data table header.
4. Double click on the selected line - by doing so you insert the device from the database into the
network project (all items in the dialogue panel will be set according to properties of theselected device). In order to insert the device, you can - alternatively - use the Insert button or
the Insert item from the context menu activated by right clicking your mouse in the data table.
16.2 Database modifications by the user
All databases are built as open-end system with the possibility of modifications and additions made
by the user. It is possible to edit both the database tree as well as items in the data table. The part of
the database supplied as standard together with the program (the so-called parent database) cannot
be edited. However, it can be copied to the user-defined database part (the „User-defined“ branch)
and here it can be modified in any way. The user shall be responsible for the correctness of the user-added data and calculations performed on the basis of these data.
The databases are independent of the currently open network project and modifications in the
database will remain saved even after you close down the program. Before you start to fill the
database, we advise you to think over its structure very carefully. The following principles apply:
Components of the same type and same properties should be included in a single branch.
Do not mix different types of components within one branch (such as circuit breakers and
residual current protective devices).
When defining the database tree, it is advisable to look for inspiration in the parent
database tree. The database tree can have the maximum of 10 branches.
The user database includes no graphics; it is not possible to attach any drawing, diagram etc.
1. Select the Database item from the Tools drop-down menu or click on the
corresponding icon in the tool bar.
2. In the subsequently opened dialogue panel, select the database to be edited and click OK. The
description below refers to the circuit-breaker database. However, it applies accordingly to
other databases as well.
3a. Creating a new branch in the database tree:E.g. you need to add different (sub)branches to
the „User-defined“ branch in order to obtain a
tree with the configuration as shown above in
the figure.
a) First of all, you create the „Circuit-
breakers, S series“ branch, which is on the
same level as the „Circuit-breakers, A
series“ branch. Double click on the „User-defined“ branch to roll down the tree. Select the
„Circuit-breakers, A series“ branch (one click) - newly created branches are alwaysinserted behind (under) the currently selected branch.
Nominal current up to 120 A
User - def i ned - Exampl e 1
Nominal current up to 64 A
Circuit-breakeres, S series
Ci r cui t - breaker s, A ser i es
Mot . st ar t er s
User- def i ned
New
branches

8/17/2019 XSpider 2.13 en Reference Manual
http://slidepdf.com/reader/full/xspider-213-en-reference-manual 157/236
_______________________________________________________________________________
_______________________________________________________________________________________________________________________
xSpider, Reference manual 149
b)
Click on the Add button in the Tree Editing group. A dialogue panel will open, in which
you type the name of the new branch (i.e. „Circuit-breakers, S series“ and set the level of
the new inserted branch to Same (= the same level as the currently selected branch):
Close the dialogue panel by clicking OK. The new branch will be inserted.
Name (description) of the new inserted branch,
text free of choice with max. 50 characters.
Level of the new inserted branch in relation
to the currently selected branch.
Copying the currently selected line from the data table to clipboard.
Sorting the data table according to various criteria (description, type, ..)
Pasting the line of data from the clipboard
to the data table behind the selected line.
Deleting the selected data line from the database
Editing the selected data line (data modification).
Insertion of a new data line in the
database to the selected branch.
Deleting the selected branch from the database;
all data included in the branch will be destroyed
as well when the branch is deleted.
Insertion of a new branch in the database tree. The new branch will be
inserted behind the selected branch and can be at the same or lower level
Modification of the description of the selected branch of the database
Parent database,
neither the tree northe data items can
be edited.
User database, new
branches can be
added and data items
can be inserted toevery branch.

8/17/2019 XSpider 2.13 en Reference Manual
http://slidepdf.com/reader/full/xspider-213-en-reference-manual 158/236
_______________________________________________________________________________
_______________________________________________________________________________________________________________________
150 xSpider, Reference manual
c) Now add the „Nominal current …“ sub-branches, which are on the level being one lower.
Select the newly inserted „Circuit-breakers, S series“ branch (one click).
d)
Click on the Add button in the Tree Editing group. A dialogue panel will open, in which
you type the name of the new branch (i.e. „Nominal current up to 64 A“ and set the level
of the new inserted branch to One lower (= another/lower level behind the currently
selected branch). Close the dialogue panel by clicking OK. The new branch will beinserted.
e) Select the newly inserted „Nominal current up to 64 A“ branch (one click).
f)
Click on the Add button in the Tree Editing group. A dialogue panel will open, in which
you type the name of the new branch (i.e. „Nominal current up to 120 A“ and set the level
of the new inserted branch to Same (= the same level as the currently selected branch).
Close the dialogue panel by clicking OK. The new branch will be inserted.
3b. Renaming a branch in the database tree: You need to rename the „User-defined“ branch to
„Switching devices“:
a)
Select the branch in the database tree, the name of which you want to change. b) Click on the Edit button in the Tree Editing group. A dialogue panel will open, in which
you type the new name of the branch. Close the dialogue panel by clicking OK. The
branch will be renamed. Note: the branch level cannot be modified by editing; the branch
must be deleted and created again at the new desired level.
3c. Deleting a branch in the database tree: E.g. you need to delete the „User-defined - Example 1“
branch including all its sub-branches and including all data contained in the branch and the
sub-branches.
a) Select the branch in the database tree, which you want to delete.
b)
Click on the Delete button in the Tree Editing group. Due to the irreversible nature of the performed operation, the system asks:
If you answer by clicking Yes, the selected branch will be deleted including all its sub-
branches and including all data contained in the branch and the sub-branches. The effect ofthis operation cannot be undone in any manner.
4a. Inserting a new component in the database to a given branch: E.g. you need to add the device
„S-series circuit-breaker, 3+N pole, I n=40 A, S40/ 3+N type“ in the „Circuit-breakers, S
series“ - „Nominal current max. 63 A“ branch.
a)
Select the branch in the database tree, to which you want to insert the desired device. In
case this branch does not exist, you need to create it by following the instructions provided
under 3a. It is advisable for this branch to be the end branch of the tree, but it is not a must.
b) Click on the Add button in the Data Table Editing group. A dialogue panel will open, in
which you enter all required data defining the component.

8/17/2019 XSpider 2.13 en Reference Manual
http://slidepdf.com/reader/full/xspider-213-en-reference-manual 159/236
_______________________________________________________________________________
_______________________________________________________________________________________________________________________
xSpider, Reference manual 151
c)
Close the dialogue panel by clicking OK. The new device will be added to the end of the
data table.
4b. Inserting a new device in the database to a given branch by copying an existing device: E.g.you need to add the device „S-series switch-disconnector, 3+N pole, I n=63 A, S63/ 3+N
type“ in the „Circuit-breakers, S series“ - „Nominal current up to 64 A“ branch. As you can
see all device parameters are identical with those of the device inserted in item 4a, except for
the differing nominal current. In this manner it is also possible to copy items from the parent
database in the „User-defined“ branch.
a) Select the branch in the database tree, to which you want to insert the new device (in our
case the „Circuit-breakers, S series“ - „Nominal current max. 63 A“ branch). A list of
already defined devices will be shown in the data table.
b) Select the device in the data table, which you want to copy.
c) Click on the Copy button in the Data Table Editing group. The selected line will be
copied to clipboard.
d) Select the device in the data table, behind which you want the line copy to be inserted.
e) Click on the Paste button in the Data Table Editing group. The line will be pasted from
the clipboard into the data table behind the currently clicked line.
f) Modify the data in the selected line - see procedure described in item 4c.
4c. Modifying data of an existing device in the database: E.g. you need to modify the copy
created by the procedure under item 4b:
a) Select the branch in the database tree where the device is located, which you want to
modify. b) Select the device in the data table, which you want to modify.
c) Click on the Edit button in the Data Table Editing group. The same dialogue will appear
as the one opening when defining a new device (see procedure under item 4a), with the
current data about the edited device being pre-filled in the particular fields. These fields
can be edited in any desired way. Modify the data. Close the dialogue panel by clicking
OK. The data will be recorded in the database. CAUTION: the data concerned will be
changed in the database, however, the data in the already inserted device units used in the
network project will not be edited !
4d. Deleting a device from the database:
a) Select the branch in the database tree where the device is located, which you want to delete.
b) Select the device in the data table, which you want to delete.
The number of parameters varies
depending on the component type
(see Chap. 16.3); it is necessary
to pay attention in particular to
the units, in which the individual
data are specified (V, A, kA, ...).
One of the offered options must
be selected for properties
encoded in the database. Other
options cannot be added in the
rogram environment.

8/17/2019 XSpider 2.13 en Reference Manual
http://slidepdf.com/reader/full/xspider-213-en-reference-manual 160/236
_______________________________________________________________________________
_______________________________________________________________________________________________________________________
152 xSpider, Reference manual
c)
Click on the Delete button in the Data Table Editing group. The system will ask you
whether you are sure you want to delete the selected device from the database. If you
confirm the deletion, the device will be deleted from the database (CAUTION - it will not
be deleted from the network project !!)
4e. Sorting currently displayed database tables. Sorting of the database contents can be done inalphabetical order according to various criteria. The internal Windows algorithm is used,
which distinguishes between lower-case and upper-case letters. In lower system versions, this
algorithm sorts characters with Czech diacritics all the way to the end of the alphabet.
a) Select the branch in the database tree, which contains the data table you want to sort (the
table must include at least two devices in order for the function to be of any use.
b) Click on the Sort button in the Data Table Editing group. The system will ask you what
criterion should be used to sort the table.
c) Select the required criterion and close the dialogue panel by clicking OK. The table will be
sorted. The sorting remains saved permanently. Note: sorting of large tables can take a
longer time if performed on slower computers.
5. Click Close to finish you work with the database of third-party equipment.
Note: Data files of the user-defined database of third-party equipment are located in the \ DATA\ directory.
We strongly recommend you to make a backup of this directory as not to lose the definitions in case of any
system failure. For backup of the entire xSpider system installation see Chap. 8.3.
16.3 Structure of data tables for the indiv idual component types
The following data must be defined for the individual component types:
Generators
Transformers

8/17/2019 XSpider 2.13 en Reference Manual
http://slidepdf.com/reader/full/xspider-213-en-reference-manual 161/236
_______________________________________________________________________________
_______________________________________________________________________________________________________________________
xSpider, Reference manual 153
Cables
One of the offered options must be selected for properties, which are encoded in the database.
Other options cannot be added in the software environment.
Busbar systems

8/17/2019 XSpider 2.13 en Reference Manual
http://slidepdf.com/reader/full/xspider-213-en-reference-manual 162/236
_______________________________________________________________________________
_______________________________________________________________________________________________________________________
154 xSpider, Reference manual
Circuit breakers
One of the offered options must be selected for properties, which are encoded in the database.Other options cannot be added in the software environment.
The code of Ics/Icu list for various voltages: reference to the table of breaking capacities for
various voltages in the file I c. DAT. If not specified, then the given values of Icu, Ics apply
for all voltage levels up to Un.
Name of the file with the selectivity table: the file must exist, or it must be created by means
of Windows tools (a text file). If not specified, the selectivity of the circuit-breaker/fuse
cascade cannot be determined. Code for cascade circuit-breaker/circuit-breaker assessment
can be written, delimited by semicolon character.
Name of the file with the tripping characteristic: the file must exist, or it must be created by
means of Windows tools (a text file; the time in one column, the current in the other column;the column width is fixed).

8/17/2019 XSpider 2.13 en Reference Manual
http://slidepdf.com/reader/full/xspider-213-en-reference-manual 163/236
_______________________________________________________________________________
_______________________________________________________________________________________________________________________
xSpider, Reference manual 155
Fuses
Name of the file with the tripping characteristic: the file must exist, or it must be created by
means of Windows tools (a text file; the time in one column, the current in the other column;
the column width is fixed).
Name of the file with the limiting characteristic: the file must exist, or it must be created by
means of Windows tools (a text file; the anticipated short-circuit current Ik in one column, the
limited short-circuit current Io in the other column; the column width is fixed). If not
specified, the limited short-circuit current cannot be calculated.
Motors
Compensation condensers

8/17/2019 XSpider 2.13 en Reference Manual
http://slidepdf.com/reader/full/xspider-213-en-reference-manual 164/236
_______________________________________________________________________________
_______________________________________________________________________________________________________________________
156 xSpider, Reference manual
17. Information about Project, Tit le Block _______________________________________________
By means of the Information about Project function, you can set the basic information about the
processed project, which will be in turn shown in the title block (description field) attached to thedrawing of the network wiring diagram as well as to printed lists.
1. Select Information about Project from the File drop-down menu.
2. A dialogue panel will open, in which you enter data in the
respective fields step by step:
3. Click OK. The entered data will be recorded in the system. When printing the network wiring
diagram (see Chap. 18), lists (see Chap. 18) and tripping characteristics (see Chap 15.7) to a
printer, a title block filled with the data specified here will be printed on the bottom of every
page. When exporting the lists in a data file (see Chap. 19), the data concerned are shown in the
file header.
Notes:
The entered data can be modified by activating the Information about Project function again.
The function is called automatically prior to the first saving of a project to file on the hard disk,
i.e. prior the first activation of the Save function (Chap. 20.1) and prior to every activation of the
Save As function (Chap. 20.1).
An example of the title block printed in the bottom right corner of the drawing with the network
wiring diagram:
Project identification.
Project identification number.
Date of design preparation. Name of the design author.
Note to the design, any
text can be specified.
Name of the company is shown here, whichwas granted the licence to use the program.
Modification of the text is possible under
Options (see Chap. 21.6).
Identification of the network type and
the voltage system (see Chap. 11.1).

8/17/2019 XSpider 2.13 en Reference Manual
http://slidepdf.com/reader/full/xspider-213-en-reference-manual 165/236
_______________________________________________________________________________
_______________________________________________________________________________________________________________________
xSpider, Reference manual 157
18. Printing the Results to Printer _______________________________________________
The program allows you to print, on one hand, the wiring diagram (topology) including the results
of the last performed calculation and, on the other hand, the lists of network components. Generalsetting of printouts is determined by the Options function (see Chap. 21.1).
18.1 Prin t preview
1. Select the Print Preview item from the File drop-down menu or click on the
corresponding icon in the tool bar.
2. A dialogue panel will open, in which you specify what printout you want to be shown in the
preview (list of components, image). Then click OK. The selected list will be shown in a
separate window.
Preview of the network wiring diagram has no sense
because it is displayed in the project window.
Setting for the parameters of list generation and
the print, for more details see Chap. 21.1.
Information on the last performed calculation, the results
of which are shown in the network wiring diagram.
The list of all components in the network project willbe displayed together with specification of their main
arameters (tag, type and main electrical parameters
defining the component).
The list of all components in the project network
will be shown together with the results of the last
erformed calculation.
Identification of the last
erformed calculation.
Calculation results or the main electrical parameters of the component;
or explanation of meaning of the variable see Chap 14.6.
The window size
can be changed by
dragging its edges.
The column width can
be changed by dragging
the partition.
Indication of error components, which did not
comply with some of the checks; for moredetails see Chap. dealing with the respective
calculation (see Chap. 14.3, 14.4).
Close
window.
Setting for the number of copies to be printed. The
number of copies specified here is never recorded in
the print driver and, therefore, does not affect printing
rom other programs.
The table of cables of the network project, with the cable
parameters (where from, where to, length, installation,
specification), will be displayed.

8/17/2019 XSpider 2.13 en Reference Manual
http://slidepdf.com/reader/full/xspider-213-en-reference-manual 166/236
_______________________________________________________________________________
_______________________________________________________________________________________________________________________
158 xSpider, Reference manual
3. Close the window with the list by clicking on the X in the upper right corner of the window or
by pressing Esc.
Note:
The component list can be sorted either according to the component type (see the drawings
above) or according to the individual branches (in such a way that the components of each
branch come one after another; for example: branch-1: trunk – circuit-breaker – cable – load,
branch-2: trunk – circuit-breaker – cable – trunk, etc.) – see the Program Settings function,
Chap. 21.1.
List of all the components comprised in a
network project; the main parameters of
the components are also included.
The main electrical parameters
that define a component
The current settings of the individual
parameters are displayed for circuit-breakers
with an adjustable release.
Table of cables that are comprised in a network project;
the main parameters of the cables are included as well.
Tag of the component connected
at the end of the cable
Tag of the component connected
at the beginning of the cable
Tag of the cable
Type identification of the
cable; the number in front
of the bracket is the
number of parallel
branches (if the number is
greater than 1).Code of the cable installation
method according to the IEC
60364-5-523 standard.
The number of parallel branches
+ the number of the other
circuits in the grouping (if the
total number is greater than 1).

8/17/2019 XSpider 2.13 en Reference Manual
http://slidepdf.com/reader/full/xspider-213-en-reference-manual 167/236
_______________________________________________________________________________
_______________________________________________________________________________________________________________________
xSpider, Reference manual 159
18.2 Printing l ists to printer
1. Select the Print item from the File drop-down menu or click on the corresponding icon
in the tool bar.
2. A dialogue panel will open, in which you specify what list you want to be printed (similarly
to the print preview procedure - see Chap. 18.1, the first two top options); set the requirednumber of copies and click OK.
3. A dialogue panel will open, in which you select the printer type and paper format - standard
A4 format is set as default. The dialogue panel appearance depends on the version of the
Windows operating system used (for more details see the Windows operating system
manual).
Notes:
The lists are always printed in black and white
By using the Options function (see Chap. 21.1) it is possible to:
Modify the length of a page (number of lines per page), the size of the left page margin
and the font height to be used for printing the lists,
Modify the component sorting in the lists.
The title block (description field) is shown at the bottom of every sheet. The data to be used in
this title block must be entered prior to starting the print by using the Information about
Project function (see Chap. 17).
18.3 Printing wiring diagrams
1. Select the Print item from the File drop-down menu or click on the corresponding icon
in the tool bar.
2. A dialogue panel will open, in which you specify what printout you want to be printed - select
the item called Network wiring diagram with calculation results (see also Chap. 18.1; third
option from top) and click OK.
3. Set the paper format which will be used for printing and specify manner in which the wiring
diagram should be printed to this format. Set the required number of copies. The method of
setting is similar to the standard CAD systems:
Information about the currently set output
device type, to which the lists will be printed.
Changing the properties of the currently set
output device type, to which the lists will berinted (changing the type, port, paper size,
aper orientation, ...).
Execution of the print to the currently set
output device type.
Forced interruption of the function without
rint execution.
Always leave the value 1 here (the required number
of copies was already set in the previous step).

8/17/2019 XSpider 2.13 en Reference Manual
http://slidepdf.com/reader/full/xspider-213-en-reference-manual 168/236
_______________________________________________________________________________
_______________________________________________________________________________________________________________________
160 xSpider, Reference manual
Full drawing area to the selected format - automatic reduction/enlargement so that the
drawing area (area filled with the dotted mesh - grid) was drawn in full to the paper of the
selected format; a printout example will be shown after clicking on Preview:
Automatically divide the drawing area in the selected format - the drawing area will
be divided to several sections corresponding to the size of the paper inserted in the
printer. Subsequently, you can specify the number of the page(s) to be printed (the first
page from the selected range will be shown after clicking on Preview). This function isuseful in cases when a large diagram is drawn in the A2-format drawing area for
instance, but the connected printer allows you to print only to A4 format.
Currently connected output device (printer,
lotter); paper size, to which the diagram will be
rinted (physically present in the output device).
Change of properties of the currently set output
device type, to which the diagram will be printed
(changing the type, paper size, paper orientation,
etc.). Appearance of the dialogue panel depends on
the employed version of the Windows operatingsystem and on the driver type. Attention: here you
modify the driver of the output device. The
erformed setting changes remain saved even after
closing the program and may affect printing from
other programs.
Specification of the print area, i.e. which part of
the wiring diagram is to be printed to the
selected paper and what the scale should be.
For more details see text below.
Print preview – example of the
selected area printout.
A3 drawing area printed to
A4 format paper - portrait
(the image will be shrinked as required):
A4 drawing area printed to
A4 format paper:
Paper physically inserted
in the output device.
Dashed line – border of the utilizable drawing area on the paper (no
rinter or plotter is able to print all the way to the paper margin.)
Setting for the number of copies to be printed. The
number of copies specified here is never recorded
in the print driver and, therefore, does not affect
rinting from other programs.

8/17/2019 XSpider 2.13 en Reference Manual
http://slidepdf.com/reader/full/xspider-213-en-reference-manual 169/236
_______________________________________________________________________________
_______________________________________________________________________________________________________________________
xSpider, Reference manual 161
Display - the print area is determined by the current image (as set by means of the Zoom
function - see Chap. 13). If the Scaled to fit switch is enabled, the scale will be adjusted
so that the specified area fills the available paper size; otherwise the diagram is printed in
1:1 scale.
A2 format
drawing area.
A4 paper portrait is inserted in the
rinter physically. The drawing area
will be divided into this format.
Drawing area division in the
articular sheets, here in A4 format.
The origin is in the upper left corner.
Page number.
Specification of the
ages to be printed.
The preview will display the first
age of those (here page 1 of 6).
Should the division of area to pages not suitable, it is
necessary to specify the area for print by means of the
window (see below).
Current image set by means of Zoom (see Chap. 13).
Everything what is displayed in the project window
(= on the screen) will be printed. The scale depends
on the setting of the „Scaled to fit“ switch.
The network project window reduced here.

8/17/2019 XSpider 2.13 en Reference Manual
http://slidepdf.com/reader/full/xspider-213-en-reference-manual 170/236
_______________________________________________________________________________
_______________________________________________________________________________________________________________________
162 xSpider, Reference manual
Window - after clicking on the Window button, you can specify the print area (similarly
to the Zoom Window function, see Chap. 13.4). If the Scaled to fit switch is enabled,
the scale will be adjusted so that the specified area fills the available paper size;
otherwise the diagram is printed in 1:1 scale. Tip: by using the Options function, it is
possible to modify the control over the selection window (either identical to AutoCAD
with click-click - default setting, or identical to Windows with click-hold).
A4 paper – portrait supplied in the
printer, „Scaled to fit“ switch enabled:
A4 paper – portrait supplied in the
printer, „Scaled to fit“ switch disabled:
Current image set by means of
Zoom All function (see Chap. 13.6).
The network window project reduced.
Second clicked corner.
First clicked corner of the selection window
defining the area to be printed.
„Scaled to fit“ switch enabled.„Scaled to fit“ switch disabled.

8/17/2019 XSpider 2.13 en Reference Manual
http://slidepdf.com/reader/full/xspider-213-en-reference-manual 171/236
_______________________________________________________________________________
_______________________________________________________________________________________________________________________
xSpider, Reference manual 163
4. Click on the Preview button and make sure that the printout meets your requirements. Click
OK to close the preview window.
5. Click OK to close the dialogue panel for the wiring diagram print. The diagram will be drawn
in the selected format as shown in the preview window.
Notes: By using the Options function (see Chap. 21.1) it is possible to:
Select black-and-white or color printing.
Set colors of the particular wiring diagram components and set the font height.
The data to be used in the title block (description field) must be entered prior to starting the
print by using the Information about Project function (see Chap. 17).
The printing procedure may fail on some drivers when printing a small view-port specified by
means of the window with the Scaled to fit switch being enabled, which will result in large
number of empty sheets being „printed“. In case the number of pages in the print queue
exceeds the usual limit, an error message is generated offering the option to cancel the print:
Nevertheless, there are times when you need to cancel the printing process „manually“ by
emptying the print queue and restarting the printer.
18.4 Page Setup
This function allows you to set the dimensions of the paper, on which the network wiring diagram
will be drawn. This setup determines the dimensions of the drawing area to be used for the network
wiring diagram in the project window.
1. Select the Page Setup item from the File drop-down menu.
2. A dialogue panel will open, in which you set the suitable size of your drawing area:
Standard paper formats = recommendeddimensions of the drawing area
Possibility for user modifications of the drawing
area dimensions; any dimension can be entered.
Cancel print.
Please pay attention to the information provided.
Continue in the print task. 84 empty
ages are likely to be „printed„.

8/17/2019 XSpider 2.13 en Reference Manual
http://slidepdf.com/reader/full/xspider-213-en-reference-manual 172/236
_______________________________________________________________________________
_______________________________________________________________________________________________________________________
164 xSpider, Reference manual
3. Close the dialogue panel by clicking OK. The drawing area dimensions will be adjusted
accordingly. The position of components already inserted in the diagram must be then
adapted by means of the Move function (see Chap. 12.2).
A4 format
drawing area.
A3 formatdrawing area
(after adjusting
the page setup).

8/17/2019 XSpider 2.13 en Reference Manual
http://slidepdf.com/reader/full/xspider-213-en-reference-manual 173/236
_______________________________________________________________________________
_______________________________________________________________________________________________________________________
xSpider, Reference manual 165
19. Data Export _______________________________________________
The Export function enables you to export lists of components into a
data file in a format suitable for text editors or spreadsheet processors.All graphics are exported to DXF (universal format for CAD systems),
or BMP format (bitmap). Data tables can be exported to TXT format
(universal format for text processors), TAB format (universal format
for spreadsheet processors), or XLS format (for Excel).
19.1 Exporting component lists
1. Select the Export item from the File drop-down menu (keyboard
shortcut Ctrl+E).
2. A dialogue panel will open, in which you specify what list you want to export (similarly to
the print preview procedure - see Chap. 18.1, the first two top options) and click OK.
3. Another dialogue panel will open, in which you specify the output file format:
4.
Close the dialogue panel by clicking OK. If you want the file to be exported to XLS format,which uses MS Excel, the following information text will appear:
A dialogue panel will open (similar to that opening with the Save function, see Chap. 20.1), in
which you enter the file name and the directory (folder) where the exported file is to be saved.
File type suitable for spreadsheet
rocessors. The individual columns o
the list of pieces will be separated by
tabulators. The file has a standard
TAB extension.
File type suitable for text processors,such as T602, Notepad, Word etc.
The individual columns of the list of
ieces will be separated by spaces.
The file has a standard TXT
extension.
Direct export for Microsoft Excel
spreadsheet processor; Microsoft
Excel must be installed on the
computer.
If you have MS Excel installed on your
computer, click Yes. If the Excel application
is currently running, please close it first and
then click Yes.
If the MS Excel has not been installed yet
on your computer, click No.

8/17/2019 XSpider 2.13 en Reference Manual
http://slidepdf.com/reader/full/xspider-213-en-reference-manual 174/236
_______________________________________________________________________________
_______________________________________________________________________________________________________________________
166 xSpider, Reference manual
5. Click Save to close the dialogue panel. The list will be exported to the file. Provided the
export was executed successfully, the final message appears:
Notes:
By the Options function (see Chap. 21.1) you can modify the component sorting in the lists.
Information about the project is part of the exported file. These data to be entered prior to
starting the export procedure by the Information about Project function (see Chap. 17).
19.2 Exporting the network wiring diagram to BMP file format
1.
By dragging its edges, set the dimensions of the project window to obtain a suitable size.
Select a suitable zoom (see Chap. 13). The image in the BMP file will have the same size as
the project window at the moment of its export and will include only the graphics you see in
this window.
2. Select the Export item from the File drop-down menu (keyboard shortcut Ctrl+E).
3. A dialogue panel will open, in which you specify that you require a network wiring diagram
export (similarly to the print preview procedure - see Chap. 18.1) and click OK.
4. A dialogue panel will open (similar to that opening with the Save function, see Chap. 20.1),
in which you select the “Raster image (*.BMP)” as the format of the output file by choosing
the respective option from the list of formats available.
5.
Enter the file name and the directory (folder), into which the exported image is to be saved.
Encoding and extension of
the output file.
Files of the same type in the
current directory (folder).
Setting the directory (folder), into
which the file is to be saved.
Name of the file, to which the list
is to be exported. The name of the
roject file is offered as a preset
value.
Moving one level higher in the
directory (folder) tree.
Creating a new directory (folder).
Setting the method of
representation of files in the
currently open directory (folder) –
either as icons or as a list.
Name of the file where the
list was exported,
including the path.

8/17/2019 XSpider 2.13 en Reference Manual
http://slidepdf.com/reader/full/xspider-213-en-reference-manual 175/236
_______________________________________________________________________________
_______________________________________________________________________________________________________________________
xSpider, Reference manual 167
6. Click Save to close the dialogue panel. The image will be exported to the data file.
Output file format. Select the “Raster
image (*.BMP)” to export to BMP file
ormat.
Files of the same type in the
current directory (folder).
Setting the directory (folder), into
which the file is to be saved.
Name of the file, to which the image
is to be saved. The name of the
roject file is offered as a preset
value.
Moving one level higher in the
directory (folder) tree.
Creating a new directory (folder).
Setting the method of
representation of files in the
currently open directory (folder) –
either as icons or as a list.
Project window. The BMP file image will be as
large as the project window at the moment of
its export and will contain only the graphics you can see in this window.
Contents of the BMP file.

8/17/2019 XSpider 2.13 en Reference Manual
http://slidepdf.com/reader/full/xspider-213-en-reference-manual 176/236
_______________________________________________________________________________
_______________________________________________________________________________________________________________________
168 xSpider, Reference manual
19.3 Exporting the network wir ing diagram to DXF file format
xSpider allows you to export graphics to DXF (universal exchangeable
format for CAD systems). This also makes possible the subsequent
import of the network wiring diagram including the calculation results
to CAD systems supporting DXF format (such as AutoCAD). Graphics
breakdown to levels, colors and line types is supported. Tags in the
wiring diagram are exported as blocks. Basic information about the
project is attached. Alternatively, the possibility of exporting the
graphics to BMP (raster format) remains – see Chap. 19.2.
1. Select the Export item from the File drop-down menu (keyboard
shortcut Ctrl+E).
2. A dialogue panel will open, in which you specify your requirement to export the network
wiring diagram (similarly as with Print preview – see Chap. 18.1) and click OK.
3. A dialogue panel will open (similar to that opening with the Save function, see Chap. 20.1),
in which you select the “DXF file (*.DXF)” as the format of the output file by choosing the
respective option from the list of formats available. DXF is offered as default in standard.
4. Enter the file name and the directory (folder), into which the exported image is to be saved.
5. Click Save to close the dialogue panel. The chart will be exported to the data file. Provided
the export was completed successfully, the final message appears as follows:
Notes:
In Settings under the System tab, it is possible to define the DXF file compatibility with
various AutoCAD versions (see Chap. 21.1). It is advisable to change the setting if you have
difficulties with loading the created DXF file.
The full RGB system color range can be used in xSpider. When exporting to DXF, the colorsare converted into ACI system. After loading the DXF file into the target program, the colors
might not correspond precisely to the xSpider settings.
Output file format. Select
“DXF file (*.DXF)” to export
to DXF file format. The DXF
format is offered as default in
standard.
Name of the file, to which the
image is to be saved. The
name of the project file is
offered as the default value.

8/17/2019 XSpider 2.13 en Reference Manual
http://slidepdf.com/reader/full/xspider-213-en-reference-manual 177/236
_______________________________________________________________________________
_______________________________________________________________________________________________________________________
xSpider, Reference manual 169
20. Working with Files _______________________________________________
A network project can be continuously saved to a data file on your hard disk in order to keep the
data for future editing. All information about the project is in a single file with the standard *.SPIextension and the name of the file is determined by the user All operations with the files can be
carried out by using the functions from the File drop-down menu or by means of the icons in the
tool bar.
20.1 Saving your project to a file on the disk
The current state of the network project can be saved to a file located
on your hard disk by means of the Save and Save As… functions
from the File drop-down menu.
When calling the Save function for the first time with no file
name specified before, the user is required to enter the file
name and directory (folder), where the file is to be saved.
During the second and next calls of this function, all changes to the
design are automatically saved to the data file, the name of which
was entered during the first function activation. The current name of
the edited file is shown in the top part of the main window for
xSpider application or in the top part of the project window.
Every time the Save As… function is activated, the user is required
to enter the file name and the directory (folder), where the file is saved. In this manner it is possible,
for instance, to save the current design to a file with different name, thus, copying the original
design to be used for further editing. The current name of the edited file is shown in the top part of
the main window for xSpider application or in the top part of the project window.
Setting the structure – formatof the output file.
Files of the same type in the
current directory (folder).
Setting the directory (folder), into
which the file is to be saved.
Name of the file, to which the
roject is to be saved. The .SPI
extension will be added
automatically.
Moving one level higher in the
directory (folder) tree.
Creating a new directory (folder).
Setting the method of representation of
iles in the currently open directory
(folder) – either as icons or as a list.

8/17/2019 XSpider 2.13 en Reference Manual
http://slidepdf.com/reader/full/xspider-213-en-reference-manual 178/236
_______________________________________________________________________________
_______________________________________________________________________________________________________________________
170 xSpider, Reference manual
20.2 Loading (opening) files with projects
Fast access to the last edited files is possible through the list available at the end of the File drop-
down menu.
A previously created data file with a network project can be loaded by means of the Open function from the File drop-down menu. In the next step, the user is asked for the directory
(folder) and the file name:
The loaded file is opened in a separate project window and can be edited any manner by using the
xSpider tools.
20.2.1 Loading (opening) demo f iles
A selected demo file supplied with the program can be loaded by means of the Open function
from the File drop-down menu. Demos can be used as an initial point to solve a specific
problem. The particular examples are described in Chap. 25.3.When clicking on the icon, a
dialogue panel will open in the same form as when calling the Open function (see Chap. 20.2) withthe only difference that the directory (folder) is always set there automatically, which contains the
demo files. The loaded demo example is opened in a separate project window and can be edited any
Name of the edited file in the top
art of the xSpider main window
(the project window is maximized).
Name of the edited file in the
top part of the project window.
Setting the structure – format
of the loaded file.
Files with the existing projects in the
current directory (folder). Click on the
ile name you want to open.
Setting the directory (folder), from
which the file is to be loaded.
Name of the file you want to open,
the .SPI extension does not have to
be specified.
Moving one level higher in the
directory (folder) tree.
Setting the method of representation
of files in the currently open directory
(folder) – either as icons or as a list.

8/17/2019 XSpider 2.13 en Reference Manual
http://slidepdf.com/reader/full/xspider-213-en-reference-manual 179/236
_______________________________________________________________________________
_______________________________________________________________________________________________________________________
xSpider, Reference manual 171
manner by using the xSpider tools. We recommend that you save the modified example under a
different name outside of the program directory structure (such as in the DOCUMENTS directory) -
by means of the Save function, see Chap. 20.1. - in order to keep the demo file in its original form
for further use.
20.3 Edit ing a new project
If you want to start editing a new project, use the New Project command from the File
drop-down menu. The new project is opened in a separate window and can be edited any
manner by using the xSpider tools. The default setting for the new project is given by the
Options (see Chap. 21.1).
20.4 Ending the project editing operation
If you want to terminate your project editing, click on the X in the upper right corner of the project
window or use the Exit function from the File drop-down menu. First of all, the system checks
whether the currently opened design was saved. If this is not the case, it will generate a message
asking about its saving:
Calls the Save function automatically (see Chap. 20.1) in
order to save the current state of the design on your hard
disk. Afterwards it continues in the Exit function.
Does not save the current state of the design anywhere
and continues directly in the Exit function.
Forced interruption of the function, nothing happens and
it is possible to continue in further editing of the current
roject.
The directory (folder) with the demo
examples is preset automatically.
Files with demo examples (for
description of the examples see
Chap. 25.3). Click on the file name
you want to open.
Loading of the selected file.

8/17/2019 XSpider 2.13 en Reference Manual
http://slidepdf.com/reader/full/xspider-213-en-reference-manual 180/236
_______________________________________________________________________________
_______________________________________________________________________________________________________________________
172 xSpider, Reference manual
20.5 Ending the program session
If you would like to terminate your xSpider session, use the Exit
command from the File drop-down menu or close the main program
window by clicking on the X in the upper right corner. First of all,
the system checks whether all open projects were saved. If this is not
the case, it will generate a message asking about their saving (see
Chap. 20.4). Afterwards, the xSpider program will be closed down.
To exit xSpider click
on the X and close
the main program
window
To end your
editing session of
the DEMO_
RadialNetwork
roject, click onthe X and close the
roject window.
Window with the network project maximized.
Icons in the tool bar can be arranged in tworows on smaller screens with low resolution.

8/17/2019 XSpider 2.13 en Reference Manual
http://slidepdf.com/reader/full/xspider-213-en-reference-manual 181/236
_______________________________________________________________________________
_______________________________________________________________________________________________________________________
xSpider, Reference manual 173
21. Options _______________________________________________
The Options function allows you to set the global variables affecting
the program behavior as a whole in an easy way by means of a dialogue panel. The particular setting features defined in the function are
recorded in the system and maintained until their next change
regardless of the edited project. The individual setting features are
saved in the xSpi der . I NI file in the program root directory. The file
may not be write-protected.
21.1 Graphics environment
1. Select the Options item from the Tools drop-down menu.
2.
A dialogue panel will open, in which you click on the System tab. A dialogue panel for theuser interface configuration appears:
The recommended default settings for controllers are shown in the figure.
Program behavior
immediately after startup.
Setting of the Zoom
Window control – either as
in AutoCAD (click-click) or
as in Windows (click-hold).
Sensitivity setting for
ZoomRealtime.
Setting of selection windowsor MOVE, COPY, ERASE
editing functions – either as
in AutoCAD (click-click), or as
in Windows (click-hold).
Restoration of the default position of
loating windows can be used, for
instance, when the window with the
calculation results appears outside of the
screen (suitable also when an external
screen is disconnected from laptop).
Adobe Reader software is essential to view Help in the
PDF format. After clicking on the button, the standard
dialogue panel will appear as in the Open function, you
should use it to find the executable file for Adobe Reader -
Acr oRd32. exe. Program installation is available on the
installation CD-ROM or it can be downloaded for freerom the Internet at www.adobe.com.
DXF format version according
to the compatibility with the
given AutoCAD version.
Setting to define how often the
availability of new versions will
be checked on the Moellerwebsite. The check for
availability of new versions and
the software update can also be
carried out manually at any time
– see Chap. 8.3 and 8.4.

8/17/2019 XSpider 2.13 en Reference Manual
http://slidepdf.com/reader/full/xspider-213-en-reference-manual 182/236
_______________________________________________________________________________
_______________________________________________________________________________________________________________________
174 xSpider, Reference manual
3. Click on the Page tab. A dialogue panel for the graphics environment configuration appears:
Print lists:
Number of lines per page represents the number of components from the list, which will be
printed on one page, i.e. the total number of lines per page minus the header and footer line.
Left margin width in characters indicates the number of spaces between the left paper edge
and the beginning of the first printed character on the line.
Font height in points indicates the font height in the printed version of the lists. The
recommended value is 8. It is not advisable to use smaller values. If you decide to use a
different font height, it is necessary to adjust the number of lines per page and the left margin
width accordingly to ensure that all data are printed on the paper. The paper size, format and
orientation are set not sooner than during the actual print by modifying the printer properties(the Change button in the Print dialogue panel - see Chap. 18.2 and 15.7). The table below
indicates examples of the recommended settings:
Format Orientation Lines per page Left margin Font height
A4 portrait 80 4 8
A4 landscape 18 2 12
A3 portrait 36 2 12
Sort the lists according to branches - if you tick this option, the list of network components
with the calculation results and the list of network components with their parameters will besorted in such manner that the components be listed successively after one another in every
branch (e.g.: branch-1: busbar-circuit breaker-cable-load; branch-2:busbar-circuit breaker-
Default page setup (dimensions of
the drawing area) for new
rojects. See also Chap. 18.3.
Snap size cannot be changed
(corresponds to the dimensions of
schematic symbols).
It is not recommended to changethe grid size (distance between
dots filling the drawing area) –
except for large drawing areas o
A1, A0 format.
Page setup for the currently edited
roject, see Chap. 18.3.1
Setting of parameters to print lists and
tripping characteristics. See below.
Background colors of the project
window, color of the frame and the
title block.
Grid display activation (it is
advisable to disable it when
exporting graphics to BMP format).

8/17/2019 XSpider 2.13 en Reference Manual
http://slidepdf.com/reader/full/xspider-213-en-reference-manual 183/236
_______________________________________________________________________________
_______________________________________________________________________________________________________________________
xSpider, Reference manual 175
cable-busbar, ...). In case this option is not ticked, the lists will be sorted according to
component types (all power sources first, then all circuit breakers, then cables, …).
Print to printer in colors - if you tick this option, the network wiring diagram and the
tripping characteristics will be printed in color provided you have a color printer. In case you
do not tick this option, all printouts will always be black and white. The component lists are
always printed in black and white regardless of this switch setting. Print the path to the data file – if you tick this option, the name of the file containing the
project, including the complete path to the file’s directory (folder), will be included in the
information about the project when the lists and tripping characteristics are printed and when
the lists are exported. If this item has NOT been ticked, only the name of the file, without the
path, is printed.
4. Set the individual items as desired.
5. Close the dialogue panel by clicking OK. The entered setting features will be recorded in the
system and will remain saved even after program termination.
21.2 Wiring diagram
1. Select the Options item from the Tools drop-down menu.
2. A dialogue panel will open, in which you click on the Diagram tab. A dialogue panel with
the settings for the network wiring diagram properties appears:
Color settings for the particular
network wiring diagram parts. It
will be reflected in all projects,
i.e. both the existing as well as
the newly created ones.
Setting of the initial tag position in
relation to the component insertionoint. The origin of the coordinate
system is in the upper left corner,
the positive direction of the Y axis
is downwards.
For parameter entry, see below.
Font height settings for the texts used in the network wiring
diagram. It will be reflected in all projects, i.e. both the existing
as well as the newly created ones.

8/17/2019 XSpider 2.13 en Reference Manual
http://slidepdf.com/reader/full/xspider-213-en-reference-manual 184/236
_______________________________________________________________________________
_______________________________________________________________________________________________________________________
176 xSpider, Reference manual
Set the component parameters immediately after their insertion in the diagram . If you
tick this option, you will be required to enter the electrical parameters of a component
immediately after inserting the component symbol (such as a circuit breaker) into the
diagram. In case this option is not ticked, only the component symbol will be inserted and the
electrical parameters will have to be added later by means of properties editing.
Require automatic dimensioning as default value. If this option is selected, the Dimensionautomatically switch will automatically be activated when a component such as line – cable,
line – busbar system, circuit-breaker, fuse and switch-disconnector is connected (it is
presumed that the component will be dimensioned automatically; the software is used
predominantly in the design mode). If this option is not selected, the Dimension automatically
switch is disabled when the above-specified components are inserted (it is presumed that the
component will be dimensioned by the user; the software is used predominantly in the control
mode).
3. Set the individual items as desired.
4. Close the dialogue panel by clicking OK. The entered setting features will be recorded in the
system and will remain saved even after program termination.
21.3 Free graphics
1. Select the Options item from the Tools drop-down menu.
2. A dialogue panel will open, in which you click on the Free Graphics tab. A dialogue panel
appears allowing you to set the default properties for a newly inserted free graphics (line,
circle, rectangle, text):
3. Set the individual items as desired.
4. Close the dialogue panel by clicking OK. The entered setting features will be recorded in the
system and will remain saved even after program termination.
21.4 Calculation
1. Select the Options item from the Tools drop-down menu.
2.
A dialogue panel will open, in which you click on the Calculation tab. A dialogue panel
appears with the settings of the computational algorithms:
The values set here determine the
default properties of newly
inserted free graphics, i.e. for
instance: every new drawn line
will be black, continuous, and
thicker (but lines drawn
reviously will remain without
any change).
Please pay attention to this
information.

8/17/2019 XSpider 2.13 en Reference Manual
http://slidepdf.com/reader/full/xspider-213-en-reference-manual 185/236
_______________________________________________________________________________
_______________________________________________________________________________________________________________________
xSpider, Reference manual 177
Show the real and the imaginary components … If you tick this option, the consumption currents in
nodes and the currents in branches are shown as complex number following the calculation of the
voltage drops and load distribution. In the opposite case, only the absolute values are shown. This
setting also relates to the display of impedances. Show admittance matrices… If you tick this option, the admittance matrices and other intermediate
results will be shown for all calculations. In the opposite case, the intermediate results will not be
shown.
Show the short-circuit current waveform… If you tick this option, the chart with the short-circuit
current waveform is shown when calculating the 3-phase symmetric short circuit. In the opposite case,
the chart will not be displayed.
Highlight unsuitable components… If you tick this option, then all components that did not comply
with some check will be highlighted both in the wiring diagram and the list of network components
with the calculation results. In the opposite case, the unsuitable components will not be highlighted in
any way (this setting feature is intended for experts only).
Check coordination… If you tick this option, while checking coordination between protective deviceand cable both terms required by IEC 60364-4-43 will be considered and cable time-current heating
characteristic and protective device tripping characteristic will be compared in addition also
(recommended more accurate method - see Chap 2.3). In the opposite case, terms required by IEC will
be checked only.
3. Set the individual items as desired.
4. Close the dialogue panel by clicking OK. The entered setting features will be recorded in the system
and will remain saved even after program termination.
21.5 Automatic dimensioning
1. Select the Options item from the Tools drop-down menu.
Limit voltage drop setting. The
values specified here will be
used as default values when
inserting a new component in
the diagram.
For description of effects caused
by different switch settings see
below.
Setting of the limit disconnection
time of the fault point from
source. The values specified here
will be used as default values
when inserting a new component
in the diagram.
Setting of the network type and
voltage system, the values
specified here will be used as
default values for new projects.

8/17/2019 XSpider 2.13 en Reference Manual
http://slidepdf.com/reader/full/xspider-213-en-reference-manual 186/236
_______________________________________________________________________________
_______________________________________________________________________________________________________________________
178 xSpider, Reference manual
2. A dialogue panel will open, in which you click on the Auto Dimensioning tab. A dialogue panel
appears allowing you to set the automatic dimensioning algorithm for the user-defined components:
Product series preference settings for circuit-breakers, fuses and switch-disconnectors: In case
of parameter In case of equivalence of parameters, the higher ranking type series circuit-
breaker is used. Example:
The product-series sequence is set as follows: PLS6, PLSM, PLHT … By preference,
PLS6 type-series circuit-breakers (Icn=6kA) will be used wherever possible; only in case
of unsuitable breaking capacity, PLSM (Icn=10kA), or PLHT (Icn=25kA) circuit-breakers
will be used.
The product-series sequence is set as follows: PLSM, PLHT, PLS6 … By preference,
PLSM type-series circuit-breakers (Icn=10kA) will be used even if the expected short-
circuit current is lower than 6kA; only in case of unsuitable breaking capacity, PLHT
(Icn=25kA) circuit-breakers will be used.
Specification of some conductor
parameters that will be assigned by
the Dimension Automatically
unction to the components, for
which the Dimension automatically
switch was enabled and for which
these parameters were not set when
the component was inserted in the
wiring diagram .
Required number of poles for
protective and switching
devices.
Preference settings for product
series – determines the
sequence, in which the
individual types will be
assigned during AutoDimensioning. For product
series codes, see the Moeller
product catalogue.
Specification of the standard (a
set of typically used products),
rom which components will bechosen during automatic
dimensioning.
Change of preference settings for
product series.
Move the selected series up
(higher preference).
Move the selected series down
(lower preference).

8/17/2019 XSpider 2.13 en Reference Manual
http://slidepdf.com/reader/full/xspider-213-en-reference-manual 187/236
_______________________________________________________________________________
_______________________________________________________________________________________________________________________
xSpider, Reference manual 179
3. Set the individual items as desired.
4. Close the dialogue panel by clicking OK. The entered setting features will be recorded in the
system and will remain saved even after program termination.
21.6 Changing the li cence data
1. Select the Options item from the Tools drop-down menu.
2. A dialogue panel will open, in which you click on the Licence tab. A dialogue panel appears
enabling you to enter the licence data:
3. Set the individual items as desired.
4. Close the dialogue panel by clicking OK. The entered setting features will be recorded in the
system and will remain saved even after program termination.
Possibility to enter new licence
data (user identification, licence
number and licence expiration
date) by means of a dialogue
anel identical to the one used
during the first program
initialization (see Chap. 9.1).
Current licence data.
Date of last check for availabilityof new versions on the Moeller
website. The interval, in which the
availability of new versions on the
Moeller website is to be checked,
can be set under the System tab
(see Chap. 21.1). The check for
availability of new versions and
the software update can also be
carried out manually at any time
using the “Software Update from
Website” (see Chap. 8.4) or
“Software Update from Directory”(see Chap. 8.5).

8/17/2019 XSpider 2.13 en Reference Manual
http://slidepdf.com/reader/full/xspider-213-en-reference-manual 188/236
_______________________________________________________________________________
_______________________________________________________________________________________________________________________
180 xSpider, Reference manual
22. Help _______________________________________________
The Help Topics function from the Help drop-down menu
launches Adobe Reader with the electronic version of thismanual in PDF format. In order to ensure correct operation of this
function, you must set the full path for the executable Adobe Reader
file Acr oRd32. exe by means of the Options function (see Chap.
21.1). If you do not have Adobe Reader installed on your computer
yet, you can find its setup on the installation CD or you can download it from the Internet at
www. adobe. comor at www. amsof t . cz.
22.1 Tip of the Day
The Tip of the Day is a set of suggestions for working with the program. After installation, the window with a tip of the day is shown
automatically at the program startup; a different tip is provided for
every launch. The tip window can be displayed at any time by means
of the Tip of the Day function from the Help menu.
Close the window with tips.
Move to the next tip. When the last tip has been
shown, the whole series starts from the beginning.
Switch that determines whether the window with tips should be
shown automatically at the program startup. This property can
be also set in Options under the System tab.
Tip text.
Opening of a demo example – see Chap. 20.2.1; the
demo example can be used as the initial point to solve
a specific problem. For description of the demoexamples see Chap. 25.3.

8/17/2019 XSpider 2.13 en Reference Manual
http://slidepdf.com/reader/full/xspider-213-en-reference-manual 189/236
_______________________________________________________________________________
_______________________________________________________________________________________________________________________
xSpider, Reference manual 181
23. About xSpider _______________________________________________
About xSpider … from the Help drop-down menu is a function
designed to view information about the application - the xSpidersystem. The function can be used to determine the licence
information.

8/17/2019 XSpider 2.13 en Reference Manual
http://slidepdf.com/reader/full/xspider-213-en-reference-manual 190/236
______________________________________________________________________________________________
_______________________________________________________________________________________________________________________
182 xSpider, Reference manual
24. History of Versions _______________________________________________
1. Version 1.0, November 2001
The first beta-version of the system presented at the MSV Brno ‘01 Fair.
The first live version of the system available for distribution from November 2001.
2. Version 2.0, May 2002
Beta-version of the system presented at the AMPER ‘02 Fair.
Live version of the system available for distribution from May 2002.
New functions and computation options:
New possibility introduced for the IT and TT network design.
New possibility introduced for the design of networks of various voltage systems up to 1000V (e.g. 400/230V,
690/400V and other) New design of 3-phase as well as 1-phase networks, accurate entry of the connected phase, load calculation for
the particular phases. Marking of the connected phases in the wiring diagram.
New components - Switch disconnector and Compensation unit; fuses inserted as fuse switch disconnectors.
Calculation of power factor in the network nodes.
Possibility of alternative entry of impedance values instead of the short-circuit capacity in case of power supply
from a supergrid.
New feature for the entry of limit voltage drops „dU“ and disconnection time „tv“ of the failure point from the
power source locally for every component. Possibility of mass editing of the entered values.
New option of displaying the impedance of the fault loop for 1-phase short circuit.
User interface:
General: Easier entry of the simple typical cases while maintaining the maximum variability and open-ended
character. User operation adjusted to the standard CAD systems (AutoCAD) as much as possible.
New Undo function, new Redo function.
Repeating of the last called function from the context menu activated by the right mouse button.
New Group function: insertion of typical component groups (such as power supply through transformer, a
motor circuit with circuit breaker…).
New Stretch function: editing of the shape and position of line objects, tag position editing.
Selection of items for editing possible (Copy, Move, Erase) through selection windows. Possibility of variable
behavior settings of the selection window according to AutoCAD or Windows standard.
Possibility of multiple object copying with the subsequent automatic tag editing so that no duplicities occur
within a certain wiring diagram.
Change in the default marking of lines to W (cables) and W-BUS (busbar systems). Printing of the component type designation in the network wiring diagram.
Possibility to set the font color and height in the text of the network wiring diagram.
Possibility to switch the Grid and Ortho modes on/off.
Possibility to set the Zoom function behavior (AutoCAD or Windows mode, sensitivity setting).
Free graphics now accessible through icons on the tool bar.
Improved database explorer (display of units in the data table header, explanation of meaning of the data table
variables - activation by the right mouse button, possibility to change the size of the tree and the data-table
windows
Automatic activation of new project after program launch.
Tip of the Day was added.

8/17/2019 XSpider 2.13 en Reference Manual
http://slidepdf.com/reader/full/xspider-213-en-reference-manual 191/236
______________________________________________________________________________________________
_______________________________________________________________________________________________________________________
xSpider, Reference manual 183
Databases:
Extension of the transformer database - the assortment of the most important suppliers (BEZ, ELIN, ESB, SGB)
was added.
Extension of the generator database - the assortment of the most important suppliers (Caterpillar, MEZ) was
added.
Extension of the cable database - Czech 5-wire cables were added, Tau values for the German cables were
completed.
New database of Moeller switch disconnectors, changes in the circuit-breaker database.
New database of compensation condensers (ZEZ Silko).
Print:
Substantial extension of wiring diagram print options (division of large format into several smaller ones,
possibility to specify the printing area, print preview).
Correction of faults:
Fault in the installation program corrected - the installation can be now performed without troubles also into
directories containing a space character in their names (e.g. ‘Program Files’).
Elimination of the identified problems.
3. Version 2.1, June 2003
General:
The 2.1 version does not in principle differ significantly from the 2.0 version. Its main benefit is the update and
extension of databases and new design of the current-carrying capacity of cables with respect to their laying.
New functions and computation options:
A completely new design of entering the cable laying and calculation of the current-carrying capacity of cables
with respect to their laying.
Possibility to enter the method of laying precisely according to the tables in IEC 60364-5-523 (all possible
alternatives included in the standard are available).
For the selected method of laying, it is possible to enter the grouping ways precisely according to the tables inIEC 60364-5-523 (all possible alternatives included in the standard are available).
Possibility to enter the number of other circuits in the grouping and the ambient temperature.
Possibility to enter the user coefficient, influencing the current-carrying capacity of cables and taking other
factors into account. By means of this coefficient, the user can solve also cases, which are not directly included
in the tables in IEC 60364-5-523 (e.g. cables with the cross-section of 800 mm2 or non-standard laying).
Calculation of the current-carrying capacity of cables with respect to their laying precisely according to IEC
60364-5-523.
User interface:
New „Open Demo“ function, accessible from the „Tip of the Day“ window and from the main menu, makes the
access to demonstrational examples easier. These demo examples can be used as a basis when solving a specific
design problem.
Easier selection of the tripping characteristics to be edited/erased; selection from the list according to the curve
color.
New design of Help: the complete electronic-version manual in PDF format is an integral part of the installation
(including a theoretical introduction and description of the solved examples). The „Help“ function displays this
manual using the Adobe Acrobat Reader software. Adobe Acrobat Reader (viewer of PDF format documents) is
available for free and its installation is included in the installation CD-ROM.
Databases:
Cable database:
Some type designations were modified according to the comments from users.
Values were updated according to the available documentation.
Extension of the database towards larger cross-sections.
Cables with EPR and XLPE insulation and fire resistance up to 180 mins added.

8/17/2019 XSpider 2.13 en Reference Manual
http://slidepdf.com/reader/full/xspider-213-en-reference-manual 192/236
______________________________________________________________________________________________
_______________________________________________________________________________________________________________________
184 xSpider, Reference manual
Busbar system database:
New busbar systems BD2-A and BD2-C up to 1200 A added.
Circuit-breaker database:
Type designations of small circuit breakers were changed in connection with the changes in the F&G
assortment (circuit breakers CLS6, PL7, PLHT, motor starters Z-MS, protective switches with circuit breaker
CKN, PFL7).
Update of sensitivity tables for miniature circuit breakers according to the available documentation. New types of circuit-breakers from the PMC series were added, replacing the older LCB line.
New types of circuit breakers from the NZM 1, 2, 3 series were added.
Update of the tripping characteristics was carried out for some types of the NZM 7,10,14 series circuit
breakers according to the available documentation.
New types of circuit breakers from the IZM 1, 2, 3 series were added, replacing the older series of IZM 32,
40, 50, 63.
Fuse database:
The allocation of the limiting characteristics for NH series fuses was checked.
C-type cylinder fuses were added according to the available documentation.
Switch-disconnector database:
Type designations of miniature switch-disconnectors were changed in connection with the changes in theF&G assortment.
New series of PSC switch-disconnectors was added, replacing the older HSD series.
New series of switch-disconnectors N 1, 2, 3, 4; PN 1, 2, 3 were added.
New series of switch-disconnectors IN 1, 2, 3 was added, replacing the older series IN 32, 40, 50, 63.
Print:
Possibility to define the number of copies prior to the print start, without the entry into the print driver. The
number of copies set in this manner has no influence on printing from other applications.
Correction of faults:
Print: elimination of the problem arising when printing large formats on individual smaller sheets.
Print: elimination of the problem arising when printing on color printers: not only the text, but also the lineobjects are in colors now.
Print: after printing out a wiring diagram, it is possible to print the tripping characteristics immediately without
any problems.
Installation: correction of the problem arising when transferring user databases from the previous installation.
4. Version 2.1.21, September 2003
Circuit-breaker database:
NZM4 circuit-breakers added, NZM..-M, -S, -ME circuit-breakers added
Update of tripping characteristics for NZM1,2,3,4 circuit-breakers according to the new catalogue valid as from
August 2003
General:
A variable licence system implemented, different for CZ, PL and other licensed users
Adjustment in dimensions of some dialogue panels for the needs of other language versions
Corrections of errors:
Elimination of the false message indicating that there is no selectivity for circuit-breaker/fuse cascade in cases
when no selectivity table is available for the respective fuse type
Wrong implementation of F-laying was corrected for files loaded from older versions (single-core cables
distance clamps).

8/17/2019 XSpider 2.13 en Reference Manual
http://slidepdf.com/reader/full/xspider-213-en-reference-manual 193/236
______________________________________________________________________________________________
_______________________________________________________________________________________________________________________
xSpider, Reference manual 185
5. Version 2.2.05, June 2004
General:
In principle, the 2.2 version does not differ significantly from the 2.1 version. The main benefit consists in
database update and the possibility to export graphics to DXF format.
New functions and computational possibilities:
The export of graphics to DXF was added (universal exchangeable format for CAD systems). Possibility ofsubsequent import of graphics (the wiring diagram with calculation results, tripping characteristic) to CAD
systems supporting DXF format, such as AutoCAD. Graphics breakdown into levels, colors and line types is
supported. Tags in the wiring diagram are exported as blocks. Basic information about the project is attached.
User interface:
Lists of nodes for calculation are now arranged in alphabetical order, which allows for an easier selection of the
node to be used in the calculation (e.g. for calculation of 3-phase or 1-phase short circuit in a specific node).
The list of network components to be used to plot the tripping characteristic is now arranged in alphabetical
order (according to the tag of the protection device), which allows for easier selection of the protection device /
cable pair, which are to be used to plot the tripping characteristic.
Functions allowing the user to work with busbar systems are blocked. It is not possible to insert the component
"Line - Busbar System"; access to the busbar system database is blocked. Previously designed projectscontaining some "Line - Busbar System" components can still be processed. Reason: the product group of
enclosed busbar trunking systems was sold to Siemens.
Databases:
Circuit-breaker database:
Modification of type designations of FAZ series circuit breakers according to Moeller requirements
Switching capacity of NZM1,2,3,4 circuit breakers for 690 V added
Update of PKZ motor starter database - change in the PKZM0 switching capacity, new PKZM01 series of
motor starters
Cable database:
The more accurate R0 values (active resistance, zero-sequence network) for some cables having the cross-
section of 35...300 sq. mm result in more accurate calculation of asymmetric short circuits.
Corrections:
Change when entering voltage systems – the phase voltage is entered at first and only then the delta voltage
Change in the text of the network identification above the title block - the phase voltage is indicated at first and
only then the delta voltage.
No program error in case there are more than 5 components between two nodes (i.e. more than the maximum
quantity allowed).
After clicking on “Current-carrying capacity” in the dialogue panel appearing during cable properties editing,
the correct value of the current-carrying capacity is displayed with respect to the laying also when a certain
laying is selected being out of the range defined by the standard and when there are more parallel branches used
(such as 2 parallel branches of 240 sq. mm cable with B2 laying method). More accurate calculation of voltage drops.
More accurate calculation of 1-ph short circuits in 1-ph IT networks supplied from a 1-ph isolation transformer.
6. Version 2.3.05, June 2005
General Information:
In principle, version 2.3 does not differ substantially from version 2.2. The main asset, besides the update of the
databases, is the improved concept of cascades and the option to transfer objects among projects by means of the
clipboard.
User interface:
As a new feature, the new installation program with a more convenient user interface also performs theautomatic setting of the *. SPI file association with the SPIDER program, and automatically creates an icon on
the desktop.

8/17/2019 XSpider 2.13 en Reference Manual
http://slidepdf.com/reader/full/xspider-213-en-reference-manual 194/236
______________________________________________________________________________________________
_______________________________________________________________________________________________________________________
186 xSpider, Reference manual
New functions Cut to Clipboard, Copy to Clipboard, and Paste from the Clipboard have been added, which
make it possible to transfer objects either among simultaneously opened projects or within the framework of a
project (objects are either components that form a wiring diagram or free graphics). The Ctrl+X, Ctrl+C, and
Ctrl+V standard keyboard shortcuts are available.
The new function Tags makes it possible to change component tags in bulk.
An automatic feature has been added that serves to display the release parameter settings in the component
wiring diagram for components with adjustable releases. The release parameter settings are also included in the
lists of components which comprise the component parameters.
The release parameter setting is transferred from the wiring diagram into the ‘Tripping Characteristics’ module
and back.
Identification of the release parameters has been changed: formerly, identification of the parameters according to
NZM 7,10,14 circuit-breakers (Ir , tr , Irm, Irmv, tv) was used; in the new version, identification of parameters
according to the catalogue for NZM 1-4 and IZM circuit-breakers is used (Ir , tr , Ii, Isd, tsd).
The position in the database tree and in the data table is saved for each database (for example: after inserting a
cable from the database, we insert a circuit-breaker; afterwards, when we open the cable database, the same
branch of the database tree and the same data table component will be selected as in the previous utilization).
Representation of results after the computation of voltage drops in networks with 1-ph outgoers has been
improved.
Improved selection of rectangles by means of the ‘Window’ type selection window.
New functions and computation possibilities:
Innovated assessment of the short-circuit current strength of protective devices that are connected to the
‘Switchboard Trunk’ component. As a new feature, it is assumed that the short circuit, which the protective
component at the outgoer has to withstand, can occur not only at the end of the line protected by this protective
component, but also immediately behind the circuit-breaker. So, in the new version, the breaking capacity of a
component is assessed with respect to the short-circuit current of the node to which the protective component is
connected (the ‘Switchboard Trunk’ component). This solution improves the margin of safety and complies with
the procedures that are used in important projects (industry, high-rise buildings, health service, etc.). It allows
the user to evaluate the computation results more easily.
Improved concept of cascades: The new function ‘Cascades’ makes it possible to define the incoming protective
components (at the incomers) and the outgoing protective components (at the outgoers) for each node formed by
the ‘Switchboard Trunk’ component. The breaking capacities of the outgoing protective components areassessed with respect to the incoming components (the limitation of the short-circuit current by means of a fuse,
as well as the interoperation of the circuit-breakers are taken into account).
As a new feature, the circuit-breaker / circuit-breaker cascades are evaluated for NZM.1(2)-A and PL7 (FAZ)
pairs.
Tripping characteristics: The feature of simulation of the I2t ON/OFF function has been added for circuit-
breakers with an electronic release; for circuit-breakers with a digital release, the computation has been
improved for the S-curve with the I4t switched on.
Databases:
The option to use enclosed busbar distribution systems in the same way as in version 2.1 has been restored: there
is the option to insert a ‘Line – Busbar System’ component. The database contains the general standard types of
enclosed busbar distribution systems; the database can be complemented by the user. Update of the database of circuit-breakers:
Adaptation of the database structure
The new series of PL6 modular circuit-breakers has been added (this series has replaced the CLS6 series).
The new series of PFL6 overcurrent protection residual current devices has been added (this series has
replaced the CKN6 series).
Update of the tripping characteristics of PL7-D and PLHT-C circuit-breakers
Update of the breaking capacities of PKZ motor starters
Update and complementation of the database of FAZN, FAZ and AZ modular circuit-breakers:
Update of the assortment – new current ranges have been added.
Update of the tripping characteristics
Types with S, K and Z characteristics have been newly included.
Update and complementation of the database of PMC 1,2,3,4 and NZM 1,2,3,4 power circuit-breakers:
New current ranges have been added.

8/17/2019 XSpider 2.13 en Reference Manual
http://slidepdf.com/reader/full/xspider-213-en-reference-manual 195/236
______________________________________________________________________________________________
_______________________________________________________________________________________________________________________
xSpider, Reference manual 187
Update of breaking capacities
Update of the release setting range
The tr OFF changeover switch (thermal release switch-off) for -ME and -VE releases has been added.
The I2t ON/OFF changeover switch has been added for the -VE release.
Update of the database of IZM power circuit-breakers:
Update of the release setting range
The L-curve (the overcurrent release; alternatives: I2t, I4t, tr OFF) and the S-curve (the short-circuit release;alternatives I
2t ON/OFF) are set separately for -U and -D releases.
The maximum setting of the release parameter Ii ≤ 0.8 · Ics for -D releases is tested.
The maximum setting of the release parameters Isd and tsd is tested in such a way that Isd ≤ 0.8 · Icw holds
true for -D releases.
NZM14 circuit-breakers have been removed because the production has been terminated.
Update of the database of switch disconnectors:
Adaptation of the database structure
New current ranges have been added for the ZP-A series.
The new series of IS modular switch disconnectors has been added (this series has replaced the Z-SE series).
New current ranges have been added for the PSC power switch-disconnector series.
P14 and NZM14 switch disconnectors have been removed because the production has been terminated.
Update of the database of fuses:
Adaptation of the database structure
Update of the assortment of blade-contact NH fuses with the gG characteristic according to the new
documentation (change in the assortment, change of the tripping and let-through current characteristics)
Blade-contact NH fuses with the gF characteristic have been added.
Printing, export:
A new option to print and export the table of cables
When printing or exporting the lists, you can turn off the indication of the complete file path.
Backward compatibility: Backward compatibility with the previous versions has been retained (starting from version 2.0).
For older projects, it is recommended that the PKZ, NZM 1...4, and IZM series circuit-breakers should be
inserted again (update of the breaking capacities and of the settings of the releases).
For older projects, it is recommended that the PL7 and FAZ circuit-breakers should be inserted again
(complementing of the data for correct assessment of the circuit-breaker/circuit-breaker cascades).
It is recommended that the types of circuit-breakers, switch-disconnectors and fuses that are not in production
any more should be replaced with new types.
7. Version 2.4.05, July 2006
General: In principle, version 2.4 does not differ from version 2.3. Practically, only the database was updated.
Calculations:
Improved calculation of voltage drops in networks with one-phase outlets – the current in the N conductor is
shown.
Database:
PLI circuit breakers added (modular circuit breakers 10kA with spring terminals on the outgoing side).
The support of NZM7,10,14 series circuit breakers was terminated. These circuit breakers can no longer be
inserted into new projects. When opening a project from a previous version, the user is asked to replace the
NZM7,10,14 series circuit breakers with currently supplied circuit breakers of NZM1,2,3,4 series.
The no longer supplied circuit breakers NZMB2-A125 and NZMN2-A125 were removed. The no longer supplied circuit breakers NZMB1-M.. and NZMN1-M.. for rated currents of 20-32 A were
removed.

8/17/2019 XSpider 2.13 en Reference Manual
http://slidepdf.com/reader/full/xspider-213-en-reference-manual 196/236
______________________________________________________________________________________________
_______________________________________________________________________________________________________________________
188 xSpider, Reference manual
The no longer supplied NZM..-S circuit breakers (circuit breakers without overload release) were removed.
The no longer supplied NZML... circuit breakers (breaking capacity of 150kA) were removed.
Correction of the assigned release parameters for circuit breakers IZMN2-A*.
The support for P7,10; NZM7,10 switch-disconnectors was terminated.
High voltage (HV) fuses and their tripping characteristics converted to the LV side were added. HV fuses cannot
be inserted into network projects, they can only be used in the 'Tripping Characteristics' module and are intended
only for the purpose of assessing the protection selectivity on the HV and LV side (settings of the circuit breakerrelease on the LV side).
Demo:
A new demo was added, presenting various solutions of parallel cables.
Corrections:
Correction of the incorrect calculation of voltage drop on the branch directly behind the transformer and the
incorrect value of the node voltage at the transformer (the voltage drops at the nodes and the voltage drops at other
branches remain unchanged).
Correction of a mistake: if a non-defined circuit breaker was included in a project (a circuit breaker inserted using
the “Group...” function, for which the parameters were not defined), it was not possible to open such saved project
again.
The breaking capacity of 1-phase connected protection devices is checked for 1-phase short circuit only.
8. Version 2.5.06, July 2007
General:
In principle, version 2.5 does not differ from version 2.4. Practically, only the database was updated.
User interface:
New function Find - searching and zooming any item from wiring diagram according to its tag. This function
improves orientation in large a complicated projects.
Calculations:
Coordination between protective device and cable by comparing cable time-current heating characteristic and
protective device tripping characteristic can be switched off (this test is not strictly required by IEC standard).Database:
LZM power circuit breakers were added; no longer supplied PMC circuit breakers were removed.
LN power switch disconnectors were added; no longer supplied PSC switch disconnectors were removed.
NZM..-S circuit breakers (circuit breakers without overload release) were added.
NZM..-A300 circuit breakers were added.
Cables according to standard IEC were added.
Generators by Caterpillar manufacturer were updated.
Compensation condensers by Frako manufacturer were added.
Corrections:
Corrected “idle alarm” invoked by incorrect assignment of protective device to cable after inserting part of wiring
diagram from clipboard by Paste function.
9. Version 2.6.01, July 2008
In general:
Version 2.6 is, in principle, no different from the previous versions. Only the database has been updated, and the
changes implied by the updated standard IEC 60364-4-41 (HD 60364-4-41:2007) have been reflected.
Calculations:
When calculating the fault disconnection time from the power source, the calculated impedance is multiplied by a
safety coefficient of 1.5 in accordance with IEC 60364-4-41 (HD 60364-4-41:2007).
The default value of the limit fault disconnection time from the power source for newly inserted protective devices
is set to 0.4s. This value is required for terminal circuits up to 32A in TN systems pursuant to IEC 60364-4-41
(HD 60364-4-41:2007). The option allowing the user to change this value is retained (e.g. allowing its increase up
to 5s for distribution circuits).

8/17/2019 XSpider 2.13 en Reference Manual
http://slidepdf.com/reader/full/xspider-213-en-reference-manual 197/236
______________________________________________________________________________________________
_______________________________________________________________________________________________________________________
xSpider, Reference manual 189
For user-defined cables, the value defined by the user is used for the rated current of the cable laid in air at 30°,
instead of the value calculated pursuant to the standards based on the conductor material and the insulation. This
gives the possibility to design own, user-defined cables, with higher current-carrying capacity. The user is
responsible for the correctness of the entered values.
Database:
Harmonisation of breaking capacities for modular devices:
EN/INT: For devices of PLS*, PLN*, PLHT, FAZ-PN, PKN* series protecting home and similar installations,
the breaking capacity Icn=Icu=Ics is defined in accordance with EN 60898;
EN/CZ, EN/RU, EN/BA: For devices of PL6, PL7, PLHT, FAZ-PN, PFL6 and PFL7 series protecting home
and similar installations, the breaking capacity Icn=Icu=Ics is defined in accordance with EN 60898;
EN/RO: For devices of CLS*, PLS*, PLN*, FAZ-PN, CKN* and PKN* series protecting building and similar
installations, the breaking capacity Icn=Icu=Ics is defined in accordance with EN 60898;
For FAZ, AZ circuit breakers to protect industrial installations, the breaking capacity Icu, Ics is defined in
accordance with EN 60947-2;
NZM circuit breakers:
NZMB2-A125, NZMN2-A125 circuit breakers added;
NZM3-A circuit breakers added (for circuit protection, with thermo-magnetic release);
NZM3-S circuit breakers added (for motor protection, without overload release);
4-pole circuit breakers added for all design versions; EN/INT, EN/RO: New possibilities of making cascades were added. As a new feature, the circuit-breaker /
circuit-breaker cascades are evaluated for NZMB(N)(H)1(2)-A + PLHT-B(C)(D) and NZMB(N)(H)1(2)-A +
PKNM-B(C) pairs.
EN/INT, EN/RO: Values of limit short circuit current for cascades NZMB(N)(H)1(2) and PLSM-B(C) were
corrected.
EN/CZ, EN/RU, EN/BA: New possibilities of making cascades were added. As a new feature, the circuit-
breaker / circuit-breaker cascades are evaluated for NZMB(N)(H)1(2)-A + PLHT-B(C)(D) and
NZMB(N)(H)1(2)-A + PFL7-B(C) pairs.
EN/CZ, EN/RU, EN/BA: Values of limit short circuit current for cascades NZMB(N)(H)1(2) and PL7-B(C)
were corrected.
N1, PN1 switch-disconnectors – texts in the database tree corrected.
EN/INT: LZM power circuit breakers added for all design versions.
10. Version 2.7.02, July 2009
In general:
Version 2.7 brings, in addition to an improved user interface and enhanced automatic dimensioning, new
calculation possibilities allowing you to apply simultaneous factors and use the software for radial networks. The
changes are aimed at making the software easier to use for beginners and occasional users. The algorithms were
optimised in order to increase the calculation speed, which will be highly appreciated, in particular, by
experienced users dealing with more complex projects.
User interface:
Redesigned Group function: Modified icon in the main menu; the icon was visually accentuated with white background (optically attracts
the user as the first important function).
Modified dialogue panel; the groups are selected based on images, and no longer based on text.
Current groups improved and new groups added; a simple demo example can now be drawn in 3 clicks only
(separate components such as network, transformer, circuit-breaker, line, etc. do no longer have to be used for
standard simple situations).
Entering parameters for high voltage supply network:
Icons added in the dialogue panel, accompanied with help that will show comments related to the entered
values of the short-circuit power.
A new dialogue panel added – a table with a list of typical cases with high voltage supply networks, indicating
a typical short-circuit power value. The table was compiled based on the recommendations of the power
distributor.

8/17/2019 XSpider 2.13 en Reference Manual
http://slidepdf.com/reader/full/xspider-213-en-reference-manual 198/236
______________________________________________________________________________________________
_______________________________________________________________________________________________________________________
190 xSpider, Reference manual
A new Calculation dialogue panel:
Modified icon in the main menu; the icon was visually accentuated with white background (optically attracts
the user as the second important function).
Modified dialogue panel; calculations grouped as follows:
Basic calculations (for most users),
All calculations (the same structure as until now; for experienced users),
Parameter settings (for experienced users). A graphical logo added to each calculation for easier orientation.
The dialogue panel size and position can be adjusted and remain retained also after the software is closed.
A new Calculation results dialogue panel:
Once the calculation is completed, the results of all checks are displayed in a single dialogue panel; the user
needs fewer clicks to obtain the result.
The dialogue panel size and position can be adjusted and remain retained also after the software is closed.
The Database window size and position are saved, including the partition position.
Tripping characteristics:
The position of the window with selected tripping characteristics to be edited is saved.
The position of the window with the circuit-breaker release settings is saved when handling the tripping
characteristics (the dialogues no longer overlap the diagram area). The window with the circuit-breaker release settings contains an Apply button, allowing the user to draw the
tripping characteristics curve based on the current parameter values, without having to leave the dialogue
panel.
Possibility to insert a protective device also when the characteristics of the cable assigned to it are already
displayed; it is useful for cables protected from both sides when there is, on one side, only a short-circuit
protecting fuse and, on the other side, an overload circuit-breaker.
If the comparison of the circuit-breaker tripping characteristics and the cable time-current heating
characteristics is disabled, the display of the cable heating characteristics is not offered at all.
Improved Preview dialogue window: the width of the text column changes automatically when the dimensions
change.
Possibility to open the last edited files through the list in the File drop-down menu (similarly to other applications
such as Word, Excel, ...). Additional keys added for frequently called functions.
Calculations:
Possibility to define utilization factor Ku:
Can be defined for loads (motor, general load);
The factor is taken into account in both radial and meshed networks;
Example for motor application: 7.5kW motor fitted in the project, with maximum 80% load during ordinary
operation – utilization factor Ku=0.8;
Example for general load application: general load constituted by a socket circuit composed of 10 sockets,
with 16A each – the nominal current is In=10x16=160A; however, the simultaneous consumption is max. 10%
only – utilization factor Ku=0.1.
Possibility to define simultaneous factor Ks: Can be defined for nodes where the network line splits (Switchboard trunk component);
Defines the simultaneousness of consumptions from the node (ratio between the number of devices in
operation and the total number of devices);
Example: there are 3 outlets connected to a node = 3 loads with a nominal current of: 100A, 500A, 1000A, and
a simultaneous factor was defined as Ks=0.5; the current flowing to the node is 0.5x(100+500+1000) = 800A;
Taken into account only with radial networks;
Not taken into account with meshed networks.
A new calculation algorithm for voltage drops and load distribution:
For radial networks – significantly higher calculation speed;
Respects the simultaneous factors Ks;
Automatic detection of radial network; automatic application of the new algorithm; The original algorithm is used for meshed networks, using admittance matrix; Ks ignored;
Possibility to use the original algorithm also for radial networks is retained.

8/17/2019 XSpider 2.13 en Reference Manual
http://slidepdf.com/reader/full/xspider-213-en-reference-manual 199/236
______________________________________________________________________________________________
_______________________________________________________________________________________________________________________
xSpider, Reference manual 191
Redesigned AutoDimensioning algorithm in order to extend the possibilities for its use, in particular, for
beginners:
AutoDimensioning switch can be enabled by default for all new components inserted in the wiring diagram.
As standard, the AutoDimensioning switch is disabled by default. This default setting can be modified in the
Options.
Possibility to AutoDimension both 1-phase and 3-phase circuits simultaneously in one project:
Number of wires for cables / busbars is determined automatically based on the phases connected.
Number of poles of protective devices is determined semi-automatically based on the phases connected and
taken into account the pre-selection in the Options.
Possibility to AutoDimension simultaneously:
Cu / Al, PVC / XLPE cables;
Cu / Al busbars, air insulated / sandwich design;
The required conductor material and insulation can be defined for every component after its insertion in the
diagram, or the pre-selection from the Options is used.
Modular as well as power circuit-breakers, fuses and switch-disconnectors are assigned based on the position
of the device in the diagram. The product series preference is determined in the Options (in case of
equivalence, the higher ranking types are preferred, such as NZM are preferred to LZM; PL7 are preferred to
PL6, ...).
Lines with transformer / generator are dimensioned based on the transformer / generator. Other lines aredimensioned based on the loads entered.
Check added for power supplies (transformers, generators):
Overload check added.
Overload protection check added.
Components on the transformer line must be dimensioned for the nominal current of the transformer.
A button added in the transformer definition dialogue panel to calculate the nominal current of the transformer.
Elimination of voltage drops on the transformer; the transformer always works as an ideal device and the
voltage on the secondary terminals is always equal to the nominal voltage of the network regardless of its load.
Solving situations when the cable is protected from both sides:
Only short-circuit protection is provided on one side (typically with a fuse).
Overload protection is provided on the other side (typically a circuit-breaker used also as main switch). Both protected devices are now considered, and an error message is displayed only if overload protection is
not secured by either device.
However, both devices continue to be considered when the fault tripping time from power source is calculated
because – unlike overload – short-circuit can also occur along the cable.
Solving situations when there is a switch-disconnector and a protective component on one line: The switch-
disconnector is checked for sufficient pre-protection.
The contribution of motors is ignored when 1-phase short-circuit is calculated (in case of a 3-phase short-circuit,
the contribution of motors is applied in the same manner as in previous versions).
Variables listed by the software were renamed – all variables are now based on English words. Variables are not
translated to national languages.
New Selectivity function to evaluate the selectivity of circuit-breakers based on circuit-breaker/circuit-breaker
selectivity tables specified in the catalogue; two versions are available:
Selectivity (comparison of both circuit-breakers selected from the database): Two devices can be selected from
the database independently on the switching diagram edited (no drawings necessary). Selectivity will then be
showed based on the selectivity tables, accompanied by the relevant comments.
Selectivity (comparison of circuit-breakers in the project): A cascade must be defined for every network node.
The table gives a selectivity evaluation between the incoming and the outgoing circuit-breaker based on the
selectivity tables, accompanied by general comments. The table can be printed.
System changes:
Updater implemented – automatic check and download of software updates from the Moeller website.
Possibility to restore the default position of floating windows (suitable e.g. when an external screen is
disconnected from laptop).
Name adjustment of the EXE application shown in Windows. Names of root directory files were modified (in order to make the orientation easier when preparing other
language versions).

8/17/2019 XSpider 2.13 en Reference Manual
http://slidepdf.com/reader/full/xspider-213-en-reference-manual 200/236
______________________________________________________________________________________________
_______________________________________________________________________________________________________________________
192 xSpider, Reference manual
Code page settings corrected for when the wiring diagram is exported to DXF in the Russian version. The Cyrillic
alphabet is now correctly displayed in all AutoCAD language versions.
Database:
Minor changes in the product range of Moeller power circuit-breakers:
NZMH1-M40 …100 types were added (for motor protection; breaking capacity Icu=100kA)
EN/RO, EN/INT version: Extended cascading possibilities for circuit-breaker/circuit-breaker where the LZM-
series incoming circuit-breaker serves as back-up protection of the outgoing circuit-breaker.
11. Version 2.7.05, October 2009Database:
Circuit breakers IZM1, IZM2, IZM3 were replaced by IZMX16 and IZM20, IZM32, IZM40, IZM63;
Known limitations:
Possibility to OFF instantaneous short circuit release Ii is not implemented for all release types.
Tripping characteristic is simplified in section of instantaneous short circuit release for P type release.
Special curve shapes for over current release (L curve) are not implemented for P type release:
IEEE moderately inverse, very inverse, extremely inverse
IEC-A normal inverse, IEC-B very inverse, IEC-C extremely inverse
Corrections: Problems with inserting and editing items in user defined database were fixed.
Problem with Auto Dimensioning was fixed: if maximum tripping time in middle branches was set to very small
value, there was not any way to continue with calculation (after clicking on Yes or No calculation was broken).
Problem with Auto Dimensioning was fixed: XLPE cables are assigned correctly in all regional versions.
Problem with date of last new version check wrong interpretation was fixed. Attempt to new version check on web
site is not displayed so often.
12. Version 2.8.1, July 2010In general:
All corrections, improvements and changes, released during last year, were implemented to the compilation.
Database has been updated.System changes:
New version of Updater (tool for automatic check and download updates from website) has been implemented.
Problem with printing list of inconvenient devices has been fixed.
Cable type designation in group "coupling with cable" has been corrected.
Displaying of cable current-carrying capacity on "Cable properties" dialogue has been improved (cable length and
heating time constant Tau cannot be set to display cable current-carrying capacity).
Algorithm of AutoDimensioning has been improved for outlets up to 63A where both circuit breaker and cable are
AutoDimensioned.
Database:
Circuit breakers PLHT type - nominal currents 20-50A have been added.
Combined MCB/RCD PFL7 type - nominal currents 20-40A have been added.
Combined MCB/RCD mRB6 type (3+N pole, Icn=6kA) has been added.
Motor starters with electronic release PKE type have been added.
Fuses D01, D02 type have been added.
Fuses DII, DIII - tripping and limiting characteristics have been corrected according to latest version of
Eaton/Moeller "Mother catalogue".
Fuses C10, C14, C22 - tripping characteristics have been revised according to latest version of catalogue.
Eaton busbar trunking systems, MEM XP type (800-4000A), have been added.
13. Version 2.9.1, June 2011In general:
All corrections, improvements and changes, released during last year, were implemented to the compilation.
System changes:
New version of Updater (tool for automatic check and download updates from the Eaton website) has been
implemented. Possibility to set Server Time Out value has been added.

8/17/2019 XSpider 2.13 en Reference Manual
http://slidepdf.com/reader/full/xspider-213-en-reference-manual 201/236
______________________________________________________________________________________________
_______________________________________________________________________________________________________________________
xSpider, Reference manual 193
Part III: xSpider - Solved Examples

8/17/2019 XSpider 2.13 en Reference Manual
http://slidepdf.com/reader/full/xspider-213-en-reference-manual 202/236
_______________________________________________________________________________
_______________________________________________________________________________________________________________________
194 xSpider, Reference manual
25. xSpider - Solved Examples _______________________________________________
The examples below demonstrate the basic principles of working with xSpider. It is presumed that
the program has been successfully installed by the user and is fully operational. The basicelementary knowledge of operations with applications running under Windows (working with the
mouse, operations with files etc.) as well as fundamental orientation in the issues concerning low-
voltage network dimensioning is also presumed. The instructions refer to the relevant chapters from
the xSpider, Reference Manual where you can find a more detailed explanation.
25.1 Wiring diagram - creation, editing
In this case we will show how a new network wiring diagram (network topology) is created and
how the basic tools for working with graphics are used. In the end we will carry out a quick check
of the designed network (the calculation issues are covered with more detail in the next example).The entire assignment is solved in the DEMO- Net wor k. SPI file. You will need approximately
2.0 hour of time to complete the task.
Assignment: design an industrial building power supply in xSpider. Draw the network topology
and check the used components for suitability.

8/17/2019 XSpider 2.13 en Reference Manual
http://slidepdf.com/reader/full/xspider-213-en-reference-manual 203/236
_______________________________________________________________________________
_______________________________________________________________________________________________________________________
xSpider, Reference manual 195
Parameters of the particular components are specified as follows:
NET1 high-voltage suply network 22 kV, Sk’’=500MVA TR1 SGB oil transformer, 22/0.4 kV, Sr=250kVA, Pk=4.1kW, uk=4% W1 line between the transformer and the main distribution board for the technology
cable 1-CYKY 3x240+120, 5m, 1 parallel branch, installed in air (E)
FA1 400A main protection, Moeller brand circuit breaker, Icu=50kA, NZM series, selective withelectronic release
TECH1 Technology 1 supply, Pn=40 kW, cosPhi=0.9, 100% utilization (Ku=1) W2 Feed line to technology 1
cable 1-CYKY 4x25, 50m, 1 parallel branch, installed on wall (C)FA2 Technology 1 protection
80A protection, Moeller brand circuit breaker, Icu=25kA, NZM series, circuit protection with
thermomagnetic release TECH2 Technology 2 supply, Pn=80 kW, cosPhi =0.9, 100% utilization (Ku=1) W3 Feed line to technology 1
cable 1-CYKY 3x70+50, 120m, 1 parallel branch, installed on wall (C)
FA3 Technology 1 protection160A protection, Moeller brand circuit breaker, Icu=25kA, NZM series, circuit protection with
thermomagnetic release, overload release set to 85 % (Ir=136A)M1 Power supply for the pumping station technology, motor Pn=30 kW, 100% utilization (Ku=1) W4 Feed line to the pumping station
cable CYKY 4x16, 30m, 1 parallel branch, installed in ground (D)FA4 Protection for the pumping station technology
63A protection, Moeller brand circuit breaker, Icu=25kA, NZM series, for motor protection, with
thermomagnetic release, overload release set to 90 % (Ir=56A)
Program launch and initialization of a new project
1. Launch the xSpider program (see Chap. 9.2).
2. The Tip of the Day window appears after startup. Please read the Tip for this
startup and close the window by clicking on the Close button. The pop-up of this
window at startup can be overridden, therefore, the window might not be shown.
For more details see Chap. 22.1.
3. A new project with default settings is activated automatically at startup. The activation of a
new project at the program startup can be disabled. If no network is activated (only the
gray main screen is displayed (see Chap. 10.1)), activate one by clicking on the New
Project icon (see Chap. 20.3).
4.
Set the drawing area - A4 format (see Chap. 18.4). The A4format is probably set already since it is the most frequent case
and this format is in standard set as default for new projects.
Let’s take a look at the setting procedure; this step may be
skipped if an identical case is repeated:
Select the Page Setup item from the File drop-down
menu.
In the subsequently opened dialogue panel, select the A4
format from the group of standard formats.
Close the dialogue panel by clicking OK. The drawing
area appearance will be adjusted according to the selectedformat.

8/17/2019 XSpider 2.13 en Reference Manual
http://slidepdf.com/reader/full/xspider-213-en-reference-manual 204/236
_______________________________________________________________________________
_______________________________________________________________________________________________________________________
196 xSpider, Reference manual
5. Set the network type and the voltage system (see Chap. 11.1). In this case we have a TN
400/230 V network. This network is probably set already since it is the most frequently
solved case and this type is in standard set as default for new projects. Let’s take a look at the
setting procedure; this step may be skipped if an identical case is repeated:
Select the time Network: type, voltage system from the
Tools drop-down menu. A dialogue panel will open, in which you set the TN
network type (by its selection from the offered options) and
the 400/230 V voltage system (by its selection from the
offered options):
Close the dialogue panel by clicking OK. The selected
network type will appear above the title block.
6. Save the new created project to a data file (see Chap. 20.1).
Click on the Save icon.
A dialogue panel will open, in which you enter the information about your
project (see Chap. 17). The entered data will be written in the title block (descriptionfield) and will be used for project identification. Fill in the particular items e.g. as
follows:
Close the dialogue panel by clicking OK.
Another dialogue panel will open - the standard Save dialogue panel as you are familiar
with it from other programs (for a detailed description see Chap. 20.1), in which you
enter the directory (folder) and the file name where the project is to be saved (e.g. the
DOCUMENTS directory and EXAMPLE0. SPI file name). Your screen should look as
follows:

8/17/2019 XSpider 2.13 en Reference Manual
http://slidepdf.com/reader/full/xspider-213-en-reference-manual 205/236
_______________________________________________________________________________
_______________________________________________________________________________________________________________________
xSpider, Reference manual 197
Drawing a network topology
1. First of all, insert the supply group (supply network, transformer, main protection).
Click on the Group icon (see Chap. 11.14).
Select the Power supply tab.
Select the group “Power supply from high-voltage supply network, transformer connected witha cable” (click on the image, the name of the group will be displayed below the image).
Note the image: the group includes all the necessary components. The violet crosshair
indicates the position of the group insertion point.
Click Insert.
The mouse pointer will change. The pointer form determines the position of the symbol
with respect to the insertion point (the symbol is directed downwards under the
insertion point).
Click the left mouse button to determine the position of the group insertion point in the
graphics area of the project window (in the middle of the upper part of the drawing
area). The group is drawn. Click the right mouse button to exit the group insertion mode.
2. In the previous step, you have inserted the tags only; now you must add the electrical
parameters of the individual components according to the assignment specified in the
beginning.
Double click on the Network component (see Chap. 11.2) with the NET1 tag. A
dialogue panel will open, in which you enter the values required according to the
assignment. Click OK to close the dialogue panel:
Clicked group insertion point.
22 kV high-voltage supply network.
3-phase connection
Short-circuit power of the supplynetwork is part of the entry. Click on
the question-mark icon to view a
table with typical values for
different cases of power supply
networks. If you lack other data, you
can use some of the values offered.
Exact data can be requested from
the power distribution company.
Component tag,
default value was left.
The short-circuit current is
calculated automatically.

8/17/2019 XSpider 2.13 en Reference Manual
http://slidepdf.com/reader/full/xspider-213-en-reference-manual 206/236
_______________________________________________________________________________
_______________________________________________________________________________________________________________________
198 xSpider, Reference manual
Double click on the Transformer component (see Chap. 11.4) with the TR1 tag. You
are required to enter a standard transformer manufactured by SGB, therefore you can
use the database of components supplied with the program.
Click on the Database button. The database explorer is activated, in this case the
transformer database (see Chap. 16.1). Roll down the “SGB Transformers“ branch (by
clicking on the „+“ sign or by double clicking on the branch), „Oil transformers“, „22kV“
and click on the „22/0.400 kV“. In the data table, select the type „DOT 250/20 (10)
(22/0.4kV)“, Sr=250 kVA and click Insert.
All transformer parameters will be entered.
Click on the button Nominal current ??. A dialogue panel will open, in which the
transformer nominal current Intr=361A will be indicated. Remember this value – you
will need it when dimensioning the cable and entering the circuit-breaker settings.
Close the dialogue panel by clicking OK.
Double click on the Cable component (see Chap. 11.7) with the W1 tag.
Enter the cable length - here 5 meters.
Click on the Define installation button. A dialogue panel will open, in which you select
the method of installation „(E) Multi-core cables in air“; set the number of additional
circuits in the grouping to 0 (the cable is led separately), ambient temperature - here 30
°C, the user coefficient will not be applied - value 1. Close the dialogue panel by
clicking OK.
Set: connected phases: 3-phase connection, the maximum voltage drop in this line is 5%
(see Chap. 4.1) - should the voltage drop exceeds this value, the item will be marked as
an error component.
You are required to enter a standard CYKY cable, therefore you can use the database of
components supplied with the program.
Click on the Database button. The database explorer is activated, in this case the cable
database (see Chap. 16.1). Roll down the „Copper (Cu) conductors“ (by clicking on the
„+“ sign or by double clicking on the branch), „CYKY type“ and click on the „4 wires (L1
Short-circuit power for 1-phase short
circuit does not have to be specified
with the necessary HV network (if
not known), calculation of
asymmetric short circuits will be less
Definition of the network by means ofimpedances – not used here because
the short-circuit power is known.

8/17/2019 XSpider 2.13 en Reference Manual
http://slidepdf.com/reader/full/xspider-213-en-reference-manual 207/236
_______________________________________________________________________________
_______________________________________________________________________________________________________________________
xSpider, Reference manual 199
L2 L3 PEN)“ branch. In the data table select the „1-CYKY 3x240+120“ type (as you can see
from the following columns of the data table, the cross-section of the phase conductor is
240 mm2, the cross-section of the PEN conductor is 120 mm2, the rated current for
cables laid in air (E, F) is 430 A) and click Insert.
All line parameters will be entered.
Note: a cable of this cross-section must be used to connect the transformer, although theconsumption of the currently connected loads will be lower (only 247A). Components
on the transformer line must be dimensioned according to the transformer nominal
current (Intr=361A) for if the switchgear would be expanded in the future and the
transformer would be used at full power.
Close the dialogue panel by clicking OK.
Double click on the Circuit-breaker component (see Chap. 11.9) with the FA1 tag.
Set the connected phases: 3-phase connection; 5 s as the maximum disconnection time
(see Chap. 3.7); Operating state „On“.
We want to insert a standard Moeller NZM-series, selective circuit-breaker with
electronic release, so we will use the component database supplied with the software.
Note: It is recommended to use selective circuit-breakers with electronic release to
protect transformer, due to the simple manner of securing selectivity with the outgoing
circuit-breakers of the particular outlets. In case of a fault at an outlet, only the circuit-
breaker closest to the fault point will trip, while the rest of the installation remains in
operation. For more details see Chap. 4.4 and 14.4.2.
Click on the Database button. The database explorer is activated, in this case the
circuit-breaker database (see Chap. 16.1). Roll down the “Power circuit-breakers NZM
1,2,3,4 series (up to 1600A)” branch (by clicking on the “+” sign or by double clicking on
the branch), “Protection of circuits, generators; selective (-VE)”, “Nominal current In=Iu=250-
630A (NZM3-series)”, and click on the “Icu=50kA (415V)” branch. In the data table selectthe “NZMN3-VE400” type and click Insert.
All circuit-breaker parameters will be entered.
Click on the Releases tab. Adjust the thermal release setting Ir to 90% (Ir=360A). This
is necessary in order to ensure overload protection of the transformer (transformer
Sr=250kVA, nominal current Intr=361A).
Close the dialogue panel by clicking OK.
3. Zoom in the upper half of the drawing area by means of the Zoom Window function to make
the texts more legible:
Click on the Zoom Window icon (see Chap. 13.4). Click with your mouse in the left part of the drawing area. Drag a rectangle
defining the area to be zoomed in. The rectangle must cover in full the
picture drawn. Click the upper right corner of the window. The area will be
zoomed in.
If you failed in performing this operation correctly, you can return to the
previous image by means of the Zoom Previous function (see Chap. 13.5)
or - in case of several unsuccessful attempts in a row - you can use the
Zoom All function to view the drawing area in full (see Chap. 13.6). Repeat
the Zoom Window function until you obtain the required display.
Zoom
Window
Zoom
Previous
Zoom All

8/17/2019 XSpider 2.13 en Reference Manual
http://slidepdf.com/reader/full/xspider-213-en-reference-manual 208/236
_______________________________________________________________________________
_______________________________________________________________________________________________________________________
200 xSpider, Reference manual
4. Insert the branch representing the power supply for technology 1:
Click on the Group icon (see Chap. 11.14).
Click on the Outlets tab.
Select the “General outlet with circuit-breaker ” group.
Click Insert.
With you left mouse button, click the position of the group insertion point on the
trunk/busbar (blue horizontal line close to the left margin). The group is drawn.
End the group insertion by clicking the right mouse button.
If the insertion was not successful, the group is not connected to the trunk – use
Undo and repeat the procedure.
5. Adjust the image to make the entire diagram drawn clearly visible:
Click on the Zoom Realtime icon (see Chap. 13.3).
The standard mouse pointer (usually an arrow) is changed to the Zoom Realtime
pointer (arrow up/down). Click to the image with your mouse, hold the left button down
Component type.
Group
insertion
oint.
Tag identifying the component in the wiring
diagram; the automatically offered options
were left for these components.
Conductor type, line length and
code of the installation method
(here it is E – installation in air).
3-phase circuit identification.

8/17/2019 XSpider 2.13 en Reference Manual
http://slidepdf.com/reader/full/xspider-213-en-reference-manual 209/236
_______________________________________________________________________________
_______________________________________________________________________________________________________________________
xSpider, Reference manual 201
and move the mouse slowly. When moving upwards, the image is enlarged (zoomed
in); when moving downwards it is reduced (zoomed out). Some texts are not drawn
during the move. Note: on slower computers, the movement can be jerky or the
graphics might not move at all. In such case use the Zoom Window function to enlarge
the image (see Chap. 13.4) and the Zoom All function to reduce the image (see Chap.
13.6).
Press Esc to exit the function.
Click on the Pan icon (see Chap. 13.2).
The standard mouse pointer (usually an arrow) is changed to the pan pointer
(arrows up/down, left/right). Click to the image with your mouse, hold the left button
down and move the mouse slowly. The graphics is dragged simultaneously with the
mouse move. Some texts are not drawn during the move. Note: on slower computers
and with complicated and large diagrams, the movement can be jerky or the graphics
might not move at all. In such case use the scroll bars at the side of the graphics area.
Press Esc to exit the function.
Tip: the pan function can be also activated by pressing the middle mouse button (thescroll wheel).
6. Enter the electrical parameters of the branch components:
Double click on the Circuit-breaker component (see Chap. 11.9) with the FA2 tag.
Select the Moeller circuit breaker of „NZMB1-A80“ type from the database in the manner
you are already familiar with from above.
Double click on the Cable component (see Chap. 11.7) with the W2 tag. Enter the cable
length - here 50 meters. Through the Define installation button, set the method of
installation „(C) Single-core or multi-core cables on a wall“; number of additional circuits in
the grouping is 0, ambient temperature of 30 °C, the user coefficient 1. Connected phases: 3-phase connection, the maximum voltage drop in this line is 5%. Select the „1-
CYKY 4x25“ type cable from the database in the manner you are already familiar with
from above.
Double click on the Load component (see Chap. 11.12) with the LOAD1 tag.
A dialogue panel will open, in which you enter the values required according to the
assignment. Click OK to close the dialogue panel:
Component tag can be
modified as required.
The voltage must correspond to
the selected voltage system.
3-phase connection.
You specify the rated power
consumption, the current is
calculated automatically.
The maximum voltage drop in the
load in relation to the power sourcevoltage. Should the voltage drop
exceed this value, the component
will be marked as error.
We presume that the load will
be permanently running at
100% - utilization factor Ku=1.

8/17/2019 XSpider 2.13 en Reference Manual
http://slidepdf.com/reader/full/xspider-213-en-reference-manual 210/236
_______________________________________________________________________________
_______________________________________________________________________________________________________________________
202 xSpider, Reference manual
7. Since the branch representing the power supply for technology 2 has very similar parameters,
you can copy the branch created previously.
Click on the Copy icon (see Chap. 12.3).
Select the components of the copied branch. Use the cross-wise selection window: click
with your left mouse button in the image so that the selection window is on the right
near the FA2 circuit breaker, however, it may not interfere in the text (point B1 in theimage). If you move the mouse to the left from the clicked point, the selection window
is dragged crosswise (all objects lying within the window and all objects partially
reaching into the window will be selected). Click the opposite corner of the selection
window to the left from the TECH1 motor (point B2). The selected components will be
highlighted.
If you select a different component by mistake, press Esc to abort the function and
activate Regen from the View drop-down menu to regenerate the image (see Chap.
13.1) and then use the Copy function again.
If the named components are selected, right click on your mouse to exit the selection
mode. Click the first point of the shift vector (the point behind which you are going to „carry“
the copied objects) - the upper end of the FA2 circuit breaker (point B3).
Click the other point of the shift vector (where the objects should be copied) - on the
busbar to the left from the end of the FA1 circuit breaker, however, not directly
underneath it (point B4).
Click the right mouse button to exit the copying mode.
9. Adjust the electrical parameters of the copied branch (note that the tags were automatically
adjusted during the copying in order to avoid any duplicities):
Double click on the Circuit-breaker component (see Chap. 11.9) with the FA3 tag.
Select the Moeller circuit breaker of „NZMB2-A160“ type from the database in the
manner you are already familiar with from above. Go to the Releases tab and set the
„Overload release“ to 85% (Ir =136A).
Double click on the Cable component (see Chap. 11.7) with the W3 tag. Adjust the
cable length - here 120 meters. Select the „1-CYKY 3x70+50“ type cable from the
database in the manner you are already familiar with from above.

8/17/2019 XSpider 2.13 en Reference Manual
http://slidepdf.com/reader/full/xspider-213-en-reference-manual 211/236
_______________________________________________________________________________
_______________________________________________________________________________________________________________________
xSpider, Reference manual 203
Double click on the Load component (see Chap. 11.12) with the TECH2 tag. Adjust the
rated input to 80 kW.
10. Insert the motor branch representing the pumping station technology.
Click on the Group icon (see Chap. 11.14).
Click on the Outlets tab.
Select the “Motor outlet with circuit-breaker ”.
Click Insert.
With you left mouse button, click the position of the group insertion point on the
trunk/busbar (blue horizontal line close to the right margin). The group is drawn.
Click the right mouse button to exit the group insertion mode.
If the insertion was not successful, the group is not connected to the trunk or it is
too close to the previously inserted components – use Undo and repeat the procedure.
11. Adjust the electrical parameters of the newly inserted branch:
Double click on the Circuit-breaker component (see Chap. 11.9) with the FA4 tag.
Select the Moeller circuit breaker for motor protection of „NZMB1-M63“ type from the
database in the manner you are already familiar with from above. Go to the Releases
tab and set the „Overload release“ to 90% (Ir =56.7A).
Double click on the Cable component (see Chap. 11.7) with the W2 tag. Enter the cable
length - here 30 meters. Through the Define installation button, set the method of
installation „(D) Single-core or multi-core cables directly in ground without additional
protection“; number of additional circuits in the grouping is 0, ambient temperature of 20
°C, the user coefficient 1. Connected phases: 3-phase connection, the maximum voltage
drop in the line is 5%. Select the „CYKY 4x16“ type cable from the database in the
manner you are already familiar with from above.
Double click on the Motor component (see Chap. 11.12) with the M1 tag. Select the
standard 30 kW motor from the database in the manner you are already familiar with
from above. Utilization factor Ku=1; we presume that the motor will be permanently
running at full power.
12. Save the performed changes to a data file - click on the Save icon.
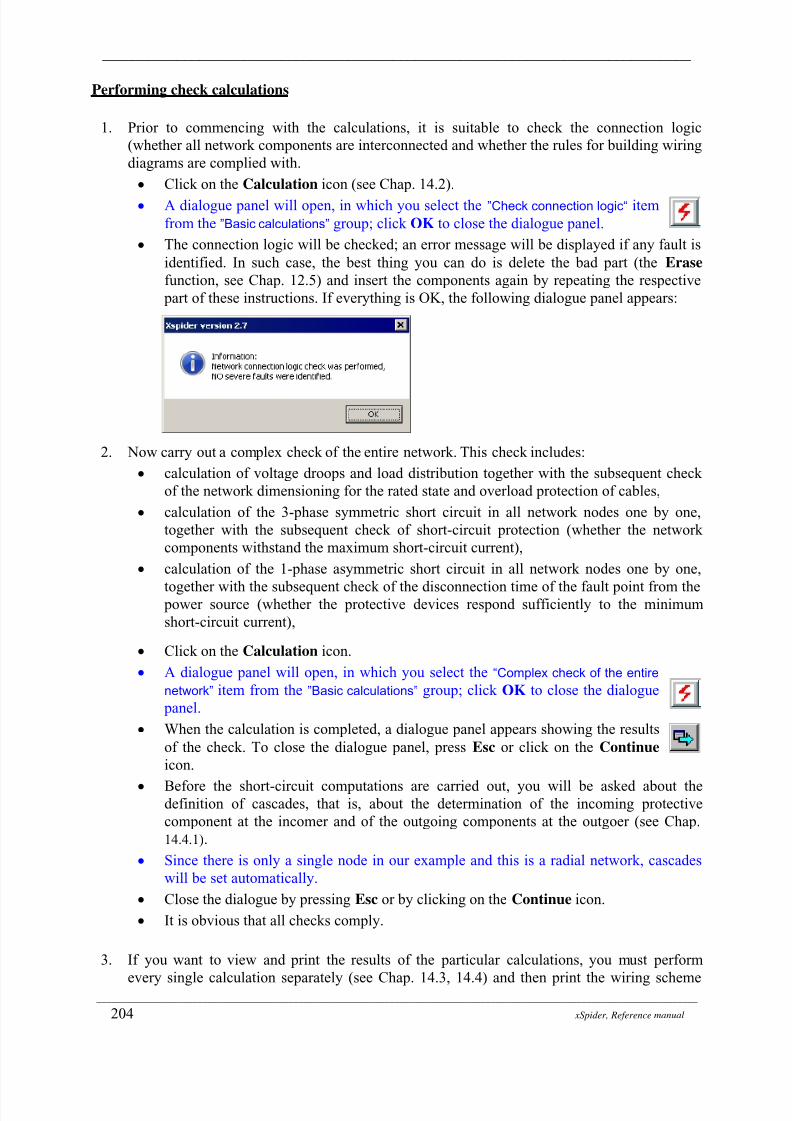
8/17/2019 XSpider 2.13 en Reference Manual
http://slidepdf.com/reader/full/xspider-213-en-reference-manual 212/236
_______________________________________________________________________________
_______________________________________________________________________________________________________________________
204 xSpider, Reference manual
Performing check calculations
1. Prior to commencing with the calculations, it is suitable to check the connection logic
(whether all network components are interconnected and whether the rules for building wiring
diagrams are complied with.
Click on the Calculation icon (see Chap. 14.2). A dialogue panel will open, in which you select the ”Check connection logic“ item
from the ”Basic calculations” group; click OK to close the dialogue panel.
The connection logic will be checked; an error message will be displayed if any fault is
identified. In such case, the best thing you can do is delete the bad part (the Erase
function, see Chap. 12.5) and insert the components again by repeating the respective
part of these instructions. If everything is OK, the following dialogue panel appears:
2. Now carry out a complex check of the entire network. This check includes:
calculation of voltage droops and load distribution together with the subsequent check
of the network dimensioning for the rated state and overload protection of cables,
calculation of the 3-phase symmetric short circuit in all network nodes one by one,
together with the subsequent check of short-circuit protection (whether the network
components withstand the maximum short-circuit current),
calculation of the 1-phase asymmetric short circuit in all network nodes one by one,together with the subsequent check of the disconnection time of the fault point from the
power source (whether the protective devices respond sufficiently to the minimum
short-circuit current),
Click on the Calculation icon.
A dialogue panel will open, in which you select the “Complex check of the entire
network” item from the ”Basic calculations” group; click OK to close the dialogue
panel.
When the calculation is completed, a dialogue panel appears showing the results
of the check. To close the dialogue panel, press Esc or click on the Continue icon.
Before the short-circuit computations are carried out, you will be asked about the
definition of cascades, that is, about the determination of the incoming protective
component at the incomer and of the outgoing components at the outgoer (see Chap.
14.4.1).
Since there is only a single node in our example and this is a radial network, cascades
will be set automatically.
Close the dialogue by pressing Esc or by clicking on the Continue icon.
It is obvious that all checks comply.
3. If you want to view and print the results of the particular calculations, you must perform
every single calculation separately (see Chap. 14.3, 14.4) and then print the wiring scheme

8/17/2019 XSpider 2.13 en Reference Manual
http://slidepdf.com/reader/full/xspider-213-en-reference-manual 213/236
_______________________________________________________________________________
_______________________________________________________________________________________________________________________
xSpider, Reference manual 205
with the calculation results (see Chap. 18.3), or the table - the list of network components
with the calculation results (see Chap. 18.2). This issue is covered in detail in the following
example, see Chap. 25.2.
4. Save the performed changes to a data file - click on the Save icon.
5. The example is completed. Close the xSpider program by clicking on the X in the
upper right corner of the program window.

8/17/2019 XSpider 2.13 en Reference Manual
http://slidepdf.com/reader/full/xspider-213-en-reference-manual 214/236
_______________________________________________________________________________
_______________________________________________________________________________________________________________________
206 xSpider, Reference manual
25.2 Wiring diagram editing and basic calculations - radial network
In this example we are going to show the method of building a network wiring diagram by
combining the particular components together and performing the basic calculations (voltage drops
and load distribution, short-circuit calculations). The initial point is the demo example in file
DEMO- Radi al Net wor k. SPI , which is included in the xSpider standard installation. A new
outlet will be inserted into the already designed radial network, and the basic calculations will be
carried out. Subsequently, the network component parameters will be adjusted in order to comply
with the requirements. You will need approximately 2 hour of time to complete the task.
1. Launch the xSpider program (see Chap. 9.2).
2. Open the file DEMO- Radi al Net wor k. SPI with the demo example project.
Use the function Open Demo (see Chap. 20.2.1). This file contains an already
designed simple radial network. We will demonstrate the basic operations in the
program through a modification of this example. You should see the following drawing:
3. Use the Save As function from the File drop-down menu (see Chap. 20.1) to save the file to a
different directory under a different file name (such as in the DOCUMENTS directory, file
name EXAMPLE1. SPI ). This is essential in order to retain the original, intact initial state of
the demo example so that it is possible to refer to it again at a later point in time, if necessary.
4. By means of the Zoom Window function (see Chap. 13.4) enlarge the image of the bottom
Rv2 busbar with the connected branches.
Activate the Zoom Window function.
Click to the bottom left corner above the title block. Drag a rectangle defining
the area to be zoomed in. The rectangle must include the entireRv2
bus - bluehorizontal line. Click the upper right corner of the window. Your screen
should look approximately as follows:
Zoom
Window

8/17/2019 XSpider 2.13 en Reference Manual
http://slidepdf.com/reader/full/xspider-213-en-reference-manual 215/236
_______________________________________________________________________________
_______________________________________________________________________________________________________________________
xSpider, Reference manual 207
If you failed in performing this operation correctly, you can return to the previous
image by means of the Zoom Previous function (see Chap. 13.5) or - in case of
several unsuccessful attempts in a row - you can use the Zoom All function to view
the drawing area in full (see Chap. 13.6). Repeat the Zoom Window function untilyou obtain the required display.
5. Now erase all components comprising the M4- 1f motor outlet (all the way to the
right).
Activate the Erase function (see Chap. 12.5).
Select components marked with M4- 1f , CAB10, FA10 tags. Use the cross-wise
selection window: click with your left mouse button so that the selection window is on
the right near the FA1 circuit breaker, however, it may not interfere in the text (point
B1). If you move the mouse to the left from the clicked point, the selection window is
dragged crosswise (all objects lying within the window and all objects partiallyreaching into the window will be selected). Click the opposite corner of the selection
window to the left from the M4- 1f motor (point B2). The selected components will be
highlighted.
If you select a different component by mistake, press Esc to abort the function and
activate Regen to regenerate the image (see Chap. 13.1) and then use the Erase
function again.
If the named components are selected, right click on your mouse to exit the selection of
components. The selected components will be erased.
Zoom
Previous
Zoom All
Erase

8/17/2019 XSpider 2.13 en Reference Manual
http://slidepdf.com/reader/full/xspider-213-en-reference-manual 216/236
_______________________________________________________________________________
_______________________________________________________________________________________________________________________
208 xSpider, Reference manual
Your screen should look approximately as follows:
6. Now you should create a new motor outlet connected via the Rv2 bus, comprising a standard
asynchronous 3-phase motor of 7.5 kW.7. First of all, insert the motor.
Activate the Motor function (see Chap. 11.11).
Click with your mouse to define the position of the motor symbol in the wiring diagram
(in the bottom right part about at the level of LOAD2). The symbol will go downwards
from the clicked point as indicated by the mouse pointer shape.
A dialogue panel will open, in which you enter the motor parameters. The motor is one
of the so-called inserted components (for explanation of this term see Chap. 1.2) and all
its parameters must be specified.
Motor
The selection of objects to be erased by the
cross-wise window. All objects lying within
the window and all objects partially reaching
to the window will be selected.
First clicked point of the selection window.
Second clicked point of the selection window.

8/17/2019 XSpider 2.13 en Reference Manual
http://slidepdf.com/reader/full/xspider-213-en-reference-manual 217/236
_______________________________________________________________________________
_______________________________________________________________________________________________________________________
xSpider, Reference manual 209
Use a standard motor from the database. Click on the Database button. The database
explorer is activated, in this case the
motor database (see Chap. 16.1). The
database includes standard components
and can be modified and expanded by
the user (see Chap. 16.2). In the data
table, select the „7.5 kW“ motor and
click Insert.
All motor parameters will be entered.
Utilization factor Ku=1 (we presume
that the motor will be permanently
running at full power). Click OK to
close the dialogue panel - the Motor
component will be inserted in the wiring diagram.
8. Now insert the protective device. For the motor outlet, use the PKZM motor starter from
Moeller, in which both the thermal protection as well as the short-circuit protection of the
motor are integrated.
Activate the Circuit-breaker function (see Chap. 11.9).
Click with your mouse to define the position of the circuit-breaker symbol in
the wiring diagram (on the busbar above the motor symbol). The symbol will
go downwards from the clicked point as indicated by the mouse pointer shape.
A dialogue panel will open, in which you enter the circuit-breaker parameters. The
circuit breaker is one of the so-called user-defined components (for explanation of this
term see Chap. 1.2), its parameters can be, but do not have to be entered depending on
the program mode you are using. In this example you use the program in the control
mode (for explanation of this term see Chap. 1.2), therefore, the circuit-breaker parameters must be specified. Use the component database again.
Click on the Database button. The database explorer is
activated, in this case the circuit-breaker database (see
Chap. 16.1). Roll down the „Motor starters, PKZ type“
branch (by clicking on the „+“ sign or by double
clicking on the branch), and click on the „PKZM0 type
(0.16-32A), rotary knob control“. In the data table, select
the type „PKZM0-16“ starter (its current corresponds to
the 7.5 kW motor) and click Insert.
All circuit-breaker parameters will be entered. Makesure that the operating state of the circuit breaker is set
to „On“. Click OK to close the dialogue panel - the Circuit-breaker component will be
inserted in the wiring diagram.
9. Now insert the line connecting the protective device with the motor. Use a standard cable
CYKY 4x1.5. The line length is 50 m and the cable will be laid on cable ladders.
Activate the Line-Cable function (see Chap. 11.7).
Now you must specify the cable path. Click the first point of the cable - you
must click precisely at the bottom end of the circuit-breaker symbol in order to ensure a
„conductive“ connection. Click the second cable point - you must click precisely at the top end of the circuit-
breaker symbol. If your symbols are not located directly under each other, you must
Circuit-
breaker
Cable

8/17/2019 XSpider 2.13 en Reference Manual
http://slidepdf.com/reader/full/xspider-213-en-reference-manual 218/236
_______________________________________________________________________________
_______________________________________________________________________________________________________________________
210 xSpider, Reference manual
first click the breakpoint and only then the point at the symbol end. If the drawing
doesn’t go well the way it should, press Esc to abort the function and activate Regen to
regenerate the image (see Chap. 13.1) and then use the Line-Cable function again.
A dialogue panel will open subsequently, in which you enter the cable parameters.
Cable is one of the so-called inserted components and all its parameters must be
specified. Enter the cable length - 50 m.
Use a standard cable from the database. Click on the Database button. The database
explorer is activated, in this case the cable database (see Chap. 16.1). The database
includes standard components and can be modified and expanded by the user (see Chap.
16.2). Roll down the „Copper (Cu) conductors“, then the „CYKY type“ and click on the „4
wires (L1, L2, L3, PEN)“ branch. In the data table, select the „CYKY 4x1.5“ type cable (as
you can see from the following columns of the data table, the cross-section of the phase
conductor and the PEN conductor is 1.5 mm2, the rated current for cables laid in air (E,
F) is 18.5 A which is sufficient for a 7.5 kW motor in the first approximation) and click
Insert. Tip: you can also insert the component by double clicking on the respective
item in the data table.
Through the Define installation button, set the method of cable installation - select „(E)
Multi-core cables on cable ladder“ (for explanation of the term „installation“ see Chap.
2.2.3); the number of additional circuits in the grouping is 0 (the cable is led
separately), ambient temperature of 30 °C, the user coefficient 1 (not applied). Close
this dialogue panel by clicking OK.
Click OK to close the next dialogue panel - the Line-cable component will be inserted
in the wiring diagram.
10. By means of the Save function (see Chap. 20.1), save the performed changes to a file
on your hard disk in order to have them stored in case of any accident and for future
use.
11. The new outlet is now defined. Another outlet of the same or identical parameters can be
created by means of the Copy function (see Chap. 12.3) with the subsequent editing of
properties for the copy made (see Chap. 12.1).
12. Prior to commencing with the calculations, it is suitable to check the connection logic
(whether the new outlet is connected correctly, whether there are no gaps between the
components or whether the components do not overlap), see Chap. 14.2. Activate theCalculation function (see Chap. 14). A dialogue panel will open, in which you select
the item ”Check the network connection logic” from the ”Basic calculations” group; then click OK
Identification of the 3-phase branch
Cable tag; the automatically assigned value is used here.
Identification of the method of installation
according to IEC (see Chap. 2.2.3).
Specified cable length.
Cable type.
Note: the tags CAB1 , CAB2 , etc. are used for older lines. The W1 ,
W2 , etc. line tag is offered as default in the new examples. The
component tags can be modified by the user in any way and serve
or identification of the respective component in the wiring
diagram. Various tags within a project are not in the way ofcorrect program functioning.

8/17/2019 XSpider 2.13 en Reference Manual
http://slidepdf.com/reader/full/xspider-213-en-reference-manual 219/236
_______________________________________________________________________________
_______________________________________________________________________________________________________________________
xSpider, Reference manual 211
to close the dialogue panel. The connection logic will be checked; an error message will be
displayed if any fault is identified. In such case, the best thing you can do is delete the new
branch - see step 5 in these instructions, and insert it again by repeating the steps 6 - 10 of
these instructions. If everything is OK, the following dialogue panel appears:
13. Now calculate the voltage drops and load distribution (see Chap. 14.3):
Activate the Calculation function (see Chap. 14).
A dialogue panel will open, in which you select the item ”Voltage drops and load
distribution” from the ”Basic calculations” group (see Chap. 14.3). When the calculation iscompleted, the following checks are carried out:
Check of voltage drops in the nodes with respect to power source voltage. Such nodes
are not compliant where the voltage drop exceeds the limit set when inserting the
component. When inserting the new branch, we used the preset value taken over from
the program settings under the Options (5 percent for branches, 10 percent for nodes).
Everything complies in our case.
Check of voltage drops in branches. Such branches are not compliant where the voltage
drop exceeds the limit set when inserting the component. Everything complies in our
case.
Check of circuit breakers and fuses for nominal current. Such devices are not compliant
where the current in the branch exceeds the nominal current of the device (switching off
takes place at the nominal state already). Here you can see that the FA1 circuit-breaker
is not suitable - it would switch off at the rated state already, and the S1 switch-
disconnector would be overloaded. Let’s ask ourselves a question: Is it really incorrect
this way? Answer: Not necessarily, due to simultaneousness. The loads connected to the
Rv2 switchboard trunk might never be activated at the same time. This can be
simulated in xSpider by setting the simultaneous factor in node Rv2, or by switching
some circuit-breakers off. For more detailed information on simultaneousness, see the
theoretical introduction in Chap. 2.1. Here it is apparent that xSpider is not an
“automatic designer”; it is only a tool, aid and the designer must correctly interpret theresults delivered by the software. Here we thus conclude that the FA1 circuit-breaker is
compliant, which can be subsequently verified through simulated operation when some
loads are switched off, or through modification of the simultaneous factor in node Rv2
and repeated calculation.
Check of cables for rated current load. Such components are not compliant where the
current in the branch exceeds the rated current of the component (determined with
respect to its installation, ambient temperature, cable grouping etc). It is a similar
situation as in the previous case.
Check of cable overload protection. The nominal current of the protective device must
be smaller than the cable current-carrying capacity determined with respect to itsinstallation and ambient temperature (first term from article 433.2 from IEC 60364-4-
43). Second term I2≤1.45*Iz from article 433.2 from IEC 60364-4-43 must be

8/17/2019 XSpider 2.13 en Reference Manual
http://slidepdf.com/reader/full/xspider-213-en-reference-manual 220/236
_______________________________________________________________________________
_______________________________________________________________________________________________________________________
212 xSpider, Reference manual
completed also. The ampere-second heating characteristic of the cable must lie above
the tripping characteristic of the circuit-breaker (this test is not required by IEC 60364-
4-43 and can switched off, but this method is more accurate). For more details see the
theoretical introduction, Chap. 2.3. The ampere-second characteristics of the cable in
relation to the respective protective device can be viewed by means of the Tripping
Characteristics module (see Chap. 15). Here you can see that the FA6/ CAB6 pair is
not compliant - the explanation of reasons follows in the next step.
The list of error components can be printed out - for future needs, to correct the diagram
components etc. Drag the partition and the corners to change the dialogue panel size.
To close the dialogue panel, press Esc or click on the Continue icon.
Voltage and drops are displayed in the network nodes and branches, and
unsuitable components are highlighted. Because the network includes 1-phase
consumption, the values are displayed for the particular phases; this makes the
assessment of phase distribution of load easier. By means of the Zoom
Window function (see Chap. 13.4), enlarge the diagram segment enough to
make the values legible. Try also the Pan function (see Chap. 13.2 and the
Zoom function (see Chap. 13.3) and view the entire diagram in full. For
interpretation of the values see the end of Chapter 14.3.
14. Print the wiring scheme with the calculation results by means of the Print function (see Chap. 18.3).
Click on the Print icon.
A dialogue panel will open, in which you double click on the item called„Network wiring diagram with calculation results“.
Zoom
Window
Pan
Zoom
List of checks
carried out.
List of error
components and
description of
errors.

8/17/2019 XSpider 2.13 en Reference Manual
http://slidepdf.com/reader/full/xspider-213-en-reference-manual 221/236
_______________________________________________________________________________
_______________________________________________________________________________________________________________________
xSpider, Reference manual 213
Another dialogue panel will open, in which you check the connected printer and the
paper supplied (A4 format is anticipated as default) and select the „Full drawing area to
the selected format“ item. This option will enlarge/reduce the diagram so that the entire
diagram including the frame fits to the selected paper format supplied in the printer
(usually A4).
Click on Preview - an exhibit of the printout will appear. Click OK to close the preview window.
Click OK - the print itself will be carried out.
15. Now you can view the tripping characteristics for the unsuitable FA6/ CAB6 pair.
Activate the module of Tripping characteristics (see Chap. 15).
Draw the characteristics of the FA6/ CAB6 pair (see Chap. 15.4).
Activate the function Insert component/cable from network project.
A list will open subsequently, in which you double click on the line with the
FA6/ CAB6 pair.
The circuit-breaker tripping characteristic will be blue (close the dialogue panel by clicking OK without changing anything).
The ampere-second heating characteristic of the cable will be green for instance.
Click on the Color button and select the color from the color range. Click OK to
close the dialogue panels.
Click Close to close the dialogue panel with the list of network components.
You can see that the characteristics for the cable and the circuit-breaker are touching each
other - the IEC requirement for cable overload protection is not complied with - for more
details see Chap. 2.3.
16. Now modify the cable CAB6 so that the standard requirement for cable overload protection is
met - a larger cable cross-section must be selected.
Use the Exit function from the File menu or click on the X in the upper right corner ofthe window to close the window of the „Tripping Characteristics“ module (see Chap.
15.8.5).
The tripping
characteristic of the
circuit-breaker.
Time/current
temperature-risecharacteristic of the
cable.
The characteristics of
the cable and of the
circuit-breaker
intersect – the
requirement stipulated
by the IEC standard for
the protection of the
cable against overload
has not been met.

8/17/2019 XSpider 2.13 en Reference Manual
http://slidepdf.com/reader/full/xspider-213-en-reference-manual 222/236
_______________________________________________________________________________
_______________________________________________________________________________________________________________________
214 xSpider, Reference manual
Adjust the image so that you can clearly see the outlet containing the CAB6 cable
(functions Zoom All, then Zoom Window and Pan, as the case may be).
Double click on the CAB6 cable - thus activating the mode for properties editing (see
Chap. 12.1). A dialogue panel will appear in the form identical to the one shown when
inserting the cable.
Click on the Database button and select the „CYKY 4x10“ cable from the data table (seeChap. 16.1), thus strengthening the cable by 2 grades.
Close the dialogue panel by clicking OK. The calculation results disappear - they would
not correspond to the new network configuration anymore.
Repeat step 15 - now you can see that there is a sufficient distance between the
characteristics, the IEC standard requirement for cable overload protection is complied with.
Close the window of the „Tripping Characteristics“ module.
Repeat step 13 - calculation of voltage drops: the error concerning the insufficient
protection of FA6/ CAB6 does not occur anymore.
17. By means of the Save function (see Chap. 20.1), save the performed changes to a file
on your hard disk in order to have them stored in case of any accident and for future
use.
18. Now calculate the 3-phase short circuit:
Activate the Calculation function (see Chap. 14).
A dialogue panel will open, in which you select the item ”Short-circuit currents: 3-
phase symmetric short-circuit Ik3p” from the ”All calculations” group.
Select the node where the short circuit is to occur, i.e. the M4 node in this case.
Now, you are asked about the definition of cascades, that is, about the determination of
the incoming protective component at the incomer and of the outgoing components at
the outgoer for each node that is formed by the ‘Switchboard Trunk ’ component (seeChap. 14.4.1). In the demonstrational example, the cascades are already set: for the Rv1
node, the FA8 is the incoming circuit-breaker (a circuit-breaker at the incomer), the
other ones are of the outgoing type (at the outgoers). The breaking capacities of the
outgoing circuit-breakers will be assessed with respect to the incoming circuit-breaker.
For the Rv2 node, the incoming component can not be defined (there is a switch
disconnector at the incomer).
Close the window by pressing the Esc key or by clicking on the Continue icon.
The computation will be carried out, and a chart will be displayed of the time
behaviour of the short-circuit current. It is apparent that the first half-wave of the short-
circuit current does not exceed the rest too much – so, the peak short-circuit current willnot be too high and the situation will quickly stabilize. Close the window with the chart
by clicking on the small cross at the right corner or by pressing the Esc key. Note: The

8/17/2019 XSpider 2.13 en Reference Manual
http://slidepdf.com/reader/full/xspider-213-en-reference-manual 223/236
_______________________________________________________________________________
_______________________________________________________________________________________________________________________
xSpider, Reference manual 215
option to display the window with the chart may have been switched off in the program
settings; in that case, the chart will not be displayed (switching on the option – see
Chap. 21.4).
Checks of the particular network components follow:
Check of circuit breakers and fuses for breaking capacity. Such devices are not
compliant for which the breaking short-circuit current in the branch exceeds the breaking capacity of the component. The breaking capacity of the device is determined
by the Ics or Icu value in case of circuit breakers - depending on the setting of the
„Dimension for …“ switch (see Chap. 11.7), or by the Icn value in case of fuses.
Everything complies in our case.
Check of switch-disconnectors for nominal current load. The switch disconnector will
not disconnect the short circuit, but must be able to withstand the short-circuit current in
the short term. Such devices are not compliant where the effective heating current in the
branch per 1 s exceeds the short-time withstand current Icw(1s) of the component.
Check of cables/busbars for short-circuit current load. Such devices are not compliant
where the effective heating current in the branch per 0.1 s exceeds the short-timewithstand current Icw(0.1s) of the component. For more details see the theoretical
introduction, Chap. 3.6. Everything complies in our case.
The values for Ik ’’ and Ikm are displayed in the node
where the short circuit occurred; the Ik ’’ current is
calculated as it „flows“ through the entire network
(for explanation of meaning of the variables see
Chap. 3.2). By means of the Zoom Window
function (see Chap. 13.4), enlarge the diagram
segment enough to make the values legible. Try also
the Pan function (see Chap. 13.2 and the Zoom function (see Chap. 13.3) and view the entire
diagram in full. Note that the program takes the
contributions from motors into account.
18. Repeat the previous item and bring about a short circuit in node Rv1 – in this case, the FA3
circuit-breaker does not conform to the condition, while the other ones do conform. Why?
How do we assess the breaking capacities of the circuit-breakers in the cascade?
All the components
connected to this node must
withstand this short-circuit
current (that is, a shortcircuit immediately behind
the component, not only at
the end of the protected line).

8/17/2019 XSpider 2.13 en Reference Manual
http://slidepdf.com/reader/full/xspider-213-en-reference-manual 224/236
_______________________________________________________________________________
_______________________________________________________________________________________________________________________
216 xSpider, Reference manual
19. Induce a short circuit in the NET1 node and repeat the previous step. Note the short-circuit
current waveform - the surge short-circuit current is significant here.20. Now calculate the 1-phase short circuit:
Activate the Calculation function (see Chap. 14).
A dialogue panel will open, in which you select the item ”Short-circuit currents: 1-phase
short-circuit Ik1p” from the ”All calculations” group.
Select the node where the short circuit is to occur, i.e. the M4 node in this case.
Now, you are asked about the definition of the cascades – the cascades were
already set in the previous step. So, only close the dialogue by pressing the Esc
key or by clicking on the Continue icon.
When the computation has been carried out, the checks of the individual components of
the network follow:
Check of circuit breakers and fuses for breaking capacity. Everything complies in our
case, which is logical since the 3-phase short circuit complied and the short-circuit
current for the 1-phase short circuit will always be lower
Check of switch-disconnectors for nominal current load. The switch disconnector will
not disconnect the short circuit, but must be able to withstand the short-circuit current in
the short term. Such devices are not compliant where the effective heating current in the
branch per 1 s exceeds the short-time withstand current Icw(1s) of the component.
Protection against dangerous voltage in non-conductive parts (check for the failure
disconnection time from source). It is carried out for 1-phase short circuits only. Suchcomponent, which is the closest to the short-circuit point, is not compliant for which the
disconnection time exceeds the limit set when inserting the component. When inserting
If it is not possible that the outgoing protective
component might interoperate with the
incoming one, it is always assessed separately,
without regard to the setting of the cascades
(in this case, the FA2 and FA3 motor starters).
The FA8 incoming circuit-breaker
serves as a backup protection of
the outgoing circuit-breakers atnode Rv1.
If the outgoing protective
component might interoperate with
the incoming protective
component, a check is carried out
to establish whether the
anticipated cut-off short-circuit
current is not greater than the limit
specified by the manufacturer for
the given pair. The fact that the
circuit-breaker is assessed as acascade is indicated by an
information message.
The FA3 motor starter must be
replaced with a different one,
one with a higher breaking
capacity, e.g. PKZM4-16.

8/17/2019 XSpider 2.13 en Reference Manual
http://slidepdf.com/reader/full/xspider-213-en-reference-manual 225/236
_______________________________________________________________________________
_______________________________________________________________________________________________________________________
xSpider, Reference manual 217
the new branch, we used the preset
value taken over from the program
settings under the Options (0.4s).
You can see that the new inserted
branch is not suitable. Therefore, you
must use a cable with larger cross-
section to reduce the impedance of
the fault loop.
Check of cables/busbars for short-
circuit current load. The cable in the
new branch is not compliant (the
short-circuit current will flow
through the conductor for a relatively
long time and, during that period of
time, the conductor will be overheated).
Check of the PEN conductor for short-circuit current load. It is carried out only for 1- phase short circuits in case the PEN conductor cross-section is smaller than the phase-
conductor cross-section. Such devices are not compliant where the effective heating
current in the branch per 0.1 s exceeds the short-time withstand current I cw(0.1s) of the
PEN cable conductor.
To close the dialogue panel, press Esc or click on the Continue icon.
21. Now modify the cable W10 so that the standard requirement for disconnection time of the
failure point from the power source is met - a larger cable cross-section must be selected.
Adjust the image so that you can clearly see the outlet containing the W10.
Double click on the W10 cable - thus activating the mode for properties editing (see
Chap. 12.1). A dialogue panel will appear in the form identical to the one shown wheninserting the cable.
Click on the Database button and select the „CYKY 4x4“ cable from the data table (see
Chap. 16.1), thus strengthening the cable by 2 grades.
Close the dialogue panel by clicking OK. The calculation results disappear - they would
not correspond to the new network configuration anymore.
Repeat the previous step - calculation of the 1-phase short circuit in the M4 node: the
error in the disconnection time test does not occur anymore; disconnection will take
place within 0.0108s, which means that the cable could possibly be unnecessarily
oversized.
Print the wiring scheme with the calculation results by means of the Print function (see
Chap. 18.3).
Now repeat the check for the 3-phase short circuit (the short-circuit current increases
due to the enlarged cable cross-section) - everything is OK.
Print the wiring scheme with the calculation results by means of the Print function (see
Chap. 18.3). You can also print the list of network components with their parameters or
with the calculation results (see Chap. 18.1, 18.2).
22. By means of the Save function (see Chap. 20.1), save the performed changes to a file
on your hard disk in order to have them stored in case of any accident and for future
use.23. The example is completed. Close the xSpider program by clicking on the X in the upper right
corner of the program window.

8/17/2019 XSpider 2.13 en Reference Manual
http://slidepdf.com/reader/full/xspider-213-en-reference-manual 226/236
_______________________________________________________________________________
_______________________________________________________________________________________________________________________
218 xSpider, Reference manual
25.3 Overview of demo examples provided with the program
Files with the demo examples are located in the . . . \ xSpi der \ DEMO directory. They are
intended as a presentation of the program possibilities, on one hand, and for inspiration and as an
initial point to help you solve your specific problems, on the other hand.
In order to load a demo file in the program, use the Open Demo function (see Chap. 20.2.1).
In the next step, use the Save As function from the File drop-down menu (see Chap. 20.1) to
save the example to a different directory under a different file name (such as in the DOCUMENTS
directory, file name EXAMPLE- x. SPI ). This is essential in order to retain the original, intact
initial state of the demo example so that it is possible to refer to it again at a later point in time, if
necessary. During the program upgrade, the demo examples are usually updated as well, therefore,
the original files can be replaced with new ones.
Note: examples taken over from the older program version use the line tags CAB1 , CAB2 , etc. The W1 , W2 ,
etc. line tag is usually offered as default in the new examples. The component tags can be modified by the
user in any way and serve for identification of the respective component in the wiring diagram. Various tags
within a project are not in the way of correct program functioning.
25.3.1 DEMO-RadialNetwork
File: DEMO- Radi al Net wor k. SPI . An example of a simple radial network supplied from a low-
voltage network. The initial situation in the example is not debugged on purpose in order to provide
an opportunity to demonstrate some error states. This example is used as the initial point in Chap. 25.2.

8/17/2019 XSpider 2.13 en Reference Manual
http://slidepdf.com/reader/full/xspider-213-en-reference-manual 227/236
_______________________________________________________________________________
_______________________________________________________________________________________________________________________
xSpider, Reference manual 219
25.3.2 DEMO-MeshedNetwork
File: DEMO- MeshedNet wor k. SPI . An example of a simple meshed network supplied from two
independent high-voltage network power sources. The initial situation in the example is not
debugged on purpose in order to provide an opportunity to demonstrate some error states.

8/17/2019 XSpider 2.13 en Reference Manual
http://slidepdf.com/reader/full/xspider-213-en-reference-manual 228/236
_______________________________________________________________________________
_______________________________________________________________________________________________________________________
220 xSpider, Reference manual
25.3.3 DEMO-Simultaneous-and-Utilization-Factors
File: DEMO- Si mul t aneous- and- Ut i l i zat i on- Fact or s. SPI . An example of a simple radial
network, explaining the application of the simultaneous factor (in a network node) and the
utilization factor (for loads).

8/17/2019 XSpider 2.13 en Reference Manual
http://slidepdf.com/reader/full/xspider-213-en-reference-manual 229/236
_______________________________________________________________________________
_______________________________________________________________________________________________________________________
xSpider, Reference manual 221
25.3.4 DEMO-Busbar
File: DEMO- Busbar . SPI . An example of how the supply of machines in an industrial facility can be
solved by means of a busbar distribution, when the branches to the individual machines are
protected separately in fuse boxes, but the „backbone-distribution“ segments between the boxes are
not protected. The aim is to verify the protection of the individual branches.

8/17/2019 XSpider 2.13 en Reference Manual
http://slidepdf.com/reader/full/xspider-213-en-reference-manual 230/236
_______________________________________________________________________________
_______________________________________________________________________________________________________________________
222 xSpider, Reference manual
25.3.5 DEMO-LoadLooping
File: DEMO- LoadL oopi ng. SPI . An example of how the so-called load looping can be solved: A
backbone cable run is led and the branches to the individual facilities are led out from the fuse
boxes. The backbone cable run segments between the junction boxes are not protected. The aim is
to verify the voltage drops and the protection of the individual branches.

8/17/2019 XSpider 2.13 en Reference Manual
http://slidepdf.com/reader/full/xspider-213-en-reference-manual 231/236
_______________________________________________________________________________
_______________________________________________________________________________________________________________________
xSpider, Reference manual 223
25.3.6 DEMO-Cascade
File: DEMO- Cascade. SPI . An example of how you can solve a circuit-breaker/fuse cascade (backup
protection of the circuit breaker) and limitation of the short-circuit current through a fuse.

8/17/2019 XSpider 2.13 en Reference Manual
http://slidepdf.com/reader/full/xspider-213-en-reference-manual 232/236
_______________________________________________________________________________
_______________________________________________________________________________________________________________________
224 xSpider, Reference manual
File: DEMO- Casc ade- CBr eak- CBr eak. SPI . An example of a circuit-breaker/circuit-breaker
cascade solution.

8/17/2019 XSpider 2.13 en Reference Manual
http://slidepdf.com/reader/full/xspider-213-en-reference-manual 233/236
_______________________________________________________________________________
_______________________________________________________________________________________________________________________
xSpider, Reference manual 225
25.3.7 DEMO-Network
File: DEMO- Net wor k. SPI . An example of a simple radial network - supply of an industrial building
with motor load. The approach applied to create this example is described step by step in Chapter 25.1.

8/17/2019 XSpider 2.13 en Reference Manual
http://slidepdf.com/reader/full/xspider-213-en-reference-manual 234/236
_______________________________________________________________________________
_______________________________________________________________________________________________________________________
226 xSpider, Reference manual
25.3.8. DEMO-Network-1F
File: DEMO- Net wor k- 1F. SPI . An example of radial network with one-phase consumptions.
After calculating the voltage drops and load distribution (see Chap. 14.3), the load of every
individual phase is determined (current in the phase, voltage drop), which allows you to assess the
load distribution in phases.
25.3.9. DEMO-Network-TN690
File: DEMO- Net wor k- TN690. SPI . An example of how a simple meshed TN network can be solved
with the 690 V voltage level (such as network in a welding shop). The impact of the voltage system
on the breaking capacity of the circuit breakers is demonstrated (see Chap. 11.9).

8/17/2019 XSpider 2.13 en Reference Manual
http://slidepdf.com/reader/full/xspider-213-en-reference-manual 235/236
_______________________________________________________________________________
_______________________________________________________________________________________________________________________
xSpider, Reference manual 227
25.3.10 DEMO-Network-IT
File: DEMO- Net wor k- I T. SPI . An example of a simple IT network representing the isolated medical
system (ZIS) for instance. Supply is provided from the TN supply network, the impedances in the
connection point are specified (as obtain by calculation for the TN supply network in a separate
project - see Chap. 14.5). The correct method of connecting an isolation transformer is
demonstrated.
25.3.11 DEMO-ParallelCables
File: DEMO- Par al l el Cabl es . SPI . An example demonstrating various methods of connection
and simulation of parallel cable branches (every branch has its own separate protection, all parallel
branches are protected with one common protection device).

8/17/2019 XSpider 2.13 en Reference Manual
http://slidepdf.com/reader/full/xspider-213-en-reference-manual 236/236
_______________________________________________________________________________
Notes: