xxk light unit guide - physicslocker 2/files... · xx unit guide © harcourt ... seeing the light...
TRANSCRIPT

XX Unit guide
Sheet 1 of 1© Harcourt Education Ltd 2004 Catalyst 2This worksheet may have been altered from the original on the CD-ROM.
K Light
Where this unit fits in Prior learningThis unit builds on:ideas introduced in unit 3F Light and shadows and unit 6F How we see things.
The concepts in this unit are: light as energy, how light travels, how light is reflected, effects of materials on light, origin of colour.This unit leads onto:sound travel is compared to light in unit 8L Sound and hearing. Light as a wave is studied at key stage 4.
This unit relates to:the drawing of objects in different lighting conditions is covered in unit 8A Objects and viewpoints in theart and design scheme of work.
To make good progress, pupils startingthis unit need to:• know that light travels from a source• know that light is reflected from
shiny surfaces.
Framework yearly teaching objectives – Energy• Recognise that when light travels from a source it is transferring energy; use this idea to describe the nature and propagation of light and explain
the behaviour of light, including reflection and absorption.
Expectations (from QCA Scheme of Work)At the end of this unit …
… most pupils will … … some pupils will not have madeso much progress and will …
… some pupils will have progressedfurther and will …
in terms of scientific enquiry NC Programme of Study Sc1 1b; 2a, d, e, g, h, i, j, k, l, m, n, o
• make measurements of light intensity using a light sensorand compare the effects of materials on light
• make predictions about the reflection of light at planesurfaces, measure angles with precision and makegeneralisations from the data
• frame a question about light and colour and plan how toinvestigate it.
• classify materials as opaque,transparent, translucent, reflectorsor absorbers, on the basis of datafrom light sensors or visually
• identify patterns in angularmeasurements of reflected rays oflight
• with help, investigate a questionabout colour and light.
• draw conclusions from their data, informedby scientific understanding about reflectionand refraction of light at plane surfaces
• make predictions about image formationusing the law of reflection or the patternsof behaviour from refraction
• make sufficient observations wheninvestigating colour to draw validconclusions.
in terms of physical processes NC Programme of Study Sc4 3a–f, i
• recognise that light travels in straight lines at very highspeed
• represent the path of light by rays• describe how light is reflected and refracted at plane surface • explain the origin of colour in the dispersion of white light
and describe the effects of coloured filters and differentcoloured lights on the appearance of coloured objects;
• give an example of how colour is important in everyday life.
• describe how light is reflected atplane surfaces and describereflected images
• describe the effect of a prism onwhite light and recognise thatfilters and coloured objects absorbsome colours and transmit or reflectothers.
• calculate the time for light to travel, e.g.from the Sun
• explain the appearance of coloured objectsin coloured lights.
MisconceptionsSome pupils think that we see by sending out a ray from the eye – a searchlight idea. Many pupils think that yellow light is made of red and green,they do not realise that we see yellow when our red and green receptors are stimulated and we can’t distinguish yellow from a mixture of red and green.
Health and safety (see activity notes to inform risk assessment)In this unit a laser may be used to demonstrate how light travels and pupils use ray boxes. Appropriate risk assessments should be made.
Suggested lesson allocation (see individual lesson planning guides)Direct route
K1 Seeing the light
K2 Which ray?
K3 Travelling through?
K4 Coloured light
K5 Mix it – Think aboutcombinations
Extra lessons (not in pupil book)
K4Investigate:Colour and light
Review and assessprogress (distributedappropriately)
J-L-Unit Guides.qxd 25-Nov-03 9:11 AM Page 8

Sheet 1 of 1© Harcourt Education Ltd 2004 Catalyst 2This worksheet may have been altered from the original on the CD-ROM.
K1Lesson planning
guideSeeing the light
Suggested alternative starter activities (5–10 minutes)
Introduce the unit
Unit map for Light.
Learning objectivesi Light travels away from a source in all directions, transferring energyii Light travels very fast.iii Light travels in straight lines.iv We see because light enters our eyes.
Scientific enquiryv Use a pinhole camera to model what we see and relate conclusions to scientific knowledge. (Framework YTO Sc1 7g,)vi Draw conclusions and describe how they are consistent with the evidence obtained. (Framework YTO Sc1 8f)
Learning outcomes
Share learning objectives
• Find out about thedirection light travels.
• Find out about the speedof light.
• Be able to draw light rayson diagrams to show howimages are formed. (Sc1)
Brainstorming
Pupils discuss pictures ofluminous and non-luminousobjects and how they canbe seen.
Problem solving
Pupils take part in activitiesto develop the idea thatlight travels in straightlines.
Capture interest
Demonstration of a laserwith chalk dust in the beamto show light rays.
Suggested alternative plenary activities (5–10 minutes)
Review learning
Pupils choose the correctrays on a diagram (eye,camera).
Sharing responses
Pupils discuss thesimilarities and differencesbetween a pinhole cameraand the eye.
Group feedback
In groups, pupils sortpossible ray diagrams fromimpossible, then comparedecisions for the whole class.
Brainstorming
Pupils think of as manydifferent luminous sourcesas possible.
Looking ahead
How do we see reflections?
Suggested alternative main activitiesActivity
Textbook K1
Activity K1a Practical
Activity K1b Paper
Activity K1c Catalyst Interactive Presentations 2
Learningobjectivesee above
i, ii, iii andiv
v and vi
i, iii and iv
Description
Teacher-led explanation and questioning OR pupils work individually,in pairs or in small groups through the in-text questions and thenonto the end-of-spread questions if time allows.
The pinhole camera Pupils construct a pinhole camera and use it toproduce images.
How we see things Pupils look at a picture and identify luminousand non-luminous objects. They draw rays to the eye.
Support animation to show light reflected from luminous and non-luminous objects.
Approx. timing
20 min
30 min
20 min
10 min
Target group
C H E S
R/G G R S
✔ ✔ ✔
✔
✔
Key wordspinhole camera, light sensors, source, image, red only: camera obscura,shadow, object
Out-of-lesson learningHomework K1.Textbook K1 end-of-spread questions.Investigate the importance of direction for, e.g., TV infrared remotecontrols.
Most pupils will …
• know that light travels away from a source inall directions
• recognise that light travels in straight lines atvery high speeds
• use a pinhole camera as a model of how wesee light
• represent the path of light by rays.
Some pupils, making less progress will …
• know that light travels away from a source inall directions
• know that light travels in straight lines• understand that we see when light enters our
eyes.
Some pupils, making more progress will …
• also calculate the time for light to travel, e.g.from the Sun.
J-L-Unit Guides.qxd 25-Nov-03 9:11 AM Page 9

Sheet 1 of 1© Harcourt Education Ltd 2004 Catalyst 2This worksheet may have been altered from the original on the CD-ROM.
K2Lesson planning
guideWhich ray?
Suggested alternative starter activities (5–10 minutes)
Recap last lesson
Remind pupils how lighttravels and how fast. Pupilsdiscuss in pairs how tomake the speed more ‘real’.Feed back to class.
Learning objectivesi Light is reflected in a predictable way.ii Rough surfaces scatter light while smooth surfaces make images we can see.
Scientific enquiryiii Investigate reflection from plane surfaces, selecting and using appropriate equipment. (Framework YTO Sc1 7d, h, 8e)iv Use appropriate range, precision and sampling and draw conclusions, describing how they are consistent with the evidence obtained and using
scientific knowledge and understanding to explain them. (Framework YTO Sc1 8e, f)
Learning outcomes
Share learning objectives
• Find out how light isreflected.
• Find out how rough andsmooth surfaces reflectlight.
• Be able to measure theangle made by a ray andthe mirror. (Sc1)
Problem solving
Pupils are given a selectionof objects. They decidewhich give the clearestreflection, which do notreflect much, etc.
Capture interest (1)
Pupils look throughperiscopes andkaleidoscopes.
Capture interest (2)
Demonstration of Pepper’sghost with two Bunsenburners and a safety screen.
Suggested alternative plenary activities (5–10 minutes)
Review learning
Pupils write three factsabout reflection.
Sharing responses
Whole class discussion ofthe results of Activity K2b.
Group feedback
In pairs, pupils explain howthey would see theirreflection in a mirror.
Word game
Pupils decide whichstatements are true or false.
Looking ahead
What happens to light thatis not reflected?
Suggested alternative main activitiesActivity
Textbook K2
Activity K2a Practical
Activity K2b Practical
Activity K2c Catalyst Interactive Presentations 2
Learningobjectivesee above
i and ii
i, iii and iv
i, iii and iv
Description
Teacher-led explanation and questioning OR pupils work individually,in pairs or in small groups through the in-text questions and thenonto the end-of-spread questions if time allows.
Equal angles Pupils measure the angle at which rays are reflected tosee that this can be predicted
Kaleidoscopes Pupils investigate how the angle between two mirrorsrelates to the number of images
Support animation to help see patterns in the angularmeasurements of reflected rays.
Approx. timing
20 min
30 min
20 min
5 min
Target group
C H E S
R/G G R S
✔ ✔ ✔
✔ ✔
✔
Key wordsreflection, reflects, scatter, ray, red only: normal, angle of incidence,angle of reflection, inverted
Out-of-lesson learningHomework K2.Textbook K2 end-of-spread questions.Pupils could look out for reflective materials in different situations, e.g. on road signs, safety clothing.
Most pupils will …
• make predictions about the reflection of lightat plane surfaces, measure angles with precisionand make generalisations from the data
• know that we see non-luminous surfacesbecause light is reflected off them and entersour eyes
• understand that rough surfaces scatter light• understand that smooth surfaces reflect light
in a way that makes an image.
Some pupils, making less progress will …
• identify patterns in angular measurements ofreflected rays of light
• know we can see objects that do not maketheir own light because they reflect light
• know that you need a smooth surface to beable to see a reflection.
Some pupils, making more progress will …
• make predictions about image formation usingthe law of reflection or the pattern ofbehaviour from reflection
• describe the law of reflection in terms of thenormal
• explain why you need a smooth surface to getan image by reflection.
J-L-Unit Guides.qxd 25-Nov-03 9:11 AM Page 10

Sheet 1 of 1© Harcourt Education Ltd 2004 Catalyst 2This worksheet may have been altered from the original on the CD-ROM.
K3Lesson planning
guideTravelling through?
Suggested alternative starter activities (5–10 minutes)
Recap last lesson
Pupils use a large mirror torecap reflection.
Learning objectivesi Classify materials according to how they absorb, transmit or reflect light energy.ii Describe refraction at plane surfaces.iii Explain that refraction is due to different speed in different materials.
Scientific enquiryiv Select and use appropriate equipment. (Framework YTO Sc1 7d)v Use first hand experience to collect, store and present information and use appropriate range, precision and sampling when collecting data.
(Framework YTO Sc1 8d,e)vi Draw conclusions from this data and describe how conclusions are consistent with evidence obtained. (Framework YTO Sc1 8f)
Learning outcomes
Share learning objectives
• Find out about absorptionand transmission of light.
• Find out about refraction.• Be able to measure how
much light is transmittedthrough a material. (Sc1)
Problem solving
Pupils sort cards into threegroups: absorption,transmission, and reflection.
Capture interest (1)
Demonstration of refraction.Show pupils the effect of arod in a trough of water.Pupils can then see therefraction effect with a coinin a mug.
Capture interest (2)
Show pupils a video clip ofexamples of refraction.Catalyst InteractivePresentations 2
Suggested alternative plenary activities (5–10 minutes)
Review learning
Pupils devise threequestions to ask anothergroup about absorption andtransmission or refraction.
Sharing responses
Pupils discuss refraction.
Group feedback
Pupils demonstraterefraction by linking armsand then taking different-sized steps.
Word game
Pupils complete a crosswordusing the clues.
Looking ahead
Show pupils photos ofrainbows and other spectra.Catalyst InteractivePresentations 2
Suggested alternative main activitiesActivity
Textbook K3
Activity K3a Practical
Activity K3b Practical
Activity K3c Catalyst Interactive Presentations 2
Learningobjectivesee above
i, ii and iii
i, iv, v and vi
ii, iii, iv, v and vi
Description
Teacher-led explanation and questioning OR pupils work individually,in pairs or in small groups through the in-text questions and thenonto the end-of-spread questions if time allows.
Is it transparent? Pupils measure light intensity through differentmaterials.
Refraction Pupils see what happens when light goes from onetransparent medium to another.
Support animation to show refraction.
Approx. timing
15 min
30 min
30 min
5 min
Target group
C H E S
R/G G R S
✔
✔
✔
Key wordstransmitted, absorption, opaque, transparent, translucent, refraction,refracts
Out-of-lesson learningHomework K3.Textbook K3 end-of-spread questions.Look at refraction effects in water, e.g. depth of pools when full andempty. Effects in air: mirages (road looks wet on a hot day as rays fromsky are refracted).
Most pupils will …
• make measurements of light intensity using alight sensor and compare the effects ofmaterials on light
• describe how light is refracted at planesurfaces.
Some pupils, making less progress will …
• classify materials as opaque, transparent,translucent, reflectors or absorbers, on thebasis of data from light sensors or visually
• know that light bends when it goes betweenair and water or glass.
Some pupils, making more progress will …
• draw conclusions from their data, informed byscientific understanding, about reflection andrefraction of light at plane surfaces
• describe refraction in terms of the normal.• relate refraction to a change in the speed of
light.
J-L-Unit Guides.qxd 25-Nov-03 9:11 AM Page 11

Sheet 1 of 1© Harcourt Education Ltd 2004 Catalyst 2This worksheet may have been altered from the original on the CD-ROM.
K4Lesson planning
guideColoured light
Suggested alternative starter activities (5–10 minutes)
Recap last lesson
Pupils put statements aboutthe refraction of lightthrough a glass block insequence order.
Learning objectivesi White light can be split into colours, this is called dispersion.ii Coloured light can be combined to produce new coloursiii The colour of reflected light from a white or coloured surface when illuminated by coloured or white light.
Scientific enquiryiv Consider how some early scientific ideas do not match present day evidence and describe how creative thinking has been used to provide a
scientific explanation. (Framework YTO Sc1 8a)v Use first hand experience to collect, store and present information. (Framework YTO Sc1 8d)vi Draw conclusions from this data and describe how conclusions are consistent with evidence obtained. (Framework YTO Sc1 8f)
Learning outcomes
Share learning objectives
• Find out which colourswhite light can be splitinto.
• Find out how to get whitelight from coloured light.
• Be able to work out whatcolour objects will appearin red, yellow, green orblue light. (Sc1)
Problem solving
Pupils work in groups to tryto predict the path of alight ray through a glassprism.
Capture interest (1)
Pupils look at charts thattest for colour ‘blindness’and other puzzles that relyon colour. They also look at3D pictures using colouredglasses.
Capture interest (2)
Show pupils a video ofrainbow dispersion througha prism, recombination witha second prism to givewhite light, and the mixingof red, green and blue spotsto give white light.Catalyst InteractivePresentations 2
Suggested alternative plenary activities (5–10 minutes)
Review learning
Pupils look at some objectsin the light of a sodiumlamp and explain what theysee in terms of Activity K4b.
Sharing responses
Pupils discuss how the eyesees colour and how andwhy colour TV andphotography work.
Group feedback
Pupils draw and mark a Venndiagram: ‘no red’, ‘no green’,‘no blue’ and compare witha red, green and blue one.
Word game
Pupils play a loop gamewith words from the unit.
Looking ahead
Pupils look at some filtersin preparation for theinvestigation in K4Investigate.
Suggested alternative main activitiesActivity
Textbook K4
Activity K4a Practical
Activity K4b Practical
Activity K4c Catalyst Interactive Presentations 2
Learningobjectivesee above
i and iii
i and iv
iii, v and vi
Description
Teacher-led explanation and questioning OR pupils work individually,in pairs or in small groups through the in-text questions and thenonto the end-of-spread questions if time allows.
Coloured light Demonstration of dispersion and recombination togive white light.
Reflecting colour Pupils use a light sensor to measure how welldifferent coloured surfaces reflect light.
Support animation/simulations of colour mixing.
Approx. timing
20 min
15 min
30 min
10 min
Target group
C H E S
R/G G R S
✔
✔ ✔
✔
Key wordsspectrum, dispersion
Out-of-lesson learningHomework K4.Textbook K4 end-of-spread questions.Pupils could observe the effects of coloured lighting in shops, theatresand on TV. Science Centres such as Jodrell Bank and the BradfordMuseum of Film and Photography have good coloured light demos.
Most pupils will …
• describe the origin of colour in the dispersion ofwhite light
• describe the effects of coloured filters and differentcoloured lights on the appearance of objects.
Some pupils, making less progress will …
• describe the effect of a prism on white light• recognise that filters and coloured objects
absorb some colours and transmit or reflectothers.
Some pupils, making more progress will …
• make sufficient observations wheninvestigating colour to draw valid conclusions
• explain the appearance of coloured objects incoloured lights.
J-L-Unit Guides.qxd 25-Nov-03 9:11 AM Page 12

Sheet 1 of 1© Harcourt Education Ltd 2004 Catalyst 2This worksheet may have been altered from the original on the CD-ROM.
K4Lesson planning
guideInvestigate: How do colouredfilters change the colour we see?
Suggested alternative starter activities (5–10 minutes)
Setting the context
Pupils look at somecoloured filters.
Learning objectivesi White light is a combination of colours.The effect of red, green and blue filters on white light in terms of absorption and transmission.
Scientific enquiryii Use scientific knowledge to decide how ideas and questions can be tested; make predictions of possible outcomes. (Framework YTO Sc1 7b)iii Identify more than one strategy for investigating questions and recognise that a range of sources of information is required. (Framework YTO
Sc1 8b, c)iv Consider whether an enquiry could be improved to yield stronger evidence. (Framework YTO Sc1 8g)
Learning outcomes
Introduce the apparatus
Show pupils the white light,the filters and the colouredobjects.
Safety
Pupils discuss any safetyissues in pairs.
Brainstorming (1)
Pupils discuss the variablesfor the investigation: thecolour of the objects andthe colour of the filters.
Brainstorming (2)
Use two different filters,e.g. yellow and magenta, toaid discussion of whichcolour filters andcombinations of filtersshould be investigated.
Suggested alternative plenary activities (5–10 minutes)
Review learning
Teacher-led review of thetransmission of light through eachfilter combination.
Group feedback
In groups, pupils discuss whetherthey carried out the investigationas they had planned.
Analysing
Teacher-led discussion of pupils’predictions and results.
Evaluating
Teacher-led discussion of how theresults could be improved.
InvestigationActivity
Activity K4dPractical
Learningobjectivesee above
i, ii, iii and iv
Description
How do coloured filters change the colour we see? Pupils plan andcarry out an investigation into how coloured filters change thecolour we see. They draw up a table and evaluate their results anddecide if their predictions were correct
Approx. timing
60 min
Target group
C H E S
✔ ✔
Most pupils will …
• frame a question about light and colour andplan how to investigate it
• carry out steps in an investigation, usingtheir ideas about coloured light in theirexplanation.
Some pupils, making less progress will …
• with help, investigate a question about colourand light
• with help, carry out all steps in aninvestigation and relate their ideas aboutcoloured light to their results.
Some pupils, making more progress will …
• also use their ideas about coloured light toexplain their prediction and explain anyanomalous results.
J-L-Unit Guides.qxd 25-Nov-03 9:11 AM Page 13

Sheet 1 of 1© Harcourt Education Ltd 2004 Catalyst 2This worksheet may have been altered from the original on the CD-ROM.
K5Lesson planning
guideMix it – Think aboutcombinations
Suggested alternative starter activities (5–10 minutes)
Bridging to the unit
Discuss with pupils the colourreceptors we have in our eyes andwhat causes colourdeficiency/blindness.
Learning objectivesi Combinationsii Use the concept of combinations to explain how the three primary colours of light can produce many different colours of light The structure of this lesson is based around the CASE approach. The starter activities give concrete preparation. The main activities move away from theconcrete towards a challenging situation, where pupils need to think. The extended plenary gives pupils time to discuss what they have learnt, tonegotiate a method to commit to paper and express their ideas verbally to the rest of the class.
Scientific enquiryiii Use scientific knowledge to decide how ideas and questions can be tested; make predictions of possible outcomes. (Framework YTO Sc1 7b)iv Draw conclusions from data and describe how conclusions are consistent with the evidence obtained, using scientific knowledge and
understanding to explain them. (Framework YTO Sc1 8f)
Learning outcomes
Setting the context
Discuss how colour photographyand television use the fact that wehave three ‘detectors’ calledreceptors.
Concrete preparation (1)
Pupils use hand-held spectroscopesto look at light sources (not theSun!) and see that many coloursare mixtures and the spectroscopesplits these up.
Concrete preparation (2)
Pupils work in pairs to sort outcards marked with a mixture of upto three spots into those that willbe recognised by a ‘detector’.
Suggested alternative plenary activities (5–10 minutes)
Group feedback
Discuss how groups used systematic ways to make sure they didn’t missany combinations.
Bridging to other topics
Discuss with pupils how animals have different numbers of receptors.Combinations also come into effect with genes.
Suggested main activitiesActivity
Textbook K5
Activity K5a Practical
Learningobjectivesee above
i and ii
i, iii and iv
Description
Teacher-led explanation and questioning OR pupils work individually,in pairs or in small groups through the in-text questions and thenonto the end-of-spread questions if time allows.
Mix it use red green and blue beads to sort out all the possiblecombinations. Add an extra colour to work out combinations of 4,etc.
Approx. timing
30 min
15 min
Target group
C H E S
R/G G R S
✔ ✔
Key wordscombinations, primary colour, secondary colour
Out-of-lesson learningTextbook K5 end-of-spread questions
Most pupils will …
• list the different combinations generated bytwo and three values
• know that greater numbers of values willproduce more combinations
• apply this to the three values of primary light:red, blue and green.
Some pupils, making less progress will …
• list the combinations from two values• know that three values will produce more
combinations than two• know that green, red and blue are primary
colours and that other colours are made bymixing them.
Some pupils, making more progress will …
• list the different combinations generated bytwo, three or four values
• know that greater numbers of values willproduce vastly more combinations
• extend the model to a situation where someanimals have four primary colours.
J-L-Unit Guides.qxd 25-Nov-03 9:11 AM Page 14

K Unit mapLight
Sheet 1 of 1© Harcourt Education Ltd 2004 Catalyst 2This worksheet may have been altered from the original on the CD-ROM.
Copy the unit map and use these words to help you complete it.You may add words of your own too.
absorptionangle of incidence Rdispersioneyefilterimageluminousmirrorsnon-luminousnormalopaqueprimary coloursprismrainbow
rayreflectionrefractionscatteringsecondary coloursshadowsourcespectrumspeedstraight linetranslucenttransmissiontransparent
Light
Mixing light Seeing light
Light rays
Light and materials
Colouredlight
Unitmaps.qxd 12-Nov-03 8:56 AM Page 11

K1 StartersSeeing the light
Introduce the unit● Either draw the outline of the unit map on the board then
ask pupils to give you words to add, saying where to addthem. Suggest some words yourself when necessary, to keeppupils on the right track.
● Or give out the unit map and ask pupils to work in groups,deciding how to add the listed words to the diagram. Thengo through it on the board as each group gives suggestions.
Share learning objectives● Ask pupils to write a list of FAQs they would put on a
website telling people about light. Collect suggestions as awhole-class activity, steering pupils towards those relatedto the objectives. Conclude by highlighting the questionsyou want them to be able to answer at the end of thelesson.
Brainstorming● Pupils are shown pictures of luminous and non-luminous
objects, with different suggestions as to how they can beseen.
● Pupils work in pairs, discussing how the objects can beseen and which suggestions they agree with.
● After a short time ask for suggestions for each picture.
Problem solving● Pupils investigate: the shape of a rubber tube when they
can see light at the other end, and light passing throughfour pinholes.
● The activities develop the idea that light travels in straightlines.
Capture interest● Demonstrate the beam from a helium neon laser.
● Chalk dust or smoke in the beam will help to show up thestraight line.
● Ensure that no reflective objects (e.g. rings) canaccidentally get in the beam.
➔ Unit map
➔ Pupil sheet
Answersa Mari; b Ali
➔ Pupil sheet
Equipmentfor each group: rubber tube, four cardswith pinholes mounted in stands, andtorch or lamp
AnswersTube and pinholes in straight line.
Equipmenthelium neon laser, screen, chalk dust(e.g. board rubber) or lighted taper toproduce smoke
Safety noteA laser designed for school use presentsminimal hazard. However studentsshould not look directly into the beam.
Sheet 1 of 1© Harcourt Education Ltd 2004 Catalyst 2This worksheet may have been altered from the original on the CD-ROM.
Suggested alternative starter activities (5–10 minutes)
Introduce the unit
Unit map for Light.
Share learning objectives
• Find out about the direction lighttravels.
• Find out about the speed of light.• Be able to draw light rays on diagrams
to show how images are formed. (Sc1)
Brainstorming
Pupils discusspictures of luminousand non-luminousobjects and howthey can be seen.
Problem solving
Pupils take part in activitiesto develop the idea thatlight travels in straightlines.
Capture interest
Demonstration of a laserwith chalk dust in thebeam to show light rays.
K-Starters.qxd 22-Oct-03 4:17 PM Page 1

K1 StartersSeeing the light
Brainstorming
How do we see things?
Who do you think is right?
Sheet 1 of 1© Harcourt Education Ltd 2004 Catalyst 2This worksheet may have been altered from the original on the CD-ROM.
A light beamfrom your eyehits the candle
flame.
a Jade
Lightspreads out fromthe candle flameand some goes in
your eye.
Mari
Light fromthe flower is
attracted towardsyour eyes.
b Rachel
Light fromyour eye reflects
off the flowerand back to your
eye.
Jodie Dan
Ali
Sam
Jack
Light from thecandle flame isattracted to the
eye.
Light from theSun reflects fromthe flower andsome reaches
your eye.
Light fromthe Sun reflects fromyour eye in a beamthat picks up the
flower.
Light fromthe Sun reflectsfrom the candleflame, into your
eye.
K-Starters.qxd 22-Oct-03 4:18 PM Page 2
K1 StartersSeeing the light
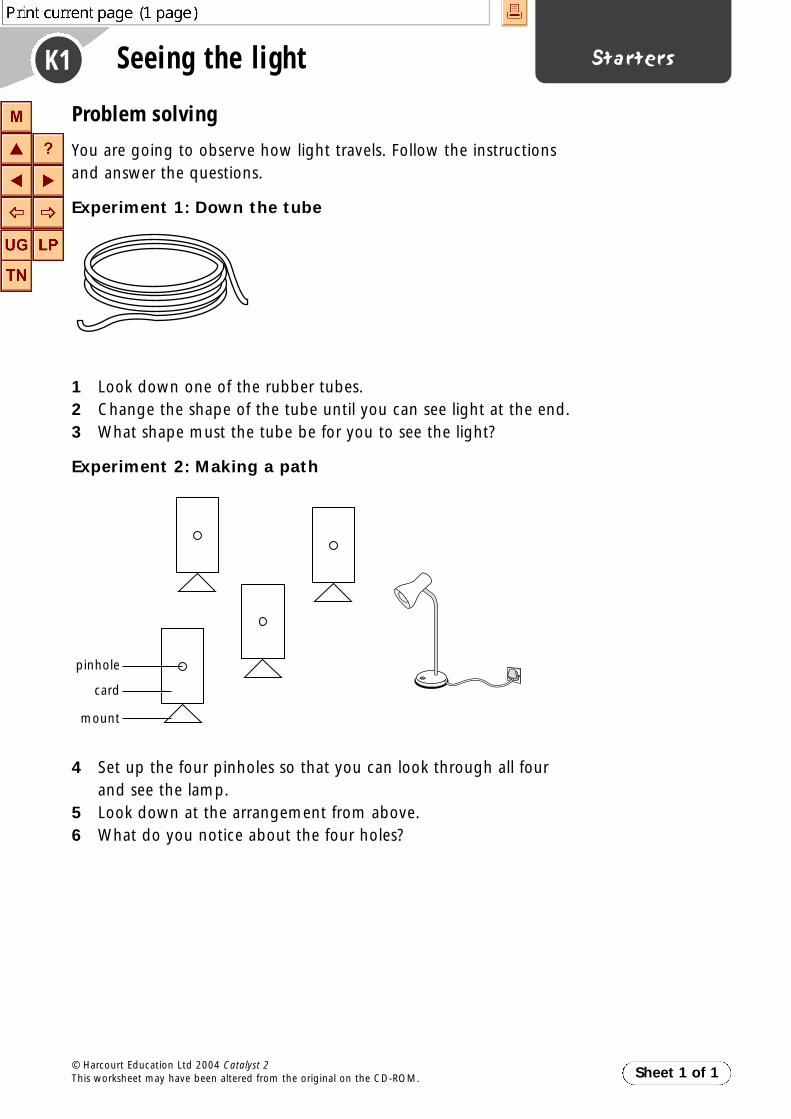
Problem solving
You are going to observe how light travels. Follow the instructionsand answer the questions.
Experiment 1: Down the tube
1 Look down one of the rubber tubes.2 Change the shape of the tube until you can see light at the end.3 What shape must the tube be for you to see the light?
Experiment 2: Making a path
4 Set up the four pinholes so that you can look through all fourand see the lamp.
5 Look down at the arrangement from above.6 What do you notice about the four holes?
Sheet 1 of 1© Harcourt Education Ltd 2004 Catalyst 2This worksheet may have been altered from the original on the CD-ROM.
pinhole
card
mount
K-Starters.qxd 22-Oct-03 4:18 PM Page 3

K2 StartersWhich ray?
Recap last lesson● Ask pupils to describe how light travels and how fast
(300 million m/s in a straight line).
● Working in pairs, pupils discuss how to make this figure moremeaningful, e.g. it takes eightminutes for light to get herefrom the Sun (but we don’t really have a feel for the distance).See what they suggest.
● More able pupils can use calculators and find data to work outthe values. A suggestion could be: how many times does lightgo round the Earth in onesecond (radius = 6 378 000m,circumference = 40 074 000m, answer = 7.5 times).
Share learning objectives● Ask pupils to write a list of FAQs they would put on a website
telling people about reflection and mirrors. Collect suggestionsas a whole-class activity, steering pupils towards those relatedto the objectives. Conclude by highlighting the questions youwant them to be able to answer at the end of the lesson.
Problem solving● Show the class a selection of objects.
● Ask them to help you sort them into ones that give a clearreflection and ones that are not so good. Note that verysmooth surfaces are good reflectors.
Capture interest (1)● Pupils look at instruments containing mirrors,
e.g. kaleidoscope, periscope.
● They are asked what the instrument does and how the mirrorsmight make it work.
Capture interest (2)● Show pupils a demonstration of Pepper’s ghost. It can be fun
for them if you start talking without mentioning thedemonstration and then ‘accidentally’ put your hand in thereflection of the Bunsen flame. Then rest your hand on top ofthe Bunsen burner.
● The bright flame will reflect in the screen so that the unlitBunsen appears to be lit.
● For best effect you may need to move some pupils so that theysee through and not round the screen.
● This method of producing a ghost was used in theatres. Ascreen of glass was placed on stage. When a ‘ghost’ in thewings was illuminated the image appeared on stage.
Equipmentcalculators
Equipmentselection of mirrors, small sheet ofaluminium, other metals, a metalspoon, glass, shiny plastic, i.e. shinymaterials that reflect but are notsilver
QuestionsWhat does the instrument do?
How could mirrors make it work?
AnswerThe kaleidoscope produces patternsas mirrors produce multiple images.
The periscope helps you see aboveobstructions or round corners, asmirrors reflect rays, changingdirection.
Equipmentkaleidoscope, periscope
➔ Technician sheet
Sheet 1 of 1© Harcourt Education Ltd 2004 Catalyst 2This worksheet may have been altered from the original on the CD-ROM.
Suggested alternative starter activities (5–10 minutes)
Recap last lesson
Remind pupils how lighttravels and how fast. Pupilsdiscuss in pairs how tomake the speed more ‘real’.Feed back to class.
Share learning objectives
• Find out how light is reflected.• Find out how rough and smooth
surfaces reflect light.• Be able to measure the angle made
by a ray and the mirror. (Sc1)
Problem solving
Pupils are given aselection of objects. Theydecide which give theclearest reflection, whichdo not reflect much, etc.
Capture interest (1)
Pupils look throughperiscopes andkaleidoscopes.
Capture interest (2)
Demonstration ofPepper’s ghost with twoBunsen burners and asafety screen.
K-Starters.qxd 22-Oct-03 4:18 PM Page 4

K2 StartersWhich ray?
Capture interestTechnician sheetSupply the following equipment for a demonstration:
● safety screen (clean) supported by holders or clamps
● two identical Bunsen burners, one on and one off.
● The Bunsen burner that is lit should be placed on the same side of the screen asthe pupils.
● The unlit Bunsen burner should be placed exactly at the same place as thereflection in the screen. This is easiest to do if you look from in front of thescreen so you can see the reflection, and move the unlit Bunsen burner tocoincide with this position.
Sheet 1 of 1© Harcourt Education Ltd 2004 Catalyst 2This worksheet may have been altered from the original on the CD-ROM.
safety screen
lit Bunsen
unlit Bunsen
Pupils sit inthis area
K-Starters.qxd 22-Oct-03 4:18 PM Page 5
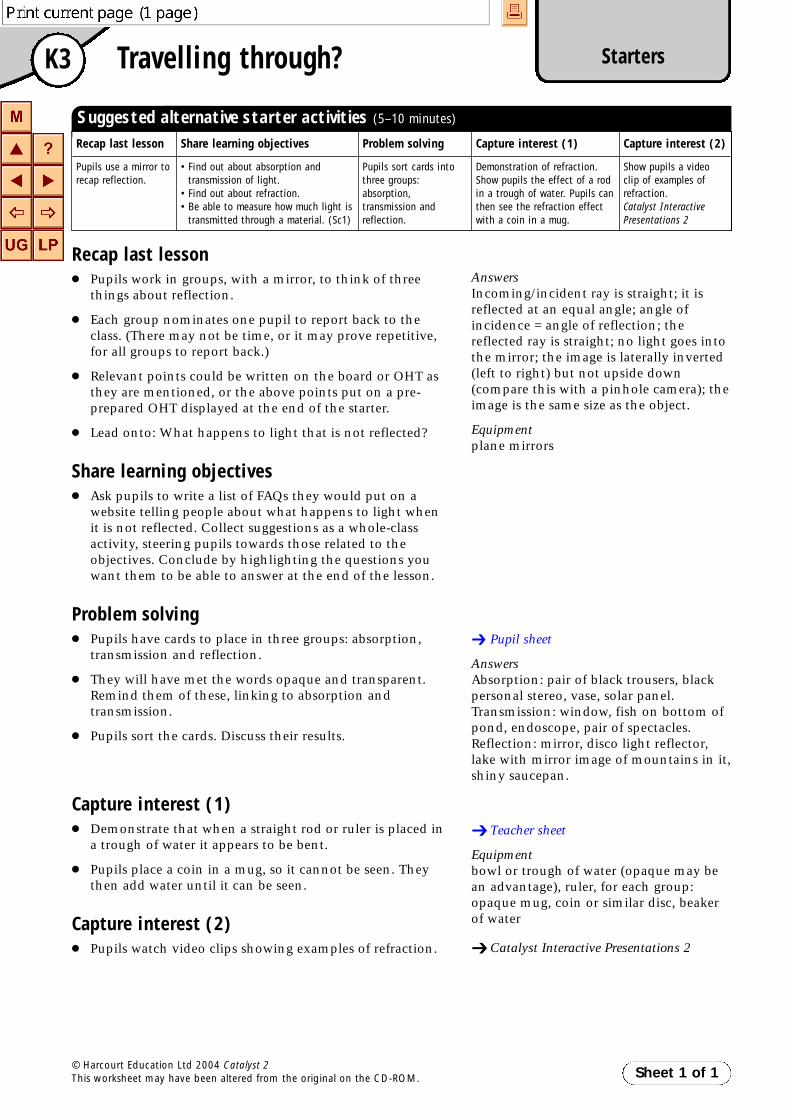
K3 StartersTravelling through?
Recap last lesson● Pupils work in groups, with a mirror, to think of three
things about reflection.
● Each group nominates one pupil to report back to theclass. (There may not be time, or it may prove repetitive,for all groups to report back.)
● Relevant points could be written on the board or OHT asthey are mentioned, or the above points put on a pre-prepared OHT displayed at the end of the starter.
● Lead onto: What happens to light that is not reflected?
Share learning objectives● Ask pupils to write a list of FAQs they would put on a
website telling people about what happens to light whenit is not reflected. Collect suggestions as a whole-classactivity, steering pupils towards those related to theobjectives. Conclude by highlighting the questions youwant them to be able to answer at the end of the lesson.
Problem solving● Pupils have cards to place in three groups: absorption,
transmission and reflection.
● They will have met the words opaque and transparent.Remind them of these, linking to absorption andtransmission.
● Pupils sort the cards. Discuss their results.
Capture interest (1)● Demonstrate that when a straight rod or ruler is placed in
a trough of water it appears to be bent.
● Pupils place a coin in a mug, so it cannot be seen. Theythen add water until it can be seen.
Capture interest (2)● Pupils watch video clips showing examples of refraction.
AnswersIncoming/incident ray is straight; it isreflected at an equal angle; angle ofincidence = angle of reflection; thereflected ray is straight; no light goes intothe mirror; the image is laterally inverted(left to right) but not upside down(compare this with a pinhole camera); theimage is the same size as the object.
Equipmentplane mirrors
➔ Pupil sheet
AnswersAbsorption: pair of black trousers, blackpersonal stereo, vase, solar panel.Transmission: window, fish on bottom ofpond, endoscope, pair of spectacles.Reflection: mirror, disco light reflector,lake with mirror image of mountains in it,shiny saucepan.
➔ Teacher sheet
Equipmentbowl or trough of water (opaque may bean advantage), ruler, for each group:opaque mug, coin or similar disc, beakerof water
➔ Catalyst Interactive Presentations 2
Sheet 1 of 1© Harcourt Education Ltd 2004 Catalyst 2This worksheet may have been altered from the original on the CD-ROM.
Suggested alternative starter activities (5–10 minutes)
Recap last lesson
Pupils use a mirror torecap reflection.
Share learning objectives
• Find out about absorption andtransmission of light.
• Find out about refraction.• Be able to measure how much light is
transmitted through a material. (Sc1)
Problem solving
Pupils sort cards intothree groups:absorption,transmission andreflection.
Capture interest (1)
Demonstration of refraction.Show pupils the effect of a rodin a trough of water. Pupils canthen see the refraction effectwith a coin in a mug.
Capture interest (2)
Show pupils a videoclip of examples ofrefraction.Catalyst InteractivePresentations 2
K-Starters.qxd 22-Oct-03 4:18 PM Page 6

K3 StartersTravelling through?
Problem solving
Sheet 1 of 1© Harcourt Education Ltd 2004 Catalyst 2This worksheet may have been altered from the original on the CD-ROM.
Black trousers Personal stereo Vase
Solar panel Window River
Glasses Mirror
Disco mirror ball Metal saucepan
Absorption Transmission Reflection
Lake
Endoscope
K-Starters.qxd 22-Oct-03 4:18 PM Page 7

K3 StartersTravelling through?
Capture interestTeacher sheet
A Show pupils the demonstration of how a ruler in a trough appears to bend atthe boundary between water and air.
It is important to make sure that pupils are looking in the correct direction tosee this. They will not see it looking straight at the ruler from the side, and theywill not see it from directly above. A plastic (not transparent glass) containerwith a large water surface is best.
They must look down through the surface of the water to one side of the ruler.
(If some see the effect, others will not admit that they cannot, so explaincarefully how to look at the ruler.)
B Pupils should then do the experiment themselves using a coin in a beaker ofwater. Have a pair of pupils try it, following the instructions below, while otherswatch. Other pupils can then try it for themselves, working in groups, whilethe other members of the group try to explain the effect.
1 Place the coin in the empty mug.2 One pupil looks at the coin, then moves back from the mug until the coin
just disappears below the rim of the mug.3 A second pupil pours water into the mug without moving the mug, while
the first pupil does not move.4 The coin should come back into view as the mug is filled with water.
Sheet 1 of 1© Harcourt Education Ltd 2004 Catalyst 2This worksheet may have been altered from the original on the CD-ROM.
straight stick or rod
not fromabove
plastic container(not see through)
view in thisregion, throughtop of water
water
eye eye
coin coin
water
mugmug
K-Starters.qxd 22-Oct-03 4:18 PM Page 8

K4 StartersColoured light
Recap last lesson● Pupils look at a list of statements about refraction
through a glass block and put them in order.
● They can either write them out, or cut the sheet up andstick them in their books.
Share learning objectives● Ask pupils to write a list of FAQs they would put on a
website telling people about coloured light. Collectsuggestions as a whole-class activity, steering pupilstowards those related to the objectives. Conclude byhighlighting the questions you want them to be able toanswer at the end of the lesson.
Problem solving● Introduce this activity by showing pupils a ray box set
up with one ray.
● Set the problem: Show them the prism. Remind themthat light bends as it enters the glass block, and backagain as it leaves. The same thing will happen as lightenters and leaves the prism. Can they work out whatwill happen to light as it passes through a prism? (Youcan give a hint: it helps to draw the normals.)
Capture interest (1)● Pupils look at standard charts for diagnosing colour
‘blindness’. Note that there are many forms of this andsome people can pick out the difference but find itdifficult rather than impossible.
● Pupils look at 3D pictures through coloured glasses.Note how each eye gets a different image and try twored and two green lenses instead of one of each.
● Pupils look at some ‘coded’ pictures where words ornumbers are hidden in a mass of colour and can bepicked out by using the correct colour filter.
Capture interest (2)● Pupils watch a video showing: a picture of a rainbow
with a second, reversed bow, dispersion through a prismand recombination to give white light, and mixing ofred, green and blue lights to give white light.
➔ Pupil sheet(core and help versions on same sheet)
Equipmentclass set of scissors and glue (optional)
Answers4, 2, 3, 6, 1, 5 or 4, 5, 2, 3, 6, 1,
Equipmentpaper, pencils, rulers
AnswerShow the path of the ray using the ray boxand the prism. Or move straight on to theactivity with the prism, and show themusing the demo equipment.
Equipmentcolour charts for diagnosing colourblindness, 3D pictures and red/greenglasses, colour puzzles
➔ Catalyst Interactive Presentations 2
Sheet 1 of 1© Harcourt Education Ltd 2004 Catalyst 2This worksheet may have been altered from the original on the CD-ROM.
Suggested alternative starter activities (5–10 minutes)
Recap last lesson
Pupils put statementsabout the refraction oflight through a glassblock in sequence order.
Share learning objectives
• Find out which colours whitelight can be split into.
• Find out how to get white lightfrom coloured light.
• Be able to work out what colourobjects will appear in red,yellow, green or blue light. (Sc1)
Problem solving
Pupils work in groups totry to predict the pathof a light ray through aglass prism.
Capture interest (1)
Pupils look at chartsthat test for colour‘blindness’ and otherpuzzles that rely oncolour. They also lookat 3D pictures usingcoloured glasses.
Capture interest (2)
Show pupils a video of rainbowdispersion through a prism,recombination with a secondprism to give white light, and themixing of red, green and bluespots to give white light.Catalyst Interactive Presentations 2
K-Starters.qxd 22-Oct-03 4:18 PM Page 9

K4 StartersColoured light
Recap last lessonCore sheet
All these statements tell part of the story of what happens to a ray oflight when it hits the side of a glass block.
Put the statements in the correct order:
1 The ray bends away from the normal.
2 The ray travels through the air until it hits the glass.
3 The ray bends towards the normal.
4 A straight ray of light leaves the ray box.
5 The ray travels through the air in a straight line.
6 The ray travels straight through the glass until it reaches the edge.
Sheet 1 of 1
Sheet 1 of 1
© Harcourt Education Ltd 2004 Catalyst 2This worksheet may have been altered from the original on the CD-ROM.
StartersK4 Coloured light
Recap last lessonHelp sheet
All these statements tell part of the story of what happens to a ray oflight when it hits the side of a glass block.
Put the statements in the correct order:
1 The ray bends to the outwards to the first direction again.
2 The ray travels through the air until it hits the glass.
3 The ray bends inwards.
4 A straight ray of light leaves the ray box.
5 The ray travels through the air in a straight line.
6 The ray travels straight through the glass until it reaches the edge.
© Harcourt Education Ltd 2004 Catalyst 2This worksheet may have been altered from the original on the CD-ROM.
K-Starters.qxd 22-Oct-03 4:18 PM Page 10

K4 StartersInvestigate: How do colouredfilters change the colour we see?
Setting the context● Discuss with pupils why the filters look coloured. They can see
through them, so some light passes through. Things look adifferent colour. To find out why, they need to investigate morefully.
Introduce the apparatus● Show pupils the different colour filters. Which ones would they
choose to use?
● Consider what objects should be used for the investigation.(Ideally they should be obvious colours and black and white.)
Safety● Ask pupils to work in pairs to list the hazards involved in this
investigation.
● Pupils then decide how to minimise the danger presented byeach hazard.
● Pairs report back to a class discussion during which a final set ofsafety procedures is listed on the board.
Brainstorming (1)● Ask pupils to discuss in groups what the variables are in the
investigation.
● Ask them to decide what variable should be changed (inputvariable, colour in white light) and what should be measuredduring the investigation (outcome variable, colour throughfilters).
● Ask individual pupils for their ideas. Use class discussion tofinalise details of the two dependent variables.
Brainstorming (2)● Ask pupils to work in groups to consider the questions opposite.
● Use answers from individual pupils to initiate class discussionabout fair testing and reliability of results.
Equipmentdifferent coloured filters
Equipmentdifferent coloured filters, someexample colour filters
QuestionsWhat needs to be done to make thisa fair test?
Will the experiments need to berepeated? Why?
Will a preliminary investigation beneeded? Why?
Sheet 1 of 1© Harcourt Education Ltd 2004 Catalyst 2This worksheet may have been altered from the original on the CD-ROM.
Suggested alternative starter activities (5–10 minutes)
Setting the context
Pupils look at somecoloured filters.
Introduce the apparatus
Show pupils the white light,the filters and the colouredobjects.
Safety
Pupils discuss anysafety issues inpairs.
Brainstorming (1)
Pupils discuss the variablesfor the investigation: thecolour of the objects and thecolour of the filters.
Brainstorming (2)
Use two different filters, e.g. yellowand magenta, to aid discussion ofwhich colour filters and combinationsof filters should be investigated.
K-Starters.qxd 22-Oct-03 4:18 PM Page 11

K5 StartersMix it – Think about
Bridging to the unit● Talk to pupils about the colour receptors in our eyes. Most people have
three: red, green and blue. Some people have one or more not working(colour blindness) and some people have one or more that picks up aslightly different colour or at a lower intensity and have some difficultyin distinguishing some colours – especially in low light levels. (We allfind it more difficult to distinguish colours as light level drops.)
● We see everything around us as a mixture of red, green and blue. Thisdoes not mean that everything is a mixture of red, green and blue, thisis just how we see it.
Setting the context● Because we see everything through red, green and blue receptors, our
eyes cannot tell the difference between a world made of red, green andblue light and one made of the rainbow of colours from a prism.
● Colour television works by using red, green and blue dots to make apicture. This would not work if we had another receptor.
● How many combinations of equal intensity of red, green and blue arepossible (changing levels of intensity gives more different colour).
Concrete preparation (1)● Hand-held spectroscopes are ideal for showing how our world is made
of mixtures of colours. Ask pupils to look through a hand-heldspectroscope at a light source. Safety note: pupils must not look directlyat the Sun.
● Looking at filament lamps will give the rainbow spectrum.
● Looking at a television screen while it is on will give red, green and bluebands of the light given out by the phosphor screen.
● Many fluorescent tubes will give red, green and blue bands – showingthat their white light is made of red, green and blue from the phosphorcoating. This leads on directly to the work on combinations.
● Other lamps such as a sodium lamp or neon lamp show lines of colourgiven out.
Concrete preparation (2)● Pupils work in pairs. They set out the three detector cards for red, green
and blue.
● Pupils then sort out cards marked with a mixture of up to three spotsand decide which detectors will detect the colour.
● Include a single spot marked UV, this will not be detected.
● If you want to explain colour deficiency/colour blindness, remove adetector – no longer able to distinguish some combinations.
➔ Pupil sheet
Sheet 1 of 1© Harcourt Education Ltd 2004 Catalyst 2This worksheet may have been altered from the original on the CD-ROM.
Suggested alternative starter activities (5–10 minutes)
Bridging to the unit
Discuss with pupils the colourreceptors we have in our eyesand what causes colourdeficiency/blindness.
Setting the context
Discuss how colour photographyand television use the fact thatwe have three ‘detectors’ calledreceptors.
Concrete preparation (1)
Pupils use hand-held spectroscopes tolook at light sources (not the Sun!) andsee that many colours are mixtures andthe spectroscope splits these up.
Concrete preparation (2)
Pupils work in pairs to sort out cardsmarked with a mixture of up to threespots into those that will berecognised by a ‘detector’.
K-Starters.qxd 22-Oct-03 4:18 PM Page 12

K5 StartersMix it
Concrete preparation (2)
Sheet 1 of 1© Harcourt Education Ltd 2004 Catalyst 2This worksheet may have been altered from the original on the CD-ROM.
REDWHITE
RED + GREEN + BLUE RED + GREEN
RED RED
RED
DETECTOR
YELLOW
REDRED BLUEGREEN
BLUE GREENMAGENTA
RED + BLUE DETECTOR
RED
BLUE + GREEN
CYAN
GREEN BLACKULTRA-VIOLET
(NO RED, GREENOR BLUE) (NO COLOURS)DETECTOR
BLUE
GREEN
BLUEBLUE BLUE GREEN GREEN
BLUEGREEN
K-Starters.qxd 22-Oct-03 4:18 PM Page 13
K1aTeacher
activity notesThe pinhole camera
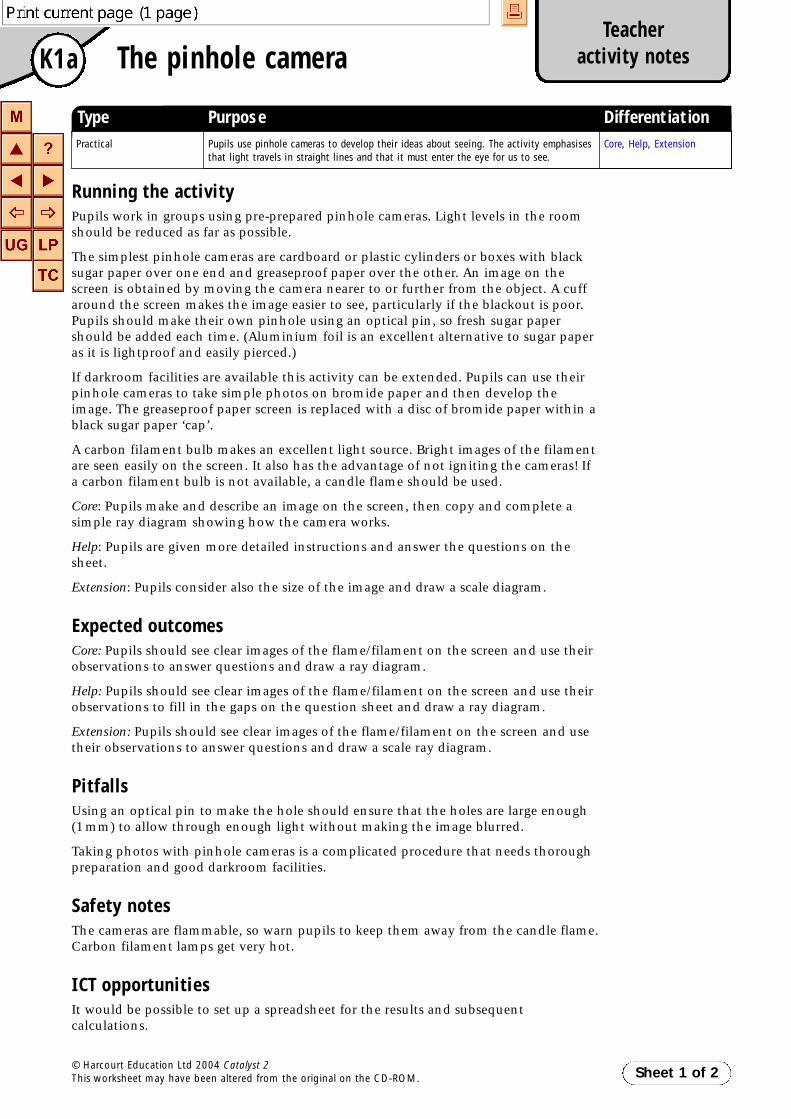
Running the activityPupils work in groups using pre-prepared pinhole cameras. Light levels in the roomshould be reduced as far as possible.
The simplest pinhole cameras are cardboard or plastic cylinders or boxes with blacksugar paper over one end and greaseproof paper over the other. An image on thescreen is obtained by moving the camera nearer to or further from the object. A cuffaround the screen makes the image easier to see, particularly if the blackout is poor.Pupils should make their own pinhole using an optical pin, so fresh sugar papershould be added each time. (Aluminium foil is an excellent alternative to sugar paperas it is lightproof and easily pierced.)
If darkroom facilities are available this activity can be extended. Pupils can use theirpinhole cameras to take simple photos on bromide paper and then develop theimage. The greaseproof paper screen is replaced with a disc of bromide paper within ablack sugar paper ‘cap’.
A carbon filament bulb makes an excellent light source. Bright images of the filamentare seen easily on the screen. It also has the advantage of not igniting the cameras! Ifa carbon filament bulb is not available, a candle flame should be used.
Core: Pupils make and describe an image on the screen, then copy and complete asimple ray diagram showing how the camera works.
Help: Pupils are given more detailed instructions and answer the questions on thesheet.
Extension: Pupils consider also the size of the image and draw a scale diagram.
Expected outcomesCore: Pupils should see clear images of the flame/filament on the screen and use theirobservations to answer questions and draw a ray diagram.
Help: Pupils should see clear images of the flame/filament on the screen and use theirobservations to fill in the gaps on the question sheet and draw a ray diagram.
Extension: Pupils should see clear images of the flame/filament on the screen and usetheir observations to answer questions and draw a scale ray diagram.
PitfallsUsing an optical pin to make the hole should ensure that the holes are large enough(1mm) to allow through enough light without making the image blurred.
Taking photos with pinhole cameras is a complicated procedure that needs thoroughpreparation and good darkroom facilities.
Safety notesThe cameras are flammable, so warn pupils to keep them away from the candle flame.Carbon filament lamps get very hot.
ICT opportunitiesIt would be possible to set up a spreadsheet for the results and subsequentcalculations.
Sheet 1 of 2© Harcourt Education Ltd 2004 Catalyst 2This worksheet may have been altered from the original on the CD-ROM.
Type Purpose DifferentiationPractical Pupils use pinhole cameras to develop their ideas about seeing. The activity emphasises
that light travels in straight lines and that it must enter the eye for us to see.Core, Help, Extension
K-Teachers.qxd 22-Oct-03 4:25 PM Page 1

K1aTeacher
activity notesThe pinhole camera (continued)
AnswersCore:1 On the screen.
2 The image is dim (relative to the object), larger than the object if the distance ofcamera to object is less than the length of the camera, smaller than the object if the distance of camera to object is greater than the length of the camera, and it is inverted.
3 Light comes from the light source. Some of this light goes through the hole and forms an image on the screen.
4
Help:1 On the screen.
2 Light, light source, image, image, inverted, eye, eye.
3 See Core answer 4 above.
Extension:1 On the screen.
2 Light comes from the light source. Some of this light goes through the hole and forms an image on the screen.
3 a
b 2.5cmc Similar – both the same shape, different – image is smaller (half size) and
inverted.d Distance of object from camera ÷ length of camera = size of object ÷ size of image
Sheet 2 of 2© Harcourt Education Ltd 2004 Catalyst 2This worksheet may have been altered from the original on the CD-ROM.
30 cm 15 cm
2.5 cm5 cm
K-Teachers.qxd 22-Oct-03 4:25 PM Page 2

K1aTechnician
activity notesThe pinhole camera
EquipmentFor each group:● pinhole camera with no hole made up in advance (see right)● access to an optical pin to make hole● piece of thick paper (e.g. sugar paper) to make cuff● piece of sticky tape
For the class:● carbon filament lamp or 8 candles in candle holders● matches (if candles used)
For your informationRunning the activityPupils work in groups using pre-prepared pinhole cameras. Light levels in the room should be reduced asfar as possible.
The simplest pinhole cameras are cardboard or plastic cylinders or boxes with black sugar paper over one endand greaseproof paper over the other. An image on the screen is obtained by moving the camera nearer to orfurther from the object. A cuff around the screen makes the image easier to see, particularly if the blackout ispoor. Pupils should make their own pinhole using an optical pin, so fresh sugar paper should be added eachtime. (Aluminium foil is an excellent alternative to sugar paper as it is lightproof and easily pierced.)
If darkroom facilities are available this activity can be extended. Pupils can use their pinholecameras to take simple photos on bromide paper and then develop the image. The greaseproofpaper screen is replaced with a disc of bromide paper within a black sugar paper ‘cap’.
A carbon filament bulb makes an excellent light source. Bright images of the filament areseen easily on the screen. It also has the advantage of not igniting the cameras! If acarbon filament bulb is not available, a candle flame should be used.
Core: Pupils make and describe an image on the screen, then copy and complete a simpleray diagram showing how the camera works.
Help: Pupils are given more detailed instructions and answer the questions on the sheet.
Extension: Pupils also consider the size of the image and draw a scale diagram.
Expected outcomesCore: Pupils should see clear images of the flame/filament on the screen and use theirobservations to answer questions and draw a ray diagram.
Help: Pupils should see clear images of the flame/filament on the screen and use theirobservations to fill in the gaps on the question sheet and draw a ray diagram.
Extension: Pupils should see clear images of the flame/filament on the screen and usetheir observations to answer questions and draw a scale ray diagram.
PitfallsUsing an optical pin to make the hole should ensure that the holes are large enough(1mm) to allow through enough light without making the image blurred.
Taking photos with pinhole cameras is a complicated procedure that needs thoroughpreparation and good darkroom facilities.
Safety notesThe cameras are flammable, so warn pupils to keep them away from the candle flame.Carbon filament lamps get very hot.
Sheet 1 of 1© Harcourt Education Ltd 2004 Catalyst 2This worksheet may have been altered from the original on the CD-ROM.
make pinholehere
thick paper
thin paperscreen
make cufflike this
Type Purpose DifferentiationPractical Pupils use pinhole cameras to develop their ideas about seeing. The activity emphasises
that light travels in straight lines and that it must enter the eye for us to see.Core, Help, Extension
K-Technician.qxd 22-Oct-03 4:29 PM Page 1

K1aActivity
CoreThe pinhole camera
You are going to use a pinhole camera to produce an image on ascreen.
Equipment
● pinhole camera ● sugar paper● pin (for making hole) ● candle or carbon filament lamp● sticky tape
Obtaining evidence
1 Look at your pinhole camera. The thin paper isgoing to be the screen, where you will see theimage.
2 Wrap a piece of paper around the screen end ofthe camera to make a cuff. This makes theimage easier to see. Hold the cuff on with apiece of sticky tape, as shown in the diagram.
3 Make a single pinhole in the centre of the thickpaper. This lets light into the camera.
4 Hold the pinhole towards the lamp or flame.Move the pinhole camera forwards andbackwards until you get an image on thescreen.
Considering the evidence
1 Where did you see the image?2 Describe the image using some of these words:
3 Explain how the pinhole camera works using these words:
4 Copy this diagram and add light rays to show how the image is produced on the screen.
Sheet 1 of 1© Harcourt Education Ltd 2004 Catalyst 2This worksheet may have been altered from the original on the CD-ROM.
If you areusing acandle, make
sure you keep thecamera out of theflame. Carbonfilament bulbs getvery hot – do nottouch!
make pinholehere
thick paper
thin paperscreen
make cufflike this
screen
bright
image lightlight sourcescreen hole
smaller larger right way up inverteddim
K-Activity.qxd 22-Oct-03 4:19 PM Page 1

K1aActivity
Help The pinhole camera
Sheet 1 of 1© Harcourt Education Ltd 2004 Catalyst 2This worksheet may have been altered from the original on the CD-ROM.
You are going to use a pinhole camera to produce an image on ascreen.
Equipment
● pinhole camera ● sugar paper● pin (for making hole) ● candle or carbon filament lamp● sticky tape
Obtaining evidence
1 Look at your pinhole camera.2 Make a cuff and hold it on
with sticky tape. This willmake the image easier to see.
3 Make a single pinhole in thecentre of the paper.
4 Hold the pinhole towardsthe lamp or flame. Moveforwards and backwardsuntil you get an image onthe screen.
Considering the evidence
1 Where did you see the image?2 Complete these sentences to describe how the image was made.
The words can be used more than once.
Some of the from the goes through
the hole.
This light falls on the screen and makes an .
The is upside down. We say that the image is .
The pinhole camera is like an .
Light has to enter our for us to see.
3 Draw light rays on this diagram to show howthe image is made on the screen.
thick paper
thin paper screen
a
make cuff like this
b
make pinhole here
c d
screen
If you areusing acandle, make
sure you keep thecamera out of theflame. Carbonfilament bulbs getvery hot – do nottouch!
image lightlight source inverted eye
K-Activity.qxd 22-Oct-03 4:19 PM Page 2

K1aActivity
ExtensionThe pinhole camera
Sheet 1 of 1© Harcourt Education Ltd 2004 Catalyst 2This worksheet may have been altered from the original on the CD-ROM.
You are going to use a pinhole camera to produce an image ona screen.
Equipment
● pinhole camera ● sugar paper● pin (for making hole) ● candle or carbon filament lamp● sticky tape
Obtaining evidence
1 Look at your pinhole camera. One end is covered with thick paper, which will notallow light through. The other end is covered with thin paper, which will allow somelight through. The thin paper is going to be the screen, where you will see the image.
2 Wrap a piece of paper around the screen endof the camera to make a cuff. This will makethe image easier to see. Secure the cuff witha piece of sticky tape, as shown in thediagram.
3 Make a single pinhole in the centre of thethick paper. This allows light into the camera.
4 Hold the pinhole towards the lamp or flame.Move the pinhole camera forwards andbackwards until you get an image on the screen.
Considering the evidence
1 Where did you see the image?2 Explain how the pinhole camera works using these words:
3 Imagine there is a 5cm tall, arrow-shaped object placed 30cm from the holeof a pinhole camera. The pinhole camera is 15cm long (between the hole andthe screen).a Draw a scale diagram showing the object, the camera and the image.b How tall is the image?c Compare and contrast the image to the object. In what ways are they similar and
in what ways are they different?d Was there a way of working out the size of the image without drawing the scale
diagram? Try out your idea with other sizes of object, distance from pinhole andlength of camera.
If you areusing acandle, make
sure you keep thecamera out of theflame. Carbonfilament bulbs getvery hot – do nottouch!
make pinholehere
thick paper
thin paperscreen
make cufflike this
image lightlight sourcescreen hole
K-Activity.qxd 22-Oct-03 4:19 PM Page 3

K1bTeacher
activity notesHow we see things
Running the activityPupils can follow the sheet independently, or can work in pairs. You may go over thedistinction between luminous and non-luminous objects and the fact that lighttravels in straight lines; this will depend on the chosen starter activity.
Pupils add rays to the diagram of a room to show how objects are seen.
Pupils can produce their own diagrams, or pictures from newspapers and magazinescould be used either in class or for homework.
PitfallsAll the luminous objects will cause rays that reflect off items. Diagrams will beconfusing if all of these are drawn; encourage pupils to concentrate on one source.
Answers1 Light from Sun through the window; ceiling light; standard lamp.
Sheet 1 of 1© Harcourt Education Ltd 2004 Catalyst 2This worksheet may have been altered from the original on the CD-ROM.
2
53
3
4
4
Type Purpose DifferentiationPaper Pupils draw in ray diagrams to show how we see luminous and non-luminous objects. Core
K-Teachers.qxd 22-Oct-03 4:26 PM Page 3

K1bActivity
CoreHow we see things
You are going to draw ray diagrams to show how we see luminous and non-luminous objects. Light travels in straight lines called rays, so we always draw rayswith a ruler. We show the direction of the light with an arrow.
Light travels from luminous objects to our eyes:
Non-luminous objects reflect light into our eyes:
1 Look at the picture of the room.
1 Make a list of the luminous objects in the picture.2 Draw a ray or rays to show how the girl sees the ceiling light.3 Draw a ray or rays to show how she uses the ceiling light to see the clock.4 Draw a ray or rays to show how the girl reads the book with light from the lamp.5 Draw rays to show how the vase on the table casts a shadow. Draw the shadow of
the vase.
Sheet 1 of 1© Harcourt Education Ltd 2004 Catalyst 2This worksheet may have been altered from the original on the CD-ROM.
a
b
K-Activity.qxd 22-Oct-03 4:24 PM Page 4

K2aTeacher
activity notesEqual angles
Running the activityPupils use a thin beam of light and a mirror, and measure the angles of the incomingand reflected light rays.
Core: This is aimed at pupils who may be using the green pupil book, or are using thered book but may find the concept of the normal difficult. The activity sheetintroduces and explains the normal, and the angles of incidence and reflection.
Help: This sheet does not tackle the concept of the normal. As in the green pupilbook, only angles between the ray and the mirror are discussed. The practical work isvery simple and should be kept brief.
Extension: This is aimed at the more able pupils who have already met, or will meet inthe red pupil book, the concept of the normal.
For pupils using the normal for the first time it is a good idea to demonstrate thisusing a mirror and set square. Show them which angle is the angle of reflection andwhich is the angle of incidence.
Expected outcomesAll pupils should gain experience of constructing ray diagrams using pencil, ruler andprotractor.
Core: Pupils should realise that reflection is predictable. Pupils will have used the lawof reflection.
Help: Pupils should realise that reflection is predictable.
Extension: Pupils should realise that reflection is predictable. Pupils will have used thelaw of reflection.
PitfallsPace is essential as this is not the most stimulating activity. Setting a time limit isadvisable. Pupils should be warned not to turn the voltage on the power packs above12V, as this will blow the bulbs.
Safety notesTake care with electrical equipment. Warn pupils that the ray box lamp and housingwill get hot enough to burn them so they should not touch it.
AnswersCore:1 angle of incidence = angle of reflection
Help:1 The angle between the incoming ray and the mirror is the same
as the angle between the reflected ray and the mirror.
Extension:1 angle of incidence = angle of reflection
2 See diagram on right.
Sheet 1 of 1© Harcourt Education Ltd 2004 Catalyst 2This worksheet may have been altered from the original on the CD-ROM.
Type Purpose DifferentiationPractical Pupils measure the angles at which rays are reflected in order to establish that rays are
always reflected in a predictable fashion.Core, Help, Extension
K-Teachers.qxd 22-Oct-03 4:26 PM Page 4

K2aTechnician
activity notesEqual angles
EquipmentFor the teacher:● set square
For each group:● mirror and stand ● ray box with single slit● sheet of white paper ● ruler● power pack ● protractor
For your informationRunning the activityPupils use a thin beam of light and a mirror, and measure the angles of theincoming and reflected light rays.
Core: This is aimed at pupils who may be using the green pupil book, or are usingthe red book but may find the concept of the normal difficult. The activity sheetintroduces and explains the normal, and the angles of incidence and reflection.
Help: This sheet does not tackle the concept of the normal. As in the green pupilbook, only angles between the ray and the mirror are discussed. The practical workis very simple and should be kept brief.
Extension: This is aimed at the more able pupils who have already met, or will meetin the red pupil book, the concept of the normal.
For pupils using the normal for the first time it is a good idea to demonstrate thisusing a mirror and set square. Show them which angle is the angle of reflectionand which is the angle of incidence.
Expected outcomesAll pupils should gain experience of constructing ray diagrams using pencil, rulerand protractor.
Core: Pupils should realise that reflection is predictable. Pupils will have used thelaw of reflection.
Help: Pupils should realise that reflection is predictable.
Extension: Pupils should realise that reflection is predictable. Pupils will have usedthe law of reflection.
PitfallsPace is essential as this is not the most stimulating activity. Setting a time limit isadvisable.
Pupils should be warned not to turn the voltage on the power packs above 12V, asthis will blow the bulbs.
Safety notesTake care with electrical equipment. Warn pupils that the ray box lamp andhousing will get hot enough to burn them so they should not touch it.
Sheet 1 of 1© Harcourt Education Ltd 2004 Catalyst 2This worksheet may have been altered from the original on the CD-ROM.
Type Purpose DifferentiationPractical Pupils measure the angles at which rays are reflected in order to establish that rays are
reflected in a predictable fashion.Core, Help, Extension
K-Technician.qxd 22-Oct-03 4:29 PM Page 2
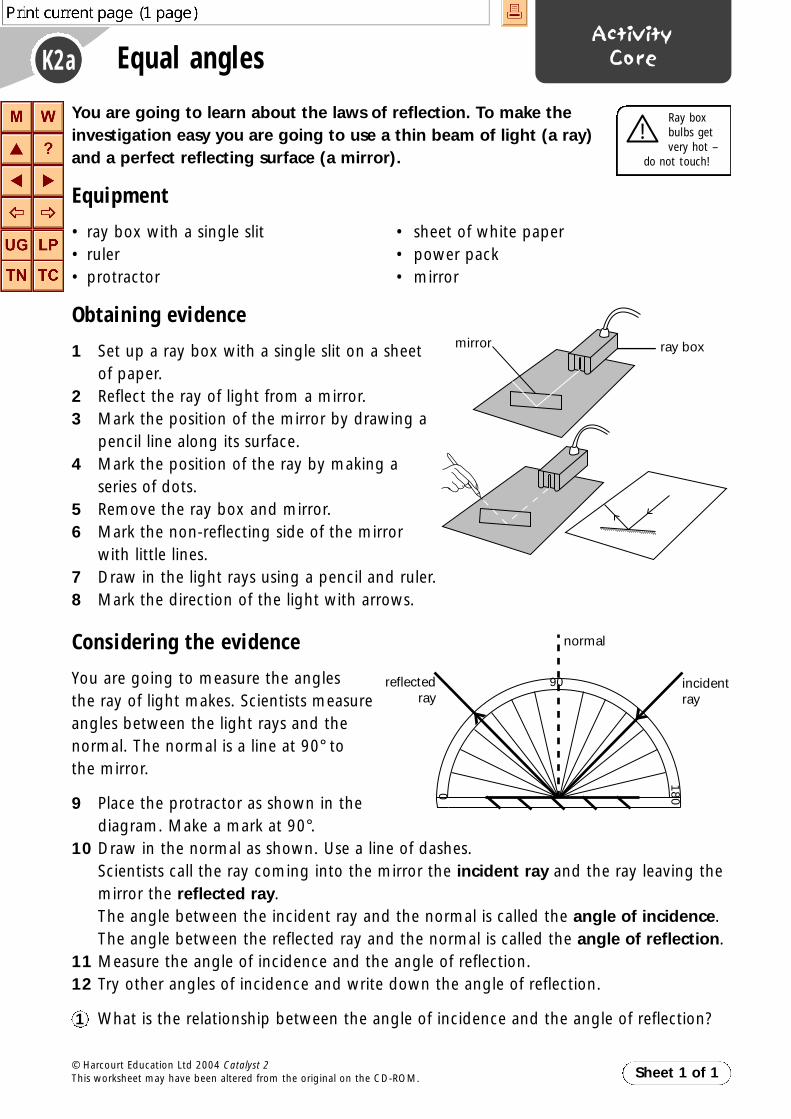
K2aActivity
CoreEqual angles
You are going to learn about the laws of reflection. To make theinvestigation easy you are going to use a thin beam of light (a ray)and a perfect reflecting surface (a mirror).
Equipment
• ray box with a single slit • sheet of white paper• ruler • power pack• protractor • mirror
Obtaining evidence
1 Set up a ray box with a single slit on a sheetof paper.
2 Reflect the ray of light from a mirror.3 Mark the position of the mirror by drawing a
pencil line along its surface.4 Mark the position of the ray by making a
series of dots.5 Remove the ray box and mirror.6 Mark the non-reflecting side of the mirror
with little lines.7 Draw in the light rays using a pencil and ruler.8 Mark the direction of the light with arrows.
Considering the evidence
You are going to measure the anglesthe ray of light makes. Scientists measureangles between the light rays and thenormal. The normal is a line at 90° tothe mirror.
9 Place the protractor as shown in thediagram. Make a mark at 90°.
10 Draw in the normal as shown. Use a line of dashes.Scientists call the ray coming into the mirror the incident ray and the ray leaving themirror the reflected ray.The angle between the incident ray and the normal is called the angle of incidence.The angle between the reflected ray and the normal is called the angle of reflection.
11 Measure the angle of incidence and the angle of reflection.12 Try other angles of incidence and write down the angle of reflection.
What is the relationship between the angle of incidence and the angle of reflection?
Sheet 1 of 1© Harcourt Education Ltd 2004 Catalyst 2This worksheet may have been altered from the original on the CD-ROM.
Ray boxbulbs getvery hot –
do not touch!
1
mirror ray box
normal
reflectedray
incidentray
90
1800
K-Activity.qxd 22-Oct-03 4:24 PM Page 5

K2aActivity
HelpEqual angles
You are going to learn about how rays reflect.
Light reflects when it hits a mirror. You are going to use a beam oflight, called a ray, to investigate reflection.
Equipment
● ray box with a single slit ● sheet of white paper● ruler ● power pack● protractor ● mirror
Obtaining evidence
1 Set up a ray box with a single slit on a sheetof paper.
2 Reflect the ray of light from a mirror.3 Mark the position of the mirror by drawing a
pencil line along its surface.4 Mark the position of the ray by making a
series of dots.5 Remove the ray box and mirror.6 Mark the non-reflecting side of the mirror
with little lines.7 Draw in the light rays using a pencil and
ruler.8 Mark the direction of the light with arrows.
Your diagram should look something like the one here:
Considering the evidence
You are going to measure the angles the ray of light makes withthe mirror.
9 Use a protractor to measure the angles between the rays and the mirror on your ray diagram.
10 Try other angles between the ray and the mirror.
What did you find out about the angles between the raysand the mirror?
Sheet 1 of 1© Harcourt Education Ltd 2004 Catalyst 2This worksheet may have been altered from the original on the CD-ROM.
Ray boxbulbs getvery hot –
do not touch!
1
mirror ray box
90
1800
K-Activity.qxd 22-Oct-03 4:24 PM Page 6

K2aActivity
ExtensionEqual angles
You are going to investigate and then apply the law ofreflection.
Equipment
• ray box with a single slit • sheet of white paper• ruler • power pack• protractor • mirror
Obtaining evidence
1 Set up a ray box with a single slit on a sheetof paper.
2 Reflect the ray of light from a mirror.3 Mark the position of the mirror by drawing a
pencil line along its surface.4 Mark the position of the ray by making a
series of dots.5 Remove the ray box and mirror.6 Mark the non-reflecting side of the mirror
with little lines.7 Draw in the light rays using a pencil and ruler.8 Mark the direction of the light with arrows.
Considering the evidence
9 Use a protractor to measure 90° where the ray hits the mirror.Make a mark and then draw in the normal.
10 Measure the angle of incidence i and the angle of reflection r.
What is the relationship between the angle of incidence and theangle of reflection?Where are the mirrors in the ray diagram on the right? Make anaccurate copy of the diagram, then use a protractor to draw inthe normals and the mirrors.
Sheet 1 of 1© Harcourt Education Ltd 2004 Catalyst 2This worksheet may have been altered from the original on the CD-ROM.
Ray boxbulbs getvery hot –
do not touch!
1
2
mirror ray box
K-Activity.qxd 22-Oct-03 4:24 PM Page 7

K2bTeacher
activity notesKaleidoscopes
Running the activityThis is not an open investigation as most of the key variables are set, i.e. the numberof mirrors (two) and the plane of reflection (flat on the table). Pupils are only allowedto vary the angles between the mirrors.
Core: Pupils are guided through the process, and are given a structured plan.
Extension: This encourages a more open approach. Pupils choose the angles they aregoing to investigate, so they need to choose angles that divide easily into 360°(i.e. that give whole number answers).
Expected outcomesPupils discover that the relationship is: number of images = (360° ÷ angle betweenmirrors) – 1.
PitfallsSmall angles will be difficult – 20º should give 17 images, 18º should give 19 imagesand 15º should give 23 images, so getting the right number of images for small angleswill require a degree of precision that is probably impossible. However, this willprovide an interesting point for discussion.
AnswersCore:1 The smaller the angle between the mirrors the more images you see.
2 Varies.
3 If you divide 360º by the angle between the mirrors, you get a number. Thisnumber is always one less than the number of images/number of images = (360º ÷angle between mirrors) – 1.
4 5
Extension:1 The smaller the angle between the mirrors the more images you see. If you divide
360º by the angle between the mirrors, you get a number that is always one morethan the number of images, i.e. number of images = (360º ÷ angle of mirrors) – 1.
2 180º = 1; 120º = 2; 90º = 3; 60º = 5; 45º = 7; 36º = 9; 30º = 11
Sheet 1 of 1© Harcourt Education Ltd 2004 Catalyst 2This worksheet may have been altered from the original on the CD-ROM.
Angle between 360° ÷÷ angle between Number of imagesmirrors mirrors
180° 2 1
120° 3 2
90° 4 3
45° 8 7
36° 10 9
Type Purpose DifferentiationPractical Pupils investigate how the angle between two mirrors relates to the number of images
produced.Core, Extension
K-Teachers.qxd 22-Oct-03 4:26 PM Page 5
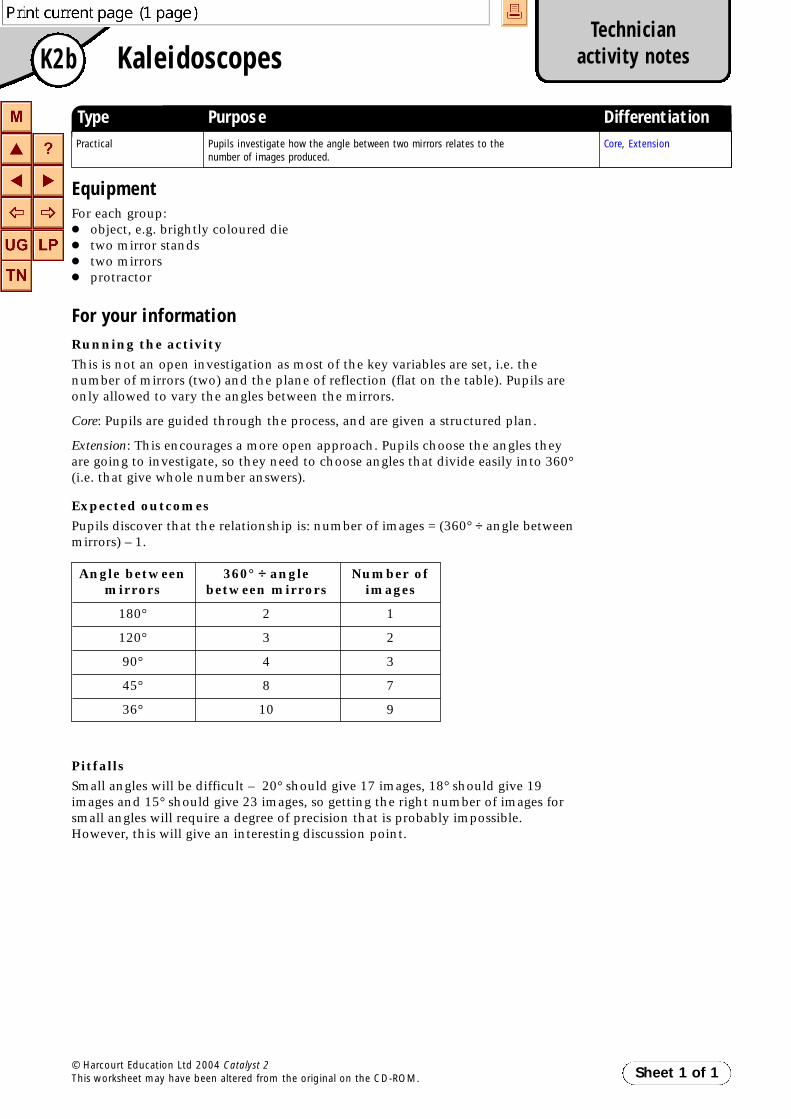
K2bTechnician
activity notesKaleidoscopes
EquipmentFor each group:● object, e.g. brightly coloured die● two mirror stands● two mirrors● protractor
For your informationRunning the activityThis is not an open investigation as most of the key variables are set, i.e. thenumber of mirrors (two) and the plane of reflection (flat on the table). Pupils areonly allowed to vary the angles between the mirrors.
Core: Pupils are guided through the process, and are given a structured plan.
Extension: This encourages a more open approach. Pupils choose the angles theyare going to investigate, so they need to choose angles that divide easily into 360°(i.e. that give whole number answers).
Expected outcomesPupils discover that the relationship is: number of images = (360° ÷ angle betweenmirrors) – 1.
PitfallsSmall angles will be difficult – 20° should give 17 images, 18° should give 19images and 15° should give 23 images, so getting the right number of images forsmall angles will require a degree of precision that is probably impossible.However, this will give an interesting discussion point.
Sheet 1 of 1© Harcourt Education Ltd 2004 Catalyst 2This worksheet may have been altered from the original on the CD-ROM.
Angle between 360° ÷÷ angle Number ofmirrors between mirrors images
180° 2 1
120° 3 2
90° 4 3
45° 8 7
36° 10 9
Type Purpose DifferentiationPractical Pupils investigate how the angle between two mirrors relates to the
number of images produced.Core, Extension
K-Technician.qxd 22-Oct-03 4:29 PM Page 3

K2bActivity
CoreKaleidoscopes
Sheet 1 of 1
You are going to investigate what happens when you put two mirrors at an angle to one another. You will then use what you have learned to make a prediction for a new experiment.
Equipment● object, e.g. brightly coloured die ● two mirror stands● two mirrors ● protractor
Planning and predicting
The input/independent variable for this investigation is the angle between the mirrors.The outcome/dependent variable is the number of images.The variables kept the same include: the number of mirrors (two), the type of mirror (flat)and the plane of the experiment (flat on the table).
1 Look at diagrams A– E.They show the values youare to use.
2 Prepare a suitable tablefor your results.
Obtaining evidence
3 Carry out the experiment.Count the number ofimages each time.
4 Record your results.
Considering the evidence
There is a relationship between the number of images and the angle between themirrors.Think about these things. Copy and complete the sentence.
The smaller the angle between the mirrors the images you see.Copy and complete this table:
Explain how the angle between the mirrors and the number of images is related.Predict the number of images you will get with a 60º angle.Carry out an experiment to test your prediction. Write down your results. Were you correct?
© Harcourt Education Ltd 2004 Catalyst 2This worksheet may have been altered from the original on the CD-ROM.
Angle between mirrors 360º/angle between mirrors Number of images
A B
C D E
180˚ 120˚
36˚45˚90˚
1
2
345
K-Activity.qxd 22-Oct-03 4:24 PM Page 8

K2bActivity
ExtensionKaleidoscopes
You are going to investigate what happens when you put two mirrors at an angle to one another. You will then use what you have learned to make a prediction for a new experiment.
Equipment● object, e.g. brightly coloured die ● two mirror stands● two mirrors ● protractor
Planning and predicting
The input/independent variable for this investigation is the angle between the mirrors.The outcome/dependent variable is the number of images.
The variables kept the same include: the number of mirrors (two), the type of mirror (flat)and the plane of the experiment (flat on the table).
1 Look at the diagram. It shows two mirrors atan angle, with an object.
2 Decide on five values for the angle betweenthe mirrors.Hint: If you need help selecting suitableangles, ask your teacher or look through therest of this sheet carefully.
3 Prepare a suitable table for your results.
Obtaining evidence
4 Carry out the experiment. Count the number of images each time.5 Record your results.
Considering the evidence
There is a relationship between the number of images and the angle between themirrors. Think about the size of the angle relative to 360º.
1 Explain the relationship between the angle between the mirrors and the number ofimages.
2 Here are some possible values for the angle between the mirrors. Predict the numberof images for two values you did not include in your investigation.
3 Carry out an experiment to test your predictions. Write down your results. Were you correct?
Sheet 1 of 1© Harcourt Education Ltd 2004 Catalyst 2This worksheet may have been altered from the original on the CD-ROM.
180° 120° 90° 60° 45° 36° 30°
K-Activity.qxd 22-Oct-03 4:24 PM Page 9

K3aTeacher
activity notesIs it transparent?
Running the activityThe set-up used will depend on the equipment available. A light source is put on oneside of the material to be tested, and a light sensor on the other. The light sensorshould be connected to a computer or datalogging device.
Ideally, the materials should all be of the same thickness. Pieces 5mm thick wouldprobably be easier to obtain. Materials should include the following:
● Clear colourless glass, clear coloured glass, opaque white glass and translucentwhite glass. This could be obtained from a stained glass supplier. Possibly amember of staff or parent in the school will use stained glass as a hobby and maybe able to help with remnants.
● Clear colourless plastic, clear coloured plastic, translucent white plastic andopaque plastic should be obtained from appropriate suppliers (approach theTechnology department for assistance).
● Paper would probably have to be thinner than 5mm, but different types of paperwould be appropriate materials to include.
● 5mm aluminium is also a possibility.
Expected outcomesThis will depend on the materials used. Each pupil should have a bar chart showing‘light level’ against ‘material’.
PitfallsAmbient light levels will vary. The shield of black card around the light sensor willhelp.
Safety notesSharp edges on cut samples of materials need to be taped over.
Take care with electrical equipment.
Warn pupils that the ray box lamp and housing will get hot enough to burn them sothey should not touch it.
Answers1 Depends on materials used.
2 There will be a range of light levels transmitted, and pupils will have to decide theboundaries between the groups.
3 Possibly not all the materials were the same thickness.
4 Possible answers: all materials same thickness and same colour, light source with a‘whiter’ light, more access to the computer, method of inputting the names of thematerial into the computer, etc.
Sheet 1 of 1© Harcourt Education Ltd 2004 Catalyst 2This worksheet may have been altered from the original on the CD-ROM.
Type Purpose DifferentiationPractical Pupils use light meters to classify materials according to the amount of light they
transmit.Core
K-Teachers.qxd 22-Oct-03 4:26 PM Page 6
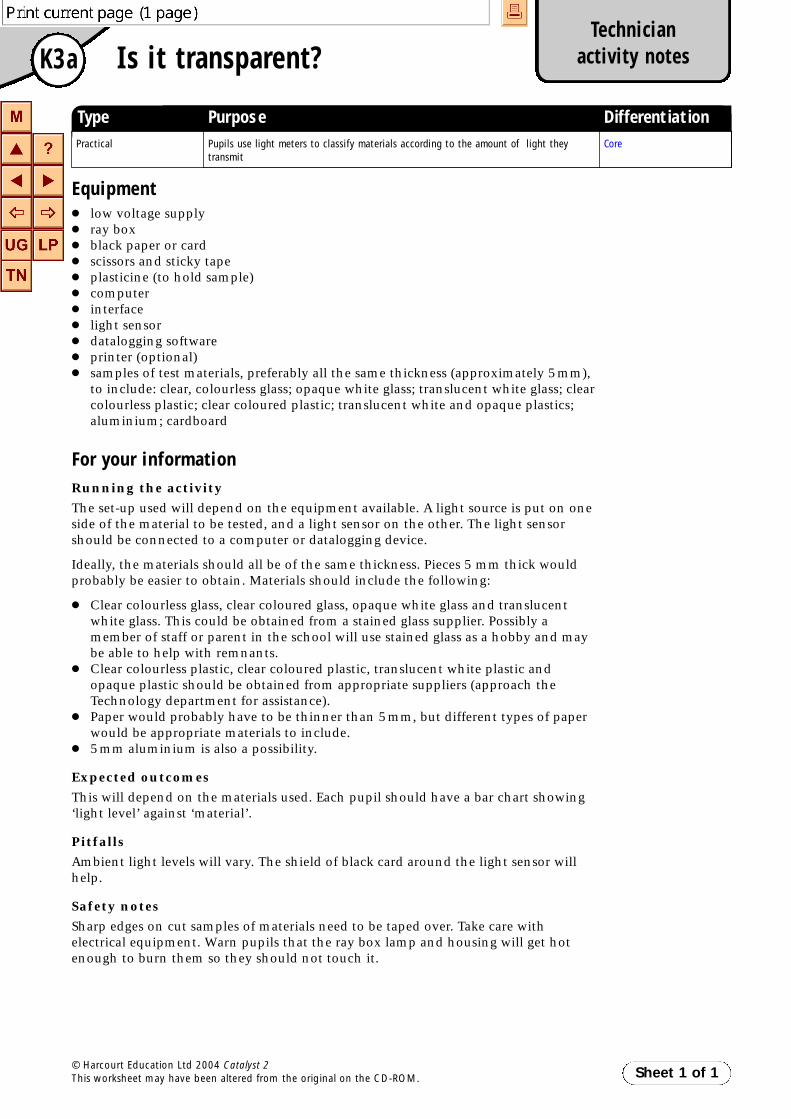
K3aTechnician
activity notesIs it transparent?
Equipment● low voltage supply● ray box● black paper or card● scissors and sticky tape● plasticine (to hold sample)● computer● interface● light sensor● datalogging software● printer (optional)● samples of test materials, preferably all the same thickness (approximately 5mm),
to include: clear, colourless glass; opaque white glass; translucent white glass; clearcolourless plastic; clear coloured plastic; translucent white and opaque plastics;aluminium; cardboard
For your informationRunning the activityThe set-up used will depend on the equipment available. A light source is put on oneside of the material to be tested, and a light sensor on the other. The light sensorshould be connected to a computer or datalogging device.
Ideally, the materials should all be of the same thickness. Pieces 5 mm thick wouldprobably be easier to obtain. Materials should include the following:
● Clear colourless glass, clear coloured glass, opaque white glass and translucentwhite glass. This could be obtained from a stained glass supplier. Possibly amember of staff or parent in the school will use stained glass as a hobby and maybe able to help with remnants.
● Clear colourless plastic, clear coloured plastic, translucent white plastic andopaque plastic should be obtained from appropriate suppliers (approach theTechnology department for assistance).
● Paper would probably have to be thinner than 5mm, but different types of paperwould be appropriate materials to include.
● 5mm aluminium is also a possibility.
Expected outcomesThis will depend on the materials used. Each pupil should have a bar chart showing‘light level’ against ‘material’.
PitfallsAmbient light levels will vary. The shield of black card around the light sensor willhelp.
Safety notesSharp edges on cut samples of materials need to be taped over. Take care withelectrical equipment. Warn pupils that the ray box lamp and housing will get hotenough to burn them so they should not touch it.
Sheet 1 of 1© Harcourt Education Ltd 2004 Catalyst 2This worksheet may have been altered from the original on the CD-ROM.
Type Purpose DifferentiationPractical Pupils use light meters to classify materials according to the amount of light they
transmitCore
K-Technician.qxd 22-Oct-03 4:29 PM Page 4

K3aActivity
CoreIs it transparent?
You are going to classify materials as transparent, translucent oropaque.
Equipment
• low voltage supply • ray box• black paper or card • scissors and sticky tape• plasticine (to hold sample) • computer• light sensor• samples of test materials, preferably all the same thickness, e.g.
clear colourless glass; opaque white glass; translucent white glass;clear colourless plastic; clear coloured plastic; translucent white andopaque plastics; aluminium; cardboard
Obtaining evidence
1 Set up the apparatus as shown in the diagram.
2 Set the computer to record a light level.3 Test all the materials provided.
The computer will display the amount of light transmitted (allowedthrough) by each material.
Presenting the results
4 Print out the bar chart or draw a sketch of it. Label the bars to showwhich material they were.
Sheet 1 of 2© Harcourt Education Ltd 2004 Catalyst 2This worksheet may have been altered from the original on the CD-ROM.
Transparent Opaque Translucent
Light goes through Light does not go Some light goes the material. through the material. through – but
not all of it.
Ray boxbulbs getvery hot –
do not touch!
ray box
test material
black paperaround sensor
interface computer
light sensor
K-Activity.qxd 22-Oct-03 4:24 PM Page 10

K3aActivity
CoreIs it transparent? (continued)
Considering the evidence
Look at your data. Classify the materials as transparent, opaqueor translucent.
Evaluating
Were there any materials that were difficult to put into a group?Explain your answer.Do you think this investigation was a fair test? Explain youranswer.If you were doing this investigation again, and you could haveany equipment you wanted, how would you improve theexperiment?
Sheet 2 of 2© Harcourt Education Ltd 2004 Catalyst 2This worksheet may have been altered from the original on the CD-ROM.
1
2
3
4
K-Activity.qxd 22-Oct-03 4:24 PM Page 11

K3bTeacher
activity notesRefraction
Sheet 1 of 1© Harcourt Education Ltd 2004 Catalyst 2This worksheet may have been altered from the original on the CD-ROM.
Running the activityPupils examine the path of a light ray through a glass or Perspex block. Less ablepupils will benefit from a demonstration of how to set up the apparatus.
Expected outcomesThe light ray passes straight through the glass block when it hits the surface at 90º(along the normal). When the light ray hits the block at other angles, the ray bendstowards the normal when it enters the glass, and away from the normal as it leavesthe glass. Less able pupils will not use the term ‘normal’. Higher achieving pupilsshould be encouraged to use the words ‘normal’ and ‘refract’ in their answers.
PitfallsSet a time limit as the experiment is repetitive and it is not necessary for all pupils tofinish all the angles.
Pupils should be warned not to turn the voltage on the power packs above 12V, asthis will blow the bulbs.
Safety notesTake care with electrical equipment.
Warn pupils that the ray box lamp and housing will get hot enough to burn them sothey should not touch it.
Answers1 It goes straight in.
2 It bends inwards (refracts towards the normal).
3 It comes straight out.
4 It bends outwards (it refracts away from the normal).
5 They are in the same direction (parallel to each other).
Type Purpose DifferentiationPractical Pupils use a glass block to show how light refracts. Core
K-Teachers.qxd 22-Oct-03 4:26 PM Page 7

K3bTechnician
activity notesRefraction
EquipmentFor each group:● ray box with single slit● low voltage supply● glass block● white paper● ruler
For your informationRunning the activityPupils examine the path of a light ray through a glass or Perspex block. Less ablepupils will benefit from a demonstration of how to set up the apparatus.
Expected outcomesThe light ray passes straight through the glass block when it hits the surface at 90°(along the normal). When the light ray hits the block at other angles, the raybends towards the normal when it enters the glass, and away from the normal as itleaves the glass. Less able pupils will not use the term ‘normal’. Higher achievingpupils should be encouraged to use the words ‘normal’ and ‘refract’ in theiranswers.
PitfallsSet a time limit as the experiment is repetitive and it is not necessary for all pupilsto finish all the angles.
Pupils should be warned not to turn the voltage on the power packs above 12V asthis will blow the bulbs.
Safety notesTake care with electrical equipment.
Warn pupils that the ray box lamp and housing will get hot enough to burn themso they should not touch it.
Sheet 1 of 1© Harcourt Education Ltd 2004 Catalyst 2This worksheet may have been altered from the original on the CD-ROM.
Type Purpose DifferentiationPractical Pupils use a glass block to show how light refracts. Core
K-Technician.qxd 22-Oct-03 4:29 PM Page 5

K3bActivity
CoreRefraction
You are going to see what happens when light passes from onetransparent medium to another.
Equipment
• ray box with a single slit • low voltage supply• glass block • white paper• ruler
Obtaining evidence
1 Set up the apparatus as shown in the diagram.
You are going to draw light rays going into andcoming out of the glass block for each of thefollowing angles:
2 For the first ray draw around the glass block.3 Mark the ray going into the block with four dots.4 Mark the ray coming out of the block with four dots.5 Take away the block.6 Join the first four dots to draw the ray going into the block.7 Join the second four dots to draw the ray coming out of the block.8 Draw a line inside the block joining the incoming and outgoing rays
(this is what happens inside the block).9 Repeat steps 2 to 8 for the other rays shown in the diagrams.
Considering the evidence
What happens when the ray enters the block at 90º?What happens when the ray enters the block at any other angle?What happens to the ray that entered at 90º when it leaves the block?What happens to the other rays when they come out of the block at any other angle?Compare the direction of the ray entering the block with the direction of the raycoming out of the block.
Sheet 1 of 1© Harcourt Education Ltd 2004 Catalyst 2This worksheet may have been altered from the original on the CD-ROM.
Ray boxbulbs getvery hot –
do not touch!
12345
plainwhitepaper
ray box
glass block
K-Activity.qxd 22-Oct-03 4:24 PM Page 12
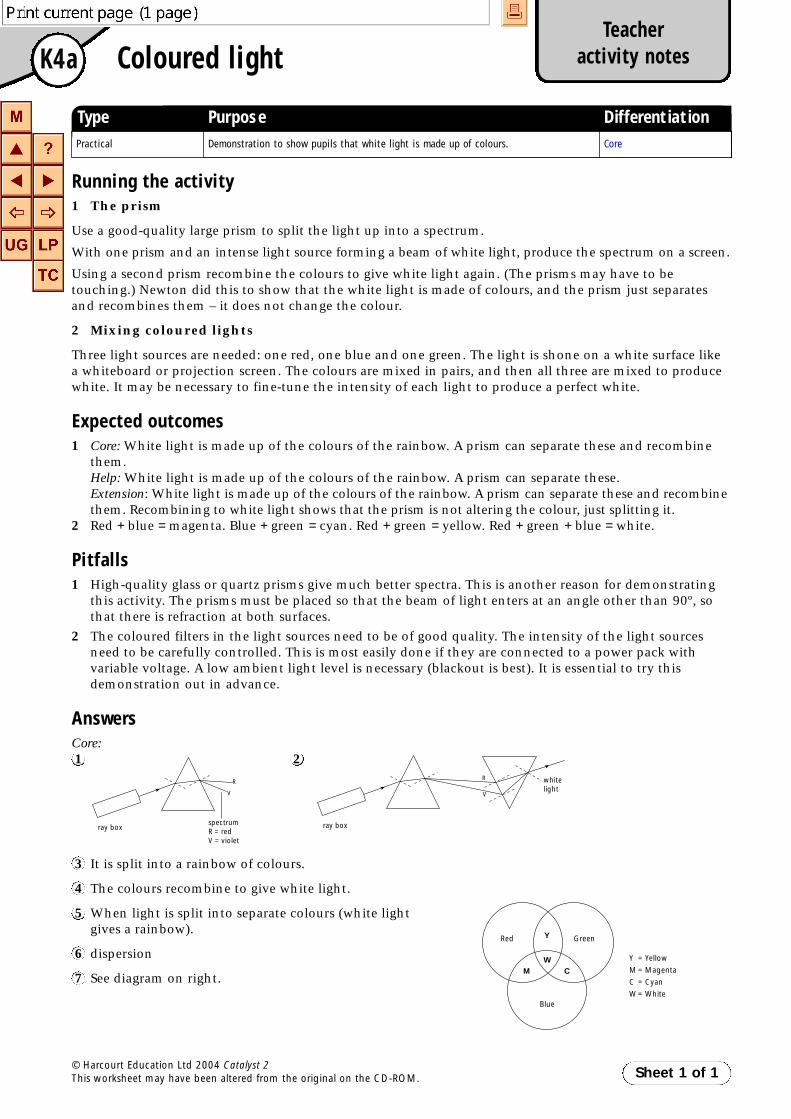
K4aTeacher
activity notesColoured light
Running the activity1 The prism
Use a good-quality large prism to split the light up into a spectrum.
With one prism and an intense light source forming a beam of white light, produce the spectrum on a screen.
Using a second prism recombine the colours to give white light again. (The prisms may have to betouching.) Newton did this to show that the white light is made of colours, and the prism just separatesand recombines them – it does not change the colour.
2 Mixing coloured lights
Three light sources are needed: one red, one blue and one green. The light is shone on a white surface likea whiteboard or projection screen. The colours are mixed in pairs, and then all three are mixed to producewhite. It may be necessary to fine-tune the intensity of each light to produce a perfect white.
Expected outcomes1 Core: White light is made up of the colours of the rainbow. A prism can separate these and recombine
them.Help: White light is made up of the colours of the rainbow. A prism can separate these.Extension: White light is made up of the colours of the rainbow. A prism can separate these and recombinethem. Recombining to white light shows that the prism is not altering the colour, just splitting it.
2 Red + blue = magenta. Blue + green = cyan. Red + green = yellow. Red + green + blue = white.
Pitfalls1 High-quality glass or quartz prisms give much better spectra. This is another reason for demonstrating
this activity. The prisms must be placed so that the beam of light enters at an angle other than 90º, sothat there is refraction at both surfaces.
2 The coloured filters in the light sources need to be of good quality. The intensity of the light sourcesneed to be carefully controlled. This is most easily done if they are connected to a power pack withvariable voltage. A low ambient light level is necessary (blackout is best). It is essential to try thisdemonstration out in advance.
AnswersCore:1 2
3 It is split into a rainbow of colours.
4 The colours recombine to give white light.
5 When light is split into separate colours (white light gives a rainbow).
6 dispersion
7 See diagram on right.
R
V
whitelight
ray boxray boxspectrumR = redV = violet
R
V
Red Green
Blue
Y = Yellow
M = Magenta
C = Cyan
W = White
Y
WCM
Sheet 1 of 1© Harcourt Education Ltd 2004 Catalyst 2This worksheet may have been altered from the original on the CD-ROM.
Type Purpose DifferentiationPractical Demonstration to show pupils that white light is made up of colours. Core
K-Teachers.qxd 22-Oct-03 4:26 PM Page 8

K4aTechnician
activity notesColoured light
EquipmentFor the prism demonstration:
● two good-quality large prisms● light source with intense white beam (not fluorescent)● white screen onto which to direct spectrum
For the colour mixing demonstration:
● three light sources, preferably of variable intensity (e.g. ray boxes linked to low-voltage supplies withvariable voltage, encased to produce a circular beam of light)
● a red, a green and a blue filter, each fitted to one of the lights to give a red, a green and a blue light.(Alternatively, you may have a dedicated piece of equipment for mixing the lights.)
● white screen
For your informationRunning the activity1 The prism
Use a good-quality large prism to split the light up into a spectrum.
With one prism and an intense light source forming a beam of white light, produce thespectrum on a screen.
Using a second prism recombine the colours to give white light again. (The prisms mayhave to be touching.) Newton did this to show that the white light is made of colours,and the prism just separates and recombines them – it does not change the colour.
2 Mixing coloured lights
Three light sources are needed: one red, one blue and one green. The light is shone on awhite surface like a whiteboard or projection screen. The colours are mixed in pairs, andthen all three are mixed to produce white. It may be necessary to fine-tune the intensityof each light to produce a perfect white.
Expected outcomes1 Core: White light is made up of the colours of the rainbow. A prism can separate these
and recombine them.
Help: White light is made up of the colours of the rainbow. A prism can separate these.
Extension: White light is made up of the colours of the rainbow. A prism can separatethese and recombine them. Recombining to white light shows that the prism is notaltering the colour, just splitting it.
2 Red + blue = magenta. Blue + green = cyan. Red + green = yellow. Red + green + blue = white.
Pitfalls1 High-quality glass or quartz prisms give much better spectra. This is another reason
for demonstrating this activity. The prisms must be placed so that the beam of lightenters at an angle other than 90º, so that there is refraction at both surfaces.
2 The coloured filters in the light sources need to be of good quality. The intensity ofthe light sources need to be carefully controlled. This is most easily done if they areconnected to a power pack with variable voltage. A low ambient light level isnecessary (blackout is best). It is essential to try this demonstration out in advance.
Sheet 1 of 1© Harcourt Education Ltd 2004 Catalyst 2This worksheet may have been altered from the original on the CD-ROM.
Type Purpose DifferentiationPractical Demonstration to show pupils that white light is made up of colours. Core
K-Technician.qxd 22-Oct-03 4:29 PM Page 6

K4aActivity
CoreColoured light
You are going to watch some demonstrations of white andcoloured light.
The prism
1 When a ray of white light strikes a glass prismthe ray is refracted. Watch the demonstration.
Add to the diagram to show what happens tothe light:
2 A second prism is added in the path of the ray,as shown in the diagram.
Complete the prism diagram to show what happens to the light.
3 Complete these sentences to describe what happens:
When white light passes through a glass prism it .
When the light then passes through a second glass prism.
A spectrum is .
The splitting up of white light by a prism is called .
Mixing coloured light
When coloured light is mixed, our eyes see new colours.
4 Watch the demonstration.
Copy and complete this diagram to show what happens whenred, green and blue light are mixed.
Sheet 1 of 1© Harcourt Education Ltd 2004 Catalyst 2This worksheet may have been altered from the original on the CD-ROM.
1
2
3
4
5
6
7
ray box
K-Activity.qxd 22-Oct-03 4:24 PM Page 13

K4bTeacher
activity notesReflecting colour
Running the activityWhere the availability of computers is limited, the teacher might choose todemonstrate the technique. Alternatively, the activity could be part of a circus ofexperiments.
Core: Pupils use a light sensor to measure how well different colour surfaces reflectlight.
Help: Pupils either watch or are shown how to use the light sensor, and thenanswer the questions on the sheet.
Expected outcomesAt a light level of 70lux a white surface gave 67lux, a green surface 64lux and ablack surface 57lux.
Bright white paper/card should reflect the most light, probably followed by yellow(which reflects both red and green, the predominant colours in the light from anelectric filament lamp). Black paper/card should reflect the least light.
PitfallsAmbient light can be a problem, particularly if the ambient light level varies.
Safety notesTake care with electrical equipment.
Warn pupils that the ray box lamp and housing will get hot enough to burn themso they should not touch it.
AnswersCore:3 White, because it reflects all colours of light/does not absorb any light.
4 White reflects all colours of light.
5 Depends on pupil prediction.
Help:1 White (but should be consistent with pupil’s results).
2 Black (but should be consistent with pupil’s results).
Sheet 1 of 1© Harcourt Education Ltd 2004 Catalyst 2This worksheet may have been altered from the original on the CD-ROM.
Type Purpose DifferentiationICT Pupils apply their understanding of reflection and absorption to explain why objects
appear coloured.Core, Help
K-Teachers.qxd 22-Oct-03 4:26 PM Page 9

K4bTechnician
activity notesReflecting colour
EquipmentFor each group:● computer● interface● light sensor● datalogging software● printer (optional)● low voltage supply● ray box● black paper or card● scissors and sticky tape● selection of metal plates sprayed with paint, or coloured card● plasticine to support coloured surfaces
For your informationRunning the activityWhere the availability of computers is limited, the teacher might choose todemonstrate the technique. Alternatively, the activity could be part of a circus ofexperiments.
Core: Pupils use a light sensor to measure how well different colour surfaces reflectlight.
Help: Pupils either watch or are shown how to use the light sensor, then answerthe questions on the sheet.
Expected outcomesAt a light level of 70lux a white surface gave 67lux, a green surface 64lux and ablack surface 57lux.
Bright white paper/card should reflect the most light, probably followed by yellow(which reflects both red and green, the predominant colours in the light from anelectric filament lamp). Black paper/card should reflect the least light.
PitfallsAmbient light can be a problem, particularly if the ambient light level varies.
Safety notesTake care with electrical equipment.
Warn pupils that the ray box lamp and housing will get hot enough to burn themso they should not touch it.
Sheet 1 of 1© Harcourt Education Ltd 2004 Catalyst 2This worksheet may have been altered from the original on the CD-ROM.
Type Purpose DifferentiationICT Pupils apply their understanding of reflection and absorption to explain why objects
appear coloured.Core, Help
K-Technician.qxd 22-Oct-03 4:29 PM Page 7
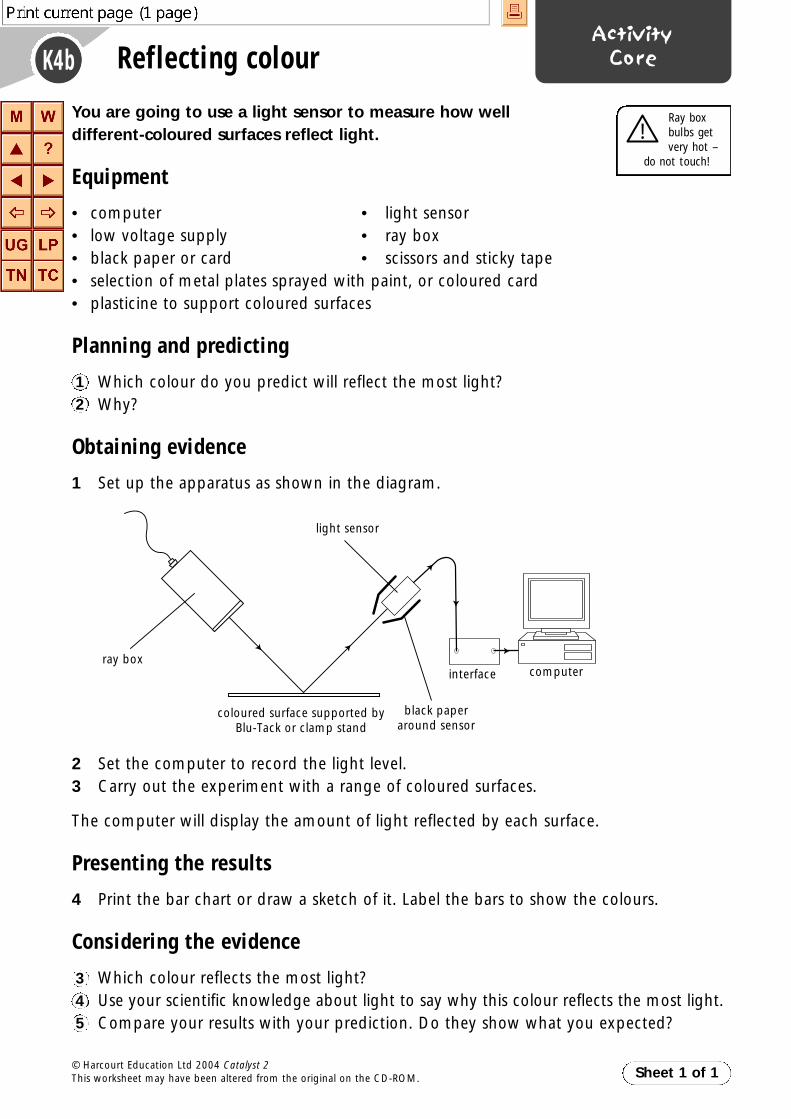
K4bActivity
CoreReflecting colour
Sheet 1 of 1© Harcourt Education Ltd 2004 Catalyst 2This worksheet may have been altered from the original on the CD-ROM.
Ray boxbulbs getvery hot –
do not touch!
12
You are going to use a light sensor to measure how welldifferent-coloured surfaces reflect light.
Equipment
• computer • light sensor• low voltage supply • ray box• black paper or card • scissors and sticky tape• selection of metal plates sprayed with paint, or coloured card• plasticine to support coloured surfaces
Planning and predicting
Which colour do you predict will reflect the most light?Why?
Obtaining evidence
1 Set up the apparatus as shown in the diagram.
2 Set the computer to record the light level.3 Carry out the experiment with a range of coloured surfaces.
The computer will display the amount of light reflected by each surface.
Presenting the results
4 Print the bar chart or draw a sketch of it. Label the bars to show the colours.
Considering the evidence
Which colour reflects the most light?Use your scientific knowledge about light to say why this colour reflects the most light.Compare your results with your prediction. Do they show what you expected?
345
ray box
light sensor
coloured surface supported byBlu-Tack or clamp stand
black paperaround sensor
interface computer
K-Activity.qxd 22-Oct-03 4:24 PM Page 14
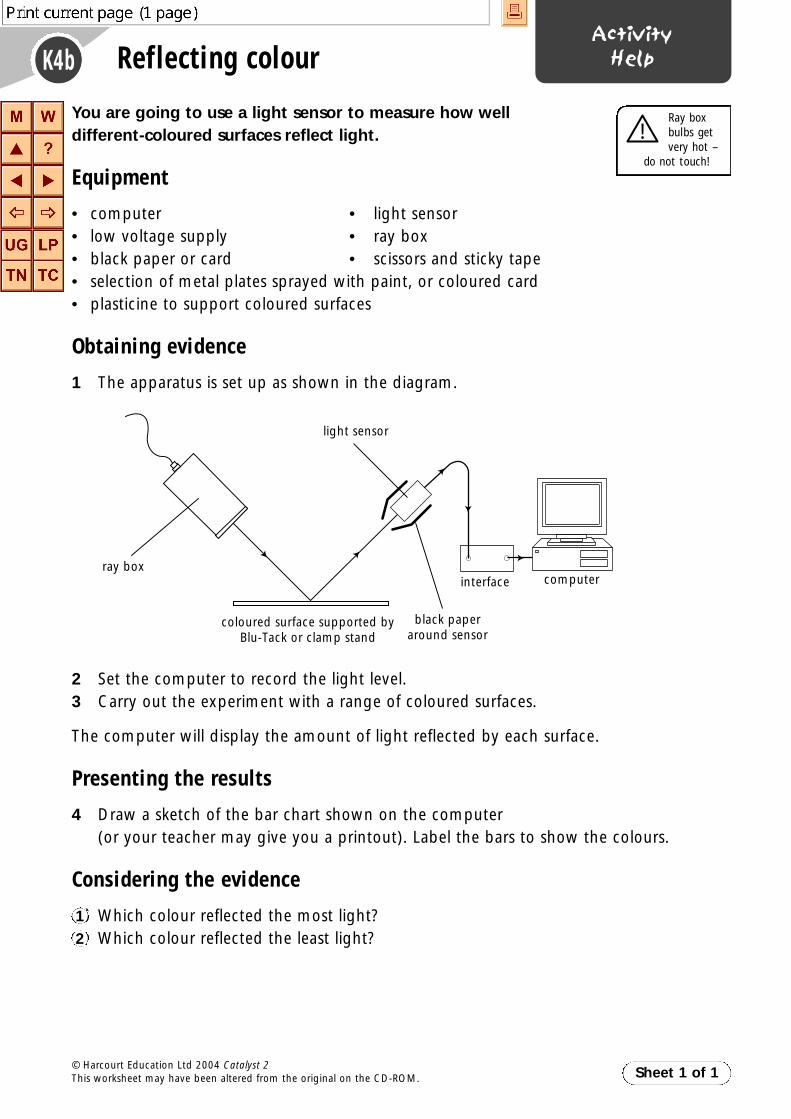
K4bActivity
HelpReflecting colour
Sheet 1 of 1© Harcourt Education Ltd 2004 Catalyst 2This worksheet may have been altered from the original on the CD-ROM.
You are going to use a light sensor to measure how well different-coloured surfaces reflect light.
Equipment
• computer • light sensor• low voltage supply • ray box• black paper or card • scissors and sticky tape• selection of metal plates sprayed with paint, or coloured card• plasticine to support coloured surfaces
Obtaining evidence
1 The apparatus is set up as shown in the diagram.
2 Set the computer to record the light level.3 Carry out the experiment with a range of coloured surfaces.
The computer will display the amount of light reflected by each surface.
Presenting the results
4 Draw a sketch of the bar chart shown on the computer (or your teacher may give you a printout). Label the bars to show the colours.
Considering the evidence
1` Which colour reflected the most light?2 Which colour reflected the least light?
Ray boxbulbs getvery hot –
do not touch!
ray box
light sensor
coloured surface supported byBlu-Tack or clamp stand
black paperaround sensor
interface computer
K-Activity.qxd 22-Oct-03 4:24 PM Page 15

K4dTeacher
activity notesInvestigate: How do colouredfilters change the colour we see?
Running the activityPupils plan an investigation using combinations of coloured filters to look atdifferent coloured objects. The coloured objects should be intense colours, primaryand secondary colours and black and white. Pupils carry out their experiment andrecord the results.
Expected outcomesPupils should realise that the world looks different when you look at it throughcoloured filters. For example, through a red filter most objects look red but some,particularly green and blue objects, look black. Combining two filters from red,blue and green should allow no light through, if the filters are of good quality.
PitfallsIt is notoriously difficult to make colour experiments work in school laboratories.This is because of the high level of ambient light and the poor quality of the filtersused to produce coloured light. Good-quality filters are essential for this activity:they should absorb all colours other than the one they transmit. Two primaryfilters should cut out all light. You may be able to use 3D glasses for viewing 3Dpictures as these do contain surprisingly good filters (or 3D pictures would notbe seen).
Pupils sometimes think they can see the original colour through the filter if theyknow what it is.
AnswersCore:
1 Red, blue, green.
2 Other light was absorbed.
3 Nothing (black); red absorbed everything except red; green absorbed everythingexcept green, so no light got through.
4 –
5 (depends on 4) Higher quality filters.
Help:
1 Red, blue, green.
2 were absorbed.
3 Nothing (black).
4 –
5 Some colours might be transmitted that should not be with better qualityfilters.
Sheet 1 of 1© Harcourt Education Ltd 2004 Catalyst 2This worksheet may have been altered from the original on the CD-ROM.
Type Purpose DifferentiationPractical Pupils reinforce their understanding of colour by explaining what they see through
coloured filters.Core, Help
K-Teachers.qxd 22-Oct-03 4:26 PM Page 10

K4dTechnician
activity notesInvestigate: How do colouredfilters change the colour we see?
EquipmentFor each group:● coloured objects (red, green, blue, black, white, yellow, magenta, cyan)● coloured filters (red, green and blue)● lamp (white light)
For your informationRunning the activityPupils plan an investigation using combinations of coloured filters to look atdifferent coloured objects. The coloured objects should be intense colours, primaryand secondary colours and black and white. Pupils carry out their experiment andrecord the results.
Expected outcomesPupils should realise that the world looks different when you look at it throughcoloured filters. For example, through a red filter most objects look red but some,particularly green and blue objects, look black. Combining two filters from red,blue and green should allow no light through, if the filters are of good quality.
PitfallsIt is notoriously difficult to make colour experiments work in school laboratories.This is because of the high level of ambient light and the poor quality of the filtersused to produce coloured light. Good quality filters are essential for this activity:they should absorb all colours other than the one they transmit. Two primaryfilters should cut out all light. You may be able to use 3D glasses for viewing 3Dpictures as these do contain surprisingly good filters (or 3D pictures would notbe seen).
Pupils sometimes think they can see the original colour through the filter if theyknow what it is.
Sheet 1 of 1© Harcourt Education Ltd 2004 Catalyst 2This worksheet may have been altered from the original on the CD-ROM.
Type Purpose DifferentiationPractical Pupils reinforce their understanding of colour by explaining what they see through
coloured filters.Core, Help
K-Technician.qxd 22-Oct-03 4:29 PM Page 8

K4dActivity
CoreInvestigate: How do colouredfilters change the colour we see?
You are going to plan and carry out an investigation into how a coloured filter affects the colour of objects.
Equipment● coloured objects ● coloured filters (red, green and blue) ● lamp
Planning and predicting1 What is the aim of your investigation? Write down the question you are trying to
answer.2 Discuss in your group what combinations of filters you will use (you can look through
0, 1, 2 or 3 filters).3 Discuss and list all the object colours you need to use.4 Discuss whether the light will affect the results.5 Decide what equipment you will use and make a list.6 Decide how you will set up your equipment. Draw a diagram.7 Think about how to make your results reliable.8 Finish your plan. Make sure it states:
● what you are going to change (the independent variable)● what you are going to observe (the dependent variable)● what you will keep the same● the number of observations you will make.
9 Check your plan with your teacher. Before you begin to make observations, draw atable for your results with headings for each column.
10 Write a sentence to say what you think will happen in your investigation as you lookthrough each filter combination and say why.
Obtaining evidence11 Set up the experiment as you planned it.12 Carry out the plan and record your results for all the filter combinations.
Considering the evidence1 What colour of light came through the ● red filter? ● blue filter? ● green filter?2 What do you think happened to the colours of light that did not come through the
filter?3 What did you see when you combined a red and a green filter? Explain what you saw.
Evaluating4 Did the combinations of filters all cut out the light you expected?5 How could the investigation be improved?
Sheet 1 of 1© Harcourt Education Ltd 2004 Catalyst 2This worksheet may have been altered from the original on the CD-ROM.
K-Activity.qxd 22-Oct-03 4:24 PM Page 16

K4dActivity
Help
You are going to plan and carry out an investigation into how a coloured filter affects the colour of objects.
Equipment● coloured objects ● coloured filters (red, green and blue) ● lamp
Planning and predictingDiscuss the points below in your group. Fill in the gaps. The question we want to answer is:
1 There are three different-coloured filters. You can look at an object through 0, 1, 2 or 3filters. Complete this list of all the different combinations you can use:
● no filter.
● red filter, filter, filter.
● red and green filters, blue and green filters, and filters.
● red, green and blue filters.
2 The input/independent variable: the filter combination being used.
3 What colour objects you will use:
4 The outcome/dependent variable: the colour the object appears through
5 Will the colour of the light shining on the objects affect the results?
6 Equipment you will need:
7 Diagram of set-up:
8 Reliable results: we will have people to say what colour each object isthrough the filter.
9 Prediction: the colours through the red, green and blue filters will be:
● objects the same colour as the filter will
● white objects will
● black objects will
● through two filters:
● through three filters:
Sheet 1 of 2© Harcourt Education Ltd 2004 Catalyst 2This worksheet may have been altered from the original on the CD-ROM.
Investigate: How do colouredfilters change the colour we see?
K-Activity.qxd 22-Oct-03 4:24 PM Page 17

K4dActivity
HelpInvestigate: How do coloured filterschange the colour we see? (continued)
Obtaining evidence
10 Set up the experiment as you planned it.
11 Write here what you are changing (the input variable):
12 Write here what you are recording (the outcome variable):
13 Carry out your plan and record the results in this table:
Considering the evidence
Fill in the gaps:
1 What colour of light came through the:
● red filter?
● blue filter?
● green filter?
2 I think the colours of light that did not come through the filter
3 Through a red and a green filter I saw
Evaluating
4 Did looking through two different filters always look pitch black?
5 If not, how do you think this might affect your results?
Sheet 2 of 2© Harcourt Education Ltd 2004 Catalyst 2This worksheet may have been altered from the original on the CD-ROM.
Colour of object with:
No Red Blue Green Red and Red and Blue and Red, filter filter filter filter blue green green green and
filters filters filters blue filters
K-Activity.qxd 22-Oct-03 4:24 PM Page 18

K5aTeacher
activity notesMix it
Running the activitySome pupils will be able to use a table to fill in all the different combinationsdirectly, but others will find that it helps to have some objects to use. As thesimplest option these can be pieces of coloured card, but if you have bricks or discsavailable these could be used.
Expected outcomesCore: There are three combinations of red and green (R, G and R+G).
There are seven combinations of red, blue and green (R, B, G, R+B, R+G, B+G andR+B+G).
There are fifteen combinations of four types (R, B, G, U, R+B, R+G, B+G, R+U, B+U,G+U, and R+B+G R+B+U, R+G+U, B+G+U, and R+B+G+U).
Help: There are three combinations of red and green (R, G and R+G).
There are seven combinations of red, blue and green (R, B, G, R+B, R+G, B+G andR+B+G).
For information:
The number of combinations forms a series: nth term = (2n – 1)
i.e. combinations of five objects = 31
PitfallsPupils may fill in all arrangements, i.e. R+G and G+R as separate entries.
AnswersCore:1 3
2 7
3 increases
4 –
5 15
Help:1 3
2 7
3 increases
Sheet 1 of 1© Harcourt Education Ltd 2004 Catalyst 2This worksheet may have been altered from the original on the CD-ROM.
Type Purpose DifferentiationPaper Pupils work out the number of combinations possible of two, three and, if time, four
objects.Core, Help
K-Teachers.qxd 22-Oct-03 4:26 PM Page 11

K5aActivity
CoreMix it
You are going to find out about combinations.
Equipment
● Red, blue and green objects (bricks, balls, discs, cards)
Planning and predicting
1 Draw a table to record how many ways there are of choosingobjects from red and green.
Obtaining evidence
2 Using the objects to help you, fill in the table with all the ways ofchoosing objects from red and green.
How many ways are there to do this and have a differentcombination of colours each time?
3 Draw a table to record how many ways there are of choosingobjects from red, green and blue. Fill in the table (use the objectsto help you).
How many ways are there to do this and have a differentcombination of colours each time?
Considering the evidence
What happens to the number of combinations as the number of
objects goes up each time?
If you have time, try drawing out a table for four types of objectand listing the different combinations.
How many combinations of four types of object are possible?
Sheet 1 of 1© Harcourt Education Ltd 2004 Catalyst 2This worksheet may have been altered from the original on the CD-ROM.
1
2
3
4
5
K-Activity.qxd 22-Oct-03 4:24 PM Page 19

K5aActivity
HelpMix it
You are going to find out about combinations.
Equipment
● Red, blue and green objects (bricks, balls, discs, cards)
Obtaining evidence
1 Draw this table of all the ways of choosing objects from red andgreen.
2 Using the objects to help you, complete the table
1 Count up the rows in the table to find out how many ways thereare to do this and have a different combination of colours eachtime.
3 Draw this table for recording how many ways there are ofchoosing objects from red, green and blue. Fill in the table(use the objects to help you).
2 How many ways are there to do this and have a differentcombination of colours each time?
Considering the evidence
3 What happens to the number of combinations as the number ofobjects goes up each time?
Sheet 1 of 1© Harcourt Education Ltd 2004 Catalyst 2This worksheet may have been altered from the original on the CD-ROM.
Red object Green object
✓
Red object Green object Blue object
K-Activity.qxd 22-Oct-03 4:24 PM Page 20

K1 PlenariesSeeing the light
Review learning● As a whole-class activity look at the ray diagrams and decide
which ones are correct.
Sharing responses● Pupils discuss how they could use the pinhole camera to take a
photo.
● Pupils compare the pinhole camera with the eye – link back toActivity K4a.
Group feedback● In groups, pupils decide which ray diagrams are possible and
which are not.
● Pupils discuss their decisions with other groups.
Brainstorming● Pupils think of as many different luminous sources as possible.
Looking ahead● Pupils consider how mirrors and other reflective surfaces
produce a reflection.
➔ Pupil sheet
Answersc and i
QuestionsWhat would you need to add to thepinhole camera to take a photo?(Film, shutter, possibly a lens.)
How is the eye similar to a camera?(Light enters pupil – pinhole, imageformed at back of eye—on screen.)
➔ Pupil sheet
AnswersCorrect: 1b, 1c depends on surfaceof table – is there a reflection? 1d,2a, 2c.
AnswersThese include: sparks, lightning,stars (including Sun, white dwarf,nova, red giant), fire, very hotobjects (e.g. coals, metals, welding,candles, filament lamps), LEDs, gasdischarge tubes, TV, fluorescentminerals.
Equipmentmirrors
Sheet 1 of 1© Harcourt Education Ltd 2004 Catalyst 2This worksheet may have been altered from the original on the CD-ROM.
Suggested alternative plenary activities (5–10 minutes)
Review learning
Pupils choose thecorrect rays on adiagram (eye, camera).
Sharing respon ses
Pupils discuss the similaritiesand differences between apinhole camera and the eye.
Group feedback
In groups, pupils sort possible raydiagrams from impossible, thencompare decisions for the whole class.
Brainstorming
Pupils think of as manydifferent luminoussources as possible.
Looking ahead
How do we seereflections?
K-Plenaries.qxd 22-Oct-03 4:29 PM Page 1

K1 PlenariesSeeing the light
Review learning
Look at the illustrations below, and choose one correct for (a)–(e) andone correct for (f)–(j).
Sheet 1 of 1© Harcourt Education Ltd 2004 Catalyst 2This worksheet may have been altered from the original on the CD-ROM.
eyeball
lens
receptorcells detect
light
a
c
d
eb
camera
film
f
j
h
g
i
lens
K-Plenaries.qxd 22-Oct-03 4:29 PM Page 2

K1 PlenariesSeeing the light
Group discussion
1 Which of these lines show how rays from the candle could travel?
2 Which of these diagrams shows how rays travel?
Sheet 1 of 1© Harcourt Education Ltd 2004 Catalyst 2This worksheet may have been altered from the original on the CD-ROM.
Sun
Sun
b
ca
d
d c
b
a
K-Plenaries.qxd 22-Oct-03 4:29 PM Page 3

K2 PlenariesWhich ray?
Review learning● Ask pupils to write down three facts they know about
reflection of light.
Sharing responses● Pupils discuss in groups the patterns they discovered in
Activity K2b on kaleidoscopes.
● Pupils then share their findings with the whole class.
Group feedback● In pairs, one pupil explains to the other how they can see
their reflection in a mirror.
Word game● Give out, or read out, the list of questions. Pupils decide if
each one is true or false.
Looking ahead● Discuss with pupils what happens to light that is not
reflected. Some objects obviously reflect more than others.Where does the light go if it is not reflected?
● You can leave the question unanswered for the next lessonor answer it now, as appropriate for the group.
AnswersThe light is reflected in a straight line,angle of incidence = angle of reflectionor the angle between the ray and thesurface is the same for the incomingand the reflected ray, light reflects fromlots of objects – that is how we seethem, very smooth objects like mirrorsgive images, reflections are laterallyinverted, i.e. left = right.
➔ Pupil sheet
Answers1 F; 2 T; 3 F; 4 F; 5 T; 6 F; 7 F; 8 T; 9 T;10 T; 11 F
AnswersTransmitted, absorbed.
Sheet 1 of 1© Harcourt Education Ltd 2004 Catalyst 2This worksheet may have been altered from the original on the CD-ROM.
Suggested alternative plenary activities (5–10 minutes)
Review learning
Pupils write down threefacts about reflection.
Sharing responses
Whole-class discussion ofthe results of Activity K2b.
Group feedback
In pairs, pupils explain how theywould see their reflection in a mirror.
Word game
Pupils decide whichstatements are true or false.
Looking ahead
What happens to lightthat is not reflected?
K-Plenaries.qxd 22-Oct-03 4:29 PM Page 4
K2 PlenariesWhich ray?
Word game
Which of these statements are true and which are false? Circle thecorrect answers.
1 Light striking a mirror curves back towards you, forming areflection. True/False
2 Images in a mirror are inverted so that right is left. True/False3 Light hits a mirror at 300miles per hour. True/False4 The angle between an incoming light ray and the mirror is twice
the angle between the reflected light ray and a mirror. True/False5 Reflected light leaves the mirror at 300million m/s. True/False6 The light goes into the mirror to make the reflection. True/False7 Images in a mirror are inverted so that they are upside down.
True/False8 The angle of incidence equals the angle of reflection, or in other
words: The angle between a flat mirror and the incoming rayequals the angle between the mirror and the reflected ray.True/False
9 Incoming rays and reflected rays are always straight lines.True/False
10 In a flat mirror your reflection is the same size as you. True/False11 In all mirrors your reflection is always the same size as you.
True/False
Sheet 1 of 1© Harcourt Education Ltd 2004 Catalyst 2This worksheet may have been altered from the original on the CD-ROM.
K-Plenaries.qxd 22-Oct-03 4:29 PM Page 5

K3 PlenariesTravelling through?
Review learning● In groups, pupils prepare three questions based on this lesson
to challenge another group. They must be able to answertheir own questions.
Sharing responses● Ask pupils to describe what happens when a ray of light
enters a glass block.
● Ask pupils to describe what happens when a ray of lightleaves a glass block.
● Relate this back to Activity K3b.
Group feedback● Pupils are put into groups of four. They practise walking so
that the first person takes small steps, about 20cm, thesecond about 35cm, the third about 50cm and the fourthabout 80cm.
● After some practice, the group links arms in number order.They walk, keeping their steps the same size as before. Oneperson will need to count so that the group keeps in step.
● The direction changes as the slowest person moves a shorterdistance than the fastest. The slowest person will be on theinside of the curve.
● Explain that this models the behaviour of light, which slowsas it enters the glass. One side of the ray enters first and isslowed more, so the ray changes direction.
Word game● Pupils complete the crossword using the clues.
Looking ahead● Pupils look at colour photos of rainbows, including double-
bow and rainbows formed by waterfalls and fountains. Alsoshow rainbow colours from prisms, such as patterns on thewalls of a room from hanging prisms.
● Ask the questions: How are the colours formed? Why are thecolours and the order of colours the same? (Except for thedouble bow, where the second one is reversed.) What isneeded to produce a rainbow? (Drops of water and sunlight.)Leave other answers to the next lesson.
➔ Pupil sheet
AnswersAcross: 2 red, 4 opaque, 7 transparent,9 incident, 11 through. Down: 1 ray;2 refraction; 3 light; 5 green, 6 reflects;8 mirror; 10 not.
➔ Catalyst Interactive Presentations 2
Sheet 1 of 1© Harcourt Education Ltd 2004 Catalyst 2This worksheet may have been altered from the original on the CD-ROM.
Suggested alternative plenary activities (5–10 minutes)
Review learning
Pupils devise three questions to askanother group about absorption andtransmission or refraction.
Sharing responses
Pupils discussrefraction.
Group feedback
Pupils demonstrate refractionby linking arms and thentaking different-sized steps.
Word game
Pupils complete acrossword using theclues.
Looking ahead
Show pupils photos of rainbowsand other spectra.Catalyst Interactive Presentations 2
K-Plenaries.qxd 22-Oct-03 4:29 PM Page 6

K3 PlenariesTravelling through?
Word game
Complete the crossword using the clues.
Across
2 A colour.4 You cannot see through objects like this.7 You can see through objects like this.9 Word used to describe incoming ray.11 Light will go glass.
Down
1 Straight path of light.2 Bending of light as it goes from air to glass.3 You cannot see without it.5 A colour.6 Number 8 does this to light.
8 on the wall.10 A translucent material is completely opaque or
completely transparent.
Sheet 1 of 1© Harcourt Education Ltd 2004 Catalyst 2This worksheet may have been altered from the original on the CD-ROM.
1
4
5 6
32
7
8
9
10
11
K-Plenaries.qxd 22-Oct-03 4:29 PM Page 7

K4 PlenariesColoured light
Review learning● In groups, pupils discuss how objects appear coloured in white light by
reflecting only some colours.
● Extend this to consider what happens in light of one colour, e.g.sodium street lamps are only yellow. (Note this is a pure yellow, no redor green.)
● Look at some coloured objects in sodium light. This is most effectivewith good blackout and with objects that pupils have not seen in whitelight, otherwise they think they can tell.
Sharing responses● Pupils look at a switched on colour TV with a magnifying glass to see
the red, green and blue dots making up the picture. Discuss how TVpictures are produced and why they depend on how our eyes see.
● Pupils discuss photography and how many inks colour printers use.
Group feedback● Working in groups, pupils draw a Venn diagram of three overlapping
circles. Instead of red, green and blue light overlapping, this diagram isone of red missing, blue missing and green missing. Discuss in groupswhat colours will be seen. See diagram below right.
● Fill in the coloured sections and give feedback to the rest of the class.
Word game● Pupils play a loop game to revise the work done so far.
● Give each pupil a card containing a question and answer. Ask one pupilto stand up and read out the question on their card then sit down. Thepupil who has the answer stands up, reads out their answer, then asksthe question on their card and sits down, and so on. The game iscomplete when the pupil who started the game stands up for a secondtime to read out the answer on their card.
● If there are not enough question/answer cards for the whole class, youmay need to make extra copies. Some pupils will have the samequestion/answer card – the first one to stand up gets to read theiranswer and ask their question.
● Before cutting up the Pupil sheet, copy it so that you hold a copy of thecorrect answers next to their questions.
Looking ahead● Pupils look through coloured filters in preparation for the next lesson.
Use ones that they will not use in the investigation.● Ask pupils what colours are unchanged and what colours look different.● Alternatively, use 3D glasses that have two different filters (red and blue
or green). These are usually good quality.
Equipmentsodium lamp, blackout orblackout area, small objects,e.g. green bead, red brick,blue toy, etc.
AnswersYellow and white appearyellow, all others arevarying shades of grey orblack.
➔ Teacher sheet
EquipmentTV, magnifying glass
Equipmentcoloured pens, large sheetsof paper, drawingcompasses or circulartemplates
➔ Pupil sheet
Equipmentcoloured filters other thanred, green and blue or 3Dglasses and pictures
Sheet 1 of 1© Harcourt Education Ltd 2004 Catalyst 2This worksheet may have been altered from the original on the CD-ROM.
Suggested alternative plenary activities (5–10 minutes)
Review learning
Pupils look at some objects inthe light of a sodium lamp andexplain what they see in termsof Activity K4b.
Sharing responses
Pupils discuss how the eyesees colour and how andwhy colour TV andphotography work.
Group feedback
Pupils draw and mark a Venndiagram: ‘no red’, ‘no green’,‘no blue’ and compare with ared, green and blue one.
Word game
Pupils play a loopgame with wordsfrom the unit.
Looking ahead
Pupils look at some filtersin preparation for theinvestigation in K4Investigate.
G = green, B = blue, R = red, K = Black
no red cyan yellow
magenta
no blue
no green
G
KB R
K-Plenaries.qxd 22-Oct-03 4:29 PM Page 8

K4 PlenariesColoured light
Sharing responsesTeacher sheetPoints that may come up in discussion:
Colour television● With a magnifying glass the screen appears to be made up of coloured dots –
red, green and blue.
● A black and white TV builds up a picture of dots of varying brightness. Thebright dots are formed by charged particles (electrons) hitting the screen. Thescreen is a phosphor screen that glows white when electrons hit it.
● A colour TV has a screen made of three different colour phosphors – red, greenand blue. There are three electron guns – one builds up a red picture, one greenand one blue.
● Our eyes see this as a full colour picture because our eyes have only red, greenand blue receptors.
Colour photography and printing● We can also use three colours to make photos and print pictures but in this case
secondary colours are often used, i.e. yellow, cyan and magenta.
● Pupils may know that when one of the three ink colours runs out in a printerthey get some strangely coloured prints.
Colour blindness● If one type of receptor is missing, it is impossible for a person to see that colour.
However, there are many different types of ‘colour deficiency’ and it may justbe more difficult for a person to distinguish certain colours.
● One in twelve boys and one in two hundred girls has some form of colourblindness.
● For more information, see the following website:The Production of Colour Teaching Materials and Colour Blindness
● To help those with difficulty in distinguishing colours: a filter colour chosen toemphasise the dark/light differences between the colours being confused canoffset the effect of the defect. Good illumination also helps.
Sheet 1 of 1© Harcourt Education Ltd 2004 Catalyst 2This worksheet may have been altered from the original on the CD-ROM.
K-Plenaries.qxd 22-Oct-03 4:29 PM Page 9

K4 PlenariesColoured light
Sheet 1 of 2© Harcourt Education Ltd 2004 Catalyst 2This worksheet may have been altered from the original on the CD-ROM.
Word game
Q A
What do we call a thin Non-beam of light (e.g. in luminousdiagrams)
Q A
What is the speed of It is light? absorbed
Q A
In what directions do 300million rays travel: curves, spirals metres per or straight lines? second
Q A
Is the Moon luminous or In straight non-luminous? lines
Q A
When a light ray enters a The angle glass block at an angle ofwhat happens to its reflectiondirection?
Q A
The angle of incidence = A ray
Q A
Light bends as it goes from It bends air to glass. What is this away from called? the normal
Q A
When a light ray leaves a It bendsglass block at an angle towardswhat happens to it? the
normal
Q A
If light will go through a Opaquematerial we say it is
Q A
If light won’t go through a Refractionmaterial we say it is
K-Plenaries.qxd 22-Oct-03 4:29 PM Page 10

K4 PlenariesColoured light (continued)
Sheet 2 of 2© Harcourt Education Ltd 2004 Catalyst 2This worksheet may have been altered from the original on the CD-ROM.
Word game
Q A
If some light, but not all, Red, greengoes through a material and bluewe say it is
Q A
What can you use to split transparentwhite light into colours?
Q A
When a prism splits A prism white light into a spectrum this iscalled
Q A
What three colours will Dispersionmake white light?
Q A
Mixing red and green Changed solight gives that left is
right (later-ally inverted)
Q A
An image in a mirror is Translucent
Q A
What colours of light do Green and black objects reflect? blue light
Q A
What colours of light is Yellow cyan coloured light a lightmixture of?
Q A
What happens to light All the that is not reflected or colours oftransmitted? light
Q A
What colours of light do No lightwhite objects reflect?
K-Plenaries.qxd 22-Oct-03 4:29 PM Page 11

K4 PlenariesInvestigate: How do colouredfilters change the colour we see?
Review learning● Ask pupils for each filter combination they used.
● For each combination consider the seven colours and ask pupilswhether each one was transmitted or absorbed. (Depending onthe quality of filters, some of the colour either side of the filtercolour may be transmitted.)
● For the combinations of filters, go through each one and thenlook for common colours transmitted – none, i.e. zerotransmission.
Group feedback● In groups, pupils discuss whether they carried out the
investigation as they planned, or had to change it during theexperiment.
● If changes were needed, why was this?
Analysing● Discuss with pupils whether they got the results they expected
in their predictions.
● How can they explain the lack of transmission through filtercombinations?
● Do combinations always give black? (Filters that let more thanone colour through may not.)
Evaluating● Pupils consider whether any of the filters needed to be
improved in quality.
● Pupils consider whether everyone sees the same results or ifindividual eye response affects results.
Sheet 1 of 1© Harcourt Education Ltd 2004 Catalyst 2This worksheet may have been altered from the original on the CD-ROM.
Suggested alternative plenary activities (5–10 minutes)
Review learning
Teacher-led review of thetransmission of light through eachfilter combination.
Group feedback
In groups, pupils discuss whether theycarried out the investigation as they hadplanned.
Analysing
Teacher-led discussion ofpupils’ predictions and results.
Evaluating
Teacher-led discussion of how theresults could be improved.
K-Plenaries.qxd 22-Oct-03 4:29 PM Page 12

K5 PlenariesMix it – Think about
Group feedback● Pupils discuss in groups how they set out the lists – was
it random or did they use patterns?
● Go through some possible patterns with the class.(Example for three might be to do all combinationswith one colour, then two, then three.)
Bridging to other topics● Discuss with pupils how animals have different
numbers of receptors – some have four receptors (anextra one in the UV). There is evidence that we haveevolved from ancestors that could see in the UV. Beeshave a receptor in the UV instead of one in the red.
● There are different combinations of genes possible aseach person has two copies and inherit two fromparents (red pupil book only).
Sheet 1 of 1© Harcourt Education Ltd 2004 Catalyst 2This worksheet may have been altered from the original on the CD-ROM.
Suggested alternative plenary activities (5–10 minutes)
Group feedback
Discuss how groups used systematicways to make sure they did not miss anycombinations.
Bridging to other topics
Discuss with pupils how animals havedifferent numbers of receptors. Combinationsalso come into effect with genes.
K-Plenaries.qxd 22-Oct-03 4:29 PM Page 13

K1 SpecialsSeeing the light
1 Draw lines to match the words to their meanings.
2 Draw a circle round all the light sources below.
Sheet 1 of 2© Harcourt Education Ltd 2004 Catalyst 2This worksheet may have been altered from the original on the CD-ROM.
light source
light
eye
image
Energy that moves away from a light sourcein all directions. It moves very, very quickly.
pinhole camera
The picture you get on the screenof the pinhole camera.
A box with a hole at one end anda screen at the other.
Your light detector! You see when lightgoes into this. It turns light into a signal
that goes to your brain.
Something that gives out light.
candle
book
Sun
cat
pencil
light bulb
traffic lights
television
fireworks
bonfire
K-Specials.qxd 29-Sep-03 1:23 PM Page 36

K1 SpecialsSeeing the light (continued)
Sheet 2 of 2
3 This question is about a pinhole camera.
Use the drawing tohelp you answerthese questions.
a In the pinholecamera the imagecan be seen onthe
b Choose words from this list that describe what the image is like.
4 Look at these pinhole cameras.
a Which camera is the longest?
b Which camera gives the largest image?
© Harcourt Education Ltd 2004 Catalyst 2This worksheet may have been altered from the original on the CD-ROM.
object
pinholescreen
blurry
clear sharpupside down
right way up
A
object
image
B
object
image
screen
C
object
image image
D
object
Colour in theright words.Cross out thewrong words.
K-Specials.qxd 29-Sep-03 1:23 PM Page 37

K2 SpecialsWhich ray?
1 Draw lines to match the words to their meanings.
2 Write true or false for each sentence.
a A ray of light is straight.
b A rough and bumpy surface reflects light well.
c A smooth and flat surface reflects light well.
3 Look at these two diagrams.
Which diagram shows alight ray being scattered?
A
B
Sheet 1 of 2© Harcourt Education Ltd 2004 Catalyst 2This worksheet may have been altered from the original on the CD-ROM.
luminous
ray
mirror
reflection
periscope
scattering
The Moon is this. It does not makeits own light.
These are things that make theirown light.
Made from two mirrors so that you cansee around corners or over a wall.
Light bouncing off a surface inall directions.
This has a very smooth surface. It is verygood at reflecting light rays in the same
direction.
Light bouncing off a surface.
A thin beam of light.
non-luminous
A B
Tick the boxto show theright answer.
K-Specials.qxd 29-Sep-03 1:23 PM Page 38

K2 SpecialsWhich ray? (continued)
4 Look at this diagram of a light raybeing reflected by a mirror.
Which is the correct reflected ray?
A
B
C
D
5 When a light ray is reflected by a mirror, the angle of thelight ray and the reflected ray is:
the same
different.
6 Complete these diagrams by drawing in the reflected rays.
Sheet 2 of 2© Harcourt Education Ltd 2004 Catalyst 2This worksheet may have been altered from the original on the CD-ROM.
A
B
C
A
BC
D
mirror
Tick the boxto show theright answer.
Tick the boxto show theright answer.
K-Specials.qxd 29-Sep-03 1:23 PM Page 39

K3 SpecialsTravelling through?
1 Draw lines to match these words to their explanations.
2 Look at these diagrams that show light rays hitting glass blocks.
Which of these statements are correct? Mark them with a tick (✓ ) or a cross (✗ ).
a If a light ray strikes a glass block at 90º it will be refracted (bent).
b Light refracts (bends) outwards when it goes from air to glass.
c Light refracts (bends) outwards when it goes from glass to air.
d Light refracts (bends) because it moves at different speeds in the different materials.
Sheet 1 of 2© Harcourt Education Ltd 2004 Catalyst 2This worksheet may have been altered from the original on the CD-ROM.
transmission
absorption
transparent
refraction
This is when a material, like paperor brick, soaks up light.
This is when a material, like air, glassor water, lets light travel through it.
You can’t see through this kindof material.
You can see through this kindof material.
Light gets bent when it goesfrom air into glass.
opaque
90˚
K-Specials.qxd 29-Sep-03 1:23 PM Page 40

K3 SpecialsTravelling through? (continued)
3 Look at these diagrams of light rays refracting. Someof the diagrams have been drawn incorrectly.
Draw a circle round the letters of the correct diagrams.
4 Complete these diagrams by drawing in the refractedrays. Remember to use a ruler to draw light rays!
Sheet 2 of 2© Harcourt Education Ltd 2004 Catalyst 2This worksheet may have been altered from the original on the CD-ROM.
A B C
D E
K-Specials.qxd 29-Sep-03 1:23 PM Page 41

K4 SpecialsColoured light
1 Use these words to fill in the gaps.
a White light is a of colours.
b I can see the colours that make up white light when sunlight shines
through raindrops and makes a .
c I can also see the colours that make up white light when white light
shines through a and makes a .
d If I mix the colours together again I get light.
2 Use some of these words to fill in the gaps.
a When white light shines through a coloured it looks
coloured. Only certain of light can go through the
filter.
b The colour of an depends on the colours of the lightfalling on it.
3 Look at these diagrams.They show white lightgoing through differentfilters.
a Colour the filters aslabelled.
b Colour the light thatcomes through each filter.
Sheet 1 of 2© Harcourt Education Ltd 2004 Catalyst 2This worksheet may have been altered from the original on the CD-ROM.
rainbow
prism
mixture
spectrum
white
object
mixture
spectrum
colours
filter
red
whitelight
green
whitelight
blue
whitelight
filter
K-Specials.qxd 29-Sep-03 1:23 PM Page 42

K4 SpecialsColoured light (continued)
4 a Complete the diagram of the colours of the spectrum. Use some words from this list.
b When you have done that, colour the spectrum in!
5 We can see a white piece ofpaper as white because itreflects all the colours of lightin the spectrum. It reflectswhite light for us to see.
We can see a red book asred because it reflects backred light for us to see. Allthe other colours are absorbedby the book.
a What colour light doesa violet book reflect?
b What colour light does a green book reflect?
c What colour light does a yellow book reflect?
d What colours of light are absorbed by an orange book?
e What colours of light are absorbed by a violet book?
Sheet 2 of 2© Harcourt Education Ltd 2004 Catalyst 2This worksheet may have been altered from the original on the CD-ROM.
pink
orange
brown
black
blue
purple
violet grey
green
red yellow indigo
white paper
white light
white light
red book
colours absorbed
orangeyellowgreenblueindigoviolet
white light
red lig
ht
K-Specials.qxd 29-Sep-03 1:23 PM Page 43

K5 SpecialsMix it
1 Look at this list of colours.
Which are the primary colours of light? Colour them in.
2 Look at this list of colours.
Which are the secondary colours of light? Colour them in.
3 When the primary colours of light are mixed, you get thesecondary colours.
Use words from this list to complete the ‘colour sums’ below.Colour the sums in when you’re sure they’re correct.
a + =b + =c + =d + + = white
cyan
yellowred
bluered
Sheet 1 of 1© Harcourt Education Ltd 2004 Catalyst 2This worksheet may have been altered from the original on the CD-ROM.
magenta
red cyan
green
whiteyellow
blue
magenta
red yellow
blue
cyan
green
white
magenta
red yellow
blue
cyan
green
white
K-Specials.qxd 29-Sep-03 1:23 PM Page 44

K Specials answersLight
K1 Seeing the light1 light source – Something that gives out
light.light – Energy that moves away from a lightsource in all directions. It moves very, veryquickly.pinhole camera – A box with a hole at one endand a screen at the other.image – The picture you get on the screen ofthe pinhole camera.eye – Your light detector! You see when lightgoes into this. It turns light into a signal thatgoes to your brain.
2 Circled – candle, traffic lights, Sun, light bulb,bonfire, fireworks, television
3 a screen b upside down, sharp4 a C b C
K2 Which ray?1 luminous – These are things that make their
own light.non-luminous – The Moon is this. It does notmake its own light.reflection – Light bouncing off a surface.scattering – Light bouncing off a surface in alldirections.mirror – This has a very smooth surface. It isvery good at reflecting light rays in the samedirection.periscope – Made from two mirrors so that youcan see around corners or over a wall.ray – A thin beam of light.
2 a true b false c true3 B4 B5 The same.6
K3 Travelling through?1 transmission – This is when a material, like air,
glass or water, lets light travel through it.absorption – This is when a material, like paperor brick, soaks up light.transparent – You can see through this kind ofmaterial.opaque – You can’t see through this kind ofmaterial.refraction – Light gets bent when it goes fromair into glass
2 a ✗ c ✓b ✗ d ✓
3 Circled – B, C, E4
K4 Coloured light1 a mixture c prism, spectrum
b rainbow d white2 a filter, colours b object3 a Filters coloured as stated.
b Red light below red filter, green light belowgreen filter, blue light below blue filter.
4 a orange, green, blue, violetb Coloured correctly.
5 a violet b green c yellowd red, yellow, green, blue, indigo, violete red, orange, yellow, green, blue, indigo
K5 Mix it1 Coloured in – red, green, blue2 Coloured in – magenta, yellow, cyan3 a magenta
b greenc green + blued red + green + blue
A
B C
Sheet 1 of 1© Harcourt Education Ltd 2004 Catalyst 2This worksheet may have been altered from the original on the CD-ROM.
Spe Answers.qxd 25-Nov-03 9:04 AM Page 12

K1 HomeworkSeeing the light
HELP
1 Copy the diagram below.
a Continue the two light rays to show where they would hit thescreen.
b On the screen, draw the shadow that the heart would form.
c Put an arrow onto each ray, to show which way the light istravelling.
2 a Imagine that you had a pinhole camera where the screen is.Draw the shape that would form on the small screen insidethe camera.
b What do we call the picture inside the camera?
3 a When you switch on a light do you:A see the light after about one second?B see the light after about 2 seconds?C see the light immediately?
b What does this tell you about the speed of light?
4 When a building is on fire it can be seen from anywhere.Explain why this is so.
Sheet 1 of 2© Harcourt Education Ltd 2004 Catalyst 2This worksheet may have been altered from the original on the CD-ROM.
screen
lightsource
object
K-Homework.qxd 22-Oct-03 3:30 PM Page 1

K1 HomeworkSeeing the light (continued)
CORE
5 John is experimenting with solar cells. This diagram shows how hehas set up a solar cell to drive an electric fan.
a Draw an energy transfer diagram showing all the energy transfers,from the light leaving the lamp to the fan spinning.
b Explain why John can see the lamp.
c Explain why John can see the solar cell.
6 a The speed of light is 300 000 km/s. How far will light travel in halfa second?
b How far will it travel in 5 seconds?
EXTENSION
7 During autumn we can see both Jupiter and Venus, from the Earth, at the same time.
a Venus is often the brightest object in the night sky but it is much smaller thanJupiter. Give three reasons why Venus is always brighter than Jupiter.
b i Jupiter has four bright moons that can be seen with a telescope.Explain why it is possible to see them.
ii Jupiter’s moons have different brightnesses, even though they are all aboutthe same distance from the Earth. Suggest a reason for the differences.
8 The Earth is 150 million kilometres from the Sun. Mars is 225 millionkilometres and Jupiter is 780 million kilometres away from the Sun.
Light takes 8.5 minutes to travel from the Sun to the Earth.
a How long does it take for light from the Sun to reach Mars? Show your working.
b How long does it take for light from the Sun to reach Jupiter?
c How long does it take reflected light, from Jupiter, to reach the Earth?Show your working.
Sheet 2 of 2© Harcourt Education Ltd 2004 Catalyst 2This worksheet may have been altered from the original on the CD-ROM.
lamp
solar cell
electric fan
K-Homework.qxd 22-Oct-03 3:30 PM Page 2

K2 HomeworkWhich ray?
HELP
1 Copy and complete the sentences below.
a Light is reflected from a shiny surface because …
b Black sugar paper does not reflect light because …
2 Cut out the mirror diagrams for this question (H1– H4) and stick theminto your book.
a i Look at diagram H1. The line going to the mirror makes a right angle(90° angle) to the mirror. Describe where the reflected ray goes.
ii On diagram H2 continue the ray to show how it is reflected fromthe mirror. Don’t forget the direction arrow.
ii On diagram H3 draw a ray that enters the mirror at 45° to it andis reflected. It must touch the centre of the cross on the mirror.
iv On diagram H4 draw a line to show where the mirror should be.
CORE
3 a Nick often cycles at night. He wears a reflectivestrip so that other traffic can see him. The diagramshows a close-up of the strip, shown edge-on.i What happens to the light that hits the
reflective strip?ii Redraw the diagram, adding three or four light
rays, and explain how the strip helps Nick to beseen at night.
iii Give one other situation where this effect is used to improve safety.
4 a What are the correct names for these angles in the diagram:i angle Y?ii angle X?
b What is the dotted line called, marked Z?
5 Cut out the mirror diagrams for this question (C1 and C2) andstick them into your book.
a Look at diagram C1. Continue the line to show where the ray goes.
b On diagram C2, draw a line to show where the second mirror should be.
Sheet 1 of 3© Harcourt Education Ltd 2004 Catalyst 2This worksheet may have been altered from the original on the CD-ROM.
Reflective surfaceof strip
Inside surface
Z
YX
K-Homework.qxd 22-Oct-03 3:31 PM Page 3

K2 HomeworkWhich ray? (continued)
Sheet 2 of 3© Harcourt Education Ltd 2004 Catalyst 2This worksheet may have been altered from the original on the CD-ROM.
EXTENSION
6 Gitte is using a periscope to watch the foxes in her garden. She ishiding behind a wall.
a i Draw a ray on the diagram to show the direction taken bythe light when Gitte sees the fox.
ii Add an arrow to the ray to show the direction in whichthe light is travelling.
iii A fox cub has appeared at point X. What must Gitte do tosee it?
7 Cut and stick the mirror images for this question (E1– E3) intoyour book.
a Look at diagram E1. Continue the ray to show how andwhere it would emerge from the ‘mirror wall’.
b For diagram E2, predict the maximum number of images youcould see in the mirrors. Show clearly how you reached youranswer.
c At what angle would you set the mirrors to see exactly 8images? Show your working out.
d i Look at diagram E3 of a convex mirror. Continue bothrays to show how they would be reflected.
ii Explain whether the image would be taller, shorter or thesame size as the object.
iii Suggest one place where a mirror like this might be used.
K-Homework.qxd 22-Oct-03 3:31 PM Page 4

K2 HomeworkWhich ray? (continued)
H4H3H2H1
90˚
20˚
20˚60˚
45˚ 45˚
C1 C2
Normal
Normal Normal
Normal
Normal
Normal
E1 E2
E3
45˚
Normal
24˚
80˚
80˚Normal
Sheet 3 of 3© Harcourt Education Ltd 2004 Catalyst 2This worksheet may have been altered from the original on the CD-ROM.
HELP
CORE
EXTENSION
K-Homework.qxd 22-Oct-03 3:31 PM Page 5

K3 HomeworkTravelling through?
HELP
1 Mike looked at a computer screen through sheets of material.
Through sheet A he could see the screen clearly.Through sheet B he could not see the screen at all.Through sheet C the screen looked grey and not very clear.
Copy and complete these sentences using the words below.
a Sheet A was because …
b Sheet B was because …
c Sheet C was because …
2 Copy the diagrams below. Then continue each light ray to showwhere it goes inside the glass blocks.
Sheet 1 of 2© Harcourt Education Ltd 2004 Catalyst 2This worksheet may have been altered from the original on the CD-ROM.
translucent opaque transparent
A
90˚
B C
K-Homework.qxd 22-Oct-03 3:31 PM Page 6

K3 HomeworkTravelling through? (continued)
CORE
3 a Draw a rectangular glass block, as seen from above.Draw onto it a light ray entering, from the top, at 45°.Continue the ray through the block and out of the other side.
b What is this effect of the glass on the light called?
4 a In Sea Life Centres, the really big tanks have glass walls up to10 cm thick. Explain why a shark sometimes looks biggerthan it really is.
b If the builders had made the tank from stainless steel, thesides could have been much thinner. Why didn’t they usesteel?
EXTENSION
5 a Explain why light bends as it enters a glass block.
b The diagram shows waves on the sea moving past aheadland.
As the waves cross the shallower area they slow down. Theyare affected as light would be, as it slows down. Describewhat happens to the direction of the waves as they moveover the shallow area.
6 Amazonian Indians catch fish with spears. They have to learnhow to do this from their parents.
Draw a diagram and write a couple of sentences to explain howrefraction makes spearfishing difficult.
Sheet 2 of 2© Harcourt Education Ltd 2004 Catalyst 2This worksheet may have been altered from the original on the CD-ROM.
K-Homework.qxd 22-Oct-03 3:31 PM Page 7

K4 HomeworkColoured light
HELP
1 Cut out the word square on sheet 3 and stick it into your book.
The answer to each of these questions can be found in the wordsquare. Circle the answers in the square.
a The colours of light make up a .
b Splitting white light into its colours is called .
c We can use this object to split light into its colours.
d When white light goes through a red filter, the colour thatcomes through is .
e Light which does not come through a coloured filter is
.
f There are colours in white light.
2 Copy and complete the sentence below.
The light coming into a building through stained glass windowsis coloured because …
CORE
3 Ellie is an actress. She is wearing a coloured top on stage. It hassquares coloured blue, red and green.
a What colours will Ellie see on her top if she is standing inwhite light?
b What colours will she see if she is standing in light from agreen light and a red light at the same time?
c What colours will she see if she is only standing in a bluelight?
d Ellie is lit by a single spotlight. It has a blue filter and a greenfilter in front of the lamp.i Which coloured light will actually be shining on Ellie?ii What colour will Ellie’s top appear to the audience?
Sheet 1 of 3© Harcourt Education Ltd 2004 Catalyst 2This worksheet may have been altered from the original on the CD-ROM.
K-Homework.qxd 22-Oct-03 3:31 PM Page 8

K4 HomeworkColoured light (continued)
EXTENSION
4 Chlorophyll gives leaves their green colour. It is an important partof photosynthesis. Gilly did some photosynthesis experimentswith different coloured lights.
She obtained the different colours by putting filters betweensome pondweed, in a beaker of water, and a white light. Shecounted the number of bubbles of oxygen that the pondweedproduced every minute. This table shows Gilly’s results.
a Explain why the number of bubbles produced in green lightis zero.
b Why does white light give the most bubbles?
c Which single colour can plants use most successfully?
d Gilly noticed that the pondweed beaker became quite warm,on the side nearest to the lamp.i Why is this a problem?ii What could Gilly do to solve the problem?
e Gilly was not very careful about where she put the lamp butit was always between 0.25 and 0.5 metres from the beaker.Explain why this might be a different problem from thewarming.
5 When white light is dispersed by a prism a spectrum is obtainedon a screen. Jim passes a beam of pure blue light through aprism.
a Describe what Jim would see on the screen.
b Explain your answer.
Sheet 2 of 3© Harcourt Education Ltd 2004 Catalyst 2This worksheet may have been altered from the original on the CD-ROM.
Colour of light used Number of bubbles per minute
White 37
Red 24
Green 0
Blue 34
K-Homework.qxd 22-Oct-03 3:31 PM Page 9

K4 HomeworkColoured light (continued)
HELP
Wordsearch
Sheet 3 of 3
Sheet 3 of 3
© Harcourt Education Ltd 2004 Catalyst 2This worksheet may have been altered from the original on the CD-ROM.
HomeworkK4 Coloured light (continued)
HELP
Wordsearch
© Harcourt Education Ltd 2004 Catalyst 2This worksheet may have been altered from the original on the CD-ROM.
a l d e b r o s b a t w
m d i m y b e l r j g j
t r s p e c t r u m u k
d s p t r k d y s b g e
q t e d e t o i j i g s
a f r v b s r i w r d n
d r s g e p h k f p i e
f o i t y n s i g d d v
g j o e k y e u y e u y
t r n r o y t y h r r t
s p f s h e f f h r t e
r m v j c d o c o v b s
a l d e b r o s b a t w
m d i m y b e l r j g j
t r s p e c t r u m u k
d s p t r k d y s b g e
q t e d e t o i j i g s
a f r v b s r i w r d n
d r s g e p h k f p i e
f o i t y n s i g d d v
g j o e k y e u y e u y
t r n r o y t y h r r t
s p f s h e f f h r t e
r m v j c d o c o v b s
K-Homework.qxd 22-Oct-03 3:31 PM Page 10

K1Homework
mark schemeSeeing the light
Sheet 1 of 6© Harcourt Education Ltd 2004 Catalyst 2This worksheet may have been altered from the original on the CD-ROM.
HELPQuestion Answer Mark
1 a, b, c Position of heart correct 1straight lines from source, 1touching object, to the imagearrow on at least one ray. 1
2 a Heart drawn upside down. 1
b Image 1
3 a C 1
b Travels very fast. 1
4 Light travels outwards from source 1in all directions. 1
Total for Help 9
screen
lightsource
object
COREQuestion Answer Mark
5 a Award 1 mark for each of the statements in italic. 5Award 1 mark for the overall quality of the diagram.
b It is a source of light or it is giving out light. 1
c Light is reflected from it 1into his eyes. 1
6 a 150 000km 1
b 1500 000km 1
Total for Core 10
EXTENSIONQuestion Answer Mark
7 a Jupiter is further from the Sun or Venus is nearer to the Earth; Jupiter is 3further from the earth or Venus is closer to the Earth; Venus reflects light better than Jupiter (or vice versa).
b i Light from the Sun 1is reflected from them to the Earth. 1
ii Either they are different sizes or some reflect better than others. 1
8 a 12.75 minutes or 12 minutes 45 seconds; 8.5 ÷ 150 × 225 2
b 44.2 minutes or 44 minutes 12 seconds 1
c Distance of Earth from Jupiter = 630 million km 1time taken = 8.5 ÷ 150 × 630 1= 35.7 minutes or 35 minutes 42 seconds 1
Total for Extension 12
Lamp
heat
energy
transferredas
transferred aselectricalenergy
light energy
transferred as movement(kinetic) energy
Solar cell Motor
K-Homework.qxd 22-Oct-03 3:31 PM Page 11

K2Homework
mark schemeWhich ray?
Sheet 2 of 6© Harcourt Education Ltd 2004 Catalyst 2This worksheet may have been altered from the original on the CD-ROM.
HELPQuestion Answer Mark
1 a Light is reflected from a shiny surface because it bounces from the surface. Underlined section is pupil response, the rest is copied. Accept equivalent answers. 1
b Black sugar paper does not reflect light because the surface absorbs the light. Underlined section is pupil response, the rest is copied. Accept equivalent answers. 1
2 a i Back along the way it came, with arrow in reverse direction. Accept equivalent answer. 1
ii Straight line (accept 5 degrees error either way) 1arrows pointing right way. 1
iii Two straight rays (accept 5 degrees error either way), 2correct arrow (not awarded if both point towards the mirror). 1
iv Mirror in correct position (accept 5 degree error) 1straight mirror 1reflective surface shown. 1
Total for Help 11
70˚
70˚
45˚ 45˚
60˚ 60˚
COREQuestion Answer Mark
3 a i It is scattered/reflects in all directions. 1
ii Any diagram showing 3 or 4 rays being scattered, such as Light is reflected in many directions. 1
iii One correct suggestion: e.g. bike or car reflector, or back of motorway police car or sharp bend indicator chevrons. 1
4 a i Angle of reflection. 1
ii Angle of incidence. 1
b The normal. 1
5 a i Diagram as shown:Straight lines 1one additional direction arrow. Allow up to 2 degrees error in 1the angle.
ii Diagram as shown: Straight mirrorreflective surfacecorrect position. Allow up to 2 degrees error in the angle. 3
Total for Core 11
45˚ 45˚
Normal
45˚
45˚
45˚
Normal 80˚
80˚Normal
Reflective surface of strip
Inside surface
K-Homework.qxd 22-Oct-03 3:31 PM Page 12

K2Homework
mark schemeWhich ray? (continued)
Sheet 3 of 6© Harcourt Education Ltd 2004 Catalyst 2This worksheet may have been altered from the original on the CD-ROM.
EXTENSIONQuestion Answer Mark
6 a i Continuous ray 1
accurately drawn. 1
ii Arrow pointing away from the fox/down the periscope/towards the eye. 1
iii Tilt bottom up/tilt it more/tilt top down Accept equivalent answers. 1
7 a Straight lines 1
correct additional arrow 1
correct angles (to within 2 degrees). 1
b 360/24 – 1 1=14 1(Do not award both marks if no working is shown.)
c 360/x = 9 1x = 360/9 1= 40° 1Deduct 1 mark if answer is correct but no working is shown.
d i Lines diverging 1lines drawn straight. 1
ii Taller because rays are further apart. 1
iii Any correct suggestion, for example: funny mirrors hall, on blind exit to see round a corner, in a bus for the driver to see upstairs, in a shop for surveillance. 1
Total for Extension 16
45˚
Normal
Normal
Normal
K-Homework.qxd 22-Oct-03 3:31 PM Page 13
K3Homework
mark schemeTravelling through?
Sheet 4 of 6© Harcourt Education Ltd 2004 Catalyst 2This worksheet may have been altered from the original on the CD-ROM.
HELPQuestion Answer Mark
1 a Sheet A was transparent because he could see through it clearly. Word in boldtype must be correct. Underlined section is the remainder of the pupil response.Accept equivalent statements. 1
b Sheet B was opaque because he could not see through it at all. Word in boldtype must be correct. Underlined section is the remainder of the pupil response.Accept equivalent statements. 1
c Sheet C was translucent because he could see through it but not clearly.Word in bold type must be correct. Underlined section is the remainder ofthe pupil response. Accept equivalent statements. 1
2 Diagrams must look very similar 3to those shown here.
Total for Help 6
COREQuestion Answer Mark
3 a Ray bends towards normal as it enters the block 1ray bends away from normal as it leaves the block 1emerging rays is parallel to entering ray. 1
b Refraction 1
4 a Light coming from shark is refracted by the glass 1which makes it look bigger. 1
b Steel is opaque/not transparent. 1
Total for Core 7
EXTENSIONQuestion Answer Mark
5 a It slows down as it enters the glass. The light hitting the glass first slows first. 1So the ‘outside’ light overtakes the ‘inside’ light.(Accept equivalent answers.) 1
b They will bend towards the headland. (Accept equivalent answers.) 1
6 Diagram similar to this: Must show light coming from the fish 1which is refracted at the water surface. 1Statement must include these ideas:• aiming at where the fish appears to be will miss• need to aim below where the fish appears to beto allow for refraction. 1
Total for Extension 6
A B C
90˚
K-Homework.qxd 22-Oct-03 3:31 PM Page 14
K4Homework
mark schemeColoured light
Sheet 5 of 6© Harcourt Education Ltd 2004 Catalyst 2This worksheet may have been altered from the original on the CD-ROM.
HELPQuestion Answer Mark
1
Award 1 mark for each correctly circled word from the list as shown. 5
2 The coloured glass only lets some colours through 1and absorbs the others. 1
Total for Help 7
COREQuestion Answer Mark
3 a The chlorophyll reflects green light. 1
b Green and red only. 2
c Blue only. 1
d i No light will be shining on her. 1
ii The blue filter only lets blue light through 1the green filter absorbs blue light 1so no light gets through. Accept equivalent answers. 1
iii Black 1
Total for Core 9
a l d e b r o s b a t w
m d i m y b e l r j g j
t r s p e c t r u m u k
d s p t r k d y s b g e
q t e d e t o i j i g s
a f r v b s r i w r d n
d r s g e p h k f p i e
f o i t y n s i g d d v
g j o e k y e u y e u y
t r n r o y t y h r r t
s p f s h e f f h r t e
r m v j c d o c o v b s
K-Homework.qxd 22-Oct-03 3:31 PM Page 15

K4
Sheet 6 of 6© Harcourt Education Ltd 2004 Catalyst 2This worksheet may have been altered from the original on the CD-ROM.
EXTENSIONQuestion Answer Mark
4 a Green light is reflected by the chlorophyll. 1
b It contains all the colours the plant can use. 1
c Blue 1
d i Higher temperatures speed up photosynthesis. Do not accept ‘not a fair test’ 1without an indication of why not.
ii Put a glass sheet between the lamp and the pondweed. Accept other sensible 1answers.
e The nearer it is to the pondweed the more light the weed would receive 1and it must get the same each time to be a fair test. 1
5 a i A ray of blue light. 1
ii It only contains one colour 1so cannot be dispersed. 1
Total for Extension 10
K-Homework.qxd 22-Oct-03 3:31 PM Page 16
Homeworkmark scheme

K Test yourselfLight
1 Draw lines to match the terms about light to the correct meaning.
Term Meaningsource ● ● transmitting lightshadow ● ● absorbs all lighttransparent ● ● represents the path of lighttranslucent ● ● where an object blocks lightopaque ● ● both absorbs and transmits lightray diagram ● ● something that gives off light
2 Complete the sentences by crossing out the wrong words.
a The Sun/Moon gives out light.b Light travels 300 m/300 million m in one second.c Light travels in straight lines/curves.d A shiny metal surface reflects/absorbs most of the light shining on it.e A carpet reflects/absorbs most of the light shining on it.
3 Complete these sentences using the words below. You may use each word once, more than once or not at all.
a Sources of light are because they give out light.
b We see objects by the light they reflect.
c We see the Moon because it light from the .
d The human eye is rather like a . Light passes into the eye
through a hole called the . This gets when it is
to let in more light. The image in the eye is formed on the
. The image is .
4 a Label the diagram using these words.
b What can you say about the sizes of the marked
angles?
Sheet 1 of 2© Harcourt Education Ltd 2004 Catalyst 2This worksheet may have been altered from the original on the CD-ROM.
bigger smaller dark light camera film
scatters retina pupil Sun upside down
mirror reflected ray incoming ray
lens luminous non-luminous reflects refracts
Test-Qust.qxd 22-Oct-03 4:00 PM Page 21

K Test yourselfLight (continued)
5 Complete the diagrams to show the path taken by the ray of lightfrom air to glass and from glass to air.
6 Complete this sentence by underlining the correct answer.
The splitting of white light into different colours of light is called …
… magnetism.
… convection.
… reflection.
… dispersion.
7 Cross out the wrong words so that these sentences make sense.
a If we shine white light through a blue filter, only red/blue/greenlight comes through. The other colours areabsorbed/reflected/scattered.
b A red surface reflects blue/red/green light. The other colours areabsorbed/reflected/scattered. In red light a green ball willlook green/black/red because the red light isabsorbed/reflected/scattered.
c Red, blue and green are the three primary/secondary colours. If red and blue lights are shone onto a white screen so that thebeams of light overlap, red/magenta/yellow light is seen.
Sheet 2 of 2© Harcourt Education Ltd 2004 Catalyst 2This worksheet may have been altered from the original on the CD-ROM.
air
glass
glass
air
air
air
air air
air
glass
glass
glass
Test-Qust.qxd 22-Oct-03 4:00 PM Page 22

KTest yourself
AnswersLight
1 Draw lines to match the terms about light to the correct meaning.
Term Meaningsource ● ● transmitting light
shadow ● ● absorbs all light
transparent ● ● represents the path of light
translucent ● ● where an object blocks light
opaque ● ● both absorbs and transmits light
ray diagram ● ● something that gives off light
2 Complete the sentences by crossing out the wrong words.
a The Sun/Moon gives out light.b Light travels 300 m/300 million m in one second.c Light travels in straight lines/curves.d A shiny metal surface reflects/absorbs most of the light shining on it.e A carpet reflects/absorbs most of the light shining on it.
3 Complete these sentences using the words below. You may use each word once, morethan once or not at all.
a Sources of light are because they give out light.
b We see objects by the light they reflect.
c We see the Moon because it light from the .
d The human eye is rather like a . Light passes into the eye
through a hole called the . This gets when it is
to let in more light. The image in the eye is formed on the
. The image is .
4 a Label the diagram using these words.
b What can you say about the sizes of the marked
angles? They are equal.
upside downretina
dark
biggerpupil
camera
Sunreflects
non-luminous
luminous
Sheet 1 of 2© Harcourt Education Ltd 2004 Catalyst 2This worksheet may have been altered from the original on the CD-ROM.
bigger smaller dark light camera film
scatters retina pupil Sun upside down
mirror reflected ray incoming ray
lens luminous non-luminous reflects refracts
mirror
incomingray
reflectedray
Test-Ans.qxd 22-Oct-03 4:06 PM Page 21

KTest yourself
AnswersLight (continued)
5 Complete the diagrams to show the path taken by the ray of lightfrom air to glass and from glass to air.
6 Complete this sentence by underlining the correct answer.
The splitting of white light into different colours of light is called …
… magnetism.
… convection.
… reflection.
… dispersion.
7 Cross out the wrong words so that these sentences make sense.
a If we shine white light through a blue filter, only red/blue/greenlight comes through. The other colours areabsorbed/reflected/scattered.
b A red surface reflects blue/red/green light. The other colours areabsorbed/reflected/scattered. In red light a green ball will lookgreen/black/red because the red light isabsorbed/reflected/scattered.
c Red, blue and green are the three primary/secondary colours. Ifred and blue lights are shone onto a white screen so that thebeams of light overlap, red/magenta/yellow light is seen.
Sheet 2 of 2© Harcourt Education Ltd 2004 Catalyst 2This worksheet may have been altered from the original on the CD-ROM.
air
glass
glass
air
air
air
air air
air
glass
glass
glass
Test-Ans.qxd 22-Oct-03 4:06 PM Page 22
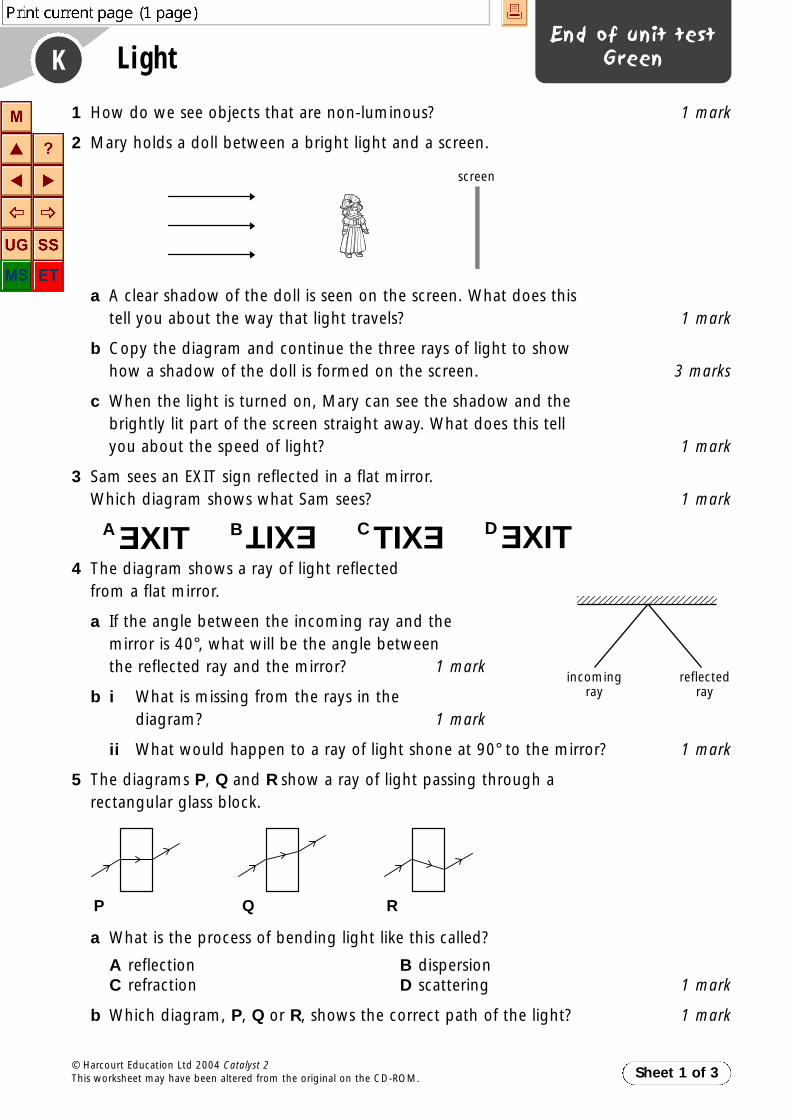
1 How do we see objects that are non-luminous? 1 mark
2 Mary holds a doll between a bright light and a screen.
a A clear shadow of the doll is seen on the screen. What does this tell you about the way that light travels? 1 mark
b Copy the diagram and continue the three rays of light to showhow a shadow of the doll is formed on the screen. 3 marks
c When the light is turned on, Mary can see the shadow and the brightly lit part of the screen straight away. What does this tell you about the speed of light? 1 mark
3 Sam sees an EXIT sign reflected in a flat mirror. Which diagram shows what Sam sees? 1 mark
4 The diagram shows a ray of light reflected from a flat mirror.
a If the angle between the incoming ray and themirror is 40°, what will be the angle between the reflected ray and the mirror? 1 mark
b i What is missing from the rays in the diagram? 1 mark
ii What would happen to a ray of light shone at 90° to the mirror? 1 mark
5 The diagrams P, Q and R show a ray of light passing through a rectangular glass block.
a What is the process of bending light like this called?
A reflection B dispersionC refraction D scattering 1 mark
b Which diagram, P, Q or R, shows the correct path of the light? 1 mark
P Q R
screen
TIXEA B EXITEXITC TIXED
incomingray
reflectedray
KEnd of unit test
GreenLight
Sheet 1 of 3© Harcourt Education Ltd 2004 Catalyst 2This worksheet may have been altered from the original on the CD-ROM.
K-EUTest.qxd 25-Nov-03 8:52 AM Page 1

KEnd of unit test
GreenLight (continued)
6 Sunlight is split up into a spectrum of colours by atriangular prism, as shown in the diagram.
a What name is given to the splitting up of sunlightin this way?
A diffraction B dispersionC differentiation D division 1 mark
b What colour is the light at X? 1 mark
c How does the prism split white light up into a spectrum? 1 mark
7 a White light is shone at a green filter.What colour is the light transmitted by the green filter? 1 mark
b Grass looks green in white light because it reflects green light and absorbs all the other colours.i Explain why a blue flower looks blue in white light. 2 marksii In a bunch of red and blue flowers, which flowers will look black
in blue light? 1 mark
8 A school is presenting ‘Alice in Wonderland’. In one scene some of the cast dress up as playing cards. Their costumes are white with the playing card patterns painted on.
The stage is lit by red light. The red nines of hearts and diamonds look red all over. Explain why the white background looks red. 1 mark
9 David and his class are investigating how effective sunglasses are at reducing light. They are using a light sensor to measure the amount of light passing through the lens of each pair of sunglasses. They decide to test the following.
a David says it is important to do the experiment with normalglasses as well as the sunglasses. Why did he say this? Choose from the list below.
A The glass may affect the experiment.
B It is safer to do this.
C Only one factor is being changed.
D It makes predicting the result easier. 1 mark
Sheet 2 of 3© Harcourt Education Ltd 2004 Catalyst 2This worksheet may have been altered from the original on the CD-ROM.
Xwhite
light
Normal glassesReactolite glasses –these get darkerwith more light
Blue tinted glasses
Brown tinted
glasses
K-EUTest.qxd 25-Nov-03 8:52 AM Page 2

KEnd of unit test
GreenLight (continued)
b David said that it was important to keep the light sensor the same distance from the lamp each time. Choose the best reason he gave for this from this list:
A Otherwise the amount of light might be different.
B Otherwise the angle of the lamp would have to be changed.
C Otherwise heat from the lamp would affect the light sensor.
D Otherwise their conclusions might be wrong. 1 mark
c David says the experiment should be carried out in sunlight, but it is a windy day and clouds keep passing in front of the Sun. Megan says that they should use an electric lamp instead. Why would Megan’s idea give more reliable results? 1 mark
d The graph below shows the results of the experiment.Which glasses were most effective at blocking light? 1 mark
e Emma said that the experiment should be done with no glasses at all.
How many light units would the light sensor record with no glasses? 1 mark
Sheet 3 of 3© Harcourt Education Ltd 2004 Catalyst 2This worksheet may have been altered from the original on the CD-ROM.
0
10
20
30
40
50
60
70
80
90
100
0 1 2 3 4normalglasses
reactoliteglasses
brownglasses
blueglasses
Light (units)
K-EUTest.qxd 25-Nov-03 8:52 AM Page 3

KEnd of unit test
RedLight
1 The diagram shows a ray of light reflected from a flat mirror.
a Calculate the size of the angle of incidence. 1 mark
b i What is missing from the ray diagram? 1 markii What is the size of the angle of reflection? 1 mark
2 The diagrams P, Q and R show a ray of light passing through a rectangular glass block.
a What is the process of bending light like this called? 1 mark
b Which diagram, P, Q or R, shows the correct path of the light? 1 mark
3 Sunlight is split up into a spectrum of colours by a triangular prism, as shown below.
a What colour is the light at X ? 1 mark
b How does the prism split white light up into a spectrum? 1 mark
c A green filter is placed in the path of the spectrum.
i What is seen now? 1 markii Explain your answer to i. 1 mark
d What would you expect to see if a second prism were arranged next to the first, as shown in the diagram below? (There is no need to draw the diagram.) 1 mark
white
light
Xwhite
light
P Q R
Sheet 1 of 3© Harcourt Education Ltd 2004 Catalyst 2This worksheet may have been altered from the original on the CD-ROM.
50°
normal
incidentray
reflectedray
K-EUTest.qxd 25-Nov-03 8:52 AM Page 4
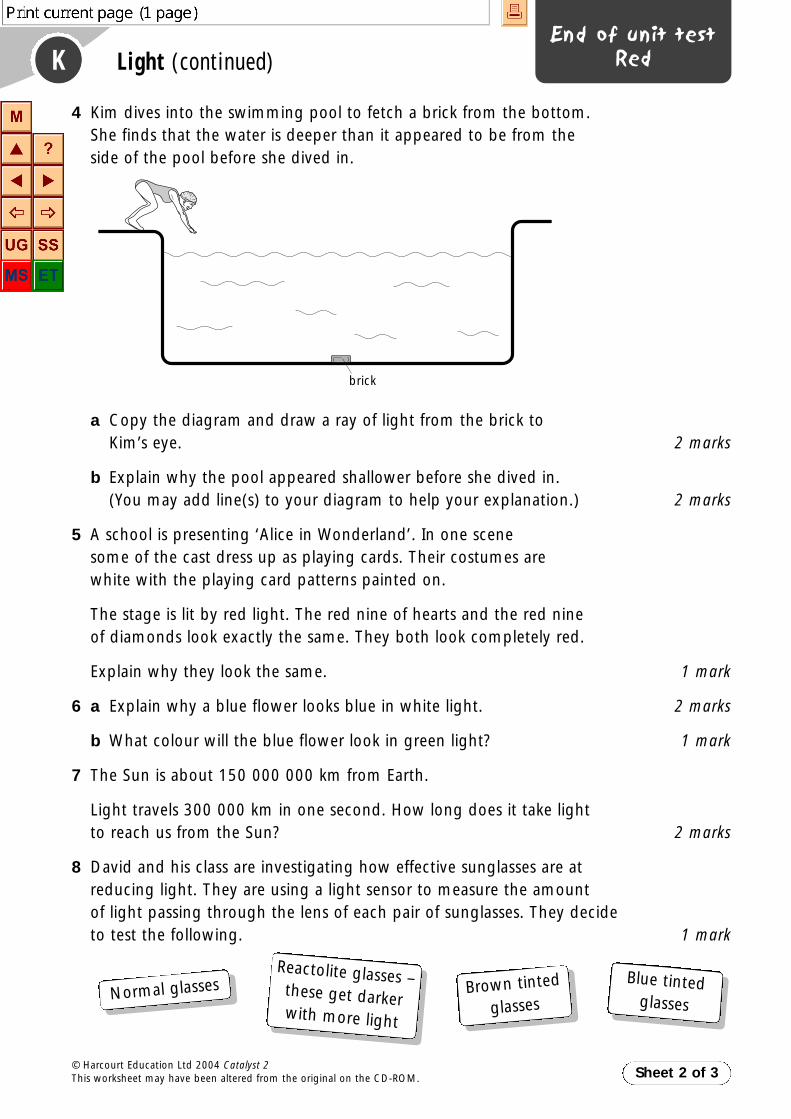
KEnd of unit test
RedLight (continued)
4 Kim dives into the swimming pool to fetch a brick from the bottom. She finds that the water is deeper than it appeared to be from the side of the pool before she dived in.
a Copy the diagram and draw a ray of light from the brick to Kim’s eye. 2 marks
b Explain why the pool appeared shallower before she dived in. (You may add line(s) to your diagram to help your explanation.) 2 marks
5 A school is presenting ‘Alice in Wonderland’. In one scenesome of the cast dress up as playing cards. Their costumes are white with the playing card patterns painted on.
The stage is lit by red light. The red nine of hearts and the red nine of diamonds look exactly the same. They both look completely red.
Explain why they look the same. 1 mark
6 a Explain why a blue flower looks blue in white light. 2 marks
b What colour will the blue flower look in green light? 1 mark
7 The Sun is about 150 000 000 km from Earth.
Light travels 300 000 km in one second. How long does it take lightto reach us from the Sun? 2 marks
8 David and his class are investigating how effective sunglasses are atreducing light. They are using a light sensor to measure the amount of light passing through the lens of each pair of sunglasses. They decide to test the following. 1 mark
brick
Sheet 2 of 3© Harcourt Education Ltd 2004 Catalyst 2This worksheet may have been altered from the original on the CD-ROM.
Normal glassesReactolite glasses –these get darkerwith more light
Blue tinted glasses
Brown tinted
glasses
K-EUTest.qxd 25-Nov-03 8:52 AM Page 5

KEnd of unit test
RedLight (continued)
a David says the experiment should be carried out in sunlight, but it is a windy day and clouds keep passing in front of the Sun. Megan says that they should use an electric lamp instead. Why would Megan’s idea give more reliable results? 1 mark
b The graph below shows the results of the experiment. Which glasses were most effective at blocking light? 1 mark
c Emma said that the experiment should be done with no glassesat all. How many light units would the light sensor record with no glasses? 1 mark
d Andrew says the sunglasses should be as close to the lightsensor as possible to make the investigation reliable. Whichvariable might be affected if the glasses were further away? 1 mark
e The reactolite glasses are photo-chromatic – they become darker with increased light intensity. Andrew measures the amount oflight that has passed through the lenses of the reactolite sunglasses from different lamps. 1 mark
He finds that there is little difference in the light sensor readings, although some of the lamps are much brighter than others. What other variable should he measure so that he can draw a conclusion about how effective the reactolite sunglasses are in different light levels? 1 mark
Sheet 3 of 3© Harcourt Education Ltd 2004 Catalyst 2This worksheet may have been altered from the original on the CD-ROM.
0
10
20
30
40
50
60
70
80
90
100
0 1 2 3 4normalglasses
reactoliteglasses
brownglasses
blueglasses
Light (units)
K-EUTest.qxd 25-Nov-03 8:52 AM Page 6

KEnd of unit test
mark schemeLight
Sheet 1 of 1© Harcourt Education Ltd 2004 Catalyst 2This worksheet may have been altered from the original on the CD-ROM.
Green (NC Tier 3–6)Question Answer Mark Level
1 a By reflection or light is scattered off them. 1 5
2 a Light travels in straight lines. 1 3
b 3 4
(one mark ƒor each ray drawn with a ruler and with an arrow pointing towards the screen)
c Very, very fast or almost instantaneous. 1 3
3 C 1 5
4 a 40° 1 4
b i Arrows (showing the direction of light) 1 5
ii It would reflect back at 90° 1 5
5 a C Refraction 1 4
b Q 1 6
6 a B Dispersion 1 4
b Red 1 5
c The different colours in white light are refracted by different amounts by the prism. 1 6
7 a Green 1 5
b i The blue flower reflects blue light 1 5and absorbs all the other colours. 1 5
ii Red flowers. 1 5
8 The white background material looks red as only red light is present. 1 6
9 a C Only one factor is being changed. 1 4
b A Otherwise the amount of light might be different. 1 4
c The amount of light would be constant. 1 5
d Reactolite glasses. 1 5
e 100 1 5
EXIT
screen
Scores in the range of: NC Level
4–7 3
8–13 4
14–17 5
18–25 6
K-EUTest.qxd 25-Nov-03 8:52 AM Page 7

KEnd of unit test
mark schemeLight
Sheet 1 of 1© Harcourt Education Ltd 2004 Catalyst 2This worksheet may have been altered from the original on the CD-ROM.
Red (NC Tier 4–7)
Scores in the range of: NC Level
4–9 4
10–14 5
15–18 6
19–25 7
Question Answer Mark Level
1 a 40° 1 4
b i Arrows showing the direction of light. 1 5
ii 40° 1 5
2 a Refraction 1 4
b Q 1 5
3 a Red 1 5
b The different colours in white light are refracted by different amounts by the prism so come out in different places. 1 6
c i Green part of the spectrum only. 1 5
ii Only green light can pass through the filter, all the other colours are absorbed. 1 5
d One from: 1 6White light.Parallel to the incident ray.
4 a Diagram shows a straight line from brick to water surface 2 5refracted away from the normal to Kim’s eye.
b Kim’s brain thinks that light travels in a straight line 1 6so thinks the brick is nearer the surface or ignores refraction at the surface (refracted ray continued back to 1 6show position of image).
5 Red hearts and diamonds will reflect red light and so will the white background material as only red light is present. 1 6
6 a The blue flower reflects blue light 1 5and absorbs all the other colours. 1 5
b Black 1 6
7 Time = distance/speed = 150 000 000/300 000 = 500 s 2 7or 8.3 minutes (one mark for correct equation and correct substitution but incorrect calculation; one mark for correct equation and incorrect substitution but correct calculation; two marks for correct answer with no working shown).
8 a The amount of light would be constant 1 5b Reactolite glasses. 1 5c 100 1 5d Light 1 6e The amount of light from each lamp. 1 6
K-EUTest.qxd 25-Nov-03 8:52 AM Page 8

K Pupil checklistLight
Sheet 1 of 1© Harcourt Education Ltd 2004 Catalyst 2This worksheet may have been altered from the original on the CD-ROM.
Learning outcomes I can do I can do I need to this very this quite do more well well work on this
I can describe the way light travels.
I can describe how fast light travels.
I can use ray diagrams to show how lighttravels.
I can use a pinhole camera.
I can explain how you see a reflection in amirror.
I can use a protractor to measure angles.
I can identify the normal and the angle ofincidence.
I can carry out an experiment to measureangles of incidence and reflection.
I can describe transmission of light.
I can describe absorption of light.
I can describe refraction.
I can name the rainbow of coloursproduced by a prism.
I can name the colours of the rainbow.
I can use a prism to show dispersion.
I can name the primary colours of light.
I can plan and carry out an investigationto find out the effect of coloured filters oncoloured light.
I can describe how coloured filters changewhite light.
Pupil checklist.qxd 12-Nov-03 8:56 AM Page 11

K GlossaryLight
Sheet 1 of 2© Harcourt Education Ltd 2004 Catalyst 2This worksheet may have been altered from the original on the CD-ROM.
Word
absorption
angle of incidence R
angle of reflection R
camera obscura R
combinations
dispersion
image
inverted R
light sensors
normal R
object R
opaque
pinhole camera
primary colour
ray
reflection/reflects
refraction/refracts
scatter
secondary colour R
shadow R
source
spectrum
translucent
transmitted
transparent
Definition
Where something starts or is produced.
Darkness due to an object blocking the light. R
An object seen indirectly on a screen or using a mirror orlens.
The earliest form of camera – a darkened room with a tinyhole to let in light. An upside-down image of the sceneoutside was formed on the wall opposite the hole. R
The simplest type of camera – a box with a pinhole at oneend and a screen at the other.
Something you look at using a mirror or lens to form animage. R
Equipment used to detect light.
When light or sound bounces off a surface, it is reflected.
A thin beam of light.
An imaginary line at 90° to a surface. R
The angle between the incoming ray and the normal. R
The angle between the reflected ray and the normal. R
When light is reflected in many directions by a rough surface,it is scattered.
Upside down. R
A material that does not allow light to pass through, butabsorbs it, is opaque.
When light or sound is soaked up by a surface, it is absorbed.
A material that allows (transmits) light through is transparent.
When light or sound passes through a material, it istransmitted.
A material that both absorbs and transmits light istranslucent.
Bending of light when it travels from one material toanother, e.g. air to water or glass to air.
Glossary.qxd 12-Nov-03 8:24 AM Page 18

K GlossaryLight (continued)
Sheet 2 of 2© Harcourt Education Ltd 2004 Catalyst 2This worksheet may have been altered from the original on the CD-ROM.
Definition
The colours in white light – red, orange, yellow, green, blue,indigo, violet.
The splitting of white light into colours.
Ways in which objects are put together.
One of three colours of light that humans can see – green,red or blue.
One of three colours of light produced by mixing twoprimary colours. R
Glossary.qxd 12-Nov-03 8:24 AM Page 19
K Key wordsLight
absorption
angle of incidence R
angle of reflection R
camera obscura R
combinations
dispersion
image
inverted R
light sensors
normal R
object R
opaque
pinhole camera
primary colour
ray
reflection/reflects
refraction/refracts
scatter
secondary colour R
shadow R
source
spectrum
translucent
transmitted
transparent
Sheet 1 of 1
Sheet 1 of 1
© Harcourt Education Ltd 2004 Catalyst 2This worksheet may have been altered from the original on the CD-ROM.
Key wordsK Light
absorption
angle of incidence R
angle of reflection R
camera obscura R
combinations
dispersion
image
inverted R
light sensors
normal R
object R
opaque
pinhole camera
primary colour
ray
reflection/reflects
refraction/refracts
scatter
secondary colour R
shadow R
source
spectrum
translucent
transmitted
transparent
© Harcourt Education Ltd 2004 Catalyst 2This worksheet may have been altered from the original on the CD-ROM.
Keywords.qxd 12-Nov-03 8:28 AM Page 11

Sheet 1 of 3© Harcourt Education Ltd 2004 Catalyst 2This worksheet may have been altered from the original on the CD-ROM.
K Book answersLight
K1 Seeing the lightGreena Light bulbs, flames, TV screens, the Sun and the
stars.b smallerc Two images.d i 300000km ii 2s1 Light is given out by a source and travels in all
directions. Light travels very, very, very fast. Wesee light when it enter our eyes. Light travels instraight lines. This is why you get a clear butupside-down image when you use a pinholecamera.
2 B, D, A, C
Reda i Electrical energy.
ii Chemical energy.b i smaller
ii largerc Five images.d Four seconds.1 The rotating top puts a blockage between the
sailor and the light, causing a shadow. Thishappens every time the top turns, so the lightappears to be flashing.
2 Individual answers, based on the fact that theimage is sharp and is formed only by light fromthe object falling on the screen. The rest of thescreen is dark.
3 a Two images would appear; suitable drawingshowing this.
b Into her eyes.
K2 Which ray?Greena Light from the Sun falls on the Moon. We see
the Moon because this light is reflected from itto the Earth.
b Ac Paper is rough and has many tiny bumps which
scatter light in all directions.d A mirror is very smooth and all the light rays are
reflected in the same direction and notscattered.
1 Light bounces off most surfaces. We say thelight is reflected. Very smooth surfaces reflectthe light in the same direction, so we see anobject. Rough surfaces scatter the light.
2 a 90º (or a right angle).b 90º (or a right angle).c Two mirrors are arranged as shown in the
diagram in the pupil book.3 Diagram showing a puddle with the surface
labelled as a smooth surface, with a light rayfalling onto the surface and being reflected atthe same angle away from the surface.
Reda Light from the Sun falls on the Moon. We see
the Moon because this light is reflected from itto the Earth.
b A thin beam of light.c Change the angle between the ray and the
mirror until the ray is reflected back in thedirection it came. The ray is then travellingalong the normal, at 90º to the surface.
d A dirty knife has its surface made rough by thedirt on it. Light falling on the dirty knife isscattered. A clean knife has a smooth surfaceand reflects rays in the same direction.
1 a Diagram showing a puddle with the surfacelabelled as a smooth surface, with a lightray falling onto the surface and beingreflected at the same angle away from thesurface.
b The smooth surface of the puddle is brokenand made rough. This scatters light.
2 a
b The angles of incidence and the angles ofreflection are equal.
c Individual answers.3 The light from the laser beam is reflected from
dust particles in the air.
K3 Travelling through?Greena Refraction, the bending of light as it goes from
water into air, makes the pencil look bent.b i yes
ii noc The light bends, or is refracted, as it goes from
water into the air.d You see the coin higher up, where the light
seems to come from.
ab
normal
normal
a = b
ab
Book Answers.qxd 25-Nov-03 8:40 AM Page 32

Sheet 2 of 3© Harcourt Education Ltd 2004 Catalyst 2This worksheet may have been altered from the original on the CD-ROM.
K Book answersLight (continued)
1 Light is absorbed by many materials. Whenthe light does not go through the material, wesay the material is opaque. Light goes throughtransparent materials like water, air and glass.When the light enters a transparent material atan angle, it bends. This bending is calledrefraction.
2 a Cb Cc Bd A
Reda Towards the normal.b noc
d low1 The light must enter the new material at an
angle to the normal and the light has to travel atdifferent speeds in the different materials forrefraction to happen.
2 a i Away from the normal.ii Towards the normal.
iii Towards the normal.b Air to perspex.
K4 Coloured lightGreena i A spectrum. ii dispersionb bluec They are absorbed.d bluee The red light is absorbed by the blue surface.f redg redh The red light is absorbed by the green
trousers.1 White light is made up of a spectrum of seven
different colours. We separate white light intocolours by dispersion. A coloured filtertransmits one colour of light and absorbs allthe others. A coloured surface reflects onecolour of light and absorbs all the others.
2 A is red light. B is no light. C is red light. D is nolight.
Reda violetb redc i Only red light through the red filter.
ii Only blue light through the blue filter.iii Only green light through the green filter.
d i The white shirt reflects all the light in theroom. As the only light in the room is red,then the shirt reflects and looks red.
ii A green surface reflects only green light andabsorbs all other colours. As the light in theroom is red, it is absorbed. No light isreflected from the trousers so they look black.
iii The red light is absorbed.1 A is red light. B is no light. C is red light. D is no
light.2 a The shirt looks red because the white shirt
reflects all colours. The skirt looks redbecause the red skirt reflects only red light.The boots look black because black absorbsall colours.
b The shirt looks blue because the white shirtreflects all colours. The skirt looks blackbecause the red skirt absorbs all coloursexcept red. The boots look black becauseblack absorbs all colours.
c The shirt looks green because the white shirtreflects all colours. The skirt looks blackbecause the red skirt absorbs all coloursexcept red. The boots look black becauseblack absorbs all colours.
3 The green light would transmit only the colourgreen. The green leaves of the plants wouldreflect the green light but no light energy wouldbe absorbed by the plants and they would die.
K5 Mix itGreena fourb
c Individual work.d Individual answers.
Insect
Image of Insectseen by fish.
Position Colour Whichcombination of red, blue, green
A red red only
B blue blue only
C green green only
D magenta red and blue
E yellow red and green
F cyan blue and green
G white red, green and blue
Book Answers.qxd 25-Nov-03 8:40 AM Page 33

Sheet 3 of 3© Harcourt Education Ltd 2004 Catalyst 2This worksheet may have been altered from the original on the CD-ROM.
K Book answersLight (continued)
e Yellow is a secondary colour made up of red andgreen light. Therefore a yellow filter will allowboth primary colours red and green to passthrough it and absorb blue light.Cyan is a secondary colour made up of blue andgreen light. Therefore a cyan filter will allowboth primary colours blue and green to passthrough it and absorb red light.
1 Red flashing with red; red flashing with greenflashing; red flashing with green; red with greenflashing; red with green; green flashing withgreen; red flashing with red and green flashing;red flashing with red and green; red with greenflashing and green; red flashing with red andgreen flashing and green.
Reda fourb
c Individual work.
d Individual answers.e For number 8, the yellow filter allows both red
and green to pass through it, so red and greenlight goes to the cyan filter. But the cyan filteronly allows blue and green to pass through it, soit absorbs the red and only green passes throughit. For number 9, the magenta filter allows bothred and blue to pass through it, so red and bluelight goes to the cyan filter. But the cyan filteronly allows blue and green to pass through it, soit absorbs the red and only blue passes throughit. For number 10, the magenta filter allows bothred and blue to pass through it, so red and bluelight goes to the yellow filter. But the yellowfilter only allows red and green to pass throughit, so it absorbs the blue and only red passesthrough it.
f fourg 101 Red flashing with red; red flashing with green
flashing; red flashing with green; red flashingwith white; red with green flashing; red withgreen; red with white; green flashing with green;green flashing with white; green with white; redflashing with red and green flashing; redflashing with red and green; red flashing withred and white; red with green flashing andgreen; red with green flashing and white; redflashing with red and green flashing and green;red flashing with red and green flashing andwhite; red flashing with red and green andwhite; red with green flashing and green andwhite; red flashing with red and green flashingand green and white.
Position Colour Whichcombination of red, blue, green
A red red only
B blue blue only
C green green only
D magenta red and blue
E yellow red and green
F cyan blue and green
G white red, green and blue
Book Answers.qxd 25-Nov-03 8:40 AM Page 34