1. in the activity builder, you can use the content editor tools to create the content for...
TRANSCRIPT

1
SAGE Formative: Form-Based Content Editors
Fall 2014

2
Form-Based Content Editors
• In the Activity Builder, you can use the Content Editor tools to create the content for activities and stimuli one at a time.
• Form-Based Content Editors: Each simplified Content Editor tool is specialized for a single activity type. Form-based Content Editors are currently available for four activity types: Multiple-Choice Activity, Multi-Select Activity, Table Match, and Text Response.

3
Content Editors• Each Content Editor tool consists of three tabs. Each tab corresponds with
a different step in the activity creation process:
• Edit Details: This tab allows you to name the activity, align it to standards, and select a group to which it belong. The fields and features on this tab are the same for all Content Editor tools.
• Edit Content: This tab allows you to create and edit the activity content. The fields and features on this tab depend on the selected Content Editor tool.
• Preview Content: This tab displays a preview of the activity content.
• The Create New Activity drop-down list on the Activity Builder screen contains the available Content Editor tools.

4
Selecting a Content Editor Tool • To begin the activity creation process, select the required Content Editor tool from the
Create New Activity drop-down list above the Activities table. The Edit Details tab of the selected Content Editor tool opens.
• To create an activity with a form-based Content Editor, select either “Multiple-Choice Activity,” “Multi-Select Activity,” “Text Response Activity,” or “Match Activity.”
• To create an activity with the All-in-One Content Editor, select “All-in-One Content Editor.”

5
Edit Details Tab• In the Name field, enter a name for the activity. • To align the activity with a standard, click [Add Alignment]. The Grades
drop-down list appears.• From the Grades drop-down list, select a grade level for the activity. A new
drop-down list displays below.

6
Adding Alignments • Continue to select options from the drop-down lists until you can click
[Add].
• Click [Save] and then click the [Edit Content] tab at the top of the screen. The Edit Content tab opens.

7
Edit Content Tab
• The Edit Content tab on the form-based Content Editor tool is different for each activity type.

8
Multiple-Choice Activity• To create a stem for the activity, hover your mouse over the Stem field and
click [Edit].• Enter the stem content in the text box that activates.

9
Multiple-Choice Activity• To enter a response option, hover your mouse over the first Response
Option field and click [Edit].
• Enter the content for that response option in the text box that activates.
• Repeat this step with the second Response Option field.

10
Multiple-Choice Activity• To configure the activity rubric, click the radio button for the correct
response option.
• To save your changes, click [Save]. If you wish to preview the activity content, click the [Preview Content] tab at the top of the screen. To exit the Content Editor tool, click [Close].

11
Multi-Select Activity• To set the maximum number of response options that students can select,
enter a numerical value in the Max Choices field.

12
Multi-Select Activity• Optional: To configure the activity to shuffle the order of response
options for each student, mark the Shuffle checkbox. Note: marking this button will only affect the response options in the individual activity.
• To create a stem for activity, hover your mouse over the Stem field and click [Edit]. Enter the content for the stem in the text box that activates.

13
Multi-Select Activity• To enter a response option, hover your mouse over the first Response
Option field and click [Edit].
• Enter the content for that Response Option in the text box that activates.
• Repeat this step with the second Response Option field.

14
Multi-Select Activity• To configure the activity rubric, mark the checkbox for each correct
response option. Note: The number of correct responses you mark should not exceed the number you entered in the Max Choices field.
• To save your changes to the activity, click [Save]. If you wish to preview the activity content, click the [Preview Content] tab at the top of the screen. To Exit the Content Editor tool, click [Close].

15
Text Response Activity• On the Edit Content tab, create a stem for the activity by hovering your
mouse over the Stem field and clicking [Edit]. Enter the content for the stem in the Content Editor text box that activates.

16
Text Response Activity• To create a rubric for the activity, hover your mouse over the Hand Scoring
Rubric field and click [Edit]. Enter the content for the rubric in the Content Editor text box that activates. Note: this rubric is for hand-scoring purposes only and will not be visible to students when they access the essay activity.
• To save your changes to the activity, click [Save]. If you wish to preview the activity content, click the [Preview Content] tab at the top of the screen. To exit the Content Editor tool, click [Close].

17
Match Activity

18
Match Activity • To create a stem for the activity, hover your mouse over the Stem field and
click [Edit]. Enter the content for the stem in the Content Editor text box that activates and click [OK].

19
Match Activity • To enter a response option in the first match set, hover your mouse over
the first Response Option field in the left column and click [Edit].
• Enter the content for the response option in the text box and click [OK]. You may use the formatting buttons in the toolbar. Repeat this step with the second Response Option field in the left column.

20
Match Activity • Optional: To add another response option to the first match set, click [Add
Response Option to Column 1] and enter the content for the new response option. Repeat this step until you have added all the response options for the first match set.
• To enter response options for the second match set, repeat previous steps in the right column of Response Option fields. Students will have to associate options in the first match set with the corresponding options in the second match set.
21
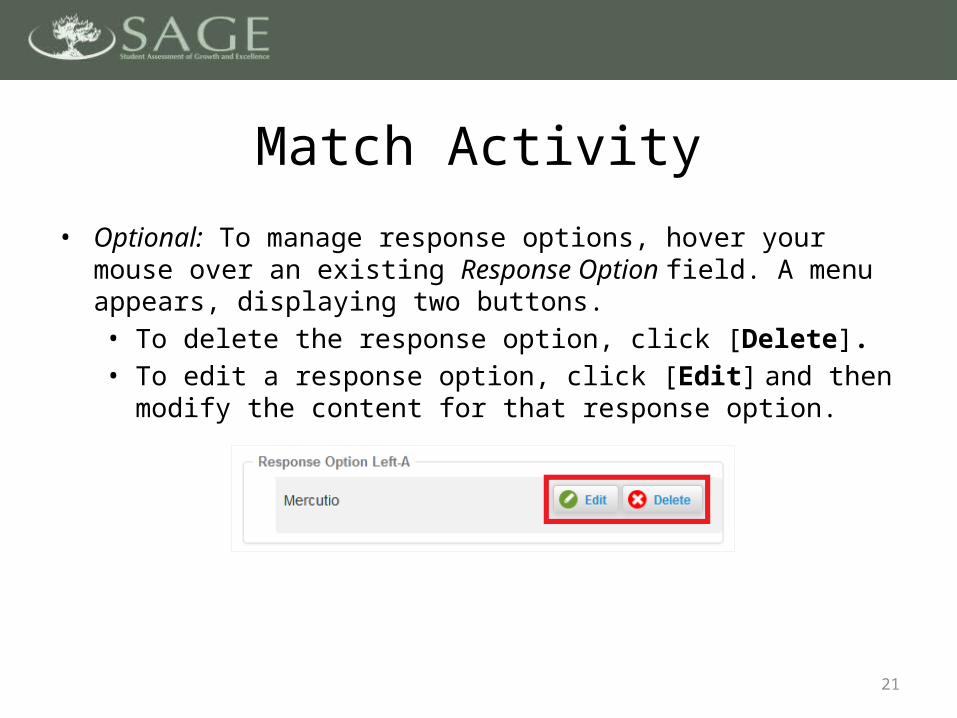
Match Activity• Optional: To manage response options, hover your mouse over an existing
Response Option field. A menu appears, displaying two buttons. • To delete the response option, click [Delete]. • To edit a response option, click [Edit] and then modify the content for
that response option.

22
Match Activity • In the Maximum Associations field, enter the maximum number of
associations students will be allowed to create between the two match sets.
• In the Minimum Associations field, enter the minimum number of associations students must create between the two match sets.

23
Match Activity • As you add response options to the activity, the corresponding columns
and rows are added to the Match rubric at the top of the form. The first match set appears as rows and the second set appears as columns.

24
Match Activity • To configure the rubric, mark the checkboxes wherever a response option
in the first match set intersects with the corresponding response option in the second match set.
• To save your changes, click [Save]. If you wish to preview the activity content, open the [Preview Content] tab at the top of the screen. To exit the Content Editor tool, click [Close].