160611 feuillet v2 -...
TRANSCRIPT
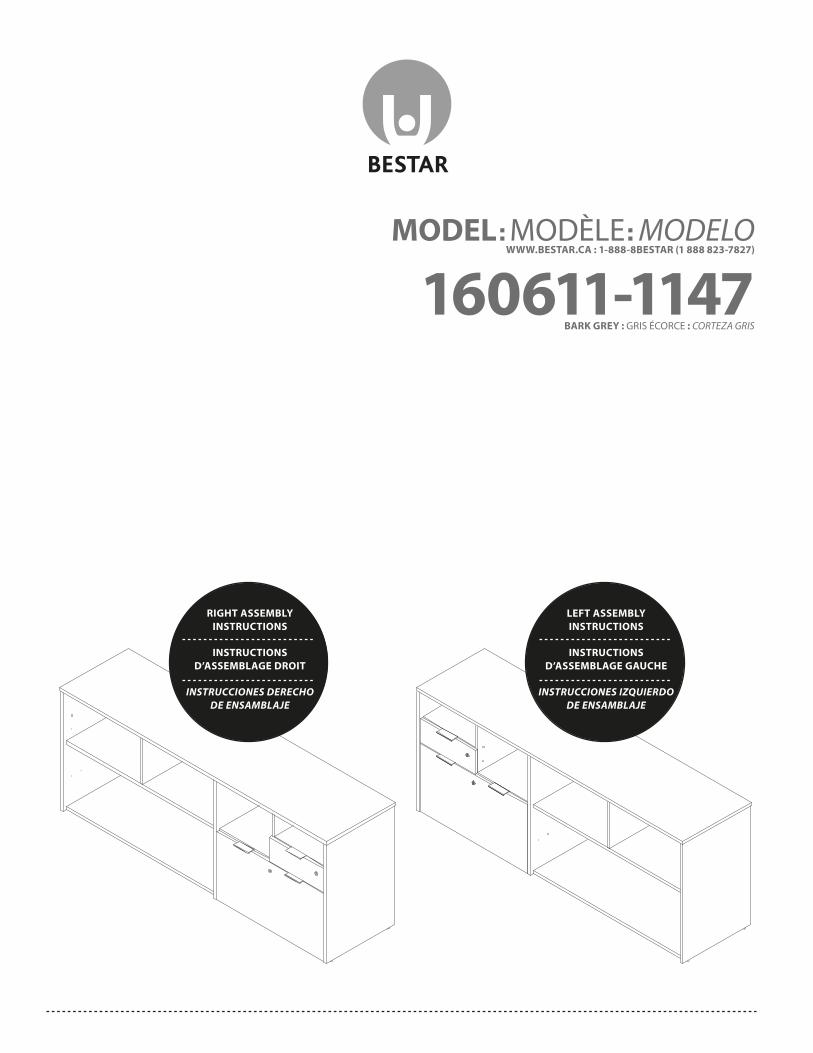
MODEL MODÈLE MODELO
160611-1147BARK GREY : GRIS ÉCORCE : CORTEZA GRIS
WWW.BESTAR.CA : 1-888-8BESTAR (1 888 823-7827)
LEFT ASSEMBLY INSTRUCTIONS
INSTRUCTIONS D’ASSEMBLAGE GAUCHE
INSTRUCCIONES IZQUIERDODE ENSAMBLAJE
RIGHT ASSEMBLY INSTRUCTIONS
INSTRUCTIONS D’ASSEMBLAGE DROIT
INSTRUCCIONES DERECHODE ENSAMBLAJE

www.bestar.ca1 888 823-7827
HEAD OFFICE AND FACTORY / SIÈGE SOCIAL ET USINE / CASA CENTRAL Y FÁBRICA4220, RUE VILLENEUVE, LAC-MÉGANTIC, QC. CANADA G6B 2C3 TÉL. : (819) 583-1017WWW.BESTAR.CA : 1-888-8BESTAR (1 888 823-7827)
Thank you for choosing a BESTAR product. Your total satisfaction is our #1 priority. Customer Service and warranty information
Should you have a problem or need more information concerning the warranty, do not call to the place of purchase. Please call our customer service department for immediate assistance using the following toll free number:Monday to Thursday: 8 a.m. to 8 p.m. E.S.T. / Friday: 8 a.m. to 4 p.m. E.S.T. / Saturday and Sunday: 9 a.m. to 4 p.m. E.S.T.
Please have your assembly instruction manual on hand when you call. BESTAR products are warranted to the original purchaser against defects in material or workmanship in the furniture. Defects as mentioned in this warranty refer to any imperfections which may impair the use of the product. Our warranty is expressly limited to the replacement of furniture parts and components for ten years following the date of purchase. BESTAR will replace any part that is defective. This warranty applies under conditions of normal use. Our furniture products are not intended for outdoor use. The warranty does not cover defects caused by improper assembly or disassembly, defects occurring after purchase due to product modi�cations, intentional damage, accident, misuse, exposure to the elements and labor or assembly costs. Bestar reserves the right to request proof of purchase to document a warranty claim. In no event shall BESTAR be liable for incidental or consequent damages resulting from the misuse of the product. This warranty is not transferable and is valid only in Canada and the United States excluding Alaska, Hawaii and Puerto Rico.
MERCI D’AVOIR CHOISI LES PRODUITS BESTAR. VOUS SATISFAIRE EST NOTRE PRIORITÉ.Service à la clientèle et informations relatives à la garantieSi vous rencontrez un problème ou si vous souhaitez de plus amples informations concernant votre garantie, ne vous adressez pas au magasin où vous avez e�ectué votre achat. Pour obtenir une aide immédiate, veuillez appeler notre service après-vente au numéro sans frais : Lundi au jeudi : 8 h à 20 h HNE / Vendredi : 8 h à 16 h HNE / Samedi et dimanche : 9 h à 16 h HNE
Veuillez avoir en main le manuel d’instructions lors de votre appel. La garantie des produits BESTAR est valide, pour l’acheteur original, en cas de défaut de matériel ou de fabrication. Les défauts couverts par cette garantie incluent toutes les imperfections qui ont pour conséquence une utilisation non appropriée du produit. Notre garantie est expressément limitée au remplacement des composants et des éléments de meubles pour une durée de dix ans suivant la date de l’achat. BESTAR s’engage à remplacer tout élément défectueux. Cette garantie s’inscrit dans le cadre d’une utilisation du produit dans des conditions normales. Nos meubles ne sont pas destinés à être utilisés à l’extérieur. La garantie ne couvre pas les défauts générés par un assemblage ou un démontage non conforme, les défauts apparus suite à des modi�cations apportées au produit, à des dommages intentionnels, à un accident, une mauvaise utilisation, l’utilisation à l’extérieur, ni les coûts de main d’œuvre ou d’assemblage. Bestar se réserve le droit d’exiger une preuve d’achat a�n de documenter la réclamation. La société BESTAR ne pourra être tenue, en aucun cas, responsable de dommages indirects ou consécutifs, suite à une mauvaise utilisation du produit. Cette garantie ne peut être transférée et est valide au Canada et aux États-Unis sauf Hawaï, Puerto Rico et Alaska.
Gracias por elegir un producto BESTAR. Su entera satisfacción es nuestra prioridad N°1.Servicio de atención al cliente e información sobre la garantía
Si tiene algún problema y necesita más información sobre la garantía, no vaya al lugar donde realizó la compra. Llame a nuestro departamento de atención al cliente para recibir ayuda inmediata utilizando nuestro servicio de llamada gratuita :De lunes a jueves : de 8H00 AM a 8H00 PM EST / Viernes : de 8h00 AM a 4H00 PM EST / Sábado y domingo : de 9h00 AM a 4H00 PM EST
Cuando llame, tenga a mano su manual de instrucciones de montaje. Los productos BESTAR están garantizados por el comprador original contra defectos en el material o en la confección del mueble. Los defectos, tal como se describen en esta garantía incluyen toda imperfección que pueda impedir el uso del producto. Nuestra garantía se limita expresamente al reemplazo de las partes y componentes del mueble defectuosos por diez años a partir de la fecha de compra. BESTAR remplazará cualquier pieza defectuosa. Esta garantía se aplica según las condiciones de uso normal. Nuestros productos no están diseñados para ser utilizados al aire libre. La garantía no cubre defectos provocados por ensamblaje o desensamblaje incorrectos, defectos ocurridos luego de la compra por la modi�cación del mueble, daños intencionales, accidentes, uso incorrecto, exposición a los agentes naturales ni costos derivados de la fabricación o ensamblaje. Bestar se reserva el derecho de solicitar una factura de compra para poder extender un reclamo de garantía. Bajo ninguna circunstancia BESTAR será responsable de los daños accidentales o consecuentes que pudieran resultar del uso incorrecto del producto. Esta garantía es intransferible y se aplica solamente a Canadá y los Estados Unidos.
PROBLEMSOR INFORMATION
POUR TOUT PROBLÈMEOU INFORMATION
PROBLEMA OINFORMACION

PARTS / PIÈCES / PIEZAS
CODE / CÓDIGO QTY / QTÉ / CANT. CODE / CÓDIGO QTY / QTÉ / CANT. CODE / CÓDIGO QTY / QTÉ / CANT. CODE / CÓDIGO QTY / QTÉ / CANT.
13 2
20 1
21 1
22 1
30 1
31 1
40 1
41 1
42 1
43 1
44 1
66 1
67 1
68 1
69 1
70 2
90 Extrusion EX-681 26 7/8“ (672 mm) 2
CA01A 2
CA05A 2
CA09A 2
CL081B 1
bottom / fond / fondo12 1/2 ” x 15 3/8” (316 mm x 391 mm) 2
bottom / fond / fondo26 3/4” x 15 3/8” (680 mm x 391 mm) 2
3SERVICE/SERVICIO: 1-888 8BESTAR (1-888 823-7827)160611
3143
41
20 40
40
6967
67 69
42
42
30
6866
44
31
66 68
44
2122
22
43
41
2130
If you prefer the left assembly,refer to pages 4 to 8 and 13 to the end.Si vous préférez l’assemblage gauche, référez-vous aux pages 4 à 8 et 13 jusqu’à la fin.Si prefiere el ensamble izquierdo,vea las páginas 4 a 8 y 13 hasta el final.
If you prefer the right assembly,refer to pages 4 and 9 to the end.Si vous préférez l’assemblage droit,
référez-vous aux pages 4 et 9 jusqu’à la fin.Si prefiere el ensamble derecho,
vea las páginas 4 y 9 hasta el final.

Main hardware system / Système de quincaillerie principal / Sistema principal de quincalla
1
insertinsérez
insertar
2
tools requiredoutils requis
herramientas necesarias
A
importantimportante
tightenserrezapretar
3 B
pull outretirezretire
Bturntournezhaga girar
A
How to remove a misplaced assembly bolt (H-36).Comment retirer un boulon (H-36) mal situé.Cómo retirar un perno (H-36) mal ubicado.
arrowflècheflecha
H-03
Insert the cam with the arrow pointing towards the hole in the edge.Insérez la rondelle en pointant la flèche vers le trou de la bordure.Inserte la arandela con la flecha apuntando hacia el orificio cercano al borde.
IMPORTANT NOTICE / NOTE IMPORTANTE / NOTA IMPORTANTE
REAL SIZE / GRANDEUR RÉELLE / TAMAÑO REAL
CODE / CÓDIGO QTY / QTÉ / CANT.CODE / CÓDIGOQTY / QTÉ / CANT.
VE-244 10
VM-601 4
VC-204 6
VR-207 16
VR-211 4
VR-212 22
1/2 in/po (13 mm)3/8 in/po (10 mm)
3/4 in/po (20 mm)
SE-736 2
SU-682 4
TI-703 2
3500-D06-50125 1
H-03 34
H-36 34
PA-844 6
PO-971 3
CA-77 2
CA-99 16
CA-100 2
CA-101 2
CL-745 1
CO-249 2
EX-743 2
2
EC-744 6
CODE / CÓDIGO QTY / QTÉ / CANT. CODE / CÓDIGO QTY / QTÉ / CANT. CODE / CÓDIGO QTY / QTÉ / CANT. CODE / CÓDIGO QTY / QTÉ / CANT.
runners 406 mm (16”)coulisseaux 406 mmcorrederas 406 mm
HARDWARE / QUINCAILLERIES / QUINCALLA
1 in/po (25 mm)
4SERVICE/SERVICIO: 1-888 8BESTAR (1-888 823-7827)160611
PROBLEMS OR INFORMATIONPOUR TOUT PROBLÈME OU INFORMATIONPROBLEMAS O INFORMACIÓN
www.bestar.ca1888 823-7827
30,3 cm (11 7/8 in./po)
Will not be usedNe sera pas utiliséNo se utilizará
41,1 cm (16 1/8 in./po)
1” (25 mm)
2” (50 mm)
D
A
B
C
14 9/16” (370 mm)3/32” (2,5 mm)
5/16” (8 mm)
3/4” (19 mm)

Code / Código
Qty / Qté / Cant.
H-36
x 10
H-03
x 16
CO-249
x 2
VE-244
x 7
HARDWARE INSTALLATION / INSTALLATION DES QUINCAILLERIES / INSTALACIÓN DE LAS QUINCALLAS
CREDENZA / CRÉDENCE / CREDENCIA1
5
1
SERVICE/SERVICIO: 1-888 8BESTAR (1-888 823-7827)160611
4430 7020
CO-249Use these holes / Utilisez ces trous / Utilice estos orificios
Push plastic lever and slide out piece to be used for parts CA09A & CA01A laterSoulever pour dégager et séparer la section qui servira pour les pièces
CA09A et CA01A plus tardLevantar para soltar y separar la sección que servirá para las piezas
CA09A Y CA01A más tarde VE-244
20
70
70
44
44
30
30
2x20
20
H-36
H-36
H-03
H-03
PA-844
x 2
1” (
25 m
m)
3/8”
(10
mm
)
PA-844
InsideIntérieurDentro
OutsideExtérieurExterior
LEFT / GAUCHE / IZQUIERDOAssembling sequenceSéquence d’assemblageSecuencia de ensamblajeParts / Pièces / Piezas:

Code / Código
Qty / Qté / Cant.
H-36
x 6
H-03
x 16
CO-249
x 2
VE-244
x 3
2
PA-844
x 2
VC-204
x 2
1” (
25 m
m)
3/8”
(10
mm
)
H-36
HARDWARE INSTALLATION / INSTALLATION DES QUINCAILLERIES / INSTALACIÓN DE LAS QUINCALLAS
CREDENZA / CRÉDENCE / CREDENCIA2
6SERVICE/SERVICIO: 1-888 8BESTAR (1-888 823-7827)160611
30 4420
22
22
22
21
21
41
41
43
43
42
H-03
H-03
PA-844
VC-204
2” (
5 cm
)
InsideIntérieurDentro
OutsideExtérieurExterior
42
CO-249
2242 41 2143
LEFT / GAUCHE / IZQUIERDOAssembling sequenceSéquence d’assemblageSecuencia de ensamblajeParts / Pièces / Piezas:

H-36
31
31
31
40
40
H-03
VC-204
VC-204
x 2
2” (
5 cm
)
Code / Código
Qty / Qté / Cant.
H-36
x 18
H-03
x 2
3
PA-844
x 2
1” (
25 m
m)
HARDWARE INSTALLATION / INSTALLATION DES QUINCAILLERIES / INSTALACIÓN DE LAS QUINCALLAS
CREDENZA / CRÉDENCE / CREDENCIA3
7SERVICE/SERVICIO: 1-888 8BESTAR (1-888 823-7827)160611
2 3/8” (60 mm)
PA-844
4031
LEFT / GAUCHE / IZQUIERDOAssembling sequenceSéquence d’assemblageSecuencia de ensamblajeParts / Pièces / Piezas:
H-36

VC-204
VC-204
x 2
2” (
5 cm
)
Code / Código
Qty / Qté / Cant.
4
HARDWARE INSTALLATION / INSTALLATION DES QUINCAILLERIES / INSTALACIÓN DE LAS QUINCALLAS
CREDENZA / CRÉDENCE / CREDENCIA4
8SERVICE/SERVICIO: 1-888 8BESTAR (1-888 823-7827)160611
Straighten the furnitureRedresser le meubleEnderezar los muebles
Put the 2 screws on the backMettre les 2 vis au dosColoque los 2 tornillos en la parte posterior
LEFT / GAUCHE / IZQUIERDO

Code / Código
Qty / Qté / Cant.
H-36
x 6
H-03
x 20
HARDWARE INSTALLATION / INSTALLATION DES QUINCAILLERIES / INSTALACIÓN DE LAS QUINCALLAS
CREDENZA / CRÉDENCE / CREDENCIA1
9
1
SERVICE/SERVICIO: 1-888 8BESTAR (1-888 823-7827)160611
21
70
70
70
43
44
41
30
30
2x43
21
H-36
H-36
H-03
H-03
PA-844
x 2
1” (
25 m
m)
PA-844
4430 7043 2170
RIGHT / DROIT / DERECHOAssembling sequenceSéquence d’assemblageSecuencia de ensamblajeParts / Pièces / Piezas:
VC-204
x 2
2” (
5 cm
)

Code / Código
Qty / Qté / Cant.
H-36
x 8
H-03
x 12
CO-249
x 2
VE-244
x 5
2
PA-844
x 2
VC-204
x 2
1” (
25 m
m)
3/8”
(10
mm
)
HARDWARE INSTALLATION / INSTALLATION DES QUINCAILLERIES / INSTALACIÓN DE LAS QUINCALLAS
CREDENZA / CRÉDENCE / CREDENCIA2
10SERVICE/SERVICIO: 1-888 8BESTAR (1-888 823-7827)160611
44
22
22
22
44
42
H-03
PA-844
VC-204
2” (
5 cm
)
InsideIntérieurDentro
OutsideExtérieurExterior
42
CO-249
4222 4420
RIGHT / DROIT / DERECHOAssembling sequenceSéquence d’assemblageSecuencia de ensamblajeParts / Pièces / Piezas:
20
H-36
20
CO-249Use these holes / Utilisez ces trous / Utilice estos orificios
Push plastic lever and slide out piece to be used for parts CA09A & CA01A laterSoulever pour dégager et séparer la section qui servira pour les pièces
CA09A et CA01A plus tardLevantar para soltar y separar la sección que servirá para las piezas
CA09A Y CA01A más tarde VE-244

VE-244
x 5
3/8”
(10
mm
)
H-36
H-36
31
31
31
40
40
H-03
Code / Código
Qty / Qté / Cant.
H-36
x 18
H-03
x 2
3
PA-844
x 2
1” (
25 m
m)
HARDWARE INSTALLATION / INSTALLATION DES QUINCAILLERIES / INSTALACIÓN DE LAS QUINCALLAS
CREDENZA / CRÉDENCE / CREDENCIA3
11SERVICE/SERVICIO: 1-888 8BESTAR (1-888 823-7827)160611
PA-844
4031
RIGHT / DROIT / DERECHOAssembling sequenceSéquence d’assemblageSecuencia de ensamblajeParts / Pièces / Piezas:
2 3/8” (60 mm)

VC-204
VC-204
x 2
2” (
5 cm
)
Code / Código
Qty / Qté / Cant.
4
HARDWARE INSTALLATION / INSTALLATION DES QUINCAILLERIES / INSTALACIÓN DE LAS QUINCALLAS
CREDENZA / CRÉDENCE / CREDENCIA4
12SERVICE/SERVICIO: 1-888 8BESTAR (1-888 823-7827)160611
Straighten the furnitureRedresser le meubleEnderezar los muebles
Put the 2 screws on the backMettre les 2 vis au dosColoque los 2 tornillos en la parte posterior
RIGHT / DROIT / DERECHO

13
13
CL09A
ASSEMBLY / ASSEMBLAGE / ENSAMBLAJE
DRAWER / TIROIR / CAJÓN5
SERVICE/SERVICIO: 1-888 8BESTAR (1-888 823-7827)16061113
Assembling sequenceSéquence d’assemblageSecuencia de ensamblajeParts / Pièces / Piezas:
CA09ACA09A
CA13A CA13A
VR-212
VR-212
VR-212
x 2
16 1
/8 in
/po
(41,
1 c
m)
bottom / fond / fondo
VM-601
x 2
1/2
in/p
o (1
3 m
m)
VR-207
x 8
VR-212
x 12
1 in
/po
(25
mm
)
screws / vis / tornillos
CO-249
x 1
Code / Código
Qty / Qté / Cant.
5
PO-971
x 2
EC-744
x 2
CL-745
x 1
1
3
6 7
4 5
2
67 69
69
VR-207
CO-249alignaligneralinear
6769
Ensure that the closed end of part CO-249 laysagainst part 67 (or 69)S’assurer que le bout fermé du CO-249 soit accoté sur la pièce 67 (ou 69)Asegúrese de que el extremo cerrado de la pieza CO-249 se apoye sobre la pieza 67 (o 69)
CL09A
CL81B
EX-74390
67
EC-744PO-971
VM-601
VR-207
VR-207
VR-210
3500-D06-50125
SE-736-A
5/8”
(16
mm
)
VR-210
x 4
3500-D06-50125
x 1
SE-736-A
x 1
bottom / fond / fondo
or/ou/o
or/ou/o
VM-601
x 2
1/2
in/p
o (1
3 m
m)
VR-207
x 8
VR-212
x 8
1 in
/po
(25
mm
)
screws / vis / tornillos
Right assemblyAssemblage droit Ensamblaje derecha
Left assembly Assemblage gauche Ensamblaje izquierdo
CO-249
x 1
Code / Código
Qty / Qté / Cant.
6
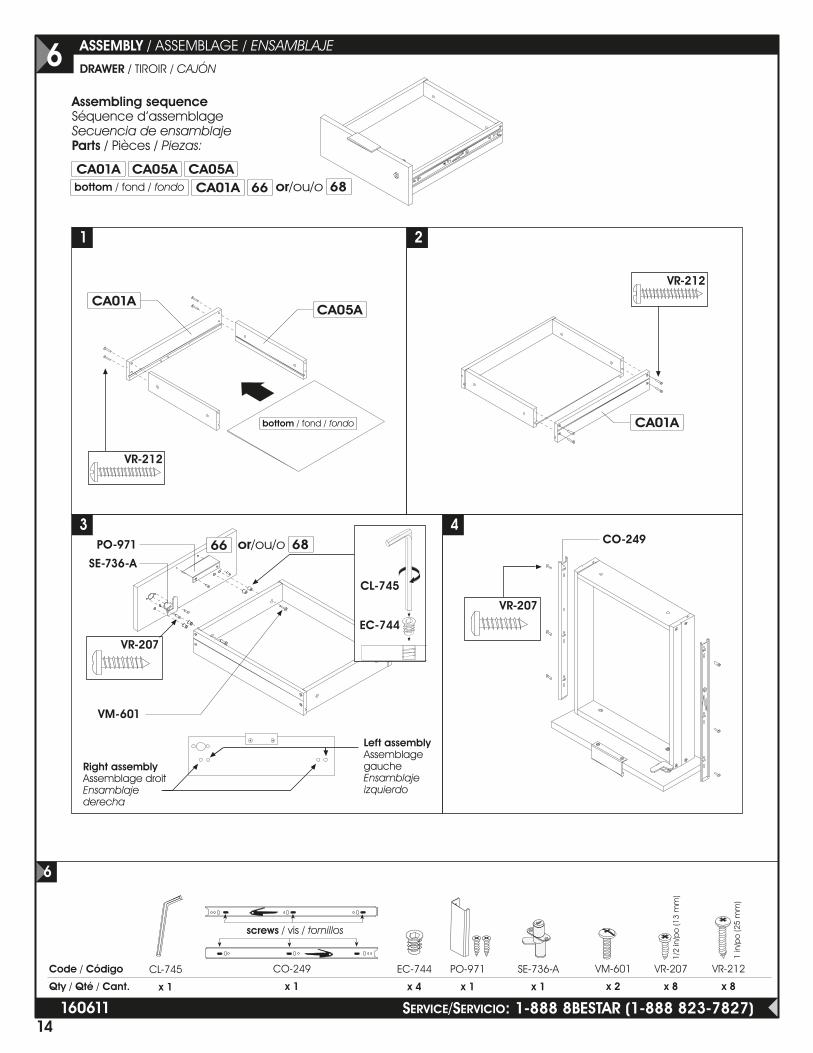
ASSEMBLY / ASSEMBLAGE / ENSAMBLAJE
DRAWER / TIROIR / CAJÓN6
SERVICE/SERVICIO: 1-888 8BESTAR (1-888 823-7827)16061114
Assembling sequenceSéquence d’assemblageSecuencia de ensamblajeParts / Pièces / Piezas:
CA01A CA05A CA05ACA01A
CA01A
VR-212
VR-212
CA01A
CA05A
66
VR-207
VR-207
bottom / fond / fondo
1 2
3 4
EC-744
x 4
CL-745
x 1
68
PO-971
x 1
SE-736-A
x 1
PO-971
VM-601
SE-736-A66 CO-249
EC-744
CL-745
bottom / fond / fondo
or/ou/o
68or/ou/o
VR-212
x 2
1 in
/po
(25
mm
)
VR-212
Code / Código
Qty / Qté / Cant.
7
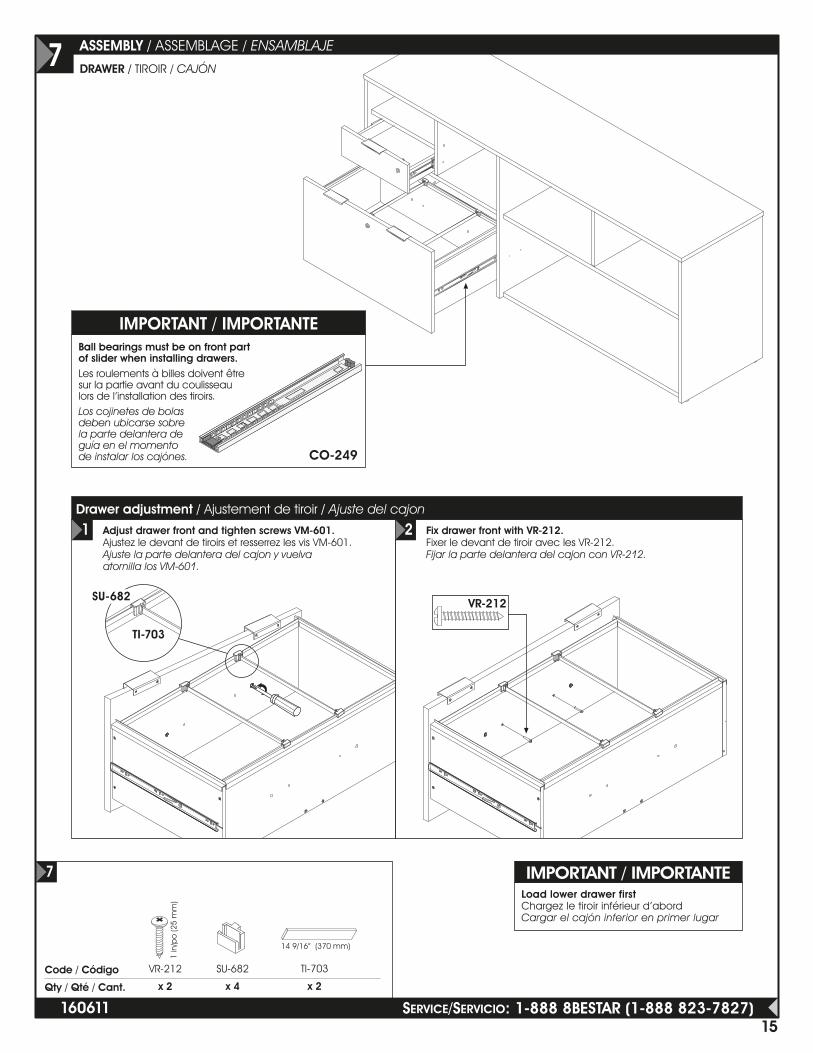
ASSEMBLY / ASSEMBLAGE / ENSAMBLAJE
DRAWER / TIROIR / CAJÓN7
15SERVICE/SERVICIO: 1-888 8BESTAR (1-888 823-7827)160611
Adjust drawer front and tighten screws VM-601.Ajustez le devant de tiroirs et resserrez les vis VM-601.Ajuste la parte delantera del cajon y vuelva atornilla los VM-601.
1 Fix drawer front with VR-212.Fixer le devant de tiroir avec les VR-212.Fijar la parte delantera del cajon con VR-212.
2Drawer adjustment / Ajustement de tiroir / Ajuste del cajon
Ball bearings must be on front part of slider when installing drawers.Les roulements à billes doivent être sur la partie avant du coulisseau lors de l’installation des tiroirs.Los cojinetes de bolas deben ubicarse sobre la parte delantera de guía en el momento de instalar los cajónes. CO-249
IMPORTANT / IMPORTANTE
SU-682
x 4
TI-703
x 2
14 9/16” (370 mm)
SU-682
TI-703
Load lower drawer firstChargez le tiroir inférieur d’abordCargar el cajón inferior en primer lugar
IMPORTANT / IMPORTANTE

For future reference and to better serve you, please apply the self-adhesive sticker in an accessible space such as inside a drawer.
Pour mieux vous servir en cas de besoin, veuillez apposer l’autocollant dans un endroit facilement accessible tel que l’intérieur d’un tiroir.
Para futura referencia y mejor servicio por favor pegue la etiqueta en un lugar accesible, por ejemplo al interior de un cajón.
MODEL MODÈLE MODELO
COLOR : COULEUR : COLORWWW.BESTAR.CA : 1-888-8BESTAR (1 888 823-7827)
00000-0000Model / Modèle :
Production NumberNuméro de production :
Customer ServiceService à la clientèle
To better serve you!Pour mieux vous servir!
1-888-823-7827
PRODUCTION 0000
PRODUCTION 0000
PRODUCT CARE / ENTRETIEN DU PRODUIT / MANTENIMIENTO DEL PRODUCTO
Avoid placing the furniture in the sunlight or near a source of heat. Use a soft dry cloth for dusting. To clean heavy dirt, use a cloth dipped in a solution of mild detergent and water. Avoid leaving wet objects on the surface or using commercial chemical cleaning products.
Évitez d'exposer le meuble au soleil ou près de toute source de chaleur. Pour le nettoyage, utilisez un chiffon doux et sec.Pour la grosse saleté, utilisez un chiffon humidifié avec un peu de détergent dilué dans l'eau. Évitez de laisser des objets mouillés sur la surface de votre meuble ou d'utiliser des nettoyants chimiques.
Evite exponer el mueble al sol o las fuentes de calor. Para limpiarlo, utilice un paño suave y seco. Para limpiar las manchas rebeldes, utilice un trapo húmedo con un poco de detergente diluido en agua. No deje objetos mojados encima del mueble ni utilice limpiadores que contengan productos químicos.
CONGRATULATIONS! YOU ARE NOW THE OWNER OF A QUALITY PRODUCTFÉLICITATIONS! VOUS AVEZ MAINTENANT EN VOTRE POSSESSION UN PRODUIT DE QUALITÉ
FELICITACIONES! AHORA ES USTED DUEÑO DE UN PRODUCTO DE CALIDAD.
040314
INSTALLATION / INSTALLATION / INSTALACIÓN
CREDENZA / CRÉDENCE / CREDENCIA8
SERVICE/SERVICIO: 1-888 8BESTAR (1-888 823-7827)16061116
When you have completed the assembly of your new furniture, install plastic caps.Lorsque vous avez complété l’assemblage de votre meuble, installez les capuchons de plastique. Una vez que haya ensamblado el mueble, coloque los capuchones de plástico.
CA-991.5 cm
(5/8 in./po)
H-03
CA-771 cm
(3/8 in./po)
Unused holesPerçages non utilisésOrificios no utilizados
CA-1035 mm
(3/16 in./po)
LEFT ASSEMBLY INSTRUCTIONS
INSTRUCTIONS D’ASSEMBLAGE GAUCHE
INSTRUCCIONES IZQUIERDODE ENSAMBLAJE
RIGHT ASSEMBLY INSTRUCTIONS
INSTRUCTIONS D’ASSEMBLAGE DROIT
INSTRUCCIONES DERECHODE ENSAMBLAJE

The doors on your furniture are crooked or the space between the doors is uneven:It is very important to install the hinges and hinge plates on the correct parts while respecting the instruction manual. For the installation and adjustment of the doors, please refer to your instruction manual or log on to the BESTAR internet site (www.bestar.ca).
Les portes de votre meuble sont croches ou l’espace qui les sépare est inégal :Il est important d’installer les pentures et les plaques sur les bonnes pièces en respectant le feuillet d’instructions. Pour l’installation des portes et leur ajustement, référez-vous à l’étape d’installation des portes dans le feuillet d’instructions ou sur le site internet de BESTAR (www.bestar.ca).
Las puertas de su mueble están chuecas o el espacio que las separa es desigual :Es importante instalar las bisagras y las placas sobre las piezas adecuadas respetando el folleto de instrucciones. Para la instalación de las puertas y su ajuste, consulte la etapa de instalación de las puertas en el folleto de instrucciones o en el sitio Internet de BESTAR (www.bestar.ca).
You are at a step of hardware installation and some H-36 are missing:Before calling to order your missing bolts (H-36), please make sure you have not installed any bolts (H-36) in the wrong place. To remove a bolt (H-36) which is not in the correct place, please refer to your instruction manual.
Vous êtes à une étape d’installation de quincaillerie et il vous manque des H-36 :Avant d’appeler pour commander des boulons (H-36), assurez-vous de ne pas avoir installé des boulons (H-36) au mauvais endroit. Pour enlever un boulon (H-36) mal situé, consultez le feuillet d’instructions.
Usted está en alguna etapa de la instalación de quincallas y le faltan las H-36 :Antes de llamar para pedir los pernos (H-36), asegúrese de que no los haya instalado en el lugar equivocado. Para retirar un perno (H-36) mal puesto, consulte el folleto de instrucciones.
How to separate and install your CO-249 and CO-684 slides:The CO-249 & CO-684 slides consist of two sections which you must separate. To separate the slides, please refer to your instruction manual. The slides are installed on distinct parts which will be re-grouped only when the drawers are installed on the furniture.
Comment séparer et installer les coulisseaux CO-249 et CO-684 :Les coulisseaux CO-249 et CO-684 sont constitués d’une partie que vous devez séparer en deux sections. Pour séparer le coulisseau, référez-vous au feuillet d’instructions. Les coulisseaux sont installés sur deux pièces distinctes et seront regroupés seulement lors de l’installation des tiroirs dans le meuble.
Cómo separar y instalar las guías correderas CO-249 y CO-684 :Las guías correderas CO-249 y CO-684 están constituidas por una parte que usted debe separar en dos secciones. Para separar las guías correderas, consulte el folleto de instrucciones. Las guías correderas se instalan en dos piezas distintas y sólo serán reagrupadas una vez que se instalen los cajones en el mueble.
Problems and Solutions / Problèmes et solutions / Problemas y Soluciones
The drawers on your furniture are crooked or the space between the drawers is uneven:While referring to the section indicating the actual sizes of the screws in your instruction manual , please insure that you are using the correct size screws needed when installing your drawer slides and drawer fronts. They must be installed straight. While installing the drawer front, make sure that the correct side is facing up. For the adjustment of the drawer fronts, please refer to your instruction manual or log on to the BESTAR internet site (www.bestar.ca).
Les tiroirs de votre meuble sont croches ou l’espace qui les sépare est inégal :En vous référant au tableau de vis grandeur réelle du feuillet d’instructions, assurez-vous que vous avez utilisé les bonnes vis lors de l’installation des coulisseaux ainsi que du devant de tiroir et qu’elles sont posées bien droites. Assurez-vous également que le devant du tiroir n’est pas assemblé à l’envers. Référez-vous à l’étape d’ajustement des tiroirs dans le feuillet d’instructions ou sur le site internet de BESTAR (www.bestar.ca).
Los cajones de su mueble están chuecos o el espacio que los separa es desigual :Consulte la tabla de tornillos en tamaño real del folleto de instrucciones y asegúrese de que haya utilizado los tornillos adecuados durante la instalación de las guías correderas así como también la parte delantera del cajón y que éstos estén puestos bien derechos. Asegúrese también de que la parte delantera del cajón no esté ensamblada al revés. Consulte la etapa del ajuste de cajones en el folleto de instrucciones o en el sitio Internet de BESTAR (www.bestar.ca).
DR
Part B / Partie B / Parte BPart A / Partie A / Parte A


V2
YOU andUS
For more information or to discover our new productsPour toute information ou pour découvrir nos nouveaux produitsPara obtener más información o para obtener nuevos productos
www.bestar.ca
VOUS etNOUS
FOR LONG TIMEPOUR LONGTEMPSPOR MUCHO TIEMPO
The new logo shows an open and radiant person. It also evokes the past of BESTAR, the fact that we were the �rst manufacturer of ready-to-assemble furniture to design U-Shape furniture. Finally, if you take the logo in its simplest form, it shows that BESTAR is there for its employees, for its customers and for its consumers, “BESTAR is there for you (U)”.Le nouveau logo illustre un personnage ouvert et rayonnant. Il évoque également le passé de BESTAR qui fut le premier manufacturier de meubles prêt-à-assembler à concevoir des bureaux en forme de «U». Finalement, si on prend le logo sous sa forme la plus simple, il rappelle que BESTAR est présent pour ses employés, ses clients et ses consommateurs.El logotipo ilustra un personaje abierto y radiante. Élevoca igualmente, el pasado porque Bestar fue el primer fabricante de muebles listos para ensamblar a concebir escritorios en forma de "U". Finalmente, si tomamos el logotipo con su forma la más sencilla, nos recuerda que Bestar está presente para sus empléados, paras sus clientes y para sus consumidores . "BESTAR está aquì para USTED (U)".
OUR FURNITURE IS GARANTEED FOR 10 YEARS. NO MATTER THE PROBLEM, OUR CUSTOMER SERVICE IS THERE FOR YOU.NOS MEUBLES SONT GARANTIS POUR 10 ANS. PEU IMPORTE LE PROBLÈME, N’HÉSITEZ PAS À COMMUNIQUER AVEC NOTRE SERVICE À LA CLIENTÈLE. NUESTROS MUEBLES TIENEN UNA GARANTIA DE 10 AÑOS. NO IMPORTA EL PROBLEMA, COMUNIQUE CON NUESTRO SERVICIO À CLIENTE.
WWW.BESTAR.CA
USTEDESy
NOSOTROS