175-100381 mos install guide - imaginecommunications.com · chapter 5 upgrading nmg ... rundown...
TRANSCRIPT

Delivering the MomentDelivering the Moment
Installation Guide
Nexio® MOS
April 2014
175-100381-03

Publication Information© 2014 Imagine Communications Corp. Proprietary and Confidential
Imagine Communications considers this document and its contents to be proprietary and confidential. Except for making a reasonable number of copies for your own internal use, you may not reproduce this publication, or any part thereof in any form, by any method, for any purpose, or in and language other than English without the written consent of Imagine Communications. All others uses are illegal.
This publication is designed to assist in the use of the product as it exists on the date of publication of this manual, and may not reflect the product at the current time or an unknown time in the future. This publication does not in any way warrant description accuracy or guarantee the use for the product to which it refers. Imagine Communication reserves the right, without notice to make such changes in equipment, design, specifications, components, or documentation as progress may warrant to improve the performance of the product.
Trademarks6800+™, ADC™, CCS Navigator™, Channel ONE™, ChannelView™, ClipSync™, Delay™, D-Series™, D-Series DSX™, Deliver the Moment™, Delivering the Moment™, FAME™, Farad™, G8™, G-Scribe™, HView™, IconMaster™, IconLogo™, IconStation™, IconKey™, InfoCaster™, InfoCaster Creator™, InfoCaster Manager™, InfoCaster Player™, InstantOnline™, Invenio®, Live-Update™, mCAPTURE™, Magellan™, Magellan CCS Navigator™, Magellan Q-SEE™, MultiService SDN™, NetPlus™, NetVX™, NewsForce™, Nexio® G8™, Nexio AMP® ChannelView™, Nexio® Channel ONE™, Nexio® ClipSync™, Nexio® Delay™, Nexio® Digital Turnaround Processor™, Nexio® Farad™, Nexio® G-Scribe™, Nexio® IconKey™, Nexio® IconLogo™, Nexio® IconMaster™, Nexio® IconStation™, Nexio® InfoCaster™, Nexio® InfoCaster Creator™, Nexio® InfoCaster Manager™, Nexio® InfoCaster Player™, Nexio® InfoCaster Traffic™, Nexio® InstantOnline™, Nexio® mCAPTURE™, Nexio® NewsForce™, Nexio® NXIQ™, Nexio® Playlist™, Nexio® Remote™, Nexio®RTX Net™, Nexio® TitleMotion™, Nexio® TitleOne™, Nexio® Velocity ESX™, Nexio® Velocity PRX™, Nexio® Velocity XNG™, Nexio® Volt™, OPTO+™, Panacea™, Platinum™, Playlist™, Predator II-GRF™, Predator II-GX™, Punctuate™, Remote™, RTX Net™, QuiC™, Q-SEE™, SD-STAR™, Selenio™, Selenio 6800+™, SelenioNext™, Selenio X50™, Selenio X85™, Selenio X100™, TitleMotion™, TitleOne™, Velocity ESX™, Velocity PRX™, Velocity XNG™, Versio™, Videotek® SD-STAR™, X50™, and X85™ are trademarks of Imagine Communications or its subsidiaries.
Altitude Express®, Connectus®, Enabling PersonalizedTV®, ICE® Broadcast System, ICE Illustrate®, ICE-Q® algorithms, ICEPAC®, Imagine ICE®, Inscriber®, Inscriber® Connectus®, Invenio®, NEO®, Nexio®, Nexio AMP®, PersonalizedTV®, RouterWorks®, Videotek®, Videotek® ASI-STAR®, Videotek® GEN-STAR®, and Videotek® HD-STAR® are registered trademarks of Imagine Communications or its subsidiaries.
Microsoft® and Windows® are registered trademarks of Microsoft Corporation. HD-BNC is a trademark of Amphenol Corporation. Some products are manufactured under license from Dolby Laboratories. Dolby and the double-D symbol are registered trademarks of Dolby Laboratories. DTS Neural audio products are manufactured under license from DTS Licensing Limited. DTS and the Symbol are registered trademarks & the DTS Logos are trademarks of DTS, Inc. © 2008-2010 DTS, Inc. All other trademarks and trade names are the property of their respective companies.
Contact InformationImagine Communications has office locations around the world. For location and contact information see: http://www.imaginecommunications.com/company/contact-us.aspx
Support Contact InformationFor domestic and international support contact information see:
•Support Contacts: http://www.imaginecommunications.com/services/technical-support.aspx
•eCustomer Portal: http://www.support.imaginecommunications.com
NEXIO MOS SuiteInstallation Guide
3
Copyright © 2012, Harris Corporation
Contents
Chapter 1 MOS Suite Overview ....................................................................................... 5
Terms and Abbreviations ...........................................................................................................6Related Documentation .............................................................................................................. 7MOS Hardware .............................................................................................................. 7MOS Software ............................................................................................................... 7
Chapter 2 Installing NMG for the First Time.......................................................... 9
Installing Nexio MOS Software ................................................................................................9Installing the Nexio MOS Database ...................................................................................... 10Installing Admin ......................................................................................................................... 12Assigning Servers to Run Notify ............................................................................................ 13Installing Notify .......................................................................................................................... 14Installing GPRX .............................................................................................................................17
Chapter 3 Configuring NMG ............................................................................................. 19
Starting Notify in Console ....................................................................................................... 19Synching the Database ............................................................................................................ 20Configuring the NMG ................................................................................................................ 21Starting the NMG Application ............................................................................................... 26Running the NMG ......................................................................................................................27
Chapter 4 ThumbStore ........................................................................................................ 29
Configuring ThumbStore ........................................................................................................ 30Managing Thumbnails Cache ................................................................................................ 30Using ThumbStore Tools ......................................................................................................... 35Closing ThumbStore ................................................................................................................. 38
Chapter 5 Upgrading NMG ................................................................................................ 39
Software Version Upgrades ....................................................................................... 39Un-install Existing MOS Suite Software ............................................................................. 39Installing the Software Upgrade .......................................................................................... 44
Chapter 6 Nexio MediaBase Plug-In.......................................................................... 49
Installing NXMB Plug-In ........................................................................................................... 49NXMB Configuration ................................................................................................................ 54NXMB Plug-In Setup ..................................................................................................................55

Chapter 4
Copyright © 2012, Harris Corporation
Upgrading NXMB Plug-In ........................................................................................................ 56
Chapter 7 MOS Playlist Manager..................................................................................57
Installing MPLM ..........................................................................................................................57Registering your MPLM Software ........................................................................................ 59MPLM Administration .............................................................................................................. 62MPLM Configuration ................................................................................................................ 62Upgrading MPLM ....................................................................................................................... 67

Nexio MOS SuiteInstallation Guide
5
1 MOS Suite Overview
Sample Nexio MOS Gateway Network
The Nexio MOS Suite is a server system solution used to connect your newsroom computer system (NRCS) to a Nexio server system.
Editing
Video Server
NXMB
NRCS Clients with
NRCS Tool
NRCS Tool
Velocity Units
FCP Units
Video Server Video Server
Playout
MOS SuiteNewsroom System
NRCS Gateway(optional)
MOS Gateway
NRCS MPLM
Nexio Browse Low-Res Storag& License Serve(optional)
Chapter 1MOS Suite Overview
6
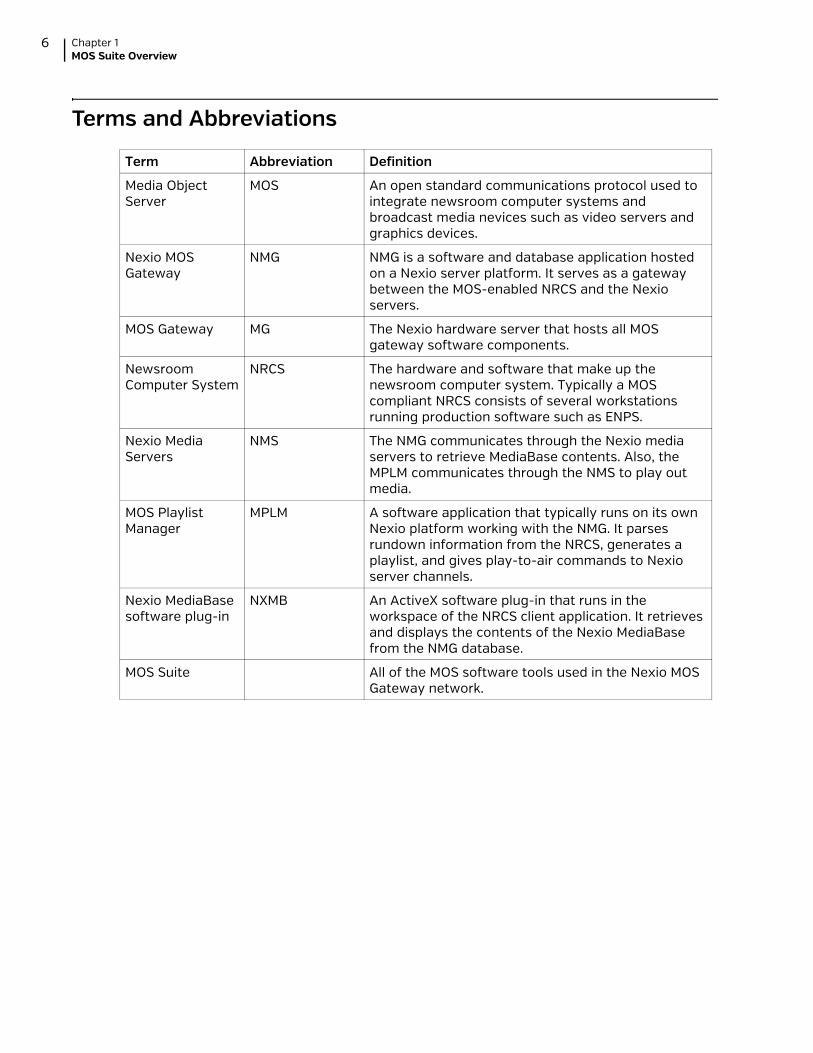
Terms and Abbreviations
Term Abbreviation Definition
Media Object Server
MOS An open standard communications protocol used to integrate newsroom computer systems and broadcast media nevices such as video servers and graphics devices.
Nexio MOS Gateway
NMG NMG is a software and database application hosted on a Nexio server platform. It serves as a gateway between the MOS-enabled NRCS and the Nexio servers.
MOS Gateway MG The Nexio hardware server that hosts all MOS gateway software components.
Newsroom Computer System
NRCS The hardware and software that make up the newsroom computer system. Typically a MOS compliant NRCS consists of several workstations running production software such as ENPS.
Nexio Media Servers
NMS The NMG communicates through the Nexio media servers to retrieve MediaBase contents. Also, the MPLM communicates through the NMS to play out media.
MOS Playlist Manager
MPLM A software application that typically runs on its own Nexio platform working with the NMG. It parses rundown information from the NRCS, generates a playlist, and gives play-to-air commands to Nexio server channels.
Nexio MediaBase software plug-in
NXMB An ActiveX software plug-in that runs in the workspace of the NRCS client application. It retrieves and displays the contents of the Nexio MediaBase from the NMG database.
MOS Suite All of the MOS software tools used in the Nexio MOS Gateway network.

Nexio MOS SuiteInstallation Guide
7
Related DocumentationFor information on using the MOS Playlist Manager software and the MediaBase ActiveX application, you should refer to the following:
Nexio MOS User Guide, HBC part number 175-100382
MOS Hardware
MOS Gateway server. The MOS Gateway server, model number NX1011HMG, is a 1 RU chassis that hosts the Nexio MOS Gateway software and database components. The MOS Gateway server comes pre-loaded with all of the necessary software. To get your MOS system up and running you must run the installer routines for the software components and configure the NMG network.
MOS Software
Nexio MOS Network Components Nexio MOS Gateway (NMG). NMG software is hosted on a Nexio server. This
software acts as a gateway between NRCS MOS applications and Nexio server system. The NMG monitors changes in rundowns and scripts on the NRCS and acts as an intermediary between MOS-complaint newsroom systems and other Nexio MOS suite components. NMG communicates changes to all Nexio MOS applications, including MOS Playlist Manager, NRCS Tool, and the Nexio MediaBase ActiveX (NXMB).
Notify. Notify is a service that runs on the MOS Gateway machine. It provides MediaBase updates to the NMG database so that NXMB, MPLM, and the NRCS database can receive live updates of media as they are added, deleted, and changed in the Nexio system. Notify normally runs as a service on a primary and a backup Nexio server. It can also run in console mode for configuration and administrative tasks.
Admin. You will use the Admin configuration tool to identify the Nexio media servers that will provide media updates to the Nexio MOS Gateway. Admin is also used to sync the database.

Chapter 1MOS Suite Overview
8
Software Applications MOS Playlist Manager (MPLM). MPLM is a software application that resides on
the MOS Playlist Manager computer. MPLM can create its own rundowns. It also parses rundown and script information from the NRCS, generates dynamically updated playlists, and gives play-to-air commands to the Nexio server channels.
Nexio MediaBase Plug-in (NXMB). The NXMB software plug-in is an ActiveX control that is installed onto your NRCS workstations. NXMB provides live inventory of media from the Nexio server system. You can access clip information, preview clips, create placeholder IDs, perform advanced searches for media, and drag media from the MediaBase into a newsroom script.
ThumbStore. The ThumbStore software resides on the MOS Gateway server. It is a background application that generates thumbnail images for each clip in the Nexio MediaBase. The MPLM application displays these thumbnails in its playlist.

Nexio MOS SuiteInstallation Guide
9
2 Installing NMG for the First Time
Use the instructions in this chapter to install Nexio MOS Gateway software for the first time. Go to Upgrading NMG to install new software on an existing Nexio MOS system.
You should perform the setup tasks in the order they are described in this chapter. Here is a summary list.
Installing the Nexio MOS Gateway Software Installing the Nexio MOS Database Installing Admin Installing Notify
Installing Nexio MOS SoftwareNew Nexio MOS Gateway servers come pre-installed with the SQL database and the installation package. If you are upgrading a Nexio MOS Gateway server, you must get the new software from Customer Support. In either case, you must run an installation routine before the software can be used.
From the Nexio MOS Gateway server’s desktop, run the following file:
NexioMosGatewayInstall.exe
1 The MOS Gateway InstallShield Wizard welcome form displays.
Chapter 2Installing NMG for the First Time
10
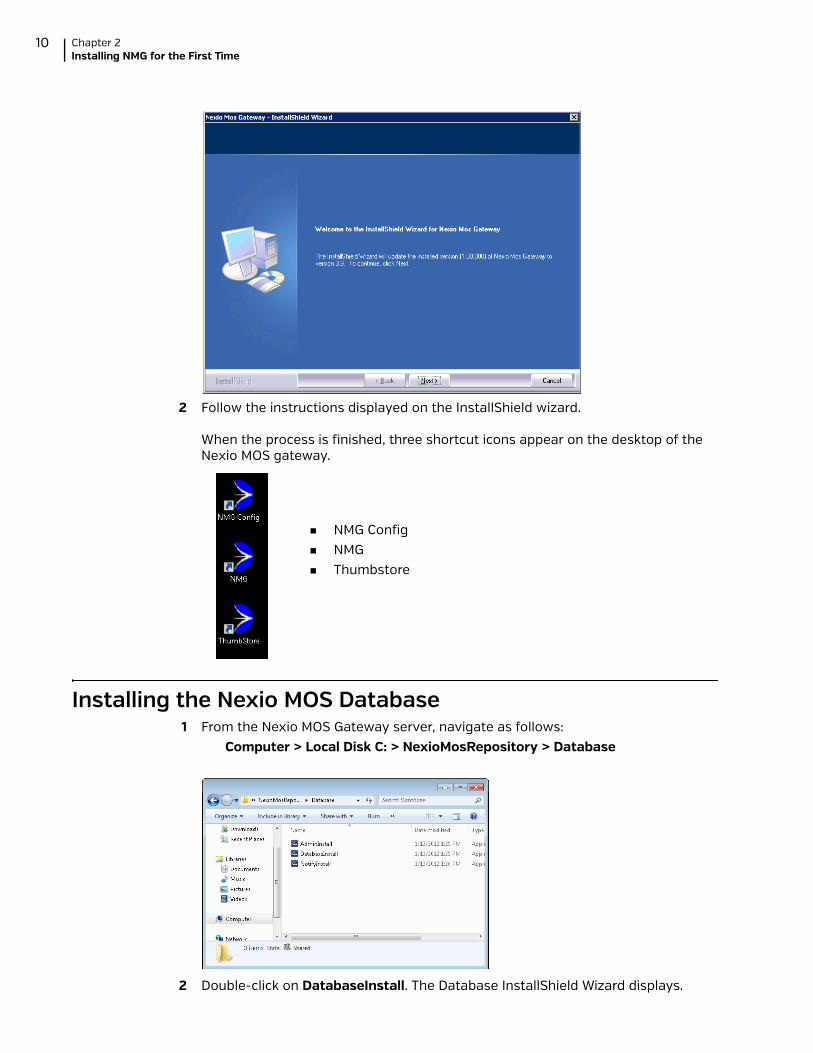
2 Follow the instructions displayed on the InstallShield wizard.
When the process is finished, three shortcut icons appear on the desktop of the Nexio MOS gateway.
Installing the Nexio MOS Database1 From the Nexio MOS Gateway server, navigate as follows:
Computer > Local Disk C: > NexioMosRepository > Database
2 Double-click on DatabaseInstall. The Database InstallShield Wizard displays.
NMG Config NMG Thumbstore
Nexio MOS SuiteInstallation Guide
11
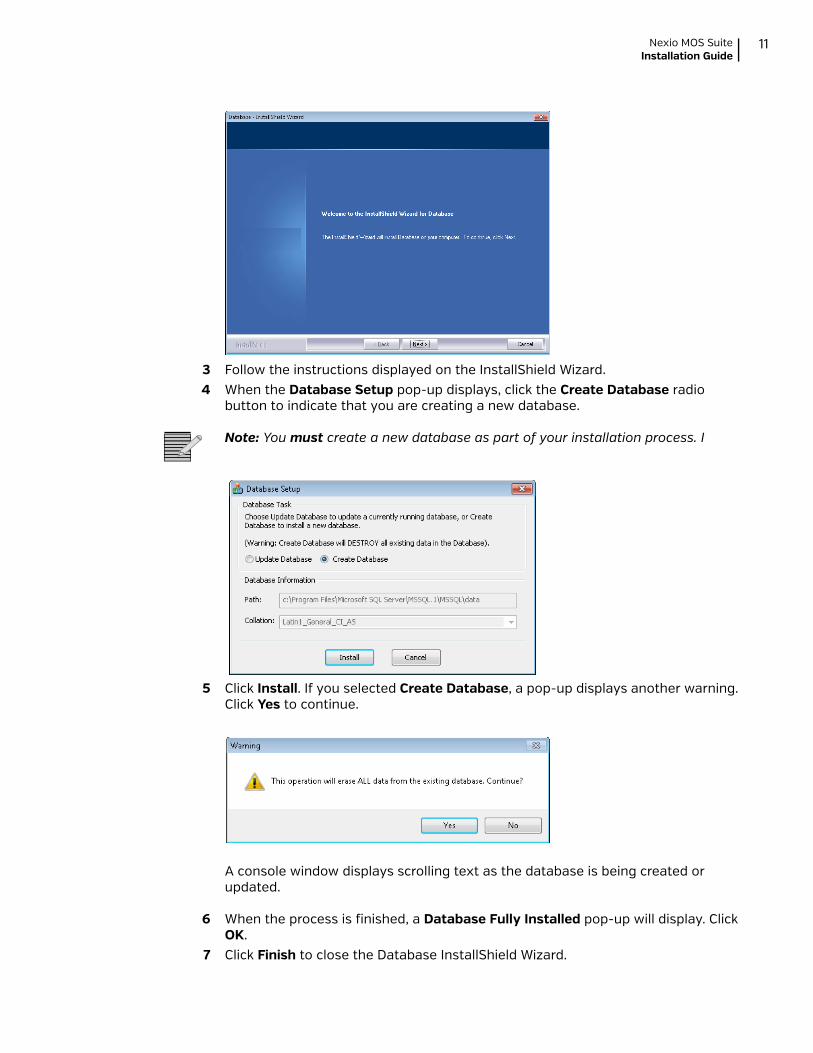
3 Follow the instructions displayed on the InstallShield Wizard. 4 When the Database Setup pop-up displays, click the Create Database radio
button to indicate that you are creating a new database.
Note: You must create a new database as part of your installation process. I
5 Click Install. If you selected Create Database, a pop-up displays another warning. Click Yes to continue.
A console window displays scrolling text as the database is being created or updated.
6 When the process is finished, a Database Fully Installed pop-up will display. Click OK.
7 Click Finish to close the Database InstallShield Wizard.

Chapter 2Installing NMG for the First Time
12
Installing AdminThe Admin configuration tool is used to identify the Nexio media servers that will provide media updates to the Nexio MOS Gateway.
1 From the Nexio MOS Gateway server, navigate as follows:Computer > Local Disk C: > NexioMosRepository > Database
2 Double-click on AdminInstall. The Admin InstallShield Wizard welcome form displays.
3 Follow the instructions displayed on the InstallShield Wizard. 4 When the Nexio MOS Repository form displays, type in the IP address of your
Nexio MOS Gateway server and click Next.

Nexio MOS SuiteInstallation Guide
13
5 When the Admin InstallShield Wizard has completed, click Finish to close.When the process is finished, an Admin shortcut icon will display on the Nexio MOS Gateway server’s desktop.
Assigning Servers to Run NotifyHere are instructions for idenitfying the Nexio media servers that will provide media updates to the Nexio MOS Gateway.
1 From the Nexio MOS Gateway desktop, double-click the Admin shortcut icon. The Admin console displays.
2 Select the Servers tab and click the green check icon. The Assign Server pop-up displays.
3 In the Server Name field, enter the IP address of the primary NXOS server. In the Description field, enter a text description such as Nexio 1. In the Priority field, select 1. Click Add.
Chapter 2Installing NMG for the First Time
14
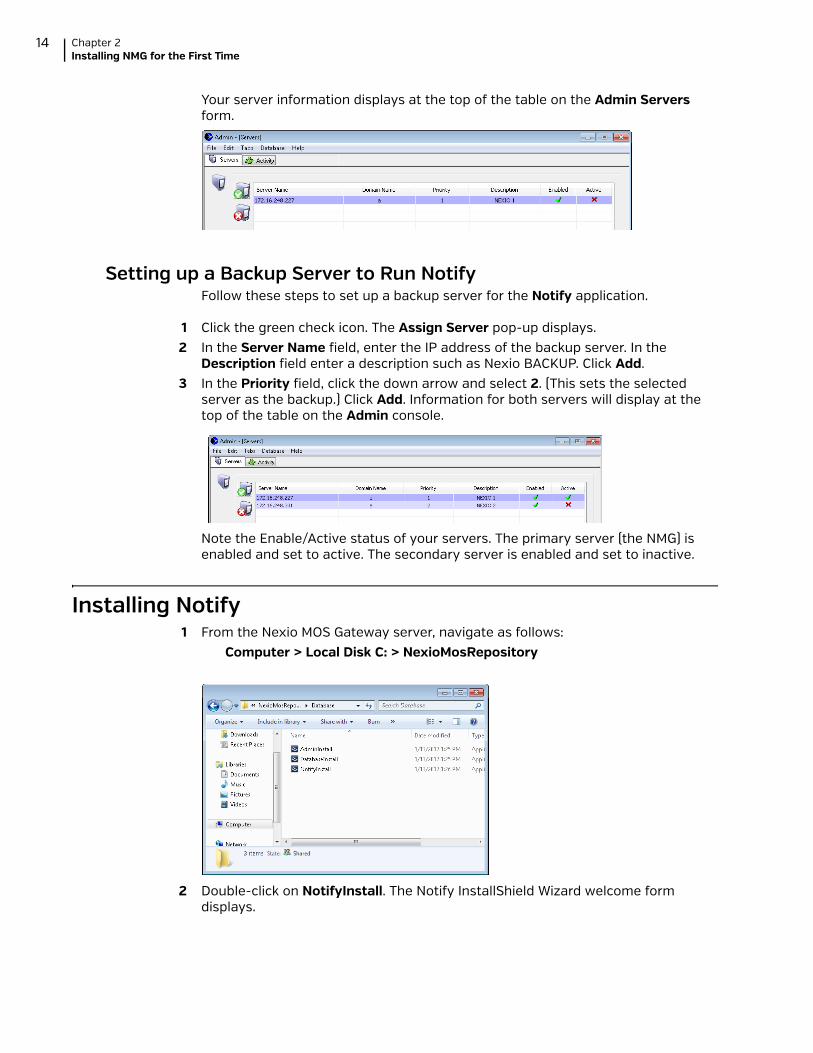
Your server information displays at the top of the table on the Admin Servers form.
Setting up a Backup Server to Run NotifyFollow these steps to set up a backup server for the Notify application.
1 Click the green check icon. The Assign Server pop-up displays. 2 In the Server Name field, enter the IP address of the backup server. In the
Description field enter a description such as Nexio BACKUP. Click Add. 3 In the Priority field, click the down arrow and select 2. (This sets the selected
server as the backup.) Click Add. Information for both servers will display at the top of the table on the Admin console.
Note the Enable/Active status of your servers. The primary server (the NMG) is enabled and set to active. The secondary server is enabled and set to inactive.
Installing Notify1 From the Nexio MOS Gateway server, navigate as follows:
Computer > Local Disk C: > NexioMosRepository
2 Double-click on NotifyInstall. The Notify InstallShield Wizard welcome form displays.

Nexio MOS SuiteInstallation Guide
15
3 Follow the instructions displayed on the InstallShield Wizard. When the wizard asks for the IP address of the MOS Repository, enter the IP address of the Nexio MOS Gateway.
4 When the wizard asks about Notify, you should accept the default to run Notify on the Nexio MOS Gateway.

Chapter 2Installing NMG for the First Time
16
If you decide to un-check this option, the Nexio Server Information page displays. In this case, you will install Notify on your Nexio server.
Here, you will enter the IP Address of your Nexio server.
5 When the wizard asks for “server information,” you should leave this box blank.
Note: If you are updating an existing Notify instance, you must restart before the new software will take effect.
Once the wizard has finished installing Notify, a shortcut appears on the desktop.

Nexio MOS SuiteInstallation Guide
17
Installing GPRXA GPRX is an optional device that can be configured into the MOS system as a low resolution server.
The manufacturer does not provide the GPRX machine. You will need a 64-bit Windows 7 or XP operating system with 2 GB RAM.
1 From your GPRX machine, navigate to the Nexio MOS Gateway server (NMG) using Start > Run.
2 Enter two back-slashes (\\) and type th path to the Nexio MOS Gateway Server. Click OK.
Note: If you are prompted to log in, use the login credentials for your MOS server.
3 Navigate to NexioMosRepository > GPRX and run the installer. The GPRX Server InstallShield Wizard displays.
Chapter 2Installing NMG for the First Time
18
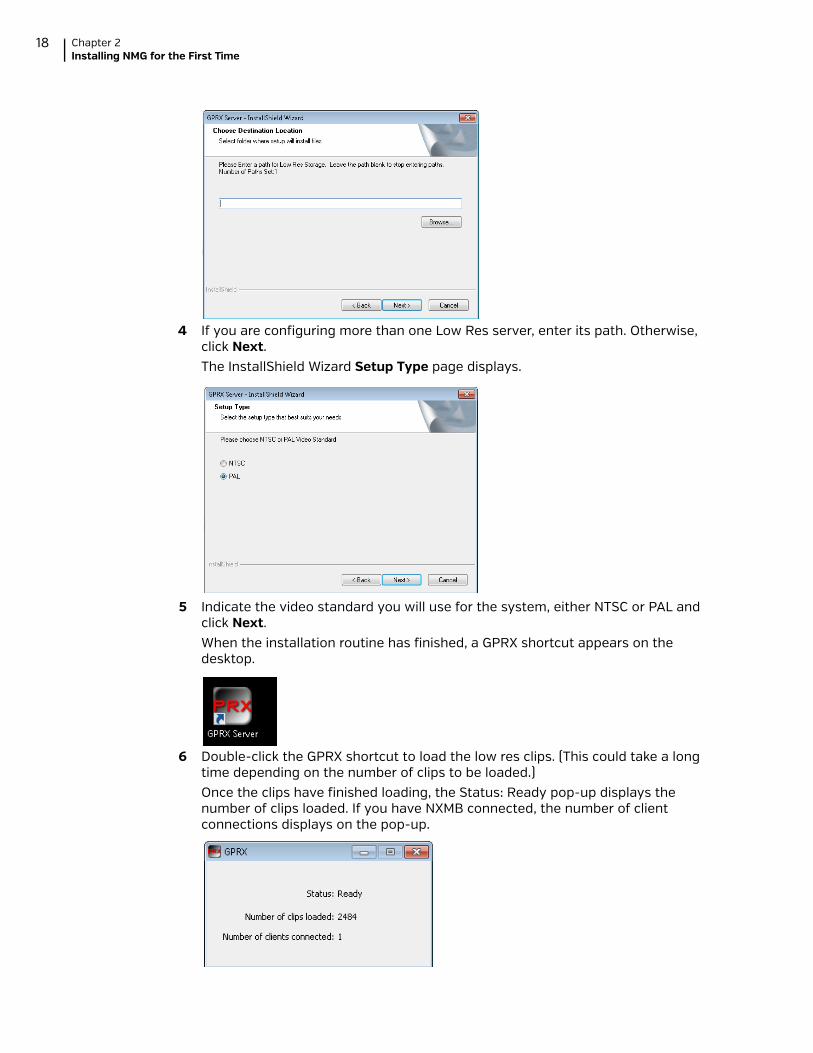
4 If you are configuring more than one Low Res server, enter its path. Otherwise, click Next. The InstallShield Wizard Setup Type page displays.
5 Indicate the video standard you will use for the system, either NTSC or PAL and click Next.When the installation routine has finished, a GPRX shortcut appears on the desktop.
6 Double-click the GPRX shortcut to load the low res clips. (This could take a long time depending on the number of clips to be loaded.)Once the clips have finished loading, the Status: Ready pop-up displays the number of clips loaded. If you have NXMB connected, the number of client connections displays on the pop-up.

Nexio MOS SuiteInstallation Guide
19
3 Configuring NMG
To configure your Nexio MOS gateway (NMG) you will need the following information:
Your MOS ID assigned to the Nexio system by the NRCS system administrator. Your NRCS ID assigned to the newsroom computer system by the NRCS
system administrator. IP address of your NRCS server. If you are using Nexio Browse low-resolution system, you will need
IP address of your License Server. Path to your low resolution media server.
If you are using a MOS object path, you will need: IP address of your FTP server.
Starting Notify in Console1 From the desktop of the Nexio MOS gateway server, open the Notify application
using the Run Notify in Console desktop shortcut.
The Notify Console application will display. Notify is working correctly if no errors are shown at the end of the list.

Chapter 3Configuring NMG
20
Synching the Database You will use the Notify service to synchronize the MediaBase with the database you installed on the Nexio MOS Gateway.
Note: The Admin application must be installed and configured on the MOS Gateway server before the database can be synched.
First, you will make sure that the Notify Console is open on the Nexio MOS Gateway server.
Second, you will use the Admin console on the Nexio MOS Gateway to verify that the Nexio media server is visible on the Admin console Activity tab.
Third, you will use the Admin console on the Nexio MOS Gateway server to synch the database.
1 From the desktop of the Nexio MOS Gateway server, double-click the Admin shortcut icon. When the Admin console displays, make sure the Activity tab is selected.
The Nexio media server should be listed in the Active Notifys table.
Note: If you are synching the database for the first time, this process can take a long time and will result in sluggish performance on the server during the synchronization.
Note: Do not perform a synchronization during a live broadcast or close in time to a live broadcast.
2 Click the green arrows icon to start the synchronization.During the synchronization process, the Notify console will scroll text and the Admin window will flash the word SYNCING next to the Clip Count label. When synchronization is completed, the number of clips in the database will display.

Nexio MOS SuiteInstallation Guide
21
Configuring the NMG1 From the desktop of your Nexio MOS Gateway server, double-click the NMG Config
shortcut icon. The Nexio MOS Gateway pop-up displays.
2 Click Yes to continue. The Nexio MOS Gateway Config pop-up displays.3 Click on each tab and fill in the settings.
MOS TabSome of the configuration values will be pre-populated from your Config.XML file when you upgrade.
mosID. Enter your MOS ID. nrcsID. Enter the network ID for your NRCS server NRCS IP Address. Enter the IP address for your NRCS.
Note: If you are working with iNEWS, your NRCS ID is the same as the hostname of your iNEWS server and your NRCS IP address is the same as the IP Address of your iNEWS gateway.
Buddy Server nrcsID. A buddy server can be used as a backup NRCS server. If you are using one, enter the ID of your NRCS backup server. This setting is optional.

Chapter 3Configuring NMG
22
NRCS IP Address. If you are using a buddy server as a backup, enter the IP address of your NRCS backup server.
MOS Gateway Tab
Notify Server IP. Enter the IP address for the Nexio server that is running LLM. Heartbeats. Enable if you need to send MOS heartbeat messages to the NRCS
server. This option is recommended for systems that have a firewall. Delete Protection. Enable to protect active rundown clips from being deleted
in the Nexio server system. Item Status. Enable for acknowledgement in rundown. This should be enabled
for ENPS. Enable Channel Reflection. Enable if you want to display channel assignments
from MPLM to the NRCS client. Mode Default. Use this mode for all NRCS systems except ENPS. Mode ENPS. Use for ENPS systems.

Nexio MOS SuiteInstallation Guide
23
MOS Objects Tab
Filter updates... Recommend enabled for ENPS. Include M.E.M. block... MOS protocol setting. Check to enable if you need this
data. Include Object Paths... MOS protocol setting. This setting is required if you are
using low resolution or third party low resolution viewers. FTP Server IP. IP address of your FTP server. FTP File Type. Select your FTP file type. Proxy Path. Enter the network path for your proxy storage. Object Autocreate Naming Scheme. If you are using the auto-create function
directly from the NRCS client, you have three naming conventions to choose from: <objSlug> Use this option if you want to type in object IDs manually. <objSlug>-xxx This option auto-increments existing ID names by adding a
number. For example, if the original ID name is “Test” the software will record the next file as “Test-001.”
MOSxxxxxxxx This option will not allow you to type an object ID manually. Each ID will be a MOS incremental number.
Chapter 3Configuring NMG
24
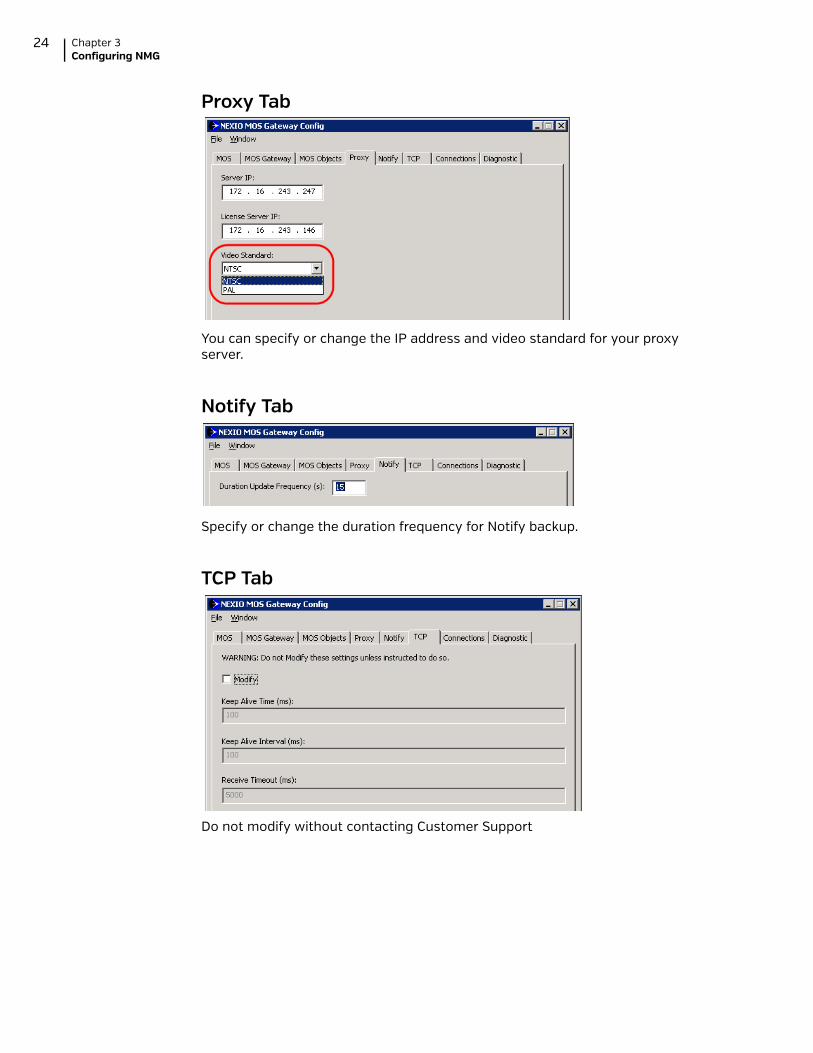
Proxy Tab
You can specify or change the IP address and video standard for your proxy server.
Notify Tab
Specify or change the duration frequency for Notify backup.
TCP Tab
Do not modify without contacting Customer Support

Nexio MOS SuiteInstallation Guide
25
Connections Tab
Do not change port numbers without contacting Customer Support.
Note: You may change the maximum number of connections needed for your NRCS tool plug-ins and MPLM machines.
Diagnostic Tab
Select the logs needed to troubleshoot your system and set the number of days the logs should remain before they are automatically deleted.
4 Click Apply and OK when you complete filling out all tabs. A confirmation pop-up displays.
5 Click OK to close the confirmation pop-up.

Chapter 3Configuring NMG
26
Starting the NMG ApplicationOnce you use NMG Config to configure the Nexio MOS gateway, you will use the NMG desktop icon to start the application and verify that it is running.
1 From the desktop of your NMG, double-click the NMG shortcut icon. The NMG will start and the application log will display.
You can verify the NMG configuration as displayed in the log. The following values are listed:
Nexio MOS Gateway version number Your config.xml path MOS ID NRCS ID Statuses of each port Status of the MBP DLL
2 Click the Window menu and select Port Stats.
3 When the Port Stats window displays, click the + marks to expand the tree.

Nexio MOS SuiteInstallation Guide
27
4 Click the View menu and select Refresh. If NRCS is up and running, you can veiw the status of your outbound ports here.
Running the NMGThe NMG application must be running at all times for the system to work.
You can minimize the NMG application by clicking the minimize icon.

Chapter 3Configuring NMG
28
Nexio MOS SuiteInstallation Guide
29
4 ThumbStore
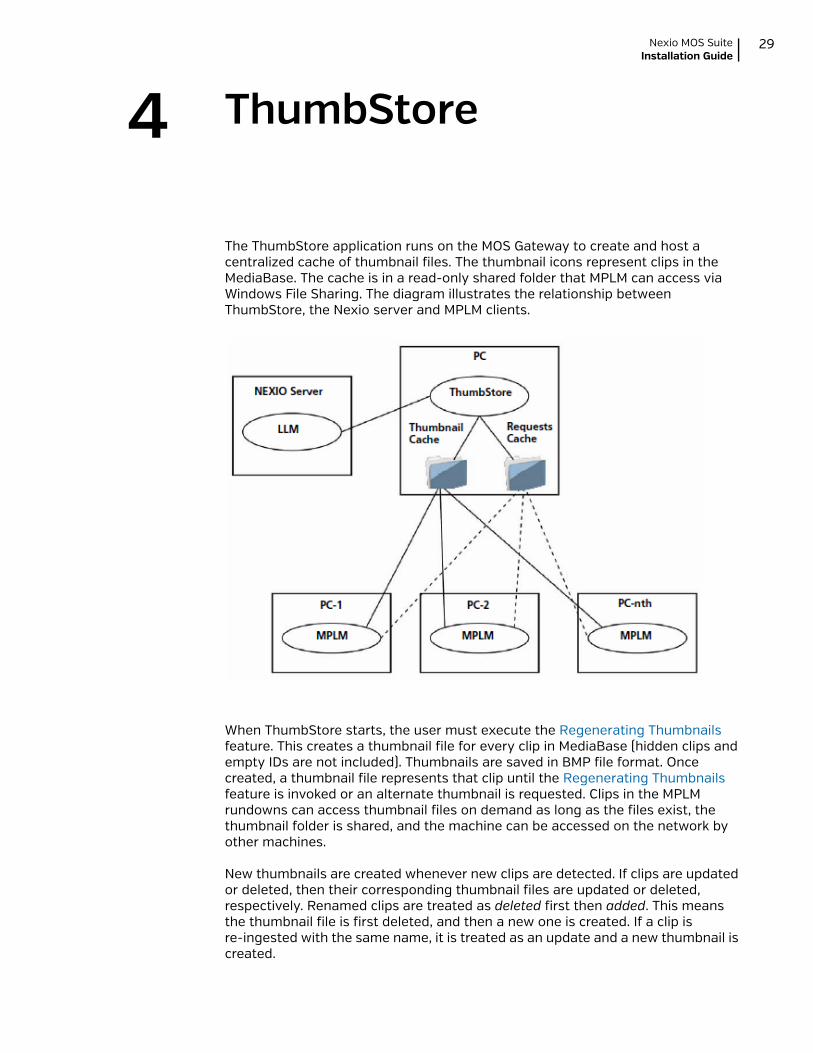
The ThumbStore application runs on the MOS Gateway to create and host a centralized cache of thumbnail files. The thumbnail icons represent clips in the MediaBase. The cache is in a read-only shared folder that MPLM can access via Windows File Sharing. The diagram illustrates the relationship between ThumbStore, the Nexio server and MPLM clients.
When ThumbStore starts, the user must execute the Regenerating Thumbnails feature. This creates a thumbnail file for every clip in MediaBase (hidden clips and empty IDs are not included). Thumbnails are saved in BMP file format. Once created, a thumbnail file represents that clip until the Regenerating Thumbnails feature is invoked or an alternate thumbnail is requested. Clips in the MPLM rundowns can access thumbnail files on demand as long as the files exist, the thumbnail folder is shared, and the machine can be accessed on the network by other machines.
New thumbnails are created whenever new clips are detected. If clips are updated or deleted, then their corresponding thumbnail files are updated or deleted, respectively. Renamed clips are treated as deleted first then added. This means the thumbnail file is first deleted, and then a new one is created. If a clip is re-ingested with the same name, it is treated as an update and a new thumbnail is created.
Chapter 4ThumbStore
30
Configuring ThumbStoreIf your MOS Suite software has been installed properly, ThumbStore should be running in the background on your MPLM.
Note: If a firewall blocks Windows File Sharing ports (TCP/139, TCP/445), then remote applications cannot access the thumbnail cache or requests folder.
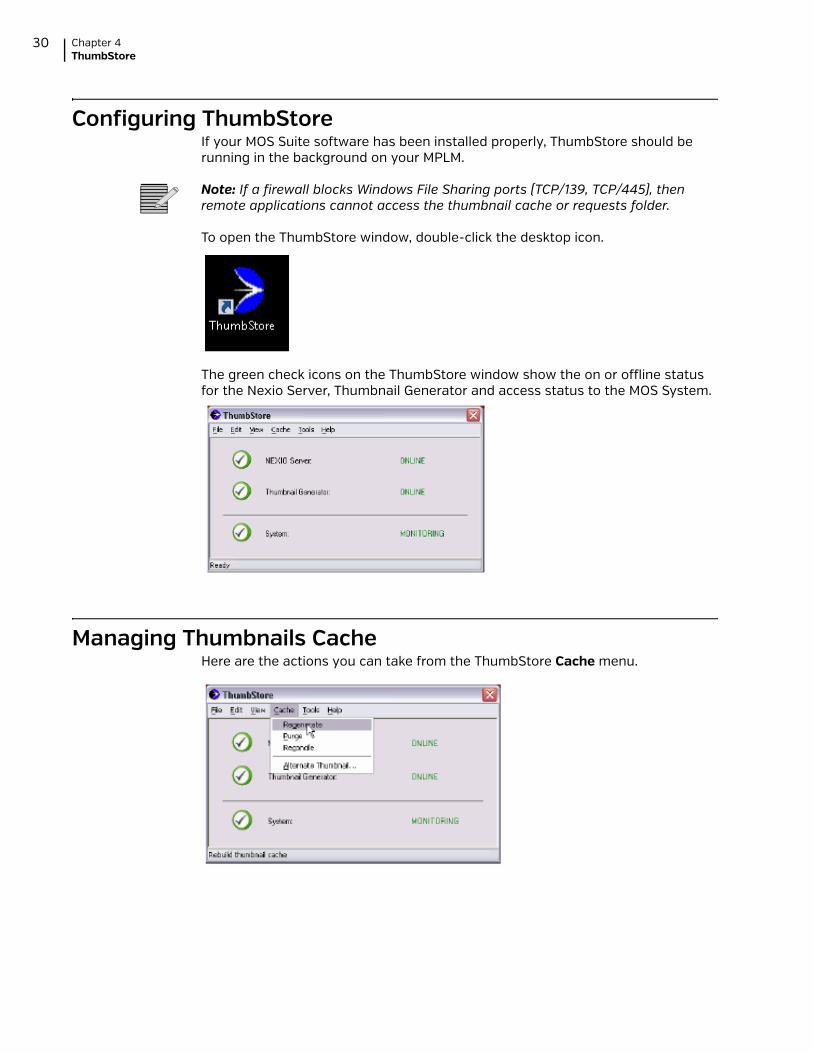
To open the ThumbStore window, double-click the desktop icon.
The green check icons on the ThumbStore window show the on or offline status for the Nexio Server, Thumbnail Generator and access status to the MOS System.
Managing Thumbnails CacheHere are the actions you can take from the ThumbStore Cache menu.
Nexio MOS SuiteInstallation Guide
31
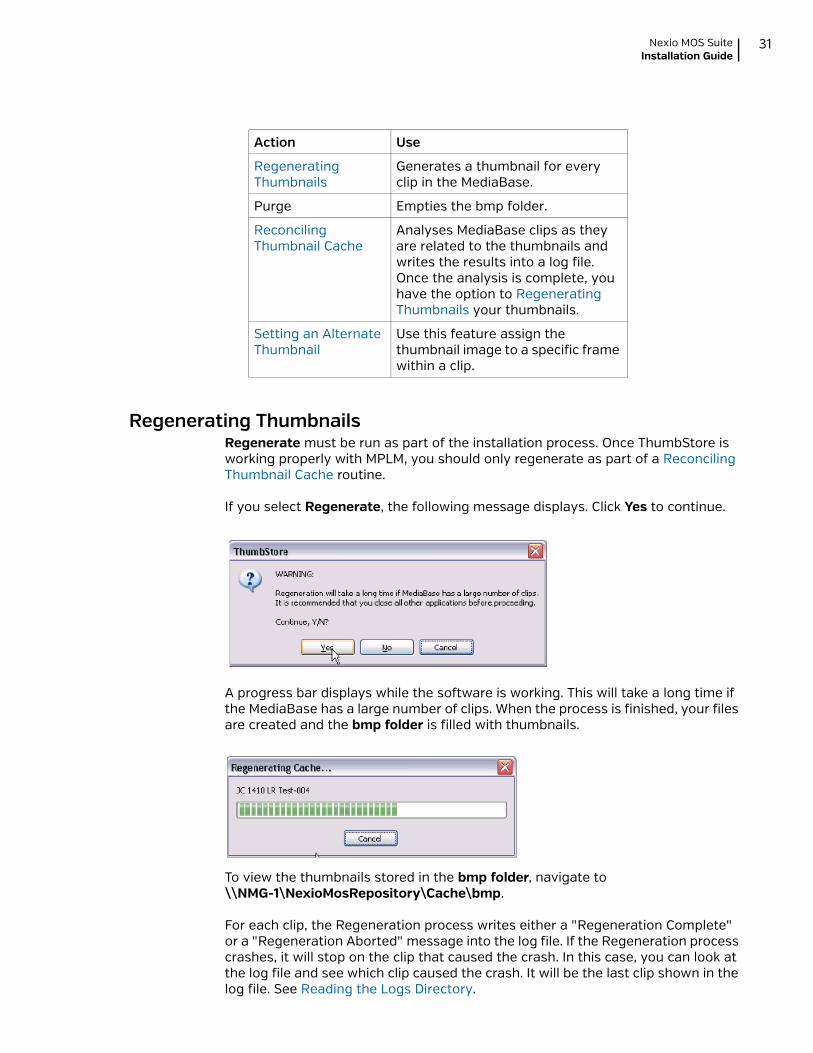
Regenerating ThumbnailsRegenerate must be run as part of the installation process. Once ThumbStore is working properly with MPLM, you should only regenerate as part of a Reconciling Thumbnail Cache routine.
If you select Regenerate, the following message displays. Click Yes to continue.
A progress bar displays while the software is working. This will take a long time if the MediaBase has a large number of clips. When the process is finished, your files are created and the bmp folder is filled with thumbnails.
To view the thumbnails stored in the bmp folder, navigate to \\NMG-1\NexioMosRepository\Cache\bmp.
For each clip, the Regeneration process writes either a "Regeneration Complete" or a "Regeneration Aborted" message into the log file. If the Regeneration process crashes, it will stop on the clip that caused the crash. In this case, you can look at the log file and see which clip caused the crash. It will be the last clip shown in the log file. See Reading the Logs Directory.
Action Use
Regenerating Thumbnails
Generates a thumbnail for every clip in the MediaBase.
Purge Empties the bmp folder.
Reconciling Thumbnail Cache
Analyses MediaBase clips as they are related to the thumbnails and writes the results into a log file. Once the analysis is complete, you have the option to Regenerating Thumbnails your thumbnails.
Setting an Alternate Thumbnail
Use this feature assign the thumbnail image to a specific frame within a clip.

Chapter 4ThumbStore
32
Note: The ThumbStore Regeneration process does not print a list of clips without corresponding thumbnails. To find that information, you must analyze the logs. See Reading the Logs Directory.
Excluding a File During RegenerationYou can exclude a file from the regeneration process. This option is useful for preventing regeneration errors caused by corrupt clips.
1 Fom the ThumbStore window, navigate to Edit > Preferences to display the Preferences dialog. Check the ID Exclusion box and click Edit List.
2 From the ID Exclusion List window, type in the name of the files you want to exclude.
3 Click the icon in the ID Exclusion List title bar and select Close.
Nexio MOS SuiteInstallation Guide
33
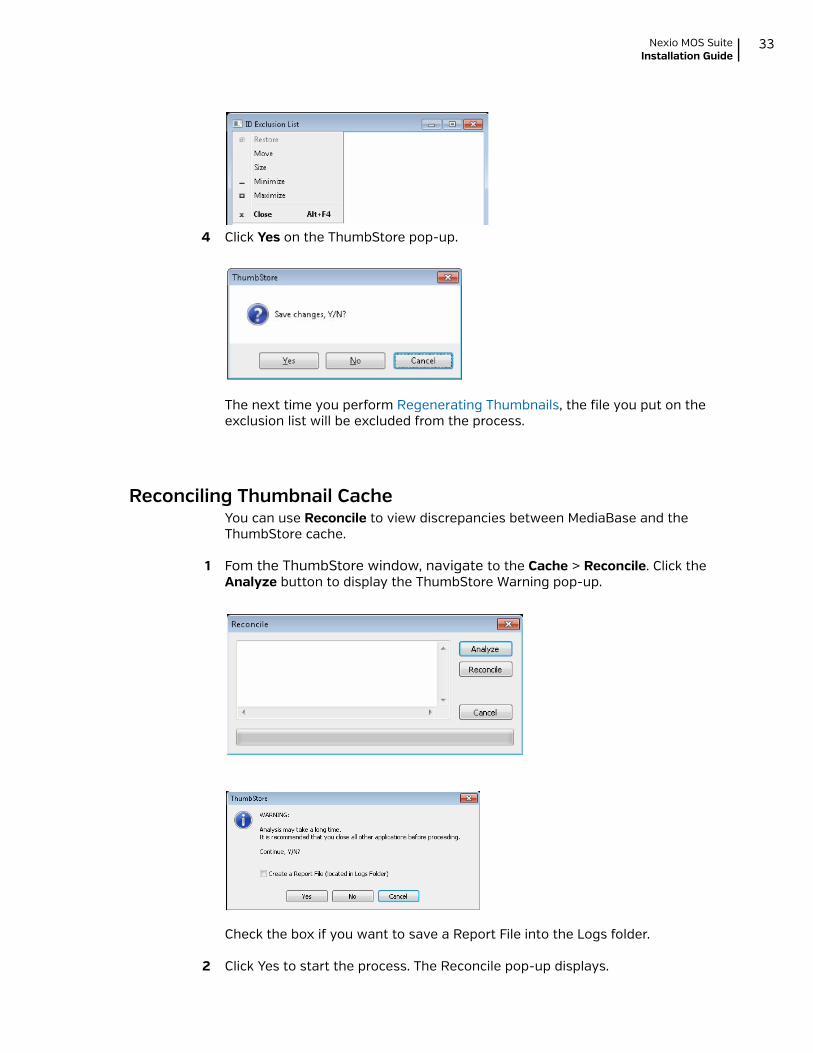
4 Click Yes on the ThumbStore pop-up.
The next time you perform Regenerating Thumbnails, the file you put on the exclusion list will be excluded from the process.
Reconciling Thumbnail CacheYou can use Reconcile to view discrepancies between MediaBase and the ThumbStore cache.
1 Fom the ThumbStore window, navigate to the Cache > Reconcile. Click the Analyze button to display the ThumbStore Warning pop-up.
Check the box if you want to save a Report File into the Logs folder.
2 Click Yes to start the process. The Reconcile pop-up displays.
Chapter 4ThumbStore
34
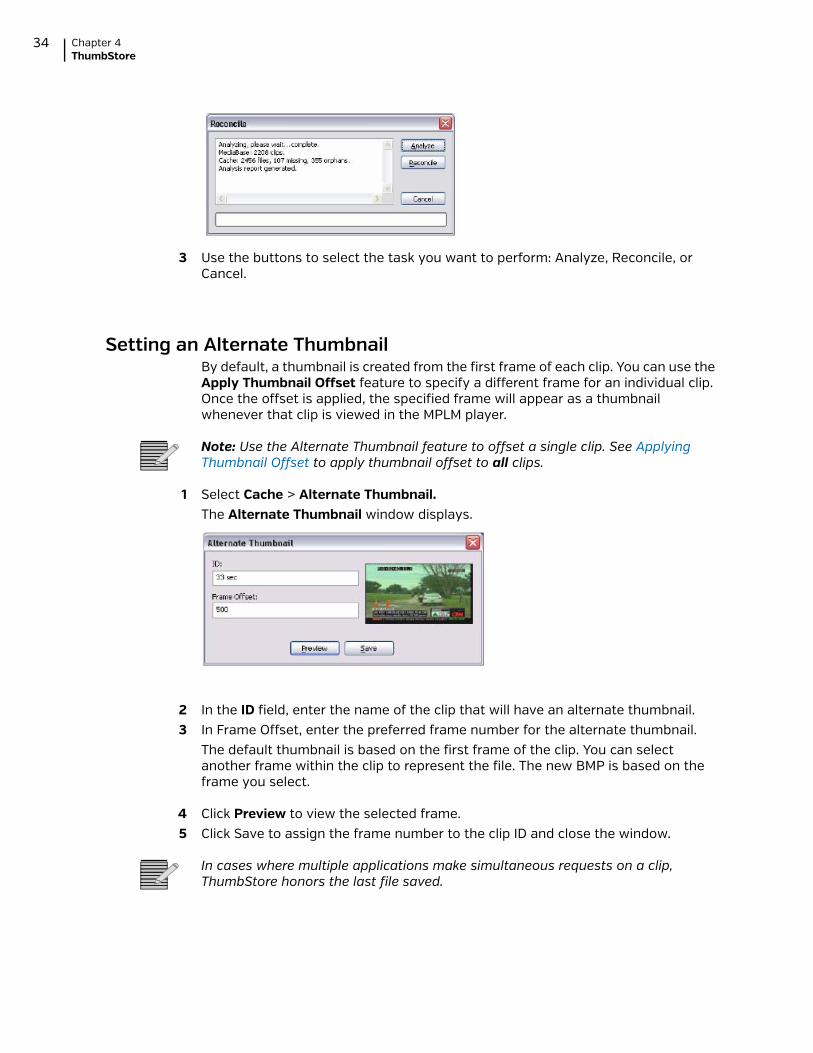
3 Use the buttons to select the task you want to perform: Analyze, Reconcile, or Cancel.
Setting an Alternate ThumbnailBy default, a thumbnail is created from the first frame of each clip. You can use the Apply Thumbnail Offset feature to specify a different frame for an individual clip. Once the offset is applied, the specified frame will appear as a thumbnail whenever that clip is viewed in the MPLM player.
Note: Use the Alternate Thumbnail feature to offset a single clip. See Applying Thumbnail Offset to apply thumbnail offset to all clips.
1 Select Cache > Alternate Thumbnail. The Alternate Thumbnail window displays.
2 In the ID field, enter the name of the clip that will have an alternate thumbnail.3 In Frame Offset, enter the preferred frame number for the alternate thumbnail.
The default thumbnail is based on the first frame of the clip. You can select another frame within the clip to represent the file. The new BMP is based on the frame you select.
4 Click Preview to view the selected frame. 5 Click Save to assign the frame number to the clip ID and close the window.
In cases where multiple applications make simultaneous requests on a clip, ThumbStore honors the last file saved.
Nexio MOS SuiteInstallation Guide
35
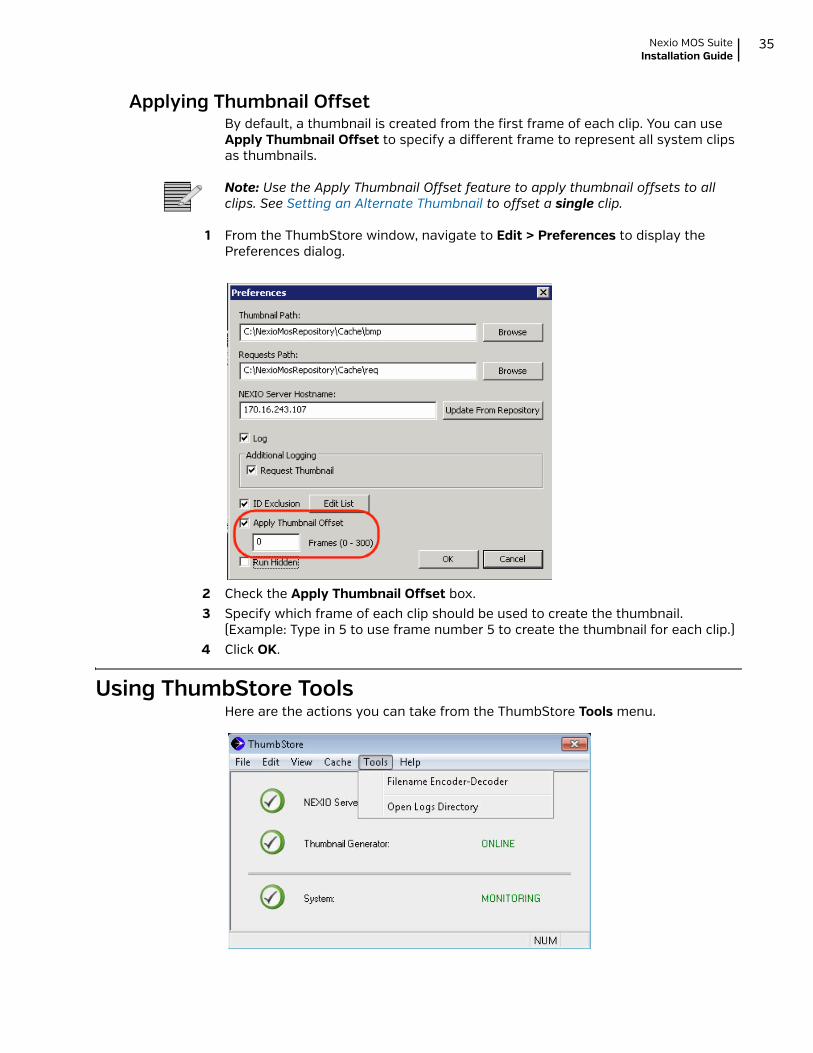
Applying Thumbnail OffsetBy default, a thumbnail is created from the first frame of each clip. You can use Apply Thumbnail Offset to specify a different frame to represent all system clips as thumbnails.
Note: Use the Apply Thumbnail Offset feature to apply thumbnail offsets to all clips. See Setting an Alternate Thumbnail to offset a single clip.
1 From the ThumbStore window, navigate to Edit > Preferences to display the Preferences dialog.
2 Check the Apply Thumbnail Offset box. 3 Specify which frame of each clip should be used to create the thumbnail.
(Example: Type in 5 to use frame number 5 to create the thumbnail for each clip.)4 Click OK.
Using ThumbStore ToolsHere are the actions you can take from the ThumbStore Tools menu.

Chapter 4ThumbStore
36
Viewing File NamesSince the Windows File System does not handle the same characters as the Nexio system, ThumbStore automatically renames the bitmap files. As a convenience, you can use the Filename Encoder feature to see how the file names are translated.
To access, navigate to Tools > Filename Encoder-Decoder.
Opening the Logs DirectoryTo view the Logs directory, navigate to Tools > Open Logs Directory.
Tool Use
Filename Encoder- Decoder
View bitmap filename translations.
Open Logs Directory Shows the Windows directory where ThumbStore logs are stored as defined on the Edit > Preferences window.

Nexio MOS SuiteInstallation Guide
37
Reading the Logs DirectoryIf you encounter issues, you can use the error log file to find the name and location of a problem file. Follow these steps to run the Log file.
1 From the ThumbStore window, navigate to Edit > Preferences to display the Preferences dialog.
2 Check the box for Log and check the box for Request Thumbnail.3 Click OK. 4 Navigate to C:\Program Files\Harris\ThumbStore\Log to display the Log
file directory.
5 Click on the most current file to view which systems are running, which thumbnails were created, and which files may have caused problems.

Chapter 4ThumbStore
38
Closing ThumbStoreThe ThumbStore program should be running at all times in the background. You can minimize the ThumbStore monitor by clicking the X-icon.
To close ThumbStore altogether, navigate to the File menu and select Exit.

Nexio MOS SuiteInstallation Guide
39
5 Upgrading NMG
Use the instructions in this chapter to upgrade an existing Nexio MOS system. Go to Installing NMG for the First Time if this is your first Nexio MOS installation.
Software Version Upgrades
Nexio MOS Gateway systems running software version 3.8 are not required to un-install the MOS software before installing version 3.9. In this case, go to Installing the Software Upgrade.
Nexio MOS Gateway systems running software versions prior to 3.8 must un-install the MOS software before installing version 3.9.
Un-install Existing MOS Suite SoftwareIf your current installation of MOS software is version 3.8 or higher, you do not need to un-install your software before upgrading to a newer version. In this case, go to Installing the Software Upgrade.
If your current installation of MOS software is version 3.5 or 3.6, you must un-install your existing MOS software before installing your upgrade.
You will use the Windows Add or Remove Programs utility to uninstall your existing NMG software. You should uninstall your NMG software components in the order listed here.
First, uninstall Nexio MOS Gateway. Next, uninstall Nexio MOS Database. Next, uninstall Admin. Next, uninstall Notify.
Un-install Nexio MOS Gateway1 Navigate to your Windows Control Panel and select Add or Remove Programs or
Uninstall Programs, depending on your Windows version. 2 Double-click to open Add or Remove Programs and select Nexio MOS Gateway
from the list.

Chapter 5Upgrading NMG
40
3 Click Remove. The Nexio MOS Gateway InstallShield wizard will remove the software. Click Finish to close the wizard.
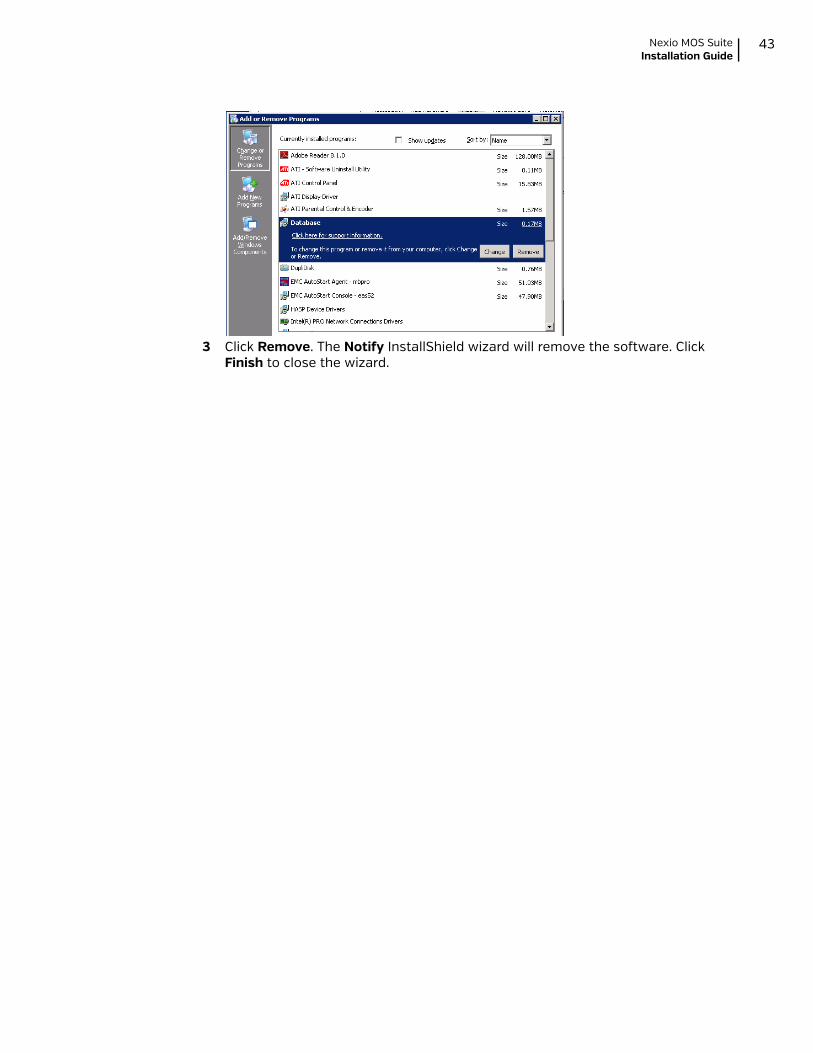
Un-install Nexio MOS Database1 Navigate to your Windows Control Panel and select Add or Remove Programs or
Uninstall Programs, depending on your Windows version. 2 Double-click to open Add or Remove Programs and select Nexio MOS Database
from the list.

Nexio MOS SuiteInstallation Guide
41
3 Click Remove. The Database InstallShield wizard will remove the software. Click Finish to close the wizard.
Un-install Admin1 Navigate to your Windows Control Panel and select Add or Remove Programs or
Uninstall Programs, depending on your Windows version. 2 Double-click to open Add or Remove Programs and select Admin from the list.

Chapter 5Upgrading NMG
42
3 Click Remove. The Admin InstallShield wizard will remove the software. Click Finish to close the wizard.
Un-install Notify1 Navigate to your Windows Control Panel and select Add or Remove Programs or
Uninstall Programs, depending on your Windows version. 2 Double-click to open Add or Remove Programs and select Notify service from the
list.
Nexio MOS SuiteInstallation Guide
43
3 Click Remove. The Notify InstallShield wizard will remove the software. Click Finish to close the wizard.

Chapter 5Upgrading NMG
44
Installing the Software UpgradeAfter uninstalling the existing MOS suite software you will re-install the newest version. You will get the new software from Customer Support.
You should perform the setup tasks in the order they are described. Here is a summary list.
Re-install the Nexio MOS Gateway Software. Re-install the Nexio MOS Database. Re-install Admin. Re-install Notify.
Re-install the Nexio MOS Gateway Software1 From the Nexio MOS Gateway server’s desktop, navigate as follows:
Computer > Local Disk C: > Install
2 Double-click on NexioMosGatewayInstall. The Nexio MOS Gateway InstallShield Wizard welcome form displays.
3 Follow the instructions displayed on the InstallShield Wizard.

Nexio MOS SuiteInstallation Guide
45
When the process is finished, three new shortcut icons appear on the desktop of the Nexio MOS gateway.
Re-install the Nexio MOS Database1 From the Nexio MOS Gateway server, navigate as follows:
Computer > Local Disk C: > NexioMosRepository > Database
2 Double-click on DatabaseInstall. The Database InstallShield Wizard welcome form displays.
3 Follow the instructions displayed on the InstallShield Wizard.
NMG Config NMG Thumbstore

Chapter 5Upgrading NMG
46
4 When the Database Setup pop-up displays, click the Create Database radio button.
Note: You must create a new database as part of your upgrade process.
5 Click Install. A pop-up will display another warning. Click Yes to continue.
A console window displays scrolling text as the database is being created or updated.
6 When the process is finished, a Database Fully Installed pop-up will display. Click OK.
7 Click Finish to close the Database InstallShield Wizard.
Re-install the Admin ConsoleFrom the Nexio MOS Gateway server, navigate as follows:
Computer > Local Disk C: > NexioMosRepository > Database

Nexio MOS SuiteInstallation Guide
47
8 Double-click on AdminInstall. The Admin InstallShield Wizard welcome form displays.
9 Follow the instructions displayed on the InstallShield Wizard. 10 When the Nexio MOS Repository form displays, type in the IP address of your
Nexio MOS Gateway server and click Next.
11 When the Admin InstallShield Wizard has completed, click Finish to close.When the process is finished, an Admin shortcut icon will display on the Nexio MOS Gateway server desktop.
Chapter 5Upgrading NMG
48
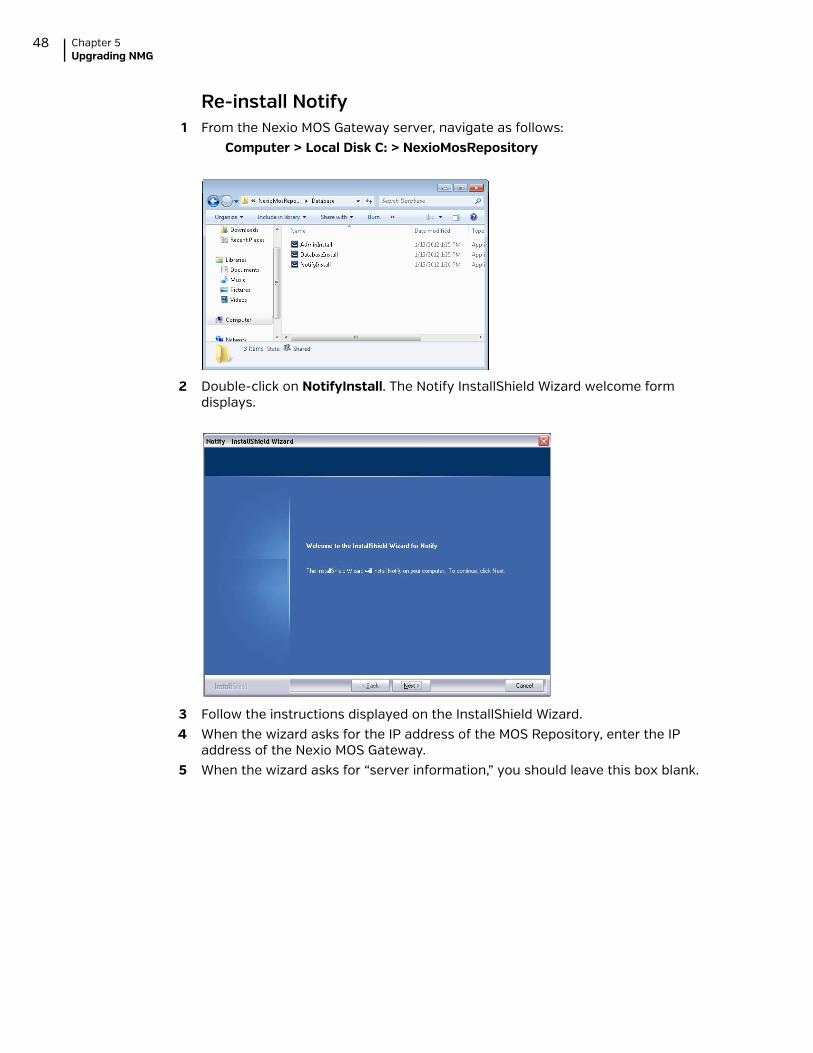
Re-install Notify1 From the Nexio MOS Gateway server, navigate as follows:
Computer > Local Disk C: > NexioMosRepository
2 Double-click on NotifyInstall. The Notify InstallShield Wizard welcome form displays.
3 Follow the instructions displayed on the InstallShield Wizard. 4 When the wizard asks for the IP address of the MOS Repository, enter the IP
address of the Nexio MOS Gateway.5 When the wizard asks for “server information,” you should leave this box blank.

Nexio MOS SuiteInstallation Guide
49
6 Nexio MediaBase Plug-In
The NXMB MediaBase Plug-In allows the NRCS clients to access Nexio content.
Installing NXMB Plug-InYou will install the NXMB MediaBase Plug-In on your NRCS client computers.
1 From your NRCS client, navigate using Start > Run.2 Enter two back-slashes (\\) and type the IP address of your Nexio MOS gateway.
Click OK.
Note: If you are prompted to log in, use Administrator for the username and VR300 as the password.
3 Double-click on NexioMosRepository, then double-click on NXMB.
4 Double-click on the NXMBControl icon to launch the installer. A security warning displays.

Chapter 6Nexio MediaBase Plug-In
50
5 Click Run to continue. The NXMB Control InstallShield Wizard displays.
6 Follow the instructions displayed on the InstallShield Wizard. 7 When the Nexio MOS Repository form displays, type in the IP address of your
Nexio MOS Gateway server and click Next.
8 When the wizard has completed, click Finish to close.
Nexio MOS SuiteInstallation Guide
51
Verify the Plug-In InstallationYou can verify the installation of your NXMB plug-in by viewing the contents of the MediaBase from your NRCS client software.
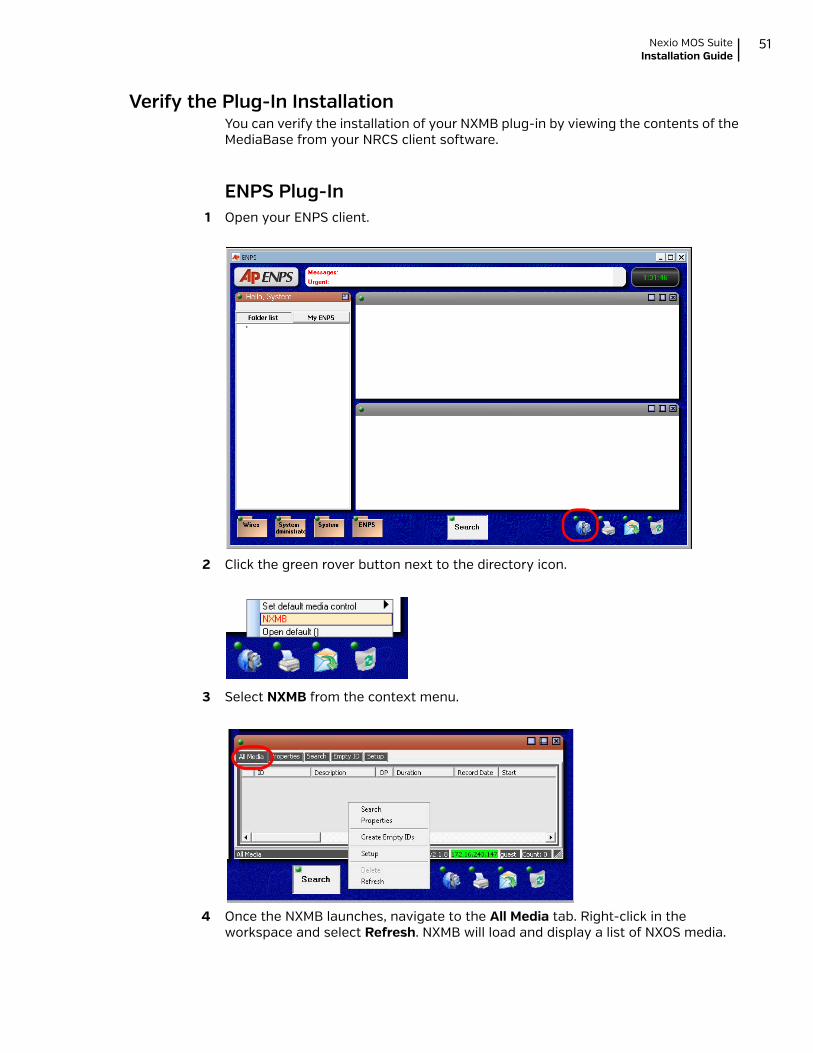
ENPS Plug-In1 Open your ENPS client.
2 Click the green rover button next to the directory icon.
3 Select NXMB from the context menu.
4 Once the NXMB launches, navigate to the All Media tab. Right-click in the workspace and select Refresh. NXMB will load and display a list of NXOS media.

Chapter 6Nexio MediaBase Plug-In
52
Note: The IP address of your Nexio MOS Gateway displays bright green in the status bar of your ENPS client to indicate connectivity.
5 If you have a low resolution PRX system, verify that you can view clips in NXMB. Click on the Properties tab and open the Proxy Viewer.
6 Click on a title in the list and the video for the selected title should display.
iNEWS Plug-In1 Open your iNEWS client and navigate to Tools > Plugins > NXMB.

Nexio MOS SuiteInstallation Guide
53
2 Right-click in the NXMB Control pane displays and select Refresh.

Chapter 6Nexio MediaBase Plug-In
54
NXMB ConfigurationYou can access the NXMB Settings configuration tool from the desktop of the NRCS client computer by navigating to Start > Harris > NXMB > NXMB Config.
MOS Repository TabThe NXMB Settings window displays the MOS Repository tab. The IP address of the NMG displays along with other MOS Id information. These values are read from the MOS repository.
If you change NXMB Settings using this tool, you must enable Override repository settings. This will cause NXMB to load the new settings from the local registry.
Options Tab
Load Media —All. The MediaBase view displays and updates automatically.

Nexio MOS SuiteInstallation Guide
55
Load Media — On demand (Recommended). The operator manually updates the MediaBase view as needed.
Tabs. Select which NXMB tab displays on startup. 1 = All Media, 2 = Properties, 3 = Search, 4 = Empty ID, 5 = Setup.
Proxy Viewer. Enables or disables the low-resolution Proxy Viewer. (Proxy Viewer is used to view low-resolution clips in NXMB.)
NXMB Plug-In SetupThe NXMB plug-in allows the operator to view the contents of the MediaBase and add clips to a script in the NRCS.
All Media. The All Media tab displays all items in the Nexio server system
Properties. The Properties tab displays a list of media and a clip viewer, which allow you to preview items in the MediaBase before adding them to your script. The PRX Player can use pointers to use as bookmarks to flag different sections.
Search. Use the Search tab to perform global and advanced searches in the MediaBase from your NRCS.
Empty ID. The Empty ID tab is used to create placeholders for media that will be ingested or edited at a later time.
Setup. The Setup tab is used to define how the Nexio MediaBase plug-in displays. Also, it is used to troubleshoot connections to the Nexio server system.
Note: Refer to the Nexio MOS User Guide for information on using the NXMB plug-in.
Chapter 6Nexio MediaBase Plug-In
56
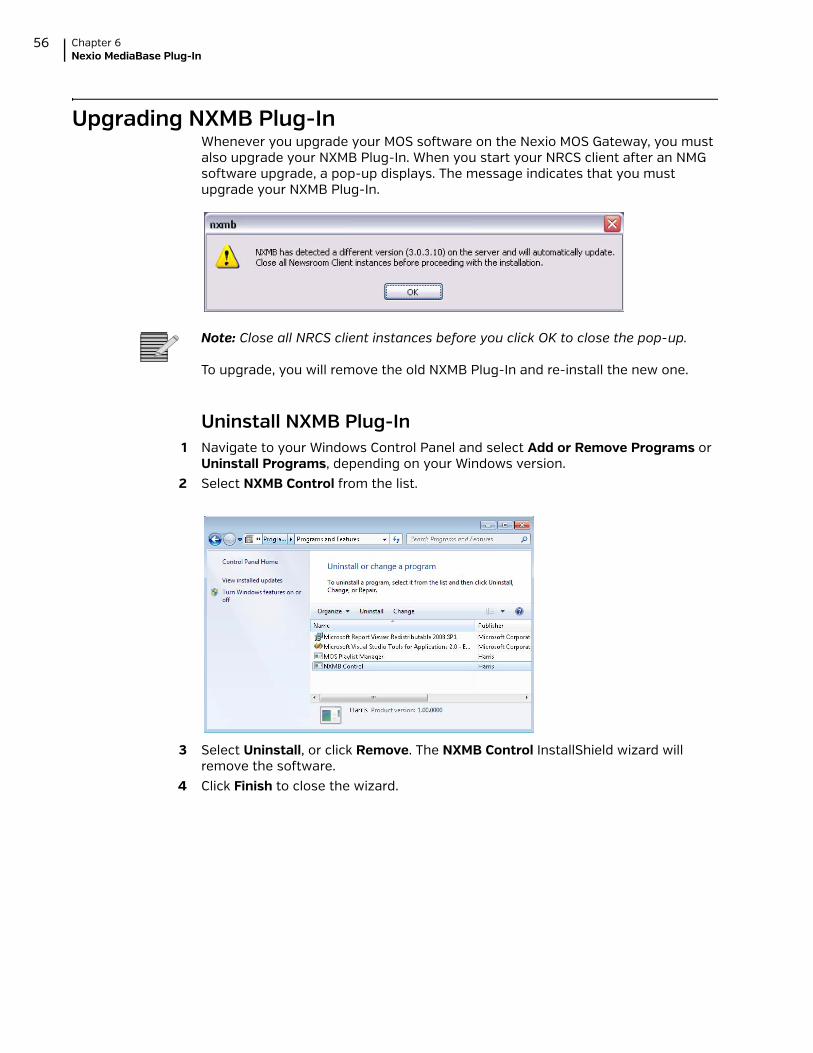
Upgrading NXMB Plug-InWhenever you upgrade your MOS software on the Nexio MOS Gateway, you must also upgrade your NXMB Plug-In. When you start your NRCS client after an NMG software upgrade, a pop-up displays. The message indicates that you must upgrade your NXMB Plug-In.
Note: Close all NRCS client instances before you click OK to close the pop-up.
To upgrade, you will remove the old NXMB Plug-In and re-install the new one.
Uninstall NXMB Plug-In1 Navigate to your Windows Control Panel and select Add or Remove Programs or
Uninstall Programs, depending on your Windows version. 2 Select NXMB Control from the list.
3 Select Uninstall, or click Remove. The NXMB Control InstallShield wizard will remove the software.
4 Click Finish to close the wizard.

Nexio MOS SuiteInstallation Guide
57
7 MOS Playlist Manager
The Nexio MOS Playlist Manager (MPLM) software application allows users to view rundowns created on their NRCS client.
Installing MPLMYou will log in to your MPLM workstation and navigate to the Nexio MOS Gateway server (NMG). You will install the software onto your MPLM workstation from the NMG.
1 From your MPLM workstation, navigate to the Nexio MOS Gateway server (NMG) using Start > Run.
2 Enter two back-slashes (\\) and type the IP address of the Nexio MOS Gateway Server. Click OK.
Note: If you are prompted to log in, use the login credentials for your MOS server.
3 Navigate by double-clicking on NexioMosRepository, MPLM, and PlaylistManagerInstall.
4 View the security warning and click Run to contine.

Chapter 7MOS Playlist Manager
58
5 The MOS Playlist Manager InstallShield Wizard displays.
6 Follow the instructions displayed on the InstallShield Wizard.
7 When the InstallShield Wizard Complete form displays, select Yes, to restart and click Finish.

Nexio MOS SuiteInstallation Guide
59
Registering your MPLM SoftwareYou must register your MPLM software with Customer Support before you can configure or use the software. To do this, you must do the following:
Create a .dc file using your Registration manager. (Registration manager is a software utility located on your MPLM workstation.)
Email the .dc file to Customer Support. Customer Support will in turn, send you a license file.
Load the license file from Customer Support using your Registration Manager.
Note: Your MPLM software must be loaded before you can begin this process.
Once you have installed the MPLM software, two new icons display on the desktop of your MPLM machine.
Create the .dc File1 From the desktop of your MPLM workstation, double-click the MPLM Config
shortcut icon. The Please register... pop-up displays. Click OK.
2 From your desktop, navigate using this path Start > All Programs > Harris > Playlist Manager and select Registration Manager. The Software License Key pop-up displays.
3 Click Register. The Save As window displays.

Chapter 7MOS Playlist Manager
60
4 In the File name field, enter a name that identifies your organization or the device you are working from. (For example, KRRW or a your workstation serial number.) Click Save. A file with a .dc extension is written to your desktop.
5 Email your .dc file to Customer Support along with your company name and sales order number.
Load License FileWhen you receive your license file from Customer Support you will use the Registration Manager on your MPLM workstation to load it. Be sure to save the license file to a location that can be accessed from your workstation.
1 From the desktop of your MPLM workstation, double-click the MPLM Config shortcut icon. The Please register... pop-up displays. Click OK.
2 From your desktop, navigate using this path Start > All Programs > Harris > Playlist Manager and select Registration Manager. The Software License Key pop-up displays.
Nexio MOS SuiteInstallation Guide
61
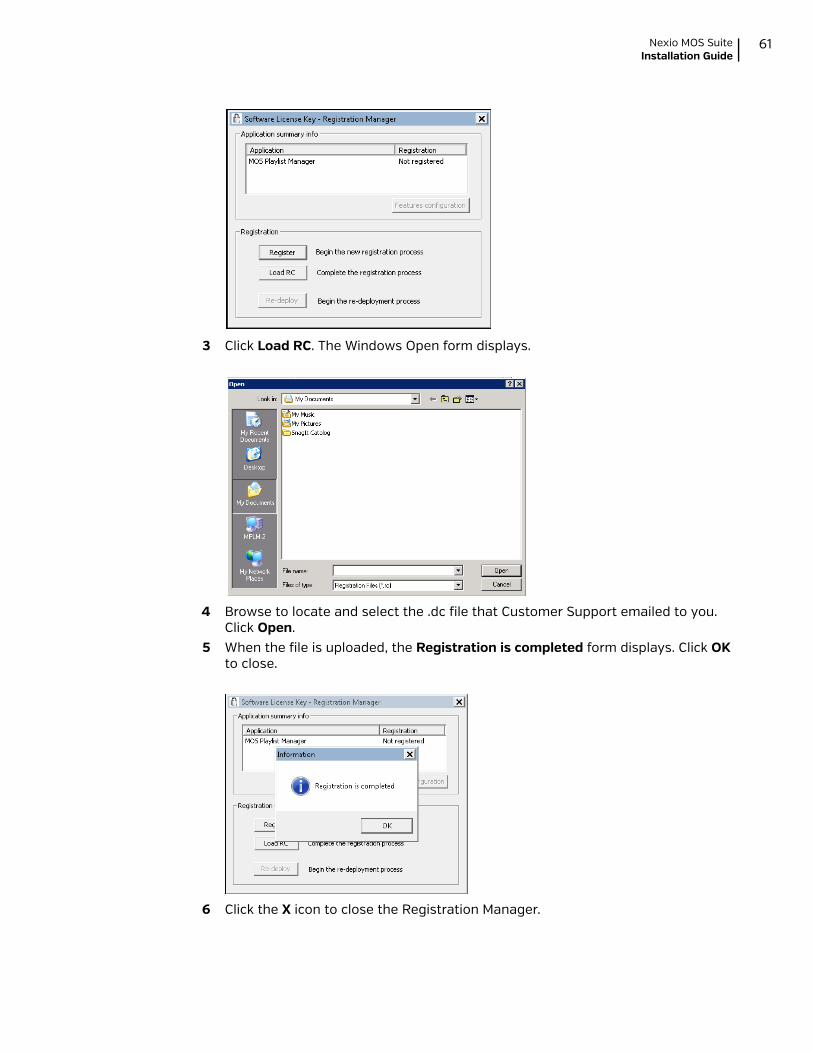
3 Click Load RC. The Windows Open form displays.
4 Browse to locate and select the .dc file that Customer Support emailed to you. Click Open.
5 When the file is uploaded, the Registration is completed form displays. Click OK to close.
6 Click the X icon to close the Registration Manager.

Chapter 7MOS Playlist Manager
62
MPLM AdministrationYou must set MPLM and MPLM Config programs as an administrator. Follow this process to set your privilege level.
Note: Be sure to set your privilege level for both MPLM Config and MPLM.
1 On your MPLM workstation desktop, right-click the MPLM Config or MPLM desktop icon and select Properties.
2 Select the Compatibility tab.
3 Select Run this program as an administrator. Click OK.
MPLM Configuration1 From the desktop of your MPLM workstation, double-click the MPLM Config
shortcut icon. The MOS Playlist Manager Config pop-up displays. 2 Click on each tab and fill in the settings.3 Click Apply, then click OK.

Nexio MOS SuiteInstallation Guide
63
MOS Tab
mosID. Enter your MOS ID. nrcsID. Enter the network ID for your NRCS server MOS Gateway Hostname or IP Address. Enter the IP address for your Nexio
MOS Gateway server.
Channels Tab
Here you will enter channel information on the primary server that MPLM will control. You can also set channel information for a backup server.
Name. Enter an alphanumeric name for the channel. PRI Hostname/IP. Enter the IP address for your primary server. PRI Channel. Select a channel number. Each channel in this table must have a
different number. BAK Hostname/IP. Enter the IP address for backup server if you are using one. BAK Channel. Select a channel number. Each channel in this table must have a
different number.Standby. Check the box to indicate a standby channel. These channels do not follow auto-assigned rules. Rather, they can be assigned through NRCS.
Chapter 7MOS Playlist Manager
64
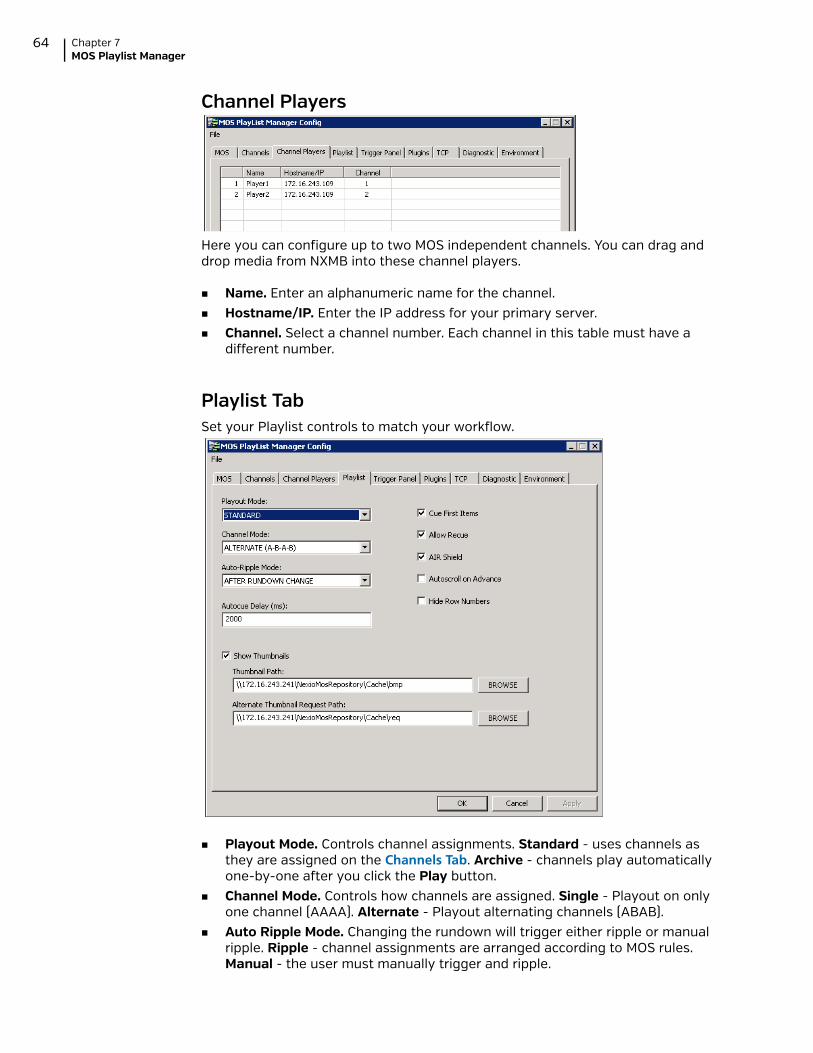
Channel Players
Here you can configure up to two MOS independent channels. You can drag and drop media from NXMB into these channel players.
Name. Enter an alphanumeric name for the channel. Hostname/IP. Enter the IP address for your primary server. Channel. Select a channel number. Each channel in this table must have a
different number.
Playlist TabSet your Playlist controls to match your workflow.
Playout Mode. Controls channel assignments. Standard - uses channels as they are assigned on the Channels Tab. Archive - channels play automatically one-by-one after you click the Play button.
Channel Mode. Controls how channels are assigned. Single - Playout on only one channel (AAAA). Alternate - Playout alternating channels (ABAB).
Auto Ripple Mode. Changing the rundown will trigger either ripple or manual ripple. Ripple - channel assignments are arranged according to MOS rules. Manual - the user must manually trigger and ripple.
Nexio MOS SuiteInstallation Guide
65
Autocue Delay (ms). The delay for automatically cueing the next clip defined in miliseconds.
Cue First Items. Enables autocuing of the first READY event on each channel. Allow Recue. Enbles the ability to recue a CUED, STOPPED, or PLAYING clip. AIR Shield. Enables on-air clip protection. Autoscroll on Advance. A long rundown that does not fit onto a single screen
will automatically scroll itself down. Hide Row Numbers. Hides the Row Numbers column in the MPLM table. Show Thumbnails. Enables showing thumbnails in Playlist Manager.
Thumbnail Path. Define path to thumbnail files.
Alternate Thumbnail Request Path. Define alternate path to thumbnail files.
Trigger PanelSet the COM Port for your trigger panel if you are using one.
COM Port. COM port your trigger panel is connected to. (Example entry - COM1) NOTE: This setting is not required if you are using a USB trigger panel.
Duplicate Key Window. Keep this setting at the default value of 500.
Plugins PanelClick to enable the plug-ins your system will use.
Clip Preview. Enable Clip Preview plug-in for use with MPLM. MediaBase. Enable MediaBase plug-in for use with embedded NXMB plug-in.

Chapter 7MOS Playlist Manager
66
TCP Panel
Note: Do not modify settings on the TCP channel without first contacting Customer Support.
Diagnostic PanelIndicate the logs you need for diagnostics.
MOS Messages. Click to enable MOS message logging. Default = Disabled. GPI. Click to enable GPI trigger logging. Default = Disabled. Trigger Panel. Click to enable grigger panel command logging. Default =
Disabled. Maintenance. Enter the number of days logs will be kept before being
automatically deleted. Click Delete Now to delete all current logs.

Nexio MOS SuiteInstallation Guide
67
Environment PanelAllows your Playlist Manager workspace to reset to the default layout whenever you restart the software.
Reset Window Layout. Enable workspace reset. Default = disabled.
Upgrading MPLMYou will upgrade your MPLM whenever you upgrade hour MOS software. To upgrade, you will remove the old MPLM and re-install the new one.
Uninstall MPLM1 Navigate to your Windows Control Panel and select Add or Remove Programs or
Uninstall Programs, depending on your Windows version.2 Select MOS Playlist Manager from the list.
3 Right-click to select Uninstall, or click Remove. The Nexio InstallShield wizard will remove the software.
4 Click Finish to close the wizard.